

Page 1

Technaxx® * User Manual
Mini LED Beamer TX-113
The Declaration of Conformity for this device is under the Internet
link: www.technaxx.de/ (in bottom bar “Konformitätserklärung”).
Before using the device the first time, please read the user manual
carefully.
Service phone No. for technical support: 01805 012643 (14
cent/minute from German fixed-line and 42 cent/minute from mobile
networks).
Free Email: support@technaxx.de
Keep this user manual for future reference or product sharing
carefully. Do the same with the original accessories for this product.
In case of warranty, please contact the dealer or the store where
you bought this product. Warranty 2 years
Enjoy your product * Share your experience and opinion on
one of the well-known internet portals.
Features
Mini projector with multimedia player
Projection size from 32” to 176"
Integrated 2 watts stereo speakers
Manual focus adjustment
Long LED lifetime 40,000 hours
Connectable with Computer/Notebook, Tablet, Smartphone and
Gaming consoles via AV, VGA, or HDMI
Playback of Video, Photo and Audio Files from USB, MicroSD or
external harddisk
Usable with Remote Control
Page 2
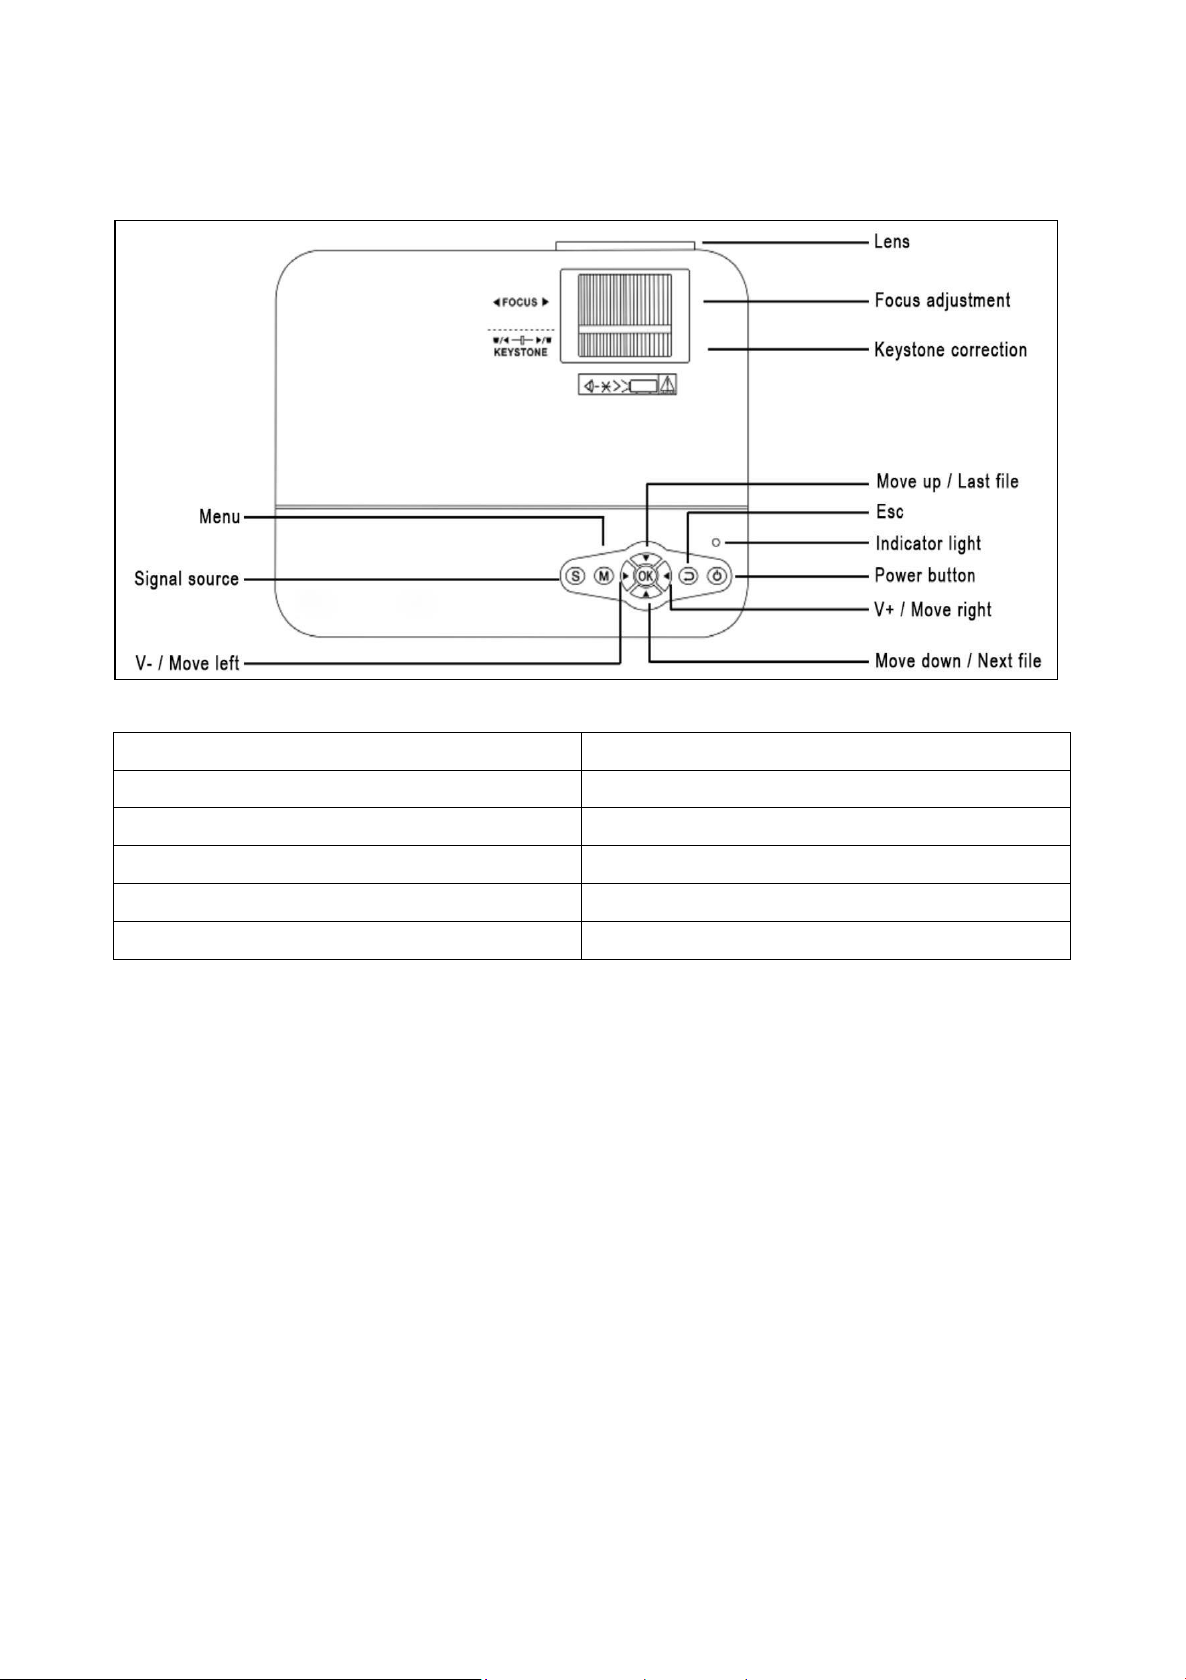
Menu
Move up / Last file
Signal source
Esc
V– / Move left
Indicator light
Lens
Power button
Focus adjustment
V+ / Move right
Keystone correction
Move down / Next file
Product view & Functions
Power button: Press this button to shut on or off the device.
Volume plus and minus button: Press the two buttons to
increase or decrease volume. They can also be used in the menu
as selection and parameter adjustment.
Menu: Bring up the main menu or exit system.
Arrow keys: Move up, down, left or right in the menu options.
Signal source: Select the signal or an external video signal. It is
also usable as “play” button.
Lens: Rotate the lens to adjust the image.
Air outlet: Do not cover the air cooling openings during operation
to avoid burns.
Page 3

Power Switch
OK
Menu
Play / Pause
Select Signal Source
Exit
Move Up / Last File
Volume down
Move Left / Backwards
Volume up
Move Right / Forward
Mute
Move Down / Next File
Remote control & Functions
Page 4

Between the remote control and remote control receiving host
window, do not put any items, In order to avoid blocking the signal.
Point the remote control to the left side of the device or the
projection screen, to receive the Infrared Radiation.
Such as long-term when not in use take out the battery, remote
control to prevent battery leakage corrosion.
Do not put the remote control in high temperature or damp
places, in order to avoid damage.
Power on / Power off
After the device gets power through the adapter, it goes into standby status:
Press the POWER button on the device or on remote control to
turn the on the device.
Press the POWER button again to turn off the device.
Pressing the POWER button once again can shut down the
engine power. TX-113 will stay in standby as long as it is
connected with the power socket. If you do not use the device for a
long time, take the power cord from the power socket.
Press the M button on the device or the MENU button on the
remote control, to show the MENU screen.
According to the remote control or the ◄ ► buttons on the
projector you need to adjust or set level menu items, the menu of
the selected icon will brighten.
According to the remote control or the ▲▼ buttons on the
device in the lower menu choice you need to adjust the menu item.
Then press the OK button on the remote control or the OK
button on the device, to activate the selected icon menu at
secondary menu.
Press the ◄ ► ▲▼ buttons, to adjust the parameter values for
the selected menu item.
Repeat the second to fifth step to regulate other MENU
items, or directly click MENU or EXIT button to EXIT a single
interface.
Multimedia boot screen
When the projector starts working, the screen displays takes about
10 seconds to come into the multimedia screen.
Page 5

Focus & Keystone
Sometimes, the image projected on the wall looks like a trapeze
rather than a square, causing distortion that needs to be avoided.
You can adjust it with the keystone adjustment wheel (3) see
following picture.
Image focus
Put the device vertical to the projector screen or white wall. Adjust
the focus with the focus adjustment wheel (2) until the image is
clear enough. Then the focus is finished. During the focusing, you
could display video or display the menu to check the adjustment
see following picture.
The device provides optical keystone function, so you could turn
the keystone to adjust the image. The device does not have
horizontal keystone correction function.
Multimedia connection
VGA input socket: the port can be connected to a computer or
other VGA video signal output socket. Refer to the following
Page 6

Frequency (kHz)
Field Frequency (Hz)
VGA Resolution 640 x 480
31.5
60
34.7
70
37.9
72
37.5
75
SVGA Resolution 800 x 600
31.4
50
35.1
56
37.9
60
46.6
70
48.1
72
46.9
75
XGA Resolution 1024 x 768
40.3
50
48.4
60
56.5
70
Table parameters to adjust the output signal of the computer
(PC)
Page 7

NOTE: The device and connection of laptop may not be able to
display images at the same time, if that happens, set the computer
display attributes, select for CRT output mode.
Video input socket: from now on the interface can be connected
to the LD player, DVD players, video cameras and video player
(VIDEO) or audio output socket.
Audio output: Audio signal from the output port of the device, if
you want to high power play music input end connected to external
power amplifier.
HDMI signal input: this interface can be used with HD players.
You have to connect the supplied HDMI cable from your player to
the device.
Page 8

Operation
Input source selection
Selecting an input signal from the device: (Check that the correct
signal cable is connected).
Press the S button on the device or the SOURCE button on
the remote control to display the right interface.
Confirm whether correctly connected to the signal cable
press ▲▼ buttons on the device or on the remote control to
select the following input PC, AV, HDMI, SD/USB (DMP). Choose
your needed input signal with the OK button.
Manually operation
Select the menu language
Press the M button on the device or the MENU button on the
remote control to enter the MENU.
Press the ◄ or ► button to go to OPTIONS.
Press the OK button on the device or on the remote control
to enter the language option.
Press the ▲▼ or ◄ ► buttons, to select the language
you need and then press the MENU button to accept Settings and
exit.
Page 9

Set Clock Time
Press the M button on the device or the MENU button on the
remote control to enter the MENU.
Press the ◄ or ► button to go to the TIME settings. Press OK
on the device or on the remote control to enter the time settings.
Now you can select the day, the month, the year, the hour and the
minutes with the ▲ ▼ ◄ ► buttons. Then press the MENU button
to accept settings and exit.
Image model
Press the M button on the device or the MENU button on the
remote control to enter the MENU.
Press the OK button to enter the PICTURE settings. Now you
can choose with the ◄ ► buttons between DEFAULT, SOFT,
DYNAMIC and PERSONAL mode. Press the M button on the
device or the MENU button on the remote control to exit the
PICTURE settings.
After complete the adjustment, press the M button on the
device or the MENU button on the remote control to save settings
and exit.
Color temperature
Press the ▼ button to go to the COLOR TEMPERATURE
settings. Now press the OK button to enter the COLOR
TEMPERATURE settings.
Press the ◄ ► buttons, to choose the settings you need to
adjust and then press the buttons ▲▼ or ◄ ► to adjust the values
of the parameters of the options (NormalWarmPersonaCool).
Press the M button on the device or the MENU button on
the remote control to save settings and exit.
Aspect Ratio
Press the ▼ button to go to the ASPECT RATIO settings. Now
press the OK button to enter the ASPECT RATIO settings.
Press the ▲▼ buttons to choose the parameters. You can
choose between AUTO, 16:9 an 4:3. Now press the OK button to
select the setting you need.
Page 10

Press the M button on the device or the MENU button on
the remote control to save the settings and exit.
Noise cancel
Press the ▲▼ buttons, to go to the NOISE REDUCTION
settings. Then press the OK button to enter the NOISE
REDUCTION settings.
Press the ▲▼ buttons, to select the level of noise reduction,
and then press the M button on the device or the MENU button on
the remote control to save the settings and exit.
Image projection mode
Image flip Press the M button on the device or the the MENU
button on the remote. Press ▲▼ to reach projection mode. Press
the OK button to rotate the image.
Mute
Mute Press the Mute button repeatedly to close or to open the
voice signal.
Sound
Press the M button on the device or the MENU button on the
remote control to enter the MENU.
Press the ◄ ► buttons to go to the SOUND settings.
Press the ▲▼ buttons to choose the items you need to
adjust and then press the ◄ ► buttons to adjust the values of the
single items. Press the M button on the device or the MENU button
on the remote control to confirm and exit.
Auto Volume
Press the M button on the device or the MENU button on the
remote control to enter the MENU.
Press the ▲▼ buttons, to select AUTO VOLUME.
Then press the OK button repeatedly to turn off or on the AUTO
VOLUME settings. Press the M button on the device or the MENU
button on the remote control to confirm an exit.
Page 11

Multimedia supported format from USB or MicroSD
Audio file: MP3 / WMA / ASF / OGG / AAC / WAV
Picture file: JPEG / BMP / PNG
Video file: 3GP (H.263, MPEG4) / AVI (XVID, DIVX, H.264) /
MKV (XVID, H.264, DIVX) / FLV (FLV1) /
MOV (H.264) / MP4 (MPEG4, AVC) /
MEP (MEPG1) VOB (MPEG2) / MPG (MPG-PS) /
RMVB(RV40)/RM
Choose the content which you need to display: Video, Music,
Photo, Text.
The projector supports HDMI, MHL and iPush connection, you
can connect your mobile devices and tablets with it.
This product is NOT recommended for PPT, Word, Excel or
business presentation.
To connect the mini projector with iPad or smart phone, you need
a wireless HDMI adapter. For Android phone which supports MHL,
you need a MHL to HDMI cable; for iPhone/iPad, you need a
lighting (Lightning Digital AV Adapter) to HDMI adapter cable.
To connect the mini video projector with PC/Notebook, help
adjust the PC/Notebook display resolution to 800x600 or 1024x768,
which can provide the best clarify.
Note that it only provides clear image in dark room.
Page 12

Projection technic
LCD TFT projection system / low noise / low light
leaking
Lens
Multichip composite coating optical lens
Power supply
AC ~100V-240V 50/60Hz
Projection size / distance
32”–176” / 1-5m
Projector consumption / brightness
50W / 1800 Lumen
Contrast ration / Display colours
2000:1 / 16.7M
Lamp color temperature / lifetime
9000K / 40000 hours
Correction
Optical ±15°
Using time
~24 hours continuously
Audio frequency
2W + 2W
Fan noise
Max. 54dB
Signal ports
AV input (1. OVp-p +/–5%)
VGA input (800x600@60Hz, 1024x768@60Hz)
HDMI input (480i, 480p, 576i, 720p, 1080i, 1080p)
Headphone Output
Native resolution
800x480 pixel
USB / MicroSD card /
ext. harddisk format
Video: MPEG1, MPEG2, MPEG4, RM, AVI,
RMVB, MOV, MKV, DIVX, VOB, M-JPEG
Music: WMA, MP3, M4A(AAC)
Photo: JPEG, BMP, PNG
USB / MicroSD card
max. 128GB / max. 128GB
External harddisk
max. 500GB
Weight / Dimensions
1014g / (L) 20.4 x (W) 15.0 x (H) 8.6cm
Packing contents
Technaxx® Mini LED Beamer TX-113, 1x AV
signal cable, 1x Remote control, 1x HDMI cabel,
1x Power cable, User Manual
Compatible devices
Digital camera, TV box, PC/Notebook,
Smartphone, Game console, USB-Device /
MicroSD card, external harddisk, Amplifier.
Technical specifications
Hints
Make sure you lay the cable in a way that the danger of stumbling is
avoided. Never hold or carry the device by the power cable. Do not
clamp or damage the power cable.
Ensure that the power adapter do not come into contact with water,
steam or other liquids.
Page 13

You have to check the complete construction at regular intervals for
functionality, tightness and damage to prevent the defect of the device.
Install the product due to this user manual and operate or maintain it
in accordance with the manufacturers operating instructions. Only use
the product for purposes due to its intended function & only for
household use. Do not damage the product. Following cases may
damage the product: Incorrect voltage, accidents (including liquid or
moisture), misuse or abuse of the product, faulty or improper
installation, mains supply problems including power spikes or lightning
damage, infestation by insects, tampering or modification of the product
by persons other than authorized service personnel, exposure to
abnormally corrosive materials, insertion of foreign objects into the unit,
used with accessories not preapproved. Refer to and heed all
warnings and precautions in the user manual.
Safety instructions
Use standard power cord with ground wire, to ensure stable power
supply and the same power voltage with the product marked. Do not
disassemble the product by yourself, otherwise we will not provide free
warranty service. Do not look into the lens when the projector is
working, otherwise it will damage your eyes easily. Do not cover the
product’s ventilation hole. Keep the product away from rain, moisture,
water or any other liquid as it is not waterproof. It may cause an electric
shock. Turn off and cut off the power supply if not use the product for
long time. Use the original packing when moving the product.
Hints for Environment Protection: Packages
materials are raw materials and can be recycled. Do
not disposal old devices or batteries into the
domestic waste. Cleaning: Protect the device from
contamination and pollution. Avoid using rough,
coarse-grained materials or solvents/aggressive
cleaner. Wipe the cleaned device accurately.
Distributor: Technaxx Deutschland GmbH & Co.KG,
Kruppstr. 105, 60388 Frankfurt a.M., Germany
 Loading...