

Page 1

Table of Contents
Main Features
Description of Buttons and Controls
Layout of infrared remote control
Basic Operations
System Setup Menu
Functional Setup Menu
Definition of Keys
Photo
Music
Video
Files
Memory Cards
Host Jack
USB Port
Earphone Jack
Audio Out Jack
Optional Function: Built-in Flash Memory
Troubleshooting
Technical Specification
1
Page 2

Main Features
1. Elegant appearance, excellent quality
2. Supports various digital audio/video formats such as AVI, MP3, JPEG, etc.
3. System setup and file management
Multilingual menu:
English/German/French/Italian/Spanish/Dutch/Simplified
Chinese/Traditional Chinese
4. Compatible with many memory cards, including CF/MMC/MS/SD/XD
5. Control keys:
6 control keys: up/down to select a submenu; thumbnail function;
rotate/zoom/move position/show file information, press volume, etc.
6. Major features:
Read information in MP3 player and serve as a USB mass storage
device directly when connected via host jack.
Simple to use: insert the memory card from digital camera into digital
photo frame to browse photos directly.
High quality matrix 10.4 inch TFT LCD display
Easily transfer files among various storage devices.
Connect to computer for copying, downloading and deleting files;
Slideshow in music background
High-speed USB 2.0, transfer speed may reach 480Mbps
Built-in stereo speaker 2*2W
Two control ways: 6 keys on the device and infrared remote control
2
Page 3
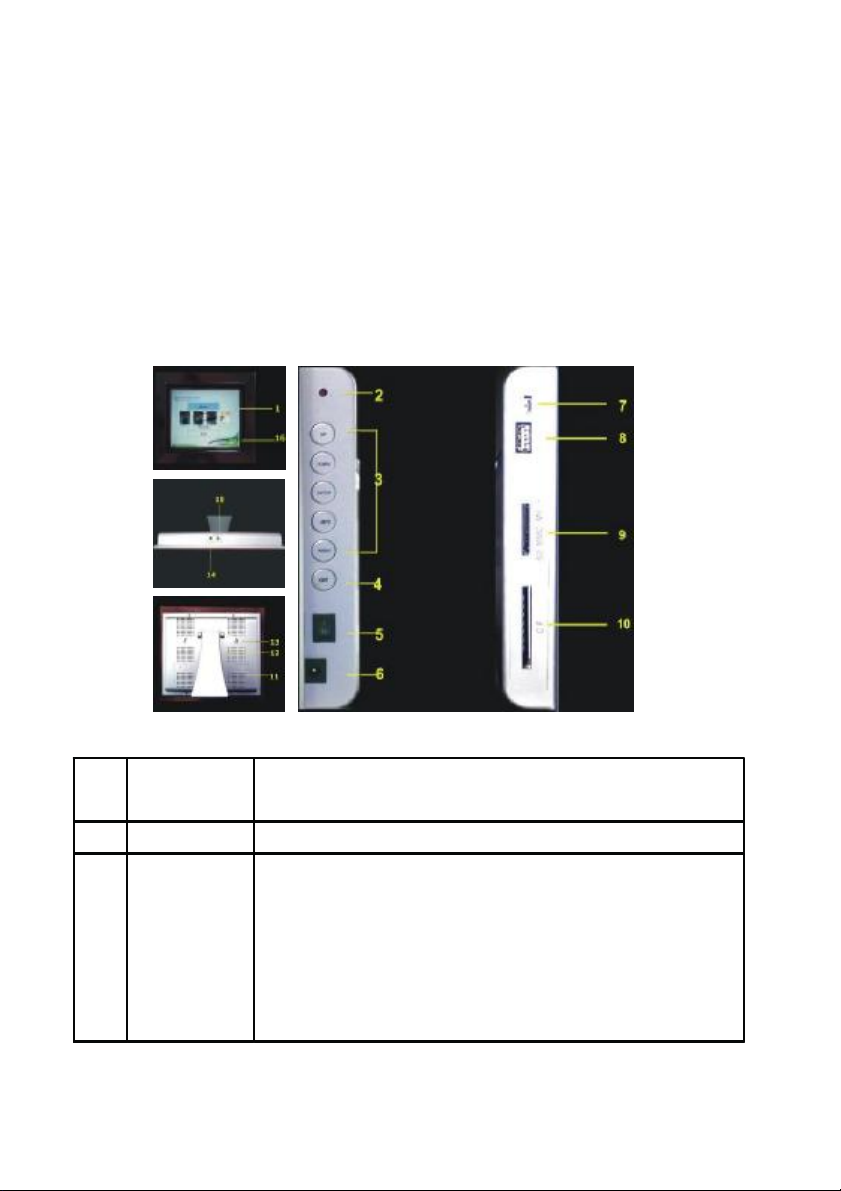
Description of Buttons and Controls
1
TFT True color TFT LCD display with resolution 800*600
pixels
2 Indicator Power on/ off
Play Keys Up: Previous, Rotate
3
Down: Next
Enter: Play/Pause/Zoom in
Play/Pause: Play/Pause
Left: Fast rewind, Volume down, Select files, Move
Right: Fast forward, Volume up, Select files, Move
3
Page 4

4
5
6
7
8
Exit
Power
on/off
DC jack
USB1/ USB
port / USB2
Host jack
Return to the last menu, enter/exit, setup menu
Switch on/off device
Connect adapter
Connect to computer, high transmission speed
Read MP3/ USB mass storage device
9 4 in 1 slot Support SD/MMC/MS/XD card
10 CF slot
11 Built-in
Speaker
12 Bracket
13 Hanging
hole
14 Earphone
Support CF card
Built-in mini-speaker, stereo audio output
Easel stand
Wall mounting
Audio output to earphone
jack
15 Audio out Audio signal output jack
16 Remote
control
sensor
Receives the signal from remote control
4
Page 5
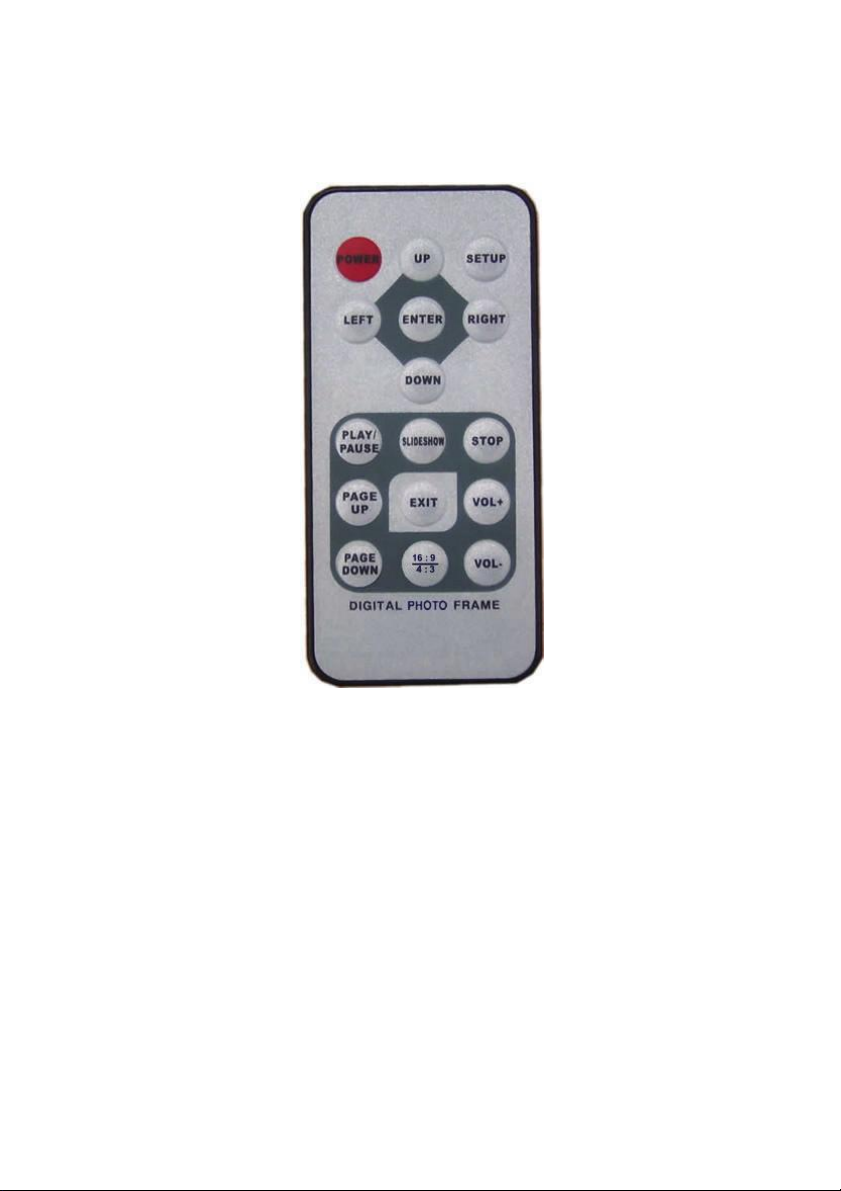
Layout of infrared remote control
Basic Operations
Power ON/OFF
Power on: insert the plug of adapter to DC jack on the device, and then
connect it to a proper wall outlet. Press and hold the Power button for a
few seconds to turn on the device with a welcome picture.
Power off: in play mode, press and hold the Power button for a few
seconds to turn off the device, then unplug it from the wall outlet.
5
Page 6

Enter main menu
Press the left/right key to select memory card after entering the main page,
then press “Enter” to enter main menu.
Browse modes
There are several modes
/
/
/
on the main menu,
press the left/right key to select, and then press “Enter” to confirm.
Play/Pause
After entering a mode, press the Left/Right and Up/Down to select a file,
then press Enter to play a music/video file. Press “Enter” again to
pause.
Select a File
In Photo mode
, press the left/right key to select a photo file, press
the up/down key to change modes in order to select a music/ video file.
Adjust the volume and playing speed
Press the right key to increase the volume, press the left key to decrease
the volume in Music mode
or in Video mode
. When
playing, press and hold the right key for seconds to fast forward, and
6
Page 7

functional setup menu, including copy / copy all / delete / delete all / print / exit.
press and hold the left key for seconds to fast rewind, press Enter to
pause.
System Setup Menu
In main menu, press and hold the EXIT button for a few seconds to enter
system setup menu. It is to setup the system, including
Photo/Music/Movie/System/Exit as below:
Show information /Adjust playtime/
Adjust effect/ Slideshow in music
background
Repeat one / Repeat all / Repeat off
Repeat one / Repeat all / Repeat off
USB mode / Output mode / System language
Functional Setup Menu
In a mode, press and hold the EXIT button for a few seconds to enter
Functional setup menu is to deal with file management. (Copy / copy all
is to transfer files among various storage devices.)
7
Page 8

Definition of Keys
UP: Rotate, Next
DOWN: Rotate, Previous
ENTER: Play, Enter, Pause, Zoom in
LEFT: Next, Fast rewind, Volume down, Select files, Move
RIGHT: Previous, Fast forward, Volume up, Select files, Move
EXIT: Exit
Photo
Browse pictures
Press and hold the Enter button for a few seconds, the device will play
photos automatically (if no setup menu works).
Select the Photo mode
from main menu, select a file by RIGHT
or LEFT , to choose a page by DOWN or UP. Press Enter
to enjoy the desired file. When a picture is displayed, press Enter to zoom
in, press RIGHT or LEFT and DOWN or UP to move
8
Page 9

it. Select a photo display mode via functional setup menu.
Photo Setup
Show file information or do not
Information
Interval
Display mode
show
Setup the display interval of
pictures
Note: pictures of different sizes
have different display interval
Setup the display mode of pictures
Note: select a display mode when
playing slideshow
Slideshow in the music background You can enjoy the desired music
when watching slideshow. If no
music is selected, the slideshow
will be played without music
background.
Delete/Delete All
In Photo mode, press and hold EXIT for a few seconds to enter the option
“Delete”, then select the desired picture you want to delete, press Yes to
delete.
Music
Play music files
Select the Music mode
from main menu, press ENTER to start
9
Page 10

playing. Select a file by RIGHT or LEFT . Press ENTER to
enjoy the desired file. When playing music, choose files by DOWN ( ) or
UP( ), press ENTER to pause, press it again to continue playing.
Adjust the volume by RIGHT or LEFT. Press and hold RIGHT or
LEFT for a few seconds to fast rewind / fast forward.
Music setup
Play a music file repeatedly
Play all music files repeatedly
Play music normally
Delete/Delete All
In Music mode, press and hold EXIT for a few seconds to enter the option
“Delete”, then select the desired music file you want to delete, press Yes
to delete. You can also select “Delete All” if necessary.
Video
Play video files
Select Video mode
from main menu, press ENTER to start
10
Page 11

playing. Choose files by DOWN or UP, press ENTER to enter.
When playing video, choose files through DOWN or UP, press
ENTER to pause, press it again to continue playing. Adjust the volume by
DOWN or UP.
Video setup
The setup operations are the same as Music Setup.
Delete/Delete All
In Video mode, press and hold EXIT for a few seconds to enter the option
“Delete”, then select the desired video file you want to delete, press Yes
to delete. You can also select “Delete All” if necessary.
Files
Browse files
Select File mode
from main menu, press ENTER to start playing.
Choose the files by DOWN or UP, including photo, music, video
files.
Delete/Delete All
In File mode, press and hold EXIT for a few seconds to enter the option
“Delete”, then select the desired file you want to delete, press Yes to
delete. You can also select “Delete All” if necessary.
11
Page 12

Memory Card
You may read or play the files contained in the memory card inserted to
the device. It is no need to create a folder when copying files from
computer to the card.
Host Jack
Insert a MP3 player or a USB mass storage device to the host jack on the
device. An icon “Device” will be shown on the screen, press the icon to
read the files contained in the player or storage device.
USB Port
Connect the device with a computer or digital camera via a USB cable,
you can transfer files/photos from the computer/digital camera to the
device or vice versa.
Earphone Jack
Plug a 3.5mm stereo earphone to the earphone jack to enjoy music.
Audio Out Jack
Connect your digital photo frame with other audio devices via Audio Out
jack, you can enjoy the music files in your digital frame on other audio
devices.
Optional Function: Built-in Flash Memory
You can choose this function as per your need. With the built-in flash
12
Page 13

memory, the device can work without any external memory card.
Troubleshooting
Phenomenon
Unable to insert a
memory card
Power is on but the
device fails to work
Wrong
storage Real capacity is
capacity
Black screen
No sound
Possible problem
Insert the card in the
wrong direction
The device can not
work properly
smaller than the data
shown on the card
The device is not ON
or the adapter is not
connected properly.
The volume level is
set too low; bad
Solution
Insert it in a right way
Reset the device
Formatted memory
capacity will be less
than the data marked
on HDD.
Check if the device is
on or the adapter is
connected properly
Check if the volume is
at a proper level;
connection with ensure a good
earphone; the reading connection with
Unable to play or
download music files
of file is not complete
The file format cannot
be supported; USB
cable is damaged or
connected improperly;
there may be
something wrong with
earphone; check if the
reading of file is
complete.
Check if the file
format is supported by
the device; ensure all
the connections are in
good condition; Check
if there is no corrupted
13
Page 14

Unable to display
some files by flash
card
Technical
Specification
Screen
USB Port USB2.0
Memory
card
Adapter AC adapter,
Audio
Format
Video
Format
Picture
Format
Key
Control
your storage device.
Some flash cards are
not compatible with
the device; some file
formats can not be
supported by the
device.
area on your storage
device.
Change a card
compatible with the
device; check if the
file formats can be
supported by the
device
TFT true color LCD display
Resolution: 800*600 pixels
Transmission speed: 480Mbps
CF/MS/SD/MMC/XD
Output: 12 Volt DC/1.5A
MP3
M-JPG, AVI (less than 352x288
pixels)
JPEG
6 keys on the device to control setup
menu, up/down, play/pause
thumbnail, and show file
information, volume adjustment etc.
14
 Loading...