

Page 1

Musicman Measy User’s Manual
Cautions
Thank you for purchasing the MP3 player. Please read this user’s manual carefully before
using it in order to understand the functions of the player.
The player should not be stored in an area of extreme high temperature (>40℃)
particularly inside a closed area (e.g. in a car) during summer season.
The player should be kept in the areas free from extreme temperatures, moisture and
dust.
Do not drop the player, because the display might get damaged and cannot operate
properly.
Please select appropriate sound level to avoid auditory disorder.
Do not attempt to disassemble the player.
Do not operate this player inside restricted area (e.g. on an aircraft).
Do not operate this player while driving to avoid accidents.
We do not assume any liability arising out of improper operation or incidental damages.
Changes in product specifications and features may be made without prior notice or
obligation.
We do not take responsibility for any data loss due to misusing or malfunction of the
player. Always backup your important data.
Page 2
Features
.
.
and WAV music files.
.
documents (.WAV or .ACT) stored into the memory card, and can be played back (one or all)
and deleted (one or all).
.
.
DBB.
.
random.
.
as a SD/MMC card reader. The player supports Windows 98, Windows 2000, Windows ME and
Windows XP operating systems.
Accepts SD or MMC memory card. No built-in memory.
■
Music playback Support playback of MPEG 1/2/2.5 Layer I/II/III, WMA, WMV, ASF
■
Digital voice recording Voice can be recorded via the built-in microphone as voice
■
Dot matrix LCD display with backlight.
■
Seven sound effects (EQ) available: Natural, Rock, Popular, Classic, Soft, Jazz and
■
Different replay modes: normal, repeat one, repeat all, shuffle play, select one and
■
USB card reader When the player is plugged to the USB port of a PC, it can be used
■
P
a
g
e
1
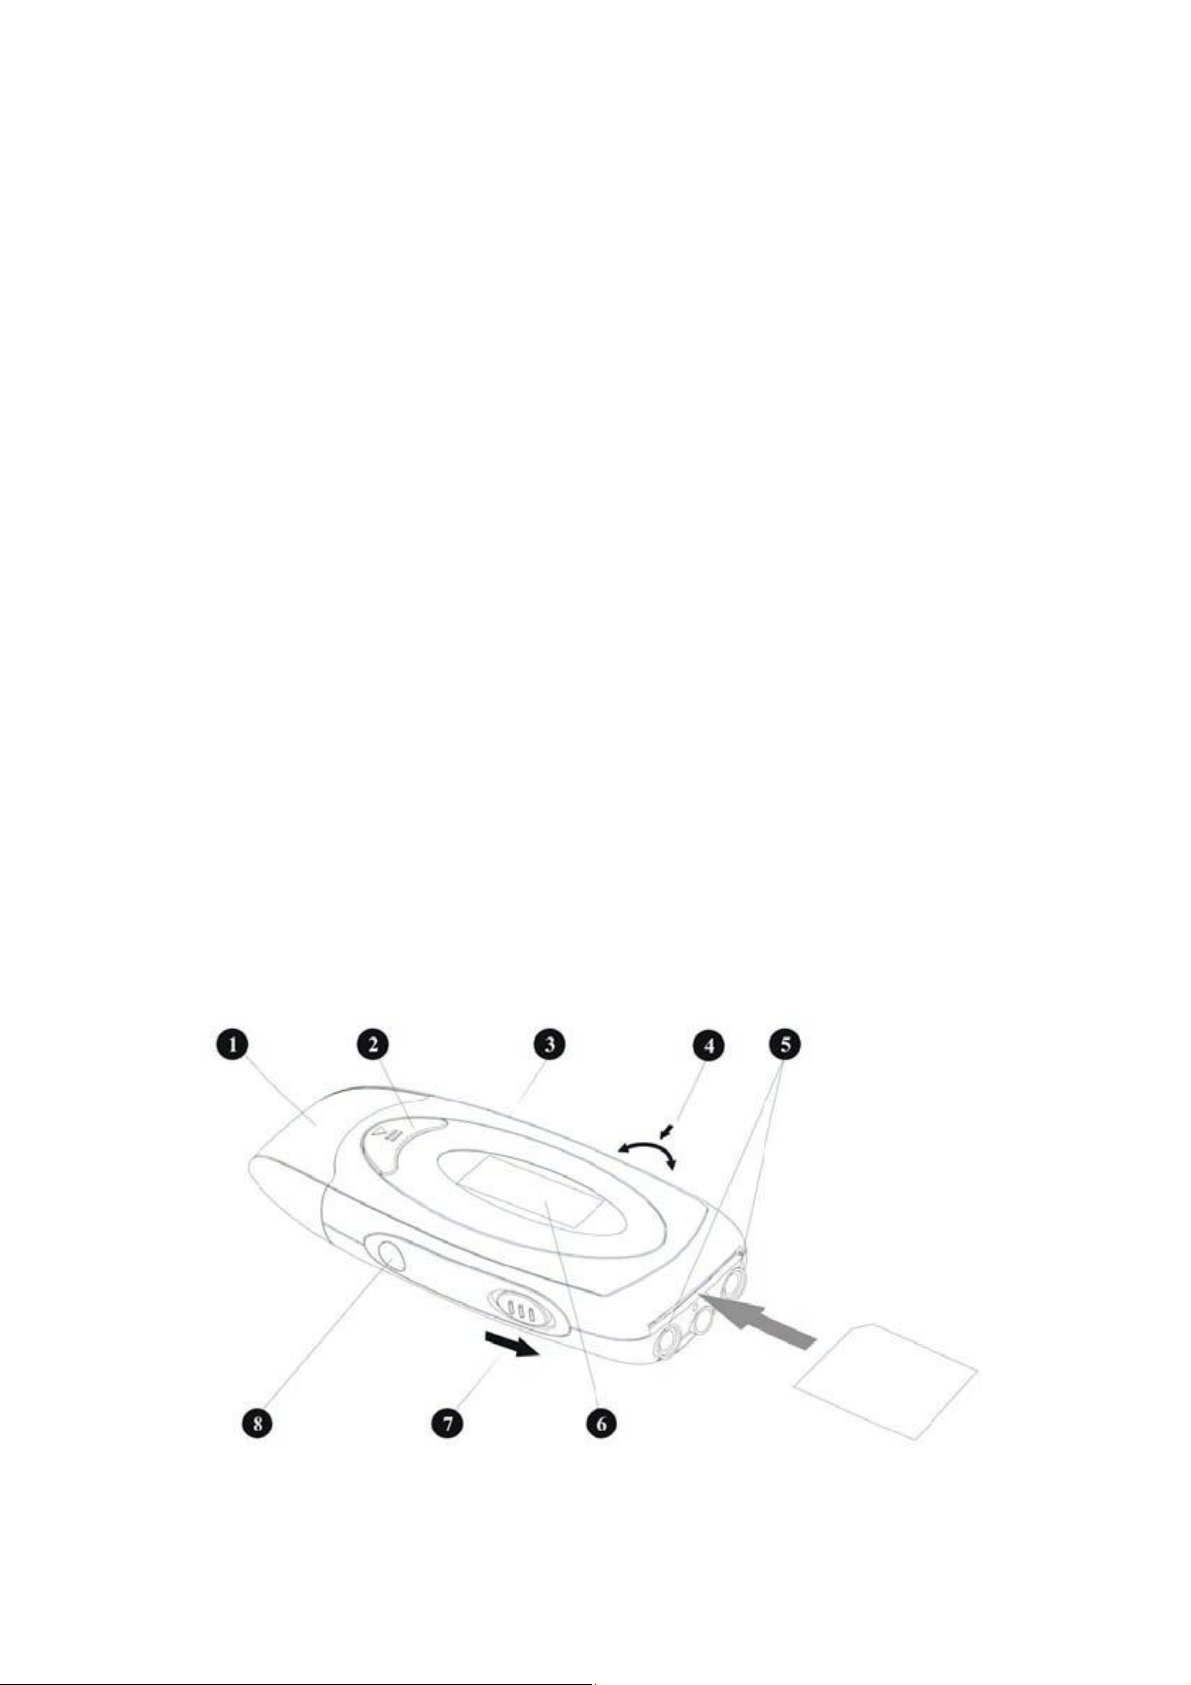
Outlook
Page 3

1. 1. Cap (remove to reveal the USB plug)
2. 2. Play / Pause / Stop button (hereafter referred as [Play])
3. 3. Increase volume [Vol+] button
4. 4. Previous [Prev] / Mode [Mode] / Next [Next] button
5. 5. Earphone plugs
6. 6. LCD display
7. 7. Hold [Hold] switch
8. 8. Decrease volume [Vol-] button
Getting started
Turning the Player On /Off Insert an AAA size dry cell by opening the battery compartment
■
door behind. The player can be turned on manually or automatically. Manually turning on/off
the player:
!.
".
Press and hold [Play] for 3sec to turn the power on.
-
Press and hold [Play] for 3 sec to power off.
-
Player will power off automatically when the battery is out.
Auto turning on the player:
Connect the player to the PC via the USB port, the player will automatically be turned on
-
and communicate with the PC and act like a removable disk storage when a SD/MMC
card is present. Press
[M] button to switch to other modes.
Adjusting the Music/Voice Volume
■
When playing music or voice documents, press the [Vol+] or [Vol-] button to adjust the sound
volume
accordingly.
Caution: adjust sound volume to an appropriate level to avoid auditory disorder.
Battery This player is powered by an AAA size dry cell.
■
The battery icon in the display of music mode, record mode or voice mode indicates the
-
current level of the battery. When the battery is weak this icon becomes “empty”, the
display will “low battery” and the player will switch off automatically.
When the battery is run out, replace it with a new battery.
-
#.
volume, type of documents playing, playing mode, etc.
The battery playing time will vary depends on the memory card being used, sound
-
Page 4

$.
down settings menu]
The player can enter power save mode according to customized settings set at the [shut
-
Main Menu
Main Menu
■
Enter main menu:Press and hold the [Mode] button in any menu
-
Menu navigation:Press [Prev] or [Next] to select the desire menu items
-
Enter desire menu item / Save the settings:Press [Mode] button once
-
Music Mode: Playing Music(please refer to “Playing Music” section)
Record Mode: Voice Recording(please refer to “Voice Recording” section)
Voice Mode: Playing recorded files (please refer to “Voice Playback” section)
System Mode: Setting the system (please refer to “System Settings” section)
P
a
g
e
4
Playing Music
%.
&.
select the file to be played, and press [Play] once to start listening.
'.
(.
).
“click” sound appears.
*.
+.
,.
-.
..
/.
0.
.
Play / Pause
■
Play:Enter into Music mode via the Main Menu, connect the player with a headphone,
-
Pause:Press [Play] once.
-
Insert / Removing a memory card
■
Insert a SD or MMC card with compatible music files from into the card slot. Push until a
-
To remove the memory card in the card slot, push slightly to release the card.
-
Select the Music
■
While music is playing, press the [Next] button to play the next song.
-
Press [Prev] to play the previous song.
-
Fast Forward / Rewind
■
While music is playing, press and hold [Vol+] for fast forwarding.
-
Press and hold [Vol-] to rewind.
-
■
While music is playing, press [Mode] to enter into “Music Playing Menu”. Navigate
-
among the menu items using [Prev] or [Next] and press [Mode] to select.
Music Playing Menu:
Music Playing Menu
Repeat
Equalizer
Tempo Rate
Page 5

Replay
Replay Times
Replay Gap
Exit
■ Repeat
Select the Repeat Menu and choose any of the following repeat mode:
-
Normal Play music according to index (no repeat)
Repeat One Repeat current song only
Folder Play all the music in a particular folder once
Repeat Folder Repeat all songs inside a selected folder
Repeat All Repeat all songs
Random Play songs randomly from current folder
Intro Play 10sec introduction of every songs from the current folder
Equalizer
■
Select the Equalizer Menu and choose any of the following tone mode:
-
P
a
g
e
5
Normal
Rock
Popular
Classic
Soft
Jazz
DBB
1.■ Tempo Rate
2.
normal playing speed, positive will increase the playing speed while negative will decrease the
playing speed.
3.
4.
automatically change to A-B repeat sign.
5.
[Vol+] button to select the repeat starting point (point A). “A-“ icon will stop flashing and “B” on
the top left will start flashing. Listen to the music and press the [Vol-] button to select the repeat
end point (point B). Then the player will start to repeat the music between point A and point B.
6.
Select the Tempo Rate Menu. Press [Vol-] or [Vol+] to select tempo rate, 0 represents
-
Replay (A-B Repeat)
■
Select the Replay Menu and enter A-B Repeat selection. The song playing sign will
-
The “A-“ icon displayed on the display will be blinking. Listen to the music and press
-
Press [Vol+] or [Vol-] during the A-B Repeat session will restart the A-B repeat process
-
Page 6

will “A-“ start flashing again for selection of point A.
7.
8.
9.
.
Press [Mode] during the A-B Repeat session will resume to normal music play.
-
Replay Times
■
Select the replay time during A-B Repeat range from 1 to 10.
-
■
Select the time interval time between each A-B Repeat range from 1sec to 10sec.
-
Replay Gap
Voice Recording
P
a
g
e
6
:.
;.
<.
=.
>.
again.
?.
@.
A.
B.■ Recording Menu
C.
[Prev] or [Next] and press [Mode] to select the menu item.
D.■ Card Folder
E.
F.
G.
menu”.
H.
memory space.
I.
Please save to a different directory for recording.
. ■ Recording Type
Voice Recording
■
Enter the Record Mode via the Main Menu.
-
Please make sure the battery and disk space are adequate for recording.
-
Press [Play] to start recording.
-
While recording, press [Play] to pause the recording, and resume by pressing [Play]
-
Press and hold [Play] to stop recording.
-
Press and hold [Mode] to save the document and exit.
-
During recording, the player will only react to the [Play] or [Mode] button.
-
While in the Record Mode, press [Mode] to enter into “Recording Menu”. Navigate using
-
Select the folder where the recorded documents are stored.
-
The player supports up to 99 recorded files under each directory.
-
Recorded files will be saved in the directories set under “stop recording menu / main
-
When folder is full, player will indicate “Out of space”, please delete other files to release
-
If the player displays “directory is full”, it indicates that the number of files exceeds 99.
-
Select the appropriate recording type with different sound qualities and memory usages:
-
Fine Recording WAV Format High sound quality
Page 7

Long recording ACT Format Consistent sound quality
Fine VOR WAV Format Sound control
Long VOR ACT Format Sound control
In long VOR mode, the player will pause recording if without effective sound, and resume
-
with effective sound in order to save memory space.
J.
K.
the background sound.
It is recommended to record files under area with less background noise.
-
It is recommended to start recording the voice after 5-6 secs when the player adapts to
-
Voice Playback
L.
M.
N.
O.
P.
Q.
R.
S.
T.
U.
. ■ Voice Playing Menu
Playing recorded files
■
Enter the Voice Mode via the Main Menu.
-
Play:Press [Play] to start playing.
-
Pause:Press [Play] to pause.
-
Select the Voice document
■
While voice is playing, press [Next] button to play the next document.
-
Press [Prev] to play the previous document.
-
Fast Forward / Rewind
■
Press and hold [Vol+] for fast forwarding.
-
Press and hold [Vol-] to rewind.
-
While voice is playing, press [Mode] to enter into “Voice Playing Menu”. Navigate using
-
[Prev] or [Next] and press [Mode] to select the menu item.
Voice Playing Menu:
Repeat
Tempo rate
Replay
Exit
Please refer to the “Playing Music” section for illustrations of similar operation details.
System Settings
V.
W.
[Mode] to select the menu item.
X.
Y.
Z.
or [Vol-] to adjust the figures. Press [Prev] or [Next] to adjust the previous or next figures. Press
[Mode] to confirm and exit.
[.
\.
System Mode
■
Enter the System Mode via the Main Menu. Navigate using [Prev] or [Next] and press
-
Record Time
■
This option set the date and time for time stamping the recorded voices.
-
Press [Next] until the “year” blinking sign appears to set the year of the date. Press [Vol+]
-
Backlight
■
The player will activate backlight function when pressing any button. The lighting time of
-
Page 8

the backlight can be set.
].
backlight. Press [Mode] to confirm and exit.
^.
_.
exit.
`.
a.
enter.
b.
duration of time (mins). Press [Vol-] or [Vol+] to adjust the time.
c.
music or voice. Press [Vol-] or [Vol+] to adjust the time.
d.
e.
segment (defined by empty music/voice) within a continuous music/voice document.
f.
g.
.
Press [Vol-] or [Vol+] to adjust the lighting time. “0” represents the deactivation of
-
Language selection
■
Select the language by navigating using [Prev] or [Next]. Press [Mode] to confirm and
-
Power off
■
Press [Prev] or [Next] to select the setting of Off time or Sleep time. Press [Mode] to
-
Off time: The player will automatically power off when the player is idle for the set
-
Sleep time: preset the time for an automatically power off when the player is playing
-
Replay mode
■
Select between manual (Manual replay) or automatic (Auto replay) selection of replaying
-
Contrast
■
Adjust the contrast of the display by [Vol-] or [Vol+] button.
-
■
Show the firmware version.
-
Firmware version
Document Management
h.
i.
management. This player supports up to 9 folders.
j.
Menu”.
k.
l.
m.
.
Card Folder
■
User can save different music files under different folders for easier music file
-
While music or voice is not playing, press [Mode] to enter the “Document Management
-
Press [Prev] or [Next] to select desired folder and press [Mode] to enter the folder.
-
Delete file
■
Use [Prev] or [Next] to select [Yes] or [No] to confirm deletion of current file.
-
■
Use [Prev] or [Next] to select [Yes] or [No] to confirm deletion of all files in the current
-
folder.
Delete all
P
a
g
e
9
Page 9

Installation of Driver Software
When using the player under Windows 98 environment, device driver must be installed first.
Insert the provided CD into the CD-ROM drive and run setup.exe in the “USB Driver” directory to
enter the installation interface. On the PC, press [next] and select the installation details and
press [next] to start installation. Follow the instruction and after installation, press [close]. Driver
can be found by clicking “My Computer”Æ”Procedure”Æ”MP3 Player Upgrade”.
Converting ATC files to WAV files
Recorded files in .ATC format can be converted to .WAV format using the included PC software
tools. Simply run SoundCon.exe in the “Sound Convert” directory of the supplied CD and select
“open” to choose the current .ATC files to be converted and press [convert] to start the
conversion.
Note: This tools can also convert .WAV and .MP3 format documents.
Troubleshooting
If the player cannot operate properly, please
check the followings:
Problems
Cannot power on Is the battery emptied?
Disk error Is the memory card present?
LCD is not activated Make sure the contrast is set to an appropriate level
Cannot play music Any foreign material on the earphone tip? Is the earphone
Cannot upload / Make sure the play is securely connected to the USB port of
Download documents PC.
/ PC cannot detect
the
player
Cannot record Is the battery emptied?
Display languages Please select the appropriate language.
Possible Causes
Is the battery emptied?
plugged in securely? Is the battery emptied? Is the button
being hold? Is the memory card present? Make sure the sound
volume is not set at “0”.
Make sure the files are not damaged.
Please re-install the software driver.
Is memory full?
Page 10

Product Specifications
Item
Specification
Dimension 96 x 37 x 23mm (W x H x D)
Weight 30 grams (without memory card and battery)
Display 96x26 dot matrix LCD with LED backlight
Languages English, French, German, Italian, Dutch, Portuguese, Spanish,
Speed
and Simplified Chinese
USB 2.0 full speed(Read1000Kbyte/s,Write750Kbyte/s)
Document formats Music: MPEG 1/2/2.5 Layer I/II/III, WMA, WMV, ASF, WAV
Voice: ACT, WAV
S/N ratio 85dB
Headphone output (L) 10mW + (R)10mW (32 ohm)
Memory SD or MMC memory card, maximum 1Gbyte
Battery AAA size dry cell x 1
Battery life Music/voice playing: 10hours*
Working temperature
Voice recording: 12hours*
-5℃
40℃
-
System requirement Windows ME/2000/XP, Mac OS 10.3, Linux 2.4.2 and
Windows
* Battery life depends on the memory card being used, sound volume, type of documents playing,
playing mode, etc.
98 (please refer to driver installation details)
P
a
g
e
1
Page 11

2
 Loading...