

Page 1
User Manual
by
Page 2

Safety Warnings
Before using the player, please read and ensure you fully understand
the following safety precautions. The safety precautions describe
important details regarding your safety.
• Disconnect the AC adaptor from the power outlet during
electrical storms.
• Listening to loud sounds for prolonged periods may
permanently damage your hearing. Before putting on the
headphones turn the volume down. Then put the headphone on
and slowly increase the volume until you find a comfortable
listening level.
• Don’t place the player near sources of strong magnetism such
as magnets, TVs, or monitors…etc. to avoid
malfunction/damage to the player.
• Don’t let the AC adapter cable or other cables lie across
walkways.
• Don’t repair, disassemble or modify this device.
• Prevent the player from getting wet from rainwater, drinks, etc.
1
Page 3

• Protect the player from external impact, as this will cause the
player to lose data, the manufacturer will not bear any
responsibility for loss of data. The user is solely responsible for
backup of data.
• Use only with the AC adapter included. Using of any other
adapter may cause product damage.
• If the player is severely damaged beyond repair or no longer
functions, please dispose of it in accordance with the relevant
local laws.
2
Page 4

Contents
PARTS CHECKLIST...........................................................5
BASIC REQUIREMENTS ...................................................6
SETTING UP YOUR PLAYER........................................9
Step 1: Charge the battery.............................................. 9
Step 2: Connect to your PC............................................ 9
Step 3: Install the software and drivers.........................10
Step 4: Transfer your music...........................................11
Step 5: Play your music................................................13
BASIC FEATURES........................................................... 16
Using Audiophile...........................................................16
Transfer tab...............................................................17
My Collections tab.....................................................20
MAIN MENU................................................................. 24
Menu Map:................................................................25
Play My Music menu................................................. 28
Voice Record menu...................................................35
3
Page 5

Advanced features ..........................................................38
Music Record (Direct Encoding) ...............................38
Setting Preferences ..................................................40
Using Book Marks (excellent for Audio Books)......... 45
Troubleshooting ..............................................................47
Care of your product.......................................................52
Specifications.................................................................. 53
Recycling .........................................................................54
Disclaimers ......................................................................54
4
Page 6

PARTS CHECKLIST
Congratulations on your purchase of the Digital
Jukebox Player, the cutting edge in portable audio
technology.
Your Digital Jukebox Player cont ains the following
accessories:
- Digital Jukebox Player
- Stereo hea dphones
- USB cable
- Line in cable
- AC adapter
- Quick Start Guide
- Installation CD
5
Page 7

BASIC REQUIREMENTS
To use the Player with a PC, you must have:
- PC with PIII-500 or above
- Windows 98SE or above
- Audiophile (i ncluded on CD)
- USB port (USB 2.0 recommended)
To use the Player with a Mac, you must have:
- Mac OS 9.5 or above
- USB port
Note: with the Mac, the Player will appear only as a removable hard
drive, so the songs will not be indexed by the database. You can see
all the songs imported in the “Explorer” menu.
We’ve made setting up your Player easy! Follow the
simple steps that follow to charge the battery, inst all the
software, and transfer your existing songs – then play
away!
6
Page 8
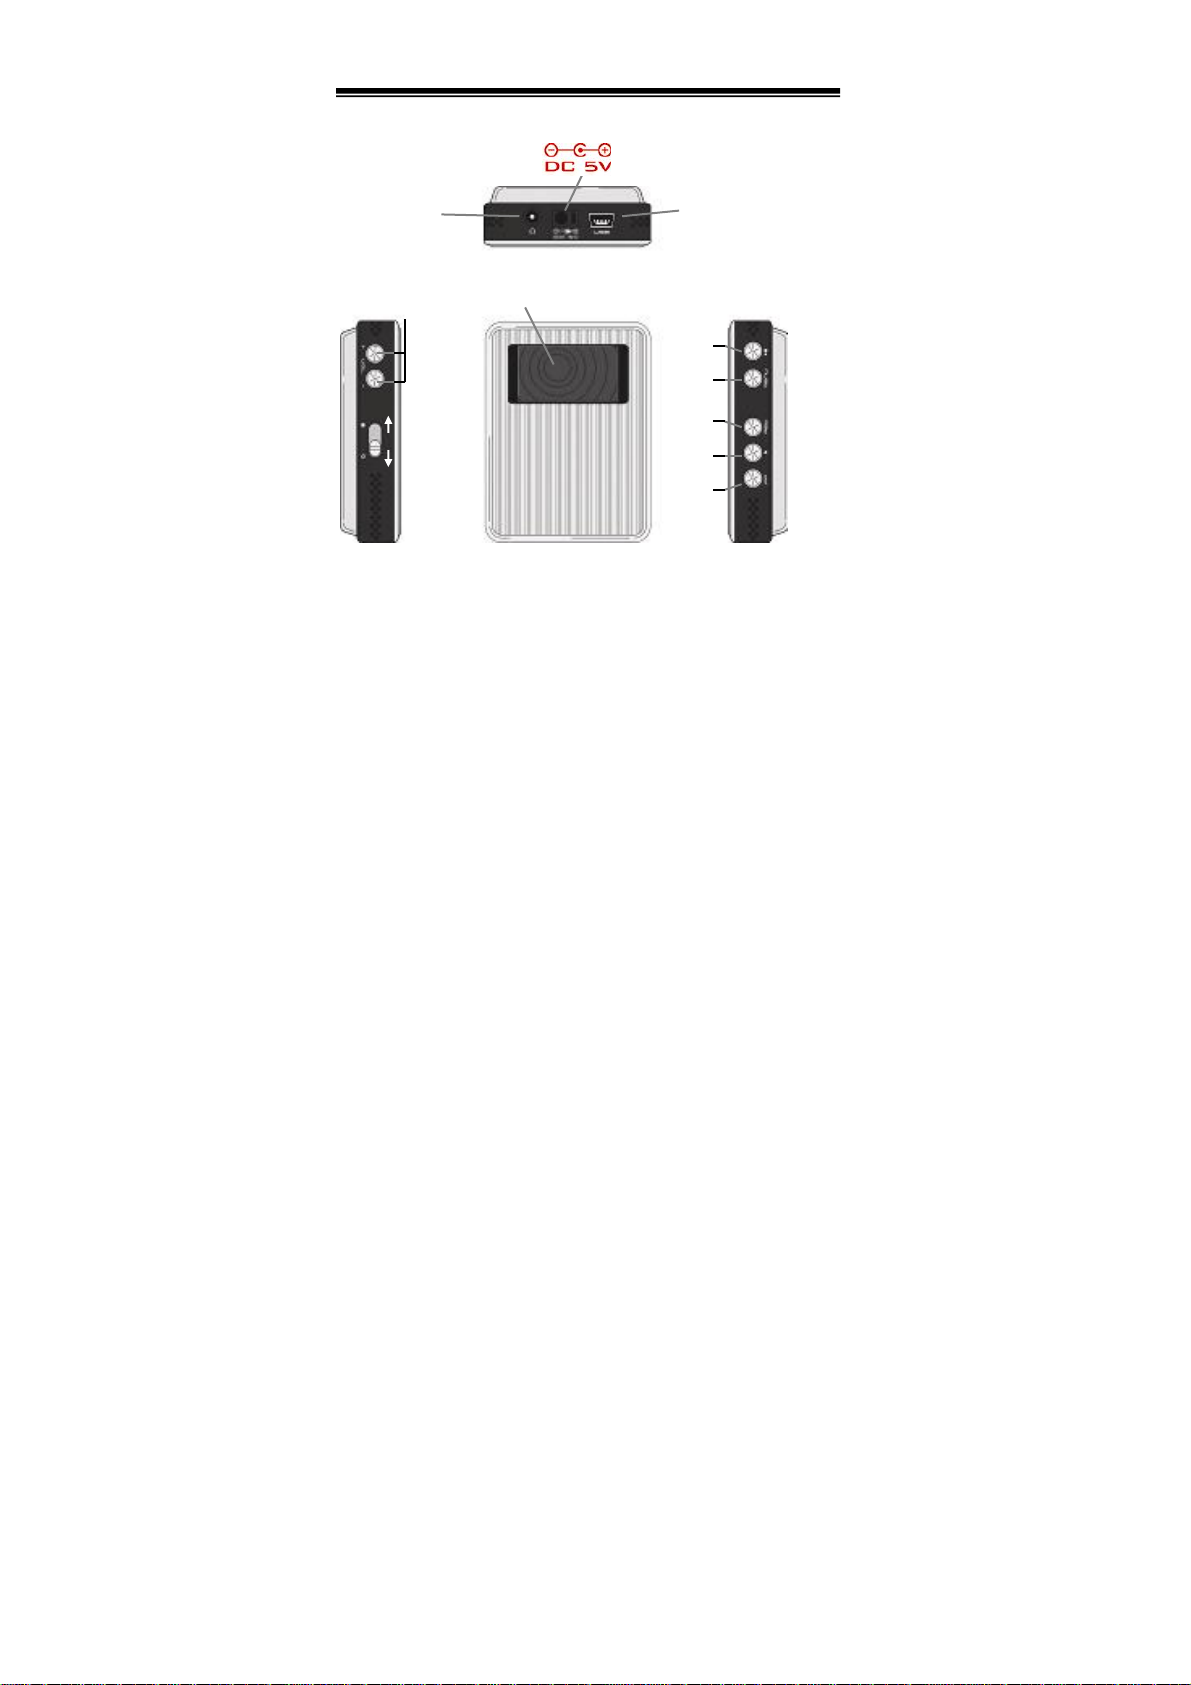
GETTING TO KNOW YOUR PLAYER
Earphone
/ Line in
USB Socket
VOL +/-
Hold
Power
on/off
Display Panel
Play
Menu
REW
Select
FF
7
Page 9

Turn on the Player Slide Power switch over 2 seconds
Turn off the Player
Select a menu item Scroll to the item and press Select
Back to previous menu Press Menu
Play a song Highlight the song and press Select or Play
Play entire Playlist Highlight the playlist and press Play
Change the volume Press VOL+ / Pause a song Press Play(/Pause)
Stop a song Press and hold Play(/Pause) over 3
Disable buttons Slide Power switch to Hold position
Skip to next song Press FF
Start song again Press REW
Play previous song Press REW twice
Fast forward Press and hold FF
Rewind Press and hold REW
Reset the Player Press Play, Select, and Menu together
lide Power switch over 2 seconds
seconds
8
Page 10
SETTING UP YOUR PLAYER
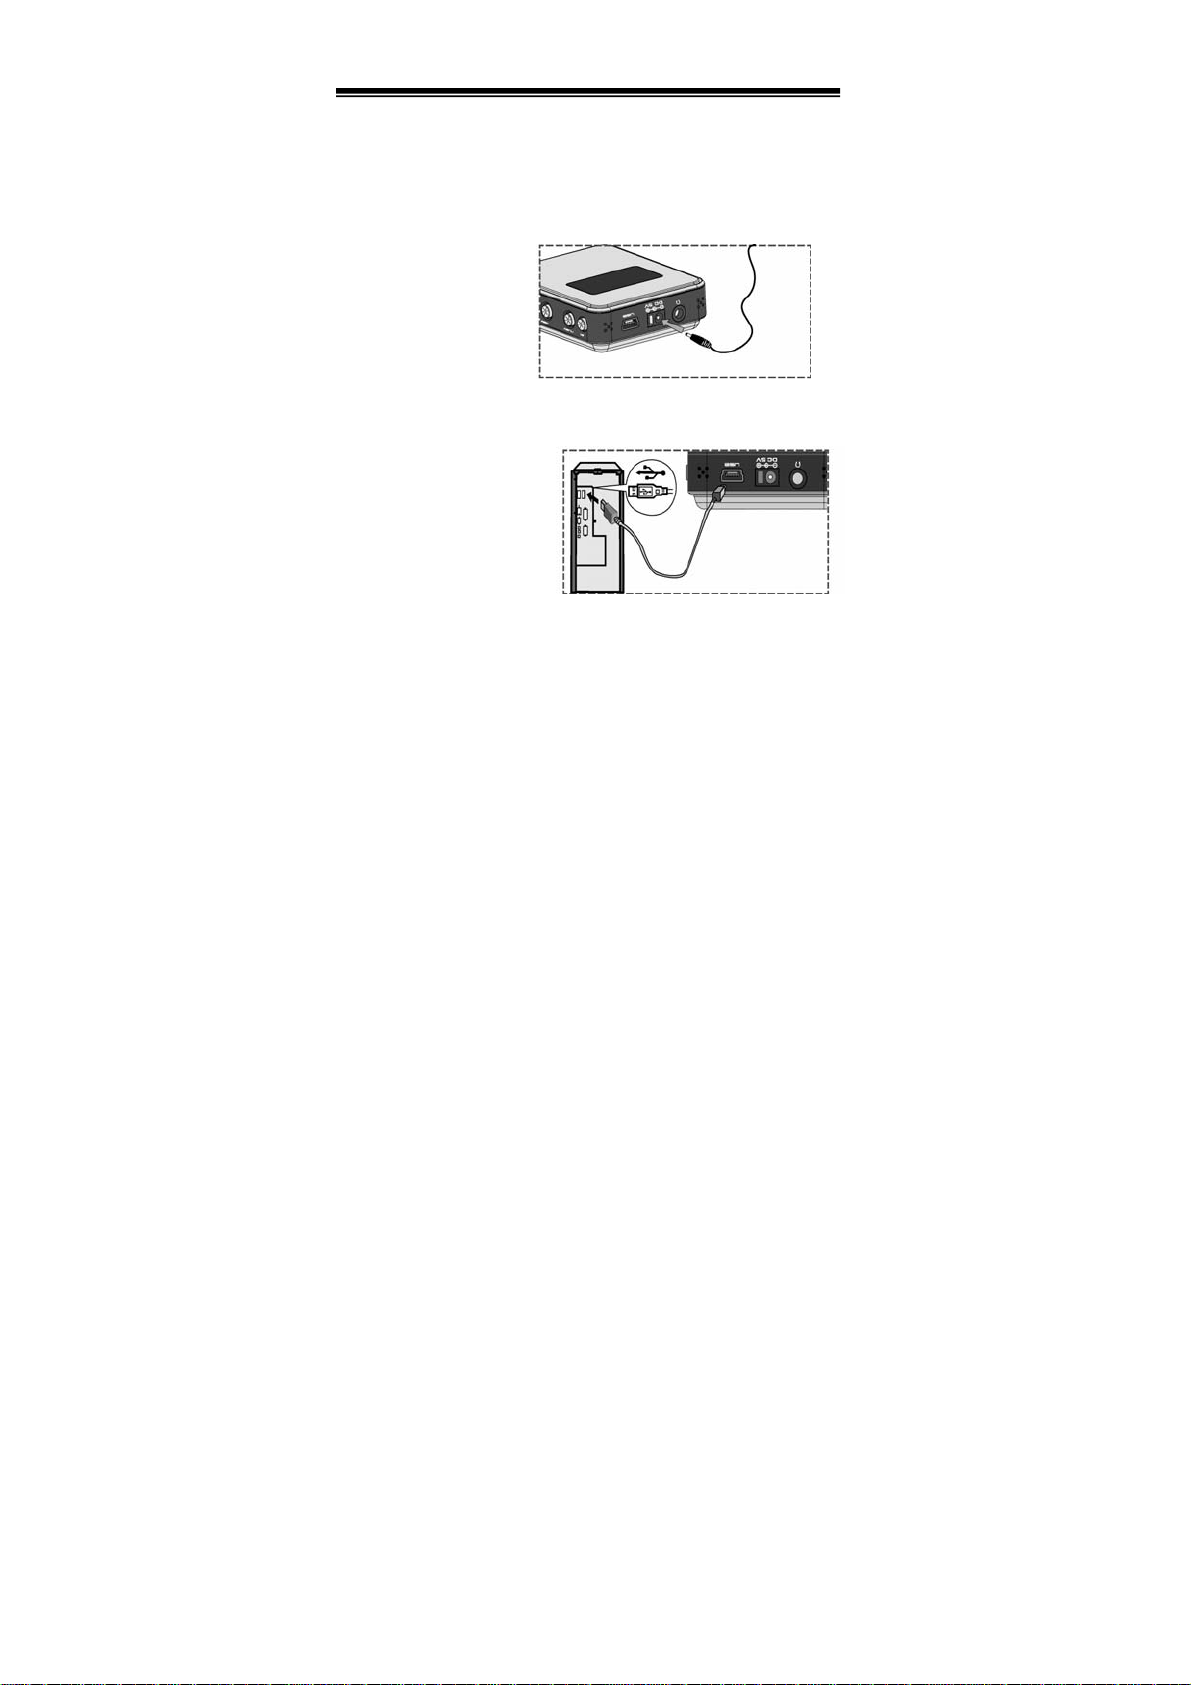
Step 1: Charge the battery
Before first use, we recommend you charge the battery
for 4 hours. Connect the Player to the supplied AC
adapter and
plug into the
mains power
supply (see
diagram for
connection).
Step 2: Connect to your PC
Use the supplied
USB cable to
connect the Player
to your computer’s
USB port.
Note: To avoid file
transfer errors while
9
Page 11

your player is connected via USB, we recommend you always plug
your player into the mains power via the AC adapter.
Step 3: Install the software and drivers
Note: If you are a Win98SE/ME/2000 user you will need to
install Windows Media Player 9 (or later revision) BEFORE
installing the Audiophile drivers for this Player. The Microsoft
® Windows Media Player 9 is included in the driver CD.
1. Make sure your Player is connected to your
computer using the USB cable supplied.
2. Insert the CD supplied into your PC.
3. Choose the language for installation.
The main menu will appear ...
4. If you are a Windows 98 user , you need to install
the Win98 Driver. Otherwise, skip this step.
5. If you don’t have Windows Media Player 9, please
click Windows Media Player to install.
6. Click Audiophile to install the music management
tool.
10
Page 12

Step 4: Transfer your music
There are four ways to download your music to your
Player. Using:
1. Windows Media Player (recommended)
2. Audiophile
3. Windows Explorer
4. Direct Encoding
1. Using Windows Media Player (version 9 is
contained on the CD-ROM supplied or download
version 10 from www. microsoft.com)
1. Run Windows Media Player
2. Click on Copy to CD or Device (WMP9) or Sync
(WMP10)
3. Click on Edit Playlist
4. Select the desired songs from your PC.
5. From the device selection drop down box (please
refer to the diagram on the next page). There are
two Jukebox devices available. Please choose the
Jukebox with the music
icon (not the one with
11
Page 13

the disc drive icon).
6. Click on
version 10) to transfer the music to the Player.
Copy button (Sync button on WMP
12
Page 14

2. Using Audiophile (contained on the CD supplied)
Your HDD player is equipped with a title management
utility called Audiophile. The Audiophile will help you
to organize your digital audio collection. Please refer to
page 16 Using Audiophile for details.
3. Using Windows Explorer
When your Player is connected to your PC, it is
recognized as a removable drive named Jukebox.
Use Explorer to copy or move music files into the folder
‘MY MUSIC’ in Jukebox by the ‘drag and drop’
method.
4. Using Direct Coding
This is an advanced feature. See page 38 for details.
(using the supplied line in cable)
Step 5: Play your music
When the music transfer process is finished the
progress bar will disappear from the Player. Select the
‘Safely Remove Hardware icon from the toolbar and
13
Page 15
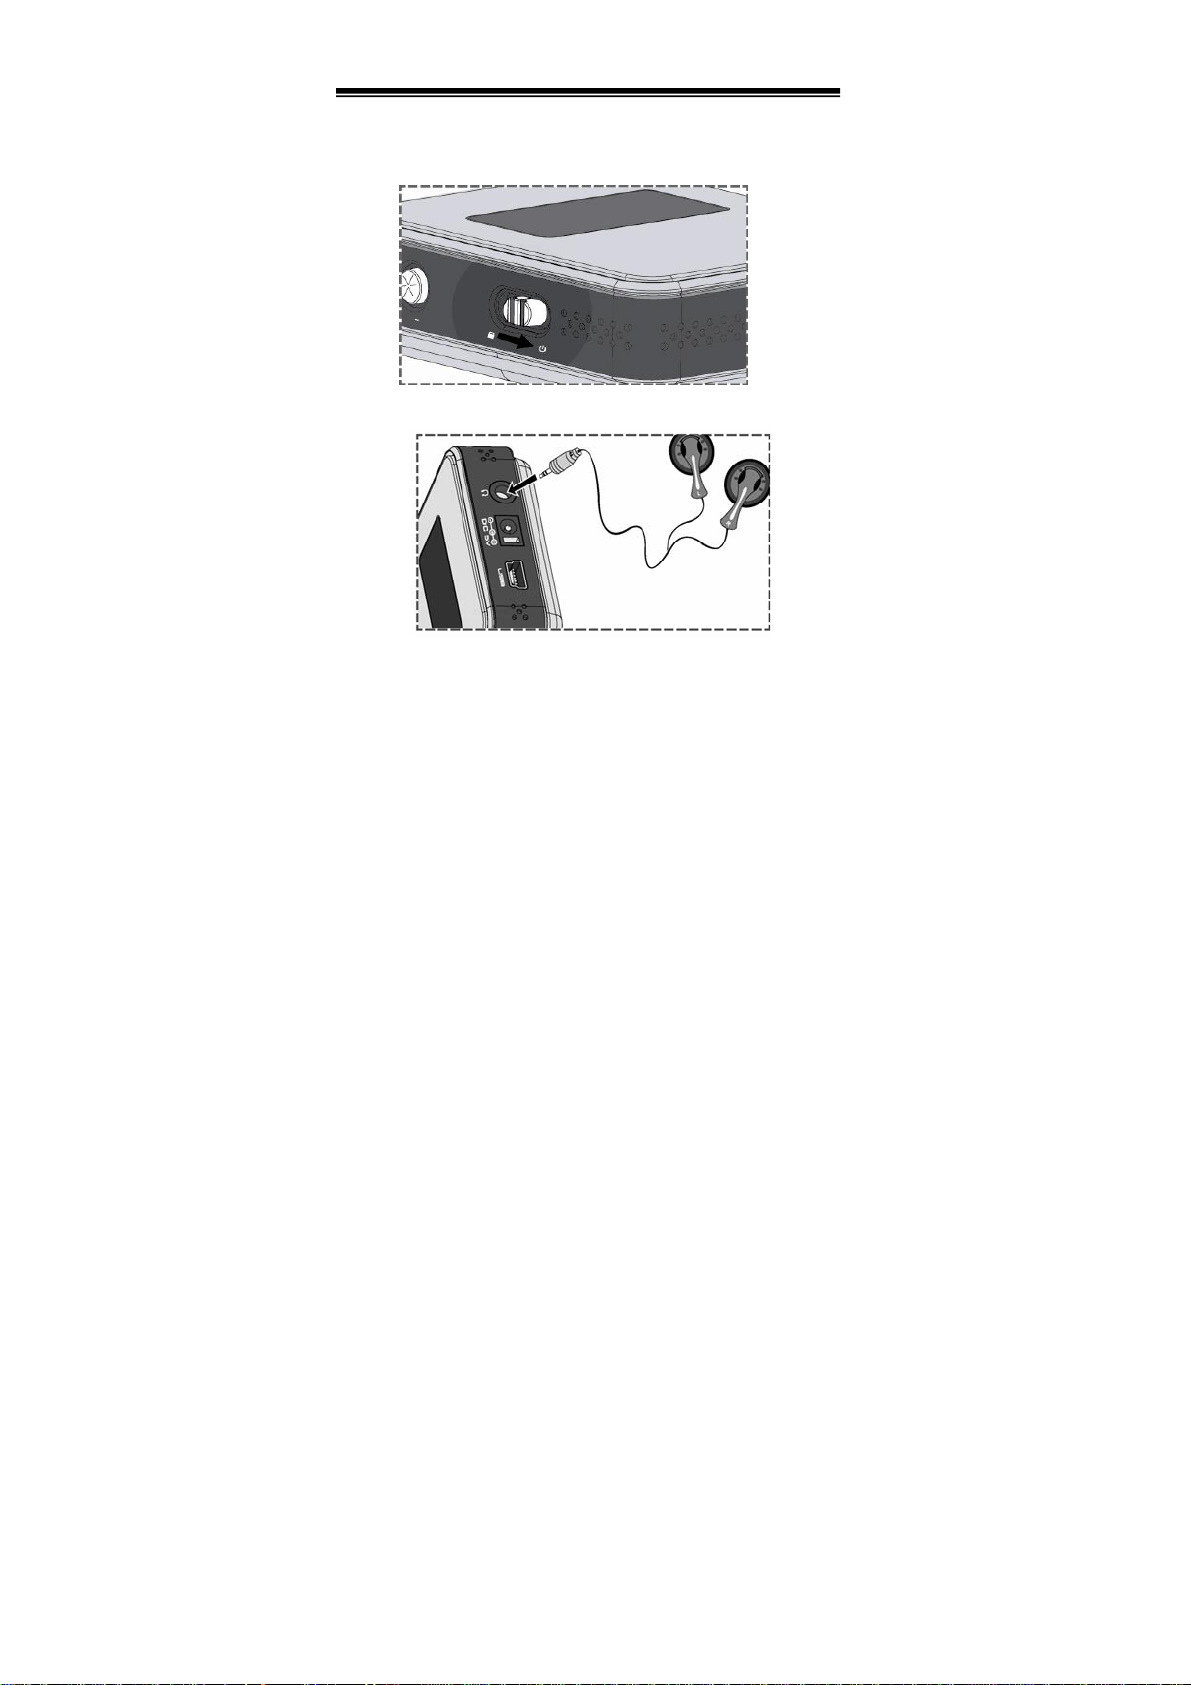
disconnect the Player from the USB cable.
Slide down and hold the POWER ON switch to turn
your Player ON.
Plug in the earphone.
14
Page 16
A
FINDING YOUR MUSIC FILES
Use the FF/REW keys to move to the Play My Music
icon and press Select to enter the menu.
If you have downloaded your music via Windows
Media Player or Audiophile, the music will be sorted
by embedded music information. This allows you to
search by Artist, Album, Year or Genre.
Play My Music
Artists
ll >>
All >>
01 A
01 A
02 AA
03 AAA
In contrast, if the music has been copied or moved via
Windows Explorer, you can browse those music files
using the Explorer menu, on the player which can be
found in the ‘Play My Music’ folder.
15
Page 17

BASIC FEATURES
Using Audiophile
Audiophile is a useful feature that enables you to easily
upload/download music to/from the player as well as
edit ID3 tag information.
Firstly, make sure the player is properly connected to
the USB port using the supplied USB cable. Then
double-click the Audiophile.exe icon. The Audiophile
window will open as shown on the next page:
16
Page 18

Files List 1
Files List 2
Transfer tab
Click on the Transfer tab to access the following
features:
- Upload/download music between player and PC
- Upgrade firmware
- Rebuild database (only if instructed to do so)
17
Page 19

To download files to your player:
1. Select the folder where your music files (in MP3,
WMA or OG G format) are held.
2. Select the file(s) from Files List 1.
3. Click Send to Player
To Drag and Drop Music Files
You can import your music library by using Windows
drag and drop functionality. Just simply drag music
files from somewhere else and drop them to
Audiophile while it is running.
T o use Windows DRM protected contents on your Player , the
Note:
files must be transferred with Windows Media Player.
To transfer files to your PC:
1. Select the music file(s) stored in Files List 2.
2. Click the Back to PC button
18
Page 20

To rebuild your database:
Caution: Please be aware that rebuilding the database
will remove the entire user created playlists in My
Collections box. Y ou sho uld only rebuild the dat abase
if necessary, and as infrequently as possible.
Click on “Rebuild Database”
To update firmware
1. Connect the AC ada pter to the Jukebox
2. Click the F/W Update button
3. Select the folder which contains the new firmware
file.
4. Select the firmware file.
5. Click OK
19
Page 21

Music List 1
Music List 2
My Collections tab
Click on the My Collection tab to do the following:
- Sort music by songs, artist, album, genre or year.
- Search for specific songs
- Create/remove/rename playlists
Making a selection from the Sorting Box will sort your
music by title, album, artist or genre in Music List 1.
20
Page 22

If you select a track from Music List 1, the following
functions are available:
- Click the TAG button to edit the music information
such as title, album, artist and genre for each
individual file.
- Click the Delete button to delete highlighted music.
- Click the Add to Collection button to add your
highlighted music to a specific playlist in the My
Collections box.
- Click the Send to PC button to upload the highlighted
music to your PC.
Click the Search For button to search music by filling
in title, artist or album. You don’t need to fill out the full
searching criteria; the search engine can find the music
from the first characters. The search results will be
listed at Music List 1 and it is kept until another search
is done.
Note: you also can use “Conditional search”. That is, Selecting“*” as
21
Page 23

the character to replace any other ones while searching.
The following Playlist features are available in the My
Collections box:
- Click the Add button to add a new playlist.
- Click Delete button to remove a playlist.
- Highlight a specific playlist and click the Rename
button to change its name.
Music listed in Music List 2 corresponds to the
highlighted playlist in My Collections box, you can do
the following to manage the highlighted music:
- Click the TAG button to edit the music information
such as title, album, artist and genre for each
individual file.
- Click the Remove button to delete music from the
playlist. If the option Also delete from JukeBox is
ticked, the music file will be deleted from your HDD
player as well.
22
Page 24

- Click the Send to PC button to upload the highlighted
music to your PC.
23
Page 25

MAIN MENU
Record
Play My Music
Information
Preference
From the main menu, you can choose the following
options:
1. Play My Music: find your digital music files
2. Record: voice and line-in record
3. Preference: EQ Setting, Contrast, Play Options,
Language Date/Time, Timers, Book Marks, Utility.
4. Information: Status of player
NOTE: If the language versions between your Windows operating
system and filename are different, you may get some abnormal
characters displayed.
24
Page 26

Menu Map:
Main menu:
Play My Music Artists
Albums
Year
Genre
Explorer
Playlists
List Manager
Songs
Record Voice Record Do Record
Play Voice File
Delete Voice File
Music Record Stop Record
Pause
Volume
Preference EQ setting Normal
Classic
Jazz
Rock
Pop
Bass
Treble
Blues
Club
Live
Party
Soft
SKA
Disco
Techno
Reggae
Hall
Rap
Cult
Punk
Contrast FWD / RWD
Genre (Personal EQ)
25
Page 27

Play Options Sequence Play list
Repeat Title
Repeat Playlist
Random
Repeat & Random
Language English English
Europe Deutsch
Español
Français
Itanliano
Portugais
Nederlands
簡体中文
繁體中文
日本語
Date/Time FWD/ RWD/ Select
Timer Display Timer FWD / RWD
Sleep Timer FWD/ RWD/ Select
Standby Timer FWD / RWD
Book Mark Initial Read Bookmark Bookmar k 1
Bookmark 2
Bookmark 3
Bookmark 4
Setting Write Bookmark Bookmark 1
Bookmark 2
Bookmark 3
Bookmark 4
Utility Record Quality 64K
96K
128K
160K
192K
CD Sync FWD/ RWD Off
1…5
26
Page 28

Information F/W Version X.X
H/W Version X.X
Total Space X GB
Free Space THIS WILL CHANGE
Now Playing menu:
Now Playing A-B mode A
B
Normal Playback
Utility EQ Setting as Main menu
Play Options as Main menu
Variable Speed 1 Normal
2
3
4
5 Slow
Information Title
Artist
Album
Genre
Bit rate
Play option
Song’s length
Elapse time
DEPANDANT ON
FILES STORED
27
Page 29

A
Play My Music menu
The Player allows you to sort music by Artist, Album,
Year, or Genre. The diagram below demonstrates how
to browse through your music library.
Play My Music
Artists
ll >>
All >>
01 A
01 A
02 AA
03 AAA
From this menu, you can chose which track to play by
Artist, Album, Year, Genre, or look for a track using
explorer, or by playlists created with Audiophile, or by
Song.
28
Page 30

List Manager menu
The list manager allows you to adjust your play list from
the music tracks on your Player.
From the List Manager menu, you can add or delete
music to/ from the highlighted playlist.
Songs menu
You can search for songs by Title under the “Songs”
menu.
songs
ABCDEFGHIJKLMNO
AB
29
Page 31

1. Af ter locating the first character of the Title, press
Select.
2. Use the FF/REW to find the desired song.
3. Press Select to play back.
Explorer menu
If the music was copied or moved to your Player’s
mymusic sub-folder via Windows Explorer, you may
not be able to find them by artist, album, title or genre.
Instead, you have to browse these music files using the
Explorer menu.
The follow diagram shows you how to browse the
music files:
Play My Music
Explorer
30
Folder1
Music 1.MP3
Music 2.MP3
Music 3.WMA
Page 32

3
Now playing menu
While playing music, your HDD player will display the
following in the Now Playing menu:
21:01
VOL:17
ID
0:03:53
A-B Repeat Utilities Information
0:00:04
From the Now Playing menu, you can access the
submenu by pressing Select. This allows you to define
segment repeat (A-B mode), EQ settings, playback
mode, change playback speed or view detailed music
information.
A-B mode
1. From Now Playing, press Select and move to A-B
mode.
2. Press Select to define the starting point in the music.
3. Press Select again to define the end point. The
player will repeat the segment between starting and
31
Page 33

end points until Select is pressed again to return to
normal operations.
View music information
1. From Now Playing, press Select and move to
Information option.
2. Press Select to view detailed now playing music
information.
3. Press Menu to return.
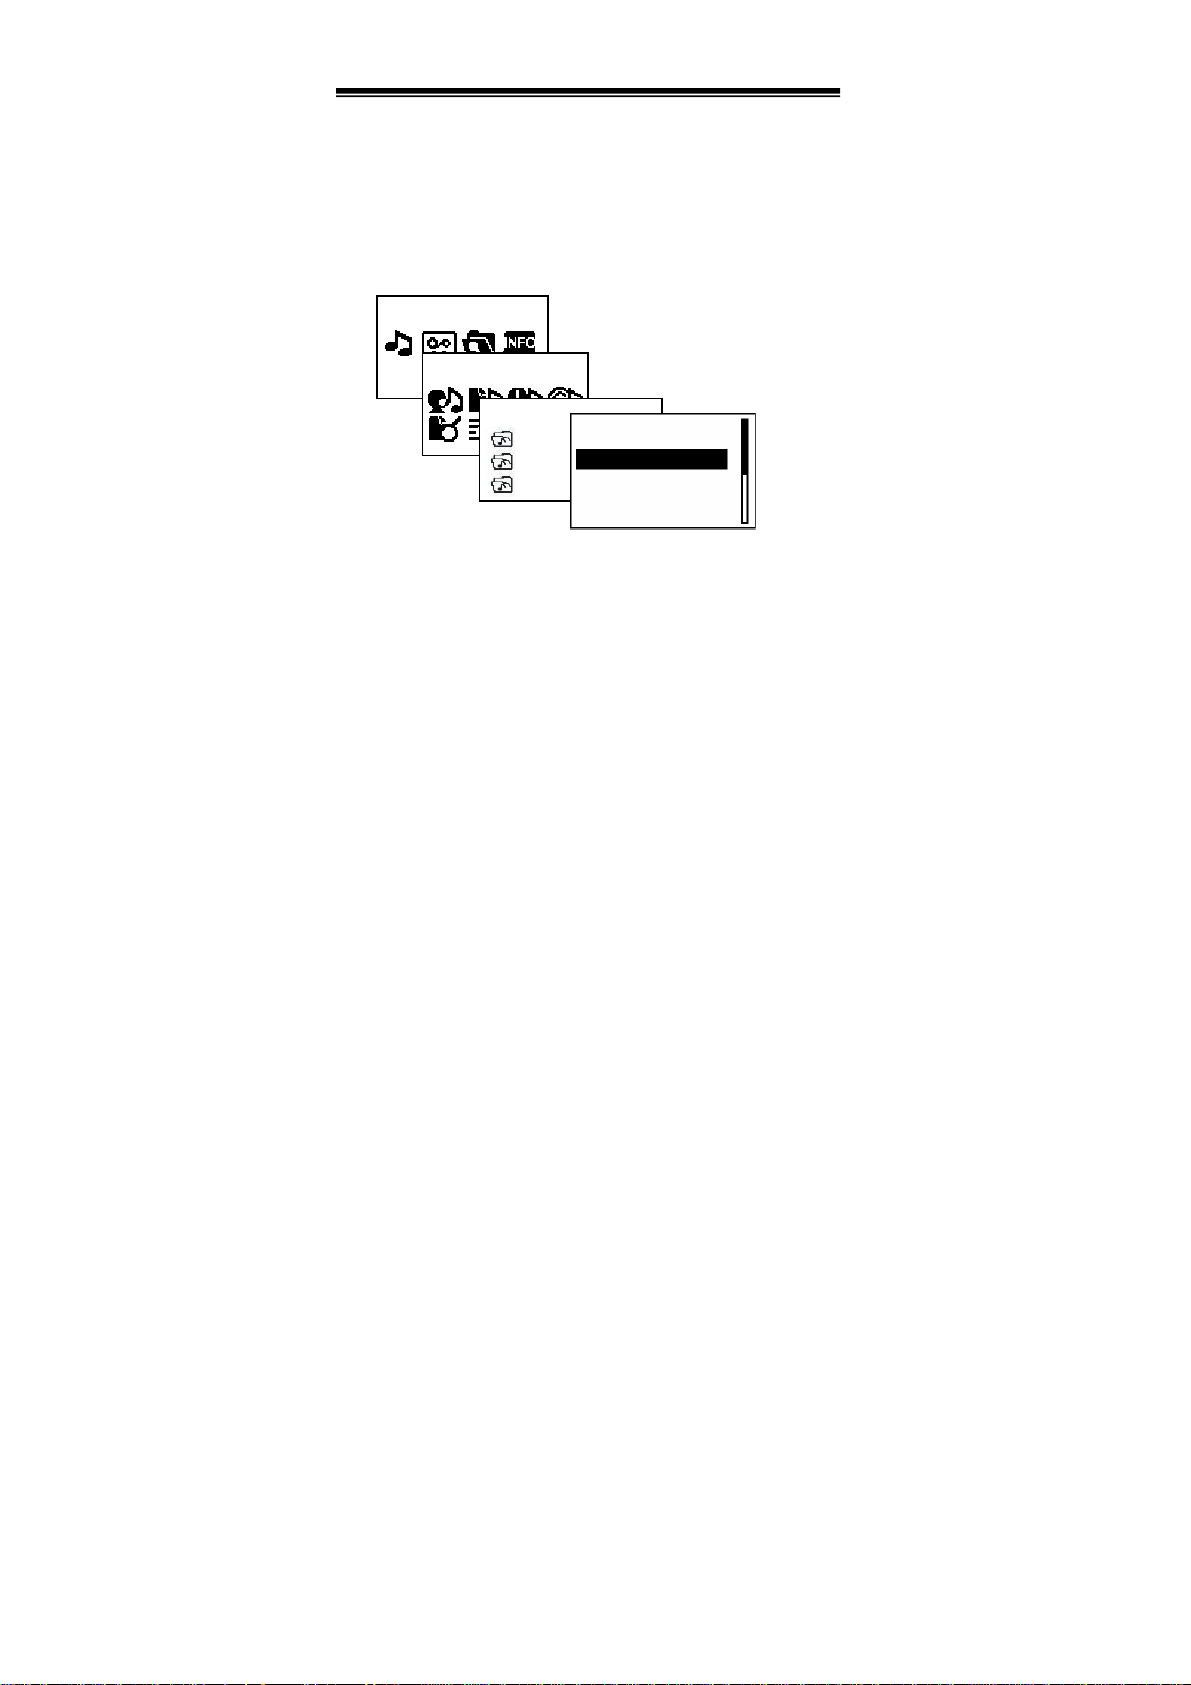
EQ Setting
1. From Now Playing, press Select and move to
Utility to enter the submenu.
2. Enter the EQ Setting submenu.
3. From this menu, you may choose from several
preset Equalizer settings and press Select to
confirm the setting.
4. Or define your own custom EQ. To define the custom
EQ, select Genre (the last option in the EQ list)
following
menu is shown:
32
. The
Page 34

5. Press FF/REW to move to different frequency bands
and use VOL +/- to adjust its gain value.
6. Press Menu to return
.
Play Options
1. From Now Playing, press Select and move to
Utility and enter the submenu.
2. Enter the Play Options submenu. You can change
the playback format to sequential, repeat, repeat all,
random, or random-repeat.
3. Press Select to confirm or press Menu to return.
33
Page 35

Variable Speed
1. From Now Playing, press Select and move to
Utility and enter the submenu.
2. Using FF/REW to move to Variable Speed option.
3. Press Select to change the playback speed. A
higher number represents a slower playback sp eed.
4. Press Menu to return.
34
Page 36

d
Voice Record menu
The HDD player comes equipped with a built-in
microphone for you to do voice recording.
From Main menu, select Record. Then, move to
V oice Re cord and p ress Select to enter the subm enu.
Recorder
Voice Record
To voice record
1. From Voice Record menu, press Select on Do
Record. Voice recording will start.
21:01
VOL:17
Do Recor
35
Page 37

2. To stop recording, press Select on Stop Record
option. This will create an MP3 file.
3. To pause recording, press Select on Pause option.
4. To resume recording, press Select on Resume
option
Listening to voice recording file
1. From Voice Record menu, enter the Play Voice
File submenu.
2. Highlight and select the desired folder (named by
recorded date).
3. Highlight the desired file (named by recorded time).
4. Press Select to begin listening.
The diagram demonstrates how to browse through
your voice record library.
36
Page 38

Recorder
Voice Record
To delete voice recording file
1. From Voice Record menu, enter the Delete Voice
File submenu.
2. Highlight and select the desired folder (named by
recorded date).
3. Highlight the desired file (named by recorded time).
4. Press Select to delete the file.
21:01
VOL:17
20040101
20040101
15:14:22
15:31:08
37
Page 39

Advanced features
Music Record (Direct Encoding)
To record audio from external audio source, plug the
supplied line-in cable between your Player’s line in
(earphone) socket and the audio source (CD/MD) line
out.
From the Main menu, select and enter the Record
submenu. Then, move to the Music Record icon and
enter the submenu
Music Record
Music Recording……
Stop Record
Pause
38
0:00:01
Page 40

To record music
1. From the Music Record menu, press Select to start
music recording. Recording starts when input is
detected
2. To stop recording, press Select on Stop Record
option. This will create an MP3 file of the recorded
track.
3. To pause recording, press Select on Pause option.
4. To resume recording, press Select on the Resume
option when CD Sync is on.
Listening to music recording file
1. From Main menu, navigate to Play Lists menu.
2. Highlight Recorded Songs and select the recorded
program.
3. Press Select to begin listening.
The following diagram demonstrates how to browse
through your music-recording library.
39
Page 41

Record
Play Lists
Setting Preferences
You can customize the Player’s settings to fit your
individual style. From Main menu, move to
Preference and press Select. The following diagram
shows the options for preference settings.
EQ Setting
Date/Time
Recorded Songs
Reco
Contrast
Timer
20040101\15:14:22
20040101\15:14:22
Play
Options
Book Mark
Language
Utility
40
Page 42

From the menu, you may choose from the following
EQ Setting
The Equalizer setting of Preference is synchronized
with the one in Now Playing. That is, you can set the
Equalizer in either menu.
Adjust contrast
1. From Preference menu, move to Contrast and
press Select.
2. Use FF/REW to adjust contrast.
3. You can press Select to confirm the setting or press
Menu to return.
Play Options
The play options setting of Preference is synchronized
with the one in Now Playing. That is, you can set the
playback format in either menu.
41
Page 43

Change Languages (both menu and music
information languages)
1. From Preference menu, move to Language and
press Select.
2. Highlight desired language for music information
and press Select.
3. Highlight desired language for operating menu s a nd
press Select.
4. Press Menu to return.
Set Date/Time
1. From Preference menu, move to Date/Time and
press Select.
2. Highlight Year (or Month, Date, Hour, Min) and
press Select.
3. Use FF or REW to adjust the time
4. You can press Select to confirm or press Menu to
return.
42
Page 44

Set Timers
There are three timers for different kinds of control
functions:
-Display timer: This timer determines how long the
display will last if the user does not touch any key.
-Sleep timer: The player is forced to switched off when
this timer times out.
- Standby timer: If the player is left idle for the set time
period, the player will switch itself off.
To set the timers:
1. From Preference menu, move to desired timer and
press Select.
2. Use FF or REW to set the timer
3. You can press Select to confirm or press Menu to
return.
43
Page 45

Utility
*. Set Record quality (64kbps – 192kbps).
*. CD Sync (0-5s)
Setting Record Quality. Normally, the higher bit rate
provides better quality but requires more storage
space.
1. From Preference menu, move to Utility and press
Select.
2. Move to Record Quality and press Select.
3. Highlight the desired bit rate and you can press
Select to confirm or press Menu to return.
The CD Sync timer is used to identify the interval
between CD tracks. Music Record detects the silence
as setting the CD Sync timer and saves the recorded
track as a MP3 file.
1. From Preference menu, move to Utility and press
Select.
2. Move to CD Sync and press Select.
44
Page 46

3. Use FF/REW to set the timer
4. You can press Select to confirm or press Menu to
return.
Using Book Marks (excellent for Audio Books)
Book Marks store specific player settings, including the
current running order, the current track, the current
elapse time of the track, the playback mode, etc.
Users can save these setting in Book Mark and retrieve
whenever they use the device. Book Marks are great
for:
- Placing digital Book Mark in digital audio books or
other extended length tracks.
- Maintaining positions in long term running orders.
- Sharing your player with others without losing
personal settings.
The player provides four independent Book Marks.
To save a Book Mark:
1. From Preference menu, move to Book Mark and
45
Page 47

press Select.
2. Highlight the Initial and press Select.
3. Highlight the desired Book Mark number and press
Select to confirm. This will store the player’s current
status to the Book Mark.
To retrieve a Book Mark:
1. From Preference menu, move to Book Mark and
press Select.
2. Highlight the Setting and press Select.
3. Highlight the desired Book Mark number and press
Select to confirm. This will retrieve the Book Mark
data and override the current player settings.
46
Page 48

Troubleshooting
1. What are the differences between MP3 and
WMA?
MP3/WMA format files a re both compressed digital
audio files, which offer near CD quality however WMA
are a much smaller file size than MP3.That means you
will be able to store many more WMA music files than
MP3 files.
2. Why can’t the PC detect the player as a
removable device after connecting player to
PC?
• Make sure the player is turned on.
• Make sure the USB cable has been connected
properly between PC and Player.
• Ensure Audiophile has been installed.
• If your PC’s operating system is Win98/ME make
sure the driver on the supplied CD is installed.
47
Page 49

3. What operating systems work with the Player?
The player support Win98SE/ME/2000/XP. It will not
work on Win95
or NT.
4. Does the player support Mac OS?
(1) If you use the player as the removable drive, the
player will work well with Mac OS 9.04 or newer
version.
(2) If you play music with the player, ple ase note the
following limits:
The audiophile, music management softwa re, will not
function with the Mac system.
With Mac OS, you can only copy or move your music
files from/to the MYMUSIC folder of your Player.
48
Page 50

5. Why won’t Audiophile recognize the player after
it is formatted?
After you finish formatting, do the following to restore
the system:
1. Connect your Player with your PC via USB.
2. Run the application “Jukebox restore.exe” on the
supplied CD. This will restore the basic operating
system to your Player.
3. Upgrade firmware if necessary.
6. Why won't Windows Media Player recognize the
Player?
Make sure Audiophile is loaded. Refer to the section "
Installing the driver and applications".
7. What kind of files does the player support?
If you use it as a removable device, it works like any
hard drive and you can store any files to it. If you use it
as a digital audio player, it supports MP3, WMA,
WMA –DRM and OGG.
49
Page 51

8. Why won't the player playback the songs I
bought from web sites?
To use Windo ws DRM protected contents on your Player,
they must be transferred via an application program such as
Windows Media Player.
9. Why won’t ‘Safely Remove Hardware’ operate to
allow me to remove my Player from the USB
connection ?
An application program is still running. Stop Windows Media
Player before selecting the ‘Safely Remove Hardware’ icon
(on the bottom right of your PC’s system tray).
10. How do I reset?
Like all processor based equipment, this unit may lock
up from time to time. This is not a fault. If this occurs
(note, do not Reset unless the player freezes),
50
Page 52

press the ’’Select’’, ’’Menu’’, and ‘’Play’’ buttons
together to Reset.
This will restore normal operation of the unit.
11. Restore the operating system for your
jukebox.
If there is a data crash on your Player’s hard drive,
you will need to reformat the hard drive to fix it. As a
result, the jukebox operating system will be wiped
out. You will therefore need to use the JukeBox
Restore Tool to restore the operating system. The
procedure below explains how to do this:
1. Run setup.exe from the folder “JukeBox
Restore Tool” on the supplied driver CD .
2. Complete the installation.
3. From your PC’s Start menu launch the JukeBox
Restore Tool.
4. Choose your hard drive designation, the tool will
complete the rest.
51
Page 53

Care of your product
• To avoid damage to the player housing, don’t use
chemicals such as benzene, acetone…etc to
polish the player.
• T o avoid player dam age or malfunction, do not use
in the following environments:
(1) Locations that are too hot, too cold or highly
humid
(2) In direct sunlight
(3) Enclosed areas where heat can build up
• Remove the AC adapter when the player is fully
charged.
• Don’t heavily press the player.
• If file errors are generated due to physical impact
or other causes, the player may not work normally.
Please use the scan disk program in the Windows
operating system to fix the error.
52
Page 54

Specifications
M9501 2-Color OLED
Size 65x53x20 mm
Weight 80g
Storage 1’’ HDD
Power Sources Rechargeable Li-polymer battery
PC Connection USB 2.0 HIGH SPEED
File System FAT 16 or FAT 32
S/N Ratio 90dB
Earphone O/P 16 ohms, 10mW
Frequency
Response
20Hz~20KHz
53
Page 55

Recycling
This symbol on the product or in the instructions means that your
electrical and electronic equipment should be disposed at the end of
its life separately from your household waste. There are separate
For more information, please contact the local authority or your
collection systems for recycling in the EU.
retailer where you purchased the product.
Disclaimers
• Weight and dimensions are approximate. Because we
continually strive to improve our products we may change
specifications and designs without prior notice.
• The product is not designed for water-resistant usage.
Exposing the product to moisture may cause damage.
54
Page 56

Caution
Changes or modifications not expressly approved by the responsible
for compliance could void the user’s authority to operate the
equipment.
CE
The apparatus meets the requirements of the above standards and
hence fulfills the requirements of EMC Directive 89/336/EEC as
amended by Directives 92/31/EEC and 93/68/EEC within CE
marketing requirement.
55
 Loading...