

Technaxx Midi Security Kit PRO FullHD 1080P TX-51, Maxi Security Kit PRO FullHD 1080P TX-50 User manual [ml]
Page 1
Technaxx
®
Additional Bullet & Dome Camera
for Midi Security Kit PRO FullHD 1080P TX-51
for Maxi Security Kit PRO FullHD 1080P TX-50
User Manual
Table of Contents
1
1.1
1.2
1.3
General Introduction
Overview
Functions
Specifications of the BULLET and DOME camera
3
3
3
4
2
3
4
4.1
4.2
5
6
7
7.1
7.2
8
Framework & Dimensions & Structure Bullet Camera
Installation Bullet Camera
Menu Bullet Camera
Settings
Note
Framework & Dimensions & Structue Dome Camera
Installation Dome Camera
Menu Dome Camera
Settings
Note
Important Safeguards & Warnings
Bedienungsanleitung
Inhaltsverzeichnis
6
7
9
9
10
11
12
14
14
15
16
1
1.1
1.2
1.3
2
3
Allgemeine Anweisungen
Übersicht
Funktionen
Spezifikationen der BULLET und DOME Kamera
Rahmen & Maße & Struktur Bullet Kamera
Installation Bullet Kamera
17
17
17
18
21
22
1
Page 2
4
4.1
4.2
5
6
7
7.1
7.2
8
Menü Bullet Kamera
Einstellungen
Hinweis
Rahmen & Maße & Struktur Dome Kamera
Installation Dome Kamera
Menü Dome Kamera
Einstellungen
Hinweis
Wichtige Sicherheitshinweise & Warnungen
Appendix / Anhang
Linux License / Linux Lizenz
24
24
25
26
27
30
30
21
32
34
50
2
Page 3

1 General Introduction
1.1 Overview
This series megapixel HD camera conforms to the HDCVI standard. It supports video
signal high-speed long distance transmission without any delay. It can be controlled by
the DVR conforming to the HDCVI.
1.2 Functions
HDCVI Specification: HDCVI(High Definition Composite Video Interface) is an over-
coaxial –cable HD video transmission standard. The technology renders two HD video
formats by progressive scanning.
ICR: IR cut removal is to filter IR light in the daytime and then auto switch to the general
fitter at night. This function allows the camera to output the high sensitivity clear video.
Smart IR technology: The sensor controls the IR light on/off via the combination work
of the hardware and software, which realizes the automatically IR light compensation
according to the environment illumination.
Auto gain function: To output the standard video signal in the different illumination
environments, the amplifier needs to adjust in a wide range. The system can enhance
the camera sensitivity in low illumination and enhance the video signal output to get the
clear and high definition video.
Auto white balance: The white balance refers to the camera to restore the white object
color. It allows the camera to automatically adjust the color temperature in indoor and
outdoor environment, just like our human eyes does.
Auto exposure: System can automatically set shutter speed and iris value according to
the snapshot video exposure condition.
Auto electronic shutter: The system can automatically adjust the electronic shutter
when the environment light changes.
Auto Focus Technology: Detect the location of main screen by the camera auto focus
algorithm, and auto adjust focus motor according to the current focus situation, which
would realize zoom control the entire auto focus. The image stays clear during the
process of zooming.
OSD: User-friendly on-screen display for you to select the different functions.
3D NR: Comparing with the general 2D denoise function, the 3D denoise function can
not only denoise the brightness of the video separation signal and saturation signal, it
can also denoise the original data from CCD. It greatly enhances noise reduction
performance and guarantees clear and bright video.
3
Page 4

1.3 Specifications
ENGLISH
Features & Technical Specifications BULLET CAMERA
Video resolution: 1980 × 1225 @ 30 fps (PAL)
High-performance CMOS image sensor with 2.4 Mega pixel
Supports HDCVI HD video output
Transmission distance up to 300m via 75-3 coaxial cable without data loss
High speed, long distance real-time transmission
Automatic ICR switch to realize surveillance both in the daytime and at night
Automatically: exposure, white balance, electronic shutter, gain function
Restore clear and vivid video
Supports IR function with IR LED distance max. 15m
Protection class IP66 (dust and waterproof)
Video frame rate: 25/30/50/60 fps @ 720P & 25/30 fps @ 1080p
Min. illumination: 0.05 Lux @ F1.2 (AGC ON), 0 Lux with IR switched on
Electronic shutter: 1/3 sec. ~ 1/100000 sec. (PAL)
1-channel BNC HDCVI HD video output & CVBS standard definition video output
BLC (BackLight Control): automatically
IR light only is active for video recordings in night mode
Noise reduction of 2D/3D
Colour or Black/White: selectable
Horizontal angle of view: 105.5° ~ 32.9°
Focal length: 2.7 ~ 12.0mm / automatic zoom
Fixed aperture for the brightness
Power: DC 12V ± 10%
Power consumption: 7.44W max. (Input 12V/0.62A) IR 15m max.
Working temperature: – 30°C ~ 60°C
Indoor and outdoor installation: wall mount
Weight / Dimensions: 550 g / (L) 21,3 x (W) 8,0 × (H) 7,2 cm
Package Contents: Bullet camera for Midi Security Kit PRO FullHD 1080P TX-50 &
Maxi Security Kit PRO FullHD 1080P TX-51, 1x BNC 18.3m video cable, 3x screws
and 3x dowels, User Manual
Features & Technical Specifications DOME CAMERA
Video resolution: 1980 × 1225 @ 30 fps (PAL)
High-performance CMOS image sensor with 2.4 Mega pixel
Supports HDCVI HD video output
4
Page 5

Transmission distance up to 300m via 75-3 coaxial cable without data loss
High speed, long distance real-time transmission
Automatic ICR switch to realize surveillance both in the daytime and at night
Automatically: exposure, white balance, electronic shutter, gain function
Restore clear and vivid video
Supports IR function with IR LED distance max. 15m
Protection class IP66 (dust & waterproof) & IK10 (shockproof)
Video frame rate: 25/30/50/60 fps @ 720P & 25/30 fps @ 1080p
Min. illumination: 0.05 Lux @ F1.2 (AGC ON), 0 Lux with IR switched on
Electronic shutter: 1/3 sec. ~ 1/100000 sec. (PAL)
1-channel BNC HDCVI HD video output & CVBS standard definition video output
BLC (BackLight Control): automatically
IR light only is active for video recordings in night mode
Noise reduction of 2D/3D
Colour or Black/White: selectable
Horizontal angle of view: 105.5° ~ 32.9°
Focal length: 2.7 ~ 12.0mm / automatic zoom
Fixed aperture for the brightness
Power: DC 12V ± 10%
Power consumption: 8.6W max. (Input 12V/0.72A) IR 15m max.
Working temperature: – 30°C ~ 60°C
Indoor and outdoor installation: wall mount / ceiling mount
Weight / Dimensions: 450 g / Φ 12.2 × (H) 8.9 cm
Package Contents: Dome Camera for Midi Security Kit PRO FullHD 1080P TX-50 &
Maxi Security Kit PRO FullHD 1080P TX-51, 1x BNC 18.3m video cable, 3x screws
and 3x dowels, User Manual
This device complies with the requirements of the standards referred to the Directive
R&TTE 1999/5/EC. The Declaration of Conformity you find here: www.technaxx.de/
(in bar at the bottom “Konformitätserklärung”). Before using the device the first time,
read the user manual carefully. Service phone No. for technical support: 01805
012643 (14 cent/minute from German fixed-line and 42 cent/minute from mobile
networks). Free Email: support@technaxx.de
Hints for Environment Protection: Packages materials are raw
materials and can be recycled. Do not disposal old devices or batteries
into the domestic waste. Cleaning: Protect the device from
contamination and pollution (use a clean drapery). Avoid using rough,
coarse-grained materials or solvents/aggressive cleaner. Wipe the
cleaned device accurately. Important Notice: Should battery fluid leak
from a battery, wipe the battery case with a soft cloth dry. Distributor:
Technaxx Deutschland GmbH & Co.KG, Kruppstr. 105, 60388 Frankfurt
a.M., Germany
5
Page 6

2 Dimensions (unit is mm) & Structure Bullet Camera
When the standard definition/high definition switch control cable is short circuit, system
outputs standard definition video. Otherwise, when the circuit is open, system outputs
the high definition video.
6
Page 7
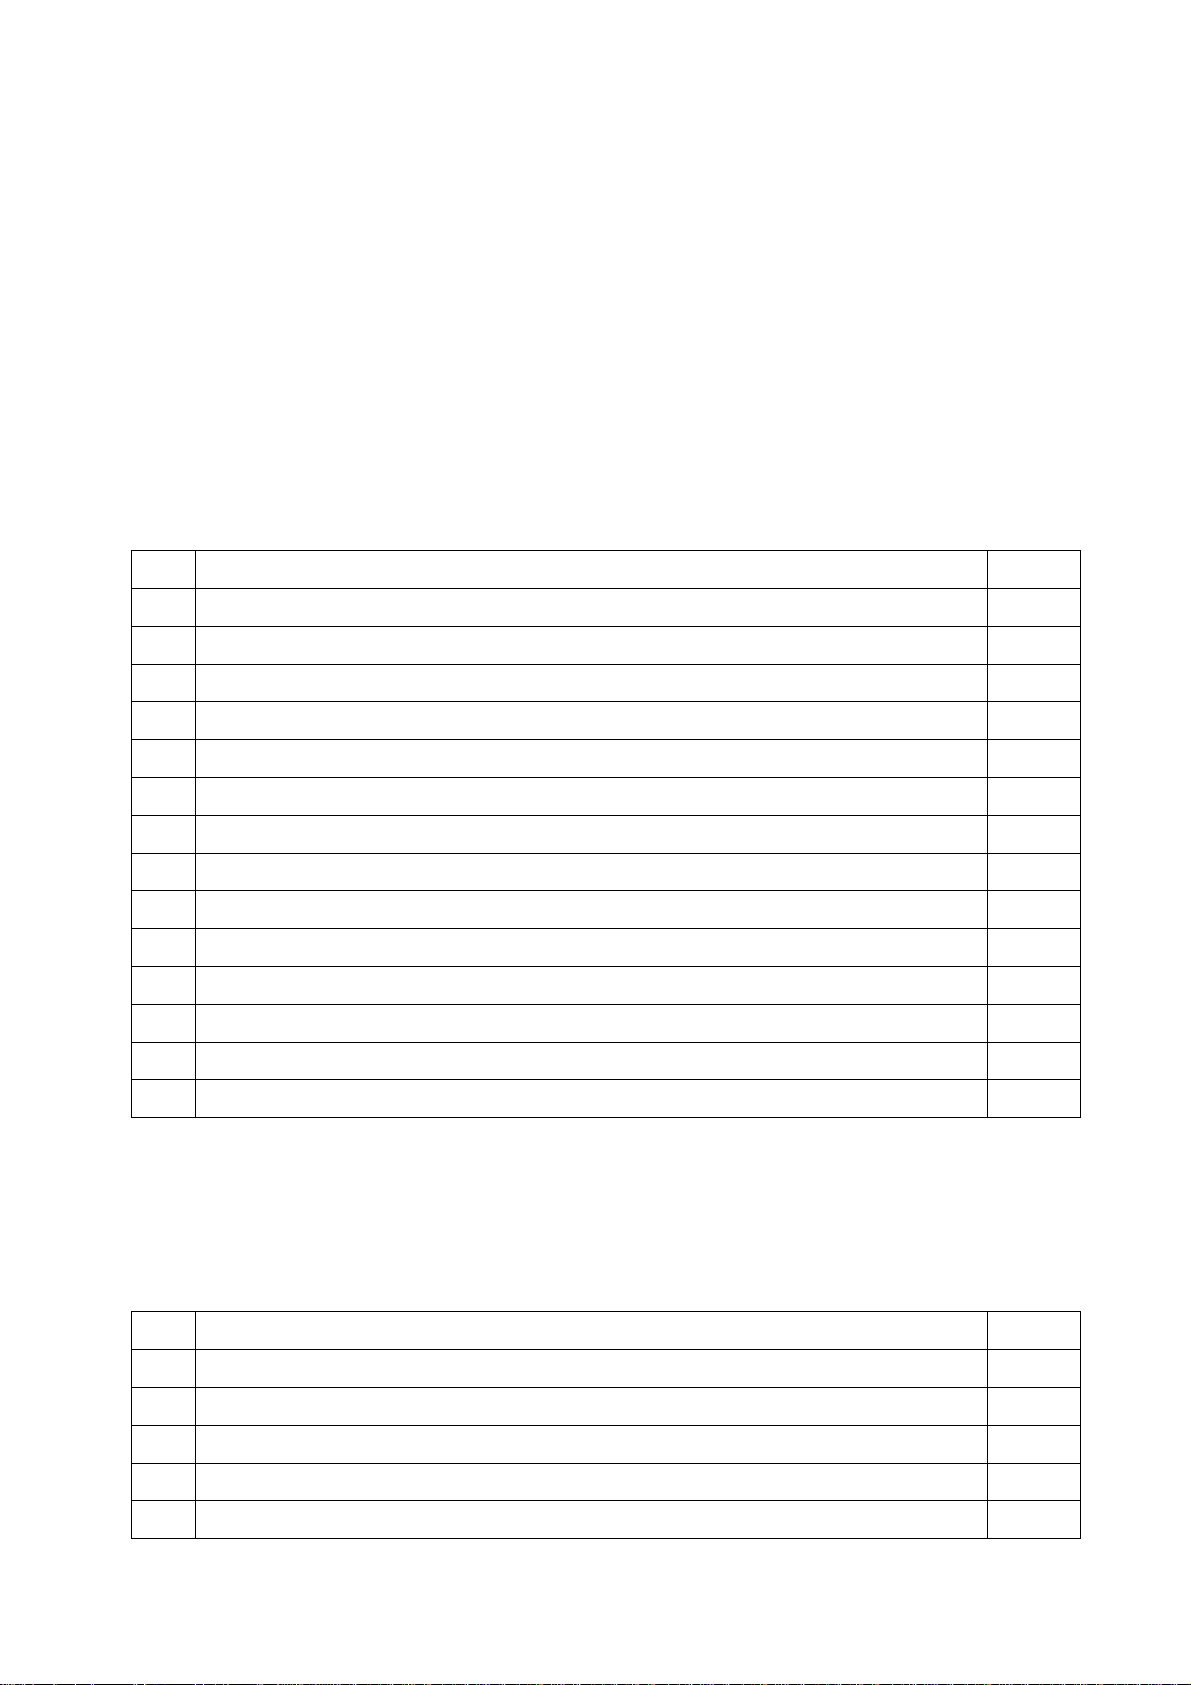
3 Installation Bullet Camera for TX-50 & TX-51
Important: Make sure the installation surface can min support the 3x the weight of
the camera and the bracket.
If you drill a hole in the wall, make sure that power cables, electrical cords and/or
pipelines are not damaged. When using the supplied mounting material, we do not take
the liability for a professional installation. You are entirely responsible to ensure that the
mounting material is suitable for the particular masonry, and that the installation is done
properly. When working at higher altitudes, there is danger of falling! Therefore, use
suitable safeguards.
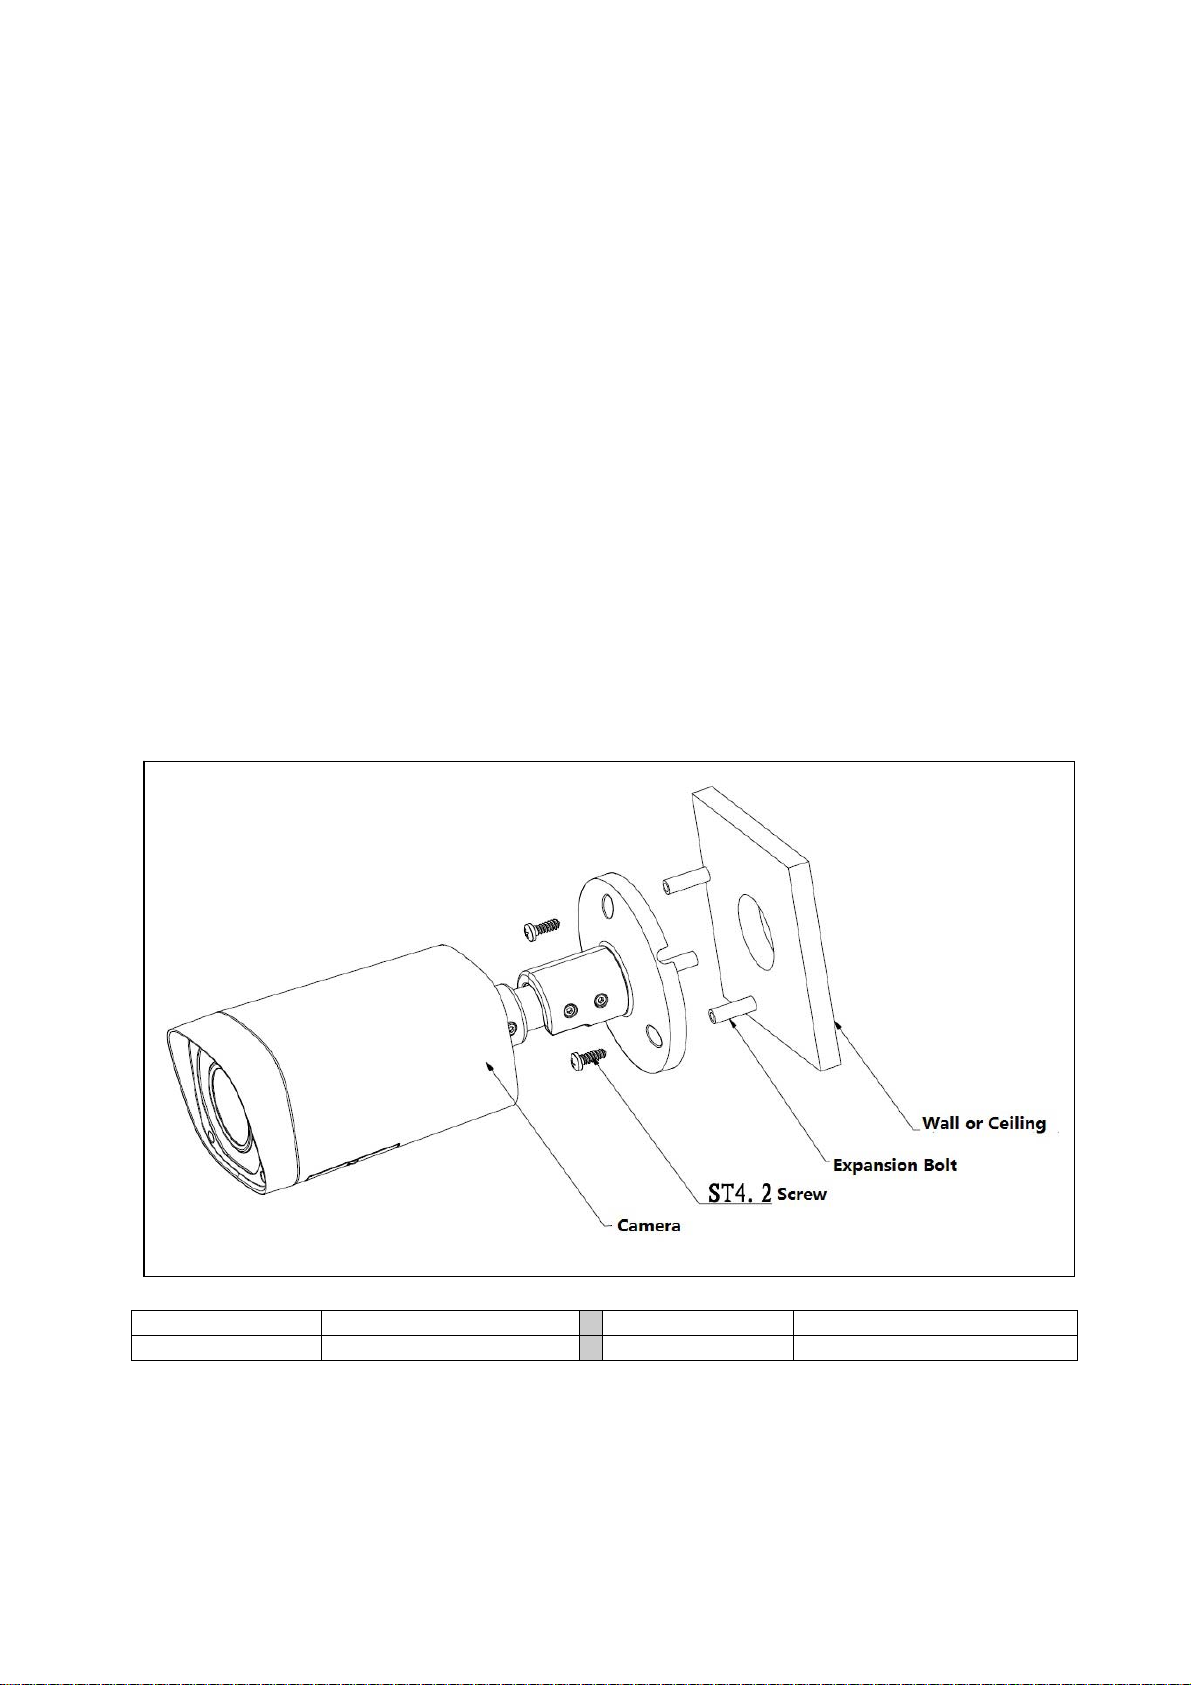
Step 1: Before you install the bracket, pull the cable through the cable exit of the
bracket chassis.
Install the expansion bolt if you want to install in the cement wall (make sure the
installation holes of the expansion bolts are the same with the bracket.) Then you can
install the bracket. If you want to install in the wood surface, skip the first step and then
use the self-tapping screws to install the bracket directly.
7
Page 8
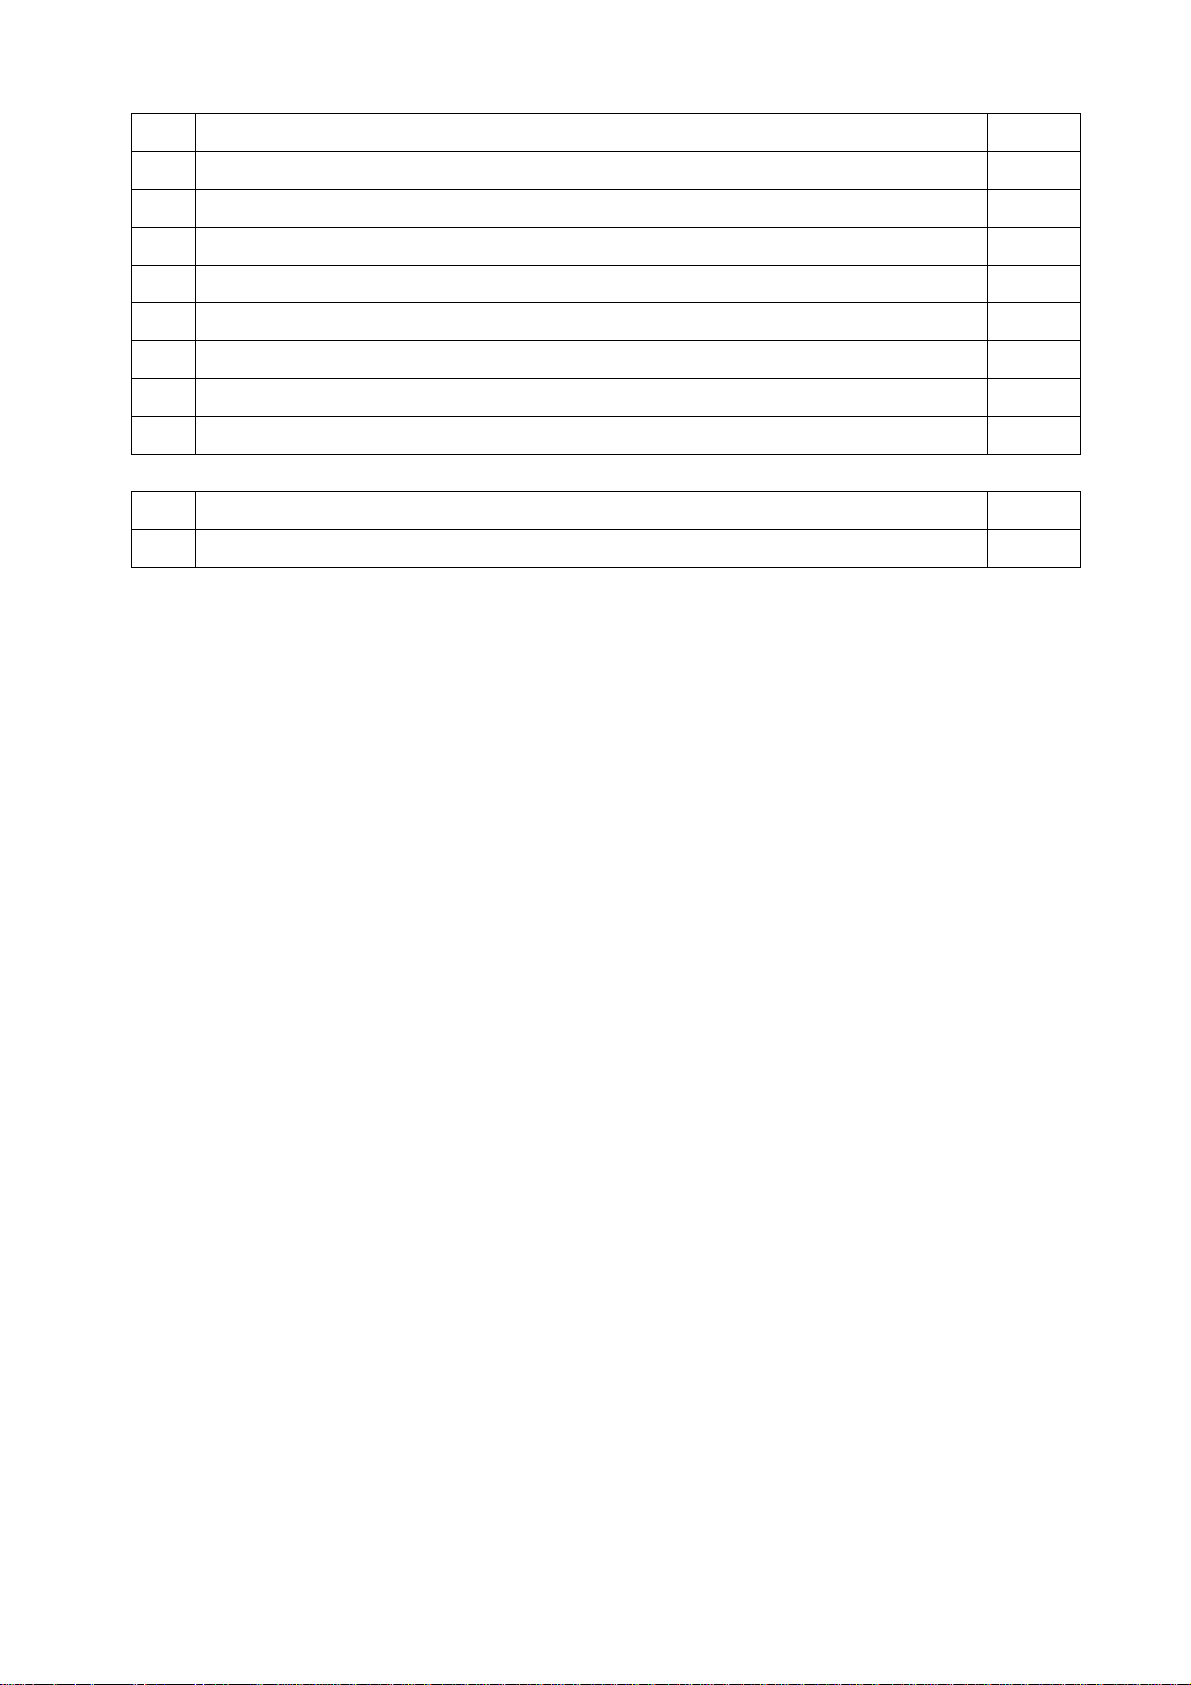
Step 2: Unscrew the M3 x 20 and M3 x 5 screws on the bracket in the direction, adjust
the camera to an exact location which needs to be monitored by rotating the bracket
and camera body, then secure the bolts.
Step 3: Connect the video output port of the device cable to the HDCVI DVR, and
connect the power port of the device cable to the power.
Step 4: After the image is shown on the HDCVI DVR, control the interface by HDCVI
series DVR PTZ, adjust lens zoom by using coaxial control, and the camera will auto
focus to the best position which makes the image clear. So far the camera installation is
completed.
8
Page 9

4. Menu
4.1 Settings
NOTE: The following operation and interfaces for reference only. Refer to the
HDCVI series DVR user’s manual for detailed information.
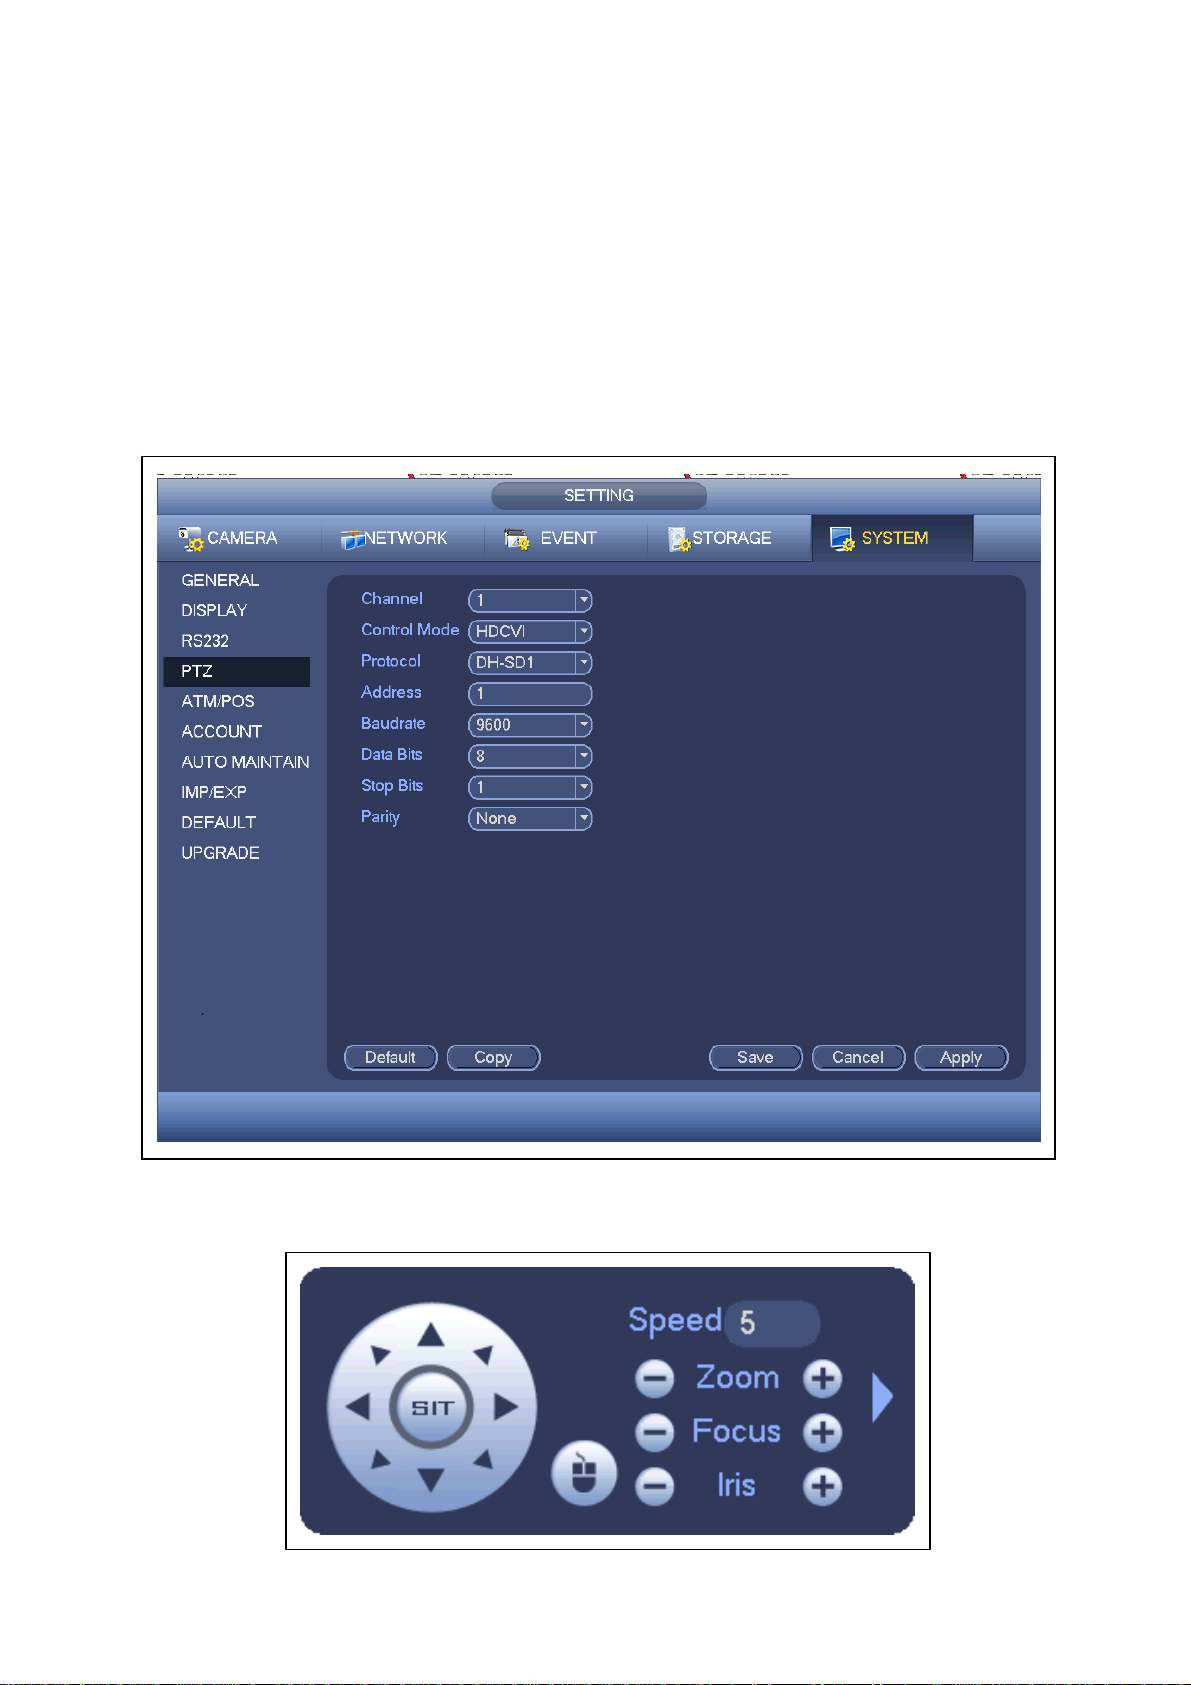
After connected the camera to the HDCVI series DVR, from Main Menu -> Setting ->
System -> PTZ, you need to set control mode as HDCVI and the protocol as DH-SD1.
Click Save button to save current setup.
On the preview interface, right click mouse and then select PTZ; you can see this
interface.
9
Page 10

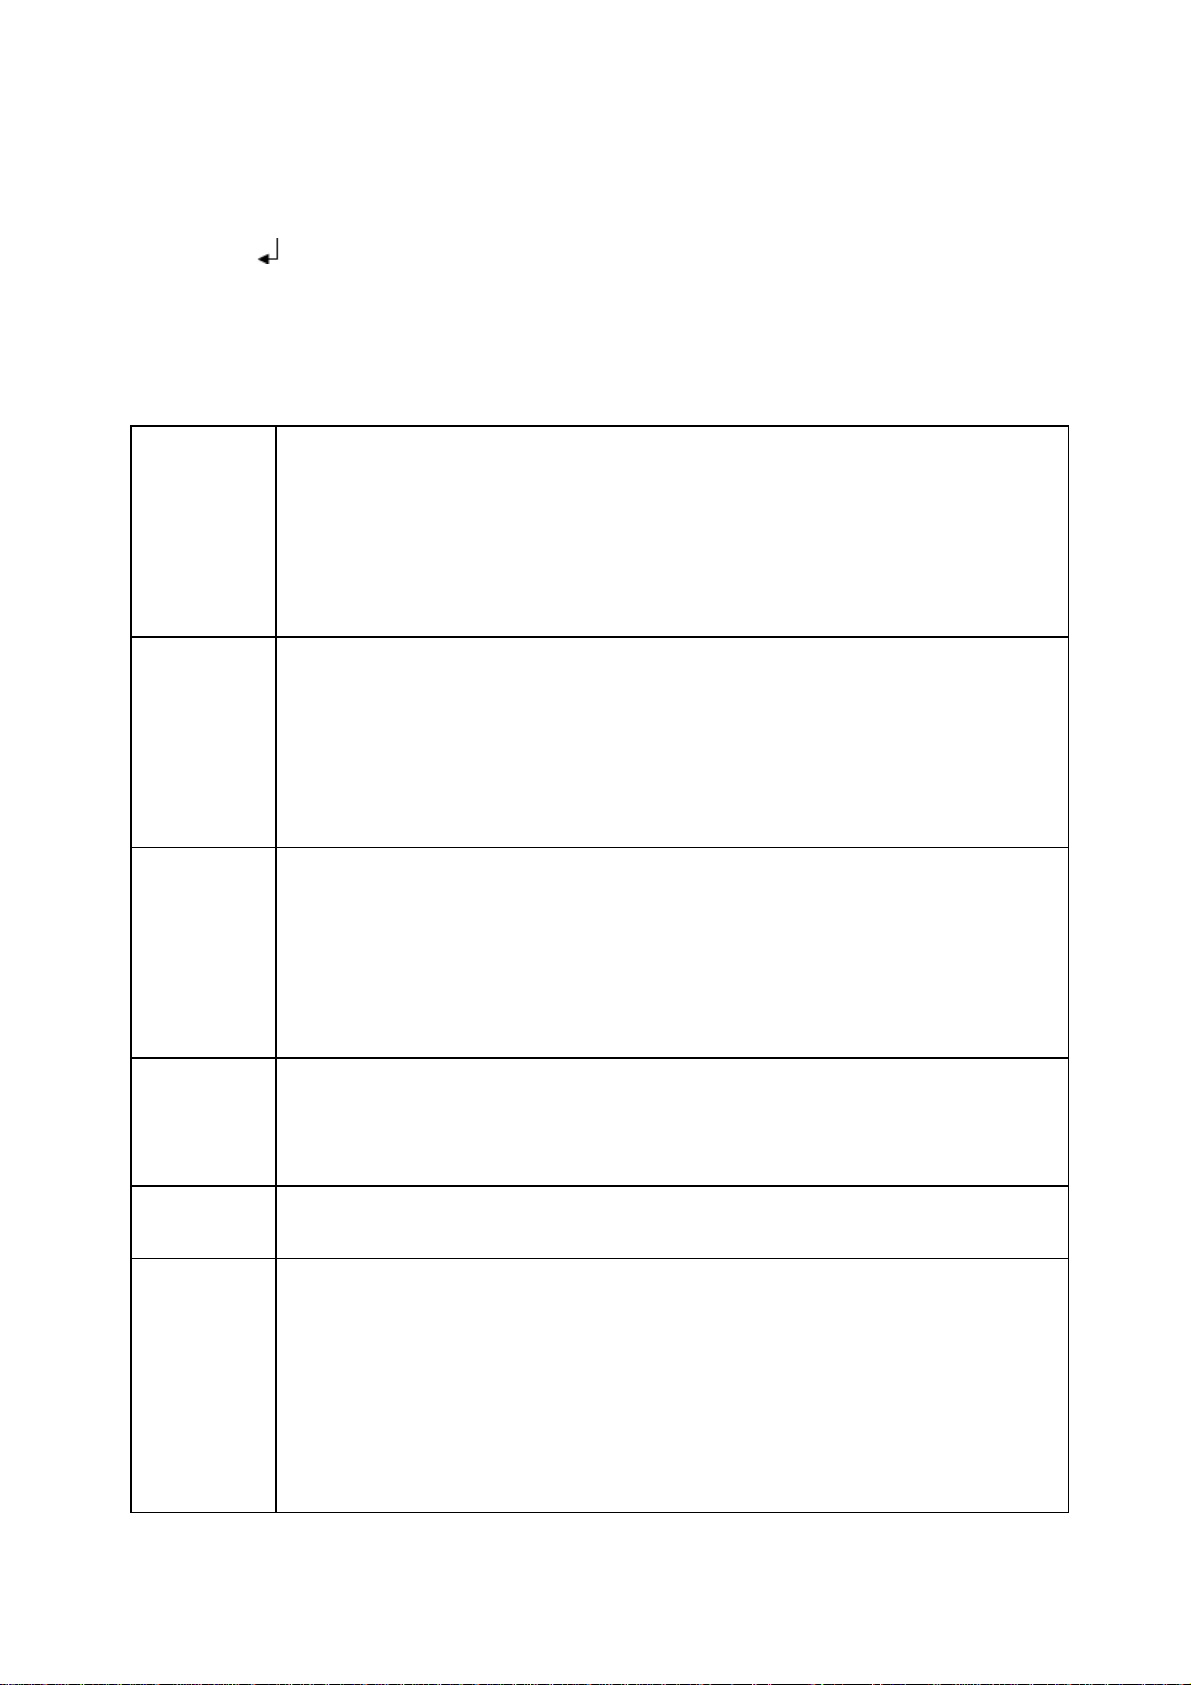
Click Iris “+” to open menu or confirm current operation.
Click Iris “-” to realize auto focus.
Click up/down button to view all the items on the left pane of the following list. Click
left/right button to set the corresponding values on the right pane of the following list. If
there is “ ”, click confirm button to go to the 2nd menu. Repeat the previous steps to
set detailed value. Click Return button to go back to the previous menu interface.
Click Zoom “+” to zoom in and click Zoom “-” to zoom out.
4.2 Note
Brightness It is to adjust monitor window bright. The value ranges from 0 to 100.
The default value is 50. The larger the number is, the bright the video is.
When you input the value here, the bright section and the dark section
of the video will be adjusted accordingly. You can use this function
when the whole video is too dark or too bright. Note the video may
become hazy if the value is too high. The recommended value ranges
from 40 to 60.
Contrast It is to adjust monitor window contrast. The value ranges from 0 to 100.
The default value is 50. The larger the number is, the higher the contrast
is. You can use this function when the whole video bright is OK but the
contrast is not proper. Note the video may become hazy if the value is
too low. If this value is too high, the dark section may lack brightness
while the bright section may over exposure .The recommended value
ranges from 40 to 60.
Saturation It is to adjust monitor window saturation. The value ranges from 0 to
100. The default value is 50. The larger the number, the strong the color
is. This value has no effect on the general brightness of the whole video.
The video color may become too strong if the value is too high. For the
grey part of the video, the distortion may occur if the white balance is not
accurate. Note the video may not be attractive if the value is too low.
The recommended value ranges from 40 to 60.
Sharpness The value here is to adjust the edge of the video. The value ranges from
0 to 100. The larger the value is, the clear the edge is and vice versa.
Note there is noise if the value here is too high. The default value is 50
and the recommended value ranges from 40 to 60.
3DNR It is to reduce video noise. The larger the number is, the lower the noise
is. The details of the video may disappear if the value here is too large.
Anti-flicker Outdoor: In this mode, you can switch exposure mode to get the
effect under the corresponding exposure mode.
50Hz: When the current is 50Hz, system can auto adjust the
exposure according to the environment brightness in case there is
any strip.
60Hz: When the current is 60Hz, system can auto adjust the
exposure according to the environment brightness in case there is
any strip.
10
Page 11

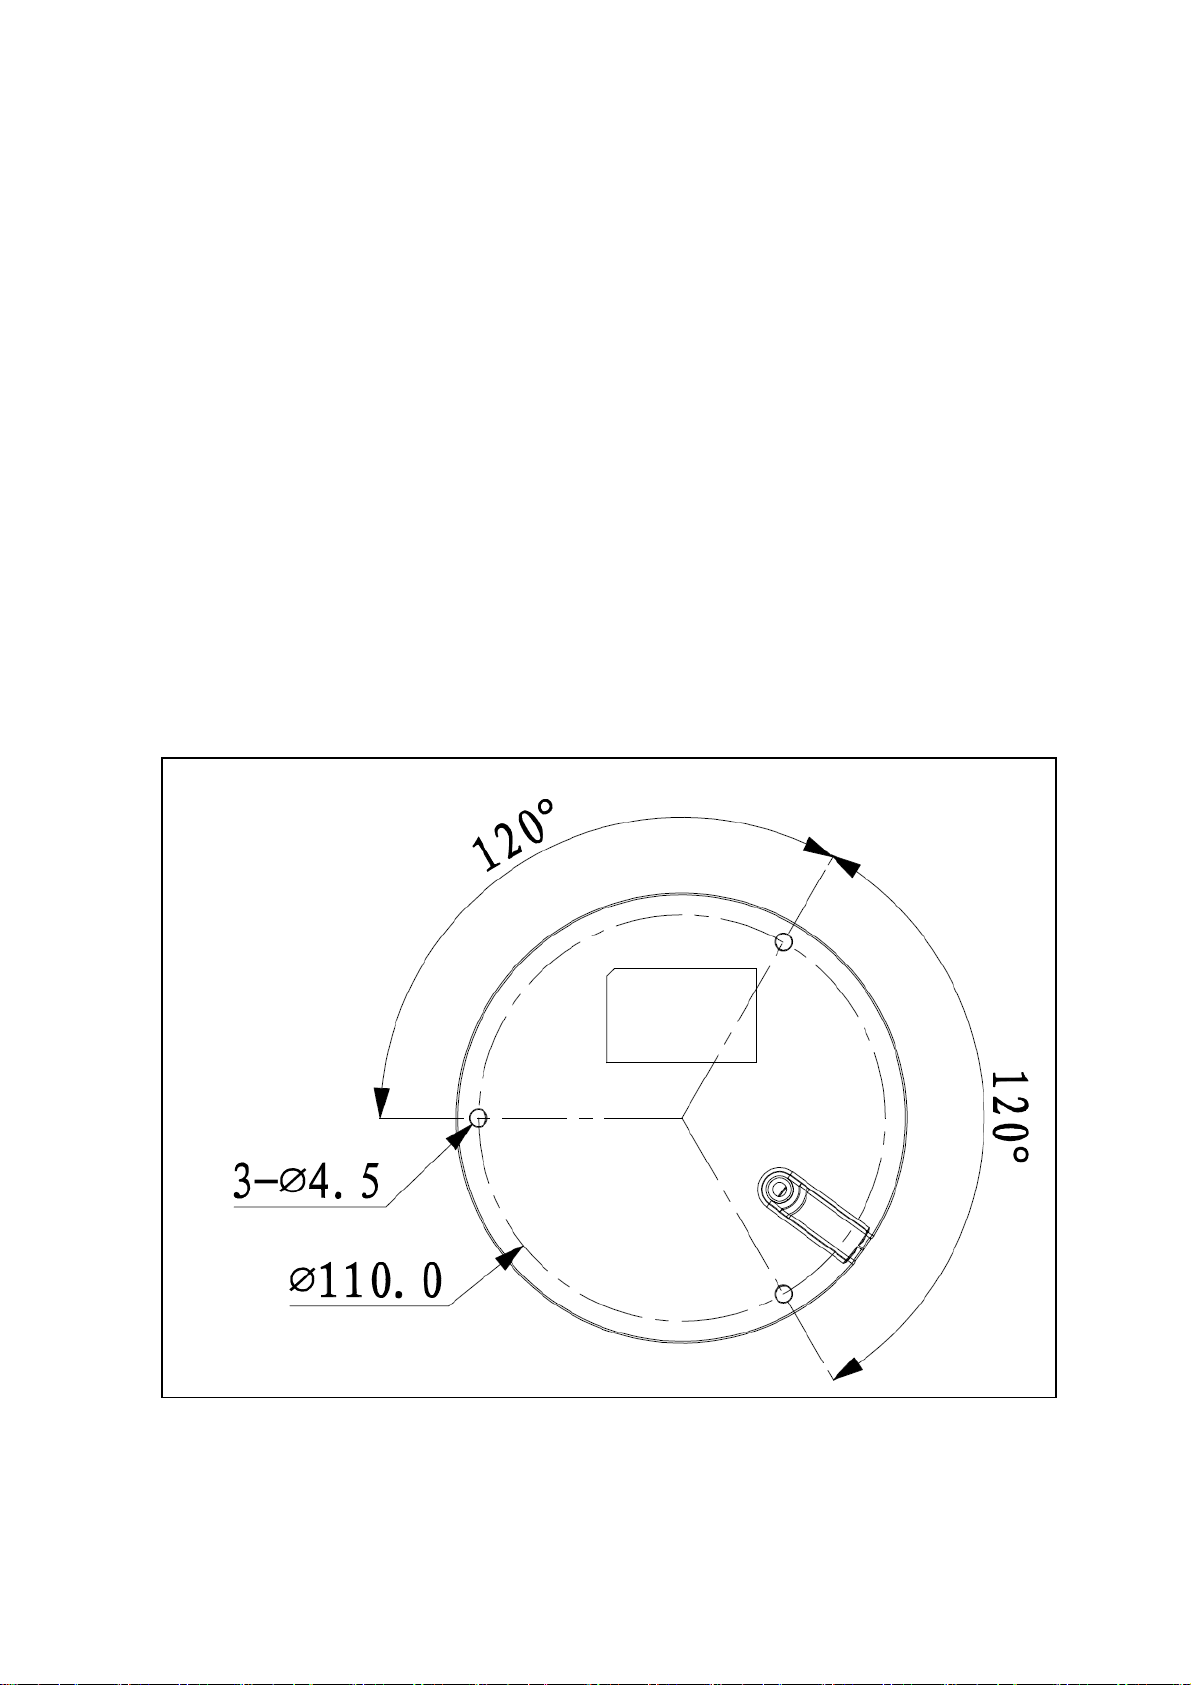
5 Dimensions (unit is mm) & Structure Dome Camera
When the standard definition/high definition switch control cable is short circuit, system
outputs standard definition video. Otherwise, when the circuit is open, system outputs
the high definition video.
11
Page 12
6 Installation Dome Camera for TX-50 & TX-51
Important: Make sure the installation surface can min support the 3x the weight of
the camera and the bracket.
If you drill a hole in the wall, make sure that power cables, electrical cords and/or
pipelines are not damaged. When using the supplied mounting material, we do not take
the liability for a professional installation. You are entirely responsible to ensure that the
mounting material is suitable for the particular masonry, and that the installation is done
properly. When working at higher altitudes, there is danger of falling! Therefore, use
suitable safeguards.
The dome camera usually mainly uses the in-ceiling installation. It can be installed on
the ceiling or the wall.
For side exit cable installation, make sure the side exit cable direction is the same
as shown in the installation position map.
Before you secure the screws on the pedestal, put the cable through the cable exit
of the pedestal.
Before you complete the installation and debug, do not remove the electrostatic film.
After you remove the film, do not touch the enclosure in case there is any scratch.
Step 1: Take the installation position map from the accessories bag and then put it on
the surface of the ceiling or the wall according to the cable exit position. Dig three holes
according to the installation position map and then take three expansion bolts from the
accessories bag and put them to the holes you just dug.
12
Page 13

Step 2: Use inner hex wrench to remove the three case locking screws and then
remove the dome enclosure.
Step 3: Adjust the pedestal position according to the cable exit mode (ceiling/side). Pull
the cable through the cable side exit at the installation surface and the pedestal (skip
this step if you want to use ceiling exit mode). Line up the screw holes at the bottom of
the pedestal to the expansion bolts in the installation surface. Put three self-tapping
screws to expansion bolts and then secure firmly. Now the pedestal is on the installation
surface.
Step 4: Connect the video output port of the device cable to the HDCVI DVR, and
connect the power port of the device cable to the power. After the image is shown on
the HDCVI DVR, control the interface by HDCVI series DVR PTZ, adjust lens zoom by
using coaxial control, and the camera will auto focus to the best position.
Step 5: Use three case locking screws to secure the dome housing on the pedestal.
Now you have completed the device installation and cable connection. You can use the
terminal encode devices to view the monitor video.
13
Page 14
7 Menu
7.1 Settings
NOTE: The following operation and interfaces for reference only. Refer to the
HDCVI series DVR user’s manual for detailed information.
After connected the camera to the HDCVI series DVR, from Main Menu -> Setting ->
System -> PTZ, you need to set control mode as HDCVI and the protocol as DH-SD1.
Click Save button to save current setup.
On the preview interface, right click mouse and then select PTZ; you can see this
interface.
14
Page 15
Click Iris “+” to open menu or confirm current operation.
Click Iris “-” to realize auto focus.
Click up/down button to view all the items on the left pane of the following list.
Click left/right button to set the corresponding values on the right pane of the list.
If there is “ ”, click confirm button to go to the 2nd menu. Repeat the previous steps to
set detailed value. Click Return button to go back to the previous menu interface.
Click Zoom “+” to zoom in and click Zoom “-” to zoom out.
7.2 Note
Brightness It is to adjust monitor window bright. The value ranges from 0 to 100.
The default value is 50. The larger the number is, the bright the video is.
When you input the value here, the bright section and the dark section
of the video will be adjusted accordingly. You can use this function
when the whole video is too dark or too bright. Note the video may
become hazy if the value is too high. The recommended value ranges
from 40 to 60.
Contrast It is to adjust monitor window contrast. The value ranges from 0 to 100.
The default value is 50. The larger the number is, the higher the contrast
is. You can use this function when the whole video bright is OK but the
contrast is not proper. Note the video may become hazy if the value is
too low. If this value is too high, the dark section may lack brightness
while the bright section may over exposure .The recommended value
ranges from 40 to 60.
Saturation It is to adjust monitor window saturation. The value ranges from 0 to
100. The default value is 50. The larger the number, the strong the color
is. This value has no effect on the general brightness of the whole video.
The video color may become too strong if the value is too high. For the
grey part of the video, the distortion may occur if the white balance is not
accurate. Note the video may not be attractive if the value is too low.
The recommended value ranges from 40 to 60.
Sharpness The value here is to adjust the edge of the video. The value ranges from
0 to 100. The larger the value is, the clear the edge is and vice versa.
Note there is noise if the value here is too high. The default value is 50
and the recommended value ranges from 40 to 60.
3DNR It is to reduce video noise. The larger the number is, the lower the noise
is. The details of the video may disappear if the value here is too large.
Anti-flicker Outdoor: In this mode, you can switch exposure mode to get the
effect under the corresponding exposure mode.
50Hz: When the current is 50Hz, system can auto adjust the
exposure according to the environment brightness in case there is
any strip.
60Hz: When the current is 60Hz, system can auto adjust the
exposure according to the environment brightness in case there is
any strip.
15
Page 16

8 Important Safeguards & Warnings
8.1 Electrical safety: All installation and operation here should conform to your local
electrical safety codes. The power shall conform to the requirement in the SELV (Safety
Extra Low Voltage) and the Limited power source is rated 12V DC (24V AC) in the
IEC60950-1. We assume no liability or responsibility for all the fires or electrical shock
caused by improper handling or installation.
8.2 Transportation security: Heavy stress, violent vibration or water splash are not
allowed during transportation, storage and installation.
8.3 Installation: Do not apply power to the camera before completing installation. Install
the proper power cut-off device during the installation connection. Always follow the
instruction guide the manufacturer recommended.
If this product is installed in the ceiling, make sure the installation position can sustain
the min 50N.
8.4 Qualified engineers needed: All the examination and repair work should be done
by the qualified service engineers. We are not liable for any problems caused by
unauthorized modifications or attempted repair.
8.5 Environment: This series camera should be installed in a cool, dry place away from
direct sunlight or strong light, inflammable, explosive substances and etc. This series
camera shall work on the specified working temperature. Keep it away from the
electromagnetic radiation object and environment. Keep the sound ventilation. Do not
allow the water and other liquid falling into the camera.
8.6 Accessories: Be sure to use all the accessories recommended by manufacturer.
Before installation, open the package and check all the components are included.
Contact your local retailer ASAP if something is broken in your package.
8.7 Maintenance: Shut down the device and then unplug the power cable. Use the dry
soft cloth to clean the device. If there is too much dust, use the water to dilute the mild
detergent first and then use it to clean the device. Finally use the dry cloth to clean the
device. Put the dustproof cap to protect the CCD (CMOS) component when you do not
use the camera.
16
Page 17

Technaxx
®
Zusatzkamera Bullet & Dome
für Midi Sicherheits-Kit PRO FullHD 1080P TX-51
für Maxi Sicherheits-Kit PRO FullHD 1080P TX-50
Bedienungsanleitung
1 Allgemeine Anweisungen
1.1 Übersicht
Diese Serien-Megapixel-HD-Kamera entspricht der HDCVI-Norm. Sie unterstützt
Videosignalübertragung mit hoher Geschwindigkeit und großer Entfernung ohne
Verzögerung. Sie kann durch den DVR entsprechend der HDCVI gesteuert werden.
1.2 Funktionen
HDCVI-Spezifikation: HDCVI (High Definition Composite Video Interface) ist ein HDVideoübertragungsstandard über Koaxialkabel. Die Technik gibt zwei HD-Videoformate
durch progressives Scanning wieder.
ICR: Die IR Schnittentfernung ist, um die IR-Beleuchtung bei Tag zu filtern und dann
den allgemeinen Filter bei Nacht automatisch zu schalten. Diese Funktion ermöglicht,
dass die Kamera die hohe Empfindlichkeit ausgibt und das Video klar macht.
Smart IR-Technologie: Der Sensor steuert die IR-Beleuchtung ein/aus über die
Kombinationsarbeit der Hardware und Software, die die automatische IRBeleuchtungskompensation gemäß der Umgebungsbeleuchtung durchführt.
Automatische Verstärkerfunktion: Um das Standardvideosignal in den verschiedenen
Beleuchtungsumgebungen auszugeben, muss der Verstärker in einem weiten Bereich
ausrichten. Das System kann die Kameraempfindlichkeit bei geringer Beleuchtung
verbessern und den Videosignalausgang verbessern, um ein klaren Hochauflösungsvideo zu bekommen.
Automatischer Weißabgleich: Der Weißabgleich bezieht sich auf die Kamera, um die
Farbe des weißen Objekts wiederherzustellen. Er ermöglicht der Kamera die
Farbtemperatur in der inneren und äußeren Umgebung automatisch auszurichten, so
wie es unsere menschlichen Augen machen.
Automatische Belichtung: Das System kann automatisch die
Auslösergeschwindigkeit und den Blendenwert gemäß der SchnappschussVideobelichtungsbedingung einstellen.
Automatischer elektronischer Auslöser: Das System kann automatisch den
elektronischen Auslöser anpassen, wenn das Umgebungslicht sich ändert.
17
Page 18

ICR: Die IR Schnittentfernung ist, um die IR-Beleuchtung bei Tag zu filtern und dann
den allgemeinen Filter bei Nacht automatisch zu schalten. Diese Funktion ermöglicht,
dass die Kamera die hohe Empfindlichkeit ausgibt und das Video klar macht.
Smart IR-Technologie: Der Sensor steuert die IR-Beleuchtung ein/aus über die
Kombinationsarbeit der Hardware und der Software, die die automatische IR
Beleuchtungskompensation gemäß der Umgebungsbeleuchtung durchführt.
3D NR: Im Vergleich zu der allgemeinen 2D-Rauschunterdrückungsfunktion, kann die
3D-Rauschunterdrückungsfunktion nicht nur die Helligkeit des Videotrennungssignal
und des Sättigungssignals entrauschen, es kann auch die Originaldaten vom CCD
entrauschen. Es verbessert die Geräuschreduzierungsleistung enorm und garantiert ein
klares und helles Video.
1.3 Spezifikationen
DEUTSCH
Besondere Merkmale & Technische Details BULLET KAMERA
Videoauflösung: 1980 × 1225 @ 30 fps (PAL)
Hochleistungs-CMOS-Bildsensor mit 2,4 Megapixel
Unterstützt HDCVI HD Videoausgang
Übertragungsreichweite bis zu 300m über 75-3 Koaxialkabel ohne Datenverlust
Echtzeitübertragung mit hoher Geschwindigkeit und großer Entfernung
Automatischer ICR-Schalter für Überwachung bei Tag und auch bei Nacht
Automatisch: Belichtung, Weißabgleich, elektronische Blende, Verstärkerfunktion
Klares und anschauliches Video wiederherstellen
Unterstützt IR-Funktion mit IR LED Reichweite max. 15m
Schutzklasse IP66 (staub- und wassergeschützt)
Videobildrate: 25/30/50/60 fps @ 720P & 25/30 fps @ 1080p
Min. Beleuchtung: 0,05 Lux @ F1.2 (AGC AN), 0 Lux mit IR eingeschaltet
Elektronische Blende: 1/3 Sek. ~ 1/100000 Sek. (PAL)
1-Kanal BNC HDCVI HD Videoausgang & Videoausgang CVBS Standardauflösung
BLC (Hintergrundlicht-Kontrolle): automatisch
IR-Licht ist nur aktiv bei Videoaufnahmen im Nachtmodus
Lärmminderung 2D/3D
Farbe oder Schwarz/Weiß wählbar
Horizontaler Blickwinkel: 105.5° ~ 32.9°
Brennweite: 2,7 ~ 12,0mm / automatischer Zoom
Feste Blende für die Helligkeit
18
Page 19

Stromversorgung: DC 12V ± 10%
Stromverbrauch: 7,44W max. (Eingang 12V/0.62A) IR 15m max.
Betriebstemperatur: – 30°C ~ 60°C
Installation Innen- und Aussenbereich: Wandmontage
Gewicht / Maße: 550 g / (L) 21,3 × (B) 8,0 x (H) 7,2 cm
Verpackungsinhalt: Bullet Kamera zum Midi Security Kit PRO FullHD 1080P TX-50
& Maxi Security Kit PRO FullHD 1080P TX-51, 1x BNC 18,3m Videokabel, 3x
Schrauben und 3x Dübel, Bedienungsanleitung
Besondere Merkmale & Technische Details DOME KAMERA
Videoauflösung: 1980 × 1225 @ 30 fps (PAL)
Hochleistungs-CMOS-Bildsensor mit 2,4 Megapixel
Unterstützt HDCVI HD Videoausgang
Übertragungsreichweite bis zu 300m über 75-3 Koaxialkabel ohne Datenverlust
Echtzeitübertragung mit hoher Geschwindigkeit und großer Entfernung
Automatischer ICR-Schalter für Überwachung bei Tag und auch bei Nacht
Automatisch: Belichtung, Weißabgleich, elektronische Blende, Verstärkerfunktion
Klares und anschauliches Video wiederherstellen
Unterstützt IR-Funktion mit IR LED Reichweite max. 15m
Schutzklasse IP66 (staub- & wassergeschützt) & IK10 (stoßfest)
Videobildrate: 25/30/50/60 fps @ 720P & 25/30 fps @ 1080p
Min. Beleuchtung: 0,05 Lux @ F1.2 (AGC AN), 0 Lux mit IR eingeschaltet
Elektronische Blende: 1/3 Sek. ~ 1/100000 Sek. (PAL)
1-Kanal BNC HDCVI HD Videoausgang & Videoausgang CVBS Standardauflösung
BLC (Hintergrundlicht-Kontrolle): automatisch
IR-Licht ist nur aktiv bei Videoaufnahmen im Nachtmodus
Lärmminderung 2D/3D
Farbe oder Schwarz/Weiß wählbar
Horizontaler Blickwinkel: 105.5° ~ 32.9°
Brennweite: 2,7 ~ 12,0mm / automatischer Zoom
Feste Blende für die Helligkeit
Stromversorgung: DC 12V ± 10%
Stromverbrauch: 8,6W max. (Eingang 12V/0.72A) IR 15m max.
Betriebstemperatur: – 30°C ~ 60°C
Installation Innen- und Aussenbereich: Wandmontage / Deckenmontage
Gewicht / Maße: 450 g / Φ 12,2 × (H) 8,9 cm
19
Page 20

Verpackungsinhalt: Dome Kamera für Midi Security Kit PRO FullHD 1080P TX-50
& Maxi Security Kit PRO FullHD 1080P TX-51, 1x BNC 18,3m Videokabel, 3x
Schrauben und 3x Dübel, Bedienungsanleitung
Dieses Gerät ist konform mit den Anforderungen der Normen gemäß Richtlinie
R&TTE 1999/5/EG. Hier finden Sie die Konformitätserklärung: www.technaxx.de/
(in der unteren Leiste unter “Konformitätserklärung”). Vor dem ersten Gebrauch
lesen Sie die Bedienungsanleitung sorgfältig durch.
Telefonnummer für den technischen Service: 01805 012643 (14 Cent/Minute aus
dem deutschen Festnetz und 42 Cent/Minute Mobilfunknetz). Kostenfreie E-Mail:
support@technaxx.de
Hinweise zum Umweltschutz: Verpackungen sind recycelbares
Rohmaterial. Alte Geräte nicht im Hausmüll entsorgen. Reinigung:
Gerät vor Verschmutzung schützen. Keine rauen, groben Materialien
oder Lösungsmittel oder andere aggressive Reinigungsmittel
verwenden. Gereinigtes Gerät gründlich abwischen.
Inverkehrbringer: Technaxx Deutschland GmbH & Co.KG, Kruppstr.
105, 60388 Frankfurt a.M., Deutschland, Kruppstr. 105, 60388
Frankfurt a.M., Germany
20
Page 21

2 Maße (Einheit ist mm) & Struktur
Bullet Kamera für Kit TX-50 & TX-51
Wenn das Standardauflösungs-/Hochauflösungsschalter-Steuerkabel kurzgeschlossen
ist, gibt das System ein Standardauflösungsvideo aus. Ansonsten, wenn der Stromkreis
geöffnet ist, gibt das System das Hochauflösungsvideo aus.
Power Port = Stromanschluss
HD/SD Switch Cable = HD/SD Schalterkabel
Video Port = Videoanschluss
21
Page 22
3 Installation Bullet Kamera für TX-50 & TX-51
Wichtig: Stellen Sie sicher, dass die Installationsoberfläche min. das 3-fache des
Gewichts der Kamera und der Befestigung stützen kann.
Wenn Sie ein Loch in die Wand bohren, stellen Sie sicher, dass Stromkabel, elektrische
Stecker und/oder Rohrleitungen nicht beschädigt sind. Bei Verwendung des
bereitgestellten Montagematerials übernehmen wir nicht die Haftung für eine
professionelle Installation. Sie sind komplett verantwortlich, um sicher zu stellen, dass
das Montagematerial für das spezielle Mauerwerk geeignet ist und dass die Installation
richtig durchgeführt wird. Beim Arbeiten auf größeren Höhen, gibt es eine Absturzgefahr.
Verwenden Sie daher geeignete Sicherheitshinweise.
Schritt 1: Bevor Sie die Befestigung installieren, ziehen Sie das Kabel durch den
Kabelausgang des Befestigungsgehäuses. Installieren Sie den Spreizbolzen, wenn
Sie in der Betonmauer einbauen möchten (stellen Sie sicher, dass die
Installationslöcher der Spreizbolzen die gleichen sind wie die der Befestigung). Dann
können Sie die Befestigung installieren. Wenn Sie die Kamera in einer Holzoberfläche
einbauen möchten, überspringen Sie den ersten Schritt und verwenden Sie dann die
Schneidschrauben, um die Befestigung direkt einzubauen.
Camera Kamera Expansion Bolt Dübel
Screw Schraube Wall or Ceiling Montagefläche
22
Page 23

Schritt 2: Lösen Sie die M3 x 20 Schrauben (= Bolt) und M3 x 5 Schrauben (= Bolt) auf
der Befestigung in der angezeigten Richtung, richten Sie die Kamera an einen genauen
Standort aus, der durch die Drehung der Befestigung und des Kameragehäuses
überwacht werden muss, sichern Sie dann die Schrauben.
Schritt 3: Verbinden Sie den Videoausgangsanschluss des Gerätekabels mit dem
HDCVI DVR und verbinden Sie den Stromanschluss des Gerätekabels mit Strom.
Schritt 4: Nachdem das Bild auf dem HDCVI DVR angezeigt wird, steuern Sie die
Schnittstelle durch HDCVI Serie DVR PTZ, richten Sie den Linsenzoom aus durch
Verwendung der Koaxialsteuerung und die Kamera wird zur besten Position selbstfokussieren, die das Bild klar macht. So weit ist die Kamerainstallation abgeschlossen.
23
Page 24

4. Menu 4.1 Einstellungen
HINWEIS: Die folgenden Vorgänge und Schnittstellen sind nur zur Referenz.
Siehe HDCVI Serie DVR Benutzerhandbuch für detaillierte Information.
Nach Verbindung der Kamera mit der HDCVI Serie DVR, vom Hauptmenu -> Setting ->
System -> PTZ, müssen Sie den Kontrollmodus als HDCVI einstellen und das Protokoll
als DH-SD1. Klicken Sie die Taste Save, um das aktuelle Setup zu speichern.
Auf der Vorschau-Schnittstelle, machen Sie einen Rechtsklick auf die Maus und wählen
Sie dann PTZ; Sie können eine Schnittstelle wie nachstehend angezeigt sehen.
Speed = Geschwindigkeit
Iris = Blende
Klicken Sie auf Blende “+”, um das Menü zu öffnen oder den aktuellen Vorgang zu
bestätigen. Klicken Sie auf Blende “-”, um den Autofokus durchzuführen. Klicken Sie
die Taste oben/unten, um alle Elemente auf der linken Seite der folgenden Liste zu
sehen. Klicken Sie die Taste rechts/links, um die entsprechenden Wert auf der
rechten Seite der folgenden Liste zu einzustellen.
Wenn es “
Wiederholen Sie die vorherigen Schritte, um den detaillierten Wert einzustellen. Klicken
Sie die Taste Zurück, um zurück zur vorherigen Menüschnittstelle zu gehen. Klicken
Sie auf Zoom “+”, heranzuzoomen und klicken Sie auf Zoom “-”, um
herauszuzoomen.
” gibt, klicken Sie die Taste bestätigen, um zum 2. Menü zu gehen.
24
Page 25

4.2 Hinweis
Helligkeit Es dient zur Anpassung der Monitorfenster-Helligkeit. Der Wert reicht von
0 bis 100. Der Standardwert ist 50. Je größer die Zahl ist, desto heller ist
das Video. Wenn Sie den Wert hier einsetzen, wird der helle Abschnitt
und der dunkle Abschnitt des Videos dementsprechend angepasst. Sie
können diese Funktion verwenden, wenn das ganze Video zu dunkel oder
zu hell ist. Beachten Sie, dass das Video verschwommen werden kann,
wenn der Wert zu hoch ist. Der empfohlene Wert reicht von 40 bis 60.
Kontrast Es dient zur Anpassung der Monitorfenster-Kontrast. Der Wert reicht von
0 bis 100. Der Standardwert ist 50. Je größer die Zahl ist, desto höher ist
der Kontrast. Sie können diese Funktion verwenden, wenn die gesamte
Videohelligkeit OK ist, aber der Kontrast nicht richtig ist. Beachten Sie,
dass das Video verschwommen werden kann, wenn der Wert zu niedrig
ist. Wenn dieser Wert zu hoch ist, kann es im dunklen Abschnitt an
Helligkeit mangeln, während der helle Abschnitt überbelichtet werden
kann. Der empfohlene Wert reicht von 40 bis 60.
Sättigung Es dient zur Anpassung der Monitorfenster-Sättigung. Der Wert reicht von
0 bis 100. Der Standardwert ist 50. Je größer die Zahl, desto stärker die
Farbe. Dieser Wert hat keine Auswirkung auf die allgemeine Helligkeit des
gesamten Videos. Die Videofarbe könnte zu stark werden, wenn der Wert
zu hoch ist. Für den grauen Teil des Videos, könnte die Verzerrung
auftreten, wenn der Weißabgleich nicht genau ist. Beachten Sie, dass
das Video nicht ansprechend werden kann, wenn der Wert zu niedrig ist.
Der empfohlene Wert reicht von 40 bis 60.
Schärfe Der Wert hier, dient zur Anpassung des Randes des Videos. Der Wert
reicht von 0 bis 100. Je größer der Wert ist, desto klarer ist der Rand und
umgekehrt. Beachten Sie, dass es ein Geräusch gibt, wenn der Wert zu
hoch ist. Der Standardwert ist 50 und der empfohlene Wert reicht von 40
bis 60.
3DNR Es dient zur Reduzierung des Videogeräusches. Je größer die Zahl ist,
desto geringer ist das Geräusch. Die Details des Videos können
verschwinden, wenn der Wert hier zu groß ist.
AntiFlicker
Außenbereich: In diesem Modus können Sie den Belichtungsmodus
schalten, um den Effekt unter dem entsprechenden
Belichtungsmodus zu bekommen.
50Hz: Wenn der Strom 50Hz ist, kann das System automatisch die
Belichtung gemäß der Umgebungshelligkeit ausrichten, für den Fall,
dass es einen Streifen gibt.
60Hz: Wenn der Strom 60Hz ist, kann das System automatisch die
Belichtung gemäß der Umgebungshelligkeit ausrichten, für den Fall,
dass es einen Streifen gibt.
25
Page 26

5 Maße (Einheit ist mm) & Struktur Dome Kamera
Video Port Videoanschluss Light Blocking Cover Lichtundurchlässige Abdeckung
Power Port Stromanschluss Case Gehäuse
HD/SD
Switch Cable
Wenn das Standardauflösungs-/Hochauflösungsschalter-Steuerkabel kurzgeschlossen
ist, gibt das System ein Standardauflösungsvideo aus. Ansonsten, wenn der Stromkreis
geöffnet ist, gibt das System das Hochauflösungsvideo aus.
Angle Adjustment
Screw
IR Light IR-Licht
HD/SD
Schalterkabel
Winkeleinstellschraube
Pedestal Fuß
Photosensor Lichtsensor
Horizontal Rotatiing
Bracket
Horizontale drehbare Befestigung
26
Page 27

6 Installation Dome Kamera für TX-50 & TX-51
Wichtig: Stellen Sie sicher, dass die Installationsoberfläche min. das 3-fache des
Gewichts der Kamera und der Befestigung stützen kann.
Wenn Sie ein Loch in die Wand bohren, stellen Sie sicher, dass Stromkabel, elektrische
Stecker und/oder Rohrleitungen nicht beschädigt sind. Bei Verwendung des
bereitgestellten Montagematerials übernehmen wir nicht die Haftung für eine
professionelle Installation. Sie sind komplett verantwortlich, um sicher zu stellen, dass
das Montagematerial für das spezielle Mauerwerk geeignet ist und dass die Installation
richtig durchgeführt wird. Beim Arbeiten auf größeren Höhen, gibt es eine Absturzgefahr.
Verwenden Sie daher geeignete Sicherheitshinweise.
Bei der Dome-Kamera wird normalerweise die Deckeninstallation angewandt. Sie kann
an der Decke oder der Wand installiert werden.
Für Seitenausgangs-Kabelinstallation, stellen Sie sicher, dass die Seitenausgangs-
Kabelrichtung die gleiche ist, wie auf der Installationspositionsplan angezeigt.
Bevor Sie die Schrauben auf dem Fuß sichern, stecken Sie das Kabel durch den
Kabelausgang des Fußes.
Bevor Sie die Installation beenden und austesten, entfernen Sie nicht den
elektrostatischen Film. Nachdem Sie den Film entfernt haben, berühren Sie nicht
das Gehäuse, für den Fall, dass es einen Kratzer gibt.
27
Page 28

Schritt 1: Nehmen Sie den Installationspositionsplan aus dem Zubehörbeutel und legen
Sie Ihn dann auf die Oberfläche der Decke oder der Wand gemäß der
Kabelausgangsposition. Machen Sie drei Löcher gemäß des Installationspositionsplan
und nehmen Sie dann drei Spreizdübel aus dem Zubehörbeutel und stecken Sie sie in
die Löcher, die Sie gerade gemacht haben.
Schritt 2: Verwenden Sie den Innensechskantschlüsssel, um die drei
Gehäuseverriegelungsschrauben zu entfernen und dann das Dome-Kameragehäuse zu
entfernen.
Schritt 3: Richten Sie die Fußposition gemäß den Kabelausgangsmodus (Decke/Seite)
an. Ziehen Sie das Kabel durch den Kabelseitenausgang an der Installationsoberfläche
und dem Fuß (überspringen Sie diesen Schritt, wenn Sie den Deckenausgangsmodus
verwenden möchten). Richten Sie die Schraubenlöcher auf der Unterseite des Fußes
auf die Spreizdübel in der Installationsoberfläche aus. Setzen Sie die drei
Schneidschrauben in die Spreizdübel und sichern Sie sie fest. Jetzt ist der Fuß auf der
Installationsoberfläche.
Schritt 4: Verbinden Sie den Videoausgangsanschluss des Gerätekabels mit dem
HDCVI DVR und verbinden Sie den Stromanschluss des Gerätekabels mit Strom.
Nachdem das Bild auf dem HDCVI DVR angezeigt wird, steuern Sie die Schnittstelle
durch HDCVI Serie DVR PTZ, richten Sie den Linsenzoom aus durch Verwendung der
Koaxialsteuerung und die Kamera wird zur besten Position selbst-fokussieren.
Schritt 5: Verwenden Sie drei Gehäuseverriegelungsschrauben, um das DomeKamera-Gehäuse auf dem Fuß zu sichern.
Jetzt haben Sie die Geräteinstallation und Kabelverbindung abgeschlossen. Sie können
die Terminal-Verschlüsselungsgeräte verwenden, um das Überwachungsvideo
anzusehen.
28
Page 29

Ceiling or Wall Decke oder Wand
Installation
Position Map
Bottom Case
Component
Module
Component
Cover
Component
Inner Hex
Wrench
Installationspositionsplan
Untere
Gehäusekomponente
Modulkomponente
Abdeckungskomponente
Innensechskantschlüssel
Ceiling or Wall Decke oder Wand
Module Bracket Modulbefestigung
Horizontal
Rotating
Adjustment Field
Angle
Camera Module Kameramodul
Vertical Rotating
Adjustment Field
Angle
Installation
Screw
Horizontaler drehbarer
Anpassungsfeldwinkel
Vertikaler drehbarer
Anpassungsfeldwinkel
Montageschraube
29
Page 30

7 Menu 7.1 Einstellungen
HINWEIS: Die folgenden Vorgänge und Schnittstellen sind nur zur Referenz.
Siehe HDCVI Serie DVR Benutzerhandbuch für detaillierte Information.
Nach Verbindung der Kamera mit der HDCVI Serie DVR, vom Hauptmenu -> Setting ->
System -> PTZ, müssen Sie den Kontrollmodus als HDCVI einstellen und das Protokoll
als DH-SD1. Klicken Sie die Taste Save, um das aktuelle Setup zu speichern.
Auf der Vorschau-Schnittstelle, machen Sie einen Rechtsklick auf die Maus und wählen
Sie dann PTZ; Sie können eine Schnittstelle wie nachstehend angezeigt sehen.
Speed = Geschwindigkeit
Iris = Blende
Klicken Sie auf Blende “+”, um das Menü zu öffnen oder den aktuellen Vorgang zu
bestätigen. Klicken Sie auf Blende “-”, um den Autofokus durchzuführen. Klicken Sie
die Taste oben/unten, um alle Elemente auf der linken Seite der folgenden Liste zu
sehen. Klicken Sie die Taste rechts/links, um die entsprechenden Wert auf der
rechten Seite der folgenden Liste zu einzustellen.
Wenn es “
Wiederholen Sie die vorherigen Schritte, um den detaillierten Wert einzustellen. Klicken
Sie die Taste Zurück, um zurück zur vorherigen Menüschnittstelle zu gehen. Klicken
Sie auf Zoom “+”, heranzuzoomen und klicken Sie auf Zoom “-”, um
herauszuzoomen.
” gibt, klicken Sie die Taste bestätigen, um zum 2. Menü zu gehen.
30
Page 31

7.2 Hinweis
Helligkeit Es dient zur Anpassung der Monitorfenster-Helligkeit. Der Wert reicht von
0 bis 100. Der Standardwert ist 50. Je größer die Zahl ist, desto heller ist
das Video. Wenn Sie den Wert hier einsetzen, wird der helle Abschnitt
und der dunkle Abschnitt des Videos dementsprechend angepasst. Sie
können diese Funktion verwenden, wenn das ganze Video zu dunkel oder
zu hell ist. Beachten Sie, dass das Video verschwommen werden kann,
wenn der Wert zu hoch ist. Der empfohlene Wert reicht von 40 bis 60.
Kontrast Es dient zur Anpassung der Monitorfenster-Kontrast. Der Wert reicht von
0 bis 100. Der Standardwert ist 50. Je größer die Zahl ist, desto höher ist
der Kontrast. Sie können diese Funktion verwenden, wenn die gesamte
Videohelligkeit OK ist, aber der Kontrast nicht richtig ist. Beachten Sie,
dass das Video verschwommen werden kann, wenn der Wert zu niedrig
ist. Wenn dieser Wert zu hoch ist, kann es im dunklen Abschnitt an
Helligkeit mangeln, während der helle Abschnitt überbelichtet werden
kann. Der empfohlene Wert reicht von 40 bis 60.
Sättigung Es dient zur Anpassung der Monitorfenster-Sättigung. Der Wert reicht von
0 bis 100. Der Standardwert ist 50. Je größer die Zahl, desto stärker die
Farbe. Dieser Wert hat keine Auswirkung auf die allgemeine Helligkeit des
gesamten Videos. Die Videofarbe könnte zu stark werden, wenn der Wert
zu hoch ist. Für den grauen Teil des Videos, könnte die Verzerrung
auftreten, wenn der Weißabgleich nicht genau ist. Beachten Sie, dass
das Video nicht ansprechend werden kann, wenn der Wert zu niedrig ist.
Der empfohlene Wert reicht von 40 bis 60.
Schärfe Der Wert hier, dient zur Anpassung des Randes des Videos. Der Wert
reicht von 0 bis 100. Je größer der Wert ist, desto klarer ist der Rand und
umgekehrt. Beachten Sie, dass es ein Geräusch gibt, wenn der Wert zu
hoch ist. Der Standardwert ist 50 und der empfohlene Wert reicht von 40
bis 60.
3DNR Es dient zur Reduzierung des Videogeräusches. Je größer die Zahl ist,
desto geringer ist das Geräusch. Die Details des Videos können
verschwinden, wenn der Wert hier zu groß ist.
AntiFlicker
Außenbereich: In diesem Modus können Sie den Belichtungsmodus
schalten, um den Effekt unter dem entsprechenden
Belichtungsmodus zu bekommen.
50Hz: Wenn der Strom 50Hz ist, kann das System automatisch die
Belichtung gemäß der Umgebungshelligkeit ausrichten, für den Fall,
dass es einen Streifen gibt.
60Hz: Wenn der Strom 60Hz ist, kann das System automatisch die
Belichtung gemäß der Umgebungshelligkeit ausrichten, für den Fall,
dass es einen Streifen gibt.
31
Page 32

8 Wichtige Sicherheitshinweise & Warnungen
4.1 Elektrische Sicherheit: Alle Installationen/Vorgänge hier sollten Ihren lokalen
elektrischen Sicherheitscodes entsprechen. Der Strom sollte den Anforderungen in der
SELV (Sicherheitsklein-spannung) übereinstimmen und die Stromquelle mit begrenzter
Leistung ist mit 12V DC (24V AC) in der IEC60950-1 eingestuft. Wir übernehmen keine
Haftung oder Verantwortung für alle Brände oder Stromschläge, die durch falsche
Handhabung oder Installation verursacht werden.
4.2 Transportsicherheit: Hohe Belastung, starke Erschütterung oder Wasserspritzer
sind während des Transports, der Lagerung und der Installation nicht erlaubt.
4.3 Installation: Versorgen Sie die Kamera vor dem Abschluss der Installation nicht mit
Strom. Installieren Sie das richtige Stromabschaltgerät, während der
Installationsverbindung. Folgen Sie immer der vom Hersteller empfohlenen
Gebrauchsanweisung.
Wenn dieses Produkt in der Decke installiert ist, stellen Sie sicher, dass die
Installationsposition min. 50N aushalten kann.
4.4 Qualifizierte Techniker nötig: Die gesamte Untersuchungs- und Reparaturarbeit
sollte von den qualifizierten Servicetechnikern durchgeführt werden. Wir haften nicht für
Probleme, die durch unautorisierte Änderungen oder versuchte Reparatur verursacht
wurden.
4.5 Umgebung: Diese Serienkamera sollte an einem kühlen, trockenen Ort weg von
direktem Sonnenlicht oder starkem Licht, entflammbaren, explosiven Substanzen und
etc. installiert werden. Diese Serienkamera sollte bei der spezifizierten
Arbeitstemperatur funktionieren. Halten Sie sie fern von elektromagnetischen
Strahlungsobjekten und -umgebung. Behalten Sie die starke Belüftung. Erlauben Sie
nicht, dass Wasser oder eine andere Flüssigkeit in die Kamera eintritt.
4.6 Zubehör: Seien Sie sicher, dass Sie das gesamte vom Hersteller empfohlene
Zubehör verwenden. Öffnen Sie vor der Installation die Verpackung und überprüfen Sie
alle mitgelieferten Komponenten. Kontaktieren Sie Ihren lokalen Händler SOFORT,
wenn etwas in Ihrer Verpackung kaputt ist.
4.8 Wartung: Schalten Sie das Gerät ab und ziehen dann das Stromkabel. Verwenden
Sie das trockene weiche Tuch, um das Gerät zu reinigen. Wenn es zu viel Staub gibt,
verwenden Sie Wasser, um zuerst das milde Reinigungsmittel zu verdünnen und
verwenden Sie es dann, um das Gerät zu reinigen. Verwenden Sie schließlich das
trockene Tuch, um das Gerät zu reinigen. Setzen Sie die staubfreie Kappe auf, um die
CCD (CMOS)-Komponente zu schützen, wenn Sie die Kamera nicht verwenden.
32
Page 33

Dieses Gerät ist konform mit den Anforderungen der Normen gemäß Richtlinie R&TTE
1999/5/EG. Hier finden Sie die Konformitätserklärung: www.technaxx.de/ (in der
unteren Leiste unter “Konformitätserklärung”). Vor dem ersten Gebrauch lesen Sie die
Bedienungsanleitung sorgfältig durch.
Telefonnummer für den technischen Service: 01805 012643 (14 Cent/Minute aus dem
deutschen Festnetz und 42 Cent/Minute aus Mobilfunknetzen). Kostenfreie E-Mail:
support@technaxx.de
Hinweise zum Umweltschutz: Verpackungen sind recycelbares
Rohmaterial. Alte Geräte nicht im Hausmüll entsorgen. Reinigung:
Gerät vor Verschmutzung schützen (mit sauberem Tuch reinigen).
Keine rauen, groben Materialien oder Lösungsmittel oder andere
aggressive Reinigungsmittel verwenden. Gereinigtes Gerät gründlich
abwischen. Inverkehrbringer: Technaxx Deutschland GmbH & Co.KG,
Kruppstr. 105, 60388 Frankfurt a.M., Deutschland
Now the APPENDIX follows for both cameras with Functions,
Specifications and Hints in the languages French, Italian,
Spanish, Polish, Dutch & Czech.
Nun folgt der ANHANG für beide Kameras mit Funktionen,
Spezifikationen und Hinweisen in den Sprachen Französisch,
Italienisch, Spanisch, Polnisch, Niederländisch &
Tschechisch.
33
Page 34

FRANCĄIS Fonctions
Spécification HDCVI : HDCVI (Interface vidéo composite haute définition) est un câble
coaxial normal de transmission de vidéo HD. La technologie génère deux formats vidéo
HD par un balayage progressif.
ICR : Le retrait de coupe de l'IR sert à filtrer la luminosité de l'IR le jour, et à basculer
automatiquement sur la position générale la nuit. Cette fonction permet à la caméra de
produire une vidéo claire et avec une haute sensibilité.
Technologie Smart IR : Le capteur contrôle l’activation/la désactivation de la
luminosité de l'IR par le fonctionnement conjoint du matériel et du logiciel, qui effectue
la compensation automatique de la luminosité de l'IR selon la luminosité ambiante.
Fonction gain automatique : Pour la sortie du signal standard vidéo dans des
environnements de luminosités différentes, l'amplificateur doit être réglé sur une grande
étendue. Le système peut améliorer la sensibilité de la caméra lors de faible luminosité
et améliorer la sortie du signal vidéo pour obtenir une vidéo en claire et haute définition.
Equilibre automatique des blancs : L'équilibre des blancs concerne la restauration
par la caméra de la couleur d'objets blancs. Il permet à la caméra de régler
automatiquement la température de la couleur dans un environnement intérieur et
extérieur, tout comme nos yeux humains le font.
Exposition automatique : Le système peut automatiquement régler la vitesse de
l'obturateur et la valeur de l'iris selon la condition d'exposition de la prise vidéo.
Obturateur auto électronique : Le système peut automatiquement régler l'obturateur
électronique lors de changements de luminosité ambiante.
ITALIANO Funzioni
Specifiche di HDCVI: HDCVI( nterfaccia ad alta definizione del video composito) è un
cavo HD sopra-coassiale - standard di trasmissione. La tecnologia rende due formati
HD video tramite scanner progressivo.
Tecnologia autofocus: Rilevi la posizione dello schermo principale dalla procedura
autofocus della telecamera e l'auto sistema il focus secondo la situazione corrente della
messa a fuoco, che realizzerebbe il controllo dello zoom l'intero autofocus. L'immagine
rimane chiara durante il processo di zoom.
OSD: Esposizione facile da usare sulla visualizzazione a schermo selezionando le
funzioni differenti.
ICR: La rimozione IR filtra la luce IR del giorno e l'auto cambio genera il filtro per la
notte. Questa funzione permette alla telecamera di creare video chiari e di alta
sensibilità.
Tecnologia IR intelligente: Il sensore controlla la luce accesa/spenta IR tramite il
lavoro di hadrware e software che realizza la compensazione di luce IR
automaticamente secondo l'illuminazione dell'ambiente.
3D NR: Paragonando alla funzione generale 2D del denoise, il denoise 3D non solo
segnala la luminosità del segnale del video e la saturazione del segnale, ma può
eliminare i rumori dei dati originali dal CCD. Aumenta notevolmente le prestazioni di
riduzione di rumore e garantisce un video luminoso e chiaro.
34
Page 35

ESPAÑOL Funciones
Especificaciones HDCVI: HDCVI (High Definition Composite Video Interface, Interfaz
de vídeo compuesto en alta definición) es un estándar de transmisión de vídeo HD a
través de cable coaxial. La tecnología produce dos formatos de vídeo HD por
exploración progresiva.
ICR: El filtro de eliminación de IR es para filtrar la luz de IR durante el día y para
cambiar automáticamente al filtro general por la noche. Esta función permite que la
cámara tenga una alta sensibilidad y claridad de vídeo.
Tecnología inteligente de IR: El sensor activa y desactiva la luz de IR mediante el
trabajo combinado de hardware y software, que realiza una compensación automática
de luz por IR según la iluminación ambiental.
Función de autoganancia: Para producir una señal de vídeo estándar en diferentes
ambientes de iluminación, en necesario que el amplificador se ajuste en un alcance
ancho. El sistema puede aumentar la sensibilidad de la cámara con poca iluminación y
aumentar la salida de señal de vídeo para obtener un vídeo nítido de alta definición.
Balance automático de blancos: El balance de blancos se refiere a cómo restituye la
cámara el color de un objeto blanco. Permite a la cámara ajustar automáticamente la
temperatura del color en interiores y exteriores, como lo hace el ojo humano.
Autoexposición: El sistema puede establecer automáticamente la velocidad del
obturador y el valor de iris según las condiciones de exposición de captura de vídeo.
Obturador electrónico automático: El sistema puede ajustar automáticamente el
obturador electrónico cuando se producen cambios en la luz ambiental.
POLSKIE Funkcje
Specyfikacje HDCVI: HDCVI ( Interfejs kompozytowy wideo wysokiej jakości ) to
kabel współosiowy, standardowy dla transmisji HD wideo. Technologia obsługuje dwa
formaty wideo HD poprzez progresywne skanowanie.
ICR: Usuwanie wycinka IR ma na celu filtrowanie oświetlenia IR podczas dnia i
automatyczne przełączanie na ogólny filtr nocą.. Ta funkcja umożliwia kamerze na
wyjście dla wysokiej czułości i wyczyszczenie wideo.
Inteligentna technologia IR: Czujnik steruje wł/wył oświetlenia IR poprzez łączoną
pracę sprzętu i oprogramowania, co wykonuje automatyczną kompensację oświetlenia
IR na podstawie światła w otoczeniu.
Funkcja automatycznego przyrostu: Aby pojawił się standardowy sygnał wideo w
różnych środowiskach, wzmacniacz musi dokonać regulacji w szerokim zakresie
System może wzmocnić czułość kamery w niskim podświetleniu i wzmocnić sygnał
wideo, aby pozyskać czysty obraz wideo wysokiej jakości.
Automatyczny balans bieli: Balans bieli to przywracanie białego koloru danego
obiektu. Pozwala kamerze na automatyczną regulację temperatury koloru wewnątrz i
na zewnątrz, tak jak robi to ludzkie oko.
Automatyczne naświetlanie: System może automatycznie wyregulować prędkość
migawki oraz wartość tęczówki wg warunków naświetlania migawki wideo.
Automatyczna migawka elektroniczna: System może automatycznie wyregulować
elektroniczną migawkę podczas zmian oświetlenia w otoczeniu.
35
Page 36

NEDERLANDSE Functies
HDCVI Specificaties: HDCVI(High Definition Composite Video Interface) is een
standaard voor het versturen van HD video via een coax-kabel. Deze technologie geeft
twee HD videoformaten weer via progressieve scanning.
ICR: Het IR-afkapfilter filtert overdag het IR licht uit, en schakelt 's nachts automatisch
over op het algemene filter. Door deze functie kan de camera scherpe beelden leveren
met hoge gevoeligheid.
Slimme IR technologie: De sensor schakelt het IR licht in/uit via een combinatie van
hard- en software, die zorgt voor automatische IR lichtcompensatie volgens de
omgevingsbelichting.
Automatische opwaardeerfunctie: Om het standaard videosignaal in verschillende
belichtingsomstandigheden te kunnen opleveren dient de versterker een groot bereik te
hebben. Het systeem kan de cameragevoeligheid bij slechte lichtomstandigheden
verhogen, en het videosignaal opwaarderen om zo een helder en high definition
videobeeld te verkrijgen.
Automatische witbalans: De witbalans refereert aan de juiste opname van witte
voorwerpen door de camera. Hiermee kan de camera automatisch de juist kleurtemperatuur binnens- en buitenshuis bepalen, net zoals menselijke ogen dit kunnen.
Automatische belichting: Het systeem kan automatisch de sluitersnelheid en
diafragma instellen, afhankelijk van de belichtingsomstandigheden.
Automatische elektronische sluiter: Het systeem kan automatisch de elektronische
sluiter regelen, als de omgevingsbelichting verandert.
ČEŠTINA Funkce
Specifikace HDCVI: HDCVI(High Definition Composite Video Interface) je norma
pro přenos HD videa po koaxiálním kabelu. Tato technologie renderuje dva formáty HD
videa pomocí postupného řádkování.
ICR: UV filtr pro filtrování infračerveného světla za denního světla a pak automatické
přepnutí na hlavní filtr v noci. Tato funkce umožňuje vysokou citlivost a čistý obraz
výstupu z kamery.
Chytrá IR technologie: tento snímač ovládá propustnost infračerveného světla pomocí
kombinace hardwaru a softwaru, který provádí automatickou kompenzaci
infračerveného světla podle osvětlení prostředí.
Funkce automatického zesílení: Zesilovač potřebuje nastavení v širokém rozsahu
kvůli výstupu standardního video signálu za různých světelných podmínek prostředí.
Tento systém umí zvýšit citlivost kamery za nízkého osvětlení a zdokonalit výstup video
signálu pro získání čistého obrazu s vysokým rozlišením.
Automatické vyvážení bílé: Vyvážení bílé se týká kamery a zobrazení předmětu bílé
barvy. Umožnuje kameře automaticky upravovat teplotu barev ve vnitřním a vnějším
prostředí, stejně jako to dělají lidské oči.
Automatická expozice: Systém umí nastavit rychlost uzávěrky a hodnotu clony
automaticky podle stavu expozice při snímání.
Automatická elektronická uzávěrka: Systém umí automaticky upravovat
elektronickou uzávěrku při změně světla prostředí.
36
Page 37

FRANCĄIS
Particularités & Caractéristiques techniques BULLET CAMÉRA
Résolution vidéo: 1980 × 1225 @ 30 fps (PAL)
Capteur d'image CMOS de haute performance avec 2,4 méga pixels
Prise en charge de la sortie vidéo HDCVI HD
Distance de transmission ~ 300m par câble coaxial 75-3 sans perte de données
Haute vitesse, transmission longue distance en temps réel
Interrupteur ICR automatique pour effectuer la surveillance à la fois le jour /la nuit
Automatiquement: exposition, équilibre des blancs, obturateur électronique,
fonction de gain
Restaure des vidéos claires et nettes
Prise en charge de la fonction IR avec IR LED distance max. 15m
Class de protection IP66 (poussière et l'eau protégée)
Taux de trame vidéo: 25/30/50/60 fps @ 720P & 25/30 fps @ 1080p
Min. luminosité: 0.05 Lux @ F1.2 (AGC ON), 0 Lux avec IR allumé
Obturateur électronique: 1/3 sec. ~ 1/100000 sec. (PAL)
Sortie vidéo HD 1-canal BNC HDCVI & sortie vidéo CVBS standard définition
BLC (contrôle rétroéclairage): automatiquement
Lumière IR uniquement est actif pour les enregistrements vidéo en mode de nuit
Réduction du bruit 2D/3D
Couleur ou Noir/Blanc: sélectionnable
Angle de vue horizontal: 105.5° ~ 32.9°
Distance focale: 2.7 ~ 12.0mm / zoom automatique
Ouverture fixe pour la luminosité
Alimentation: CC 12V ± 10%
Consommation d'alimentation: 7,44W max. (Entrée 12V/0.62A) IR 15m max.
Température opérationnelle: – 30°C ~ 60°C
Installation intérieure et extérieure: montage mural
Poids / Dimensions: 550 g / (Lo) 21,3 x (La) 8,0 × (H) 7,2 cm
Contenu de la livraison: Bullet caméra pour Midi Security Kit PRO FullHD
1080P TX-50 & Maxi Security Kit PRO FullHD 1080P TX-51, 1x BNC 18,3m
câble vidéo, 3x vis et 3x chevilles, Manuel d’utilisation
Particularités & Caractéristiques techniques DOME CAMÉRA
Résolution vidéo: 1980 × 1225 @ 30 fps (PAL)
Capteur d'image CMOS de haute performance avec 2,4 méga pixels
Prise en charge de la sortie vidéo HDCVI HD
37
Page 38

Distance de transmission ~ 300m par câble coaxial 75-3 sans perte de données
Haute vitesse, transmission longue distance en temps réel
Interrupteur ICR automatique pour effectuer la surveillance à la fois le jour/la nuit
Automatiquement: exposition, équilibre des blancs, obturateur électronique,
fonction de gain
Restaure des vidéos claires et nettes
Prise en charge de la fonction IR avec IR LED distance max. 15m
Classe de protection IP66 (poussière et l'eau protégée) & IK10 (antichoc)
Taux de trame vidéo: 25/30/50/60 fps @ 720P & 25/30 fps @ 1080p
Min. luminosité: 0.05 Lux @ F1.2 (AGC ON), 0 Lux avec IR allumé
Obturateur électronique: 1/3 sec. ~ 1/100000 sec. (PAL)
Sortie vidéo HD 1-canal BNC HDCVI & sortie vidéo CVBS standard définition
BLC (contrôle rétroéclairage): automatiquement
Lumière IR uniquement est actif pour les enregistrements vidéo en mode de nuit
Réduction du bruit 2D/3D
Couleur ou Noir/Blanc: sélectionnable
Angle de vue horizontal: 105.5° ~ 32.9°
Distance focale: 2.7 ~ 12.0mm / zoom automatique
Ouverture fixe pour la luminosité
Alimentation: CC 12V ± 10%
Consommation d'alimentation: 8,6W max. (Entrée 12V/0.72A) IR 15m max.
Température opérationnelle: – 30°C ~ 60°C
Installation intérieure et extérieure: montage mural / montage ou plafond
Poids / Dimensions: 450 g / Φ 12,2 × (H) 8,9 cm
Contenu de la livraison: Dôme Caméra pour Midi Security Kit PRO FullHD
1080P TX-50 & Maxi Security Kit PRO FullHD 1080P TX-51, 1x BNC 18,3m
câble vidéo, 3x vis et 3x chevilles, Manuel d’utilisation
38
Page 39

Cet appareil est conforme aux conditions des normes référencées de la Directive
R&TTE 1999/5/CE. Veuillez trouver ici la Déclaration de Conformité:
www.technaxx.de/ (sur la barre inférieure “Konformitätserklärung”). Avant la
première utilisation, lisez attentivement le manuel d’utilisation.
No. de téléphone pour le support technique: 01805 012643 (14 centimes/minute
d’une ligne fixe Allemagne et 42 centimes/minute des réseaux mobiles). Email
gratuit: support@technaxx.de
Conseils pour le respect de l'environnement: Matériaux
packages sont des matières premières et peuvent être recyclés.
Ne pas jeter les appareils ou les batteries usagés avec les
déchets domestiques. Nettoyage: Protéger le dispositif de la
saleté et de la pollution (nettoyer avec un chiffon propre). Ne pas
utiliser des matériaux dures, à gros grain/des solvants/des agents
nettoyants agressifs. Essuyer soigneusement le dispositif nettoyé.
Remarque importante: Si vous notez une perte de l'électrolyte
de la batterie, essuyez le boîtier de la batterie avec un chiffon
doux sec. Distributeur: Technaxx Deutschland GmbH & Co.KG,
Kruppstr. 105, 60388 Frankfurt a.M., Allemagne
ITALIANO
Particularità & Specifiche tecniche BULLET CAMERA
Risoluzione video: 1980 × 1225 @ 30 fps (PAL)
Sensore ad alto rendimento di immagine CMOS con 2,4 mega pixel
Uscita video HDCVI HD
Distanza della trasmissione ~ 300m di cavo coassiale 75-3 senza perdite di dati
Alta velocità, trasmissione in tempo reale a lunga distanza
Interruttore automatico ICR per realizzare la sorveglianza sia di giorno/di notte
Automaticamente: esposizione di sostegno, equilibrio bianco, otturatore
elettronico, controllo di guadagno
Ripristina video vivido e chiaro
Funzione IR di supporto con IR LED distanza mas. 10m
Classe di protezione IP66 (polvere e acqua protetta)
Grado video frame: 25/30/50/60 fps @ 720P & 25/30 fps @ 1080p
Min. illuminazione: 0.05 Lux @ F1.2 (AGC ON), 0 Lux con IR acceso
Otturatore elettronico: 1/3 sec. ~ 1/100000 sec. (PAL)
Uscita video HD 1-canale BNC HDCVI & uscita video CVBS standard definizione
BLC (controllo della retroilluminazione): automaticamente
Luce IR è attivo solo per le registrazioni video in modalità notte
Riduzione del rumore 2D/3D
Colore o Noir/Bianco: selezionabile
Angolo orizzontale di vista: 105.5° ~ 32.9°
39
Page 40

A
Distanza focale: 2,7 ~ 12,0mm / zoom automatico
Apertura fissa per la luminosità
Accensione: CC 12V ± 10%
Consumo di energia: 7,44W mas. (Entrata 12V/0.62A) IR mas. 15m
Temperatura di funzionamento: – 30°C ~ 60°C
Installazione interna ed esterno: montaggio a parete
Peso / Dimensioni: 550 g / (Lu) 21,3 x (La) 8,0 x (A) 7,2 cm
Contenuto della confezione: Bullet camera per Midi Security Kit PRO FullHD
1080P TX-50 & Maxi Security Kit PRO FullHD 1080P TX-51, 1x BNC 18,3m cavo
video, 3x viti e 3x tasselli, Manuale dell'utente
Particularità & Specifiche tecniche DOME CAMERA
Risoluzione video: 1980 × 1225 @ 30 fps (PAL)
Sensore ad alto rendimento di immagine CMOS con 2,4 mega pixel
Uscita video HDCVI HD
Distanza della trasmissione ~ 300m di cavo coassiale 75-3 senza perdite di dati
Alta velocità, trasmissione in tempo reale a lunga distanza
Interruttore automatico ICR per realizzare la sorveglianza sia di giorno/di notte
utomaticamente: esposizione di sostegno, equilibrio bianco, otturatore
elettronico, controllo di guadagno
Ripristina video vivido e chiaro
Funzione IR di supporto con IR LED distanza mas. 15m
Grado di protezione IP66 (polvere e acqua protetta) & IK10 (antiurto)
Grado video frame: 25/30/50/60 fps @ 720P & 25/30 fps @ 1080p
Min. illuminazione: 0.05 Lux @ F1.2 (AGC ON), 0 Lux con IR acceso
Otturatore elettronico: 1/3 sec. ~ 1/100000 sec. (PAL)
Uscita video HD 1-canale BNC HDCVI & uscita video CVBS standard definizione
BLC (controllo della retroilluminazione): automaticamente
Luce IR è attivo solo per le registrazioni video in modalità notte
Riduzione del rumore 2D/3D
Colore o Noir/Bianco: selezionabile
Angolo orizzontale di vista: 105.5° ~ 32.9°
Distanza focale: 2,7 ~ 12,0mm / zoom automatico
Apertura fissa per la luminosità
Accensione: CC 12V ± 10%
Consumo di energia: 2,2W max. (Entrata 12V/0,18A) IR max. 10m
Temperatura di funzionamento: – 30°C ~ 60°C
40
Page 41

Installazione interna ed esterno: montaggio a parete / montaggio a soffitto
Peso / Dimensioni: 450 g / Φ 12,2 × (A) 8,9 cm
Contenuto della confezione: Dome camera per Midi Security Kit PRO FullHD
1080P TX-50 & Maxi Security Kit PRO FullHD 1080P TX-51, 1x BNC 18,3m cavo
video, 3x viti e 3x tasselli, Manuale dell'utente
Questo dispositivo aderisce agli standard richiesti ai sensi della Direttiva R&TTE
1999/5/CE. Su questo sito è possibile leggere la Dichiarazione di Conformità:
www.technaxx.de/ (sulla barra inferiore "Konformitätserklärung"). Al primo
utilizzo del dispositivo, leggere attentamente il manuale dell’utente.
Numero di telefono per supporto tecnico: 01805 012643 (14 centesimo/minuto da
linea fissa tedesca e 42 centesimo/minuto da reti mobili). Email:
support@technaxx.de
Istruzioni per la tutela dell'ambiente: Materiali di pacchetti sono
materie prime e riciclabili. Non smaltire dispositivi vecchi o batterie
nei rifiuti domestici. Pulizia: Proteggere il dispositivo da
contaminazione e inquinamento (pulire il dispositivo con un panno
pulito). Non usare di materiali ruvidi, a grana
grossa/solventi/detergenti aggressivi. Asciugare il dispositivo dopo
la pulizia. Avviso importante: In caso di perdita di liquido dalla
batteria, asciugare l'alloggiamento della batteria con un panno
morbido asciutto. Distributore: Technaxx Deutschland GmbH &
Co.KG, Kruppstr. 105, 60388 Frankfurt a.M., Germania
ESPAÑOL
Descripción & Especificaciones técnicas BULLET CÁMARA
Resolución de vídeo: 1980 × 1225 @ 30 fps (PAL)
Sensor de imagen CMOS de altas prestaciones con 2,4 Mega píxeles
Soporta salida de vídeo HDCVI HD
Distancia de transmisión ~ 300m a travès cable coaxial 75-3 sin pérdida de datos
Transmisión en tiempo real a alta velocidad y larga distancia
Interruptor ICR automático para vigilancia durante el día y durante la noche
Automáticamente: exposición, balance de blancos, obturador electrónico, control
de ganancia
Restablece un vídeo nítido y vivo
Soporta función de IR con IR LED distancia max. 15m
Clase de protección IP66 (polvo e agua protegida)
Tarifa de marco vídeo: 25/30/50/60 fps @ 720P & 25/30 fps @ 1080p
Min. iluminación: 0.05 Lux @ F1.2 (AGC ON), 0 Lux con IR encendido
Obturador electrónico: 1/3 seg. ~ 1/100000 seg. (PAL)
Salida vídeo HD BNC HDCVI 1-canal & salida vídeo CVBS definición estándar
BLC (control de luz de fondo): automáticamente
41
Page 42

Luz IR sólamente está activo para las grabaciones de vídeo en modo nocturno
Reducción de ruido 2D/3D
Color o Negro/Blanco: seleccionable
Ángulo de visión horizontal: 105.5° ~ 32.9°
Distancia focal: 2,7 ~ 12,0mm / zoom automático
Apertura fija para el brillo
Alimentación: DC 12V ± 10%
Consumo de potencia: 7,44W max. (Entrada 12V/0.62A) IR max.15m
Temperatura de trabajo: – 30°C ~ 60°C
Instalación en interiores et al aire libre: montaje en pared
Peso / Dimensioni: 550 g / (Lu) 21,3 x (La) 8,0 x (A) 7,2 cm
Contenido del paquete: Bullet cámara para Midi Security Kit PRO FullHD 1080P
TX-50 & Maxi Security Kit PRO FullHD 1080P TX-51, 1x BNC 18,3m cable vídeo,
3x tornillos y 3x clavijas, Manual de usuario
Descripción & Especificaciones técnicas DOME CÁMARA
Resolución de vídeo: 1980 × 1225 @ 30 fps (PAL)
Sensor de imagen CMOS de altas prestaciones con 2,4 Mega píxeles
Soporta salida de vídeo HD HDCVI
Distancia de transmisión ~ 300m a travès cable coaxial 75-3 sin pérdida de datos
Transmisión en tiempo real a alta velocidad y larga distancia
Interruptor ICR automático para vigilancia durante el día y durante la noche
Automáticamente: exposición, balance de blancos, obturador electrónico, control
de ganancia
Restablece un vídeo nítido y vivo
Soporta función de IR con IR LED distancia max. 15m
Clase de protección IP66 (polvo e agua protegida) & IK10 (a prueba de golpes)
Tarifa de marco vídeo: 25/30/50/60 fps @ 720P & 25/30 fps @ 1080p
Min. iluminación: 0.05 Lux @ F1.2 (AGC ON), 0 Lux con IR encendido
Obturador electrónico: 1/3 seg. ~ 1/100000 seg. (PAL)
Salida vídeo HD BNC HDCVI 1-canal & salida vídeo CVBS definición estándar
BLC (control de luz de fondo): automáticamente
Luz IR sólamente está activo para las grabaciones de vídeo en modo nocturno
Reducción de ruido 2D/3D
Color o Negro/Blanco: seleccionable
Ángulo de visión horizontal: 105.5° ~ 32.9°
Distancia focal: 2,7 ~ 12,0mm / zoom automático
42
Page 43
Apertura fija para el brillo
Alimentación: DC 12V ± 10%
Consumo de potencia: 2,2W máx. (Entrada 12V/0,18A) IR máx. 10m
Temperatura de trabajo: – 30°C ~ 60°C
Instalación en interiores et al aire libre: montaje en pared / montaje en techo
Peso / Dimensiones: 450 g / Φ 12,2 × (Al) 8,9 cm
Contenido del paquete: Dome cámara para Midi Security Kit PRO FullHD
1080P TX-50 & Maxi Security Kit PRO FullHD 1080P TX-51, 1x BNC 18,3m
cable vídeo, 3x tornillos y 3x clavijas, Manual de usuario
Este dispositivo cumple con los requisitos de las normativas a las que hace
referencia la Directiva R&TTE 1999/5/CE. Aquí encontrará la Declaración de
Conformidad: www.technaxx.de/ (en la barra inferior “Konformitätserklärung”).
Antes de utilizar el dispositivo por primera vez, lea este manual de usuario.
Número de teléfono de ayuda técnica: 01805 012643 (14 céntimos/minuto desde
líneas fijas en Alemania y 42 céntimos/minuto desde redes móviles). Email
gratuito: support@technaxx.de
Consejos para la protección del medio ambiente: No elimine
los dispositivos antiguos junto con los residuos domésticos.
Limpieza: Proteja el dispositivo contra la contaminación y la
polución. Limpie el dispositivo solo con un paño suave o similar,
evitando utilizar materiales rugosos o de grano grueso. NO utilice
disolventes ni otros productos de limpieza agresivos. Pase un
paño por el dispositivo después de limpiarlo. Distribuidor:
Technaxx Deutschland GmbH & Co.KG, Kruppstr. 105, 60388
Frankfurt a.M., Alemania
POLSKIE
Cechy & Specyfikacje techniczne BULLET KAMERA
Rozdzielczość wideo: 1980 × 1225 @ 30 fps (PAL)
Wysokiej jakości czujnik obrazu CMOS 2,4 Mega pixels
Obsługuje wyjście wideo HDCVI HD
Zasięg transmisji do 300m przez kabla współosiowego 75-3 bez utraty danych
Transmisja o wys. prędkości, duże odległości w czasie rzeczywistym
Automatycznie przełącznik ICR celu monitorowania podczas dnia jak i w nocy
Automatycznie: naświetlanie, balans bieli, migawkę elektroniczną, kontrola
przyrostu
Przywraca czysty i jasny obraz wideo
Obsługuje funkcję IR z IR LED odległość maks. 15m
Klasa ochrony IP66 (kurz i wodę chronione)
Wideo klatek: 25/30/50/60 fps @ 720P & 25/30 fps @ 1080p
Min. podświetlenie: 0.05 Lux @ F1.2 (AGC ON), 0 Lux włączonym IR
43
Page 44

A
Migawka elektroniczna: 1/3 Sek. ~ 1/100000 Sek. (PAL)
1-kanałowe wyjście wideo BNC HDCVI wysokiej jakości & wyjście wideo CVBS
standardowa rozdzielczość
BLC (kontrola podświetlinea): automatycznie
IR światła jest aktywna tylko do nagrán wideo w trybie nocnym
Redukcja szumów 2D/3D
Kolor lub Czarny/Biały: do wyboru
Kąt widzenia w poziomie: 105.5° ~ 32.9°
Dystans ogniskowy: 2,7 ~ 12,0mm / automatyczny zoom
Stała jasności przysłony
Zasilanie: DC 12V ± 10%
Pobór mocy: 7,44W maks. (Wejście 12V/0.62A) IR maks. 15m
Temperatura robocza: – 30°C ~ 60°C
Instalacja wewnątrz i na zewnątrz: montaż ścienny
Waga / Wymiary: 550 g / (D) 21,3 x (S) 8,0 × (W) 7,2 cm
Zawartość pakietu: Bullet kamera do Midi Security Kit PRO FullHD 1080P TX50 & Maxi Security Kit PRO FullHD 1080P TX-51, 1x BNC 18,3m kabel wideo, 3x
śruby i 3x kołki, Instrukcja obsługi
Cechy & Specyfikacje techniczne DOME KAMERA
Rozdzielczość wideo: 1980 × 1225 @ 30 fps (PAL)
Wysokiej jakości czujnik obrazu CMOS 2,4 Mega pixels
Obsługuje wyjście wideo HDCVI HD
Zasięg transmisji do 300m przez kabla współosiowego 75-3 bez utraty danych
Transmisja o wys. prędkości, duże odległości w czasie rzeczywistym
Automatycznie przełącznik ICR celu monitorowania podczas dnia jak i w nocy
utomatycznie: naświetlanie, balans bieli, migawkę elektroniczną, kontrola
przyrostu
Przywraca czysty i jasny obraz wideo
Obsługuje funkcję IR z IR LED odległość maks. 15m
Klasa ochrony IP66 (kurz i wodę chronione) & IK10 (odporność na uderzenia)
Wideo klatek: 25/30/50/60 fps @ 720P & 25/30 fps @ 1080p
Min. podświetlenie: 0.05 Lux @ F1.2 (AGC ON), 0 Lux włączonym IR
Migawka elektroniczna: 1/3 Sek. ~ 1/100000 Sek. (PAL)
1-kanałowe wyjście wideo BNC HDCVI wysokiej jakości & wyjście wideo CVBS
standardowa rozdzielczość
BLC (kontrola podświetlinea): automatycznie
IR światła jest aktywna tylko do nagrán wideo w trybie nocnym
44
Page 45

Redukcja szumów 2D/3D
Kolor lub Czarny/Biały: do wyboru
Kąt widzenia w poziomie: 105.5° ~ 32.9°
Dystans ogniskowy: 2,7 ~ 12,0mm / automatyczny zoom
Stała jasności przysłony
Zasilanie: DC 12V ± 10%
Pobór mocy: 8,6W maks. (Wejście 12V/0.72A) IR maks. 15m
Temperatura robocza: – 30°C ~ 60°C
Instalacja wewnątrz i na zewnątrz: montaż ścienny / montaż sufitowy
Waga / Wymiary: 450 g / Φ 12,2 × (W) 8,9 cm
Zawartość pakietu: Dome kamera dła Midi Security Kit PRO FullHD 1080P TX-
50 & Maxi Security Kit PRO FullHD 1080P TX-51, 1x BNC 18,3m kabel wideo, 3x
śruby i 3x kołki, Instrukcja obsługi
Jeśli urządzenie jest zgodny z wymaganiami norm określonych dyrektywą Rady
R&TTE 1999/5/WE. Deklarację zgodności odnajdziesz na stronie:
www.technaxx.de/ (w pasku na dole "Konformitätserklärung"). Przed pierwszym
użyciem urządzenia należy dokładnie przeczytać instrukcję obsługi.
Numer telefonu do wsparcia technicznego: 01805 012643 (14 centów/minuta
z niemieckiego telefonu stacjonarnego i 42 centów/minuta z sieci komórkowych).
Email: support@technaxx.de
Wskazówki dotyczące ochrony środowiska: Materiały
opakowania utworzono z surowców wtórnych imożna poddać je
recyklingowi. Nie usuwać starych urządzeń ani baterii z
odpadami gospodarstwa domowego. Czyszczenie: Chronić
urządzenie przed skażeniem i zanieczyszczeniami. Czyścić
urządzenie wyłącznie miękką szmatką lub ścierką, nie używać
materiałów szorstkich ani ścierających. NIE używać
rozpuszczalników ani żrących środków czyszczących. Dokładnie
wytrzeć urządzenie po czyszczeniu. Dystrybutor: Technaxx
Deutschland GmbH & Co.KG, Kruppstr. 105, 60388 Frankfurt
a.M., Niemcy
NEDERLANDSE
Bijzonderheden & Technische specificaties BULLET CAMERA
Videoresolutie: 1980 × 1225 @ 30 fps (PAL)
High-performance CMOS beeldsensor met 2,4 Megapixels
Ondersteuning HDCVI HD video-uitgang
Transmissie-afstand tot 300m via 75-3 coax-kabel zonder gegevensverlies
Real-time verzending op hoge snelheid en grote afstand
Automatische ICR-schakelaar voor surveillance bij zowel daglicht als 's nachts
Automatisch: belichting, witbalans, elektronische sluiter, opwaardeerfunctie
45
Page 46

Herstel heldere en contrastrijke video
Ondersteunt IR functie met IR-LED-bereik max. 15m
Beschermingklasse IP66 (stof- en spatwaterdicht)
Video framerate: 25/30/50/60 fps @ 720P & 25/30 fps @ 1080p
Min Lichtsterkte: 0,05 Lux @ F1.2 (AGC AAN), 0 Lux met IR ingeschakeld
Elektronische sluiter: 1/3 Sek. ~ 1/100000 Sek. (PAL)
1-kanaal BNC HDCVI HD video-uitgang & video-uitgang CVBS standaardresolut.
BLC (terug lichtcontrole): automatisch
IR-Licht alleen is actief voor video-opnamen in de nachtmodus
Ruizonderdrukking 2D/3D
Kleur o Zwart/Wit: selecteerbaar
Horizontal beeldhoek: 105.5° ~ 32.9°
Brandpuntsafstand: 2,7 ~ 12,0mm / automatische zoom
Vast diafragma voor helderheid
Voeding: DC 12V ± 10%
Stroomverbruik: 7,44W max. (Ingang 12V/0.62A) IR max. 15m
Gebruikstemperatuur: – 30°C ~ 60°C
Installatie binnen en buiten: muurmontage
Gewicht / Afmetingen: 550 g / (L) 21,3 x (B) 8,0 x (H) 7,2 cm
Inhoud verpakking: Bullet camera voor Midi Security Kit PRO FullHD 1080P TX50 & Maxi Security Kit PRO FullHD 1080P TX-51, 1x BNC 18,3m videokabel, 3x
schroeven en 3x pluggen, Gebruikersaanwijzing
Bijzonderheden & Technische specificaties DOME CAMERA
Videoresolutie: 1980 × 1225 @ 30 fps (PAL)
High-performance CMOS beeldsensor met 2,4 Megapixels
Ondersteuning HDCVI HD video-uitgang
Transmissie-afstand tot 300m via 75-3 coax-kabel zonder gegevensverlies
Real-time verzending op hoge snelheid en grote afstand
Automatische ICR-schakelaar voor surveillance bij zowel daglicht als 's nachts
Automatisch: belichting, witbalans, elektronische sluiter, opwaardeerfunctie
Herstel heldere en contrastrijke video
Ondersteunt IR functie met IR-LED-bereik max. 15m
Beschermingsklasse IP66 (stof- en spatwaterdicht) & IK10 (schokbestendig)
Video framerate: 25/30/50/60 fps @ 720P & 25/30 fps @ 1080
Min Lichtsterkte: 0,05 Lux @ F1.2 (AGC AAN), 0 Lux met IR ingeschakeld
Elektronische sluiter: 1/3 Sek. ~ 1/100000 Sek. (PAL)
46
Page 47

1-kanaal BNC HDCVI HD video-uitgang & video-uitgang CVBS standaardresolut.
BLC (terug lichtcontrole): automatisch
IR-Licht alleen is actief voor video-opnamen in de nachtmodus
Ruizonderdrukking 2D/3D
Kleur o Zwart/Wit: selecteerbaar
Horizontal beeldhoek: 105.5° ~ 32.9°
Brandpuntsafstand: 2,7 ~ 12,0mm / automatische zoom
Vast diafragma voor helderheid
Voeding: DC 12V ± 10%
Stroomverbruik: 8,6W max. (Ingang 12V/0.72A) IR max. 15m
Gebruikstemperatuur: – 30°C ~ 60°C
Installatie binnen en buiten: muurmontage / plafondmontage
Gewicht / Afmetingen: 450 g / Φ 12,2 × (H) 8,9 cm
Inhoud verpakking: Dome camera voor Midi Security Kit PRO FullHD 1080P
TX-50 & Maxi Security Kit PRO FullHD 1080P TX-51, 1x BNC 18,3m videokabel,
3x schroeven en 3x pluggen, Gebruikersaanwijzing
Dit product is in overeenstemming met de voorschriften die zijn vermeld in
Richtlijn R&TTE 1999/5/EC. De Conformiteitsverklaring is te raadplegen op:
www.technaxx.de/ (in de onderste balk “Konformitätserklärung”). Voordat u het
apparaat de eerste keer, lees aandachtig de gebruiksaanwijzing.
Telefoonnummer voor technische ondersteuning: 01805 012643 (14 cent/minuut
vanaf een Duitse vaste lijn en 42 cent/minuut vanaf mobiele netwerken). Gratis Email: support@technaxx.de
Aanwijzingen voor milieubescherming: Verpakkingsmaterialen
zijn grondstoffen en kunnen opnieuw worden gebruikt. Voer oude
apparatuur niet af met het huishoudelijk afval. Reiniging:
Bescherm het toestel tegen verontreiniging. Reinig het toestel
uitsluitend met een zachte doek. Vermijd het gebruik van ruwe of
schurende materialen. Gebruik GEEN oplosmiddelen of andere
agressieve schoonmaakmiddelen. Veeg het toestel na het
reinigen zorgvuldig af. Distributeur: Technaxx Deutschland
GmbH & Co.KG, Kruppstr. 105, 60388 Frankfurt a.M., Duitsland
ČEŠTINA
Vlastnosti & Technické údaje BULLET CAMERA
Rozlišení videa: 1980 × 1225 @ 30 fps (PAL)
Velmi výkonný obrazový snímač CMOS s 2,4 Megapixelů
Podpora HDCVI HD videa
Vzdálenost přenosu ~300m, 75-3 koaxiálním kabelu pro přenos bez ztráty dat
Vysokorychlostní přenos v reálném čase na dlouhou vzdálenost
47
Page 48

Automatický ICR spínač pro provádění dozoru za denního světla i v noci
Automaticky: expozici, vyvážení bílé, elektronickou uzávěrku, regulace zesílení
Poskytuje čistý a jasný obraz
Podpora IR funkce s IR LED vzdálenost max. 15m
Třída krytí IP66 (prach a chránĕné vody)
Tarifa de marco vídeo: 25/30/50/60 fps @ 720P & 25/30 fps @ 1080p
Min. osvětlení: 0,05 Lux @ F1.2 (AGC zapnuto), 0 Lux s IR zapnuté
Elektronická uzávěrka: 1/3 Sek. ~ 1/100000 Sek. (PAL)
1-kanálový video výstup BNC HDCVI s velkým rozlišením & video výstup CVBS
standardní definition rozlišení
BLC (podsvícení ovládání): automatický
IR svĕtlo je aktivní jen pro video nahrávky v nočním režimu
Redukce šumu 2D/3D
Brava nebo Černá/Bílá: volitelné
Horizontální úhel pohledu: 105.5° ~ 32.9°
Ohnisková vzdálenost: 2,7 ~ 12,0mm / automatický zoom
Pevná clony pro jas
Napájení: DC 12V ± 10%
Spotřeba energie: 7,44W max. (Vstup 12V/0.62A) IR max. 15m
Provozní teplota: – 30°C ~ 60°C
Instalace vnitřní a venkovní: montáž na stěnu
Hmotnost / Rozměry: 550 g / (D) 21,3 x (Š) 8,0 x (V) 7,2 cm
Obsah balení: Bullet camera pro Midi Security Kit PRO FullHD 1080P TX-50 &
Maxi Security Kit PRO FullHD 1080P TX-51, 1x BNC 18,3m video kabel, 3x
šrouby a 3x hmoždinky, Návod k obsluze
Vlastnosti & Technické údaje DOME CAMERA
Rozlišení videa: 1980 × 1225 @ 30 fps (PAL)
Velmi výkonný obrazový snímač CMOS s 2,4 Megapixelů
Podpora HDCVI HD videa
Vzdálenost přenosu ~300m, 75-3 koaxiálním kabelu pro přenos bez ztráty dat
Vysokorychlostní přenos v reálném čase na dlouhou vzdálenost
Automatický ICR spínač pro provádění dozoru za denního světla i v noci
Automaticky: expozici, vyvážení bílé, elektronickou uzávěrku, regulace zesílení
Poskytuje čistý a jasný obraz
Podpora IR funkce s IR LED vzdálenost max. 15m
Třída ochrany IP66 (prach a chránĕné vody) & IK10 (nárazuvzdorný)
48
Page 49

Tarifa de marco vídeo: 25/30/50/60 fps @ 720P & 25/30 fps @ 1080p
Min. osvětlení: 0,05 Lux @ F1.2 (AGC zapnuto), 0 Lux s IR zapnuté
Elektronická uzávěrka: 1/3 Sek. ~ 1/100000 Sek. (PAL)
1-kanálový video výstup BNC HDCVI s velkým rozlišením & video výstup CVBS
standardní definition rozlišení
BLC (podsvícení ovládání): automatický
IR svĕtlo je aktivní jen pro video nahrávky v nočním režimu
Redukce šumu 2D/3D
Brava nebo Černá/Bílá: volitelné
Horizontální úhel pohledu: 105.5° ~ 32.9°
Ohnisková vzdálenost: 2,7 ~ 12,0mm / automatický zoom
Pevná clony pro jas
Napájení: DC 12V ± 10%
Spotřeba energie: 2,2W max. (Vstup 12V/0,18A) IR max. 10m
Provozní teplota: – 30°C ~ 60°C
Instalace vnitřní a venkovní: montáž na stěnu / montáž na strop
Hmotnost / Rozměry: 450 g / Φ 12,2 × (V) 8,9 cm
Obsah balení: Dome camera pro Midi Security Kit PRO FullHD 1080P TX-50 &
Maxi Security Kit PRO FullHD 1080P TX-51, 1x BNC 18,3m video kabel, 3x
šrouby a 3x hmoždinky, Návod k obsluze
Tento výrobek splňuje požadavky norem uvedených ve směrnici Rady R&TTE
1999/5/ES. Prohlášení o shodě naleznete zde: www.technaxx.de/ (v liště
“Konformitätserklärung” dole). Před prvním použitím zařízení si pečlivě přečtěte
návod k obsluze.
Číslo servisního telefonu technické podpory: 01805 012643 (14 centů/min z
pevné linky v Německu a 42 centů/min z mobilních sítí). Email zdarma:
support@technaxx.de
Pokyny pro ochranu životního prostředí: Obalové materiály
jsou suroviny a lze je opět použít. Obaly oddělit podle jejich druhu
a v zájmu ochrany životního prostředí zajistit jejich likvidaci podle
předpisů. Vyřazené přístroje a baterie nepatří do domovního
odpadu! Odborně se musejí zlikvidovat i staré přístroje a baterie!
Čištění: Chraňte zařízení před znečištěním a kontaminací
(použijte čistý hadřík). Nepoužívejte hrubé či drsné materiály,
rozpouštědla, jiné agresivní čističe. Zařízení po vyčištění otřete.
Distributor: Technaxx Deutschland GmbH & Co.KG, Kruppstr.
105, 60388 Frankfurt a.M., Německo
49
Page 50

This product includes software developed by third parties, including software which is released
under the GNU General Public License Version 2 (GPL v2). This program is free software; you can
redistribute it and/or modify it under the terms of the GNU General Public License as published by
the Free Software Foundation; either version 2 of the License, or (at your option) any later version.
You may obtain a complete machine-readable copy of the source code for the above mentioned
software under the terms of GPL v2 without charge except for the cost of media, shipping, and
handling, upon written request to Technaxx GmbH & Co. KG, Kruppstraße 105, 60388 Frankfurt
am Main, Germany.
This program is distributed in the hope that it will be useful, but WITHOUT ANY WARRANTY;
without even the implied warranty of MERCHANTABILITY or FITNESS FOR A PARTICULAR
PURPOSE. See the GNU General Public License for more details. You should have received a
copy of the GNU General Public License along with this program; if not, write to the Free Software
Foundation, Inc., 51 Franklin Street, Fifth Floor, Boston, MA 02110-1301, USA. (Notice from
Technaxx: A copy of the GPL is included below).
GNU GENERAL PUBLIC LICENSE: Version 2, June 1991 / Copyright (C) 1989, 1991 Free Software
Foundation, Inc. / 51 Franklin Street, Fifth Floor, Boston, MA 02110-1301, USA.
Everyone is permitted to copy and distribute verbatim copies of this license document, but changing it is
not allowed.
Preamble
The licenses for most software are designed to take away your freedom to share and change it. By
contrast, the GNU General Public License is intended to guarantee your freedom to share and change
free software--to make sure the software is free for all its users. This General Public License applies to
most of the Free Software Foundation's software and to any other program whose authors commit to
using it. (Some other Free Software Foundation software is covered by the GNU Lesser General Public
License instead.) You can apply it to your programs, too.
When we speak of free software, we are referring to freedom, not price. Our General Public Licenses are
designed to make sure that you have the freedom to distribute copies of free software (and charge for this
service if you wish), that you receive source code or can get it if you want it, that you can change the
software or use pieces of it in new free programs; and that you know you can do these things.
To protect your rights, we need to make restrictions that forbid anyone to deny you these rights or to ask
you to surrender the rights. These restrictions translate to certain responsibilities for you if you distribute
copies of the software, or if you modify it.
For example, if you distribute copies of such a program, whether gratis or for a fee, you must give the
recipients all the rights that you have. You must make sure that they, too, receive or can get the source
code. And you must show them these terms so they know their rights.
We protect your rights with two steps: (1) copyright the software, and (2) offer you this license which gives
you legal permission to copy, distribute and/or modify the software.
Also, for each author's protection and ours, we want to make certain that everyone understands that there
is no warranty for this free software. If the software is modified by someone else and passed on, we want
its recipients to know that what they have is not the original, so that any problems introduced by others
will not reflect on the original authors' reputations.
Any free program is threatened constantly by software patents. We wish to avoid the danger that
redistributors of a free program will individually obtain patent licenses, in effect making the program
proprietary. To prevent this, we have made it clear that any patent must be licensed for everyone's free
use or not licensed at all.
The precise terms and conditions for copying, distribution and modification follow.
50
Page 51

TERMS AND CONDITIONS FOR COPYING, DISTRIBUTION AND MODIFICATION
0. This License applies to any program or other work which contains a notice placed by the copyright
holder saying it may be distributed under the terms of this General Public License. The "Program", below,
refers to any such program or work, and a "work based on the Program" means either the Program or any
derivative work under copyright law: that is to say, a work containing the Program or a portion of it, either
verbatim or with modifications and/or translated into another language. (Hereinafter, translation is
included without limitation in the term "modification".) Each licensee is addressed as "you".
Activities other than copying, distribution and modification are not covered by this License; they are
outside its scope. The act of running the Program is not restricted, and the output from the Program is
covered only if its contents constitute a work based on the Program (independent of having been made
by running the Program). Whether that is true depends on what the Program does.
1. You may copy and distribute verbatim copies of the Program's source code as you receive it, in any
medium, provided that you conspicuously and appropriately publish on each copy an appropriate
copyright notice and disclaimer of warranty; keep intact all the notices that refer to this License and to the
absence of any warranty; and give any other recipients of the Program a copy of this License along with
the Program. You may charge a fee for the physical act of transferring a copy, and you may at your option
offer warranty protection in exchange for a fee.
2. You may modify your copy or copies of the Program or any portion of it, thus forming a work based on
the Program, and copy and distribute such modifications or work under the terms of Section 1 above,
provided that you also meet all of these conditions:
a) You must cause the modified files to carry prominent notices stating that you changed the files and the
date of any change.
b) You must cause any work that you distribute or publish, that in whole or in part contains or is derived
from the Program or any part thereof, to be licensed as a whole at no charge to all third parties under the
terms of this License.
c) If the modified program normally reads commands interactively when run, you must cause it, when
started running for such interactive use in the most ordinary way, to print or display an announcement
including an appropriate copyright notice and a notice that there is no warranty (or else, saying that you
provide a warranty) and that users may redistribute the program under these conditions, and telling the
user how to view a copy of this License. (Exception: if the Program itself is interactive but does not
normally print such an announcement, your work based on the Program is not required to print an
announcement.)
These requirements apply to the modified work as a whole. If identifiable sections of that work are not
derived from the Program, and can be reasonably considered independent and separate works in
themselves, then this License, and its terms, do not apply to those sections when you distribute them as
separate works. But when you distribute the same sections as part of a whole which is a work based on
the Program, the distribution of the whole must be on the terms of this License, whose permissions for
other licensees extend to the entire whole, and thus to each and every part regardless of who wrote it.
Thus, it is not the intent of this section to claim rights or contest your rights to work written entirely by you;
rather, the intent is to exercise the right to control the distribution of derivative or collective works based
on the Program.
In addition, mere aggregation of another work not based on the Program with the Program (or with a work
based on the Program) on a volume of a storage or distribution medium does not bring the other work
under the scope of this License.
51
Page 52

3. You may copy and distribute the Program (or a work based on it, under Section 2) in object code or
executable form under the terms of Sections 1 and 2 above provided that you also do one of the
following:
a) Accompany it with the complete corresponding machine-readable source code, which must be
distributed under the terms of Sections 1 and 2 above on a medium customarily used for software
interchange; or,
b) Accompany it with a written offer, valid for at least three years, to give any third party, for a charge no
more than your cost of physically performing source distribution, a complete machine-readable copy of
the corresponding source code, to be distributed under the terms of Sections 1 and 2 above on a medium
customarily used for software interchange; or,
c) Accompany it with the information you received as to the offer to distribute corresponding source code.
(This alternative is allowed only for noncommercial distribution and only if you received the program in
object code or executable form with such an offer, in accord with Subsection b above.)
The source code for a work means the preferred form of the work for making modifications to it. For an
executable work, complete source code means all the source code for all modules it contains, plus any
associated interface definition files, plus the scripts used to control compilation and installation of the
executable. However, as a special exception, the source code distributed need not include anything that
is normally distributed (in either source or binary form) with the major components (compiler, kernel, and
so on) of the operating system on which the executable runs, unless that component itself accompanies
the executable.
If distribution of executable or object code is made by offering access to copy from a designated place,
then offering equivalent access to copy the source code from the same place counts as distribution of the
source code, even though third parties are not compelled to copy the source along with the object code.
4. You may not copy, modify, sublicense, or distribute the Program except as expressly provided under
this License. Any attempt otherwise to copy, modify, sublicense or distribute the Program is void, and will
automatically terminate your rights under this License. However, parties who have received copies, or
rights, from you under this License will not have their licenses terminated so long as such parties remain
in full compliance.
5. You are not required to accept this License, since you have not signed it. However, nothing else grants
you permission to modify or distribute the Program or its derivative works. These actions are prohibited by
law if you do not accept this License. Therefore, by modifying or distributing the Program (or any work
based on the Program), you indicate your acceptance of this License to do so, and all its terms and
conditions for copying, distributing or modifying the Program or works based on it.
6. Each time you redistribute the Program (or any work based on the Program), the recipient
automatically receives a license from the original licensor to copy, distribute or modify the Program
subject to these terms and conditions. You may not impose any further restrictions on the recipients'
exercise of the rights granted herein. You are not responsible for enforcing compliance by third parties to
this License.
7. If, as a consequence of a court judgment or allegation of patent infringement or for any other reason
(not limited to patent issues), conditions are imposed on you (whether by court order, agreement or
otherwise) that contradict the conditions of this License, they do not excuse you from the conditions of
this License. If you cannot distribute so as to satisfy simultaneously your obligations under this License
and any other pertinent obligations, then as a consequence you may not distribute the Program at all. For
example, if a patent license would not permit royalty-free redistribution of the Program by all those who
receive copies directly or indirectly through you, then the only way you could satisfy both it and this
License would be to refrain entirely from distribution of the Program.
If any portion of this section is held invalid or unenforceable under any particular circumstance, the
balance of the section is intended to apply and the section as a whole is intended to apply in other
circumstances.
52
Page 53

It is not the purpose of this section to induce you to infringe any patents or other property right claims or
to contest validity of any such claims; this section has the sole purpose of protecting the integrity of the
free software distribution system, which is implemented by public license practices. Many people have
made generous contributions to the wide range of software distributed through that system in reliance on
consistent application of that system; it is up to the author/donor to decide if he or she is willing to
distribute software through any other system and a licensee cannot impose that choice.
This section is intended to make thoroughly clear what is believed to be a consequence of the rest of this
License.
8. If the distribution and/or use of the Program is restricted in certain countries either by patents or by
copyrighted interfaces, the original copyright holder who places the Program under this License may add
an explicit geographical distribution limitation excluding those countries, so that distribution is permitted
only in or among countries not thus excluded. In such case, this License incorporates the limitation as if
written in the body of this License.
9. The Free Software Foundation may publish revised and/or new versions of the General Public License
from time to time. Such new versions will be similar in spirit to the present version, but may differ in detail
to address new problems or concerns.
Each version is given a distinguishing version number. If the Program specifies a version number of this
License which applies to it and "any later version", you have the option of following the terms and
conditions either of that version or of any later version published by the Free Software Foundation. If the
Program does not specify a version number of this License, you may choose any version ever published
by the Free Software Foundation.
10. If you wish to incorporate parts of the Program into other free programs whose distribution conditions
are different, write to the author to ask for permission. For software which is copyrighted by the Free
Software Foundation, write to the Free Software Foundation; we sometimes make exceptions for this. Our
decision will be guided by the two goals of preserving the free status of all derivatives of our free software
and of promoting the sharing and reuse of software generally.
NO WARRANTY
11. BECAUSE THE PROGRAM IS LICENSED FREE OF CHARGE, THERE IS NO WARRANTY FOR
THE PROGRAM, TO THE EXTENT PERMITTED BY APPLICABLE LAW. EXCEPT WHEN OTHERWISE
STATED IN WRITING THE COPYRIGHT HOLDERS AND/OR OTHER PARTIES PROVIDE THE
PROGRAM "AS IS" WITHOUT WARRANTY OF ANY KIND, EITHER EXPRESSED OR IMPLIED,
INCLUDING, BUT NOT LIMITED TO, THE IMPLIED WARRANTIES OF MERCHANTABILITY AND
FITNESS FOR A PARTICULAR PURPOSE. THE ENTIRE RISK AS TO THE QUALITY AND
PERFORMANCE OF THE PROGRAM IS WITH YOU. SHOULD THE PROGRAM PROVE DEFECTIVE,
YOU ASSUME THE COST OF ALL NECESSARY SERVICING, REPAIR OR CORRECTION.
12. IN NO EVENT UNLESS REQUIRED BY APPLICABLE LAW OR AGREED TO IN WRITING WILL
ANY COPYRIGHT HOLDER, OR ANY OTHER PARTY WHO MAY MODIFY AND/OR REDISTRIBUTE
THE PROGRAM AS PERMITTED ABOVE, BE LIABLE TO YOU FOR DAMAGES, INCLUDING ANY
GENERAL, SPECIAL, INCIDENTAL OR CONSEQUENTIAL DAMAGES ARISING OUT OF THE USE
OR INABILITY TO USE THE PROGRAM (INCLUDING BUT NOT LIMITED TO LOSS OF DATA OR
DATA BEING RENDERED INACCURATE OR LOSSES SUSTAINED BY YOU OR THIRD PARTIES OR
A FAILURE OF THE PROGRAM TO OPERATE WITH ANY OTHER PROGRAMS), EVEN IF SUCH
HOLDER OR OTHER PARTY HAS BEEN ADVISED OF THE POSSIBILITY OF SUCH DAMAGES.
END OF TERMS AND CONDITIONS
53
Page 54

HOW TO APPLY THESE TERMS TO YOUR NEW PROGRAMS
(1) If you develop a new program, and you want it to be of the greatest possible use to the public, the best
way to achieve this is to make it free software which everyone can redistribute and change under these
terms.
(2) To do so, attach the following notices to the program. It is safest to attach them to the start of each
source file to most effectively convey the exclusion of warranty; and each file should have at least the
"copyright" line and a pointer to where the full notice is found.
<one line to give the program's name and an idea of what it does.>
Copyright (C) <yyyy> <name of author>
(3) This program is free software; you can redistribute it and/or modify it under the terms of the GNU
General Public License as published by the Free Software Foundation; either version 2 of the License, or
(at your option) any later version.
(4) This program is distributed in the hope that it will be useful, but WITHOUT ANY WARRANTY; without
even the implied warranty of MERCHANTABILITY or FITNESS FOR A PARTICULAR PURPOSE. See
the GNU General Public License for more details.
(5) You should have received a copy of the GNU General Public License along with this program; if not,
write to the Free Software Foundation Inc; 51 Franklin Street, Fifth Floor, Boston, MA 02110-1301, USA.
(6) Also add information on how to contact you by electronic and paper mail.
(7) If the program is interactive, make it output a short notice like this when it starts in an interactive
mode:
Gnomovision version 69, Copyright (C) year name of author Gnomovision comes with ABSOLUTELY NO
WARRANTY; for details type `show w'.
(8) This is free software, and you are welcome to redistribute it under certain conditions; type `show c' for
details.
(9) The hypothetical commands `show w' and `show c' should show the appropriate parts of the General
Public License. Of course, the commands you use may be called something other than `show w' and
`show c'; they could even be mouse-clicks or menu items--whatever suits your program.
(10) You should also get your employer (if you work as a programmer) or your school, if any, to sign a
"copyright disclaimer" for the program, if necessary. Here is a sample; alter the names:
(11) Yoyodyne, Inc., hereby disclaims all copyright interest in the program `Gnomovision' (which makes
passes at compilers) written by James Hacker.
<signature of Ty Coon>, 1 April 1989 [Ty Coon, President of Vice]
(12) This General Public License does not permit incorporating your program into proprietary programs. If
your program is a subroutine library, you may consider it more useful to permit linking proprietary
applications with the library. If this is what you want to do, use the GNU Lesser General Public License
instead of this License.
54
 Loading...