

Page 1

1
Technaxx
®
IP–Security Camera for
indoor and outdoor usage HD TX-24
User Manual
The Declaration of Conformity for this device is under:
www.technaxx.de/
(in bottom bar “Konformitätserklärung”)
Important Hint regarding the User Manuals:
All languages of the user manual (english, german, french, spanish,
italian, netherlands, polish) you find on the CD-ROM enclosed.
The english and german version of the user manual you also find as
printed version enclosed.
Contents
Before using the device the first time, read the user manual carefully.
1. Features & Product Description & Additonal Clamp Connections
2. Software Installation and Commissioning; Hardware Requirements
3. Hardware
3.1. Package contents
3.2. Hints for Environment Protection + Cleaning
3.3. Attention !
4. Getting Started
(Learn basic function to view and video in LAN and WLAN)
4.1. Video from a camera in the local network (LAN)
4.2. Set Wi-Fi connection
4.3. View the camera on the Internet (WLAN)
4.4. Register a new account and add devices
4.5. Main Menu
5. Video Surveillance (Control Panel)
6. General system settings
6.1. Camera Settings in LAN Mode
6.1.1. Set the IP Address
6.1.2. Set WIFI connection
6.1.3. Set the local video plan
6.1.4. MicroSD card configuration
6.1.5. MicroSD file download
6.1.6. Alarm alerts (Email)
Page 2

2
6.1.7. Groups
6.1.8. Change the device alias
6.1.9. Dial connection (PPPOE)
6.1.10. Restore the default settings
6.2. Camera settings in WAN Mode
6.2.1. Groups
6.2.2. Change Access password
6.2.3. Change the camera alias
6.2.4. MicroSD card query
6.2.5. Installing MY SECURE
7. Settings on the Main Menu
7.1. Full screen
7.2. Settings
7.2.1. System
7.2.2. Video
7.2.3. Local Alarm Alerts
7.3. Device management
7.3.1. Add device
7.3.2. Change management password
7.3.3. Change watch password
7.3.4. Change camera alias
7.3.5. Permissions setting
7.4. Search
7.5. Change the password (User login password)
7.6. Log
7.7. Help
8. Frequently Asked Questions – FAQ
8.1. Video delay
8.2. LAN cable should not be too long
8.3. Cannot visit the IP camera in LAN
8.4. Can visit the IP camera in LAN, but cannot view it on WLAN
8.5. Image quality is not good enough
8.6. Forgot your password?
8.7. Restore to default settings
8.8. How to reboot equipment?
9. Technical Specifications
10. INSTALLATION MANUAL for Android / IOS Smartphone
Page 3
3
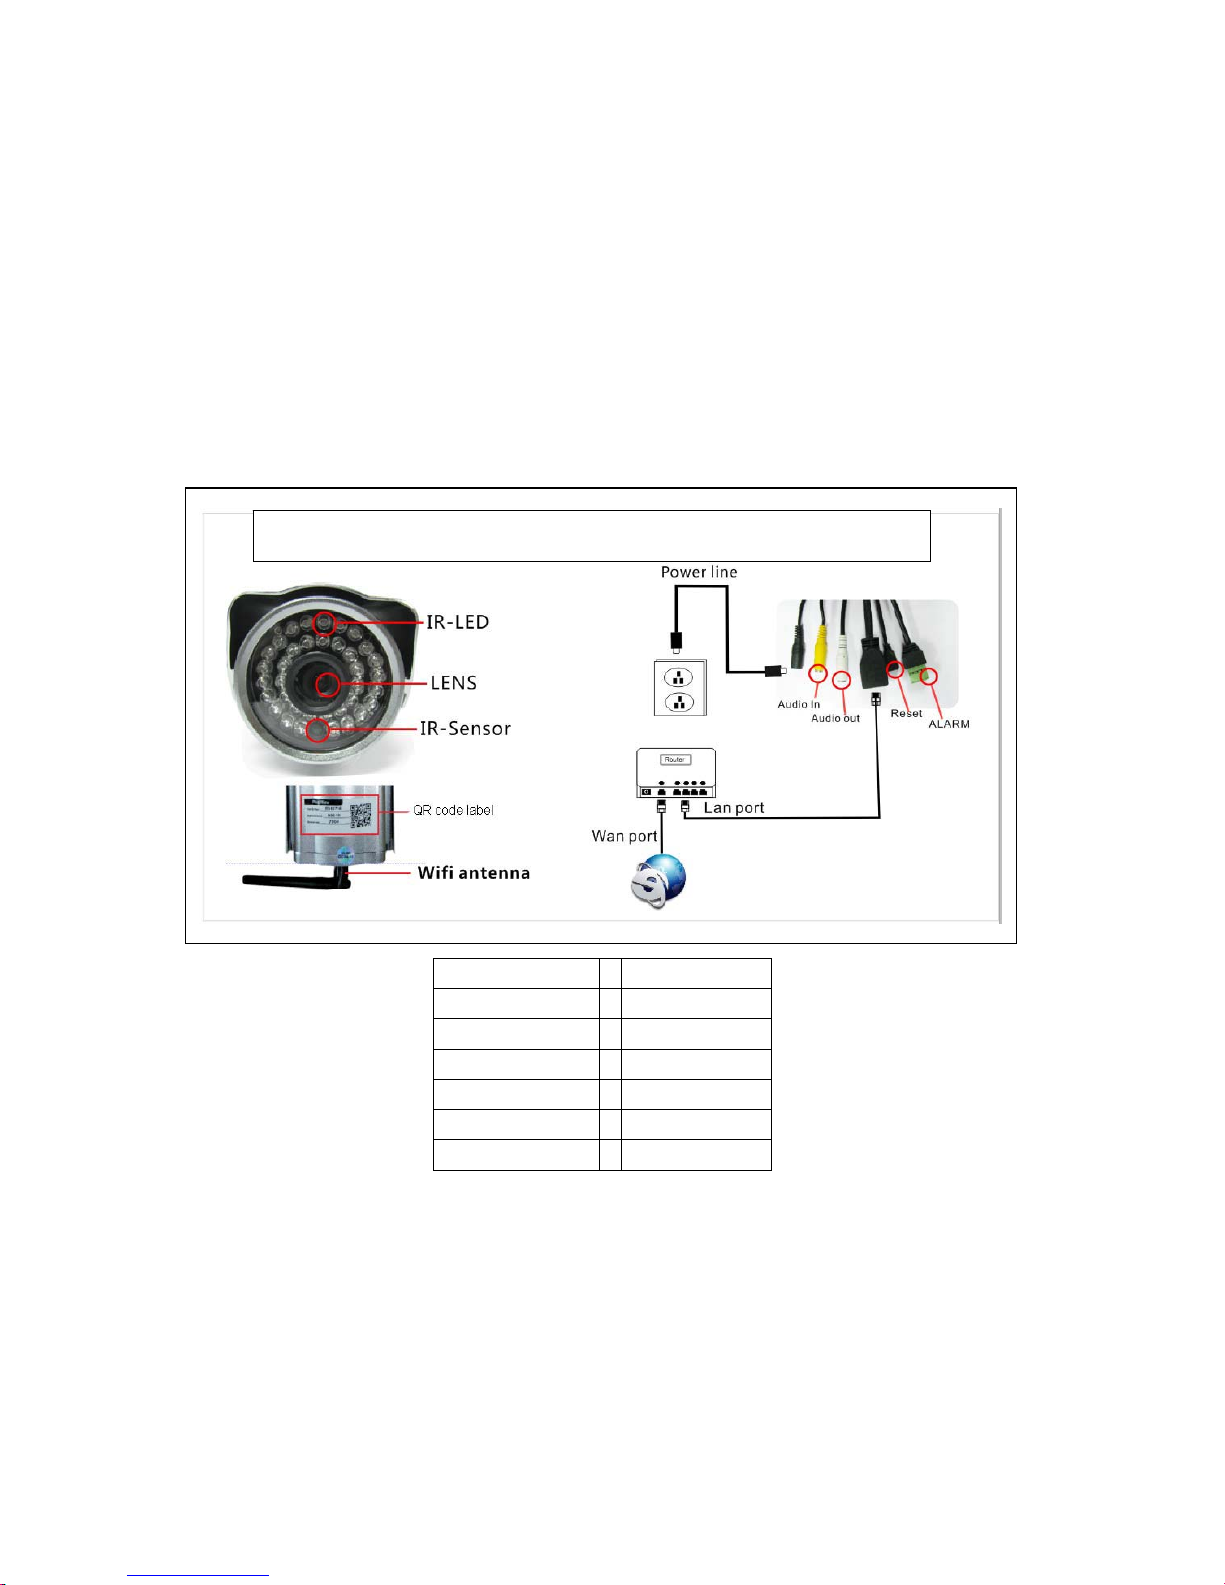
1. Features & Product Description & Additonal Camp Connections
Brilliant 1/4” CMOS colour sensor
Supports P2P function, easy to connect through internet
Alarmfunction, automatic alarm E-mails with image
Direct Smartphone connection via QR-code APP
QR-code scanning from the camera label produces immediate connection
36 IR–LEDs and IR night vision up to 20m
Supports MicroSD memory card up to 32GB
Video compress format: H.264 720p Multi Stream
Supports 802.11.b/g/n wireless protocol
Additional clamp connections to connect external alarm devices
IR–LED Power line
Lens Audio in
IR–Sensor Audio out
QR code label Reset
WiFi antenna Alarm
LAN port
WLAN port
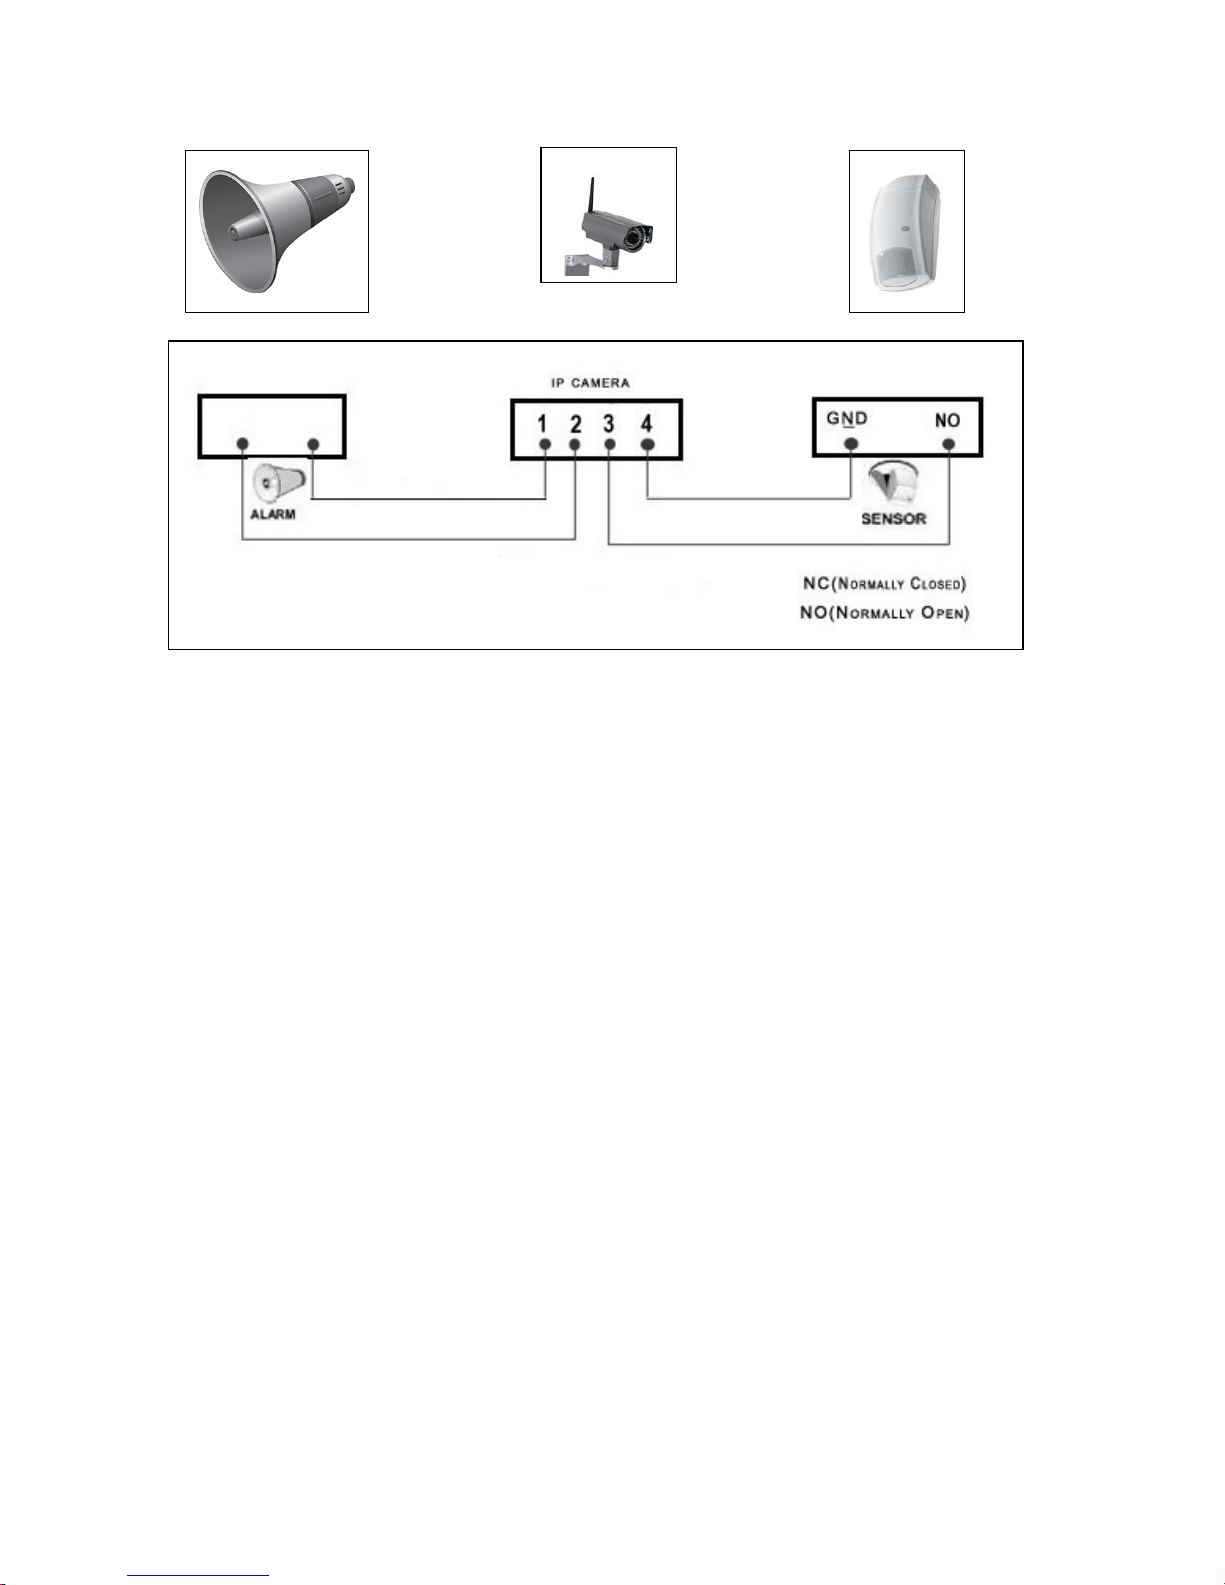
Additional clamp connections
This outdoor security camera has alarm function which can be connected to external
alarm accessories like motion detectors, sirens, etc. Notice that alarm accessories are
not (!) included in the delivery contents. The accessories must be closing over a
power supply of 5-12V DC / Max. 300mA.
IP-Security Camera for indoor and outdoor usage HD TX-24
Page 4
4
ALARM IP CAMERA SENSOR
NC (Normally Closed) NO (Normally Open)
2. Software Installation and Commissioning
Windows Requirements: WIN 7, WIN 8, Windows XP, Windows Vista
Hardware Requirements
1GB RAM and 2 Core CPU for 1 camera at 1 time
2GB RAM and i3 or updated processor for 4 cameras at 1 time
REMARKS: No matter how many cameras you’d like to connect, this software has
no requirement for GPU (Graphic Processing Unit)
Page 5
5
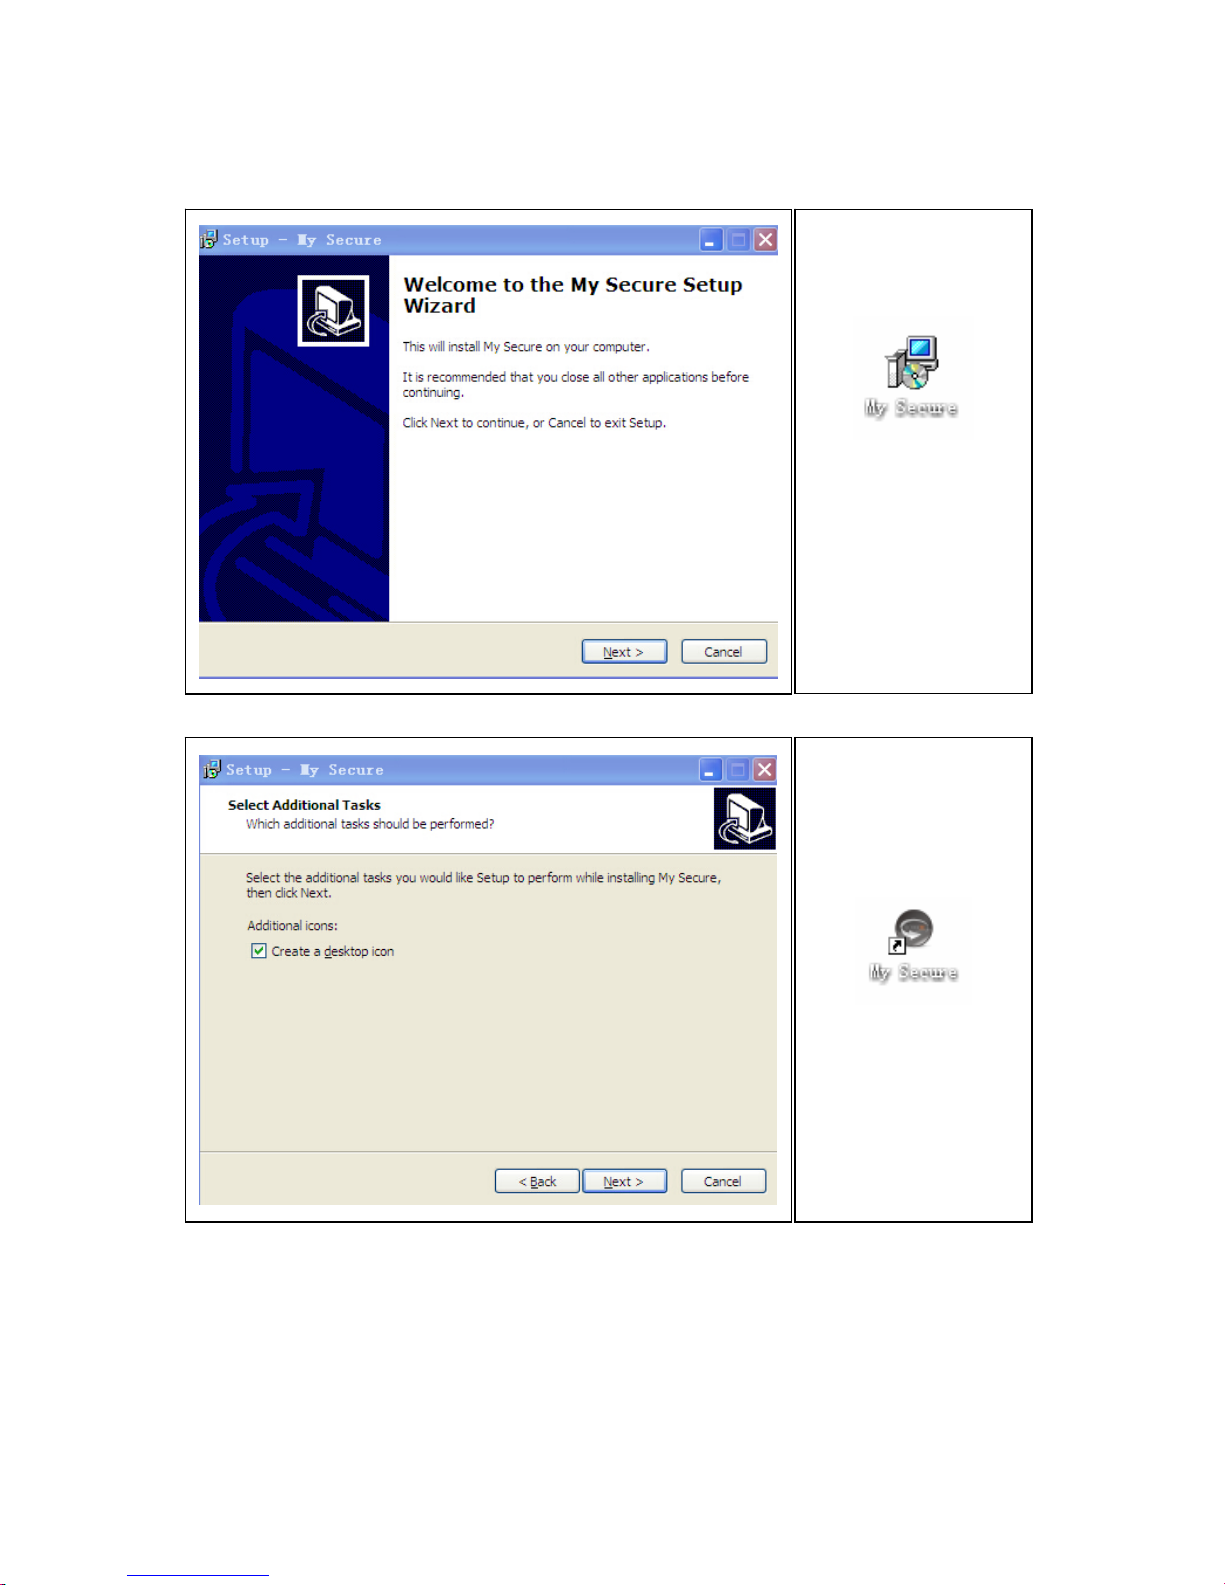
Insert the software CD into the PC drive or download the software on
http://www.technaxx.de/support/
Opening the CD and
start the program
"My Secure.exe"
Continue click
“Next“ until the
following steps were
finished.
After installation
finished, click below
icon “My Secure” to
run the software as
shown.
Page 6
6
3. Hardware
3.1. Package Contents: IP-Security Camera for indoor and outdoor usage HD TX-24,
Power Supply, Network cable, Antenna and red cap for the antenna, Bracket and
screws, Installation-CD with user manuals in 12 languages, User Manual (english and
german version)
3.2. Hints for Environment Protection + Cleaning
Hints for Environment Protection: Packages materials are raw materials and
can be recycled. Do not disposal old devices into the domestic waste.
Cleaning: Protect the device from contamination and pollution (use a clean
drapery). Avoid using rough, coarse-grained materials/solvents/other
aggressive cleaner. Wipe the cleaned device.
Distributor: Technaxx Deutschland GmbH & Co.KG, Kruppstr. 105, 60388
Frankfurt a.M., Germany
3.3. Attention !
This device may only be operated with the supplied adaptor. Do not use or store the
adaptor outdoor and do not operate the charger with moist or wet hands. Always
remove the adaptor from socket if the device is not in use. Never open the device. The
individual components of the device shall not be disassembled, repaired or modified.
Unplug the device before cleaning or maintenance or connecting accessories.
Page 7
7
4. Getting Started (learn basic function to view and video in LAN
and WLAN)
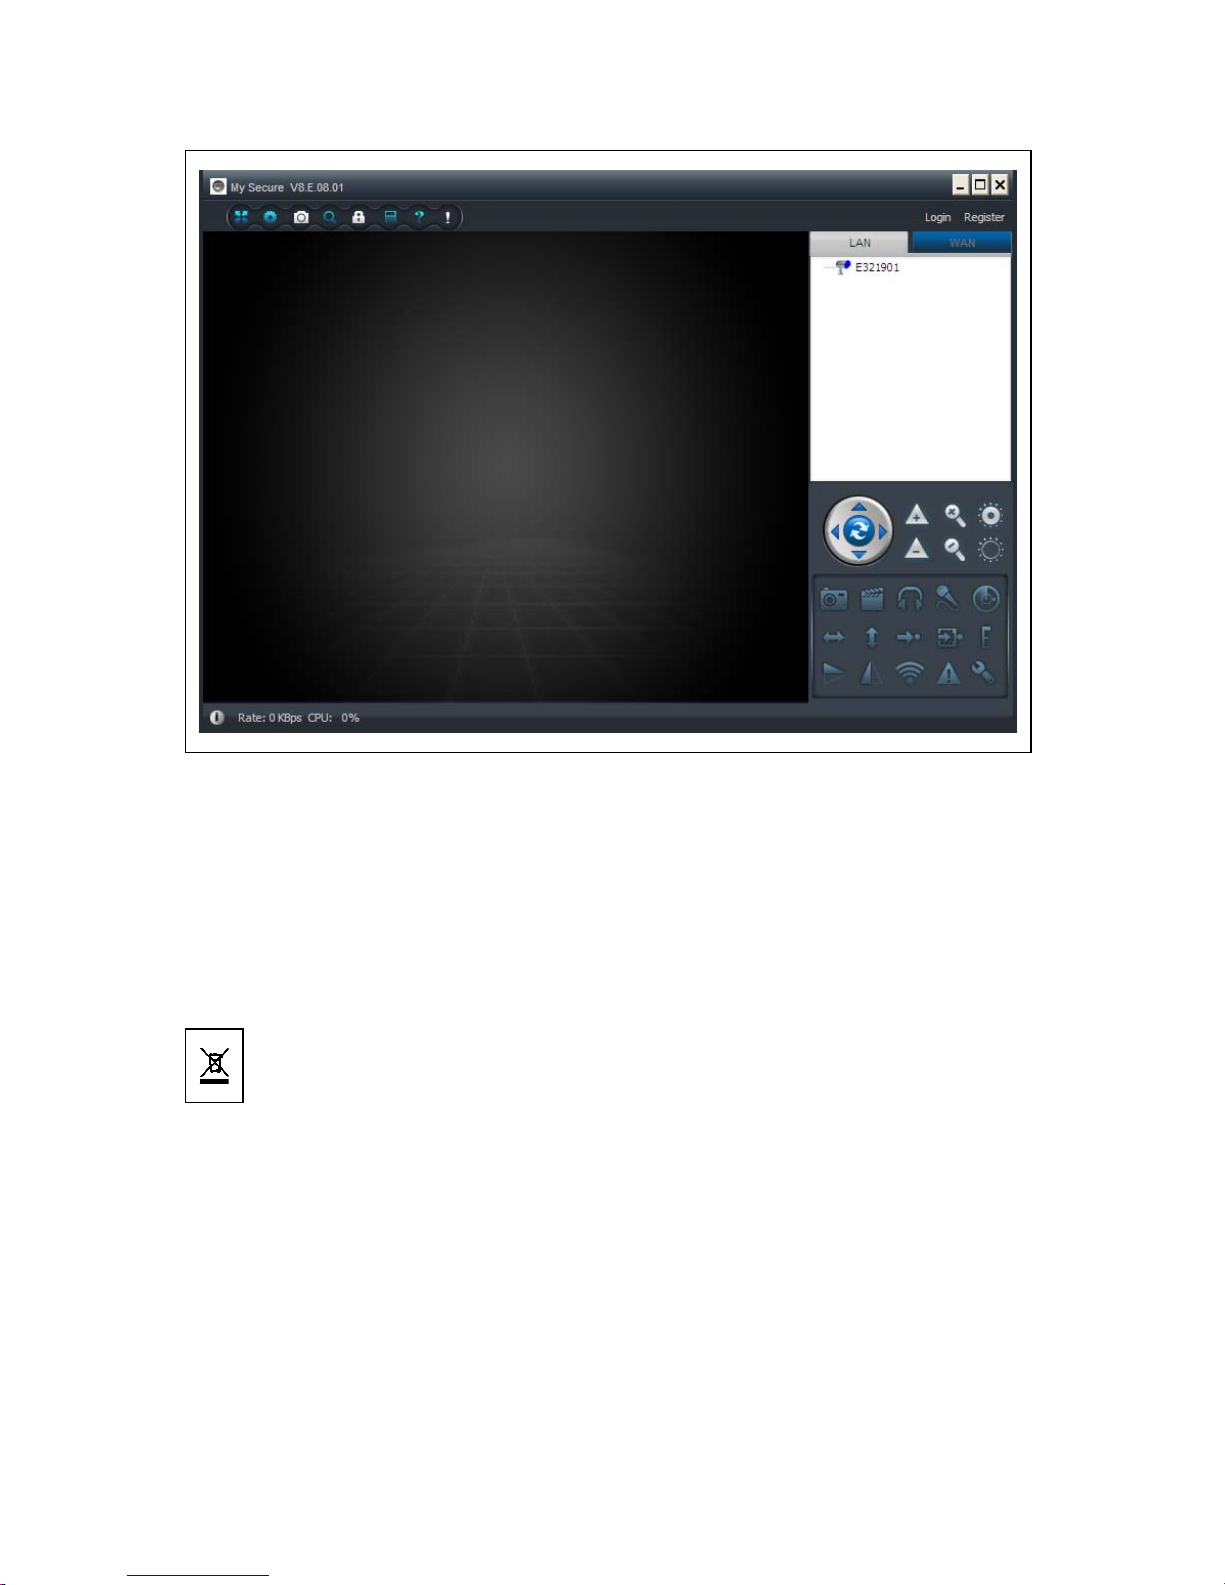
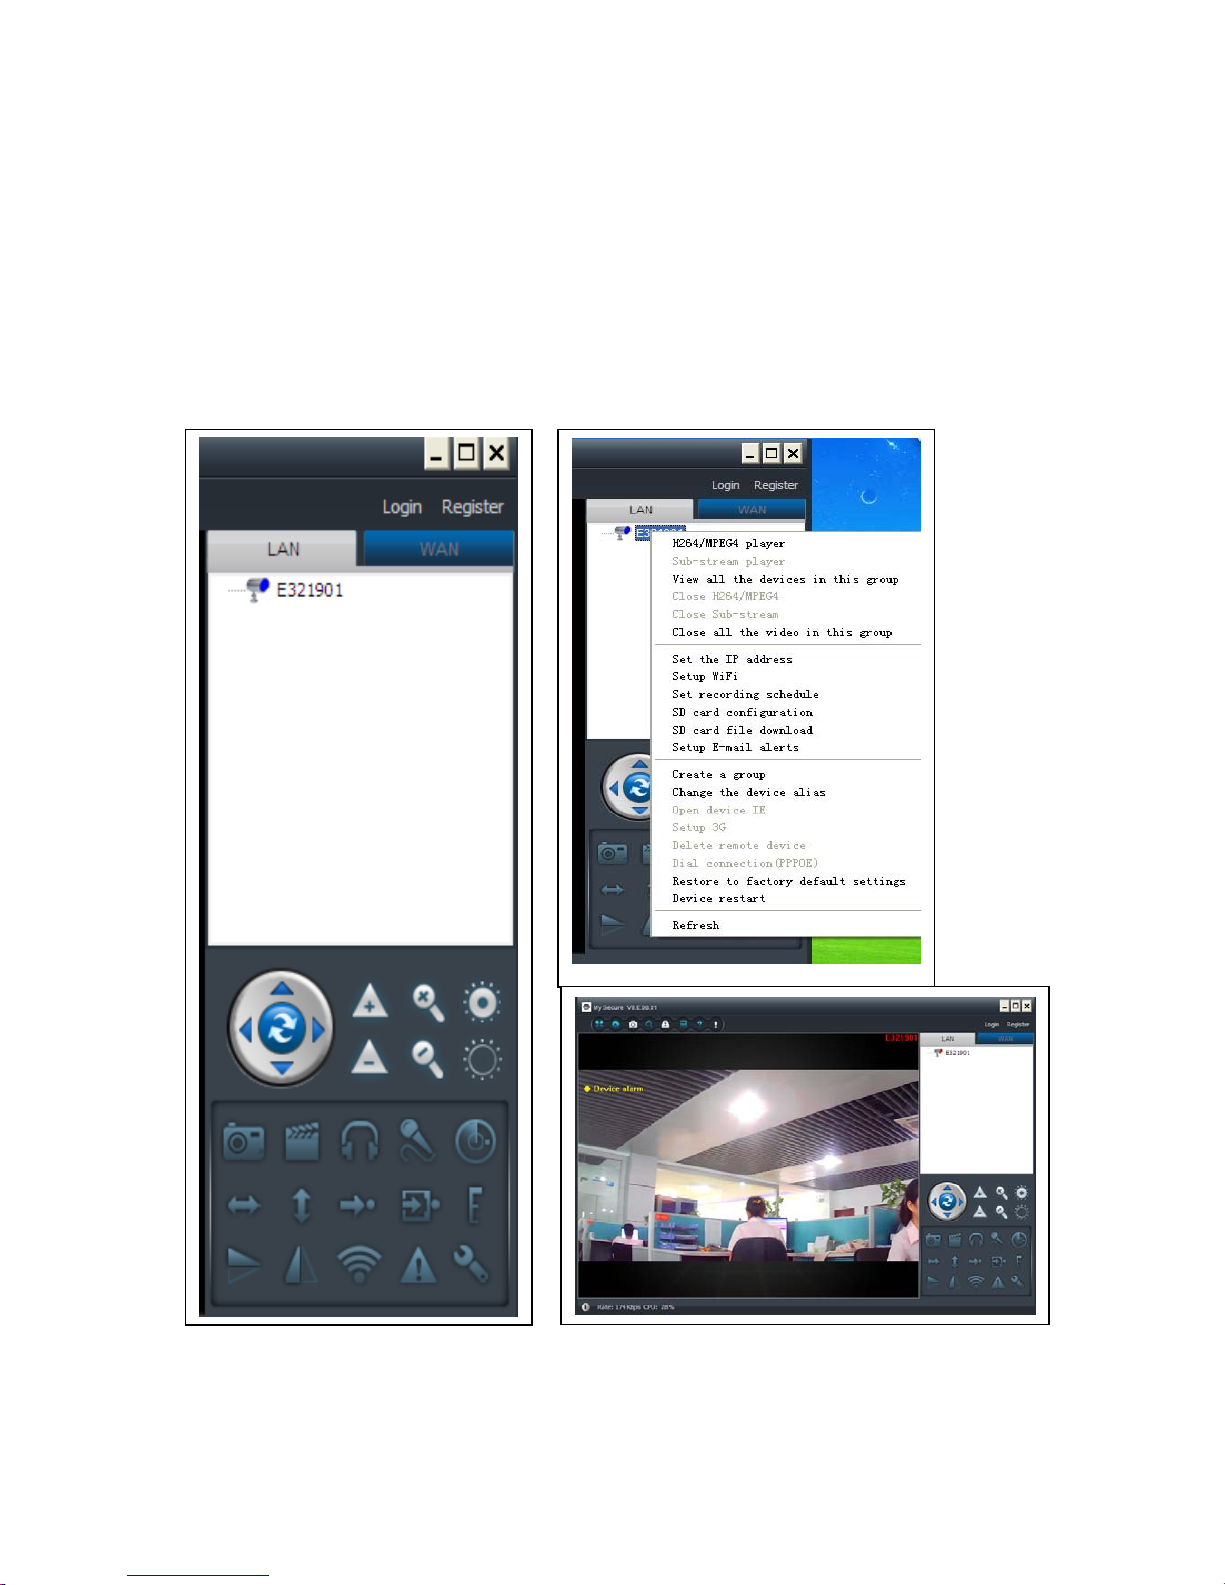
4.1. Video from a camera in the local network (LAN)
Make sure the camera was plugged in adaptor and connected with router via LAN
cable first. Run “My Secure” and click “LAN” on the right list area, then right-click the
blank area, a menu pops out similar to Figure, select "Refresh" to get the camera list
in the LAN. If there is a camera, double-click the camera ID to view the live video. If
popped out a prompt like “request camera video failure!", check FAQ for help.
Page 8
8
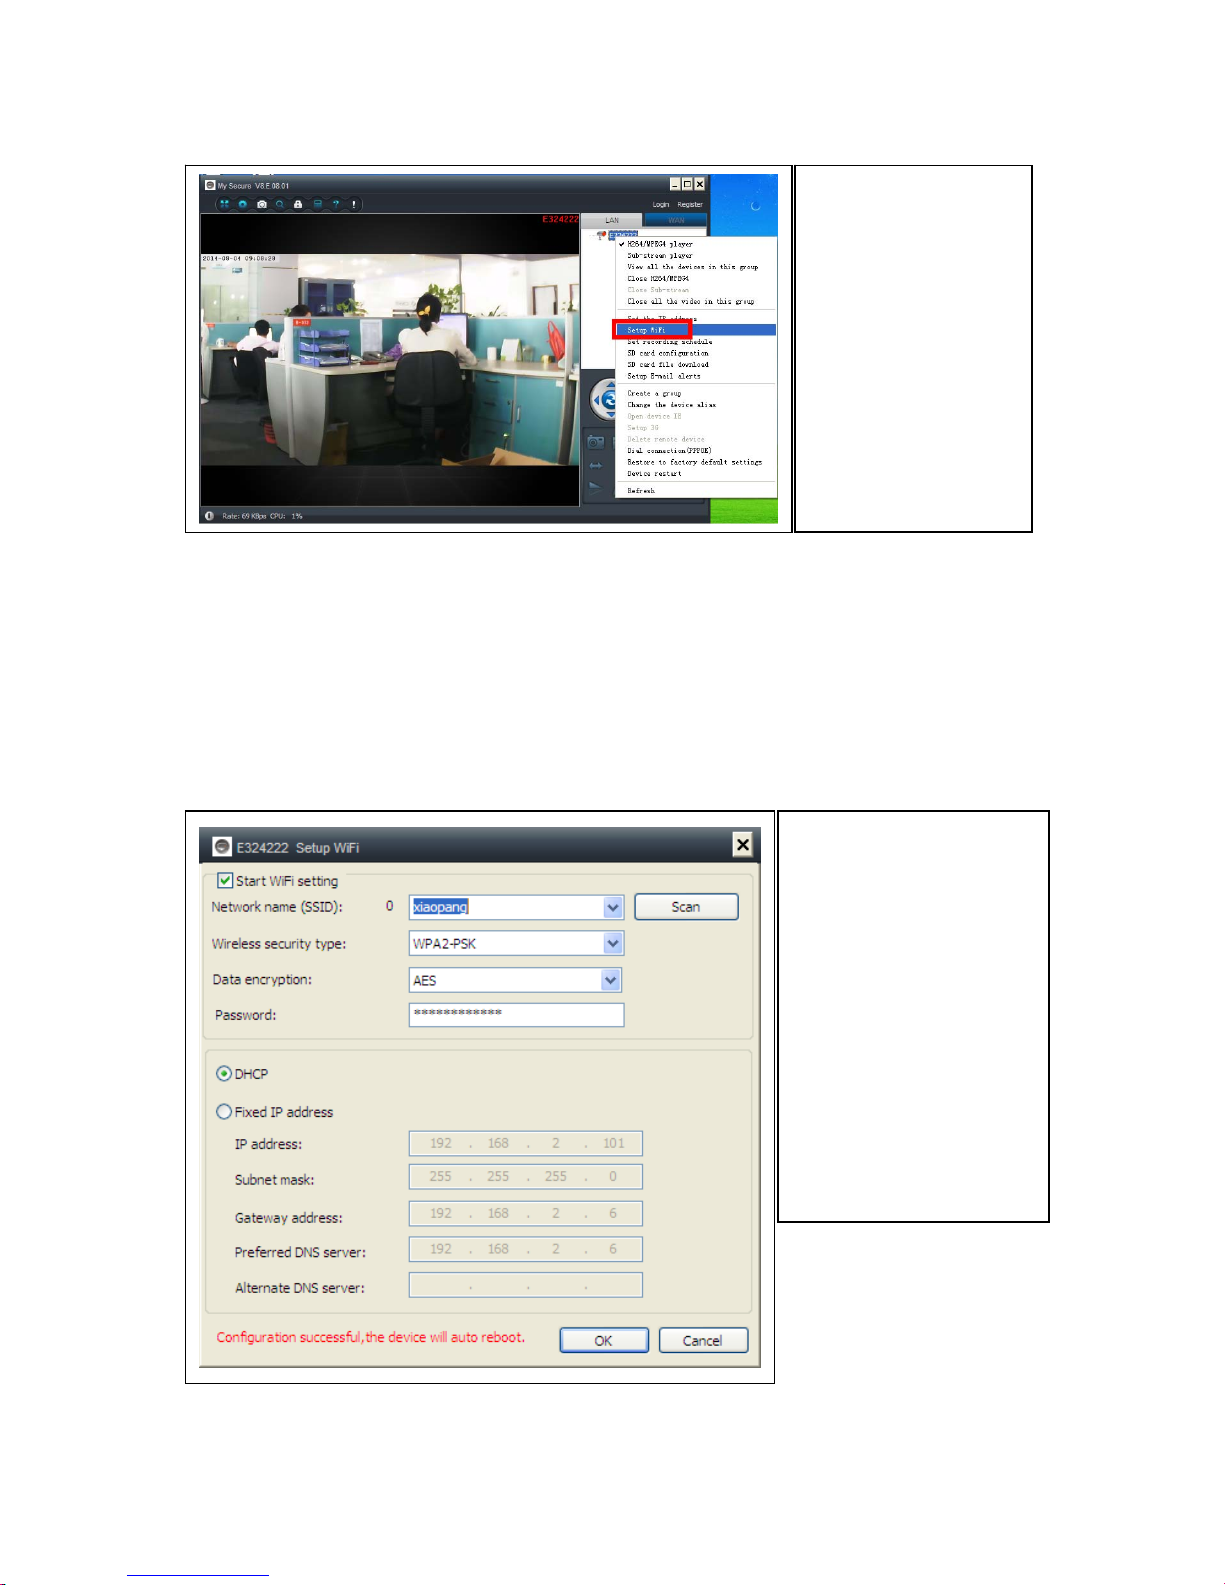
4.2. Set WIFI connection
(b) Set SSID (Wireless router name) / Password
(1) Enable “Start WiFi setting”.
(2) Click “Scan” to choose the WIFI connection “Network name [SSID]” (it is your
Wireless router name).
(3) Wireless Security Type & Data Encryption will be selected automatically after the
right Network Name (SSID) is selected. Please here no manual changes!
(4) Input the WIFI connection “Password” and click “OK” to save.
(a) Click on the right
mouse button then
you see the device
ID shown under
LAN.
Then select “Set
WIFI ” on the menu
popped out.
NOTE:
After saving WIFI
settings the camera will
restart automatically
and then you can take
off the LAN cable after
the camera boots up
successfully in 1–2
minutes and you see
the camera ID in BLUE
under LAN.
Page 9
9
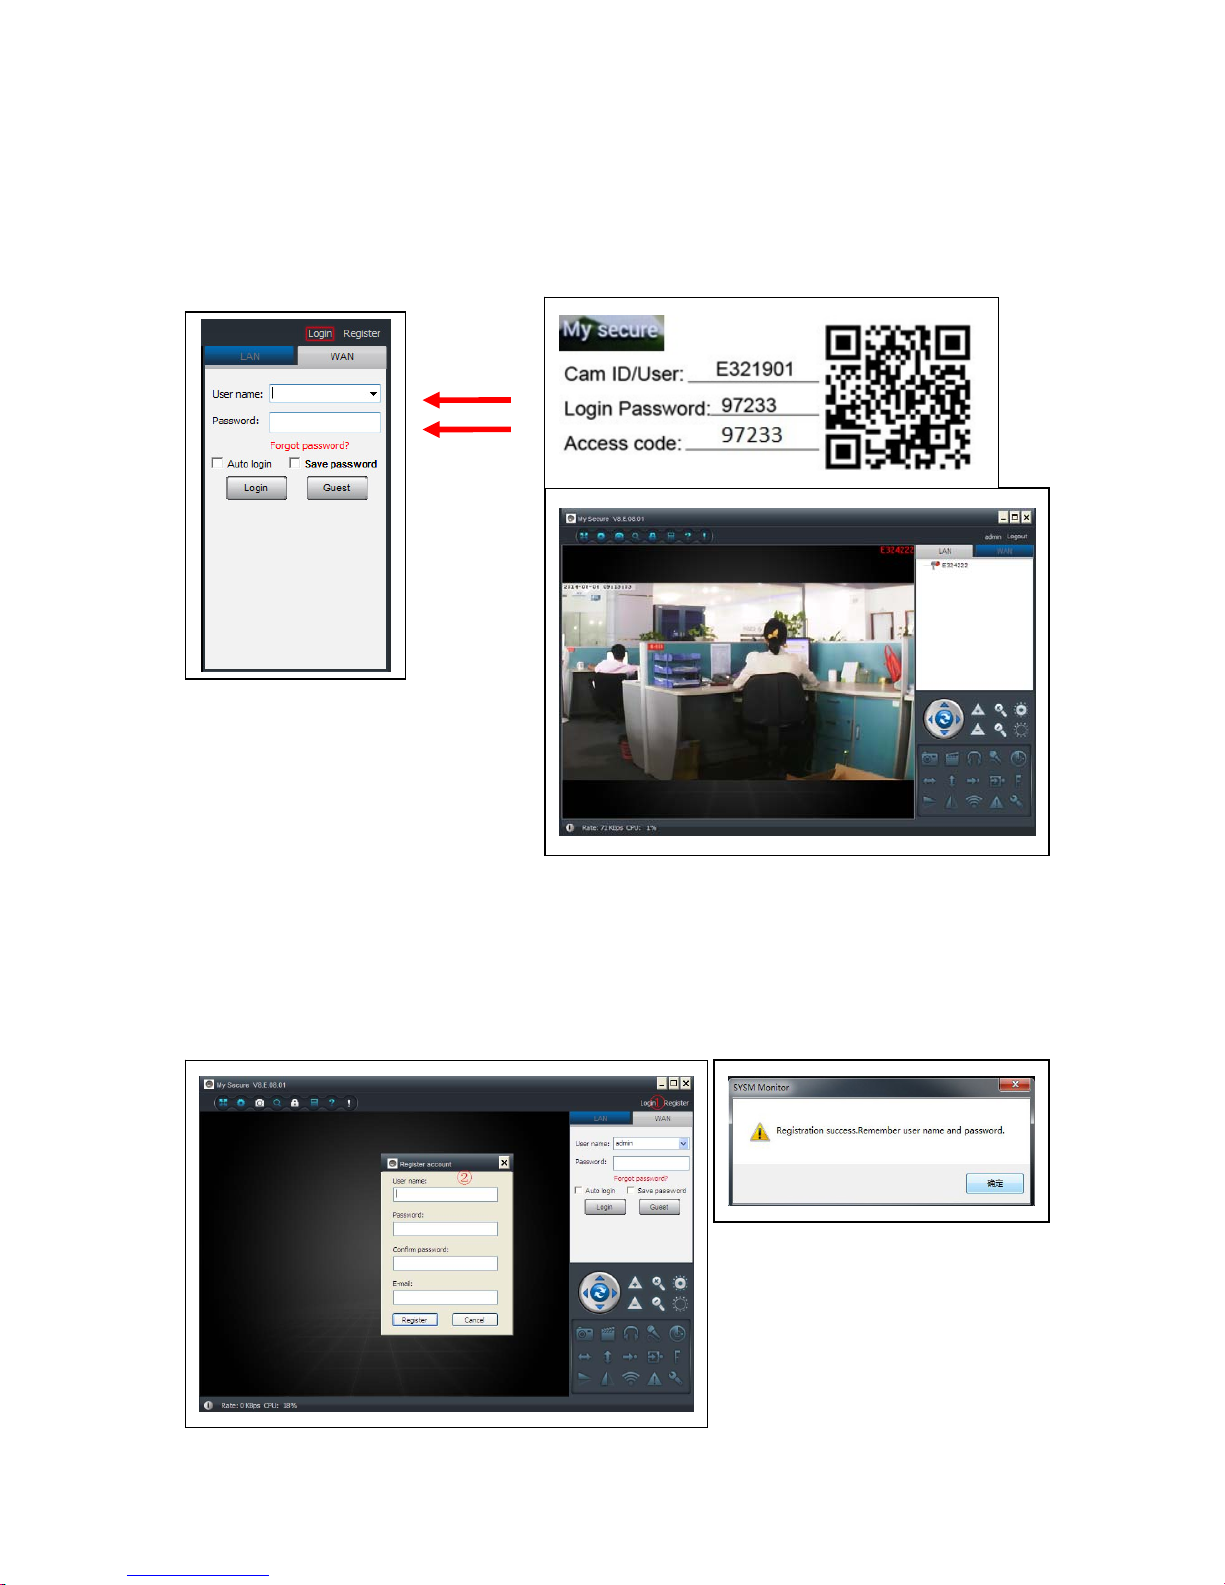
4.3. View the camera on the Internet (WLAN)
Click "Login" in the area of the main list on the right, input "User Name” (Cam/ID User)
and "Login password" and click "Login" button. The user name and password is on
the label of the camera (see the picture below).
The User name is: Cam ID/User, and the Password is: Login password
4.4. Register a new account and add devices
If you have many cameras, you also can register a new account, and add all cameras
in the same account. In this case please insert the 4 digit number Access Code.
(1) Click “Register” and input user name / password /Email.
Page 10
10
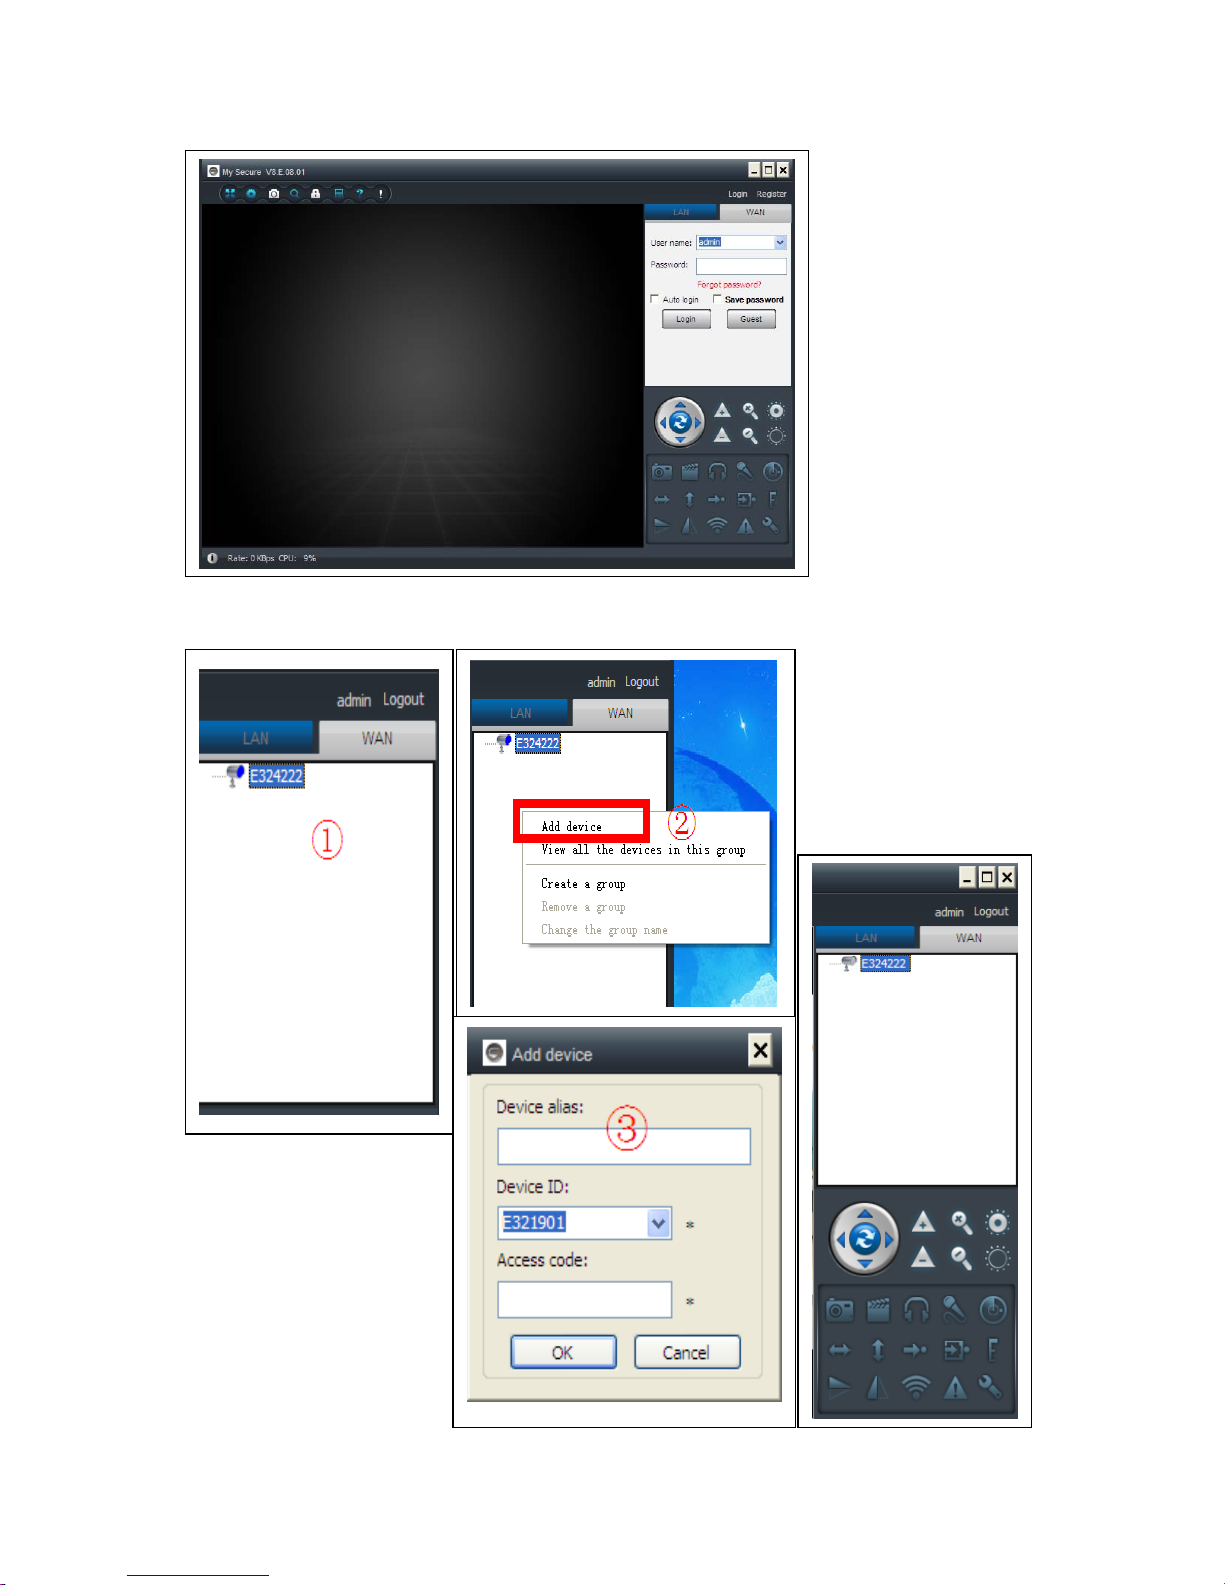
(2) Login in via the new account.
(3) Right click on the blank area , select “Add device” on the pop up window and
input camera alias / Camera ID /Access password (it is on the label of the camera).
Page 11
11
(4) Double click the camera name to view video
Attention:
when the camera lighting RED, that means the camera is in use!
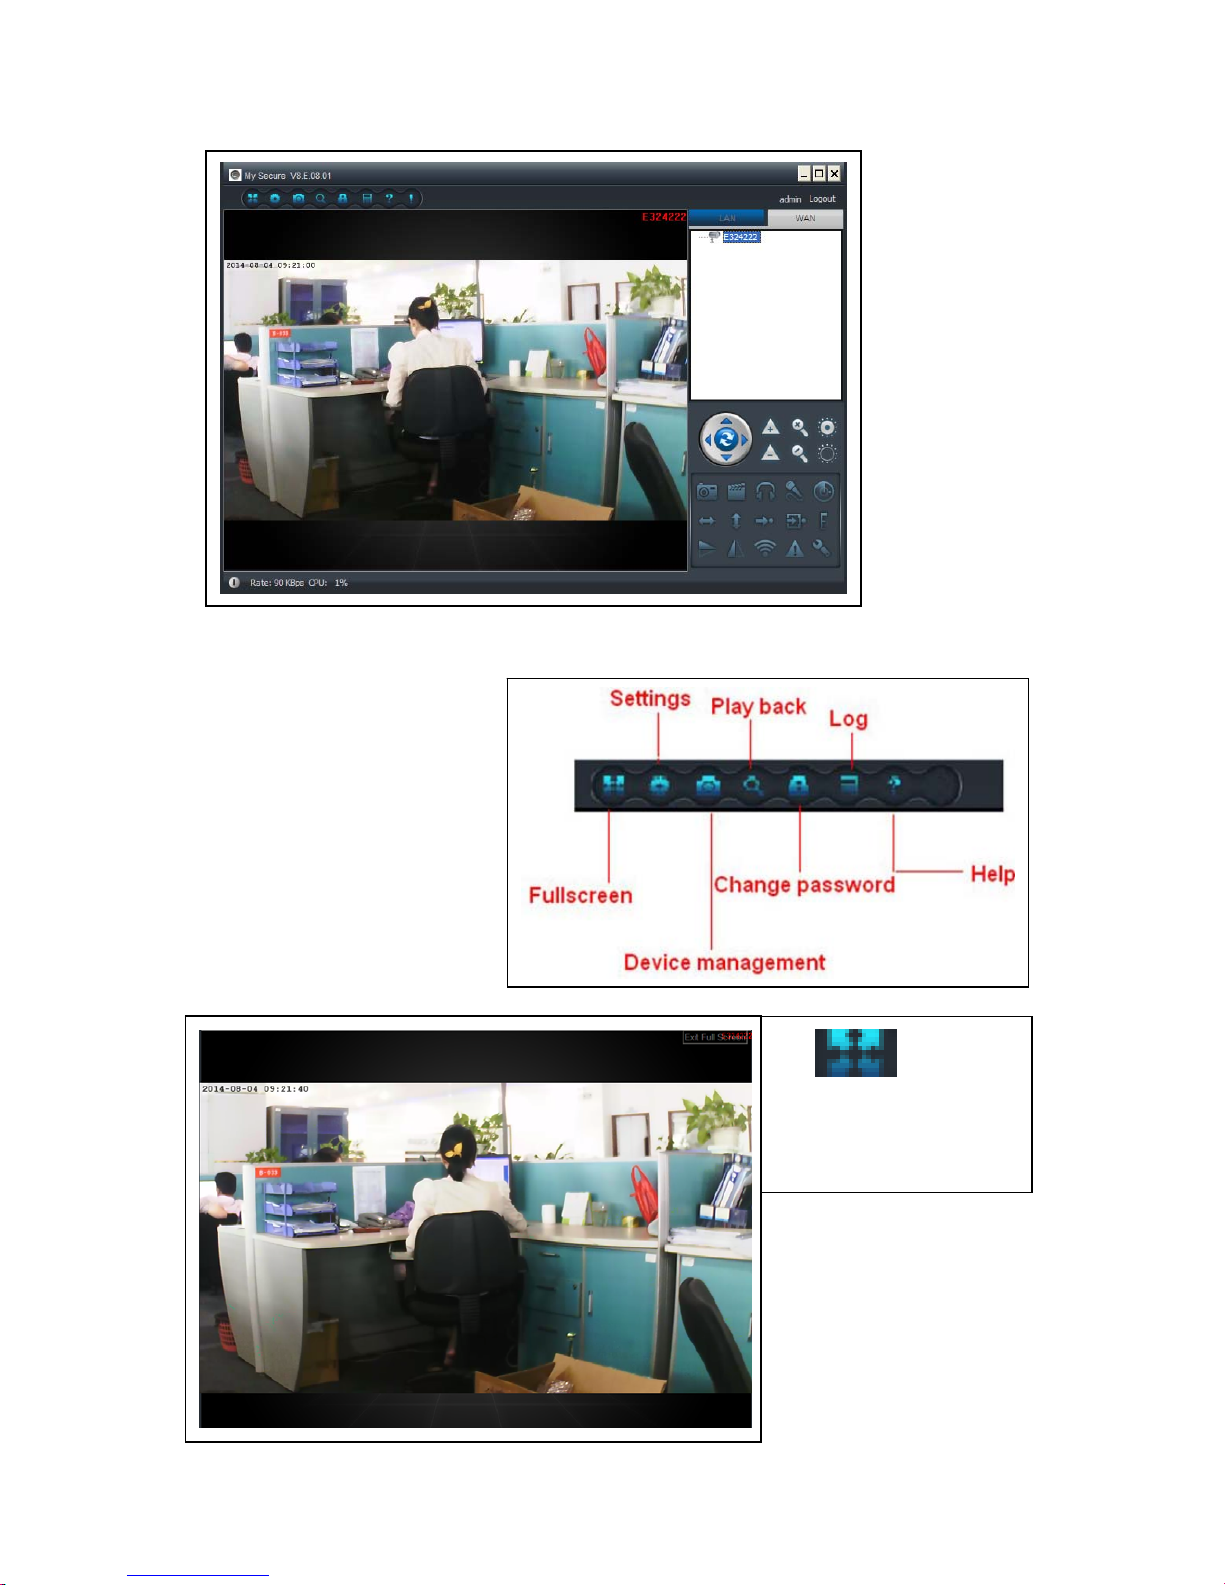
4.5. Main Menu
Settings
Play back
Log
Fullscreen
Device Management
Change password
Help
(1)
Full screen: View video
in full screen.
Page 12
12
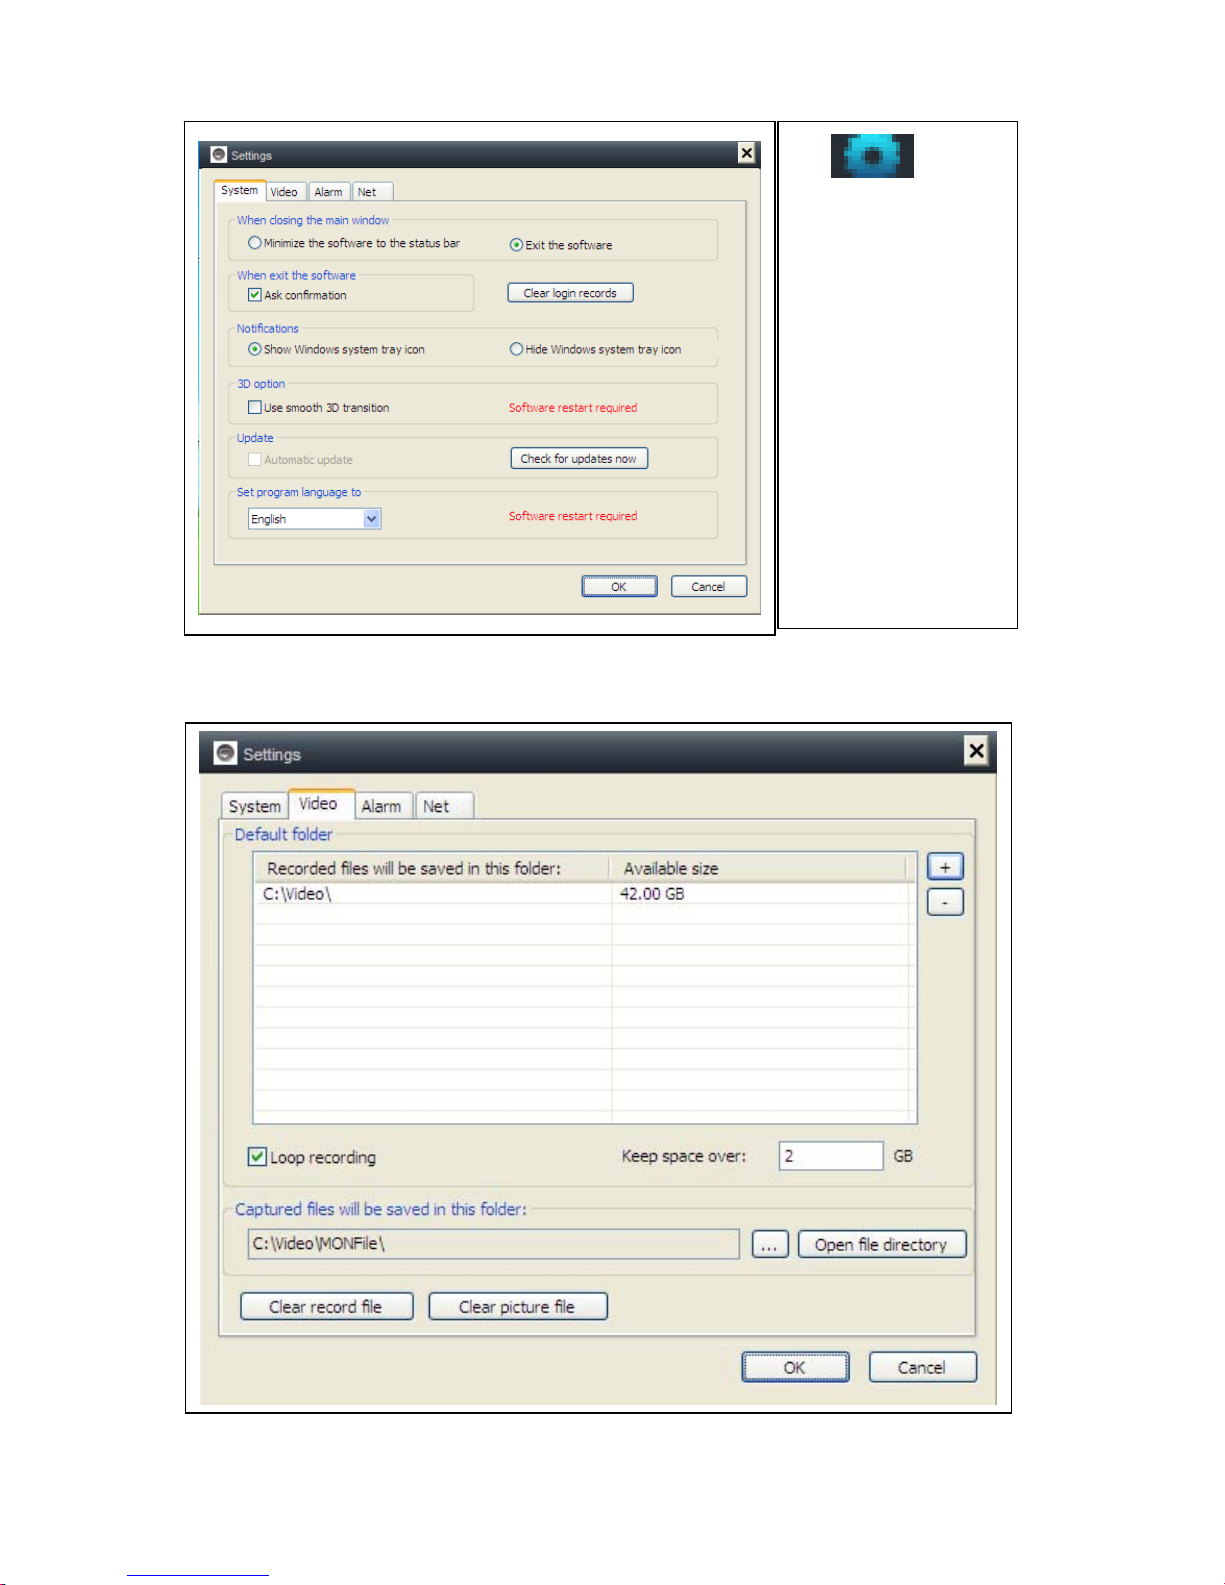
(b) Video: Set the folder of video recording and take picture / alarm view time
(2)
Settings:
Set System, Video,
Local alarm, Alerts,
Net.
(a) System: Set
Program, Language,
Set 3D option,
Notifications, Update
Please activate the
3D Option when you
want to use Digital
Zoom!
Page 13
13
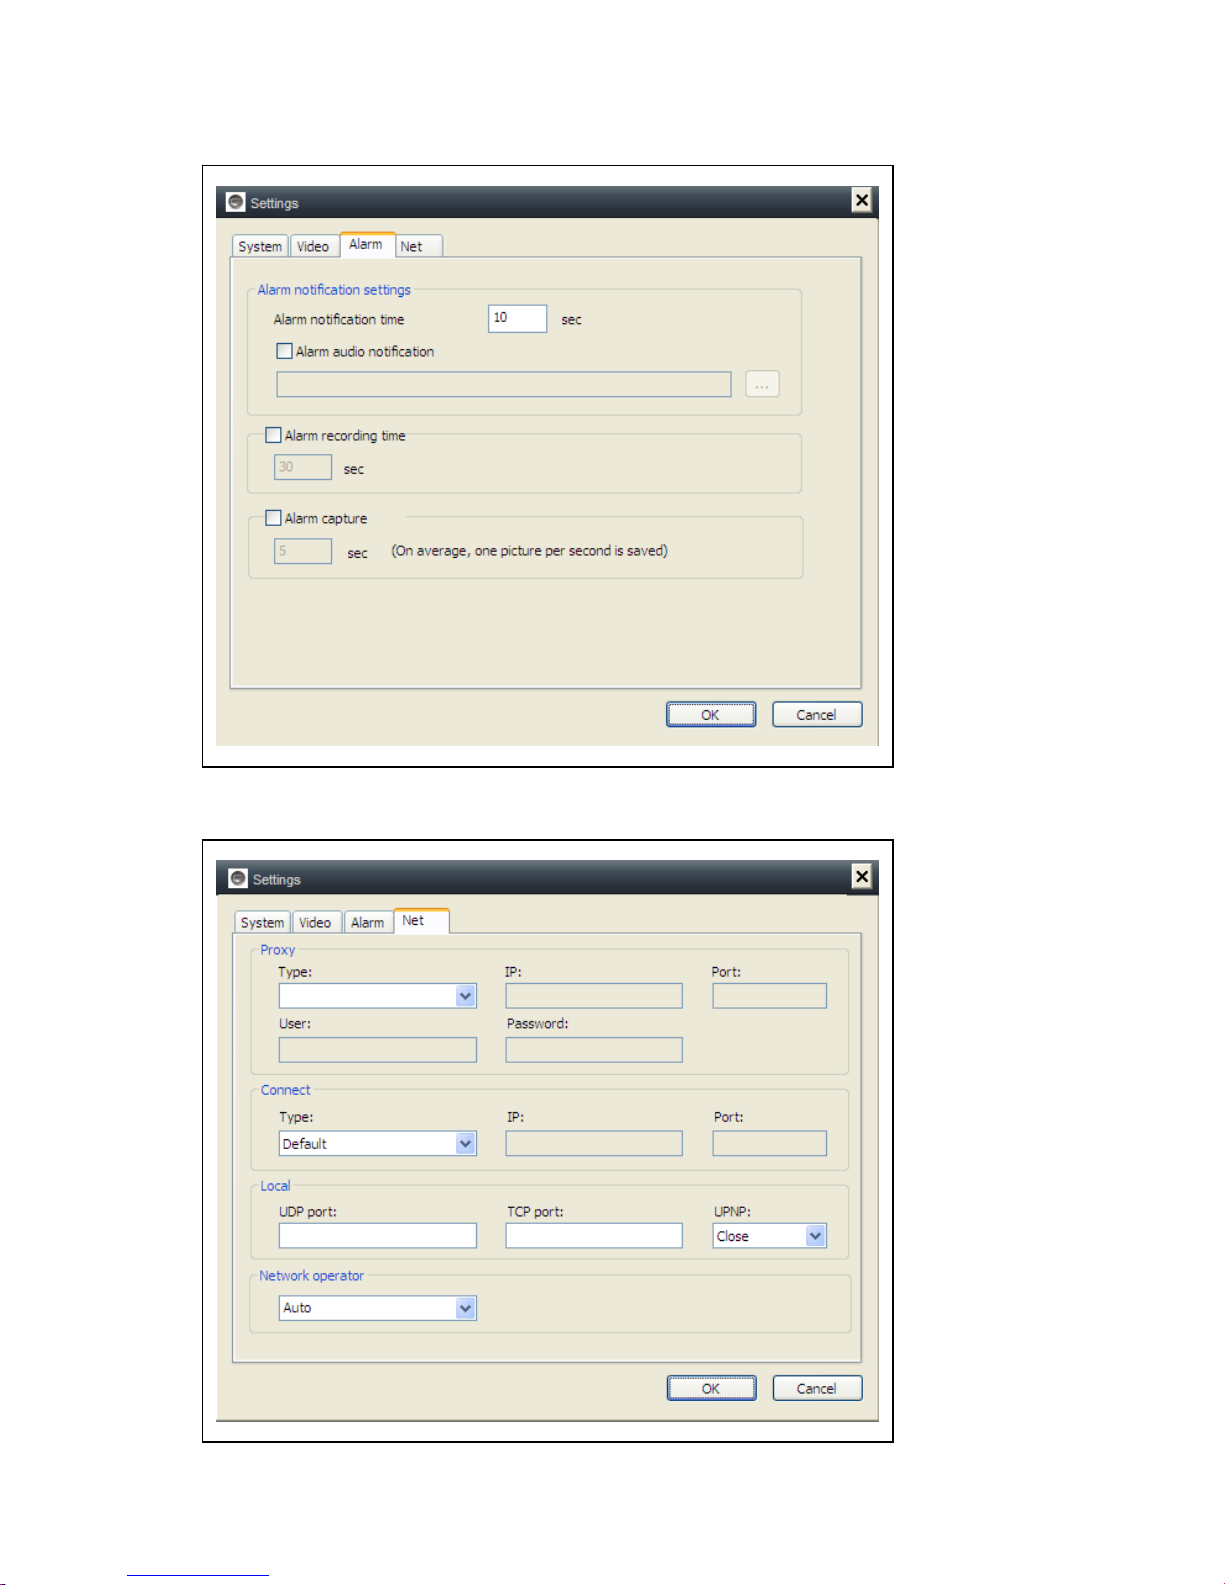
(c) Local alarm alerts: Set local alarm record time / capture time / alarm music.
(d) Net: Usually this is for development to test. Don’t change anything.
Page 14
14
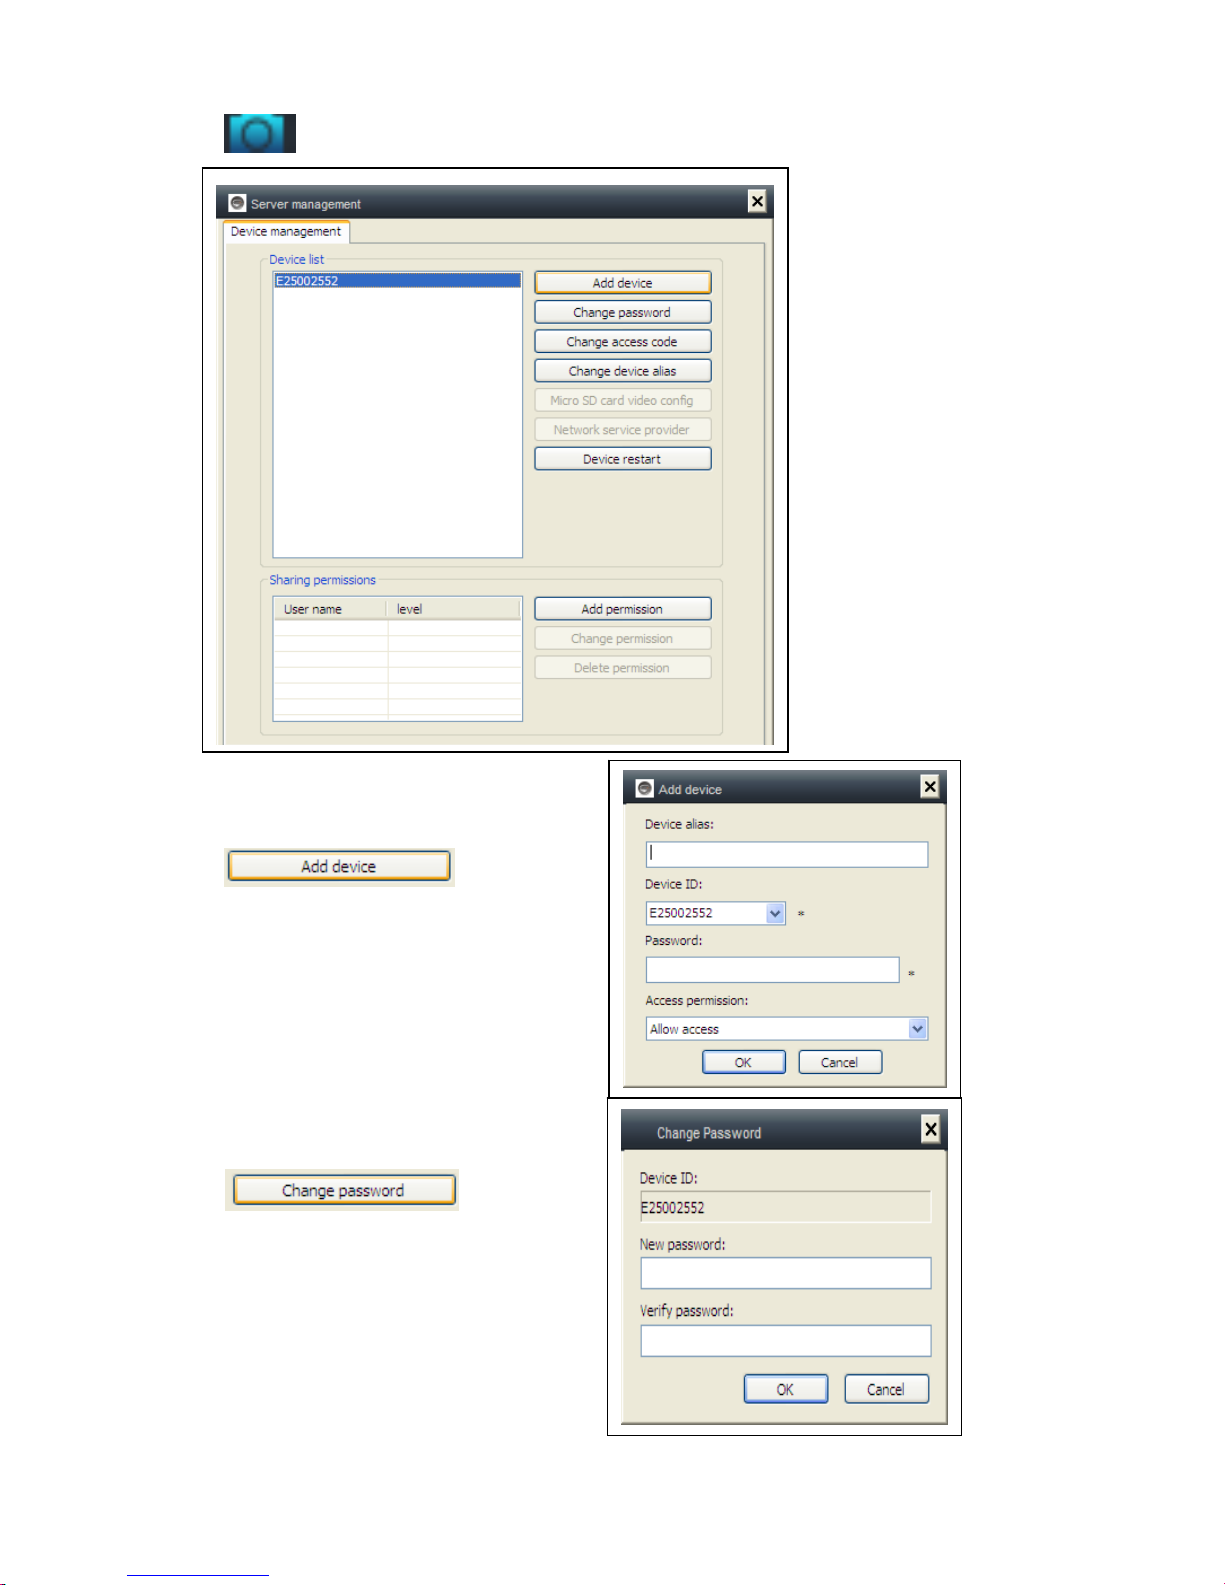
(3) Device management: Add device / change password /set permission
(a)
Add other camera to this account.
This account will get the management
authority.
(b)
Change the device management
Password.
Page 15
15
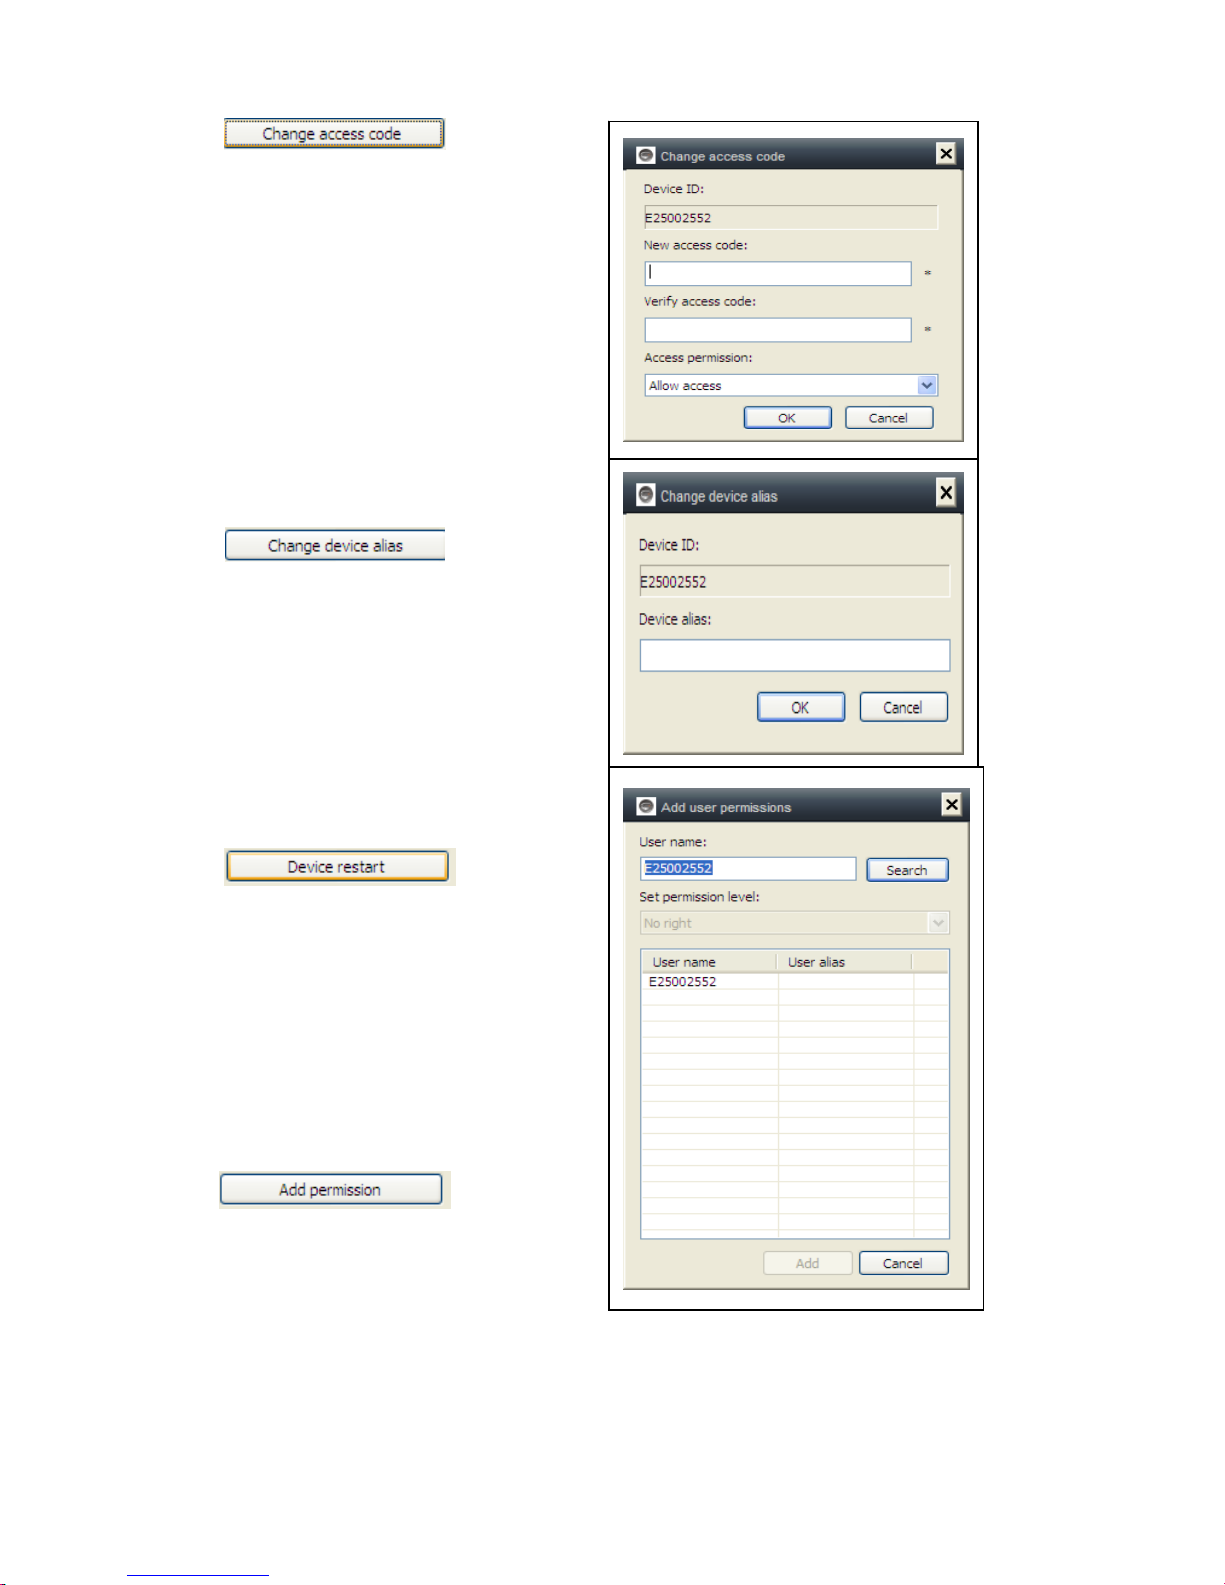
(c)
Change the device access code
(watch password).
(d)
Change device name.
(e)
Restart the device remotely.
(f)
Set permission.
Page 16
16
(4) Playback: Playback video on computer.
(5) Change password: Change login password.
(6)
Log: Check system log.
(7) Help:
Software question and answer.
Attention:
Press 2x on the file you want to watch.
The window opens (see left). Press with
the right mouse button at the display of
the window and after this you can use the
buttons displayed on the below bar.
Page 17

17
5. Video Surveillance (Control Panel)
CAUTION: some function is only for special camera!
(0)
Cruise (ON/OFF): Set cruise on, the camera will auto move rotate.
(1) Optical zoom: control camera optical zoom +/-, only for the camera
has optical zoom lens.
(2) Digital Zoom: software support 4x digital zoom
(3) Aperture switch: set camera aperture big or small
(4) Capture: snap picture
(5) Record: Record video on computer
(6) Listen: listen to the camera audio on computer
(7)
Talk: talk with camera on computer
(8)
Set motion detection area: set the motion area (only for the camera which
supports motion area. This is applicable to this TX-24 model itself.)
Set alarm sensitivity
and set area
(press left button and
move to set area)
Page 18

18
(9) Horizontal pan (ON/OFF): set camera auto rotate horizontally
(10) Vertical tilt (ON/OFF0: set camera auto rotate vertically
(11) Go to pre-set position: call the camera preset (1-8)
(12) Set preset position: set camera preset.(1-8)
(13) Set PTZ speed : set camera rotate speed (1-10, 10 is fastest)
(14) Vertical flip
(15) Mirror
(16) Set up wireless:
Enable “Start WIFI setting” and click on
Scan to search wireless router signal
and select the right wireless router
name, input password. Then press OK.
After set WIFI, the camera will auto
restart in 1–2 minutes.
Page 19

19
(17) Alarm log:
The camera alarm log
(18) Setting:
Set device properties
6. General System Settings
6.1. Camera Settings in LAN Mode
Run the My Secure. All
cameras will display in the
LAN device list, double click
the camera name to view the
camera video. Right-click the
device to set the camera
parameter!
H.264/MPEG4 player (Better
image quality)
Sub-Stream Player (Normal
image quality)
View all the devices in this
group
Close H.264/MPEG4
Close Sub Stream
Close all videos in this group
Page 20

20
6.1.1. Set the IP address
6.1.2. Set WIFI connection
(refer to 4.2. WIFI connection)
6.1.3. Set the local video plan
Set local video record plan, the software will auto record the camera schedule on the
computer after the My Secure is running, as shown below:
Enable “7 x 24” to record all the time from Sunday to Monday
Click “Add” to select the day it and set the start and End time for video recording
Click “Apply” to save the current video equipment plan settings.
The default setting is camera use DHCP.
Camera auto gets IP address from network
router.
It is a easy way for normal customer who do
not know how to set IP address manually.
Activate the „Start WiFi Setting“ and click on
Scan. Select your “Router” Network Name
and put the right password from your WiFi
router. Here no more changes! Then press
OK.
Page 21

21
6.1.4. MicroSD card configuration
Turn off the camera, then insert the MicroSD card and turn on the camera, after boot
up. First format the MicroSD card. It also does not support hot swapping.
The camera auto records video to the MicroSD card when there is motion alarm.
The camera auto records video to the MicroSD card when the camera external sensor
gets alarm.
The camera auto continue records after the camera boots up.
The camera auto coverage the old video file when the MicroSD card is full.
The camera record audio to the MicroSD card.
Select the record video stream
Set the video file size.
Set video uploading to FTP server. FTP server can be only useful when MicroSD card
has been plugged in.
Insert a MicroSD memory card:
(1) Formatting a MicroSD* Card (*not in
delivery) in Windows with FAT32.
(2) Remove the 4 screws at the rear side
of the camera.
(3) Pull out the rear part of the camera a
little bit, in order to see the MicroSD card
slot (which is the part of it).
(4) Insert the MicroSD card into the card
slot (is in the rear part of the camera).
(5) Push back the rear part of the camera
in to the housing and fix it with the 4
screws.
Page 22

22
6.1.5. MicroSD file download
Click “Search” to search the video file on the MicroSD card. Double click the file to
download, double click the file to Playback after downloaded.
Page 23

23
6.1.6. Alarm alerts (Email)
First enable the camera motion alarm
function before setting the alarm alerts
by Email.
Fill in the blanks of the pop-up window,
click “OK”. The device will
automatically take photos and sent
them to the email you set. (For
example: the SMTP port for Gmail is
587; Yahoo use 465).
Alarm pictures: picture No. you want to
the camera to snap.
Data encryption: To set the data
encryption format depend on the email
box supplier.(Gmail use TLS; Yahoo
use SSL)
Page 24

24
6.1.7. Groups
(1) Create a Group: Right click the camera ID and select “Create a group”. Enter a
name for the group in the pop-up interface.
(2) Delete a Group: Right click the group name and click "Delete group" to display the
pop-up box.
(3) Add the camera to the appropriate group: Select the camera ID, hold down the
left mouse button to drag the camera to the group, and then release the left mouse
button.
6.1.8. Change the device alias
Set a name that easy to remember for
LAN camera. Right-click the camera ID
and select “Change the device alias” to
set a new name for the camera, as shown.
6.1.9. Dial connection (PPPOE)
Right click the camera ID and select
“Dial connection (PPPOE)”:
Input user name and password of
internet, and click “OK” to save.
6.1.10. Restore default setting
Right click the camera ID and select “Restore the
default setting”, as shown:
REMARKS: Login password, watch password, and
the parameters of the device like camera system,
language, video parameter, will be restored to the
factory setting. All those settings previously saved
will be lost.
The manager for the device will not be changed
back to the default manager.
Page 25

25
6.2. Camera settings in WLAN mode
Inicie sesión en My Secure con la identificación de la cámara (o con una cuenta
nueva registrada) y la contraseña.
. H.264/MPEG4 player
(better image quality)
. Sub-Stream Player
(Normal image quality)
. Close H.264/MPEG4
. Close Sub Stream
6.2.1. Groups
(1) Create a Group: Right click the camera ID and select “Create a group”. Enter a
name for the group in the pop-up interface.
(2) Delete a Group: Right click the group name and click "Delete group" to display the
pop-up box.
(3) Add the camera to the appropriate group: Select the camera ID, hold down the
left button to drag the camera to the group, and then release the left mouse button.
6.2.2. Change Access password
After successfully login in, click right
on camera ID, select “Change access
code”, as shown:
Page 26

26
6.2.3. Change the camera alias
Set a name that easy to remember
For LAN camera. Right-click the
camera ID and select “Change the
device alias” to set a new name for
the camera, as shown.
6.2.4. MicroSD card query
(a) Right mouse click on the camera ID and select the “SD Card query”.
(b) Click “Search” to obtain the file directory of the MicroSD card.
(c) Double-click the file to download.
Maximum 3 files are supported to be downloaded at the same time.
Page 27

27
6.2.5. Installing MY SECURE
There are different kind of software can be used in our IP camera:
(1) MY SECURE: for Windows PC users
(2) My Secure: for Smartphone users like Android and iPhone.
Users can use different software above to see video from one IP camera.
NOTE: modifications on one IP camera through different software are simultaneous.
In order to prevent disorder among modifications on different devices, we suggest
each user should register one account for surveillance management only.
(3) QR-Code:
Except for logging in with the ID number and password on the sticker, users can also
login automatically by scanning the QR-Code on the sticker. After clicking the "Scan
QR Code" on the Smart Phone the scanning of the ID number and password starts
automatically. Once the scanning is correct and finished, the live video will come out
automatically via the mobile phone.
7. Settings on the Main Menu
Settings
Play back
Log
Device notify (not available)
Fullscreen
Device Management
Change password
Help
Page 28

28
7.1. Full Screen
Live video in software will be in Full screen after click button “Full screen”. To exit the
Full screen please click the button in the screen top right hand corner or “Esc” in the
keyboard.
7.2. Settings
In “Settings”, user can do the setting for System, Video, Local Alarm Alerts and Net.
7.2.1. System
7.2.2. Video
Default folder for capture and video recording can be set on this page.
User can do the setting for “When
closing the main window”, “Exit
software”, “Notification”, “3D
option”, “System Upgrade” and
“Set program languages” by this
page.
Remind to use “3D option” and
“Set program languages to” will
only be activated after restart the
software.
The new video file will cover the
old record by setting “Loop
recording” if the hard disk space is
not enough for video storage, user
can assign the minimum available
hard disk space in the PC by
setting “Keep space over”
(The default setting of software is
2 GB).
Page 29

29
“Alarm view time” means the duration showing the “Device alarm” message the top
left corner when the motion detection alarm is activated. “Clear record”, “Clear picture
file” and “Clear login record” also can be done by this page.
7.2.3. Local Alarm Alerts
Before setting the Local Alarm Alerts, complete the setting on motion detection area.
To learn about the setting of motion detection area, refer to No. 5. “Video
Surveillance“ (8) Motion detection area”.
7.3. Device Management
Device management function is used to manage the permission for different device
and different user. Before starting the device management, make sure you login with
your account which you registered.
7.3.1. Add device
Input:
Device Alias
ID
Management password
Watch password
Set watch permission
Click “Settings”, and choose
“Local Alarm Alerts” setting, as
shown.
Local alarm record: Tick the box
and set the “Alarm record time”.
Camera will start to record after
the set time reached
Local alarm capture: Tick the
box and choose the alarm time
interval when snap.
Local alarm music: Tick the box
to set the audible alarm music
you like
Click OK to confirm setting.
Page 30

30
If user forgets the password, click the restore button (Refer to Section 6.1.10.
“Restore the default settings”) and password will change back to the original
password.
7.3.2. Change management password
REMARK:
Default management password and watch
password equal to the device login password
and Access code on the QR code label.
IMPORTANT:
Default Manager (User) for the camera is
Cam ID / User on the camera label. Manager
position will be changed to other user if other
user clicking in the "Device management"
with the correct management password
(Login/ password on product QR code label).
One user can be the manager for more than
one device.
Input the new management
password (Equal to the login
password in the QR code label),
the new password will replace the
login password of device on QR
code label.
Page 31

31
7.3.3. Change watch password
7.3.4. Change camera alias
Set a friendly name easy to
Remember for the camera.
7.3.4. Change camera alias
Set a friendly name easy to Remember for the
camera.
7.3.5. Permissions Setting
Input the new watch password
(Equal to the Access code in QR
code label) and set the watch
permission, the new watch
password will replace the
Access code on QR code label.
This camera is private and
protected, to limit the activity for
registered user.
Management can assign different
permission level to different user.
To set permission for different user,
follow the steps below.
Page 32

32
Add permission: Input the user name and search, then select the user name and set
permission levels.
Change permission: Select the user name and click “Change Permission”, then
select the level by “No right”, “Allow watch”, “Allow watch and record” and “Allow
watch, record and operate”.
No right: Users are not allowed to watch the live video unless they know the watch
password.
Allow watch: Users are allowed to watch live video.
Allow watch and record: Users are allowed to watch, capture and record live video.
Allow watch, record and operate:
Users are allowed to watch live video, capture and record live video, and change
system settings, to control PTZ.
Page 33

33
Delete permission:
If the user name is deleted, user
will have the permission to watch
IP camera if the user knew the
watch password (Access code).
7.4. Search
According to recording
time of the query video
recordings on the local
computer, double-click
the video file to playback.
NOTE: Video playback
support for pause, slow
down, fast forward, drag
the progress bar and
other operations.
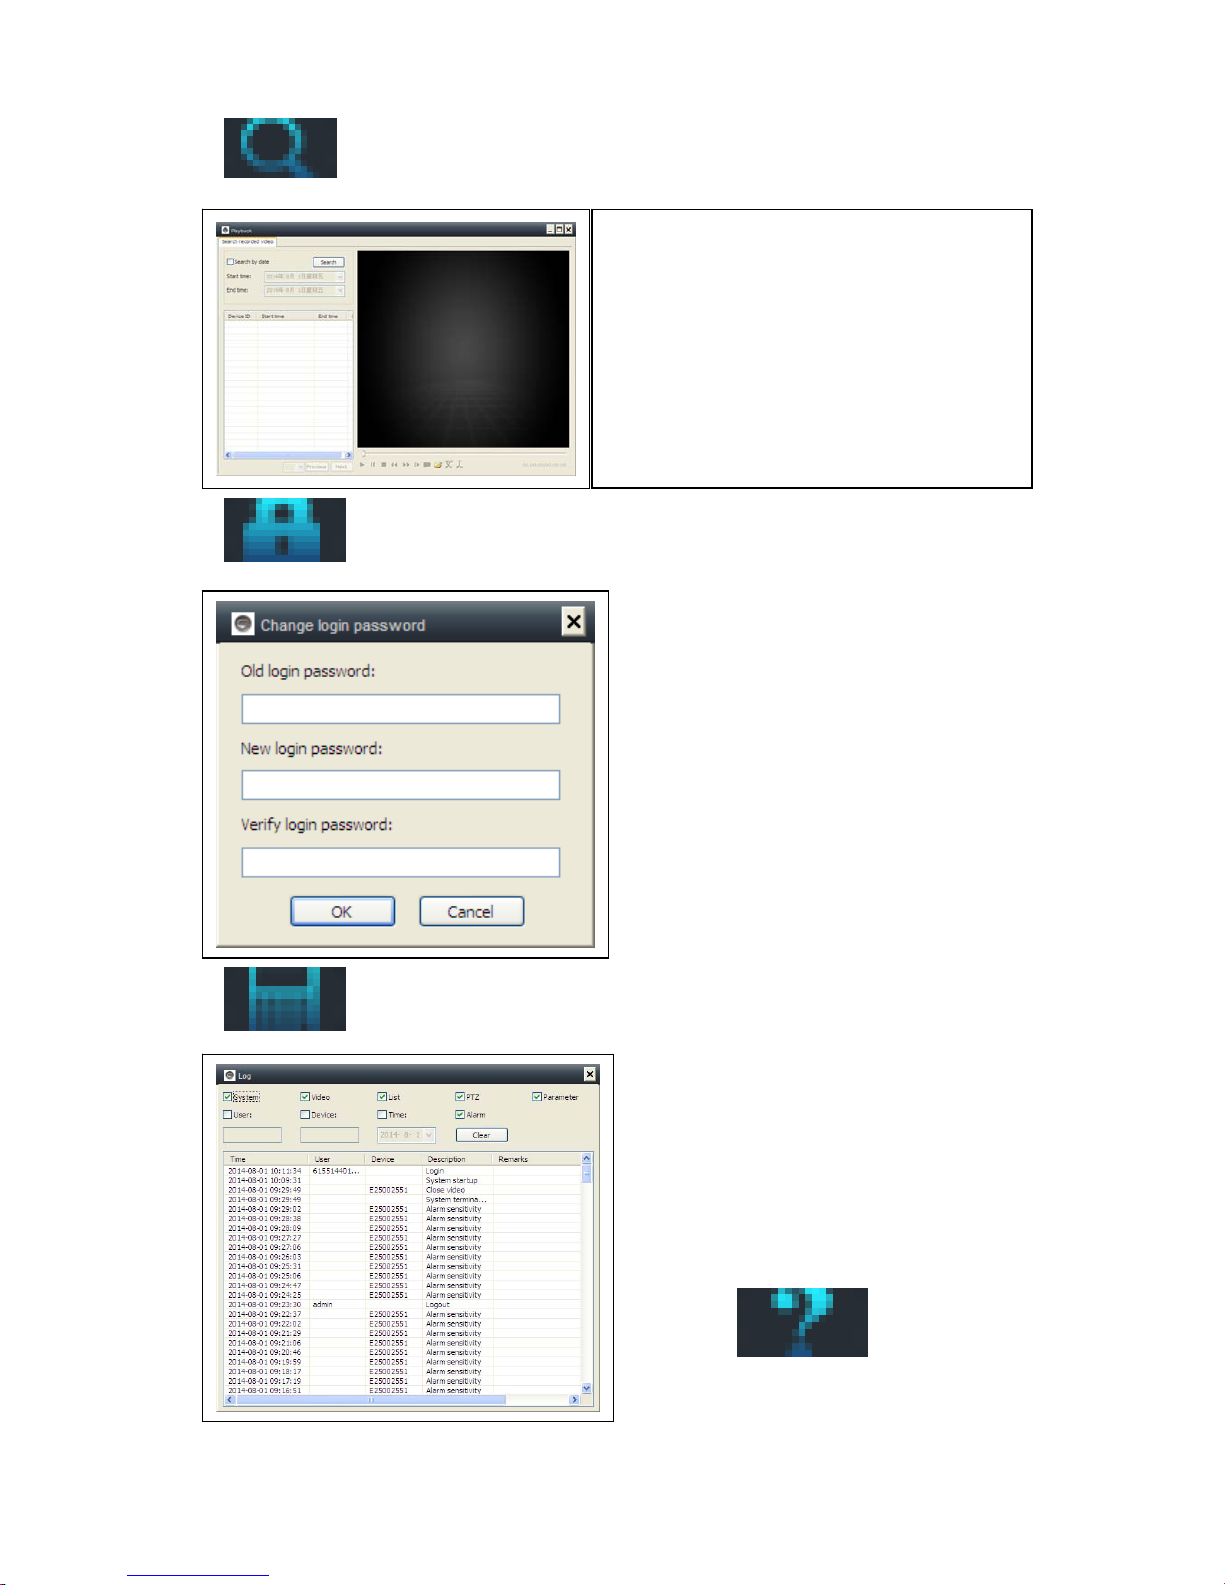
7.5. Change password
(User login password)
When login successfully, you can
click "Change Password" button
on the menu bar, pop-up window,
input the original login password
and new password.
Page 34

34
7.6. Log
User can check the Log History by
clicking on the “LOG” icon.
7.7. Help
User can check the user manual by
HTML format by clicking on the “Help”
icon on top left main menu.
8. FAQ (Frequently Asked Questions)
8.1. Video delay: There are three factors which will cause video delay: upload
speed, PC download speed, and image resolution. If the issue happens on the PC
client, generally, you can click “Settings” as below to adjust the resolution to QVGA
(320 x 240). If it also does not work, please check the other two factors.
8.2. LAN cable should not be too long
If network cable is too long, the signal will be weakened and cause disconnection. Any
network fault on PC client or IP camera will cause video disconnection.
Page 35

35
8.3. Cannot visit the IP camera in LAN
1. Check, if the network cable is connected ok.
2. Right mouseclick on LAN and select “Set the
IP address”. Normally the device will automatically
get an IP address. If not, you have to set manually
the same Subnet IP address for the device.
8.4. Can visit the IP camera in LAN, but cannot view it on WLAN
When camera can be viewed on LAN, but cannot be viewed via WLAN, usually
because the device gets wrong IP address. Try to set DHCP for the device
8.5. Image quality is not good enough
All of the camera parameters keep default
value of factory, but not all the parameters are
proper for special occasions. The default setting
is based on factory testing environment. Users
can adjust parameters according to his environment to get a good video. You can adjust the
parameters like resolution to get better quality
images according to your requirements.
8.6. Forgot your password?
If you have forgotten your own login password which registered by yourself, click
“Forgot Password”. Input your username and your registered email address. The
server will send a password to your mail box. Then use the new password to login.
Page 36

36
Please check your Email
8.7. Restore to default settings
(a) Press the reset button of the camera about 1 minute.
(b) Right-click camera ID on LAN, click “Restore to default setting”.
8.8. How to reboot equipment?
User can reboot equipment whatever he/she is in local network or Internet. If the user
is in LAN, right-click the device and select “Device restart”. If the user is in WLAN,
click “Device management” and click the “Device restart”.
9. Technical Specifications
Image Sensor 1/4" CMOS colour sensor
Minimum illumination 0.5 Lux
Waterproofed IP65
Video compression H.264 720p Multi Stream
Internet connection Supports P2P function, easy to connect through internet
Video frame rate 25fps
Motion detection & Capture Yes / Yes
Video (adjustable) Brightness, Contrast, Sharpness, Saturation
Digital Zoom 4x Digital Zoom
Audio output One audio output
Audio format G.726
System interface
Audio input/output
Alarm input/output
10Base-T / 100Base-TX internet interface
Video stream 16Kbps ~ 4Mbps
Protocol TCP / IP
Wireless network Supports 802.11.b/g/n wireless protocol
Memory card Supports MicroSD card up to 32GB
Infrared lights 36 IR–LEDs
IR night vision 20 m
Alarm input One-way high level input
Alarm output One-way DC5V 300mA output
Power supply External po wer adaptor DC 12V / 1A
Power consumption 4 W
Working temperature –5°C up to +55°C
Weight / Dimensions 725g ( with cable) / (L) 26 x (W) 7 x (H) 16cm
Page 37

37
10. Installation Manual
for Android / IOS Smartphone
Install IP Camera Install Mobile Phone App
Technaxx My Secure Software Register an
account Add cameras under this account
IP Network Camera Installation Procedure
First plug in the power cable to the IP camera. Then connect the LAN
cable with the camera and the rourter (see picture below).
ATTENTION: DHCP service
must be enabled in the router!
Page 38

38
(1) Before installation, make sure your phone is using 3G or WIFI
(2) Install software: Search and Install “My Secure”
in Apple APP store and Google play store.
(3) Click the APP icon to run the mobile APP
(4) Input the camera ID and password to Login camera
The My Secure icon (see below) you can find on the LOGIN screen right
hand side (see the picture of the LOGIN screen). Also support click this
icon to scan QR-code to auto input ID and password. Then check the
camera label and input ID and password on the APP
Page 39

39
My Secure icon
(5) Login account. (If no accounts yet, go to register an account first and
type in User name and Password). Under this account you can add
Security CAM’s (go to point 10)
(6) After successful login, click on a camera to start monitoring.
Page 40

40
(7) Press at the “+” symbol to add a camera
1.Add other camera
2.Play camera video
3.Config camera
4.Camera list in WAN
5.Camera list in LAN
6.Video playback
7.Alarm events
1.Select video resolution
2.preset operation
3.Audio talk
4.Snap Picture
5.Single screen and quad
6.Video record
Page 41

41
(8) Setting Camera under sub menu W AN
Set video quality parameters and SD card, by clicking the sign. [under iPhone;
under Samsung].
ATTENTION: The configuration of the cameras is only under “Online” status
possible!
Page 42

42
# Automatic recording starts when enough disc space on the MicroSD card
exists (Attention: only for TX-24).
# Video partition size can be defined how much MB for each stream .
# Video settings: Select between sub-stream & main-stream.
# Quality: select the quality of the video (low , n ormal, high, good, super
# Set for Resolution, Frame rate & S tream accordingly.
Page 43

43
(9) Setting Camera under sub menu LAN
Page 44

44
Page 45

45
Page 46

46
You can select to enable or disable motion detection & select the
sensitivity (highest, high, medium, low).
Control Pan/Tilt
Taking photo
Recording video
Page 47

47
After the connection to the camera is established, you see at the
bottom of the Display the following symbol:
Press the button then you find
the following picture you can select
video resolution:
HD = 1300 kbps
Smooth = 800kbps
Faster = 400 kbps
When you press the button
, you
can take a picture directly from the
Security Cam.
Button Description
Page 48

48
To remove/replace, replace the picture simply press & hold at each
picture and select.
Press the button to hear over headphone or to speak through
microphone. Connect your headphone to your Smartphone or press on
the microphone to speak.
Press the button to take a picture one by one. Press the button
to see a single windows or quad.
Page 49

49
Press the button to start recording a video.
Press the button to adjust or change the direction of the Security
CAM. (Attention: this menu functions only for TX-23!)
You can also move the direction of the camera by pressing &
Page 50

50
holding the menu for each direction:
Press ❶ to rotate the
Security CAM horizontally.
Press ❷ to rotate the
Security CAM vertically.
Press ❸ or ❹ to invert the
Security CAM down or up.
Page 51

51
(10) Register account (if successfully being registered, jump back to
Step 3):
Press “Register”; Fill in information; Click “OK” to complete it
Press the button to
adjust the color of the Security
CAM:
Hold & move a button to the
right or left to change
brightness.
Hold & move to the left or right
to change the contrast of the
picture.
Page 52

52
(11) Add cameras under account (if successfully being added, jump
back to step 4)
Login first; Click “+”
Click “Add Device” or Scan to add a device automatically (QR Code)
Camera Alias = here you can give a name which you like.
Camera ID = find this ID under your Camera written with QR Code.
Access code = find this code under your Camera.
Focus the smart phone camera directly
at the QR Code of the security cam.
Page 53

53
Fill in camera information
“Device Alias” – give a name to this camera
“Device ID” – at bottom of each camera, there is a label with QR Code
“Access Pass.”
Click “Done”
to add it
At the end: If successfully being added, the new camera will be in the
list.
 Loading...