


Flying Angel
3G Wireless Data Card
User Manual
Updated: 03/2009

Flying Angel 3G Wireless Data Card
User Manual
Table of contents
Chapter 1 Product Information .......................................................................................... 3
1.1 Feature summary......................................................................................................... 3
1.1.1 Packing list....................................................................................................................3
1.2 System requirements ................................................................................................... 4
1.3 Product Specifications.................................................................................................. 5
1.3.1 Wireless Network Capabilities ......................................................................................... 5
1.3.2 Output power................................................................................................................... 5
1.3.3 Environmental Specifications...........................................................................................6
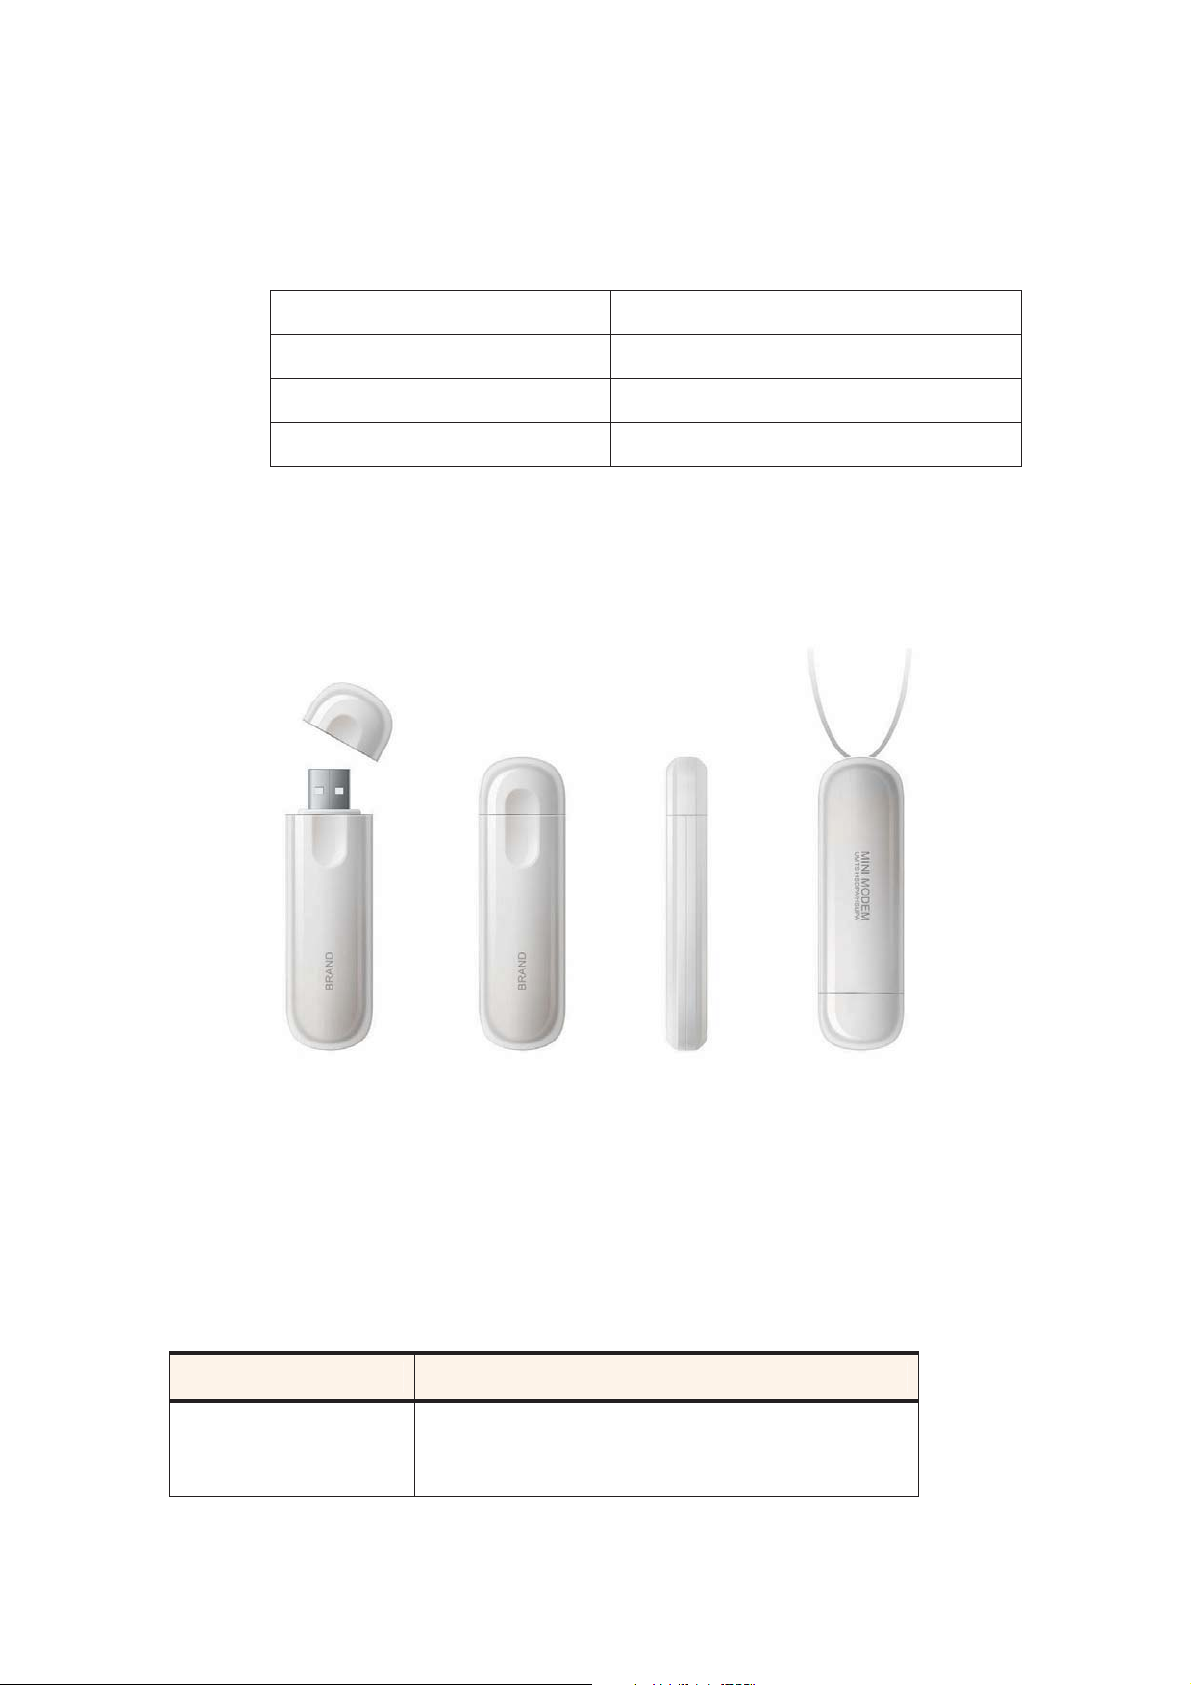
1.4 Basic Introduction to the Flying Angel.......................................................................... 6
1.4.1 Indicator Light.................................................................................................................. 6
1.4.2 Before using the Flying Angel 3G Wireless Data Card..................................................7
Chapter 2 Prepare the Flying Angel................................................................................ 8
2.1 Inserting the SIM Card and MicroSD Memory Card .................................................... 8
2.2 Removing the SIM card and MicroSD Memory Card ................................................ 12
Chapter 3 Connect the Flying Angel 3G Wireless Data Card to your PC ........................ 15
Chapter 4 Installation and Software – Windows PC........................................................ 17
4.1 Install Connection Software..................................................................................... 17
4.2 Using the Flying Angel 3G Wireless Data Card - PC.............................................. 22
4.2.1 Flying Angel Connection Manager Dashboard............................................................ 23
4.2.2 Set Up Your Connection Profile ..................................................................................26
4.2.3 Internet Options ..........................................................................................................34
4.2.4 Flying Angel Explorer..................................................................................................37
4.2.5 Manage Your Settings................................................................................................. 43
Chapter 5 Installation and Software – Macintosh............................................................ 51
5.1 Install Connection Software..................................................................................... 51
5.2 Using the Flying Angel 3G Wireless Data Card - Mac ............................................ 53
5.2.1 Connection Manager Tools ............................................................................................ 53
5.2.2 Set Up Your Connection Profile............................................................................ 54
5.2.3 Connect to the Internet..................................................................................................55
5.2.4 SMS Messages .............................................................................................................56
5.2.5 PhoneBook .................................................................................................................57
5.2.6 Settings....................................................................................................................... 57
2 Updated 03/2009

Flying Angel 3G Wireless Data Card
User Manual
Chapter 1 Product Information
Thank you for choosing the Flying Angel 3G Wireless Data Card. This wireless modem
provides a high-speed connection to the Internet using your PC and a wireless
communications account. Once you are connected, you can surf the Internet using a
web browser, send and receive e-mail, and access a virtual private network (VPN) or
corporate network, without the need for a phone line or network cable.
Please read through this user manual before using the Flying Angel
Data Card
device is ready for use.
to properly install the connection software and hardware, and ensure that the
3G Wireless
1.1 Feature summary
x USB wireless modem
x USB 2.0 high-speed connection
x Dual 3G and EDGE wireless network coverage
x Compatible with most PCs and laptops with Windows 2000, Windows XP,
Windows Vista or Mac OS.
x Internal antenna
x Easy plug-and-play software installation and set up
x Data download speeds up to 7.2 Mbps; uplink speeds up to 2.0 Mbps
(actual speeds may vary based on network configurations and other factors)
x Quickly connect to the Internet, e-mail and other web services using your wireless
account
x Send and receive SMS messages from your computer (software included)
x MicroSD expandable memory card slot for up to 4GB of portable storage (card
purchased separately)
1.1.1 Packing list
The Flying Angel package contains the following items:
Ͳ 1 (one) Flying Angel 3G Wireless Data Card
Ͳ Connection management software for Windows and Mac pre-loaded into
device
Ͳ User Guide
Ͳ Quick Start Guide for Windows and Mac
3 Updated 03/2009

Flying Angel 3G Wireless Data Card
User Manual
1.2 System requirements
To use the Flying Angel 3G Wireless Data Card, you require the following:
x An active account with a wireless service provider operating a high-speed
third generation (3G) HSDPA wireless network or EDGE wireless network
x SIM Card: A SIM card is a small portable memory chip used in cellular
telephones. The SIM holds personal identity information, cell phone number,
phone book, text messages and other data. SIM cards are available from your
wireless service provider.
x MicroSD Memory Card (optional): The Flying Angel includes a card holder for
a microSD memory card to provide up to 4GB of portable file, photo, music and
video storage (card purchased separately from wireless service providers and a
variety of retailers). The device does not require a microSD memory card to
connect to the Internet.
The Flying Angel 3G Wireless Data Card is supported on the following computer
operating systems:
Windows
x Windows Vista
x Windows XP (Home and Professional versions)
x Windows 2000
Macintosh
x Mac OS X v10.4 or newer
To use the Flying Angel 3G Wireless Data Card on a PC with Windows, you require
the following system resources:
x 1 USB Type A slot (USB 2.0)
x 40MB hard disk space
To use the Flying Angel 3G Wireless Data Card on a computer with Macintosh OS X,
you require the following system resources:
x 1 USB Type A slot (USB 2.0)
x 1.30 MB hard disk space
Flying Angel 3G Wireless Data Card Software
The Flying Angel 3G Wireless Data Card comes with the following connection
management software to manage the modem and monitor your connections:
x Flying Angel Connection Manager software for Windows
x Flying Angel Connection Manager software for Mac
4 Updated 03/2009

Flying Angel 3G Wireless Data Card
User Manual
x Driver software to interface between the Flying Angel 3G Wireless Data Card and
your Windows or Mac operating system.
Note: this software must be installed before using your Flying Angel 3G Wireless
Data Card.
1.3 Product Specifications
1.3.1 Wireless Network Capabilities
The Flying Angel 3G Wireless Data Card operates over a type of wireless network called
HSDPA. HSDPA technology provides a variety of connectivity features, depending on your
service provider and account. The Flying Angel operates with the following capabilities:
UMTS 850 Uplink 824~849MHz
Downlink 869~894MHz
UMTS1900 Uplink 1850~1910MHz
Downlink 1930~1990MHz
UMTS 2100 Uplink 1920~1980MHz
Downlink 2110~2170MHz
GSM 850 Uplink 824~849MHz
Downlink 869~894MHz
EGSM 900 Uplink 880~915MHz
Downlink 925~960MHz
DCS 1800 Uplink 1710~1785MHz
Downlink 1805~1880MHz
PCS 1900 Uplink 1850~1910 MHz
Downlink 1930~1990 MHz
1.3.2 Output power
HSDPA/UMTS 850 Output power level class 3 (24 dBm)
HSDPA/UMTS 1900 Output power level class 3 (24 dBm)
HSDPA/UMTS 2100 Output power level class 3 (24 dBm)
GSM 850 Output power level class 5 (32dBm)
EGSM 900 Output power level class 5 (32dBm)
DCS 1800 Output power level class 0 (30 dBm)
PCS 1900 Output power level class 0 (30 dBm)
5 Updated 03/2009
Flying Angel 3G Wireless Data Card
1.3.3 Environmental Specifications
Operating temperature -20oC ~ +55oC
Storage temperature -30oC~ +65oC
Humidity 93%
Vibration (non-operating) 15g peak, 10Hz to 500kHz
1.4 Basic Introduction to the Flying Angel
User Manual
1.4.1 Indicator Light
The indicator light is located on the outside of the device and will light up once inserted
into your PC. It shows the working status of the Flying Angel:
Indicator Light State Working Status
Off
6 Updated 03/2009
The device has no power. The Flying Angel is not
completely inserted into the USB slot or the computer is
in standby mode (which powers down the modem).

Flying Angel 3G Wireless Data Card
User Manual
Blinking Green
Green
Blinking Blue
Blue
Red
The device has detected a GPRS/EDGE (2G) wireless
network, and is ready to connect.
The device has connected with a GPRS/EDGE (2G)
wireless network, and is sending or receiving data.
The device has detected a 3G wireless network
(WCDMA/HSDPA/HSUPA), and is ready to connect.
The device has connected with a 3G wireless network
(WCDMA/HSDPA/HSUPA), and is sending or receiving
data.
Warning: a SIM card has not been installed in the
Flying Angel, or the SIM card is not properly seated in
the SIM card slot.
Follow the instructions in Chapter 2 to make sure
your SIM card is properly installed.
1.4.2 Before using the Flying Angel 3G Wireless Data
Card
Before you can use the Flying Angel 3G Wireless Data Card for the first time you must:
1. Correctly insert a SIM Card into the device (card purchased separately).
2. Optional: Correctly insert a microSD memory card into the device (card purchased
separately). The microSD card is only required if you plan to store files, photos, music
and video on the device. The Flying Angel does not require a microSD memory card to
connect to the Internet.
3. Connect the device with your PC.
4. Make sure you have an active account with a wireless service provider.
7 Updated 03/2009

Flying Angel 3G Wireless Data Card
User Manual
Chapter 2 Prepare the Flying Angel
2.1 Inserting the SIM Card and MicroSD Memory
Card
To use your Flying Angel 3G Wireless Data Card to connect to the Internet, you need a SIM
card from your wireless service provider. The SIM card contains account information
used by your wireless provider’s network to validate your access.
Optional: If you require extra storage capability to store files, photos, music and video
on the Flying Angel, you may insert a microSD memory card into the device to provide up
to 4GB of portable storage (card purchased separately from wireless service providers
and a variety of retailers). The device does not require a microSD memory card to
connect to the Internet.
To install your SIM card into the Flying Angel 3G Wireless Data Card, follow the
steps below:
1. If your SIM is attached to a larger card, detach the SIM and remove any fragments
stuck to it.
If you use a SIM card from a mobile phone, follow the manufacturer’s instructions to
open the phone’s cover and remove the SIM.
2. Open the back cover of the Flying Angel by sliding it downwards (as shown in figure
2-1).
8 Updated 03/2009
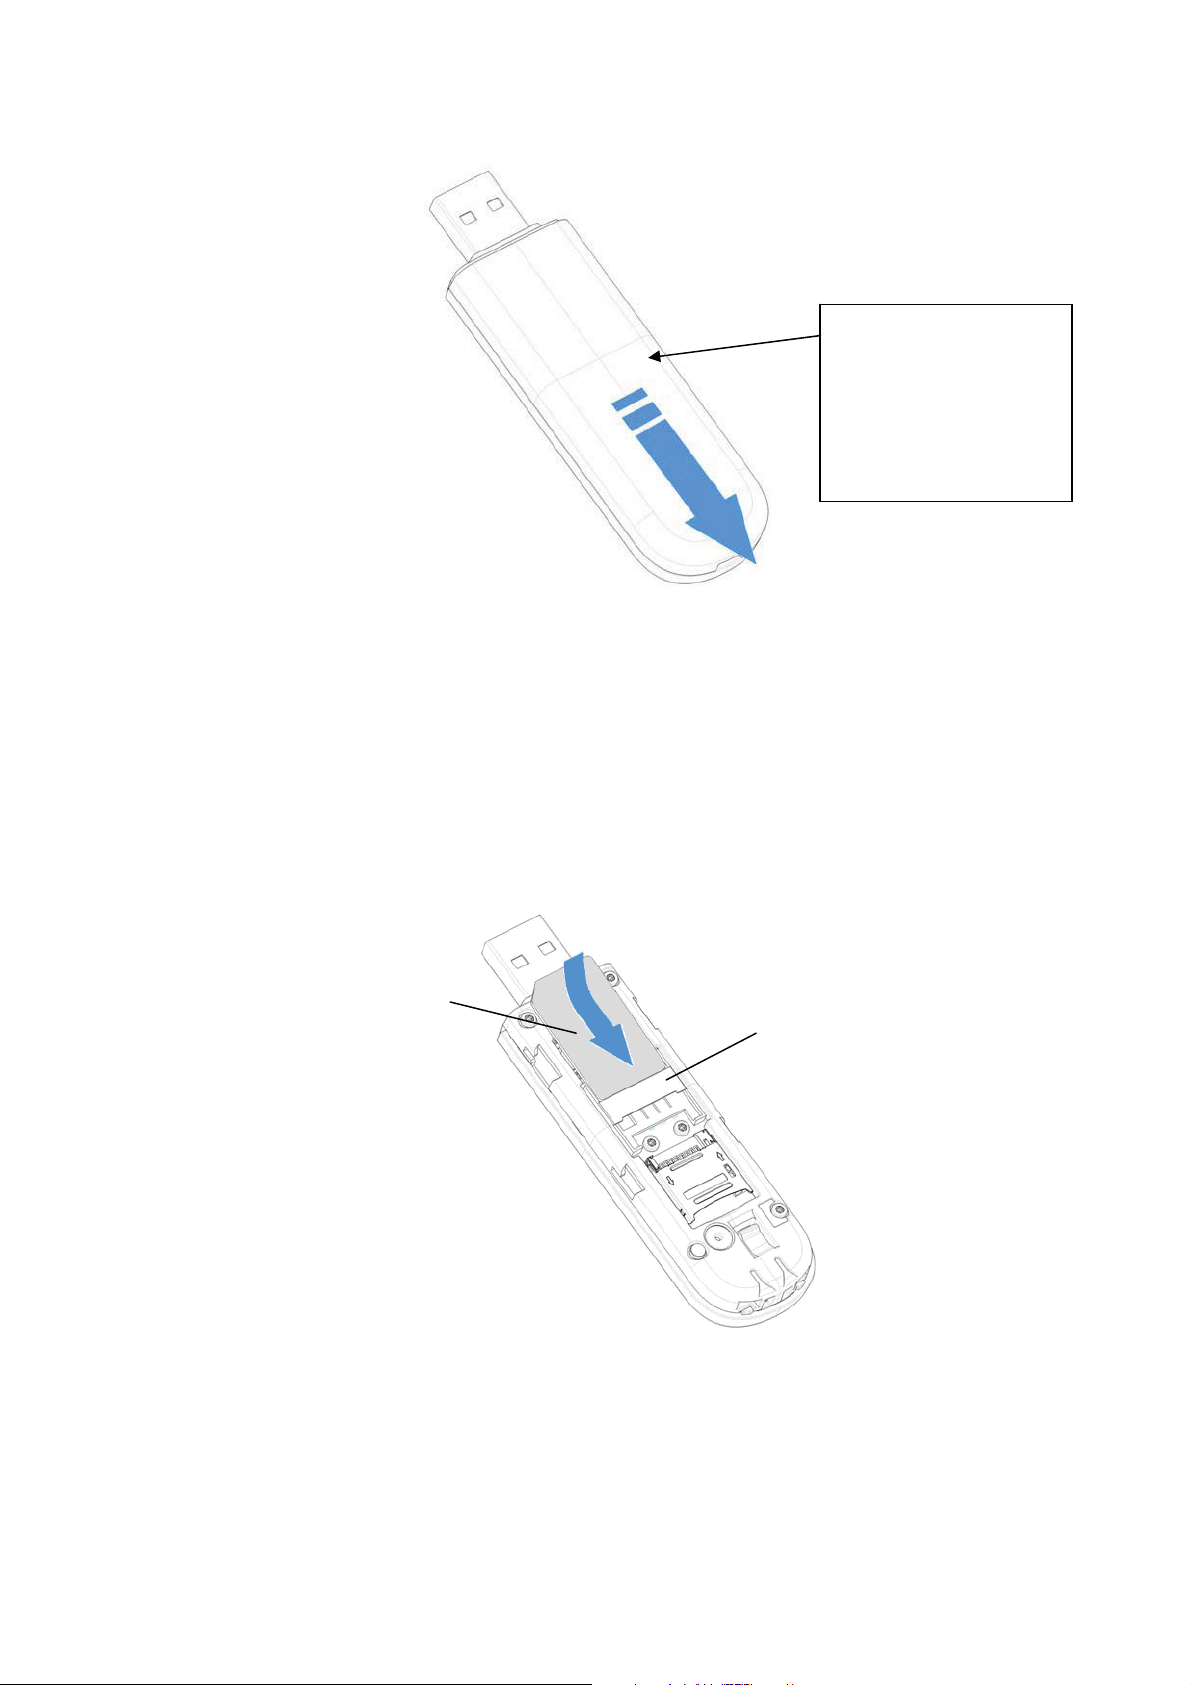
Flying Angel 3G Wireless Data Card
User Manual
NOTE: You should
darken the the line
showing the sliding panel
outline – it’s not clear
from this illustration
Figure 2-1
3. Insert SIM card into the thin card slot at the top of the device (as shown in figure
2-2). Make sure that the SIM card is properly seated in the slot and that the
gold-colored contact area on the card is facing downwards.
SIM Card
SIM Card Slot
Figure 2-2
9 Updated 03/2009
Flying Angel 3G Wireless Data Card
User Manual
4. Optional: Insert MicroSD Memory Card into the card holder at the bottom of
the device. (The microSD card provides enhanced storage capabilities and is not
required to connect to the Internet.)
a) Open the cover of the microSD memory card holder (as shown in figure 2-3).
MicroSD Card
Holder Cover
MicroSD Card
Holder
Figure 2-3
b) Insert the MicroSD Memory Card into the card holder, making sure it is
properly seated (as shown in figure 2-4).
MicroSD Card
Figure 2-4
10 Updated 03/2009
Flying Angel 3G Wireless Data Card
User Manual
c) Close the cover of the MicroSD Memory Card holder, and slide the holder
gently downward until it snaps into position (figure 2-5).
MicroSD Card
Holder Cover
Figure 2-5
5. Put the back cover of the Flying Angel 3G Wireless Data Card in place and slide
it upward until snaps closed (as shown in figure 2-6).
Figure 2-6
11 Updated 03/2009

Flying Angel 3G Wireless Data Card
User Manual
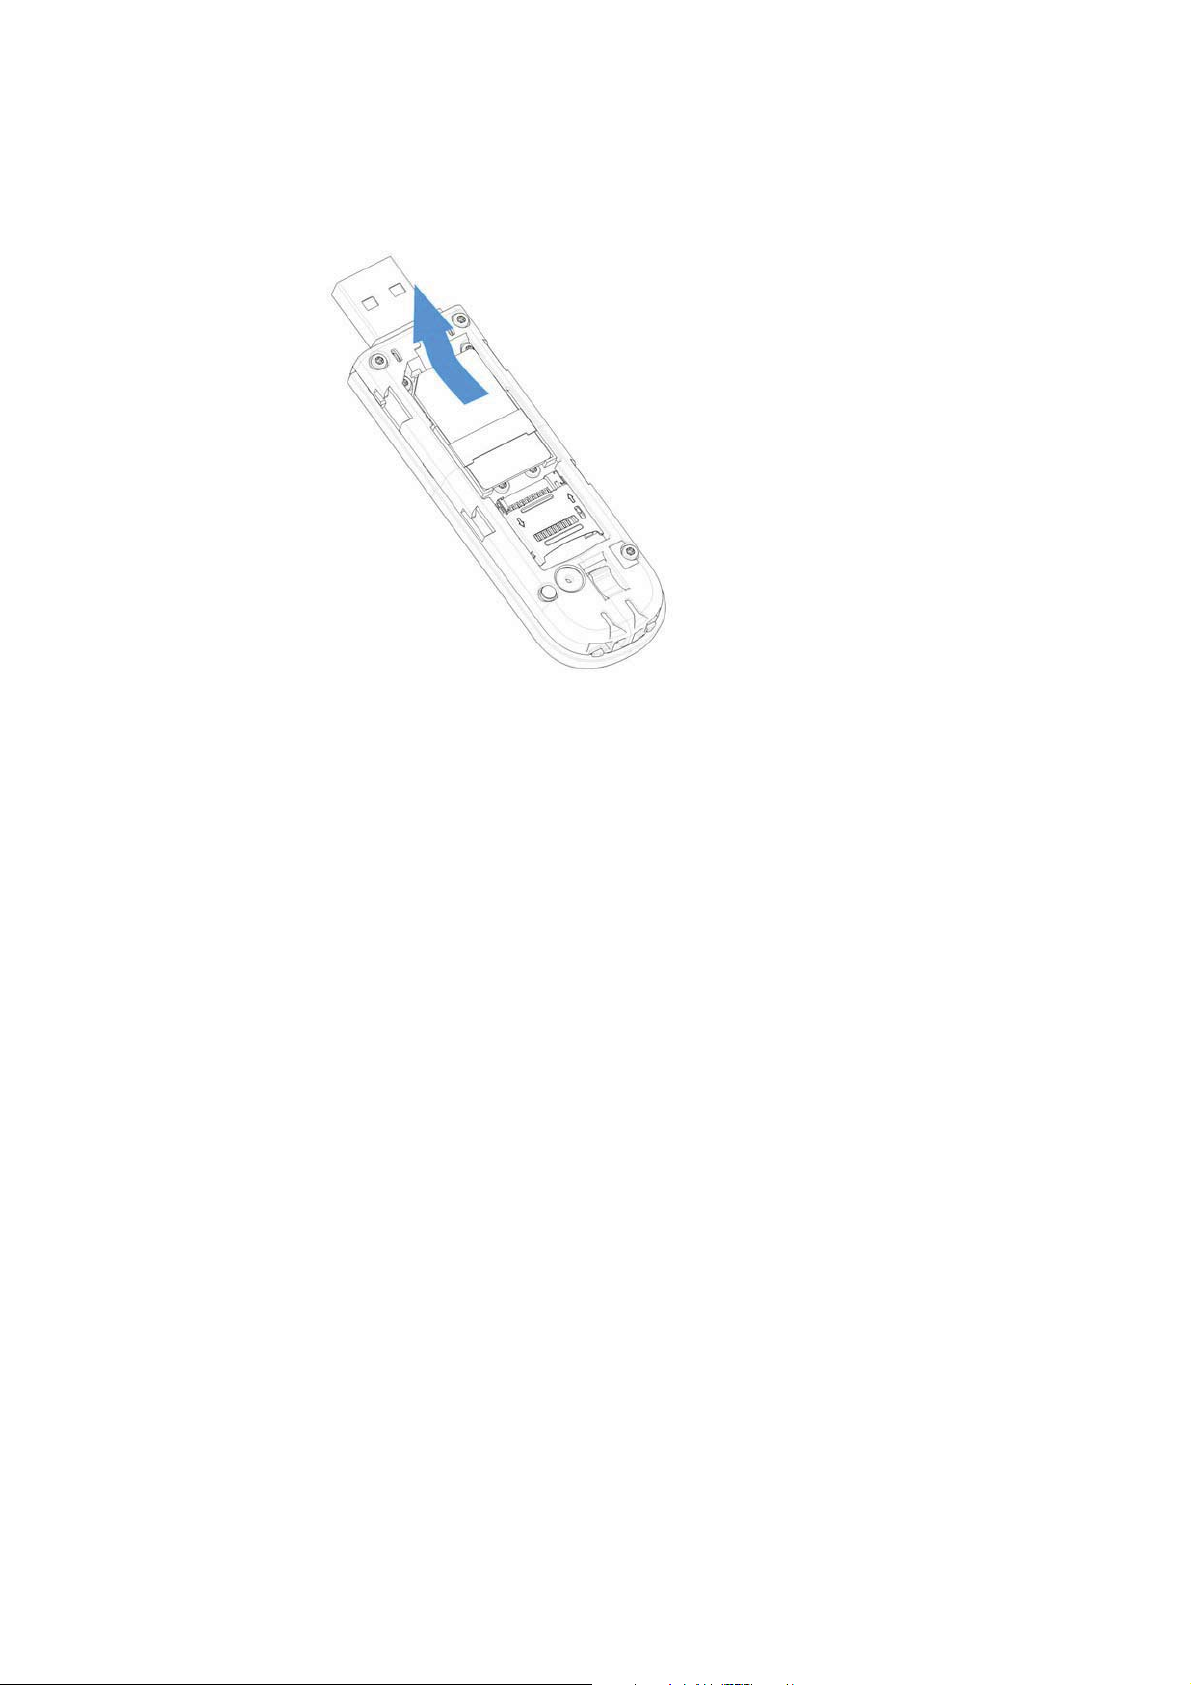
2.2 Removing the SIM card and MicroSD Memory
Card
Please follow the steps below if you wish to remove the SIM card and/or the (optional)
microSD memory card for replacement or upgrade.
1. Open the back cover of the Flying Angel 3G Wireless Data Card as directed in
section 2.1 above.
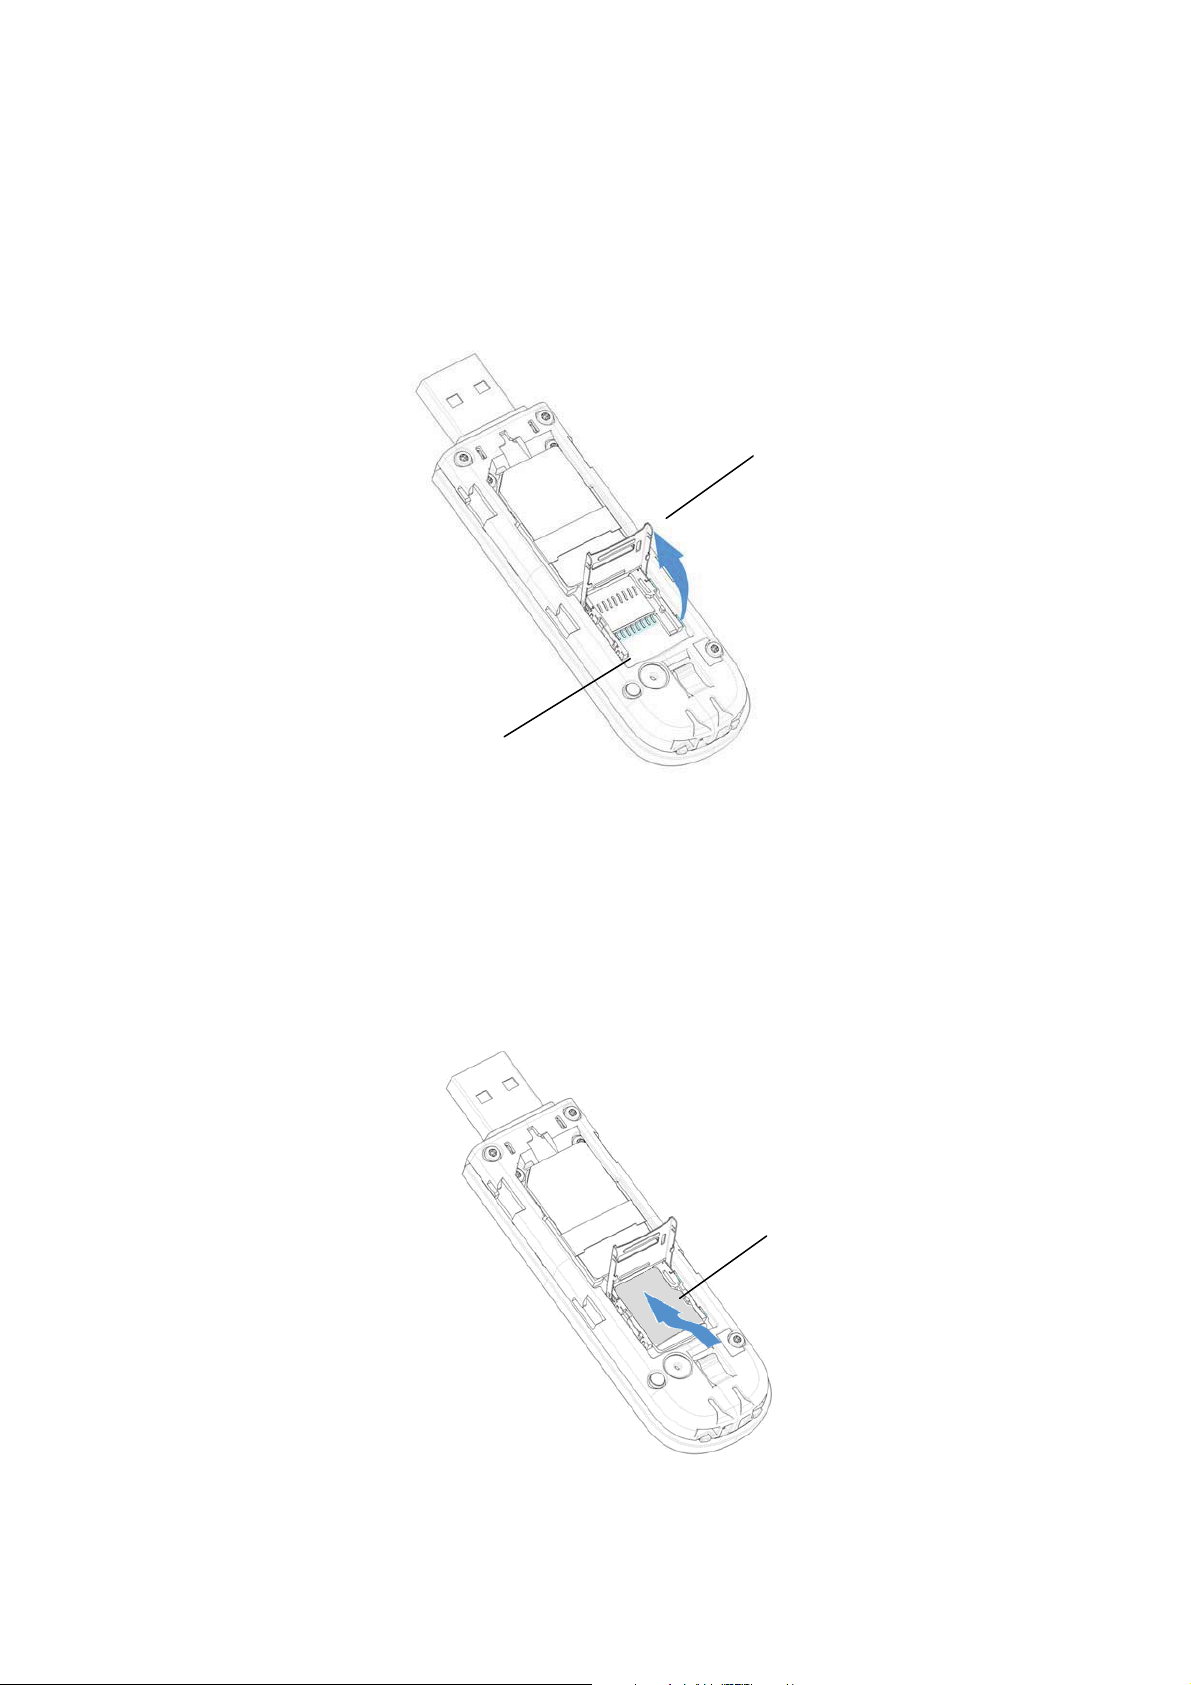
2. Remove the microSD memory card as follows:
a) Slide the microSD memory card holder upward (as shown in figure 2-7).
Figure 2-7
b) Open the cover of the memory card holder and remove the microSD memory
card from the slot (figure 2-8).
12 Updated 03/2009
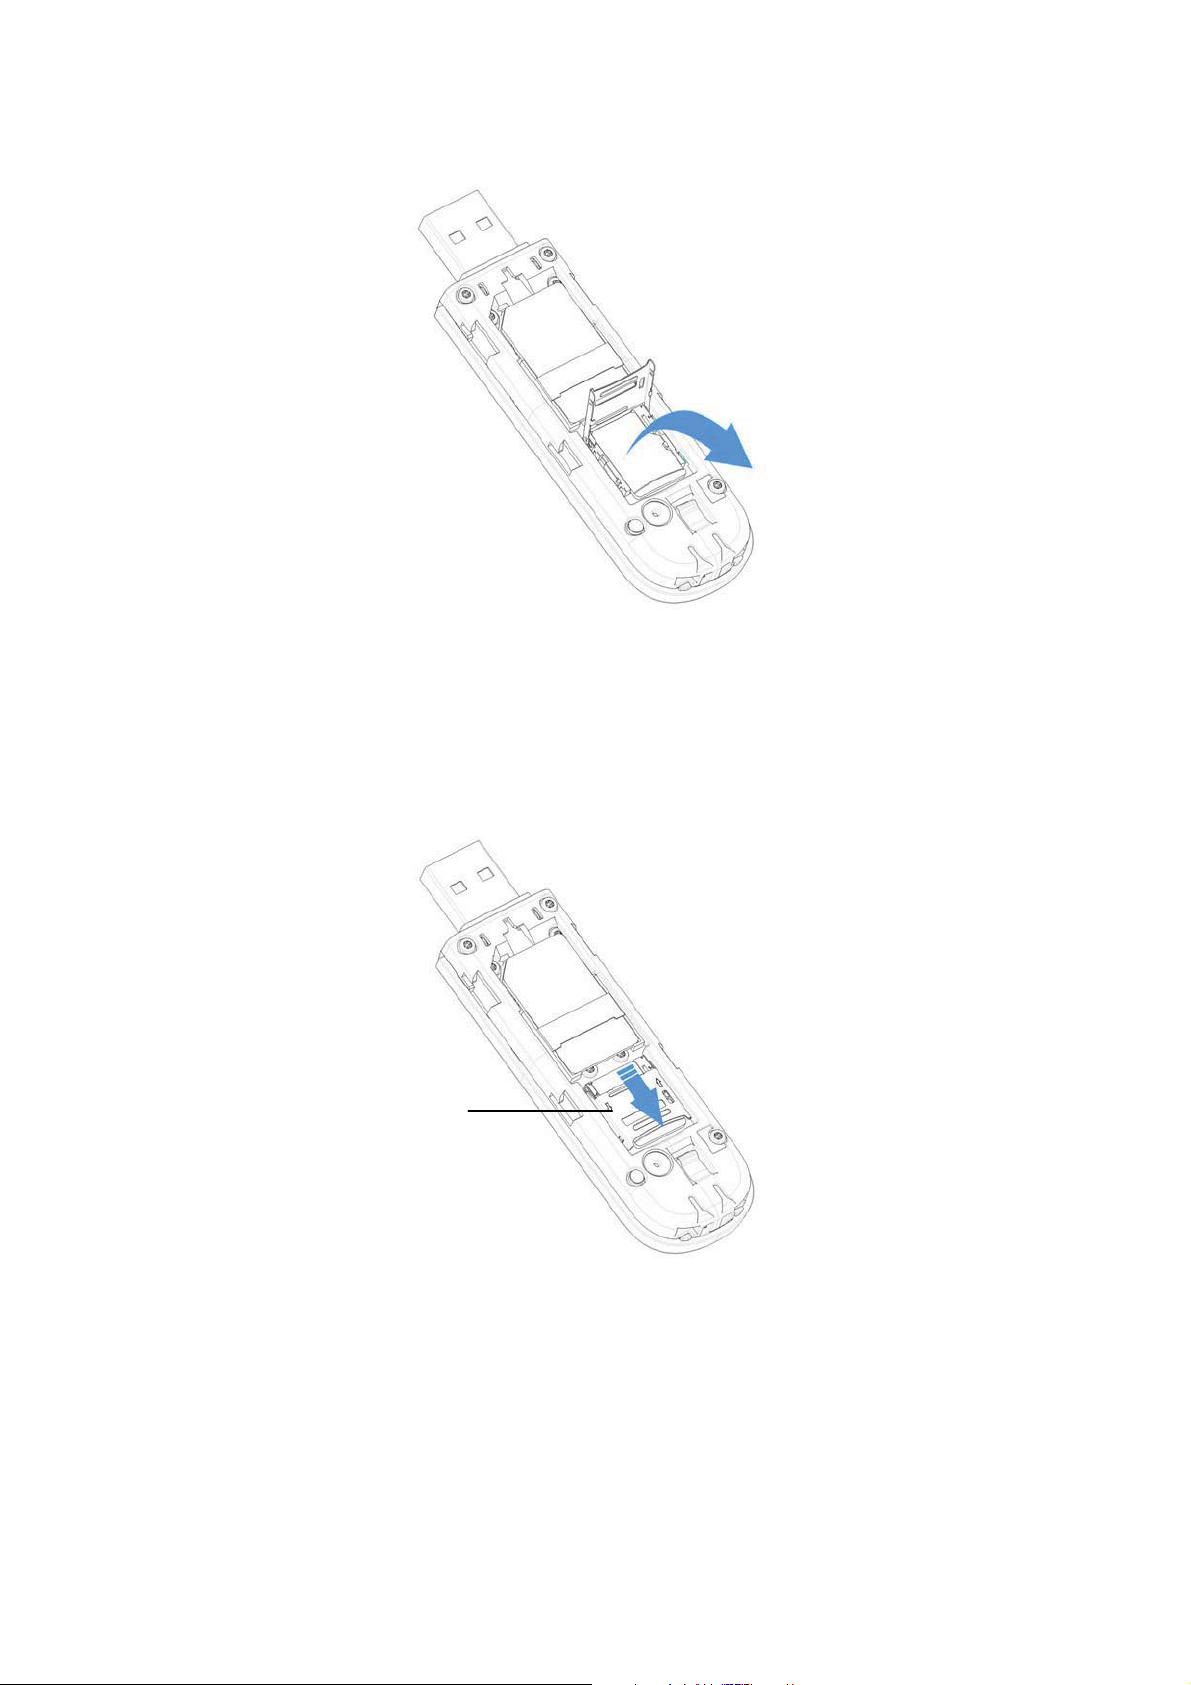
Figure 2-8
Flying Angel 3G Wireless Data Card
User Manual
c) Close the cover of the microSD memory card holder, and slide the holder gently
downward until it snaps into position (figure 2-9).
MicroSD Card
Holder Cover
Figure 2-9
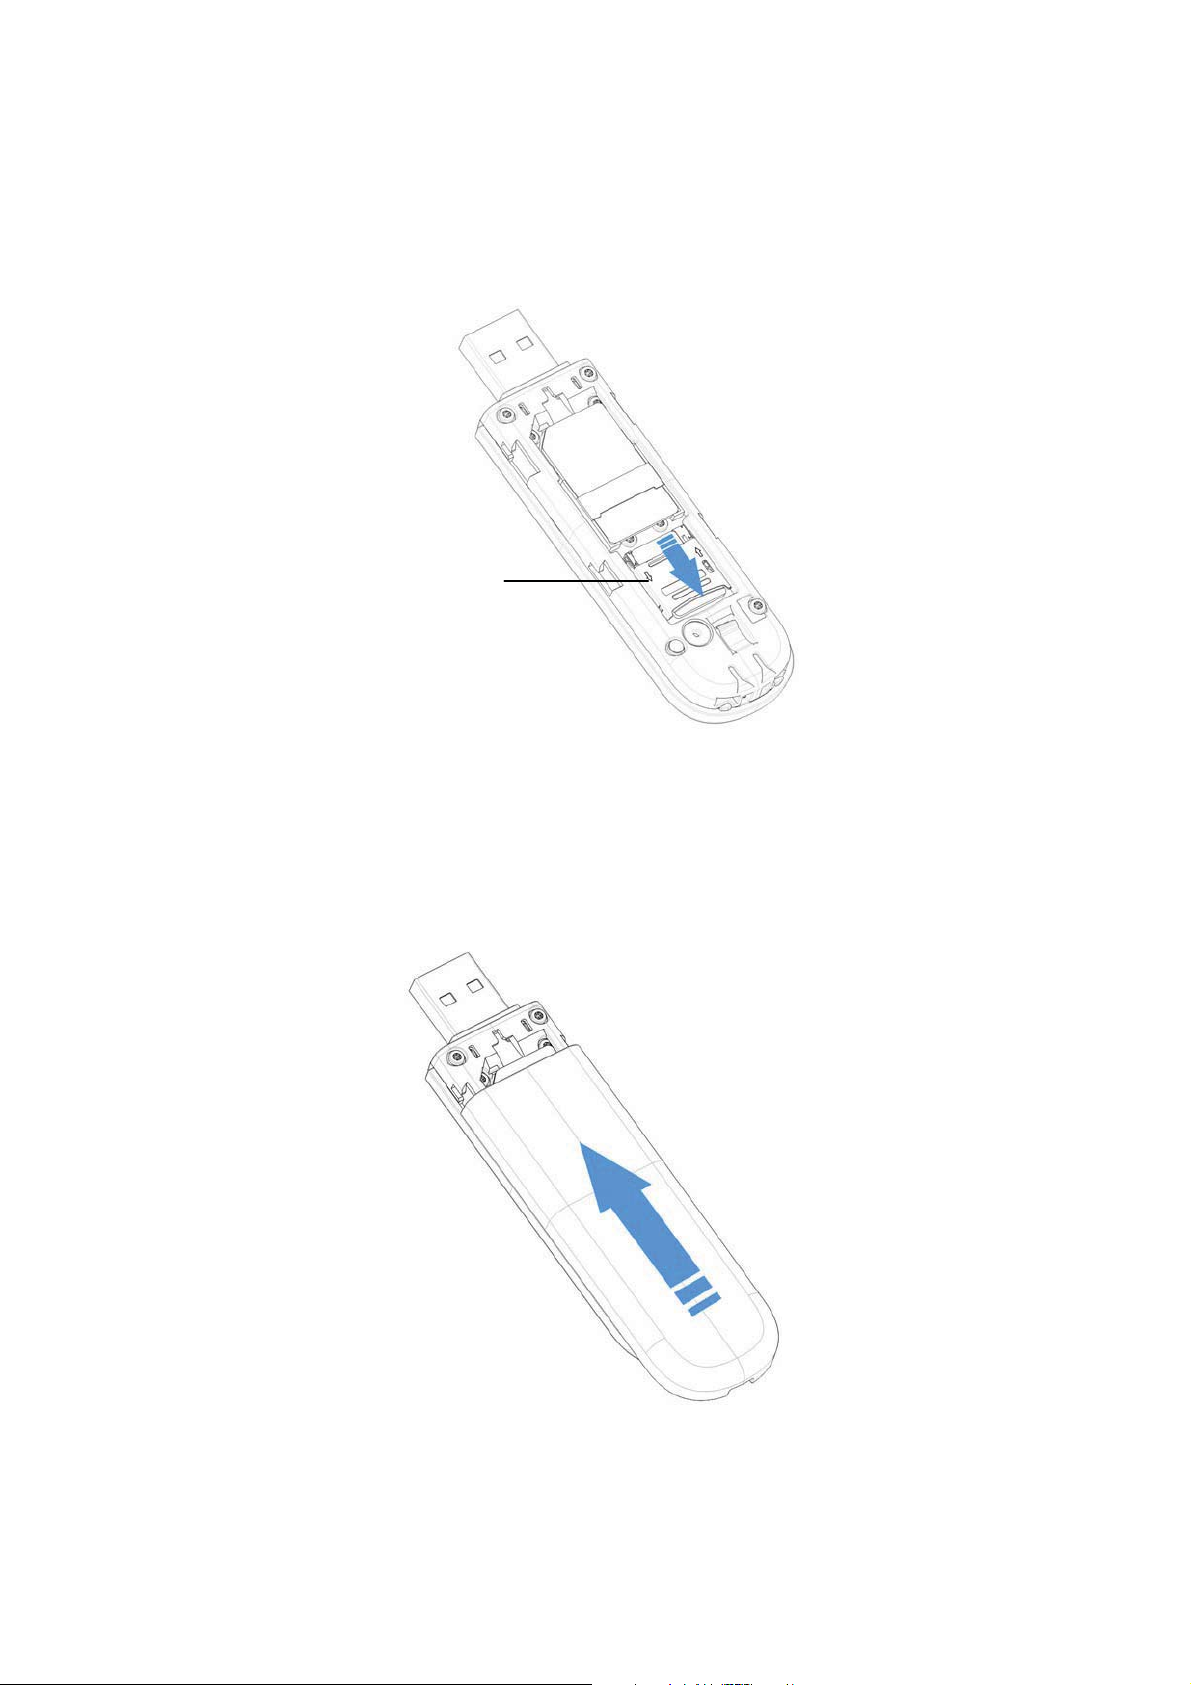
Remove the SIM card as follows:
3.
13 Updated 03/2009
Flying Angel 3G Wireless Data Card
a) Gently slide SIM card out, pushing upwards.
User Manual
4. If replacing the SIM card and microSD memory card, please follow the steps
in section 2.1 above.
14 Updated 03/2009
Flying Angel 3G Wireless Data Card
User Manual
Chapter 3 Connect the Flying Angel 3G
Wireless Data Card to your PC
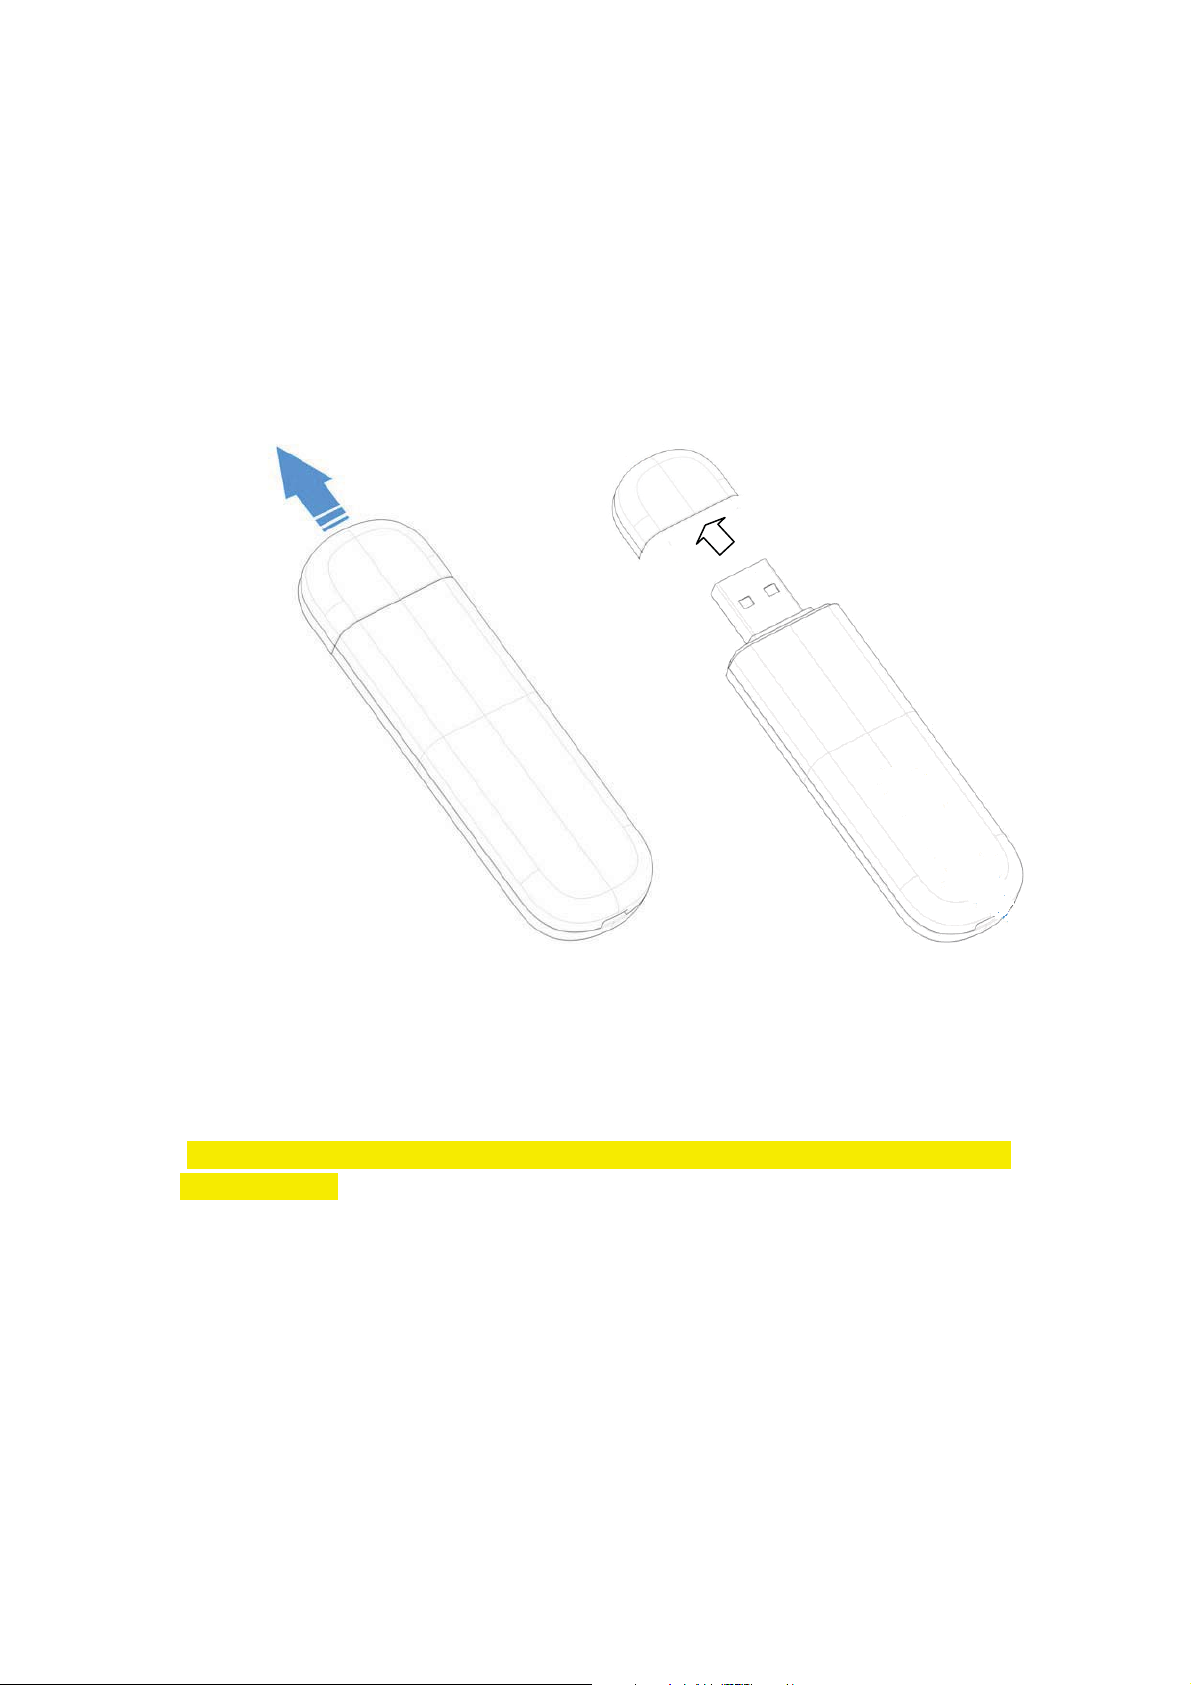
1. Remove the cover from the USB connector of the device. (See figure 3-1.)
Fig 3-1
2. Insert the USB connector of the modem into a USB port on your computer. (See
figure 3-2.)
(Note: An illustration would be helpful here, something like the one below from the Sierra
Quickstart guide.)
15 Updated 03/2009
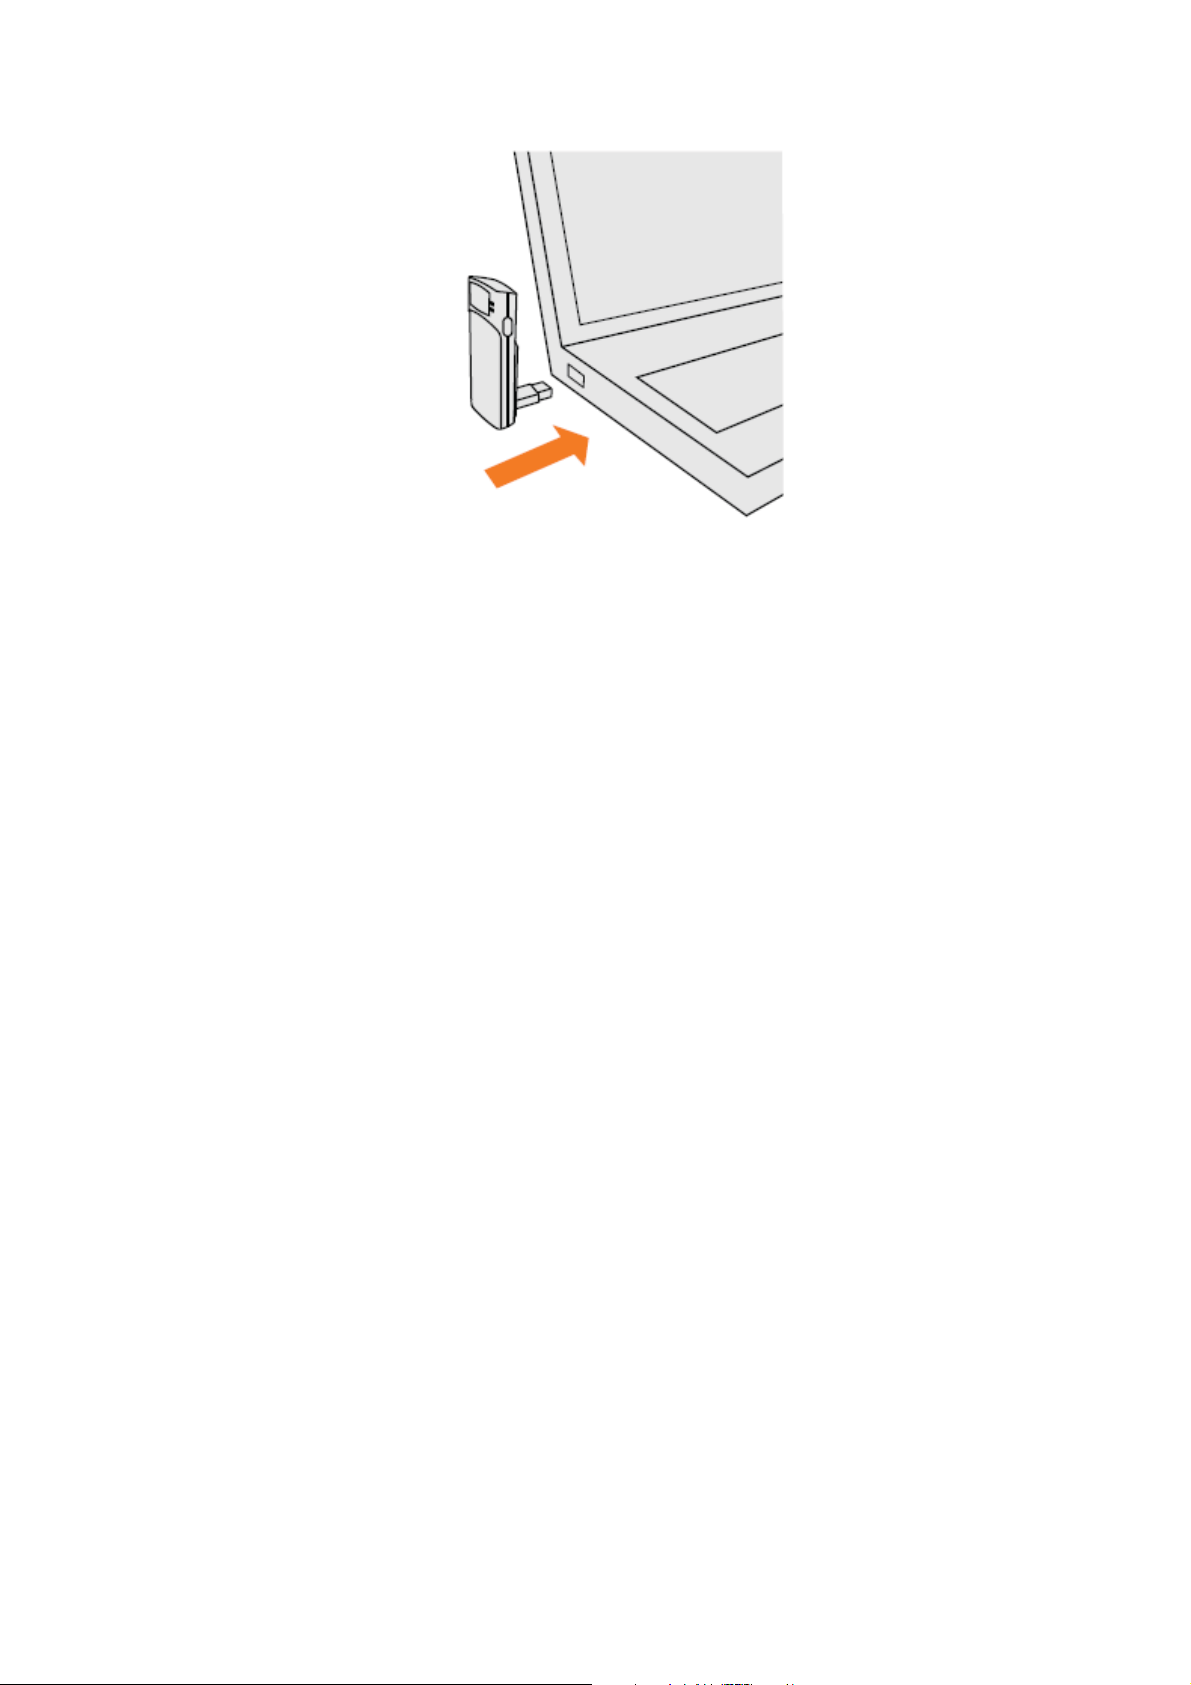
Fig. 3-2
Flying Angel 3G Wireless Data Card
User Manual
16 Updated 03/2009
Flying Angel 3G Wireless Data Card
User Manual
Chapter 4 Installation and Software –
Windows PC
4.1 Install Connection Software
The Flying Angel 3G Wireless Data Card comes with the following software which will
allow you to connect to the internet, establish modem settings, and manage your data:
x Flying Angel Connection Manager software for Windows
x Driver software to interface between the Flying Angel 3G Wireless Data Card and
your computer’s operating system.
The first time the Flying Angel 3G Wireless Data Card is inserted in a USB slot in your
Windows PC, you will be guided through the following steps to automatically install the
Flying Angel Connection Manager software and drivers.
1. Connect the Flying Angel 3G Wireless Data Card to Your PC (See Chapter 3.)
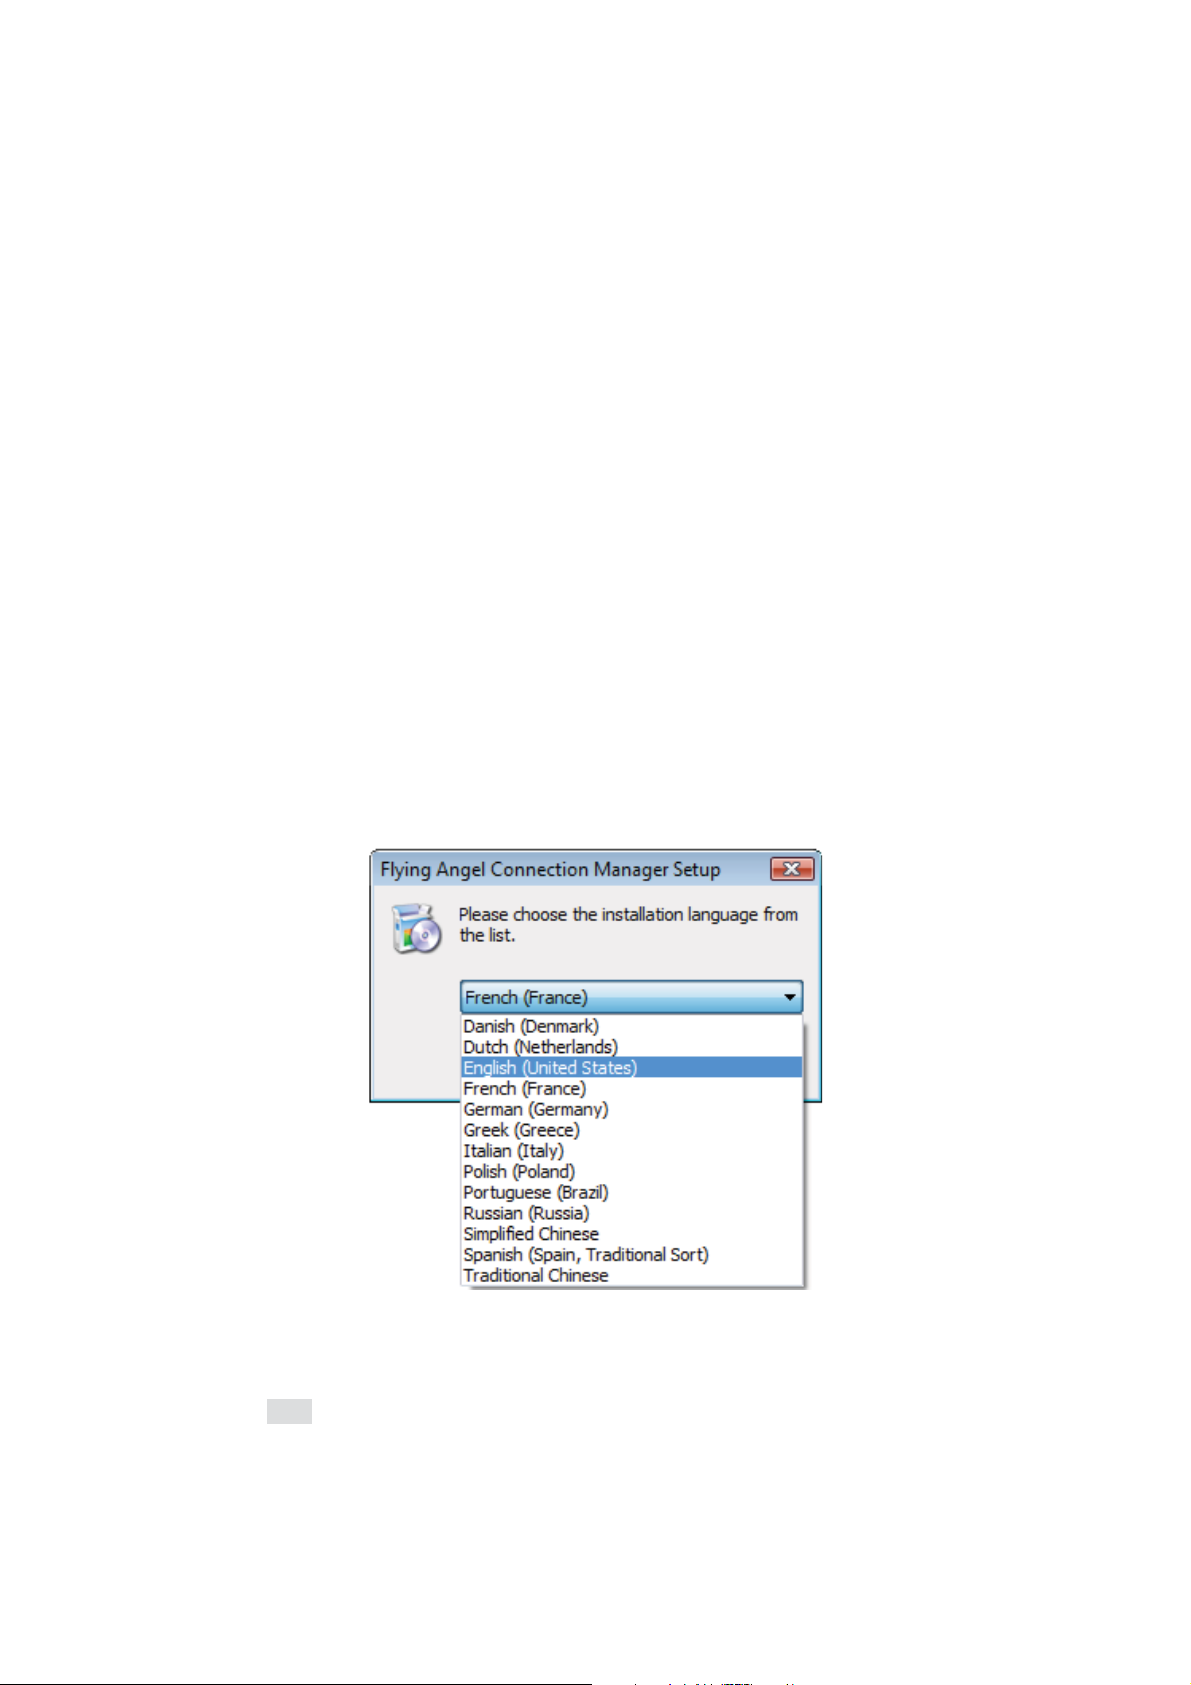
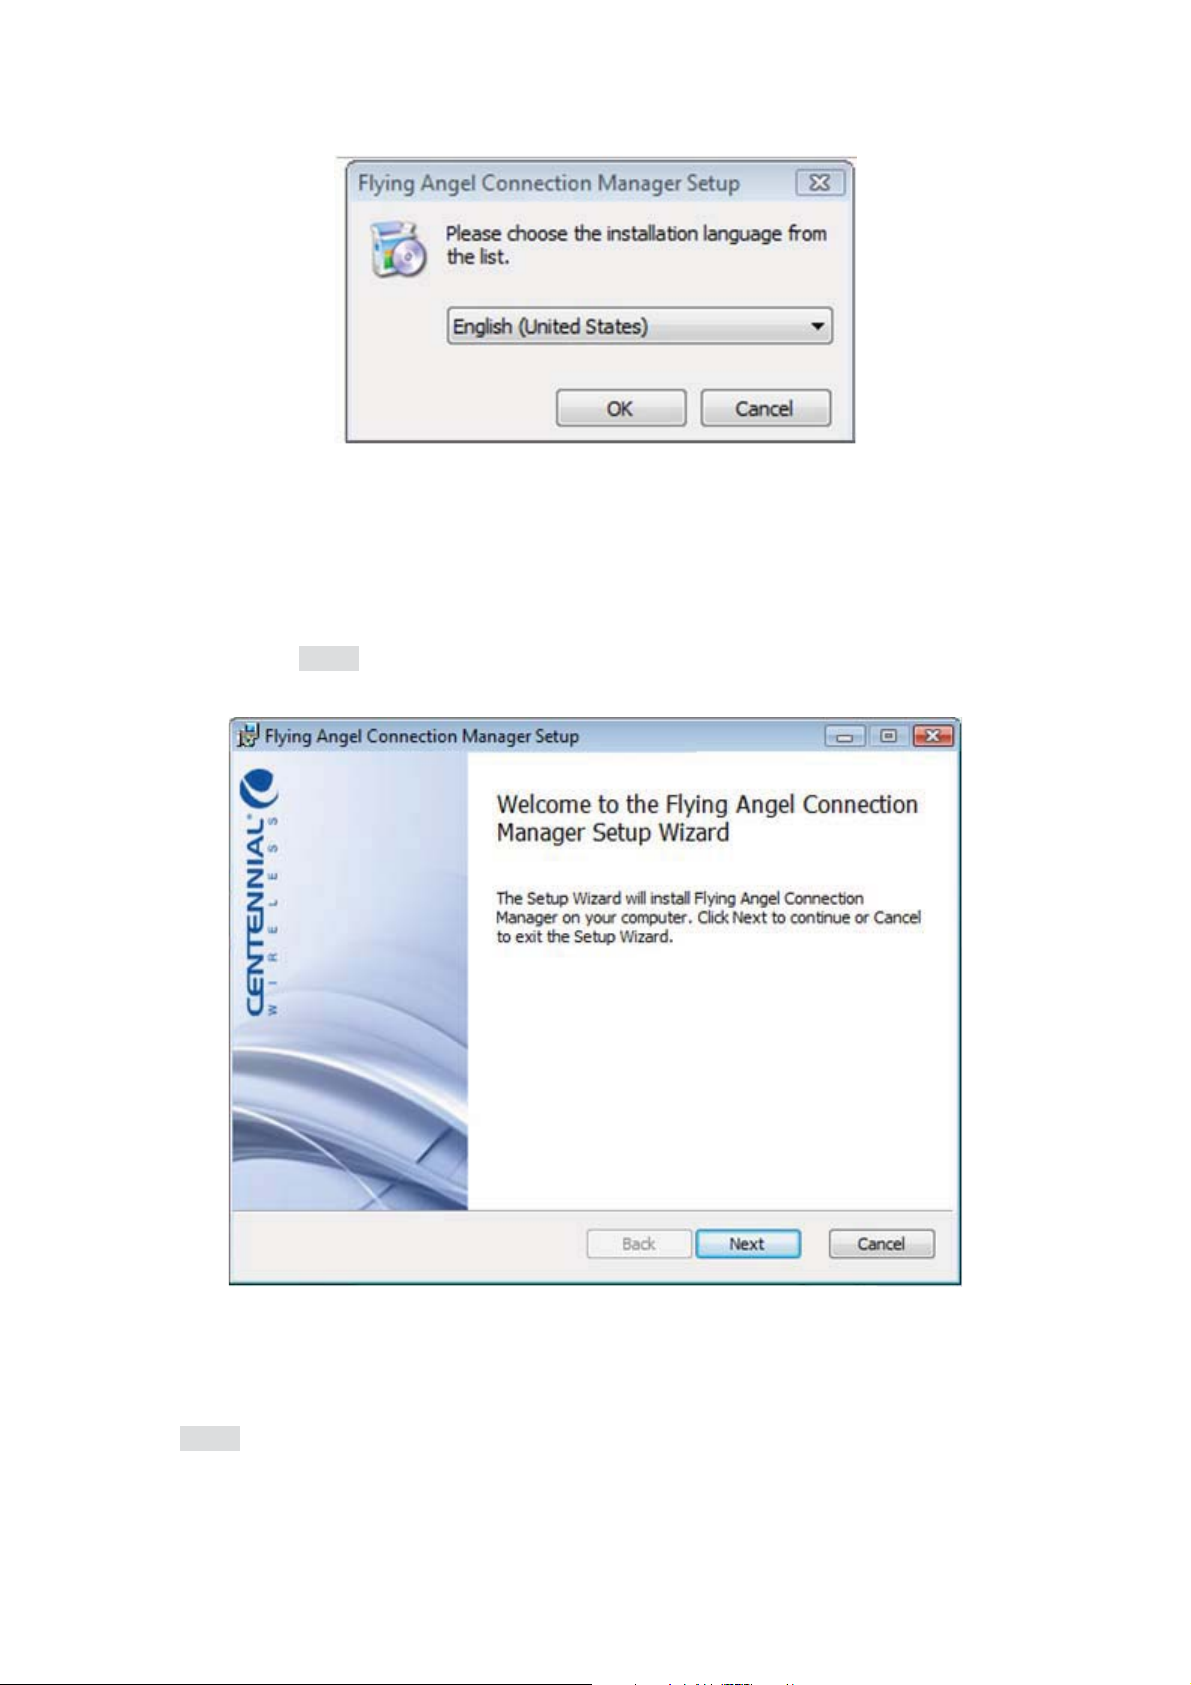
2. Select your preferred language. (See figure 4.1-1.)
Fig. 4.1-1
3. Click [OK] to start the Flying Angel Connection Manager Setup Wizard (figure
4.1-2).
17 Updated 03/2009
Flying Angel 3G Wireless Data Card
User Manual
Fig. 4.1-2
4. When the Flying Angel Connection Manager Setup Wizard window opens (figure
4.1-3), click [Next] to continue.
Fig. 4.1-3
5. Confirm accept the end user license agreement (figure 4.1-4), and then click
[Next].
18 Updated 03/2009

Flying Angel 3G Wireless Data Card
User Manual
Fig. 4.1-4
6. The Setup Wizard will automatically designate a folder location for the setup files.
(See figure 4.1-5.) To install to the suggested folder, click [Next].
If you want to set up a different location for the setup files, click [Browse] to select another
folder, then click [Next].
19 Updated 03/2009

Flying Angel 3G Wireless Data Card
User Manual
Fig. 4.1-5
7. When you see the Ready to Install screen (figure 4.1-6), click [Install] to start
installation.
20 Updated 03/2009

Flying Angel 3G Wireless Data Card
User Manual
Fig. 4.1-6
8. Software installation will take a few minutes to complete. (See figure 4.1-7.)
Fig. 4.1-7
9. The final menu screen will pop up when the software is installed (figure 4.1-8).
Click [Finish] to complete the installation.
21 Updated 03/2009

Flying Angel 3G Wireless Data Card
User Manual
Fig. 4.1-8
4.2 Using the Flying Angel 3G Wireless Data Card -
PC
Make sure the Flying Angel 3G Wireless Data Card is connected to a USB port on
your PC, and the modem software and drivers are installed as outlined in Section
4.1, above.
When the Flying Angel is properly connected, your PC detects the modem and displays a
startup menu in a pop-up window. This startup menu offers you shortcuts to a set of
standard modem actions as shown below (figure 4.2-1, table 4.2-2):
22 Updated 03/2009

Flying Angel 3G Wireless Data Card
User Manual
Fig. 4.2-1
Table 4.2-2
Flying Angel Connection Manager Startup Menu Detail
Startup Menu Command Action Taken Further Details
Do nothing
Explore the device (contacts,
SMS, ...)
Connect to the Internet
Always ask
Launch Dashboard view of Flying Angel
Connection Manager to access the full
menu of modem functions.
Launch the Flying Angel Explorer window
to manage the data saved to the SIM card
in the Flying Angel 3G Wireless Data
Card, including messages and contacts.
Launch your default Internet connection. Chapter 4.2.3 Internet
Allows you to choose whether or not to
launch this shortcut menu whenever your
PC detects the Flying Angel 3G Wireless
Data Card.
Chapter 4..2.1 Flying Angel
Connection Manager
Dashboard
Chapter 4.2.4 Flying Angel
Explorer
Options
4.2.1 Flying Angel Connection Manager Dashboard
The Dashboard View of the Flying Angel Connection Manager software (figure 4.2-3)
allows you to perform a variety of functions.
23 Updated 03/2009

Flying Angel 3G Wireless Data Card
Fig. 4.2-3
Flying Angel Connection Manager Dashboard
User Manual
The icons, buttons, commands, and menu options available in Dashboard view are
outlined in table 4-11.
Table 4.2-4
Flying Angel Connection Manager Dashboard: Icons and Buttons
Network signal level Indicates the level of the network signal The name of the operator
detected is shown to the right side of the network signal icon.
Connect to the
Internet
Disconnect from the
Internet
Close Flying Angel
Connection Manager
Dashboard
Minimize Flying
Angel Connection
Manager Dashboard
Help Click to open the Flying Angel Connection Manager Help window.
Launch Flying Angel
Explorer
Click to launch the Internet connection corresponding to your default
connection profile.
Details: Chapter 4.2.3 Internet Options
Click to disconnect an active connection.
Details: Chapter 4.2.3 Internet Options
Click to close Flying Angel Connection Manager. If connected to the
Internet, you will also disconnect an active connection.
Click to minimize the Flying Angel Connection Manager Main Window.
The application remains active in the background.
Click to launch Flying Angel Explorer, which allows you to retrieve and
manage your messages, contacts and calls.
Details: Chapter 4.2.4 Flying Angel Explorer
Launch E-mail Click to launch your default Internet connection and open your default
e-mail client to retrieve and send e-mail.
Details: Chapter 4.2.3 Internet Options
24 Updated 03/2009

Flying Angel 3G Wireless Data Card
User Manual
Launch Browser Click to launch your default Internet connection and open your default
Internet browser to surf the web.
Details: Chapter 4.2.5 Internet Options
Tools Menu Click to open the preferences and tools menu (see figure 4-12), and
set your connections profile. You can select from the Settings Menu
Options detailed in Table 4-13.
Fig. 4.2-5
Flying Angel Connection Manager Tools Menu
Click [Settings] to choose from the Settings Menu options outlined in table 4.2-6.
Table 4.2-6
Flying Angel Connection Manager: Settings Menu Options
Flying Angel Explorer Click to open a list of telecommunication devices that have been connected to your
PC and recognized by Flying Angel Connection Manager.
Click on a device name to launch a Flying Angel Explorer window for that
telecommunication device. The device name shown in boldface is the one that is
currently connected to your computer.
Details: Chapter 4.2.4 Flying Angel Explorer
Connections Dial-up Click to set up or change connection parameters to access a connection with your
Operator Click to set up and view a list of wireless service provers you can select from to
Network Type Click to select from a list of network types to use to connect to the Internet.
25 Updated 03/2009
wireless service provider.
connect to the Internet.

Flying Angel 3G Wireless Data Card
User Manual
Connection History Click to view a detailed history of all the connections made on UMTS, EDGS, GPRS
and GSM wireless networks from Flying Angel Connection Manager.
Check for Updates Click to check for Flying Angel Connection Manager software updates.
Restart in diagnostic
mode
Settings Click to define preferences including language and startup options.
Help Click to open the Flying Angel Connection Manager Help window.
About Click to view software version information for Flying Angel Connection Manager on
This option enables you to send us trace files of Flying Angel Connection Manager in
the case of malfunction.
Details: Chapter 4.2.5 Settings
your PC.
4.2.2 Set Up Your Connection Profile
The first time you use the Flying Angel 3G Wireless Data Card, you will need to create a
Connection Profile to define the connection information that enables the modem to access
your wireless network and connect to the Internet.
This connection requires an active account with a wireless service provider.
Required Connection Information
When you set up your Connection Profile, you will need network access
information from your wireless provider, which may include some or all of the
following:
x Access Point Name (APN): identifies your wireless provider’s network
x Authentication Parameters: Your provider may require you to authenticate
your account when you access their wireless network. This information may
include user name, password and domain.
x DNS Server Information
x Other Settings Information including HTTP Proxy Address (for Microsoft Internet
Explorer only), Service Quality parameters (QoS), R99 QoS, Security, or
Advanced Settings parameters
Creating a New Connection Profile
1. Click the Settings icon in the Flying Angel Connection Manager
26 Updated 03/2009

Flying Angel 3G Wireless Data Card
User Manual
Dashboard to open the Settings Menu.
You may also open the Settings Menu from the Flying Angel Explorer window,
the Messages window and the Contacts window by clicking [Tools] in the top
menu bar, then clicking [Settings].
2. Select [Connections (Dial-up)], which opens the window shown in figure 4.2-7.
Fig. 4.2-7
3. Select [Create New Connection – HSPDA/UMTS/EDGE/GPRS (fast)] (figure
4.2-8).
This is the preferred method for creating your initial connection profile, which
enables you to enter the most current and updated connection parameters as
provided by your wireless provider. Other options for creating connection profiles
are described in Step 7, below.
Click [Next] to open the Connection Parameters window.
27 Updated 03/2009

Flying Angel 3G Wireless Data Card
User Manual
Fig. 4.2-8
28 Updated 03/2009

Flying Angel 3G Wireless Data Card
User Manual
4. Enter the connection parameters:
x Enter a name for your Connection Profile. (See figure 4.2-9.)
x Enter the Access Point Name (APN) (See figure 4.2-10 – refer to your
wireless provider.)
x Enter the Authentication information if necessary (refer to your wireless
provider)
Fig. 4.2-9
29 Updated 03/2009

Flying Angel 3G Wireless Data Card
User Manual
Fig. 4.2-10
5. If your wireless provider requires it, click on the relevant tab in the
connection parameters window to enter additional connection information.
(See figure 4.2-11.)
This information may include DNS/Proxy Information, QoS, R99 QoS, Security, or
Advanced Settings. Refer to your wireless provider for more information.
Fig. 4.2-11
30 Updated 03/2009

Flying Angel 3G Wireless Data Card
User Manual
6. Click [Finish]. The Connections (Dial-up) window will open with the name of
the new connections profile you just created in the List of available connections
(see figure 4.2-12).
Fig. 4.2-12
7. You may repeat the above Steps 1 through 6 to add as many Connection Profiles
as you need. You will require a separate, active account from a wireless service
provider for each connection profile you create.
Note: The preferred method to add a connection (see figure 4.2-8) is to click
[Create New Connection – HSPDA/UMTS/EDGE/GPRS (fast)]. The “Add a
connection” window also includes the following secondary connection options:
x Use a predefined connection. Includes a limited list of wireless
providers and their connection parameters, preloaded into the Connection
Manager software. (See figure Fig. 4.2-13)
31 Updated 03/2009

Flying Angel 3G Wireless Data Card
User Manual
Fig. 4.2-13
x Copy and modify a predefined connection. If your carrier is included
in the limited list of wireless providers that is preloaded into the
Connection Manager software, you may update and modify the
parameters of that predefined connection and save it under a new name.
Setting Your Default Connection Profile
To set a connection profile as your default, click xxxxxxxxxxxxx. Xxxxxxxxxxx
xxxxxxxxx. Xxxxxxxxx. Default connections are marked with a padlock
Default column of the Connections (Dial-up) window (figure 4.2-12), which indicates
that these connections cannot be modified or deleted.
Once you set a connection profile as your default, the Flying Angel will automatically
use that connection to access your wireless provider’s network.
in the
32 Updated 03/2009

Flying Angel 3G Wireless Data Card
User Manual
For more information on exporting, importing and modifying connections, see Chapter
4.2.5, Settings.
33 Updated 03/2009

Flying Angel 3G Wireless Data Card
User Manual
4.2.3 Internet Options
Establishing an Internet Connection
Flying Angel Connection Manager makes it simple to connect to the Internet using the
Flying Angel 3G Wireless Data Card, after you set up your default wireless connection
profile (see Chapter 4.2.2, above).:
x Click on the “Connect” button in the Flying Angel Connection
Manager Dashboard to launch an Internet connection. (See
figure 4.2-3.)
x A dialog box titled with the name of your connection profile will
appear, showing you the status of your connection process. You
can cancel the connection process by clicking “Cancel” or by directly
closing this dialogue box.
Fig. 4.2-14
x Once you are connected, a Statistics window appears, containing
information on time and data status for the connection and a
Statistics button that you can click to view more statistics. You can
close this window without disconnecting from the Internet.
Fig. 4.2-15
x Click on the “Disconnect” button in the Flying Angel
Connection Manager Dashboard to disconnect an Internet
connection. (Figure 4.2-3.)
x The Statistics window also includes a Disconnect button (Fig.
34 Updated 03/2009

Flying Angel 3G Wireless Data Card
User Manual
4.2-15), which allows you to disconnect from the Internet with a click.
Launching Your Internet Browser
To launch the default Internet browser on your PC from Flying Angel Connection Manager:
x Click on the “Launch Browser” button in the Flying Angel
Connection Manager Dashboard. (Figure 4.2-3.)
x Your wireless connection is automatically made in the same way as
in the "Establishing an Internet Connection" section above.
x The default browser installed on your PC is launched when the
connection is established.
Launching Your E-Mail Client
To launch the default e-mail client on your PC from Flying Angel Connection Manager:
x Click on the “Launch E-mail” button in the Flying Angel
Connection Manager Dashboard. (Figure 4.2-3.)
x Your wireless connection is automatically made in the same way as
in the "Establishing an Internet Connection" section above.
x The default e-mail client installed on your PC is launched when the
connection is established.
Closing the Connection
You can end your Internet connection in different ways:
x Click on the “Disconnect” button in the Flying Angel
Connection Manager Dashboard. (Figure 4.2-3.)
OR
x Click on the “Disconnect” button in the statistics window that
appears once you have established an Internet connection.
If your browser and e-mail client are open when you disconnect, you will need to exit
those applications manually.
Displaying the Connections Log
35 Updated 03/2009

Flying Angel 3G Wireless Data Card
User Manual
x Click on the Settings Menu icon in the Flying Angel Connection
Manager Dashboard, then click on “Connection History”. (Figure
4.2-3.)
x The Connection History window displays all UMTS, EDGE, GPRS
and GSM connections made from Flying Angel Connection Manager
along with the associated statistics, such as the duration of the
connection and the incoming and outgoing volumes
36 Updated 03/2009

Flying Angel 3G Wireless Data Card
User Manual
4.2.4 Flying Angel Explorer
Flying Angel Explorer enables you to manage the data associated with your Flying Angel
3G Wireless Data Card, including SMS messages and contacts.
You can launch Flying Angel Explorer (figure 4.2-16) as follows:
x From the Flying Angel Connection Manager Dashboard (figure 4.2-3):
Click the “Flying Angel Explorer” button
OR
x From the Startup Menu: Click the radio button for “Explore the
device (contacts, SMS, …)”
Fig. 4.2-16
Flying Angel Explorer
The following functions can be managed using the Flying Angel Explorer:
Messages: you can send and receive SMS text messages in Flying Angel Explorer, and
manage any SMS text messages saved to the SIM card in your Flying Angel 3G Wireless
37 Updated 03/2009

Flying Angel 3G Wireless Data Card
User Manual
Data Card.
x Click on [Messages] in the Flying Angel Explorer window to manage SMS text
messages. Additional details follow in the Messages
section of this chapter.
Contacts: you can manage contacts saved to the SIM card in your Flying Angel 3G
Wireless Data Card, as well as the contacts from your mail client.
x Click on [Contacts] in the Flying Angel Explorer window to manage contacts.
Additional details follow in the Contacts
section of this chapter.
Messages
When you click on Messages in Flying Angel Explorer, the following window appears
(figure 4.2-17):
Fig. 4.2-17
Messages Window – Flying Angel Explorer
The buttons, icons, and commands available in the Messages window are outlined below
in table 4.2-18.
Table 4.2-18
Flying Angel Connection Manager Messages: Icons and Buttons
Message Status Icons
SMS text message saved to and retrieved from the SIM card in the Flying Angel 3G Wireless
Data Card.
38 Updated 03/2009

SMS text message saved to the microSD memory card in the device. (Optional – applies only if
a microSD card has been installed in the Flying Angel.)
SMS text message saved to the PC.
Toolbar Command Buttons
New SMS Click to open the SMS editor in order to compose and send an SMS
Delete Selected SMS Click to delete the selected SMS message from Flying Angel
Send/Receive SMS Click to retrieve incoming messages and send all messages stored in
Flying Angel 3G Wireless Data Card
User Manual
text message to one or more recipients. (See figure 4.2-19.)
Connection Manager Messages.
the Outbox.
Icon?
Forward Selected
SMS
Reply to Selected
SMS
Command?
Update? Sync?
Click to open the SMS editor in order to edit your selected SMS text
message, insert one or more new recipient numbers, and forward the
message to the new recipients.
Click to open the SMS editor in order to edit your selected SMS text
message and send your reply to the recipient's number.
Click to sync mailbox data between SIM card, PC, and optional
microSD card (when installed to the device).
Fig. 4.2-19
Compose New SMS Text Message with the Flying Angel Explorer SMS Editor
Importing Messages into Flying Angel Connection Manager
You can import existing SMS text message files – usually in «.xxxxx» or «.xxxx» file
format from another location on your computer into Flying Angel Connection Manager as
follows:
x Click the [Files] button
x Select [Import...]
39 Updated 03/2009

Flying Angel 3G Wireless Data Card
User Manual
x Locate and select your file
x Click [Open]: the selected message file is shown on the screen
x Click [OK] to import the file
Exporting Contacts from Flying Angel Connection Manager
You can export your Flying Angel Connection Manager SMS files in a «.xxxxx» or «.xxxx»
file format compatible with other wireless devices to a designated location on your
computer as follows:
x Select the contacts you want to export into a file
x Click the [Files] button
x Select [Export...]
x Indicate a destination path and click [xxxxx]. A message file in «xxxx»
format will be created. You can then import this file into SMS mail clients
on other devices.
For more information on modifying message settings, see Chapter 4.2.5 Settings.
Contacts
When you click on Contacts in Flying Angel Explorer, the following window appears
(figure 4.2-20):
40 Updated 03/2009

Flying Angel 3G Wireless Data Card
User Manual
Fig. 4.2-20
Contacts Window – Flying Angel Explorer
The buttons, icons, and commands available in the Contacts window are outlined below in
table 4.2-21.
Table 4.2-21
Flying Angel Connection Manager Contacts: Icons and Buttons
Contact Status Icons
Contact saved to and retreived from the SIM card in the Flying Angel 3G Wireless Data Card.
Contact saved to the microSD memory card in the Flying Angel 3G Wireless Data Card.
Can you save contact to the PC?
Toolbar Command Buttons
New Contact Click to open the contact editor and add a new contact to Flying Angel
Connection Manager Contacts.
Note: the contact list from the SIM card will contain only a name and
a telephone number. contact editor is reduced if the list displayed is
the list of contacts from the SIM card. A contact from the SIM card only
contains a name and a telephone number;
Modify Contact Click to open the contact editor and modify contact information in
Flying Angel Connection Manager Contacts.
Delete Click to delete selected contact from Flying Angel Connection Manager
New SMS Click to open the SMS editor in order to compose and send an SMS
Update Click to launch synchronization of contacts between the SIM card and
Contacts.
text message to one or more contacts. The number(s) of the selected
contact(s) will be automatically displayed in the “To” field of the
message.
the PC.
41 Updated 03/2009

Flying Angel 3G Wireless Data Card
User Manual
Importing Contacts into Flying Angel Connection Manager
You can import existing Outlook contact files – usually in «.backup» or «.wph» file format
from another location on your computer into Flying Angel Connection Manager as follows:
x Click the [Files] button
x Select [Import...]
x Locate and select your file
x Click [Open]: the selected contact file is shown on the screen
x Click [OK] to import the file
Exporting Contacts from Flying Angel Connection Manager
You can export your Flying Angel Connection Manager contact files in a «.backup» or
«.wph» file format file format compatible with Outlook to a designated location on your
computer as follows:
x Select the contacts you want to export into a file
x Click the [Files] button
x Select [Export...]
x Indicate a destination path and click [xxxxx]. A contact file in «xxxx»
format will be created. You can then import this file into Outlook.
For more information on modifying contact settings, see Chapter 4.2.5, Settings.
42 Updated 03/2009

Flying Angel 3G Wireless Data Card
User Manual
4.2.5 Manage Your Settings
To manage your Flying Angel Connection Manager preferences or change setting
parameters:
x From the Flying Angel Connection Manager Dashboard: Click on
the Settings Menu icon, then select “Settings”.
x From Flying Angel Explorer:
Ͳ Click [Tools] in the top menu bar
Ͳ Click [Settings]
x From Messages:
Ͳ Click [Tools] in the top menu bar
Ͳ Click [Settings]
x From Contacts:
Ͳ Click [Tools] in the top menu bar
Ͳ Click [Settings]
Modify General Settings
The General Settings you can modify are the following:
Insert Screenshot for main Modify General Settings screen
z Automatically run application when I log on to Windows
This option is checked by default and launches Flying Angel Connection Manager
whenever your computer is started up. If the option is un-checked, you will need to
launch the Flying Angel Connection Manager application manually from your PC’s
Program Menu.
z Select language
The default language for Flying Angel Connection Manager is selected when you
install the software to your PC. This option allows you to change the default
language, which becomes effective after you close and re-launch the application.
z Action to perform when device is connected
These radio buttons enable you to launch a specific action whenever the Flying Angel
43 Updated 03/2009

Flying Angel 3G Wireless Data Card
3G Wireless Data Card is connected to your PC and detected by Flying Angel
Connection Manager:
o Do nothing: the Flying Angel Connection Manager Dashboard will open and
allow you to choose your preferred action;
o Explore the device (contacts, SMS, files, ...): launches the Flying Angel
Explorer windows allowing you to manage messages and contacts;
o Connect to the Internet: launches the default wireless connection;
o Always ask: launches the Flying Angel Connection Manager startup
menu (see Section 3.2, fig. 3-11 above), giving a list of actions to choose from.
This option is the default option.
Modify Connections (Dial-up) Settings
User Manual
After you have set up your connections profile (Section 4.2.2), you may modify the
settings in the Connections (Dial-up) settings window, which displays a list of
connections defined in Flying Angel Connection Manager.
Insert Screenshot for main Modify/Delete Connections screen
Deleting or Modifying a connection
x Select a connection and click the [Delete] button to delete any existing connection
that is not designated as a Default connection or is in the list of predefined
connections (see figure 4.2-13). Click [OK] to confirm.
x Select a connection and click the [Modify] button to change the parameters of any
existing connection that is not designated as a Default connection. The Connection
Parameters window will open and allow you to modify the parameters. Click [OK] to
confirm these modifications. (See Section 4.2.2.)
x You may not delete or modify a Default connection, indicated by a padlock icon in
the Default column of the Connections (Dial-up) window. (See Section 4.2.2
for more information about Default connections.)
When you select a default connection, the Delete button is deactivated and the
Modify button is replaced by Copy and modify. The [Copy and modify] button
enables you to create a copy of the selected connection and to modify the
parameters.
Exporting a connection
The Export function allows you to save your Connection Profiles as Flying Angel
Connection Manager files in «xml» file format to locations on your PC.
44 Updated 03/2009

Flying Angel 3G Wireless Data Card
User Manual
You can export an existing connection into a file with an extension «.xml» format as
follows:
x Select the connection you want to export into a file
x Click the [Files] button
x Select [Export...]
x Indicate a destination path and click [xxxxx]. A connection profile in the
form of a file in «xml» format will be created. You can then import this file
into other computers in order to automatically recreate the connection
profile.
Importing a connection
The Import function allows you to import other connection profiles previously exported and
saved in «xml» file format.
You can import an existing connection with an «.xml» format from another location on
your computer into Flying Angel Connection Manager as follows:
x Click the [Files] button
x Select [Import...]
x Locate and select your file
x Click [Open]: the selected connection is shown on the screen in the list
of connections
x Click the [Default] button if you want to define it as the default connection.
Modify Contacts and Messages Settings in Flying Angel
Explorer
Configuring the Contacts Options
You may select how Flying Angel Connection Manager synchronizes the contacts stored
on the Flying Angel with contacts stored in another location on your computer. (See
figure 4.2-22.)
45 Updated 03/2009

Flying Angel 3G Wireless Data Card
User Manual
Fig. 4.2-22
x Select the external phonebook location of the Contacts on your PC that you would
like to sync with the SIM card on the Flying Angel: None, Outlook Contacts,
Windows Address Book.
Click [OK] to confirm your choice.
x Select the contact Synchronization mode, by selecting one of the following radio
buttons:
Automatic
Flying Angel Connection Manager will automatically sync
your contacts on the Flying Angel with the phonebook of
your choice when you click the Send/Receive SMS
button
Ask User
button
PC Sync will ask you if you wish to sync your contacts on
the Flying Angel with the phonebook of your choice when
.
Manual
you click the Send/Receive SMS button
Flying Angel Connection Manager will sync your contacts
on the Flying Angel with the phonebook of your choice
46 Updated 03/2009

Flying Angel 3G Wireless Data Card
User Manual
only when you complete one of the following actions:
Ͳ Click the Update button
Ͳ From the Actions Menu, click, [Update]
Click [OK] to confirm your choice.
Configuring the Message Options
You may select how Flying Angel Connection Manager delivers SMS text messages sent
with the Flying Angel.
Screenshot?
x Check the [Request a delivery report] box if you want to receive an
acknowledgement of receipt for each SMS message sent. By default, this box is
not checked.
x Select the SMS delivery class that will be used for each SMS message sent.
[0] Screen
The SMS sent will only be received on the screen of the
recipient's telecommunication device.
[1] Phone Memory
The SMS sent will be stored in the memory of the
recipient's telecommunication device
[2] SIM card
The SMS sent will be stored in the SIM card of the
recipient's telecommunication device
[3] Default
The SMS sent will be stored in the memory designated
by default on the recipient's telecommunication device.
This memory can be either the SIM card or other
storage on the telecommunication device.
[4] No class
The SMS sent will have no specified class. This is the
default option.
Click [OK] to confirm your choice.
47 Updated 03/2009

Flying Angel 3G Wireless Data Card
User Manual
Live update
NOTE: What are these updates for? PC Sync software, or are you just checking for
new messages?
Automatically check for new updates: you can set the interval of each update as 1-100
hours. After setting, automatic updates will be execute according to the timer you set.
Expert settings
Expert settings allows you to automatically retrieve network information for the Flying
Angel from your wireless network. (See figure Fig. 4.2-23.) You may choose an interval
ranging from every 15 seconds to every 60 minutes.. Click [OK] to confirm your updates.
Fig. 4.2-23
Modifying Device Settings
Flying Angel Connection Manager allows you to modify the following device settings for
the Flying Angel 3G Wireless Data Card:
48 Updated 03/2009

Flying Angel 3G Wireless Data Card
User Manual
Name displayed
You may customize the way the name of your device appears in Flying Angel Connection
Manager as shown below in figure Fig. 4.2-24:
x Click on [HSUPA Modem], which is the factory-default name given to the
device.
x In the Name Displayed field, enter your preferred device name.
x Click [OK] to confirm your update, and your new device name will appear
in the Settings menu.
Fig. 4.2-24
Change SIM Card settings
Flying Angel Connection Manager also enables you to change settings for your SIM card
using Flying Angel Connection Manager:
Enable/disable PIN code
x
Note: Need more info to edit this. Do the SIM cards have an original PIN code
that you need to do this, or are you setting up one for the first time?
You can set SIM PIN code status as Disable or Enable, and when you change
settings, you must input correct PIN code first. If you set SIM PIN code as Enable,
every time Flying Angel is detected, you will be asked for inputting SIM PIN code
first.
49 Updated 03/2009

Flying Angel 3G Wireless Data Card
User Manual
Note: you have only three attempts to input PIN code, after three wrong attempts,
your SIM will be blocked. It can only be unblocked with the PUK code. You will be
asked for this the next time Flying Angel is detected. If the PUK code is known, the
PIN code will be reset to "0000".
Change SIM PIN code
x
Note: Need more info to edit this. Is this changing a PIN code that originally
came with the card, or are you changing the one you just set up in the section
above?
To change SIM PIN code, the following steps shown as:
x Previous SIM PIN code: old PIN code of the SIM card;
x New SIM PIN code: new PIN code of the SIM card;
x Confirm new SIM PIN code: confirmation of the new PIN code of the SIM card.
Note: you have only three attempts to change SIM PIN code, after three tries, your SIM
card will be blocked. It can only be unblocked with the PUK code. You will be asked for
this the next time Flying Angel is detected. If the PUK code is known, the PIN code will be
reset to "0000".
50 Updated 03/2009

Flying Angel 3G Wireless Data Card
User Manual
Chapter 5 Installation and Software –
Macintosh
5.1 Install Connection Software
The Flying Angel 3G Wireless Data Card comes with the following software which will
allow you to connect to the internet, establish modem settings, and manage your data:
x Flying Angel Connection Manager software for Macintosh
x Driver software to interface between the Flying Angel 3G Wireless Data Card and
your computer’s operating system.
The first time the Flying Angel 3G Wireless Data Card is inserted in a USB slot in your
computer, you will be guided through the following steps to automatically install the
Connection Manager software and drivers.
1. Connect the Flying Angel 3G Wireless Data Card to Your PC (See Chapter 3.)
2. The Flying Angel Connection Manager Welcome screen will appear (see figure 5.1-1).
Select [Continue] to continue with the installation.
Fig. 5.1-1
3. The installation guide will automatically designate “Macintosh HD” as the location for
the Standard Installation. To install to the suggested folder, click [Install]. (Figure
5.1-2)
51 Updated 03/2009

Flying Angel 3G Wireless Data Card
User Manual
Fig. 5.1-2
If you want to set up a different location for the installation files, select [Change Install
Location...] and select an alternative destination (figure 5.1-3). Select Continue to
return to the Installation Screen. Select [Install] to start the installation.
Fig. 5.1-3
4. Enter the Username and Password and click [OK] to continue with the installation.
(Figure 5.1-4.)
52 Updated 03/2009

Flying Angel 3G Wireless Data Card
User Manual
5.1-4
4. The installation will take several minutes. When the software has been
successfully installed and the “Install Succeeded” screen appears (5.1-5), click
[Close].
Fig. 5.1-5
5.2 Using the Flying Angel 3G Wireless Data Card -
Mac
Make sure the Flying Angel 3G Wireless Data Card is connected to a USB port on
your Mac, and the modem software and drivers are installed as outlined previously
in Section 5.1.
When the Flying Angel is properly connected, your computer detects the modem and
opens Connection Manager.
5.2.1 Connection Manager Tools
Connection Manager features a toolbar (see figure 5.2-2) that allows you to manage the
following functions:
Table 5.2-1
Connection Manager: Icons and Buttons
Globe
Icon
Internet
Click to set up and manage your Internet
connection parameters. For more detail, see
Section 5.2.3
53 Updated 03/2009

Flying Angel 3G Wireless Data Card
User Manual
SMS
PhoneBook
Settings
Icon Info
Click to send and manage SMS text messages.
For more detail, see Section 5.2.4.
Click to manage phone numbers and contacts.
For more detail, see Section 5.2.5.
Click to establish and update your settings
preferences. For more detail, see Section 5.2.6.
Click for Help.
5.2.2 Set Up Your Connection Profile
The first time you use the Flying Angel 3G Wireless Data Card, you will need to create a
Connection Profile to define the connection information that enables the modem to access
your wireless network and connect to the Internet.
This connection requires an active account with a wireless service provider.
Required Connection Information
When you set up your Connection Profile, you will need network access
information from your wireless provider, which may include some or all of the
following:
x Access Point Name (APN): identifies your wireless provider’s network
x Authentication Parameters: Your provider may require you to authenticate
your account when you access their wireless network. This information may
include user name, password and domain.
x DNS Server Information
x Other Settings Information including HTTP Proxy Address (for Microsoft Internet
Explorer only), Service Quality parameters (QoS), R99 QoS, Security, or
Advanced Settings parameters
Creating a New Connection Profile
Step-by-step instructions and screenshots.
You can change your geographical region, ISP information and APN data by clicking the
54 Updated 03/2009

Flying Angel 3G Wireless Data Card
arrow key for relevant pulldown menu. (See figure 4-9.)
User Manual
Fig. 5.2-2
5.2.3 Connect to the Internet
After you have set your connection parameters (Section 5.2.2), click the blue [connect]
button to establish a connection.
When a connection has been established, data for Send (Bytes), Receive (Bytes),
Connect time, and IP Address will be displayed. (See figure 5.2-3.)
Fig. 5.2-3
55 Updated 03/2009

Select [Disconnect] to close the connection.
5.2.4 SMS Messages
Click on the SMS icon in the tool bar to open the SMS main window, shown
below in figure 4-11.
Flying Angel 3G Wireless Data Card
User Manual
Fig. 5.2-4
To view SMS messages:
x Click the
(sent mail), draft.
x Click on [PC SMS] to open SMS messages saved to your computer
x Click on [SIM SMS] to open the messages saved to the SIM card in the Flying
Angel modem
x Click on [Phone SMS] to open the messages saved to the phone (NOTE: What
does this mean? What phone?)
To create a new SMS message:
x Click on
x Add multiple recipients by adding them in the [Type a number here] area
button to select your view from the following folders: inbox, send
New SMS to create a new SMS message.
56 Updated 03/2009

Flying Angel 3G Wireless Data Card
User Manual
5.2.5 PhoneBook
Click on the PhoneBook icon in the tool bar to open the main window for your contact
phone numbers, shown below in figure 5.2-5.
Fig. 5.2-5
To manage your contact list and send messages:
x Highlight your preferred contact(s) and select [SMS] to send an SMS message to
one or more of your contact numbers.
x To edit contact information or export the contact, select the contact name and right
click .
5.2.6 Settings
Click on the Settings icon in the tool bar to manage the settings for Connection Manager,
shown below in figure 5.2-6.
57 Updated 03/2009

To change your Settings:
Flying Angel 3G Wireless Data Card
User Manual
Fig. 5.2-6
x Security: You can enhance security for your Flying Angel device by setting the
SIM PIN setting: click [On] (for greater security) or [Off]. You may change the
SIM PIN by clicking on [Change PIN]. Do the SIM cards have an original PIN
code that you need to know for this, or are you setting up one for the first time?
x Network Access: Your wireless network access setting is set at [Automatic] by
default. Click the check boxes for GSM Only or WCDMA Only to limit your
designated wireless access.
x Date and Time Settings: Click [Sync date & time with PC] to sync your
computer with the Flying Angel 3G Wireless Data Card.
Click [Apply] to activate any changes in Settings.
58 Updated 03/2009

Flying Angel 3G Wireless Data Card
User Manual
FCC RF Exposure requirements:
The highest SAR value reported under this standard during product certification for use next to the body is
0.828 W/kg. This transmitter must not be collocated or operating in conjunction with any other antenna or
transmitter. USB dongle transmitter is approved for use in typical laptop computers. To comply with FCC
RF exposure requirements, it should not be used in other devices or certain laptop and tablet computer
configurations where the USB connectors on the host computer are unable to provide or ensure the
necessary operating configurations intended for the device and its users or bystanders to satisfy RF
exposure compliance requirements.
This device complies with part 15 of the FCC rules. Operation is subject to the following two conditions:
(1) this device may not cause harmful interference, and (2) this device must accept any interference
received, including interference that may cause undesired operation.
NOTE: The manufacturer is not responsible for any radio or TV interference caused by unauthorized
modifications to this equipment. Such modifications could void the user's authority to operate the
equipment.
NOTE: This equipment has been tested and found to comply with the limits for a Class B digital device,
pursuant to part 15 of the FCC Rules. These limits are designed to provide reasonable protection against
harmful interference in a residential installation. This equipment generates uses and can radiate radio
frequency energy and, if not installed and used in accordance with the instructions, may cause harmful
interference to radio communications. However, there is no guarantee that interference will not occur in a
particular installation. If this equipment does cause harmful interference to radio or television reception,
which can be determined by turning the equipment off and on, the user is encouraged to try to correct the
interference by one or more of the following measures:
- Reorient or relocate the receiving antenna.
- Increase the separation between the equipment and receiver.
-Connect the equipment into an outlet on a circuit different from that to which the receiver is connected.
-Consult the dealer or an experienced radio/TV technician for help
59 Updated 03/2009
 Loading...