

Page 1

TechFaith
PEAN
User Manual Version 1.0
1
Page 2

Please Read Before Proceeding
Microsoft, MS-DOS, Windows, Windows NT, Windows Server, Windows Mobile, ActiveSync, Excel, Internet Explorer,
MSN, Outlook, PowerPoint, and Word are either registered trademarks or trademarks of Microsoft Corporation in the
United States and/or other countries.
THIS DEVICE IS NOT CHARGED WHEN YOU TAKE IT OUT OF THE BOX. DO NOT REMOVE THE BATTERY PACK WHEN THE DEVICE IS CHARGING.
WHEN INSERTING YOUR SIM CARD, MAKE SURE THE DEVICE IS POWERED OFF, AND THAT THE SIM CARD SNAPS INTO THE SOCKET.
YOUR WARRANTY IS INVALIDATED IF YOU OPEN OR TAMPER WITH THE DEVICE'S OUTER CASING.
The socket outlet used for the travel charger shall be near the equipment and easily accessible.
PRIVACY RESTRICTIONS
Some countries require full disclosure of recorded telephone conversations, and stipulate that you must inform the
person with whom you are speaking that the conversation is being recorded.
Always obey the relevant laws and regulations of your country when using the recording feature of your Pocket PC
Phone.
2
Page 3

SAR INFORMATION
The SAR limit of USA (FCC) is 1.6 W/kg averaged over one gram of tissue. Device types Pean (FCC ID:
UJQ-06378T) has also been tested against this SAR limit. The highest SAR value reported under this standard
during product certification for use at the ear is 0.491 W/kg and when properly worn on the body is 0.724 W/kg.
This device was tested for typical body-worn operations with the back of the handset kept 1.5cm from the body. To
maintain compliance with FCC RF exposure requirements, use accessories that maintain a 1.5cm separation
distance between the user's body and the back of the handset. The use of belt clips, holsters and similar
accessories should not contain metallic components in its assembly. The use of accessories that do not satisfy
these requirements may not comply with FCC RF exposure requirements, and should be avoided.
Statement
For WLAN (802.11g) function, because
transmitter. So it is not capable of using both transmitters at the same time.
Note
Changes or modifications not expressly approved by the party responsible for compliance could void the user's
authority to operate the equipment.
WLAN transmitter can’t operate simultaneously with the GSM/GPRS
3
Page 4

Contents
TECHFAITH.....................................................1
PEAN...............................................................1
USER MANUAL VERSION 1.0.....................1
CHAPTER 1 ....................................................6
INSTALLING THE SIM CARD ............................. 11
BATTERY INFORMATION ..................................12
CHARGING AND DISCHARGING.............................12
STARTING UP ................................................... 16
TURNING ON/OFF THE DEVICE..............................16
DEVICE LOCK .................................................. 16
LOCKING/UNLOCKING YOUR DEVICE .....................16
THE TODAY SCREEN ..........................................17
CHAPTER 2 ..................................................21
INTRODUCTION: INPUT PANEL ......................23
BLOCK RECOGNIZE .........................................24
STAR T TRANSCRIBER ........................................26
WRITE WITH TRANSCRIBER.............................29
OPTIMIZE HANDWRITING RECOGNITION FOR
TRANSCRIBER .................................................30
SHOW OR HIDE THE TRANSCRIBER TOOLBAR31
DRAWING AND WRITING ON THE SCREEN.....32
CHAPTER 3 ..................................................35
USING THE PHONE ............................................37
MAKING CALLS.................................................38
FUNCTIONS DURING A CALL .................................41
RING TONE SETTINGS.........................................42
PHONE SERVICES..............................................43
NETWORKS......................................................43
CHAPTER 4...................................................44
CHAPTER 5...................................................51
CUSTOMIZING THE TODAY SCREEN .......................53
CUSTOMIZING THE STAR T MENU ..........................54
SETTING DATE /TIME/ALARM/LANGUAGE/REGIONAL
..........................................................54
OPTIONS
OTHER HELPFUL SETTINGS.................................55
REMOVING PROGRAMS ......................................58
MANAGING MEMORY..........................................58
BACKING UP FILES .......................................59
CHAPTER 6...................................................63
CONNECTING TO THE INTERNET....................65
USING WIRELESS MANAGER ........................67
BLUETOOTH..................................................70
INTERNET EXPLORER MOBILE ......................74
USING TERMINAL SERVICES CLIENT.............77
CHAPTER 7 MESSAGING (SMS, EMAIL AND MMS)
.........................................................................79
SMS SERVICE ..................................................79
OUTLOOK E-MAIL .............................................80
MMS..............................................................80
MENU IN SMS/MMS/EMAIL LIST ..........................81
FOLDERS OF MAILING SYSTEM ............................82
OPTIONS .........................................................83
USING POCKET MSN MESSENGER.......................84
CHAPTER 8 CONTACTS (PHONE BOOK)...........88
OVERVIEW OF CONTACTS...................................88
4
Page 5

FIND A CONTACT ...............................................88
SEND A MESSAGE TO A CONTACT..........................89
REMOVE A PICTURE FROM CONTACT
INFORMATION
...............................................94
CREA TE A SIM CONTACT..............................94
FIND A CONTACT ONLINE..............................95
SEND CONTACT INFORMATION ......................96
CHAPTER 9 MULTIMEDIA EXPERIENCES..........98
GAMES...........................................................98
BUBBLE BREAKER.............................................98
SOLITAIRE.....................................................100
CHANGE SOLITAIRE OPTIONS ............................101
PICTURES & VIDEOS .......................................101
PREVIEWING PICTURES....................................101
CHAPTER 10 CAMERA (PENDING)..................105
BEFORE USING THE BUILT-IN CAMERA ON YOUR PHONE,
PLEASE READ THIS
: .........................................105
CAPTURING IMAGES ........................................105
CAPTURING A VIDEO ........................................106
WHERE PHOTOS AND VIDEO FILES ARE STORED.....106
PERSONALIZING YOUR CAMERA .........................106
CHAPTER 11 WINDOWS MEDIA ......................109
AUDIO/VIDEO FORMAT SUPPORTED ....................109
PLAYING A FILE ...............................................109
LIBRARY SCREEN............................................ 111
PLAYER OPTIONS............................................ 112
CALCULATOR .................................................121
NOTES ........................................................122
TASKS .........................................................124
CALENDAR .................................................127
JAVA .............................................................128
APPENDIX.......................................................133
REGULATORY NOTICES...............................134
PC REQUIREMENT TO RUN ACTIVESYNC 4.X
...................................................................137
SPECIFICATIONS..........................................138
ADDITIONAL SAFETY INFORMATION ...........143
BATTERIES.....................................................145
COMMON PROBLEMS AND SOLUTIONS.................148
MAINTENANCE GUIDE ................................150
CHAPTER 12 USING OTHER APPLICATIONS ..116
WORD MOBILE........................................... 116
EXCEL MOBILE...........................................117
VIEWING SLIDE SHOWS WITH POWERPOINT
MOBILE......................................................119
5
Page 6

Chapter 1
Getting started
1.1 Getting to know your device & accessories
1.2 Installing the SIM Card
1.3 Battery Information
1.4 Starting up
6
Page 7

1.1 Getting to know your device and accessories
View from left side, front, right side and bottom
7
Page 8
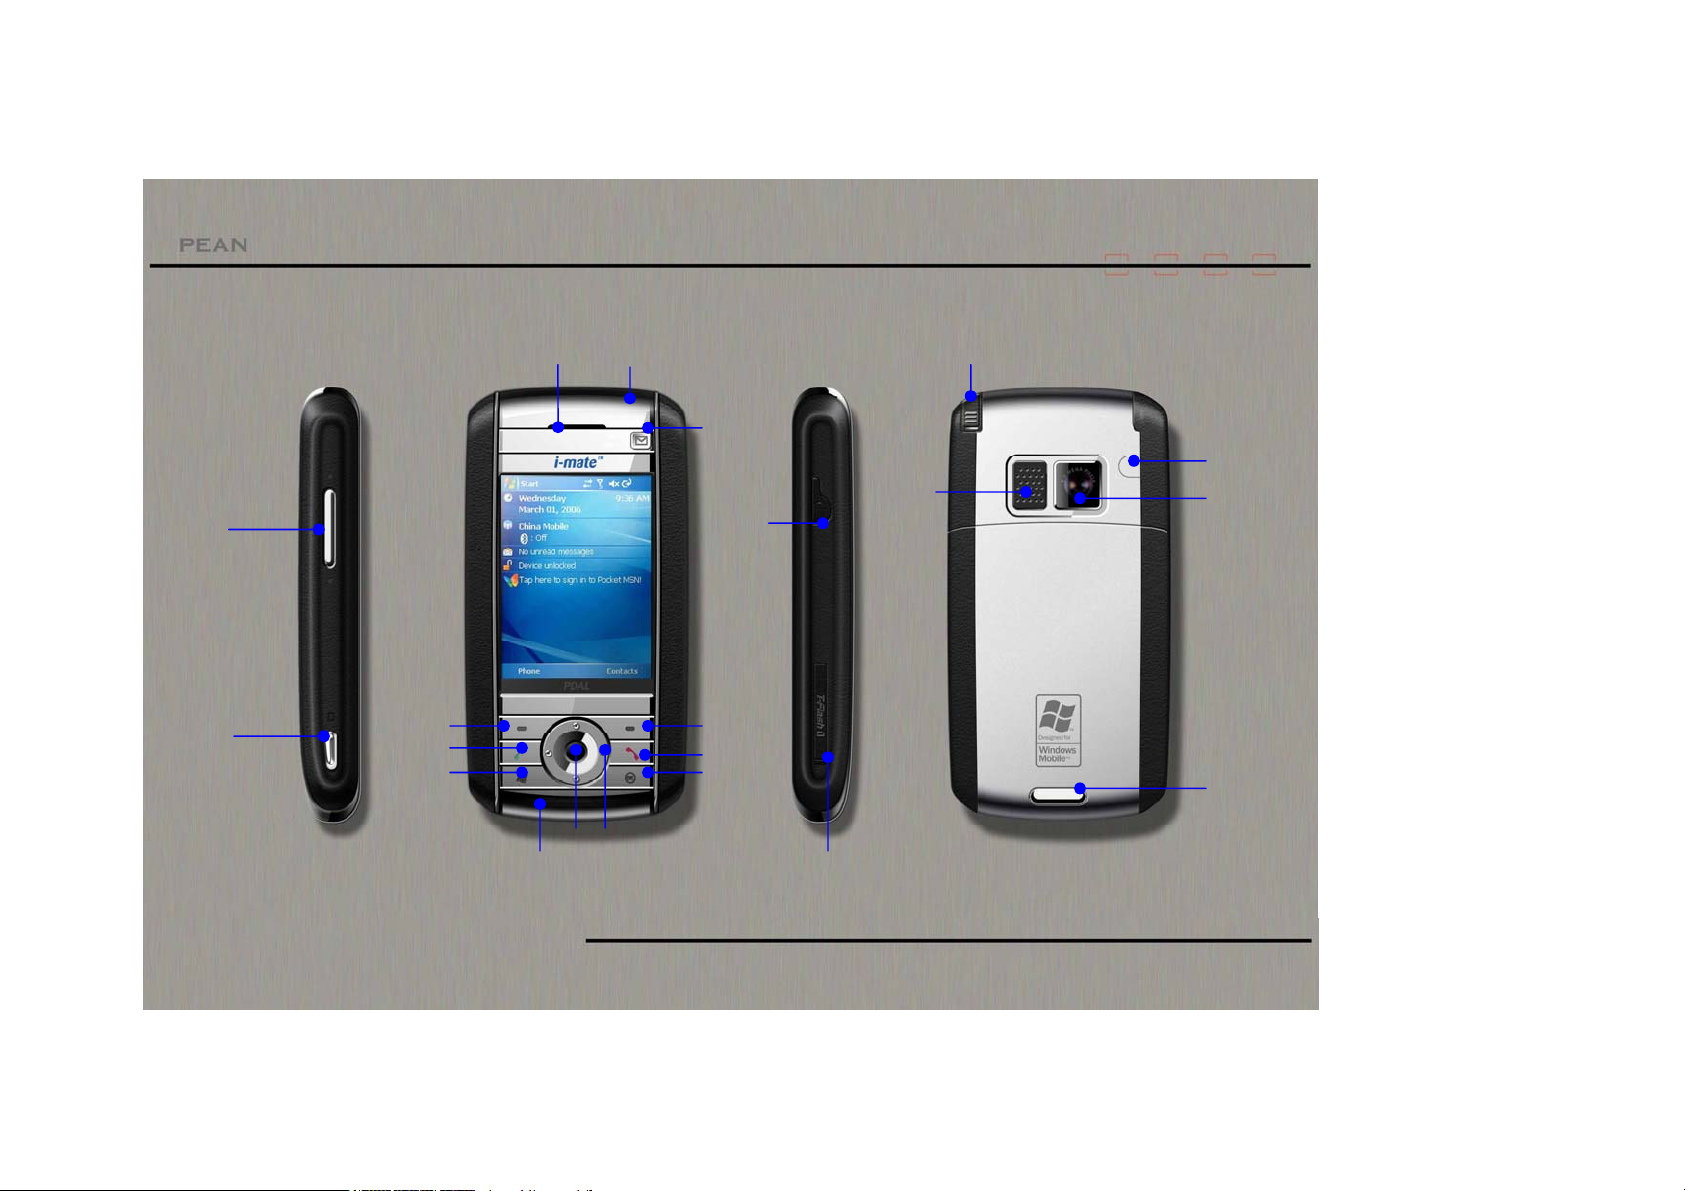
7 8 10 9 11 14 12 13 18
21
15
1
2
3
4
5
17
6
16
19
20
8
Page 9

No. Item Function Instruction
1 Volume controller
2 Camera key
3 Function left key
4 Talk key
5 Start menu key
6 Function right key
7 End key
8 Back/Delete key
9 Enter key
10 Navigation keys
11 Microphone
12 Power/Backlight
13 Custom key/Notification
LED
14 Receiver
15 Earphone jack
16 Mini-SD card slot
17 Speaker
18 Flash light
19 Camera Lens
20 Cover Latch
21 Stylus
Press to adjust the volume of the phone and the receiver.
Press to launch Camera.
Press to perform the function indicated by the text above it.
Press to enter the phone pad in the standby mode. Answer a call, or dial numbers.
Press to draw out Start Menu wherever you are.
Press to perform the function indicated by the text above it.
End a call or back to the Today screen
Back to the previous screen or delete an entry in text/number editing.
Press to carry out the selection (Enter to submenu, run program etc.).
Using this multi-functional control, scroll through options, items etc.
Speak to it to talk during a call, or make a recording.
Press and hold it to power on/off the device. Press briefly to turn on the backlight.
Press to run the customized program (See Chapter 5
LED in the centre, it indicates various status, like charging, SMS, WiFi,etc.
Listen to a phone call here
Plug the earphone to listen to audio media, or use the hand-free kit.
Insert a storage card here to store data.
Listen to audio media (Including voice note) here.
Use it in a dark environment when taking pictures
Taking pictures or videos through this lens, when Camera mode is active.
Press to open the cover
Use the stylus to write, draw, or select items on the touch screen.
Reassigning button functions). As a notification
9
Page 10

This user manual is published by TECHFAITH. TECHFAITH reserves the right to correct the typos or description errors, modify the contents on function
improvement and technical update in this manual at any time. We feel sorry that the contents of this manual are subject to change without prior notice.
Accessories
The following accessories are provided with the device:
1
2
3
No. Item Function Instruction
10
Page 11

1 AC adapter
2 USB cable
3 Stereo-wired earphone,
with volume control jog,
and Send/End button
Connect it to a power supply to recharge the battery.
Connect it to a PC to synchronize data.
Listen to audio media, or answer/reject/end a phone call.
Speak to it to create a voice note.
Installing the SIM Card
Follow these steps to install a 3G USIM (Universal IC Card) or a GSM SIM (Subscriber Identity Module) card provided by your local network service provider
that contains your phone number, service details, and phonebook/message memory:
11
Page 12

1 Press the cover latch and slide down to remove the back cover.
2 Find the gap between the battery and the casing at the bottom. Stick it upward to lift the bottom end.
3 Insert the SIM card into the SIM card slot with its gold contacts facing down. Its cut-off corner should match the cut-off corner in the slot. Push down lightly
and forward to snap it into place.
4 Replace the battery and gently push down to snap it into place.
5 Replace the cover: Slide it back on, and then push down lightly at the bottom to snap it securely into place.
Battery information
Charging and Discharging
Your device is powered by a rechargeable battery. The full performance of a new battery is achieved only after two or three complete charge and discharge
cycles. The battery can be charged and discharged hundreds of times but it will eventually wear out. When the talk and standby times are noticeably shorter
than normal, replace the battery. Use only TECHFAITH approved batteries, and recharge your battery only with TECHFAITH approved chargers designated for
12
Page 13

this device. Unplug the charger from the electrical plug and the device when not in use. Do not leave a fully charged battery connected to a charger, since
overcharging may shorten its lifetime. If left unused, a fully charged battery will lose its charge over time.
If the battery is completely discharged, it may take a few minutes before the charging indicator appears on the display or before any calls can be made. Use the
battery only for its intended purpose. Never use any charger or battery that is damaged. Do not short-circuit the battery. Accidental short-circuiting can occur
when a metallic object such as a coin, clip, or pen causes direct connection of the positive (+) and negative (-) terminals of the battery. (These look like metal
strips on the battery.) This might happen, for example, when you carry a spare battery in your pocket or purse. Short-circuiting the terminals may damage the
battery or the connecting object. Leaving the battery in hot or cold places, such as in a closed car in summer or winter conditions, will reduce the capacity and
lifetime of the battery. Always try to keep the battery between 15°C and 25°C (59°F and 77°F). A device with a hot or cold battery may not work temporarily,
even when the battery is fully charged. Battery performance is particularly limited in temperatures well below freezing.
Do not dispose of batteries in a fire as they may explode. Batteries may also explode if damaged. Dispose of batteries according to local regulations. Please
recycle when possible. Do not dispose as household waste.
Battery life estimates (approximations):
• Standby time:
GSM: 220 – 260 hours
WCDMA 190 – 250 hours
• Talk time (Screen off):
GSM: 5 – 8 hours
WCDMA 2 – 4 hours
Checking the battery power
• On the Today screen, Tap Start > Settings > Power (on the System tab)
• Tap the battery level icon on the Today screen
Warning
To reduce risk of fire or burns:
• Do not attempt to open, disassemble, or service the battery pack.
13
Page 14

• Do not crush, puncture, short external contacts, or dispose of in fire or water.
• Do not expose to temperatures above 45˚C (125˚F).
• Replace only with the battery pack designated for this product.
• Recycle or dispose of used battery as stipulated by local regulation.
Charging the battery
New batteries are shipped partially charged. Before you can use your device, you need to install and charge the battery. Some batteries perform best after
several full charge/discharge cycles. You can charge the battery by:
• Connecting your device directly to an external power source.
• Plugging the device sync cable into the USB port on your PC.
14
Page 15

Optimizing the power performance
How long your battery power lasts depends on battery type and how you use your device.
Try the following to help preserve battery life:
• Tap > Settings > System tab > Power. On the Advanced tab, you can specify when your device turns off to conserve battery power. For optimum
conservation, specify 3 minutes or less.
• Use the AC adapter to plug your device into external power whenever possible, especially when using a Mini-SD card or when using a modem or other
peripherals.
• Adjust the backlight settings.
Set the backlight to dim after a time delay
If your device supports it, you can set the backlight to dim after a specific amount of time has elapsed.
1 Tap > Settings > System tab > Backlight.
2 Tap the Battery power tab or the External power tab.
3 Select the Turn off backlight if device is not used for check box, and specify the time delay.
15
Page 16

Dealing with low battery
In case that the battery is running out, you are supposed to:
• Charge the battery using the AC adapter, especially when you are using a Mini-SD card, modem, or other peripherals.
• Save all unsaved data if necessary
• Power off your device
Starting up
Turning on/off the device
Press and hold Power key to turn it on. First time you do this, you are asked to complete a calibration process. For more information, see Section Calibrate the
device.
To turn off the device, press and hold Power again.
☺ Note When your phone is switched on, you can press briefly Power to temporarily turn it off and switch it to sleep mode. However, you can still receive
messages and calls in this status.
Device Lock
You can lock your device to prevent the items on the Today screen from responding to any tap, or applications being accidentally launched. Once you have your
device locked, press Power to light it.
Locking/Unlocking your device
• On Today screen, tap Device unlocked section.
• To unlock it, just tap Unlock or press LSK, in the middle screen, tap Unlock button again.
16
Page 17
Calibrating the device
To complete a calibration process:
• Following the cross as it moves about, tap the center of it when it holds and is still. The calibration process helps you tap an item more precisely with the
stylus.
If your device does not respond to screen taps that accurately, follow the steps to re-calibrate it:
Tap Start > Settings > System tab >Screen
On the General tab, tap Align screen,
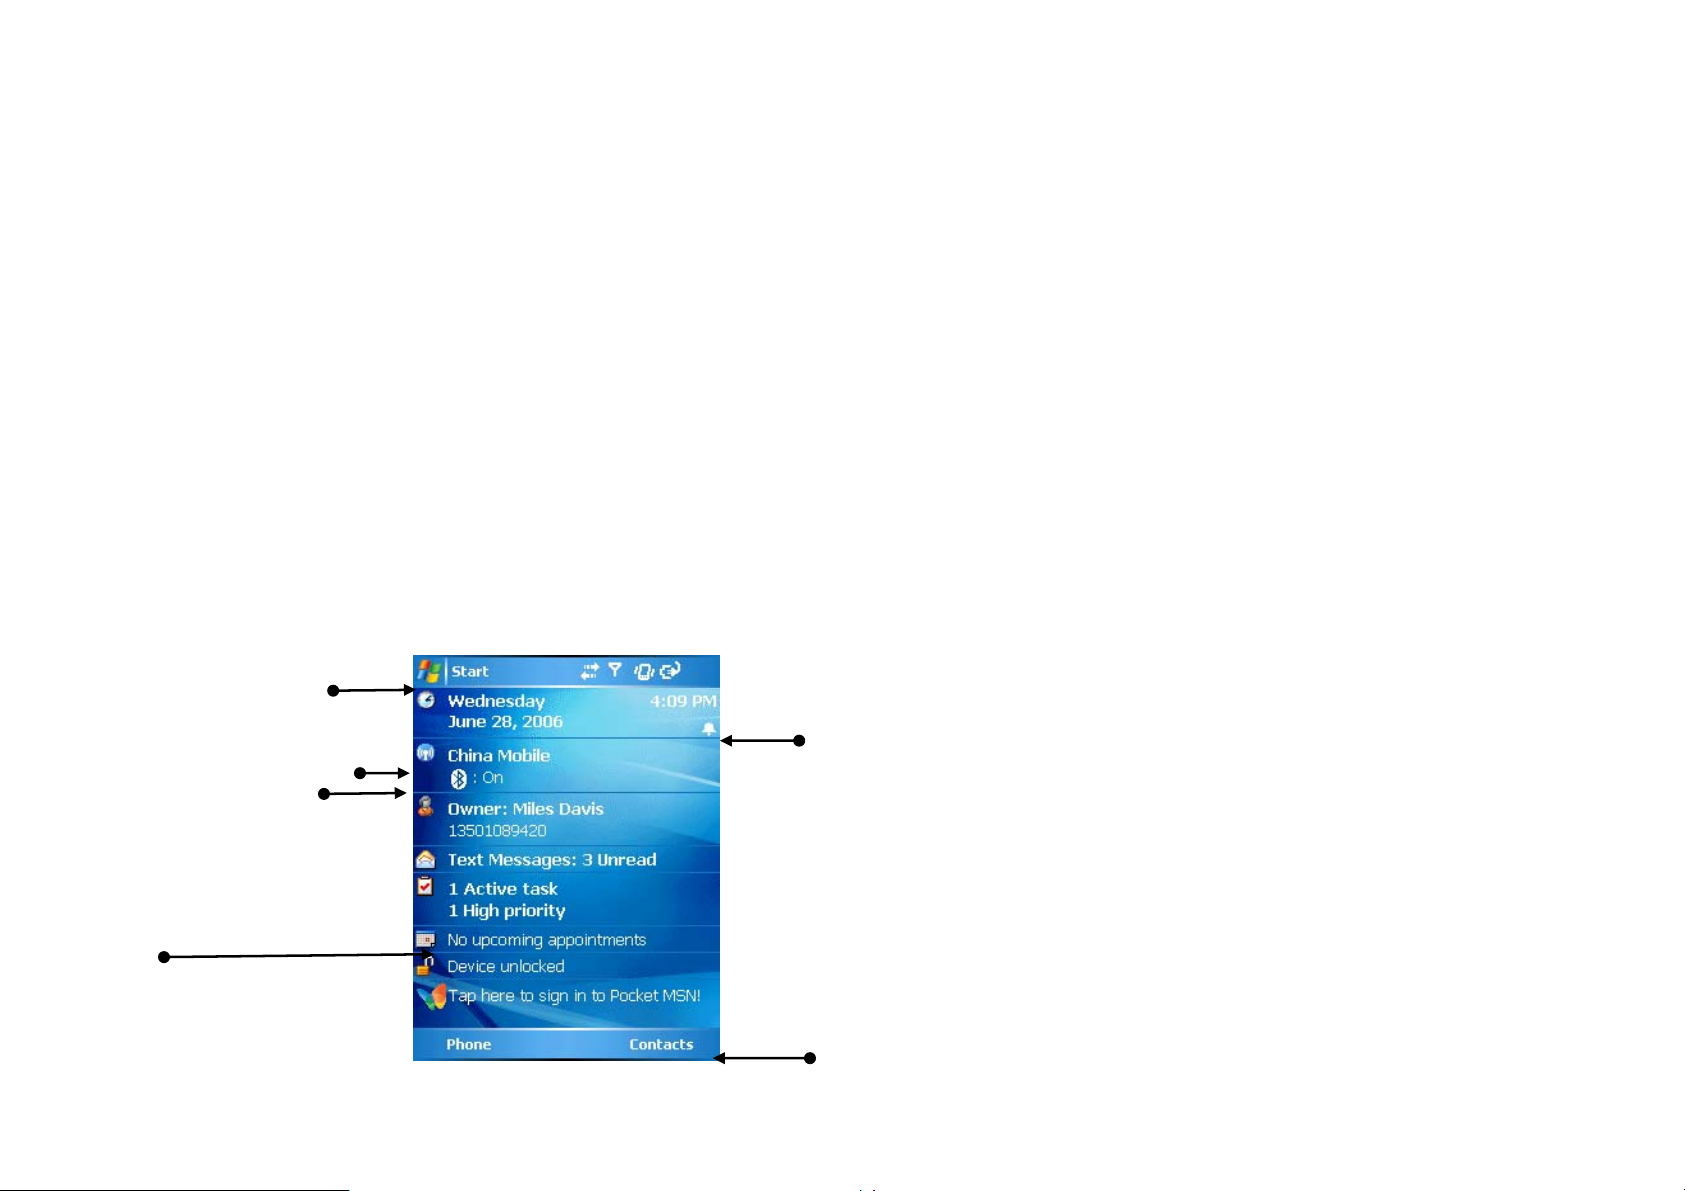
The Today screen
The Today screen displays important information, such as upcoming appointments, status indicators, the current date and time, profile, text messages. At
shortcut bar, icons of programs you have recently used are lined, in which you can tap one then press RSK to open a program directly.
Start Menu icon
Wireless service provider
Bluetooth status
Appointments display area
Status bar
Shortcut bar
Soft key bar
17
Page 18

• To access the Today screen from anywhere, tap Start > Today.
• To personalize your Today screen, see “Personalizing your Pocket PC Phone” in Chap.5
• Soft key bar
Perform the function indicated on top of it.
Status Indicators
The common status indicators are listed and indicated as follows:
18
Page 19

Unread message
The max signal strength
Phone is turned off
The battery is full charged
Battery power is very low
Battery power is used up.
Battery charging
Call in progress
Sound on
Mute
Call on hold
Call is diverted
New voice message
GPRS is enabled
Synchronization errors
Bluetooth is enabled
Bluetooth voice gateway
No SIM card
Data transfer in progress
Wi-Fi on
Wi-Fi connection in progress
Wi-Fi data call
MSN instant message
Missed call
19
Page 20

Start Menu
On Today screen, press Home or tap Start to draw out Start Menu. Some common programs are listed on it.
To start a program on Start Menu:
• Using Navigation up/down to scroll to a program, and then press OK
• Tap a program with the stylus.
20
Page 21

Chapter 2
Entering text & Searching information
1.1 Starting up
1.2 PC Requirement to Run ActiveSync
1.3 Specifications
1.4 Additional Safety Information
21
Page 22

22
Page 23

Introduction: Input Panel
When you start a program or select a field that requires text or numbers, Input Panel appears.
Input Panel provides various input methods, including Block Recognizer, Keyboard, Letter Recognizer, Phone Pad, and Transcriber.
By default, the Input Panel icon appears on the menu bar to indicate which input method is currently selected. Tap the arrow beside you can select other input methods.
To show/hide Input Panel
• Tap the Input Panel con on the menu bar
On-screen Keyboard
Switch to on-screen keyboard, and then use stylus to tap on the smart keyboard to enter characters.
♫ Tips: Tap áü to enter miscellaneous vowels or symbols.
♫ Tips: Using (Tap to blacken) Shift +? , Ctl +? , Shift + Ctl +? (“?” stands for other keys) to utilize key combinations, you can perform Copy, Cut,
etc. just like on a real keyboard.
Keyboard options
Tap the selector arrow and select Options
In Input method box, select Keyboard
• Tap the circle before “Large keys” to enlarge the smart keyboard.
• Select the Use gestures for the following keys check box to enable gesture command.
23
Page 24

Letter Recognizer
With Letter Recognizer, you can write individual letters, numbers and punctuation, which are then converted into typed text.
Using Letter Recognizer
Tap the Selector arrow, and tap Letter Recognizer.
The handwriting area is divided into three designated parts: ABC, abc, and 123(all dimmed)
Write characters, numbers, symbols, and punctuation in separate area:
• Write in the ABC area to enter capital letters.
• Write in the abc area to enter lowercase letters.
• Write in the 123 area to enter numbers.
• Tap the box in the right corner labeled “@$*” to open table of symbols and punctuation.
☺ Note: Letter Recognizer is available when text entry is possible
♫ Tip: For help with using Letter Recognizer, tap “?” in the right corner to see demo.
Block Recognizer
With Block Recognizer, you use a single stroke to write individual letters, numbers and punctuation, which are then converted into typed text.
Using Block Recognizer
Tap the Selector arrow, and tap Block Recognizer.
The handwriting area is divided into two designated parts: abc, and 123(both dimmed)
24
Page 25

Write characters, numbers, symbols, and punctuation in separate area:
• Write in the abc area to enter lowercase letters.
• Write in the 123 area to enter numbers.
• Tap the box in the right corner labeled “@$*” to open table of symbols and punctuation.
☺ Note: Block Recognizer is available when text entry is possible
♫ Tip: For help with using Block Recognizer, tap “?” in the right corner to see demo.
Transcriber
Transcriber is a handwriting recognition program that allows you to write in cursive, print, or a combination of both. Transcriber works transparently
in the background of programs, recognizing words with its integrated dictionary. When transcriber is turned on, it interprets stylus movement
anywhere on the screen as handwriting input. For more information about using Transcriber, see Help on your device:
• Start a program such as Word Mobile.
• Tap the Input Panel icon at the bottom center of the screen and tap the Input Selector arrow. Tap Transcriber. The Transcriber introductory
screen appears.
25
Page 26

Start Transcriber
Because Transcriber works transparently in the background of programs that accept user input, you must have one of these programs open to use
Transcriber.
1. Start a program such as Word Mobile.
2. Tap the Input Panel icon at the bottom center of the screen and tap the Input Selector arrow.
3. Tap Transcriber.
The Transcriber introductory screen appears.
Use the Transcriber keyboard
Transcriber comes with an on-screen keyboard that provides an easy way to add punctuation or a special symbol to existing text.
• From a program, tap on the Transcriber toolbar.
The keyboard remains visible until you tap the button again.
Tips
To reposition the keyboard, tap and hold the title bar, then drag to the desired location.
When no text is selected, you can also open the keyboard by doing the gesture.
26
Page 27

To edit text
1. In a program, draw a line across the text you want to edit.
2. After you lift the stylus from the screen, the line will disappear and the selected text will be highlighted.
3. Do either of the following:
• Rewrite the text.
• Use gestures to capitalize letters, insert a space, and so on. For information about using gestures, see “Transcriber Gestures” in this chapter.
27
Page 28

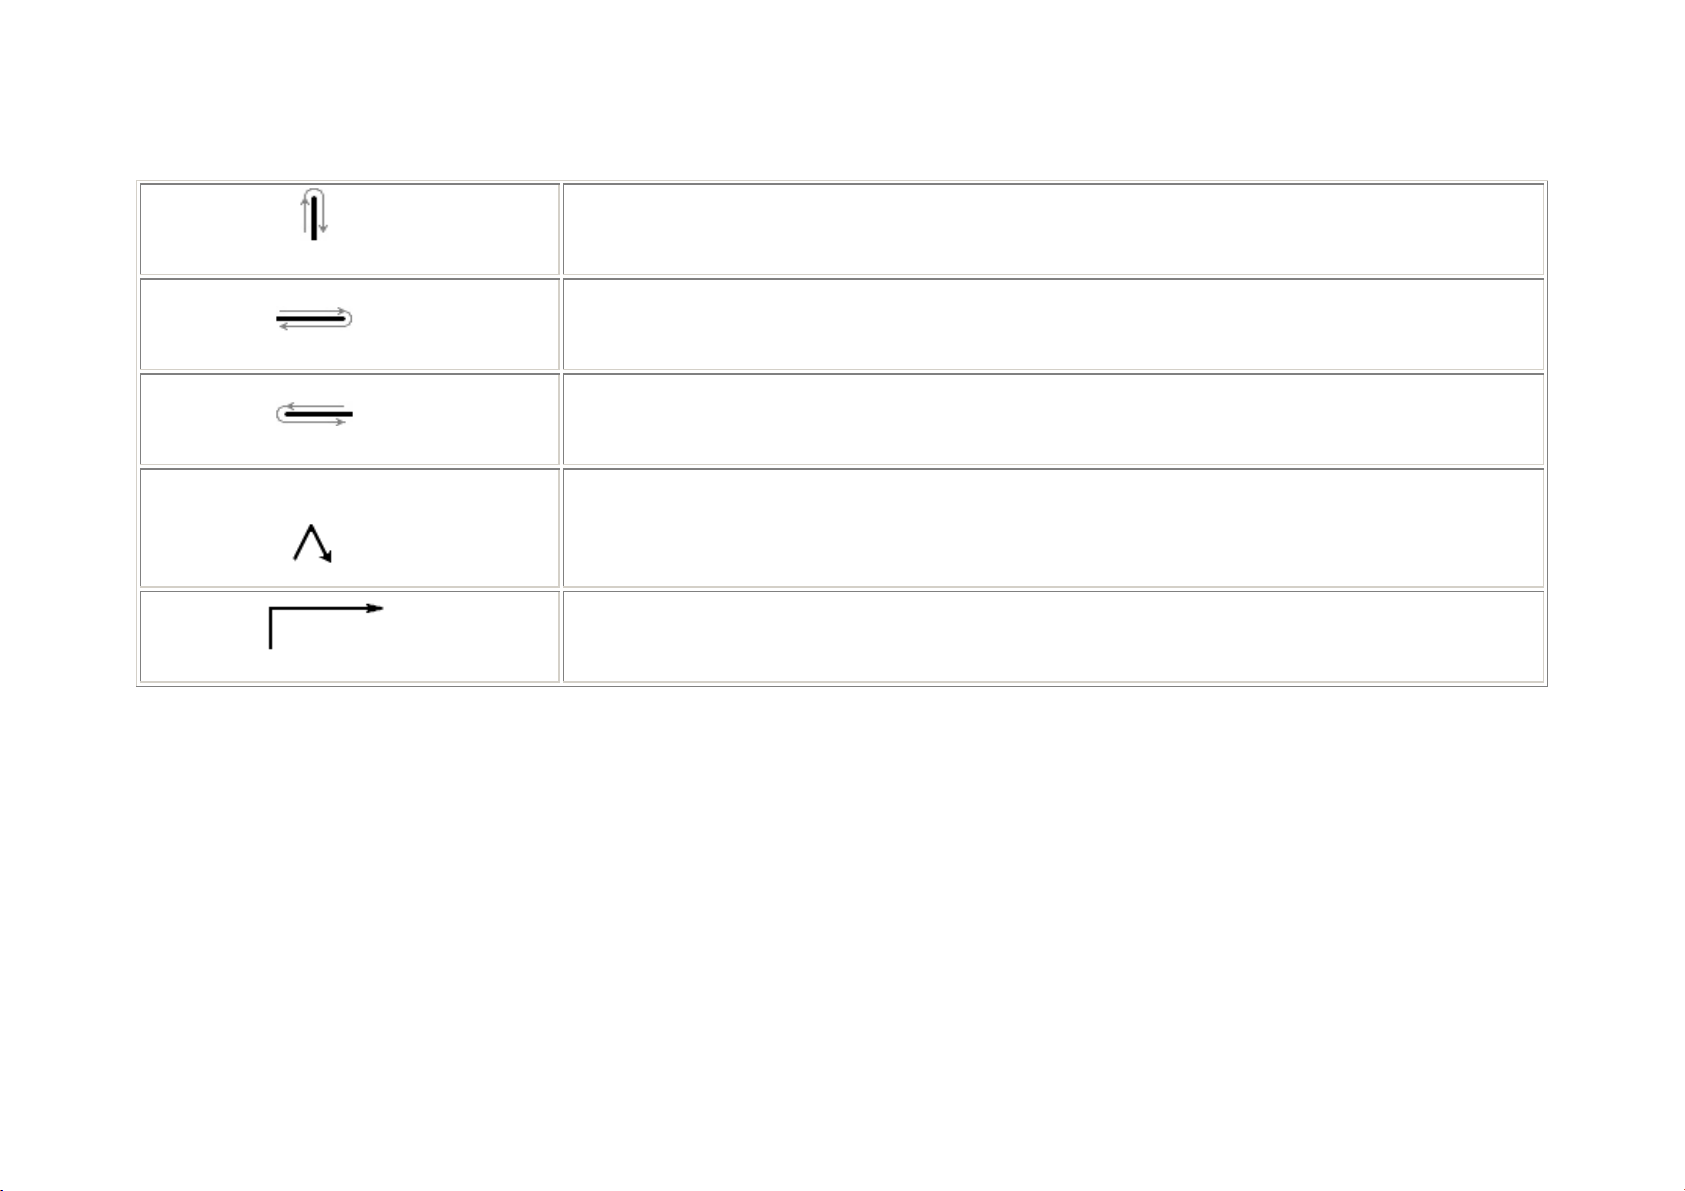
Using gestures in Transcriber
Use quick strokes of the stylus to edit your text. Do the Enter, Space, and Tab gestures while writing text to insert returns, spaces, or tabs.
Do To
Insert a paragraph return at the cursor.
The horizontal portion of the gesture must be at least two times longer than the vertical portion.
Insert a space at the cursor.
The horizontal portion of the gesture must be at least two times longer than the vertical portion.
Move the cursor one space back and erase any text.
Do the gesture by drawing a line from right to left.
Open the menu of alternate words if a word is selected or the on-screen Transcriber keyboard if no text is
selected.
Do the gesture by drawing a line straight down and back up.
Change the capitalization of a selected letter, word, or block of text.
Do the gesture by drawing a line straight up.
28
Page 29
Undo the last action.
Do the gesture by drawing a line straight up and back down.
Copy the selected text.
Do the gesture by drawing a line from left to right and back.
Cut the selected text.
Do the gesture by drawing a line from right to left and back.
Paste copied or cut text.
Do the gesture by drawing a line from the lower left of the screen diagonally up toward the right and back down
to the right.
Insert a tab.
The horizontal portion of the gesture must be at least two times longer than the vertical portion.
Tip
You can also use the Enter, Space, and Backspace buttons on the Transcriber toolbar.
Write with Transcriber
Transcriber allows you to write in cursive, print, or a combination of both.
29
Page 30

1. From a program, position the cursor where you want text to appear.
2. Use the stylus to write anywhere on the screen.
The handwriting will be converted to text shortly after you lift the stylus from the screen.
Optimize handwriting recognition for Transcriber
If Transcriber does not recognize your handwriting as accurately or quickly as you'd like, there are some things you can do to optimize handwriting recognition.
• Select the Writing Direction picture that best matches the slant of your handwriting. For information, see Set Transcriber startup options.
• Use Letter Shapes to eliminate letter shapes that you do not use or to learn methods of writing characters that will make them easier for Transcriber to
recognize. For information, see Match letter shapes to handwriting.
• Try writing in another format. If you have been printing, try writing cursive, or if you have been writing in both cursive and print, try printing alone.
• Adjust the speed at which Transcriber returns text after you write. For information, see Set Transcriber text entry options.
• Add a user dictionary that contains special terms you may be using, such as medical or legal terms. For information, see Create a dictionary for
Transcriber.
Verify that you are using your Letter Shapes user profile. For information, see Save a Letter Shapes user profile.
Note
The next time you write the shorthand text, the appropriate program will open.
30
Page 31

Show or hide the Transcriber toolbar
The Transcriber toolbar, which appears at the bottom of the screen when Transcriber is open, provides easy access to several tools, Enter, Space, and
Backspace buttons, and Left and Right arrow buttons.
• From a program, tap the Transcriber icon at the bottom of the screen.
Tap To
Open the Options dialog box, where you can set options such as writing direction, text entry, and shorthand.
Open Letter Shapes, where you can set your personal writing styles to maximize recognition.
Use the miniature keyboard to quickly enter numbers, punctuation, and other symbols.
Change the character recognition mode.
• a mode. This is the default for optimum handwriting recognition.
• 123 mode. Numbers and some letters are allowed and the calculator is activated.
• A mode. All letters are automatically capitalized.
If you are in A or 123 mode, recognition returns automatically to the default mode once you lift the stylus.
Insert a space at the cursor.
31
Page 32

Insert a paragraph return at the cursor.
Move the cursor one space to the left.
Move the cursor one space to the right.
Move the cursor one space back and erase any text.
Open the Transcriber Help.
Drawing and Writing on the Screen
Drawing on the Screen
With your Pocket PC Phone, you can draw directly on the screen, or write on the screen and save notes in your own handwriting. To do this, you must set the
input mode in Notes to Writing. If you prefer to use handwriting or frequently add drawings to your notes, you may find it helpful to set Writing as the default input
mode. If you prefer typed text, set Typing as the default input mode. For more information on what you can do with Notes, see “Notes” in
Chapter 7.
To set the input mode for Notes
1. Tap Start > Programs > Notes.
2. In the note list, tap Menu > Options.
32
Page 33

3. In the Default mode box, tap one of the following:
• Writing if you want to draw or enter handwritten text in a note.
• Typing if you want to create a typed note.
4. Tap OK.
To write a note
1. Tap Start > Programs > Notes.
2. In the note list, tap New.
3. Write your text on the screen.
4. When finished, tap OK to return to the note list.
☺ Notes To select handwritten text, tap and hold next to the writing. As soon as dots appear, and before they form a complete circle, quickly drag across
the writing. If a letter crosses three ruled lines, it is treated as a drawing rather than text.
To draw in a note
To draw on the screen, use the stylus like a pen.
1. Tap Start > Programs > Notes.
2. In the note list, tap New.
3. Draw on the screen, crossing at least three ruled lines.
4. A selection box labeled Drawing appears around your drawing.
5. When finished, tap OK to return to the note list.
☺ Note To select a drawing (for example, to copy or delete it), tap and hold the drawing briefly. When you lift the stylus, the drawing is selected.
33
Page 34

Searching
You can search for files and other items stored on your device in the My Documents folder or on a storage card.
You can search by file name or by key words located in the item. For example, you can search E-mail messages, notes, appointments, contacts, and tasks as
well as in online Help.
To search for a file or an item
1 Tap Start > Program > Search.
2 In Search for, enter the file name, word, or other information you want.
3 If you have searched for an item before, tap the arrow in Search for to find it in the searching history.
4 In Type, select a data type to help narrow your search area.
5 Type Search.
6 In the Results list, tap the item you want.
☺ Note: The My Documents folder and its subfolders are included in the search area.
☺ Note: Results found on a storage card is indicated by an icon.
34
Page 35

Chapter 3
Using the phone features
1.1 Starting up
1.2 PC Requirement to Run ActiveSync
1.3 Specifications
1.4 Additional Safety Information
35
Page 36

36
Page 37

Using the phone
You can use your pocket PC phone to make, receive calls, record call history and send SMS/MMS messages. You can also take notes during a call, dial directly
from Contacts, and copy SIM contacts to phone.
PIN
Most SIM cards are preset with a PIN provided by your wireless service provider.
1 Under this circumstance, enter the preset PIN assigned by the wireless service provider.
2 Ta p Enter
Please see Secure the phone in Chap. 5 for more information.
Adjusting the device volume
Tap the speaker Icon in the status bar, or press the volume buttons on the right side to pop up the volume meter.
Tap the volume meter of the phone or ringer to increase/decrease the volume.
Tap On, Vibrate, or Off to change the sound scheme.
Note: With Vibrate mode activated, you device turns muted and will vibrate next time you receive calls/messages, and an icon to indicate the mode will appear
in the title bar.
37
Page 38

Making Calls
Making a voice call
You can make a voice call from Phone, Contacts, Speed Dial, Call History, and SIM Manager.
Making a call from the Today screen
1 When on the Today screen, tap LSK (Phone), or press the Talk key to enter the phone screen.
2 On the phone screen, tap the number buttons to enter the number you desire, and then tap the Talk button to call the number.
♫ Tip: If you want to delete a number, tap ← to delete all numbers, press ←, and hold.
Making a call from the Contacts application
To make a call by Contact name:
1 Tap Contacts from Start Menu.
2 Use Navigation Up/Down to scroll to a desired name, press Talk twice to call; or tap a desired name to enter the details, and then press Talk to call.
Alternatively, press and hold a contact to pop up the shortcut menu, tap Call. If it’s a phone contact, you can select Call Work, Call Home, or Call Mobile.
• You can enter the first letters of the desired the name to search it. Matching Contacts are listed.
3 Press Talk key to call.
Calling your voice mail box (network service)
38
Page 39

To call your voice mailbox, tap and hold Num 1 on the phone screen.
Calling a recently dialed number
When on the phone screen, press the Talk key and you see the last call.
Tap Talk button to call it, or tap Call History to view other recently dialed calls.
Scroll to one, tap Call or press Talk key to call.
♫ Tip: you can also tap the icon (Phone with a green arrow) before the number to call it.
Making a call from Call History
Tap Call History from the phone screen.
Tap Menu > Filter to define a category
Do as what described above.
Making a call from a hyperlink
When you see an underlined phone number denoting a hyperlink in an E-mail, just scroll to it, and press Talk key to call it.
Answer or rejecting a call
When you get an incoming call, it will display on the screen its name or number. If you have not saved this number, you can only see its number.
Press Talk key or tap LSK (Answer) to answer it.
To mute the ringing tone, press + or – on the right side of your device.
If you want to reject it, tap RSK (Ignore). The caller will hear a line busy tone.
☺ Note: A rejected call will be diverted to voice mailbox if you subscribed this service.
39
Page 40

Answering another call at Call Waiting
If you are already in a phone conversation when another call comes in, a Call Waiting screen will appear. You have to shelve the formal on hold to answer the
latter.
Tap LSK (Answer) or the Talk key to shelve the first call on hold and answer the second.
If you prefer to ending the first call before answering the incoming call, first press Power, and then tap LSK (Answer) or Talk key to answer it.
To reject the latter, just press Power or tap RSK (Ignore).
Making a call from Speed Dial
On the phone screen, tap Menu > Speed Dial
You see a speed dial named Voicemail in there, with the dial number “1” ahead it.
40
Page 41

You need to create some speed dial entries here. To create a speed dial entry, see Chap. Adding a speed dial entry.
Back to speed dial list, you will see the entries you created.
To call a speed dial:
• On the phone screen, tap and hold a number button until the call is launched.
• If it is a 2-digit speed dial, tap the tens digit, then tap and hold the other until the call is launched.
Functions during a call
Many of the functions you can use during a call are network services.
Note: Network support from network service provider is the precondition of your using these functions.
Holding a call
During a call, tap Hold on the screen (or from Menu) to prevent the other party from hearing your voice.
This call is not yet hung up and you can tap Unhold on the screen (or from Menu) to resume.
During a call containing at least two parties, you can tap Swap button to switch to another.
☺ Note: only the one you switch to can hear you.
Mute
If you want to turn off the speaker during a call, tap Mute. Tap Unmute to revert. With the speaker muted, the other party can’t hear you but you can hear him
unless he mutes his speaker, too.
Increasing/decreasing volume
During a call, press + or - to increase or decrease volume
41
Page 42

Conference call
Please refer to Sitting a call conference for details
Additional Dialing information
Making an emergency call
You can make an emergency call under any circumstances, even if you have your SIM card or phone locked.
Enter the emergency number that is available for your locale, and press the Talk key.
Additional emergency numbers may be included in your SIM card. Contact your service provider for details
Making an international call
Tap and hold Num 0 until a + sign appears. The + is for international prefix of the country you attempt to call.
Enter the full phone number, press Talk key. The number includes country code, area code (without a “0” at the very beginning,) and main number.
Ring tone settings
From the Phone keypad, tap Menu > Options > Phone tab.
In Sounds:
Using different ring types, you change the way you are notified of incoming calls.
Tap the Ring type box to find the type (ring, vibration, or combination of both) you preferred.
Tap the Ring tone box to select a tune you like. You can tap the control buttons to listen to the sample.
♫ Tip: you can also use custom *.wav, *.mid, *.mp3, or *.wma files as ring tones.
Please see Help topics on Change the ring tone & Active Sync for detailed instructions.
42
Page 43

In Keypad, you can select Long/Short/Off tone when you tap and hold the buttons on the phone keypad.
Phone services
Here lists several services that help you handle incoming calls as you wish.
Focus on a service type then tap the Get Settings button to retrieve settings from network; you can also change them here.
Networks
You can view available wireless networks, assign another network to connect if the current one turns available. In addition, you can choose to
manually/automatically the network. For more information on network settings, please see Help topics related.
To change network provider
Tap Start > Settings > Phone > Network tab
By default, your device displays the current network name here; however, you can choose a preferred one:
Tap Start > Settings > Phone > Network tab.
By default, the Network selection box is set to Automatic.
Select Manual and wait for it to search for all available network providers. Choose one to register.
Tap Set networks and you see a list of networks it has read from the network.
Select one and press Move up or Move down to arrange the order.
43
Page 44

Chapter 4
Active sync
4.1 Synchronizing your phone
4.2 Using ActiveSync
4.3 Installing Active sync
44
Page 45

45
Page 46

Synchronizing your phone
Using ActiveSync
Maintaining a steady connection between your Phone and your desktop or notebook PC is essential. This process of sharing information is called
"synchronization." Active-Sync synchronizes information stored on your Phone from your PC or Microsoft Exchange Server.* It also allows you to share files
between your Phone and your PC.
When you synchronize, ActiveSync compares the information on your Phone with the information on your PC and/or Exchange Server and updates all
locations with the
most recent information.
With ActiveSync, you can:
• Keep your Outlook information up-to-date by synchronizing your Phone with your PC.
• Maintain connection with your Inbox, Calendar, and Contacts with a server* so that you have the latest information, even when your computer is turned off.
• Copy (rather than synchronize) files between your Phone and your PC. Installations of new Phone software applications / utilities are done through ActiveSync.
• Have control over when synchronization occurs by taping a synchronization schedule.*
• Tap which types of information are synchronized, and specify how much information is synchronized. For example, you can choose how many weeks of past
appointments to synchronize.
• Using Server ActiveSync, you can synchronize information directly with Microsoft Exchange Server 2003.*
* Wireless access to Outlook or Microsoft Exchange requires IT configuration. Additional software and hardware may be required.
46
Page 47

Installing ActiveSync
Before synchronization can begin, you must install Active-Sync 3.7 or above on your desktop or notebook PC. Use the Companion CD that came with your
device, or install ActiveSync free by downloading the software from Microsoft's web site at http://www.microsoft.com/windowsmobile.
ActiveSync is already installed on your phone.
Creating a partnership
After the ActiveSync installation is completed, the New Partnership wizard will help you set up a partnership between your Phone and your desktop or
notebook PC. Your first synchronization process will automatically begin when you finish using the wizard. After the first synchronization, you will notice that the
information from your PC that you taped now appears on your Phone. Before setting up ActiveSync, connect the device to your computer using a USB port, or
via infrared connection.
Using synchronization
The first synchronization begins automatically after you finish using the New Partnership wizard. By default, ActiveSync does not automatically synchronize all
Outlook information. You can use ActiveSync options to turn synchronization for specific information types on and off:
1. On your PC, open the Microsoft ActiveSync program. Tap Options.
2. By default, Calendar, Contacts, Tasks, and Inbox will be synchronized. De-tap the check box for the item (s) you do not want to synchronize.
3. To adjust the settings for a particular type of information, tap the type and then tap Settings. For example, you may tap which folders in Inbox to synchronize.
Synchronizing
ActiveSync Server
47
Page 48

Before synchronizing information with a server, make sure all the requested server authentication information such as username, password, and the name of the
Microsoft Mobile
Information Server are correct. In the New Partnership wizard, tap Synchronize with Microsoft Mobile Information Server and/or this PC, instead of Synchronize
with this PC.
To set up ActiveSync Server:
1. From the Today screen, press the Start, then tap ActiveSync from the list of programs.
2. Tap Menu, then Options.
3. Tap Server Settings, and then Connection.
4. In User name, enter your Microsoft Exchange user name.
5. In Password, enter your Microsoft Exchange password.
6. In Domain, enter the name of the domain of your Exchange server (if required).
7. If you want the device to save your password so that you need not enter it when connecting, tap Save password.
8. If configuring a Server Name, enter the name of your Exchange server.
9. Tap Done. To begin synchronizing with the server, press the Sync.
To change server synchronization settings: First, disconnect your phone from the PC. From your Phone's Today screen, tap Start > ActiveSync. In the
ActiveSync screen, open the menu and tap Options > Server Settings. Tap synchronization settings to edit
Calendar, Contacts, or Inbox; change the amount of information to be synchronized. To synchronize the information, tap the Sync [Information Type] with a
server checkbox
on the appropriate synchronization settings page.
Synchronizing Inbox
48
Page 49

When you tap Inbox for synchronization in ActiveSync, E-mail messages are synchronized as part of the general synchronization process. During
synchronization, the following
events occur:
• Messages are copied from the Outlook Inbox folder on your PC, or from Microsoft Exchange Server, to the Inbox folder on your phone.
• By default, when synchronizing Inbox information with your PC or Microsoft Exchange Server, you receive only messages from the last 3 days and the
first 500 bytes of
each new message.
• The messages on your Phone and on your PC are linked. When you delete a message on your phone, it is deleted from your PC the next time you
synchronize, and vice versa.
• Messages in subfolders of other Outlook E-mail folders are synchronized only if the folders have been taped for synchronization in Inbox on your Phone.
NOTE: SMS and MMS messages are not received in Messaging through synchronization. Instead, they are sent to your Phone by way of your cellular
service provider.
Synchronizing Calendar
When you tap Calendar for synchronization in Active-Sync, by default Calendar items from the last two weeks are synchronized. Calendar items created on your
Phone are copied to your desktop computer and/or server during synchronization, and vice versa. Similarly, Calendar items that are deleted from your Phone
are deleted from your PC and/or server during synchronization, and vice versa.
Synchronizing Contacts
When you tap Contacts for synchronization in ActiveSync, by default all of your contacts are synchronized. Contacts created on your Phone are copied to your
PC and/or server during synchronization, and vice versa. Similarly, contacts that are deleted from your Phone are deleted from your desktop computer and/or
server during synchronization, and vice versa.
49
Page 50

Synchronizing Tasks
Task synchronization is automatically taped in ActiveSync. By default, all of your incomplete tasks are synchronized. Tasks created on your phone are copied to
your desktop computer during synchronization, and vice versa. Similarly, tasks that are deleted from your phone are deleted from your desktop computer during
synchronization, and vice versa.
☺ NOTE: Tasks can be synchronized only with your desktop computer; they cannot be synchronized with a server.
50
Page 51

Chapter 5
Managing your pocket PC phone
5.1 Customizing the Today Screen
5.2 Customizing the Start Menu
5.3 Setting Date/Time/Alarm/Language/Region options
5.5 Other Helpful Settings
5.6 Removing Programs
5.7 Managing Memory
5.8 Backing up Files
51
Page 52

52
Page 53

Customizing the Today Screen
Tap Start > Settings > Personal tab >Today
• On the Appearance tab, select a theme you desire for the Today screen.
Setting a picture as the background
1 Select the Use this picture as the background check box, tab Browse to view the picture files.
2 Tap the file name of the picture you choose.
3 Tap OK
• On the Items tab, select the items you want to appear on the Today screen.
Setting appointment display in Calendar Options
1 Tap Calendar then tap the Options… button
• Tap Next appointment to display only the next appointment on schedule.
• Tap Upcoming appointments to display the appointments you have not done yet.
• Tap the Display all day events check box to display all events (Both done or not) today.
2 Tap OK
Setting tasks display in Calendar Options
1 Select a task type in the check box below to display the number of that type
2 In the Category combo box, you can choose to display all tasks or only personal ones.
53
Page 54

Customizing the Start Menu
If you don’t want too many items there on your Start Menu, you can reduce them:
Tap Start > Settings > Personal tab > Menus
You can select/deselect items/programs in the combo box to let it appear on/disappear from the Start Menu.
♫ Note: Only 7 programs are allowed on the Start Menu.
Setting Date/Time/Alarm/Language/Regional options
Ta p Start > Settings > System tab > Clock & Alarms
Setting Date/Time in Clock & Alarms
Tap the Time tab and you see two clock named “Home” and “Visiting” there.
• In Home, you set the time zone, current time and date in your homeland
• While in Visiting, you set the same object of a country you are visiting.
Now the two clocks start ticking separately so that you can check either comparably.
♫ Note: Synchronization will update the time on your phone with that on a PC.
54
Page 55

Setting Alarm in Clock & Alarms
1 Tap the Alarms tab
2 Tap Description; use the Keyboard to define a clock type.
3 Tap the uppercase letters below to arrange the days on which you need the alarm.
4 Tap the time display at the end to set a time for this alarm.
5 Tap the bell icon to select the reminder mode: Sound, Flash light, Vibrate, etc.
If you have the Play sound check box selected, tap the sound selection box beside to select an alarm ring you like.
Changing Language and regional settings
The display style of numbers, currency, dates, and time varies by regions and countries.
You can specify it:
1 Ta p Regional Settings, on the Region tab, select your region and language.
2 To detailedly set them up, tap other tabs (Number, Currency, Time, and Date)
Other Helpful Settings
Reassigning button functions
There already are programs that assigned to the hardware buttons, however, you may not satisfied with some assignments as you want those often-in-use
55
Page 56

programs to replace the ones rarely run.
To reassign a button:
Tap Buttons on the Personal tab and you see the names of buttons and their current assignments.
Tap a button you want to reassign, and then in Assign a program selection box, select a program to this button.
♫ Note: There is an icon representing the original functions of a button. It helps you identify a button and restore its default at any time.
Increasing/Decreasing text size
1 Tap Screen on the system tab, and then tap the Text Size tab.
2 Tap and pin the slider to move it from Smallest to Largest.
3 You can see an example in the meanwhile.
Owner information
Owner information makes it possible that in case you lose your phone, the person who gets it can contact you in time; In addition, a personalized phone projects
owner’s individuality.
1 Tap Owner Information on the Personal tab
2 Enter your information on the Identification tab.
You can also take important notes on the Notes tab, or choose to display them when your device is tuned on.
♫ Tip: If you have selected to show owner information on the Today screen, just tap the section there to edit.
Enabling sound notifications
56
Page 57

Tap the Sounds & Notifications tab
• On the Sounds tab, select the check box to enable sounds for events and programs, or choose a soft/loud sound for screen taps and hardware button
presses.
• On the Notifications tab, select one from the various events in the selection box, and then choose a sound for it. In the following check box, select the way
you want this event to be notified (Some may be dimmed according to the event).
♫ Tip: Disabling sounds and flash light helps conserve battery power.
Adjusting the scroll speed
The scroll speed is about how fast you scroll through items on a list.
Tap Start > Settings > Personal tab > Buttons > Up/Down control tab.
At Delay before first repeat, tap and pin the slider, and move it to adjust time it responds scroll.
At Repeat rate, move the slider to adjust the time it takes to scroll one item from another.
About
Tap Settings > System tab, tap About.
Viewing the OS version
On the Version tab, you see information on version, copyright, and hardware.
Changing Device ID
Tap the Device ID tab.
57
Page 58

Here it shows you what Device ID is and what it is used for. Note that your Device ID should start with a letter and contains only letters from A to Z, numbers
from 0 to 9, underscore, and hyphen.
Why is Device name important?
The device name is used to identify your device in following situations:
• Synchronizing with PC
• Connecting to a network
• Restoring information from a backup
Removing Programs
You can only remove the addition programs you installed. Programs coming with your device can not be removed.
Tap Start > Settings > System tab > Remove programs
In the Programs in storage memory list, select an unwanted one, and then tap Remove button below.
Note: The last line shows the total memory available.
Managing Memory
See memory details on your device
58
Page 59

To ensure a good performance of your device, it’s necessary to maintain a sufficient memory.
To see the memory available
Tap Start > Settings > System tab > Memory
You see on the main tab the details of Storage and Program
Tap the Storage card tab to see the memory available on the storage card.
Free up program memory
Please see Help topics on “Free up program memory” for instructions.
To end a program
You can close programs manually to release more memory
Tap Start > Settings >System tab > Memory > Running Programs tab
In the Running Programs list, tap the program you want to close, and tap Stop.
Tap Activate to restore a program, and Stop All to stop all running programs.
Backing Up Files
You can back up files to your PC using ActiveSync, or copy files to a storage card you insert into your device. Your device has an expansion slot compatible with
a range of secure digital (SD) and multimedia (MMC) storage cards. Using ActiveSync, you can copy or move information from the PC to the device and vice
59
Page 60

versa. Changes you make to the information on one computer will not affect the information on the other computer. If you want to automatically update
information on both your device and PC, synchronize the information instead. For more information about copying and synchronizing files, see ActiveSync Help
on your PC.
To copy files to a storage card
1. Push the storage card into the storage card slot until it clicks into place. The card is secure when it does not protrude from the base.
2. Tap Start > Programs > File Explorer and navigate to the appropriate folder.
3. Tap and hold the file you want to copy, and tap Copy.
4. Tap the folder list (labeled My Documents by default) and tap Storage Card.
5. Tap Menu > Edit > Paste.
To copy a file using ActiveSync
Copying a file results in separate versions of a file on your device and PC. Because the files are not synchronized, changes made to one file will not affect the
other.
1. Connect your device to your PC.
2. In ActiveSync, click Explore, which opens the Mobile Device folder for your device.
3. In the Mobile Device folder, go to the file that you want to copy on your device or PC.
4. Do one of the following:
• To copy the file to your device, right-click the file, and click Copy. Right-click the desired folder under Mobile Device, and click Paste.
• To copy the file to your PC, right-click the file and click Copy. Right-click the desired folder on your PC, and click Paste.
To automatically save files on a storage card
In the Word Mobile, Excel Mobile, and Notes programs, you may find it helpful to save all new documents, notes, and workbooks directly on a storage card.
60
Page 61

1. From the program file list, tap Menu > Options.
2. With a storage card inserted in the device, in the Save to box, tap the appropriate storage card to automatically save new items on the storage card.
3. Tap OK.
Note In the file or note list, a storage card symbol is displayed next to the names of files saved on a storage card.
Protecting Your Device
There are two kinds of security on your device. You can protect your phone from unauthorized use by assigning a type of password called a PIN (personal
identification number). Additionally, you can prevent unauthorized access to any part of the device by using password protection.
Your first PIN will be given to you by your wireless service provider; you can change the PIN later.
You create your own password when you begin using your device.
To protect your phone with a PIN
1. From the Phone keypad, tap Menu > Options > Phone tab.
2. Tap Require PIN when phone is used.
To change the PIN at any time, tap Change PIN.
♫ Tip Emergency calls can be placed at any time, without requiring a PIN.
To protect your device with a password
You can help keep your data more secure by requiring a password every time the device is turned on.
1. Tap Start > Settings > Personal tab > Password.
2. Select the Prompt if device unused for check box, and in the box to the right, select how long your device must be turned off
before a password is required. In the Password type box, select the type of password you would like to use. Enter the password and, if necessary, confirm the
password. If your device is configured to connect to a network, use a strong password to help protect network security.
61
Page 62

3. On the Hint tab, enter a phrase that will help you remember your password, but doesn’t allow others to guess your password. The hint will be displayed after
the wrong password is entered four times.
4. Tap OK.
The next time the device is turned on, you will be prompted to enter your password.
Notes Each time a wrong password is entered, the time the device takes to respond will get longer and longer until the device appears to be not
responding. If you forget your password, you must follow the instructions in your owner’s manual to clear memory before you can access your device.
To change your password
1. Tap Start > Settings > Personal tab > Password. You will be prompted to enter your current password.
2. In the Password box, enter your new password.
3. On the Hint tab, enter a phrase that will help you remember your new password, but doesn’t allow others to guess your password.
The hint will be displayed after the wrong password is entered four times.
4. Tap OK.
To display owner information on the Today screen
Having your contact information displayed on the Today screen on startup allows for easy identification of the device in case it is lost.
1. Tap Start > Settings > Personal tab > Owner Information.
2. On the Options tab, select the Identification information check box.
3. On the Options tab, select the Notes check box if you want additional text displayed, such as: Reward if found.
4. On the Notes tab, enter the additional text.
♫ Tip To display owner information on the Today screen, tap Start > Settings > Personal tab > Today. On the Items tab, select the Owner Info check box.
62
Page 63

Chapter 6
Getting connected
6.1 Connecting to the Internet
6.2 Using Wireless Manager
6.3 Bluetooth
6.4 Other Helpful Settings
6.5 Internet Explorer Mobile
6.6 Using Terminal Services Client
63
Page 64

64
Page 65

Connecting to the Internet
Your device is equipped with powerful networking functions that enable you to connect to the Internet through a General Packet Radio Service (GPRS) or
Universal Mobile Telecommunications System (UMTS) network. You can set up connections to the Internet or to a corporate network to browse the Internet, and
exchange e-mail or instant messages.
Your device has two groups of connection settings: My ISP (Internet Service Provider) and My Work Network. The My ISP settings are used to connect to the
Internet, while My Work Network settings can be used to connect to any private, corporate network.
To connect to the Internet via ISP
1. Obtain the following information from your ISP:
• ISP server phone number
• User name
• Password
• Access point name (required for GPRS connection)
2. Tap Start > Settings > Connections tab > Connections.
3. Tap Add a new modem connection.
4. Enter a name for the connection.
5. Select a modem from the list:
65
Page 66

• If you want to use the mobile phone network, select Cellular Line.
• If you want to use GPRS, select Cellular Line (GPRS, 3G).
6. Tap Next.
7. Complete the connection wizard by entering the required information and tap Finish.
☺ Notes To view additional information for any screen, tap Help.
To modify your connection settings, tap Manage existing connections on the Connections screen, and complete the connection wizard.
To start browsing the Internet, tap Start > Programs > Internet Explorer.
To connect to a private network
Connection Setting
1. Obtain the following information from your network administrator:
• Server phone number
• User name
• Password
• Domain (If provided by an ISP or a network administrator)
2. Tap Start > Settings > Connections tab > Connections.
3. In My Work Network, follow the instructions for each type of connection.
4. Complete the connection wizard and tap Finish.
66
Page 67

☺ Note To start browsing the private network, tap Start > Programs > Internet Explorer.
To reset or modify the network card settings on your device
1. Tap Start > Settings > Connections tab > Network Cards.
2. In the My network card connects to list, select the appropriate item:
• If you want to connect to the Internet using your ISP, select The Internet.
• If you want to connect to a private network, select Work.
3. In Tap an adapter to modify settings, tap the appropriate adapter.
The fields on the IP Address tab are populated automatically.
4. Configure the TCP/IP settings, if required. If your ISP or private network does not use dynamically-assigned IP addresses, tap Use specific IP address and
enter the requested information. Contact your ISP or network administrator to obtain the IP address, subnet mask, and/or default gateway (if required).
5. Configure the DNS and WINS settings, if required. If your ISP or private network does not use dynamically-assigned IP addresses, enter the requested
information on the Name Servers tab. Servers that require an assigned IP address may also require a way to map computer names to IP addresses. DNS and
WINS are the resolution options supported on your device.
Using Wireless Manager
Wireless Manager allows you to manage and view the status of GPRS/UMTS, Bluetooth or Wireless LAN connections. You can use the device’s Power Save
Mode to make optimal use of the battery under the WLAN networking environment, view a variety of data related to the current configuration and signal quality,
67
Page 68

and increase network security. To run Wireless LAN on your device, you need access to broadband Internet, and the necessary access point or router that emits
WLAN signals. If you do not have access to broadband Internet, consult your ISP before you try to run this utility. However, the availability and range of your
device’s WLAN signal depends on the number, infrastructure, and other objects through which the signal passes.
☺ Note: You can activate Bluetooth on your device and communicate with other Bluetooth enabled devices. To communicate, make sure you have another
device with Bluetooth activated on it, which is within the close range of your device (within 10-meter range).
To activate a second generation network like GPRS on your device and communicate with other devices on the network, you need to have a
SIM or USIM card installed on your device.
Check for a Wireless LAN signal
Before you start a Wi-Fi connection, verify that your device has access to a Wireless LAN channel signal. You can check the current wireless connection status
from the following three screens of your device.
• Today screen. If your device detects a WLAN network connection, the WLAN connection icon appears at the top of the Today screen and a “W” icon appears at
the bottom-right corner of the screen.
• Wireless LAN Main screen. The current connection status and signal quality for each specific wireless channel appears on the Wireless LAN Manager screen
with the current configuration.
• Configure Wireless Networks screen. This screen displays the wireless networks currently available and allows you to add new ones if available.
68
Page 69

☺ Note: WLAN (Wi-Fi) is the default wireless channel setting for your device. However, GPRS starts by default if your device does not detect any Wi-Fi signal.
To connect to a Wi-Fi network
• Tap Start > File Explorer, find My Device, and then tap to enter the cetk folder.
• Tap Wlanloader to run it. On the screen, tap the Load box to activate driver. Now, it starts searching networks. Tap Start >Settings > Connections tab >
Wireless Manager, you can see an option named Wi-Fi there, with its status (On/Connecting/Available) under it.
Highlight Wi-Fi, tap Menu, and then select Wi-Fi settings to configure wireless networks.
You can see a list of network names with their status behind. In additional, you can choose to add new network from here.
Tap the Networks to access box to specify a network type.
Once some networks are detected, it pops up a list from the bottom asking you to select one to connect.
To save battery power while connected to a Wi-Fi network
• On the Connections tab in Settings, tap to run Cheetah. Move the Power Save Mode slider to a position that optimizes performance with the least power
consumption.
• In Power Save Mode box, choose how you deploy the power save mode.
69
Page 70

Bluetooth
Using Bluetooth
Bluetooth is a short-range wireless communications technology. Devices with Bluetooth capabilities can exchange information over a distance of about 10
meters without requiring a physical connection. You can even beam information to a device in a different room, as long as it is within range.
The software included with your device allows you to use Bluetooth in the following ways:
• Beam information, such as files, appointments, tasks, and contact cards, between devices that have Bluetooth capabilities.
• Create a dial-up modem connection between your device and a Bluetooth-enabled phone, and then beam information using the Bluetooth phone as a modem.
To turn on or off Bluetooth on your device
1. On your device, tap Start > Settings > Connections tab > Bluetooth.
2. Select the Turn on Bluetooth and Make this device discoverable to other devices check boxes.
3. Tap OK.
☺ Note To add an extra layer of security while beaming information with other devices, or to set up Bluetooth synchronization, tap Start > Settings >
System tab > Bluetooth Setting. Bluetooth modes
Bluetooth on your device operates in three different modes:
• On. Bluetooth is turned on and you can use Bluetooth features.
• Off. Bluetooth is turned off. In this mode, you can neither send nor receive information using Bluetooth. You might want to turn the radio off at times in order to
conserve battery power, or in situations where radio use is prohibited, such as onboard an aircraft and in hospitals.
70
Page 71

♫ Note By default, Bluetooth is turned off. If you turn it on, and then turn off your device, Bluetooth also turns off. When you turn on your device again,
Bluetooth automatically turns on.
• Discoverable. Bluetooth is turned on, and all other Bluetooth enabled devices within a range of 10 meters can detect your device.
To make your device discoverable
1. On your device, tap Start > Settings > Connections tab > Bluetooth.
2. Select the Turn on Bluetooth and Make this device discoverable to other devices check boxes.
3. Tap OK.
☺ Note Selecting the Make this device discoverable to other devices check box also turns on Bluetooth.
Bluetooth partnerships
A Bluetooth partnership is a relationship that you create between your device and another Bluetooth-enabled device in order to exchange information in a
secure manner. Creating a partnership between two devices involves entering the same personal identification number (PIN) on both devices. Creating a
partnership between two devices is a one-time process. Once a partnership is created, the devices can recognize the partnership and exchange information
without entering a PIN again. Make sure the two devices are within a range of 10 meters from one another, and Bluetooth is turned on and in discoverable
mode.
To create a Bluetooth partnership
1. On your device, tap Start > Settings > Connections tab > Bluetooth.
2. On the Devices tab, tap New Partnership.
Your device searches for other Bluetooth devices and displays them in the box.
3. Tap the desired device name in the box.
4. Tap Next.
71
Page 72

5. Enter a passkey to establish a secure connection. The passkey must be between 1 and 16 characters.
6. Tap Next.
7. Enter the same passkey that is entered on the other device. You can, however, edit and enter a new name for the other device.
8. Tap Finish.
To accept a Bluetooth partnership
1. Ensure that Bluetooth is turned on and in discoverable mode.
2. Tap OK when prompted to establish a partnership with the other device.
3. Enter a passkey (the same passkey that is entered on the device requesting the partnership) to establish a secure connection. The passkey must be between
1 and 16 characters.
4. Tap Next.
5. Tap Finish.
You can now exchange information with the other device.
To rename a Bluetooth partnership
1. Tap Start > Settings > Connections tab > Bluetooth.
2. Tap and hold the partnership on the Devices tab.
3. On the shortcut menu, tap Edit.
4. Enter a new name for the partnership.
5. Tap Save.
To delete a Bluetooth partnership
72
Page 73

1. Tap Start > Settings > Connections tab > Bluetooth.
2. Tap and hold the partnership on the Devices tab.
3. Tap Delete from the shortcut menu.
Beam information using Bluetooth
To beam information from your device
1. On the device, tap and hold an item to beam. The item can be an appointment in your calendar, a task, a contact card, or a file.
2. Tap Beam [type of item].
3. Tap the device name to which you want to send the beam.
The item is beamed to the device you selected.
☺ Note If the device you want to beam to does not appear in the box, make sure that it is turned on, discoverable, and within close range (10 meters) of your
device.
Use a Bluetooth device as a modem
You can use a phone that has Bluetooth capabilities as a modem for your device.
To do so, create a Bluetooth modem connection on your device and then send information to another device by using Bluetooth. The device relays the
information over the network and then sends back to your device any information that you had requested over the connection.
Once you create a modem connection to the Bluetooth phone, you can reuse it whenever you want to use the phone as a modem. Make sure that your device
and the destination device are turned on, Bluetooth is turned on, and that the devices are within close range.
To configure and use a Bluetooth device as a modem
73
Page 74

1. On your device, tap Start > Settings > Connections tab >
Connections.
2. Tap Add a new modem connection.
3. Enter a name for the connection.
4. In the Select a modem list, tap Bluetooth.
5. Tap Next.
6. If the device appears in the My Connections list, skip to step 11.
7. If the device does not appear in the My Connections list, tap New, and follow the remaining steps.
8. Select the device name from the list and tap Next.
9. Enter a passkey and tap Next.
10. Enter the same passkey on the device and tap Finish.
11. In the My Connections list, tap the device and tap Next.
12. Enter the phone number to dial for this connection and tap Next.
13. Enter the required logon information for this connection and tap Finish. You can start using this service for the program that uses the Bluetooth connection,
such as Inbox on your device, to send and receive e-mail, or Internet Explorer to browse the Web.
Internet Explorer Mobile
Internet Explorer Mobile is a full-featured Internet browser, optimized for use on your mobile device.
74
Page 75

To start Internet Explorer Mobile
• Ta p Start > Internet Explorer.
To choose a Home page
1. In Internet Explorer Mobile, tap Menu > Tools > Options > General tab.
2. Do one of the following:
• To use the displayed page as your Home page, tap Use Current.
• To use the default Home page, tap Use Default.
Tip To go to your Home page, tap Menu > Home.
To transfer favorites from your PC
You can transfer the favorites you have stored on your PC to your device by synchronizing the Internet Explorer favorites on your PC with your device.
1. In ActiveSync on your PC, on the Tools menu, click Options, and select Favorites.
2. In Internet Explorer on your PC, save or move favorite links to the Mobile Favorites subfolder in the Favorites list.
3. Connect your mobile device to your PC. If synchronization does not start automatically, click Sync.
To add a favorite
1. In Internet Explorer Mobile, go to the page you want to add.
2. Tap and hold the page, and tap Add to Favorites.
3. Confirm or change the name, and select a folder for storing the favorite.
To delete a favorite or folder
1. In Internet Explorer Mobile, tap Menu > Favorites > Add/Delete tab.
2. Select the item you want to delete, and tap Delete.
75
Page 76

To change how Web pages fill the screen
1. In Internet Explorer Mobile, tap Menu > View.
2. Tap one of the following:
• One Column. Arranges the content into one column that is as wide as the screen. This means that you will rarely have to scroll horizontally.
• Default. Maintains a layout similar to what you see on a desktop computer, but it makes items smaller and arranges the content so that you can see most of it without having to
scroll horizontally.
• Desktop. Keeps the same layout and size as on a desktop computer, which will require both horizontal and vertical
scrolling.
To change the size of text on Web pages
• In Internet Explorer Mobile, tap Menu > Zoom, and tap the size you want.
To show or hide pictures on Web pages
• In Internet Explorer Mobile, tap Menu > View > Show Pictures.
A check mark next to Show Pictures indicates that pictures will be displayed on Web pages.
To clear the History list
1. In Internet Explorer Mobile, tap Menu > Tools > Options >
Memory tab.
2. Tap Clear History.
To save a picture from a Web page
1. In Internet Explorer Mobile, tap and hold the picture, and tap
Save Image.
2. Do one of the following:
76
Page 77

• To save the picture in My Pictures on your device, tap Yes.
• To save the picture in another location, such as a storage card, tap Save As.
To change cookies and security settings
Internet Explorer Mobile supports the protocols used by Secure Sockets Layer (SSL). A connection that uses SSL helps you to send personal information more safely.
Cookies are small files containing information about your identity and preferences so that a page can tailor information to your needs. The page sends the file, and it is stored on your
mobile device.
1. In Internet Explorer Mobile, tap Menu > Tools > Options > Security tab.
2. Select the check boxes for the options you want, and click OK.
♫ Tip To prevent Internet Explorer Mobile from accepting any cookies, clear the Allow cookies check box.
To delete temporary Internet files
Some Web content is stored as you view it to speed up the display of pages you frequently visit or have already seen. You may want to delete these files to free storage space.
1. In Internet Explorer Mobile, tap Menu > Tools > Options > Memory tab.
2. Tap Delete Files.
All pages stored on your device, including offline favorites content, will be deleted.
Using Terminal Services Client
The Terminal Services Client allows you to log on to a PC running Terminal Services or Remote Desktop, and use all the resources available on that PC. For example, instead of
running Word Mobile on your device, you can run the PC version of Word and access the .doc files available on that PC.
77
Page 78

Connect to a Terminal Server
1. On your device, tap Start > Programs > Terminal Services Client.
2. Enter the server name.
3. You can also select a server name in Recent servers if you have recently connected to a server.
4. Select the Limit size of server desktop to fit on this screen check box if you want to use programs that have been specifically sized for use with your device.
5. Tap Connect.
Navigate within Terminal Services Client
When connected to a remote server, you may notice that your device screen is displaying more than one horizontal and vertical scroll bar. Use these scroll bars to either scroll the
contents on the PC, or to scroll the PC display through the Terminal Services Client window.
To make sure you are scrolling the PC display through Terminal Services Client, use the five directional buttons at the bottom of the Terminal Services Client window. To better fit
information on your device screen, select the Limit size of server desktop to fit on this screen check box. For best results, the programs on your PC should be maximized.
Disconnect without ending a session
1. From the Terminal Services Client screen on your device, tap Start > Shutdown.
2. Tap Disconnect.
Notes Do not use the Start menu on your device. If a network administrator has configured Terminal Services Client on your device to reconnect to disconnected sessions, and you
previously disconnected from a Terminal Server without ending the session, the Terminal Services Client reconnects to that session.
Disconnect after ending a session
1. From the Terminal Services Client screen on your device, tap Start > Shutdown.
2. Tap Log Off.
78
Page 79

Chapter 7 Messaging (SMS, Email and MMS)
You can create, send, and receive E-mail and Messages here. In addition, you can check E-mail by connecting your phone to a mail server. Enter different types
(Text Messages, Outlook E-mail, & MMS) to check messages.
SMS service
SMS service is provided by network provider, and is for short text message transfer.
First time to send SMS, please check to ensure that SMS Centre number has been set up. You can consult with your service operator for local SMS center
number
Creating and sending SMS
Enter SMS, on screen it will list all SMS already received, now press LSK (New) to create a new SMS
At To, you can directly enter recipient’s number or tap Add recipient from Menu to add recipients from Contacts. This phone supports group-send, by which
you can sent SMS to multi-recipients
After entering recipients, press Navigation Down to move the cursor below to edit text. See Chap.3.5: Input method for instructions.
• Tap quick text on Menu to list the common text all (see figure below), tap a proper text, and then press LSK (Insert) to insert it. Below the text, word count
79
Page 80

and capacity are displayed.
• After you finish the text, press LSK (Send) to send it. Once it is sent successfully, it will be saved in a folder named Sent Items
Viewing SMS
On SMS list screen, focus on one item and press RSK to view the detail. Press LSK (Reply) to reply to the bearer. Press RSK (Menu) to do other operations.
Outlook E-Mail
It supports receiving/sending E-mail on your phone. In addition, you can synchronize Outlook E-mail on PC.
Using Outlook on your phone, you need to configure the network and set up your account. Just check them out in Settings.
1 On Outlook screen, press LSK (New) to create an E-mail
2 At To, you can directly enter recipient’s number or tap Add recipient on Menu to add recipients from Contacts. This phone supports group-send, by which
you can sent SMS to multi-recipients
3 Input E-mail subject at Subject.
4 After you enter recipients, press Navigation Down to move the cursor below to edit text. See Chap.3.5: Text input method for instructions.
5 Press LSK to send it to the recipient, in default mode all sent messages will be saved into Sent folder.
MMS
80
Page 81

Creating and sending MMS (Multi-media message service) to your friends is much fun and easy. You can insert video/audio clips, music, pictures, photos, funny
text in an MMS and sent it to your friends or relatives to enjoy.
Creating and sending MMS
• On MMS main screen, press LSK (New) to create a new MMS
• ·At To, you can directly enter recipient’s number or tap Add recipient from Menu to add recipients from Contacts. This phone supports group-send, by
which you can sent MMS to multi-recipients
• Enter your subject for this MMS
• Press Navigation Down to insert multi-media files: There are three parts below: Insert Picture/Video, Insert Text, and Insert Audio. Focus on anyone,
and then press RSK to add files. Tap Cancel from Menu to quit.
• Tap Preview Message from Menu to preview the effect as a whole.
• Press LSK to send this MMS
Receiving MMS
System will notice you if you have a new MMS.
You can view the MMS after it has been completely downloaded on your phone in folder MMS.
Menu in SMS/MMS/Email list
On SMS/MMS/Email screen, press RSK to open Menu and you can:
Delete
Delete current message
81
Page 82

Reply
Reply to all and Forward current message.
Folders
Switch to other folders (including Draft box, Outbox, Inbox, Sent Items, and deleted mail)
Switch Accounts
Switch amongst SMS, Email and MMS;
Move
Move current message into other folders.
Mark as Read
Mark current item as an unread one;
Download Messages
It is only available in Email. As it’s only heading and subject that the phone receives from an Email, you need to tap it to download the whole mail to your phone
if it is necessary for you to view the detail.
Options
Change options on messages or Email.
Send/Receive
Send or receive messages and Email.
Folders of Mailing System
Folders of a mailing system contain Drafts, Outbox, Inbox, Sent Items, and Deleted Items.
For efficient use of storage space, please clear termly the old messages in Sent Items.
If current space is insufficient, it only allows you to play the received MMS. Operations like Sending, saving and downloading all turn to be unavailable in that
case.
Draft
All uncompleted or ready-to-be-sent messages are stored here.
Outbox
82
Page 83

All fail-to-be-sent messages are stored here.
Inbox
All received messages are stored here.
Sent Items
All successfully sent messages are stored here, if the auto-save function of MMS enabled, after an MMS is successfully sent, it will be saved into Sent Items
immediately。
Deleted Items
In this folder, all files that removed from other folders are disposed. If deleted from this folder, it will be cleared out permanently.
Options
To utilize mailing features better, you can set the parameters.
On SMS, Email or MMS screen, press RSK to tap option from Menu and then you can set up following parameters.
Display
Set up it to choose to display or not the time and date in Email information and the way it was arranged.
Sending
Choose to show or not the content of former Email in a reply Email, or backup a sent Email.
Signatures
Create your signature here that you can choose to insert your signature in SMS.
83
Page 84

Account options
Here you can respectively set SMS and MMS.
The items in Settings includes: whether to use Unicode which help correct errors in displaying content of messages sent from this phone or, whether to require
service center to deliver send report after its forwarding a message to a recipient.
New account
You can set up an Email account here in order to send/receive Email. This phone supports POP3/IMAP4.
You can set up an account by following steps, any question, please consult MSP
Loading messages on SIM
By this function, you can load SMS on SIM from Inbox.
Using Pocket MSN Messenger
Pocket MSN Messenger provides practically instant access to your up-to-date MSN Hotmail Inbox, MSN Messenger, and related options for you to enjoy your Pocket MSN
experience.
• Read, write, and send E-mail via MSN Hotmail. Delete mail from Hotmail folders; Manage your Hotmail folders.
• With MSN Messenger, you can check online/offline friends; send or receive instant messages. Subscribe to status updates for selected contacts so you’re notified if
they are online.
84
Page 85

• Options and settings, which help you, create a custom Pocket MSN experience. For example, you can block strangers or people whom you don’t want to see you online
or send you messages.
☺ Before you can use Pocket MSN Messenger, your phone must be connected to Internet.
See Connecting to the internet in Chap. 6 for instructions on setting up your Internet connection.
You need a Microsoft.NET Passport or Hotmail account to use MSN Messenger.
• To obtain a Passport, go to http://www.passport.com
• To create a Hotmail account, go to http://www.hotmail.com
After obtaining a passport, complete the following tasks:
1 Set up a connection on your mobile device, such as a modem or wireless connection, that enables you to connect to the Internet (See Chap.6 Getting connected).
2 Set up an account in MSN Messenger
3 Sign in to MSN Messenger.
Starting MSN Messenger
• On the Today screen, tap > Pocket MSN
• Enter MSN Messenger
85
Page 86

To sign in or out
• To sign in, tap anywhere on the MSN Messenger screen. Enter the e-mail address and password for your Passport or Hotmail account, and tap Sign In.
Signing in may take several minutes, depending on your connection speed.
• To sign out, tap Menu > Sign Out.
Your status changes to Offline.
To add or delete contacts
• To add a contact, tap Menu > Add a Contact, and follow the instructions on the screen.
• To delete a contact, tap and hold the contact's name, and tap
Deleting Contact.
To send an instant message
1. Tap the contact to whom you want to send a message.
2. Enter your message in the text entry area at the bottom of the screen, and tap Send.
♫ Tip To quickly add common phrases, tap Menu > My Text and select a phrase in the list.
To block or unblock contacts
• To block a contact from seeing your status and sending you messages, tap and hold the contact, and tap Block.
• To unblock a contact, tap and hold the name of the blocked contact, and tap Unblock.
86
Page 87

To check your own Messenger status
• Tap and hold your own name at the top of the page. Your current status is indicated in the displayed list by a bullet point.
To change your display name
1. Tap Menu > Options > Messenger tab.
2. Enter the name you want to display to others in MSN Messenger.
To get more help about MSN Messenger
• From within MSN Messenger, tap Start > Help.
87
Page 88

Chapter 8 Contacts (Phone book)
Overview of Contacts
Contacts is your address book and information storage for the people and businesses you communicate with. Store phone numbers, e-mail addresses, home
addresses, and any other information that relates to a contact, such as a birthday or an anniversary date. You can also add a picture to a contact.
From the contact list, you can quickly communicate with people. Tap a contact in the list for a summary of contact information. From there, you can call or send
a message.
Want to find a contact quickly? There are several ways to organize your contacts. View contacts by name or grouped by company. Or, assign one or more
categories to contacts, so you can quickly filter them.
If you use Outlook on your PC, you can synchronize contacts between your device and PC.
Find a contact
There are several ways to find a contact when your contact list is long.
1. Tap > Contacts.
2. If you are not in Name view, tap Menu > View By > Name.
3. Do one of the following:
88
Page 89

• Begin entering a name or phone number in the provided text box until the contact you want is displayed. To show all contacts again, tap the text
box and clear the text, or tap the arrow to the right of the text box.
• Use the alphabetical index displayed at the top of the contact list.
• Filter the list by categories. In the contact list, tap Menu > Filter. Then, tap a category you've assigned to a contact. To show all contacts again,
select All Contacts.
☺ Note To search for a contact by entering a name or number, or by using the alphabetical index, you must be in Name view. To switch to Name view, tap
Menu > View By > Name.
Tips
You can locate your contacts by the name of the company they work for. In the contact list, tap Menu > View By, and tap Company. Tap the company to see
the contacts who work there.
When working in Company view, you can filter by categories you've assigned to contacts. Then, only the companies with contacts that have that category
assigned to them will appear in the list.
Send a message to a contact
1 Tap > Contacts.
2 Tap the contact you want to send a message to.
3 Tap the address you want to send a message to.
4 Tap the account you want to send the message from.
89
Page 90

Tip
To quickly add a contact's address to a new message, tap the To, Cc, or Bcc line, and tap Menu > Add Recipient. Tap the contact you want to send the
message to and choose the address if necessary.
Why use categories?
Use categories to group related contacts, tasks, and appointments. For example, you can assign work-related contacts to the Business category and personal
contacts to the Personal category. You can then use these categories to filter your contacts, tasks, and appointments and quickly find the information you are
looking for.
You can also create your own categories, such as Family, to group your relatives' contact information.
Add a picture to contact information
1 Tap > Contacts.
2 Tap the contact.
3 Tap Menu > Edit.
4 Tap Picture.
5 Do one of the following:
• Tap the picture you want to add.
• Tap Camera and take a picture.
90
Page 91

Create a contact
1. Tap > Contacts.
2. Tap New and enter the contact information.
3. When finished, tap OK.
Note
If your contact list has been filtered by a category when you create a contact, that category is automatically assigned to the new contact.
Tips
If someone who isn't in your list of contacts calls you or sends you a message, you can create a contact from Call History, or from the message by tapping Menu
> Save to Contacts.
To save an existing contact to your SIM, open the contact and tap Menu > Save to SIM.
If someone who isn't in your list of contacts calls you or sends you a message, you can create a contact from Call History, or from the message by tapping Menu
> Save to Contacts.
If someone who isn't in your list of contacts sends you a message, you can create a contact from the message by tapping Menu > Save to Contacts.
To include a nickname, title, and more, while creating a contact, tap the Name arrow. For an existing contact in the contact list, tap the contact, tap Menu > Edit,
and tap the Name arrow.
If most of the contacts you create have phone numbers that begin with the same area code, in the contact list, tap Menu > Options and enter that area code in
the Area code box.
Change contact information
1 Tap
> Contacts.
91
Page 92

2 Tap the contact.
3 Tap Menu > Edit and enter the changes.
4 When finished, tap OK.
Tips
To include a nickname, title, and more, for an existing contact in the contact list, tap the contact, tap Menu > Edit, and tap the Name arrow.
If most of the contacts you create have phone numbers that begin with the same area code, in the contact list, tap Menu > Options and enter that area code in
the Area code box.
Work with the contact list
There are several ways to use and customize the contact list. Here are a few tips on how to make it work for you.
1 Tap > Contacts.
2 In the contact list, do any of the following:
• In Name view, you can search for a contact by entering a name or number, or by using the alphabetical index. To switch to Name view, tap
Menu > View By > Name.
• To see a summary of information about a contact, tap the contact. From there you can also make a call or send a message.
• To see a list of available actions for a contact, tap and hold the contact.
• The last method of communication you used to reach a contact is displayed in the contact list. However, you can change what is displayed.
Select a contact and press NAVIGATION left or right until the contact method you want appears with the contact's name. A single letter next to
the contact information signifies which method you have chosen. For example, If you choose a contact's e-mail address, the letter e is
displayed.
92
Page 93

• To see a list of contacts employed by a specific company, tap Menu > View By > Company. Then, tap the company name.
Tip
To display a greater number of contacts, tap Menu > Options, select the Show contact names only check box, and clear the Show alphabetical index check
box.
Create a contact from an existing one
If you want to create multiple contacts that have similar contact information, you can save time by creating one contact and then copying it.
1. Tap > Contacts.
2. Tap and hold the contact you want to copy.
3. Tap Copy Contact.
4. Tap the copy of the contact.
5. Tap Menu > Edit.
6. Change the contact information as needed and tap OK.
Note
The displayed category is automatically assigned to the new contact.
Tips
To include a nickname, title, and more, for an existing contact in the contact list, tap the contact, tap Menu > Edit, and tap the Name arrow.
If most of the contacts you create have phone numbers that begin with the same area code, in the contact list, tap Menu > Options and enter that area code in
the Area code box.
93
Page 94

Remove a picture from contact information
1 Tap > Contacts.
2 Tap the contact.
3 Tap Menu > Edit.
4 Tap Menu > Remove Picture.
Create a SIM contact
Contacts can be created and stored on a subscriber identity module (SIM.) If you move the SIM to another device, your SIM contacts are moved as well.
1. Tap > Contacts.
2. Tap Menu > New SIM Contact.
3. Enter the contact's information and tap OK.
Tip
To save an existing contact to your SIM, open the contact and tap Menu > Save to SIM.
94
Page 95

Find a contact online
In addition to having contacts on your device, you can also access contact information from your organization's Global Address List (GAL). This enables you to
quickly add a message recipient or meeting attendee from a GAL. Access to the GAL is available if your organization is running Microsoft Exchange Server
2003 SP2 and you have completed your first synchronization with Exchange Server.
1. Synchronize with Exchange Server if you have never done so.
2. Tap
3. Do any of the following:
4. Enter the contact name and tap Find.
Notes
Your device must be set up with a data connection.
You can search on the following information as long as that information is included in your organization's GAL.
• First name
• Last name
• E-mail name
• Display name
• E-mail address
• Office location
> Contacts > Menu > View By > Name.
• In Contacts, tap Menu > Find Online.
• In a new message, tap the To box. Tap Menu > Add Recipient > Menu > Find Online.
• In a new meeting request, tap Attendees. Tap Menu > Find Online.
95
Page 96

Send contact information
Using a text message, you can quickly send someone information about a contact in your contacts list.
1. Tap > Contacts.
2. Select the contact.
3. Tap Menu > Send Contact > Text Message.
4. Select the contact information that you want to send and then tap Done.
5. In the new text message, enter the address of the person to whom you are sending the contact information and tap Send.
96
Page 97

97
Page 98

Chapter 9 Multimedia experiences
Games
Bubble Breaker
Overview of Bubble Breaker
Bubble Breaker is easy to learn, yet difficult to master. The objective is to align similar bubbles to form large blocks of bubbles before bursting them. The more
bubbles you have in the block before they are burst, the greater number of points you will receive.
Tap Start > Programs > Games, select Bubble Breaker
To burst a bubble, the bubble must be connected to other similar bubbles on the playing board. If you tap a bubble that is connected, those connected bubbles
will be highlighted and a new bubble will pop up, displaying that block's potential bubble points. Tap your selection again to burst the bubbles.
Breaker Bonus
If you manage to leave fewer than five bubbles on the board, you will be rewarded with more points at the conclusion of the game.
Undo
Moves in Bubble Breaker can be undone. To take back the last move you made, tap Game > Undo Move.
Set Bubble Breaker options
Bubble Breaker allows you to vary your playing experience.
98
Page 99

• Tap Game > Options, and select options from the following:
• Play Sounds. Turns on or off the game sounds.
• Confirm End Game. Displays a confirmation dialog at the end of a game.
• Guest Mode. Enables guests to play without affecting the statistics.
• Game Style. Changes the style for new games as follows:
• Standard - the default play mode in which bubbles will not increase as you burst them.
• Continuous - whenever a vertical set of bubbles has been burst and the remaining bubbles have shifted over to the right, a new, randomly
selected column of bubbles will pop up on the left, allowing a game to be played for an extended amount of time.
• Shifter - when a set of bubbles has been burst, all remaining bubbles to the top and left will shift down and to the right.
• MegaShift - a combination of the shifter and continuous styles where bubbles will shift down and to the right while empty columns will fill on the
left.
View Bubble Breaker statistics
Bubble Breaker records your statistics for each playing style.
• Tap Info > Statistics.
Games - the total number of games played.
Average - the average score across all games played in that style.
High - the high score for the particular style.
♫ Tip To reset all your statistics, tap Reset.
99
Page 100

Solitaire
Play Solitaire
• To open Solitaire, tap > Programs > Games > Solitaire.
• To deal the cards, tap Menu > New Game.
• To display cards in the upper-left stack, tap the stack.
• To move a card to one of the stacks, drag the card. Build the row stacks in descending order, from King to two, alternating between red and black cards.
• In the row stacks, turn a card face-up by tapping it. You can move a King to an empty row stack.
• To undo a move, tap Menu > Undo.
• Build the suit stacks at the top in ascending order, from Ace to King.
• You win the game when all cards are in the suit stacks.
Solitaire scoring systems
In Standard scoring (the default), you earn points based on time and moves:
• 10 points for each card moved to a suit stack.
• 5 points for each card moved from the deck to a row stack.
• 5 points for each card turned face-up in a row stack.
• 3 points for each card moved from one row stack to another.
• -2 points for each 10 seconds elapsed during a timed game.
• -15 points for each card moved from a suit stack to a row stack.
• -20 points for each pass through the deck after four passes (Draw Three option).
• -100 points for each pass through the deck after one pass (Draw One option).
• You receive a bonus when you complete a timed game. The shorter the game, the larger the bonus.
100
 Loading...