

Page 1
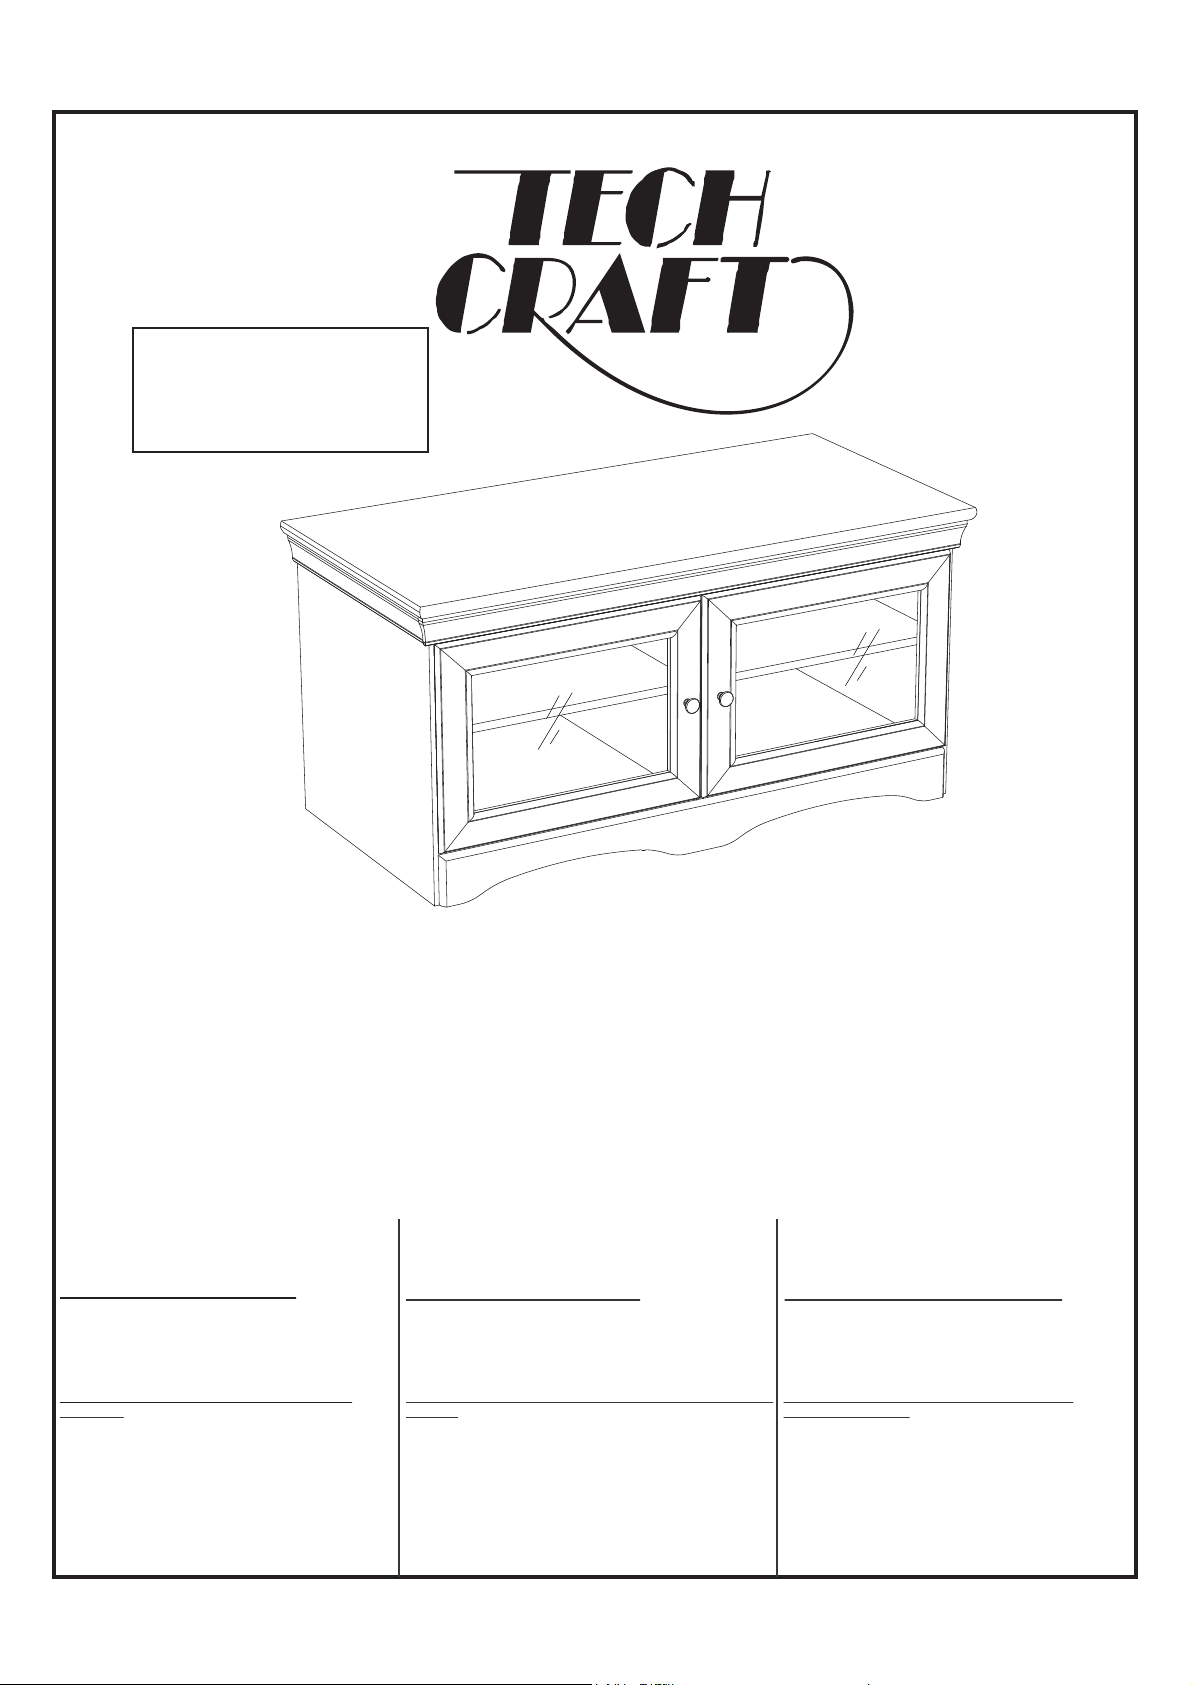
COMPATIBLE WITH OPTION PLM50
(PLASMA MOUNT).
COMPATIBLE AVEC L’OPTION PLM50
(SUPPORT POUR TV LCD ET PLASMA).
COMPATIBLE CON LA OPCIÓN PLM50
(SOPORTE PARA TV LCD Y PLASMA).
Model/Modèle/Modelo
IMPORTANT CUSTOMER SERVICE INFORMATION / IMPORTANT INFORMATION DE NOTRE SERVICE À LA CLIENTÈLE /
INFORMACIÓN IMPORTANTE SOBRE SERVICIO AL CLIENTE INCLUIDA
THIS ASSEMBLY INSTRUCTION IS REQUIRED TO VALIDATE THE WARRANTY AND FOR ANY REQUEST TO THE CUSTOMER SERVICE.
CE MANUEL D’INSTRUCTION EST REQUIS POUR VALIDER LA
ESTA MANUAL DE INSTRUCCIÓN ES REQUERIDA PARA VALIDARLE LA
Thank you for your purchase of this product.
To enhance your purchase and secure your warranty,
please review these important notes.
NOTES ON CUSTOMER SERVICE & PARTS
Please examine ALL packaging materials before discarding.
Shortages can occur by leaving parts in the packing material.
If any parts are missing or damaged, please review the parts
LIST found in the Assembly Manual, identify the missing
damaged part, and go to
Please have the following information ready when you
contact us:
1) The model and revision numbers of the product (found on the
cover of the Assembly Manual, on the back panel label or under
the box)
2) The name and address of the location where you purchased
this product
3) The Ten-Digit Production PO number (found either on the back
panel label, inside the instruction sheet or on the shipping box)
4) The Serial Number of the product (if there is on
found on the back panel label
also be
5) A list of the part numbers of missing or damaged parts.
www.techcraft.net
or
e) which can
ABS48
rev. 05.R0
GARANTIE ET POUR TOUTE DEMANDE AU SERVICE À LA CLIENTÈLE.
GARANTÍA Y PARA TODA PETICIÓN EL SERVICIO AL CLIENTE.
M
erci d’avoir acheté un de nos produits.
Pour améliorer votre achat et sécuriser votre garantie,
veuillez lire attentivement ces notes.
À PROPOS DU SERVICE À LA CLIENTÈLE :
S.V.P. Bien regarder à l’intérieur de l’emballage, AVANT DE LE
JETTER OU DE LE RECYCLER. Il se pourrait qu’il reste encore
des pièces requises pour l’assemblage. Si, par erreur, une pièc
serait manquante ou défectueuse, prière de l’identifier avec
votre manuel d’instruction,
Avant de nous contacter, ayez à la portée de la main les informations
suivantes:
1) Les numéros de modèle et de révision du produit (situé sur la page
couverture de votre manuel d’instruction, sur l’étiquette à l’arrière
du meuble ou sous la boîte).
2) Le nom et l’adresse de l’endroit où le produit a été acheté.
3) Le numéro de code “PO” à dix (10) chiffres (situé sur l’étiquette à
l’arrière du meuble, dans le manuel ou sur le carton d’emballage).
4) Le numéro de série indiqué sur l’é
ou sur le carton d’emballage (s’il y a lieu).
5) La ou les numéro(s) de pièce endommagée(s) ou manquante(s).
et d’aller sur
www.techcraft.net
tiquette à l’arrière du meuble
e
Gracias por la compra de este producto
Para mejorar su compra y asegurar su garantia,
por favor revise estas notas importantes.
NOTAS SOBRE PIEZAS Y SERVICIO A LA CLIENTELA :
Por favor, examine TODOS los materiales de empaque antes de
destruirlos. La falta de piezas puede ocurrir si se dejan dentro del
material de empaque que se encuentra en el manual de instrucciones,
identifique la pieza dañada ò
hace falta y vaya a
que
.
.
www.techcraft.net
Antes de ponemos en contacto, por favor tenga listas las
informaciones siguientes:
1) Los Números de Modelo y de revisión del producto (se encuentra
en la portada del manual de instrucciones, en la etiqueta del panel
trasero ò bajo la caja).
2) El nombre y dirección del lugar donde compró este producto.
3) Los diez digitos del número de PO (se encuentra ya sea
en la etiqueta del panel trasero del mueble ò en la caja de cartón).
4) El Número de Serie del producto (si lo hay)
encontrar en la etiqueta del panel trasero del mueble.
5) Una lista de los números de las piezas dañadas ò faltantes.
que también se puede
Page 2
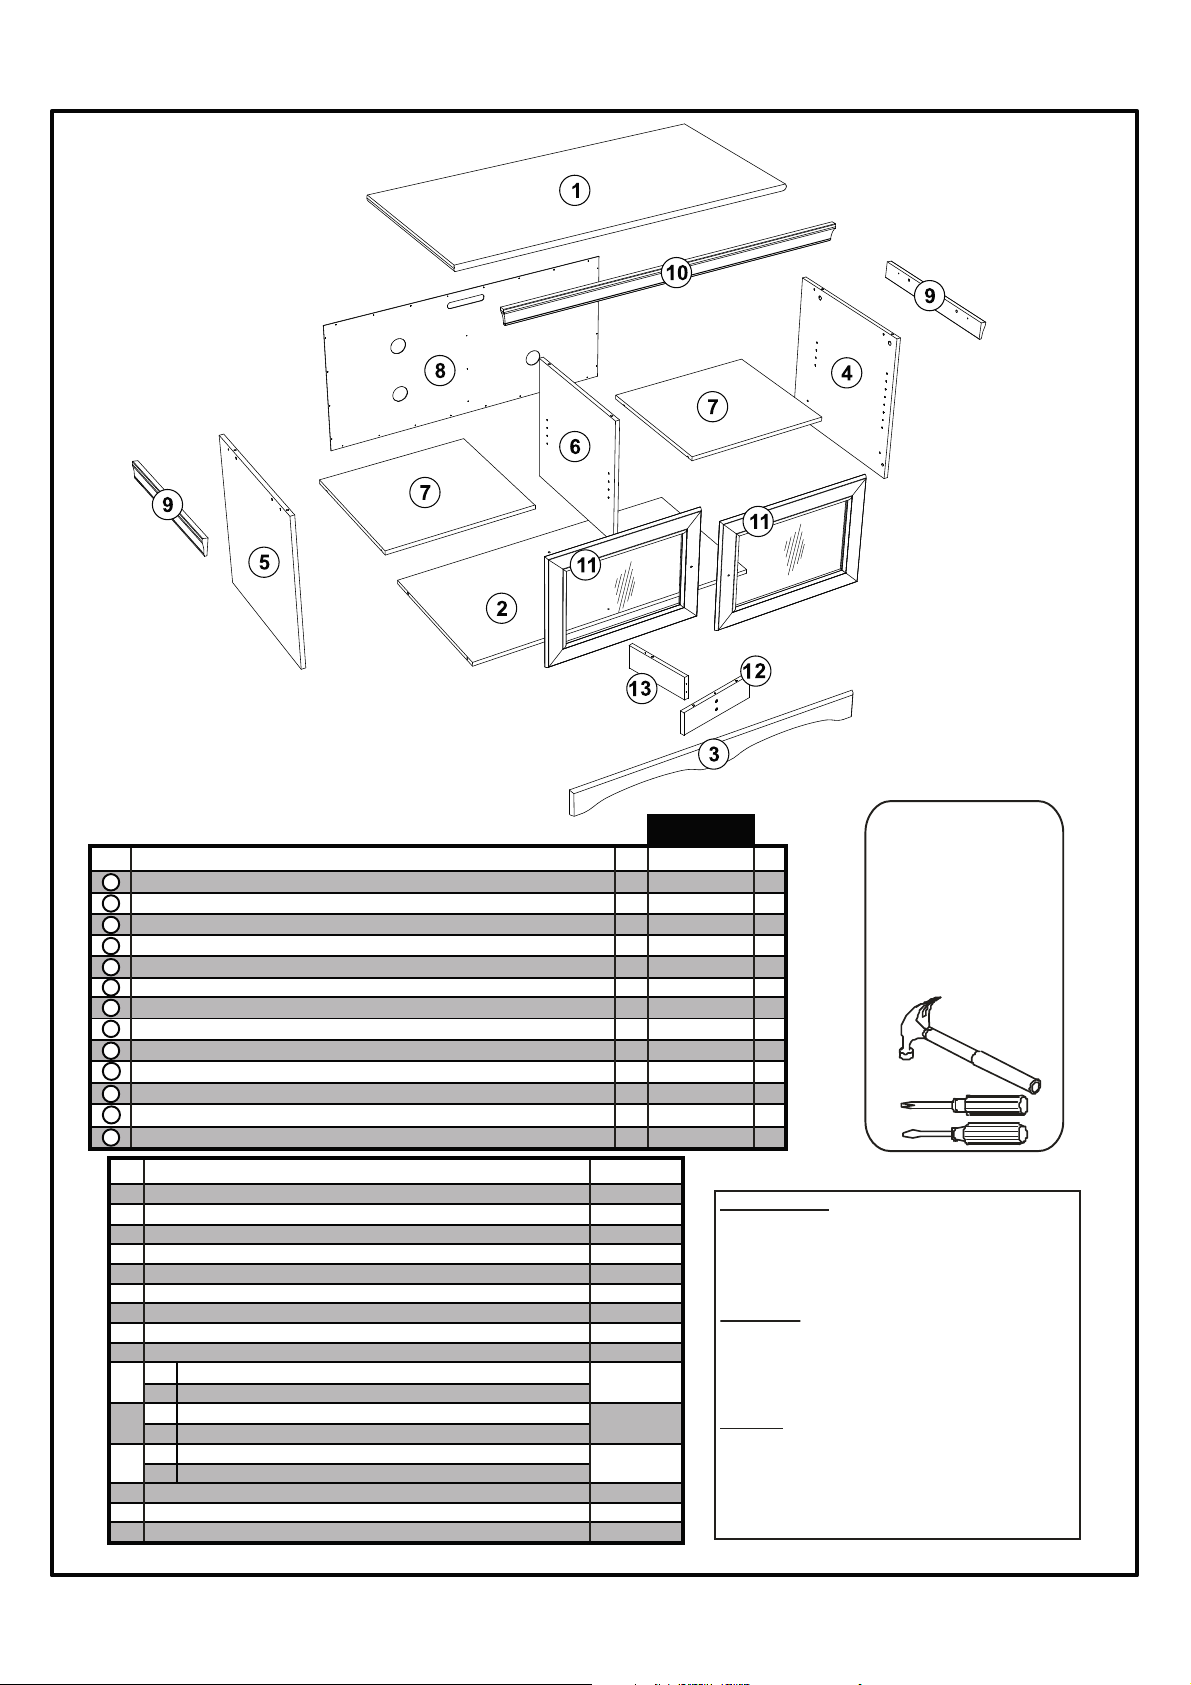
KEY
CLÉ
CVE
1
TOP SHELF / TABLETTE SUPÉRIEURE / Tabla superiore
BOTTOM SHELF / TABLETTE INFÉRIEURE / Tabla inferiore
2
APRON / TRAVERSE / Travezaño
3
RIGHT GABLE / PANNEAU LATÉRAL DROIT / Panel lateral derecho
4
LEFT GABLE / PANNEAU LATÉRAL GAUCHE / Panel lateral izquierdo
5
6
INTERIOR GABLE / PANNEAU INTÉRIEUR / Panel interior
LOOSE SHELF / TABLETTE AJUSTABLE / Tabla ajustable
7
BACK PANEL / PANNEAU ARRIÈRE / Panel trasero
8
SIDE MOULDING / MOULURE LATÉRALE / Moldura laterale
9
FRONT MOULDING / MOULURE AVANT / Moldura delantera
10
FRAMED GLASS DOOR / PORTE EN VERRE / Puerta de vidrio
11
FRONT FLOOR SUPPORT / SUPPORT AU SOL AVANT / Soporte del suelo delantera
12
REAR FLOOR SUPPORT / SUPPORT AU SOL ARRIÈRE / Soporte del suelo trasero
13
QTY
QTÉ
CANT
10 IHA0311
10
3
2
8
2
24
4
2 IFA0135
8
2
5
1
4
PART NAME / NOM DE LA PIÈCE / NOMBRE DE LA PIEZA
PART NAME / NOM DE LA PIÈCE / NOMBRE DE LA PIEZA
METAL FITTING / RACCORD EN MÉTAL / Pieza de ajuste metalicá
PUSH BOLT / BOULON PRESSION / Perno de pressión
DOWEL / CHEVILLE DE BOIS / Clavija de madera
BUMPER / PARE-CHOC / Paragolpe
SHELF SUPPORT / SUPPORT À TABLETTE / Soporte a tabla
COVER CAP / COUVRE VIS / Camufla tornillo
NAIL / CLOU / Clavo
SCREW / VIS / T
SCREW / VIS / Tornillo
1
4
1
2
1
1
DOWEL (SMALL) / CHEVILLE DE BOIS (PETITE) / Clavija de madera (pequeña)
ALLEN KEY / CLÉ HEXAGONALE / Llave hexagonal
SCREW / VIS / T
ornillo
METAL HINGE / CHARNIÈRE EN MÉTAL / Bisagra metálica
SCREW / VIS / Tornillo
ANGLE BRACKET / ÉQUERRE / Escuadra
SCREW / VIS / Tornillo
HANDLE / POIGNÉE / Manija
SCREW / VIS / Tornillo
ornillo
PO #: 4500008039
QTY
QTÉ
CANT
1
1
1
1
1
1
2
1
2
1
PART No
No PIÈCE
PARTE No
IHA0357
IHA0358
IHA0422
IHA0419
IHA0421B
IFA0133
IFA0134
IHG00084
IHA0420
IHA0418
IHA0423
IHA0425
IFA0137
ABS48
PART No
No PIÈCE
PARTE No
ITOSS0257-AB
IBOTS0103-BK
IAPRS0140-AB
IGASR0078-ABBK
IGASL0078-ABBK
IGAIS0071-BKBK
ISHLS0077-BK
IPA572-ABAB
IML367C-AB
IML367D-AB
ISTGS0005-ABAB
ISUSS0010-AB
ISUSS0011
HOW TO CLEAN :
Do not place this product near a heat source, such
as a radiator, or in direct sunlight.
Clean the product periodically with a soft cloth.
If finger prints, food and beverage stains, etc. are
difficult to remove, use a cloth moistened with a
mild non-abrasive detergent solution.
Do not use scouring powder, abrasive pad or solvent.
ENTRETIEN :
Ne placer pas ce meuble près d’une source de chaleur,
tel qu’un calorifère ou directement au soleil.
Utilisez toujours un chiffon humide pour nettoyer le meuble.
Pour enlever les traces plus difficiles, utilisez un chiffon
avec un savon non-abrasif.
Ne pas utiliser de poudre à récurer, de tampon abrasif
ni de solvant.
LIM PIEZ A :
No coloque este producto cerca de un afuente de calor,
tales como un radiador ò directamente bajo la luz del sol.
Limpie el producto periódicamente con un paño suave.
Si las manchas de huellas digitales, comida, bedida, etc.
resultan dificiles de quitar, utilice un paño húmedecido
con una solución de detergente suave sin corrosivos.
No utilice detergente en polvo, ningun material abrasico
ò solvente.
REV.
0
0
0
0
0
0
0
0
0
0
02
01
01
TOOL S R EQUIR E
(NOT INCLUDE D)
OUT IL S R EQUIS
(NON INCLUS)
HERRAMIENTAS
NECE SARIAS
(NO INCLUIDAS )
9002 / 90 ENIHC NE ÉMIRPMI / ANIHC NI DETNIRP
Page 3
IHA0311
IHA0357
IHA0420
IHA0358
FROM/DE
IHA0420
IHA0423
IHA0311
IHA0357
IHA0311
IHA0567
IHA0311
IHA0311
IHA0357
1x
IHA0358
IHA0423
IHA0420
2x
IHA0358
Page 4
IHA0423
IHA0357
IHA0420
IFA0134
FROM/DE
IHA0420
IF YOU HAVE PURCHASED THE PLM50 TO COMPLETE
NOTE/NOTA
THIS UNIT, YOU SHOULD INSTALL THE BRACKET
HOOK (TOP) (PART #3) AT THIS STEP.
SI VOUS AVEZ ACHETÉ LE PLM50 POUR COMPLÉTER
CE MEUBLE, VOUS POUVEZ INSTALLER L’ÉQUERRE
(DESSUS) (PIÈCE #3) À CETTE ÉTAPE.
SI USTED HA COMPRADO EL PLM50 PARA COMPLETAR
ESTA UNIDAD, USTED PUEDE INSTALAR LA ESCUADRA
(ENCIMA) (LA PARTE #3) A ESTA ETAPA
IHA0423
IHA0423
IHA0357
IHA0420
IFA0134
Page 5
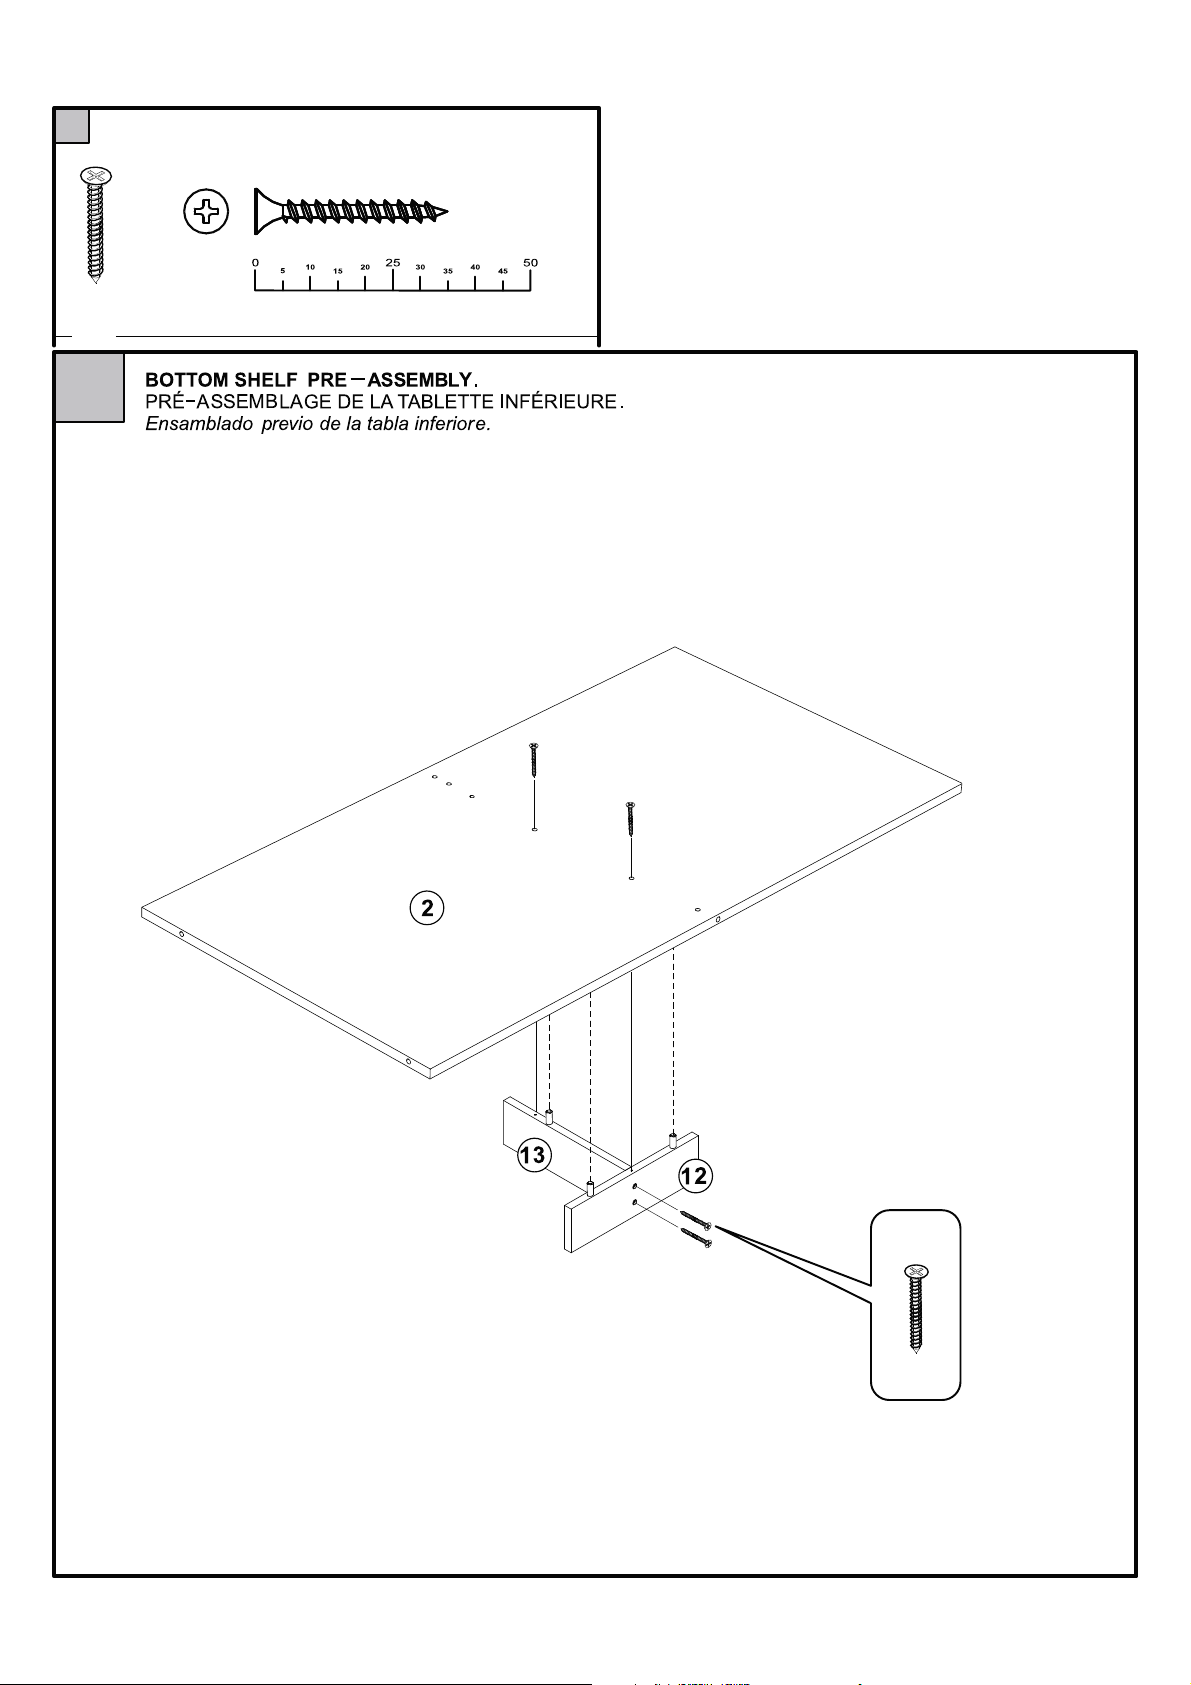
4
IFA0137
4x
4
M3.5 x 35mm
4x
IFA0137
Page 6
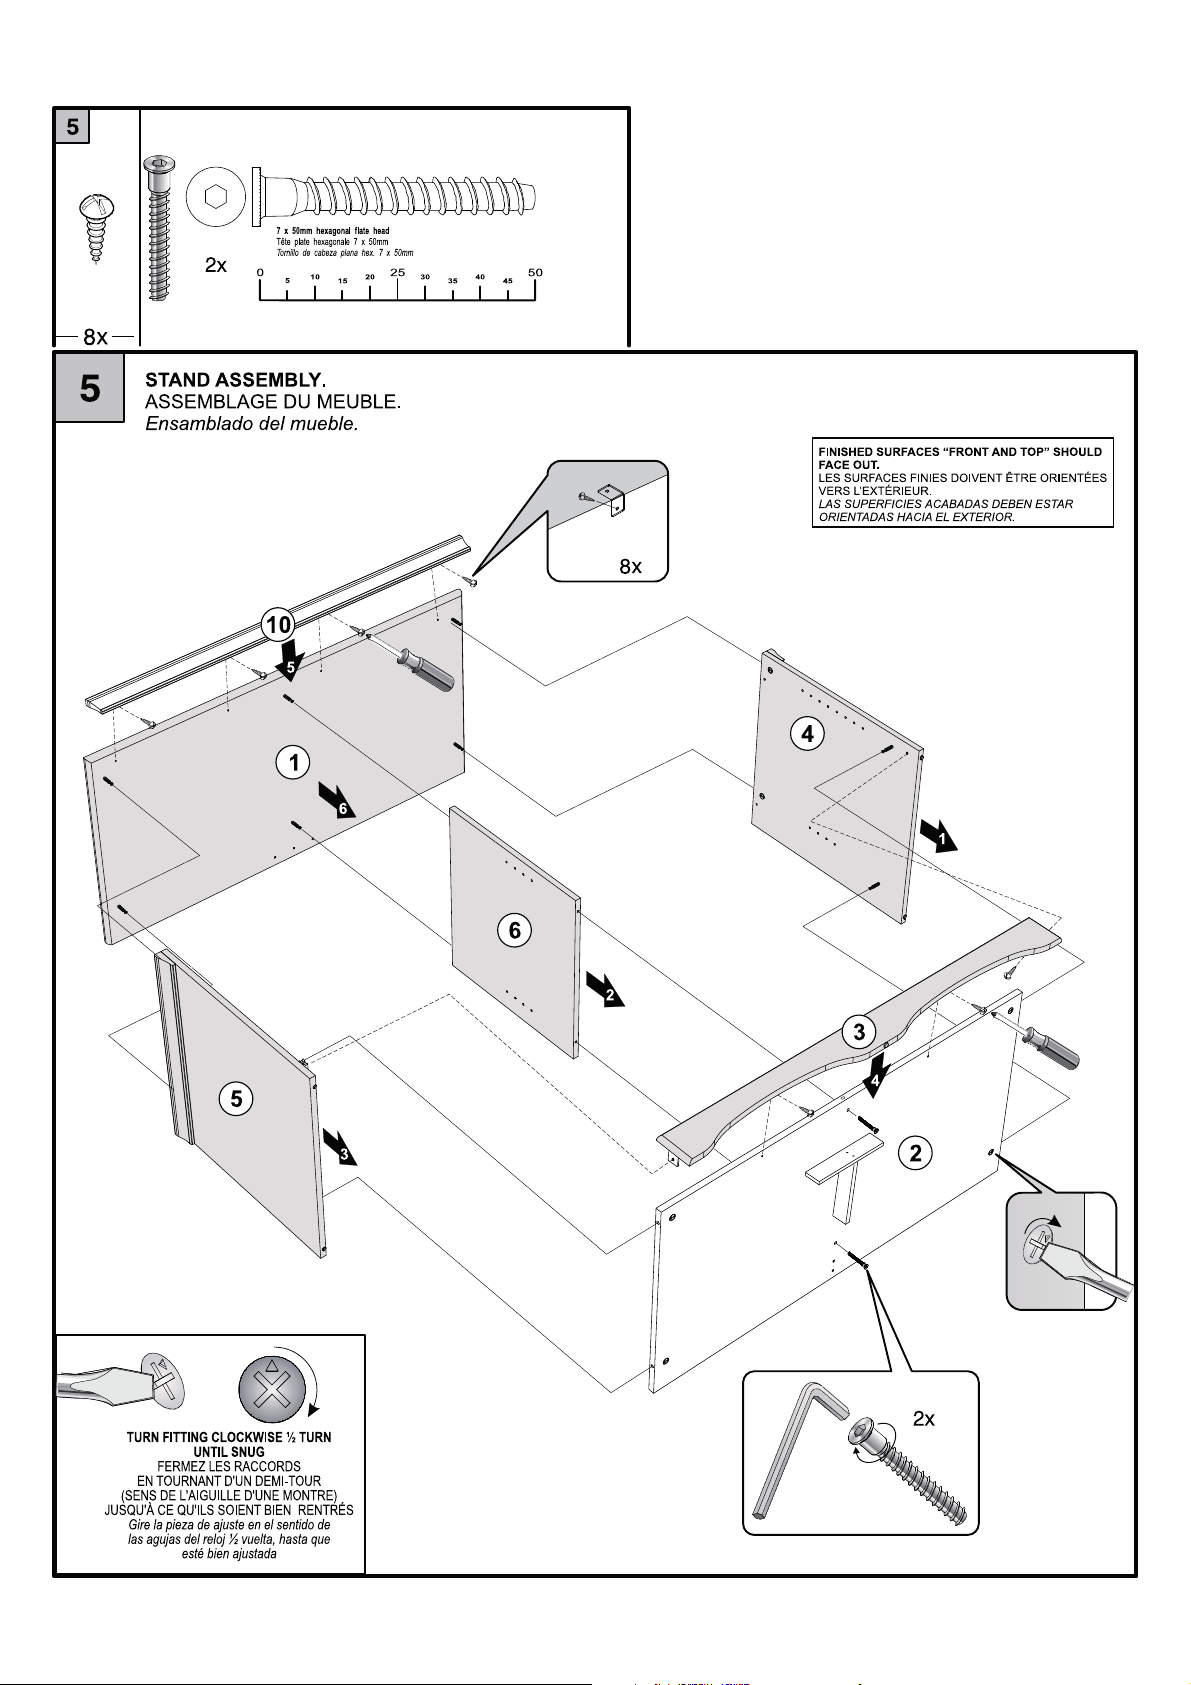
FROM/DE
IHA0420
IFA0135
IHA0420
IFA0135
Page 7
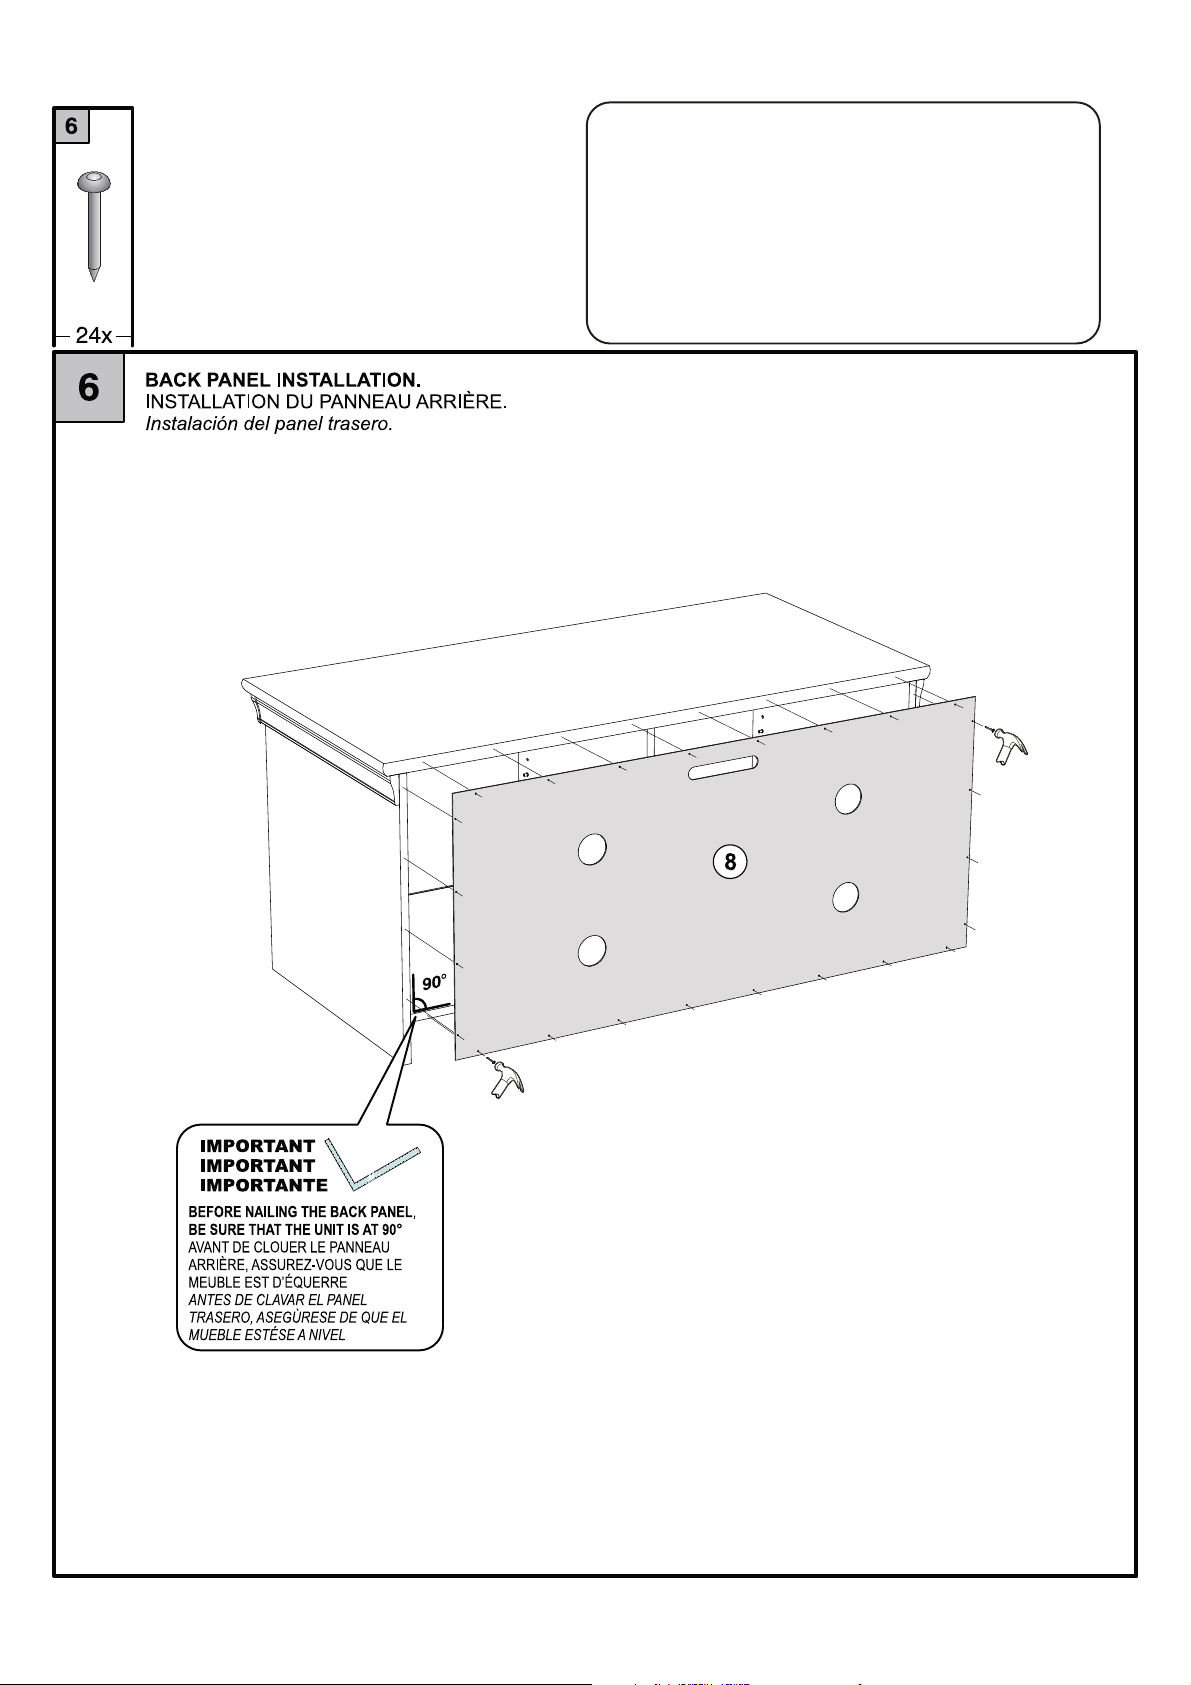
IFA0133
IF YOU HAVE PURCHASED THE PLM50 TO COMPLETE THIS
NOTE/NOTA
UNIT, YOU SHOULD INSTALL THE POST (PART #1) AND THE
BRACKET HOOK (BACK) (PART #4) BEFORE THIS STEP.
SI VOUS AVEZ ACHETÉ LE PLM50 POUR COMPLÉTER CE
MEUBLE, VOUS POUVEZ INSTALLER LE POTEAU (PIÈCE #1)
ET L’ÉQUERRE (ARRIÈRE) (PIÈCE #4) AVANT CETTE ÉTAPE.
SI USTED HA COMPRADO EL PLM50 PARA COMPLETAR ESTA
UNIDAD, USTED PUEDE INSTALAR EL POSTE (LA PARTE #1) Y LA
ESCUADRA (TRASERO) (LA PARTE #4) ANTES DE ESTA ETAPA
Page 8
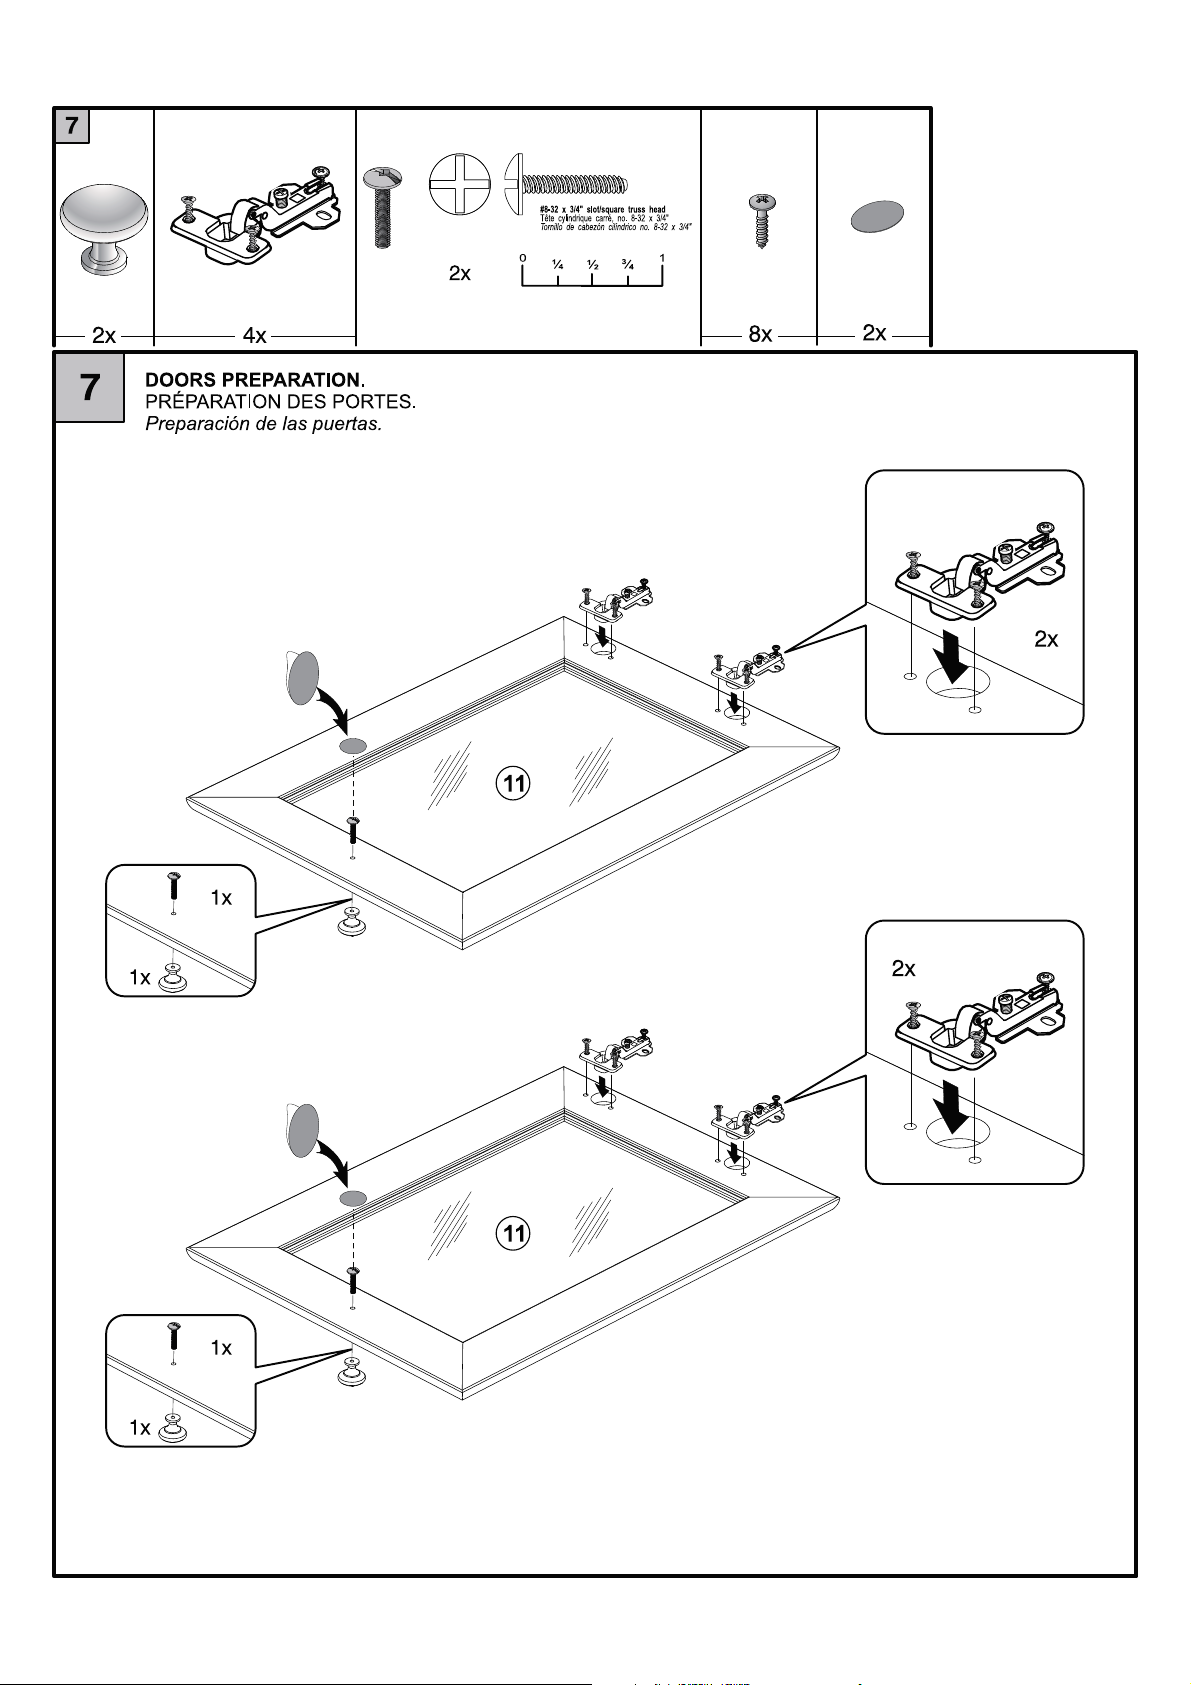
IHA0418
IHG0008
IHA0421B
FROM/DE
IHA0418
FROM/DE
IHG0008
IHA0421B
IHG0008
IHA0418
IHA0421B
IHA0418
IHG0008
Page 9
IHA0419 IHA0422
FROM/DE
IHG0008
IHG0008
IHA0419
IHA0422
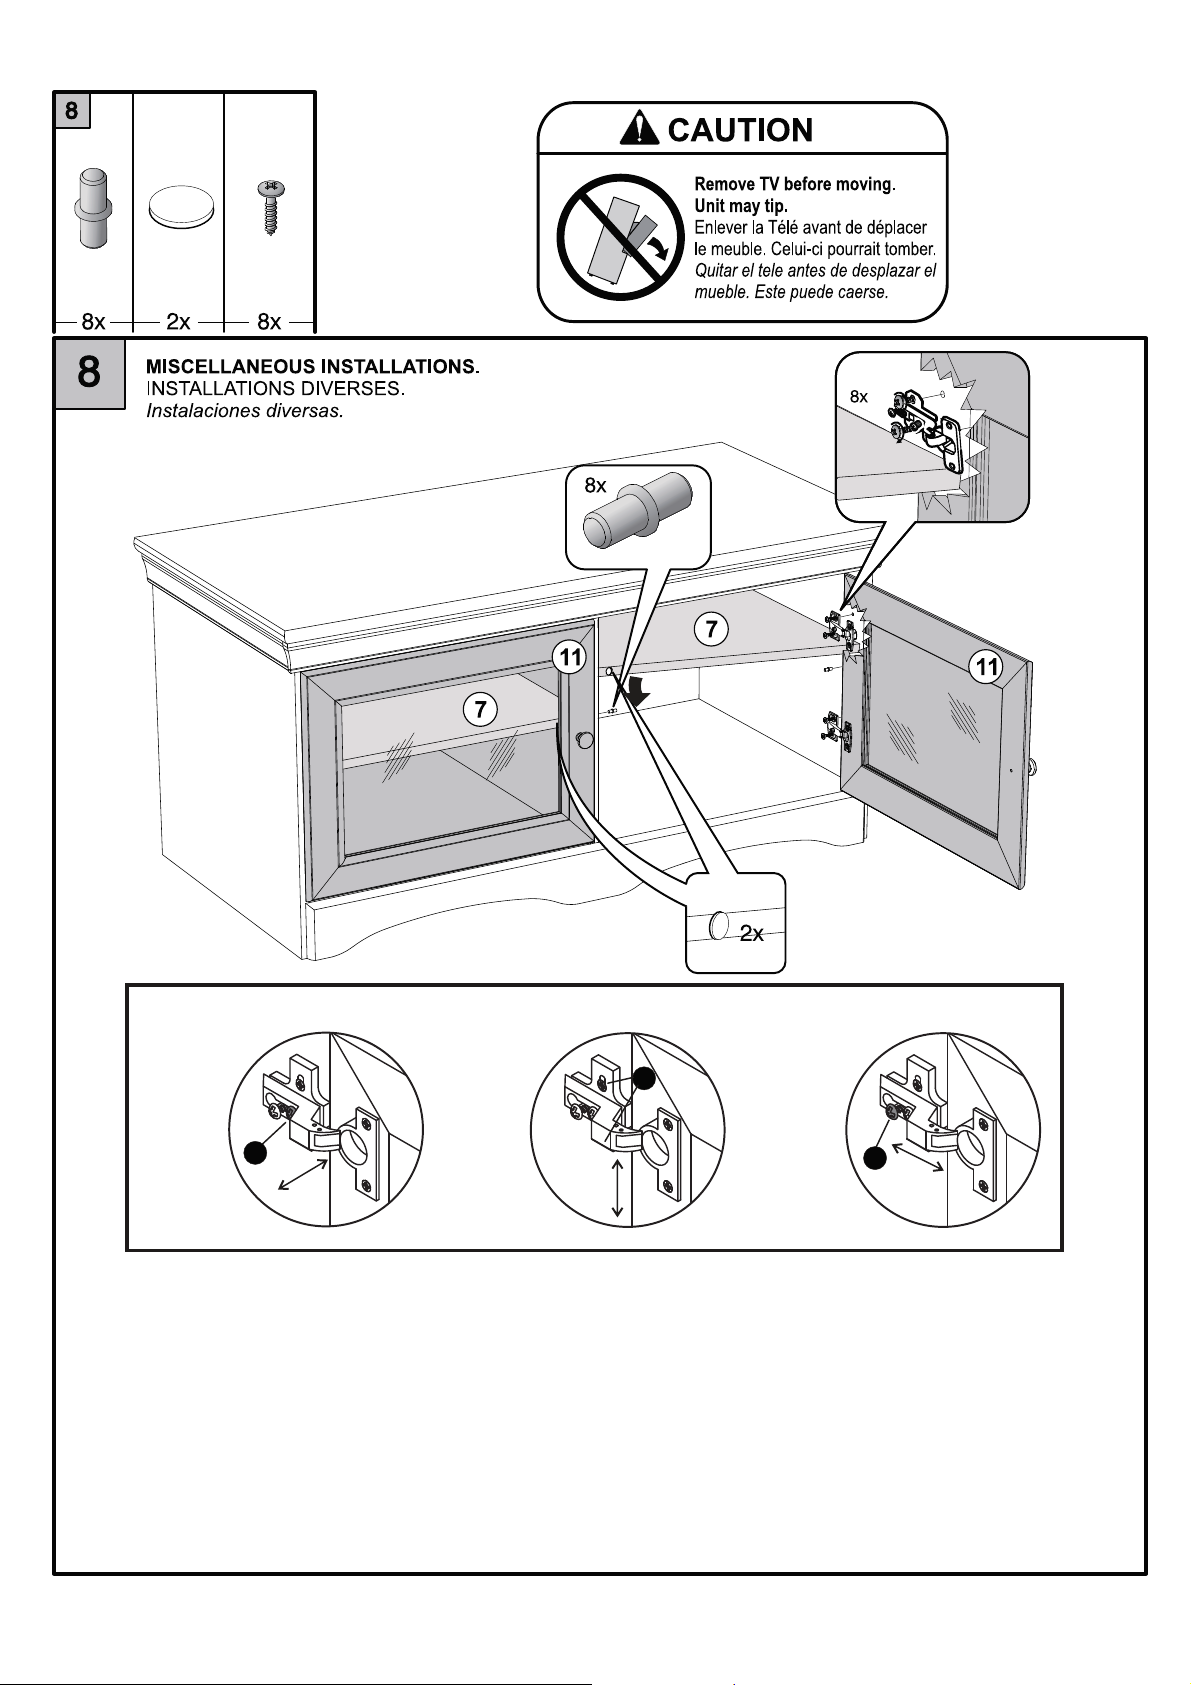
DOORS FITTING / AJUSTEMENT DES PORTES / Ajuste de las puertas
2
To adjust in width
Pour ajuster en largeur
Para ajustar en anchura
1
To adjust in height
Pour ajuster en hauteur
Para ajustar en altura
To adjust in depth
Pour ajuster en profondeur
Para ajustar en profundidad
3
FOR EACH DOOR, ADJUST ONE PARAMETER AT A TIME ON ONE HINGE AT A TIME.
AT FIRST, LEAVE THE DEPTH SCREW AT ITS ORIGINAL POSITION
AND TRY THE OTHER ADJUSTMENTS.
THEN, IF NEEDED, DO THE DEPTH ADJUSTMENTS.
POUR CHAQUE PORTE, AJUSTEZ UN PARAMÈTRE À LA FOIS SUR UNE CHARNIÈRE À LA FOIS.
AU DÉBUT, LAISSEZ LA VIS POUR LA PROFONDEUR À SA POSITION ORIGINALE
ET ESSAYEZ LES AUTRES AJUSTEMENTS.
PUIS, SI NÉCESSAIRE, FAITES LES AJUSTEMENTS POUR LA PROFONDEUR.
PARA CADA PUERTA, AJUSTE UN PARÁMETRO A LA VEZ SOBRE UN BISAGRA A LA VEZ.
AL PRINCIPIO, DEJE EL TORNILLO PARA LA PROFUNDIDAD EN SU
POSICIÓN ORIGINAL Y INTENTÁIS OTROS AJUSTES.
LUEGO, DE SER NECESARIO HAGA LOS AJUSTES PARA LA PROFUNDIDAD.
 Loading...