

Page 1
Traileader PRO with Heart Rate Monitor & PC Link
Page 2

All instructions that relate to the Heart Rate features
are in This Color.
Contents
Overview
Introduction
TIME MODE MENU
1.0 Time/Date/system/user/unit Mode
1.1 Time/Date Display
1.2 Set the Time
1.3 Set the Date
1.4 Set Up the System
1.5 Establish Units of Measure
1.6 Enter Your Personal Data
2.0 Alarm Mode
2.1 Set an Alarm
2.2 Alarm Function
3.0 Chronograph Mode
3.1 Chronograph Display
3.2 Start/Stop the Chronograph
3.3 Enter Lap/Split Times
3.4 Chronograph Recall
4.0 Countdown Timer Mode
4.1 Countdown Timer Display
4.2 Countdown Timer Setting
4.3 Countdown Timer Use
5.0 Dual Time Zone Mode
5.1 Dual Time Zone Display
5.2 Dual Time Zone Setting
TRAIL MODE MENU
6.0 Distance Mode
6.1 Distance Mode Display
6.2 Distance Use
6.3 Distance Mode Set Menus
Save (menu 1)
Session (menu 2)
Daily Record (menu 3)
Sleep (menu 4).
Sense (menu 5).
7.0 heart rate mode
7.1 Heart Rate Chest Strap
7. 2 Heart Rate Mode Display
7.3 Estimated Maximum Heart Rate & Percentage of
Maximum Heart Rate
7.4 Heart Rate Zone Alerts
7.5 Heart Rate Data AcquIsition
7.6 Heart Rate Set Menus
Save
Session
Daily Record
Zone
Page 3

8.0 User Mode
8.1 User Mode Display
8.2 User Mode Use
8.3 User Mode Set Menus
Save
Session
Daily Record
View
9.0 Altimeter Mode
9.1 Altimeter Mode Display
9.2 Set a Reference Altitude
9.3 Use the Altitude Difference Calculator
9.4 Start the Ascent / Descent Calculator
9.5 Stop the AS/DS Calculator
9.6 Clear the AS/DS Calculator
9.7 Set an Altitude Alarm
9.8 View the Altimeter Log Book
9.9 Altimeter Graph Display
9.10 Switch Between Meters & Feet
9.11 Lock the Altimeter
10.0 Barometer Mode
10.1 Barometer Display
10.2 Barometer Setting Menu
Sea Level Pressure
Current Local Pressure
View Log
10.3 Change Units of Measure
11.0 Compass Mode
11.1 Compass Display
11.2 Compass Use
11.3 Compass Idle Refresh
11.4 Take a Reverse Bearing
11.5 Lock the Compass Bearing
11.6 Calibrate the Compass
11.7 Enter an Angle of Declination
12.0 LOGBOOK MODE
12.1 Logbook Display
12.2 Logbook Set Menus
View
Stop/Start
PC link
Log Rate
Auto
Erase
Mem )
13.0 Battery Replacement
13.1 Watch
13.2 Chest Strap
14.0 PC Link
15.0 Troubleshooting
16.0 Limited Warranty
Declination Map for North America
Declination Map for Europe
Contacts
Page 4
Thank you for purchasing one of our Tech4o Traileader Watches.
Use this manual to guide you through the initial setup and calibration and keep it for
later reference.
Avoid exposing the watch to extreme temperatures, impacts, and moisture. Also, avoid
using the watch near magnets, or objects and appliances that contain magnets, as
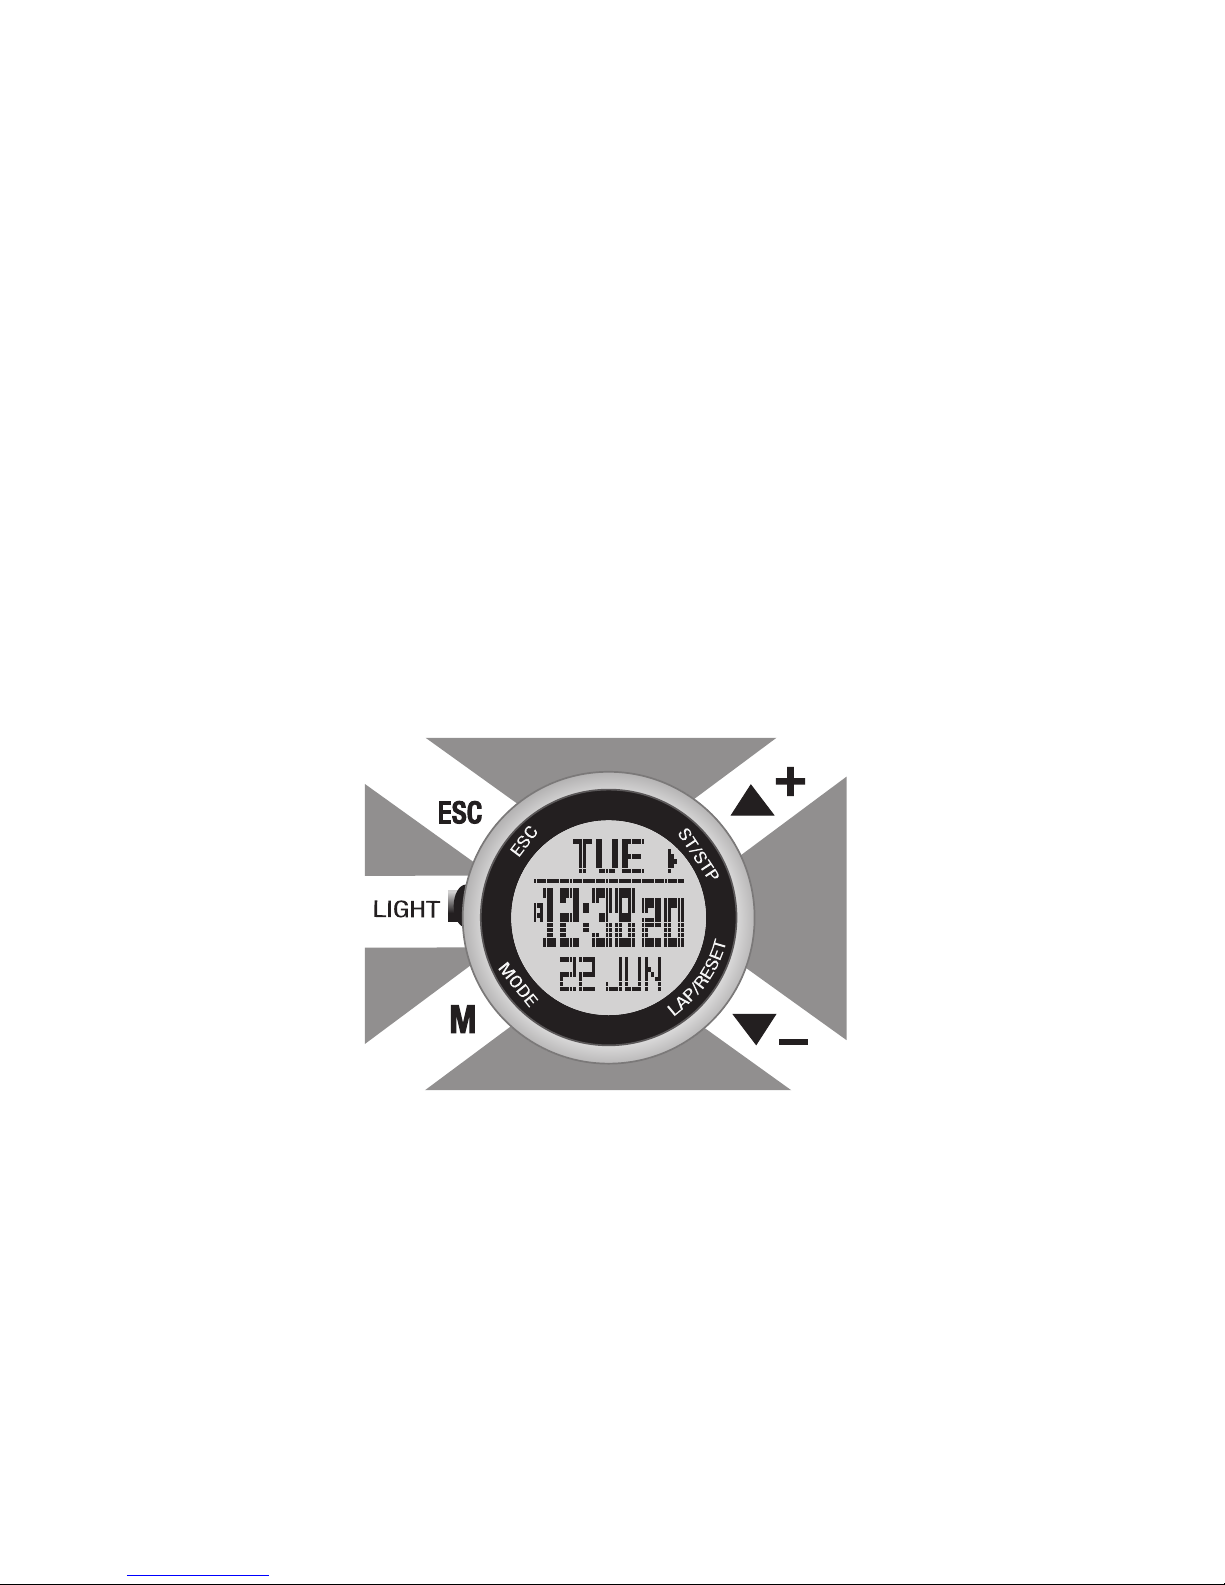
inaccurate results will occur. The watch has several functions per button. See fig.1.
ST/STP ▲
Scrolls display up
Increases values
View alternative displays
Starts/Stops timers
LAP/RESET ▼
Scrolls display down
Decreases values
Changes units
Enters laps and resets timers
fig. 1
ESC
Escape- returns to the
previous screen
Provides the answer NO
Toggles between the
Time or Trail menu
LIGHT
Illuminates a backlight
modE m
Selects modes
Confirms selections
Enters settings modes
Page 5
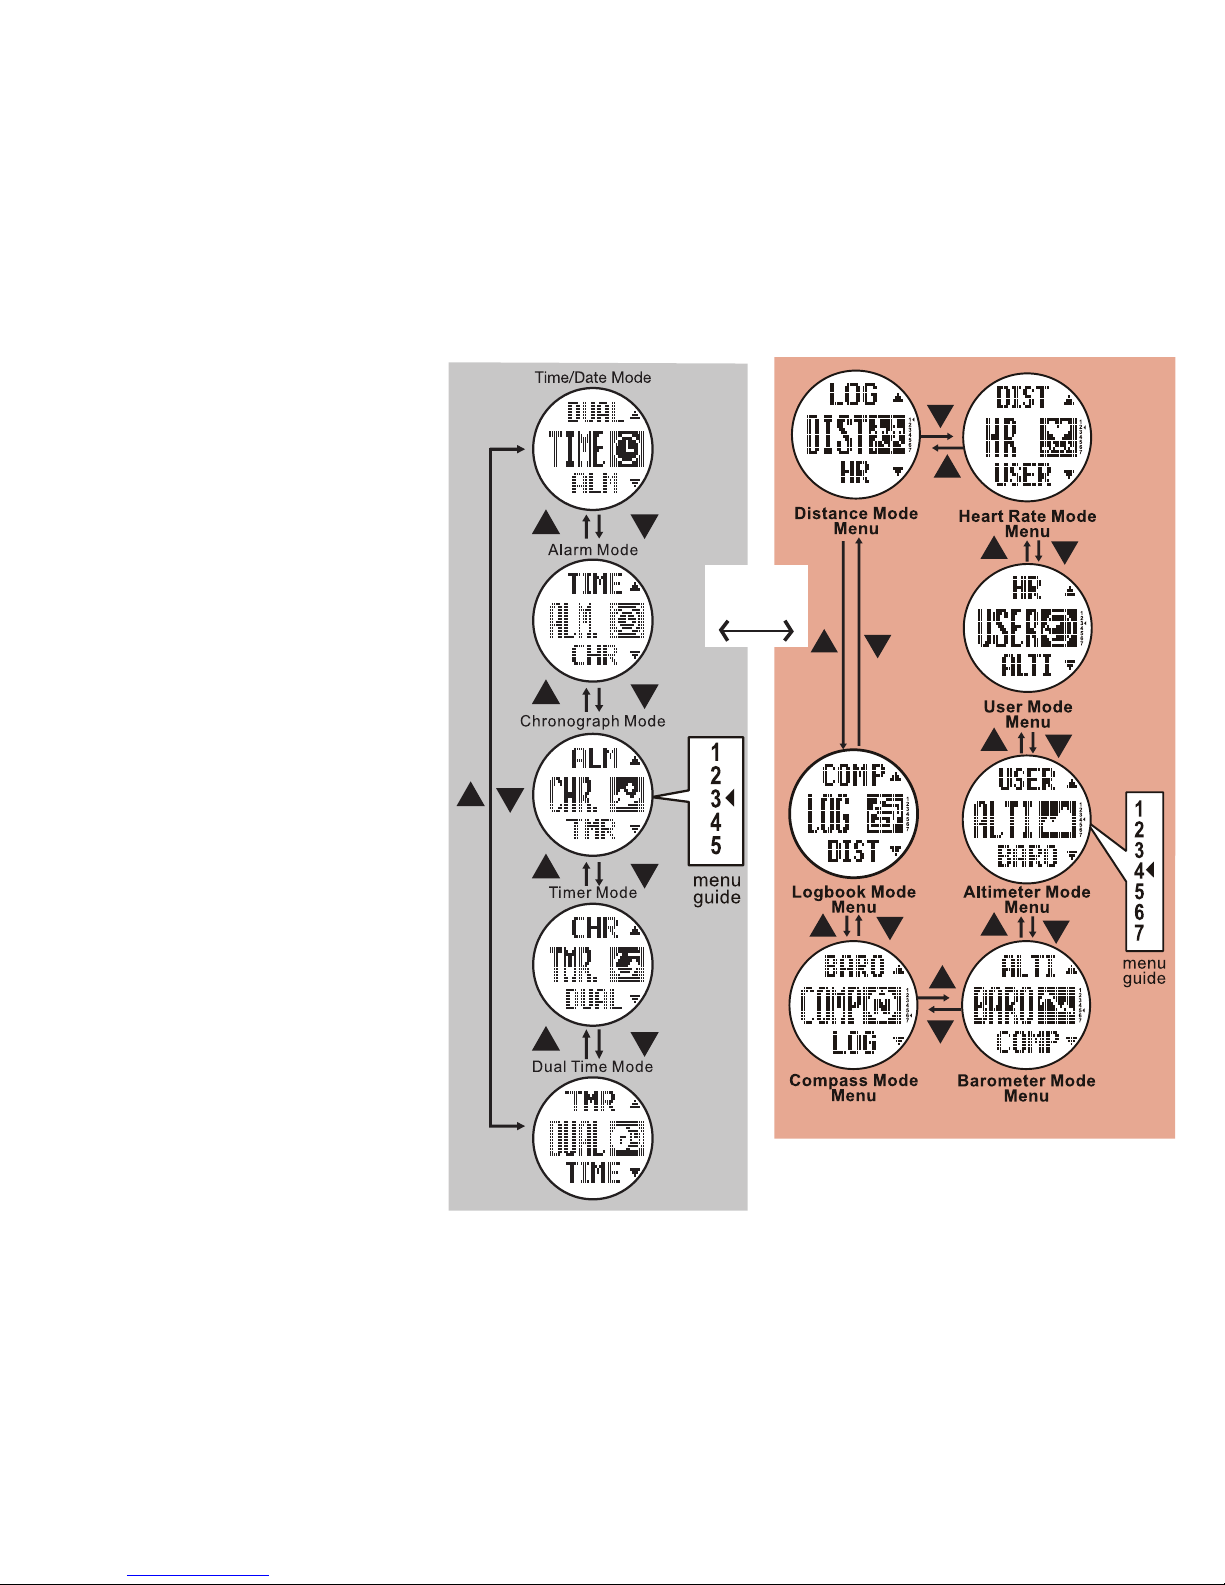
The Traileader Pro has two main
menus- Time & Trail. Learning
to navigate these is key to a
successful experience.
See fig. 2 & 3
To access any Time Function Display
when in another Time Mode
Menu function - press M until
the display you wish is visible.
To access a Time Function Display
when you're in any Trail Mode
Menu function - press ESC twice
to enter Time Menu then press
ST./STP. ▲ or LAP/RESET ▼
to scroll to the display you wish.
Press ESC to back out of any screen.
As a convention, we use ▲ to
indicate pressing the ST./STP.
button and we use ▼ to indicate
pressing the LAP/RESET button.
Also, these icons appear in the
watch display whenever they are
available.
All instructions that relate to the
Heart Rate features are in
This Color.
ESC
ESC
fig. 3
TIME MODE MENU TRAIL MODE MENU
fig. 2
Page 6
Time Mode Menu
1.0 TIME/DATE/SYSTEM/USER/UNIT MODE
The Traileader’s Time/Date Mode displays: Current
Time and Date, Altitude, Pressure, Weather, and
Temperature. This mode is where many of the
system setting are adjusted.
1.1 Time/Date Display
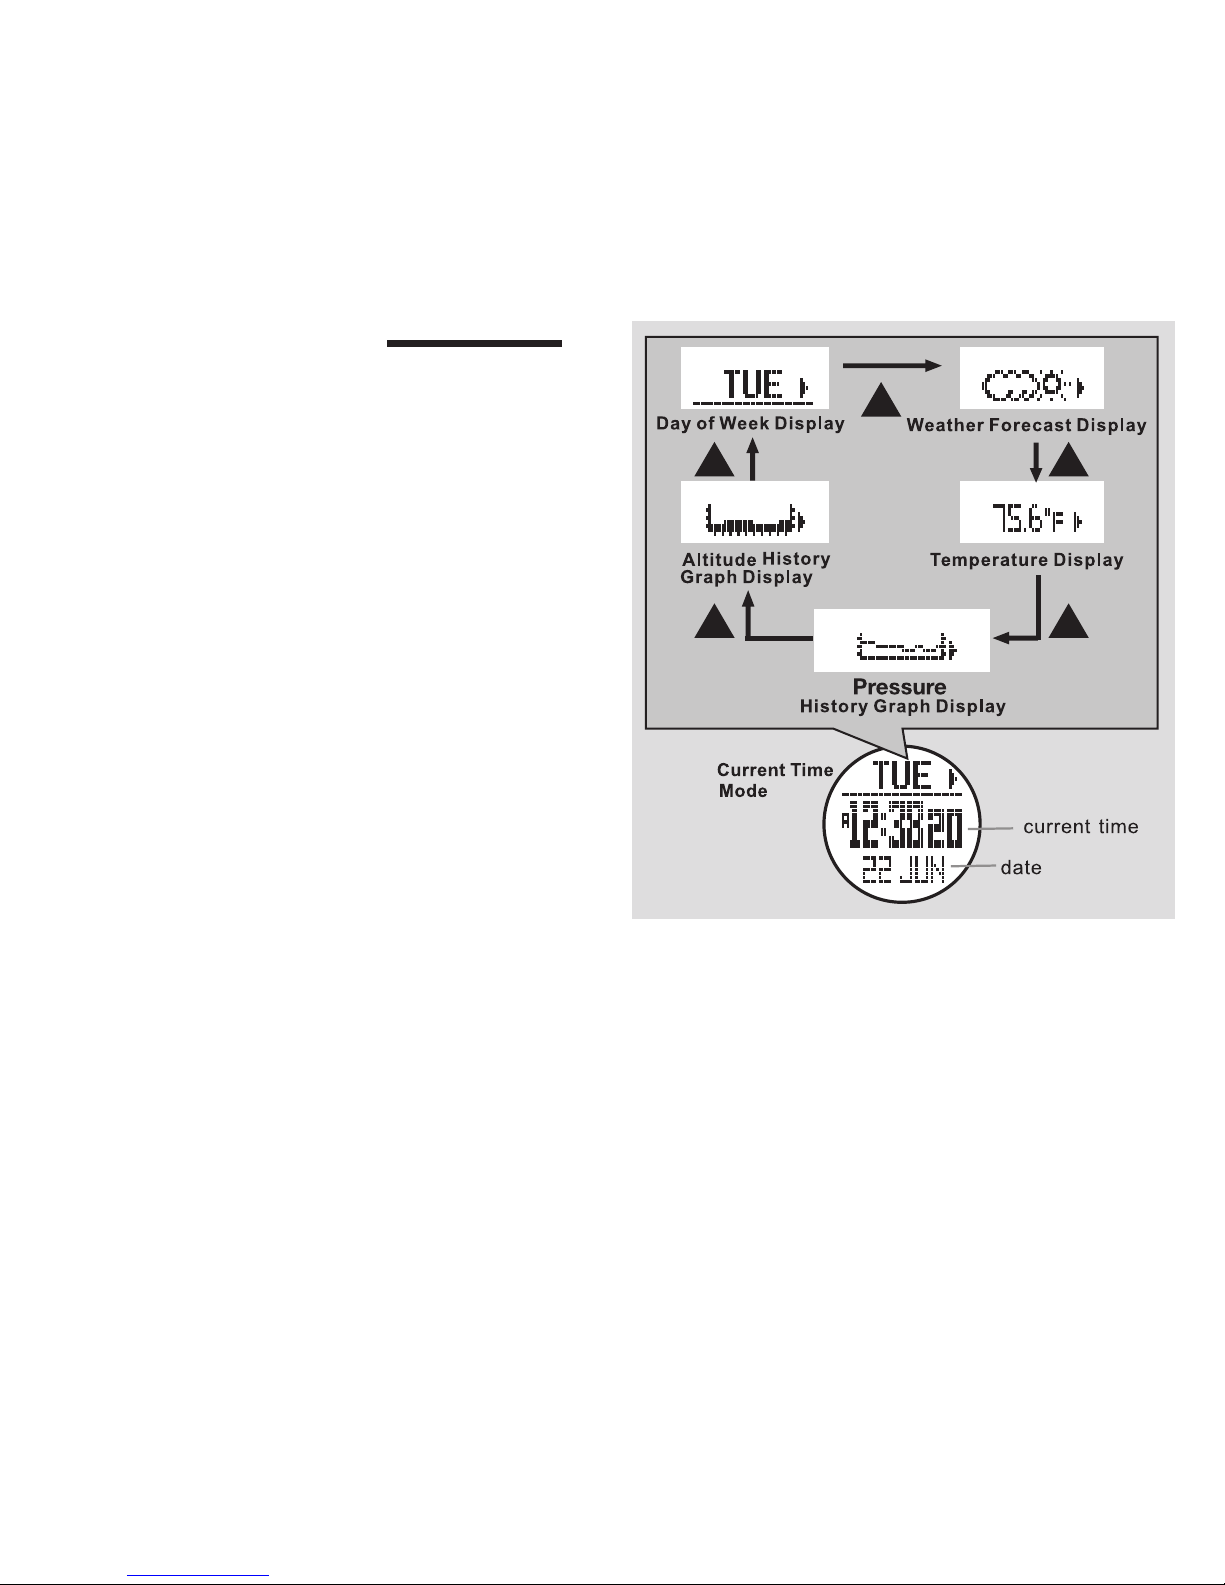
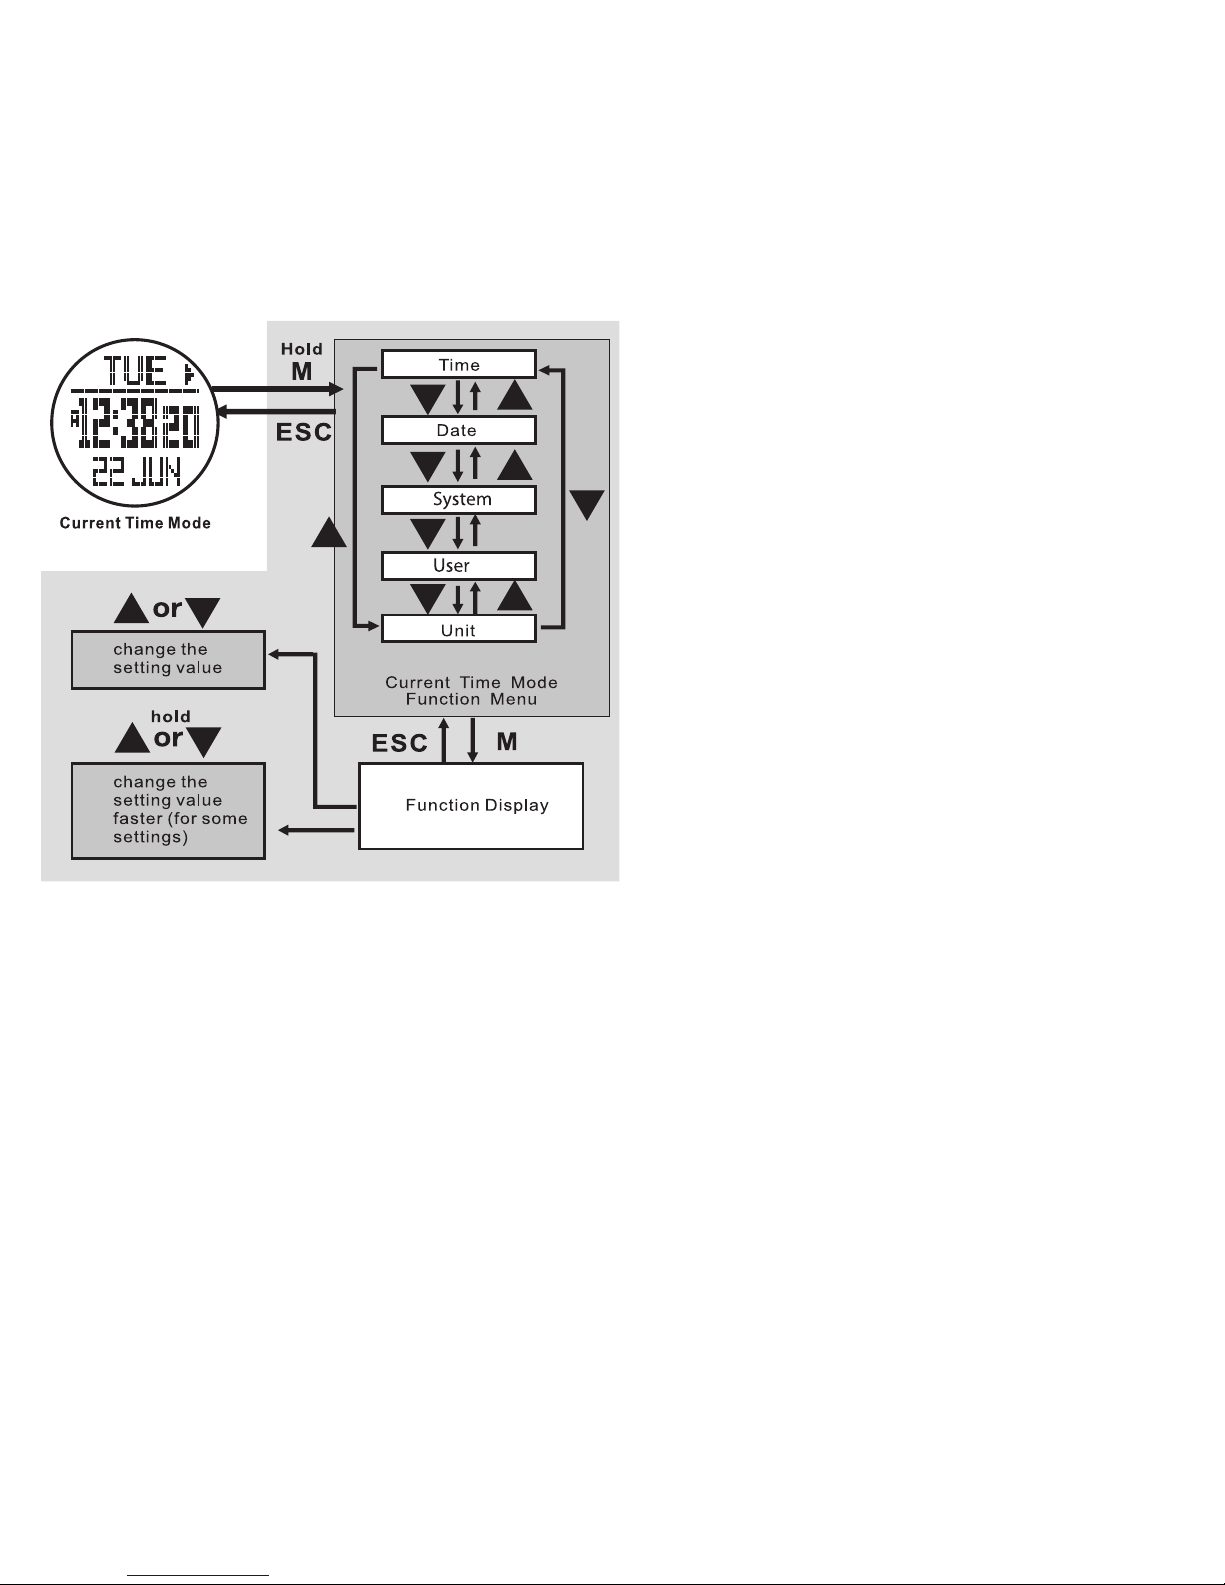
Access the Time/Date Mode Display. See fig. 4
Display Features:
* Top Row: One of the following- day of week,
weather forecast, current temperature, altitude
graph or pressure graph -Press ▲ to scroll
through the displays
* Middle Row: Current Time
* Bottom Row: Current Date
NOTE: The weather forecasting system uses changes
in atmospheric pressure to predict the weather.
Changes in altitude will affect pressure and can
skew the forecast. For greatest accuracy maintain
a stable altitude for several hours.
1.2 Set the Time (second, minute, hour, 12/24)
Access the Time/Date Mode Display.
See fig. 5 next page.
• Hold M for 3 seconds to enter Time/Date set menu
• Press M to select Time.
* Press ▲ or ▼ to reset the seconds to 00
* Press M to confirm selection
* Press ▲ or ▼ to adjust minutes
* Press M to confirm selection
* Press ▲ or ▼ to adjust hour
* Press M to confirm selection
* Press ▲ or ▼ to set time format (12 / 24hr)
* Press M to confirm selection
* Press ESC to exit Time
• Press ESC to exit the Time/Date set menu
fig. 4
Page 7
1.3 Set the Date (year, month, day)
Access the Time/Date Mode Display.
• Hold M 3 seconds to enter Time/Date set menu
• Press ▼ to scroll to Date
• Press M to select Date
* Press ▲ or ▼ to adjust year
* Press M to confirm selection
* Press ▲ or ▼ to adjust month
* Press M to confirm selection
* Press ▲ or ▼ to adjust day
* Press M to confirm selection
* Press ESC to exit Date
• Press ESC to exit the Time/Date set menu
1.4 Set Up the System (LCD, Sound, Light, Pair)
Access the Time/Date Mode Display.
• Hold M 3 seconds to enter Time/Date/ System
set menu
• Press ▼ to scroll to System
• Press M to enter System
* Press ▼ to scroll to Pair
* Press M to enter Pair
* Press ESC to confirm selection and exit Pair
NOTE: You must be wearing the heart rate chest
strap for this to work. See section 7.1
Continue to scroll through the remaining windows
in this screen- LCD, Sound, Light- press M to
enter and use ▲ or ▼ to adjust the display
contrast, turn on /off keytone or chime and set
the backlight for normal /night.
• Press ESC to exit the Time/Date/System set menu
1.5 Establish Units of Measure for Temperature,
Pressure, Speed or Other
Access the Time/Date Mode Display.
• Hold M 3 seconds to enter Time/Date/System/
User/Unit set menu
• Press ▼ to scroll to Unit
• Press M to select Unit
fig. 5
Page 8
* Press ▼ to scroll to Pressure
* Press M to select Pressure
* Press ▲ or ▼ to select: mb, hPa or inHg
* Press ESC to confirm and exit Pressure
Continue to scroll through the remaining windows in
this screen- Temperature, Speed ,Other- and use
▲ or ▼ to select temp- ˚F or ˚C, speed- km/h,
m/h or knot, and metric or imperial
• Press ESC to exit the Time/Date/System/User/Unit
set menu
1.6 Enter Your Personal Data (Gender, Birth, Height,
Weight, Stride)
Access the Time/Date Mode Display.
• Hold M for 3 seconds to enter Time/Date/ System/
User set menu
• Press ▼ to scroll to User
• Press M to enter User
* Press M to enter Gender
* Press ▲ or ▼ to scroll to Male or Female
* Press ESC to confirm and exit Gender
Continue to scroll through the remaining windows
in this screen- Birth, Height, Weight, Stride- and
press M to enter and use ▲ or ▼ to enter your
personal data
• Press ESC to exit the Time/Date/System/User set
menu
See www.tech4o.com for our stride length calculator.
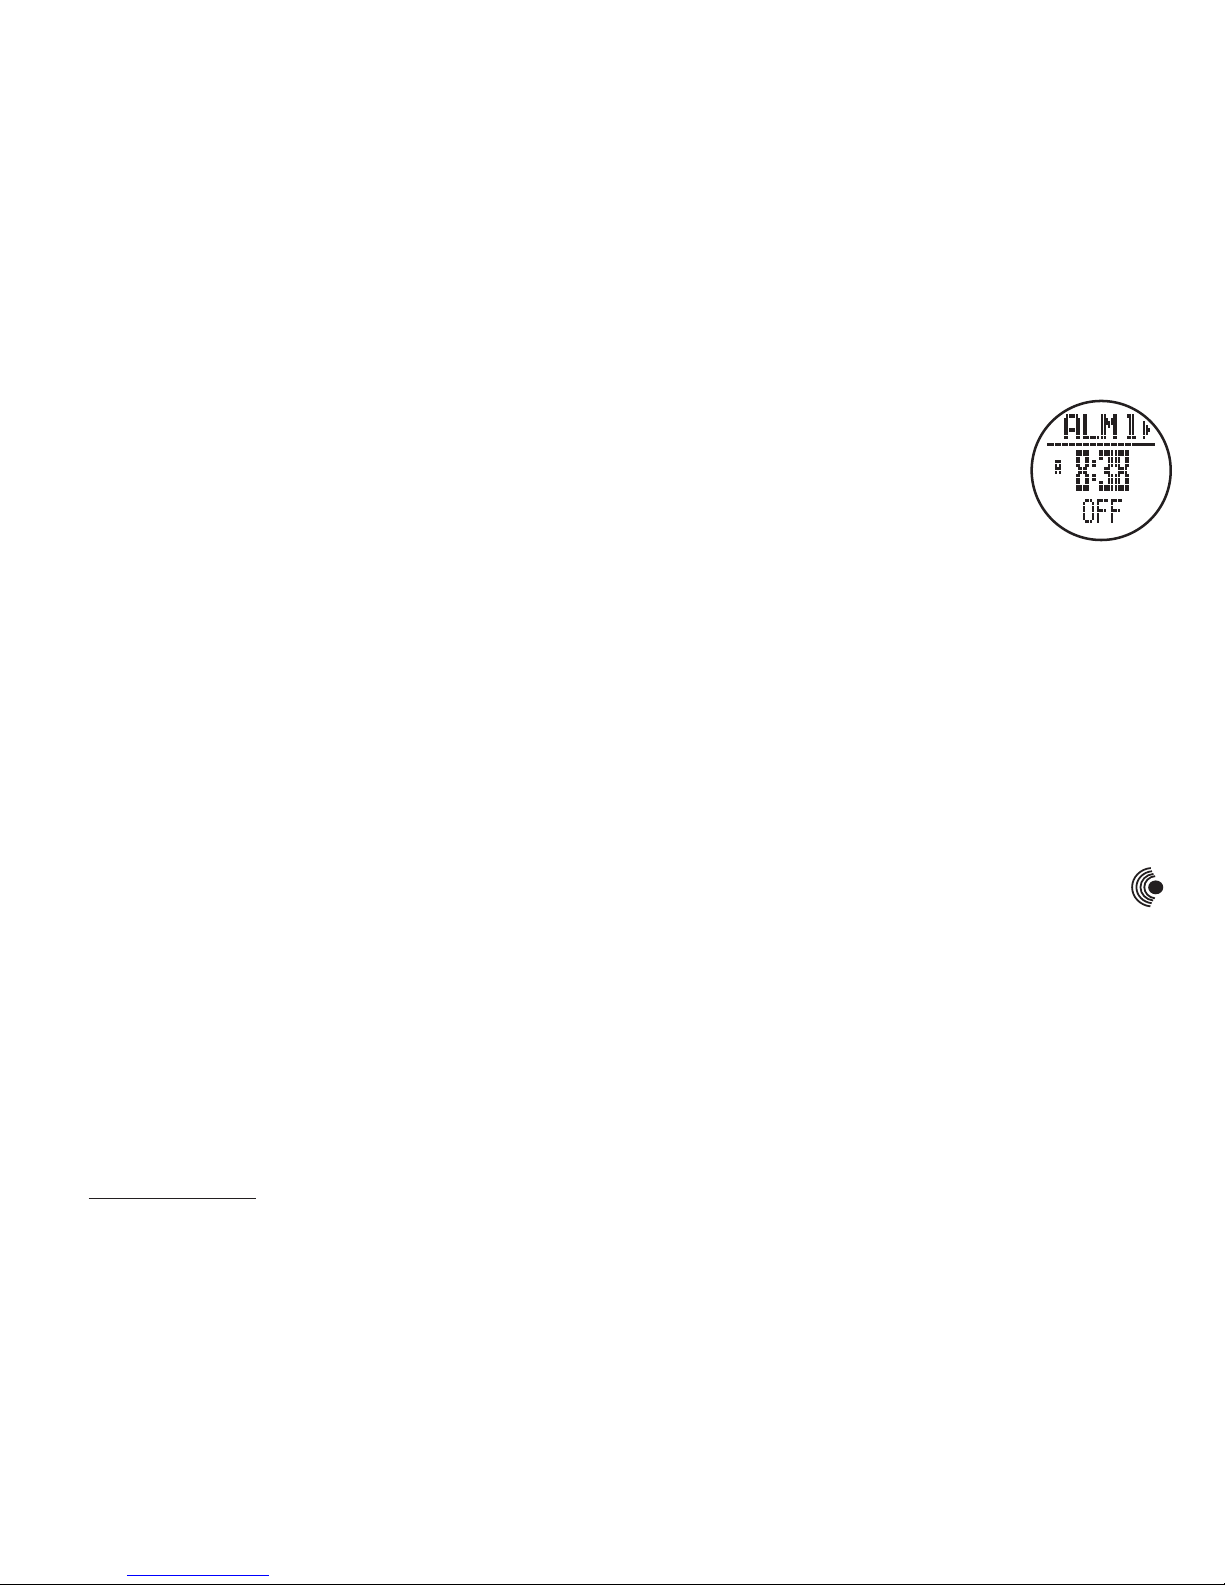
2.0 ALARM MODE
You can set two alarms for daily, weekly or never.
Access the Alarm Mode Display.
See fig. 6.
Display Features:
* Top Row: Alarm 1 or 2. Press ▲
to select between them
* Middle Row: Alarm Time
* Bottom Row: Alarm Status
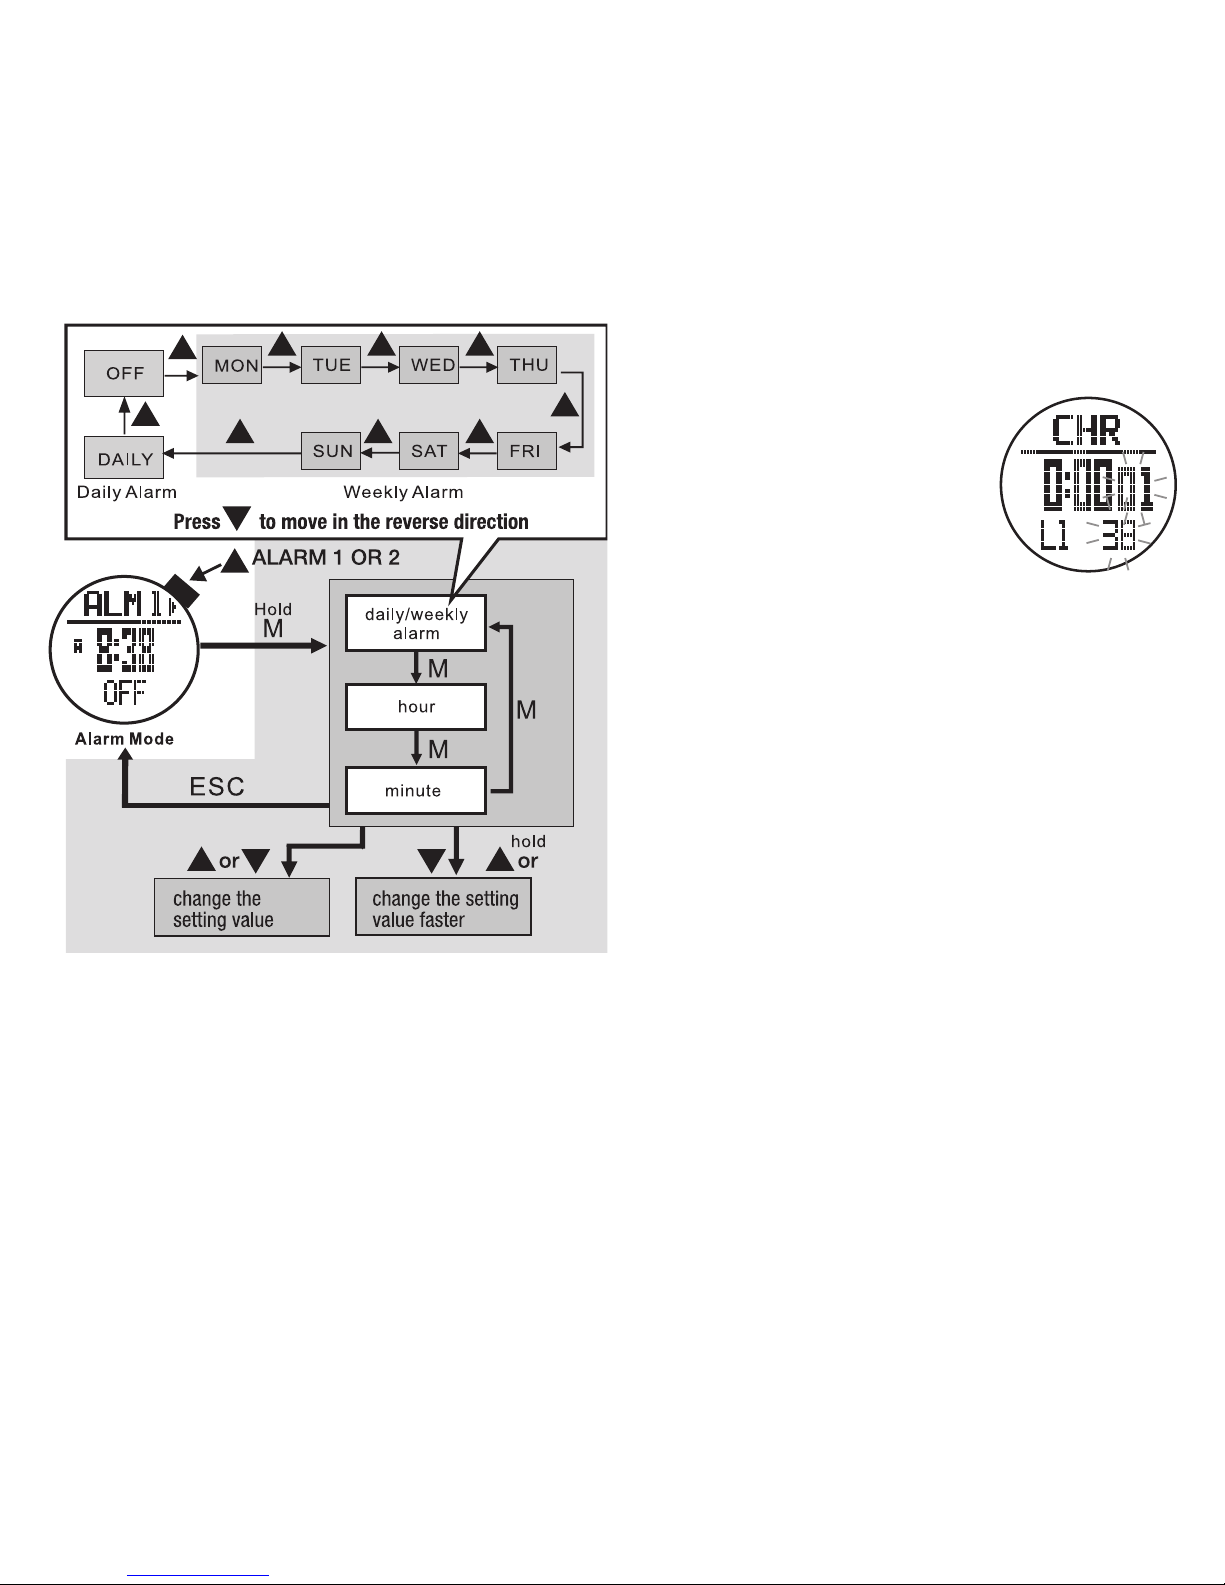
2.1 Set an Alarm Daily/Weekly/Off, Hour, Minute
Access the Alarm Mode Display.
See fig. 7 on the next page.
• Press ▲ to select between alarm 1 or 2
• Hold M for 3 seconds to enter Alarm set mode
* Press ▲ or ▼ to select a daily or weekly alarm
or to turn off
* Press M to confirm your selection
* When an alarm is scheduled, the alarm icon
will appear at the display bottom
* Press ▲ or ▼ to adjust the hour
* Press M to confirm selection
* Press ▲ or ▼ to adjust minute
* Press ESC to confirm selection
• Repeat to set additional alarms
2.2 Alarm Function
a scheduled alarm will chime for 30 seconds and
then turn off.
fig. 6
Page 9
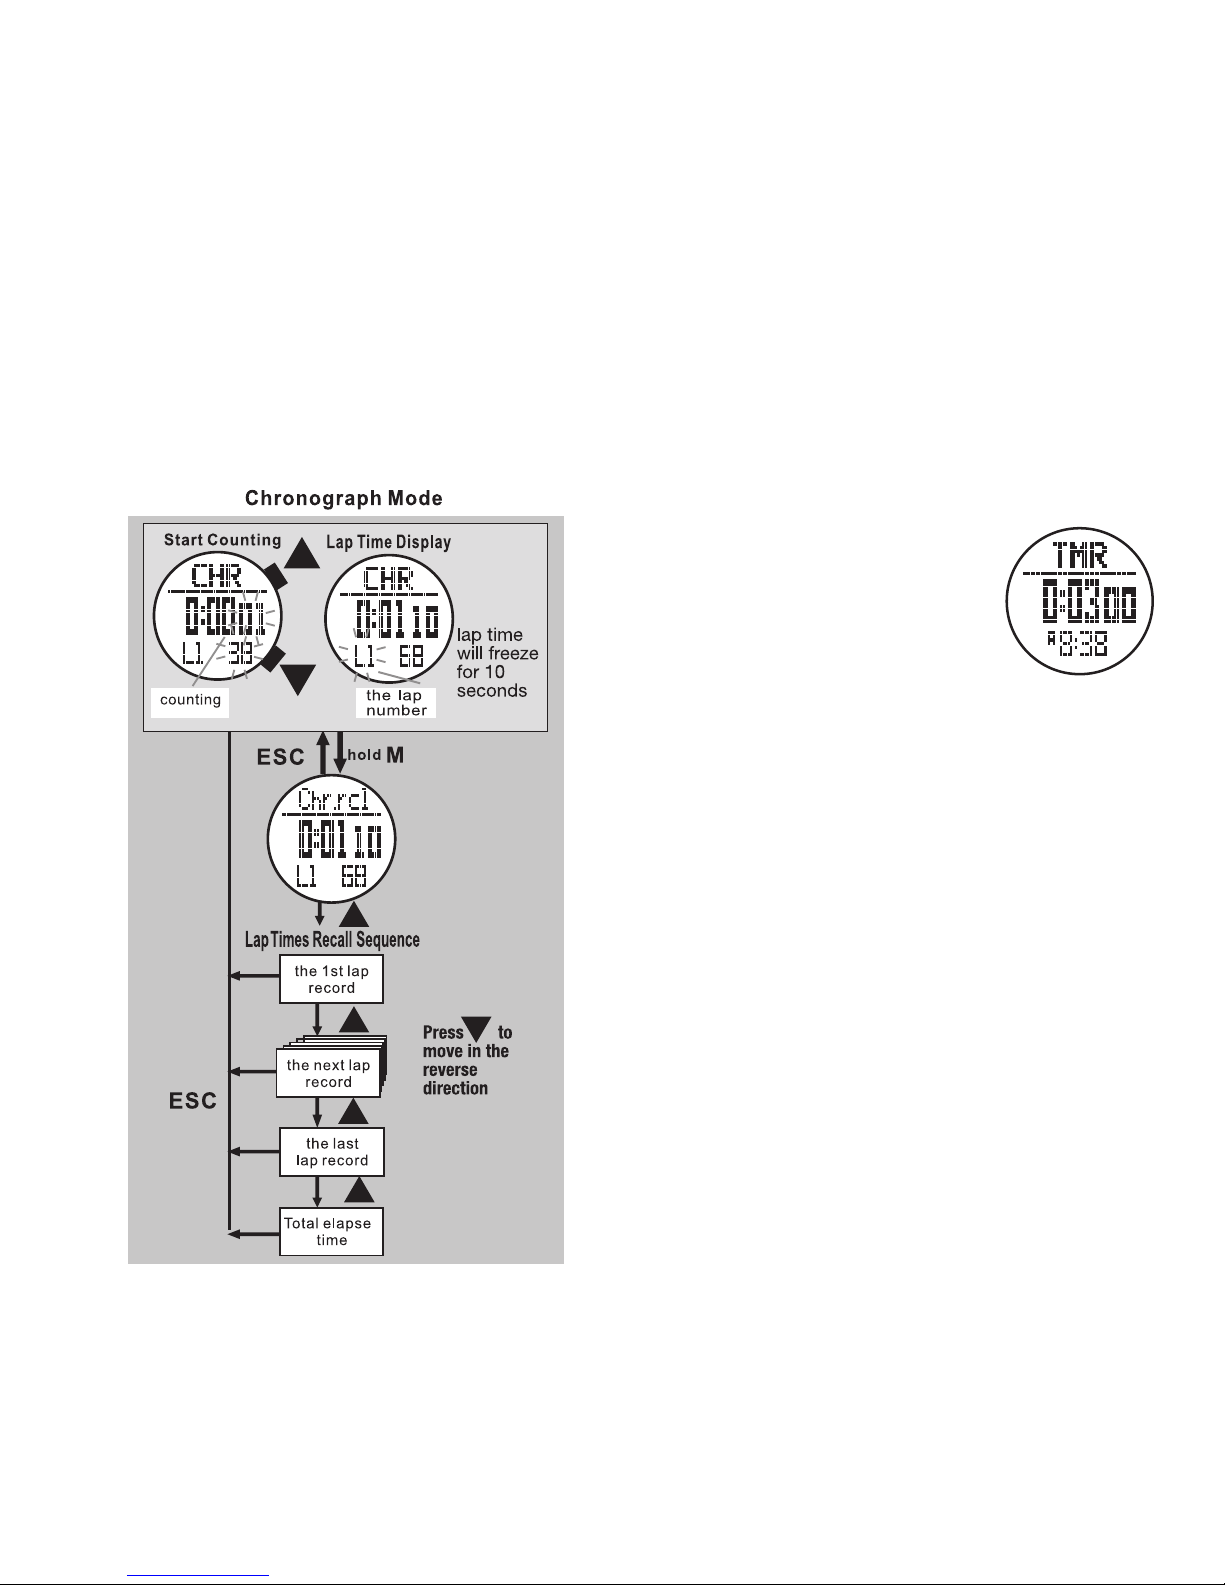
3.1 Chronograph Display
Access the Chronograph Mode Display.
See fig. 8.
Display Features:
* Top Row: CHR indicator
* Middle Row: Running time /
most recent lap time in
hours, minutes and seconds
* Bottom Row: Lap number and
100th of a second lap time
3.2 Start/Stop the Chronograph
Access the Chronograph Mode Display
• Press ▲ to start the Chronograph
• Press ▲ again to stop the Chronograph
• Hold ▼ for 3 seconds to clear the recorded time
3.3 Enter Lap/Split Times
• Press ▲ to start the Chronograph
• Press ▼ to record a lap
* The most recent recorded lap time will display for
10 seconds. The total elapsed time will continue
counting in the background
* After 10 seconds, total elapsed time will display
* Repeat the above to record additional laps
* Press ▲ to stop the Chronograph
3.4 Chronograph Recall
NOTE: There must be recorded lap times for this to
work. Chronograph Recall is still accessible while
the Chronograph is recording.
During the chime, press any button to stop it.
The alarm will automatically reset and sound again
at the next scheduled time. See section 2.1 to disable
scheduled alarms
3.0 CHRONOGRAPH MODE
The Chronograph can record up to 50 laps. Stored
laps can be recalled while the Chrono is still running.
fig.7
fig. 8
Page 10
4.0 COUNTDOWN TIMER MODE
The countdown timer counts backwards, toward zero
from a programmable time and sounds convenient,
interval beeps.
4.1 Countdown Timer Display
To access the Countdown Timer Display.
See fig.10.
Display Features:
* Top Row: TMR indicator
* Middle Row: Countdown time
* Bottom Row: Current time
4.2 Countdown Timer Setting
Access the Countdown Timer Display.
Countdown Timer has five preset timers - 3, 5, 10, 15,
and 45 min. and one programmable timer.
To select a preset timer:
• Continue pressing ▼ to select the timer you wish
to use (skip to section 4.3)
To set your own countdown timer:
• Hold M for 3 seconds -the hour will flash
* Press ▲ or ▼ to adjust the hour
* Press M to confirm your selection
* Press ▲ or ▼ to adjust minutes
* Press M to confirm your selection
* Press ▲ or ▼ to adjust seconds
• Press ESC to confirm your selection
Access the Chronograph Mode Display. See fig. 9.
• Hold M for 3 seconds to access Chronograph Recall
* Press ▲ or ▼ to scroll through the recorded lap
times and total time
• Press ESC to exit Chronograph Recall
fig. 9
fig. 10
Page 11
4.3 Countdown Timer Use
Access the Countdown Timer Display.
• Press ▲ to start the countdown timer
• Press ▲ again to stop the countdown timer
• Press ▼ to reset the countdown timer
• The countdown timer will chime at these intervals:
* Every minute during the last 10 minutes
* Every 10 seconds during the last minute
* Every second during the last 5 seconds
* For 30 seconds at the expiration of the timer
• Press ▲ to stop the expiration chime
• The timer will automatically reset after it expires
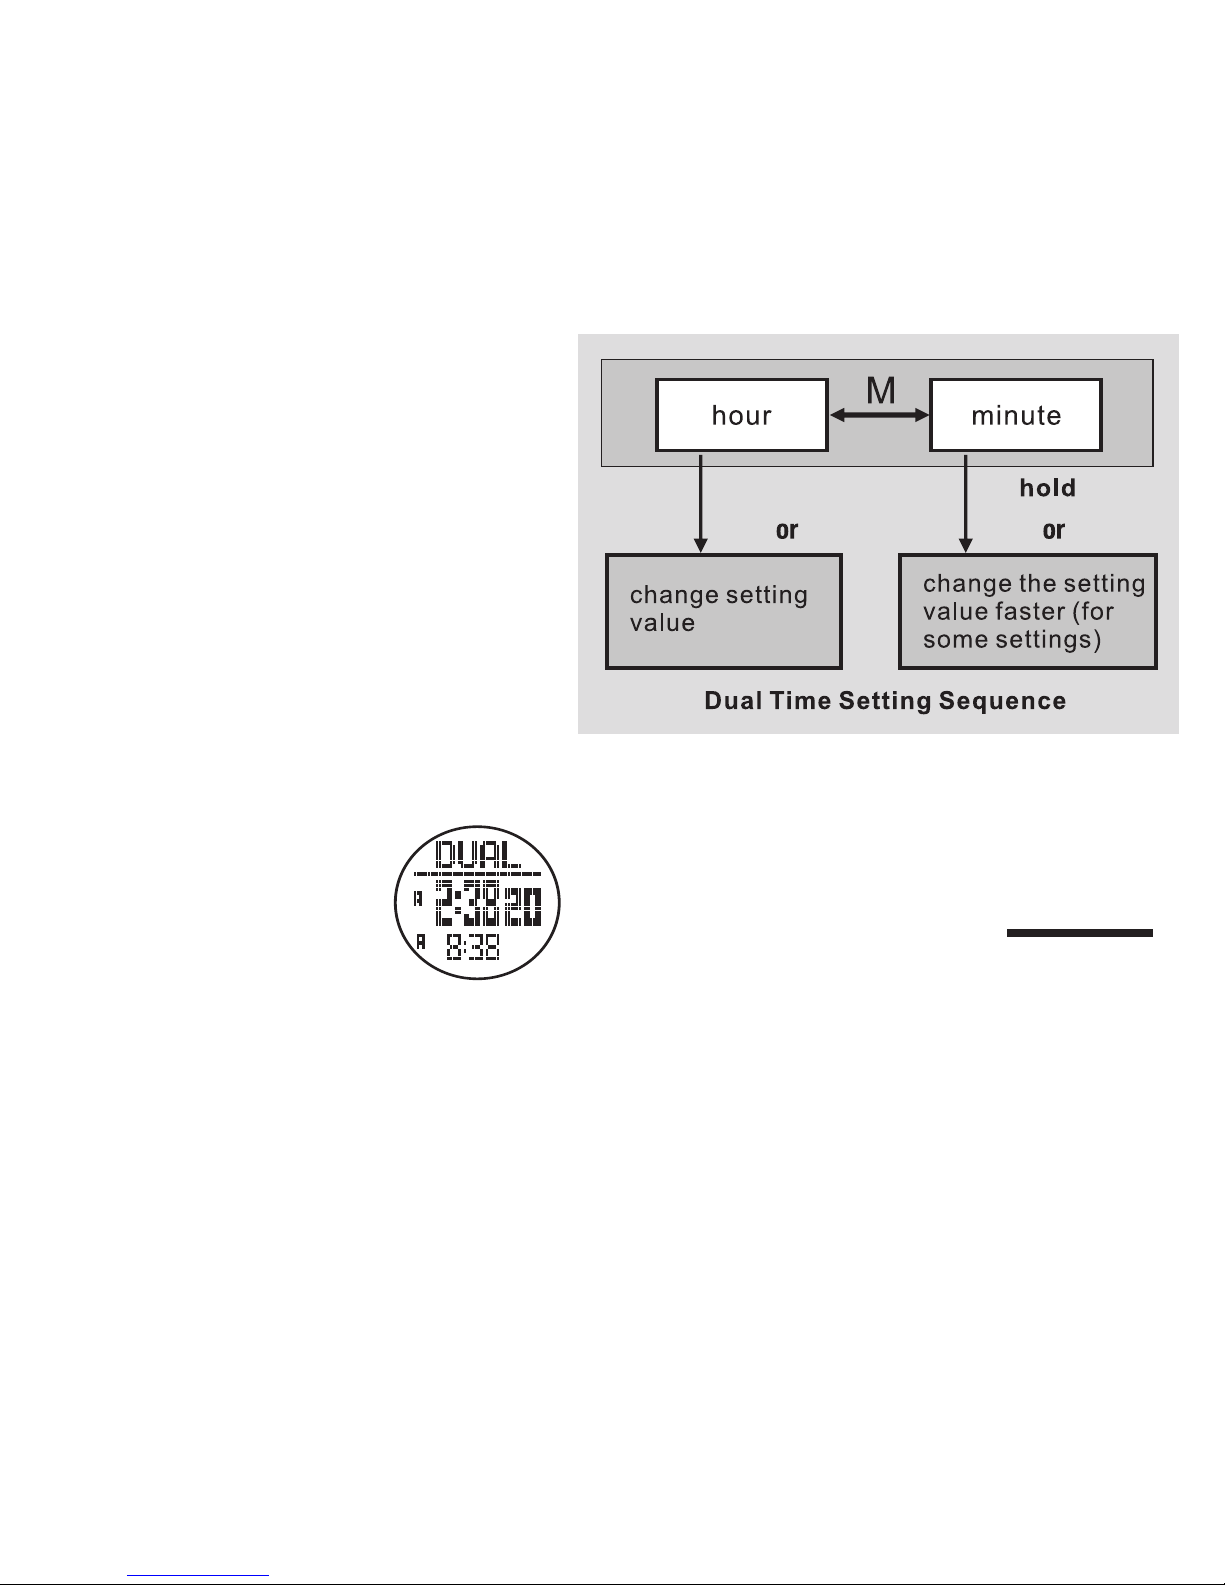
5.0 DUAL TIME ZONE MODE
Use this to set and keep an alternate time zone
5.1 Dual Time Zone Display
Access Dual Time Zone Display.
See fig. 11
Display Features:
* Top Row: DUAL indicator
* Middle Row: Dual Zone time
* Bottom Row: Current time
5.2 Dual Time Zone Setting
Access the Dual Time Zone Display
• Hold M for 3 seconds to enter Dual Time Zone set
mode. See fig. 12.
* Press ▲ or ▼ to adjust the hour
* Press M to confirm your selection
fig. 11
▲
▼
▲
▼
fig. 12
* Press ▲ or ▼ to adjust the minutes
• Press ESC to confirm your selection
TRAIL MODE MENU
The following 7 sections are TRAIL MODE MENU
functions.
Understanding how to switch between
menus is important to navigating your watch.
press ESC twice to toggle between the
Time and Trail Mode Menus.
Page 12
Also, you may:
* Press and Hold ▼ 3 seconds to manually reset
the current Screen or
* Continue Holding ▼ to reset the current Session
or
* Continue holding ▼ to reset the Timer
• The dots will flash on the right of the display when
Distance mode is ready
• Begin walking or running and Distance Mode will
start measuring your exercise data
6.0 DISTANCE MODE
Distance mode accurately tracks your Speed,
Distance, Pace, Calories, and Steps.
NOTE: Although your watch came programmed
with a generic profile, we recommend that you
calibrate a personal profile for the most accurate
results. See section 1.5
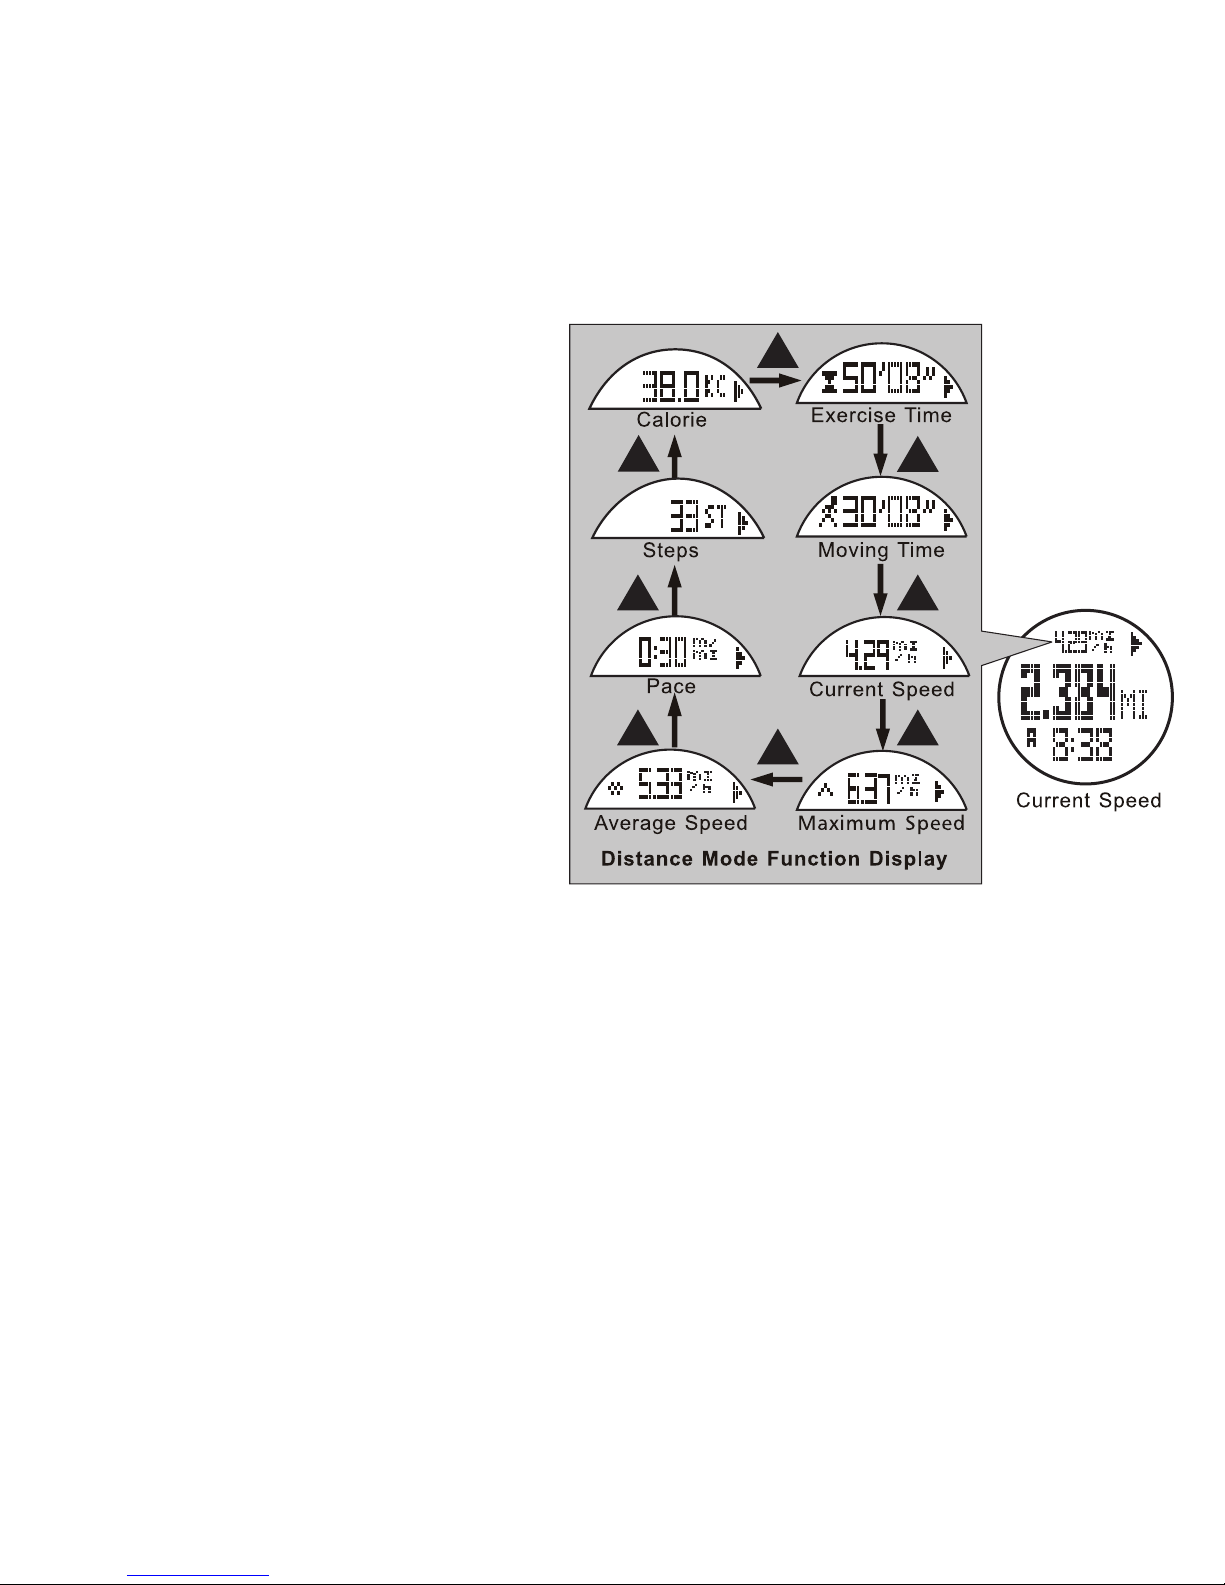
6.1 Distance Mode Display
Access Distance Mode Display. See fig.13
Display Features:
* Top Row: Exercise data (exercise time, moving
time, current speed, maximum speed, average
speed, pace, steps, and calories)
* Press ▲ to scroll through the data
* Middle Row: Exercise distance
* Bottom Row: Current time
6.2 Distance Use
See fig. 14 on the next page.
Access the Distance Mode Display
• Distance mode automatically begins recording
after a pre-programmed 8 second delay
When in the Distance Mode you may:
* Press and Hold ▲ 3 seconds to manually Stop/
Start the Sensor or
* Continue Holding ▲ to Start/Stop the Timer or
* Continue holding ▲ to Start/Stop the Logbook
fig. 13
Page 13
• Press ▲ to scroll through the data in the
top row of the display
• Press and Hold ▲ at any time to stop
recording
• Hold ▼ 3 seconds to clear all recorded
data for that session
• Distance continues to measure data;
* Unless you turn it off
* Unless no movement is sensed for a
period that exceeds the sleep timer
setting
* Until midnight, when the day’s statistics
are logged into memory and Distance
Mode turns off
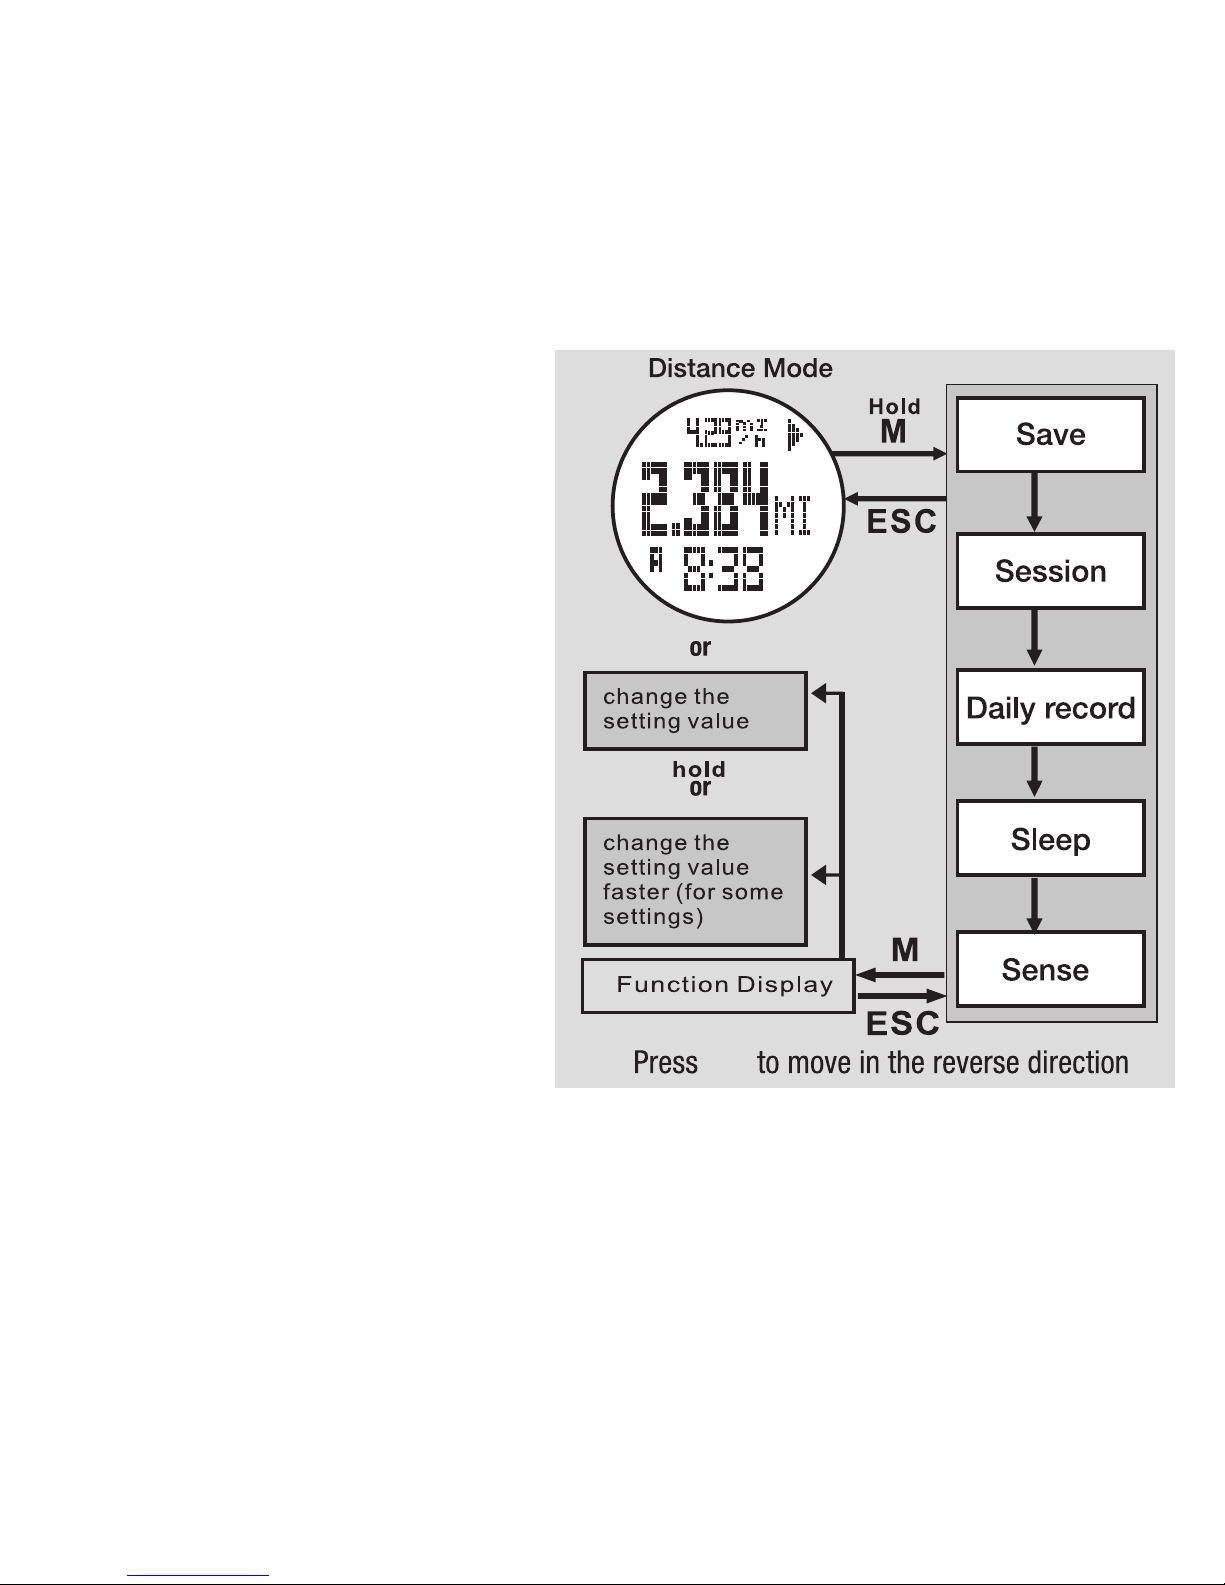
6.3 Distance Mode Set Menus
The following 5 menus add supplemental
functions to the Distance Mode. See fig. 14.
Save (menu 1)
Saving the current data will add to any saved
data for that day and clear current statistics
from the Distance mode
Access the Distance Mode Display
• Hold M 3 seconds to enter Distance set
menu
• Press M to select Save
* Press ▲ to save the current recorded
data or
* Press ESC to cancel and return
• Press ESC to exit Distance set menu
▲
▲
▼
▼
▲
▼
▼
▼
▼
fig. 14
Page 14
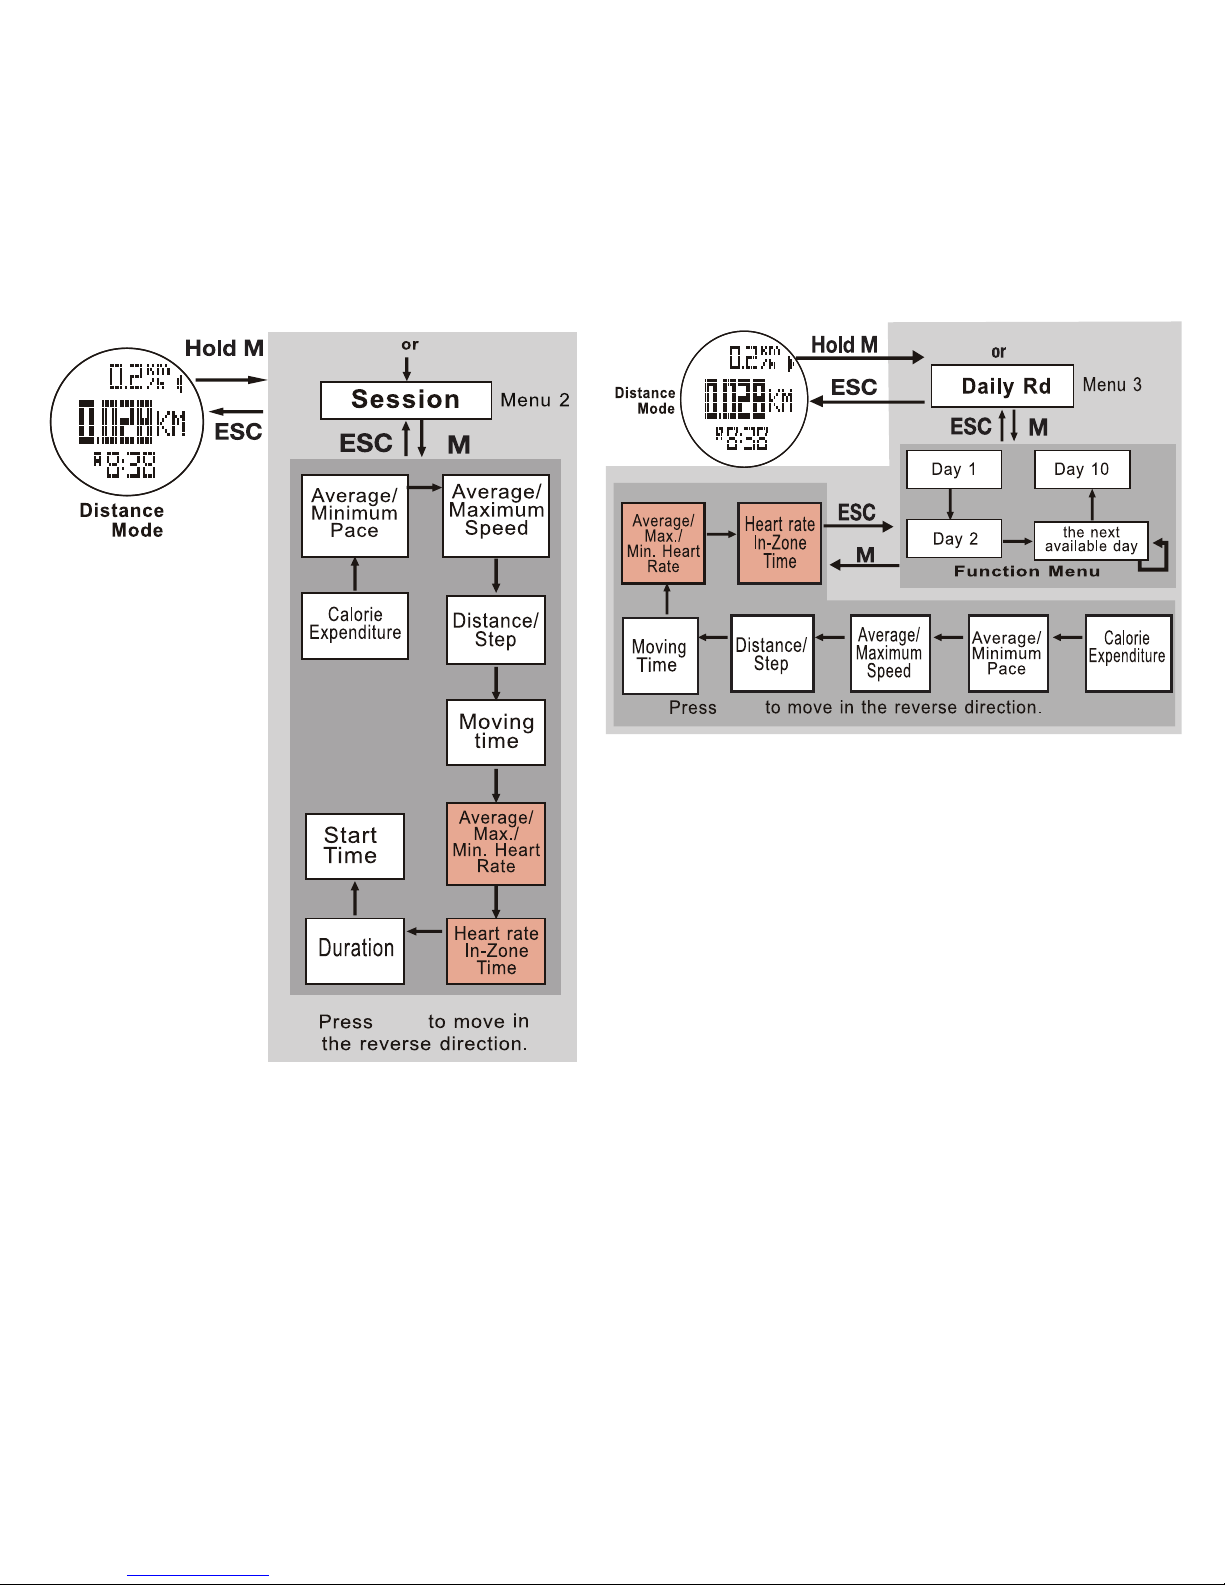
Session (menu 2)
Allows review of the 9 screens of collected statistical
data for this current session. See fig. 15.
Access the Distance Mode Display.
• Hold M 3 seconds to enter Distance set menu
• Press ▼ to scroll to Session
▲
▲
▼
▼
▼
▼
▼▼
▼
▼
▼
fig. 15
▼▼▼▼
▼
▼
▼
▼
▼
▼
▼
▲
▲
fig. 16
• Press M to select the Session
* Press ▲ or ▼ to scroll through the collected data
* Press ESC to exit the records
* Press ESC to exit Session
• Press ESC to exit Distance set menu.
Daily Record (menu 3)
Allows review of the 7 screens of collected data for
each day up to and including day 10. See fig. 16.
Access the Distance Mode Display,
• Hold M 3 seconds to enter Distance set menu
• Press ▼ to scroll to Daily Record
• Press M to select the Daily record
* Press ▼ to scroll to the review day
* Press M to access records
Page 15

* Press ▲ or ▼ to scroll through the 7 screens
* Press ESC to exit the records
* Press ESC to exit the day
* Press ESC to exit Daily Record
• Press ESC to exit Distance menu.
Sleep (menu 4).
Distance Mode has an automatic sleep timer to
conserve battery power. If no movement is sensed
for a period that exceeds the programed time,
Distance Mode will turn off and stop recording
until you again accesses the Distance Mode.
Access the Distance Mode Display.
• Hold M for 3 seconds to enter Distance set
menu
• Press ▼ to scroll to Sleep
• Press M to select the Sleep
* Press ▲ or ▼ to adjust the sleep timer for
Distance Mode
* Press ESC to confirm and exit Sleep
• Press ESC to exit Distance set menu
Sense (menu 5).
The sensors that measure movement in Distance
Mode are adjustable. Level 1 (least sensitive)
works best for most users and will produce the
most accurate results. However, if you have a
very quiet/smooth gate, you may need a more
sensitive setting.
NOTE: A discrepancy between actual distance
measured and walked is not usually a
sensitivity issue but rather a need to adjust
your stride length. Unless, you have entered a
higher than necessary sensitivity.
Access the Distance Mode Display.
• Hold M 3 seconds to enter Distance set menu
• Press ▼ to scroll to Sense
• Press M to select the Sense
* Press the ▲ or ▼ to adjust the sensitivity
level
(1 = lease sensitive to 7 = most sensitive)
* Press ESC to confirm and exit Sense
• Press ESC to exit Distance set menu
7.0 HEART RATE MODE
The Traileader Pro's Heart Rate Mode supports
the following 6 data gathering functions.
• Shows in Beats Per Minute and % of estimated
max BPM
• Alerts when heart rate is out of target zone
• Shows number of calories burned
• Shows ave., min., max. HR
• Shows elapsed time HR is in the zone
• Logs data into a session, saves to a daily record
and shows current session
Page 16
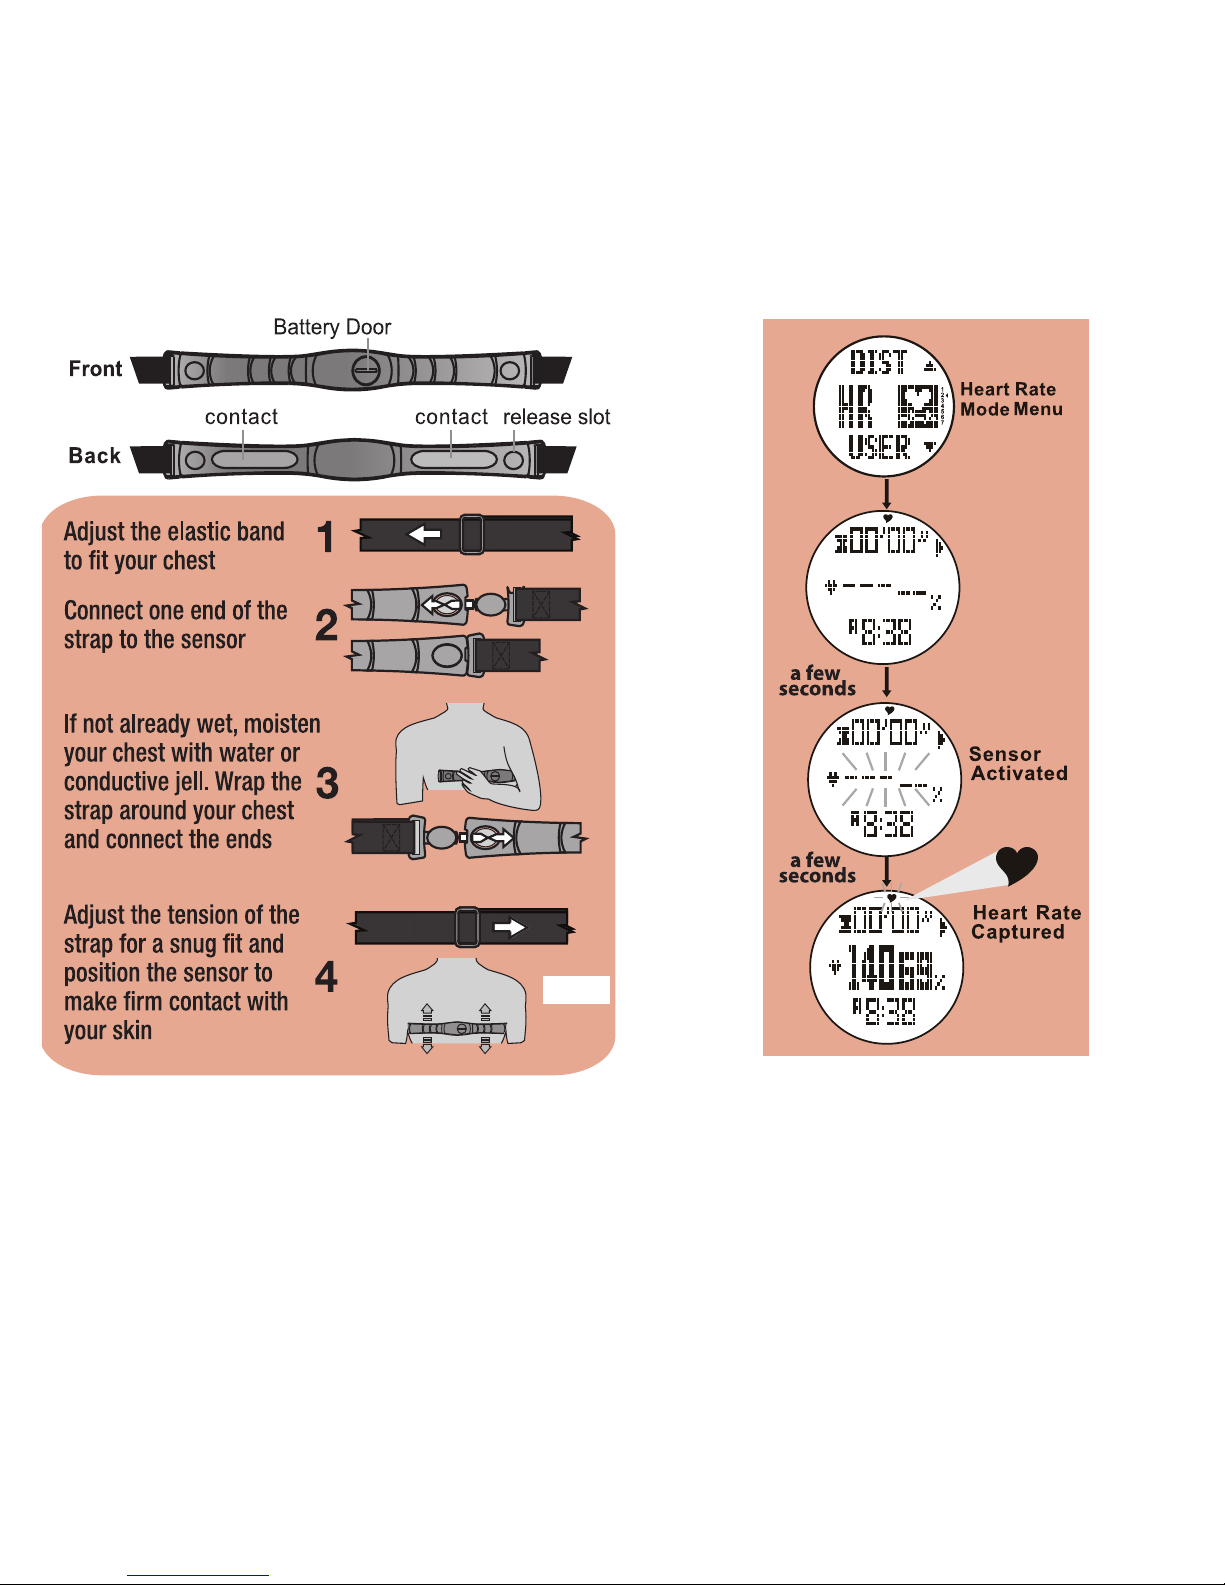
fig. 17
7.1 Heart Rate Chest Strap
The chest strap captures, displays and saves heart
rate data. This strap must be worn with good contact
on your bare skin. Moisture between the strap and
your skin aids in conductivity. See fig. 17.
7. 2 Heart Rate Mode Display
Access the Heart Rate Mode Display See fig. 18.
The display will auto-scroll until the heart rate is
captured. All screens will flash for 30 seconds if no
chest strap is found.
fig. 18
Page 17
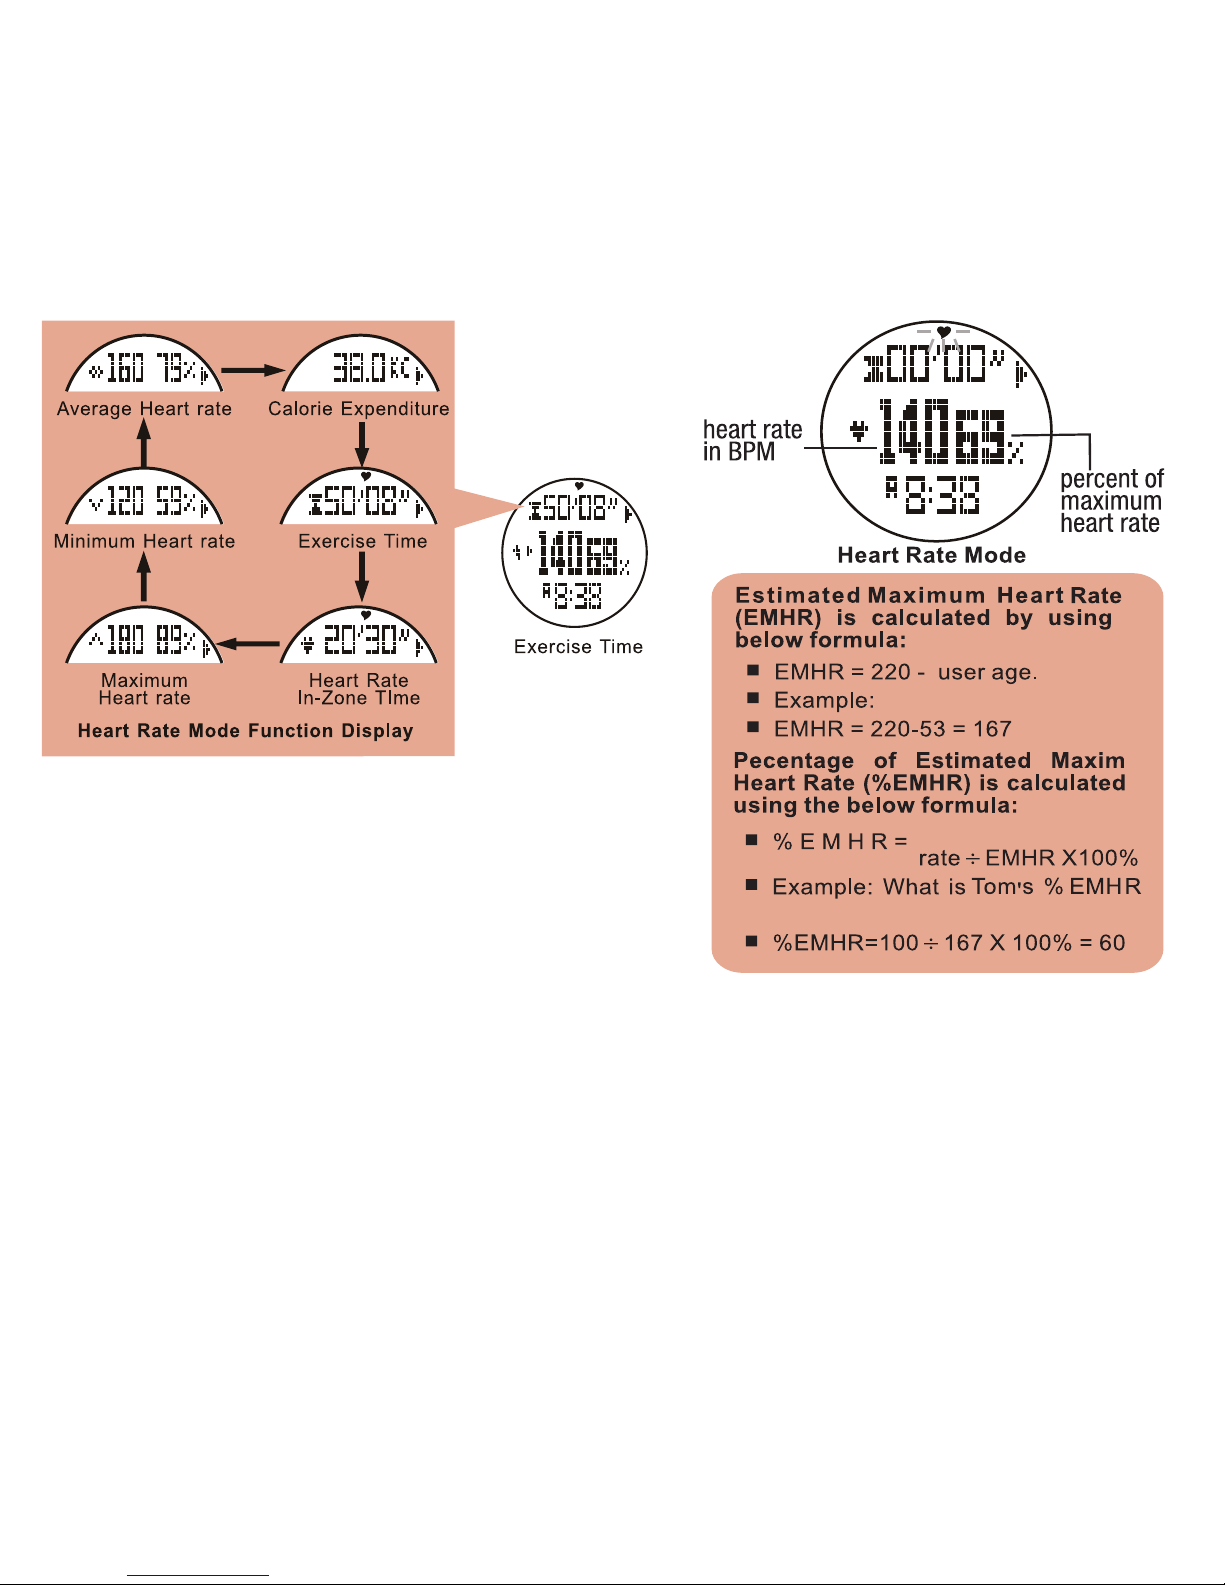
▲
▲
▲
▲
▲
▲
fig. 20
Tom is 53
Current heart
if his current heart rate is 100
Display Features:
* Top Row: Stats (exercise time, HR in-zone
time, max HR, min HR, average HR , and calories
burned). Press ▲ to scroll through the 6 screens
* Middle Row: Beats per minute and % of
estimated max HR
* Bottom Row: Current time See fig. 19.
7.3 Estimated Maximum Heart Rate &
Percentage of Maximum Heart Rate
Your watch records and calculates heart rate data.
The data is based on your EMHR as determined by
the information entered in your personal profile.
See fig. 20.
fig. 19
NOTE: Before starting any exercise program involving
heart rate monitoring, please consult your physician
for an accurate measure of your actual maximum
heart rate.
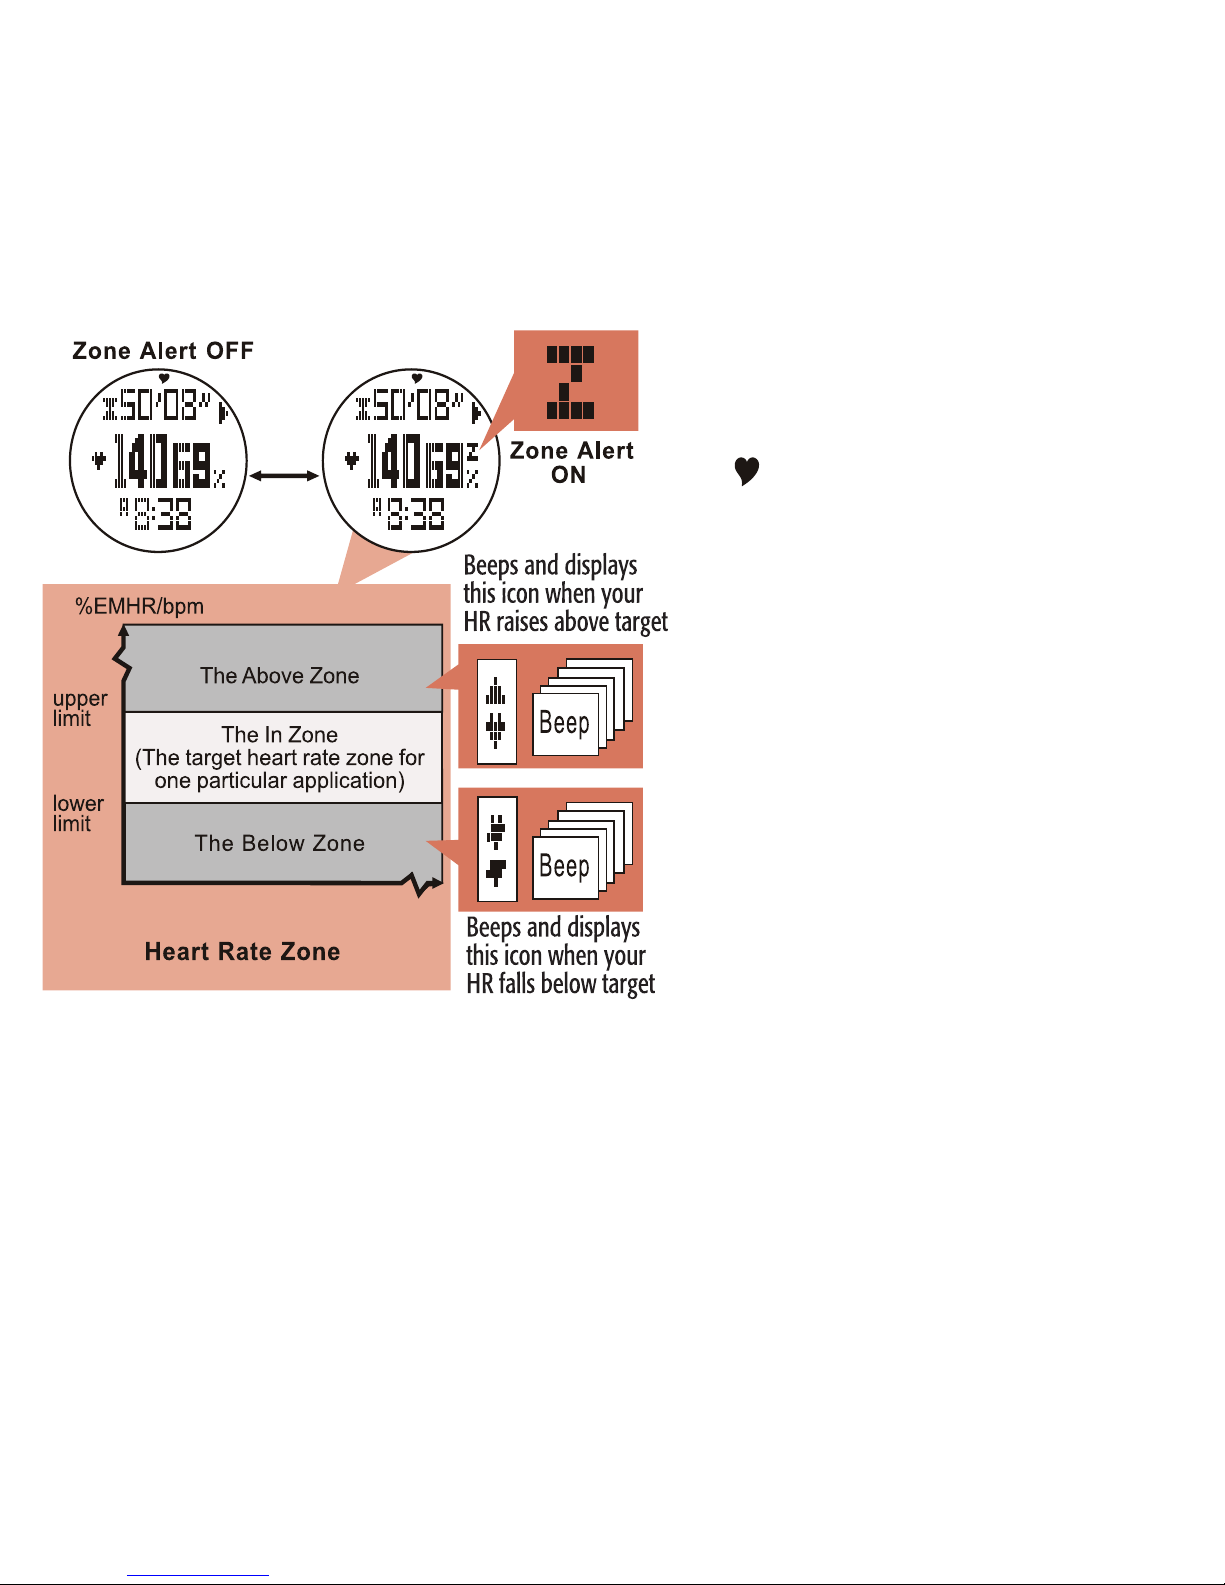
7.4 Heart Rate Zone Alerts
There are 2 different heart rate zone alerts that sound
whenever the target beats per minute is exceeded at
either the upper or lower end. See fig. 21 on next page.
Page 18
7.5 Heart Rate Data AcquIsition
Access the Heart Rate Mode Display.
Heart Rate mode automatically begins recording
after a pre-programmed 10 second delay. The
ic
on will flash when the mode is active.
It
will continue to record:
* Unless you manually turn it off
* Unless it no longer receives a signal from the
chest strap
NOTE: When in the Heart Rate Mode you may:
* Press and Hold ▲ for 3 seconds to manually
Stop/Start the Sensor or
* Continue Holding ▲ to Start/Stop Timer or
* Continue holding ▲ to Start/Stop the
Logbook
Also you may:
* Press and Hold ▼ 3 seconds to manually
reset the current Screen or
* Continue Holding ▼ to reset the current
Session or
* Continue holding ▼ to reset the Timer
• Begin walking/running and it will record your
statistics
• Press ▲ to scroll through the statistics in the
top row of the display
• Press and Hold ▲
at any time to stop recording
• Hold ▼ 3 seconds to clear all recorded data
for that session
fig. 21
▼
With the Heart Rate Mode running:
• Press ▼ to toggle the Alerts ON/OFF
NOTE: The default Fitness Alert is pre-programed
and cannot be changed. In the Custom Alert you
set targets within a range of 40-239 bpm. on the
low end and 41- 240 bpm. on the upper end.
fig. 21
Page 19
7.6 Heart Rate Set Menus
The following 4 menus add supplemental functions
and controls to the Heart Rate Mode.
Save (menu 1)
Saves the current session into today's record. If the
previous session has NOT been saved, the software
will automatically save it into today's record at
midnight.
Access the Heart Rate Mode Display.
• Hold M 3 seconds to enter Heart Rate set menu
• Press M to select Save
* Press ▲ to save the current data OR
* Press ESC to cancel and return to Save
• Press ESC to exit Heart Rate set menu
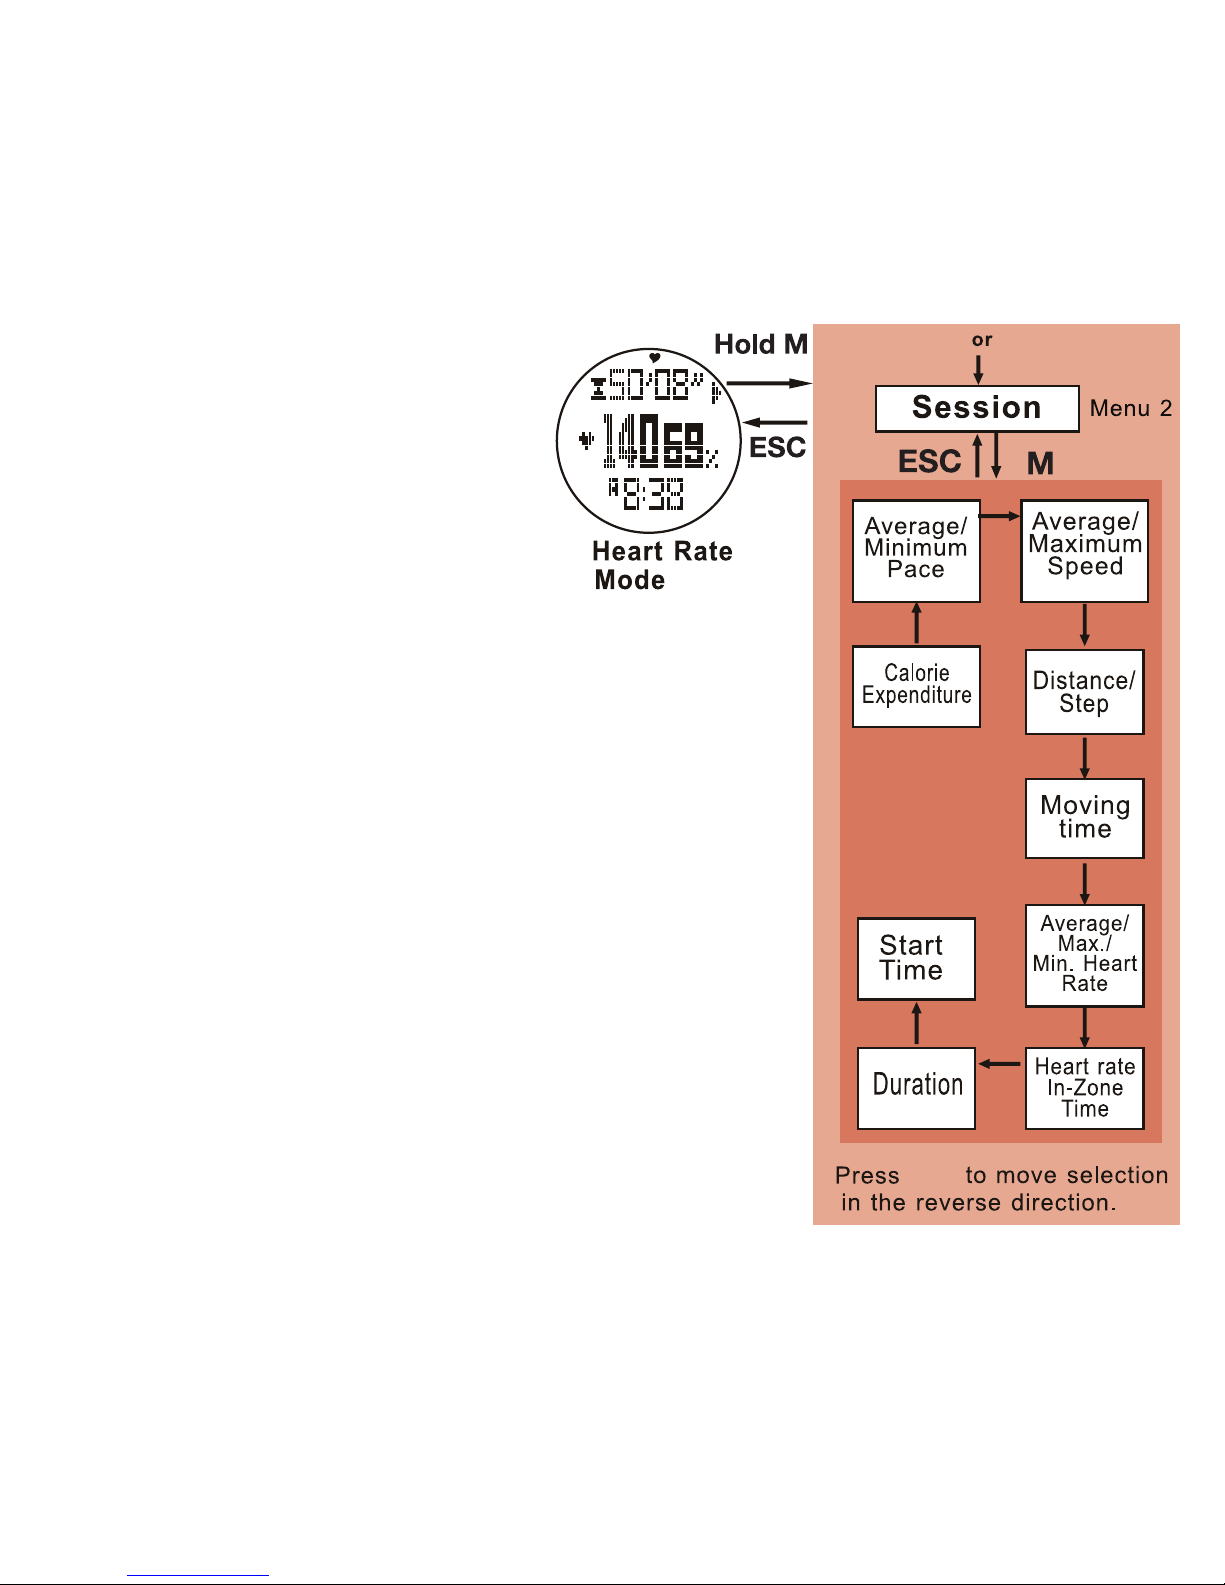
Session (menu 2)
Allows review of the 9 screens of collected data for
the current session. See fig. 22.
Access the Heart Rate Mode Display.
• Hold M for 3 seconds to enter Heart Rate set
menu
• Press ▼ to scroll to Session
• Press M to select the Session
* Press ▲ or ▼ to scroll through the collected
data
* Press ESC to exit the records
• Press ESC to exit Session
fig. 22
▼
▼ ▼
▼
▼
▼
▼
▼
▼
▲
▲
Page 20
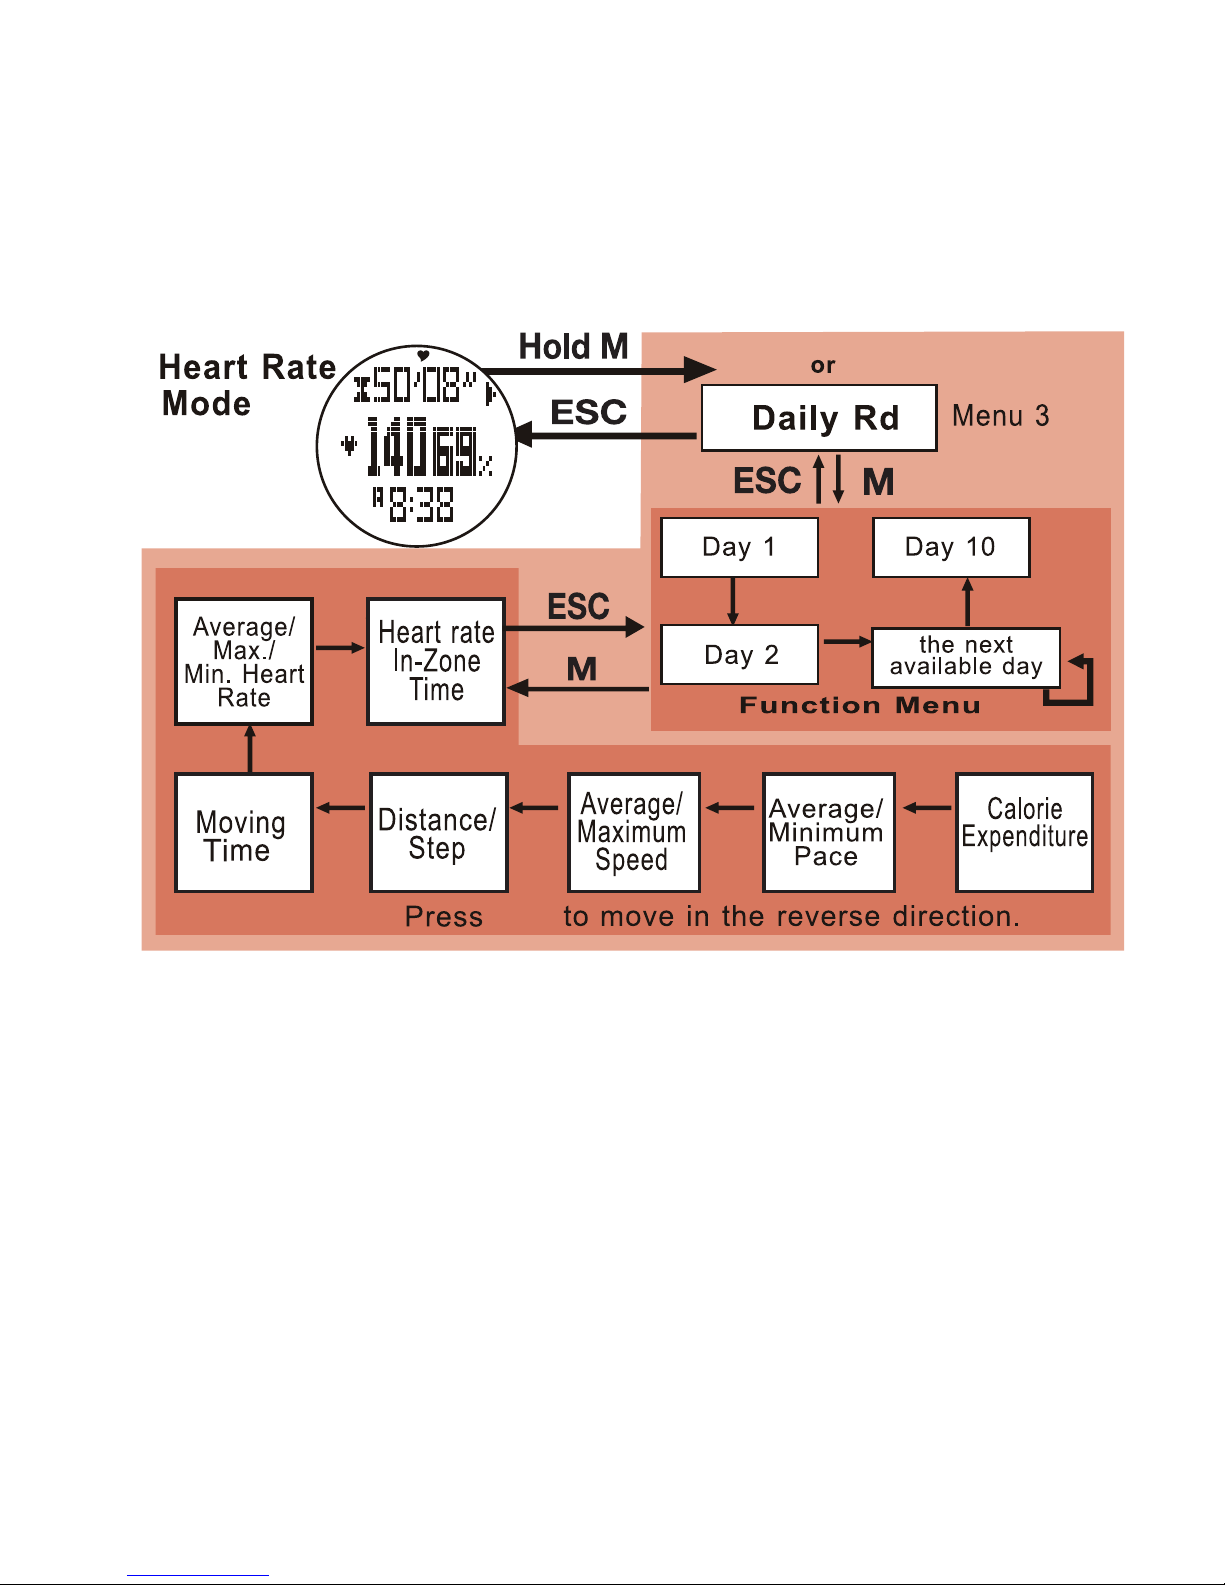
Daily Record (menu 3)
Provides a review of the 7 screens of collected data
for each day up to and including day 10.
See fig. 23.
Access the Heart Rate Mode Display.
• Hold M 3 seconds to enter Heart Rate set menu
• Press ▼ to scroll to Daily Record
• Press M to select the Daily record
* Press ▼ to scroll to the day
* Press M to access records
* Press ▲ or ▼ to scroll through the screens
* Press ESC to exit the records
* Press ESC to exit the day
• Press ESC to exit Daily Record
fig. 23
▲
▲
▼
▼
▼
▼
▼
▼▼▼▼
▼
▼
Page 21
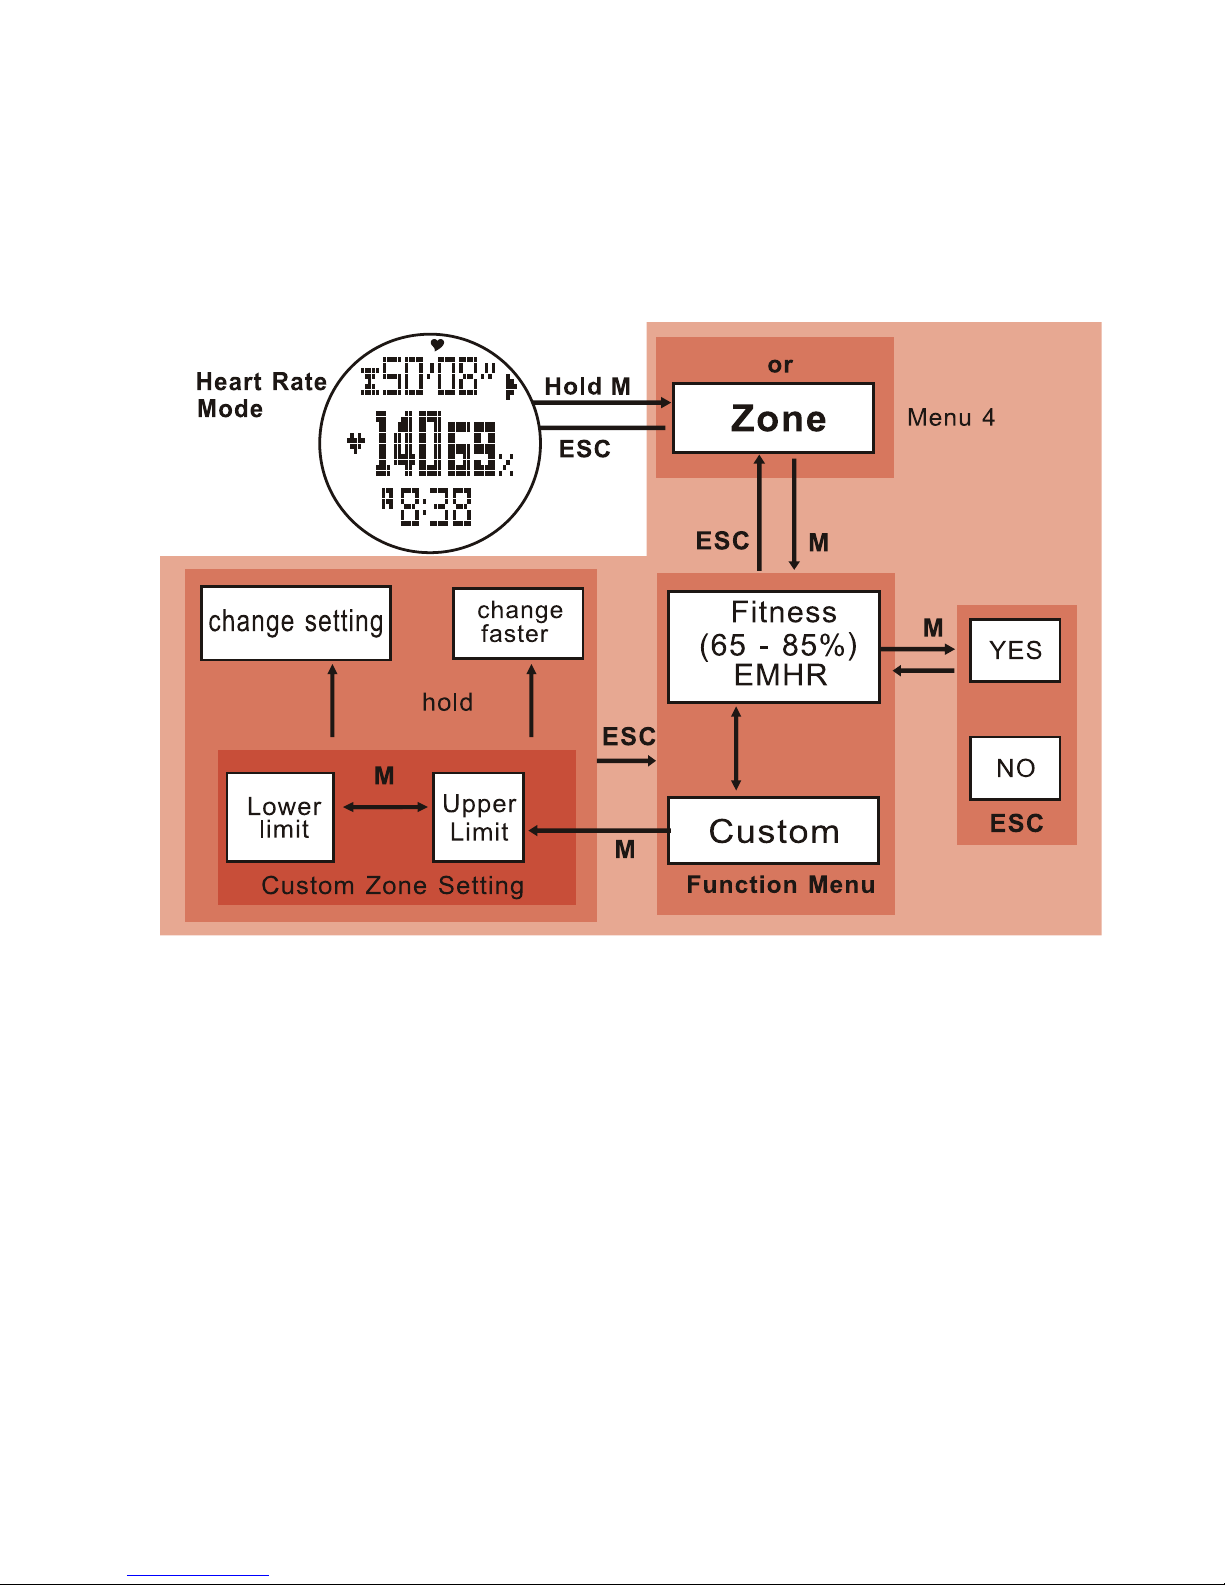
Zone (menu 4)
Allows you to establish and set upper and lower targets
for the zone alert. See fig. 24.
Access the Heart Rate Mode Display.
• Hold M 3 seconds to enter Heart Rate set menu
• Press ▼ to scroll to Zone
• Press M to select the Zone
* Press M to enter the menu
* Press ▲ or ▼ to scroll to Fitness
* Press M to select Fitness
* Press ▲ or ESC for YES / NO or
* Press ▲ or ▼ to scroll to Custom
* Press M to enter Custom
* Press ▲ or ▼ to change the value for upper limit
* Press M to confirm and to enter lower limit
* Press ▲ or ▼ to change the value for the lower
limit
* Press ESC to confirm and exit the setting
* Press ESC to confirm exit Custom
fig. 24
or
or
▲
▲
▲
▲
▼
▼
or
▲
▼
▼
Page 22
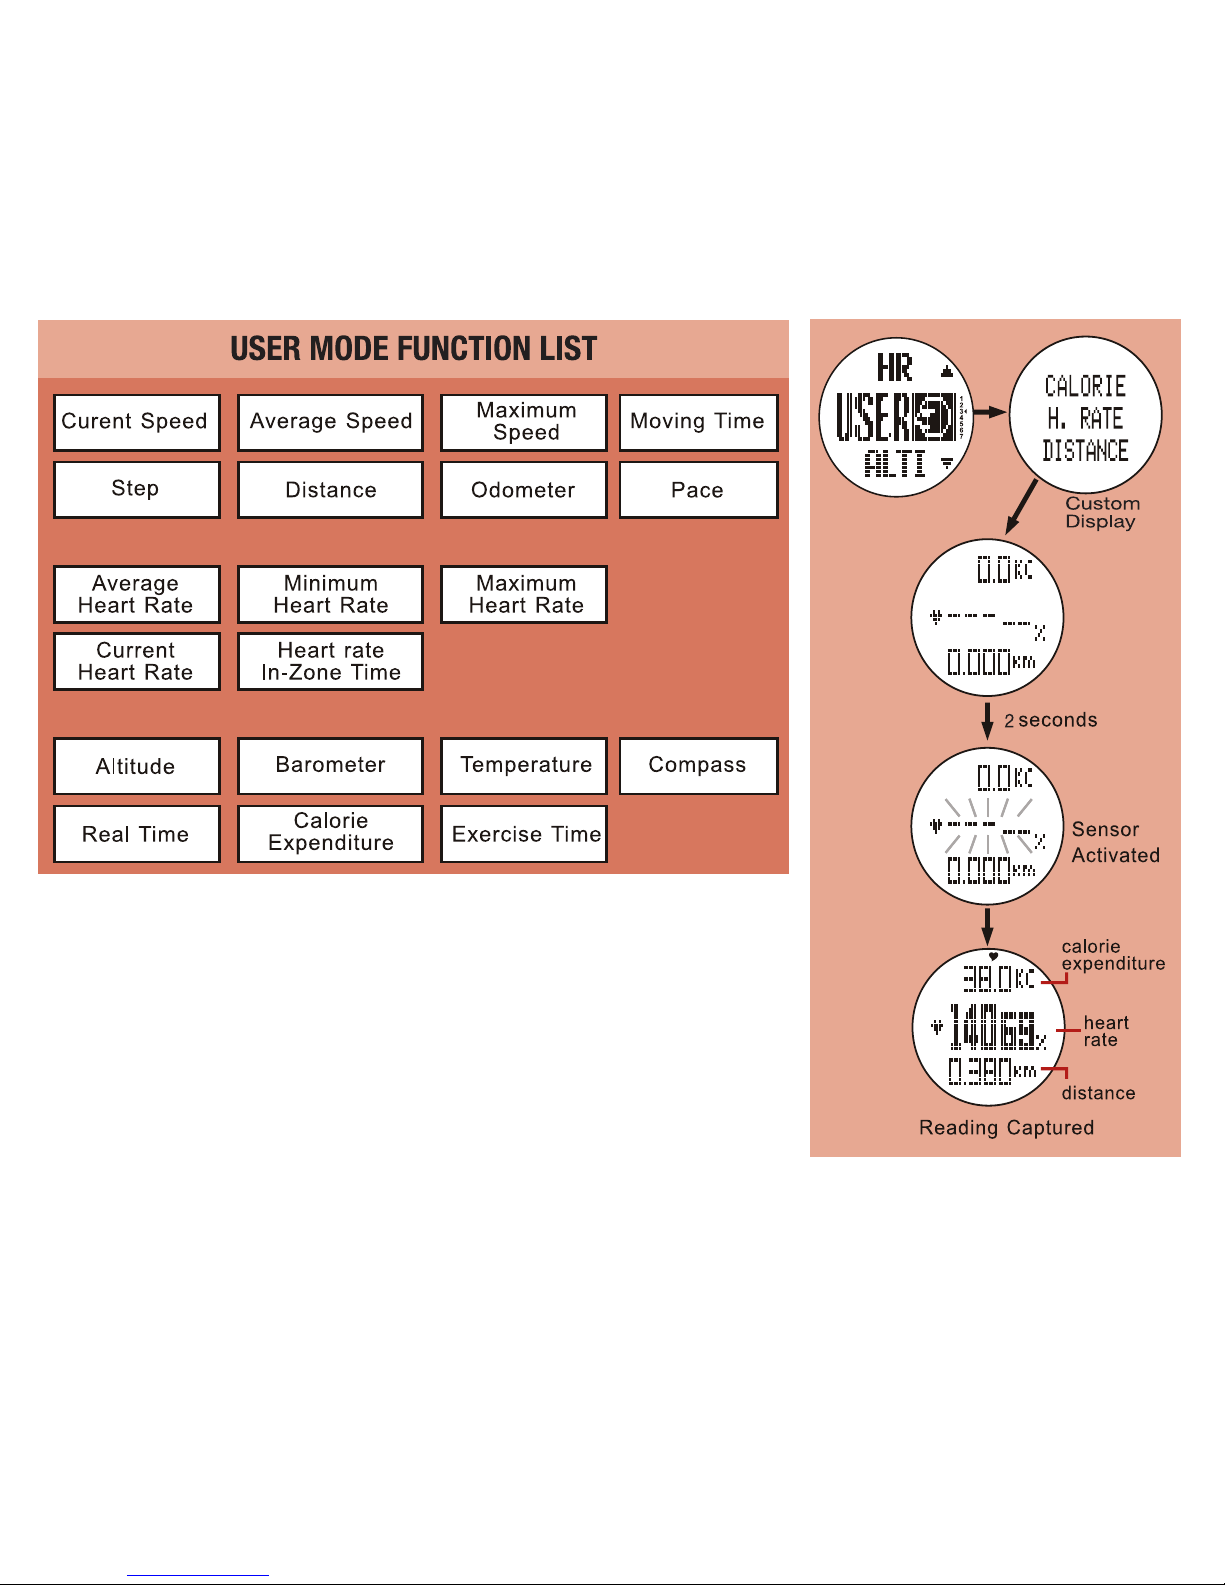
• Press ESC to exit Zone
8.0 USER MODE
The User Mode allows you to choose from the 20 selections on the chart to
create a custom display in the top, middle and bottom rows. See fig. 25.
Important: This mode functions with the chest strap.
See section 7 before you choose.
8.1 User Mode Display
A
ccess the User Mode Display. See fig. 26.
fig. 25
fig. 26
Page 23

8.2 User Mode Use
Access the User Mode Display.
User mode automatically begins recording after an
8 second delay.
Note: When in the User Mode you may:
* Press and Hold ▲ for 3 seconds to
manually Stop/Start the Sensor or
* Continue Holding ▲ to Start/Stop the Timer or
* Continue holding ▲ to Start/Stop the Logbook
Also you may:
* Press and Hold ▼ for 3 seconds to manually
reset the current Screen or
* Continue Holding ▼ to reset the current
Session or
* Continue holding ▼ to reset the Timer
• Begin walking or running and User Mode will start
measuring your exercise statistics
• Press ▲ to scroll and change the middle row of
the display
• Press ▼ to scroll and change the bottom row of
the display
• Press and Hold ▲ at any time to stop recording
• Hold ▼ for 3 seconds to clear all recorded
statistics for that session
• User Mode continues to measure exercise
statistics;
* Unless you turn it off
* Unless no movement is sensed for a period that
exceeds the sleep timer setting
* Until midnight, when the day’s exercise stats are
logged into memory and User mode turns off
8.3 User Mode Set Menus
The following 4 menus add supplemental functions
to the User mode.
Save (menu 1)
Saving the current data will add to any data saved
for that day and clear current statistics from User
Mode.
Access the User Mode Display.
• Hold M 3 seconds to enter User set menu
• Press M to select Save
* Press ▼ to save current recorded data, or
* Press ESC to cancel and return
• Press ESC to exit User set menu
Page 24
▼
▼
▼
▼
▼
▼▼
▼
▼
▲
▲
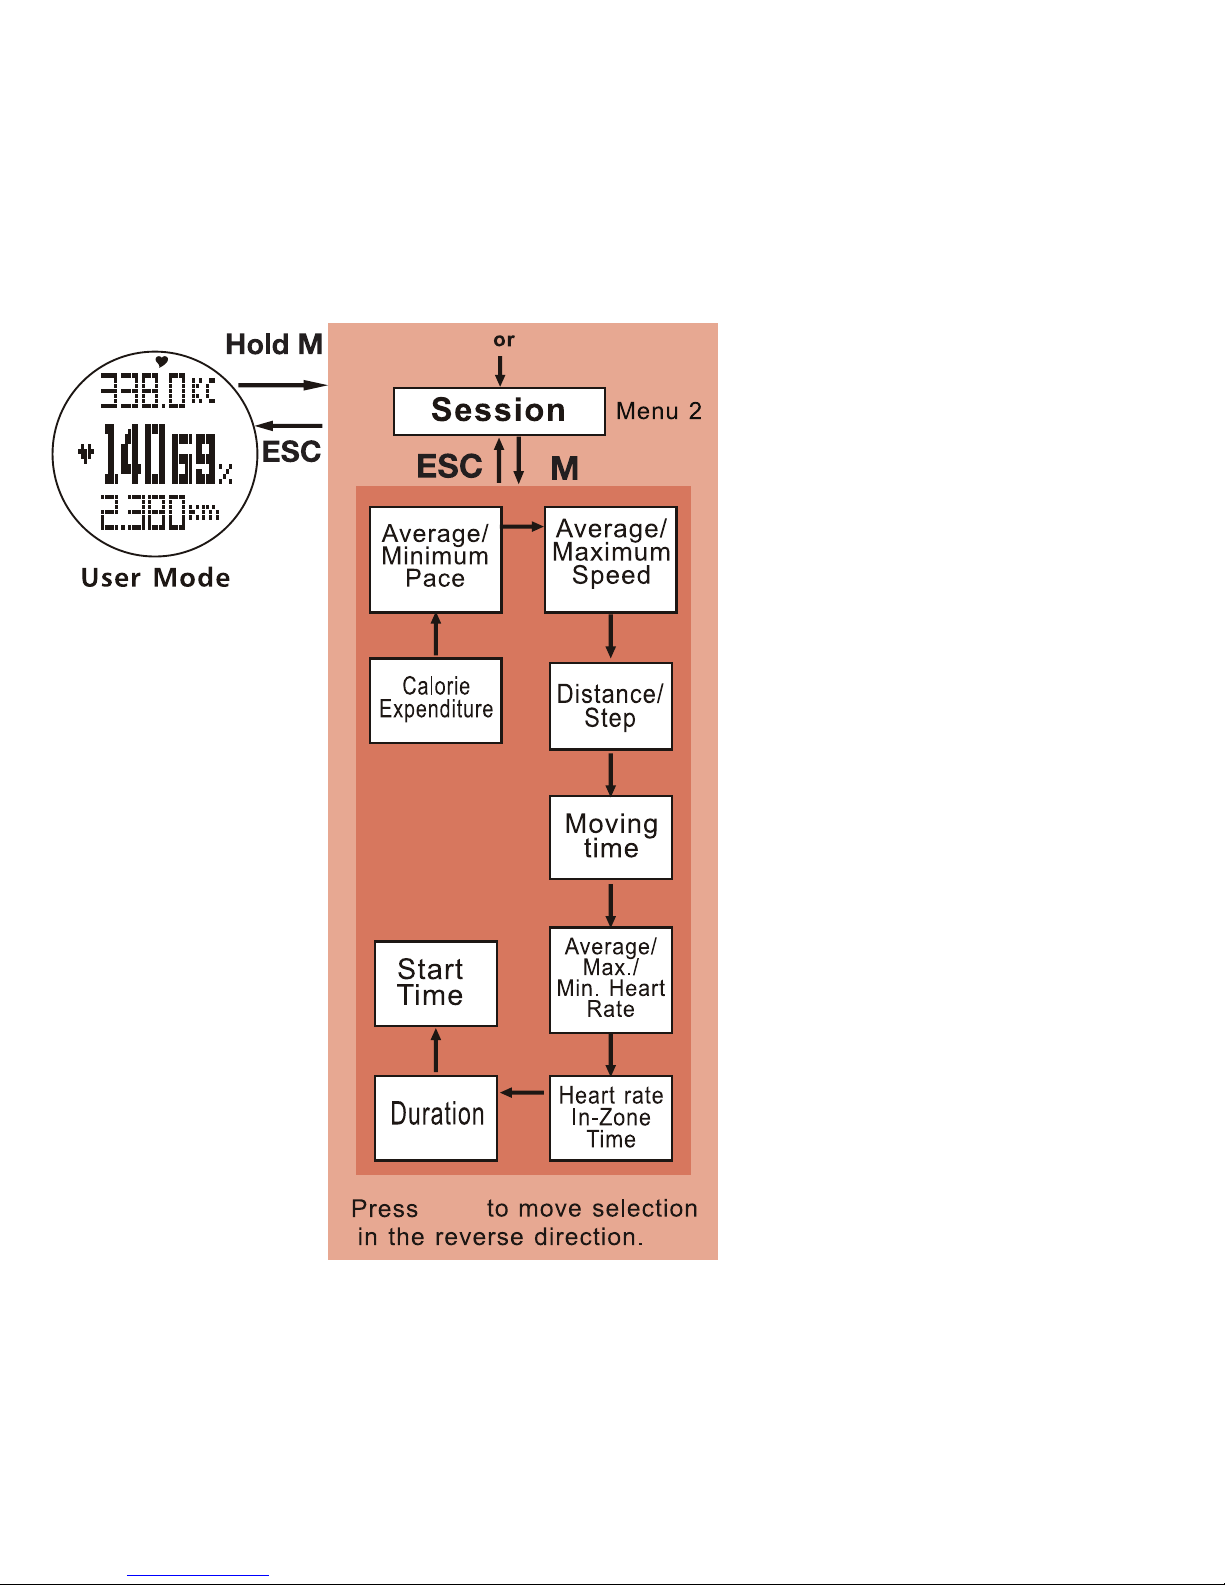
fig. 27
Session (menu 2)
Provides a review of the 9 screens of
collected statistical data for this current
session.
Access the User Mode Display.
• Hold M for 3 seconds to enter User
set menu
• Press ▼ to scroll to Session
• Press M to select the Session
* Press ▲ or ▼ to scroll through the
screens of collected data
* Press ▲ to reverse direction
* Press ESC to exit the records
* Press ESC to exit Session
• Press ESC to exit User set menu
See fig. 27.
Page 25
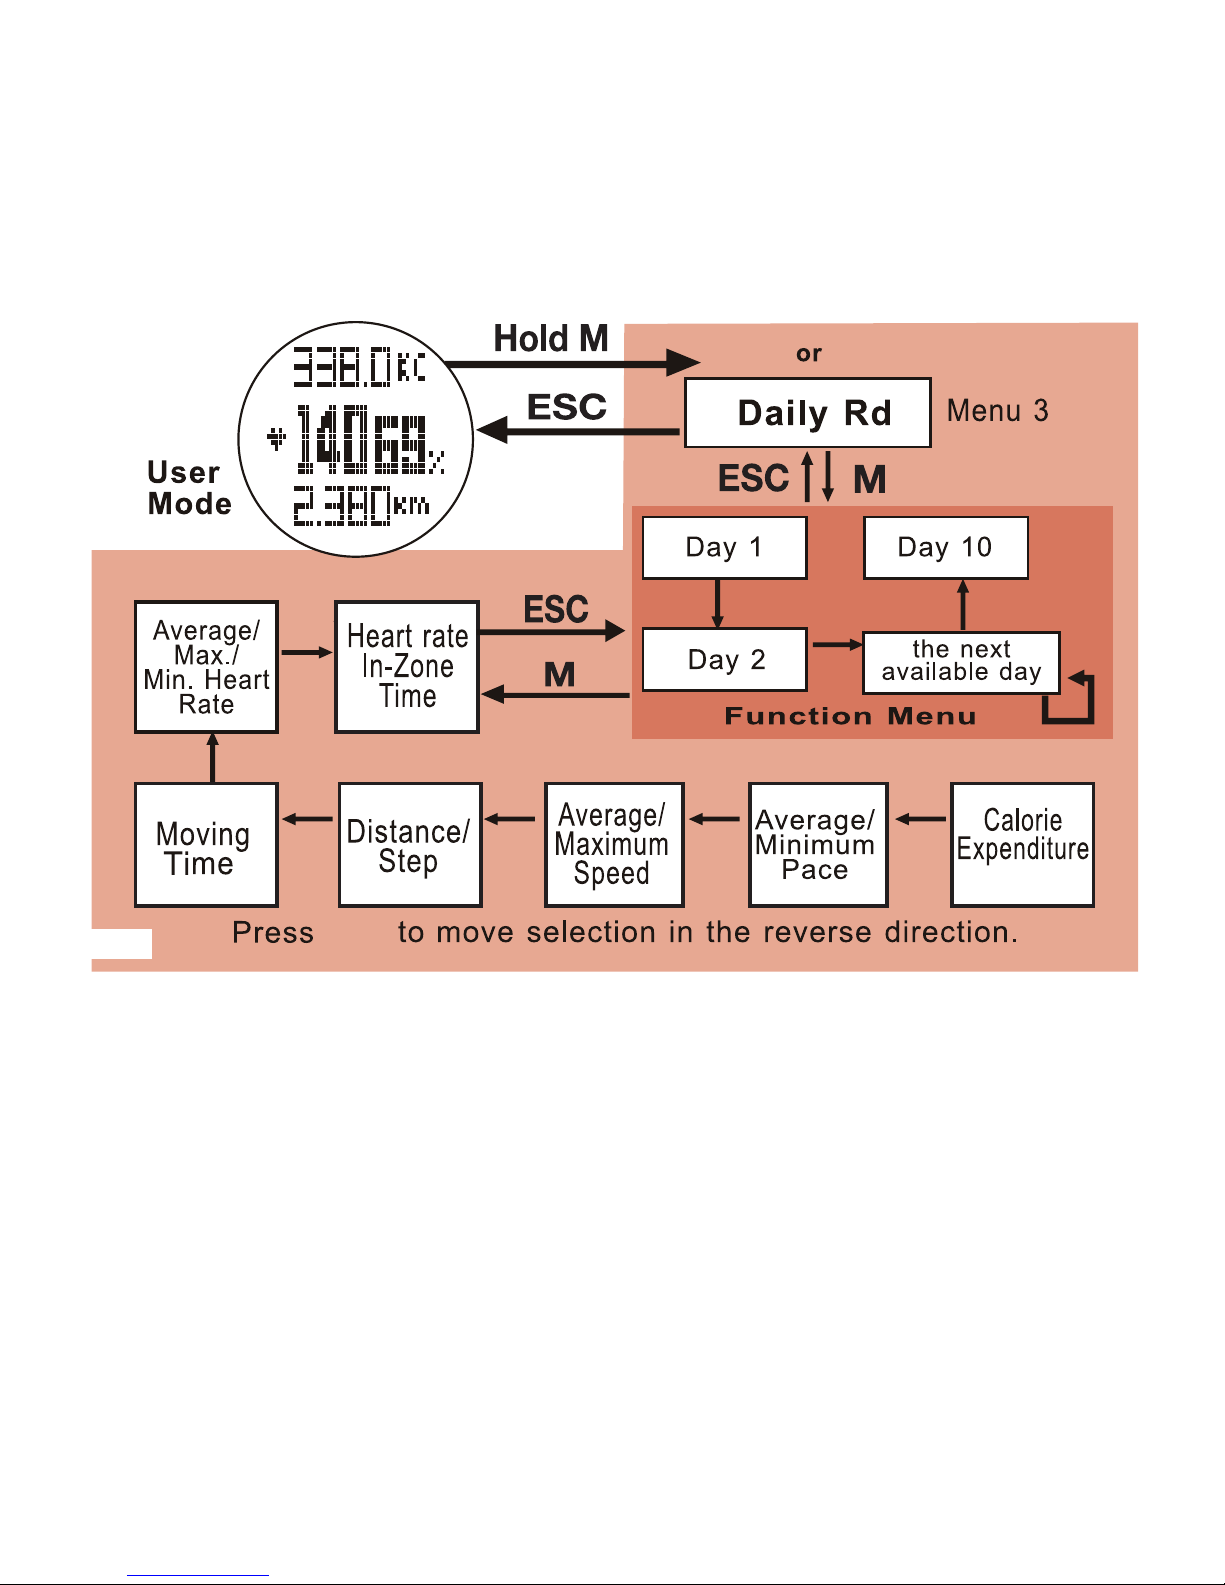
Daily Record (menu 3)
Provides a review of the 7 screens of collected statistics for each day up to and including day 10.
See fig. 28.
Access the User Mode Display.
• Hold M for 3 seconds to enter User set menu
• Press ▼ to scroll to Daily Record
• Press M to select the Daily record
▲
▲
▼
▼
▼
▼
▼
▼
▼
▼
▼ ▼ ▼
* Press ▼ to scroll to the review day
* Press M to access records
* Press ▲ or ▼ to scroll through the 7 screens
* Press ESC to exit the records
* Press ESC to exit the day
* Press ESC to exit Daily Record
• Press ESC to exit User menu
fig. 28
Page 26
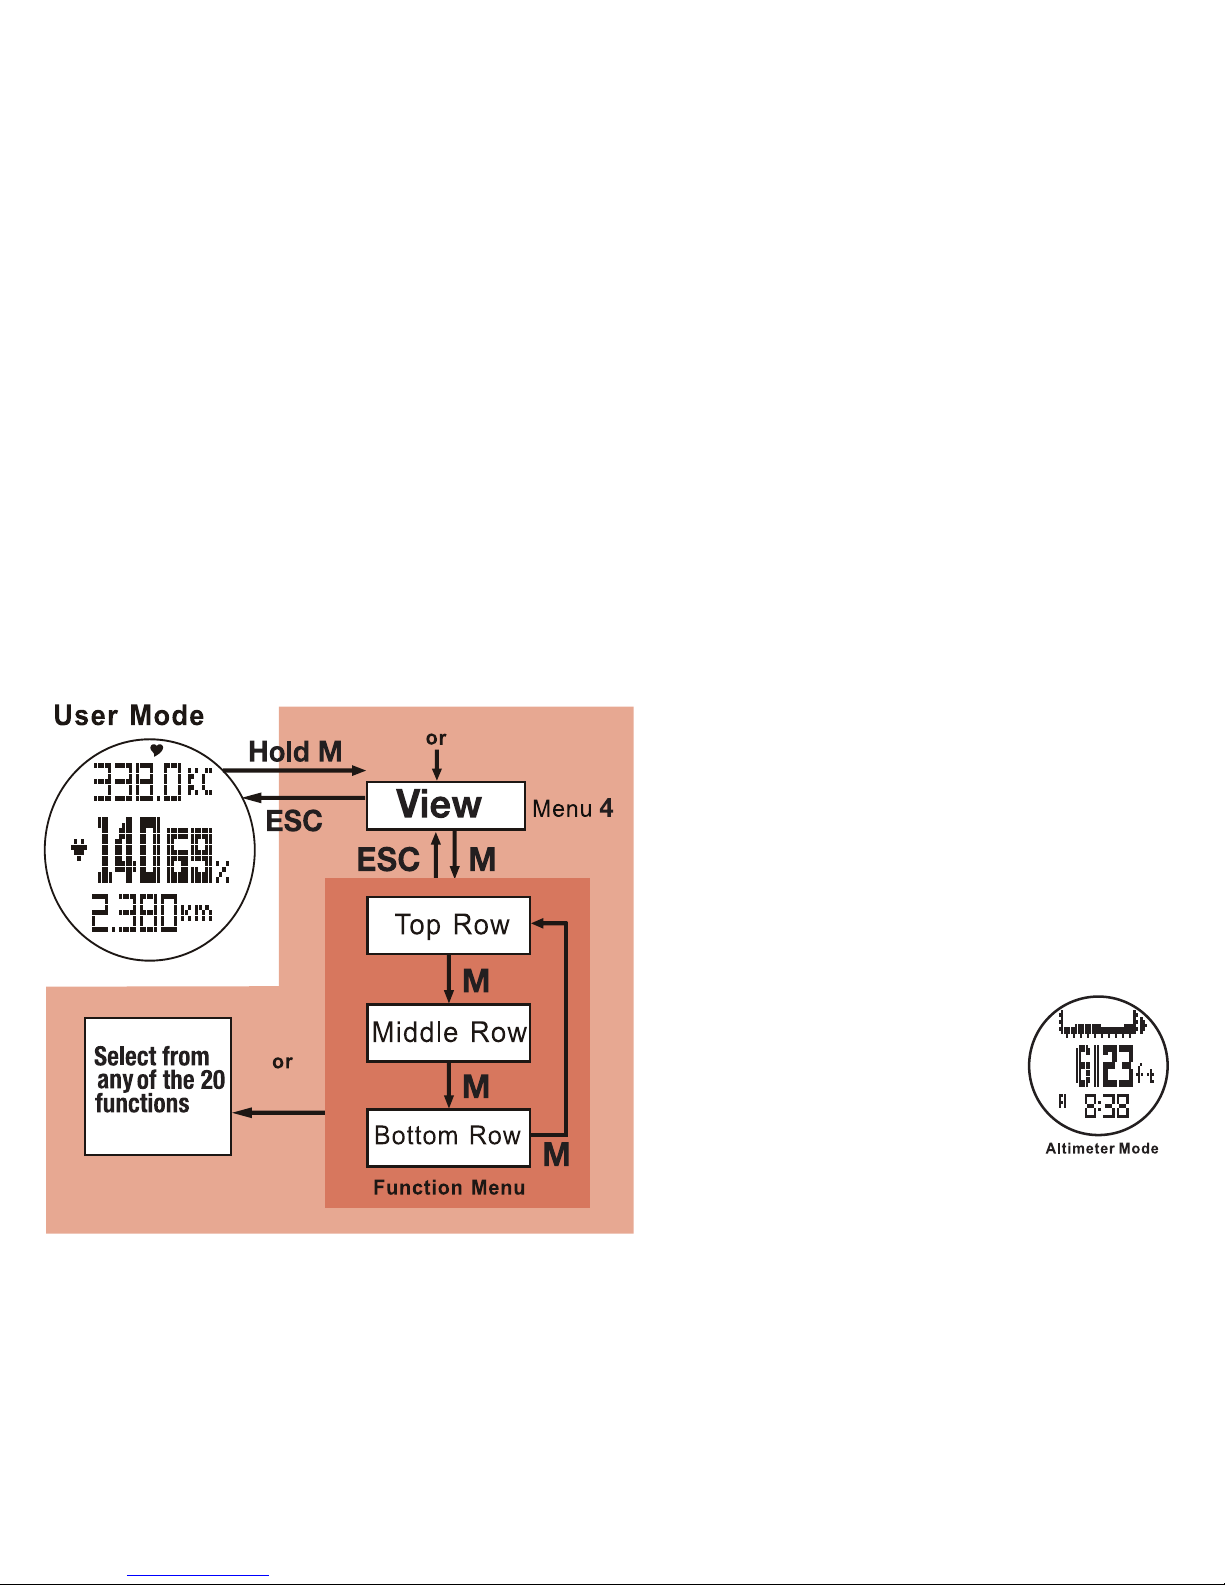
View (menu 4)
View mode allows you to choose exactly the information you want displayed in the three rows of User
mode. See fig. 25 for a list of choices.
Access the User Display
• Hold M for 3 seconds to enter User set menu
• Press ▼ to scroll to View
• Press M to select the View
* Press ▲ or ▼ to scroll and choose a function for
the top row
* Press M to confirm and move to middle row
* Press ▲ or ▼ to scroll and choose a function for
the middle row
*
Press M to confirm and move to bottom row
* Press ▲ or ▼ to scroll and choose a function for
the bottom row
• Press ESC to exit View set menu See fig. 29.
9.0 ALTIMETER MODE
The altimeter software uses an advanced pressure
sensor to determine altitude. There is a direct proportion between atmospheric pressure and altitude. The
benchmark sea level (0 elevation) has a pressure of
29.92 inHgl. At other altitudes, there is more or less
pressure. The pressure sensor measures atmospheric
pressure and then determines the proper altitude.
NOTE: Changes in weather create high and low
pressure events that can skew altitude readings.
This WILL OCCUR. When it does, you will need to
set a reference altitude. See section 9.2 or 10.0.
9.1 Altimeter Mode Display
Access the Altimeter Mode display See fig. 30
Display Features:
* Top Row: Altitude data change in altitude, total ascent,
total descent, altitude graph
and current temperature.
* Press ▲ to scroll through data
* Middle Row: Current Altitude
* Bottom Row: Current time
fig. 29
▼
▼
▲
▲
fig 30
Page 27
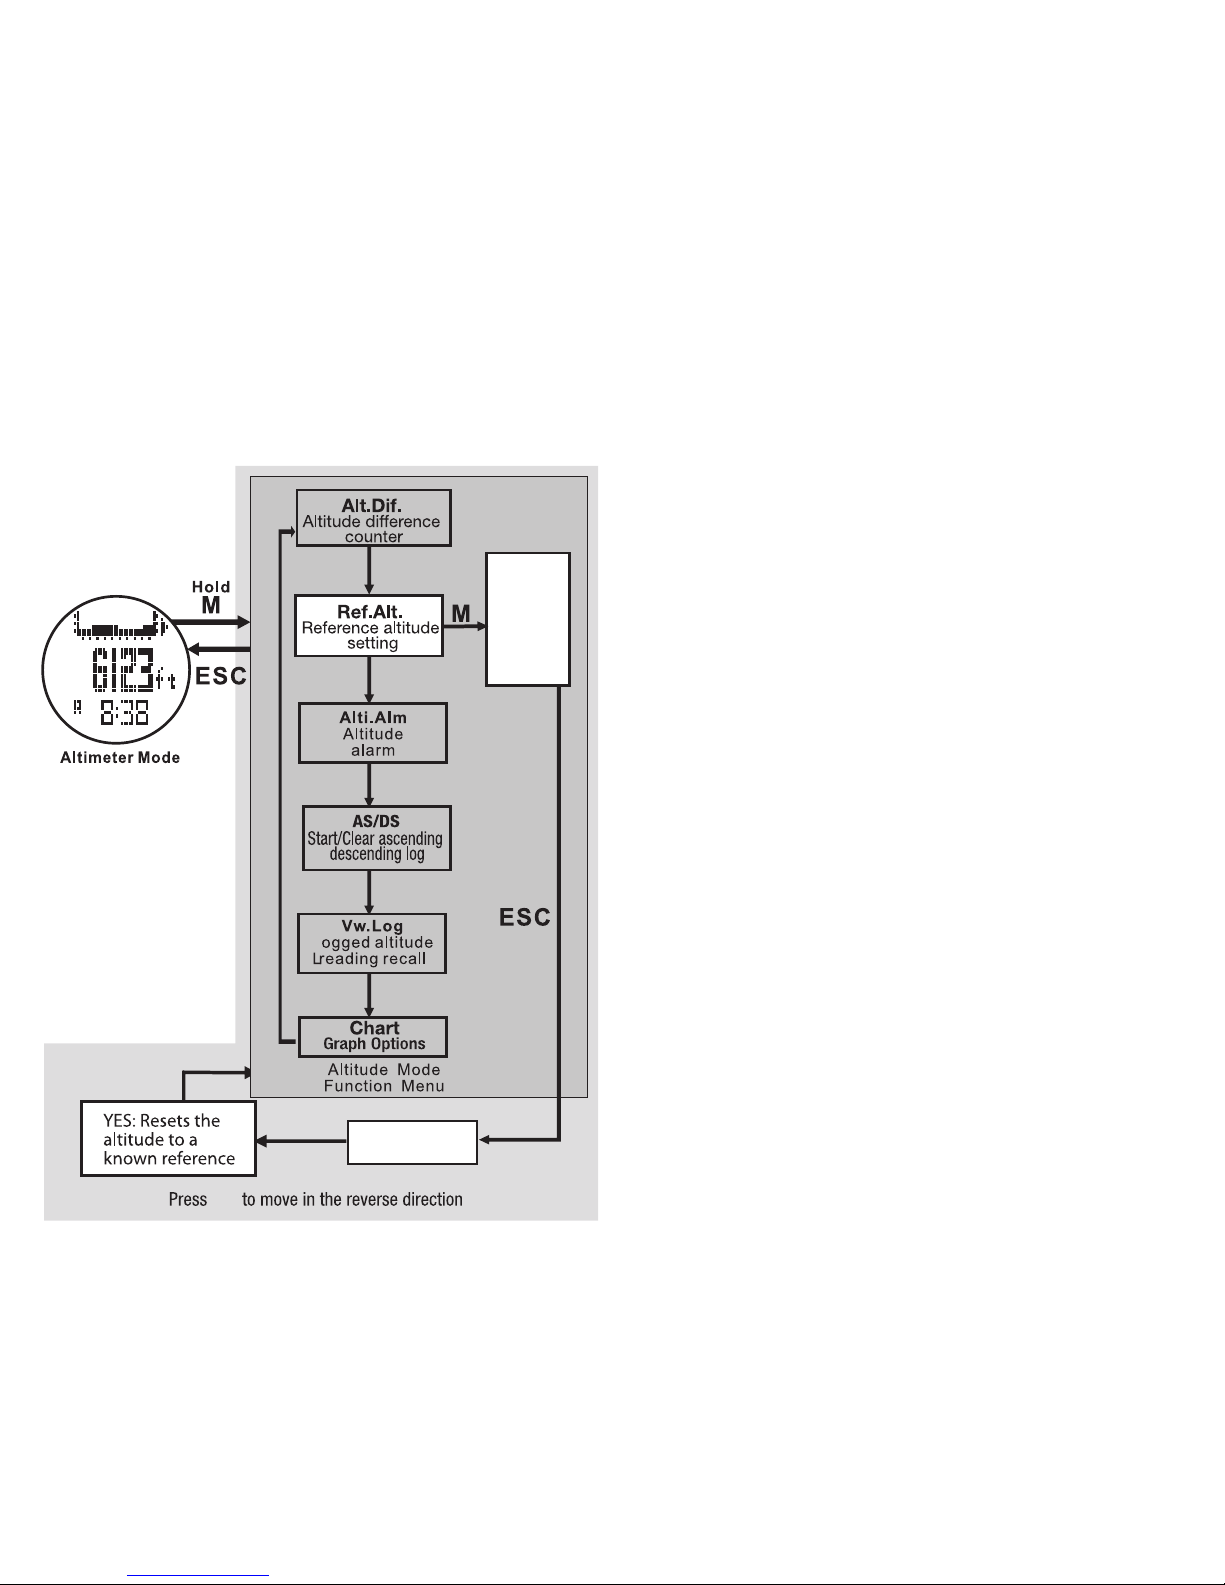
9.2 Set a Reference Altitude
Setting a reference altitude is key to ensuring accurate
readings. Changes in air pressure skew altimeter readings. Remedy this by setting a new, known reference
altitude. Whenever you set a reference altitude,
use a trusted source such as a topographical map,
trail head marker or summit sign for a benchmark.
See fig. 31.
Access the Altimeter Mode Display.
• Hold M for 3 seconds to enter Altimeter set menu
• Press ▼ to scroll to Ref. Alt.
• Press M to select Ref. Alt.
* Press ▲ or ▼ to adjust the reference altitude
to match a benchmark altitude
* Press ESC to go to No/Yes
* Press ▲ to confirm or
* Press ESC to cancel
• Press ESC to exit Altimeter set menu
9.3 Use the Altitude Difference Calculator
This feature allows you to measure the difference
in altitude from your current location to any other
point along your trek.
Access the Altimeter Mode Display.
• Hold M for 3 seconds to enter Altimeter set menu
• Press M to select Alt. Dif.
* Press ▲ to clear the Altitude Difference
calculator
The altitude difference calculator now uses your
current altitude as a benchmark to measure altitude
difference until it is reset or you:
* Press ESC to cancel and exit Alt. Dif.
fig 31
Confirmation
Yes/No
Decrease
Increase
▼
▼
▼
▼
▼
▼
▼
▲
▲
▲
Page 28

a steep 3000 ft. incline. To end your hike, you
descend 2500 ft. back your start. Your total
ascent is 3500 ft. and your total descent is 4000
ft. Together, they represent the total of vertical
travel.
Access the Altimeter Mode Display.
• Hold M 3 seconds to enter Altimeter set menu
• Press ▼ to scroll to AS/DS
• Press M to select AS/DS
* Press M to select Start
* Press ▼ to begin recording and exit Start
* Press ESC to cancel and exit AS/DS
• Press ESC to exit Altimeter set menu
The mountain icon will flash in Altimeter
Mode when AS/DS is on
9.5 Stop the AS/DS Calculator
Access the Altimeter Mode Display.
• Hold M for 3 seconds to enter Altimeter set menu
• Press ▼ to scroll to AS/DS
• Press M to select AS/DS
* Press M to select Stop
* Press ▲ to end recording and exit Stop
* Press ESC to cancel and exit AS/DS
• Press ESC to exit Altimeter set menu
Note: The Ascent/Descent calculator will turn off
if you exit Altimeter Mode and do not return
within 24 hours
* Press ESC to exit Altimeter set menu
• Press ▲ in the Altimeter Mode Display to
see the altitude difference calculator’s
measurements
NOTE: The altitude difference calculator is not
a measure of total ascent or descent but
strictly the net difference between the altitude
in which it was last cleared and the current
altitude.
Example: You clear the altitude difference
calculator at the beginning of a hike. The
altitude is 1000 ft. at the time it's cleared. Then
you descend 500 ft., after a mile you ascend
2000 ft. Later, you descend another 1000 ft.
to finish the hike. At this point, the altitude
difference calculator will read -500 ft. (the total
difference between the starting altitude = 1000
ft. and current altitude = 500 ft.) even though
you have ascended 2000 ft and descended
1500 ft.
9.4 Start the Ascent / Descent Calculator
The watch has an auto ascent and descent
calculator that keeps track of the total vertical
distance you have ascended and descended. This
measures all vertical travel, not just the difference
between two points.
Example: In the course of a day hike, you ascend
500 ft. and descend 1500 ft. You then scale
Page 29

9.6 Clear the AS/DS Calculator
Access the Altimeter Mode Display.
• Hold M 3 seconds to enter Altimeter set menu
• Press ▼ to scroll to AS/DS
* Press ▼ to scroll to Clear
* Press M to select Clear
* Press ▲ to empty the ascent/descent calculator and
exit Clear
* Press ESC to exit AS/DS
• Press ESC to exit Altimeter set menu
9.7 Set an Altitude Alarm
Access the Altimeter Mode Display.
• Hold M 3 seconds to enter Altimeter set menu
• Press ▼ to scroll to Alt. Alm.
• Press M to select Alt. Alm.
* Press ▲ to toggle between the two altitude alarms
* Press ▼ to toggle altitude alarm ON/OFF
• Hold M 3 seconds to enter an alarm altitude
* Press ▲ or ▼ to adjust the alarm
* Press M to confirm
* Press ▲ to toggle between Alt. Dif and Cur. Alt.
* Alt. Dif. will sound the alarm when the altitude
difference calculator exceeds or drops below the
alarm value
* Cur. Alt. will sound when the current altitude
exceeds or drops below the alarm value
* Press ESC to confirm
* Press ESC to cancel and exit Alt Alm
• Press ESC to exit Altimeter set menu
NOTE: The altitude alarm will not sound if you exit the
Altimeter Mode
9.8 View the Altimeter Log Book
The altimeter contains a logbook that tracks maximum
and minimum altitude readings over the past 48 hours,
as well as, an every hour on the hour, time stamped
altitude reading for the past 48 hours.
Access the Altimeter Mode Display.
• Hold M 3 seconds to enter Altimeter set menu
• Press ▼ to scroll to Vw. Log
• Press M to select Vw. Log
* Press ▲ or ▼ to view the maximum and minimum
altitudes and when the measurement occurred
* Press M to view a graphical history of the previous
48 hours
* Press ▲ or ▼ to scroll through time/altitude
records with corresponding graphic display
* Press ESC to exit the graphical history
* Press ESC to exit Vw. Log
• Press ESC to exit Altimeter set menu
9.9 Altimeter Graph Display
The chart displays logged readings two ways:
• Daily Chart - shows the logged readings for the
current day only. The first reading [ AM 12:00 ] is
shown in column 30, the second [ AM 1:00 ] is in
column 29 and the remaining readings for the day
follow in the same manner
• History Chart - shows continuously logged readings
in a "first in first out" structure. The latest reading is
Page 30
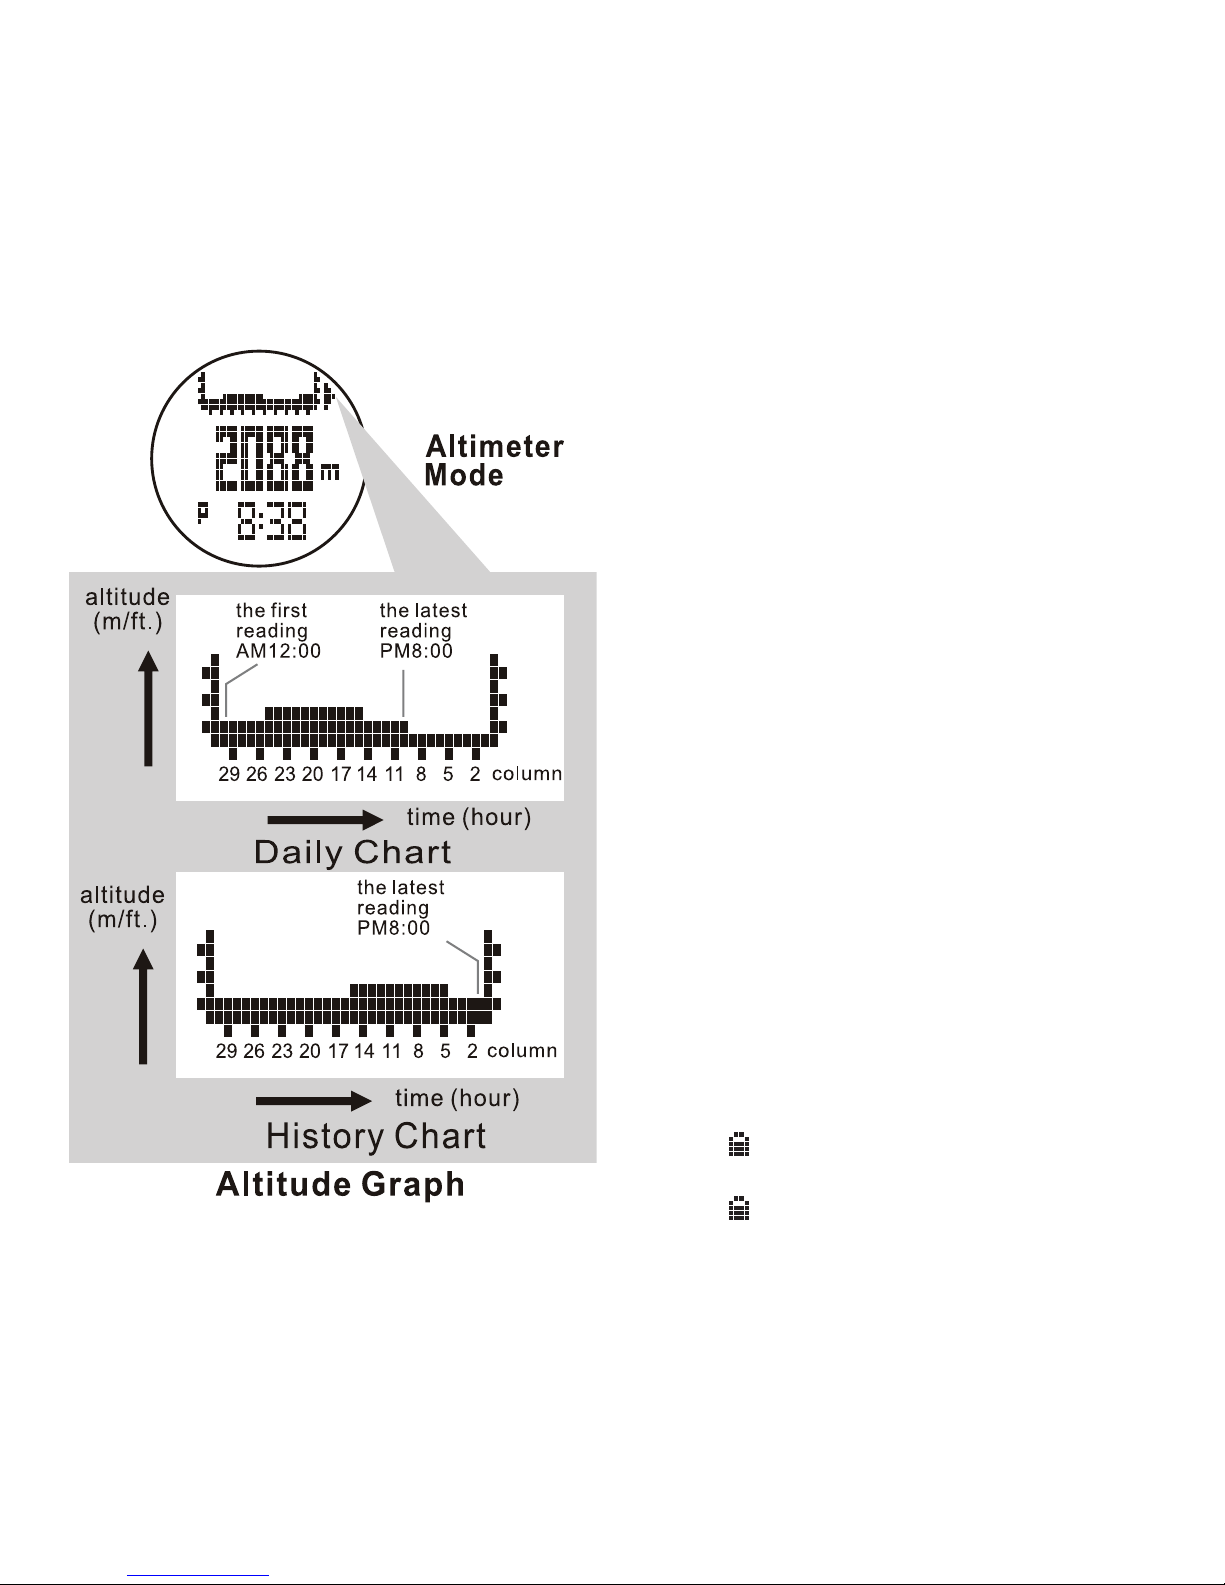
in the 1st column, the next latest reading is in the
2nd column and all other readings follow in the
same manner. See fig. 32.
To Access the Altimeter Mode Display.
• Hold M 3 seconds to enter Altimeter set menu
• Press ▼ to scroll to Chart
• Press M to select Chart
* Press ▲ to toggle between Daily and History
* Select Daily to view the 24 hour altitude graph or
* Select History to view the continually rolling 48
hour altitude graph
* Press ESC to confirm and exit Chart
• Press ESC to exit Altimeter set menu
9.10 Switch Between Meters & Feet
Access the Altimeter Mode Display.
• Press ▼ to change the units between ft /m
9.11 Lock the Altimeter
The altimeter lock feature is useful when you have a
set reference altitude that you do not want changed
due to changing weather, such as, at base camp before a hike the next morning, when changing weather
could skew your base camp altitude overnight.
Access the Altimeter Mode Display.
• Hold ▼ 3 seconds to lock the altimeter. The lock
icon will display
• Hold ▼ 3 seconds to unlock the altimeter. The lock
icon will disappear
fig. 32
Page 31
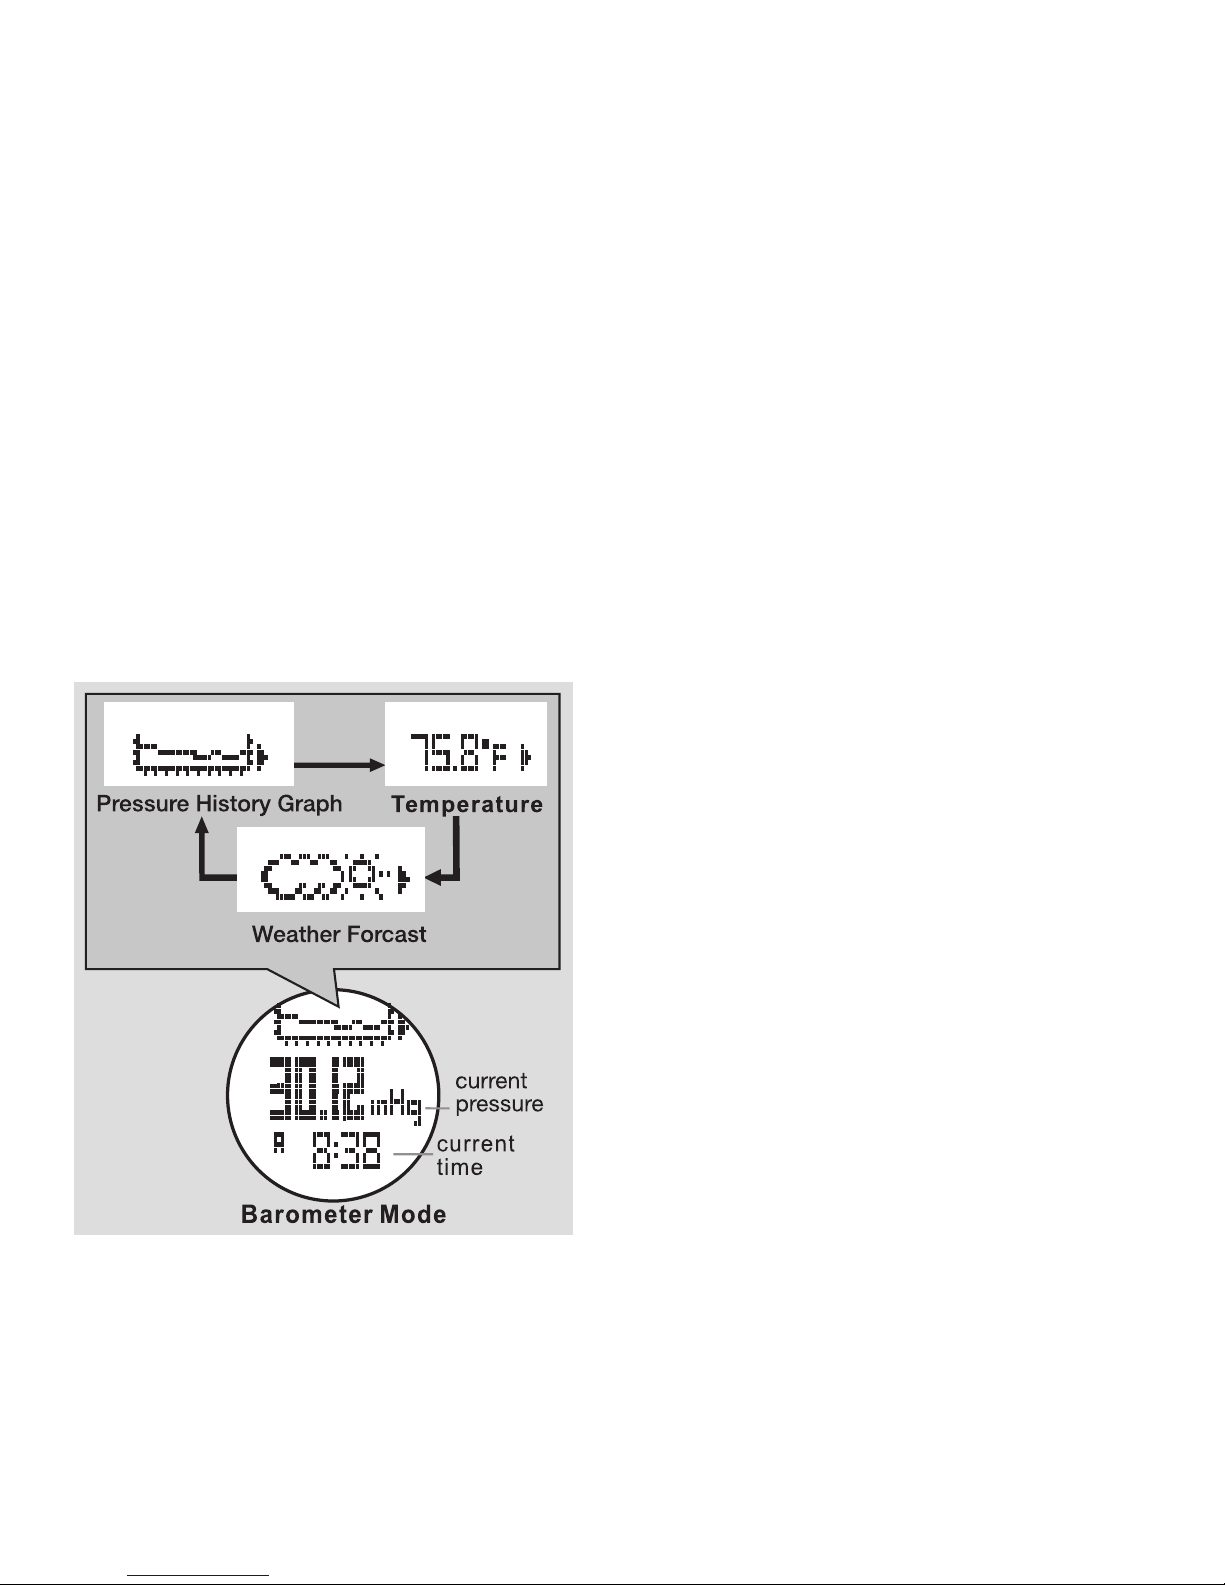
10.0 BAROMETER MODE
The barometer measures atmospheric pressure that
is used to forecast changing weather. High pressure is
associated with clear skies. Low pressure is associated
with cloudy skies and/or wet weather. See fig. 33.
Important: Adjustments made to Sea Level Pressure
and/or Current Pressure are rarely necessary and
not recommended. If you choose to adjust these
settings, be sure your changes are from a trusted
source located in exactly the same area that the
barometer will be used.
10.1 Barometer Display
Access Barometer Mode Display.
Display Features:
* Top Row: Press ▲ to scroll through pressure
history graph, current temperature and
weather forecaster
* Middle Row: Current Pressure
* Bottom Row: Current time
NOTE: Our forecasting system uses atmospheric
pressure to predict weather. Changes in
altitude also affect air pressure and will skew
the system’s accuracy. Weather forecasts will
be most accurate when you maintain a stable
altitude for several hours.
10.2 Barometer Setting Menu
Allows you to change the sea level pressure and/
or current local pressure.
Caution: Before you re-calibrate the Barometer,
you must obtain the absolutely accurate
pressure of your current position from a
reliable source. Because, it is this pressure
that will be entered into memory. Incorrect
pressure values entered in calibration will
result in incorrect pressure readings.
See fig. 34 on the next page.
fig. 33
▲▲
▲
Page 32
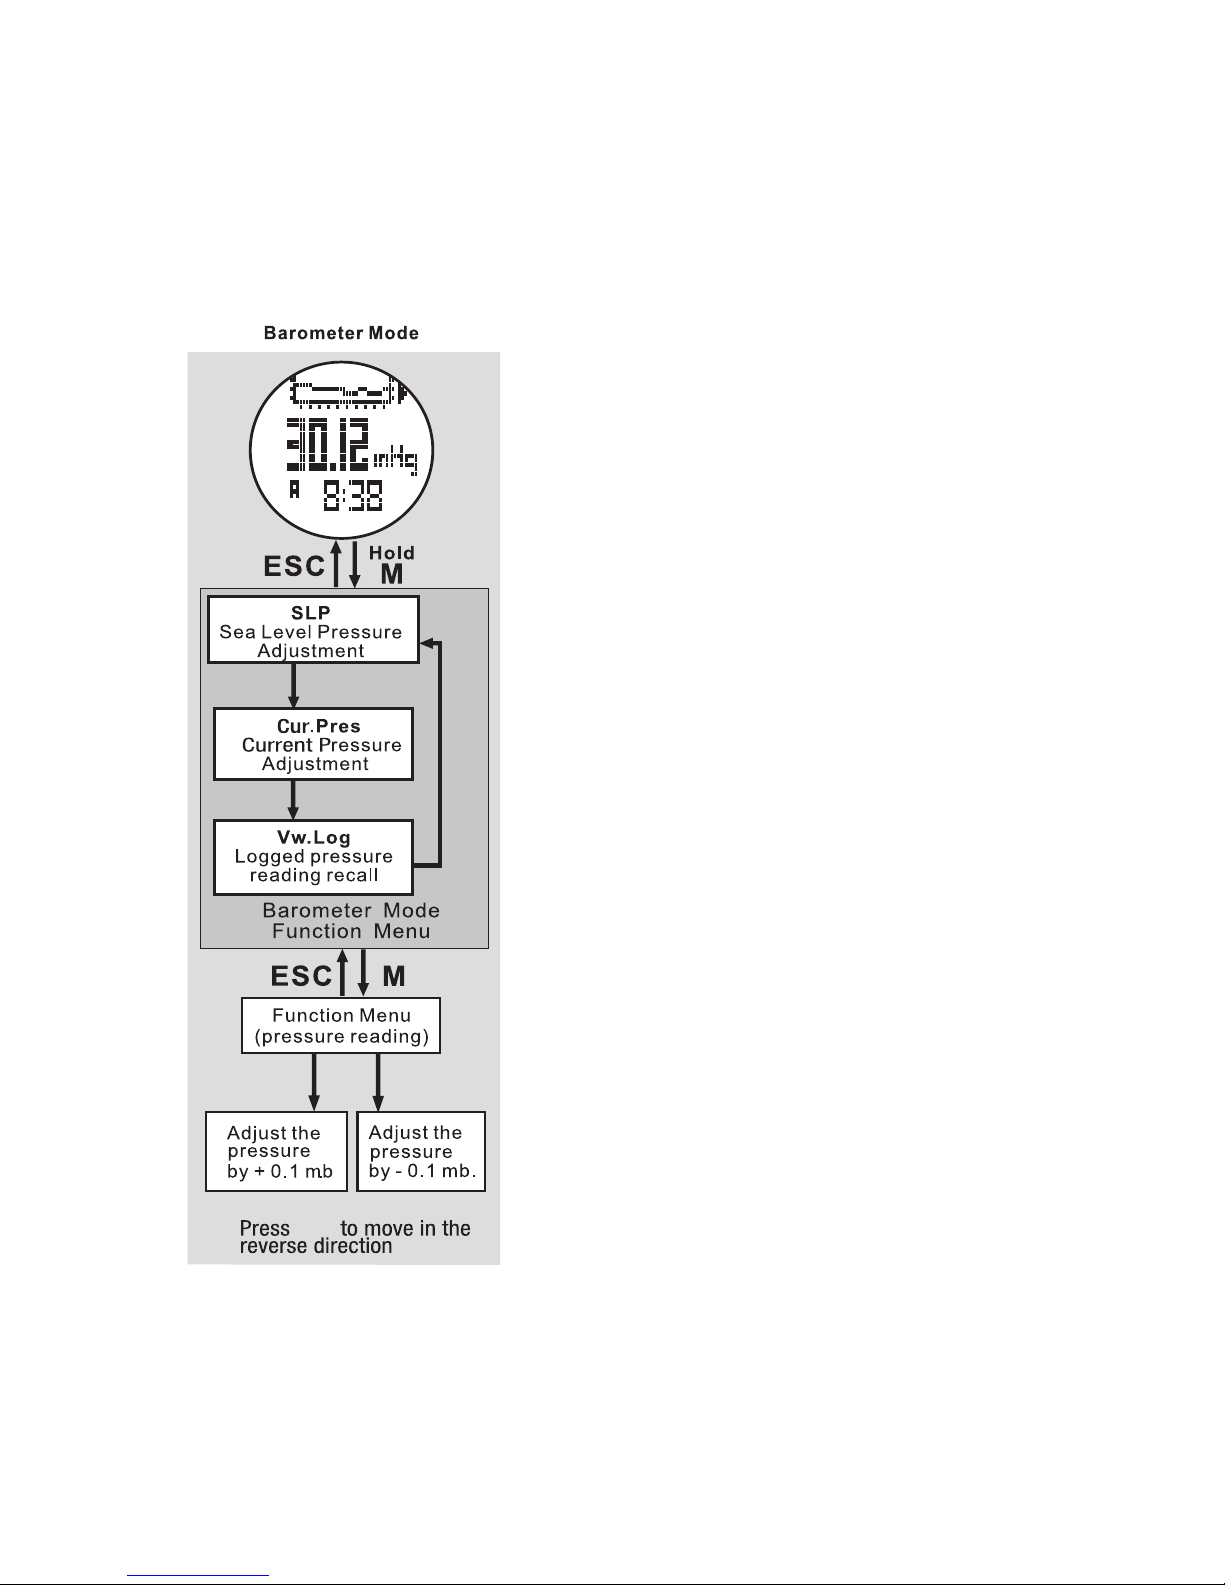
Sea Level Pressure
Access the Barometer Mode Display.
• Hold M 3 seconds to enter Barometer set menu
• Press M to select SLP
* Press ▲ or ▼ to adjust the Seal Level Pressure to
match your current, known Sea Level Pressure
* Press ESC to confirm and exit SLP
• Press ESC to exit Barometer set menu
Current Local Pressure
Access the Barometer Mode Display.
• Hold M 3 seconds to enter Barometer set menu
• Press ▼ to scroll to Cur. Pres.
• Press M to select Cur. Pres.
* Press ▲ or ▼ to adjust the pressure to match your
current, known pressure
* Press ESC to confirm and exit Cur. Pres.
• Press ESC to exit Barometer set menu
View Log
The Barometer contains a logbook that tracks the
maximum & minimum pressure and temperature readings over the last 48 hours, as well as, an hourly time
stamped altitude reading for the past 48 hours.
Access the Barometer Display.
• Hold M for 3 seconds to enter Barometer set menu
• Press ▼ to scroll to Vw. Log
• Press M to select Vw. Log
* Press ▲ or ▼ to view the:
- maximum and minimum pressures, and
▲
▲
▼
▼
▼
▼
fig. 34
Page 33

- maximum and minimum temperatures, and
- time the measurement occurred
* Press M to view a graphical history of the
previous 48 hours’ pressure measurements
* Press ▲ or ▼ to scroll through the time/
pressure records
* Press ESC to exit the graph history
* Press ESC to exit Vw. Log.
• Press ESC to exit Barometer set menu
10.3 Change Units of Measure
Access the Barometer Mode Display.
With the temperature on the top row of the display,
• Press and Hold ▲ to toggle between F˚ / C˚
• Press ▼ to change inHG, mb, and hPA
11.0 COMPASS MODE
The digital compass provides check of your direction. To obtain the most accurate compass bearing,
be sure to calibrate the compass often. Make sure
that you are not using it near a magnetic field.
11.1 Compass Display
Access Compass Mode. See fig. 35.
Display Features:
Center: Heading degree and
cardinal direction
Outer Ring: Magnetic North
indicator
11.2 Compass Use
Keep the watch parallel to the horizon. The compass
reading will flash if there is any distortion. Be sure
that the watch is away from magnets and objects or
appliances that contain magnets such as speakers,
motors and cell phones.
Calibrate the compass often, especially when:
* You are using the watch for the first time
* You have recently replaced the battery
* Bearing reading is flashing
* Your angle of declination has changed
11.3 Compass Idle Refresh
To conserve battery power, the compass will go idle
(sleep mode) 1 minute after use.
• Press ▲ or ▼ to wake the compass
11.4 Take a Reverse Bearing
The compass provides a reverse bearing for a distant
landmark. This bearing is the exact 180° opposite of
a forward bearing. Reverse bearings are useful for
orienteering exercises such as the triangulation used
to determine your whereabouts in the wild.
Access the Compass Display.
• Press ▲ to obtain a reverse bearing
• Press ▲ again to return to normal bearing
11.5 Lock the Compass Bearing
The compass allows you to lock a bearing. Once the
lock is activated, the compass no longer displays an
fig. 35
Direction of travel
Page 34
adjusted bearing based on change of direction. It
only displays the locked bearing.
Access the Compass Mode Display.
• Press ▼ to lock the current compass bearing
• Press ▼ again to unlock the compass bearing
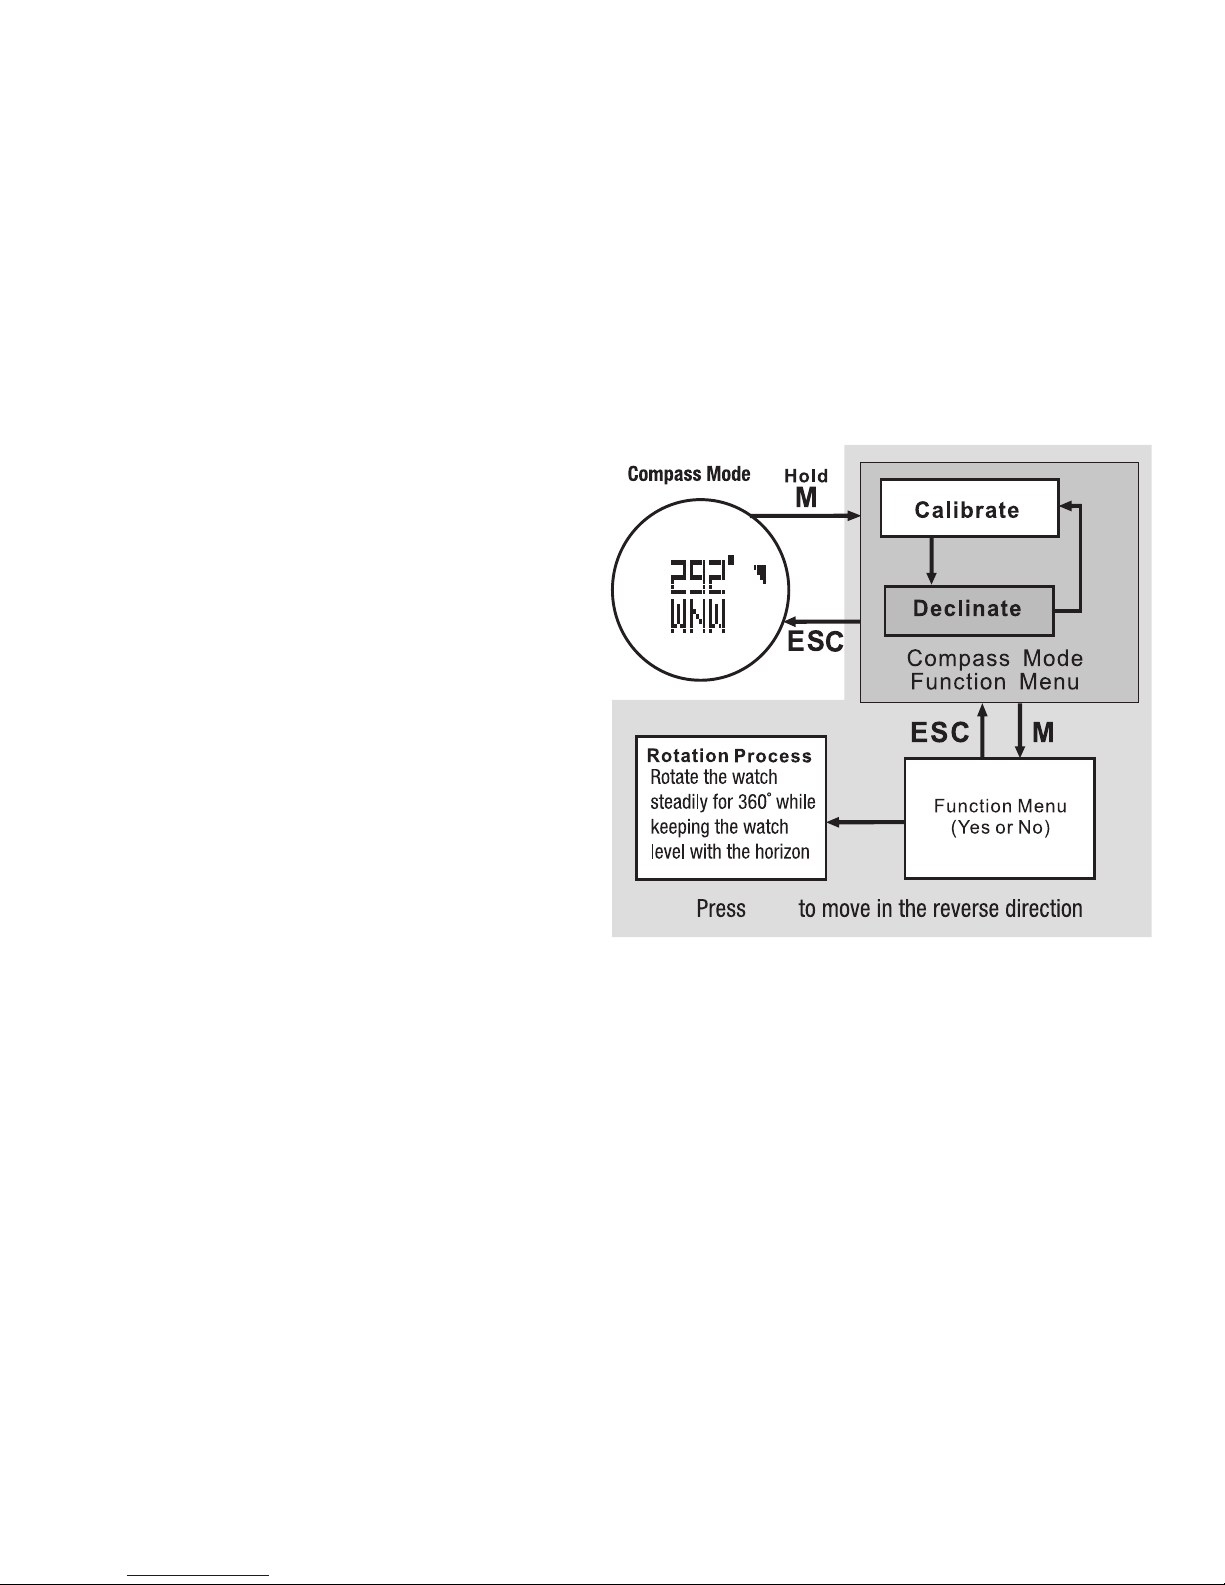
11.6 Calibrate the Compass
See fig. 36.
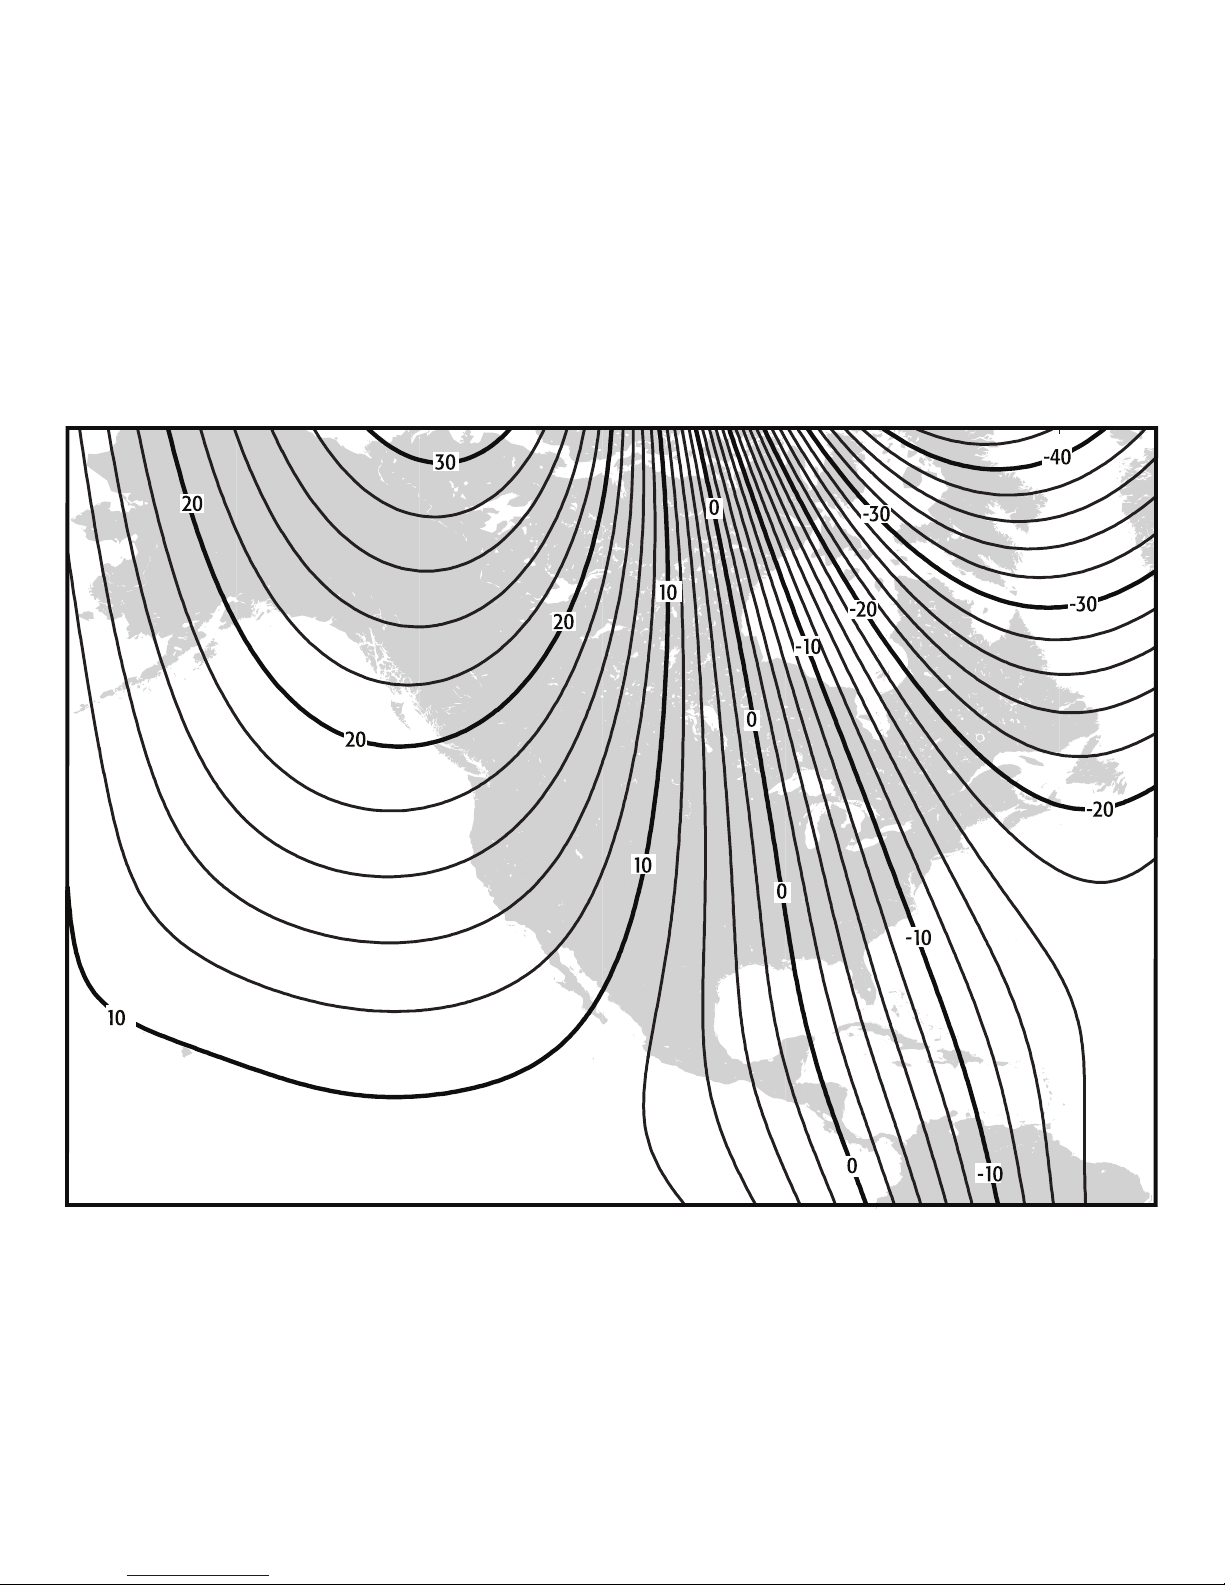
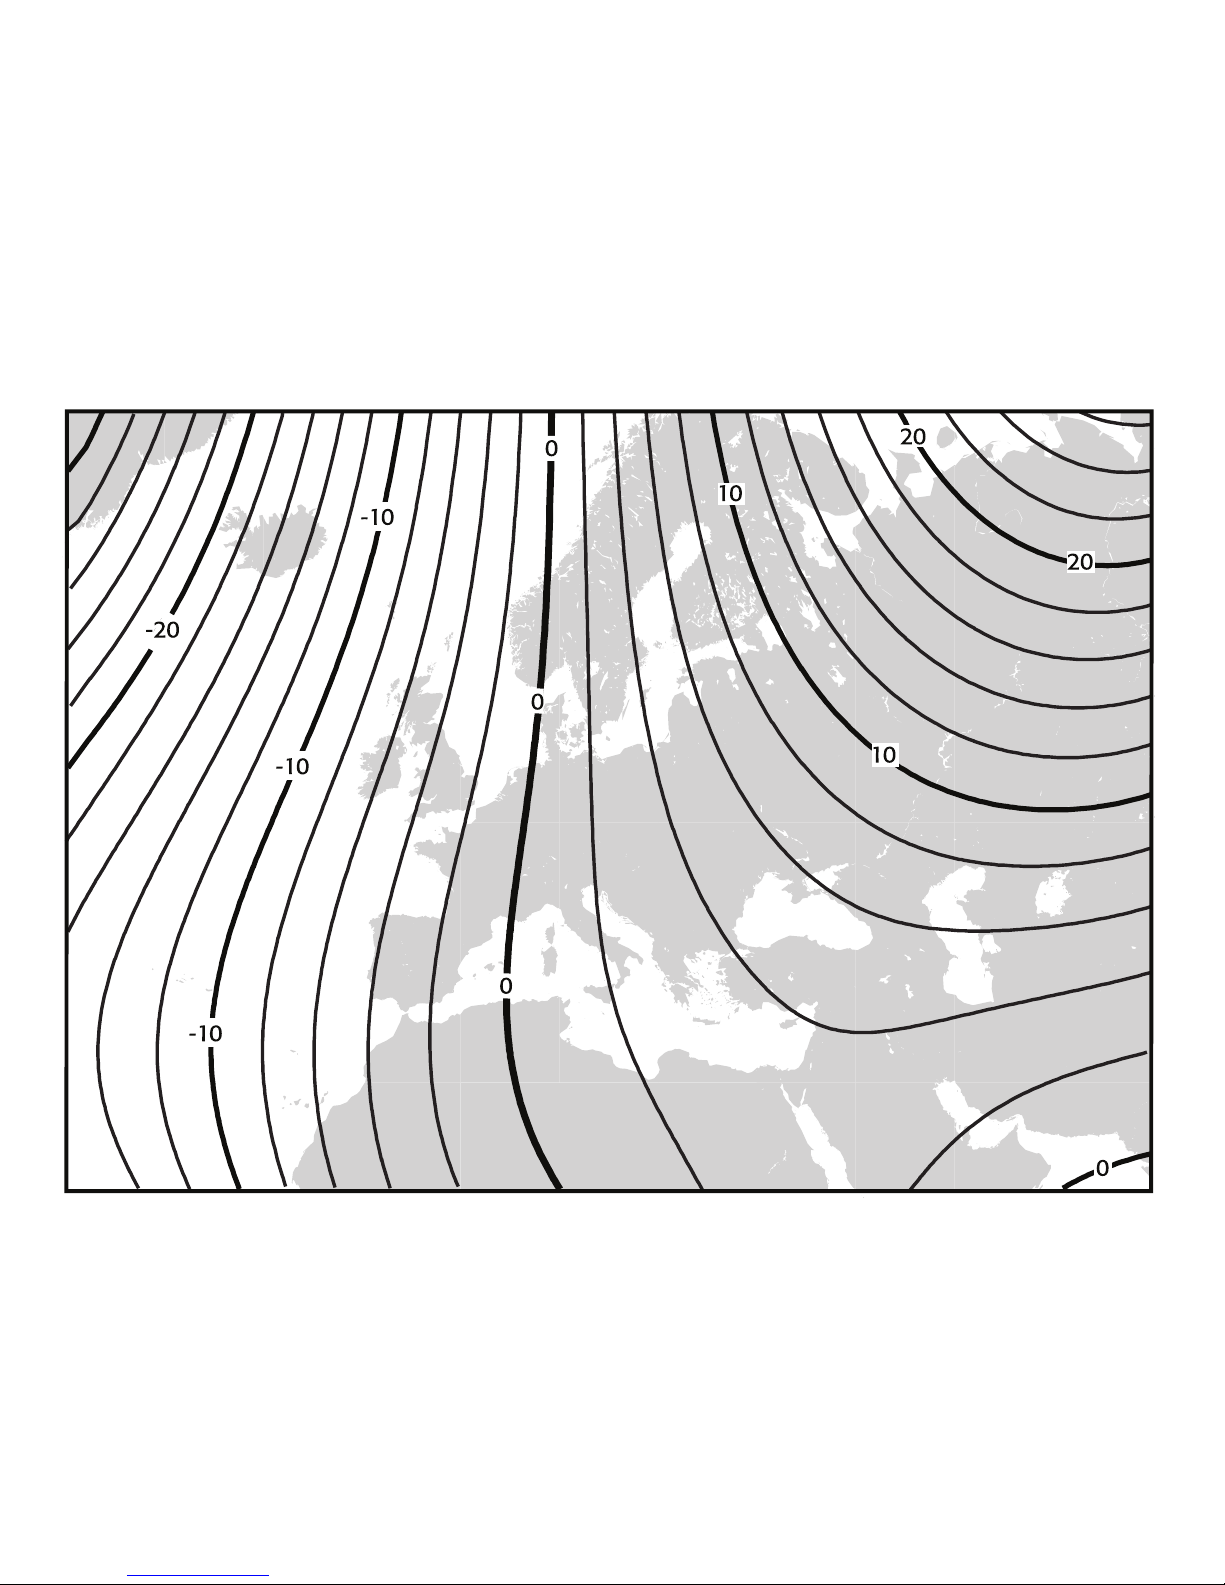
The Magnetic North Pole is different from the North
Pole on your map. All magnetic compasses, point to
the Magnetic North, but a map relates to Geographic
(Map) North. The angular difference between the
two North poles is called declination. Depending
upon where you are on the planet, you will usually
need to adjust the Compass for declination. Most
topographic maps include a small arrow to show
Magnetic North and declination information. You can
also acquire this information from:
• USA – USGS at www.store.usgs.gov
• Canada – Centre for Topographic
Information http://maps.nrcan.gc.ca
Access the Compass Mode Display.
• Hold M 3 seconds to enter Compass set menu
• Press M to select Calibrate
• Press ▲ to confirm and begin calibration
* Calibrate the compass by holding the watch
face level in your hands while rotating yourself
clockwise, 360 degrees, taking 30 seconds to
complete the rotation
* Press ESC to confirm and exit Calibrate
• Press ESC to exit Compass set menu
▼
▲ ▲
▲
fig. 36
11.7 Enter an Angle of Declination
Access the Compass Mode Display.
• Hold M 3 seconds to enter Compass set menu
• Press ▼ to scroll to Declinate
• Press M to select Declinate
* Press ▲ or ▼ to adjust the angle of magnetic
declination to match the angle found on your map
Page 35
See the declination maps for North America
and Europe on the two reference pages at
the end of section 16.0.
12.0 LOGBOOK MODE
The logbook mode allows you to: record, store,
delete and retrieve data, to link to a Windows®
PC, monitor the memory, set the mode to auto
and establish a sampling rate.
12.1 Logbook Display
Access the Logbook Mode Display.
Display Features:
* Top Row: LOG
* Middle Row: Memory
* Bottom Row: FREE
After 2 seconds- if you have
stored a session.
See fig. 37.
* Top Row: LOG
* Middle Row: 1/30
* Bottom Row: Date
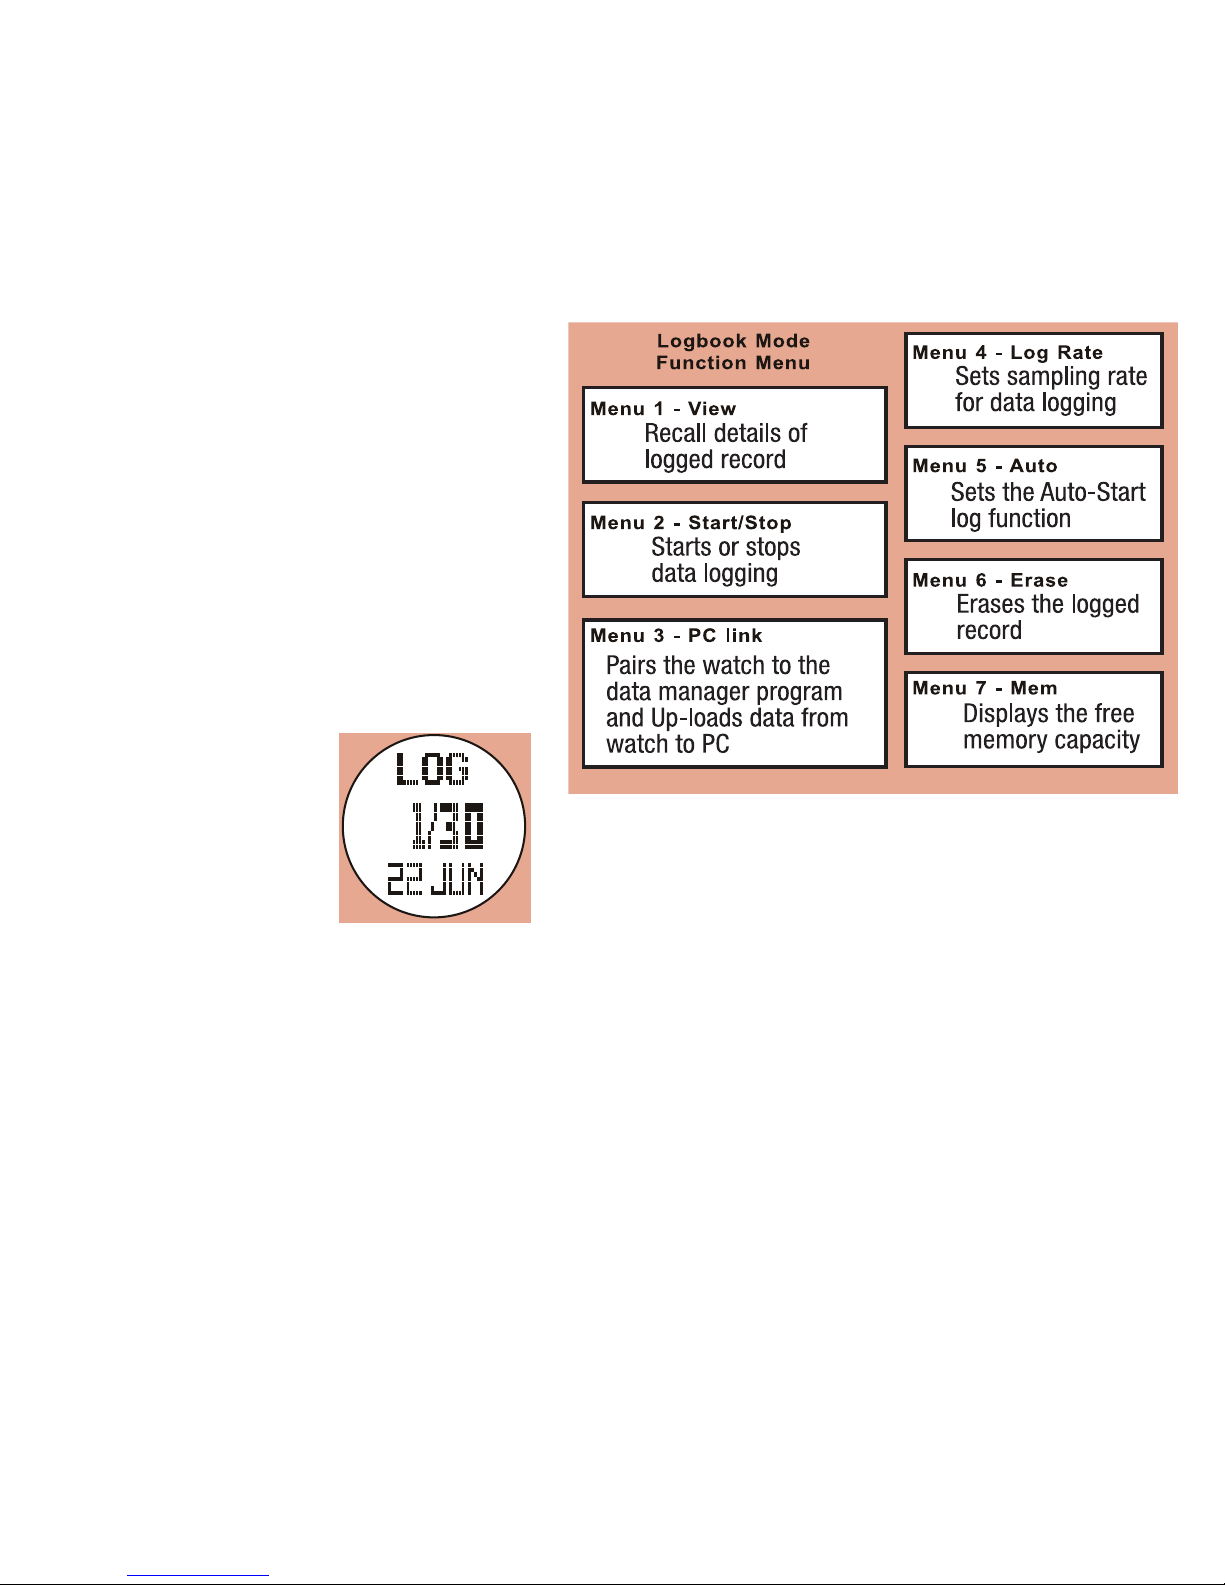
12.2 Logbook Set Menus
The following 7 menus add supplemental
functions and controls to the Logbook mode.
See fig. 38.
View (menu 1)
Reviews /displays all 17 records of captured data for any
one of up to 30 sessions.
• Press ▼ or
▲
to select a target session
Access the Logbook Mode Display.
• Hold M for 3 seconds to enter Logbook set menu
• Press M to select View
• Press ▲ to scroll to the records
• Press M to view the detailed logged data
* Press ▼
or
▲ to scroll the data
* Press M to scroll through Date /Altitude /Sea Level
Pressure /Speed /Distance
* Press ESC twice to return to View
• Press ESC to exit Logbook set menu
fig. 37
fig. 38
Page 36

Stop/Start (menu 2)
Access the Logbook Mode Display.
See fig. 39 on following page.
• Hold M 3 seconds to enter Logbook set menu
• Press ▼ to scroll to Start
• Press M to select Start
* Press ▲ for yes,- the log icon on the top row
will flash and Start will change to Stop or
* Press M to select Stop
* Press ▲ yes
* Press ESC to exit Stop
• Press ESC to exit Logbook
PC link (menu 3)
This mode works in conjunction with the included
PC Link and your computer. Therefore, before use
you must:
* Install the software "Wireless Data Manager"
on a Windows based PC only
* Connect the PC Link to a USB port
* Start the data upload. See section 14.0
Access the Logbook Mode Display.
• Hold M 3 seconds to enter Logbook set menu
• Press ▼ to scroll to PC Link
• Press M to select PC Link and remain here until
transmission is complete
• Press ESC to return to PC Link
• Press ESC to exit Logbook set menu
Log Rate (menu 4)
Important:
Once a log is started, the rate can-
not be changed.
Access the Logbook Mode Display.
• Hold M 3 seconds to enter Logbook set menu
• Press ▼ to scroll to Log rate
• Press M to select Log rate
* Press ▲ to increase the value or
* Press ▼ to decrease the value
* Press ESC to return to Log rate
• Press ESC to exit Logbook set menu
Auto (menu 5)
If this is set to ON; the Distance, Heart Rate
or User Modes will also be able start the log
function.
Access the Logbook Mode Display.
• Hold M 3 seconds to enter Logbook set menu
• Press ▼ to scroll to Auto
• Press M to select Auto
* Press ▲ or ▼ to toggle ON/OFF
* Press ESC to return to Auto
• Press ESC to exit Logbook set menu
Page 37
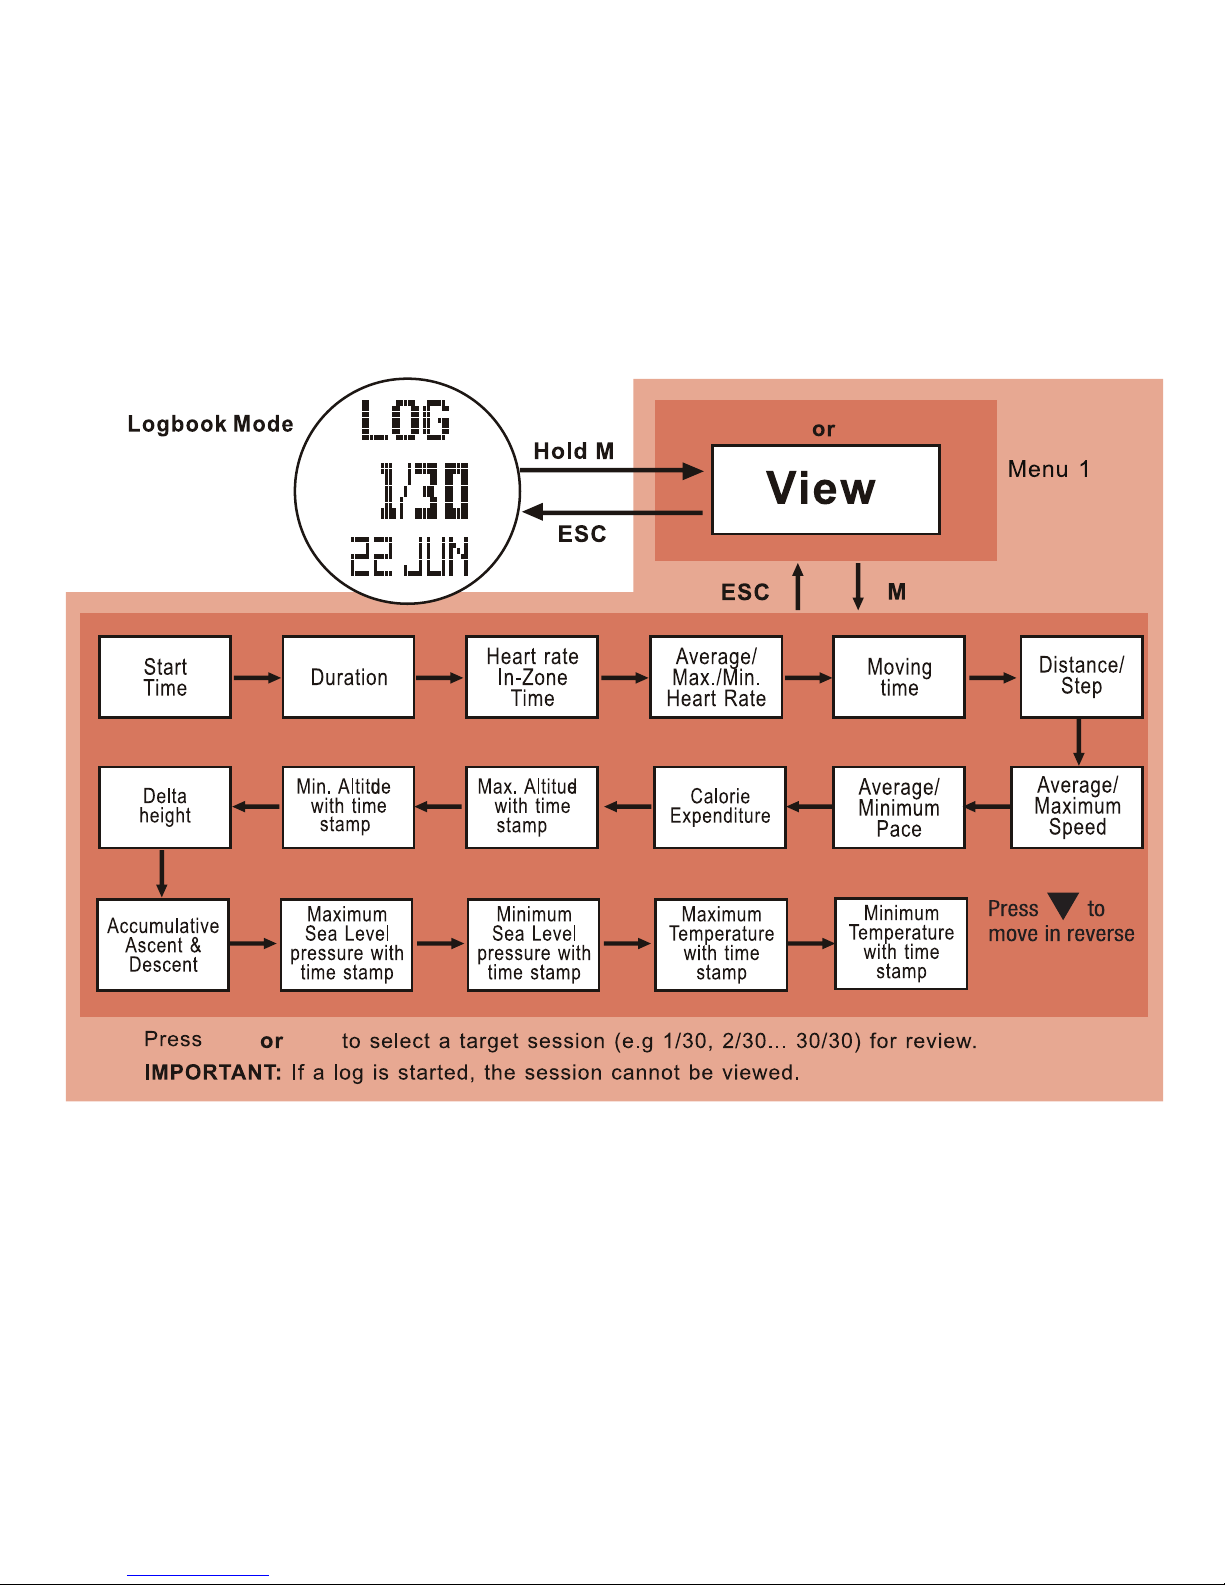
fig. 39
▲
▲
▲ ▲ ▲ ▲ ▲
▲
▲
▲▲▲▲
▲
▲ ▲ ▲ ▲
▼
▼
Page 38

Erase (menu 6)
This feature allows you to delete individual or all
stored sessions.
Access the Logbook Mode Display
• Hold M 3 seconds to enter Logbook set menu
• Press ▼ to scroll to Erase
• Press M to select Erase
* Press ▲ or ▼ to toggle All/ONE
* Press M to select
* Press ▲ for YES or
* Press ESC to return to Erase
• Press ESC to exit Logbook set menu
Mem (menu 7)
This feature shows the amount of available free
memory.
Access the Logbook Mode Display
• Hold M 3 seconds to enter Logbook set menu
• Press ▼ to scroll to Mem
* Press M to select Mem
* Press ESC to return to Mem
• Press ESC to exit Logbook set menu
13.0 Battery Replacement
The Traileader Pro uses 1 battery for the watch
and 1 for the Chest strap. Both are CR2032.
13.1 Watch
All watch settings and saved data will be lost.
1. Use a coin to turn the battery door ¼” counterclockwise to open
2. Push a pin between the battery door and watch
case to lift the door away from the case. Then
remove old battery
3. Slide the new battery under the battery clip but
on top of the copper coil spring
4. The watch will sound 5 times if the battery has
been replaced successfully
5. Refit the battery door and turn it ¼” clockwise
to close
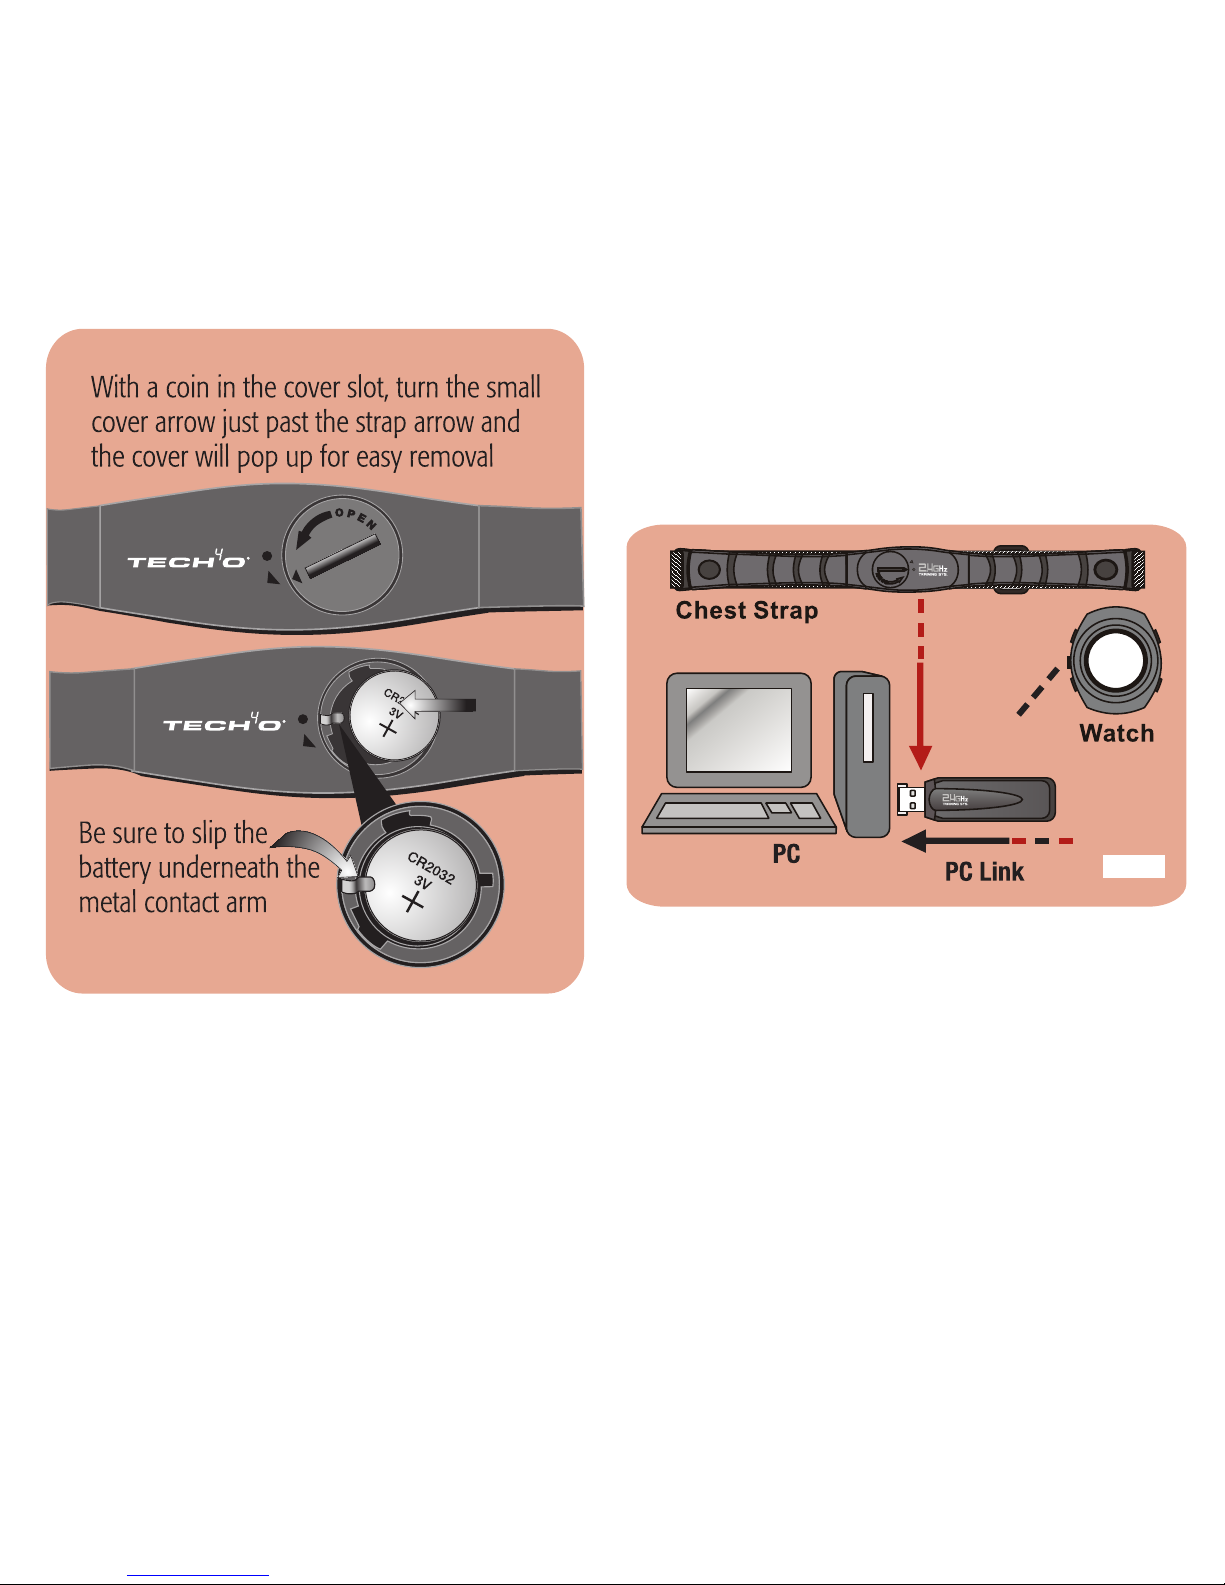
13.2 Chest Strap
1. Fit a coin into the slot on the back of battery
cover. Turn the cover from the DOT towards
the ARROW until the cover lifts out. Remove
old battery
2. Replace the battery with the [+] side up. Slide
the battery under the metal contact arm
3. Align the cover ARROW with the case ARROW
and press down until the cover is level with
the case
4. Turn the cover with a coin until the cover
ARROW again aligns to the case DOT See fig.
40 on the next page
NOTE: If the chest strap fails to initialize [no
signal], reset the strap.
A. Remove the battery and turn it upside down
B. With the positive side of the battery facing
down, lay it on the plus and minus contacts
inside the battery well. This will reset the strap
C. Re-install the battery with the positive side up
Page 39
14.0 PC LINK
This hard and software allows you to download your
exercise data to a Windows® based PC only.
Cannot Link to: Mac OS® and Linux
®
1. Insert the included CD into your computer. Click
the "PC Software" button and follow the on screen
instructions to install
2. Attach the USB PC Link to your computer then place
the watch and chest strap within 15 ft. of the PC
3. When complete, open the "Wireless Data Manager"
program and follow the on screen instructions to
pair the watch and chest strap to the PC program.
See fig. 41.
fig. 40
fig. 41
Data sent from the chest strap:
real time heart rate average heart rate
minimum heart rate maximum heart rate
Data sent from the watch:
chrono logs 48 hour logs
logbook logs daily statistic logs
The watch must be in the PC Link Mode for the
computer to retrieve data:
* on the PC screen, click Watch,
* select the log you wish to download
* click download
Page 40

15.0 TROUBLESHOOTING
Speed & Distance measurements are off
• You will achieve the most accurate results by
properly setting up a personal profile
• Match the sensitivity or sleep timer to your personal
stride and schedule
• The watch is most accurate when you maintain a
steady running or walking pace. Your stride lengths
should be measured using the same pace that you
use when running or walking
The watch does not read the correct altitude
All altitude readings are based on measured
atmospheric pressure. The relationship between
pressure and altitude is: At higher altitudes there
is less/ lower, atmospheric pressure. At lower
altitudes there is more/higher, atmospheric
pressure. Sea level is the benchmark altitude/
pressure in which 29.92 inHG is the pressure at 0
ft in elevation. Changes in weather create high and
low pressures. The pressure sensor is unable to
distinguish between the changes in pressure caused
by weather or altitude. Therefore, the watch may
display an altitude reading that is higher/lower than
actual. This can be mitigated by using the altimeter/
barometer lock feature and turning off the sensor
when not in use.
Barometric pressure reading is incorrect
If you believe that the pressure reading of your watch is
incorrect, adjust it. See section 8.2.
The compass isn’t accurate
• Make sure that you have set the correct angle of
declination
• Make sure that the watch is well away from magnetic
interference
• Keep the watch parallel to the horizon
The Temperature reading isn’t accurate
Body heat may skew measurements. For more accurate
results, remove the watch from your wrist and allow
it to acclimate for 5 minutes.
The Heart Rate doesn't read or is too slow
Ensure good, firm contact between your skin and the
sensors. Possible causes:
• Dry skin or excessive hair on your chest
• Lotions or creams often insulate and inhibit the
sensor
• The watch cannot provide reliable readings for those
with arrhythmia - Irregular heart beat
• Low battery
• Interference from RF devices
• Interference from static electricity generated when
wearing synthetic fabrics. Change to cotton
Page 41

Warning: This device complies with part 15 of the
FCC Rules. Operation is subject to the following
two conditions:
1. This device may not cause harmful interference.
2. This device must accept any interference
received, including interference that may cause
undesired operation. Changes or modifications
not expressly approved by the party responsible
for compliance could void the user's authority to
operate the equipment.
16.0 Limited Warranty
What is covered? Johnson Outdoors Gear LLC warrants
your Tech4o® brand product to be free from defects in
materials or workmanship and to perform accurately, for
one (1) year from date of original purchase provided it
has not been damaged by the causes described in the
next paragraph.
What is not covered? Normal wear and tear, damage
due to misuse, alteration, accidents, abuse, improper
maintenance and non-compliance with written
instructions and precautions are not covered by this
warranty. Watches & Electronic instruments are water
resistant, they are not waterproof. Damage resulting
from excessive exposure to water, heat or cold is not
covered under this warranty. The replaceable battery is
not covered under the warranty.
THERE ARE NO OTHER EXPRESS WARRANTIES BEYOND
THE TERMS OF THIS LIMITED WARRANTY. IN NO
EVENT SHALL JOHNSON OUTDOORS GEAR LLC
BE LIABLE FOR INCIDENTAL OR CONSEQUENTIAL
DAMAGES.
Some states do not allow exclusion or limitation of
incidental or consequential damages, so the above
exclusion may not apply to you.
How to obtain warranty service. Should a defect
covered by this warranty appear in your product,
call our Consumer Service Department toll-free at
1.800.572.8822 for return authorization and instructions.
(You must pay the cost of returning the unit to us).
If the product is found to be defective in material or
workmanship, we shall, at our option, either repair or
replace it without charge, and will pay the cost of return
shipment to you.
How State law relates to this warranty: This warranty
gives you specific legal rights, and you may have other
rights which vary from state to state.
Page 42
DECLINATION MAP FOR NORTH AMERICA
Page 43
DECLINATION MAP FOR EUROPE
Page 44

U.S.A.: Johnson Outdoors Gear LLC
625 Conklin Road, PO Box 966
Binghamton, New York, 13902
Phone: 607.779.2222 Toll Free: 1.800.572.8822
Canada: Johnson Outdoors Canada Inc.
4180 Harvester Road Burlington,
Ontario Canada L7L 6B6
Phone: 905.634.0023 Toll Free: 1.800.263.6390
Europe: Nigor Net BV
Kabelweg 100, 1014 BC Amsterdam
Phone: +31 (0)20-5818550
Web: www.tech4o.eu E-mail: [email protected]
For technical help: www.tech4o.com
Johnson Outdoors Gear LLC © 2010, All Rights Reserved Rev. A July 10
 Loading...