

Page 1
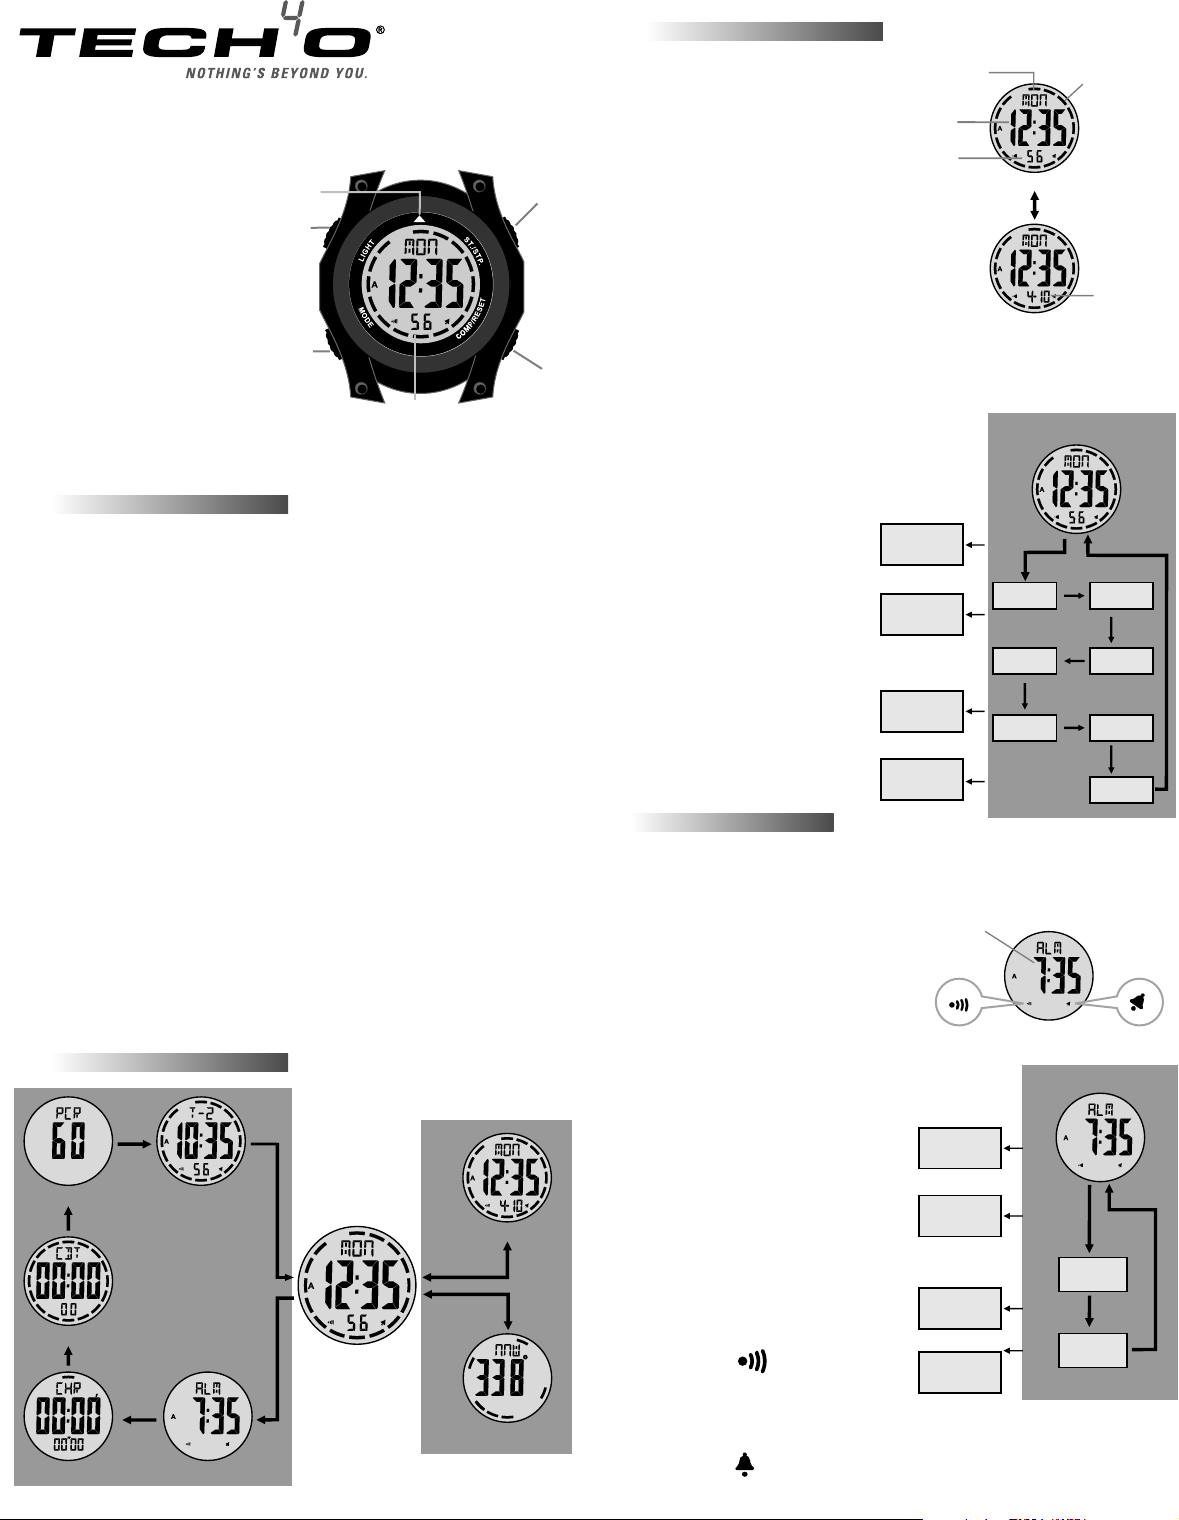
CURRENT TIME MODE
Congratulations on the purchase of
the Tech4o NORTHSTAR CW1 or
CW2 compass watch.
NORTHSTAR CW1 & CW2
Please read these instructions and
save for future reference.
For best performance, we
recommend that you:
• Avoid exposing the watch to
Navigation
Arrow
LIGHT
ST/STP
extreme conditions for extended
periods
• Avoid rough use or severe
impacts
• Do not open the watch case
unless certified to repair
electronic instruments
• Clean with a soft damp cloth
MODE
LAP/RESET
Display
• Keep watch away from
magnetic fields such as mobile phones, speakers and motors
• Store in a dry place
NORTHSTAR FEATURES
Current Time Mode
Time System:
• Hour - minute - second. AM [A] PM [P]
• 12 hour or 24 hour format
• Animated 1 second bar graph
Calendar System :
• Month - date - day of week. Auto correction for leap year and day of week
Compass Mode
• 16 compass directions- 4 cardinal and 12 ordinal points
• Magnetic North pointer • Compass lock
• Backward bearing • Declination setting and calibration
Daily Alarm Mode
• Daily alarm • Hourly beep
Chronograph Mode
• Measurement unit - 1/100 second
• Measuring capacity - 99 hours. 59 minutes & 59.99 seconds
Timer Mode
• Measurement unit - 1 second
• Measuring capacity - 99 hours, 59 minutes & 59 seconds
Pace Mode
• Pace beat - 40 to 180 beats per minute
Dual time Mode
Time System
• Hour - minute - second. AM [A] PM [P]
• Animated 1 second bar graph
FUNCTIONS MAP
[MODE]
Pace
[MODE]
Countdown Timer
[MODE]
Dual Time
[MODE]
[MODE]
Current Time
[seconds]
Current Time (date)
[ST/STP]
[LAP/RESET]
Press [ ST/STP ] button to toggle between
Seconds Display and Date Display
Time Display
• 1st row displays: day of week
• 2nd row displays: hour - minute
• 3rd row displays: second
• Animated (1 second) - displays in the
perimeter bar graph
day of week
current hour,
minute
current
second
time display
animated
bar graph
[ST/STP]
Date Display
• Day of week, hour, minute - display in the 1st and
2nd rows
• Numerical day, month - display in the 3rd row
• Animated (1 second) - displays in the perimeter bar
graph
date display
day,
month
NOTE: Press and Hold [ ST/STP ] to toggle the date
format between month - day and day - month
To Set the Currant Time Mode
• In the currant time mode, Press and Hold [MODE]
for 2 seconds until the "seconds" digits flash
Current Time Mode
• Press [ST/STP] or [LAP/RESET] to reset the
seconds to zero; OR Press [MODE] to navigate to
any setting you wish to change.
See navigation chart at right
• When the setting you wish to
change flashes, Press [ST/STP]
to raise the value or
[LAP/RESET] to lower the value.
Note: If you Press and Hold the
button, the rate of change is faster
• When 12 or 24 flashes, Press
[ST/STP] or [LAP/RESET] to
toggle between the 12 /24 hour
format. Press [MODE] to confirm
NOTE: If NO INPUT for 1 minute
during setup, the display will
default to the Current Time Mode
[ST/STP]
Increase
[ST/STP]
hold
Increase
faster
[LAP/RESET]
Decrease
[LAP/RESET]
hold
Decrease
faster
hold
[MODE]
second
year
month
[MODE]
[MODE]
minute
[MODE]
hour
[MODE]
date
[MODE]
12/24
DAILY ALARM MODE
When the daily alarm is ON, the watch will beep for 20 seconds at the assigned time.
When the hourly beep is ON, the watch will beep twice every hour on the hour
Daily Alarm Display
Daily alarm setting ( hour - minute ) -
displays in the 2nd row
Alarm Time
( hour, minute)
Daily Alarm Mode
To Set the Daily Alarm Mode
• In the Daily Alarm Mode, Press and
Hold [ MODE ] for 2 seconds until
the "seconds" digits flash
Alarm Beep
Hourly Beep
• Press [ST/STP] or [LAP/RESET] to
reset the seconds to zero; OR Press
[MODE] to navigate to any setting
you wish to change. See navigation
chart at right
• When the setting you wish to
change flashes, Press [ST/STP] to
raise the value or [LAP/RESET] to
lower the value.
Increase
hold
Increase
faster
[ST/STP]
[ST/STP]
Daily Alarm Mode
hold
[MODE]
[MODE]
Note: If you Press and Hold the button,
the rate of change is faster
To turn Daily Alarm ON/OFF
• Press [ ST/STP ] while in the Daily
Alarm Mode
• When the icon appears, the
Daily Alarm is ON
[LAP/RESET]
Decrease
hold
[LAP/RESET]
Decrease
faster
minute
[MODE]
hour
[MODE]
Chronograph Daily Alarm
Compass
To turn Hourly Beep ON/OFF
• Press [ LAP/RESET ] while in the Daily Alarm Mode
• When the icon appears, the hourly beep is ON
Page 2
CHRONOGRAPH MODE:
This watch is a stopwatch
• Measurement unit: 1/100th second
• Measuring capacity: 99 hours 59 minutes & 59.99 seconds
• The watch will measure elapsed time, lap time and display elapsed time without
stopping measurement
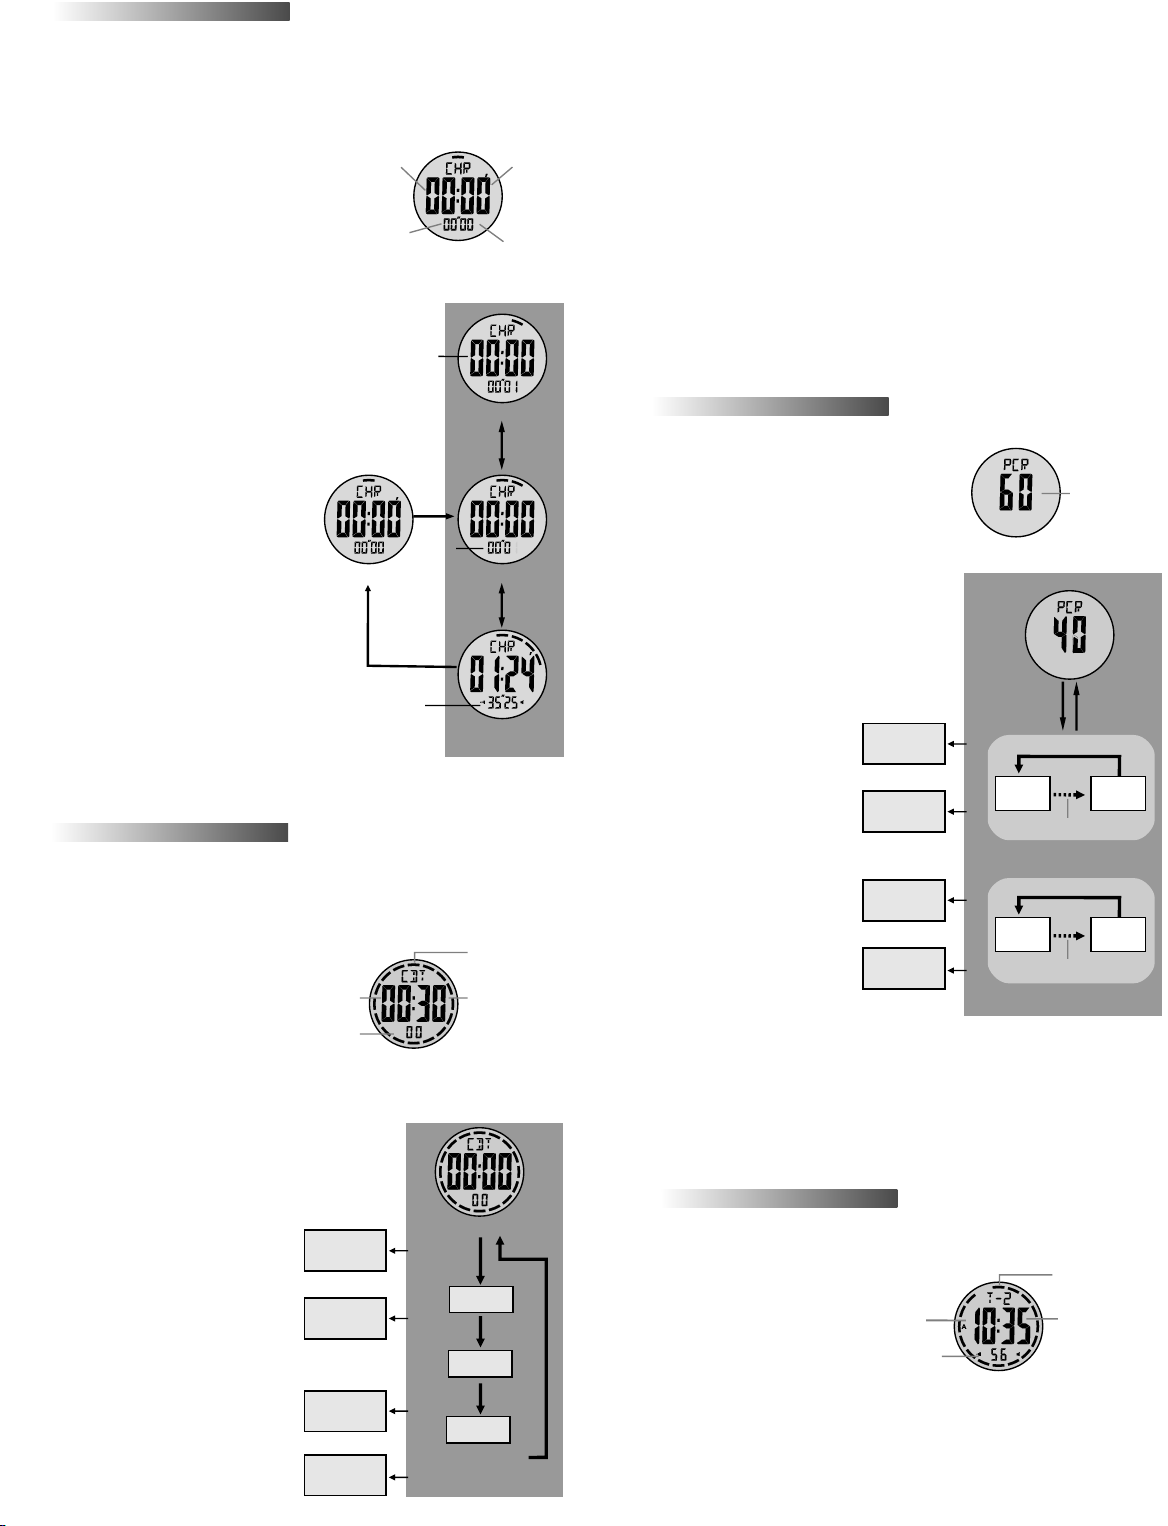
Chronograph Display
run time
(hour)
run time
(minute)
• Running time (hour, minute) - displays
in the 2nd row
• Running time (second, 1/100th second)
- displays in the 3rd row
run time
(second)
1/100 sec
• Animated (1/100th of a second) displays in the perimeter bar graph
To Measure Elapsed Time
• In Zero Display, Press [ ST/STP ] once to
lap time
start measurement - ( the digits will
advance). Press [ ST/STP ] once again to stop
[ST/STP]
elapsed
time (run)
Lap Display
[LAP/
RESET]
Run Display
[ST/STP]
- (digits will not advance) The elapsed time
between the 1st Press [ ST/STP ] and the
2nd Press [ ST/STP ] will display
To Display Lap Time
• With the chronograph active, Press [
LAP/RESET ] and the cumulative lap
times will display
• Press [ LAP/RESET ] again to return to
counting display.
NOTE: When the lap time is displayed the
Zero Display
elapsed time is still being measured in the
background
To Reset the Chronograph
• If you wish to record a new set of elapsed
times, Press (when the chronograph has
[LAP/RESET]
elapsed time
(stopped)
Stopped Display
stopped) [ LAP/RESET ] to reset the
chronograph
COUNTDOWN TIMER MODE
This watch is a countdown timer
• Measurement unit: 1 second
• Measuring capacity: 99 hours 59 minutes & 59 seconds
• The watch will descend from the target time to zero
Countdown Timer Display
• The running time (hour, minute) displays in the 2nd row
• The running time (seconds) displays in the 3rd row
running time
(hour)
running time
(second)
• Animated (1 second) - displays in
the perimeter bar graph
To Set the Countdown Timer Target Time
• In the Countdown Timer Mode,
Press and Hold [ MODE ] for 2
seconds until the "seconds"
digits flash
• Press [ MODE ] to navigate to the
setting that you wish to change.
See navigation chart at right
• When the setting you wish to
change flashes, Press [ ST/STP ]
to raise the value or [ LAP/RESET ]
Increase
hold
Increase
faster
[ST/STP]
[ST/STP]
to lower the value. Note: If you
Press and Hold the button, the
rate of change is faster
• When the hour is set, Press
[ MODE ] to confirm
[LAP/RESET]
Decrease
[LAP/RESET]
hold
Decrease
faster
Countdown Timer
animated
bar graph
running time
(minute)
Countdown Timer Mode
hold
[MODE]
second
[MODE]
minute
[MODE]
hour
[MODE]
NOTE: If NO INPUT for 1 minute during the setup, the display will default to the
Countdown Timer Mode
To Use the Timer
• Once a target time has been set (expl. 15 min. ) Press [ ST/STP ] to start
(digits will descend to zero). Press [ ST/STP ] again to terminate the countdown
(digits will stop)
• Elapsed time will display through out the countdown
To Reload the Timer
• Press (when the timer has stopped) [ LAP/RESET ] to reload the target time
Alarm Sound
• The watch will beep once when it reaches 5, 4, 3, 2 and 1 seconds
• The watch will sound a long beep at zero.
NOTE: Press [ MODE ] to exit the Countdown Timer
PACE MODE
Pace mode allows users to track their paces
while performing advanced orienteering
techniques in the wilderness. Users will match
their hiking pace with the pacer function’s
beats per
minute
audible beeps to maintain and track their speed
and distances over unfamiliar terrain.
Pace Display
• The rate can be set in a range from 40 beats
per minute to 180 beats per minute in 5 beat
increments
Pace Display
• The rate (beats per minute) displays in the 2nd row
To Use the Pace Feature
• Once a pace rate has
been set (expl. 60 BPM),
Press [ ST/STP ] to start
the sound. Press [ ST/STP ]
Increase
hold
Increase
faster
[ST/STP]
[ST/STP]
hold
[MODE] [MODE]
40
x 5 BPM
180
again to stop
To set the Pace
• In the Pace Mode, Press
and Hold [ MODE ] for 2
seconds until the "beat
rate" digits flash
• Press [ ST/STP ] to raise
[LAP/RESET]
Decrease
hold
[LAP/RESET]
Decrease
faster
40180
x 5 BPM
the value or [ LAP/RESET ]
to lower the value. Note: If
you Press and Hold the button, the rate of
change is faster
• When the rate is set, Press [ MODE ] to confirm
NOTE: If NO INPUT for 1 minute during setup, display
will default to Pace Mode
DUAL TIME MODE
This watch is a dual time piece.
Dual time is synchronized with
current time
Dual Time Display
• Dual time (hour, minute) displays in the 2nd row
• Dual time (seconds) displays in the 3rd row
• Animated (1 second) displays in the perimeter
bar graph
dual time
(hour)
dual time
(second)
Dual Time Mode
animated
bar graph
dual time
(minute)
Page 3
DUAL TIME MODE
To Set the Dual Time Mode
• In Dual Time Mode, Press and
Hold [ MODE ] for 2 seconds
until the "minutes" digits flash
• Press [ MODE ] to navigate to
the setting that you wish to
change. See navigation chart at
right
• When the setting you wish to
change flashes, Press [ ST/STP ]
to raise the value or [LAP/RESET]
Increase
hold
Increase
faster
[ST/STP]
[ST/STP]
Dual Time Mode
hold
[MODE]
to lower the value.
Note: If you Press and Hold the
button, the rate of change is
faster
• When the hour is set, Press
[ MODE ] to confirm and return to
the Dual Time Mode
[LAP/RESET]
Decrease
[LAP/RESET]
hold
Decrease
faster
NOTE: If NO INPUT for 1 minute
during the setup, the display will
default to the Dual Time Mode
COMPASS MODE
This watch is a digital compass that provides directions, bearings and
Magnetic North Pole location.
Caution: Accurate readings will be compromised when used near
magnetic fields, mobile phones, speakers, motors, electrical
appliances and inside a moving vehicle or a ferroconcrete building.
Watch may need to be calibrated for
declination
Perform calibration when:
• first time of use
•
DIST
is flashing
• Declination has changed
• Battery has been changed
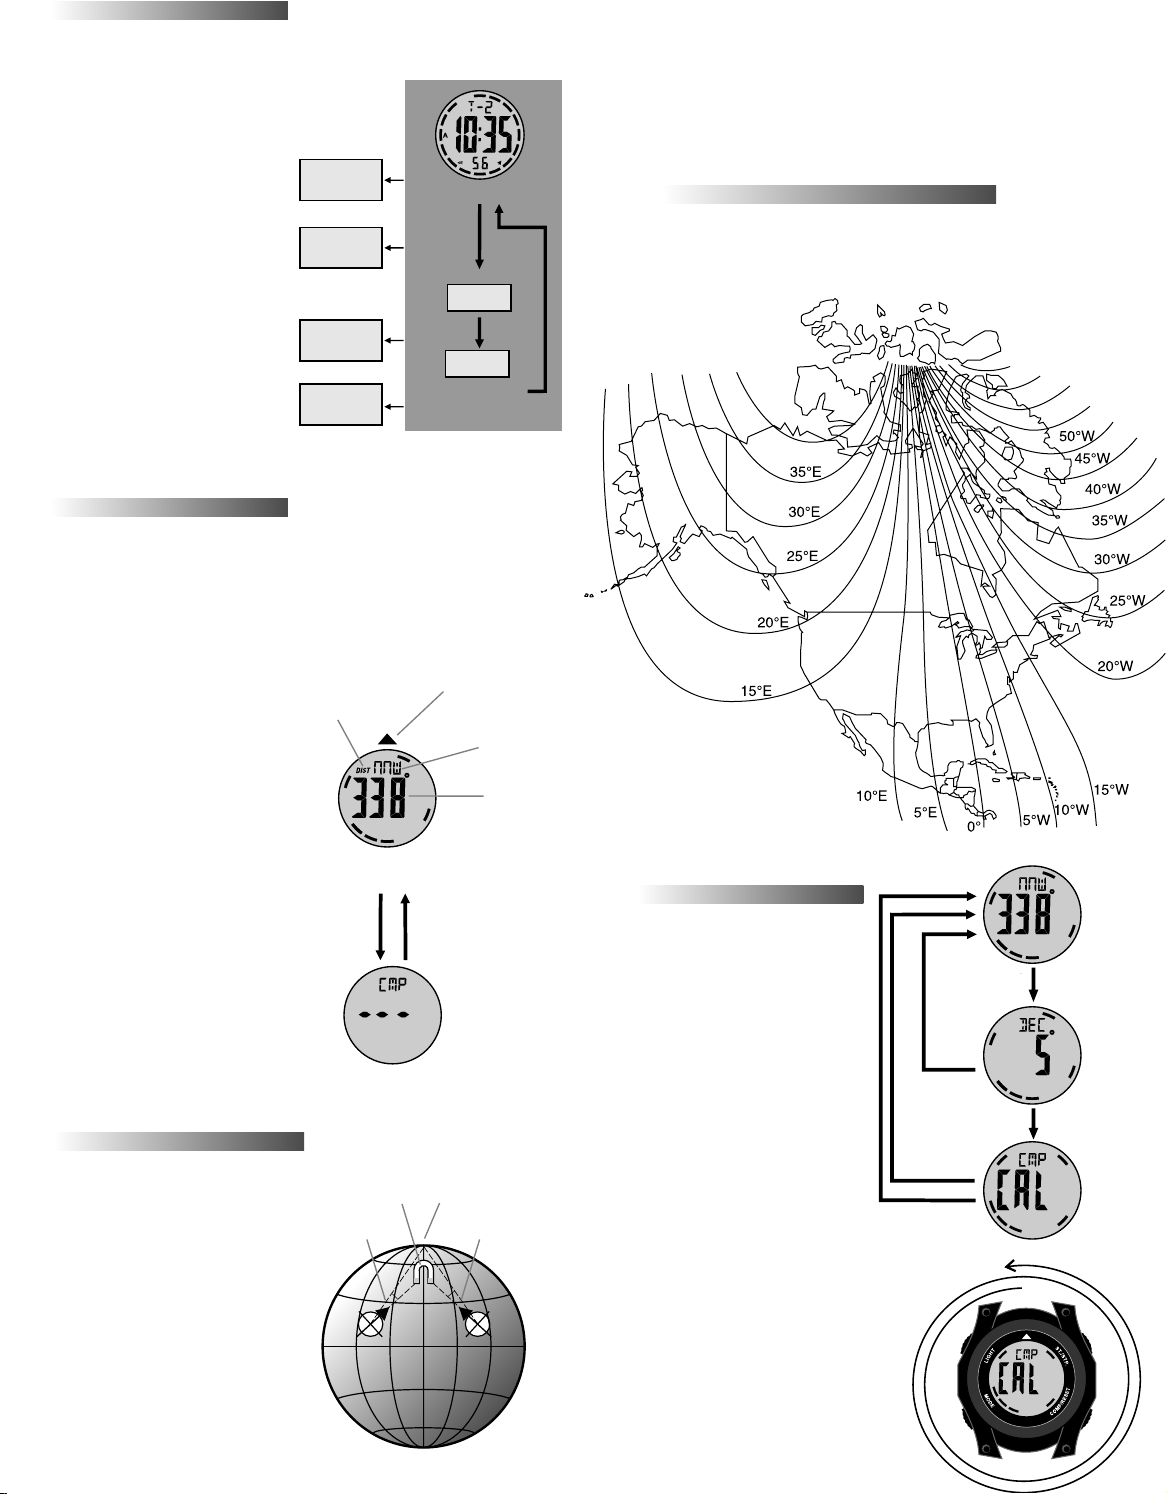
Compass Display
To access, press [ LAP/RESET ] when in
current time mode.
• Compass direction - displays in 1st
row
• Compass bearing - displays in 2nd row
• Animated cardinal points - display in
perimeter bar graph
direction of travel heading indicator
dist indicator
N
W
E
S
Compass Mode
1 minute
any button
except [LIGHT]
Compass Standby Mode
• To extend battery life, watch will
switch to standby mode if there is NO
INPUT for 1 minute when in compass
mode
• Press any button except [ LIGHT ] to
Compass Stand-by Mode
exit standby mode
MAGNETIC DECLINATION
The Magnetic sensor in the compass is
attracted by the magnetism of the
Earth and therefore, always points to
the constantly shifting Magnetic
North. There is another “North Pole.”
True North is static and located
geographically about 800 miles
north of the magnetic pole. Maps
and directions usually are based on
True North. Magnetic declination is
the angle between True North and
Magnetic North. The amount of
declination at any given point
depends on the location of that
point.
magnetic north
magnetic
declination
true north
minute
hour
[MODE]
compass
direction
compass
[MODE]
[MODE]
bearing
magnetic
declination
on the continent. Where True and Magnetic North are in the same direction, the
declination is zero. At any point west of that line, your compass needle will
point east of True North. This is called “Easterly Declination.” At any point east
of that zero line, your compass needle will point west of True North. This is
called “Westerly Declination.”
NOTE: The watch displays Westerly Declination as a negative number.
example: -45
MAGNETIC DECLINATION COMPENSATION
The watch will automatically make declination compensation. We have
included a list of the declination angles of North America. In the
Declination Setting Mode, input the closest angle and the watch will
make the adjustment.
COMPASS CALIBRATION
To Calibrate the Compass
• In the Compass Mode, Press
and Hold [ MODE ] for 2
seconds. DEC will display in
the 1st row and the digits will
flash
• Press [ ST/STP ] to set
desired declination angle (-90
to +90)
• Press [ MODE ] CAL will
display in the 1st row and the
north pole pointer will move
• Lay the watch on a level
surface. Steadily rotate the
watch counter-clockwise
twice. Keep the pointer in the
same direction through out
the rotation
• Press [MODE] to confirm and
return to Compass Mode
Rotation
[LAP/RESET]
[MODE]
1 minute
hold
[MODE]
[MODE]
Finish
Compass
Mode
Declination
Mode
Calibration
Mode
Start
Page 4
TAKE A BEARING
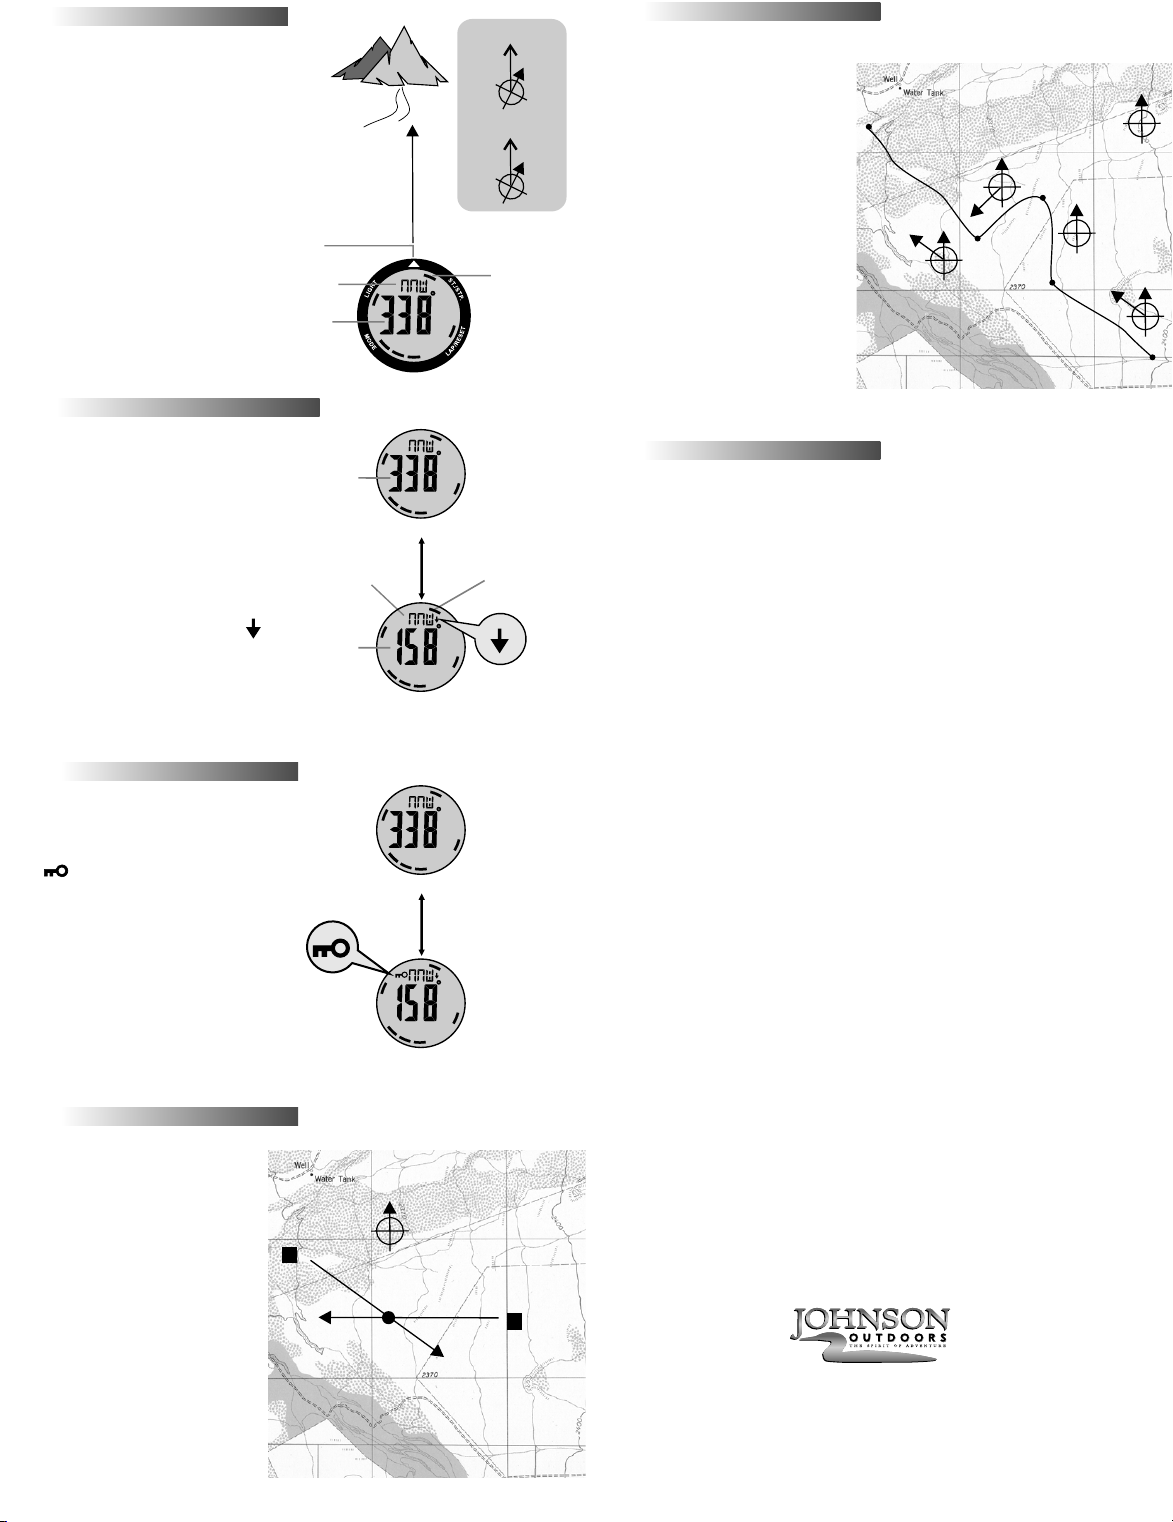
To Determine the Direction of Travel
• Turn the watch until the
navigation arrow points to the
direction of travel. Press [
COMP/RESET ] to enter Compass
Mode
• The compass direction displays
in the 1st row
• The bearing displays in the 2nd
row
• The bar graph will indicate
Magnetic North
Important: When taking a bearing, the
watch MUST be parallel to the
horizon or the data will be
inaccurate.
TAKE A REVERSE BEARING
navigation
Arrow
compass
direction
bearing
target
direction
of travel
338˚
0˚
north/northwest
north
magnetic north
indicator
FIND YOUR WAY
Use this watch and a protractor to
keep to a trail
Before Hiking
• Locate the distance between
and location of the turning points
of the trail on a map
• Use a protractor to determine
the bearing of each turn and
mark the map. See right
Start to B = 315˚ / 1.2 mi
B to C = 0˚ / .6mi
C to D = 225˚ / .5 mi
D to finish = 315˚ / 1.7 mi
While Hiking
• Use the watch to find the
bearing at each turn
finish
315˚
1.7 mi
0˚
0˚
225˚
0˚
.5 mi
D
C
.6 mi
B
0˚
1.2 mi
315˚
0˚
start
This watch will also display the opposite
direction (180˚) of a bearing. A reverse
bearing is used to accurately
backtrack your direction or determine
you location on a map
To determine a Backward Bearing
• In Compass Mode, Press
[MODE] to toggle between forward
and reverse bearings. The icon " "
displays for Reverse Bearing
• The watch will automatically return
to forward bearing after being
changed to Standby Mode or Current
Time Mode
LOCK A BEARING
This watch will provide a "compass
lock" function to secure an
improtant bearing. When the
" " is displayed, the
compass reading will not change
To Lock / Unlock the Compass
• When in Compass Mode,
Press [ST/STP] to toggle between
lock and unlock
• The watch will automatically
return to unlock after being
changed to Standby Mode or
Current Time Mode
FIND YOUR LOCATION
Use this watch with the reverse
bearing feature, a map and
protractor, to determine your
current position
To Find Your Current Position
• Locate two distant, identifiable
landmarks. See diagram at right
• Find each landmark's location
on the map
• Use the watch to determine
the reverse bearing of each
landmark
• With a protractor, draw a line
down each reverse bearing onto
the map
• Your current position is the
intersection of these two lines
bearing
compass direction
has no affect
reverse
bearing
Reverse Bearing Display
bearing lock
indicator
Locked Bearing Display
landmark A
270˚
current
position
Bearing Display
[MODE]
Bearing Display
[ST/STP]
0˚
135˚
magnetic north
indicator has no
affect
reverse bearing
indicator
landmark B
LIMITED WARRANTY:
What is covered? Johnson Outdoors Inc. warrants your Tech4o
Watch to be free from defects in materials or workmanship, and to
perform accurately, for one (1) year provided it has not been
damaged by the causes described in the next paragraph.
What is not covered? Normal wear, and damage due to the abrasion,
melting, misuse, alteration, and abuse (including any disassembly)
are not covered by this warranty.
Digital Watches are water resistant, they are not waterproof.
Damage resulting from excessive exposure to water, heat or cold is
not covered under this warranty. Additionally, the battery is not
covered under the warranty.
How to obtain warranty service or repair of your watch: Should a
defect covered by this warranty appear in your watch, call our
Consumer Service Department toll-free at 1.800.572.8822 for
return authorization and instructions. (You must pay the cost of
returning the unit to us). If the product is found to be defective in
material or workmanship, we shall, at our option, either repair or
replace it without charge, and will pay the cost of return shipment
to you. If repairs are required to correct any problem not covered
by this warranty, we will contact you for approval to proceed and to
charge you for the components repaired or replaced, plus a
nominal charge for labor.
THERE ARE NO EXPRESS WARRANTIES ON YOUR WATCH THAT ARE
NOT CONTAINED IN THIS DOCUMENT. IN NO EVENT SHALL WE BE
LIABLE FOR INCIDENTAL OR CONSEQUENTIAL DAMAGES ARISING
FROM USING OR LOSS OF USE OF YOUR WATCH.
Some states do not allow exclusion or limitation of incidental or
consequential damages, so the above exclusion may not apply to
you.
This warranty gives you specific legal rights, and you may have
other rights which vary from state to state.
Contact us: www.tech4o.com
U.S.A.:
Johnson Outdoors Inc.
625 Conklin Road
PO Box 966
Binghamton, NY 13902
Phone: 607.779.2222
Toll Free: 1.800.572.8822
Fax: 607.779.2293
Tech4O is a trademark of Johnson Outdoors Inc. Rev.A 5-07
Canada.:
Johnson Outdoors Canada Inc.
4180 Harvester Road
Burlington, Ontario, Canada L7L 6B6
Phone: 905.634.0023
Toll Free: 1.800.263.6390
Fax: 1.800.661.1170
 Loading...