

Page 1

BESPOKE MIRROR TVs
15” | 19” | 22” | 27” | 32” | 42” | 46” | 55” | 65”
Instructions Manual
Page 2

2
Table of Contents
Safety Guidelines 3
Package Contents 4
Ports and Connectors 5
Technical Specications 6
Installation Guidelines 7
Installation Instructions - In Wall Installation Method 8
Installation Instructions – Ceiling Speakers 9
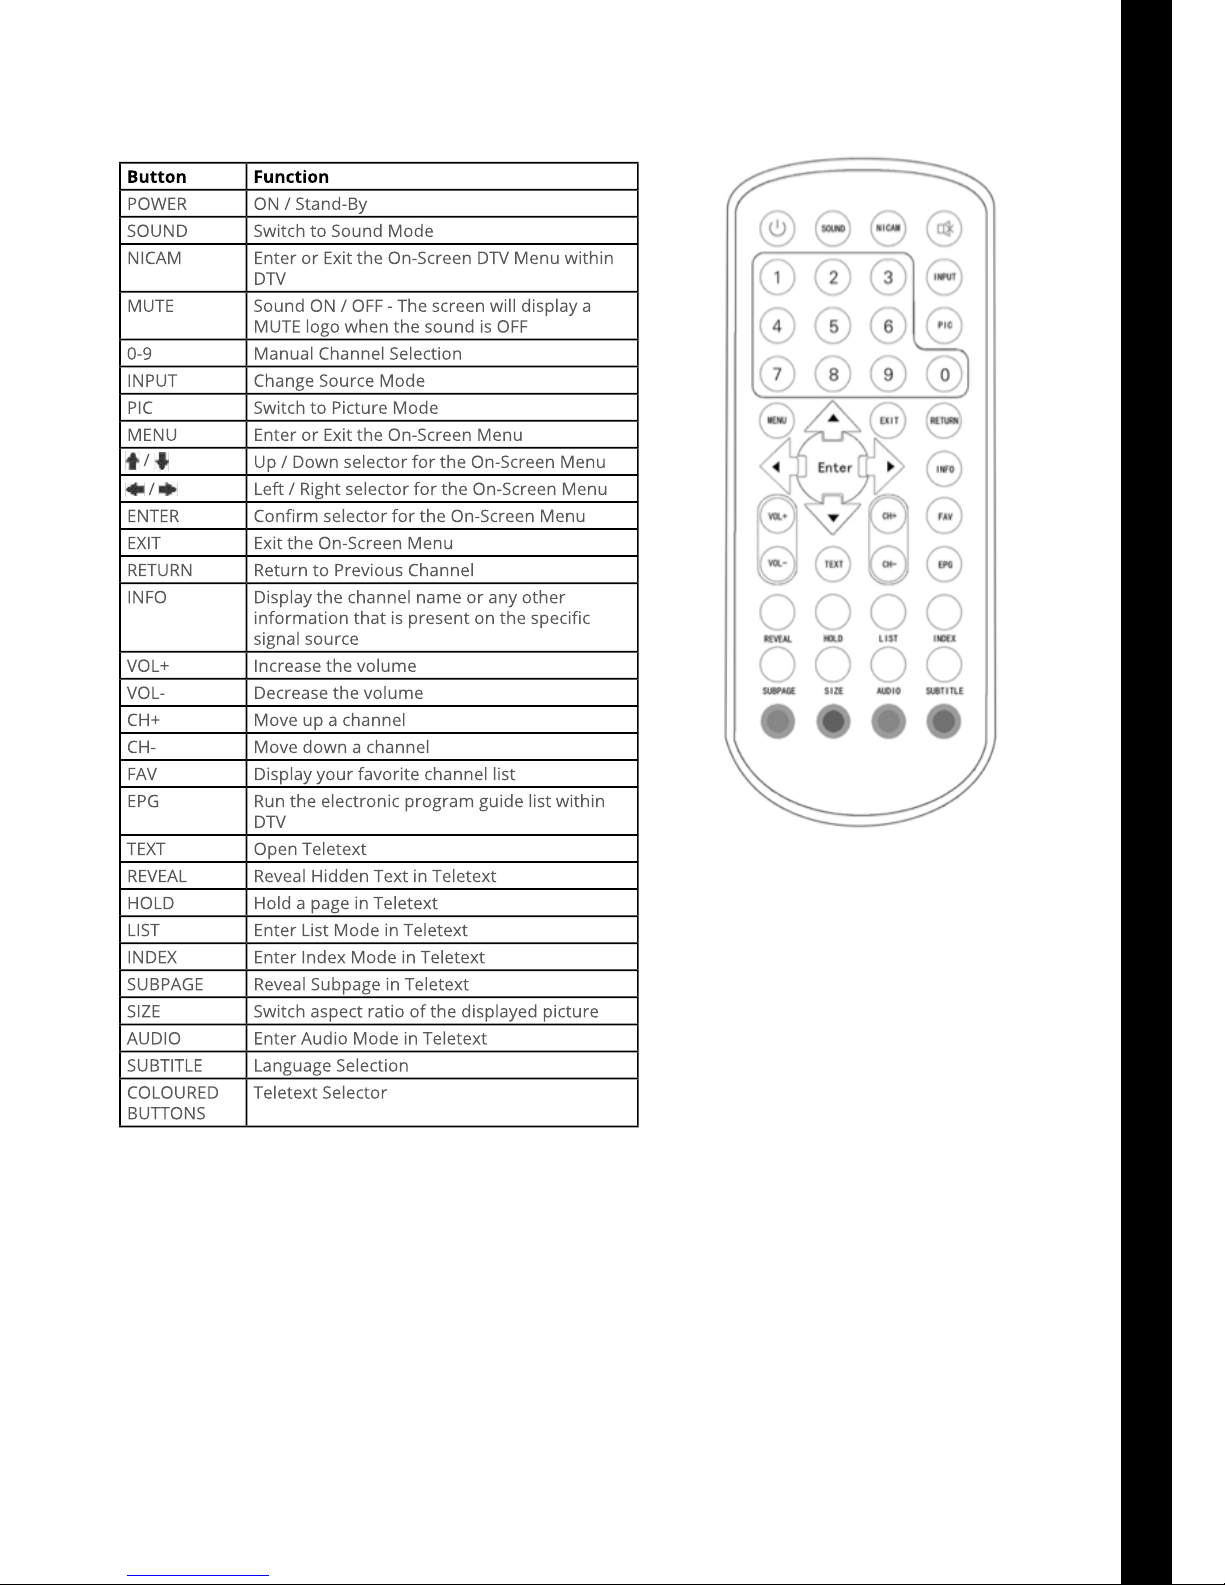
Remote Control Overview 12
Remote Control Key Functions 13
Sky Magic Eye IR Link Instructions 14
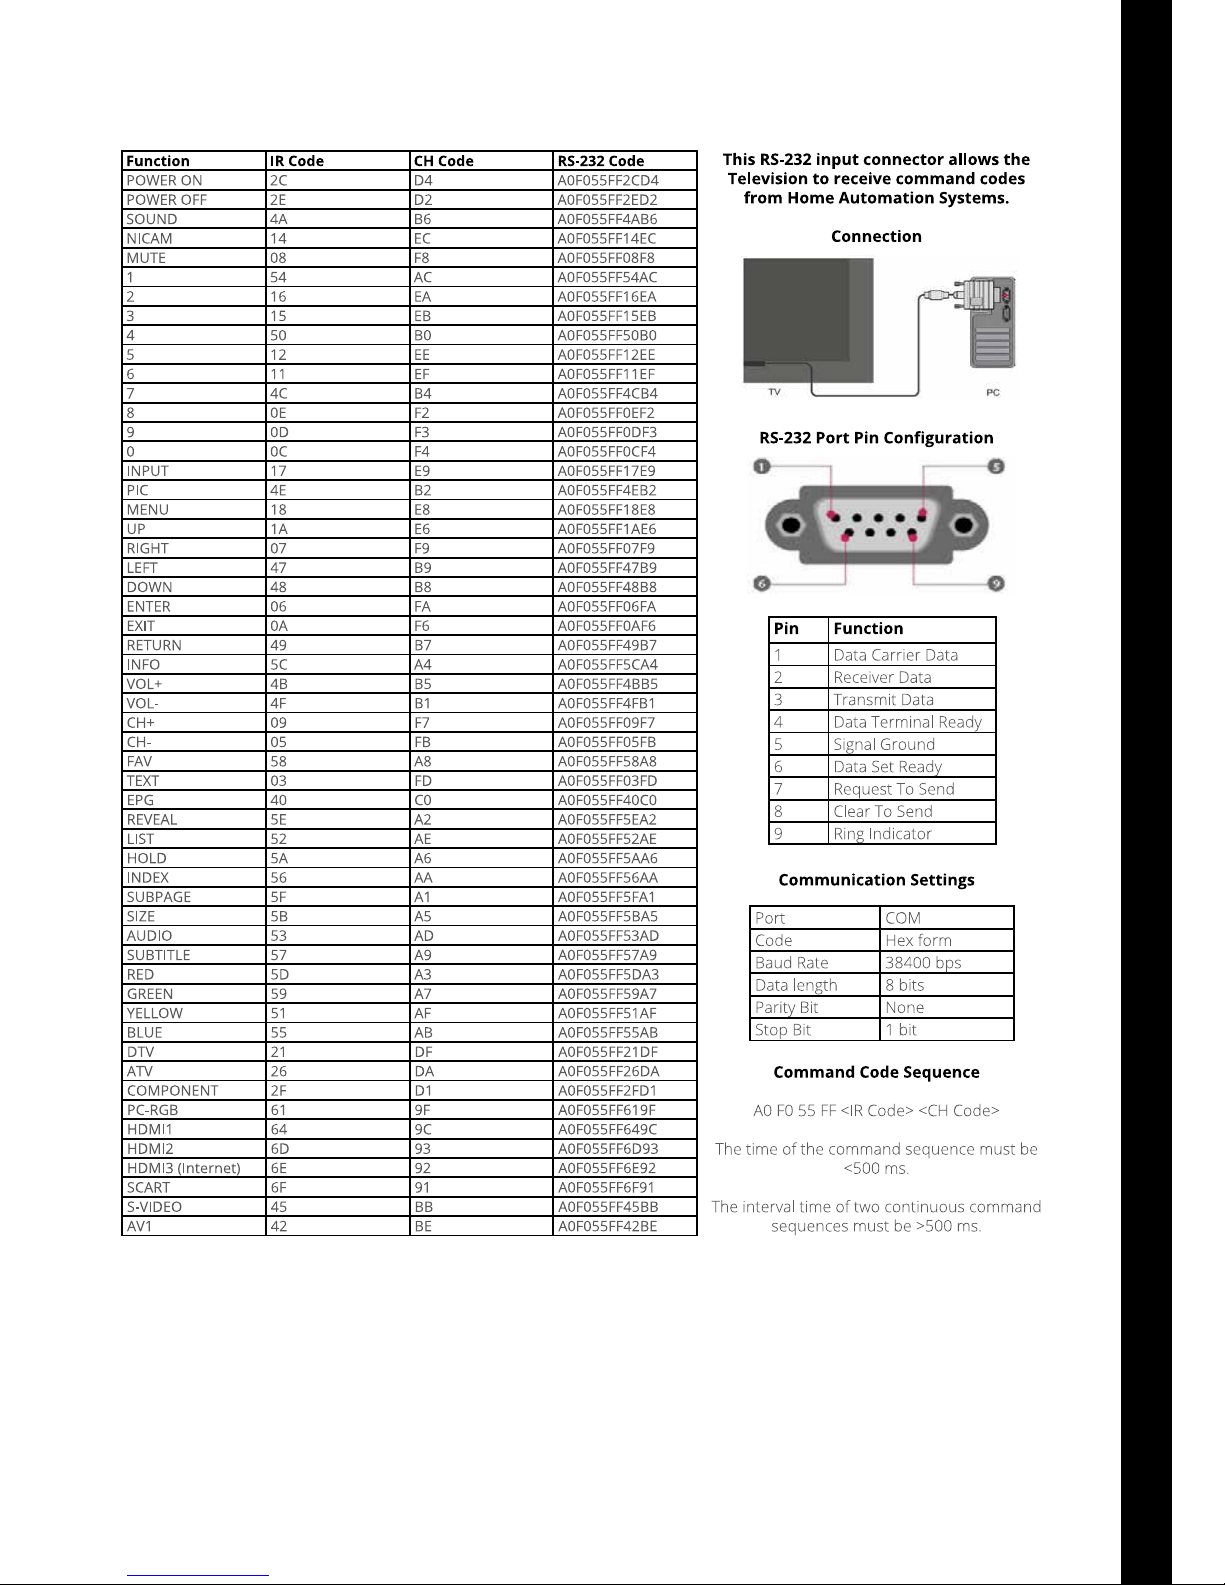
RS-232 Protocol 15
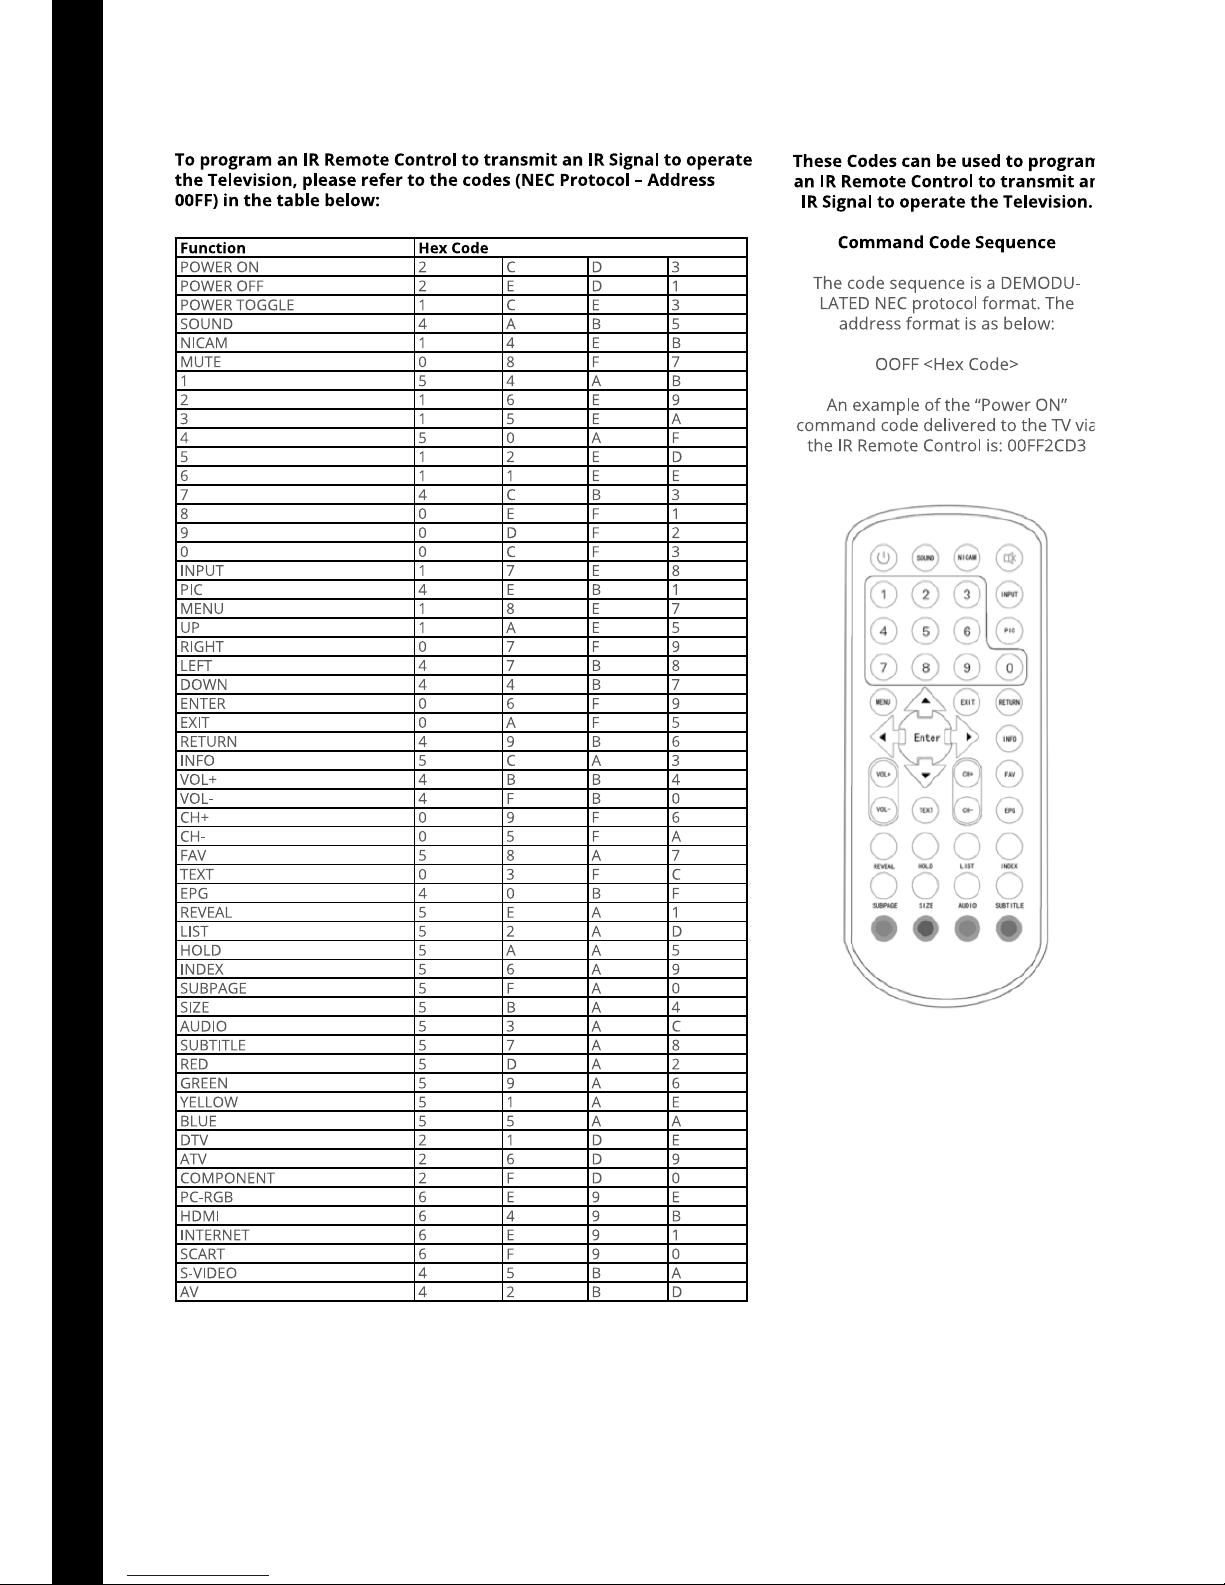
IR Remote Control Codes 16
RJ12 Command Codes 17
IR Link In & Out Instructions 18
Smart TV Remote Control Key Functions 19
Smart TV User Guide 20
OSD Menu User Guide - 1.1 Input Source Menu 22
OSD Menu User Guide - 1.2 Main Menu Layout 23
OSD Menu User Guide - 1.3 Channel Menu 24
OSD Menu User Guide - 1.4 Picture Menu 25
OSD Menu User Guide - 1.5 Sound Menu 26
OSD Menu User Guide - 1.6 Time Menu 27
OSD Menu User Guide - 1.7 Options Menu 28
OSD Menu User Guide - 1.8 Lock Menu 29
OSD Menu User Guide - 1.9 Applications Menu 30
Troubleshooting 31
Warranty Details 32
Page 3
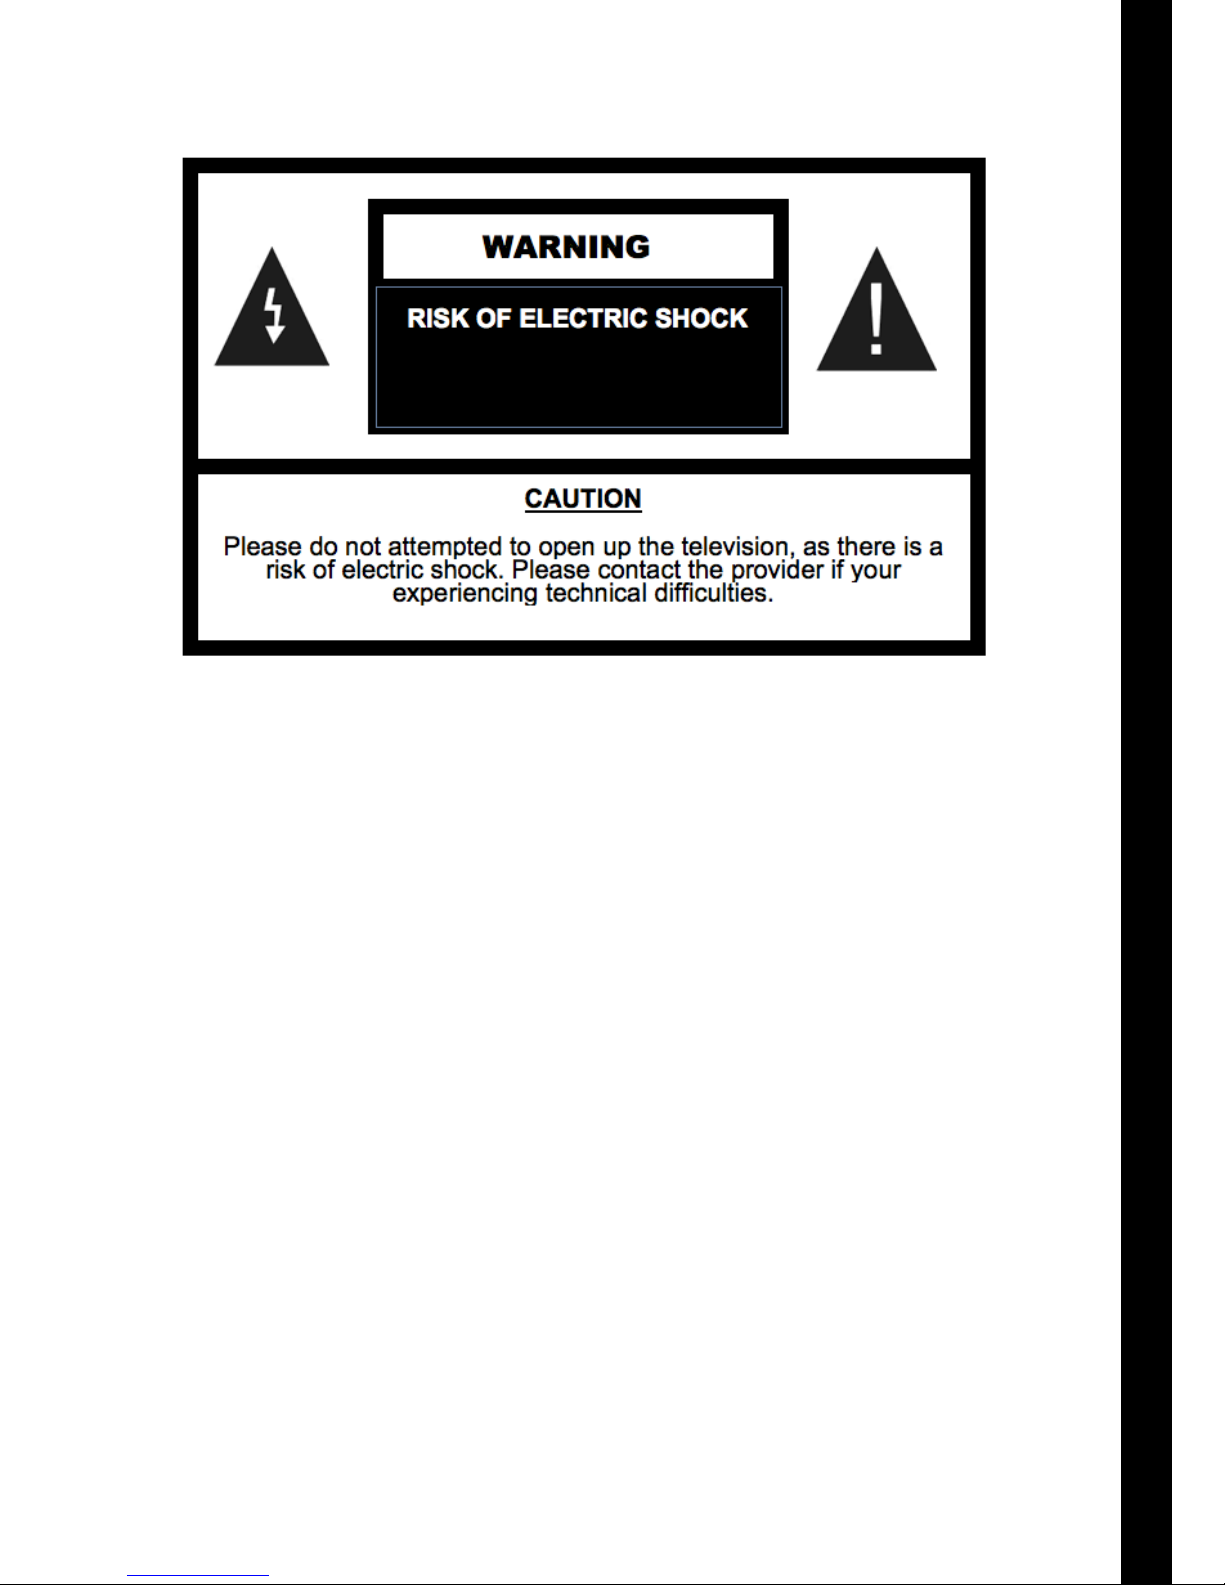
3
Safety Guidelines
This Mirror Television has been rated under IP65 Waterproof Classication. The item should not be exposed to
harsh weather conditions. For safety reasons we advise that no objects are placed on top of the television unit
once installed.
Please read the following before operating this television:
• Please do not allow children to operate this television without adult supervision or guidance.
• The television should not be subjected to temperatures below 0 Celsius or above + 50 Celsius when in use.
Do not install in areas that are subjected to direct heat or light.
• Please do no carry out any maintenance or servicing on this television unless you’re a qualied technician.
• If for any reason the transformer, mains cable, remote controller or television is not performing correctly,
please contact the provider.
• Please use a qualied electrician to install the power cables to your television. If the power cable is pinched
or cut when installed, the users or installers could be subject to an electric shock.
• Disconnect the television in the event of (a) a power cut, (b) leaving the unit ON for a long period of time
unattended, and (c) for cleaning the unit.
• Do not fully submerse the television in water.
• Do not allow the television to be subjected to acid or alkaline-based substances.
• Please install the television using the provided brackets, xtures and ttings supplied by the provider.
Follow installation instructions within this manual.
• Install the television in an area that is not subjected to vibrations or within the reach of young children.
• Do not subject the television screen to hard or sharp objects at any time.
• Do not apply harmful chemicals or corrosive liquids to the television screen.
• Please remove the protective lm from the television screen and speaker panels within one week of
installing.
Page 4
4
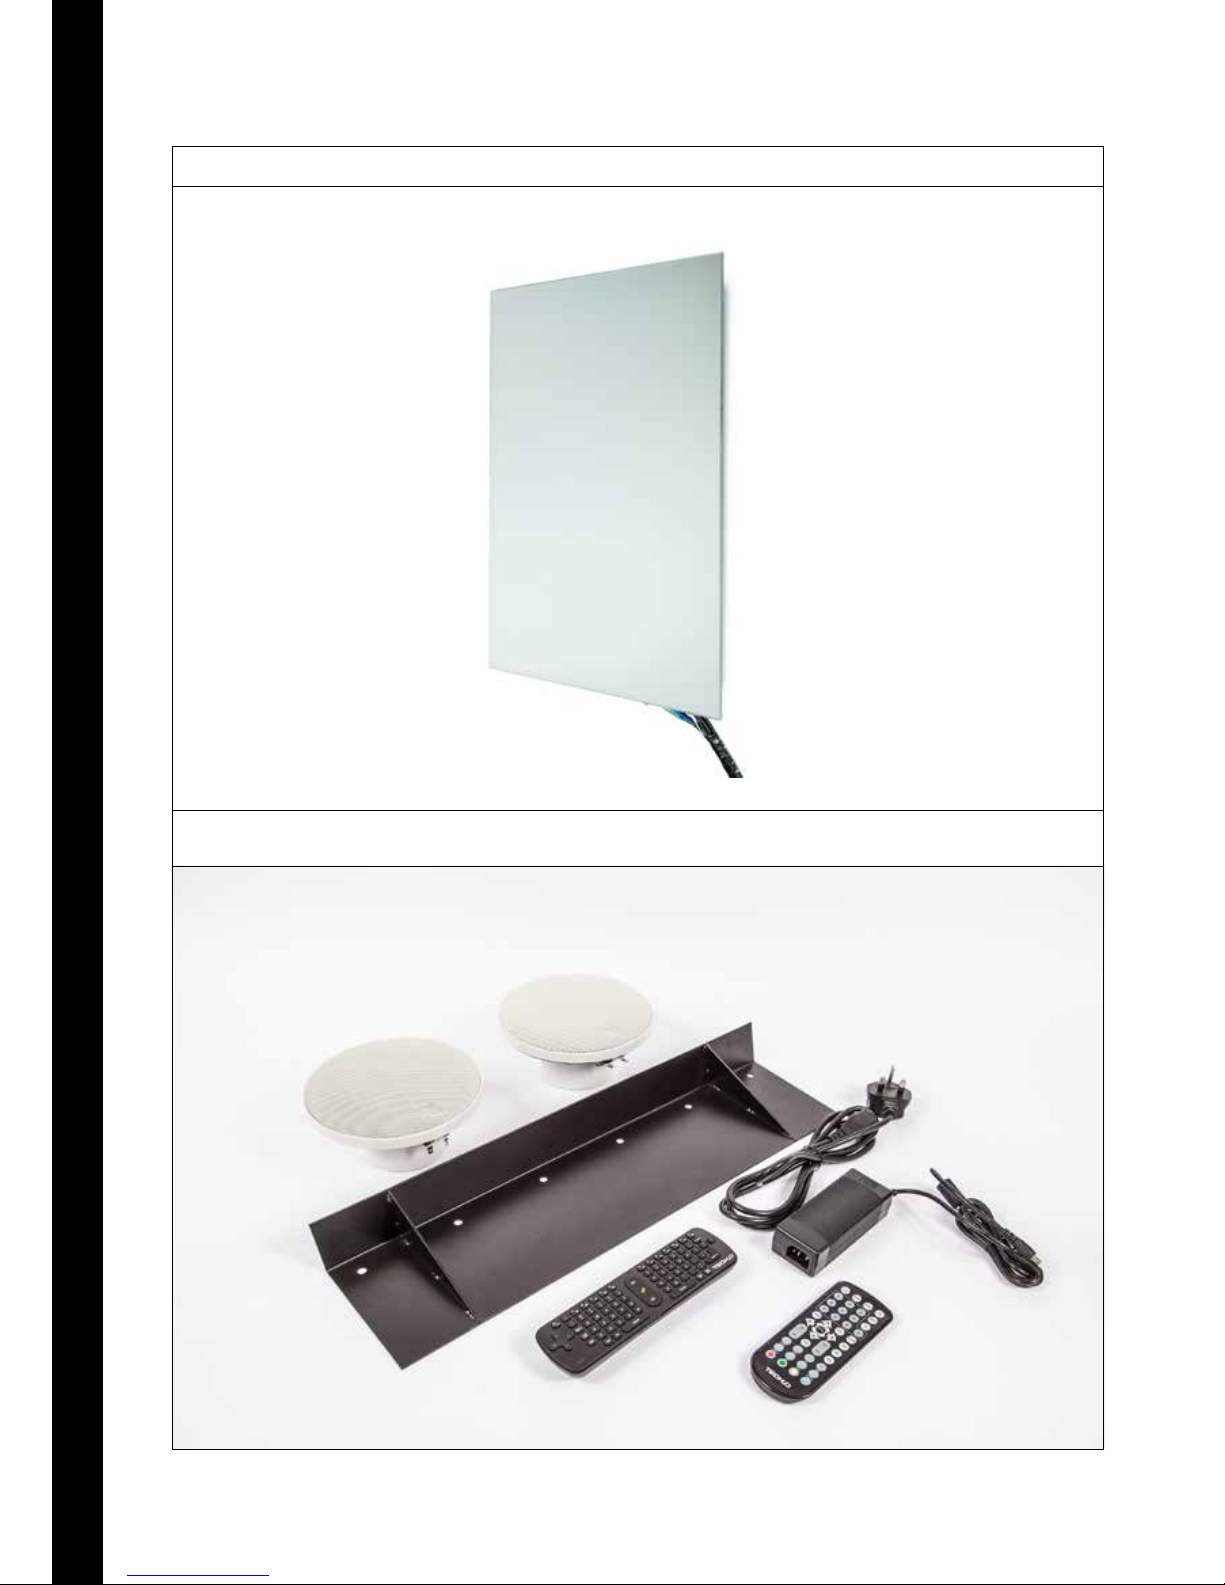
Package Contents
Mirror Television
Accessories: 2 x External Speakers, Waterproof Remote Control, Smart TV Wireless Keyboard,
Power Adapter and Installation Brackets
Page 5
5
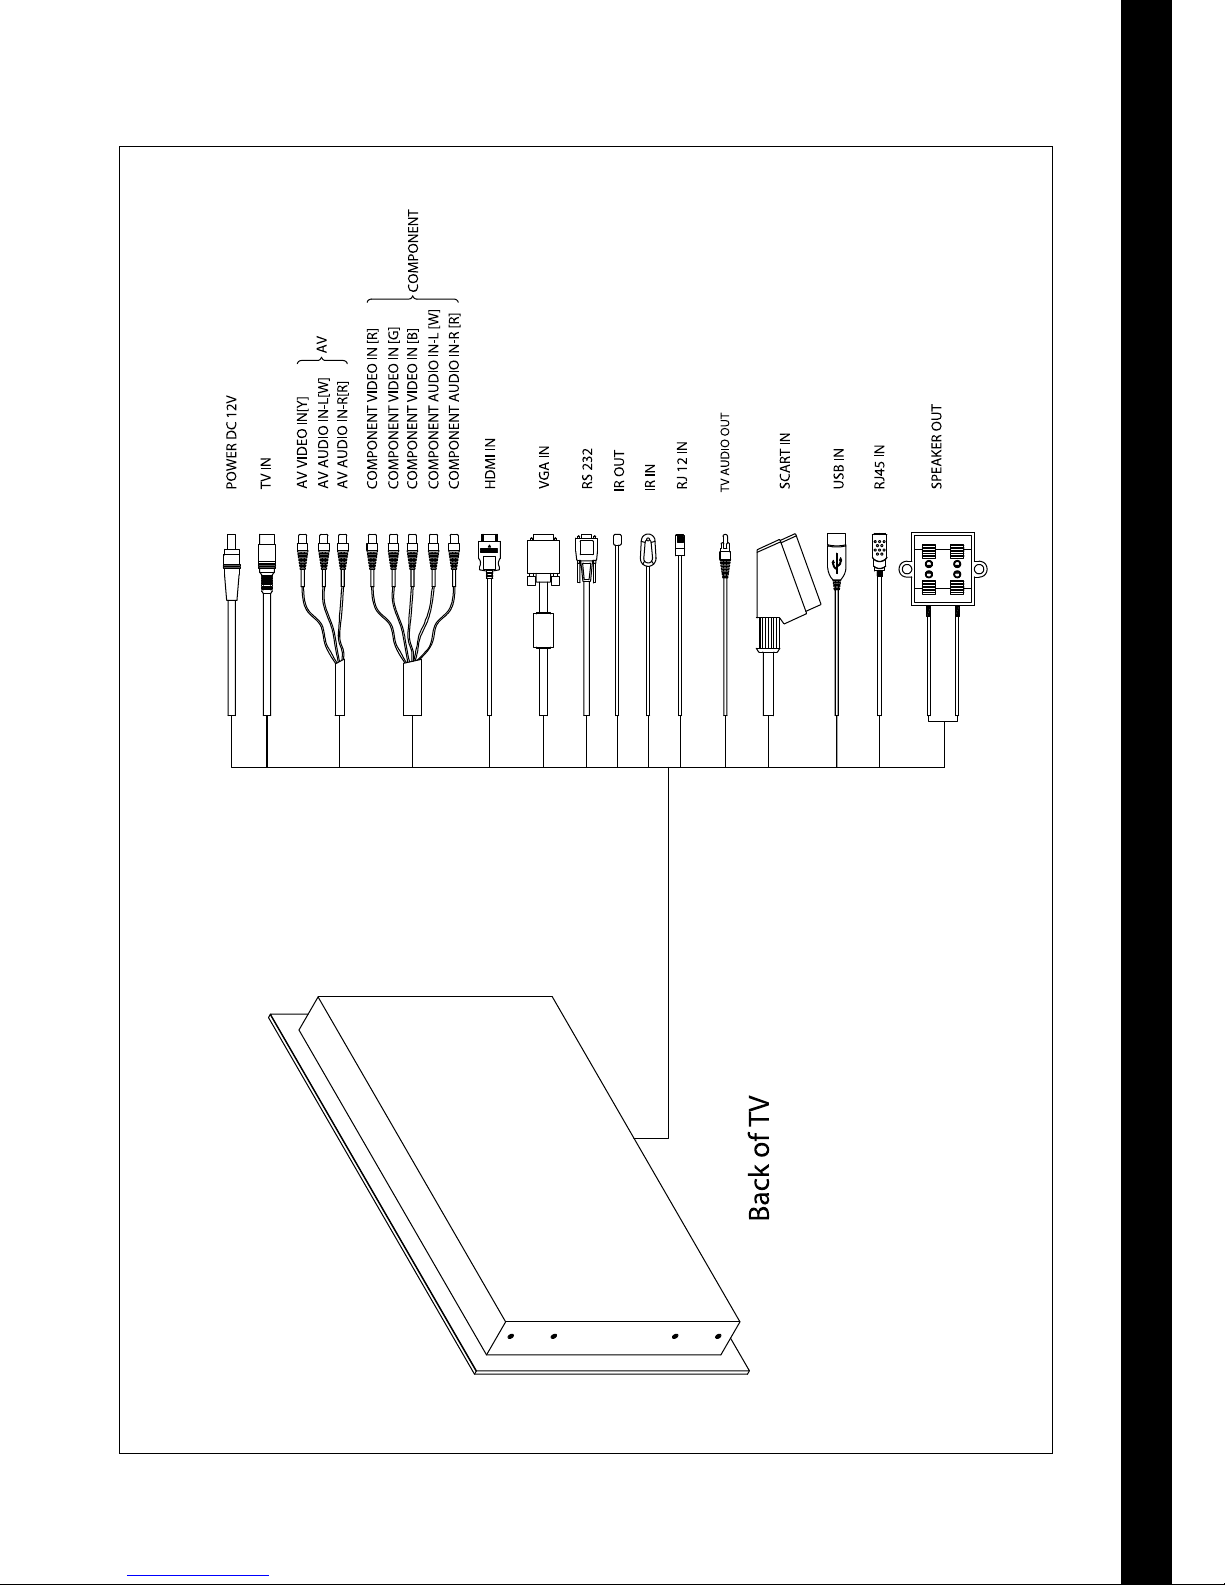
Ports and Connectors
Page 6
6
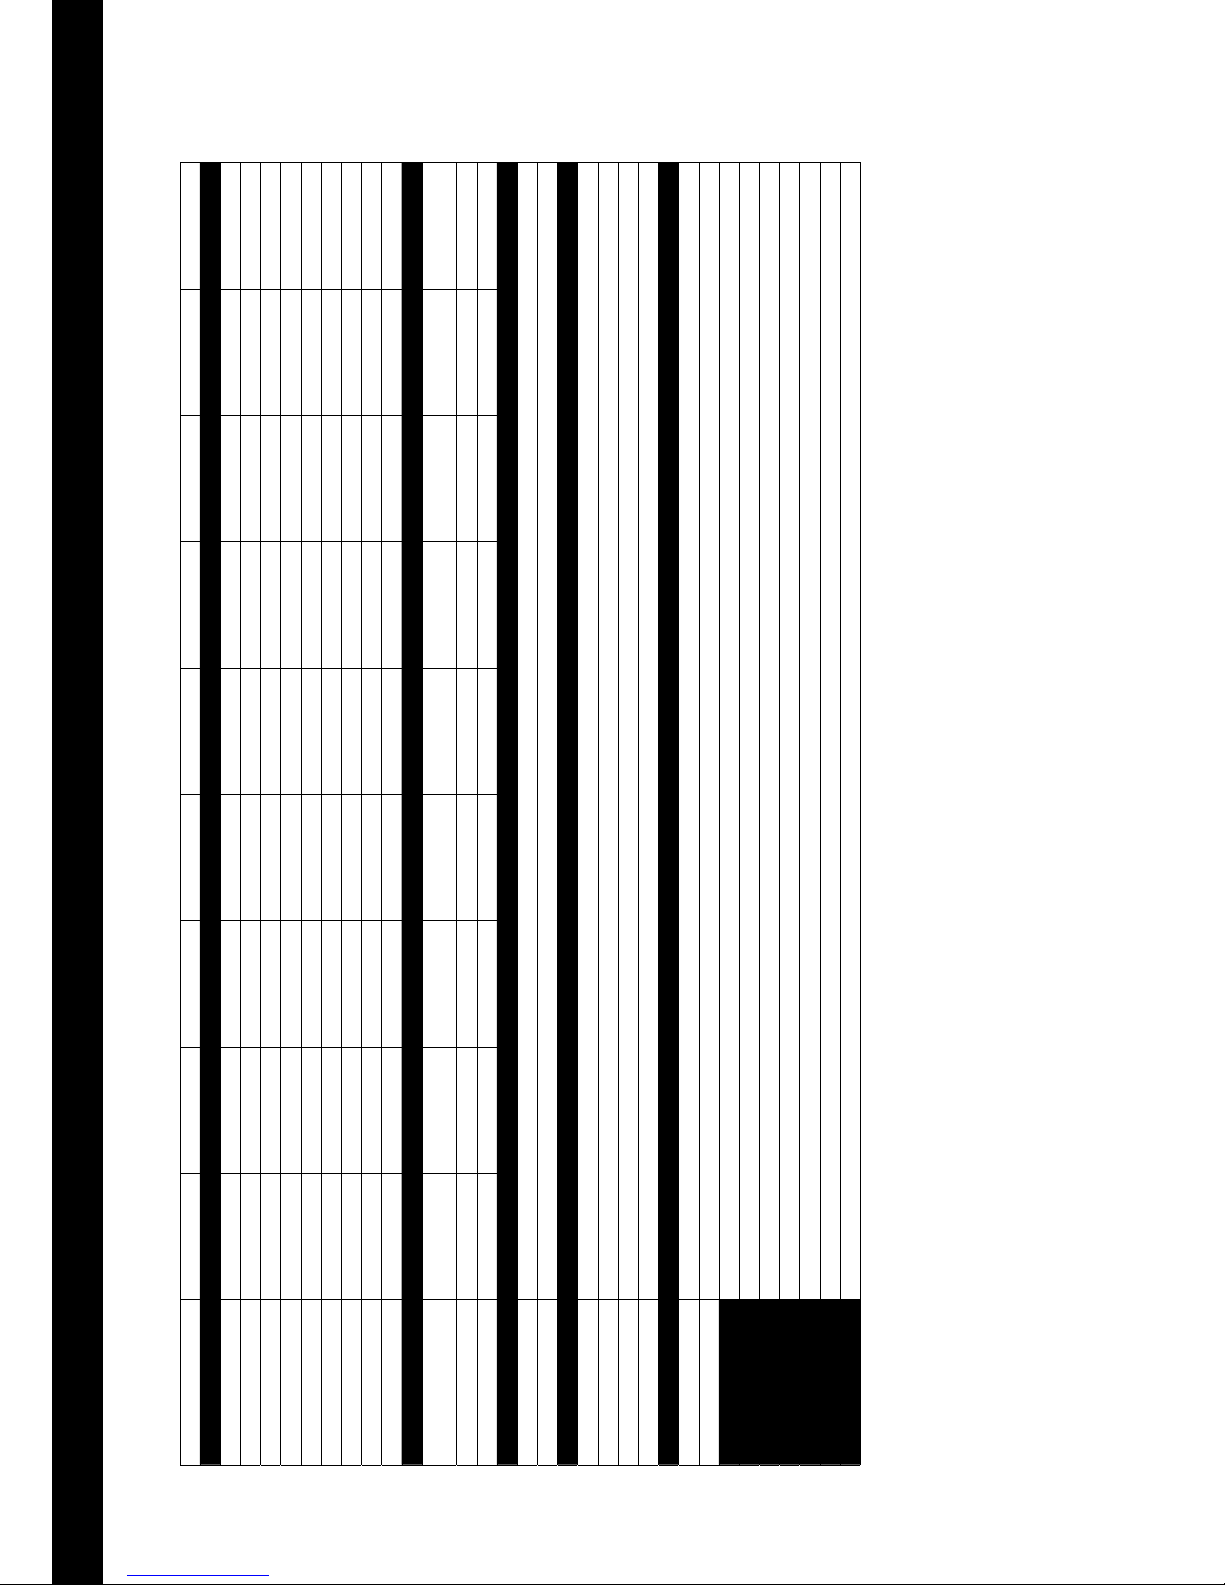
Technical Specications
TV Size 15” 19” 22” 27” 32” 42” 46” 55” 65”
Display
Screen Type LED LED LED LED LED LED LED LED LED
Active Screen Size (WxH) 345.5 x 195mm 408 x 255mm 475 x 297.5mm 599 x 337mm 698 x 392mm 933 x 526mm 1019 x 573.5mm 1212 x 683mm 1430 x 805mm
Resolution 1920 x 1080 pixels 1920 x 1080 pixels 1920 x 1080 pixels 1920 x 1080 pixels 1920 x 1080 pixels 1920 x 1080 pixels 1920 x 1080 pixels 1920 x 1080 pixels 1920 x 1080 pixels
Brightness 300 cd/m2 300 cd/m2 300 cd/m2 500 cd/m2 500 cd/m2 500 cd/m2 500 cd/m2 500 cd/m2 500 cd/m2
Aspect Ratio 16:9 16:9 16:9 16:9 16:9 16:9 16:9 16:9 16:9
Contrast Ratio 400:1 1000:1 1000:1 1000:1 1500:1 1500:1 1500:1 1500:1 1500:1
Colour Depth 16.7 M 16.7 M 16.7 M 16.7 M 1.06 Billion 1.06 Billion 1.06 Billion 1.06 Billion 1.06 Billion
Viewing Angle (L/R/U/D) 89° / 89° / 89° / 89° 89° / 89° / 89° / 89° 89° / 89° / 89° / 89° 89° / 89° / 89° / 89° 89° / 89° / 89° / 89° 89° / 89° / 89° / 89° 89° / 89° / 89° / 89° 89° / 89° / 89° / 89° 89° / 89° / 89° / 89°
Response Time 6 ms 6 ms 6 ms 6 ms 6 ms 6 ms 6 ms 6 ms 6 ms
Power
Mains Power 110-240V (DC
12V/3A adaptor)
110-240V (DC
12V/4A adaptor)
110-240V (DC
12V/4A adaptor)
110-240V (DC
24V/4A adaptor)
110-240V (DC
24V/5A adaptor)
AC 110-240v
50/60Hz
AC 110-240v
50/60Hz
AC 110-240v
50/60Hz
AC 110-240v
50/60Hz
Power Consumption 25 watts 42 watts 42 watts 50 watts 100 watts 120 watts 120 watts 175 watts 250 watts
Standby Consumption 3 watts 3 watts 3 watts 3 watts 3 watts 3 watts 3 watts 3 watts 3 watts
Audio
Speakers 2 x External Speakers
Speaker Output 80 Watts
Design
Glass Type High Intensity Tempered Glass - Heat, Wear and Scratch Resistant
Glass Thickness 8mm
Mirror Size Custom Sizes Available
TV Case Material Steel Construction
Operating Environment
Working Temperature 0°C ~ +50°C
Working Humidity 10% ~ 90%
System DVB-T / T2 / C TV System, HD Freeview (Digital) TV & Radio, Analogue Tuner, MHEG 5 System, Tech2o Smart TV
Smart TV Processor:DualCore 1.5GHz, Chipset:Amlogic®AML8726-MX, Graphics:IntergratedHDGraphics, Memory:4GB, Storage:512MB, OperatingSystem:Android®, NetworkConnections:Wi-Fi,RJ45LAN
Ports and Connectors TV / Aerial Input, Component (YPbPr) Input, AV Input, SCART Input, VGA Input, HDMI Input, Sky Magic Eye IR Link, RS 232 Input, RJ 12 Input, RJ 45 Input, IR IN and OUT, SPDIF Audio Output, USB Input
Certifi cations & Standards CE, RoHS, ISO9001, ISO14001
Waterproof Rating IP65
Package Contents Mirror TV, 2 x External Speakers, Waterproof Remote Control, Smart TV Wireless Keyboard, Power Adapter, User Manual, Installation Guide, Installation Brackets
Product Warranty 2 Year Warranty
Page 7

7
Installation Guidelines
• We advise that a professional body should install our televisions. We do not take any liability for the
television being installed incorrectly and then causing damage or harm to the installer or user.
• Please do not open or tamper with the television, as this can break the television seal, which may lead to
water penetrating the internal parts of the television.
• The brackets provided can easily endure the weight of the television, however please conrm the area
your xing the bracket to can hold the television bracket and television weight safely.
• Install the television on a smooth surface and in an area where people are not likely to collide with the
television once installed.
• Do not plug the power cable in an area subjected to water or moisture.
Page 8
8
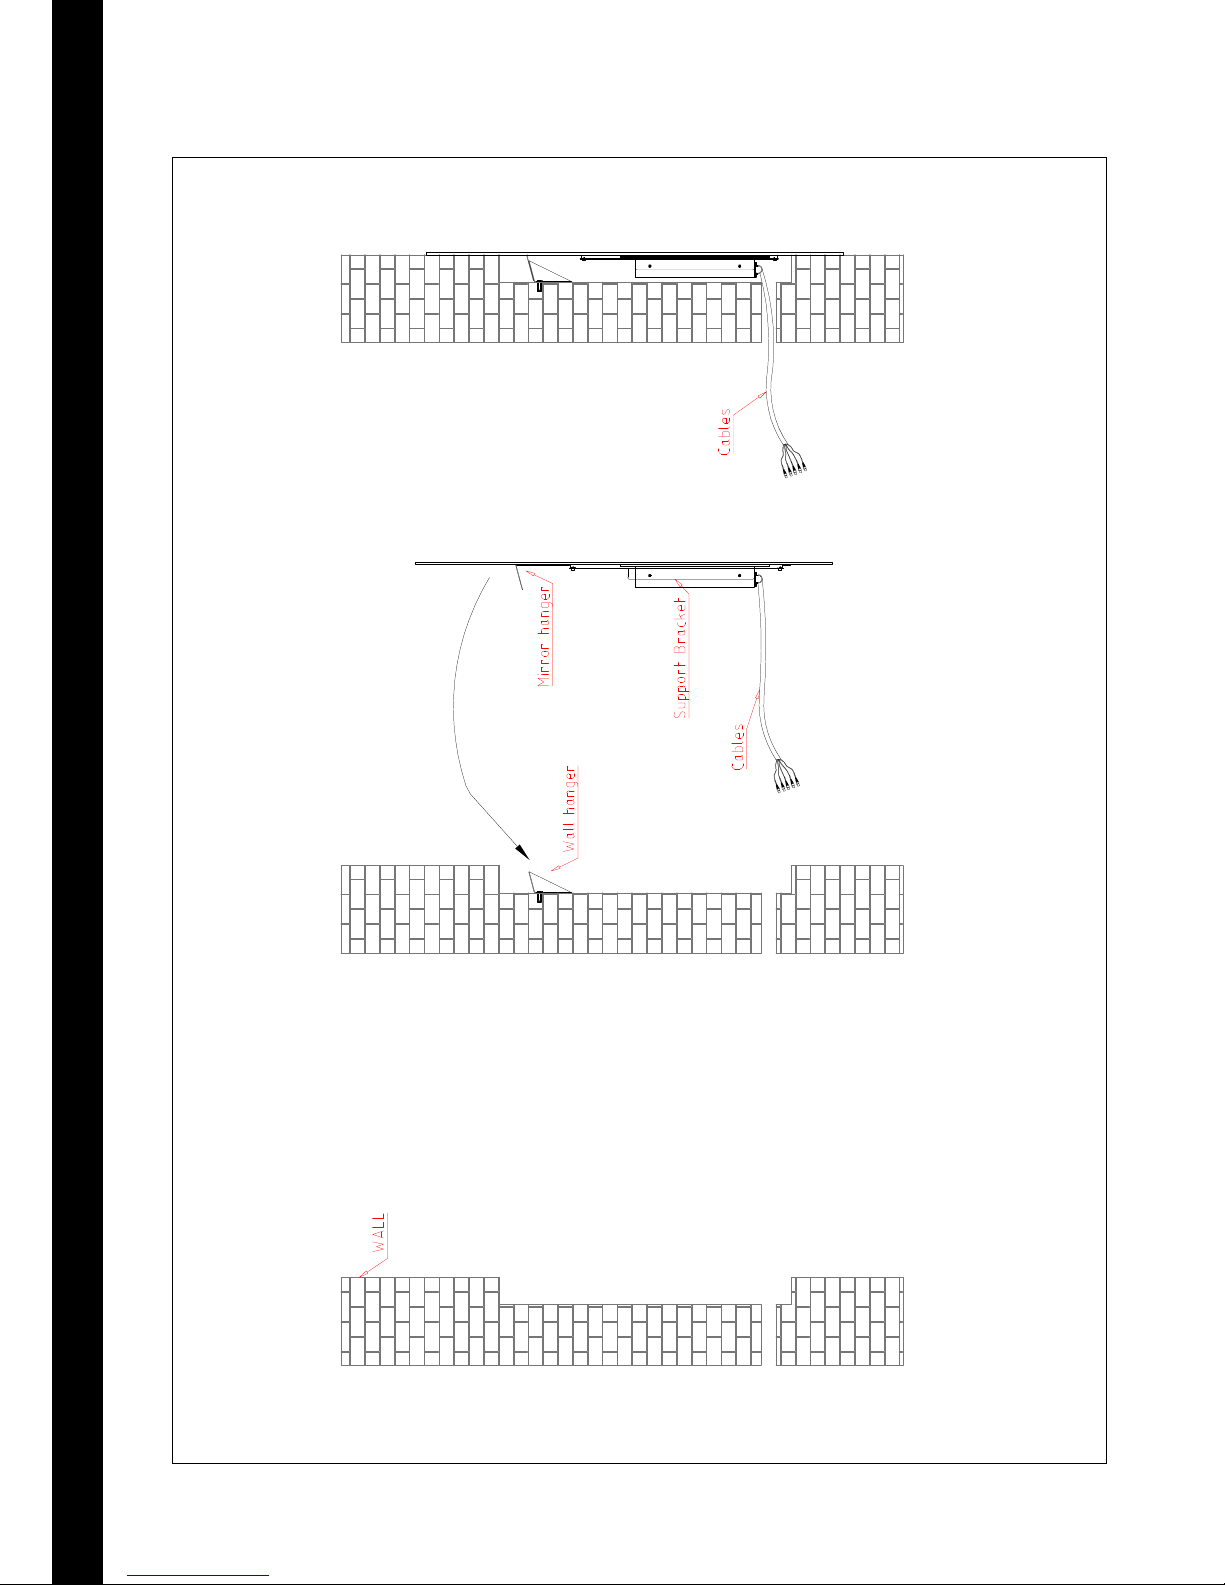
Installation Instructions - In Wall Installation Method
'(6,*1(5
'5$:,1*
'5$:,1* 7,7/(
&+$5*(5%<
'5$:,1*12
6&$/(
(',7,21
'$7(
MOK
Page 9
9
Installation Instructions – Ceiling Speakers
Introduction:
Our best in-ceiling speakers for music and movies
Simplified in-ceiling installation method with snap-fit
grills
Features a 14.5cm woofer and single tweeter; delivering
deeper low notes for more dramatic movie sound effects
and musical richness.
Experience excellent sound quality in your home and
bathroom with TECH2O in-ceiling speaker. Our unique
speakers are designed to deliver lifelike sound with more
depth and impact than ever before. The speaker performance offers even distribution as well as being easy to
install and flush-mountable.
Technical Specification:
Technical Specification In-Ceiling 2 Way Speaker
Wattage: 80watts
Impedance 4 Ohms
Frequency Response 60 - 20,000 Hz
Sensitivity 90dB
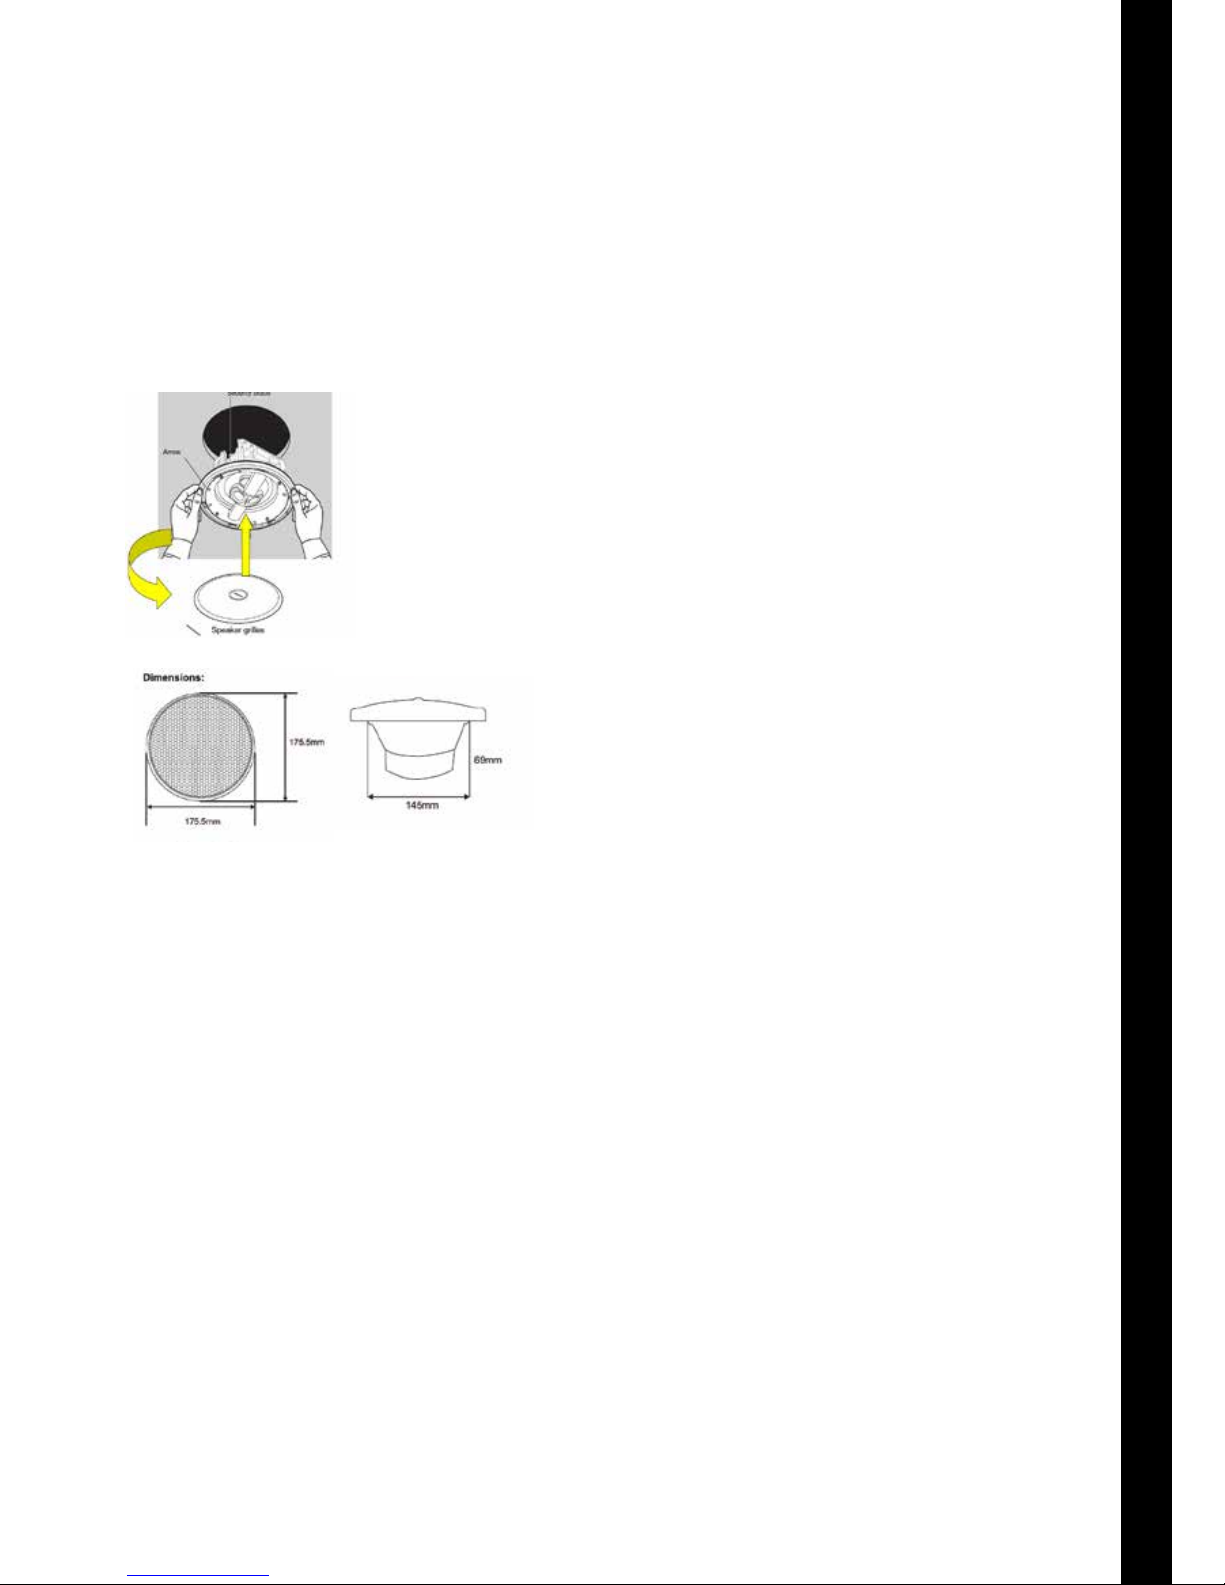
Grill Diameter: 175.5mm
Speaker Depth 69mm
Cone Diameter 145mm
Ceiling Hole Size 140mm
Waterproof Rating IP66
Colour Artic White
Enclosure Material UV Stabilised ABS Plastic
Grill Material Stainless Steel
Speaker Cable Length 6 meters
Caution
Please read this installation guide completely before you
start the installation process. Please also carefully
consider your experience installing such items and if you
have doubts about completing this installation, you
should contact either the dealer you purchased the
product from, an electrician, or a professional
audio/video installer.
If any part of the speaker appears damaged, do not use.
Notify your supplier immediately.
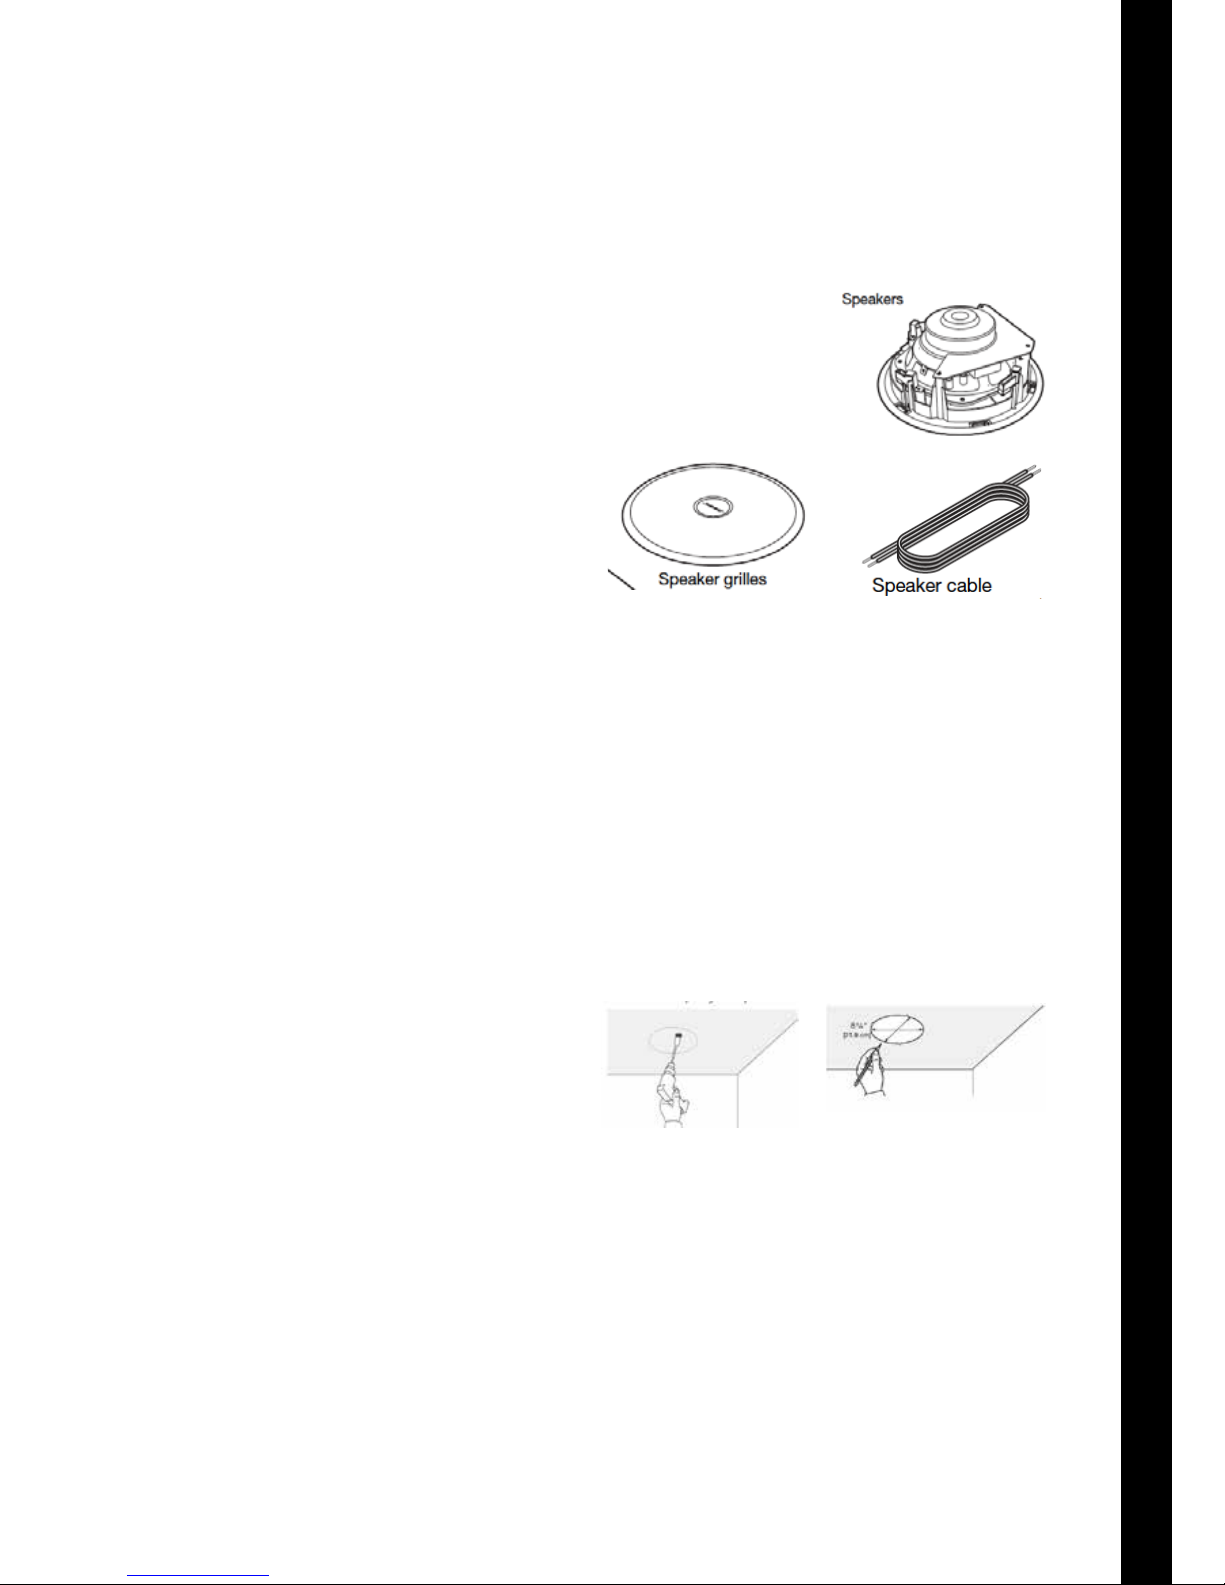
Unpacking Your Items
Carefully unpack the speakers. Check to be sure the
carton includes all the parts shown below:
➢ Speakers
➢ Speaker Grill
➢ Speaker Seal
➢ Speaker Cable
Installation Guide
Stage 1: Create a template and pilot hole
Create a template of the speaker and place on to the
area where the speaker is being fitted. Draw around the
template to create a guide for cutting.
Ceiling hole size: 145mm
Drill a pilot hole inside the circle you have drawn. Choose
a spot near the center or closer to the outside edge of
the circle, depending on which will be easier when you
begin to use your cutting implement.
Ceiling Speakers
Installation Guide
Page 10
10
Installation Instructions – Ceiling Speakers
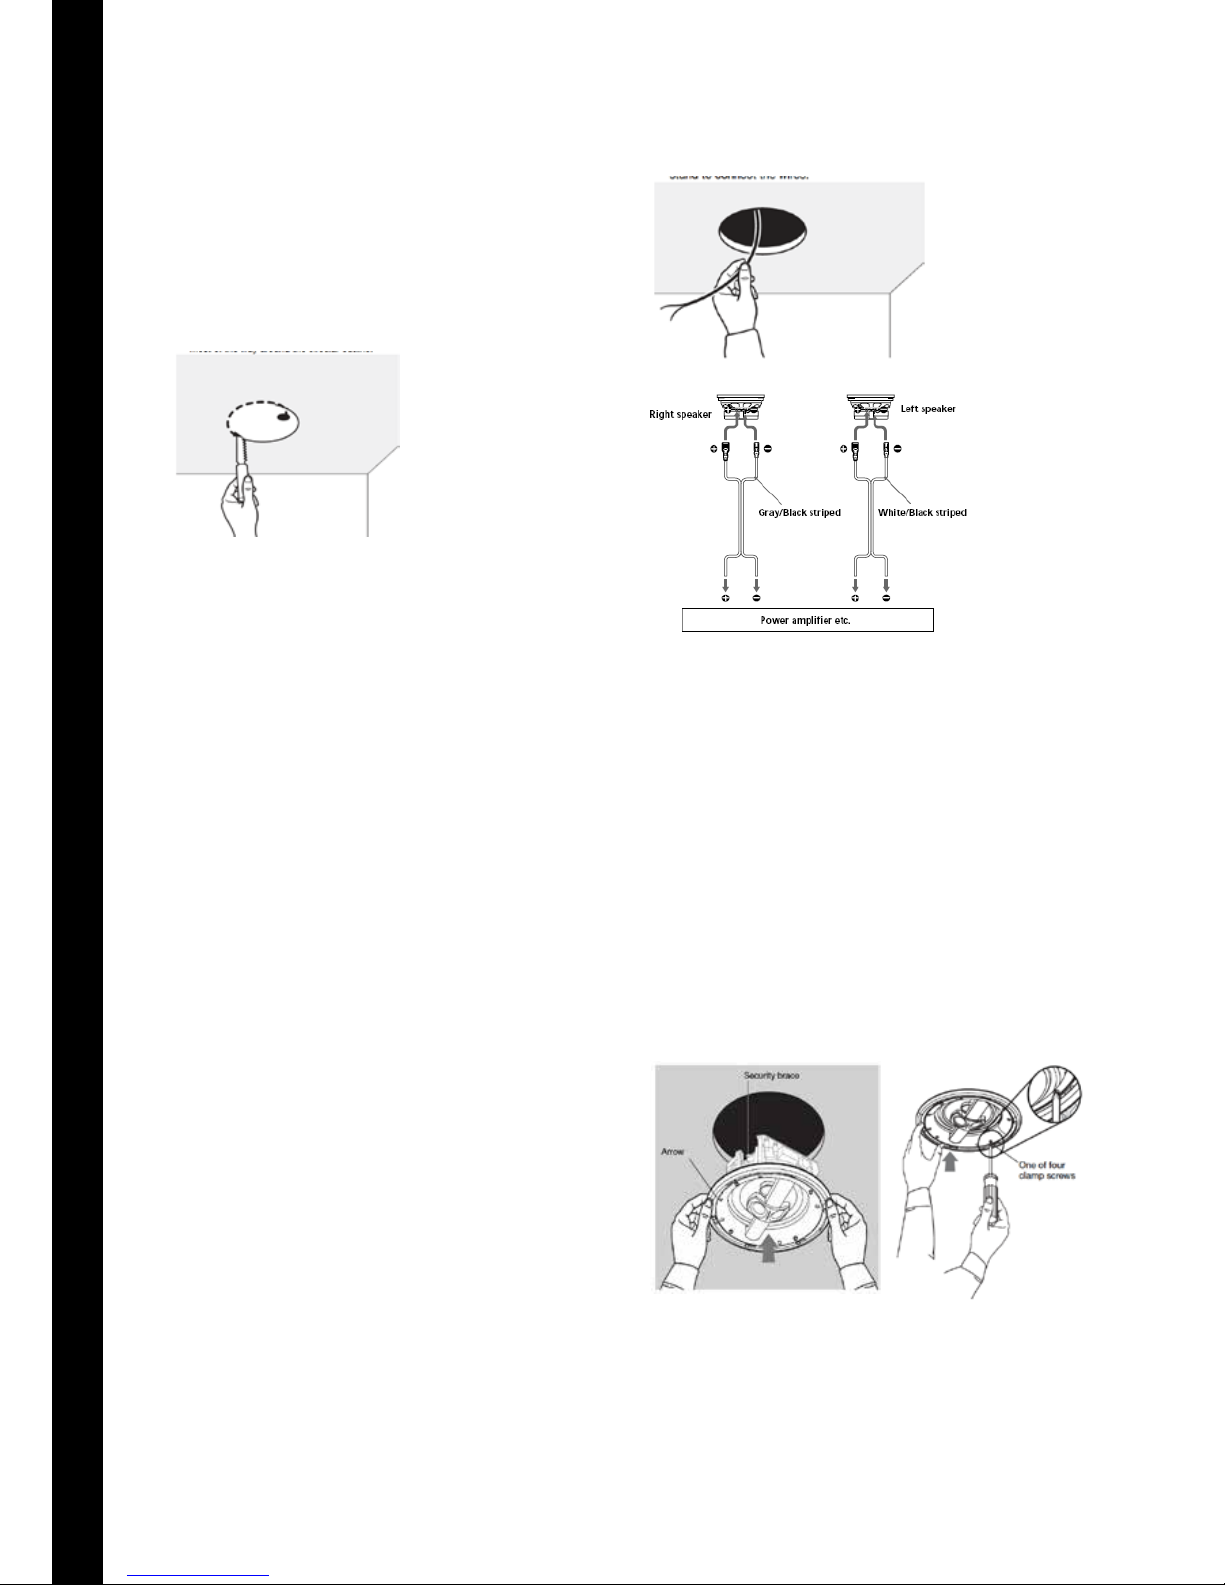
Stage 2: Cutting the speaker hole
Use a single sided saw / blade to cut out the ceiling
material. Insert the tip of your saw / blade into the pilot
hole and cut most of the way around the circular cutting
line. Place one hand under the circle to brace it and
complete cutting the hole.
Stage 3: Getting the wire ready & connecting the
speaker
When your speaker cable is within reach of the hole you
have cut, follow the procedure below:
1. Push any insulation away from inside the speaker
hole.
Be sure that all blown insulation is at least 4 to 6 inches
(10 to 15cm) from the edges of the hole.
2. Locate and pull out at least 14 inches (36 cm) of your
speaker cable. Allow enough cable for where you stand
to connect the wires.
3. As you connect the wires, be careful to match the
polarity of each wire to the proper terminal, as described
below. An error here will adversely affect speaker
performance.
> Choose the one wire on the cable end that has the
larger connector (+). Simply push the connector on to the
larger of the receivers on the underside of the speaker.
> Insert the other wire that has a smaller connector (-)
onto the smaller receiver located on the underside of the
speaker.
> Do not allow exposed wires to brush against each
other. This could damage your speaker or your receiver/amplifier. Trim any excess wire and reinsert it as
necessary.
Stage 4: Securing the speaker
Offer the speaker up to the hole that’s been created,
making sure all cables are within the ceiling to avoid
pinching the speaker cable.
You can use a Phillips-head screwdriver to tighten /
secure the speaker firmly within the ceiling. We advise
using between 6-8 medium sized screws to hold the
speaker securely in place.
Tighten these screws firmly, but avoid using so much
pressure that the screws compress the ceiling material.
This can cause the material to crumble, creating an
uneven surface with gaps between the speaker face and
the ceiling.
Ceiling Speakers
Installation Guide
Page 11
11
Installation Instructions – Ceiling Speakers
Stage 5: Attaching the grille
Once the speaker is securely fixed within the ceiling, offer
the speaker grille up to the speaker and push in to the
allotted grove that runs around the exterior of the
speaker casing.
The speaker grille will simply snap in to place.
WARNINGS:
Certain forms of insulation (such as horse hair plaster,
newspaper, cellulose, or any blown-in materials) may
pose a risk of ignition. Be sure to keep all insulation
away from speakers in accordance with the installation
instructions.
• Make sure the spot chosen is safe for cutting. Do not
cut through surfaces that may have hazards such as
electrical wiring, conduits, or plumbing concealed
behind them. Follow all other safety precautions.
• If you believe there is asbestos insulation in the ceiling
where you want to install a speaker, do not drill or cut
there. Find a different ceiling area for the speakers
instead.
• If there is another type of moveable insulation in the
ceiling, you can proceed after reading these tips:
– You may need to cut or push the insulation away
before inserting the speaker.
– Beware of hidden nails when reaching into the
ceiling to remove insulation.
– Wear gloves and protection for your mouth, nose,
and eyes before handling insulation that contains
fiberglass.
– Be sure keep a 4-6 in. (10-15 cm) area around the
speaker hole free from any types of insulation to
maximize acoustic performance.
Ceiling Speakers
Installation Guide
Page 12

12
Remote Control Overview
• The waterproof remote controller comes with one CR2025 3V battery ready installed.
• The remote controller doesn’t need syncing to the television.
• To control the television with the remote controller, simply aim the controller at the television. If there are
barriers between the remote controller and television the response may be delayed or non-existent.
• For the best remote controller connection stay within 3-metres of the television and keep the remote at a
30-degree angle. The remote controller will stay connected to the television up to a distance of 8 meters.
• The remote controller is rated IPX5 waterproof classication. Do not submerse the remote controller
underwater for long periods of time.
• To change the batteries use a coin to rotate the opening on the back of the remote controller.
Page 13
13
Remote Control Key Functions
Page 14
14
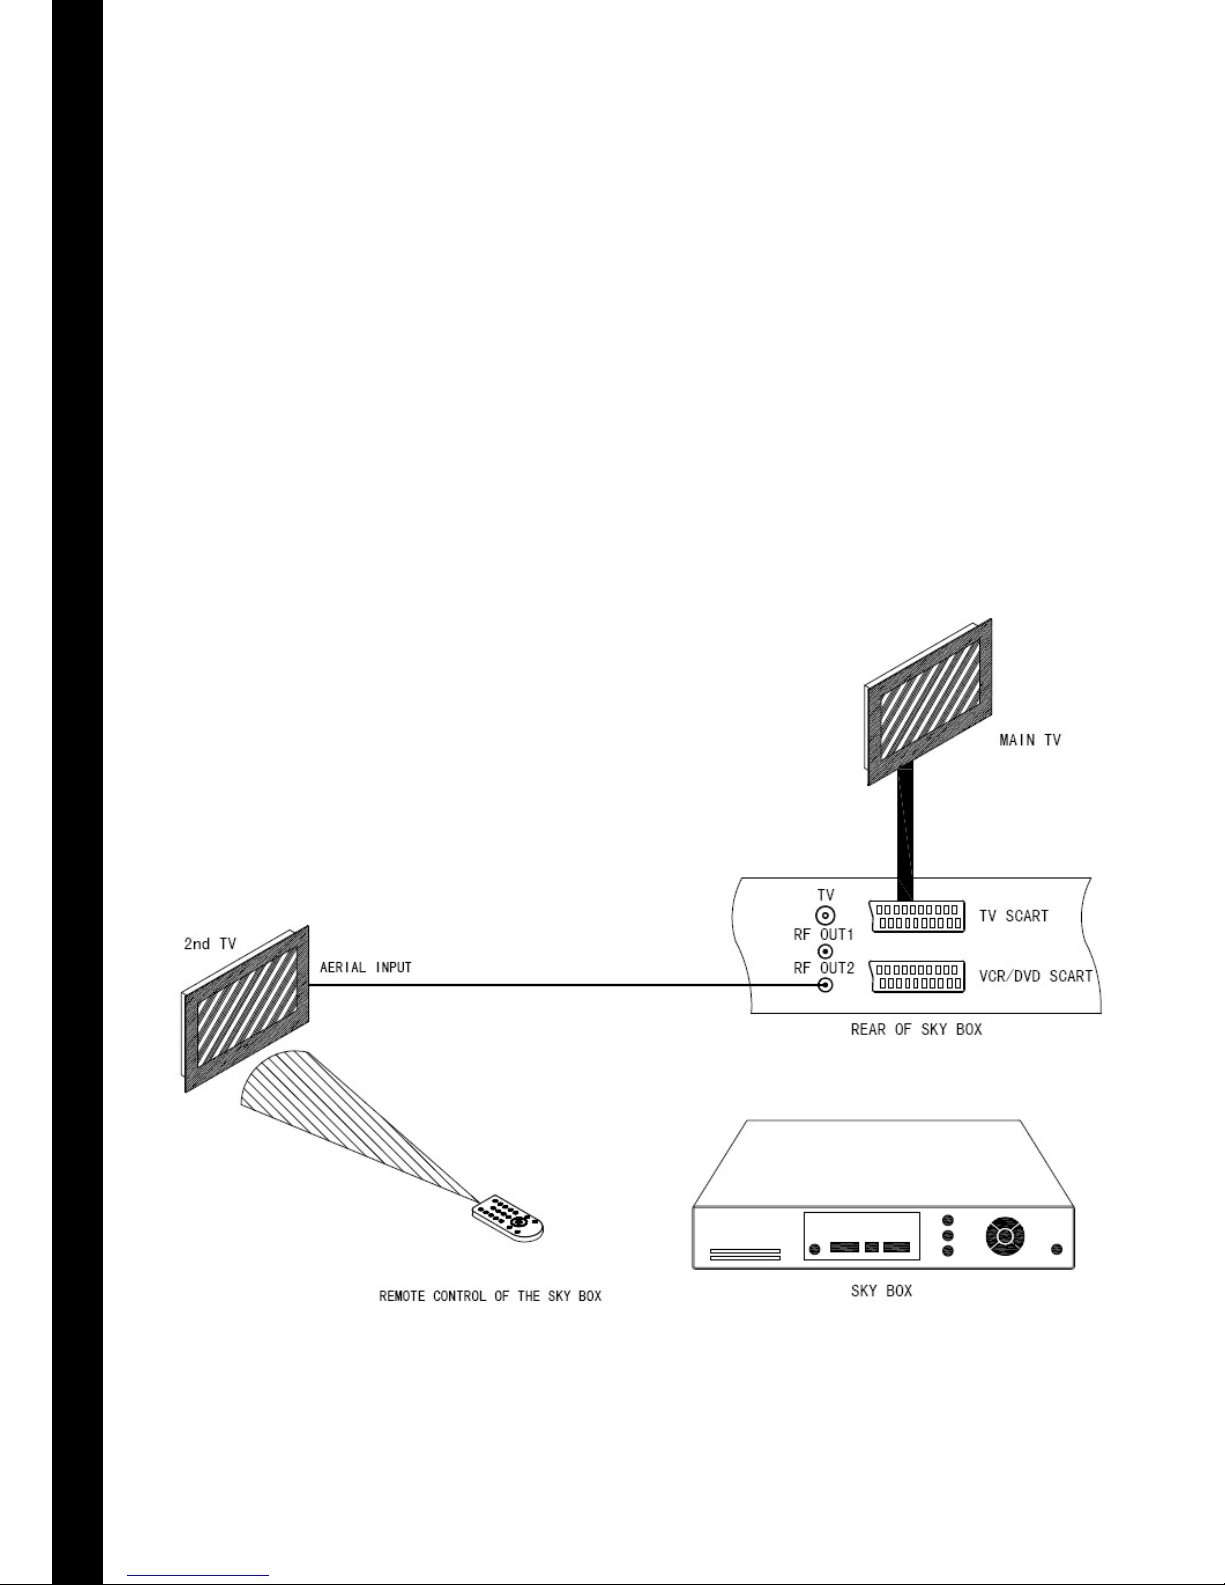
The built in Sky Magic Eye IR Link System allows you to control Sky Digital broadcasts on your
Television… Enabling you to view Sky television programmes and control the Sky box from another
location.
To setup the Sky Magic Eye IR Link System, you will need to run a length of coax cable from the socket marked
RF2 output on the back of the Sky box directly to the televisions aerial input. Sky television programmes can
then be viewed on the ANALOGUE part of the tuner. Your Sky box needs to be set up to faciliate for an RF2
output. Please refer to your Sky user guide on how to do this.
Control of the Sky system is available via either a standard Sky remote control or the included learning remote
control. The IR receiver within the television will receive the IR signal from the remote control, send it back
down the aerial cable to the Sky box allowing you to have complete control from another location.
Please refer to the diagram below for illustrative reference of how to set up your Sky Magic Eye IR Link System:
Sky Magic Eye IR Link Instructions
6 SKY-EYE instructions tech2o home.pdf 1 15/08/2013 19:20
Page 15
15
RS-232 Protocol
7 RS 232 Protocol tech2o BATHROOM.pdf 1 17/08/2013 08:30
Page 16
16
IR Remote Control Codes
9 IR Remote Control Codes tech2o BATHROOM.pdf 1 17/08/2013 08:31
Page 17
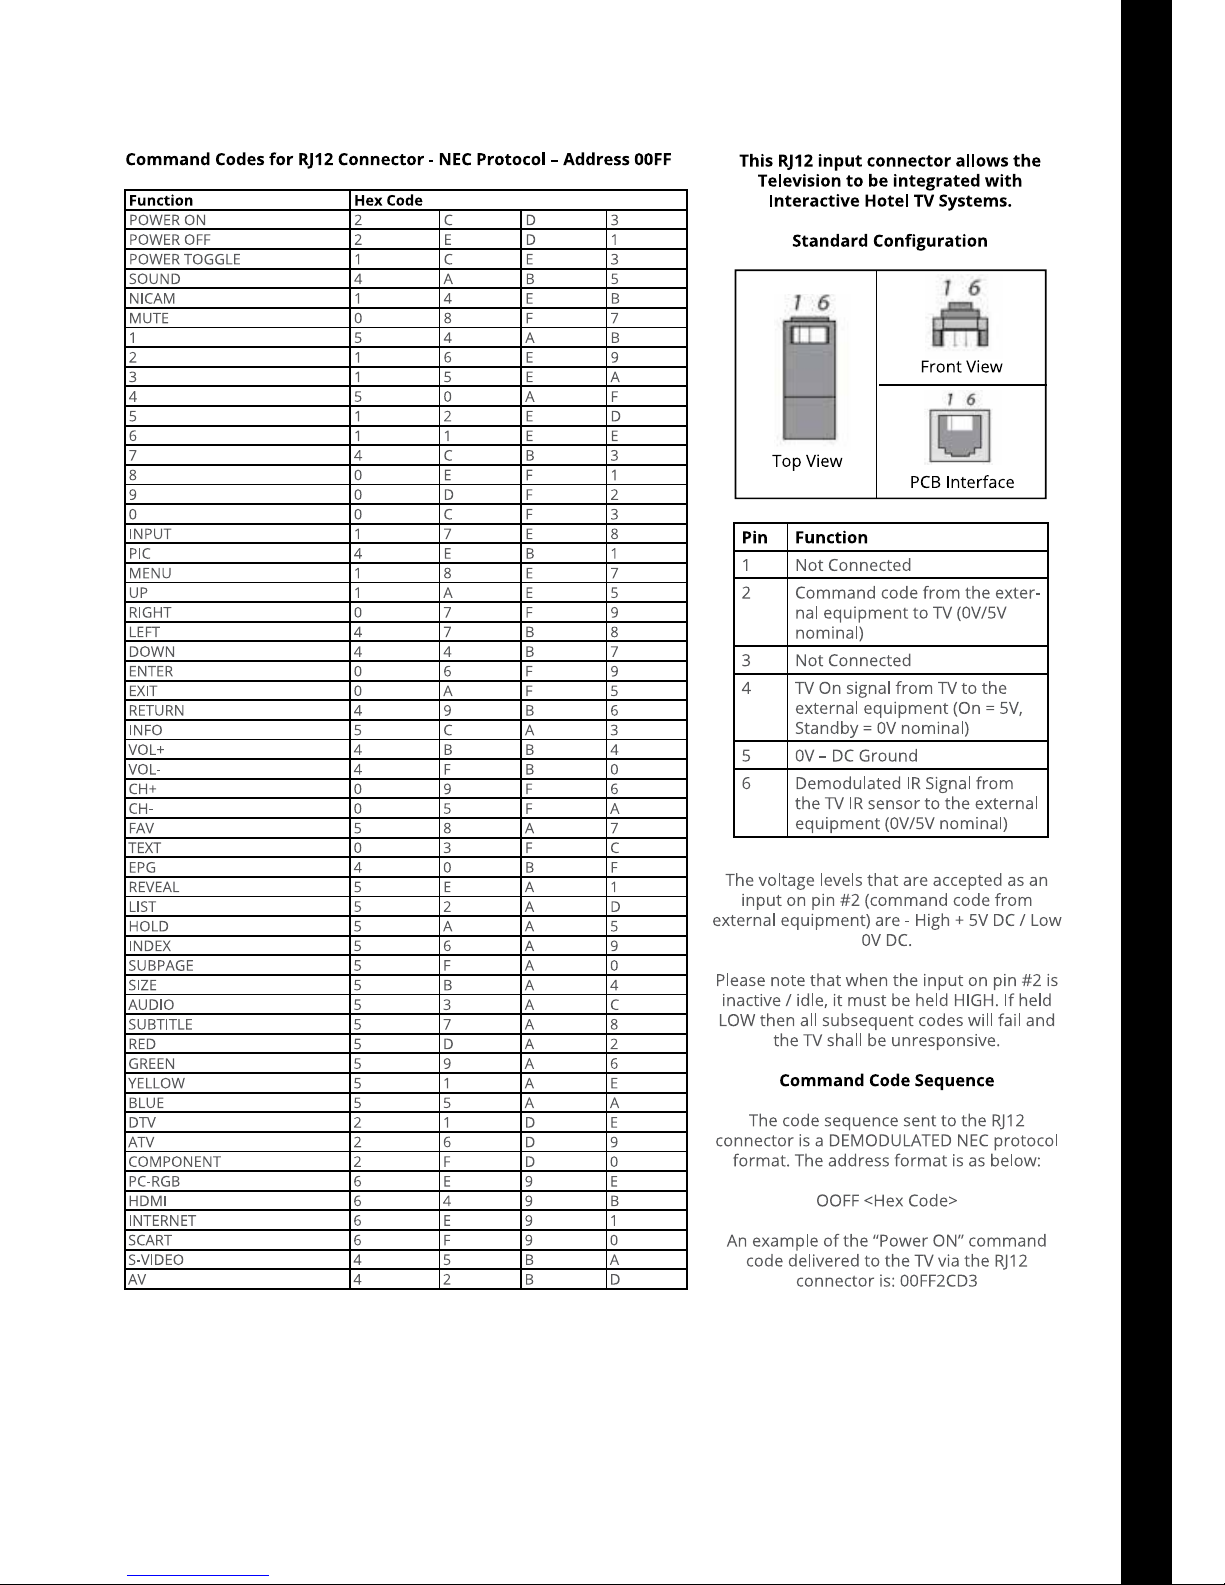
17
RJ12 Command Codes
8 RJ12 Connection Instructions tech2o BATHROOM.pdf 1 17/08/2013 08:32
Page 18
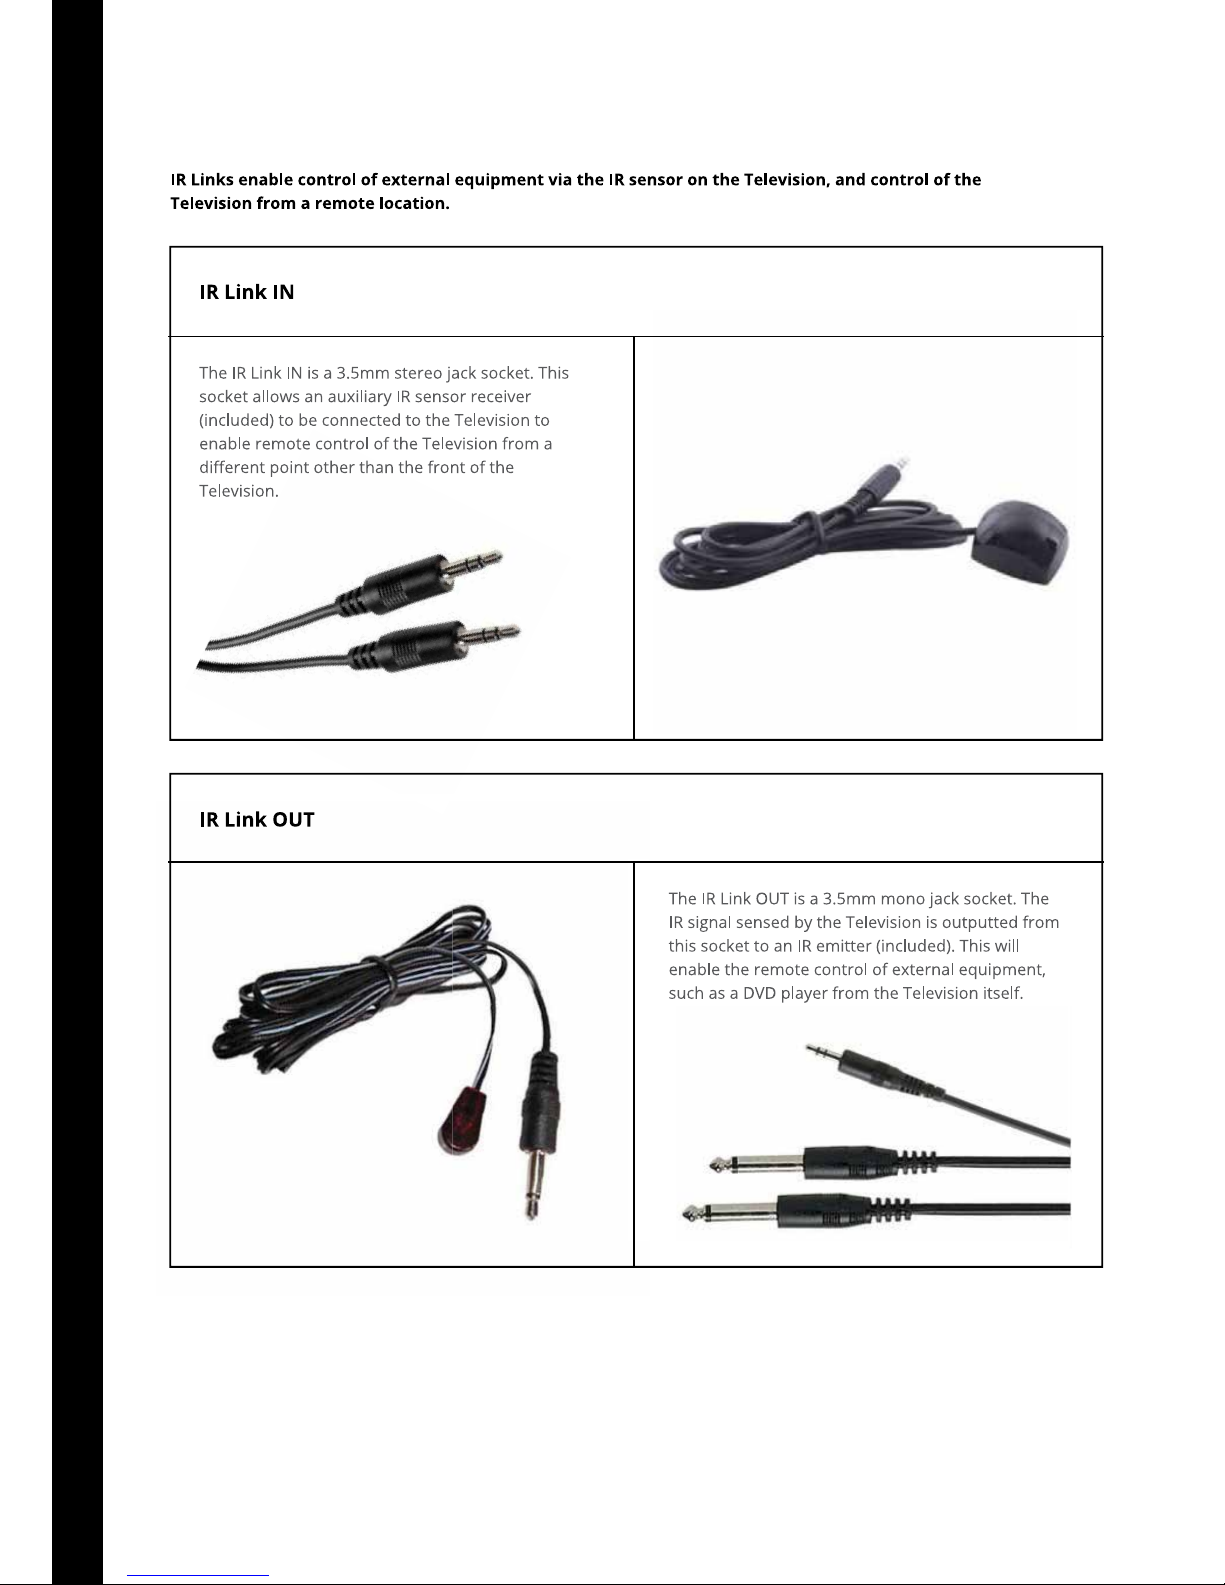
18
IR Link In & Out Instructions
10 IR Link In & Out Instructions tech2o Bathroom.pdf 1 17/08/2013 08:33
Page 19
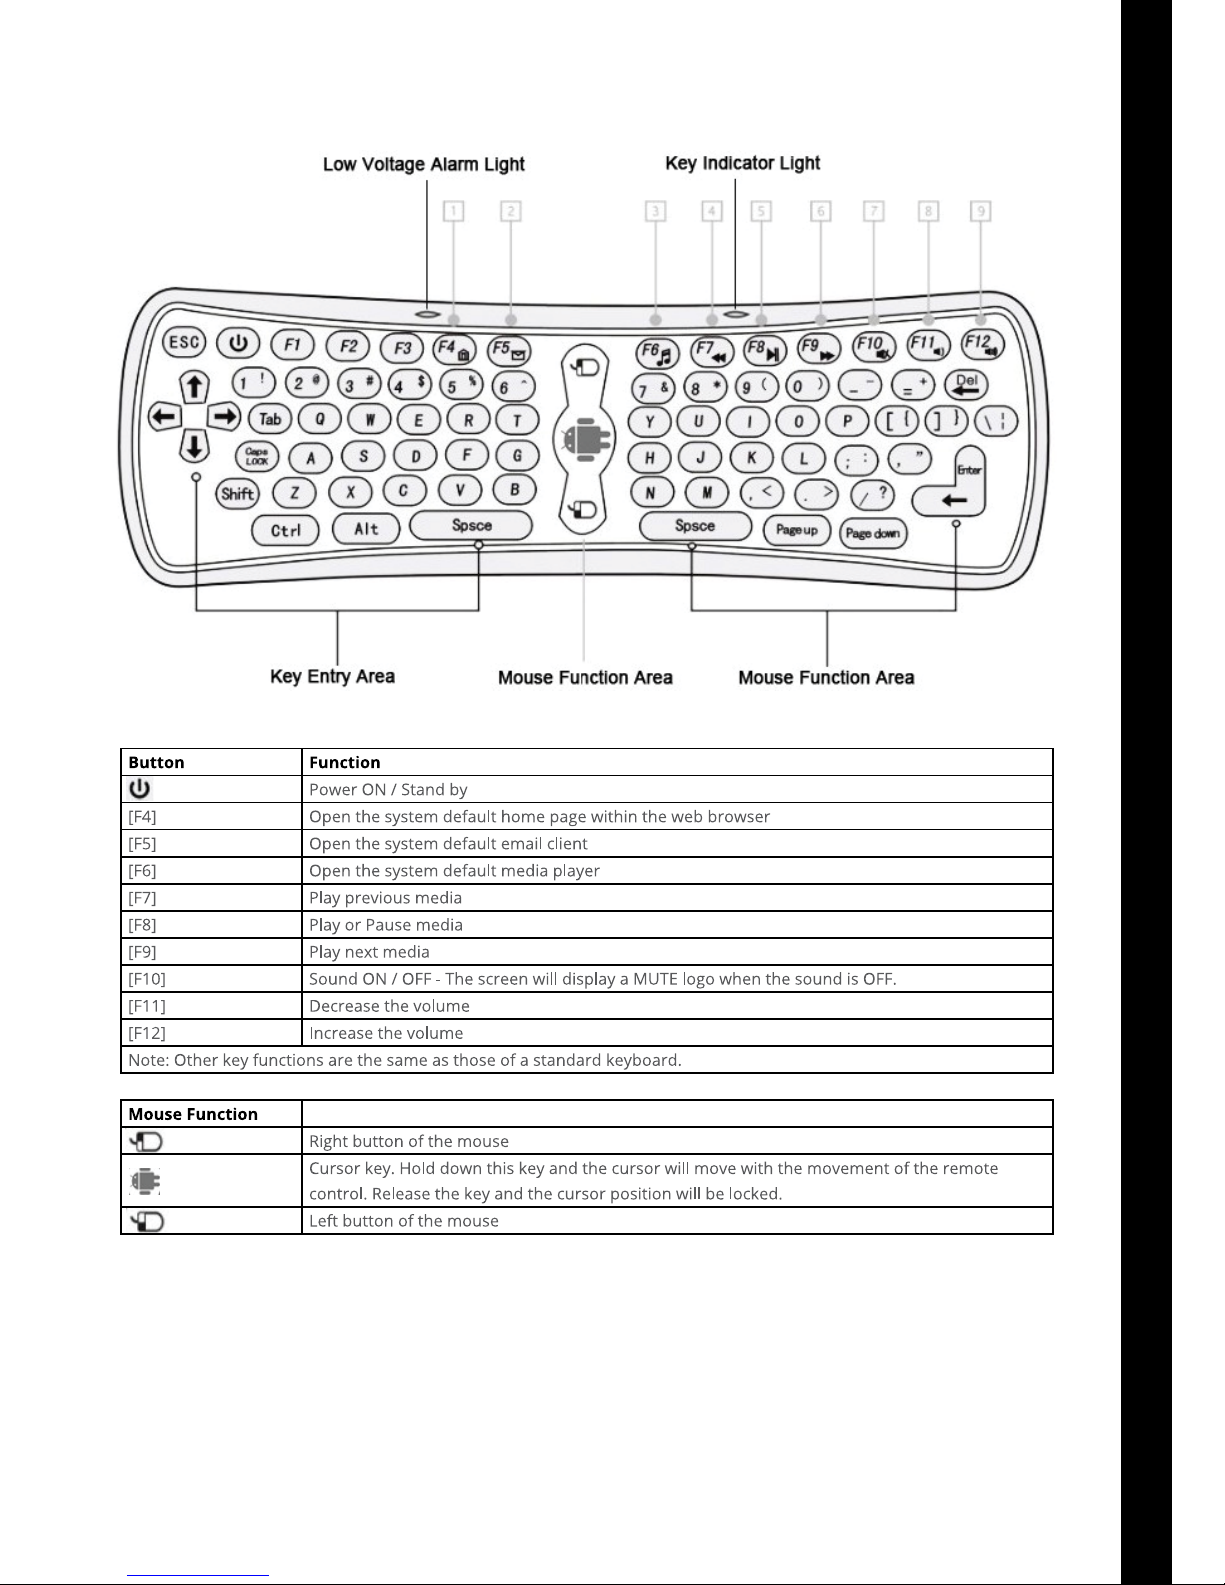
19
Smart TV Remote Control Key Functions
3 Smart TV Remote Control Key Functions tech2o BATHROOM.pdf 1 17/08/2013 08:36
Page 20
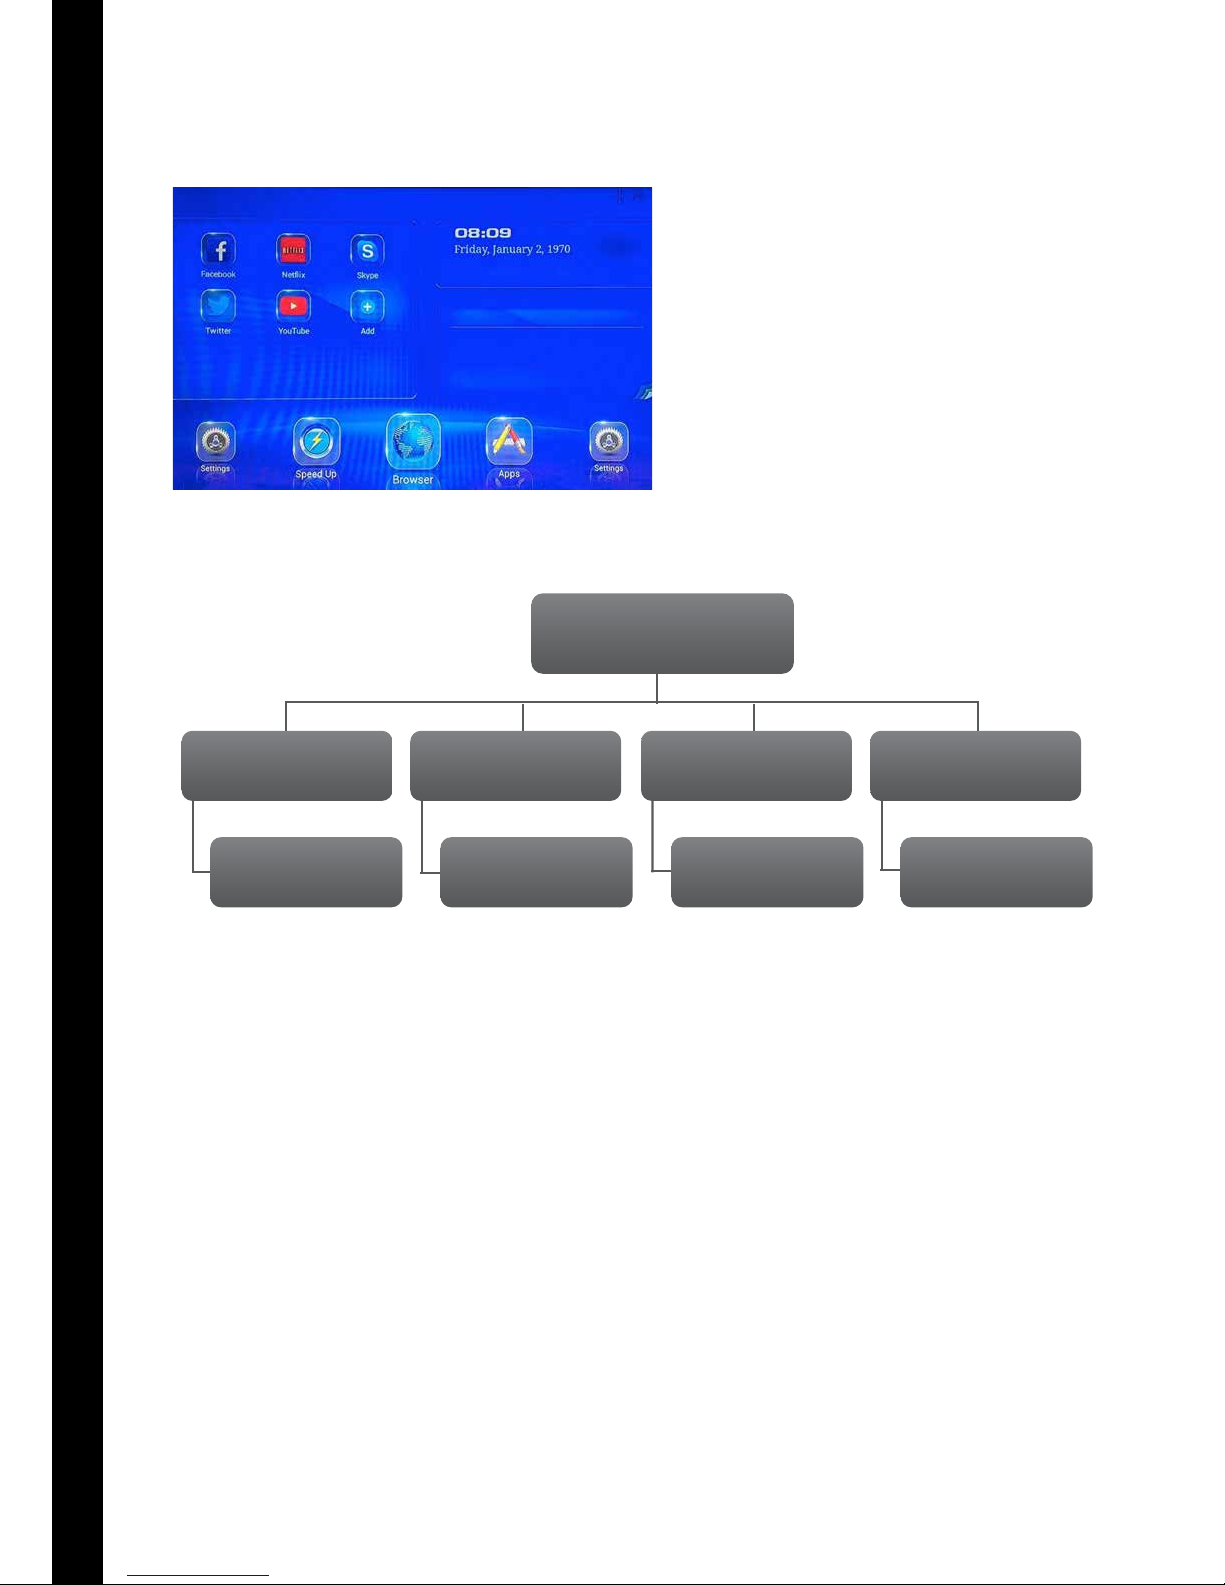
20
Smart TV User Guide
1.0 Specication
• Built on a Linux-based Android operating
system developed by Google
• Equipped with Wi-Fi and Ethernet input for
internet connectivity
• Google Play Application installed as standard
allowing you to access and download a
multitude of android applications
• Supports USB input and Media Player for
presentation of media (picture, video and
audio) in a wide range of formats
• Supports wireless keyboard and mouse
• Supports multiple languages
2.0 Homepage Interface
Homepage
Browser
Surf the net
Speed Up
Force quit
open applications
Apps
Access and
download apps
Settings
Change
system settings
3.0 Network Setup Instructions
WI-FI Connectivity
a. Select “Settings” on the Smart TV homepage menu
b. Set Wi-Fi to be “ON” and the system will
automatically scan for available wireless networks
c. Once the scanning process has nished, the
available networks will be listed on the screen
d. Select the wireless network to connect with, and if
secure, enter the relevant password
Note: when in Wi-Fi mode, the signal status indicator
will be displayed in the status bar at the top of the
page, which describes the current strength of signal.
LAN Connectivity
a. Select “Settings” on the Smart TV homepage menu
b. Select “Advanced Settings”
c. Set “Ethernet” to be “ON”
If your network allows for dynamic acquisition of IP
address, then the system will automatically acquire
the IP address for you. If your network does not allow
dynamic acquisition of IP address, then you will have
to select “Static IP Settings” and input the relevant
information accordingly.
Page 21
21
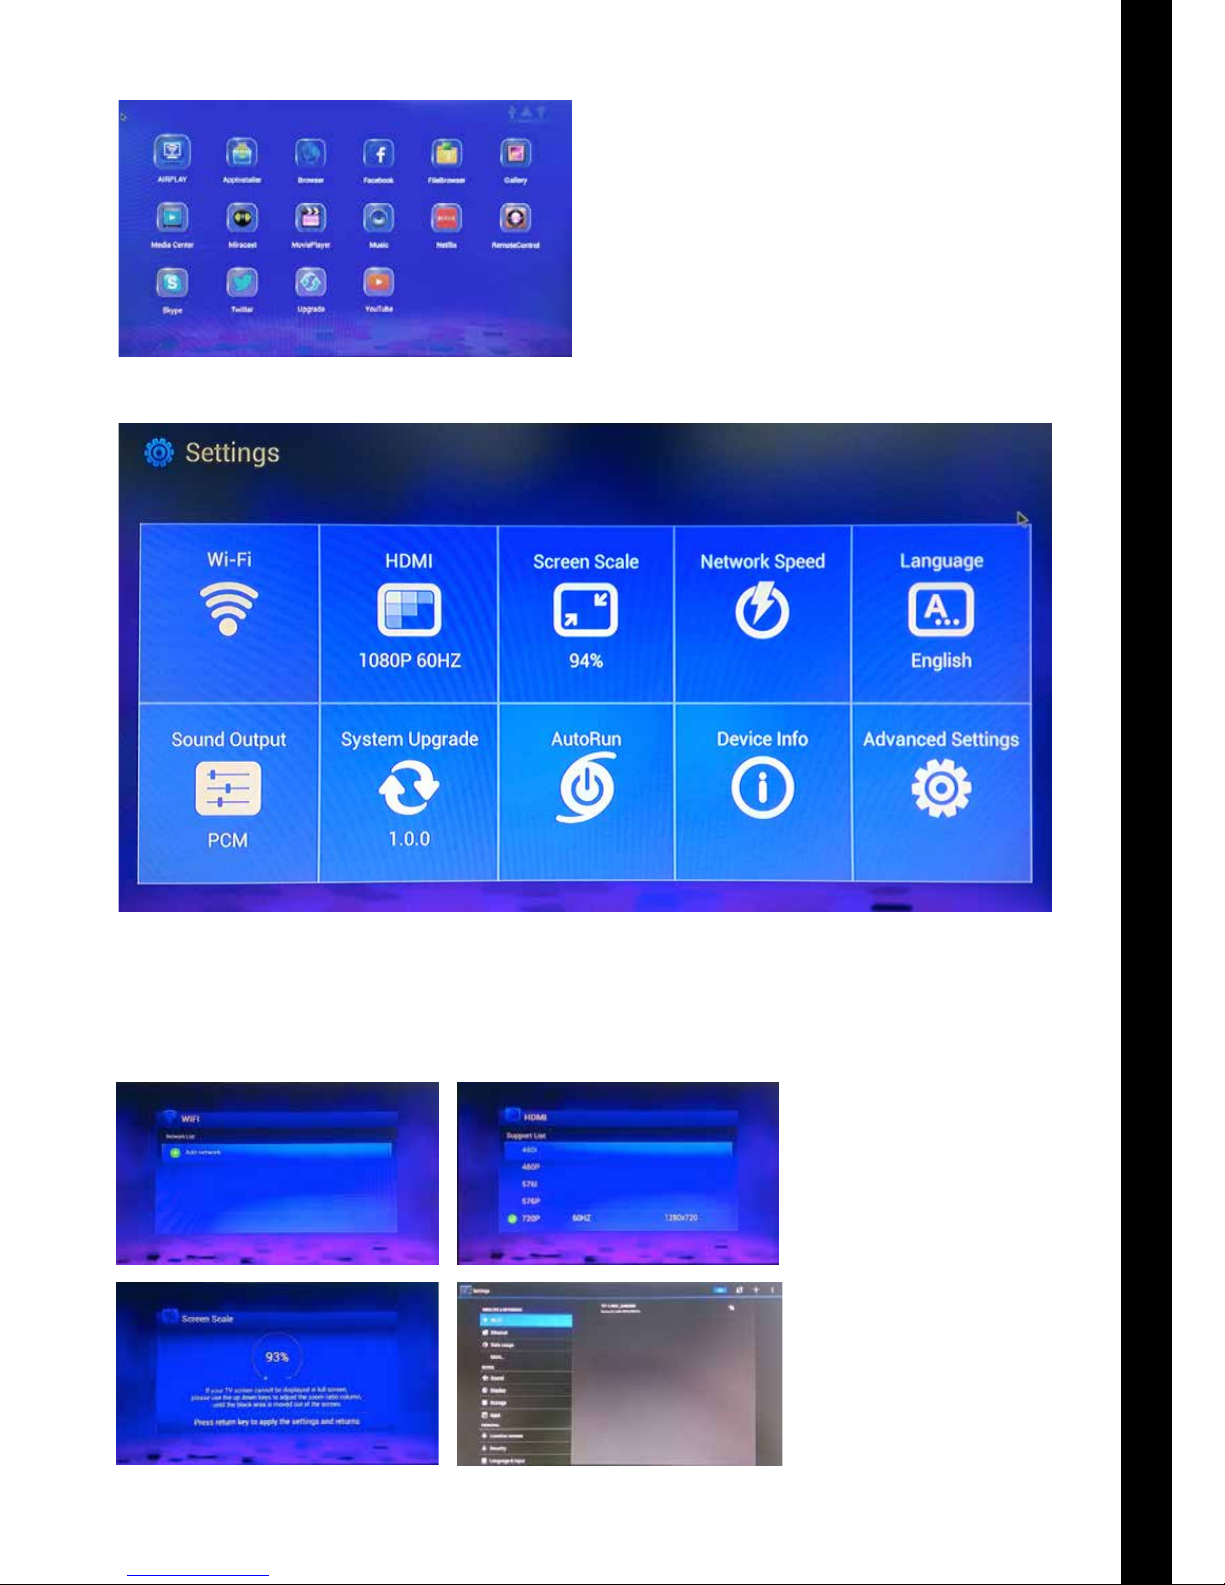
4.0 Apps Page Screenshot
5.0 Settings Menu
Wi-Fi: Setup and select
Wi-Fi network.
HDMI: Change the screen
resolution.
Screen Scale: Adjust the
zoom ratio.
Network Speed: Test the
network status.
Language: Change the
text language.
Sound Output:
Select audio output.
System Upgrade:
Upgrade software.
AutoRun: Select apps to
auto-run on start up.
Device Info:
View system information.
Advanced Settings:
Change further system
settings.
Page 22
22
OSD Menu User Guide - 1.1 Input Source Menu
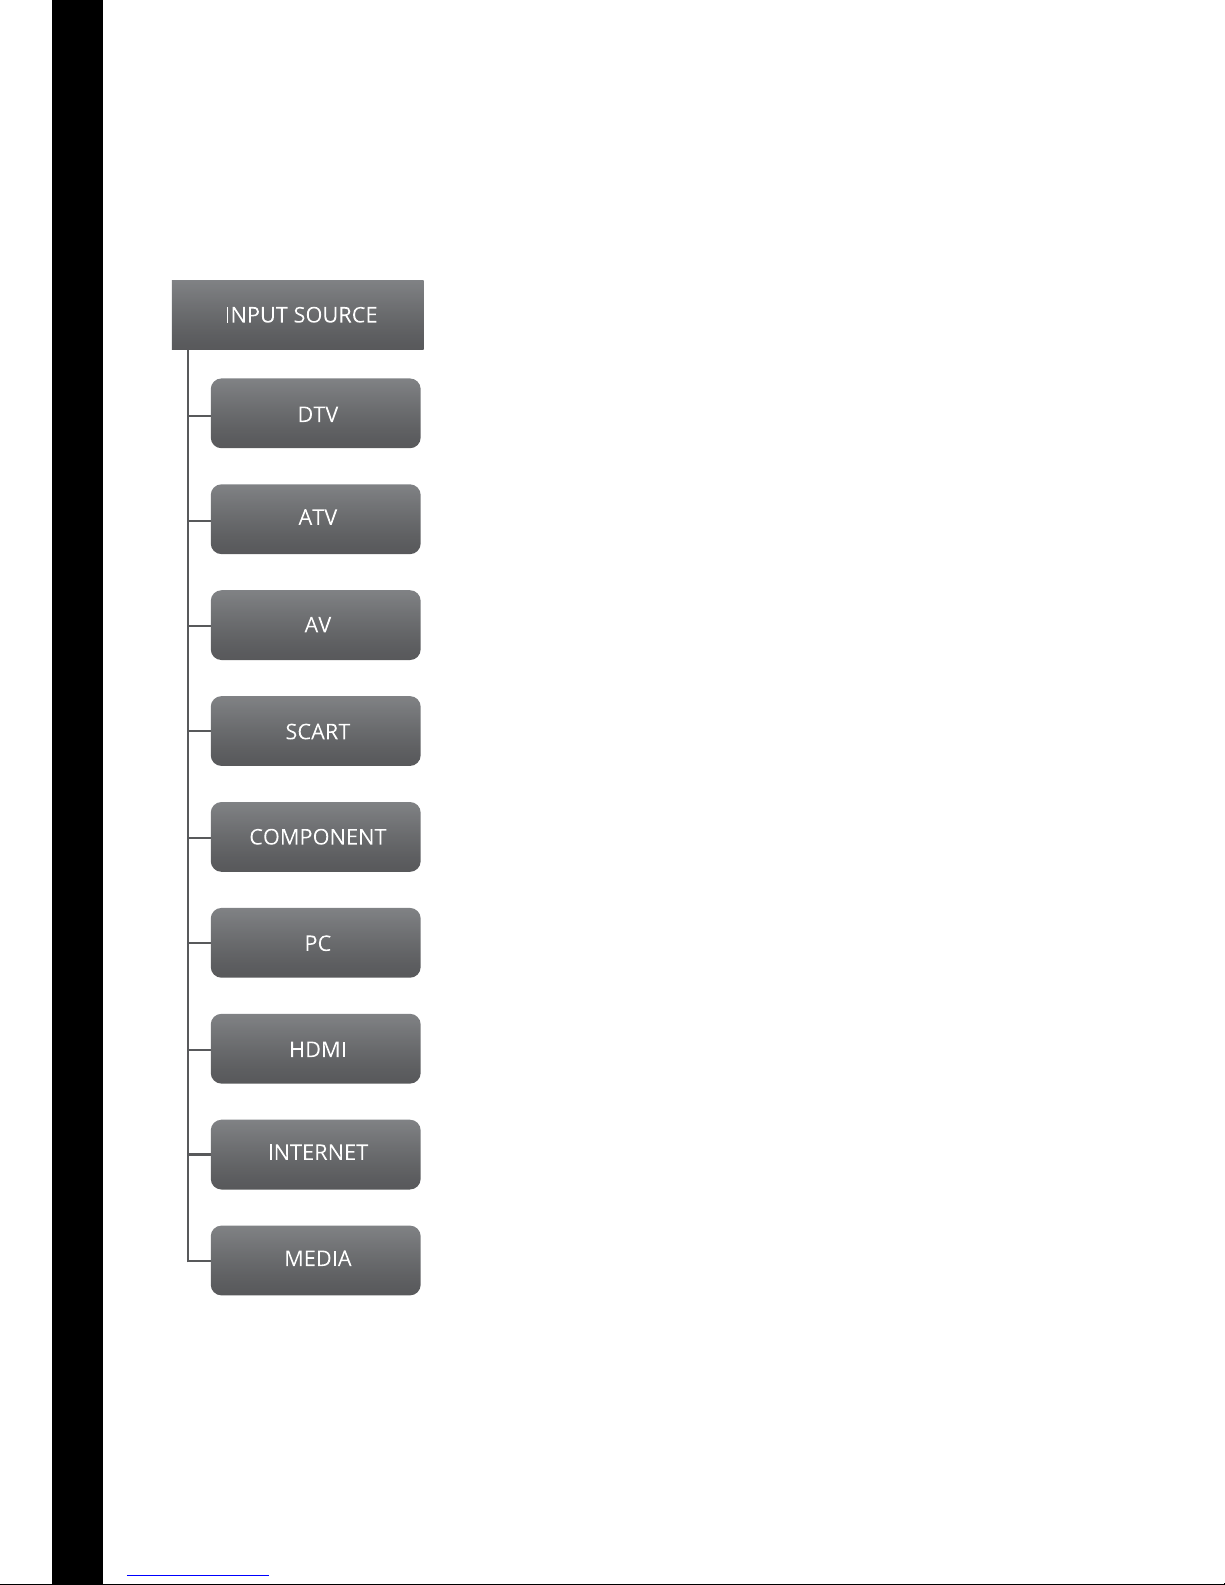
Press the INPUT button to display the input source menu.
Press ▼ / ▲ to select the input source you want to select.
Press the OK button to enter the input source.
Press the EXIT button to quit.
Page 23
23
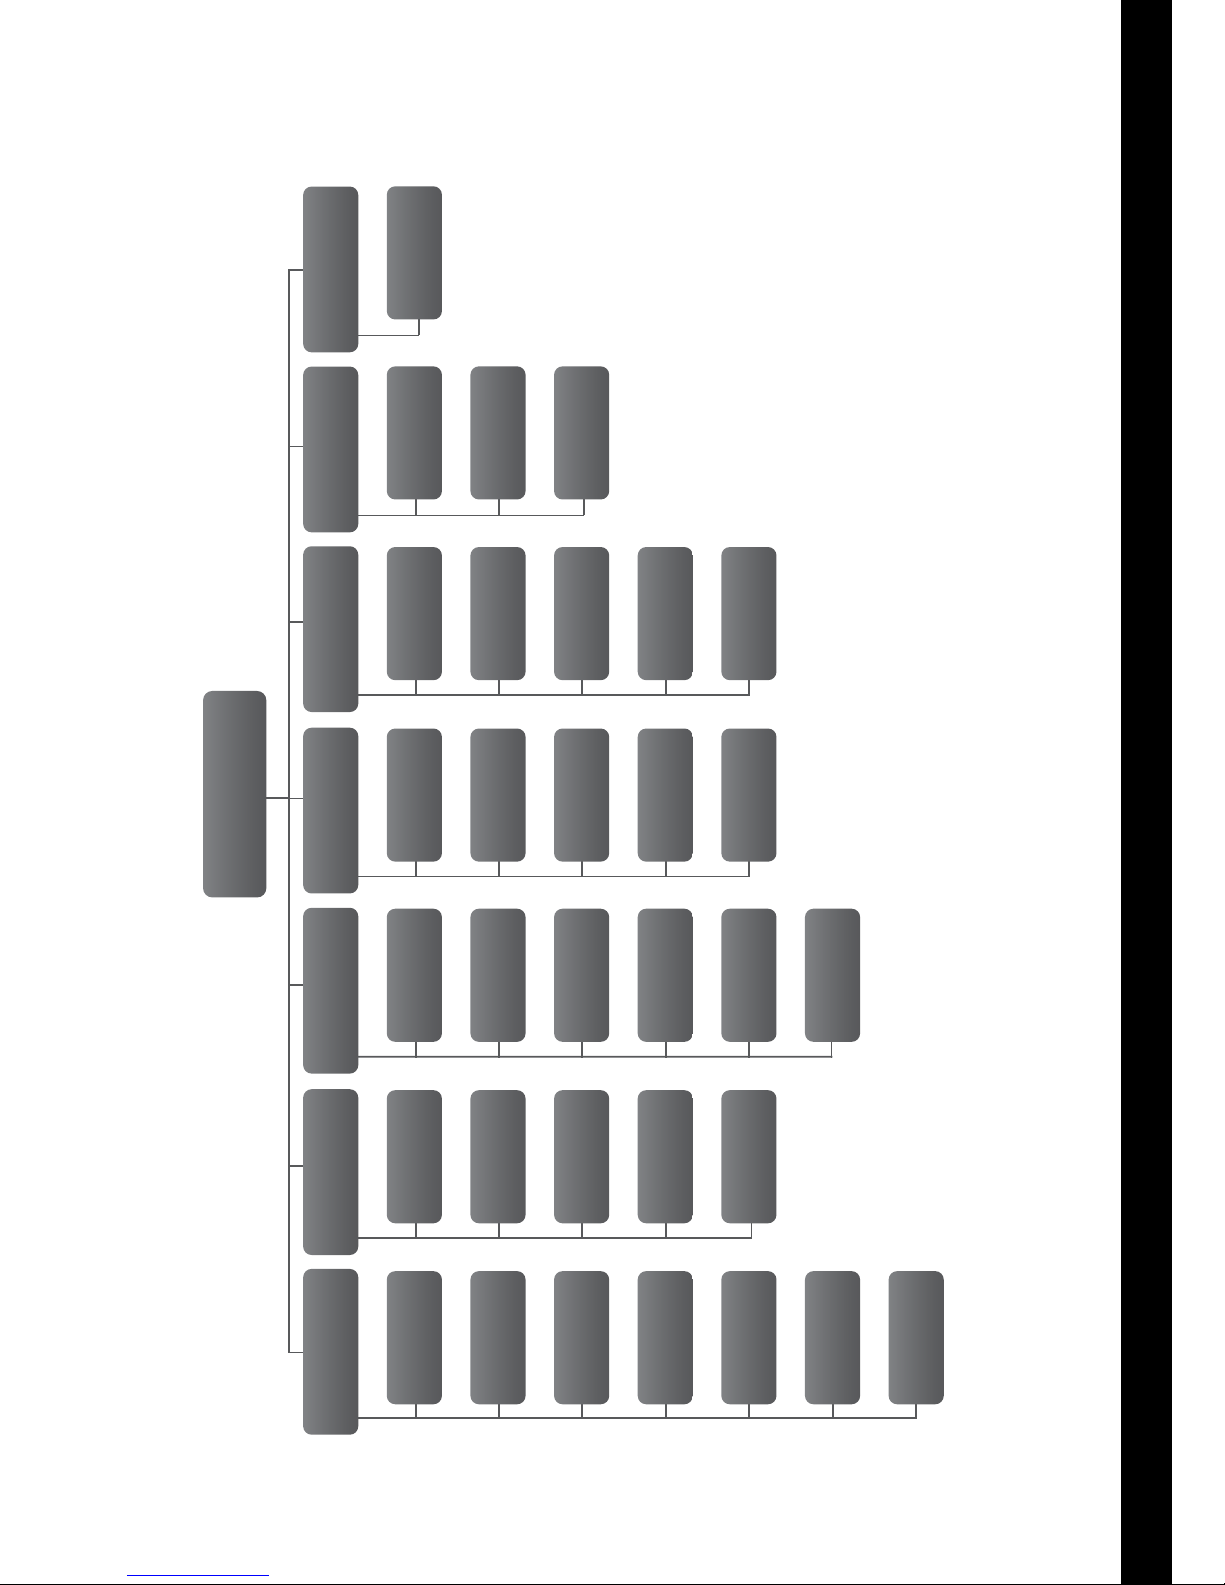
OSD Menu User Guide - 1.2 Main Menu Layout
OSD Menu
Channel
Tune Mode
ATV (Analogue)
Manual Tuning
Auto Tuning
DVB (Digital)
Manual Tuning
Program
Edit
Signal
Information
CI Information
Picture
Picture Mode
Noise
Reduction
Color
Temperature
Aspect Ratio
Dynamic CR
Sound
Sound Mode
Surround
Sound
Hearing
Impaired
Balance
Auto Volume
AD Switch
Time
Off Time
Time Zone
On Time
Sleep Timer
Auto Standby
Options
OSD Language
Restore
Factory Default
Network
Configuration
First Time
Installation
ECO
Mode
Lock
Lock System
Parental
Guidance
Key Lock
Applications
DLNA
Page 24
24
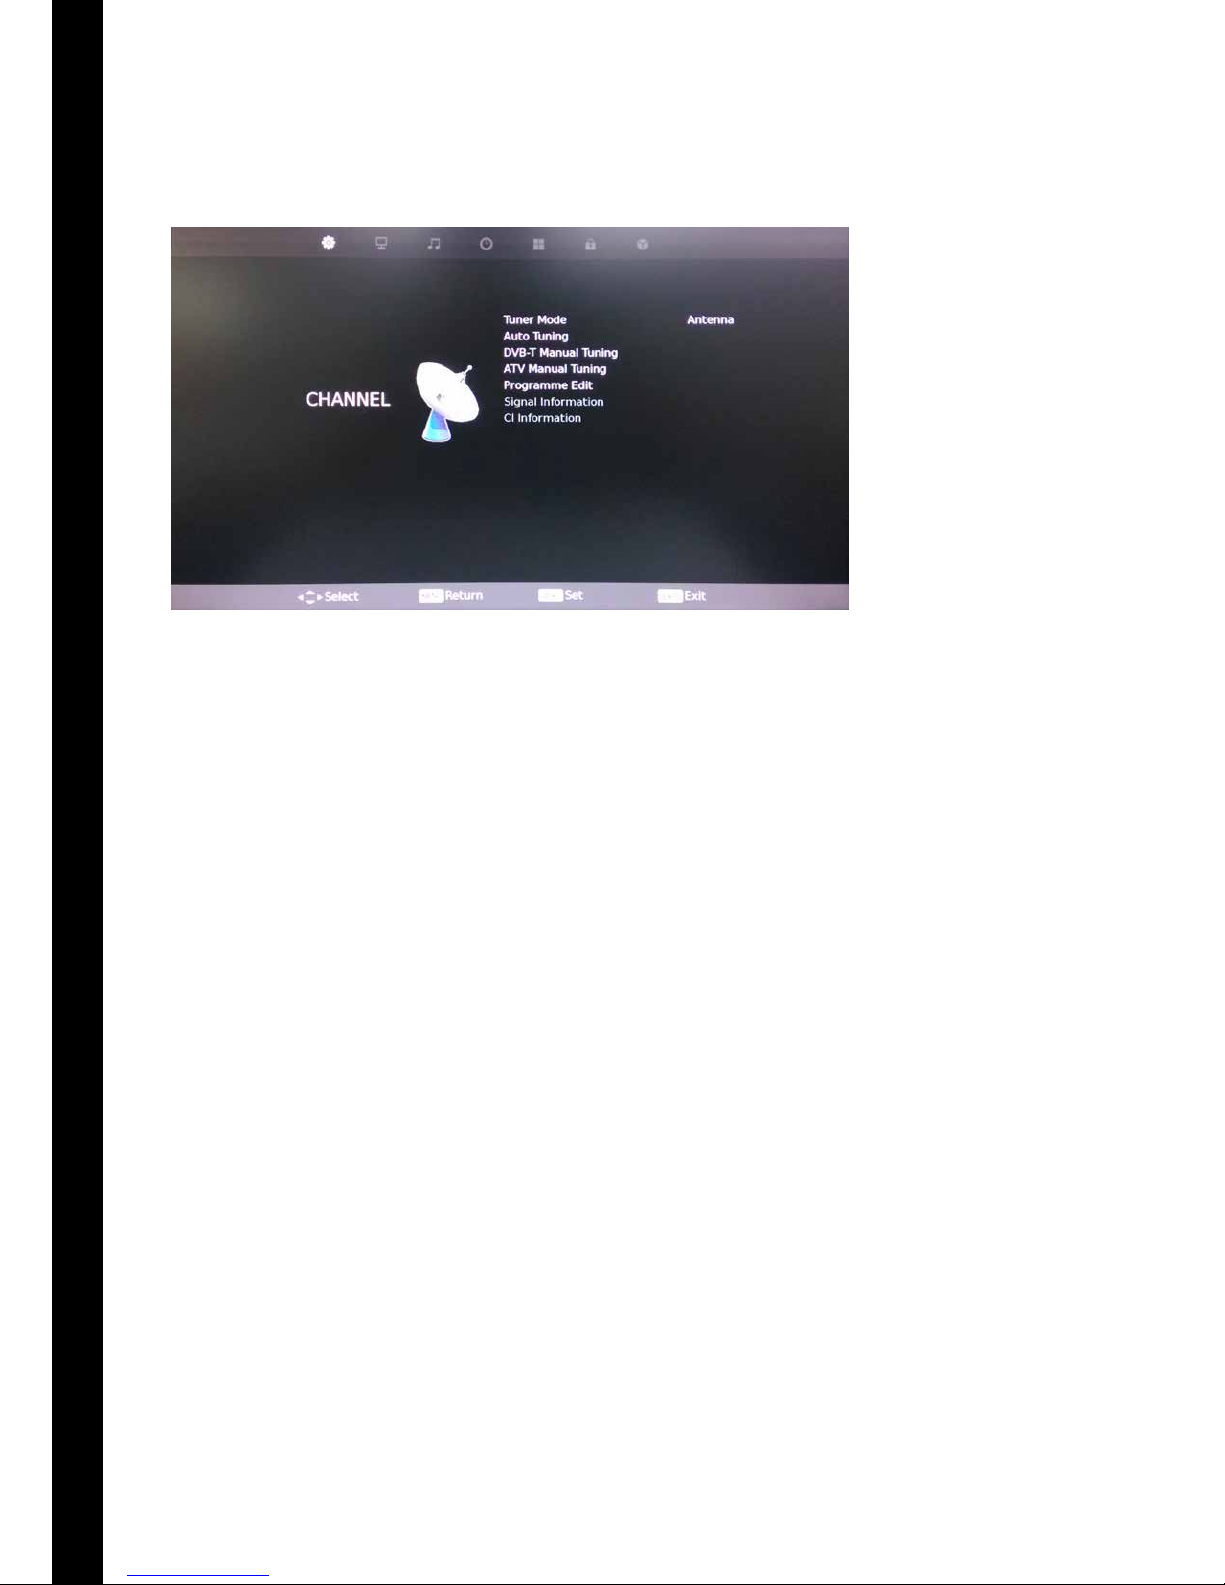
OSD Menu User Guide - 1.3 Channel Menu
Press MENU button to display the main menu. Then press ◄ / ► buttons to select CHANNEL in the main
menu.
Press ▲ / ▼ buttons to select the option that you want to adjust in the CHANNEL menu.
Press ENTER button to adjust.
After nishing your adjustments, press MENU button to save and return back to the previous menu.
Tune Mode
Press ▲ / ▼ buttons to select Tune Mode, then press ENTER button to enter the sub-menu.
Press ◄ / ► buttons to select tuner mode.
Tuner mode options: Antenna and Cable.
Auto Tuning
Press ▲ / ▼ buttons to select Auto Tuning, then press ENTER button to start auto tuning.
DVB (Digital) Manual Tuning
Press ▲ / ▼ buttons to select DVB Manual Tuning, then press ENTER button.
Press ◄ / ► buttons to select the channel, then press ENTER button to search for the programs.
ATV (Analogue) Manual Tuning
Press ▲ / ▼ buttons to select ATV Manual Tuning, then press ENTER button.
Press ◄ / ► buttons to select the channel, then press ENTER button to search for the programs.
Program Edit
Press ▲ / ▼ buttons to select Program Edit, then press ENTER button to enter the sub-menu.
Press ▲ / ▼ / ◄ / ► buttons to edit the programs and program order required.
Signal Information
Press ▲ / ▼ buttons to select Signal Information, then press ENTER button and you can see the information of
the signal.
CI Information
Press ▲ / ▼ buttons to select CI Information, then press ENTER button and you can see the information of the
common interface.
Page 25
25
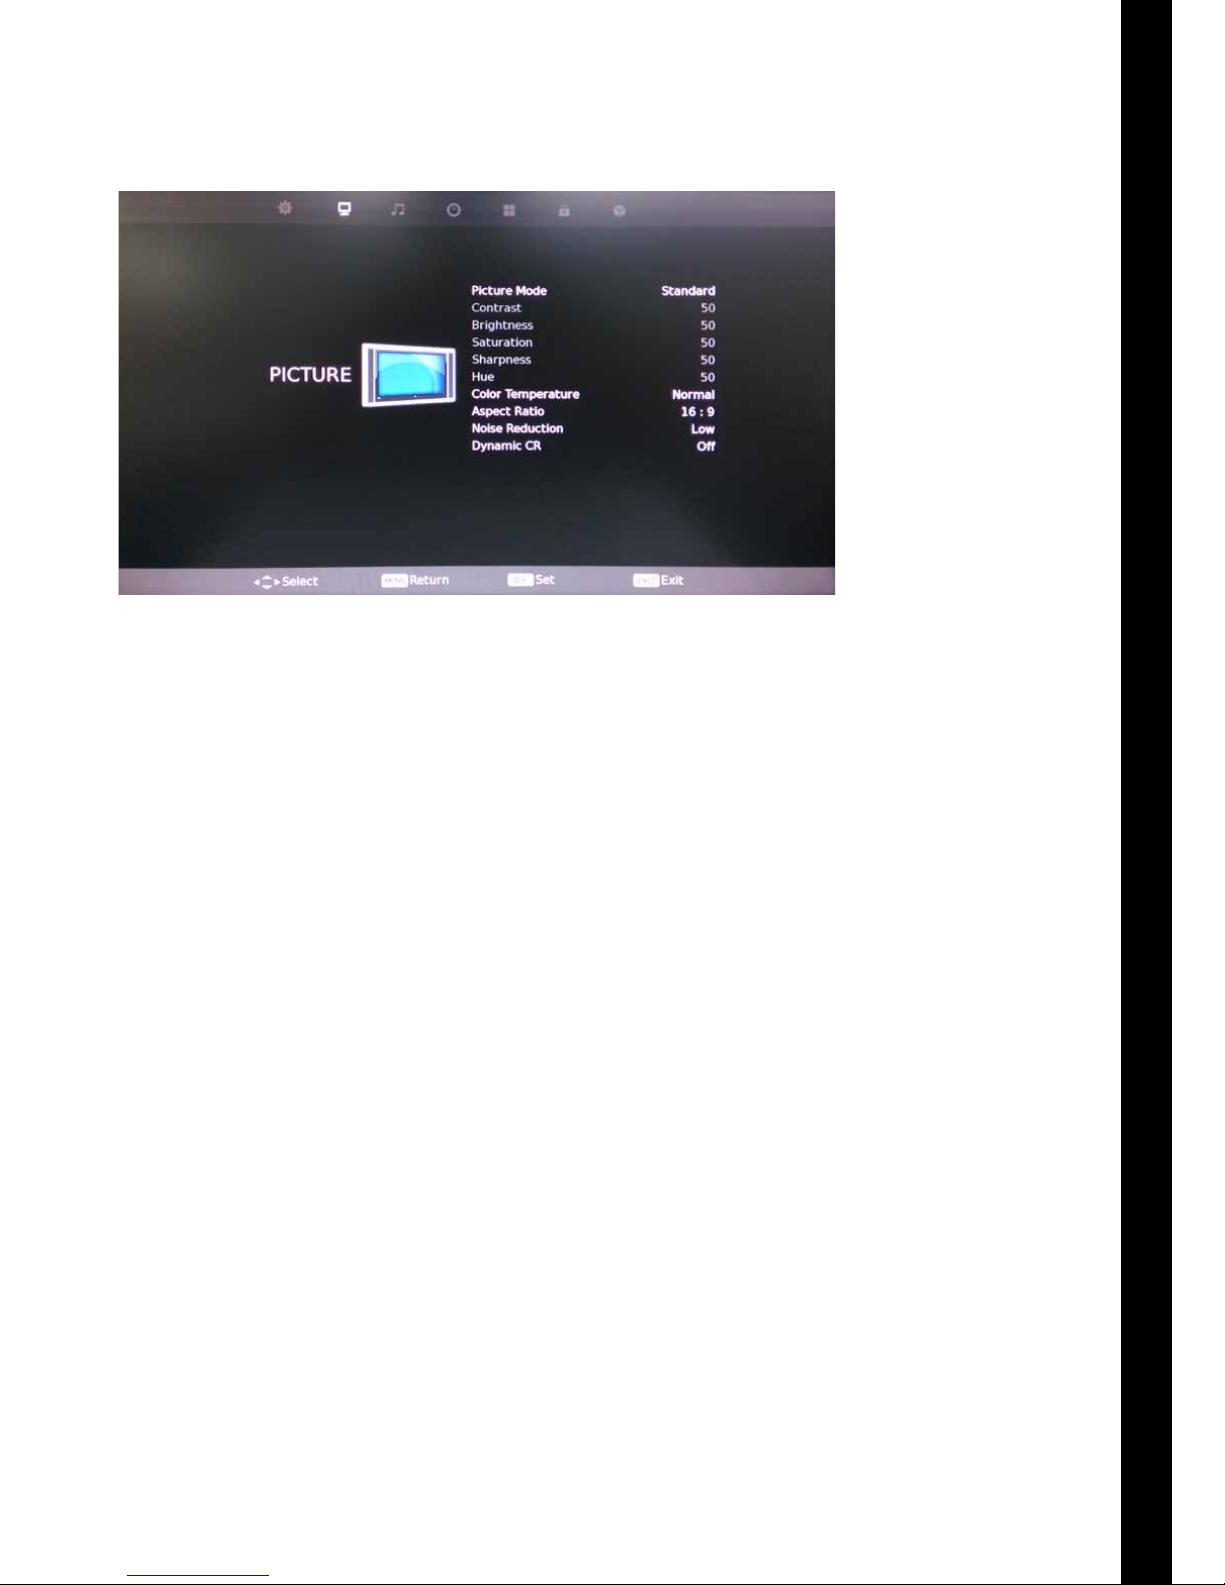
OSD Menu User Guide - 1.4 Picture Menu
Press MENU button to display the main menu. Then press ◄ / ► buttons to select PICTURE in the main menu.
Press ▲ / ▼ buttons to select the option that you want to adjust in the PICTURE menu.
Press ENTER button to adjust.
After nishing your adjustments, press MENU button to save and return back to the previous menu.
Picture Mode
Press ▲ / ▼ buttons to select Picture Mode, then press ENTER button to enter the sub-menu.
Press ◄ / ► buttons to select picture mode.
Picture mode options: Standard, Movie, User and Dynamic. Contrast, Brightness, Saturation, sharpness and
Hue can be adjusted when it is under User Mode.
Color Temperature
Press ▲ / ▼ buttons to select Color Temperature, then press ENTER button to enter the sub-menu.
Color temperature options: Normal, Warm and Cool.
Aspect Ratio
Press ▲ / ▼ buttons to select Aspect Ratio, then press ENTER button to enter the sub-menu.
Aspect ratio options: Auto, 4:3, 16:9, Zoom 1 and Zoom 2.
Noise Reduction
Press ▲ / ▼ buttons to select Noise Reduction, then press ENTER button to enter the sub-menu.
Noise reduction options: Low, Middle, High and O.
Dynamic CR
Press ▲ / ▼ buttons to select Dynamic CR, then press ENTER button.
Press ◄ / ► buttons to select On or O.
Page 26
26
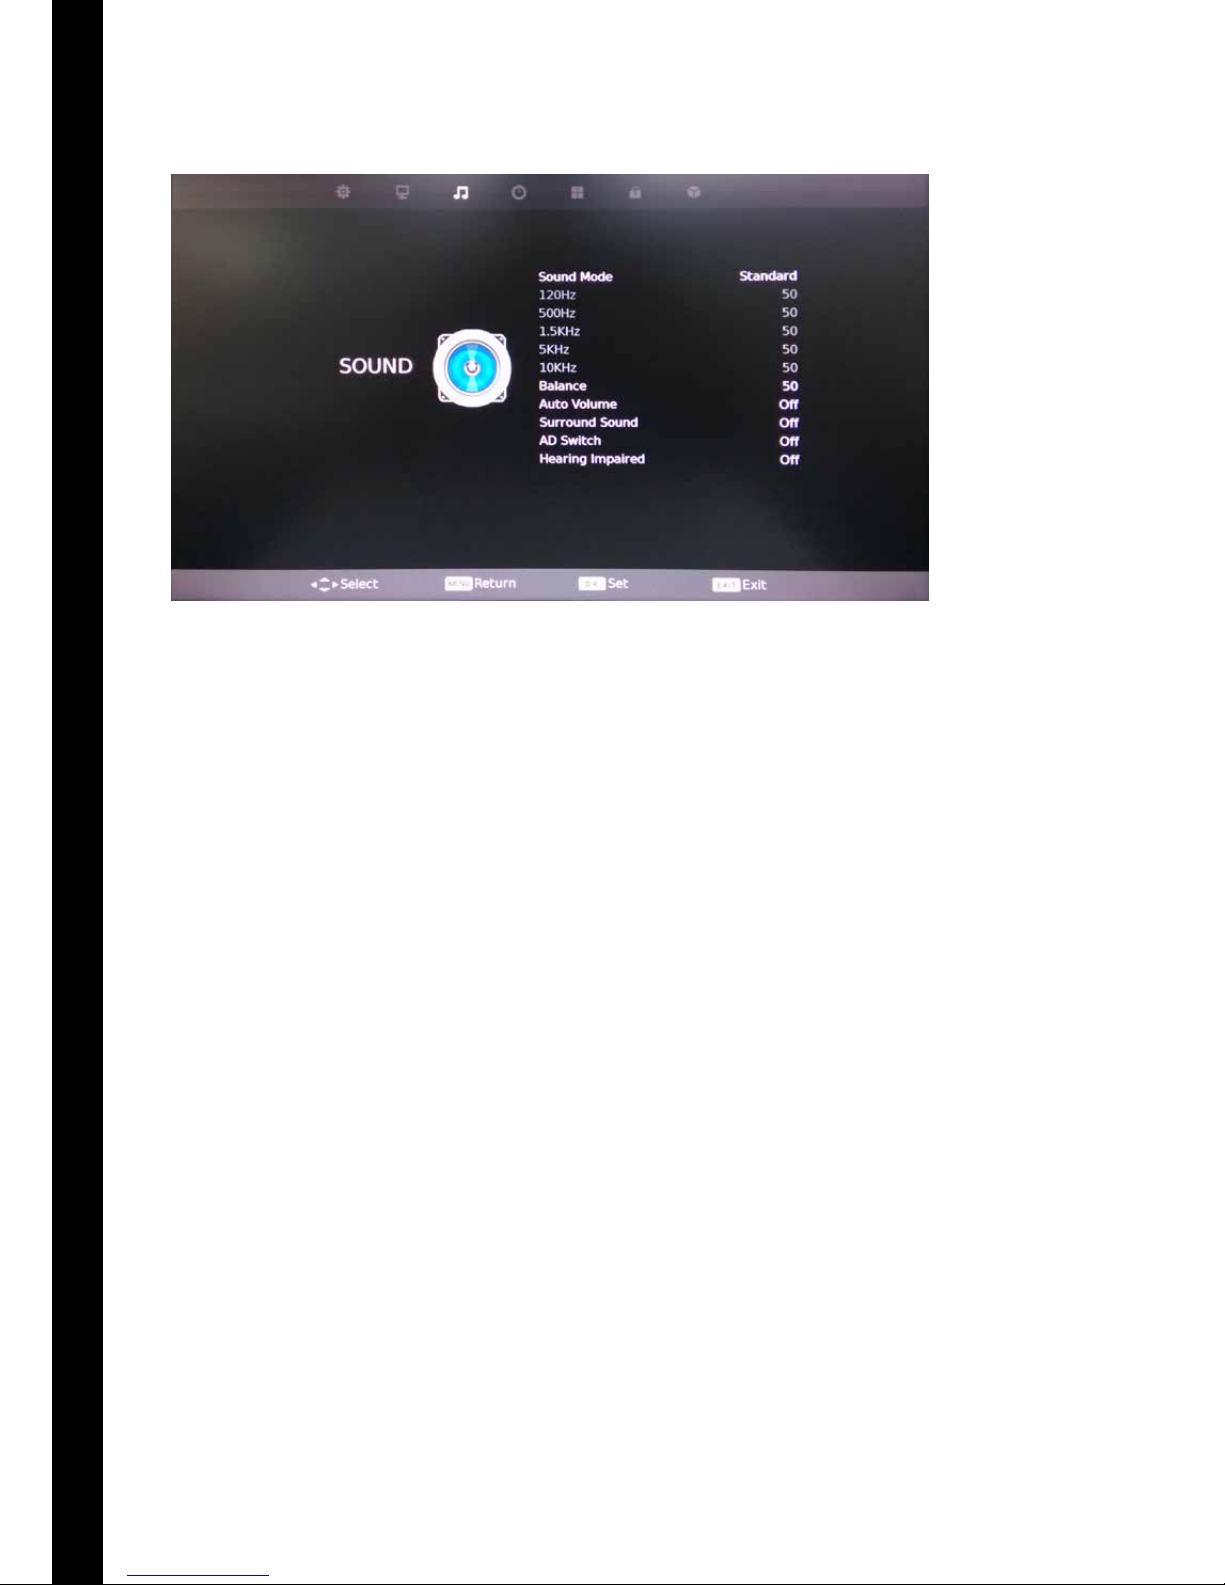
OSD Menu User Guide - 1.5 Sound Menu
Press MENU button to display the main menu. Then press ◄ / ► buttons to select SOUND in the main menu.
Press ▲ / ▼ buttons to select the option that you want to adjust in the SOUND menu.
Press ENTER button to adjust.
After nishing your adjustments, press MENU button to save and return back to the previous menu.
Sound Mode
Press ▲ / ▼ buttons to select Sound Mode, then press ENTER button to enter the sub-menu.
Press ◄ / ► buttons to select sound mode.
Sound mode options: Standard, Music, Movie, Sports and User. 120Hz, 500Hz, 1.5KHz, 5KHz and 10Khz can be
adjusted when it is under User Mode.
Balance
Press ▲ / ▼ buttons to select Balance, then press ENTER button.
Press ◄ / ► buttons to adjust the balance.
Auto Volume
Press ▲ / ▼ buttons to select Auto Volume, then press ENTER button.
Press ◄ / ► buttons to select On or O.
Surround Sound
Press ▲ / ▼ buttons to select Surround Sound, then press ENTER button.
Press ◄ / ► buttons to select On or O.
AD Switch
Press ▲ / ▼ buttons to select AD Switch, then press ENTER button.
Press ◄ / ► buttons to select On or O.
Hearing Impaired
Press ▲ / ▼ buttons to select Hearing Impaired, then press ENTER button.
Press ◄ / ► buttons to select On or O.
Page 27
27
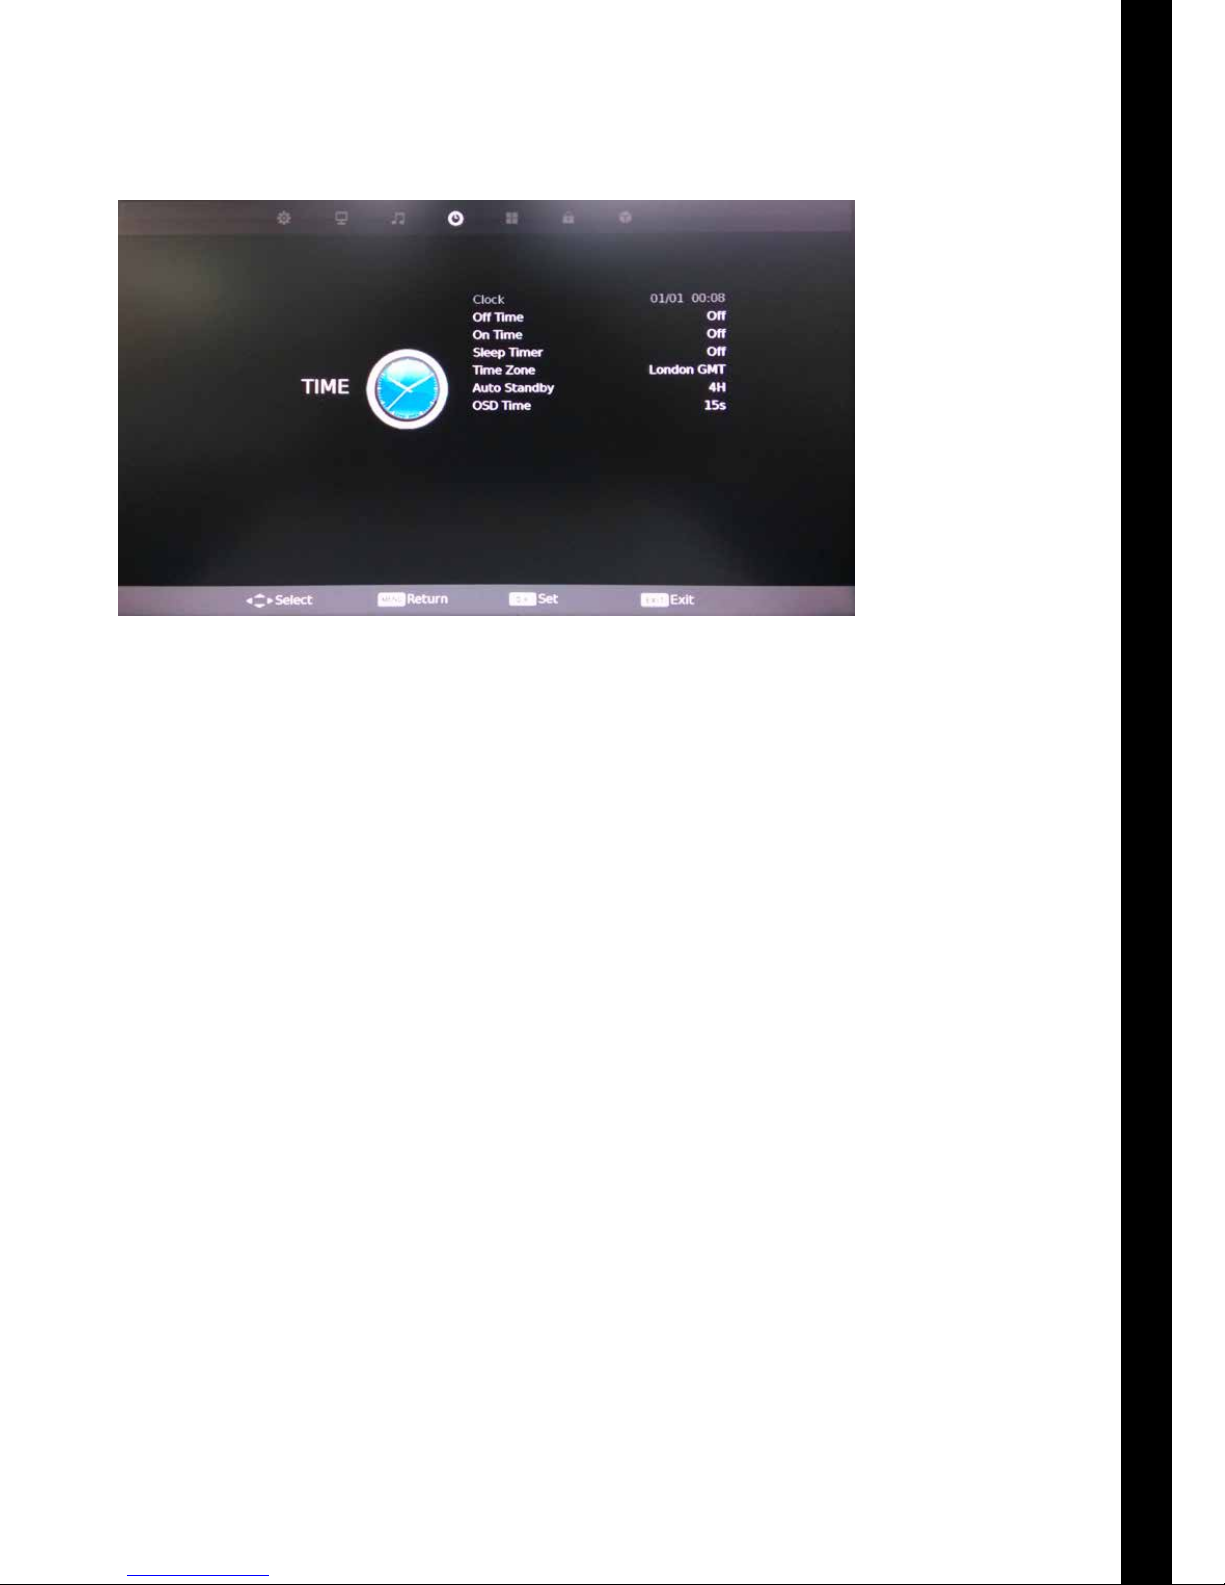
OSD Menu User Guide - 1.6 Time Menu
Press MENU button to display the main menu. Then press ◄ / ► buttons to select TIME in the main menu.
Press ▲ / ▼ buttons to select the option that you want to adjust in the TIME menu.
Press ENTER button to adjust.
After nishing your adjustments, press MENU button to save and return back to the previous menu.
O Time
Press ▲ / ▼ buttons to select O Time, then press ENTER button.
Press ◄ / ► buttons to select on or o. If on is selected, the o time can be adjusted.
On Time
Press ▲ / ▼ buttons to select On Time, then press ENTER button.
Press ◄ / ► buttons to select on or o. If on is selected, the on time can be adjusted.
Sleep Timer
Press ▲ / ▼ buttons to select Sleep Timer, then press ENTER button.
Press ◄ / ► buttons to adjust.
Sleep timer options: O, 10Mins, 20Mins, 30Mins, 60Mins, 90mins, 120Mins, 180Mins and 240Mins.
Time Zone
Press ▲ / ▼ buttons to select Time Zone, then press ENTER button.
Press ◄ / ► / ▲ / ▼buttons to select the time zone required.
Auto Standby
Press ▲ / ▼ buttons to select Auto Standby, then press ENTER button.
Press ◄ / ► buttons to adjust. Auto Standby options: O, 3H, 4H and 5H.
Page 28
28
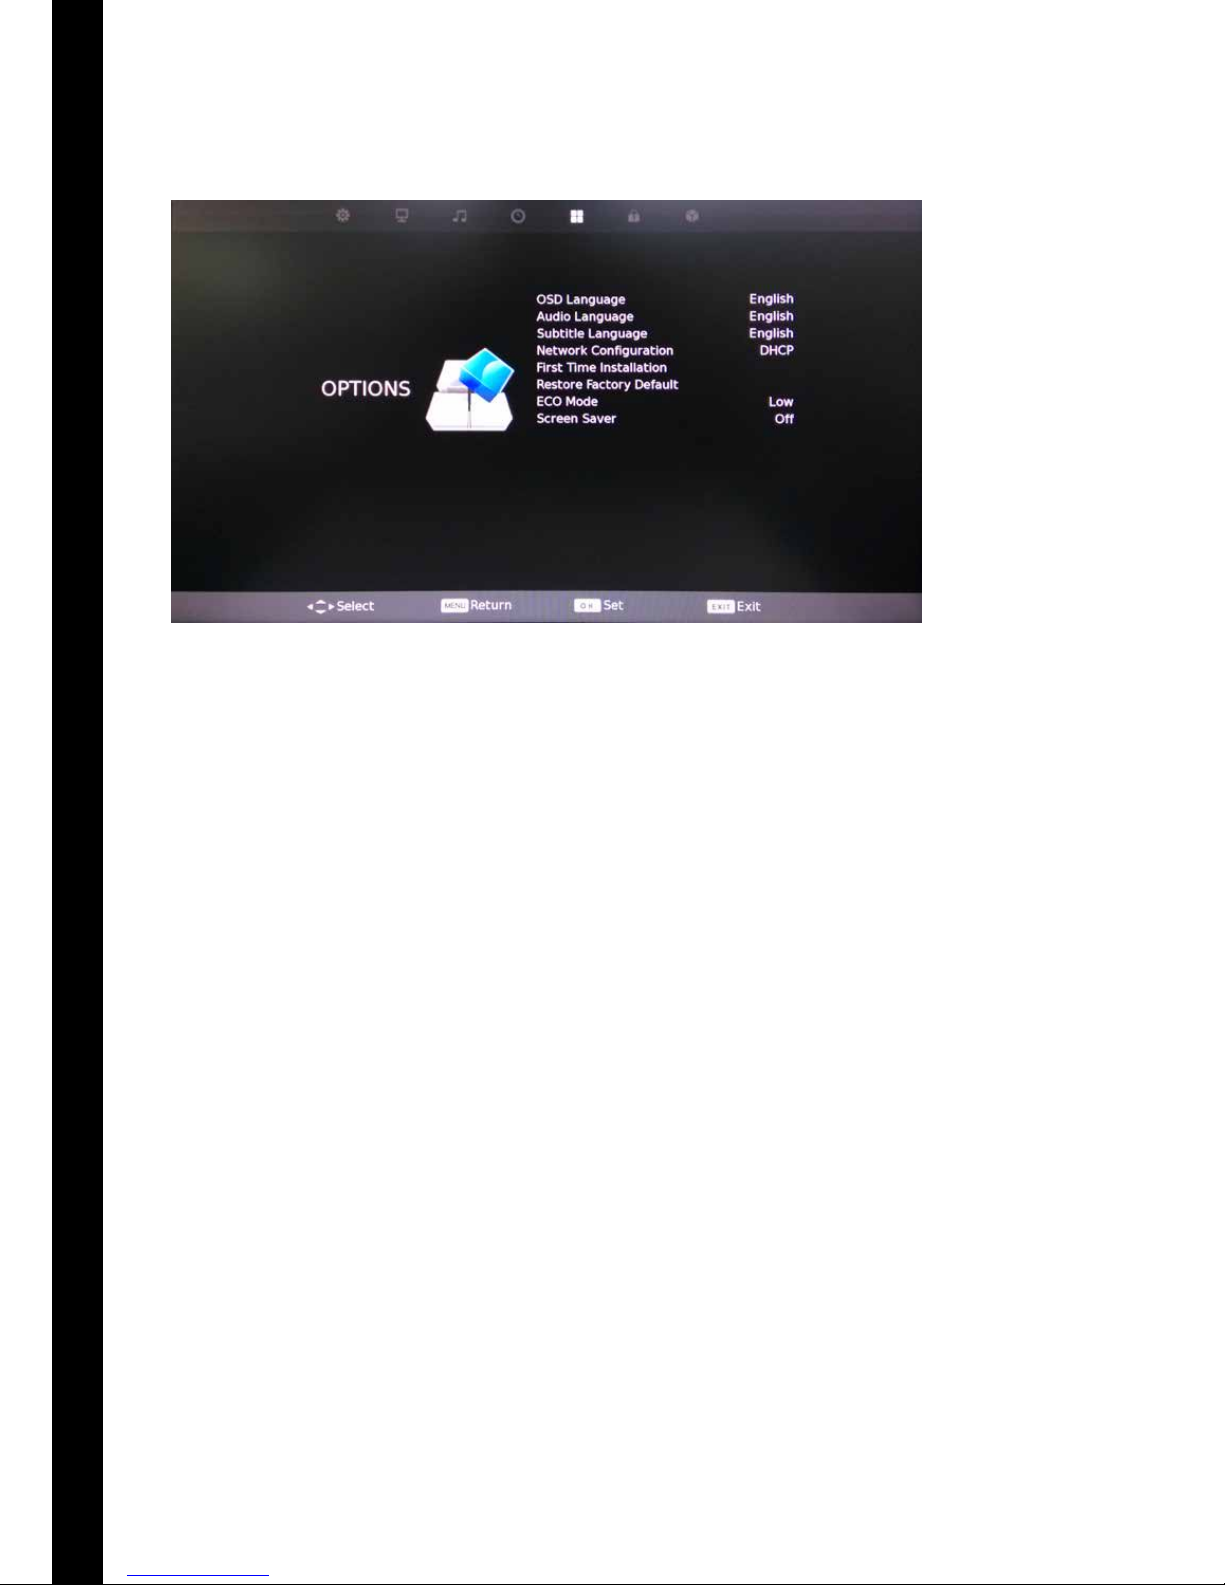
OSD Menu User Guide - 1.7 Options Menu
Press MENU button to display the main menu. Then press ◄ / ► buttons to select OPTIONS in the main
menu.
Press ▲ / ▼ buttons to select the option that you want to adjust in the OPTIONS menu.
Press ENTER button to adjust.
After nishing your adjustments, press MENU button to save and return back to the previous menu.
OSD Language
Press ▲ / ▼ buttons to select OSD Language, then press ENTER button.
Press ◄ / ► buttons to select the language required.
Audio Language and Subtitle Language will be default to be the same language with the OSD Language.
Network Conguration
Press ▲ / ▼ buttons to select Network Conguration, then press ENTER button.
Network conguration: Wired Network and Wi-Fi Network.
First Time Installation
Press ▲ / ▼ buttons to select First Time Initiation, then press ENTER button to enter into a dialogue.
Press ◄ / ► buttons to select No and step into rst time initiation.
Restore Factory Default
Press ▲ / ▼ buttons to select Restore Factory Default, then press ENTER button to enter into a dialogue.
Press ◄ / ► buttons to select No and step into restore factory default.
ECO Mode
Press ▲ / ▼ buttons to select ECO Mode, then press ENTER button.
ECO mode options: Low, Middle, High and O.
Page 29
29
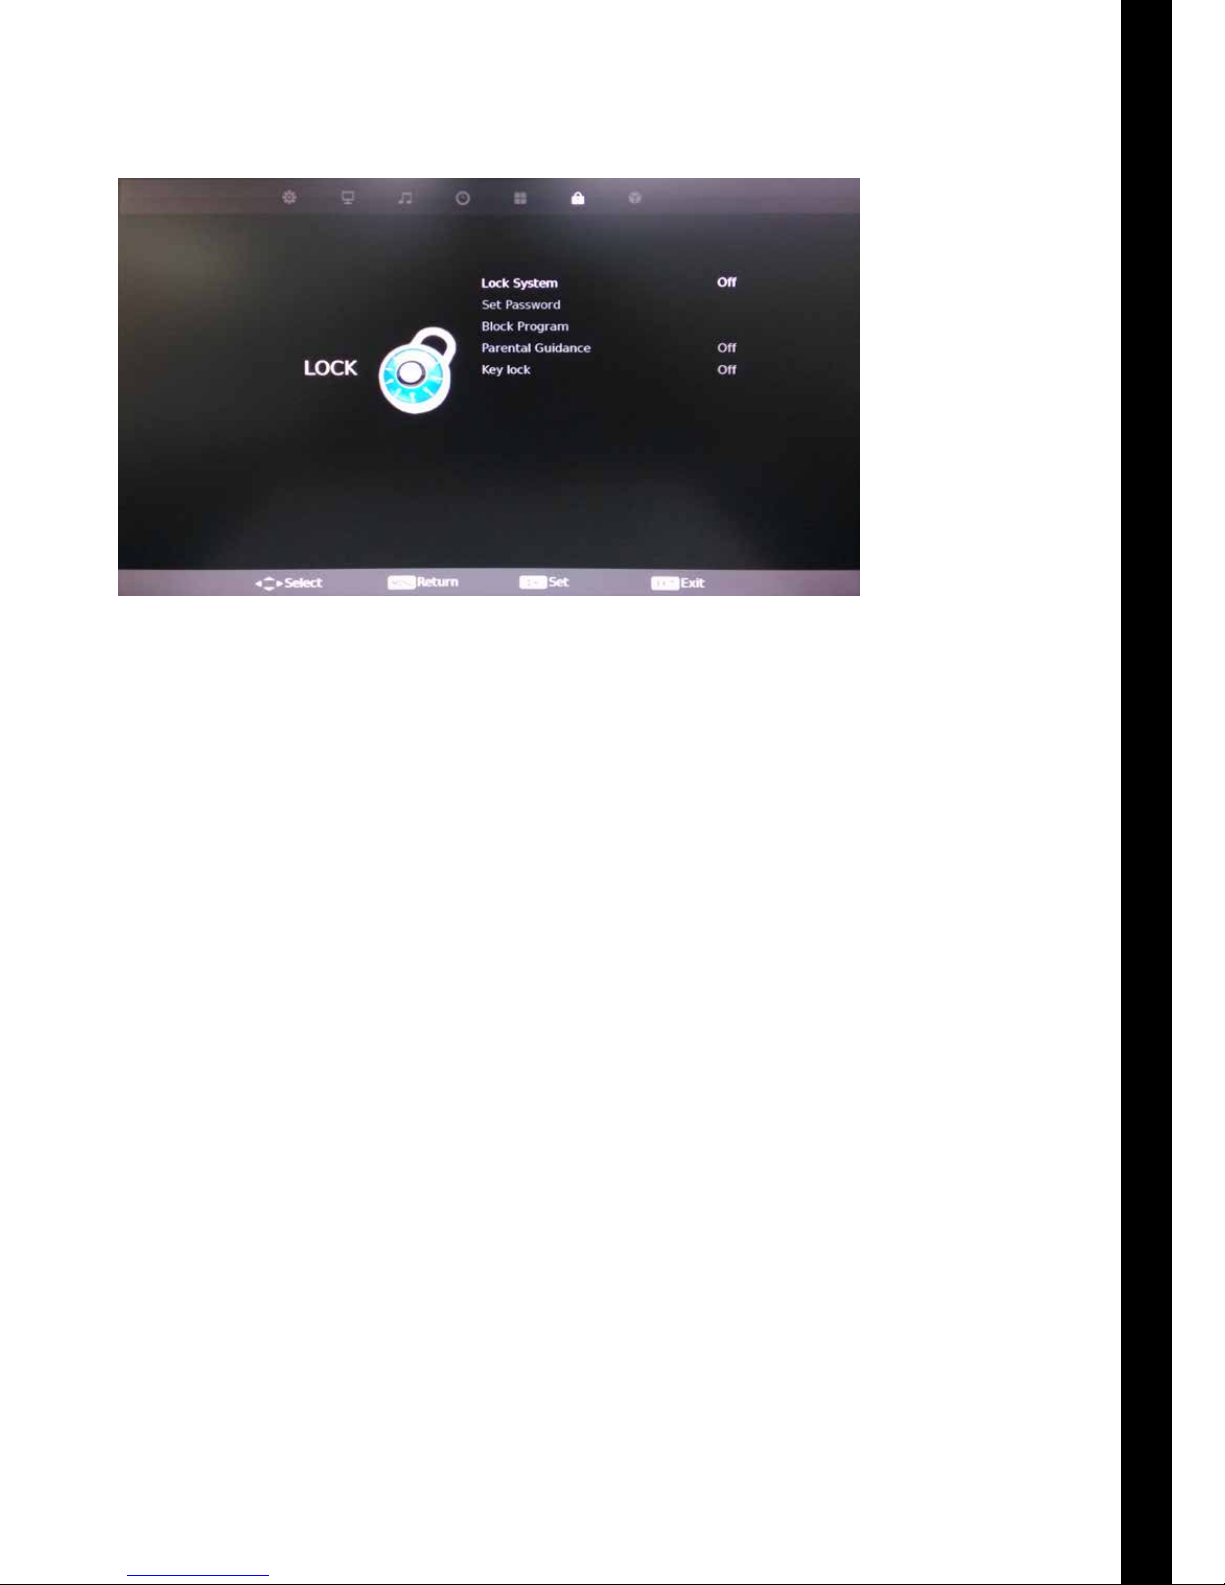
OSD Menu User Guide - 1.8 Lock Menu
Press MENU button to display the main menu. Then press ◄ / ► buttons to select LOCK in the main menu.
Press ▲ / ▼ buttons to select the option that you want to adjust in the LOCK menu.
Press ENTER button to adjust.
After nishing your adjustments, press MENU button to save and return back to the previous menu.
Lock System
Press ▲ / ▼ buttons to select Lock System, then press ENTER button.
Press ◄ / ► buttons to select On or O.
If it is on, Set Password, Block Program can be adjusted. The initial password is ‘0000’ (four zero).
Parental Guidance
Press ▲ / ▼ buttons to select Parental Guidance, then press ENTER button.
Press ◄ / ► buttons to select On or O.
Key Lock
Press ▲ / ▼ buttons to select Key Lock, then press ENTER button.
Press ◄ / ► buttons to select On or O.
Page 30
30
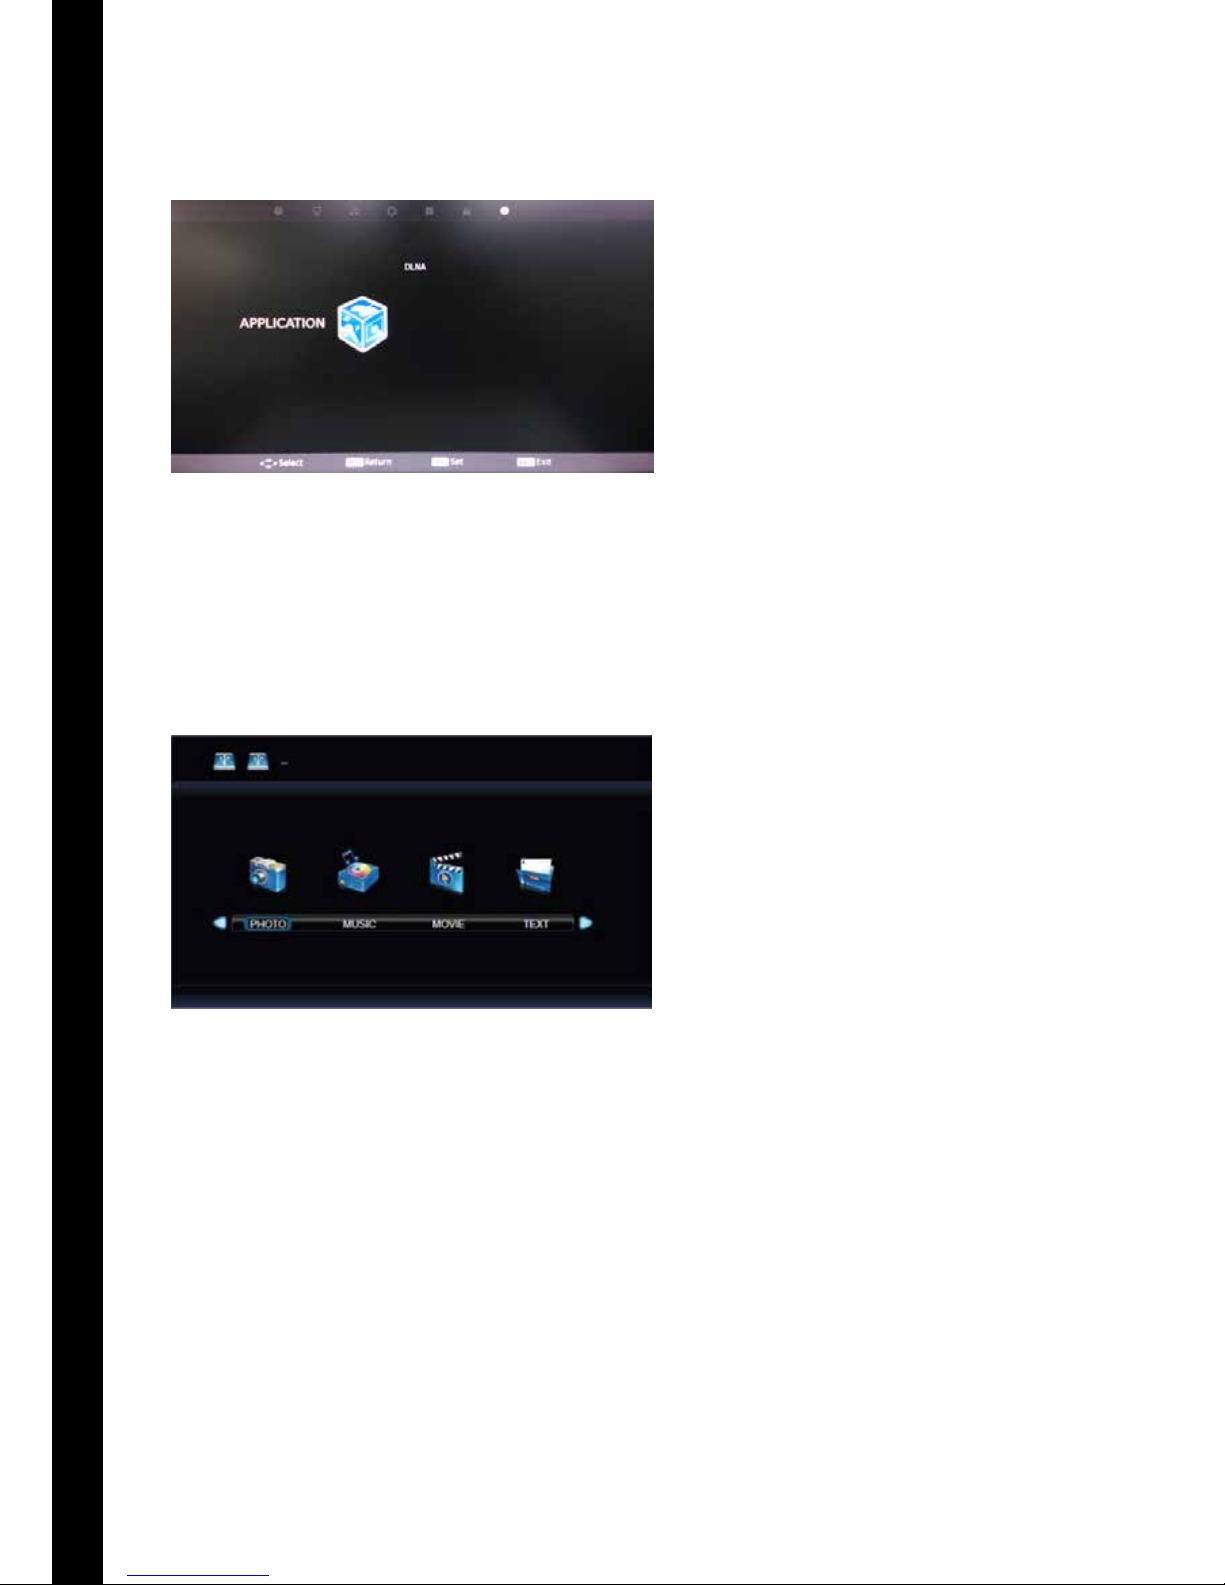
OSD Menu User Guide - 1.9 Applications Menu
Press MENU button to display the main menu. Then press ◄ / ► buttons to select APPLICATION in the main
menu.
Press ▲ / ▼ buttons to select the option that you want to adjust in the APPLICATION menu.
Press ENTER button to adjust.
After nishing your adjustments, press MENU button to save and return back to the previous menu.
DLNA
Press ▲ / ▼ buttons to select DLNA, then press ENTER button. Then the following interface will appear.
Please Note: Make sure that USB disk is plugged in and the input source is set to Media Player before operating this media menu.
Photo
Press ◄ / ► buttons to select Photo, then press ENTER.
Press ◄ / ► / ▲ / ▼ buttons to select the photo that you want to see.
Music
Press ◄ / ► buttons to select Music, then press ENTER.
Press ◄ / ► / ▲ / ▼ buttons to select the music that you want to listen to.
Movie
Press ◄ / ► buttons to select Movie, then press ENTER.
Press ◄ / ► / ▲ / ▼ buttons to select the movie that you want to watch.
Text
Press ◄ / ► buttons to select Text, then press ENTER.
Press ◄ / ► / ▲ / ▼ buttons to select the text that you want to see.
Page 31
31
Troubleshooting
If you are experiencing problems with your television please read through all the troubleshooting points below
before contacting the provider.
Problem Subjects Possible Solutions
No Power
• Check that there is a green light on the mains power cable – transformer. If
the green light isn’t ON then please check the connections.
• Unplug the television from the mains for 5 minutes and check all
connections. Plug the television in to mains and try again.
No Television Signal
• Check whether the aerial that’s connected to the television is getting a
reception.
• Check that the Coax cable has been plugged in to the television correctly.
• Check that all other ports are working properly, including SCART, HDMI &
USB.
Poor Picture Quality
• Check or adjust the following screen settings: Contrast Ratio, Colour, Tint and
Brightness.
• Try returning the television settings back to factory settings or running the
Auto Picture Function.
No Sound
• Check that the MUTE function is not switched On.
• Check that the audio inputs are connected correctly.
• Increase the television volume.
• Use the remote controller to reprogram the sound settings within the
television’s Main Menu.
Picture Shadow
• This may be down to the quality of signal being received via the aerial
antenna. Please consult an aerial specialist to run checks.
No Remote Controller
Response
• Change the batteries within the remote control.
• The remote controller will only work within 8 meters of the television.
If you are experiencing a fault that is not listed above then please contact the provider.
Page 32

32
Warranty Details
• All Tech2o televisions are guaranteed to be free from defects in parts and manufacture for 2 years from
the date of purchase, provided that the product is used under the normal operating conditions stated
within the manual.
• The warranty is only available to the original purchaser and is not transferable. Your consumer rights are
not aected.
• If there are any defects with your television please contact the provider stating your invoice number, date
of purchase, full name and address.
• Do not attempt to repair or take apart the television your self. If the television has been tampered with
before it arrives with us, the warranty will be void.
• We advise that all customers retain original packaging should the unit need to be returned.
• If your television occurs a problem outside of the warranty period, we oer a repair service where we can
collect and professionally repair your television.
Page 33

33
Notes
Page 34

34
Notes
Page 35

35
Notes
Page 36

Visit www.tech2o.tv or email [email protected] for more information
BESPOKE MIRROR TVs
 Loading...