

Page 1

User Manual
Brand:TECH
Page 2

40
Contents
Prologue ............................................................................................................ 43
1.Familiarization TECH Moon .......................................................................... 44
1.1 Your TECH Moon .................................................................................... 44
1.2 Status Icons............................................................................................. 45
1.3 Installing the SIM card and battery ......................................................... 45
1.4 Installing the storage card....................................................................... 46
1.5 Battery load ............................................................................................. 46
1.6 On / Off.................................................................................................... 47
1.6.1 On................................................................................................... 47
1.6.2 Off................................................................................................... 47
1.7 Using shortcut keys................................................................................. 47
2.Using functions ............................................................................... 48
2.1 Making a call ........................................................................................... 48
2.1.1 Call directly to the home screen..................................................... 48
2.1.2 Make international call ................................................................... 48
2.1.3 Call from Contacts.......................................................................... 48
2.1.4 Redial history of CTOD .................................................................. 48
2.1.5 Dial an extension number .............................................................. 48
2.1.6 Make an emergency call ................................................................ 48
2.2 Answer or reject a call ............................................................................. 48
2.2.1 Responder unallamada.................................................................. 48
2.2.2 Answer a second call ..................................................................... 48
2.2.3 Rejecting a call ............................................................................... 48
2.3 Call options ............................................................................................. 48
2.4 Aujustar call volume ................................................................................ 49
2.5 Rejecting call........................................................................................... 49
3.Call History ............................................................................... 49
3.1 Calls made .............................................................................................. 49
3.2 Received calls ......................................................................................... 50
3.3 Missed calls............................................................................................. 50
3.4 L rejectedcalls as .................................................................................... 50
3.5 Delete...................................................................................................... 50
3.6 Call duration ............................................................................................ 50
3.7 Call costs (requires network support) ..................................................... 50
3.8 GPRS counter ......................................................................................... 50
4.User profiles ............................................................................... 50
4.1 Rulesl ...................................................................................................... 50
4.2 Vibrate..................................................................................................... 51
4.3 High Tmbre and vibrate........................................................................... 51
4.4 Soft Ring ................................................................................................. 51
4.5 Silence .................................................................................................... 51
5.Contacts ............................................................................... 51
5.1 View a contact......................................................................................... 51
5.2 Smart Search .......................................................................................... 51
5.3 Add a new contact................................................................................... 52
6.Message ............................................................................... 52
6.1 Write a message ..................................................................................... 52
6.1.1 New SMS ....................................................................................... 52
6.1.2 New MMS....................................................................................... 52
6.2 Inbox ....................................................................................................... 53
6.3 Outbox..................................................................................................... 53
6.4 Dra
fts....................................................................................................... 53
6.5 Submittedbox .......................................................................................... 53
6.6 Message settings .................................................................................... 54
Page 3

41
6.6.1 Templates....................................................................................... 54
6.6.2 Voicemail server............................................................................. 54
6.6.3 Broadcast Message ....................................................................... 54
6.6.4 SMS settings .................................................................................. 54
6.6.5 MMS configuration ......................................................................... 55
6.6.6 Message capacity........................................................................... 55
7.Internet ............................................................................... 55
7.1 Entry URL................................................................................................ 55
7.2 Home....................................................................................................... 55
7.3 Bookmark ................................................................................................ 56
7.4 History ..................................................................................................... 56
7.5 Online...................................................................................................... 56
WAP 7.6 settings........................................................................................... 56
7.6.1 Browser Settings ............................................................................ 56
7.6.2 Network Account ............................................................................ 56
7.6.3 refers storage Pque........................................................................ 57
7.6.4 GPRS establishment...................................................................... 57
7.6.5 Restore Defaults............................................................................. 57
8.Multimedia ............................................................................... 57
8.1 Camera ................................................................................................... 57
8.1.1 Capturing a photo........................................................................... 57
8.2 Video Recorder ....................................................................................... 58
8.3 Mobile TV (Optional) ............................................................................... 58
Audio Player 8.4............................................................................................ 59
8.4.1 Background audio player ............................................................... 59
Video Player 8.5............................................................................................ 59
8.6 Image Browser ........................................................................................ 59
Recorder 8.7 ................................................................................................. 60
8.8 FM Radio................................................................................................. 60
File Manager 8.9 ........................................................................................... 60
9.Tools ............................................................................... 61
Alarm 9.1....................................................................................................... 61
9.2 Calendar.................................................................................................. 61
9.3 Calculator ................................................................................................ 61
Bluetooth 9.4 ................................................................................................. 61
EBook Reader 9.5......................................................................................... 61
10.Settings ............................................................................... 62
10.1 DSIM OUBLE........................................................................................ 62
10.2 Call setup .............................................................................................. 63
10.2.1 Select Network ............................................................................. 63
10.2.2 Call Forwarding ............................................................................ 63
10.2.3 Call barring ................................................................................... 63
10.2.4 Call waiting (Do you need network support) ................................ 63
10.2.5 Hide ID (Do you need network support)....................................... 64
10.2.6 Select line..................................................................................... 64
10.2.7 Flight mode................................................................................... 64
10.2.8 Other ............................................................................................ 64
10.3 Configuration TECH Moon.................................................................... 64
10.3.1 Time and date............................................................................... 64
10.3.2 Select language ........................................................................... 64
10.3.3 Auto On / Off................................................................................. 64
10.
3.4 Motion Sensor Switch .................................................................. 65
10.3.5 Shortcut settings........................................................................... 65
10.3.6 For Management.......................................................................... 65
10.4 Display settings ..................................................................................... 65
Page 4

42
10.4.1 Own funds .................................................................................... 65
10.4.2 Off-screen style ............................................................................ 65
10.4.3 On the screen............................................................................... 65
10.4.4 On Screen .................................................................................... 65
10.4.5 Contrast........................................................................................ 65
10.4.6 Backlight....................................................................................... 65
10.4.7 The keyboard light........................................................................ 65
10.5 Security settings.................................................................................... 65
10.5.1 PEN .............................................................................................. 66
10.5.2 PIN2 ............................................................................................. 66
10.5.3 Privacy.......................................................................................... 66
10.5.4 Auto keypad lock .......................................................................... 66
10.5.5 Screen Lock key late.................................................................... 67
10.5.6 Startup password.......................................................................... 67
10.5.7 Guardlock ..................................................................................... 67
10.6 Restore Defaultssettings....................................................................... 68
11.TECH Moon maintenance ........................................................................... 68
12.Troubleshooting ............................................................................... 69
12.1 The TECH Moon not enciende.............................................................. 69
12.2 The TECH Moon automatically turns off ............................................... 69
12.3 PIN / PUK code lock.............................................................................. 69
12.4 Poor call quality..................................................................................... 69
12.5 Puede'T answer a call........................................................................... 70
12.6 Puede'T make a call.............................................................................. 70
12.7 The call volume is too low..................................................................... 70
12.8 The recipient can not hear your voice................................................... 70
12.9 No sound when a call comes ................................................................ 70
12.10 The battery can be charged ................................................................ 71
12.11 Network Puede'T screen ..................................................................... 71
12.12 TTECH Moon can not recognize the storage card ............................. 71
12.13 Lack of space ...................................................................................... 71
12.14 Camare PC can not be used............................................................... 71
13.Security Caution ............................................................................... 72
13.1 Usage environment............................................................................... 72
13.2 Medical Devices .................................................................................... 72
13.2.1 Pacemaker ................................................................................... 72
13.2.2 Headphones ................................................................................. 72
13.2.3 Emergency Calls .......................................................................... 72
13.3 Password access .................................................................................. 73
13.3.1 Pperfeccionar password............................................................... 73
13.3.2 PEN code ..................................................................................... 73
13.3.3 PIN2 code..................................................................................... 73
13.3.4 Prein Kingdom code..................................................................... 73
13.3.5 PUK2 code ................................................................................... 73
13.4 Precautions for battery.......................................................................... 74
13.5 Precautions for battery use ................................................................... 74
13.6 Precautions for the use of spare parts .................................................. 75
13.7 other safety information ........................................................................ 75
Page 5

43
Prologue
Dear customer, thank you for choosing our cell TECH Moon. The TECH Moon
unprecedented and will pleasantly surprise the experience: TECH Moon supports
cards dual standby GSM dual SIM function. Camera 1.3 million pixel
high-definition digital color keep the memories for you. The built-in MP3 and MP4
media player will bring full enjoyment for you too.
Declaration
The contents of this guide is protected by copyright. You may not copy, distribute,
publish or quote the content of this user guide, in any form without the
empowerment of our company.
The company has carefully reviewed and closely the content of this guide.
However, there may be errors and omissions.
The images in this manual as a reference work only, please based on the actual
image using the TECH Moon.
The company reserves the right to update and improve the products described in
this guide, and the content of this guide. The amendments will be made without
notice.
This is the User's Guide TECH Moon phone only and does not include an
introduction to software product and hardware configuration.
Some of the features outlined in this guide will also need the support of a network
operator or service provider. If you can not confirm whether it will be able to use
certain features or services that TECH Moon, Please contact your network
operator or service provider.
The TECH Moon may include some components, technology or software, which
is under the export control law and regulations China or other countries and areas,
therefore, any action is forbbiden illegal transfer.
To the fullest extent permitted by applicable law, in any case, the company or the
party with their permission should have no responsibility for any loss of data,
special revenue and losses, casual or indirectly, no matter what the reason is
due.
To ensure your safety, please read the "Security Warning" and "Safety
Precautions."
Typographical conventions used in this guide are:
<>: Displays the function key;
"" Show prompts on the interface TECH Moon;
【 】: Displays the keys;
[]: Displays menus TECH Moon.
Page 6

44
Safety Notice
Before using TECH MoonPlease read and follow the rules carefully.
If you make or answer a call
while driving, use
hands-free device or use
TECH Moon after parking
the vehicle.
Please make sure your TECH
Moon is off or in flight mode during
the flight, for TECH Moon may
interfere with the mobile
communications network for the
plane.
All TECH Moons that may
be susceptible to
interference, which could
affect performance.
Please turn off the TECH Moon
near medical equipment or places
forbbiden TECH Moon use.
To ensure high performance
and to avoid damaging the
TECH Moon, Please use the
original accessories and
battery. Please do not use
products that are not
compatible.
To avoid risk of explosion, please
turn off TECH Moon at gas
stations and fuel locations near by,
chemicals or other hazardous
substances.
To avoid interfering with
blasting operations, turn off
parrendamiento TECH
Moon the scene of
explosions "or areas with
sign" Turn off two-way radio.
Pay attention to and comply
with any relevant rules and
regulations.
Please do not burn the battery
TECH Moon or treated as
garbage, because it would
endanger life and damage to the
environment. Please observe
local environmental policies, and
availability and recycle time.
If you need to connect your
TECH Moon to other
devices, please read the
instructions carefully for that
device safety.
Keep small parts (eg storage card)
out of reach of children, to avoid
being swallowed or cause other
dangers.
Please backup the important
information TECH Moon or
keep a written record on
hand to avoid losing
important data.
SOS
Make sure TECH Moon is
switched on and within coverage
service before dialing the
emergency number. Press the call
to inform his position.
1. Familiarization TECH Moon
1.1 Your TECH Moon
Page 7

45
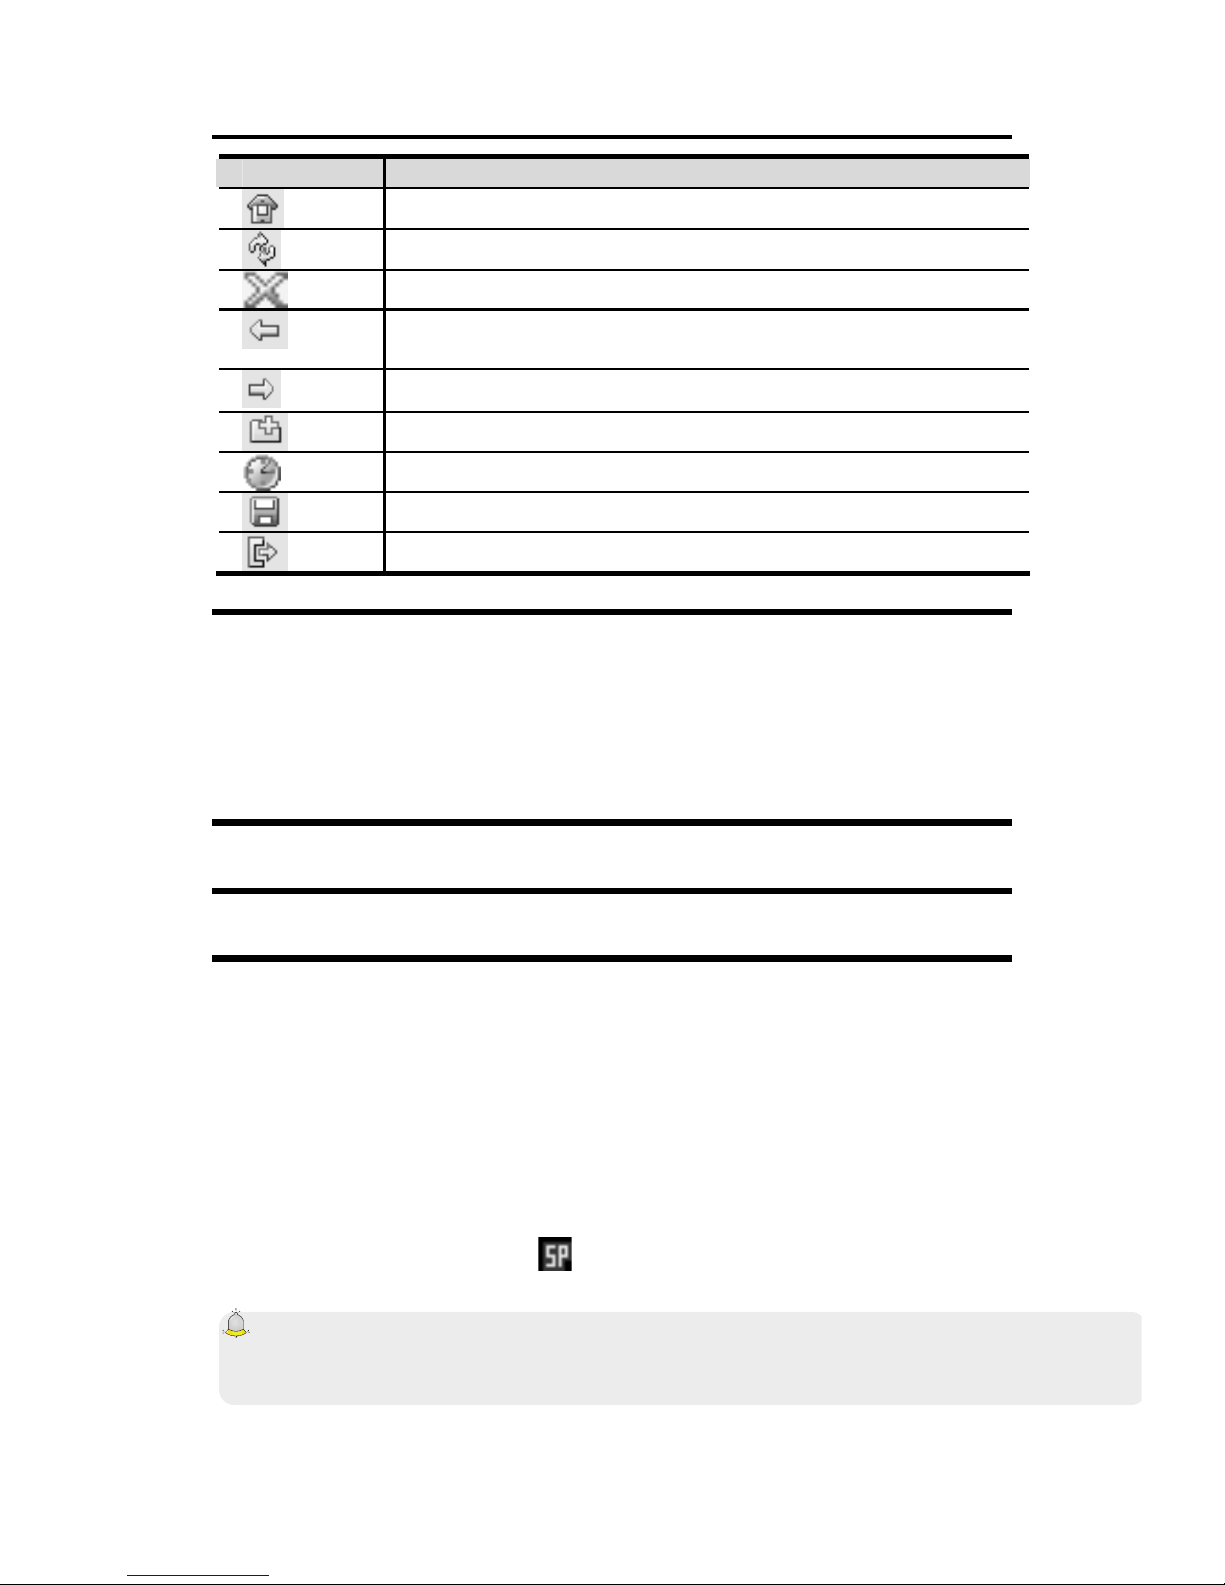
1.2 Status Icons
Icon Functional Description
Representation of the current network signal SIM1 and SIM2.
The more bars, the stronger the signal
Flight mode
Battery state, more bars indicate a higher capacity battery left
unconditional call divert SIM 1 and SIM 2
Unread MMS
MMS memory full
MMS Downloads
Headset mode
Unread SMS
SMS memory full
New issue
Alarm
SP New Message
PUSH full message
PUSH Unread
Bluetooth estto activated
The profile is set to silent mode
The profile has been set as ring under way
The profile has been set as a standard mode
The profile has been set as ring high and vibrate mode
The profile has been set as a mode of vibration
1.3 Installing the SIM card and battery
(1) Press 【Upload】for about three seconds.
(2) Slide the battery cover in the direction of the lower TECH Moon and then
remove.
(3) Remove the battery.
Page 8

46
(4) Follow the sign in SIM1 and SIM2 TECH Moon to install SIM1 and SIM2.
Please make sure the gold contacts face toward the TECH Moon and the cut
corner in the same direction with the card slot, then press the other side of the
card gently until it is fixed in the card slot.
(5) Replace the battery with your hand in contact with gold against a set of
batteries TECH Moon contact piece, and then replace the lid.
Caution:
All features described in this manual is based on two SIM cards, please select
[Settings→Dual SIM→Standby→Dual SIM Dual Standby]. If only Ione SIM
card is inserted or the card doesn dual'T function activated, the screen TECH
Moon and elements of the selection might be different than the directions
described.
1.4 Installing the storage card
His TECH Moon is compatible with T-Flash storage card. After inserting the
storage card, they will be able to see or copy files stored on the storage card
through its TECH MoonAnd to expand the memory space TECH Moon.
(1) Press 【 Upload】 for about three seconds to turn TECH Moon.
(2) Remove the battery cover.
(3) Follow the direction of the arrow "OPEN" at the top of the T-Card slot, card
slot cover open, place the T-card in the vertical slot, make sure the gold contacts
of the card face up , until the card is set in the card slot.
(4) Follow the direction arrow "LOCK"In the T-card slot, pull the card slot to
block the card slot.
Warning:
1. No hard and often insert or remove the storage card in order to avoid damage.
2. Do not remove or insert the card while reading or writing the memory card
(such as playing mp3, mp4, take pictures or video, send or receive MMS,
recording, transmitting Bluetooth files, etc), otherwise, the Damage can be
caused to TECH Moon or storage card.
1.5 Battery load
Accused by the travel charger
(5) Install the battery properly to the TECH Moon.
(6) Insert the travel charger cable to connect the slot on the left side TECH
Moon, And then plug the charger into a standard outlet.
Once the charger is plugged, the battery icon
in the upper right corner of the
screen starts scrolling, showing that it is charging. When TECH Moon is fully
charged, the battery icon will stop scrolling, and are shown as
.
Page 9

47
When loading is complete, unplug the charger from the outlet standard first, and
then remove TECH Moon and charger.
Caution:
1. Please use the battery and charger approved for this product, otherwise it may
cause an explosion.
2. If the battery is completely empty, the battery icon will appear after loading two
to three minutes. In general, the charging time is 2-5 hours, depending on the
current situation TECH Moon (Either on, during a call TECH Moon, Etc).
3. Please use the charger to charge, do everything possible to avoid loading
using a USB cable.
4. For optimal performance of the battery charge and discharge the new battery
two or three times. The first few times you charge the batteryto, charge for at least
10 hours
1.6 On / Off
1.6.1 On
Press【Upload】for three seconds to turn TECH Moon.
1.6.2 Off
Press 【Upload】 for three seconds to turn TECH Moon.
Warning:
Do not switch the TECH Moon in areas where use is prohibited TECH Moons
networks or when it may cause interference or danger, and also ensure that not
activated the "Schedule power on / off."
1.7 Using shortcut keys
By pressing some keys directly from the home screen provides direct access to
functions TECH Moon common.
Key Operation Function
Call key
tap Enter Call History
1 ~ 2 Keys hold on Enter your voice mailbox for SIM1 or SIM2
3 ~ 9 Keys hold on Enter the appropriate speed dial
The direct access functions of the navigation keys are:
While the display principal shown asstyle intelligent"
Up / Down: Select the icon of profiles or
or the shortcut icons on the main screen.
Left / Right key: When the shortcut is
selected Move left / right to select the icon.
While the main screenCIPAL shown asstyle
Up key Audio player.
Key: Dual-SIM.
Left key File Manager.
Right key: Profiles.
Page 10

48
2.
Using functions
2.1 Making a call
2.1.1 Call directly to the home screen
(1) At the start screen, enter the area code and number TECH Moon.
(2) Press briefly 【Call Key 1】 to call from one SIM, and briefly press【Call
button 2】to call from SIM 2.
2.1.2 Make international call
(1) Enter the country code (To enter "+", press 【】 * Key twice).
(2) Enter the area code (usually exclude the first "0") And the number of TECH
Moon.
(3) Press briefly【Call Key 1】to call from one SIM, and briefly press【Call button
2】to call from SIM2.
2.1.3 Call from Contacts
(1) Enter the contacts to select the desired information.
(2) Press briefly 【Call Key 1】to call from one SIM, and press【Call button 2】
to call from SIM2.
2.1.4 Redial history of CTOD
Enter the main menu and select [Call Records], then select the desired
number.
In the Sceen Start, click 【2.1 Call key】To view the call history, and selected
a number to dial.
Press briefly【Call Key 1】to call from SIM1, and press【Call button 2】called from
SIM2.
2.1.5 Dial an extension number
(1) Enter the number of the unit.
(2) In the dialing screen, select <Option→Insert→P Pause>, Then enter the
extension number.
(3) Press briefly 【Call Key 1】 to call from SIM1, and press 【Call button 2】
SIM2. The extension number will be transmitted within seconds after getting
through the switchboard.
2.1.6 Make an emergency call
(1) Enter the number of TECH Moon emergency.
(2) Press briefly 【Call Key 1】to call from one SIM, and press【Call button 2】
to call from SIM 2.
2.2 Answer or reject a call
2.2.1 Responder unallamada
When an incoming call, you can press 【Call key】or【Left soft key】 to respond.
2.2.2 Answer a second call
If the call waiting function is activated when there is nothing new coming call is in
mientrasYa TECH Moon, You can:
Press【Call key】to answer the second call and the current call is put on hold.
Press 【End Key】to reject the second call and to keep the current call.
2.2.3 Rejecting a call
When an incoming call, you can press 【End Key】to reject it.
2.3 Call options
While the TECH MoonSelect <Menu > And you can have the following options:
Page 11

49
Turn on the speakerphone: Select to enable or disable the speaker. Press
【Right Soft Key】during a call to turn on the speaker either.
Switch: Select [Change] To maintain the current call, and this function
needs network support.
Contacts: Select to view your list of contacts.
Posts: Enter the message screen.
Call records: Enter your call records.
Record:Record the conversation. Select [Menu→Hide] To stop recording
and the recorded file is stored via
[Multimedia→Recorder→Option→Recording file list] Automatically.
Caution:
Recording a call is illegal in some countries, therefore, you must obtain
permission from the caller before recording.
MUTE: Select this option to turn off the microphone while talking TECH
Moon, So you can hear the caller but the caller can not hear. Select [Unmute] To
switch the microphone again.
2.4 Aujustar call volume
During unallamada, you can press 【Navigation key】 to adjust the headset
volume.
2.5 Rejecting call
Press 【End Key】 to end the call.
3. Call History
Enter the main menu, then select [Call logs] To enter the call list.
In the main screen, press【Call key】to see the call list.
3.1 Calls made
Display records of recent calls. Choose any call log and select <Option> To
access the following:
Option Function
Details Display information for the selected call
Call Make a call SIM 1 or SIM 2
Save Save the entry to the SIM card or TECH Moon
Send Message Send an SMS or MMS to the selected input
Add to existing
contact
Save the selected number to existing contact entry (add it
only allows the TECH Moon'S list)
Add to
blacklist
Set the number of TECH Moon selected as the number
rejected, after saving, the number will be available in
[Contacts→Blacklist]
Page 12

50
IP Call IP make a call via the SIM 1 or SIM 2
Delete Delete the selected entry from the list
Delete all Delete all entries in the list called
For the function line, you can also select [Settings→Dual-SIM→Main SIM
settings→Call], And the basis of need to choose SIM1 SIM2, or system to select.
3.2 Received calls
Show the last call received. Similar operations, you may refer to "Calling Out."
3.3 Missed calls
Show recent calls without crop up. For most operations, see "Call made."
3.4 L rejectedcalls as
Screen TECH Moon numbers of calls that rejected.
3.5 Delete
Delete all incoming calls.
3.6 Call duration
Select the SIM card, and then you can see all the relevant information about the
SIM card.
3.7 Call costs (requires network support)
All calls: Registration of the total call charges SIM1 and SIM2.
Max cost: You can adjust the desired upper limit for call charges.
Cost rate: Record the rate of cost of SIM1 and SIM2.
Cost reset: Reset total call cost zero.
3.8 GPRS counter
You can view details on GPRS flow.
4. User profiles
With this feature, you can configure user profiles to suit different environments.
There are five preset profiles are available, each has its own default value, which
can be configured according to your needs.
4.1 Rulesl
Activate: Activates the selected profile.
Settings: Set the following options as needed.
¾ Game ringssettings: Set ring or call ring msg for SIM1 and SIM2.
¾ Adjust the volume: Adjust the volume for incoming ringtone, message
tone, etc. Press the navigation key 【】 to adjust the volume.
¾ Call Alert: Set the mode desired wake-up call for SIM1 and SIM2.
¾ Alert Message: Set the desired message profile warning for SIM1 and
SIM2.
¾ Alarm recall: Set the alarm you want to recall how
¾ Key tone: Set the desired tone keypad.
¾ Low battery alert: Set whether to activate the tone for low battery
warning.
¾ On / off tone: Set whether to activate the on / off tone.
Rename: Amend the name of the selected profile.
Page 13

51
4.2 Vibrate
For setup, refer to "General."
4.3 High Tmbre and vibrate
For setup, refer to "General."
4.4 Soft Ring
For configuration, see "General."
4.5 Silence
For configuration, see "General."
5. Contacts
The TECH Moon space is designed with a high capacity memory. Different SIM
card will have a different memory capacity.
5.1 View a contact
Enter contacts, TECH Moon default is to display the contact list with all entries.
Press 【Left / right】 to switch between the different groups.
Classification sequences are as follows: no name, special symbol, number, and
letter (Chinese names were classified after his first letter phonics).
5.2 Smart Search
Enter the main menu and select [Contacts] For a list of contacts.
You can find the desired contact by pressing the appropriate keys (The TECH
Moon is compatible with the fuzzy search).
# For example: Search "Sam"
Input the number keys "726" which is corresponding to the English letter "S", "a"
and "m", then you can find.
# For example: The search saved from symbols
Directly input "1" to find it.
Select the desired contact and then select <Option> To access the following:
Option Function
New Add a new contact
Search Search Details of the number of TECH Moon desired
Write a message
Allows you to send an SMS, MMS to the selected
contact.
Bookmark Make a call to the selected contact
Send vCard Sends the selected contact via SMS or Bluetooth
Delete Delete the selected contact
Marcos Mark the selected contact or all contacts
Copy
Copy the selected contact to SIM1, SIM2, the TECH
Moon or memory card
Speed dial
settings
Preset speed dail numbers. In the main screen, hold the
3 ~ 9 keys to dial directly for that key.
Ot
her
s
Caller ID Set the selected number as the number of TECH Moon.
The role and the amount of stored numbers all depend
Page 14

52
on the SIM card.
STATUS
REPORT
View memory status contacts in SIM1 SIM2, or TECH
Moon
display a
single line
double line
Display
Select to display contacts by line or double line.
5.3 Add a new contact
In the contact list, select <Option→New> To create a new contact.
Phone: You can enter the contact name, phone number, house number,
etc. You can also configure the image and ring Special input contact
SIM1: The log entry is saved in SIM1, with the name of each phone number.
SIM2: The log entry is saved in SIM2, the name of each phone number.
Caution:
When creating a new contact, the name can be in blancoSin however, the
number of TECH Moon can not.
6. Message
Tthe messaging service is a type of network service. If you can work normally
depends on the SIM card and services provided by the network operator.
Therefore, please check with your network operator before using this feature.
6.1 Write a message
You should get the number for service center The network operator before using
this feature. The memory capacity is different due to different types of SIM card.
6.1.1 New SMS
The TECH Moon supports multiple SMS editing.
In the main screen, press【Left soft key】and select [Message→Write a
message→New SMS] To edit a new SMS directly.
After writing an SMS, click <Option> Have the following:
Send: Send the message to the intended recipient, or you can click
<Contacts> To find the desired contact, and then send it after choosing the SIM
card.
Insert Template: Select the desired template and inserted into the SMS.
Add Contact Information: Retrieve the contact information you want
(eg.name and number of TECH Moon) Contacts and add to the SMS.
Add phiz: Add phiz want to insert in your SMS.
Save: Save the edited SMS in Drafts.
6.1.2 New MMS
MMS is a multimedia message, support for images in GIF, JPEG, WBMP, and
BMP
Caution:
The MMS can be used only when supported by the network operator, and only
TECH Moons multimedia function can usually receive and display it.
Page 15

53
In the main screen, press【Left soft key】and select [Message→Write a
message→New MMS] To create a new MMS.
Send: Send MMS editing the intended recipient. You must preset number of
the recipient before sending.
RecipientsAdd the recipient's number using [Add recipient] O [Add
Group].
Cc: The MMS can be carbon copied to the intended destination.
CCO: Neither the recipient nor the recipient of the carbon copy shows the
number of TECH Moon.
Subject: Edit the title MMS.
Edit content: Modify the content of MMS, click <Option> To access the
following:
¾ Text : Modify the text MMS.
¾ Add
Slide: You can insert a new slide.
Image:: Select the desired image and inserted into the MMS. The TECH Moon
supports WBMP, BMP, GIF and JPEG.
Audio: Select the desired audio file and inserted into the MMS. The TECH Moon
supports MIDI, WAV, MP3 and AMR format.
Video: Select the desired video file and inserted into the MMS. The TECH Moon
is compatible with 3GP and MP4.
¾ Delete
This slide: Delete the current slide.
Image: Deletes the current image in the slide (This option is available then insert
an image).
Audio: Delete the audio file in the current slide (This option is available after an
audio file is inserted).
Video: Delete the video file in the current slide (This option is available after a
video file is inserted).
¾ Previous slide: Move to the last slide (This option is available when
multiple slides).
¾ Next slide: Move to the next slide (This option is available when multiple
slides).
¾ Adjust the time of the slide: Adjust the playing time of current slide,
and is valid from 100 to 600 seconds.
Preview: Preview of the slide in the sequence.
Save: Save the current MMS [Drafts] Available for re-editing and sending.
6.2 Inbox
Store all SMS and MMS.
6.3 Outbox
Store all SMS and MMS has not been sent.
6.4 Drafts
Save. edited SMS and MMS is not sent.
6.5 Submittedbox
Store all SMS and MMS sent successfully. If you want the sent messages are
Page 16

54
saved automatically, select
[Posts→Option], Then select [SMS settings→Save sent messages→Save].
6.6 Message settings
In the main screen, press【Left soft key】to enter the main menu, then select
[Message→Option] To enter the message settings menu.
6.6.1 Templates
While editing messages, you can directly quoting common phrases presets.
Select <Edit> To adjust the common phrases for yourself (up to 5 pieces).
6.6.2 Voicemail server
This function works as united response to machine, which can transfer a call lost
your personal voicemail, allowing the caller to leave a voice message and will
notify you by SMS. Voice mail is a part of the software package provided by the
network operator, therefore registration is required to activate this feature, and
manually set the TECH Moon. Contact your network operator for more details.
Caution:
It'S feasible to transfer the voice call voicemail (The number of call leave a
message) by setting "Call Forwarding".
6.6.3 Broadcast Message
You can receive broadcast text messages with different content through network
service, such as news, weather or traffic. For more information, please contact
your network operator.
Read: Read the broadcast message received.
Release Dissemination: If [selectOff], Then no matter corresponding
channel number has been established or not, TECH Moon can not receive
broadcast messages.
Channel settings: You can select [Add channel] O [Canales].
Languages: Multi-languages, you can listen to the broadcat in the desired
language.
6.6.4 SMS settings
Msg center SIM1: While sending messages, you must set the service
center number provided by the network operator. Most of the default SIM card
contains the number of center service. You can also get éhis issue directly from
the network operator.
Caution:
If you modify or delete the service center number, a SMS can not be sent.
SIM2 msg center: Please refer to [Msg center SIM1].
Message validity period: Allows you to adjust the length of time during
which the SMS is stored in the message center. The validity period depends on
the network operator.
Progress Report: S [electIn] Next, the text message informs the center
sent a message successfully.
Save sent messages: You can select to save the message sent or not.
Preferred storage: You can select to save the SMS on the SIM card or
TECH Moon first.
Page 17

55
6.6.5 MMS configuration
MMS MMS SIM1 count/SIM2 account: You can select SIM1 or SIM2
acount acount MMS MMS
Delivery Report: S [electActivate] Next, the MMS center will inform you
that the recipient has received and downloaded the MMS.
Send Read Report: Click on [Activate], Then you will receive a warning
message when the MMS sent is read by the recipients.
Anonymous post: Select [Activate], The MMS is sent to the intended
recipient without showing the number of TECH Moon the sender.
Priority: Set the priority level for MMS.
Receive MMS: You can select [Manual receive] Enter [Auto receive]. If
manual restore feature is enabled, then you have to manually download the MMS
received from the inbox, if auto function is chosen, then the TECH Moon MMS is
downloaded automatically once received TECH Moon returns to the screen.
Play Audio: Once activated, the TECH Moon play the sound while reading
a picture message.
Allow adversting: Once activated, the TECH Moon receive publicity while
receiving an MMS.
Validity: Can establish the validity of the MMS. The period depends on the
service provided by the network operator.
Storage: You can select the location of storage required for images, music
or video files to MMS.
Restore Defaults: Reset the default settings.
6.6.6 Message capacity
You can view the status of memory for SMS and MMS through this function.
7. Internet
The network service allows you to access the Internet through wireless
communication, where you can get extensive information and resources, and
electronic commerce on the Internet.
In the main screen, press【Left soft key】and select [Internet].
Caution:
1.Su network service provider is not compatible with some features. To ensure
that browser work normally, please first confirm that your SIM card supports the
role of the Internet is active.
2. If you browse the website, under charges flow.
7.1 Entry URL
Enter the website wanted, and click <Confirm> To connect.
7.2 Home
When you select this option, your TECH Moon moving directly to visit the home
page default or default.
While browsing the web, press【Left soft key】 to swtich between the address bar,
websites and the toolbar.
Using the toolbar:
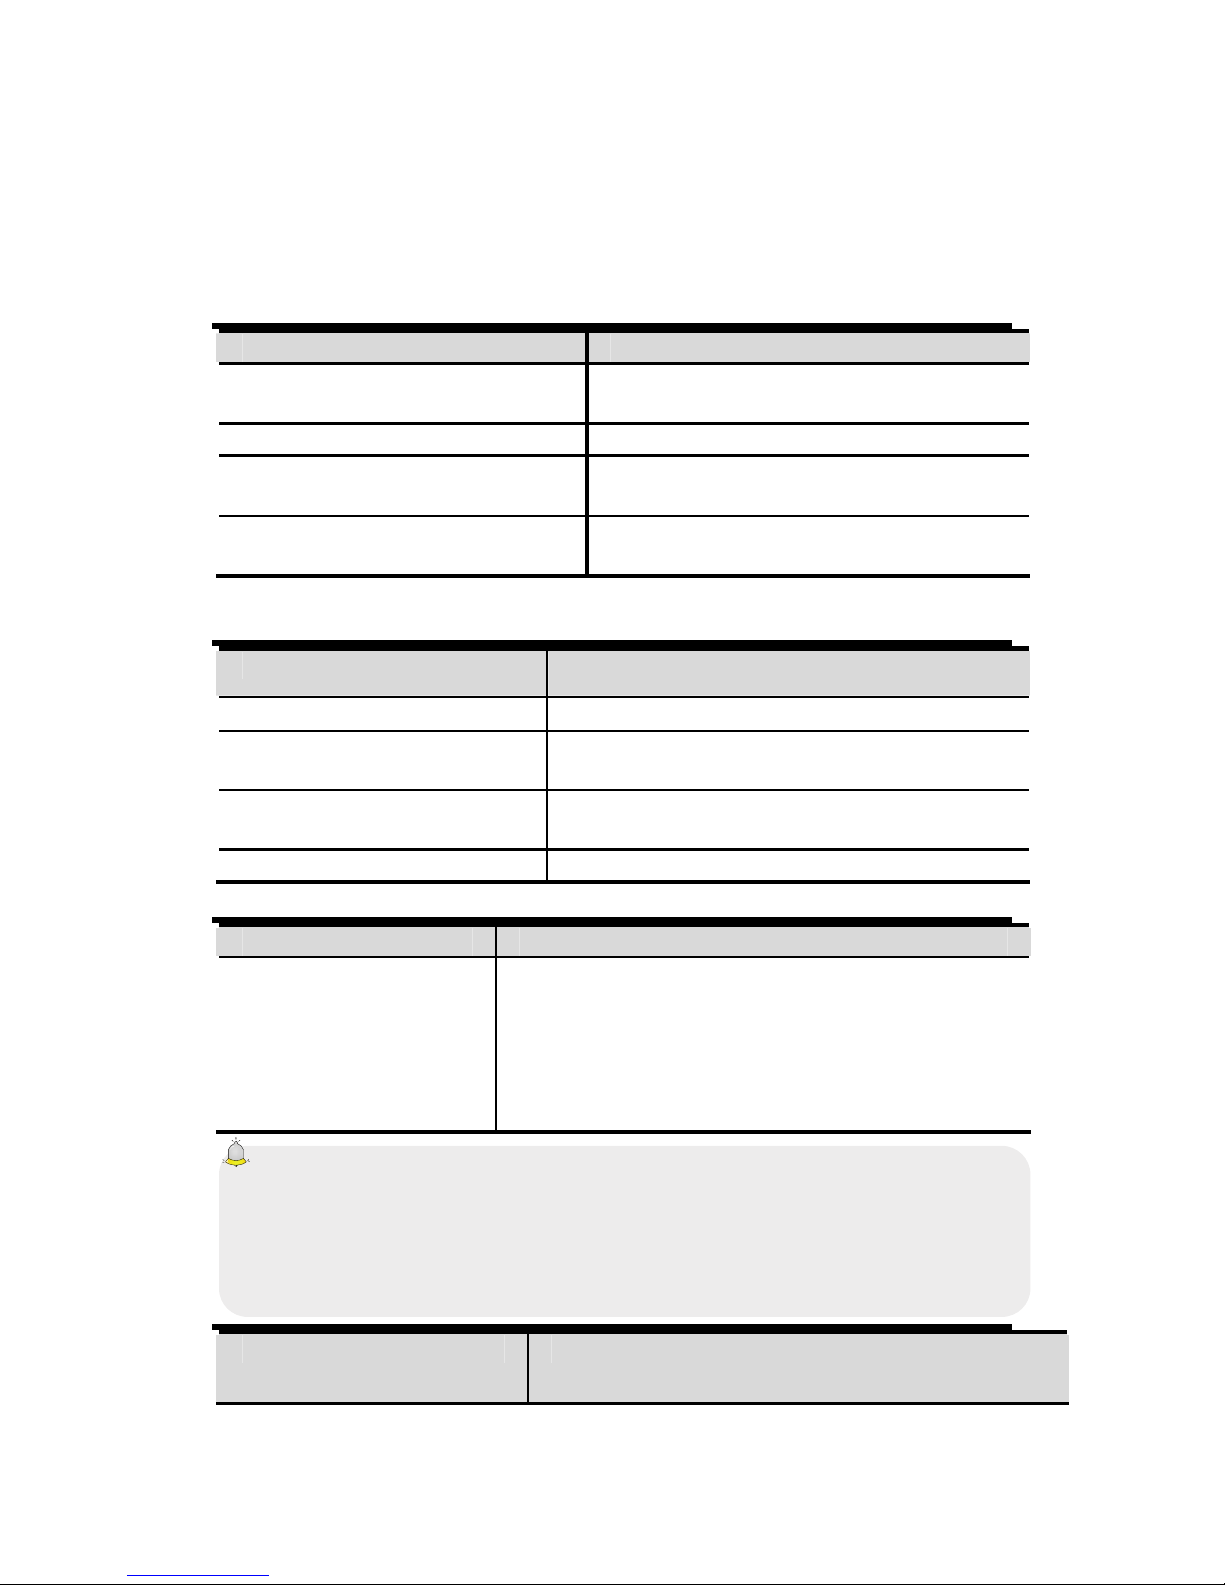
While viewing the web, icons below function as below:
Page 18
56
Icon Function
Home: Return to the home page.
Restore: Renovate current web page.
Close: Close current web page.
BackBased on the story again to visit the website of view
recently.
ForwardBased on the story, go forward to the next page.
Bookmark: Save current URL in the Favorites
History: See the story.
Saving files: Save the name, image or music files.
Exit: Select to exit the browser.
7.3 Bookmark
The markers are defaulted to blank, and are able to modify it as you want. Save
the common web site visited on the Favorites, and marked by simple names.
Select a stored name, then the corresponding web connected. Please check the
following settings:
Bookmark: Enter the address and name of the new marker, then select
<OK> To save it.
7.4 History
Registration of web sites you visited before.
7.5 Online
After saving a Web site as a snapshot, you can browse the web offline.
WAP 7.6 settings
7.6.1 Browser Settings
Clear cache: In order to avoid congestion and improve web browsing
speedN, please clear your cache regularly.
SIM1 network account: Set the network port SIM1.
SIM2 network account: Set the network port SIM2.
Download Image: After activating this function, the image is only displayed
after being downloaded.
Play background sound: After activating this function, you can play
background music.
Accept: If you enable this feature, you can receive push messages. Upon
receiving push message, an icon
appear on the screen, and you can see the
WAP Push message sent by the system through this menu.
Caution:
Do not arbitrarily change the settings or that may not normally visit the website.
7.6.2 Network Account
You can select the desired account nekwork: China Mobile GPRS, China Mobile,
China Unicom, MMS or WAP, and can add the desired account itself.
On the screen counting network, select <Option> To process the following:
Page 19

57
New Connection
¾ Itsafety: Set whether to enable the security possible.
¾ Username: Modify the user name of the network.
¾ Password: Set the connection password.
¾ APN: Set the port name of the access network.
¾ Gateway IP Address: Set network IP address.
¾ Port gateway: Set the network port.
¾ Rename: Modify the network account name.
¾ Set as homepage: Set the address of the website homepage.
¾ Advanced Settings: Configuring the DNS address and the type of
network.
Add to the list: You can add multiple accounts default network.
Search: Find the network configuration recorded in the nearby areas, which
can be used directly after being searched.
Delete: Delete the selected network account.
Edit: Edit the selected network account.
7.6.3 refers storage Pque
You can choose where to save the image files, music or video from the Internet.
7.6.4 GPRS establishment
You can choose to open or GPRS always open when needed.
7.6.5 Restore Defaults
WAP settings reset back to the factory.
8. Multimedia
8.1 Camera
Enter the main menu, and select [Camera] to enter the camera preview screen.
8.1.1 Capturing a photo
In the capture screen preview, press 【OK key】to take a picture.
Capture setting
In the capture screen preview, select <Option> To then process the transactions.
Vacation capture mode: Albe to activate the auto capture mode or not.
Photos: Enter Vierwer image to see the photos captured.
Camera settings
¾ Flash: Set the flash.
: In
: Auto
: Off
¾ Contrast: Adjust the contrast level.
¾ Anti-Flicker: 50 Hz and 60 Hz are available for you to choose.
¾ Delay Timer: After seting the time delay, press 【OK key】while taking
pictures, the screen displays a preview screen countdown and automatically
takes a picture when the time runs out.
: Off
: 3 seconds
: 10 sec
¾ Cont shooting: Set to continuously shot images.
Page 20

58
: Off
: 3 shots
: 6 shots
Picture Settings
¾ Image Size: Available to adjust the resolution.
: 640 X 480
: 220 x 176
: 320 x 240
¾ Image Quality: You can select as you need.
: Normal
: High
: Low
White Balance: White balance settings.
: Auto
: Solar light
: Fluorescent
: Clear
: Incandescence
Scene Mode: Available for switch between Nomal and night mode.
: Normal
: Night
Storage: Select the storage location for captured photos.
8.2 Video Recorder
Enter the main menu and select [Video Recorder] To access the video preview
screen and press 【】 OK button to start recording video.
Video recording facility
In the video preview screen, select <Option> To then process the transactions.
Vacation capture mode: Albe to activate the auto capture mode or not.
Video Viewer: To see the video shot.
Camcorder settings
¾ Night Mode: Select this option to activate the night mode or not.
¾ Anti-Flicker: 50 Hz and 60 Hz are available for you to choose.
¾ Type: Sets the video format like AVI or 3GP, as you need.
Storage: Select the storage location for captured photos.
8.3 Mobile TV (Optional)
In the main screen, remove the antenna, press 【】 Left soft key the main menu
and select [Mobile TV] To enter the TV function. The TECH Moon automatically
selects the television channel when the TV function is used for the first time.
Press 【Left / Right】 to change between the previous or next channel
Press【Up / Down】to adjust the volume
Press【OK key】to display in full screen
Page 21

59
Audio Player 8.4
The TECH Moon can play music stored on TECH Moon or the storage card and
ring discharge, and also supports MP3 playback background.
Note:
MP3 supports MPEG 1 Layer 3 audio, MPEG 2 layer 3 low frequency extension
of sampling and MPEG 2.5 layer 3 (unofficial).
On screen, press the left soft key 【】 to access the main menu and select [Audio
Player] To enter the audio player on the screen:
The following table shows the icons on the screen of the player:
Icon Description
Press【Key】to show or pause
Press 【Key】to stop
/
Press【Left / Right】to skip to the last / next
Show the playback volume, press【+ Key】/【- Key】Up / down
volume
8.4.1 Background audio player
While playing a song, press 【End Key】out of the game screen to enter
background mode of play.
Video Player 8.5
The video player supports video file in 3gp, mp4 or avi format.
If the file is in standard format compatible, please use the conversion tool to chat
in a format standard.
Enter the main menu, and click [Multimedia→Video player].
Icon Description:
Icon Description
/ Play or pause
/ Jump to last / file
Stop playing
Raise or lower the volume. Press【+ Key】or【- Key】to adjust the
volume.
8.6 Image Browser
The feature offers quick access to see the photos and images.
The Image Viewer screen, select <Option> To process the following:
Change folderAutomatically checks all channels and stored in the radio list.
SendSend the selected image via MMS or Bluetooth.
Slide play: Screenshots mode full-screen slideshow.
Delete: Delete the selected image.
Set image as wallpaper: Set the selected image as wallpaper for TECH
Moon.
Rename: Change the name of the selected image.
Marcos: Able to mark selected image.
Page 22

60
Details: Displays the details of the selected image.
Slide settings: Able to change the effect of the slide show by setting [Select
the effect] Y [Elay Dtiempo].
Recorder 8.7
In the main screen, press 【Left soft key】 to enter the main menu, select
[Multimedia→Recorder], And choose <Option→Start recording> To start the
recording. Select <Pause> Have the break in recording for a while, select <Stop>
Stop recording. After leaving the recording, the recorded file is automatically
saved in the [Audio] Press 【 Up / Down 】 to select
or
<selectOption→Recording file list> Check.
While completing the recording, select <Option> The process following action:
Hearing: Play the recorded file.
Record AgainRecord a new file.
Delete: Delete selected entry.
Send: Send the selected file via MMS or Bluetooth.
Recording file list: Check all files saved.
8.8 FM Radio
In standby mode, plug the headset, press【Left soft key】 to access the main
menu, then select [FM Radio].
Radio FM has a telescopic antenna. You can listen without headphones.
Icon Description:
Icon Description
Press 【Key】to enable or disable the radio
Frequency slider, press【Left / Right】to adjust the frequency
/
Press【Left / Right】to adjust the radio frequency.
Shows the volume of the player, press【+ Key】or【- Key】
to fit
In the FM Radio screen, select <Option> To process the following:
Automatic search and saveAutomatically checks all channels and stored
in the radio list.
Channel List: Show all search channels, press【Up / Down】to select the
channel and then click <OK> Listen.
Save: Save the current channel.
Manual search: Directly input the desired channel and the pursuit of it.
Open speaker / speakers Close: On or off the speaker.
Background play: You can still listen to the radio after leaving the radio
display.
File Manager 8.9
This menu allows you to manage files stored on USB drive or storage card.
Audio: Save the audio files such as WAV, MP3, MIDI, AMR, ACC, etc.
Ebook: Save the eBook files. (THE ELECTRONIC books)
Photos: Save the photos and image files, supporting formats: jpg, gif, bmp
and wbmp.
Video: Save captured video files, support for AVI, MP4 and 3GP.
Page 23

61
vCard: Save the vcf file. Copy a selected contact from the contacts on the
memory card, and then save VCF format in this folder.
9. Tools
Alarm 9.1
In Hlgunas Screen, press the left soft key 【】 to enter the main menu and select
[Tools→Alarm], Then you can set the alarm name, time, ring and mode.
There are three alarms that can be activated simultaneously. Each alarm has
three modes of the system [Once] [All] O [Weekly].
9.2 Calendar
In Hlgunas Screen, press the left soft key 【】 to enter the main menu and select
[Tools→Calendar] To enter the calendar screen.
Select <Options> Al correonter the following:
Add Task: Create a new calendar and the schedule is to pay as the current
date.
View tasks: See if there is a time when the date was clicked.
All TasksView all schedules.
Clear today's tasks: Clear the schedule on the chosen date.
Clear all: Delete all schedules.
Go to date: Enter the date and the Press 【OK key】 to see the timetable for
the chosen date.
9.3 Calculator
Directly input numbers, press【Navigation key】 to select the operation symbols
(+, -, /, X). Press 【OK key】 To get the answer. Press 【Right Soft Key】 to clear
last digit entered, holding the key to delete all digits.
Bluetooth 9.4
Open / Close bluetooth: This feature allows you to switch Bluetooth on or
off.
Bluetooth Visibility: Set to show or hide your Bluetooth TECH Moon. If you
choose to hide TECH MoonOther devices can not detect your Bluetooth device
TECH MoonEven have activated Bluetooth.
Disp: You can search for nearby devices with Bluetooth
My Bluetooth name: If Bluetooth function turned on, while searching for
other devices to the Bluetooth signal, the corresponding name represents the
TECH Moon.
Storage: Able to set the storage location for files received via Bluetooth.
Help: Bluetooth help provide relevant information.
EBook Reader 9.5
You can see the TXT file formats and copy of Ebook TXT file with [Ebook] Folder
on the memory card of your PC.
In the main screen, press【Left soft key】to enter the main menu and select
[Tools→EBook Reader] To enter the screen to read Ebook last time. Select
<Back> To access the list Ebook and then select the file you want to read.
Ebook On screen, select <Option> To access the following options:
BookmarkAdd the contents of the current page to your favorites.
Page 24

62
View Bookmarks: View the contents of the marker that was added.
Jump to first page: Skip to first page of the current book and read it.
Jump to last page: Skip to last page of the current book and read it.
Jump to:Entry of the pages to go and press <Confirm> Turn to it.
Cancel backlight always on / always backlight: Select to enable or
disable the backlight.
Caution:
If memory is not enough, there will be a notice that appears on the screen Ebook.
Please delete unnecessary files to ensure at least 500 KB of space on the
memory card.
Ebook In the folder, select the eBook you want and press <Option> To process
the following:
Details: View Details Ebook selection, such as name, date, time, etc.
Recent Books: View recently read Ebooks.
Send by blutooth: Send the selected Ebook to others through blutooth.
Delete: Delete the selected Ebook.
Marcos: Able to mark the Ebook. Marked Ebook can be sent or delected,
etc.
Settings: Sets see page method and color.
10. Settings
10.1 DSIM OUBLE
Dual SIM Game divert calls
You can configure the two SIM cards to divert the calls together. Before using this
feature, select [Settings→Dual-SIM→Dual SIM settings]
Standby: You can select the standby mode for SIM card, either waiting for a
SIM card, or two SIM cards standby at the same time.
Key SIM settings: There are several types as below:
¾ Communication: For functions such as calls, SMS, MMS and the
Internet, you can choose the type of SIM card to be used according to their need,
and you may also choose to have the choice of system for the use of some
specific functions.
¾ Speed Dial: If you enable this feature, you can speed dial number TECH
Moon through the screening of the SIM card.
¾ Original SIM response: You can activate the response of the current
SIM card call TECH Moon, SMS, MMS and network services.
Caution:
"Response of the existing card" has priority over Master and the establishment of
additional card. "
Set SIM name: You can name the card you want.
Dual SIM settings: Please follow the steps prompted on the screen locking
process dual SIM.
Help: Provide help information.
Page 25

63
10.2 Call setup
10.2.1 Select Network
Automatic selection: The TECH Moon automatically search and register
for available networks.
Manual select: Enable this function, the TECH Moon search the web, and
the list of all searches in networking, then you must choose the one that is
needed to register.
10.2.2 Call Forwarding
Based divert all conditions, incoming calls are Forware in voice mail or other
numbers.
unconditional transfer: All incoming calls are transferred to the preset
number or voicemail. Select [Status Inquiry] To see the unconditional call divert
current situation.
Divert if busy: Calls will be transferred to voicemail or the number of TECH
Moon default when you are in the TECH Moon.
Divert if no answer choices: Calls will be transferred to voicemail or the
number of TECH Moon default, when the prescribed time is over and TECH
Moon remains unanswered.
Divert if unreachable: Calls will be transferred to the designated number or
voice mail when TECH Moon is outside the scope of services on or off.
Cancel all diverts: All call forwarding functions are canceled.
10.2.3 Call barring
This feature helps to restrict incoming and outgoing calls.
Select the desired call and press <Confirm>, Then you can select [On] [Off] O
[Status Inquiry]. Select [On], The TECH Moon network support will currect
setting. Below are the available options restricted call.
Option Description
All outgoing calls Restrict outgoing calls
All incoming calls Restrict incoming calls
Incoming calls while
roaming
No incoming calls when roaming
International Calls
Outgoing international calls prohibited
Dial when roaming INTL
International roaming incoming prohibited
Cancel all barring Cancel all call restrictions
Change Password Change the password for the Restrict calls
function
Cautioin:
1. Some network operators prohibit tque function. For more information, contact
your network service provider.
2. The network operator will provide initial network password, as requested by
this service.
10.2.4 Call waiting (Do you need network support)
Activate: If set the function, the network will notify you of an incoming call.
You can keep the current call and answer another.
Page 26

64
Off: Cancel Call Waiting feature, then the new incoming ganado'T be
answered while you are in the TECH Moon now.
Status Inquiry: Select to view the current status of this function.
10.2.5 Hide ID (Do you need network support)
Hide ID: During the call, the recipient ganado'T see your phone number.
Show own ID: During the call, ynuestro number TECH Moon be visible to
the recipient.
ID display on the network: During the call, if the number of TECH Moon
will be visible to the recipient or not depends on the screening of the network.
10.2.6 Select line
You can choose line 1 or line 2 as you need.
10.2.7 Flight mode
Activate: Turn on flight mode, then all network services not available.
Select to turn: You can select whether to activate the flight mode when the
power.
10.2.8 Other
IP Shortcut keys
After activating this function, the selection <Option→IP Call> The IP number,
then preset it is automatically added before the number to dial and call through it.
50 seconds warning
If you set a reminder time will be announced in the second 50 of each minute
during the call so that you can complete the call in time to save on telephone
rates.
Connect the system
The TECH Moon vibrates to prompt you when the recipient answers the TECH
Moon.
Answer / Reject Mode
¾ SMS after rejecting response: You may choose whether to answer a
SMS after rejecting a call.
¾ Any key answer: You can answer calls by pressing any key (except the
left soft key 【】 【and End key】.
Automatic redial
If you set this function, TECH Moon redial the number after an unsuccessful call,
10.3 Configuration TECH Moon
10.3.1 Time and date
Set time: Direct the time of entry or press 【Up / Down】to establish that.
Set Date: Directly enter 【date or press Up / Down key】 to set ..
Time Format: Set the time format as [12 hours] O [24 hours].
Display Type Date: Set the date format as [Year-mis days]
[Mon-day-year] O [Date of month years].
10.3.2 Select language
Two languages are available, [English] Y [Simplified Chinese].
10.3.3 Auto On / Off
You can configure the TECH Moon on / off at a scheduled time. For the setting
method, please refer to "Alarm".
Page 27
65
10.3.4 Motion Sensor Switch
The function allows you to enable auto-rotation sceen wallpaper of inactivity, the
audio function is omitted player.The as "Disabled."
Note:
Motion sensor function only works when the display lighting. If the backlight is off,
then the motion sensor is disabled and there will be no response.
Inactive wallpaper: Click on [Inactive wallpaper], Then the process
"Accelerate shaking right to left"Therefore, the wallpaper will change to pay the
ultimate form of the list, the process"Accelerate shaking from left to right"And
the wallpaper is activated following defaul in the list.
Note:
wallpaper current switching function supports only the default wallpaper. For
custom paper, which ganó'T work.
Audio Player: Click on [Audio Player] Process "Accelerate shaking right
to left"So the song will skip to the last default in the playlist, the
process"Accelerate shaking from left to right" then the song can be changed
as follows defaul in the playlist.
Caution:
Song skiping ganado'T work while playing back is turned.
10.3.5 Shortcut settings
While the screen is elegant, can change the shortcuts on the home screen
through this.
While the main screen is a common style, you can change the shortcuts
responsible 【】 Navigation key in standby mode.
10.3.6 For Management
Show the battery capacity.
10.4 Display settings
10.4.1 Own funds
Select the default or other images as wallpaper TECH Moon.
10.4.2 Off-screen style
"Standard Style" and "intelligent style" are available.
10.4.3 On the screen
You can select the animation preset or as the power of animation on your mobile.
10.4.4 On Screen
You can select the animation preset or as the power of animation on your mobile.
10.4.5 Contrast
Press 【Left / Right】to adjust the contrast.
10.4.6 Backlight
Select the desired light time.
10.4.7 The keyboard light
Select the time the keyboard light.
10.5 Security settings
In order to obtain the information can be PIN code, PIN2 password Guardlock
power and function.
Page 28

66
10.5.1 PEN
PIN code is the personal identification number for the card SIM.Si can not change
the initial password set by the network operator must be 1234 or 0000. If you
activate the PIN code on, then you have to enter the PIN password each time you
turn on TECH Moon. You can change the PIN code to prevent your SIM card
used by others.
Caution:
If you enter the wrong PIN three times in succession, the SIM card is blocked
automatically, prompting you to enter the PUK code to unlock it. Therefore,
please do not remember the PIN code, if you modify it.
PUK code (PUK1) consists of eight digits, not modifiable. When TECH Moon is
locked by the PIN code, please enter the correct PUK code to unlock the TECH
Moon. If incorrectly input times PUK ten in the succession, the SIM card can not
be used more. Some PUK are supplied with the SIM card, some must be learned
from the network service provider. If you do not know the PUK code, while the
PIN code is blocked, please enter the code no chance. In this case, please call
the service provider's SIM card, after a simple check on the user's identity, you
can get the PUK code to unlock free TECH Moon.
Caution:
Please take care when using this feature. If you forgot the PUK code, please
consult your network operator. If incorrectly input times PUK ten in the succession,
the SIM card is junk.
Select the type of SIM and has the following options:
On: You must enter the PIN code every time you turn on the TECH Moon.
Edit: You must activate the PIN code before you edit.
Off: Sou must enter the correct PIN code before it goes off.
10.5.2 PIN2
PIN2 code is required personal identification code for some specific functions
(such as establishing a fixed number, tariff system TECH Moon, Etc.).
PIN2 code is another password which, together with the SIM card service
provider. If you input wrong three times, the TECH Moon is blocked until the
correct PUK2 entered for the operation details, see the PIN and PUK code.
Caution:
If incorrectly input times PUK2 ten in a row, you can not use the SIM card. Please
take care when using this feature.
10.5.3 Privacy
Secured password TECH Moon.The TECH Moon be protected from other users
unotherised. When the password function has been activated to record calls or
messages, you must enter the correct password in the main menu or the
corresponding submenu. The default password is "0000."
10.5.4 Auto keypad lock
After activating this function, the TECH Moon automatically locks when the set
time is reached, to avoid error operations.
Manual key lock: In the main screen, press the left soft key 【】 and press
【Key alt】To lock the keypad manually.
Page 29

67
Manual unlock the keypad: In the main screen, select <Unlock> And
press【Key alt】to unlock the keypad manually.
10.5.5 Screen Lock key late
Once activated this function, when the backlight is on, press【End Key】to turn off
the backlight and keyboard autolock.
10.5.6 Startup password
You should set the power of the password when using this feature for the first time
(The password is 4-8 digits). Once activated this feature, Shoud input password
every time you turn on TECH Moon.
Caution:
Turn on the disabled doesn't 'have mistakenly introduced limiting. Please
remember carefully about the power of people with disabilities, otherwise, the
TECH Moon not turn on normally once forgotten password.
10.5.7 Guardlock
Guardlock (MSD) is dubbed as TECH Moon Mobile dog. When other illegal use
TECH Moon, CellID information as the TECH Moon will be collected and sent to
TECH Moon default mobile and also the function will prevent others from using
the TECH Moon after certain hours or on certaim times.
This feature is defaulted to be off. To activate, please change your password.
Then you need to enter the password to activate, deactivate or change the
password for the operation of the process, and the 6-digit password. To activate,
you must enter a preset number of TECH Moon Mobile (The number of TECH
Moon Mobile set to receive the message if the TECH Moon stolen), apart from
the password.
Once activated, the TECH Moon stores the IMSI number of original SIM card,
which is unique and singular, if you insert another SIM card, there will be a
system that asks you to enter the password guardlock. If you mistakenly enter the
password three times, the TECH Moon by default as illegal and show relevance
of the system, then collect and send information as CellID, LAC, MCC, MNC, the
number of predefined MCN TECH Moon mobile. While receiving this message,
the legal user can report to the police, you can check the status of illegal use
(including the location used, call history, etc) network operator through the piece
of information.
The message will remain senting the TECH Moon Mobile preset until successfully
received. If TECH Moon stolen more than 24 hours or switch back, the TECH
Moon will send a message to your number TECH Moon preset. When the
message has been sent successfully 15 times, any SIM card used illegally in
ganadoTrabajo t TECH Moon stolen, whick automatically off.
Caution:
Please report to the police in time if TECH Moon stolen, but this DOES NOT
mean that the TECH Moon definitely lost back. Therefore, be careful of their
personal property.
If TECH Moon default SIM card inserted is illegal, then the function can not be
activated guardlock, and appropriate adjustment can not work. If another SIM
card is inserted, enter the correct password, number of messages sent from the
Page 30

68
ground, meanwhile, will be a message asking if you join this SIM card. Select
binding, then the TECH Moon renewed the number default IMSI and SIM card as
designated.
On: Before you enable this feature, set the first password, if it hasn
contraseña'T established, the TECH Moon track "Change Password" first ", then
please enter [Change Password] To finish setting the password and reactivate
this feature. While activated, password and number of reported guardlock TECH
Moon phone (the number to receive information from the SIM card used illegally
stolen TECH Moon) Are required. After these, the function guardlock work.
Off: To turn guardlock, you must enter the correct password Guardlock.
Change Password: Modify guardlock password.
Warning:
Please use this function with care. The TECH Moon robado'T be used if the
forgotten password.
10.6 Restore Defaultssettings
Reset all parameter values in the default state. Please enter the privacy password
protect (the initial password is 0000) to resume the factory settings.
11. TECH Moon maintenance
The TECH Moons mobile AREP precision electronic devices and must be
carefully maintained. The following tips can help you take care of your TECH
Moon and prolong its life.
The TECH Moon and spare parts should be put out of reach of children.
Keep TECH Moon dry. The rain, water or moisture damage electronic
circuits. If TECH Moon gets wet, remove the battery immediately and take TECH
Moon closer to the local authorized service center.
Do not place TECH Moon in dusty or it will affect everyday use.
LCD is a part of TECH Moon that can be easily damaged, so try to avoid
dropping the TECH Moon on the ground or any other form of agitation. Do not
touch the screen with a sharp object.
Do not place TECH Moon in a high temperature environment. High
temperatures shorten the life of electronic devices, battery and desort destroy or
melt a plastic housing TECH Moon.
Do not place TECH Moon in a low temperature environment. Otherwise,
when the temperature is raised to normal temperature, moisture will TECH Moon
and this will destroy the electronic circuits TECH Moon.
Do not drop, knock or shake the TECH Moon hard as it could damage the
electronic circuitry and structure TECH Moon.
Do not use harsh chemicals or abrasive cleaners to clean the TECH MoonAs
they may damage the TECH Moon.
Do not paint TECH MoonIf you stick removable parts and affect normal use.
Please use a clean, soft and think to clean the lens as the camera lens, etc.
If you have to replace the antenna TECH Moon, Please only replace it with an
accessory or designee. To use the antenna unauthenrized or replacement parts
will be damaged TECH Moon and disobeying the regulations to the wireless
device.
Page 31
69
12. Troubleshooting
If you encounter usability issues, see below troubleshooting guide. If the
appropriate solution is not available in this manual, contact centers authenrized
maintenance.
12.1 The TECH Moon not enciende
Possible Cause Solution
There has to press the power
key long enough
Press and hold the key more than 2
seconds.
The battery power is exhausted Upload Battery
Improper installation of the
battery
Install battery correctly
Incorrect password Please enter the correct security
password
12.2 The TECH Moon automatically turns off
Possible Cause Solution
Enable auto-off Please cancel if necessary.
The battery power is
exhausted
Carge battery
Loose battery Install the battery properly in accormoon with
the user manual.
Incorrect password Please enter the correct security password
12.3 PIN / PUK code lock
Possible Cause Solution
Enter bad
PIN Code (Personal
Identification code at
the code) and PUK
(Personal Unblocking
Key)
Enter the correct password
Caution:
1. If you enter the wrong PIN code three times, many functions for the SIM card
and TECH Moon is blocked. For more details, see10.5 Security"On page 65 .
2. If you do not know the correct PIN code and PUK code, contact your network
operator or service provider network.
12.4 Poor call quality
Possible Cause Solution
Page 32

70
The signal changes
suddenly
Perhaps you are moving at high speed (for
example, on a train or bus). Watch the intensity of
the signal and select the site with the strongest
signal to make a call and provide better call quality.
The area is not a good
sign
Please go to the open area.
12.5 Puede'T answer a call
Possible Cause Solution
The call forwarding option
is set
Please cancel the call forwarding as required.
The call barring option is
set
Please cancel the incoming call barring or roam
blocking incoming calls.
12.6 Puede'T make a call
Possible Cause Solution
You are out of range of
network services
Please check if the network is normal.
The SIM card is inserted
incorrectly
Please check if your SIM card can be used
normally.
The keyboard is
automatically locked
Press the left soft key 【】 and press 【Key alt】
to unlock the keyboard.
Call restriction is
established
Please cancel the call barring option according
to your needs.
12.7 The call volume is too low
Possible Cause Solution
The call volume was too low Please call up the volume.
12.8 The recipient can not hear your voice
Possible Cause Solution
The microphone is too
far from the sound
source
Please put the microphone TECH Moon near its
mouth.
12.9 No sound when a call comes
Possible Cause Solution
The TECH Moon select
silent mode
For favorabler, return the ring type in ring high
or right hight and vibrate.
The ring the volume is too
low
Please turn up the volume
The call forwarding option
is set
Please cancel the call forwarding as required.
Page 33

71
12.10 The battery can be charged
Possible Cause Solution
The battery is worn out
and the charging time is
extended
Please upload when TECH Moon indicates low
battery.
The battery does not
connect well to TECH
Moon
Please make sure the battery is inserted
correctly.
The charger is not
connected to TECH
Moon
Please make sure that the interface between the
shipper and TECH Moon is connected properly,
and the loader icon should appear on the screen.
Battery or charger is
damaged
Contact one of our service centers.
The ambient temperature
is too low or too high
Please make sure the TECH Moon is charged at
a normal temperature.
12.11 Network Puede'T screen
Possible Cause Solution
The SIM card is properly
installed
Please refer to the method of installing the SIM
card.
The contact between the
SIM card and TECH Moon
dirty
Please ensure contact between the SIM card
and TECH Moon kept clean.
The SIM card does not
work
Please check if the SIM card is outdated.
The network is very weak Please go to a place with a strong signal to use
TECH Moon
12.12 TTECH Moon can not recognize the storage card
Possible Cause Solution
The storage card is properly
inserted
Please insert the memory card correctly
according to instructions from the manual.
The storage card has been
damaged
Please change the storage card.
12.13 Lack of space
Possible Cause Solution
record of the history stored by
your browser takes too much
storage capacity
Please select [Internet→WAP
settingss→Browser Settings→Clear
cache] To release more capacity.
MMS has much storage
capacity
Please delete MMS in order to free up
more space
12.14 Camare PC can not be used
Possible Cause Solution
Page 34

72
"PC Camera" in the menu
does not appear in the
TECH Moon while
connecting to the PC.
1.Please make sure that your PC's USB
interface is good.
2.With Please be sure to use the correct cable
connection provided by the retailer.
13. Security Caution
13.1 Usage environment
Please remember to obey the rules and regulations each time you use the TECH
Moon. This will prevent bad effect on you and the environment.
Disconnect the TECH Moon in presence of explosives, such as gas station,
fuel, chemical plants or a scene of explosion, and adhere to any safety signs and
instructions there. Breaking the rules may cause an explosion or injury.
TECH Moon with the plane interferes with the operation of flight and bring
danger. Therefore, please turn off your TECH Moon before boarding, and make
sure it is turned off during the flight.
Please keep the TECH Moon in special braket while driving. Please do not
put on a seat or in places where it could fall off when the car encounts collision or
breakage. To ensure safe driving and prevent accidents, please do not use the
TECH Moon while driving. If you must use it, please use the hands-free assets
TECH Moon or park on the road before making or answering a call.
Please put TECH Moon away from high temperature environment for the
explosion could be caused when the battery temperature is excessively high.
13.2 Medical Devices
Please turn off the TECH Moon in areas close to electronic medical equipment,
which obviously requires turning off the TECH Moon (AIDS, such as pacemakers,
hearing, etc.). Most medical devices can protect the RF signal TECH Moon,
Others do not. If you have questions or need more information, consult your
doctor or the manufacturer of medical devices.
13.2.1 Pacemaker
Pacemaker manufacturers advise the distance between TECH Moon and the
pacemaker of the heart must be 6 inches (15.3 cm) At least, otherwise the TECH
Moon may interfere with the pacemaker.
The personnel carrying pacemakers should do the following:
Always keep a distance (at lease 6 inches) between TECH Moon and the
pacemaker when the TECH Moon is on.
Should not have TECH Moon in a breast pocket
Should listen to TECH Moon the ear that is farther from the pacemaker.
Caution:
Please turn off your TECH Moon when you feel there is interference, and consult
the doctor promptly.
13.2.2 Headphones
TECH Moon phone could bring some interference with some hearing aids. If so,
please consult the manufacturer of hearing aids.
13.2.3 Emergency Calls
As the TECH Moon uses a radio signal, wireless networks and ground
communications networks and functions of personal settings, like other TECH
Page 35

73
Moons, it is impossible to ensure that its TECH Moon can be connected to
success in any situation, so do not rely solely on TECH Moon as the only means
of notification in cases of emergency (eg first aid).
Make an emergency call
If your TECH Moon is turned off, please turn on the TECH Moon and check the
network signal is strong enough.
(1) Enter the number of local first aid properly (eg, 120), different areas have
different numbers of first aid.
(2) Please click the call key call.
Caution:
When making an emergency call, you should do everything possible to provide all
relevant information accurately. At this point, the TECH Moon may be the only
means of communication, so do not end the call without permission.
13.3 Password access
The TECH Moon SIM card and may be protected by a password to prevent
others from using illegally.
13.3.1 Pperfeccionar password
This protects the TECH Moon unauthorized users. You can set the default
password when first used. After use, please change the password TECH Moon
as soon as possible and keep it secret.
13.3.2 PEN code
This is the personal identification code that is used to protect the SIM card from
unauthorized users. In general, the PIN code and SIM card are provided together.
After activating your PIN, you must enter the correct password each time you turn
on TECH Moon to ensure the use NORAL.
Caution:
If you enter the wrong PIN three times in succession, the SIM card is blocked.
You must enter the PUK code to unlock it. (If you do not have a PUK code,
contact your network operator or SIM card vendor to obtain this information.
Please do not input any character).
13.3.3 PIN2 code
This is the password to activate particular functions of the SIM card. Input need to
introduce some functions (eg.Charge unit fixed dialing, etc). Usually PIN2 code
and SIM card are provided together. If I enter the PIN2 code three times, will be
blocked and will need to unlock PUK2 input.
13.3.4 Prein Kingdom code
This is used to unblock the PIN code. In general, the PUK and the SIM card are
provided together. No't If you have it, contact your network operator or SIM card
vendor. Ganado't SIM card is used, if incorrect entry times PUK ten in succession.
In that case, apply a new SIM card from your network operator. PUK code is
modified.
13.3.5 PUK2 code
This is used to unlock the PIN2 code. In general, the PUK2 and SIM card are
provided together. PUK2 can change a blocked PIN2 code. If I enter the code
PUK2 to ten times, you can not access some functions. Please ask your operator
to get a new card. PUK2 code is modified. If lost, please contact your service
Page 36

74
provider.
13.4 Precautions for battery
The TECH Moon provides power through the use of a lithium battery. The waiting
time and length of service will be influenced by the system environment and
configuration TECH Moon.
Please use the battery and charger approved for this product. The company
assumes no liability for damage caused by the battery or charger is not
authorized.
Ticona battery that will start moving when the TECH Moon is loaded at
power-on-state.
Caution:
1.Si no battery left at all, then the battery icon appears after 2-3 minutes of
charging. The charging time depends on the state of TECH Moon (Either on,
making a call), usually take about 2-5 hours.
2. For the new battery to their best ability, please, loading and unloading TECH
Moon for two or three times. Charge the new battery over 10 hours during the first
few times.
Do not use wet hands to touch the battery or the charger during charging to
avoid danger.
Try not to use the TECH Moon while charging.
The battery icon stops moving when the battery is full then you can
disconnect TECH Moon charger adapter.
13.5 Precautions for battery use
The use of the battery depends on the network, configuration TECH Moonting
and use of situation. Take lithium ion 1000 amp capacity mill as an example, lets
call time of up to 4-5 hours Dual-SIM standby time and 200-250 hours, and the
waiting time of a single SIM for 250 to 300 hours.
Never use a damaged battery.
The TECH Moon will consume a little power, if it is near the station of the
network. Therefore, the call and waiting time depends largely on the signal
strength of the honeycomb network and the parameters set by the network
operator.
The charging time is remaining in power, and the type of battery and
charger. When the operating time (talk time and standby time) is noticeably
shorter than normal, it is time to replace with a new battery.
Use only approved batteries and charges for this device, otherwise, the
explosion could be caused. Please disconnect the charger that is not used. Do
not leave the battery connected to a charger for a week, for overcharging may
shorten life.
Do not connect the anode and cathode of a battery in reverse.
Do not leave the battery pack in temperatures higher or lower, otherwise the
battery capacity is reduced and battery life is shortened. Always try to keep the
battery at room temperature.
Do not short the battery. This can damage the heart-mail or within the
protected circuit. If you keep the battery used in your pocket or bag, inside metal
Page 37

75
objects (eg coin, clip or pen, etc) can directly contact the anode to the cathode of
the battery and caused a short circuit accidental. Therefore, please carefully and
separately, store the battery.
Do not burn battery TECH Moon or treated as garbage. Please adhere to
local environmental policy in order to avoid endangering life and causing damage
to the environment, and recycling batteries in time.
If your TECH MoonThe battery or other load device is accidentally entered
the water, do not put it in a heating device (such as hair, microwave, etc) to dry.
The TECH Moon or other products can go wrong, and can even cause the TECH
MoonThe battery or other charging device to record, expand and explode.
Please address the battery disposed of in accormoon with the relationship
introduction.
The company is not liable for any direct or indirect damages caused by user error.
13.6 Precautions for the use of spare parts
Please put all spare parts (such as the SIM card, storage card, battery etc)
out of reach of children, in an emergency occurs.
Please turn off the TECH Moon and unplug the TECH Moon and the charger
before removing the battery TECH Moon.
Replacement Parts TECH Moon are not waterproof, please keep all parts dry.
You have to pull the plug on any replacement part correctly when the power
goes out, do not drag the line of force feeding.
If TECH Moon, Battery and charger dont 'work normally, please contact the
nearest service centers quailified appropriate.
13.7 other safety information
If you do not use the TECH Moon, Is better off and remove the battery to
save power and prevent cellular radiation.
Please, if has the highest level during operation TECH Moon, Which can
damage hearing.
Professional debería'T not remove the battery terminal and TECH Moon.
It is recommended that you should not try to use the holster with magnet
button, so that the magnet may interfere with the signal TECH Moon, And the
hard metal button can break the LCD. cover TECH Moon Plastic lead to poor
volatilization steam and internal components have been damaged, on the other
hand, may have housing TECH Moon oxidized and faded.
If you or your family has a medical history of dizziness or epilepsy, please
consult your doctor first if you want to play phone games or the Flashla nose light
(Flash Does not available in all models TECH Moon)
Please has not put the torch too close to the eyes of humans or animals, as
this could cause eye damage.
Page 38

FCC RF EXPOSURE INFORMATION:
WARNING!! Read this information before using your phone
In August 1986 the Federal Communications Commission (FCC) of the United States with its action in
Report and Outer FCC CFOMOON adopted an updated safety standard for human exposure to radio
frequency (RF) electromagnetic energy emitted by FCC regulated transmitters. Those guidelines are
consistent with the safety standard previously set by both U.S. and international standards bodies. The
design of this phone complies with the FCC guidelines and these international standards. Use only the
supplied or an approved antenna. Unauthorized antennas modifications, or attachments could impair
call quality, damage the phone, or result in violation of FCC regulations. Do not use the phone with a
damaged antenna. If a damaged antenna comes into contact with the skin, a minor burn may result.
Please contact your local dealer for replacement antenna.
BODY-WORN OPERATION:
This device was tested for typical body-worn operations with the back of the phone kept 1.5cm from the
body. To comply with FCC RF exposure requirements, a minimum separation distance of 1.5cm must be
maintained between the user's body and the back of the phone, including the antenna, whether
extended or retracted. Third-party belt-clips, holsters and similar accessories containing metallic
components shall not be used. Body-worn accessories
that cannot maintain 1.5cm separation distance between the user’s body and the back of the phone, and
have not been tested for typical body-worn operations may not comply with FCC RF exposure limits
and should be avoided.
For more information about RF exposure, please visit the FCC website at www.fcc.gov
Your wireless handheld portable telephone is a low power radio transmitter and receiver. When it is
ON, it receives and also sends out radio frequency (RF) signals. In August, 1996, the Federal
Communications Commissions (FCC) adopted RF exposure guidelines with safety levels for hand-held
wireless phones. Those guidelines are consistent with the safety standards previously set by both U.S.
and international standards bodies:
<ANSIC95.1> (1992) / <NCRP Report 86> (1986) / <ICIMIRP> (1996)
Those standards were based on comprehensive and periodic evaluations of the relevant scientific
literature. For example, over 120 scientists, engineers, and physicians from universities, government
health agencies, and industry reviewed the available body of research to develop the ANSI Standard
(C95.1). Nevertheless, we recommend that you use a hands-free kit with your phone (such as an
earpiece or headset) to avoid potential exposure to RF energy. The design of your phone complies with
the FCC guidelines (and those standards).
Use only the supplied or an approved replacement antenna. Unauthorized antennas, modifications, or
attachments could damage the phone and may violate FCC regulations.
NORMAL POSITION:
Hold the phone as you would any other telephone with the antenna pointed up and over your shoulder.
Page 39

RF
Exposure Information:
FCC RF Exposure requirements: The highest SAR value reported under this standar d during prod uct
certification for use next to the body with the minimum separ ation distance of 1.5cm is 0.320
W/kg
,
next to the head is 0.416
W/kg.
This transmitter must not be collocated or oper ating in conjunction
with any other antenna or transmitter.
This device complies with part 15 of the FCC rules. Operation is subject to the following two
conditions:
(1) this device may not cause harmful interference, and
(2) this device must accept any interference received, including interference that may cause
undesired operation.
NOTE: The manufacturer is not responsible f or any radio or TV interference caused by unautho rized
modifications to this equipment. Such modifications could void the user’s authority to operate the
equipment.
NOTE: This equipment has been tested and found to comply with the limits for a Class B digital device,
pursuant to part 15 of the FCC Rules. These limits ar e designed to provide reasonable protection against
harmful interference in a residential installation. This equipment generates uses and can radiate radio
frequency energy and, if not installed and used in accordance with the instructio ns, may cause harmful
interference to radio communications. However, there is no guarantee that interference will not occur in
a particular installation. If this equipment does cause harmful interference to radio or television
reception, which can be determined by turning the equipment off and on, the user is enco ur aged to try
to correct the interference by one or more of the following measures:
- Reorient or relocate the receiving antenna.
- Increase the separation between the equipment and receiver.
-Connect the equipment into an outlet on a circuit different from that to which the receiver is connected.
-Consult the dealer or an experienced radio/TV technician for help
Do not use the device with the environment which below minimum -10℃ or maximum over 50℃,
the device may not work.
Changes or modifications to this unit not expressly approved by the party responsible for compliance
could void the user’s authority to operate the equipment.
 Loading...