

Page 1
GB-200 / GB-300
ANALOG
SELECT START
STEERING LEVEL SPEED LEVEL
RL
AC
AC
A
C
#704-1300
000000000 1 Copyright© 2004 CATEYE Co., Ltd. CCBT-041126
See also “GAMEBIKE FITNESS” or “GAMEBIKE FITNESS PRO” instruction manual.
Package Contents
Check that the following items are included in the package.
A
C
Installing the Wireless controller
ENG
Receiver Controller bracketWireless controller
Installing the wireless controller
Mounting Batteries
Loosen the four M5 screws and two M3 screws on the back
of the wireless controller to remove the battery cover.
Insert the 3 AAA batteries, being careful to orient the
batteries correctly.
Replace the battery cover and the M3 screws. Replace also
the bracket and the M5 screws.
M5 screw
M3 screw
Controller bracket
Battery cover
Remove the controller
Unplug the three plugs from the controller.
Caution When unplugging the connectors, make sure
that the “PlayStation2” is off.
If the controller is held in place with a plastic bracket:
Remove the existing bracket from the handlebar.
Remove the cap bolts securing the handlebar installation
bracket to the handlebar unit.
Important: Use only the new cap bolts and controller
bracket.
If the controller is held in place with an L-shaped metal
bracket:
Loosen the four M6 cap bolts which fix the controller to the
handlebar unit then remove the controller.
Reference: Use only a new controller. Use only either a
“PlayStation” or “PlayStation2” controller.
Handlebar unit
Installing the handlebar and wireless
controller
Secure the handlebar, installation bracket and controller with
the four cap bolts supplied.
Handlebar unit
Handlebar
Handlebar installation bracket
M6 x 30 cap bolts
Connecting the wireless controller
Insert the speed sensor cable plug (light blue) which extends
from the handlebar post into the “S” jack on the wireless
controller.
Install the brake button onto the handlebar grip. Insert the
cable plug (yellow) into the “B” jack on the wireless
controller.
Insert the connection cable plug into the “H” jack on the
wireless controller. Insert the straight plug on the other end
of the cable into the jack on the bottom of the handlebar unit.
Caution Do not insert or remove the wireless control-
ler connection plugs while the “Playstation2”
power is on. Doing so may cause problems
with the “Playstation2.”
Brake button cable
Cable from handlebar post
Controller cover LR03 (AAA) battery x 3M6 x 30 cap bolts x 4
GAMEBIKE FITNESS PRO Wireless controller
Cautions • Certain software packages whose packaging or documentation provides no indication of analog compliance or com-
patibility will not work in analog mode.
• Certain software packages will not switch mode even if the analog mode switch is pressed.
In the case of certain software packages, the mode switches automatically.
Important: Depending on the software, bike main unit controls sometimes take precedence on the gameplay screen and prevent
operation of the wireless controller.
Reference: This wireless controller can be used as a controller for “Playstation2”. In this case the sensitivity adjustment level con-
trols will not be activated.
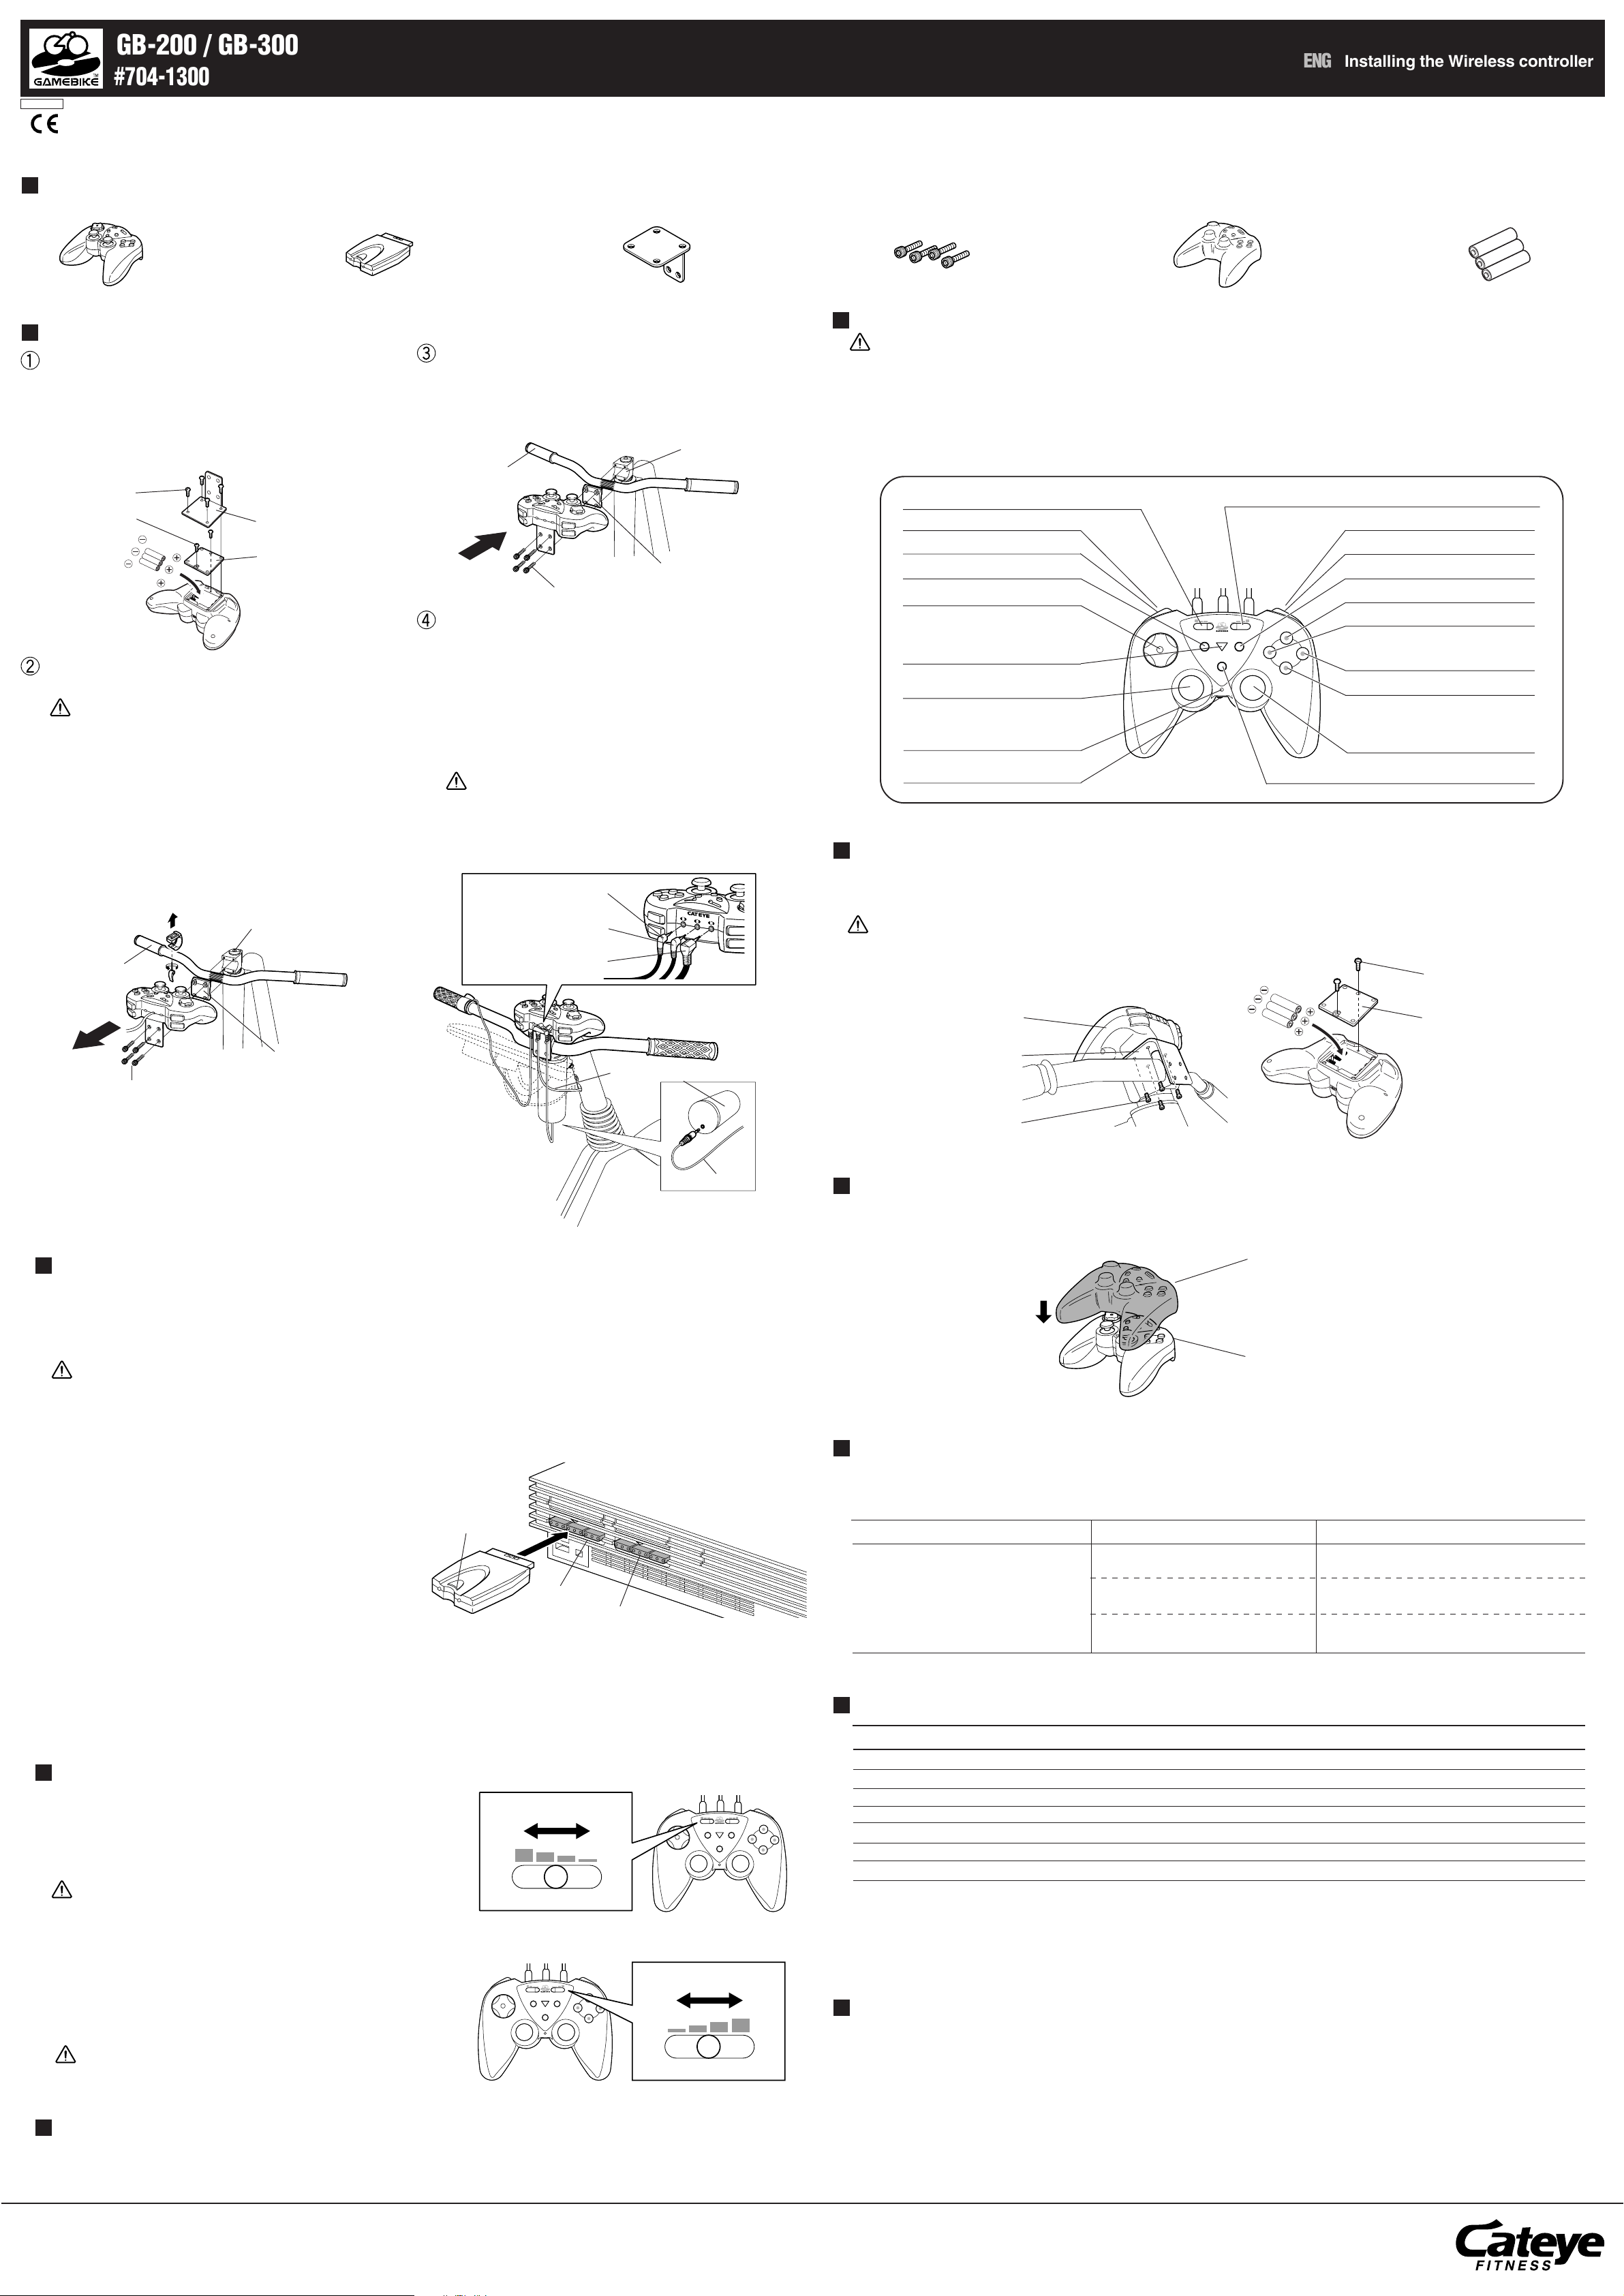
Steering sensitivity level control
L2 button
L1 button
SELECT button
Direction key
Signal from controller:
When analog mode is OFF.
AC button
Left-hand stick/L3 button
Signal from controller:
When analog mode is ON.
Green LED
Power switch
Acceleration sensitivity level control
R2 button
R1 button
START button
Green button
Pink button
Brake signal
Red button
Blue button
Right-hand stick/R3 button
Analog mode switch
Mounting batteries in the wireless controller
If the batteries are low, communication between the wireless controller and receiver cannot be carried out.
Remove the wireless controller from the controller bracket, open the battery cover, and then place the 3 LR03 (AAA) batteries in position,
being careful to orient the batteries correctly.
Cautions Do no mix old and new batteries, or different types of batteries.
Handlebar
Handlebar installation bracket
M6 cap bolts
Connection cable
Handlebar unit
Connection cable
Connecting the device to Playstation2
This controller is only used for “PlayStation 2”. Insert the receiver into the controller terminal on the front of the “PlayStation 2” main unit.
For further information, also see the instruction manual of the “PlayStation 2”.
A maximum of 16 wireless controllers can be used simultaneously.
Important: If more than 2 wireless controllers are used simultaneously, the wireless controllers and receivers automatically specify
their channels. If channel repetitions or interferences occur, it is necessary to reset the channels.
Caution Make sure to insert or remove the receiver when the power to the “PlayStation 2” main unit has been turned off.
Reference: It is possible for two players to play simultaneously by connecting two GAMEBIKE FITNESS PROs or connecting to a
general controller.
Wireless controller
Controller bracket
M5 screw
Controller Cover Care
While using GAMEBIKE FITNESS PRO, the user may perspire/sweat while training.
To prevent sweat from getting into the wireless controller, please use the controller cover provided.
Please wash and dry after use.
Controller cover
Wireless controller
M3 screw
Battery cover
Resetting channels
“Playstation2” unit
• If more than 2 wireless controllers are used, follow the steps
below.
AC button
1. Turn off the power to all wireless controllers.
2. Turn on the power to one of the wireless controllers
and press the AC button of the receiver. The green LEDs of
the wireless controller and re ceiver light.
3. Repeat the same steps for the remaining wireless control-
lers so that each receiver is set to the rel evant receiver.
Receiver
1P side
2P side
Checking the connecting condition between the wireless controller and receiver
The connecting condition can be checked with the green LED of the wireless controller:
If the green LED of the wireless controller or receiver lights, the condition is OK.
If the green LED of the wireless controller or receiver blinks or goes out, they are not connected.
How to adjust the Wireless controller
Adjusting the steering sensitivity
Turn on the “Playstation2” power. Slide the wireless controller’s handlebar sensitivity level control and check the operation of the GAMEBIKE
FITNESS PRO handlebar on the Race Screen. Adjust the handlebar
sensitivity to a suitable level.
Caution Depending on the software, while moving the handlebar
from Left to Right, the steering reaction on the game does
not work.
Adjusting the speed sensitivity
Turn on the “Playstation2” power. Slide the wireless controller’s speed
sensitivity level control and check the bicycle pedals on the Race Screen.
Adjust the speed sensitivity to a suitable level.
Caution Depending on the software,while pedaling, the speed of
the game does not register. This will cause the game not
to move forward.
Steering sensitivity
Max.
Min.
STEERING LEVEL
STEERING LEVEL SPEED LEVEL
AC
AC
SELECT START
ANALOG
RL
STEERING LEVEL SPEED LEVEL
AC
AC
SELECT START
ANALOG
Speed sensitivity
Slow
SPEED LEVEL
RL
Fast
Sleep mode
If the wireless controller has not been operated for 2 to 3 minutes, it automatically enters sleep mode (power saving mode). Pressing any
button or moving the pedal or handlebar cancels sleep mode.
Troubleshooting
The following situations are not actual malfunctions. Analyse such cases before requesting a repair.
If trouble occurs, first reset the game, if the trouble continues. Please contact the service center.
Problem Check items Countermeasures
Operation of the wireless controller is not
stable.
Does the green LED of the wireless controller blink or go out?
Does the green LED of the receiver blink
or go out?
Are the wireless controller’s batteries
weak?
See “Resetting channels” and reset the communication status.
See “Resetting channels” and reset the communication status.
Replace then with new LR03 (AAA) batteries.
Specifications
Wireless Controller Specifications
Compatible gaming devices Compatible gaming devices SONY Playstation and Playstation2
Power source / battery life LR03 (AAA) Size (UM-3) x 3 / 75 hours of continuous use (Using Alkali batteries)
Size (W x H x D) 6.3” x 2.8” x 4.5”
Weight Approx. 0.66 lb
Operating temperature range Same as applied game device.
Number of channels 16 channels, 2.4 GHz Multi-channel
Communication distance Up to 9 m
GAMEBIKE FITNESS PRO can be used with PS1 as well. For use with analog software, please push “Analog mode switch” to light
LED. Non analog-compliant software can not be used.
*Battery life is limited to the sample and varies depending upon use.
*The battery provided is only for the monitor and has a shorter battery life.
*Specification and actual appearance of components subject to change without notice due to improvements.
FCC STATEMENT
This device complies with Part 15 of the FCC rules. Operation is subject to the following two conditions:
(1) This device may not cause harmful interference, and (2) This device must accept any interference received, including interference that may cause undesired
operation.
Warning: Changes or modifications to this unit not expressly approved by the party responsible for compliance could void the user’s authority to operate the equipment.
NOTE: This equipment has been tested and found to comply with the limits for a ClassB digital device, pursuant to Part 15 of the FCC Rules. These limits are designed to
provide reasonable protection against harmful interference in a residential installation.This equipment generates, uses and can radiate radio frequency energy and, if not
installed and used in accordance with the instructions, may cause harmful interference to radio communications. However, there is no guarantee that interference will not
occur in a particular installation. If this equipment does cause harmful interference to radio or television reception, which can be determined by turning the equipment off
and on, the user is encouraged to try to correct the interference by one or more of the following measures:
• Reorient or relocate the receiving antenna.
• Increase the separation between the equipment and receiver.
• Connect the equipment into an outlet on a circuit different from that to which the receiver is connected.
• Consult the dealer or an experienced radio / TV technician for help.
www.cateyefitness.com
 Loading...