

Page 1
Fixed Wireless Phones
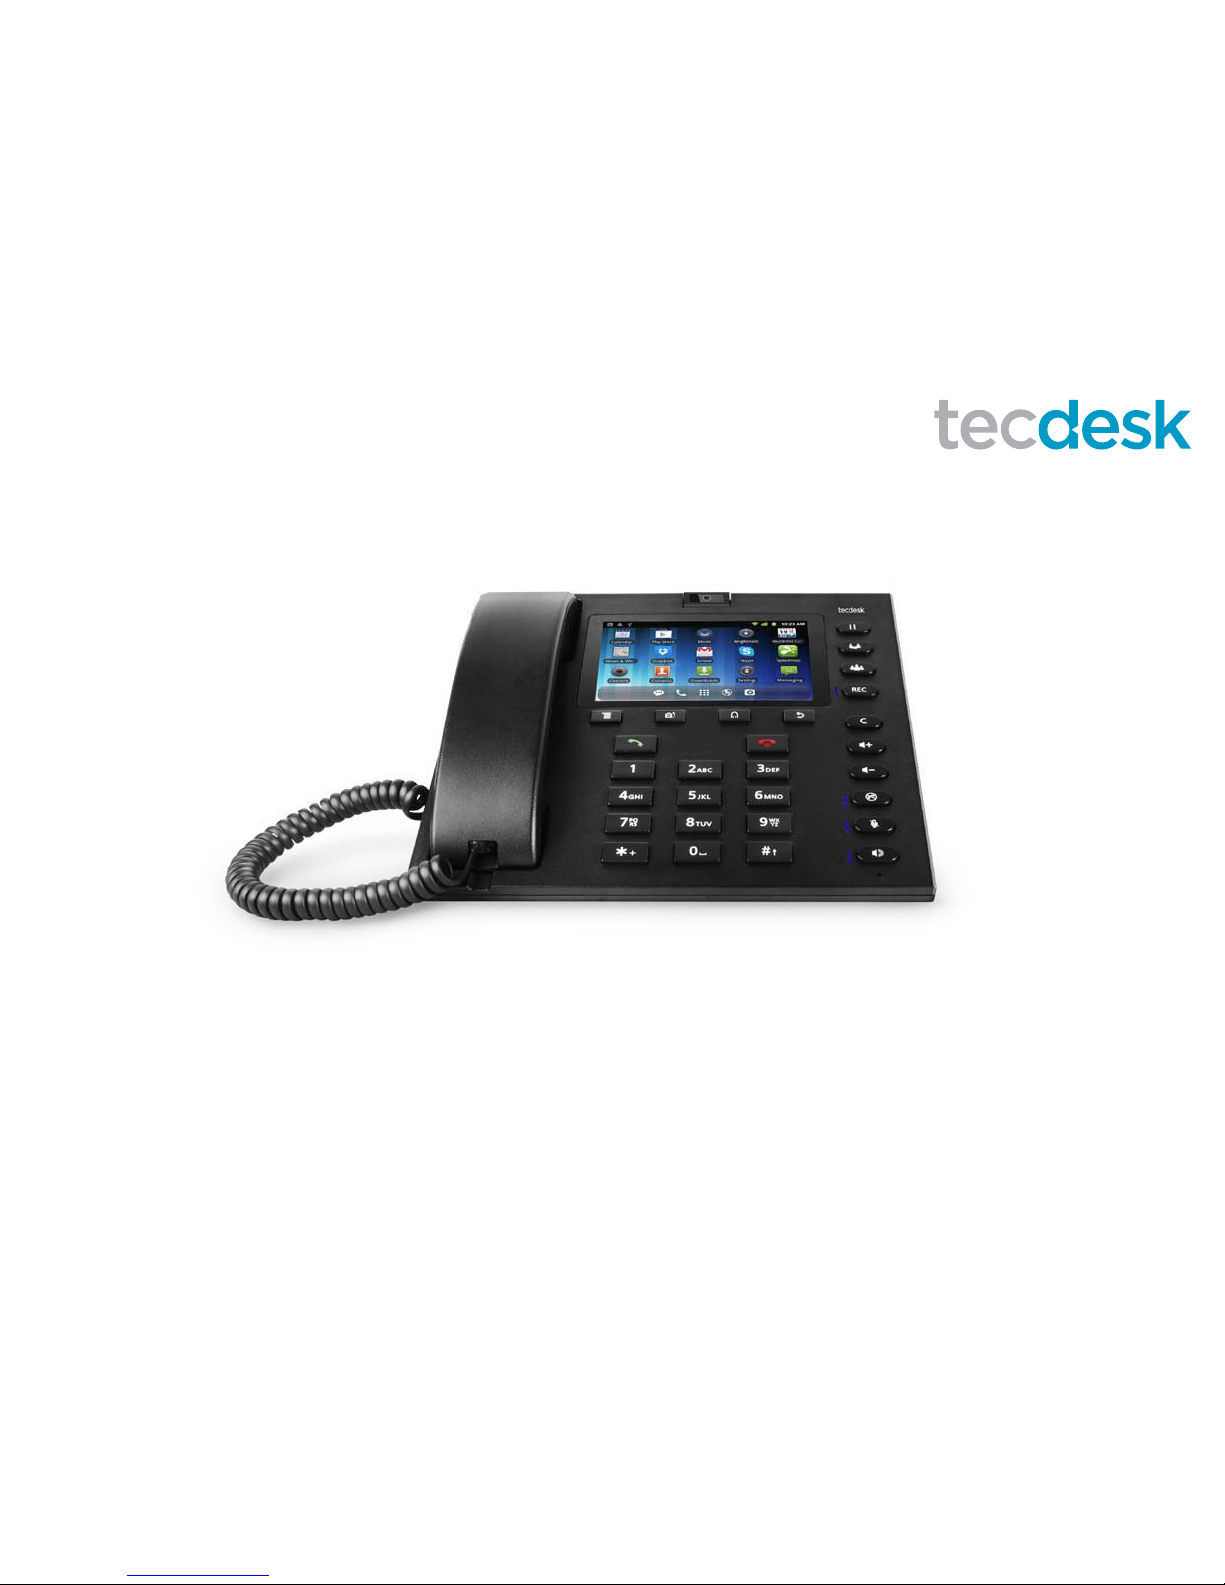
Tecdesk Smart 5500
User Manual
English
tecdesk.com
Page 2

Page 3

INTRODUCTION 4
SECTION 1: GETTING STARTED 5
SECTION 2: GETTING TO KNOW YOUR PHONE 9
SECTION 3: POWER ON/OFF 14
SECTION 4: TEXT ENTRY 14
SECTION 5: CALL FUNCTIONS 15
SECTION 6: CONTACTS 19
SECTION 7: MESSAGES 20
SECTION 8: BROWSER 22
SECTION 9: MUSIC 25
SECTION 10: CAMERA 26
SECTION 11: VIDEO PLAYER 28
SECTION 12: GALLERY 28
SECTION 13: CALENDAR 29
SECTION 14: CLOCK 29
SECTION 15: SETTINGS 30
SECTION 16: TECDESK SMART 5500
EXPANSION MODULE (OPTIONAL) 36
SECTION 17: TROUBLE SHOOTING 38
SECTION 18: LEGAL INFORMATION 40
SECTION 19: HEALTH AND SAFETY 42
SECTION 20: DECLARATION OF CONFORMITY 45
CONTENTS
Page 4

4
INTRODUCTION
Thank you for purchasing the Tecdesk Smart 5500 3G Fixed Wireless Phone. This phone is designed for use with GSM
900/1800/850/1900 and UMTS 900/2100 MHz networks. You will require a valid SIM card from your network operator. Please refer to
your network operator for more information.
Safety Instructions
Please read the following instructions carefully before starting to use the Tecdesk 5500 3G Desktop Phone. Always read the safety
instructions carefully. Keep this User Guide for future reference.
• Keep the phone away from humidity.
• Place the phone on a reliable at surface before setting it up.
• If any of the following situations arise, have the unit checked by a service technician:
– Exposure to moisture.
– Dropped and damaged.
– Obvious signs of breakage.
• Do not place the phone in a damp room at a distance of less than 1.5m from a water source. Keep water away from the device.
• Do not use the device in environments where there is a risk of explosions.
• Maintain the desk phone in an environmentally friendly manner.
Page 5
5
SECTION 1: GETTING STARTED
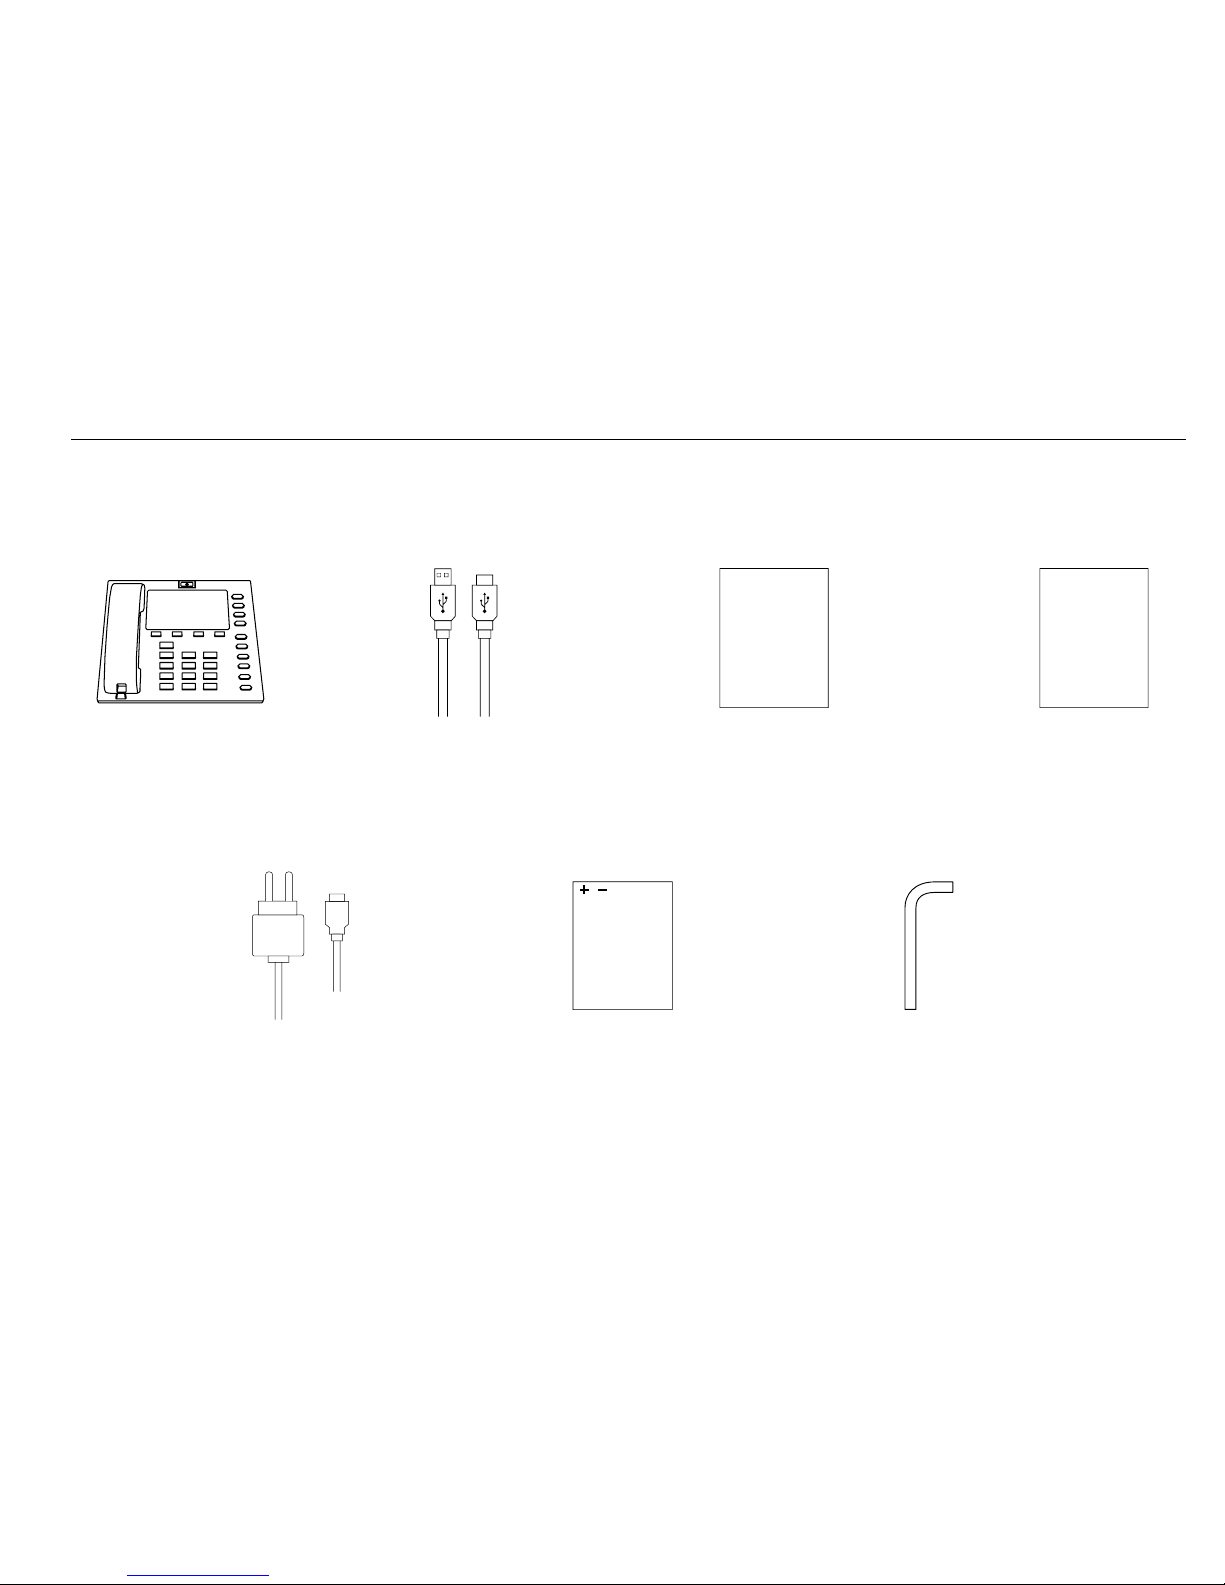
Please check the box includes the following components. If there are any items missing please contact your supplier.
B. USB data cable C. User manual
User Manual
D. Quick start-up guide
Quick
Start-Up
Guide
A. Tecdesk Smart 5500
E. AC/DC power
adaptor
F. Lithium-polymer
rechargeable battery
G Allen key
Page 6
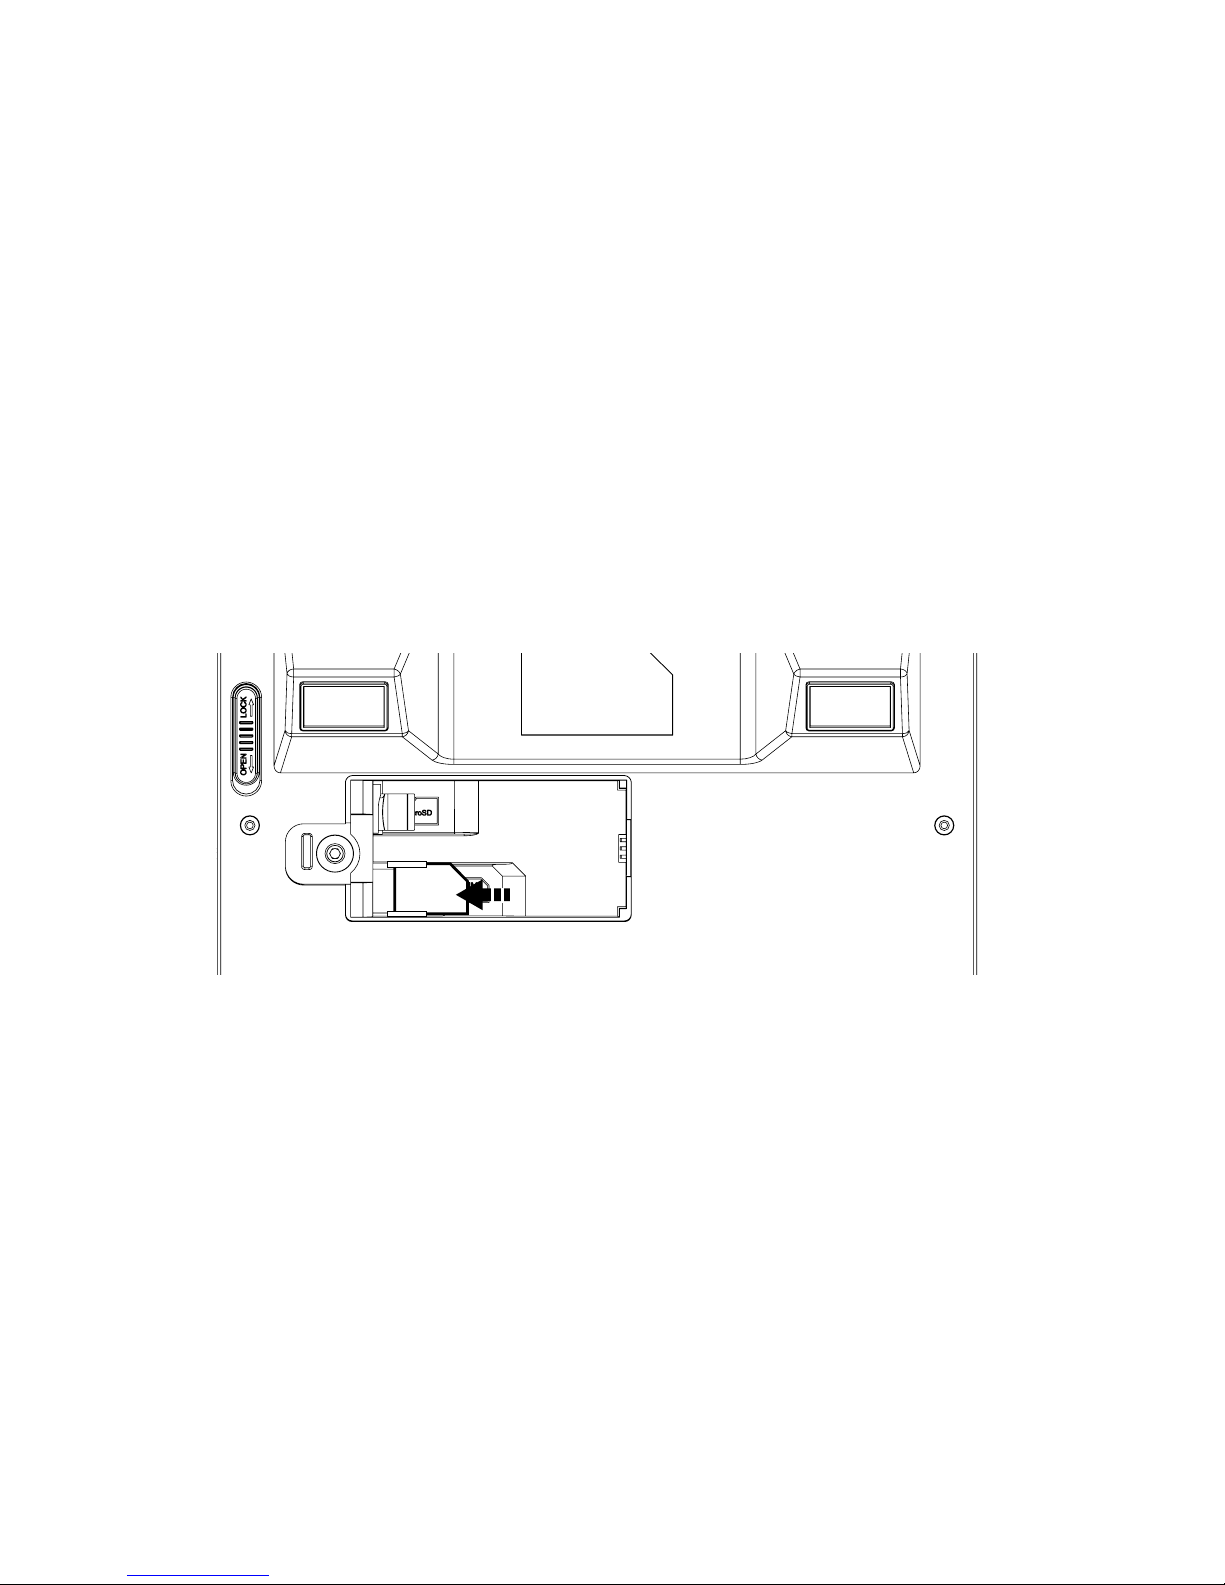
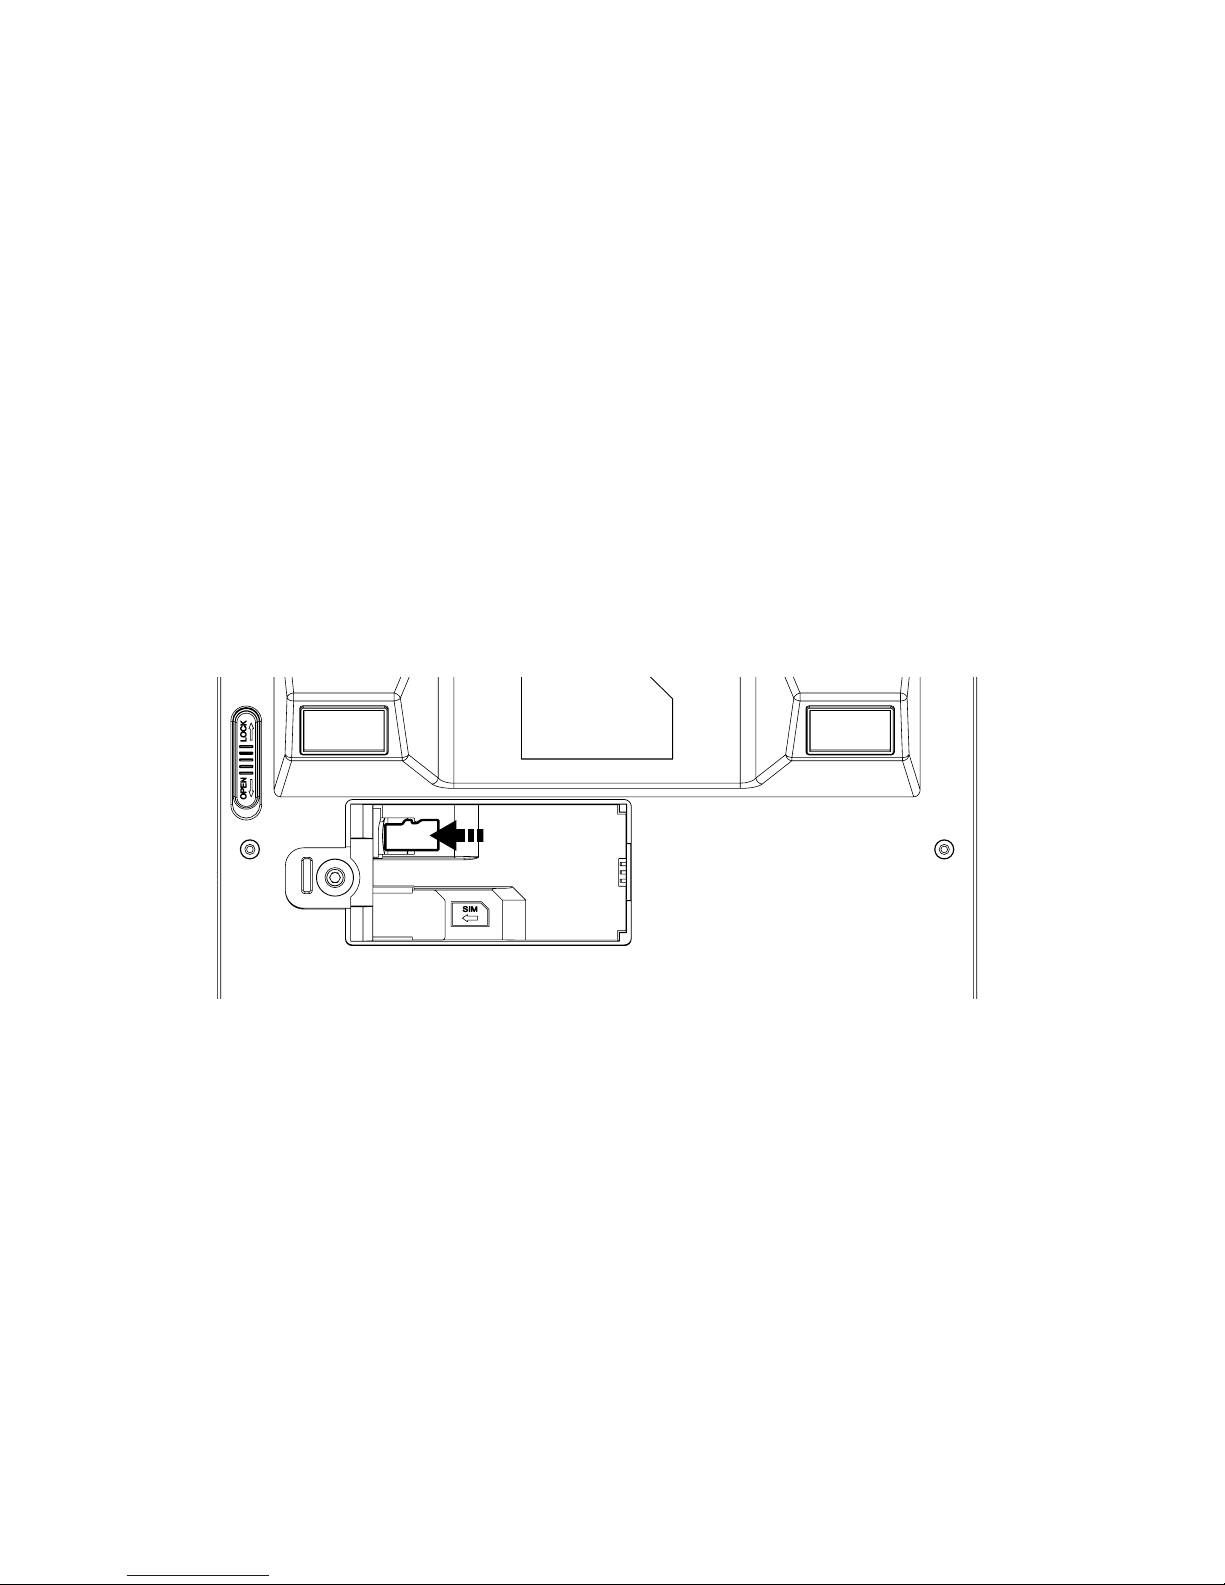
SIM
USIM card
Ensure a valid SIM card is inserted correctly into the desktop phone.
6
Page 7
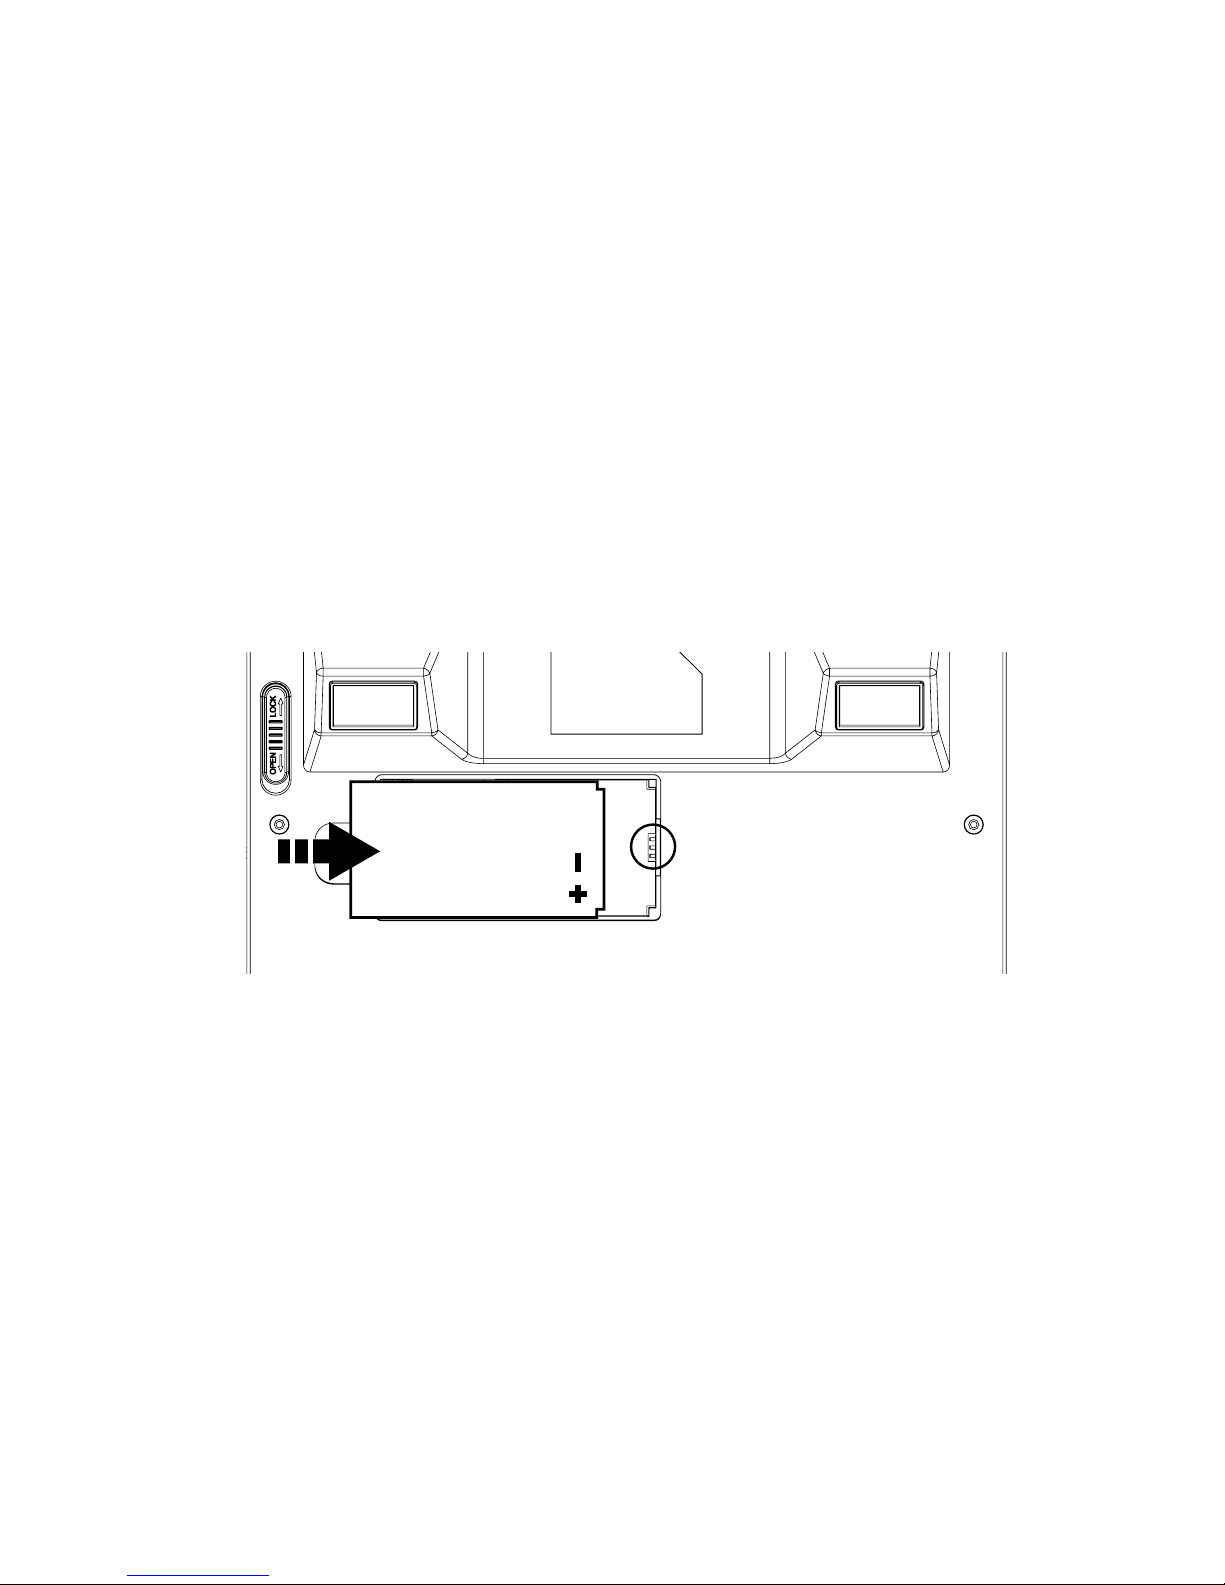
Battery
The phone is powered by a rechargeable, standard Li-Ion battery. It comes with a USB Charger to charge your phone. The battery is
under a removable cover on the back of the phone. Ensure the polarity of the battery is aligned correctly with the connectors on the
device before inserting the battery into the device.
7
Page 8
SDcard
Your phone supports a removable microSD™ memory card of up to 32GB, to store music, pictures and other les.
8
Page 9
SECTION 2: GETTING TO KNOW YOUR PHONE
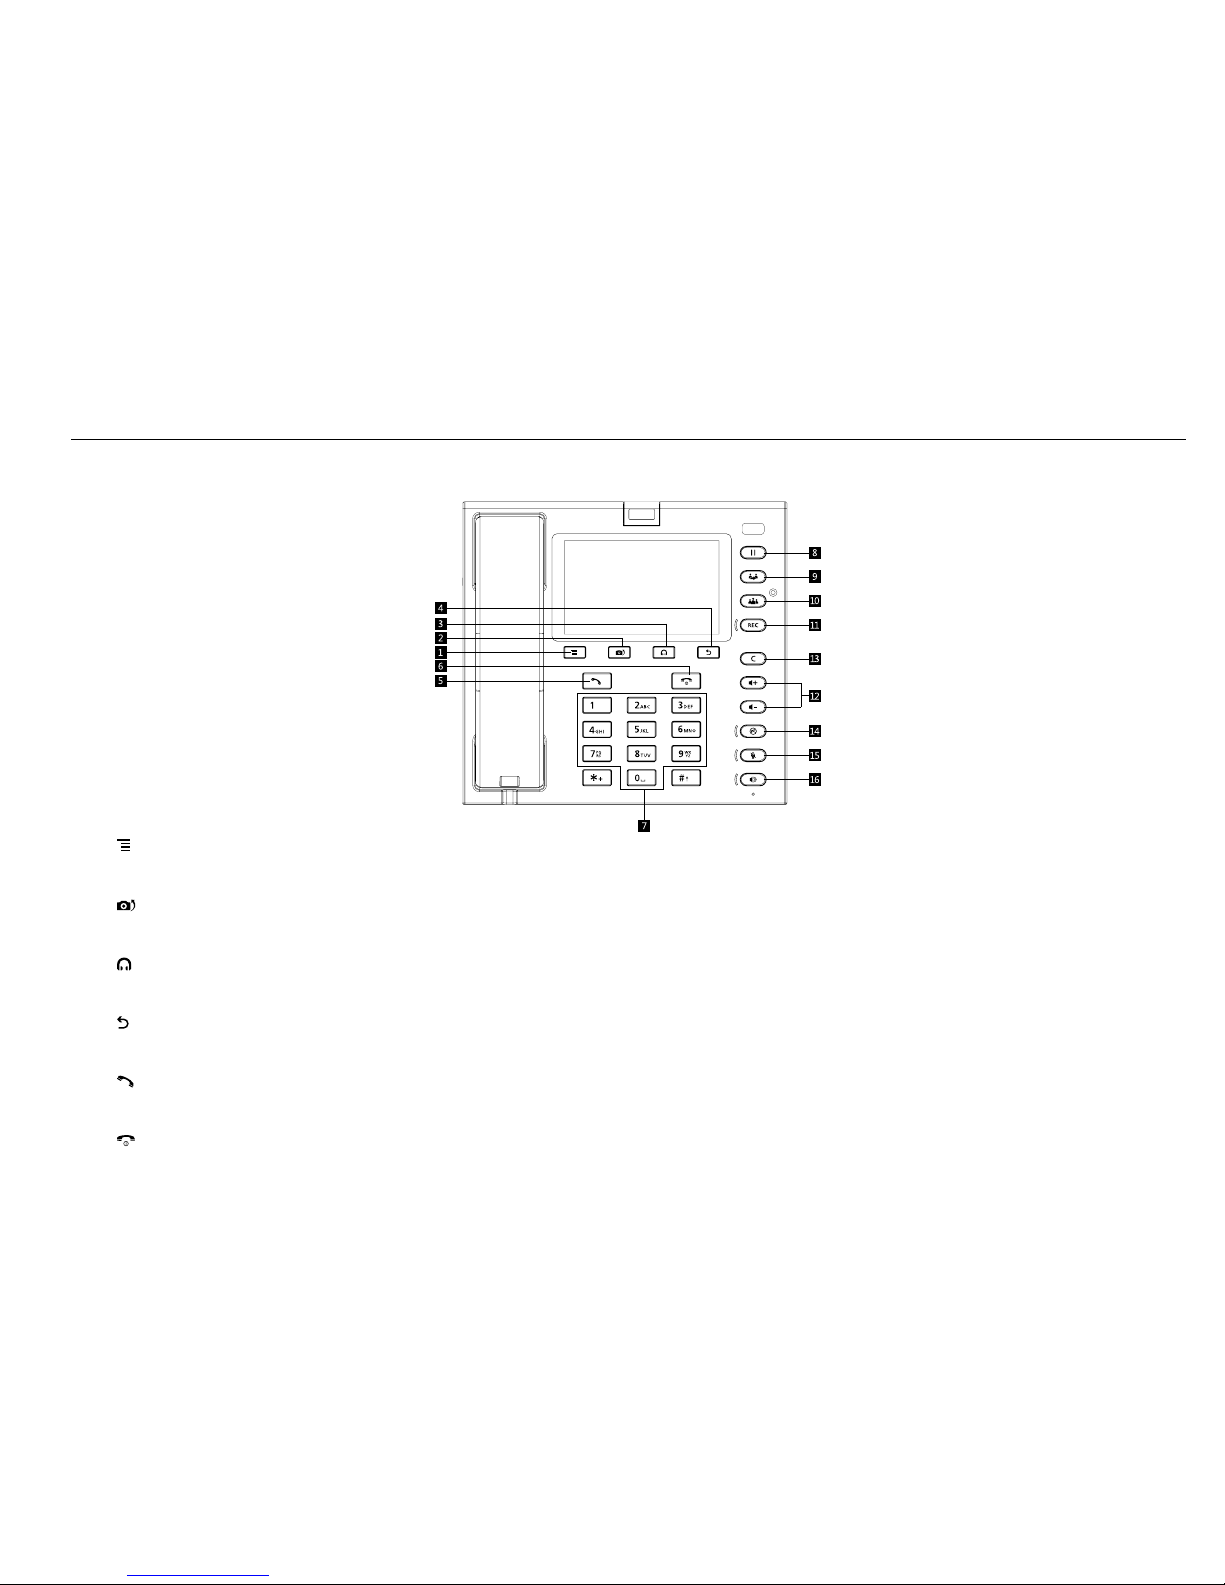
Function of buttons
1. [ ] Options button
Press to display options for the current screen.
2. [
] Camera Image Rotation button
Press to rotate the camera image.
3. [
] Headset button
Press to use the phone via headset rather than receiver (necessary for RJ11 connected headsets only).
4. [
] Back button
Press to revert to the previous screen or to go back to home screen.
5. [
] Dial button
Press to dial out or answer a call.
6. [
] End button
Press to terminate a call or power ON/OFF.
9
Page 10

10
7. [0-9] Alphanumeric keypad
When entering usernames/ passwords or writing messages, you can press the buttons to toggle between numbers (123), lowercase
characters (abc), and uppercase characters (ABC). Use this buttons to dial the phone numbers you want to call.
8. [
] Hold button
1. Press the [
] button and the current call will be placed on hold.
2. If you receive a new call while you are already on a call, you can press the [
] button to switch between the two calls.
3. You can also press the [
] button to make another call while you are on a call.
9. [ ] Transfer button
During an active call, press the [
] button to put caller 1 on hold. Using the keypad dial the extension number of the second caller
and press the [
] button. When the call is answered, press the [ ] button and replace the handset. Caller 1 will be transferred
to caller 2. You can then replace the handset.
10. [
] Conference button
During an active call, press the [
] button to put caller 1 on hold. Using the keypad to dial the contact number of the second
caller and press the [
] button. When the call is answered press the [ ] button will put caller 1, 2 and yourself on a conference call.
Replace the handset when the call is nished.
11. [
] REC button
Press the [
] button during an active call to record your conversation (HD Voice recording not supported).
12. [
] Volume + button
From the Home screen press the [
][ ] button to adjust the Ringer Volume. When playing music or during an active call
press to adjust the volume.
13. [ C ] Cancel button
Press the [ C ] button to delete an incorrect number entry or text, when editing a text message or typing a number into the dial pad.
14. [
] Do not disturb button
Press the [
] Do not disturb button to indicate this as your status within the Virtual Presence service of your group.
15. [ ] Mute button
Press the [
] button during an active call to mute or silence the outgoing sounds on your phone.
16. [ ] Speakerphone button
Press the [
] button to enable or disable the speakerphone.
Page 11

11
Finger Gestures
Touch
Touch items to select or launch them. For example:
• Touch the screen keyboard to enter characters or text.
• Touch an application icon to launch the application.
Touch and Hold
Activate onscreen items by touching and holding them. For example:
• Touch, hold and move a widget on the home screen.
• Touch and hold an application to display a pop-up menu of options.
Swipe, Flick or Slide
Swipe, ick or slide your nger vertically or horizontally across the screen. For example:
• To unlock the screen
• To scroll through the Home screen or a menu.
Home Screen
The Home screen is the starting point for using your phone.
1. Notification Bar: Displays signal reception, battery power, system time and connection details.
2. Home screen: The starting point for using your phone. Place icons, widgets and other items here to customise your Home Screen page.
3. Primary Shortcuts: Shortcuts to your phone’s common features (Message/Phone/Applications/Google/Camera).
Notication Bar
Primary Shortcuts
Page 12

12
Applications
The Application’s screen holds all applications installed on your device. Applications that you download and install from Android Market
or from the web are also added to the Applications screen.
1. From the Home screen, touch the Applications icon.
2. Slide your nger up or down to scroll through the Applications.
3. Touch an icon to launch the application.
Brightness Set the default screen brightness
Browser Access the internet
Calculator Perform mathematical calculations
Camcorder Record videos
Camera Take pictures
Clock Keep track of time with Alarm, World clock,
Stopwatch and Timer Features
Contacts Save and manage contact information of your
friends and colleagues
Downloads View the details of your downloads
Email Send/ receive emails
Extend Unit Store contacts to Expansion Module. The maximum
number of contacts to be added in 20
File Explorer View the system le. Manage SD memory card
Gallery View and manage pictures/videos stored on your phone, or
on an optional installed memory card
Messaging Send and receive message. Appears by default in the
Primary Shortcuts
Music Play music stored on an installed memory card
Phone Make and answer calls. Appears by default in Primary
Shortcuts
Portable Hotspot Share your phone’s mobile data connection via USB or as a
portable WLAN hotspot
Prole Manager Set up personal ringtone and prompt tone of the phone for
dierent scenarios
Search Launch Quick Search, search the web and your phone
Settings Congure your phone to your preferences
Sound Recorder Record your voice or other sounds, and share recordings
via Bluetooth, Messaging, or Email
Videos Play and manage videos stored on an installed memory
card
Page 13
13
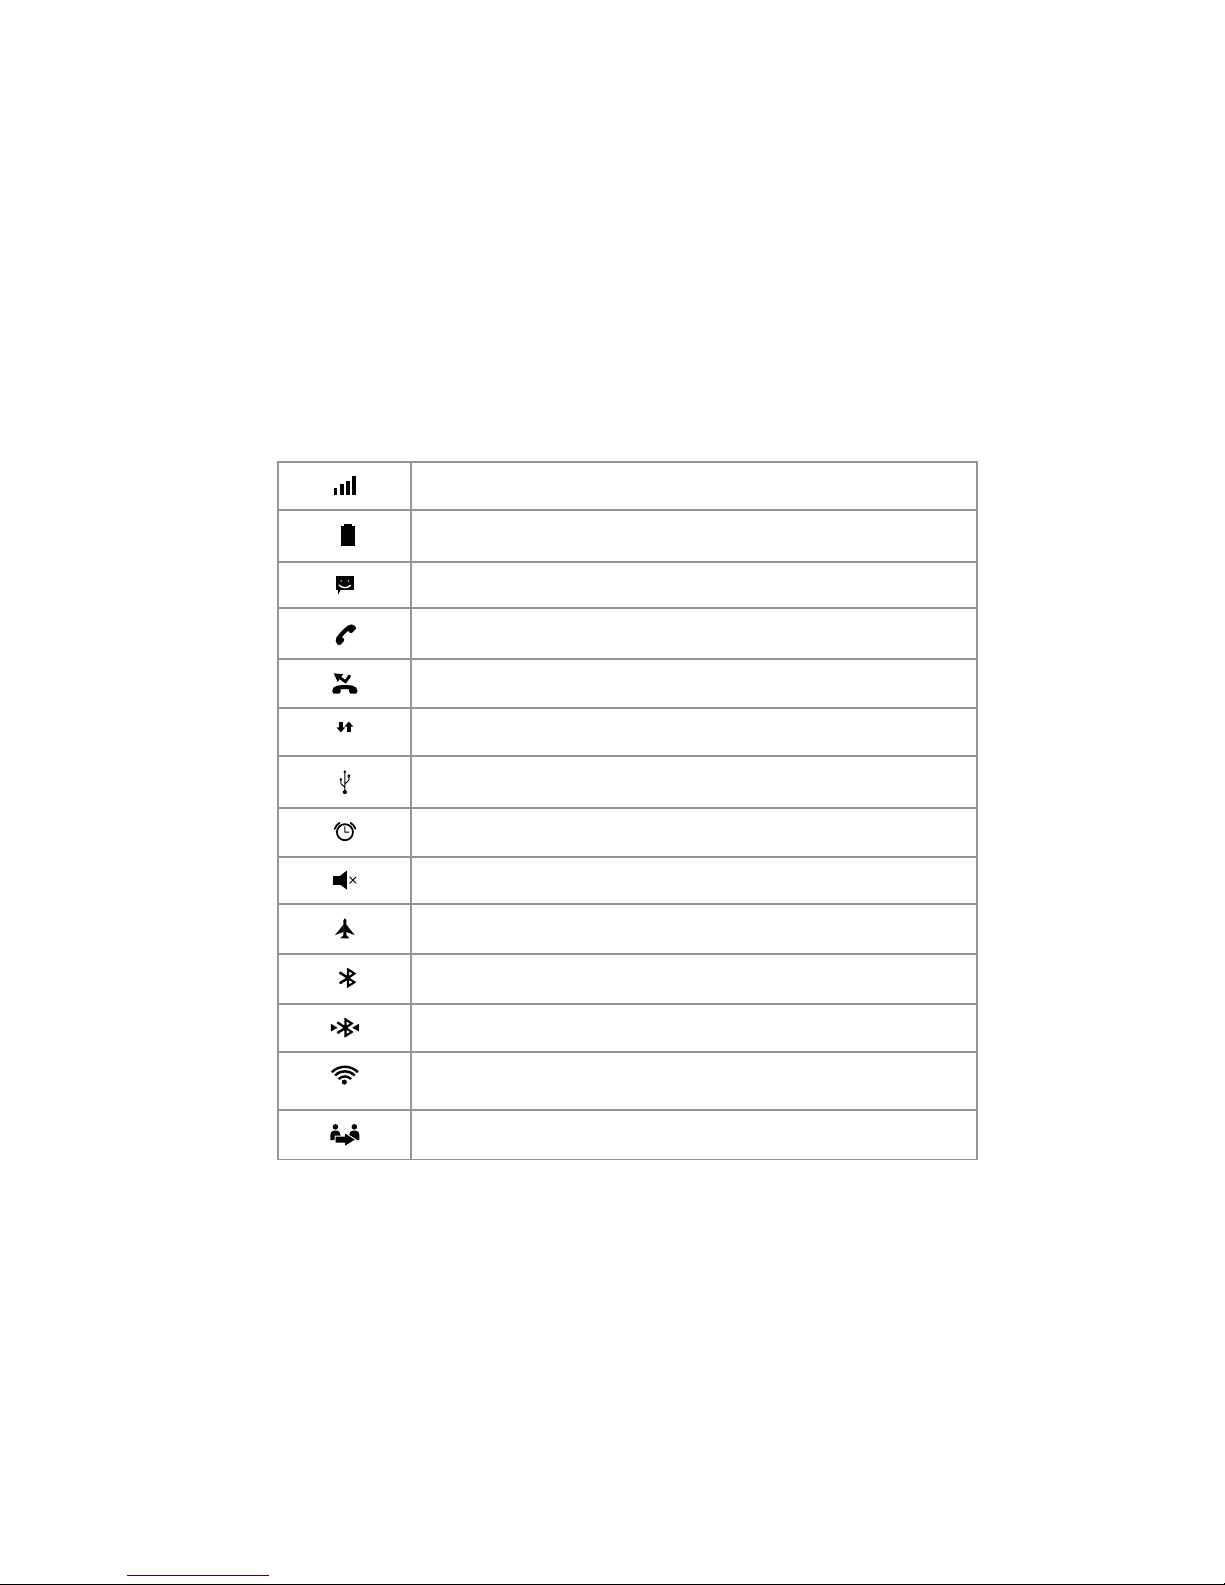
Status icons
Signal Strength: Current signal strength
Battery Level: Displays current battery level
New Message: One or several message alerts
Voice Call: Voice call in progress
Missed Call: Displays missed calls
3G
Active 3G Connection: Phone is on an active 3G connection
USB Connected: A USB cable is connecting the device to a PC/ laptop
Alarm Set: Alarm is active
Silent Mode: All sounds except media and alarms are silenced
Aeroplane Mode Active: All wireless communications are disabled
Bluetooth Active: Bluetooth has been enabled
Bluetooth Connected: The phone is paired with another Bluetooth device
WLAN Active: WLAN is connected, active, and communicating with a
Wireless Access Point (WAP)
Call Transfer Active: A call transfer is in progress
Page 14
14
SECTION 3: POWER ON/OFF
Before powering ON the phone, make sure the phone is charged and the SIM card is inserted correctly. If the phone is powered ON
without a SIM card, the screen displays a SIM card insertion message and the phone can only make calls to the emergency services. To
call the emergency services, input the emergency service number and press the [
] button to call. The phone can be powered ON
when it is being charged. If the phone automatically turns OFF, the battery level is low. The start-up information will be displayed after 30
minutes of charging then the phone can be used. Press and hold the [
] button and the phone will turn ON/OFF.
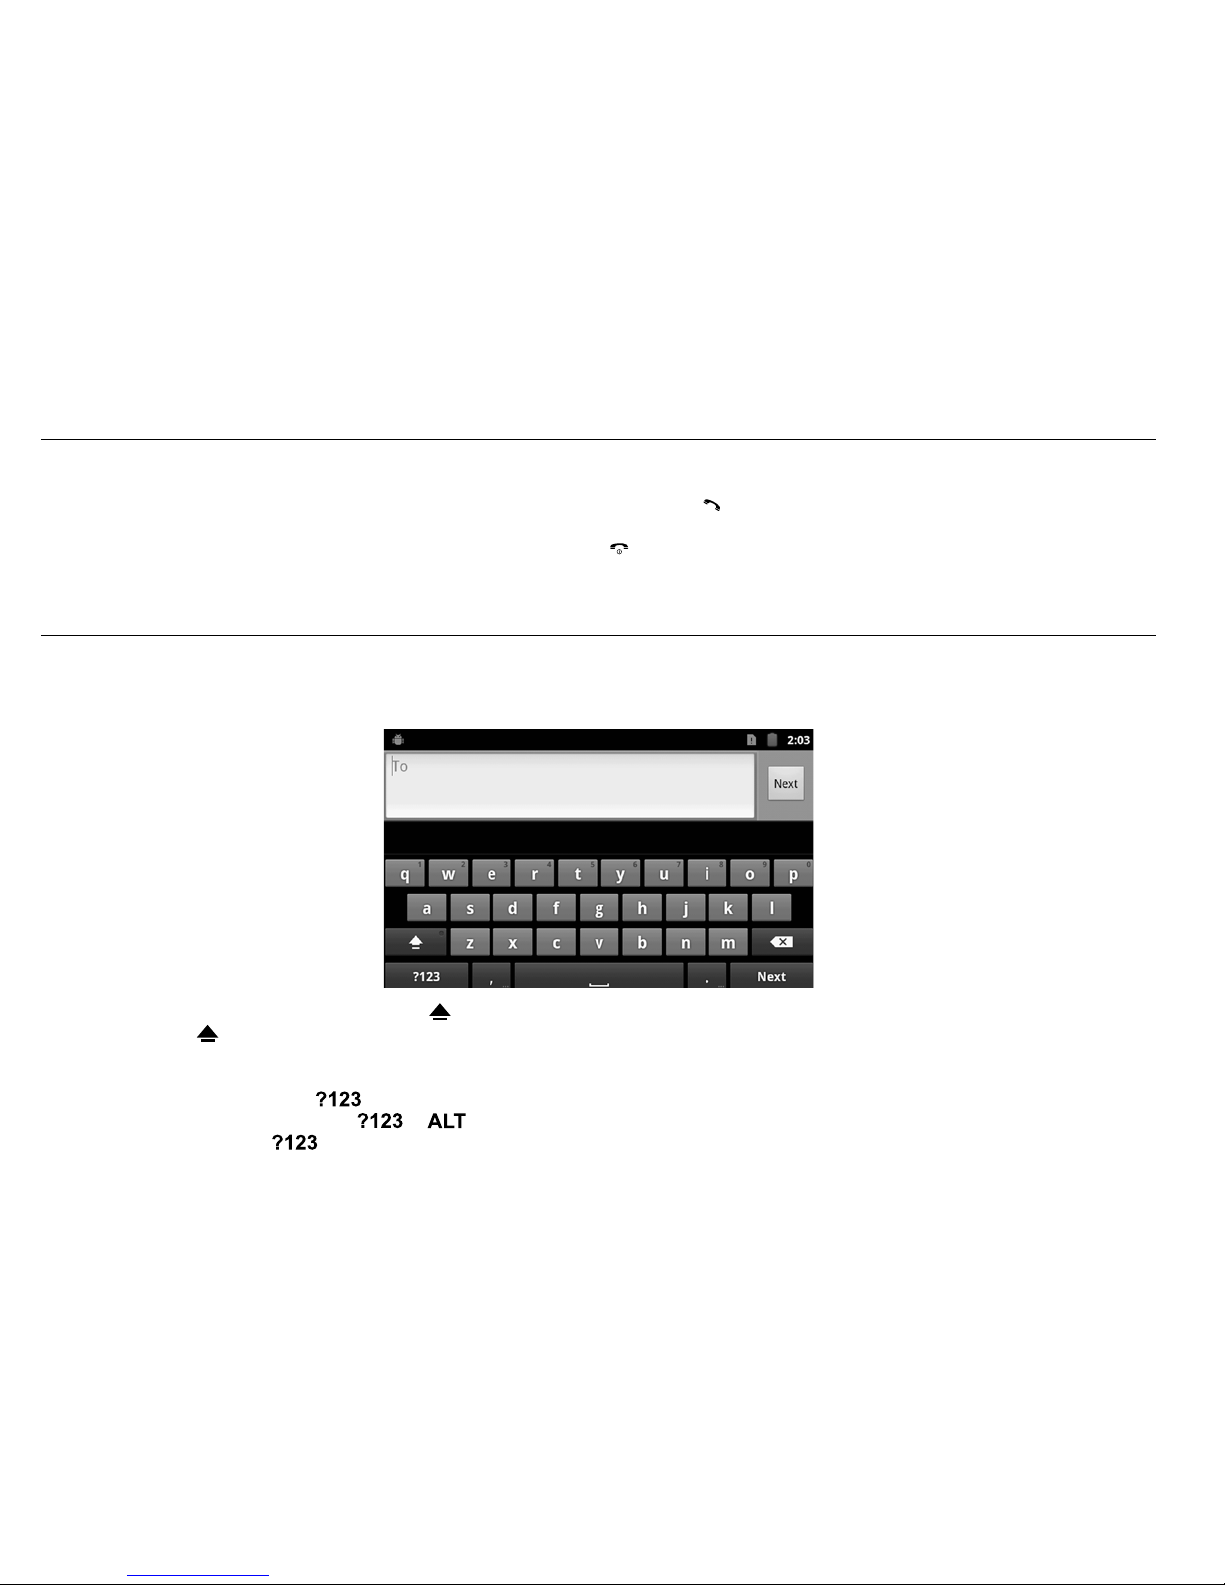
SECTION 4: TEXT ENTRY
Text input method:
This section describes how to enter words, letters, punctuation and numbers.
Entering Upper and Lower Case Letters:
The default case is lower case (abc). Touch the
button to change to Uppercase mode before inserting a character with the
keyboard. Use the
button to toggle between the upper and lower cases.
Entering Symbols and Numbers:
To enter common symbols, touch
to switch to symbol mode, and then touch the required button on the keyboard.
To enter less-common symbols, touch
> , then touch the desired button on the keyboard.
Enter numbers by touching
, then touch the required button on the keyboard.
Page 15

15
SECTION 5: CALL FUNCTIONS
Making Calls
Your phone oers multiple ways to make calls:
Making a phone call by dialing a number
1. On the Home screen, enter the phone number using the alphanumerical keypad, and press the [
] button to make the call.
2. To end the call, press the [
] button.
Page 16

16
Making a phone call using contacts
1. From the Home screen, select
(Applications) Contacts.
2. Find the contact and touch it to open details.
3. Touch
to dial the default number for the Contact.
Making a call using Favourites
1. From the Home screen, touch
(Phone).
2. Touch
(Favorites) to display your favorites.
3. Find the contact and touch it to open the Contact entry.
4. Touch
to dial the default number of the Contact person.
Making a phone call using the Call Log
To call a number from a recent call stored in the Call Log.
1. From the Home screen, touch
(Phone).
2. Touch
(Call log) to display your recent calls.
3. Find the number of the contact you require, and then touch Call to dial the number.
Page 17

17
Answering/ Ending a call
Answer or silence an incoming call
1. Press the [
] button or touch the icon to answer a call.
2. Press the [
] button or touch the icon to reject the call.
Adjusting the receiver volume
Press [
][ ] button to increase or decrease the volume on the handset during a call.
In-Call Options
During an active call, you can use the following features:
Add call: Displays the Dialler to set up a multi-party call.
End call: Terminates the current phone call.
Dial pad: Displays a keypad to enter digits.
Bluetooth: Switches the call to be taken to a Bluetooth headset.
Mute: Mutes or enables your voice on the call.
Speaker: Enable or disables the speakerphone.
Page 18

18
Calls via Headset
The [ ] button enables preferred use of the phone via a headset rather than receiver (necessary for RJ11 connected headsets only). To
use such a headset, plug its connector into the RJ11 port on the rear side of the phone and press the [
] button. A headset icon will ap-
pear on the screen to indicate the headset port is enabled. To make a call when the headset is connected, dial the required number, then
press the [
] button. To receive an incoming call, press the same button.
If you are using a headset with a 3.5mm jack, you will not need to use the headset button, simply plug the connector into the
corresponding port on the left hand side of the phone and the communication channel will be enabled.
Page 19

19
SECTION 6: CONTACTS
This section explains how to manage your Contacts. Touch to access the contacts menu in the main menu.
Creating Contacts
Creating Contacts
1. In the Contacts menu, touch
New contact.
2. Touch where you would prefer to save the contact - phone/ SIM.
Creating Contacts from the Phone Dial Status
Enter a phone number with the Phone Dialer keypad, touch
Add to contacts then save the entry.
Creating and Editing Contacts from the Call Log
Save a phone number from a recent call record to create a new contact, or update an existing one.
Groups
Assign a contact to Groups to search for contacts faster, or to call or send messages quickly to group members.
In the Contacts menu, touch
Groups.
Favourites
Favourites are displayed on the Favourites tab in the Phone Dialler, for fast dialling or messaging, and are indicated by the
in Contacts.
Touch and hold on a contact, then select Add to Favourites from the pop-up menu.
Page 20

20
SECTION 7: MESSAGES
This section explains how to send and receive messages, and other features associated with messaging.
Your phone supports these types of messages:
SMS Text messages: Send and receive simple messages containing text.
MMS Multimedia messages: Send and receive text messages with pictures and/or sound les to other mobile phones or email
addresses.
Email: Send and receive emails from your email accounts.
Gmail: Send and receive emails from your Google account.
Creating and Sending Messages
1. From the Home screen, touch (Messaging).
2. Touch Menu for the following options:
Compose: Create a new message.
Search: Enter characters to search messages and recipient lists.
Settings: Congure message settings.
Delete threads: Delete all threads.
3. Touch the To eld and enter the recipient’s name, phone number or email address.
4. Touch the Type to compose field or Next to write your message. While composing a message, touch Menu for the
following options:
Add subject: Add a subject eld to the message. This option converts the message to MMS.
Attach: Add content to the message to convert it to MMS.
Pictures: Add a picture.
Capture picture: Take a new picture.
Videos: Add a video.
Capture video: Record a new video.
Audio: Add a sound clip.
Record audio: Create then add a new audio clip.
Slideshow: Add a slideshow of pictures to this message.
Insert smiley: Add a text emoticon to the message.
Discard: Discard the message.
All threads: all messages.
5. Touch send to send the message
Note: As you enter a name, phone number or email address, possible matching contacts will appear on the screen. Touch a Contact to
select it or continue entering characters.
Page 21

21
Settings
Configuring message settings:
1. From a Home screen, touch (Messaging).
2. Touch Menu Settings to set:
Storage settings
Delete old messages: Touch to enable or disable automatic erasure of messages when storage reaches its default limits. When
this function is disabled, you will be prompted to delete old messages when the limit capacity has been reached.
Text message limit: Touch to set a limit for the number of text messages per thread.
Multimedia message limit: Touch to set a limit for the number of multimedia messages per thread.
Text message (SMS) settings
Delivery reports: Select to receive a delivery report for each message you send.
Message template: Create/edit message templates.
Manage SIM card messages: Manage messages stored on your SIM card.
SMS signature
SMS signature: Touch to enable/ disable SMS signature.
Edit SMS signature: Touch to edit SMS signature.
Multimedia message (MMS) settings
Delivery reports: Touch to receive a delivery report for each message you send.
Read reports: Touch to request a read report for each message you send.
Auto-retrieve: Touch to enable or disable automatic retrieval of MMS messages. When enabled, MMS messages will download
automatically. When disabled, the phone prompts to download new MMS messages manually.
Roaming auto-retrieve: Touch to enable or disable automatic retrieval of MMS messages when Roaming. When enabled, MMS
messages download and display automatically. When disabled, the phone prompts you to download new MMS messages.
Restricted Mode: Touch to disable image resizing and to check image resolution.
Notification settings
Notifications: Touch to enable or disable alerts in the status bar.
Select ringtone: Touch to select a ringtone for message alerts.
Broadcast Messages: Touch to receive Cell Broadcast SMS broadcast messages.
Page 22

22
SECTION 8: BROWSER
Your phone is equipped with a full HTML Browser, which allows you to access the internet.
From the Home screen, select
Browser.
Selecting items on a page
While browsing pages, use gestures and menus to navigate through dierent links:
• Touch an item to select it.
• Touch a hyperlink to follow the link.
• Touch and hold on a hyperlink for the following options:
Open: Go to the linked page.
Open in new window: Open a link in a new window.
Bookmark link: Add a bookmark to a linked page (without loading it).
Save link: Save the linked page to Download history.
Share link: Send the link via Bluetooth, Email, or SMS.
Copy link URL: Save the link’s URL to the clipboard.
Entering a URL
Access a website quickly by entering the URL.
1. From the Home screen, select
Browser.
2. Touch the URL eld at the top of the screen, and then enter the URL using the keyboard.
3. Touch Go to load the page.
Using Browser Windows
You can have up to eight windows open at the same time and switch between windows.
1. From the Home screen, select
(Browser).
2. To open a new window, touch
Menu New window.
3. To switch to another open window, touch
Menu Windows. Choose the window you want to go to.
4. To close a window, touch
Menu Windows.
5. Touch
(Close) on the desired window to close it.
Page 23

23
Using Bookmarks
Bookmark a site to have quick access.
Creating a bookmark
1. From the Home screen, select
(Browser).
2. Browse to the desired website, and then touch
(Bookmarks) next to the URL eld.
3. The new website is displayed as a thumbnail with the command Add. Touch the bookmark to add it.
4. At the Add bookmark prompt, conrm the Name and Location for the bookmark, and then touch OK to save the bookmark.
Accessing bookmarks and history
Launch a bookmarked page, or reload the recent web pages.
1. From the Home screen, select Browser.
2. Touch
Bookmarks next to the URL eld.
3. On the Bookmarks tab, touch a bookmark to load the page or touch and hold on a bookmark for the following options:
Open: Launch the bookmarked page.
Open in new window: Open the linked page in a new window.
Edit bookmark: Modify the URL.
Add shortcut to Home: Create a bookmark on the Home screen.
Share link: Send the link via Bluetooth, Gmail, or SMS.
Copy link URL: Save the link’s URL to the clipboard.
Delete bookmark: Remove the bookmark.
Set as homepage: Assign the bookmarked link as your browser’s home page.
Touch
Menu List view to view bookmarks as a list.
4. On the Most visited tab, use the following options:
• Touch a page to reload it.
• Touch the star next to a page to bookmark it.
• Touch and hold on a page for the following options:
Open: Launch the web page.
Open in new window: Launch the web page in a new window.
Add bookmark/Remove from bookmarks: Bookmark the page, or remove the bookmark for this page.
Share link: Send the page’s URL via Bluetooth, Gmail, or SMS.
Copy link URL: Copy the page’s URL to the clipboard.
Page 24

24
Remove from history: Remove the record of this page.
Set as homepage: Set this page as the default rst page when opening the Browser.
5. On the History tab, use the following options:
• Touch a page to load it.
• Touch the star next to a page to bookmark it.
• To clear the history, touch
Menu Clear history.
• Touch and hold on a page for the following options:
Open: Launch the web page.
Open in new window: Launch the web page in a new window.
Add bookmark/Remove from bookmarks: Bookmark the page, or remove the bookmark for this page.
Share link: Send the page’s URL via Bluetooth, or SMS.
Copy link URL: Copy the page’s URL to the clipboard.
Remove from history: Remove the record of this page.
Set as homepage: Set this page as the default rst page when opening the Browser.
Browser Menu
While viewing a web page, touch
Menu for the following options:
New window: Open a new browser window. The previous browser windows remain open in the background (use the Windows option
to switch between windows).
Bookmarks: Create and manage bookmarks for favourite sites.
Windows: Switch between windows, or open a new window.
Refresh: Update the current page’s content from the server.
Forward: Move forward to a previously-viewed page.
More:
Add bookmark: Create a bookmark for the current page.
Find on page: Search for content on the current page.
Select text: Enable the text selector. Returns you to the web page, where you can drag your nger over text to select it and
copy it to the clipboard.
Page info: View information about the current page, including the URL.
Share page: Send the current page’s URL via Bluetooth, or SMS.
Downloads: View a list of downloads. While viewing downloads, touch Menu for access to Clear List or Cancel All Downloads
commands.
Settings: Customise the Browser.
Fully exit: Exit Browser.
Page 25

25
SECTION 9: MUSIC
Play audio les stored on the memory card.
1. From Home screen, select
(Applications) (Music).
2. Music Player scans your memory card and displays your songs: Artists, Albums, Songs and Playlists.
3. Touch a song or playlist to begin playback.
4. During playback, use the sound and playlist controls:
Volume Buttons: Press the [
][ ] buttons to increase or decrease the volume.
List / Now Playing: Touch List to view a list of songs.
Touch Now Playing to display the current song title and details.
Shue: When enabled, songs are played in random order. When disabled, songs are played in the order they appear in the list view.
Repeat: Touch to repeat the current song, repeat all songs, or disable repeat mode.
Playback controls:
• Touch
to go back to the previous song, or hold to rewind.
• Touch
to jump to the next song, or hold to go forward.
• Touch
to pause playback. Touch to resume playback.
5. Touch Menu for the following options: Library, Party shue, Add to playlist, Use as ringtone, Delete.
Page 26

26
SECTION 10: CAMERA
Use your phone’s built-in Camera to take pictures and record videos.
Taking Pictures
1. From Home screen, touch (Applications) (Camera).
2. Using the display as a viewnder, compose your picture by aiming the lens at the subject. Press the to zoom IN or OUT.
3. Touch the Camera button to take a picture
4. After taking a picture, touch Image Viewer to view the picture. While viewing the picture, use the following options:
• Touch the zoom icons to zoom incrementally, or double-tap on the picture to zoom all the way in or out.
• Touch
(Delete) to erase the picture.
• Touch
(Share) to send the picture via Bluetooth, SMS, Email.
• Touch
(More) for the following options: Details, Set As, Crop, Rotate Left, Rotate Right.
• Touch [
] button to return to the Camera and take more pictures.
Image Viewer
Camera/ Video Mode Slider
Camera
Page 27

27
Camera Options
Touch (Settings) to congure the following:
Focus mode: Choose a automatic focus setting.
Exposure: Choose a value to set the brightness of the picture.
Picture size: Choose a size for the photos.
Picture quality: Set the quality for the photos.
Colour eect: Choose a colour eect for the pictures.
Select ISO: Choose a setting for imaging sensitivity.
Anti Banding: Set Anti Banding.
Saturation: Set Saturation.
Contrast: Set Contrast.
Sharpness: Set Sharpness.
Camera settings: Set all Camera settings to the defaults settings.
Touch the
settings for White balance and choose a setting for the light source.
Camera image Rotation
The [ ] button allows you to rotate the orientation of the image in front of the camera. The orientation of the image is reected by a
camera icon in the top right hand side of the screen. Each time the [
] button is pressed, the camera will rotate anti-clockwise in 90
degree increments. The resultant image will correspond to this angle. After approx. 5 seconds of the camera being back in the upright
starting angle, the icon will disappear.
While the ability to alter image orientation is normally available in VoIP apps, if it is not, press the [
] button to exit the app. This will
take you to the Home/app screen. Press the [
] button and when the icon appears in the top right of the screen, press the number of
times necessary to achieve the desired angle. Touch the VoIP app to re-launch it and begin to use the video call again in the correct angle.
Page 28
28
SECTION 11: VIDEO PLAYER
The 800x480px LCD screen can play videos and is DivX Certied®, it can play DivX® up to HD 720p, including premium content. Use
Video Player to view and manage videos stored on a memory card.
1. From Home screen touch
(Applications) (Videos). By default, videos are displayed by name.
2. Touch a video to play the le.
3. While playing a video,
• Touch
to go back on the video.
• Touch
to advance the video.
• Touch
to pause the video
• Touch
to resume playback.
SECTION 12: GALLERY
Viewing Pictures
1. From Home screen, select
(Applications) (Gallery).
2. Touch a category, and then touch a picture to view it.
3. While viewing a picture, tap on the screen or touch
(Menu) for the following options:
Share: Share the selected picture via Bluetooth, SMS, Email.
Delete: Erase the picture.
More:
• Details: Display information about the picture.
• Set as: Assign the picture as a Contact icon, or as Wallpaper.
• Crop: Drag the edges of the crop tool to select an area of the picture, then touch Save to save selected area, which will
remove the rest of the picture.
• Rotate left: Change the orientation of the picture to the left.
• Rotate right: Change the orientation of the picture to the right.
Page 29

29
SECTION 13: CALENDAR
Create events and appointments to manage your schedule.
1. From Home screen, select
(Applications) (Calendar).
2. Touch
(Menu) for the following options:
Day: Display today’s schedule, scroll to other days.
Week: Display the current week, scroll to other weeks.
Month: Display the current month, scroll to other months.
Agenda: Display events in chronological order.
Today: Display the day’s events.
More:
• New event: Add a new event to the calendar.
• Calendars: Display the calendars.
• Settings: Customise the calendar.
SECTION 14: CLOCK
The Clock application includes the following features:
Alarm clock: Create alarms to go o once, or to repeat on specic days.
Stopwatch: Record lap times.
Page 30

30
SECTION 15: SETTINGS
This section explains the settings you need to use to customise your phone.
Theme settings
Turn ON/OFF the Google theme and QRD theme.
Wireless & networks
Aeroplane mode
When airplane mode is activated, your phone’s wireless connections are disabled, and you cannot make or receive calls, messages or connect to networks. During in aeroplane mode, you can use other features on your phone, such as music, videos, or other applications.
WLAN
Turn your phone’s WLAN service ON or OFF. When you turn WLAN service ON, your phone automatically searches for available Wireless
Access Points (WAPs) within range. Touch WLAN to turn WLAN ON or OFF.
WLAN settings
Set up and manage wireless access points.
Touch settings to congure:
WLAN: Touch to turn WLAN ON or OFF.
Network notification: When enabled, noties you of an open network when one is available.
Add WLAN network: Manually add a new WLAN connection.
Bluetooth
Turn your phone’s Bluetooth ON or OFF.
Bluetooth settings
Set up and manage Bluetooth access points.
Touch settings to congure the following:
Bluetooth: Touch to turn Bluetooth ON or OFF.
Device Name: Your device’s default name appears on screen.
Touch to change the device name when Bluetooth is ON.
Discoverable: Make your device discoverable.
Page 31

31
Discoverable timeout: Set the time frame the device will be discoverable for.
Scan devices: Touch to scan for nearby Bluetooth devices within range. After searching, touch a device to pair with a compatible
Bluetooth device.
Tethering & portable hotspot
Share your phone’s mobile data connection via a USB or as a portable WLAN hotspot.
VPN settings
Set up and manage Virtual Private Networks (VPNs).
Mobile networks
Set options for network selection and data services while roaming.
Call settings
Call feature settings
GSM call settings: Additional GSM only call settings.
Fixed dialling numbers: Manage (enable/ disable) xed dialing numbers.
IP prefix: Edit the IP prex for IP call.
Voicemail service: Network operator details for voicemail services.
Voicemail settings: Set your voicemail number.
Reject call settings
Reject call settings: Enable/disable the automatic message relayed to a caller when a call is rejected.
Message template: Edit/create text message templates.
Other call settings
DTMF Tones: Set the length of DTMF tones. The sounds used for touch tone dialling are referred to as DTMF (Dual Tone Multiple
Frequencies) tones. Each number (as well as the “#” and “*”) is represented by a pair of tones.
Sound
General
Silent mode: Silence all sounds except media & alarms.
Volume: Set the volume level for incoming calls and notications.
Incoming calls
Phone ringtone: Choose a default ringtone for all incoming calls.
Notifications
Notifications ringtone: Select a default ringtone for messages, alarm and other notications.
Page 32

32
Feedback
Audible touch tones: Play tones when you dial numbers on the Phone Dialler.
Audible selection: Play tones when you touch the screen for selections.
Display
Brightness
Sets the brightness for your screen. Touch and drag the slider to set the brightness, or touch to enable Automatic brightness adjustment.
Animation
Sets the level of animations for transitions from one window to another. Touch Some animations, All animations or No animations.
Screen timeout
Adjusts the delay time before the screen turns o automatically – 15sec, 30sec, 1min, 2min, 10min or never.
Battery
Battery status: Displays the status of the battery.
Battery Level: Displays the power level of the battery.
Location & security
Use wireless networks
You can choose Location determined by WLAN and/or mobile network. And you can see your location in applications, when using Maps
for example.
SIM/RUIM card lock
You can lock your SIM/RUSIM card by inserting a PIN code.
Visible passwords
When enabled, password characters will be displayed briey while entering the passwords.
Select device administrators
Add or remove device administrators.
Credential storage
Use secure credentials
You can install credentials from an installed memory card and use the Credential storage settings to allow applications to access
the secure certicates and other credentials.
Page 33

33
Install from SD card
Install encrypted certicates from an installed memory card.
Set password
Set or change a password to protect credentials.
Clear storage
Clear stored credentials and reset the password.
Applications
You can download and install applications from Android Market, or create applications using the Android SDK and install them on your
phone. Use Applications settings to manage it on your phone.
Unknown sources
When enabled, allows installation of applications from dierent sources other than the Android Market.
Preferred install location
Change the preferred installation location for new applications.
Manage applications
Manage and remove applications from your phone.
Running services
View and control the services running on your phone.
Storage use
View storage used by each application that is running.
Development
Set options for application development, such as USB debugging, Stay awake (screen will never sleep while charging), and allow mock
locations.
Accounts & sync
Set up and manage accounts, including your Google and Backup Assistant accounts.
General sync settings
Background data
When enabled, all accounts can sync, send, and receive data at any time. Touch Background data to enable or disable the setting. When
enabled, a check mark appears in the check box.
Auto-sync
Touch Auto-sync to enable or disable the setting. When enabled, a check mark appears in the check box. All accounts will automatically
sync and further options are available for setting specic accounts.
Page 34

34
Privacy
Factory data reset
Use Factory data reset to return your phone to its factory default settings. This setting erases all data from your phone, including your
Google or other email account settings, system and application data and settings, and all downloaded applications. It will not erase
current system software and bundled applications, or les stored on an installed memory card, such as music or photos. Touch Factory
data reset, and then follow the prompts to perform the reset.
Storage
SD card
Manage the use of memory resources in your phone’s internal memory, and in an installed memory card.
Total space: View total space of the memory card.
Available space: View available space of the memory card.
Unmount SD card: Touch Unmount SD card to prepare the memory card for safe removal or formatting.
Erase SD card: Erase all data on the SD card, such as music and photos.
Internal storage
View memory usage for your phone’s internal memory. Your phone contains 512MB internal memory.
Language & keyboard
Language settings
Select language: Set the language on your phone.
User dictionary: When you enter text, the predictive text features of the Android keyboard suggest words matching your
character input. If you nd that predictive text often predicts the wrong word, or if you have special words that you enter often,
add them to the User dictionary.
Add and manage words in your user dictionary.
- To add a word, touch
Menu Add.
- To edit a word, touch the word, then select Edit.
- To delete a word, touch the word, and then select Delete.
Keyboard settings
Enables you to change the settings on the Android keyboard.
Page 35

35
Date & time
By default, your phone receives date and time information from the wireless network. When you are outside network coverage, you may
want to set date and time information manually using the Date & Time settings.
Automatic: Touch to enable or disable automatic date and time updates from the wireless network.
Set date: Enter the current date (only available when the Automatic setting is disabled).
Select time zone: Choose your local time zone (only available when the Automatic setting is disabled).
Set time: Enter the current time (only available when the Automatic setting is disabled).
Use 24-hour format: Set the format for time displays (12h or 24h format).
Select date format: Set the format for date display.
About phone
View information about your phone, including status, legal information, hardware and software versions, and a tutorial.
Touch items to view details:
System updates: Check availability and install updates to your phone.
Status: View Battery status, your phone number, MIN, PRL version, ERI version, MEID, Network, Signal strength, Service state,
roaming, Mobile Network state, Wi-Fi MAC address, Bluetooth address, and Up time.
Battery use: Display processes and applications that are currently running. Touch an item to view its details of battery consumption.
Legal information: Display open source licenses and Google info.
Model number: Display your phone’s model version number.
Android version: Display the android version of your phone.
Kernel version: Display the kernel version of your phone.
Build number: Display your phone’s software version.
Page 36
36
SECTION 16: TECDESK SMART 5500 EXPANSION MODULE (OPTIONAL)
This section helps you setup your Tecdesk Smart 5500 Expansion Module. This is an optional module available from your place of
purchase. Please contact your network operator for more information.
1. Make sure the Expansion Module and the Tecdesk Smart 5500 Main Unit are connected.
2. Press the [
] button to turn ON the phone.
3. From the Home screen, select
Applications Settings Wireless & network settings to set your network connection.
Set up your list of the contacts when using the Expansion Module for the rst time.
1. Touch to access the Contacts menu in the main menu.
2. Select
Options More Update Address Settings and enter the server URL address provided by your supplier.
3. Select
Options More Update Password Settings. The default password is 8888.
4. Select Options More Update Oce Contacts. The phone will update the list of contacts that have already been stored
on the server. Contact details can be edited from the Tecdesk Smart 5500 Server.
5. In the main menu, touch Expansion Module “1st expansion module” OK Options Add. You can now select a
maximum 20 contact to store in the Expansion Module.
6. Touch Add, and the Expansion Module screen will display the contacts.
7. Each contact will be allocated a corresponding speed dial key.
LED Status
• Green LED: the contact is Available.
• Red LED: the contact status is “Do not disturb”.
• Yellow LED: the contact is Busy.
• LED is OFF: the contact is Oine.
Deleting a contact from the Expansion module
1. In the main menu, touch Expansion Module “1st expansion module” OK Menu Delete.
2. Select the contact and touch Delete.
3. The contact will be removed from the Expansion Module and the display will be blank.
Adding a new contact to the Expansion Module
1. In the main menu, touch Expansion Module “1st expansion module” OK Options Add.
2. Select to add or Edit the contact details from your list.
Page 37

37
Adding multiple Expansion Modules
The Tecdesk Smart 5500 can have a maximum of 3 Expansion modules connected to the main unit.
1. Ensure you connect the 2nd Expansion Module onto 1st Expansion module.
2. Select
to access the Contacts menu in the main menu.
3. Select Options More Update Address Settings and enter the server URL address provided by your supplier.
4. Touch Options More Update Password Settings. The default password is 8888.
5. Select Options More Update Oce Contacts. The phone will update the list of contacts that have already been stored
on the Tecdesk Smart 5500 Server. Contact details can be edited from the Server.
6. In the main menu, touch
Expansion Module “2nd expansion module” OK Options Add. You can now select a
maximum 20 contacts to store in the Expansion Module.
7. Touch Add, and the Expansion Module screen will display the contacts.
8. Each contact will be allocated a corresponding speed dial key on the 2nd Expansion Module.
9. Repeat for the 3rd Expansion Module.
Page 38

38
SECTION 17: TROUBLE SHOOTING
To save the time and expense of an unnecessary service call, perform the simple checks in this section before contacting a service
professional.
Your phone cannot be switched ON
• Be sure that you press and hold the power button for more than 1 second.
• Be sure that the battery is well connected to your phone. Remove the battery, reinstall the battery, and restart your phone.
• If power is exhausted, recharge the battery.
Your phone cannot be switched ON, when switching ON your phone, the following messages may appear
• Enter the phone lock code. The automatic lock function has been enabled. You must enter the phone lock code before you
can use the phone.
• Enter the PIN code. The PIN check feature is enabled. Every time the phone is switched ON, the PIN has to be entered; (If you
are using your phone for the rst time, you must enter the PIN code supplied with the USIM card).
• Enter the PUK code. The PIN code has been entered incorrectly three times, and the SIM card is now blocked. Enter the PUK
supplied by your network service provider.
USIM card error
• USIM card is contaminated. Clear the metal contact on the USIM card with a clean cloth.
• USIM card is not placed properly. Install the USIM card according to the user’s guide.
• USIM card is damaged. Contact your network service provider.
Network failure
• You may be in a weak signal area. Move to a dierent location with a stronger signal strength.
• You are out of network service coverage.
• USIM card is invalid. Contact your network service provider.
You have entered a number but it was not dialled
• Make sure that you have pressed the dial button.
• Make sure your USIM card is valid.
• Make sure that you have not set outgoing call barring.
• Make sure that you have not set xed dialling.
The quality of your call is poor
• Check/adjust the volume.
• You are in a weak signal area, such as nearing tall building or in the basement where radio cannot be eciently transferred.
• You are using your phone during a busy period, such as commuting period when the lines are too busy to put through.
Page 39

39
Your correspondent cannot reach you
• Be sure that your phone is switched ON and connected to network.
• Be sure that your USIM card is valid.
• Be sure that you have not set incoming call barring.
Your correspondent cannot hear you speaking
• Be sure that you have switched ON the microphone.
• Be sure that you are holding the phone close enough to your mouth.
The standby duration is too short
• The standby duration is related to the network settings. You may be in a weak signal area. If your phone cannot receive signals,
the phone will continue to send signals to search for a base station and consume power, which shortens the standby duration. Use
your phone in a stronger signal area or switch o temporarily.
• Your battery needs to be changed.
The battery does not charge properly
• Be sure the cables and plug is well connected.
• Wipe the charging contacts both on the phone and on the battery with a clean soft cloth.
• Change your charging environment if above 10°C or below 40°C.
• Change a damaged battery or charger.
• If the above guidelines do not help you to solve the problem, take note of the model and serial numbers of your phone, your
warranty details, and a clear description of the problem. Then contact your local after-sales service.
Page 40

40
SECTION 18: LEGAL INFORMATION
Notice
This information is subject to change without notice. Whist every care has been taken in the preparation and design of these instructions,
statements, recommendations and information, implied or expressed, they do not constitute a warranty of any kind. No part of this
information may be reproduced, quoted or translated by any means or in any form photographically, mechanically or electronically, without
the written permission of Tecdesk.
Trademarks and Permissions
The Bluetooth® trademark and logos are owned by the Bluetooth SIG, Inc.; Google Mail is a trademark of Google Inc.; Wi-Fi, Wi-Fi
Protected Access, Wi-Fi Protected Setup, and WPA are trademarks of the Wi-Fi Alliance; Microsoft, Hotmail, Outlook, Windows Live, and
Windows Media are trademarks of Microsoft Corporation; GSM and Global System for Mobile Communications are trademarks of the GSM
MOU Association; JavaScript is a trademark of Oracle America, Inc. All other trademarks are the property of their respective owners and
any use of such trademarks by Tecdesk is under license where required.
FCC Notice
Your device operates and is in compliance with Part 15; FCC rules. However, in doing so, it must also accept any interference received, even
though it may be undesirable, and must not in itself cause harmful interference. If used in close proximity to receiving equipment, the
device may cause radio or TV interference.
Warranty Disclaimers
Although every eort is used to reduce inaccuracies and, except as required by applicable law no warranties of any kind, either express or
implied, and including but not limited to the implied warranties of tness for a particular use or satisfactory quality, are made in relation to
the contents, accuracy or reliability of this information. Tecdesk reserves the right to modify or change specications or information
without any consequential liability or prior notice. Under no circumstances, except as required by applicable law, will Tecmobile or any of its
licensors be responsible for indirect damages or consequential loss of income or data however caused.
Disclaimer
Third party content and services may be enabled and are available through your device. Some features and accessories referred to in the
instructions rely on local network settings and installed software. These may not automatically be accepted, or be accepted in a limited
way, by local service and network providers. As a consequence, some descriptions may not match the accessories or product which you
can purchase.
Page 41

41
Third party content and services belong to, are the copyright of, trademarked by and patented by their respective owners under
intellectual property law. They should not be used without the express permission of the service provider or content owner and, unless
given specic permission by them, you should not transmit, upload, publish, modify, copy or distribute in any way the services or content
displayed through this device.
The device may contain technology, software or commodities which are subject to regulations and export laws from the US and other
countries. Diversion contrary to law is prohibited.
To the fullest extent permissible by applicable law, by using the applications provided with your device, you acknowledge that the
application is provided as is. Tecdesk does not provide a warranty, make any representations, or take any responsibility for the
end-user support, content or functionality of third-party applications provided with your device.
Page 42

42
SECTION 19: HEALTH AND SAFETY
RF/SAR information
Your desk phone is a radio transmitter and receiver. When switching ON, your phone sends out low-level radio-frequency (RF).
Country governments all over the world adopt state security guidelines developed by independent scientic organisations such as
ICNIRP and IEEE. These guidelines establish permitted levels of RF energy for the general population. The guidelines include a
substantial safety margin designed to ensure the safety of all persons, regardless of age and health. SAR is the unit of measurement for
absorbed radio quantity when using mobile devices. SAR tests are conducted using standard operating positions with the phone
transmitting at its highest certied power level, however, the actual SAR level of the phone while operating can be well below the
maximum value. In general, the closer you are to a base station, the lower the power output of the phone. The SAR values may vary,
depending on dierent models of phones. To ensure the safety and health of the users, the phone is designed and manufactured to meet
the radio exposure guidelines. The ICNIRP SAR limit for mobiles devices used by the general public is 2W/kg and highest SAR value
for this device is tested for use at the ear is below the SAR limit recommended by ICNIRP. WCDMA Band I front side, middle 10g value:
1.04W/kg.
Batteries
Never use a charger or battery that is damaged in any way. Use the battery correctly. Do not short-circuit the battery, as this may
damage it, cause it to heat up or create a re. Do not dispose of batteries by burning them as they may explode. Return the waste
battery to the dealer or an appointed recycle centre. Do not dispose as household waste.
Battery charging time depends on the remaining battery charge, the type of battery, and the charger used. The battery can be charged
and discharged hundreds of times, but it will gradually wear out. When the operation time is noticeably shorter than normal, it is time to
replace the battery with a new one. Use only original or approved chargers and batteries.
Unplug the charger, from the electrical socket and the device, when not in use. Do not leave on charge permanently, as this will damage
the battery and shorten its life. Leaving the battery in extreme hot or cold places will also reduce the capacity of the battery. Cool down
or heat up the temperature to the normal level (Li-ion batteries are particularly aected by temperatures below 0°C).
Operating environment
Remember to follow any special regulations in force in the area you are located, and always switch OFF your phone whenever it is
forbidden to use it, or it may create a hazard. When connecting the phone or any accessory to another device, read its User’s Guide for
detailed safety instructions. Do not connect incompatible products. It is recommended that the equipment should only be used in the
normal operating position (held to your ear with the antenna pointing over your shoulder) for your satisfactory operation of the
equipment and for the safety of others. Recommended charging temperature is 25°C. Do not expose the equipment below 10°C or above
40°C. Keep the phone in an appropriate holder while you are driving. Do not put it on a seat or location where it could fall. To ensure
safey and avoid accidents, do NOT use the phone while driving.
Page 43

43
Medical devices
Ensure that you switch OFF your phone in areas, near electronic medical equipment, that obviously require the phone to be switched
OFF such as heart pacemakers, hearing aids, etc. Most medical devices can shield the phone’s RF signal, but some cannot. If you have any
doubts, or need to nd out more, please consult your doctor or medical device manufacturer.
Pacemakers
Pacemaker manufacturers advise the distance between your phone and heart pacemaker should be 6 inches (15.3 cm) at least,
otherwise the phone could interfere with the pacemaker.
People tted with a pacemaker should note the following:
• Always keep a distance (at least 6 inches) between the phone and the pacemaker, when the phone is switched ON.
• Do not carry the phone in a breast pocket
• Listen to the phone using the ear which is furthest away from the pacemaker.
Caution: Please switch OFF your phone if you feel there is interference, and consult a doctor as soon as you can.
Hearing Aids
Mobile phones may cause some interference with some hearing aids. If so, please consult your hearing aid manufacturer.
Other safety information
• If you do not use your phone for extended periods, please switch it OFF and remove the battery to save energy.
• Do not have the volume excessively loud while using the phone, as this could impair your hearing.
• Repairs should only be undertaken by an approved agent.
• Avoid using phone cases that have magnetic closures: These can aect the performance and life of the phone and its components.
• If you or your family have a medical record of dizziness or epilepsy, please consult your doctor rst, if you want to play games on the
device or use the torch.
Use with care, possible excessive sound pressure from the earphones and headphones can cause hearing loss
.
Page 44

44
Emergency calls
Your phone, like any wireless phone, operates using radio signals, which cannot guarantee connection in all conditions. Therefore, you
should never rely solely on any wireless phone for essential communications like medical emergencies. To make or receive calls, the phone
must be switched ON and in a service area with adequate signal strength. To make an emergency call, enter the local emergency number
in standby mode.
Care and maintenance
Your phone is a product of superior design and craftsmanship and should be treated with care. The suggestions below will allow you to
enjoy this product for many years.
• Keep your phone away from small children and pets: They may accidentally damage the phone or choke on small parts.
• Keep the phone dry and avoid liquids that could corrode the phone.
• Do not use the phone with a wet hand, as this could result in you getting an electric shock.
• Do not store the phone in hot areas, as this can shorten the life of electronic devices, damage batteries, or melt accessories.
• Do not expose your phone to hot sunlight which may over-heat your phone.
• Do not place your phone near inammable liquids, gas or explosive substances.
• Do not store the phone in cold areas. When the phone warms up to its normal operating temperature, moisture can form inside the
phone: This can damage its electronic circuit boards.
• Do not drop or knock the phone. Rough handling can break internal circuitry.
• When cleaning the phone, use a damp or anti-static cloth. Do not use a dry or static cloth. Do not use chemicals such as cleaning
solvents to clean the surface. Switch OFF the phone rst before cleaning.
• Do not paint the phone. Painting it may limit proper operation.
If your phone has a torch, do not use it too close to the eyes. This may cause damage to eyes.
• If the phone or battery gets wet and the label on the phone is damaged, phone repairs are no longer guaranteed by the
manufacturer’s warranty, even if the warranty for your phone has not expired.
Page 45

45
SECTION 20: DECLARATION OF CONFORMITY
Hereby, we declare under our sole responsibility that this product and in combination with the accessories are in compliance with the
appropriate standards 3GPP TS 51.010-1, EN 301908-1/-2, EN 301511, EN 300328, EN 301489-1/-7/-17/-24, EN 60950-1, EN 50360, EN
50361, following the provisions of, Radio Equipment and Telecommunication Terminal Equipment directive 99/5/EC with requirements
covering EMC directive 04/108/EC, and Low Voltage directive 06/95/EC.
1. Battery CAUTION : RISK OF EXPLOSION IF BATTERY IS REPLACED BY AN INCORRECT TYPE. DISPOSE OF USED BATTERIES
ACCORDING TO THE INSTRUCTIONS.
2. Adapter: Adapter shall be installed near the equipment and shall be easily accessible.
3. To power o the device, please take out the battery and disconnect the power adaptor.
4. RF distance. The device complies with RF specications when the device is used at 75cm from your body.
Page 46

MODEL NO: TD5500
tecdesk.com
 Loading...