

Page 1
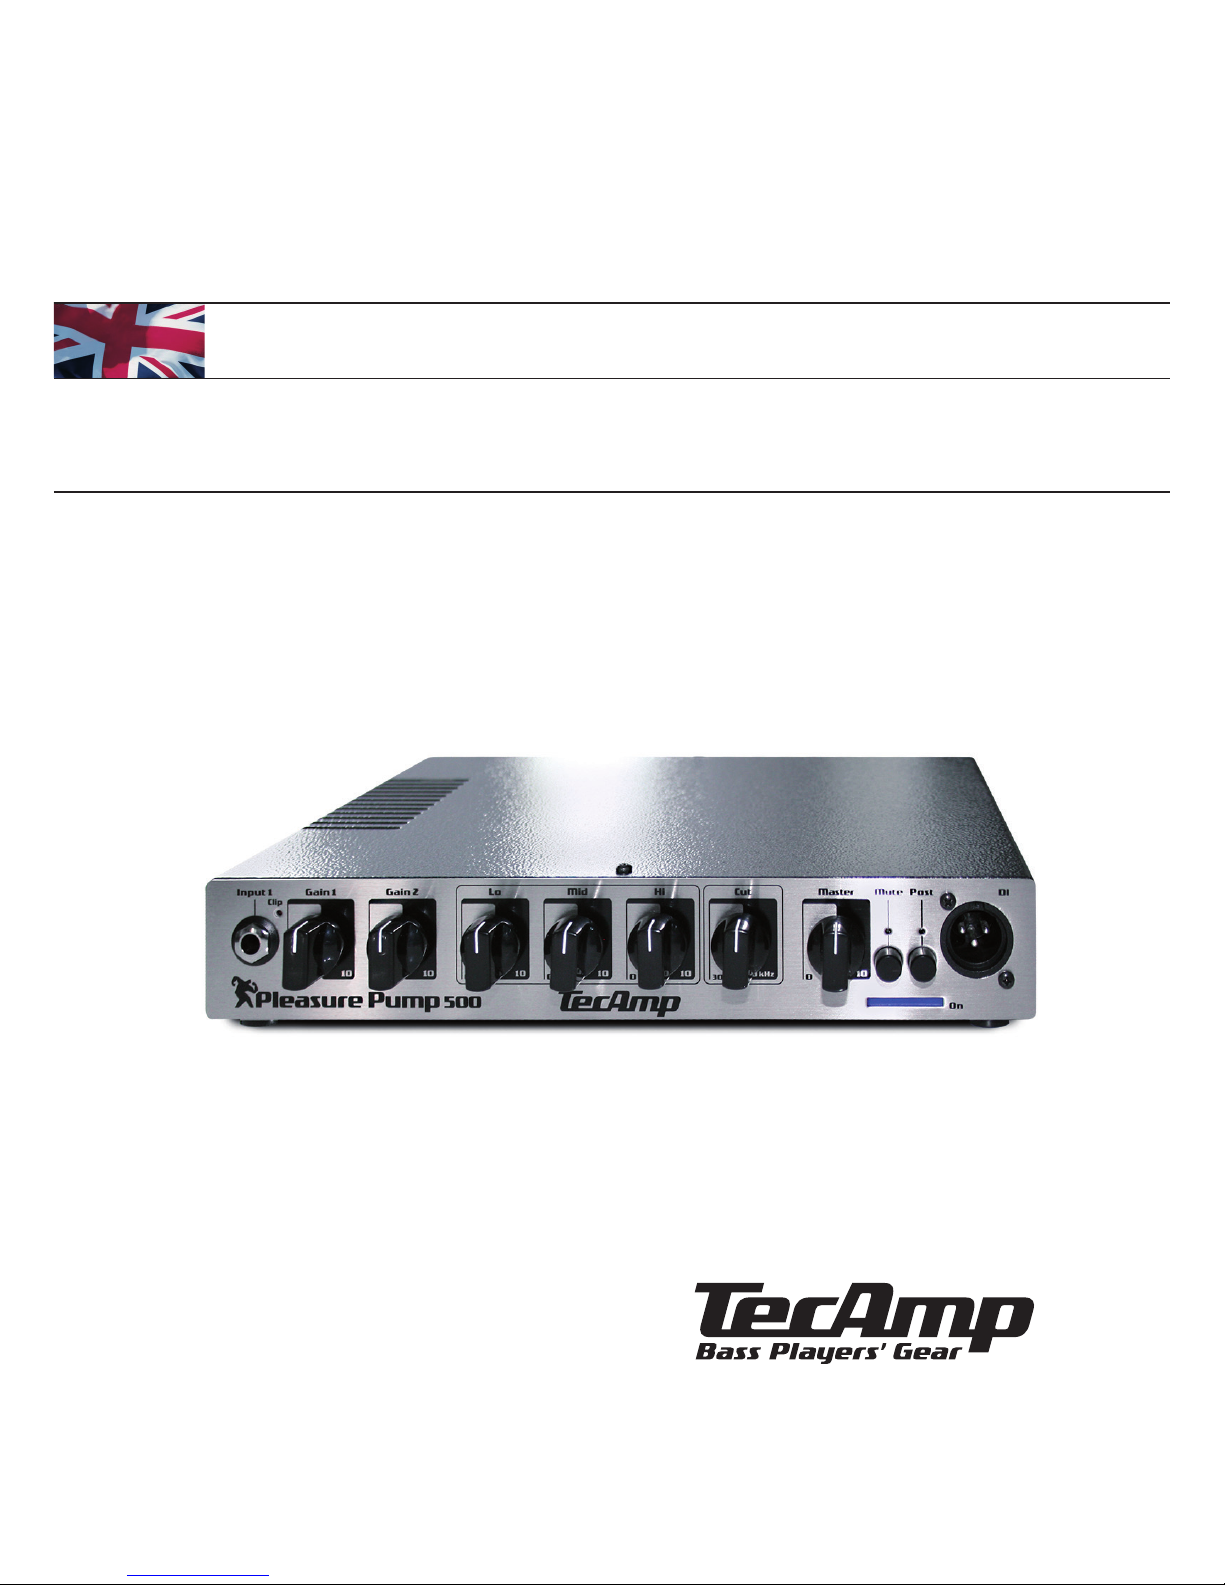
Pleasure Pump 500
>> Manual
N06....
Page 2
You must be happy – you are currently reading the
owner’s manual of your new TECAMP PLEASURE PUMP
500 amp. The PLEASURE PUMP 500 is a sophisticated
bass amplifier of highest quality. You can only take full
advantage of its power and broad range of sound options
when you know how to use it properly. There are loads
of protections built into the amp for an exceptionally reliable operation.
PLEASURE PUMP stands out due to its extraordinary
sound qualities. Useful features such as separate and
individually controllable inputs for instrument and line
sources, the “CUT” control, a phones amp and an additional line output offer a vast array of applications.
The power of the Pleasure Pump 500 is ideally suited
to drive our PLEASURE BOARD or any other cabinet with
raw power.
There are countless ways to connect to PLEASURE PUMP
500 for loads of different applications. When you use the
PLEASURE PUMP together with the PLEASURE BOARD
or any other conventional speaker cabinet, the instrument signal can be routed to the sound reinforcement
system via the “LINE OUT”. You can very well use the
PLEASURE PUMP between your instrument and your
regular bass amp, or, the other way round, plug your instrument into your standard bass amp and connect its
line output to the LINE INPUT of the PLEASURE PUMP.
Since PLEASURE PUMP 500 sports two separate inputs
you can mix other signal sources such as a CD or MP3
player as well as a monitor mix in an In-ear situation, or
plug in two bass guitars.
!
CE Declaration of Conformity
Pleasure Pump 500
We declare under our sole responsibility that this product is
in conformity with the following standards or standardization
documents in attention of operation conditions and installation
arrangements according to operating manual:
EN 61000-3-2, EN 61000-3-3, EN 55013, EN 55020, EN 55022,
EN 60065 according to the provisions of the regulations
89/336/EWG and 73/23/EWG.
>> Pleasure Pump 500
IMPORTANT SAFETY INSTRUCTIONS
The apparatus shall not be exposed to dripping or splashing and that
no objects with liquids, such as vases, shall be placed on the apparatus. The MAINS plug is used as the disconnect device, the disconnect
device shall remain readily operable.
Warning: the user shall not place this apparatus in the area during
the operation so that the mains switch can be easily accessible.
1. Read these instructions before operating this apparatus.
2. Keep these instructions for future reference.
3. Heed all warnings to ensure safe operation.
4. Follow all instructions provided in this document.
5. Do not use this apparatus near water or in locations where condensation may occur.
6. Clean only with dry cloth. Do not use aerosol or liquid cleaners.
Unplug this apparatus before cleaning.
7. Do not block any of the ventilation openings. Install in accordance
with the manufacturer’s instructions.
8. Do not install near any heat sources such as radiators, heat
registers, stoves, or other apparatus (including amplifiers) that
produce heat.
9. Do not defeat the safety purpose of the polarized or groundingtype plug. A polarized plug has two blades with one wider than
the other. A grounding type plug has two blades and a third
grounding prong. The wide blade or the third prong is provided
for your safety. If the provided plug does not into your outlet,
consult an electrician for replacement of the obsolete outlet.
10. Protect the power cord from being walked on or pinched particularly at plug, convenience receptacles, and the point where they
exit from the apparatus.
11. Only use attachments/accessories specified by the manufacturer.
12. Use only with a cart, stand, tripod, bracket, or table specified
by the manufacturer, or sold with the apparatus. When a cart is
used, use caution when moving the cart/apparatus combination
to avoid injury from tipover.
13. When a cart is used, use caution when moving the cart/apparatus combination to avoid injury from tipover.
14. Unplug this apparatus during lighting storms or when unused for
long periods of time.
15. Refer all servicing to qualified service personnel. Servicing is required when the apparatus has been damaged in any way, such
as power-supply cord or plug is damaged, liquid has been spilled
or objects have fallen into the apparatus, the apparatus has been
exposed to rain or moisture, does not operate normally, or has
been dropped.
CAUTION: Use of controls or adjustments or performance of proce-
dures other than those may result in hazardous radiation exposure.
WARNING: To reduce the risk of FIRE or electric shock, do
not expose this apparatus to rain or moisture.
CAUTION: RISK OF ELECTRIC SHOCK DO NOT OPEN
CAUTION: TO REDUCE THE RISK OF ELECTRIC SHOCK, DO NOT
REMOVE COVER (OR BACK) NO USER SERVICEABLE PARTS INSIDE
REFER SERVICING TO QUALIFIED PERSONNEL
The lightning flash with arrowhead symbol, within an equilateral triangle, is intended to alert the user to the presence of
uninsulated “dangerous voltage” within the product’ s
enclosure that may be of suficient magnitude to constitute a risk of electric shock to persons.
The exclamation point within an equilateral triangle is intended to
alert the user to the presence of important operating
and maintenance (servicing) instructions in the literature accompanying the appliance.
!
Page 3
>> Front Panel
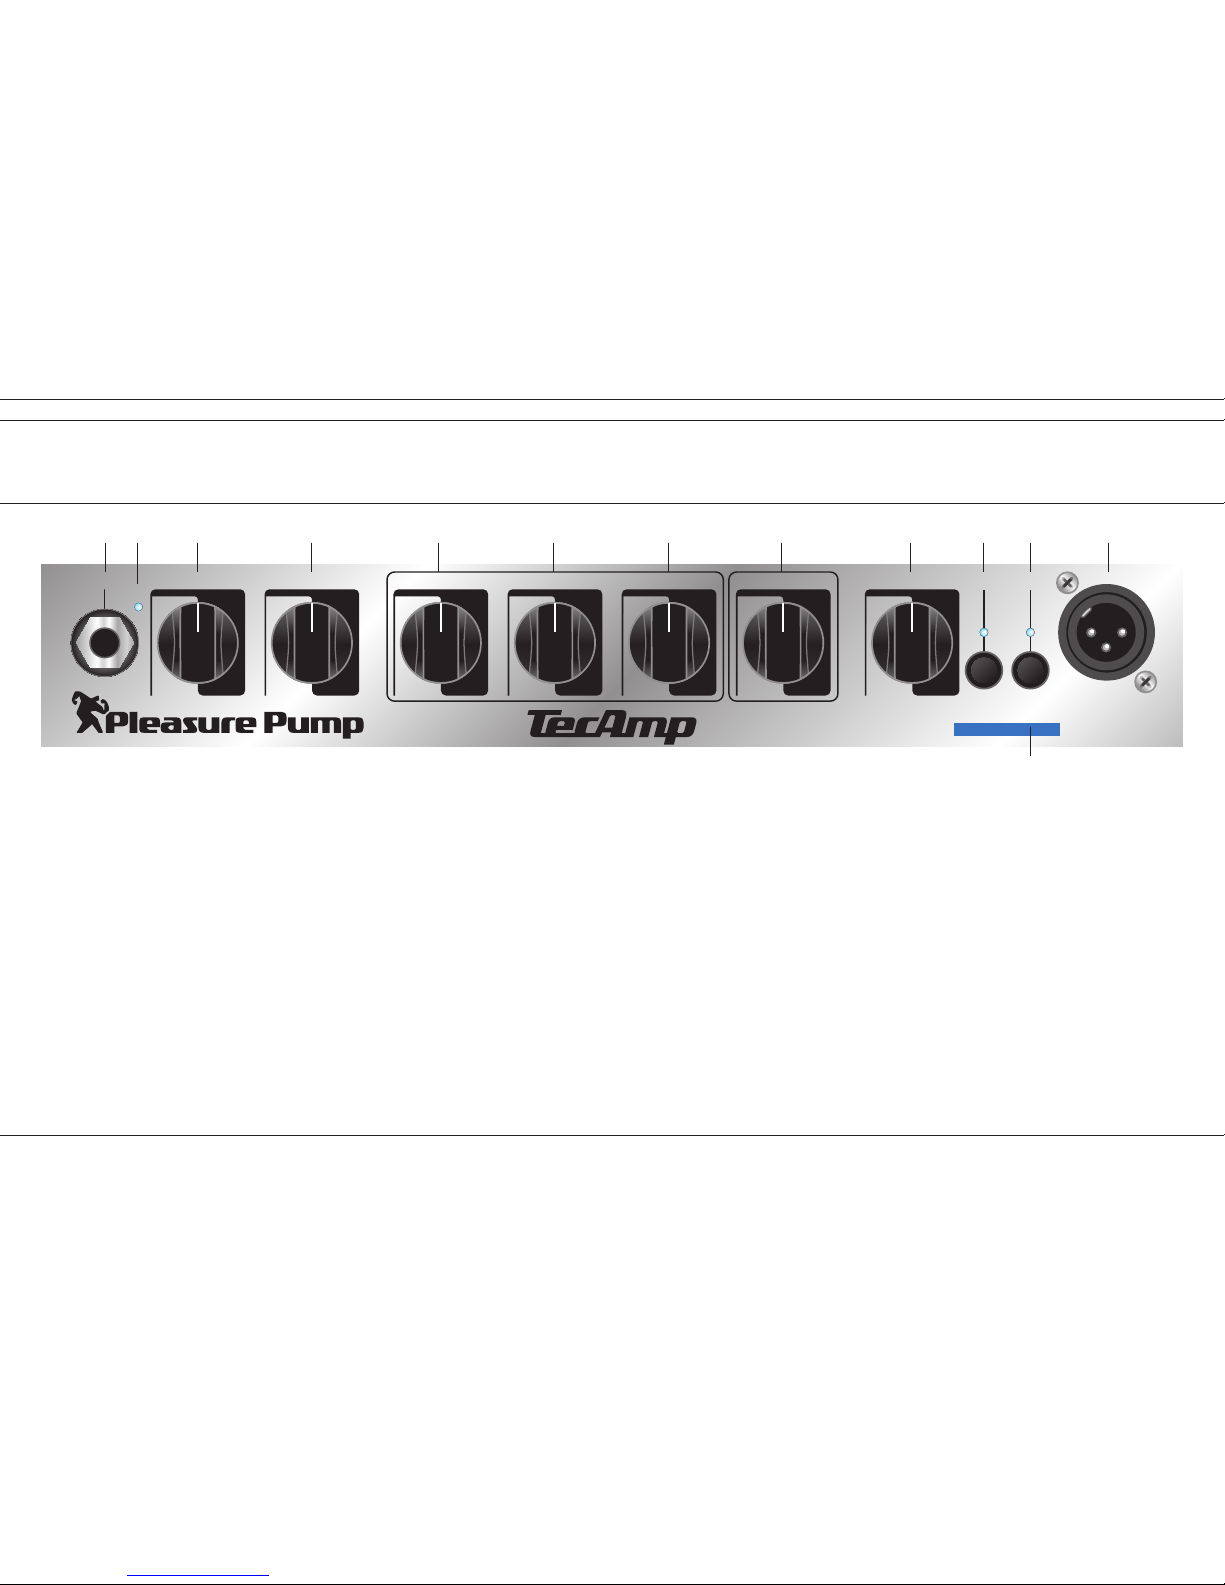
1 INSTRUMENT INPUT 1
Plug in your shielded instrument cable into this jack. We
advise you to always turn down the VOLUME control on
your instrument before plugging it into this jack.
1a GAIN 1
This control adjusts the basic signal level of the source
plugged into the “INPUT” (#1). Thus it determines the
preamp’s dynamic response as well as the signal-tonoise
ratio. The PLEASURE PUMP 500 input stage can handle
a broad range of signal levels with an extremely high
headroom. The CLIP LED (#2), however, tells you if the
signal level within the INSTRUMENT channel is too high.
If it lights up too often you are advised to turn down the
GAIN 1 VOLUME until the LED flashes only occasionally
at the highest peaks. This prevents the input stage of
the PLEASURE PUMP 500 from being overdriven which
would result in distortion.
Do not leave the VOLUME control on your instrument set
too low, otherwise noise picked up along the cable will
become more prominent and thus increase the noise
floor of the amp.
2 CLIP
This LED flashes as soon as the signal level within the
input stage of the PLEASURE PUMP exceeds a certain
limit. If it flashes too often turn down the signal level
in either the GAIN 1 (#1a), the GAIN 2 (#3), or both with
the appropriate VOLUME control (#1a or #3). The CLIP
LED is also affected by the tone controls (#4 through #6).
Particularly when turning up the LO (#4) and MID (#5)
controls too excessively the CLIP LED might come up. In
this case you should turn down the “GAIN 1” (#1a) and
“GAIN 2” (#3).
3 GAIN 2
This control adjusts the input sensitivity of the audio source plugged into the “INPUT 2” (#17/#17a). The GAIN 2
input stage offers an extremely wide headroom and can
handle literally all line signal levels to be found. The CLIP
LED (#2), however, tells you if the signal level within the
INPUT 2 channel is too high. If it lights up too often you
are advised to turn down the GAIN 2 until the LED flashes
only occasionally at the highest peaks. This prevents the
input stage of the PLEASURE PUMP 500 from being overdriven which would result in distortion.
4 - 6 Tone Controls
PLEASURE PUMP 500 features a classic three-band tone
control section. All controls interact and thus offer countless options of shaping your tone, yet even at extreme
positions the sound stays precise and stable.
Since the inherent sound quality of the PLEASURE PUMP
is on a superb level you should start with all tone controls
set to the centre position. Please be aware that the tone
controls work on both channels “INPUT1” (#1) and “INPUT2” (#17 /17a).
4 LO
This is the primary low frequency control. It allows for
cutting or boosting the frequency range around 48 Hz by
+/-15 dB, which represents the bottom end and massive
punch in a bass guitar. Start from the 12 o’clock position
and dial in the sound you like. The slope of the control is
rather steep which is helpful for achieving a distinct and
fat bass sound without spoiling the midrange. It allows
for boosting this frequency range without at the same
time adding too many mids which would result in a rather
booming tone.
5 MID
The slope of the “MID” control is not as steep as the one
of the “BASS” control in order to preserve the character of
the instrument. Centred at 1000 Hz this control offers a cut
or boost of 12 dB on a very broad frequency band, thus covering almost the whole frequency range of a bass guitar.
Turn up this control in order to support fingerstyle playing
54
Gain 1 Gain 2 Lo Mid Hi Cut Master
10
0
10
0
10
0
10
0
10
0
20 kHz
30 Hz
10
0
DI
500
Input 1
Clip
Mute Post
On
1 1a 3 4 5 6 7 8 9 10
12
112
Page 4
>> Front Panel
techniques and fretless sounds. Cutting this frequency range is great for a funky slap sound of extremely high quality.
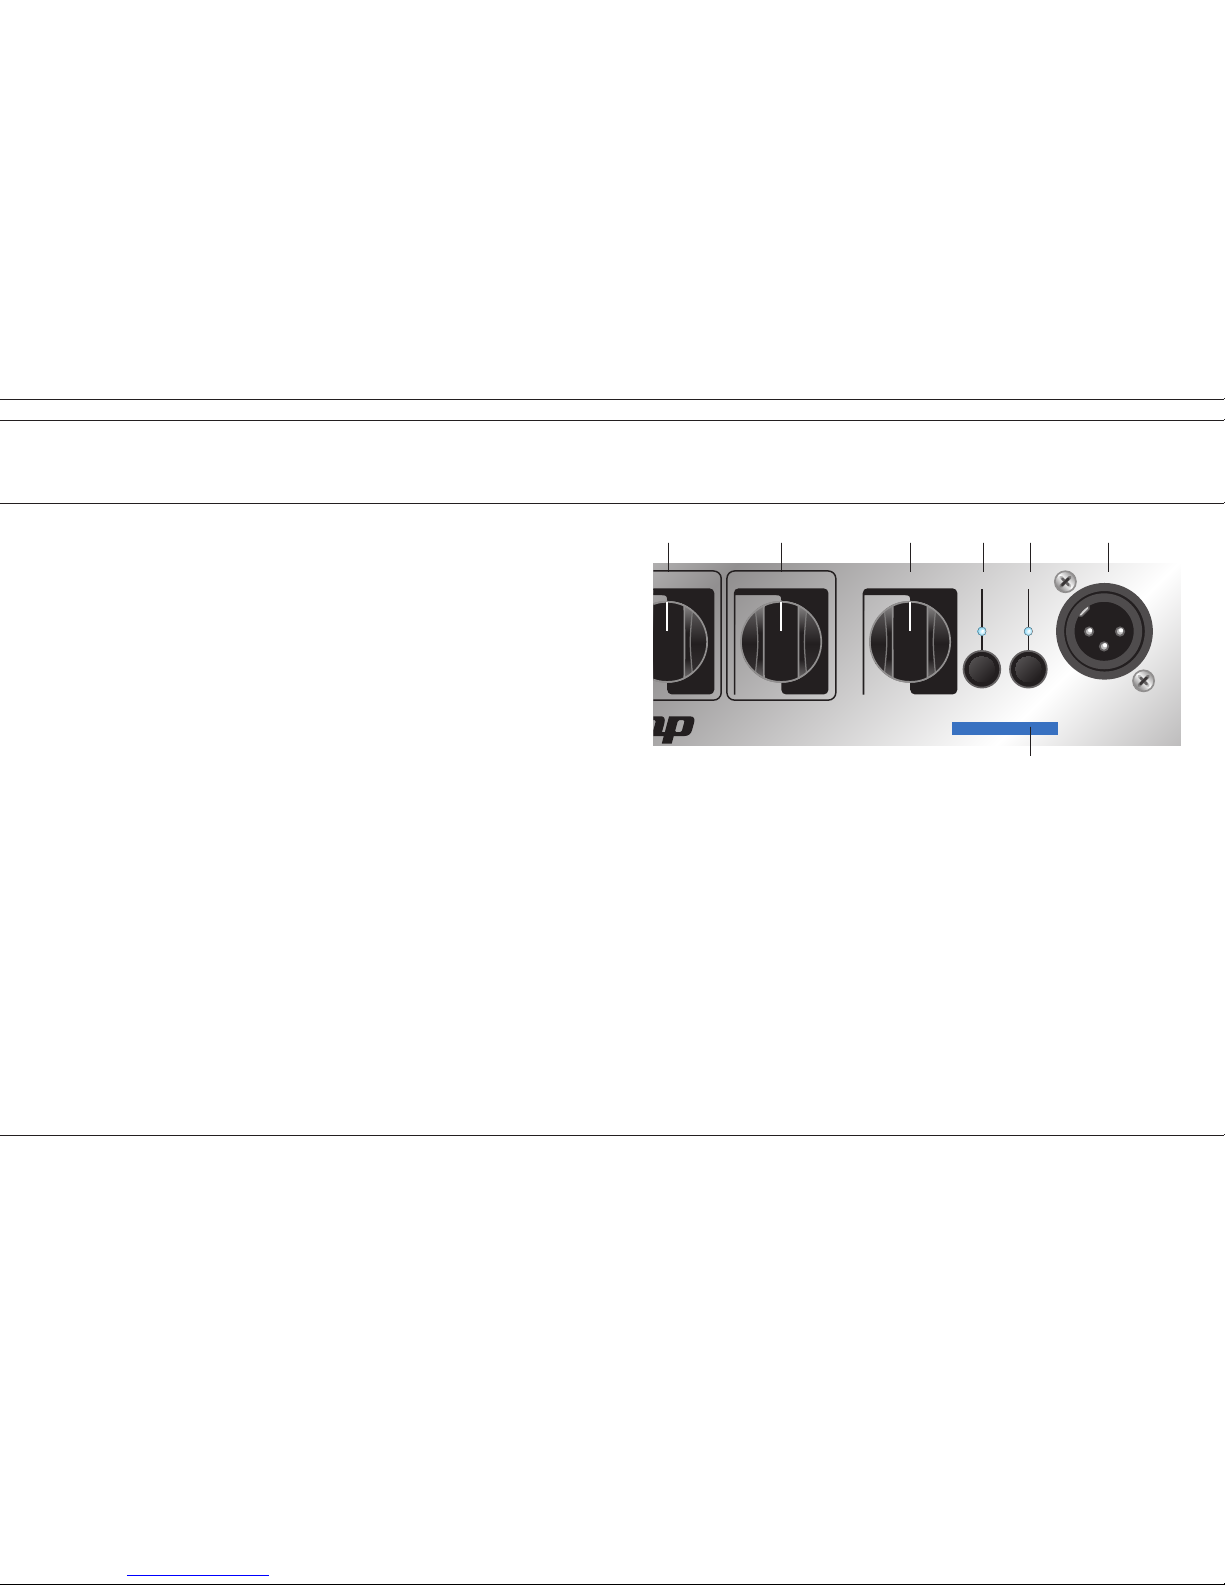
6 HI
The “HIGH” control allows for boosting and cutting of the
frequencies centred around 10 kHz. Turned clockwise it
adds definition and sparkling brightness to both a solid
rock bass played with a pick and a funky slap bass played
with the thumb. Turn it counter clockwise to reduce hiss or
generally dampen the sound.
7 CUT
“CUT” is a low pass filter and works on the speaker output. Any center frequency between 20 kHz and 30 Hz can
be dialled in. Frequencies higher than determined by this
control (i.e. to the right of the position of the knob) will be
cut by an amount of 18 dB per octave. With this control
the speaker connected to the PLEASURE PUMP 500 (any
conventional cabinet or the TECAMP PLEASURE BOARD
can act as a pure subwoofer. Particularly in combination
with the PLEASURE BOARD the “CUT” control influences
the reproduction of the midrange frequencies extremely
well. “PHONE OUT” (#18) and “LINE OUT” (#20) are not
affected by the “CUT” control, which does make sense
since these outputs need to be full range signals.
8 MASTER
This is the overall volume control of the PLEASURE PUMP
500 and works on the calss D power amp. It determines
the level at the “SPEAKER OUTPUT” (#16). The levels at
“PHONE OUT” (#18) and “LINE OUT” (#20) are not affec-
ted by the “MASTER” control, they purely depend on the
gain structure in the input stages.
9 MUTE
The “MUTE” switch should be depressed when you power up or down your PLEASURE PUMP 500 – the LED above the switch illuminates when the function is engaged.
In this mode no audio signal will be processed and heard
at any output except the “TUNER” jack (#21). That way
you don’t have to turn down the volume for silent tuning
or when changing instruments, thus you do without the
nasty cling which you usually hear when you unplug the
jack. The “MUTE” switch also interrupts the signal path
at the balanced “DI OUT” (#11), no matter which position
the switch “DI POST” (#10) is in (that way your silent
tuning or changing instruments won’t be heard in the PA,
either). During breaks the amp should be set to “MUTE”
rather than switched off completely. That way the internal fan stays on and cools down the power amp circuitry
if necessary. Disengage the “MUTE” function and start
to rumble – now there is signal at all outputs again.
10 POST
With this switch the balanced “DI OUT” (#11) can be
selected to be a “PRE” or “POST” preamp signal. In the
“PRE” position (switch is not depressed) the “DI OUT”
signal is tapped directly after the input stage including
the “GAIN 1” and „GAIN 2” control (#1a & 3).
In the “POST” position (switch depressed) the “DI OUT”
signal is taken after it has been processed by the complete preamp, i.e. including the “GAIN” controls (# 1a &
3), and the tone control section (#4 through #6). It is not
affected by the “MASTER” control (#8). As a reference
the LED above the “POST” switch illuminates when the
“DI OUT” is set to “POST”.
11 DI
PLEASURE PUMP 500 supplies a balanced line output
signal for connecting to a house mixing board, recording
console or external amplifier(s) with balanced inputs.
Connect a shielded 3-core microphone cable with XLR
plugs to this male XLR output. The need for an additional
active DI box, which can be pretty expensive, is obsolete.
Due to the advanced circuit design using only the best
components available the high sound quality of the “DI
OUT” makes it the amp of choice in any recording studio
(you can use the PLEASURE PUMP 500 pre amp on its
own without driving any speakers). The DI signal can be
tapped either before or after the preamp, as determined
by the switch “POST” (#10). There is no
need to be afraid of nasty ground loops as the DI output
is soft-grounded.
12 ON
Provided the included power cord is plugged into the
power socket on the back panel (#14) and into an appropriate wall socket, the blue line on the front panel will
illuminate when the power switch (#13) is turned on, no
matter what positions other switches are in.
76
10
20 kHz
30 Hz
10
0
DI
Mute Post
On
6 7 8 9 10
12
11
Page 5
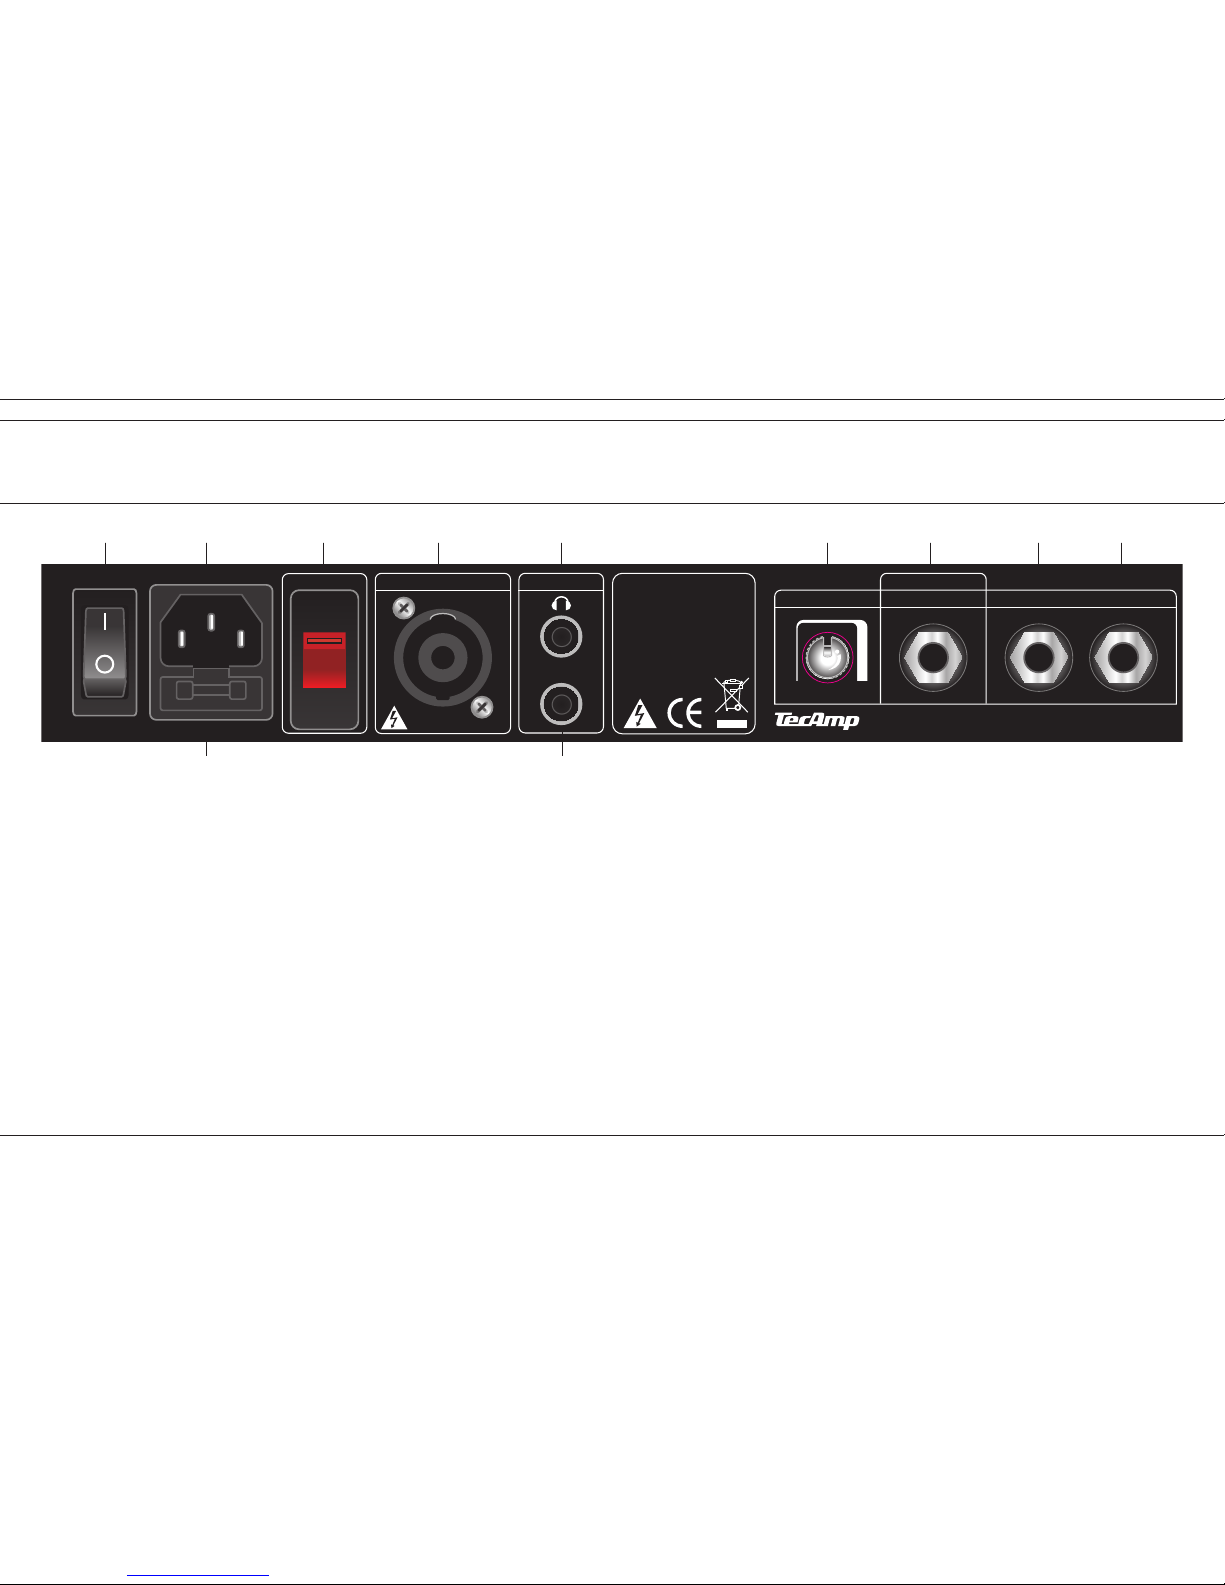
>> Back Panel
13 POWER
At the risk of stating the obvious, this switch is used to
turn the PLEASURE PUMP 500 on and off. Before you turn
on the amp do make sure that the “MUTE” switch (#9) is
depressed. Activating the POWER SWITCH (the top of
the switch must be depressed towards the amp chassis)
will make the blue line on the front panel (#12) illuminate. The amp is OFF when the bottom of the POWER
SWITCH is depressed – the blue line (#12) will no longer
illuminate.
Before you plug in do make sure that the voltage is
correct (see #15)!
14 POWER RECEPTACLE
Connect the supplied AC power cord to the power receptacle. Make sure the IEC plug is firmly inserted in the
socket. The other end of the cable should be connected
to any standard grounded AC outlet or into a power strip
of proper
voltage. Before you plug in do make sure that the voltage
is correct (see #15)! Just in case you lose the cord provided, the jack accepts a standard 3-prong IEC cord like
those found on most professional gear and computers
– you can get one at any electronics, music or computer
store.
Never (!) remove or otherwise attempt to defeat
the ground pin of the power cord in order to get rid
of a hum induced by a ground loop.
14a POWER FUSE
The PUMA is fused for your and its own protection. If
you suspect a blown fuse, disconnect the cord, pull out
the FUSE DRAWER (#14a, located just below the cord
receptacle) and replace the fuse with another suitable
fuse. There should be a spare fuse in the fuse drawer..
When you’re in a country with a standard of 115 volts set
the “VOLTAGE SELECTOR” (#15) accordingly.
If two fuses blow in a row, something is very
wrong. Do not open the unit. Refer service to qualifi ed service personnel.
15 VOLTAGE SELECTOR
The PLEASURE PUMP 500 features a “VOLTAGE SELECTOR” allowing you to use your amplifi er anywhere in
the world just by the flick of a switch. The unit is set to
230 V when we ship to a country in Europe. Should you
wish to use your PUMA in the USA set the “VOLTAGE
SELECTOR” to “115 V”.
ATTENTION: Don’t forget to set it back to “230 V”
when you return home! TecAmp cannot be made
responsible for damages to the unit caused by
improper voltage selection. Therefore it is a good
idea to always check the “VOLTAGE SELECTOR”
before powering up the unit.
16 SPEAKER OUT
PLEASURE PUMP 500 sports one Neutrik Speakon® Combo NLJ2 MD-V speaker output. Just make sure that
the minimum load of the power amp is no less than
4 ohms. Thus you can connect two 8 ohms speakers or
one 4 ohms speaker.
Whatever your setup is, always make sure that
the speaker cables are as long as necessary but
as short as possible, using heavy gauge cable
(we recommend at least 2 x 2.5 mm
2
). Do stick to
speaker cables with Speakon
®
connectors only,
either NL2FC (two pin connector) or NL4FC (four
pin connector). No matter which plug you use the
“hot” wire must be connected to pin “1+” and the
“cold” wire to pin “1-“. This Speakon
®
Combo socket is also able to handle a 1/4“ jack. High quality
TECAMP speaker cables can be obtained as an
option.
The output power of the PLEASURE PUMP 500 is 500
Watt @ 4 Ohms.
17 INPUT 2
This 3.5mm stereo Aux In jack provides the possibility to
98
USE ONLY WITH A 250V FUSE
N
E
U
T
R
I
K
MINIMUM LOAD 4
Ω
TUNER OUTLINE OUTLINE IN MONOPHONE VOL.
SPEAKER OUT REHEARSAL
HIGH VOLTAGE! CAUTION:
TO PREVENT THE RISK OF
FIRE AND SHOCK HAZARD
DON’T EXPOSE THIS
APPLIANCE TO MOISTURE
OR RAIN. DO NOT OPEN
CASE. REFER SERVICING TO
QUALIFIED SERVICE
PERSONNEL.
INPUT 2
Made in Germany
230
0
10
INPUT 2
13 14 15 16 18 19 17a 20 21
1714a
Page 6
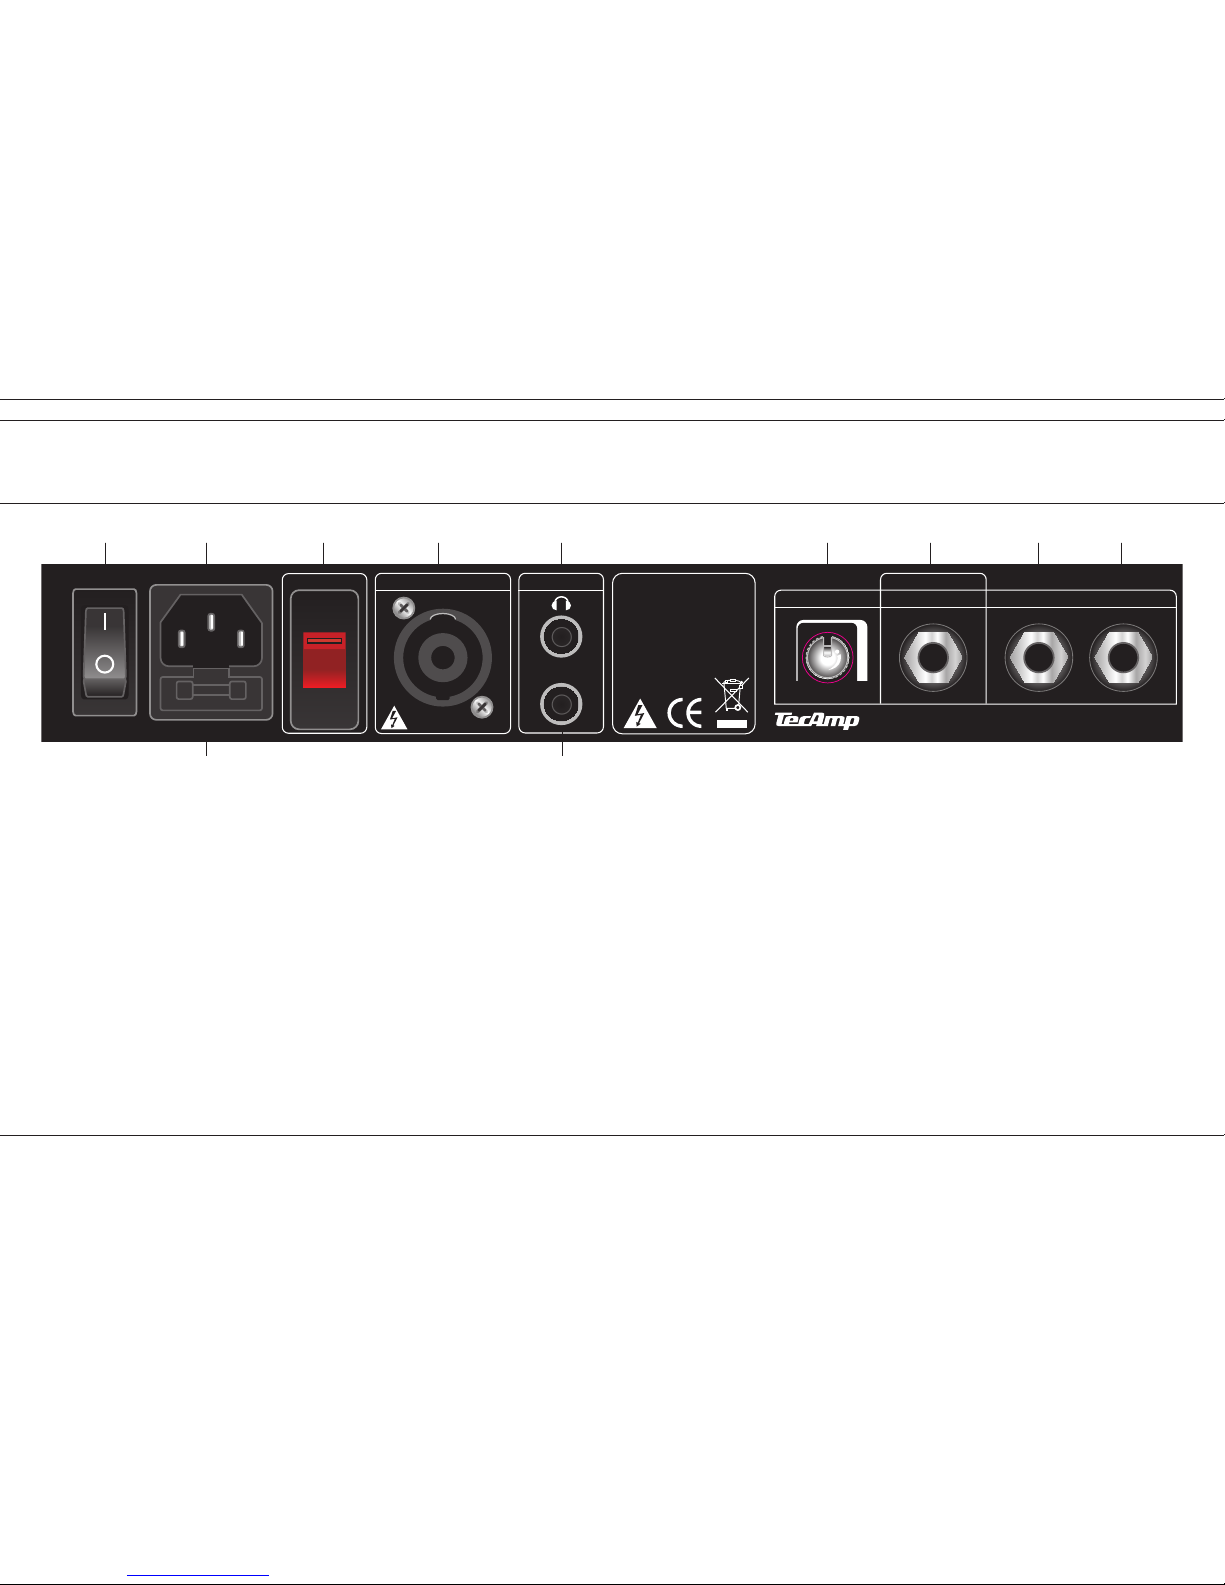
500 is in “MUTE” mode (#9). This allows for silent tuning
as well as providing a monitor feed which stays hot even
when the house mix is muted.
>> Back Panel
connect your mp3 player, your iphone or other external
audio sources. You can control its‘ level with the „GAIN
2“ (#3) and „MASTER“ volume (#8) to blend it with your
bass signal. Please use the included 3.5mm stereo cable
to connect the audio source of your choice.dem «GAIN
2»-Regler (#3) dem Signal des Instrumentes beigemischt
werden. Verwenden Sie zum Anschluss Ihrer Audioquelle
das mitgelieferte 3,5mm Stereo-Klinkenkabel.
17a INPUT 2 MONO
This ¼“ mono INPUT 2 jack provides the possibility to
connect your mp3 player, your iphone or other external
audio sources as well as a active bassguitar You can control its‘ level with the „GAIN 2“ (#3) and „MASTER“ volume (#8) to blend it with your bass signal from „INPUT 1“.
18 REHEARSAL
This 3.5 mm stereo jack lets you connect your headphones. With the „PHONE VOL.“ (#19) you can control both
the level of „INPUT 1“ and „INPUT 2“. It is possible to
use your PLEASURE PUIMP 500 without a cabinet, so you
can just play in any situation!
19 PHONE VOL..
This is the level control of the “PHONES” output (#18).
The controls “CUT” (#7) and “MASTER” (#8) do not affect
the level of the “PHONES” output.
20 LINE OUT
This jack provides a line level signal for connection to
a separate power amp, PA mixing console or recording
equipment. The volume of the signal is not controlled by
the “MASTER” control (#8). Note that the output is muted when the “MUTE” function (#10) is engaged.
21 TUNER
This jack is provided for connection to an electronic tuner and is always “live” even when the PLEASURE PUMP
1110
TECHNICAL SPECIFICATIONS
input impedance: 500 kOhms (Input 1)
sensivity: max-30 dBu
input impedance: 10 kOhms (Input 2)
sensivity: max-10 dBu
LINE OUT impedance: 600 Ohm
nominal output LINE OUT: +6 db
impedance balanced DI out: 600 Ohm
nominal output level Dl out: +6 dBu
TONE CONTROL SECTION:
LO: 48Hz/+-15dB
MID: 1000Hz/+-12dB
HI: 10k/+-15dB
Output power: 500 Watt/4 Ohms, 300
Watt/8 Ohms
Fuse 230V/AC, 115V/AC: 5,0 A/T (Slow Blow)
dimensions (w x h x d): 10,6“ x 1,7“ x 8,3“
weight: 1,45 kg, 3,2 lbs
USE ONLY WITH A 250V FUSE
N
E
U
T
R
I
K
MINIMUM LOAD 4
Ω
TUNER OUTLINE OUTLINE IN MONOPHONE VOL.
SPEAKER OUT REHEARSAL
HIGH VOLTAGE! CAUTION:
TO PREVENT THE RISK OF
FIRE AND SHOCK HAZARD
DON’T EXPOSE THIS
APPLIANCE TO MOISTURE
OR RAIN. DO NOT OPEN
CASE. REFER SERVICING TO
QUALIFIED SERVICE
PERSONNEL.
INPUT 2
Made in Germany
230
0
10
INPUT 2
13 14 15 16 18 19 17a 20 21
1714a
Page 7

Alter Bahnhofsweg 5 · D-35745 Herborn Fon +49 (0) 2777-6391 · e-Mail: [email protected] · www.tecamp.de
 Loading...