

Page 1
TEC America, Inc.
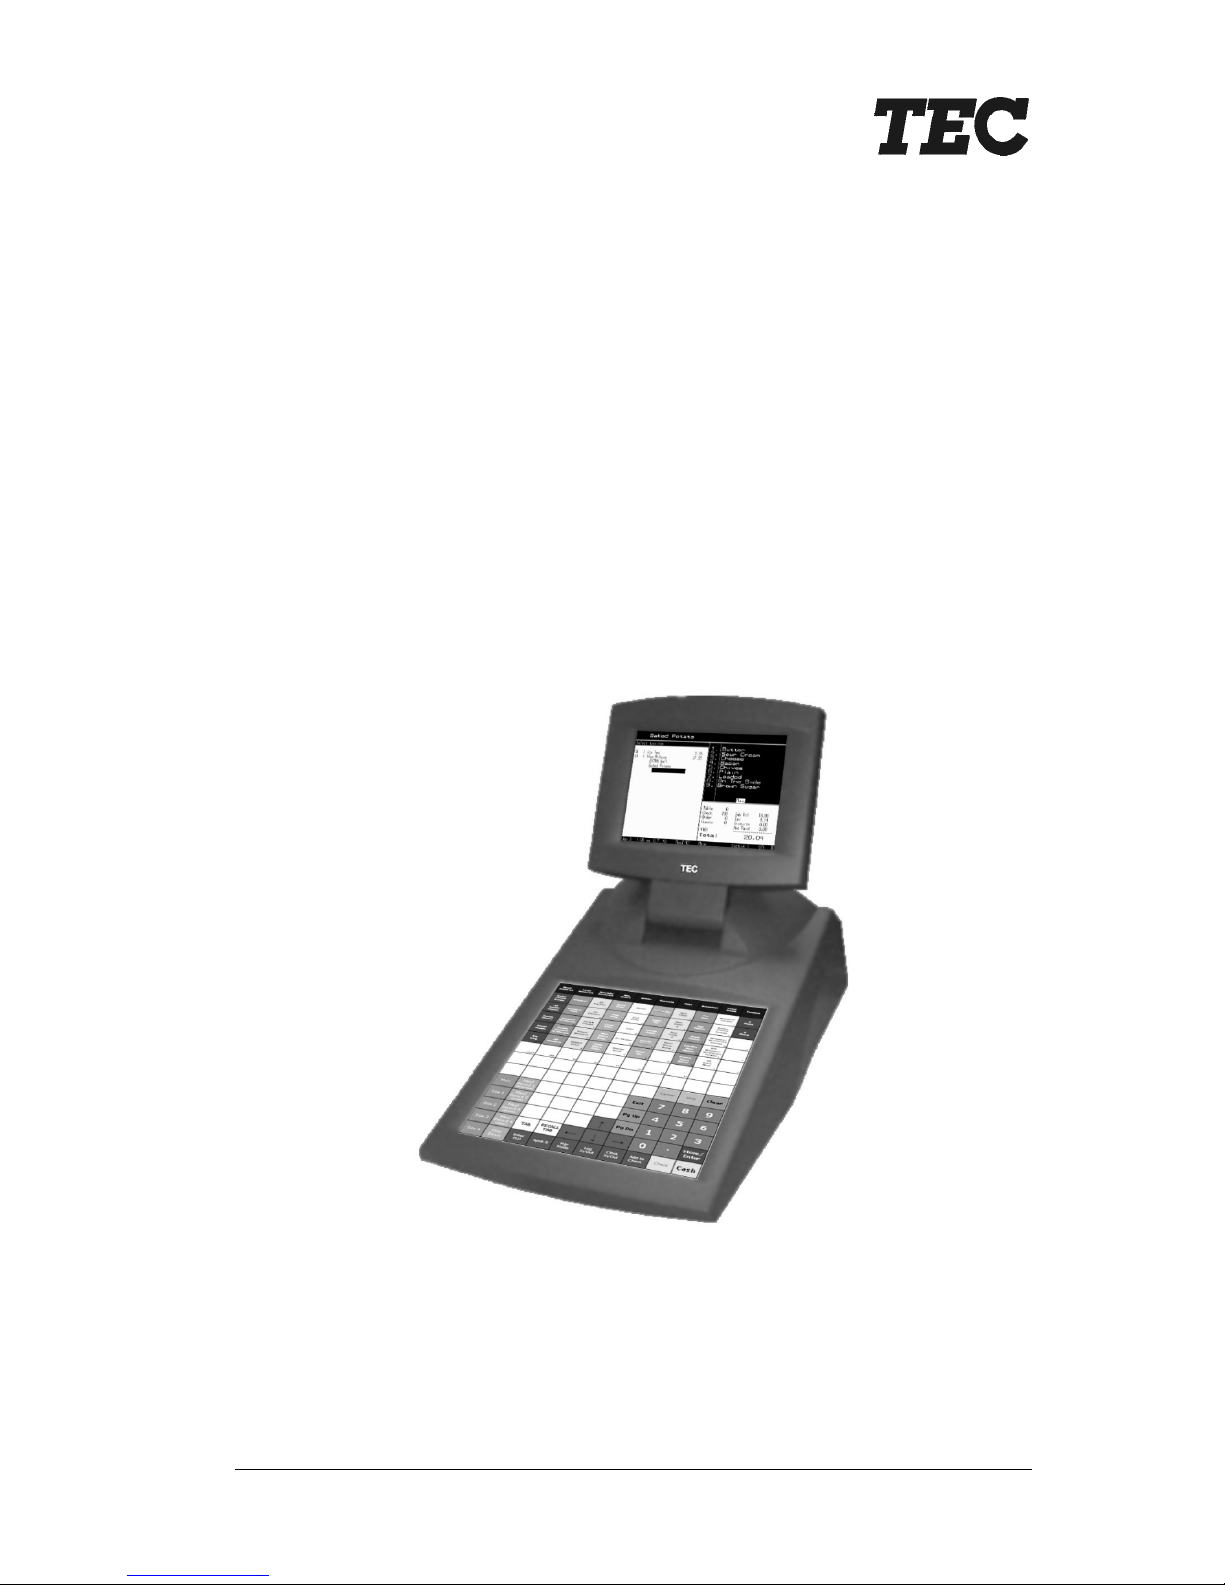
FS-2700
Owners
Manual
Page 2

Page 3
TEC America, Inc.
TEC Electronic Cash Register
FS-2700 Series
Document No. OM-2700
Original: October, 2003
(Revised: )
Page 4

Page 5

FS-2700 and Accessories
One Year Limited Warranty
TEC America, Inc warrants this product to be free from defects in materials
and workmanship for a period of one (1) year from the date of original
purchase from TEC America, Inc. or an TEC America, Inc. authorized dealer
or distributor. This warranty is limited to the original purchaser, and to
FS-2700’s and Accessories for the FS-2700 that are sold and used within the
United States. A copy of a valid dated sales receipt must be submitted with
the product for warranty service.
This limited warranty applies only to FS-2700 units and Accessories for the
FS-2700 which do not function properly under normal use, within the
manufacturer’s specifications. It does not apply to products that, in the sole
opinion of TEC America, Inc., have been damaged as a result of accident,
misuse, neglect or improper packaging or shipping. This warranty is void if
the TEC label or logo, or the rating label or serial number have been
removed or defaced, or the product has been modified or serviced by other
than TEC America, Inc. or an authorized TEC America, Inc. Service Center.
During the one-year warranty period, TEC America, Inc. will repair or replace,
at TEC America, Inc.’s option, any defective product with no charge for parts
or labor.
TEC America, Inc liability hereunder shall be limited to repair or replacement
of the defective part or parts and such correction shall constitute a fulfillment
of the warranty hereunder. TEC America, Inc. shall have no liability
hereunder.
TEC AMERICA, INC. MAKES NO WARRANTIES, EXPRESS OR IMPLIED,
INCLUDING MERCHANTABILITY OR FITNESS FOR A PARTICULAR
PURPOSE, EXCEPT AS EXPRESSLY STATED HEREIN. UNDER NO
CIRCUMSTANCES SHALL TEC AMERICA, INC. BE LIABLE TO THE
PURCHASER OR ANY USER FOR ANY DAMAGES, INCLUDING
INCIDENTAL OR CONSEQUENTIAL DAMAGES, EXPENSES, LOST
PROFITS, LOST SAVINGS, OR OTHER DAMAGES ARISING OUT OF THE
USE OF OR THE INABILITY TO USE THIS PRODUCT, EVEN IF CAUSED
BY TEC AMERICA’S SOLE NEGLIGENCE.
To obtain warranty service, contact your TEC AMERICA, INC. dealer. You
may also write or phone:
TEC America, Inc., 4401-A Bankers Circle
Atlanta, GA 30360
Phone No.: (770) 449-3040 Fax: (770) 453-0909
If the problem cannot be remedied by telephone, TEC AMERICA, INC. will
determine how service will be provided. Do not ship the equipment to TEC
AMERICA, INC. without a return authorization number. The purchaser must
prepay any shipping costs and insurance, and assume the risk of loss during
shipping.
Page 6

TEC America, Inc. provides this publication as is without warranty of any kind,
either expressed or implied. This publication could include technical
inaccuracies or typographical errors. Changes are periodically made to the
information herein; these changes will be incorporated in new editions of the
publication. TEC America, Inc. may make improvements and/or changes in
the product(s) and/or program(s) described in this publication at any time.
FCC Notice
This equipment has been tested and has been found to comply with the limits
for a Class A digital device, pursuant to Part 15 of the FCC rules. These limits
are designed to provide reasonable protection against harmful interference
when the equipment is operated in a commercial environment. This
equipment generates, uses, and can radiate radio frequency energy and, if
not installed and used in accordance with the instruction manual, may cause
harmful interference to radio communications. Operation of this equipment in
a residential area is likely to cause harmful interference in which case the user
will be required to correct the interference at the users own expense.
Changes or modifications not expressly approved by manufacturer for
compliance could void the user’s authority to operate the equipment.
This Class A digital apparatus complies with Canadian ICES-003
Cet appareil numérique de la classe A est conforme à la norme NMB-003 du
Canada .
Copyright 2003 by TEC America, Inc.
4401-A Bankers Circle, Atlanta, GA 30360
All rights reserved.
Page 7

i
Table of Contents
Overview 1-1
1.1 Introduction .............................................................................1-3
1.2 Order Entry Screen .................................................................1-4
1.3 Keyboard Layout.....................................................................1-6
1.3.1 POS Keyboard............................................................1-6
1.3.2 Manager Mode Keyboard ...........................................1-7
1.4 POS Key Functions – Summary .............................................1-8
1.4.1 Key Function Table.....................................................1-8
1.5 Function Number Look Up ....................................................1-19
1.5.1 Function Number Look Up Codes ............................1-20
Accessing the System 2-1
2.1 Manager Overrides .................................................................2-3
2.2 Clocking In/Out........................................................................2-4
2.2.1 Clock In .......................................................................2-4
2.2.2 Clock Out ....................................................................2-5
2.3 Login/Logout ...........................................................................2-6
2.3.1 Login ...........................................................................2-7
2.3.2 Logout .........................................................................2-7
Guest Check Functions 3-1
3.1 Guest Checks - Overview .......................................................3-3
3.2 New Check Prompts ...............................................................3-4
3.2.1 Table Number .............................................................3-4
3.2.2 Guest Count................................................................3-5
3.2.3 Order Type..................................................................3-6
3.2.4 Order Number.............................................................3-7
3.2.5 Override Meal Period..................................................3-8
3.2.6 Add Guest Information................................................3-9
3.3 Entering Menu Items.............................................................3-10
Page 8

ii
3.3.1 Preset Menu Item ..................................................... 3-10
3.3.2 More than One Preset Item...................................... 3-10
3.3.3 Enter Item by PLU #................................................. 3-10
3.3.4 Select from Category List......................................... 3-10
3.3.5 Open Priced Menu Item ........................................... 3-11
3.3.6 Scaleable Menu Item................................................ 3-11
3.3.7 Entering Menu Item Modifiers .................................. 3-12
3.3.8 Enter Items by Seat Numbers .................................. 3-16
3.3.9 Enter by Menu Item Size.......................................... 3-18
3.3.10 Remove Items from Checks ..................................... 3-19
3.4 Sending Items to Remote Printers ....................................... 3-21
3.4.1 Printer Mode Options ............................................... 3-21
3.4.2 With {HOLD~ORDER} .................................................. 3-22
3.4.3 Send Items on Demand............................................ 3-24
3.5 End Service Round............................................................... 3-25
3.6 Recall a Check ..................................................................... 3-26
3.6.1 By Check Number .................................................... 3-26
3.6.2 By Table Number ..................................................... 3-27
3.6.3 Recall Table with Separate Checks ......................... 3-27
3.6.4 Using a Bar Code Scanner....................................... 3-28
3.6.5 Recall with Dual Drive Thru...................................... 3-28
3.7 Splitting a Check................................................................... 3-29
3.7.1 Split By Item ............................................................. 3-29
3.7.2 Split By Amount........................................................ 3-30
3.8 Transferring a Guest Check ................................................. 3-31
3.8.1 Change a Check’s Table #....................................... 3-31
3.8.2 Transfer to a Server ................................................. 3-32
3.8.3 Transfer from a Server ............................................. 3-33
3.8.4 Transfer all Checks .................................................. 3-34
3.9 Combining Checks ............................................................... 3-35
3.9.1 Combine Stored Checks ..........................................3-35
3.9.2 Add New Check to Stored Check............................. 3-36
3.9.3 Add to Stored Check by Order Type ........................ 3-36
3.9.4 Add to Stored Check Using Table #......................... 3-37
3.9.5 Combining Checks to One Table # .......................... 3-38
3.10 Check Adjustments............................................................... 3-39
3.10.1 Void Items on Stored Checks................................... 3-39
3.10.2 Add a Discount or Surcharge ................................... 3-40
3.10.3 Exempt Tax from a Check........................................ 3-44
3.10.4 Add a Tip .................................................................. 3-45
Page 9

iii
3.11 Tender the Check..................................................................3-47
3.11.1 Tender with a Preset Key .........................................3-47
3.11.2 Tender with {MEDIA~NLU} .........................................3-48
3.11.3 Tender With Tip Entry...............................................3-49
3.11.4 Overtender to Tip......................................................3-49
3.11.5 Split Tender...............................................................3-50
3.11.6 Partial Tender ...........................................................3-51
3.11.7 Tender to Charge Account........................................3-52
3.12 Corrections to Closed Checks ..............................................3-53
3.12.1 Refund a Menu Item .................................................3-53
3.12.2 Change a Discount ...................................................3-54
3.12.3 Change Media Type .................................................3-55
3.12.4 Change a Credit Card Tip.........................................3-55
3.13 Enter a Refund Check...........................................................3-56
3.14 Review a Closed Check........................................................3-57
Functions Outside of a Sale 4-1
4.1 Finished Product Waste..........................................................4-3
4.2 Loan/Pickup ............................................................................4-4
4.2.1 Loan ............................................................................4-4
4.2.2 Pickup .........................................................................4-5
4.3 Transfer Media ........................................................................4-6
4.4 Price Changes.........................................................................4-7
4.5 Tip Payout ...............................................................................4-8
4.6 Cash Out/In of Drawer ............................................................4-9
4.6.1 Paid Out ......................................................................4-9
4.6.2 Paid In.......................................................................4-10
Reports 5-1
5.1 Reports Overview....................................................................5-3
5.1.1 Printing a Report From the POS Keyboard ................5-4
5.1.2 Report Types ..............................................................5-5
5.1.3 Report Balancing ........................................................5-7
5.1.4 Report Sample Formats..............................................5-9
5.2 Open Check Report ..............................................................5-10
Page 10

iv
5.3 Hourly Productivity Report.................................................... 5-11
5.4 Sales Mix Report .................................................................. 5-13
5.4.1 Detail Report – Menu Item Sales ............................. 5-14
5.4.2 Departments – Menu Item Sales.............................. 5-15
5.4.3 Categories – Menu Item Sales................................. 5-16
5.5 Manager Voids Report.......................................................... 5-17
5.6 Refund Report ...................................................................... 5-18
5.7 Financial Report ................................................................... 5-19
5.8 Customer Summary Report.................................................. 5-25
5.9 Media Report ........................................................................ 5-26
5.10 Loan/Pickup Report .............................................................. 5-27
5.11 Sales Tax Report.................................................................. 5-28
5.12 Charge Account Report ........................................................ 5-29
5.13 Discount Recipient Report.................................................... 5-30
5.14 Deposit Entry ........................................................................ 5-31
5.15 X Report................................................................................ 5-33
5.16 Z Report................................................................................ 5-34
5.16.1 Programming Options for Z Reports ........................ 5-35
5.16.2 Reports Included in X and Z Reports....................... 5-36
Page 11

Chapter
1
Overview
Page 12

Overview FS-2700 Owner’s Manual
1-2
Page 13

FS-2700 Owner’s Manual Overview
1-3
1.1 Introduction
The FS-2700 is a keyboard entry POS workstation for use in the
hospitality industry. It was developed as a companion workstation
for TEC America, Inc.’s FS-3600 touch screen workstation. The FS2700 and FS-3600 stations can be used interchangeably within the
same system, even though not all touch features are available on the
FS-2700.
The FS-2700 and FS-3600 workstations can be used in a system of
up to twelve workstations operating off a network. A Backoffice PC
running the Windows XP Professional operating system can be
integrated in a system to run software for additional maintenance
and reporting.
This manual describes guest check processing and adjustments.
Details of programming and configuring the FS-2700 system are in
the FS-3600/FS-2700 Programming Manual
.
The FS-2700 system offers a wide array of features that make it
easily adaptable to all types of food service applications – including
fine dine table service, dual drive-thru quick service, full-service bars,
cafeterias, delis and school lunchrooms.
The FS-3600/FS-2700 system can be easily tailored for individual restaurant menus, personnel and operating procedures.
Menus and prices can be changed to accommodate daily
changes in meal period prices.
The FS-2700 keyboard workstation provides up to four keyboard
levels that can be configured for specific needs of food servers,
bartenders and cashiers. A wide selection of Key Functions are
available to customize each application.
The FS-3600 touch workstation offers custom programming for
any application through its unique system of soft-programmed
POS touch screens. In addition to the Key Functions of the
FS-2700, many touch specific features offer additional ease of
operations.
A list summarizing POS Key Functions follows in this chapter.
Detailed explanations of the more common functions are
included in subsequent chapters of this manual.
Page 14
Overview FS-2700 Owner’s Manual
1-4
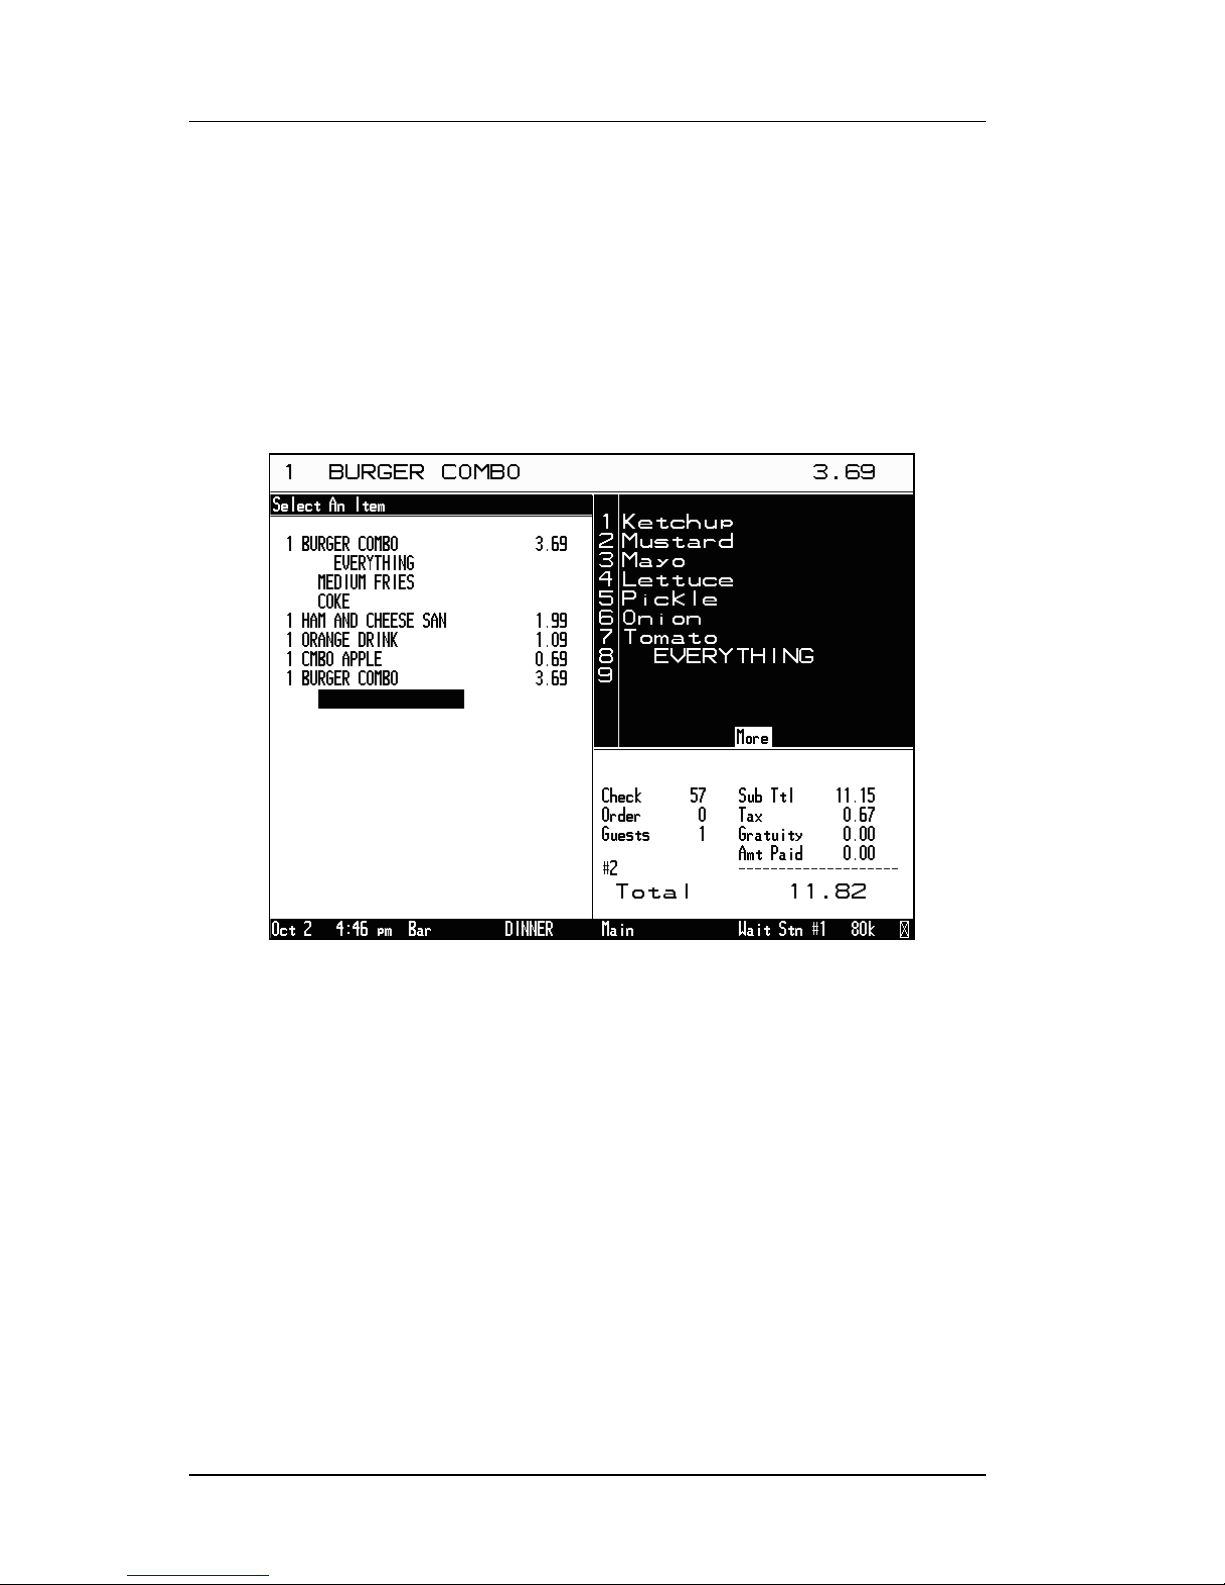
1.2 Order Entry Screen
The order entry screen displays when the system is in POS mode.
The left side of the screen displays guest check information as
transactions are entered, adjusted and tendered. Each item is
explained below using a sample screen.
Sample Order Entry Screen
→
→
→
←
←
→
Order Entry Screen Items
Message Window
• Used for displaying items as they are entered on to a
transaction, including menu items, media and functions.
• System error messages are also displayed here.
Prompt Line
• Used to guide the system operators through transactions.
• Prompts are programmed in the Category table.
Page 15

FS-2700 Owner’s Manual Overview
1-5
Check Detail
• Th
i
s area displays the last 19 line items entered on a check.
Forced Display
• When a menu item is entered that has a forced display
assigned, the choices display on the right side of the screen.
• NOTE the word “More” at the bottom of the sample screen.
It indicates that there are additional items on the forced
display Category.
∗
Use {PgDn} to scroll thru additional choices.
Check Summary
• Check Information - shows the check number, the table or
order number if assigned, the guests or meal count and the
server who is assigned to the check.
∗
Check Totals – shows the check subtotal, sales tax,
gratuity and amount paid.
Status Line
• Shows the current system date and time, the current Order
Type, the current Meal Period, the current Menu Size Level,
the Station Name and the amount of free memory on the
station.
Page 16
Overview FS-2700 Owner’s Manual
1-6
1.3 Keyboard Layout
1.3.1 POS Keyboard
Up to four keyboard levels are available in a FS-2700 system. They
can be used for meal periods such as breakfast and lunch, or for
menu types, such as dining room and bar.
When a FS-2700 workstation is powered on keyboard #1 is active.
The active keyboard can be changed by indexing the number of the
keyboard wanted (1 through 4) and pressing {SELECT~KEYBOARD}.
Each keyboard consists of 14 rows of 10 columns (see next page).
During POS functions that require alphanumeric entries, a
“QWERTY” keyboard becomes active (see the layout on the next
page). An example is using {SPELL~IT} to enter a message for the
kitchen.
It is recommended that the control keys (numeric keys, cursor keys,
Exit and Enter/Total) of the QWERTY keyboard be programmed in
the same key locations for all POS keyboard levels. The locations
are fixed for the QWERTY keyboard while in Manager Mode but are
programmable for the POS mode.
Page 17

FS-2700 Owner’s Manual Overview
1-7
1.3.2 Manager Mode Keyboard
Manager Mode is accessed using the {MGR~MODE} key. While in
Manager Mode, a “QWERTY” keyboard that represents a PC key-
board is active and is used for input and for moving through the
programming tables. A regular PC keyboard can be connected to
the keyboard port if wanted.
The “QWERTY” keyboard also becomes active during POS functions
that require alphanumeric entries.
QWERTY Keyboard Layout
` ; ‘ , . [ ] - +
Back
s
p
ace
~ : “ < > { } _ = |
! @ # $ % ^ & * ( )
Q W E R T Y U I O P
A S D F G H J K L
?
SHIFT
Z X C V B N M \ /
CAP
LOCK
TAB Space Space Space Space Space Space
Clear
Exit
7 8 9
PgUp
4 5 6
½
PgDn
1 2 3
»
¾
¼
0 .
ENTER
Page 18
Overview FS-2700 Owner’s Manual
1-8
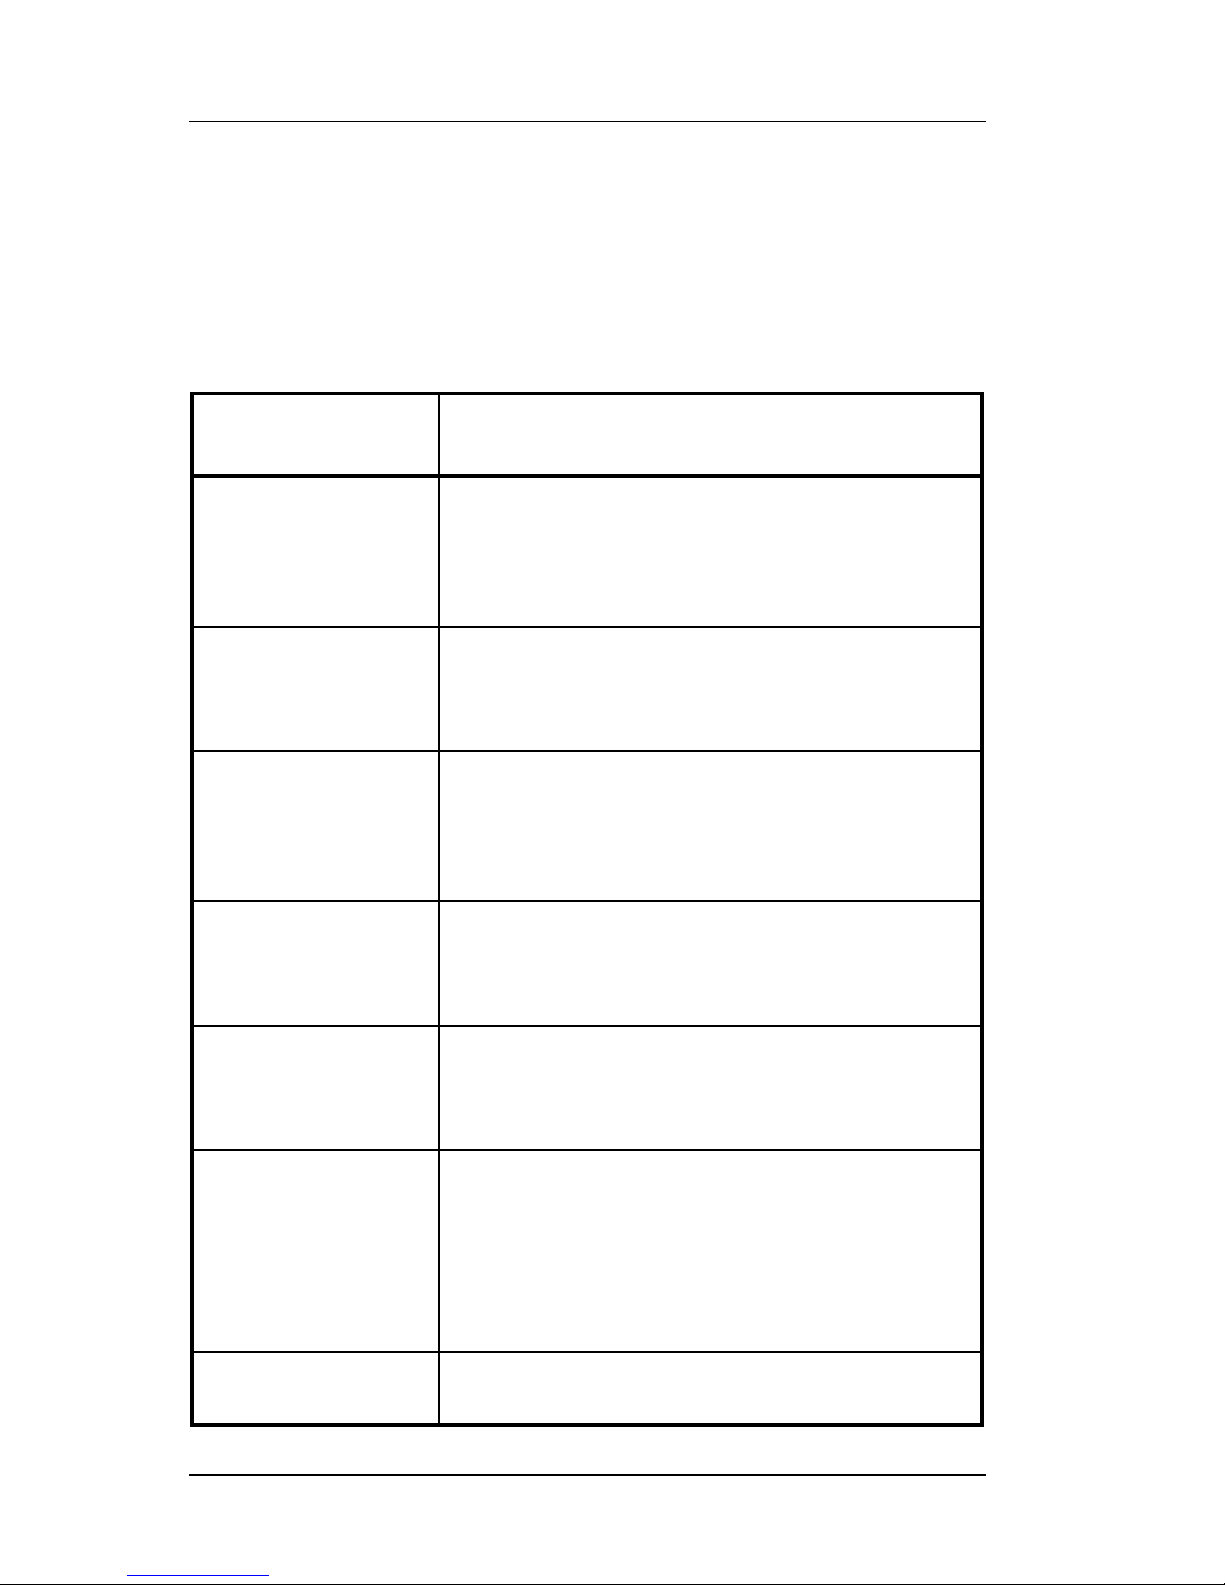
1.4 POS Key Functions – Summary
The table below lists all functions, for both check handling and
manager operations that can be done from the POS mode. Details
of the major functions are in subsequent chapters of this manual.
1.4.1 Key Function Table
Key Function POS Function Description
Add Check
Used to combine two or more stored checks to
the current check.
Both the current check and the added check
must have already been stored (from a
previous service round).
Add to Check
This function is used to add the current check
to a stored check.
This key function allows the current check to
be new (in the first service round).
Add to Check –
Order Type
#1 - #4
These four function keys are used to add the
current check to a stored check of a specified
Order Type.
These key functions allow the current check to
be new (in the first service round).
Add to Table
Used to add the current check to a stored
check that has a table number assignment.
This function allows the current check to be
new (in the first service round).
Banner
Not available on the FS-2700.
On the FS-3600, this key type has no function
when placed on a screen but is used as a title
to describe a group of other keys.
Cancel
Cancels the current transaction.
When a transaction is cancelled, any changes
done during the round will be reversed.
Any new Menu Items that have been added to
the check in this service round will be removed
and any items that have been voided from the
check in this round will be added back.
Cash Advance
Used to process a cash advance from a credit
card.
Page 19
FS-2700 Owner’s Manual Overview
1-9
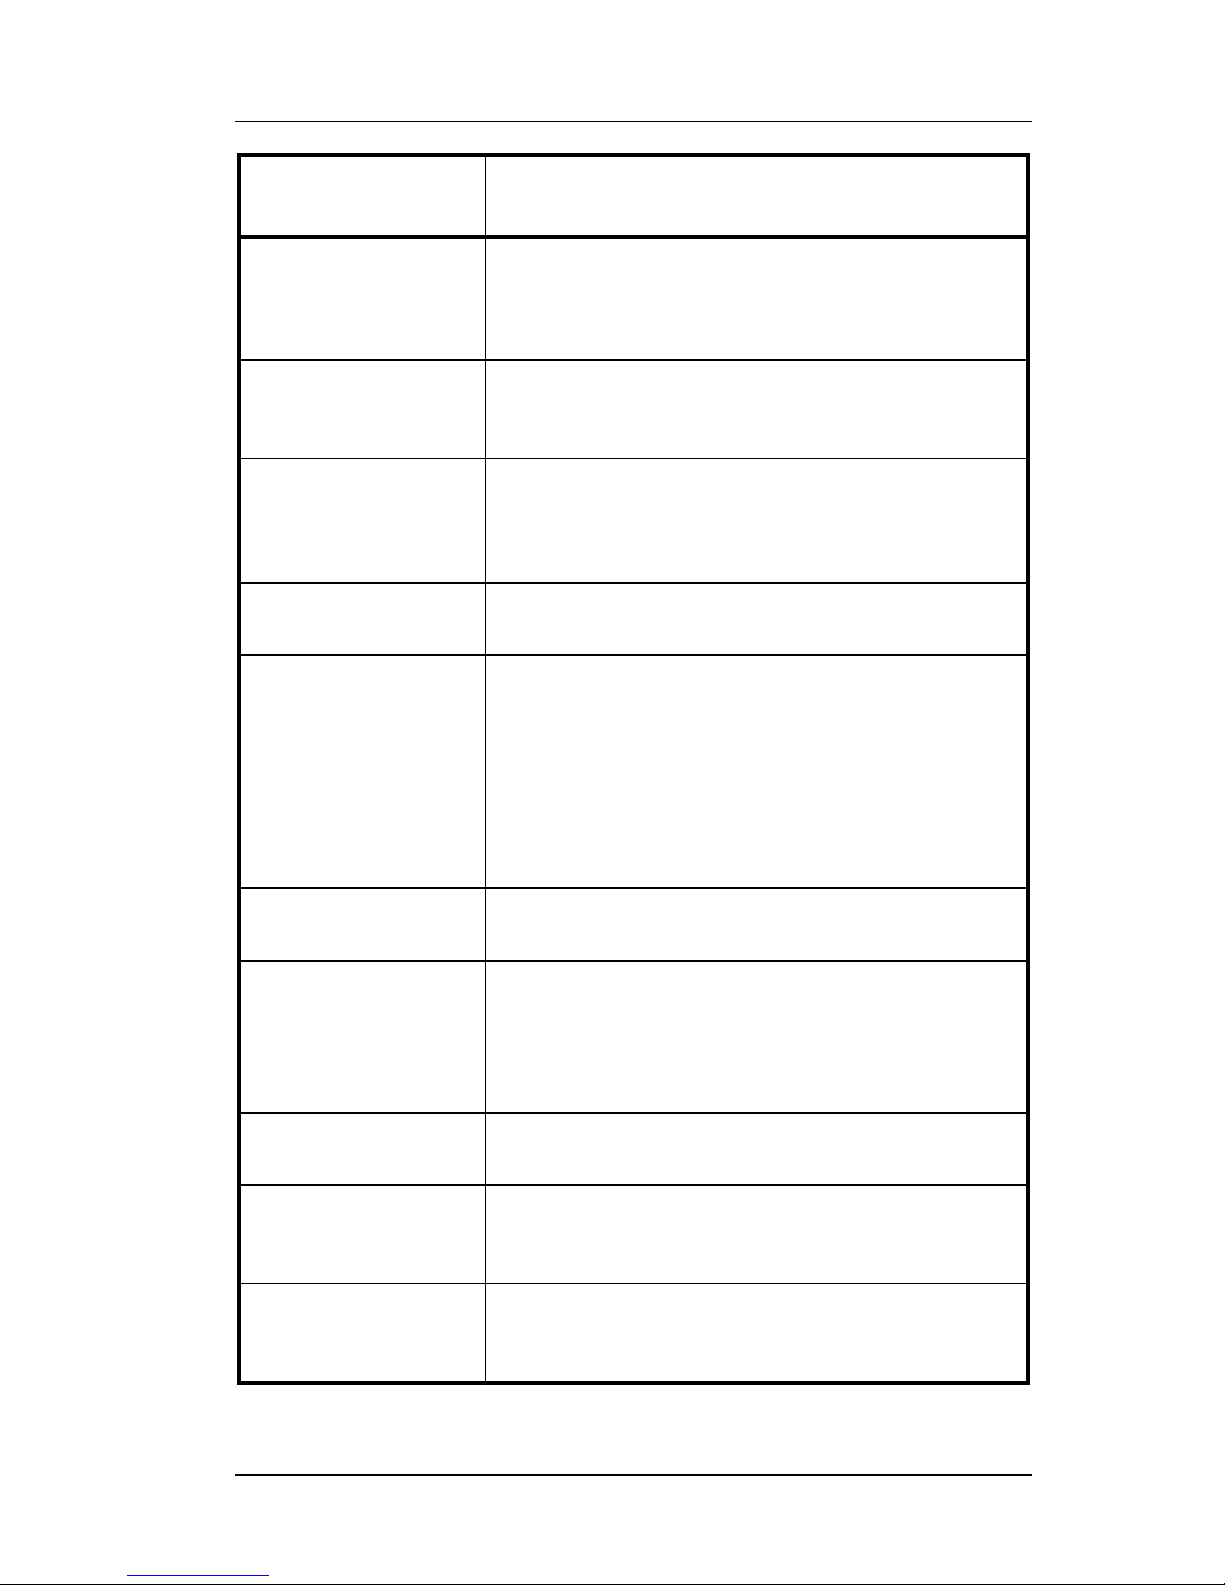
Key Function POS Function Description
Category
Used as a Menu Item look up key by displaying
a list of all items within the Category assigned
to the key. Index the number from the list to
add the item to the check.
Change Seat
Not available on the FS-2700.
On the FS-3600, this key type is used to move
an item or items on a check to a different seat.
Clear Input
This key type functions as a backspace key – it
is used to clear input of a numeric entry.
Example: clear an incorrect menu item
quantity before pressing the menu item key.
Clock In/Out
Clocks employees in and out of the system for
time and attendance recording.
Cursor Keys
Use ½ and ¾ to highlight items for voiding
from a check.
Use » and ¼ to scroll thru checks when using
{REVIEW~CHECKS}
.
Use
{PgDn}
to move thru selection lists that
are more than one page, such as Category
and modifier lists when entering items, and
lists of Checks/Tables when recalling checks.
Discounts
This key type is used to add a discount or
surcharge to the check.
Discount NLU
(Number Look Up)
Used to enter a discount on a check when the
specific discount is not preset on the keyboard.
Index the record number of the discount (from
the Discount Setup table), and press
{DISCOUNT~NLU}
.
Downline to OCB
This key is used to send the Menu Item table
to an order confirmation board.
Enter Bar Code
This key type is used to enter a numeric bar
code for a product.
It is used when a product fails to scan properly.
Enter PLU
Used to add a Menu Item to a check by
entering the PLU # rather than pressing a
preset key.
Page 20
Overview FS-2700 Owner’s Manual
1-10
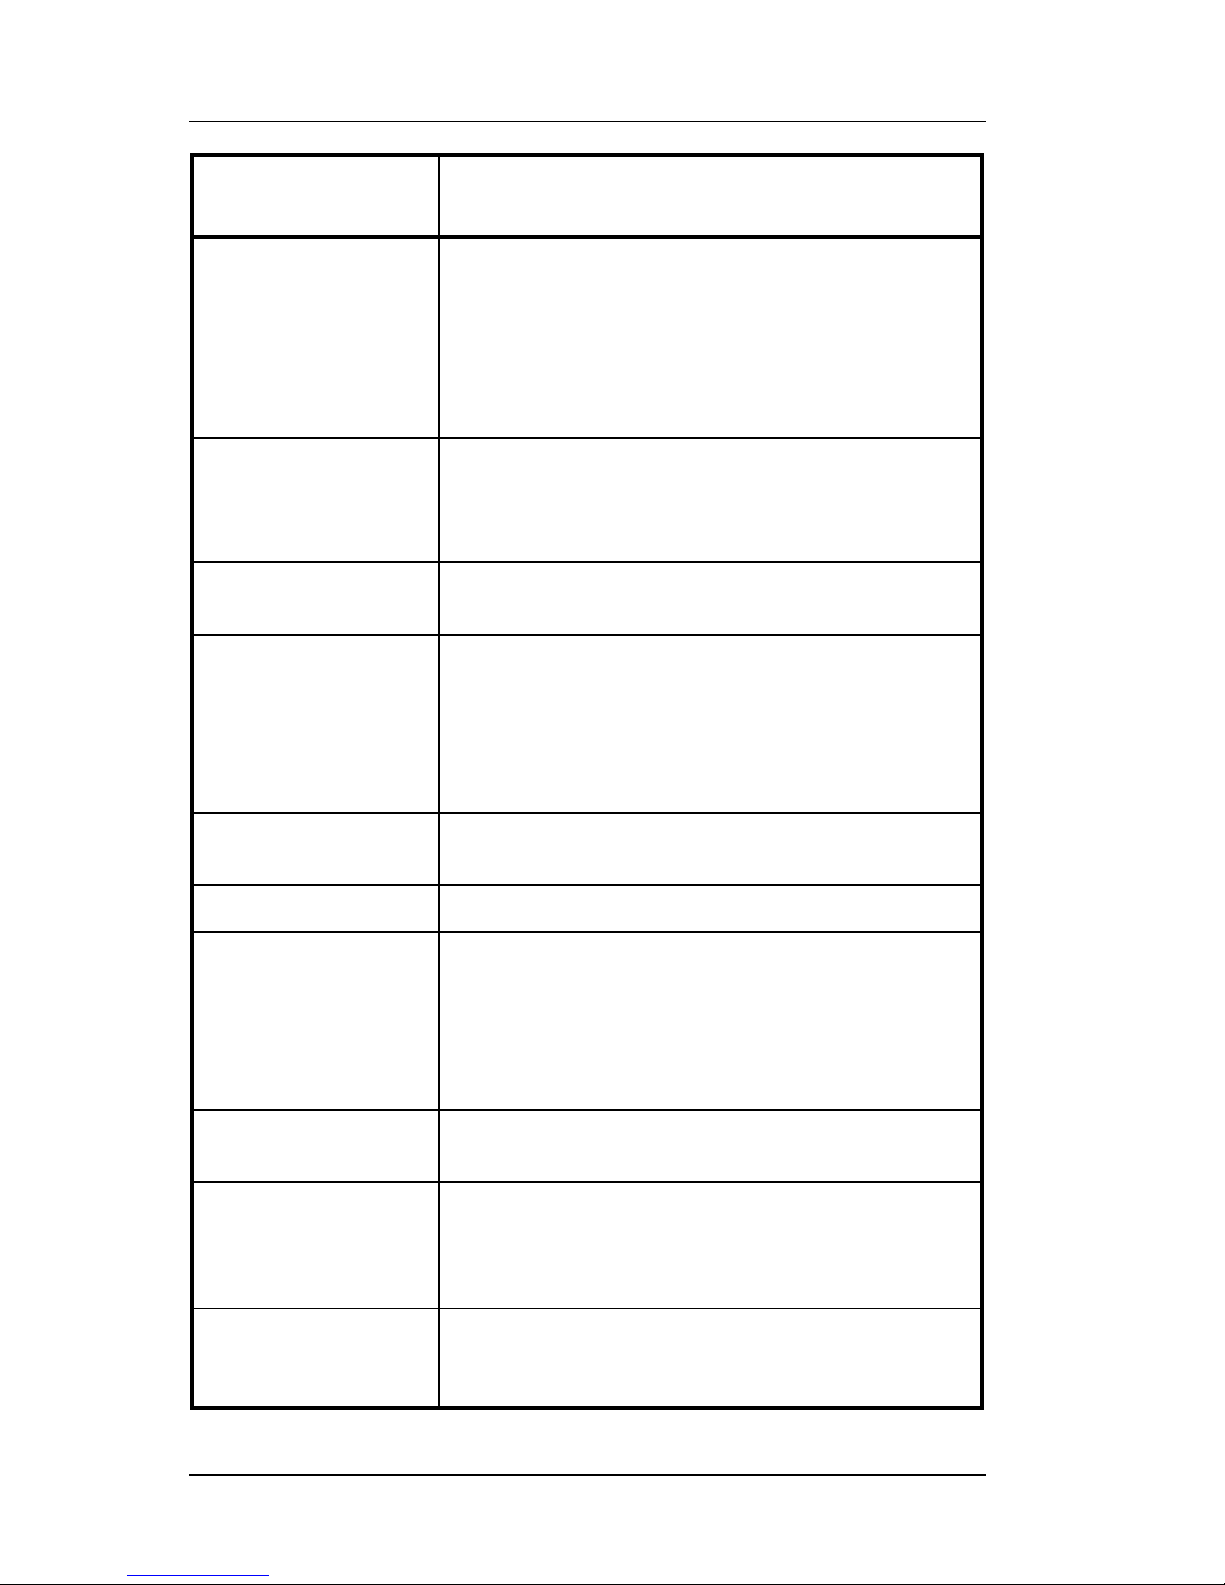
Key Function POS Function Description
Exit
In POS mode, this key can be used to clear out
of a modifier screen and remove the menu
item.
NOTE: This key MUST be preset on each POS
keyboard. If it is not, it will not be possible to
exit out of the Edit Keyboard table unless a PC
keyboard is connected to the FS-2700.
Finished Prod
Waste
This key type is used at the beginning of a
transaction to identify it as a waste ticket.
All items entered in the transaction will update
the waste totals.
Foreign Currency
This key type is used to calculate the amount
due on the check in a foreign currency.
Function NLU
(Number Look Up)
Can be used for functions that are not preset
on the keyboards. Index the code for the
function then press
{FUNCTION~NLU}
.
See the table on page 1-20 for a list of oper-
ations that can be done with this key and
codes used with each one.
Guests
This key type is used to enter or change the
number of guests on a check.
Inventory Report
Assign one of the Inventory Reports to a key.
Inventory Rpt NLU
(Number Look Up)
Used to print Inventory Reports from the
keyboard.
Select a report from a list that displays when
the key is pressed, or index the function
number of the report then press
{INV.~REPORT~NLU}
.
Labor Report
Used to assign one of the Labor Reports to a
key.
Labor Report NLU
(Number Look Up)
Used to print Labor Reports from the keyboard.
Select a report from a list that displays, or
index the function number of the report then
press
{LABOR~REPORT~NLU}
.
Hold Order
Used to indicate that the current order should
be held from printing to the remote printers
until the next order is entered.
Page 21
FS-2700 Owner’s Manual Overview
1-11
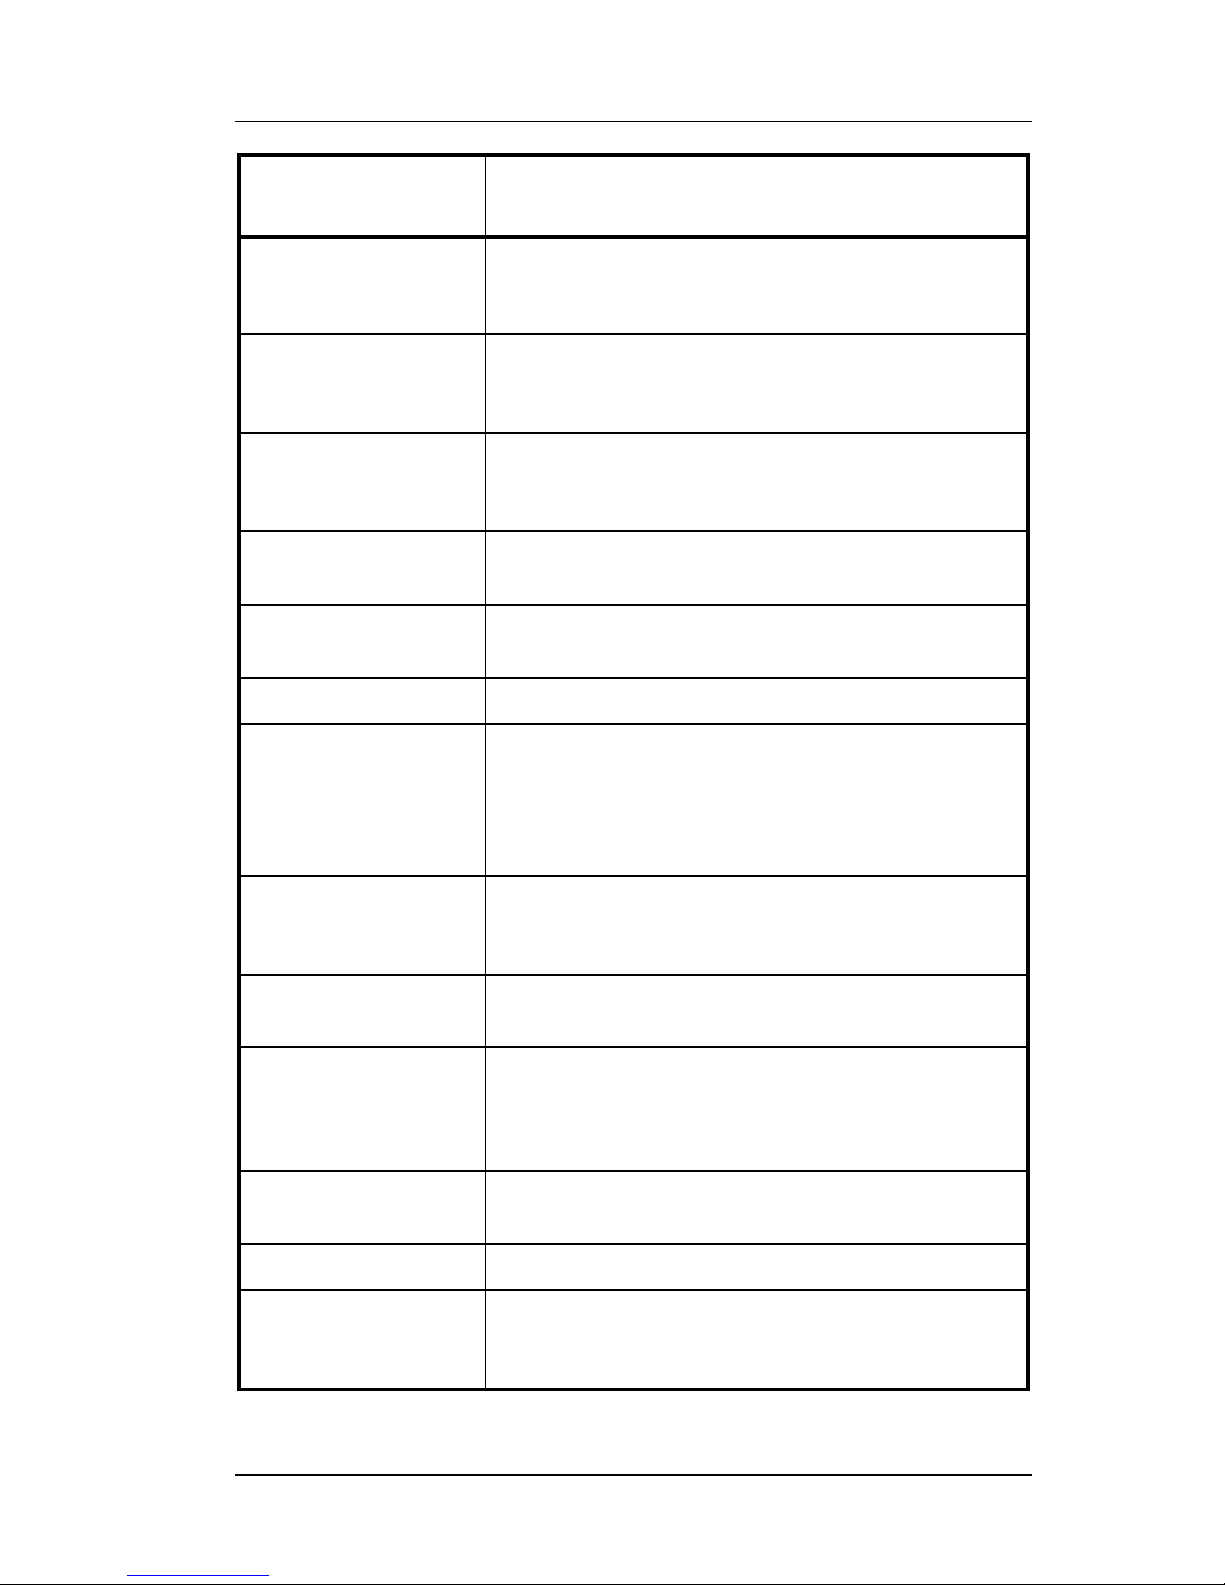
Key Function POS Function Description
Last Item Void
Voids the last item entered on a check. The
item being voided must be a new item in the
service round.
Loan/Pickup
This key type is used to track when funds are
added to a drawer or when excess funds are
removed from a drawer.
Login/Logout
This key type is used to sign a user into the
system for POS operations. It can also be
used to log the current user out of a station.
Macro
Used to run a macro which was previously
recorded using a
{RECORD~MACRO}
key.
Meal Period
This key is used to override the current Meal
Period assigned to a station for one order only.
Media
Used to tender guest checks.
Media NLU
(Number Look Up)
Used to tender a check with a media when the
specific media is not preset on the keyboard.
Index the record number of the media (from
the Media Setup table), and press
{MEDIA~NLU}
.
Menu Item
This key is used to preset menu items on the
keyboard. Press the key to enter the item to a
check.
Menu Item Size
Entered before a menu item on a guest check
to set the item’s size level.
Mgr Mode
This key type is used to access the Manager
Mode area of the system. Manager Mode
contains the Database Setup, Reports,
Utilities, Inventory and Timeclock Menus.
No Sale
Used to open the cash drawer outside of a sale
transaction.
Numeric
Used to enter a numeric value from 0 to 9.
Open Refund
This key type is used to create a refund check.
All items entered on the check will be part of
the refund.
Page 22
Overview FS-2700 Owner’s Manual
1-12
Key Function POS Function Description
Order Complete
This key type is used to fire orders to the
remote printers when the ORDER CHECK ON
DEMAND option in the Order Type Setup table
is used. Any new items that have not yet been
sent to the order printers will be printed when
this key is pressed.
Order Type
Used to override the Order Type setting of the
user’s Job Code for one order only.
Paid In
This key type is used to add cash to the drawer
from sources of income other than a sale.
Paid Outs
#1 - #5
These five function keys are used to remove
cash from the drawer for purposes other than
to give change for a sale.
Price Change
This key is used to change a Menu Item’s
price.
Print Check
This key type is used to print a copy of the
guest check to any On Demand printers, and
ends the current service round.
Print Journal
Prints the station’s electronic journal.
Print/Reset Journal
This function is used to print and reset (clear)
the station’s electronic journal.
Recall Check
This key is used to recall checks being tracked
by the check number.
Recall Check
Order Type #1- #4
These four function keys are used to recall
checks of only the specified Order Type.
Recall Table
This key is used to recall checks being tracked
by the table number.
Record Macro
This key type is used to record a sequence of
keys that can be played back by pressing a
single button.
Macros recorded using this key are played
back by pressing the
{MACRO}
key.
Re-Order Item
This key type is used for all-you-can-eat items.
Page 23
FS-2700 Owner’s Manual Overview
1-13
Key Function POS Function Description
Report
Not available on the FS-2700.
On the FS-3600, this key type is used as a
banner key for one of the Report groups.
Reprint Voucher
Used to print another copy of a credit card
voucher.
Reset Journal
Used to reset (clear) the station’s electronic
journal, deleting all of the current data.
Revenue Center
Report
Used to assign one of the Revenue Center
Reports to the keyboard.
Revenue Center
Report NLU
(Number Look Up)
Used to print Revenue Center Reports from
the keyboard.
Select a report from a list that displays when
the key is pressed, or index the function
number of the report then press
{REV.~CENTER~REPORT~NLU}
.
Review Check
This key type is used to display checks that
have been closed out.
Screen Select
Not available on the FS-2700.
On the FS-3600, this key is used to move the
display to another screen.
Seat Select
This key is used to preset seat numbers for
use when entering items on checks by seat
numbers.
+Seat
Used to increment the current seat number.
When a new transaction is started, or a check
is recalled, the current seat number is 1.
Any Menu Items entered will be linked to the
current seat number selected.
This key type is only used if the Use Seat #'s
flag is set in the System Configuration table.
-Seat
Used to decrement the current seat number.
When a new transaction is started, or a check
is recalled, the current seat number is 1.
Any Menu Items entered will be linked to the
current seat number selected.
This key type is only used if the Use Seat #'s
flag is set in the System Configuration table.
Page 24
Overview FS-2700 Owner’s Manual
1-14
Key Function POS Function Description
Select Keyboard
Changes the current keyboard level. Index the
number of the keyboard wanted (1-4) and
press
{SELECT~KEYBOARD}
.
Sell Media
This key type is used to sell a form of media,
usually gift certificates, at the point of sale.
Spell-It Instr
This key type is used when an instruction
needs to be printed with a check on the remote
slip, and a pre-programmed instruction is not
available.
Split by Amount
Used to split a single check into multiple
checks by entering dollar amounts for each
check.
Split by Item
Used to split a single check into multiple
checks by tagging items to be split.
Split by Seat
Not available on the FS-2700.
On the FS-3600, this key type is used to split a
single check into multiple checks by choosing
a seat number.
Station Report
Assigns one of the Station Reports to a key.
The report will apply to the station on which the
key is pressed.
Station Report NLU
(Number Look Up)
Used to print a Station Report from the
keyboard.
Select a report from a list that displays when
the key is pressed, or index the function
number of the report then press
{STATION~REPORT~NLU}
.
The report will apply to the station on which the
key is pressed.
Stay Down
Used to set or change the default Menu Item
size level and/or Meal Period.
Press
{STAY~DOWN}
then the
{MEAL~PERIOD~#}
or
{MENU~ITEM~SIZE~#}
key wanted. Screen
prompts to broadcast the selection to other
stations.
The selection becomes the default Menu Size
or Meal Period for new checks until a System Z
report is taken or another selection is made.
Page 25
FS-2700 Owner’s Manual Overview
1-15
Key Function POS Function Description
System Report
This key type is used to assign one of the
System Reports to a key.
System Report
NLU
(Number Look Up)
Used to print a System Report from the
keyboard.
Select a report from a list that displays when
the key is pressed, or index the function
number of the report then press
{SYSTEM~REPORT~NLU}
.
Table Number
This key is used to assign a table number to a
check, or change a table number of a check.
∗
In order to use this key type, the Require
Table # flag in the Order Type table must be
set for the current Order Type.
Table Select
This key is used to preset table numbers for
use when tracking checks by tables.
A numeric table number is assigned to each
key. Pressing the key assigns that table
number to the check.
Tare
This key is used to enter a tare table for a
menu item.
Tax Exempt
This key type is used to remove all sales tax
from the check. All taxable totals are moved to
non-taxable totals.
Tax Exempt
#1 - #8
These eight function keys are used to remove
sales tax applied to the specified Tax Table.
Each Menu Item Category is linked to one of
the eight Tax Tables. When a specific Tax
Table is exempt, only the sales tax for items in
that Tax Table are removed.
The taxable totals for the Tax Table are moved
to non-taxable totals.
Tip
This key type is used to add a tip or gratuity to
a check.
To accept the default percentage programmed
in the System Config Table, press
{TIP}
then
{TOTAL}
.
To override the default, press
{TIP}
, enter the
new $ amount, then press
{TOTAL}
.
Page 26
Overview FS-2700 Owner’s Manual
1-16
Key Function POS Function Description
Tip Payout
This key is used to transfer tips from one User
report as a TIPS PAID OUT to another User
report as a TIPS PAID IN.
Index the amount of the Tips being paid out
and press
{TIP~PAYOUT}
. At the prompt, index
the User ID of the employee receiving the
payout.
Total
This key is used for several purposes:
End a service round, storing the check and
leaving it unpaid.
∗
This is called "Service Totaling" the check.
∗
The Order Type must be configured to allow
unpaid checks to be stored in the system in
order for this use to be applicable.
Finalize an input field, like an Enter key on a
keyboard.
∗
For example, enter a number for an amount,
and then press the
{TOTAL}
key to indicate
completion of the entry.
Accept allowable modifiers for a Menu Item.
∗
An allowable modifier is one that has the
required quantity set to zero.
∗
When all modifiers from the Category
screen are entered, press
{TOTAL}
to
indicate the entry is complete.
Transfer Media
This key type is used to transfer media totals
from one Media Type to another.
This procedure is normally used when a user
tenders a transaction or transactions using the
wrong payment type.
User Report
Assigns one of the User Reports to a key.
The report will apply to the User logged into
the station on which the key is pressed.
User Report NLU
(Number Look Up)
Used to print a User Report from the keyboard.
Select a report from a list that displays when
the key is pressed, or index the function
number of the report then press
{USER~REPORT~NLU}
.
The report will apply to the User logged into
the station on which the key is pressed.
Page 27
FS-2700 Owner’s Manual Overview
1-17
Key Function POS Function Description
Video Mode
# 1 - # 8
These eight function keys are used to set the
current Kitchen Video System into the
specified mode.
The KVS receives notification that the video
mode has been changed and must be capable
of switching to a new routing system.
Void
This key type has several purposes.
Void items from a check.
∗
Any items that were added in the current
service round may be removed using this
key type without any reporting.
∗
Items from a prior service round that are
voided will be recorded in the Void file.
∗
Items voided from a check that has already
been paid are recorded in the Refund file.
Backspace key to erase numeric entries.
∗
For example, when signing into the system,
if an incorrect ID number is entered, press
the VOID key one time for each incorrect
digit entered.
Backup key when required modifiers are
being entered for a Menu Item.
∗
Pressing the VOID key after a modifier entry
will remove the modifiers and the primary
Menu Item and allow the user to start over.
Void All Items
Using this key removes all items from a check.
Xfer All Checks
Used to transfer ALL checks from one user to
another.
This key is used by the server who is taking
over the checks.
Xfer Chk From Svr
This key type is used to transfer a check from
one user to another.
This key type is used by the server who is
taking over the check.
When a user is giving a check to another
server, use the
{XFER~CHK~TO~SVR}
key type.
Page 28
Overview FS-2700 Owner’s Manual
1-18
Key Function POS Function Description
Xfer Chk To Svr
This key type is used to transfer a check to one
user from another.
This key type is used when the server who
created the check is giving the check to
another server.
When a user is taking the check from another
server, use the
{XFER~CHK~FROM~SVR}
key
type.
Page 29

FS-2700 Owner’s Manual Overview
1-19
1.5 Function Number Look Up
The {FUNCTION~NLU} can be used for completing many operations
without having the actual function key for that operation programmed
on a keyboard.
1. To perform an operation, press {FUNCTION~NLU}.
2. A list of function codes displays. Press {PgDn} to scroll through
the list.
3. Index the number of the function wanted and press {TOTAL}.
4. If applicable, the screen will prompt for further input necessary to
complete the function.
OR
1. Index the number of the function wanted (see the list starting on
page 1-8.
2. Press {FUNCTION~NLU}.
3. If applicable, the screen will prompt for further input necessary to
complete the function.
Sample Procedures
When Function Code Is NOT Known
• Press {FUNCTION~NLU}, then {PgDn}to look up the code for
Transfer Check to Server (Xfer Chk To Srv).
• Index {37} {TOTAL}
• Screen prompts: Enter ID
• Continue with the procedure.
When Function Code Is Known
• To enter Manager Mode, index {5}.
• Press {FUNCTION~NLU}
• The Manager Mode Menu displays.
Page 30
Overview FS-2700 Owner’s Manual
1-20
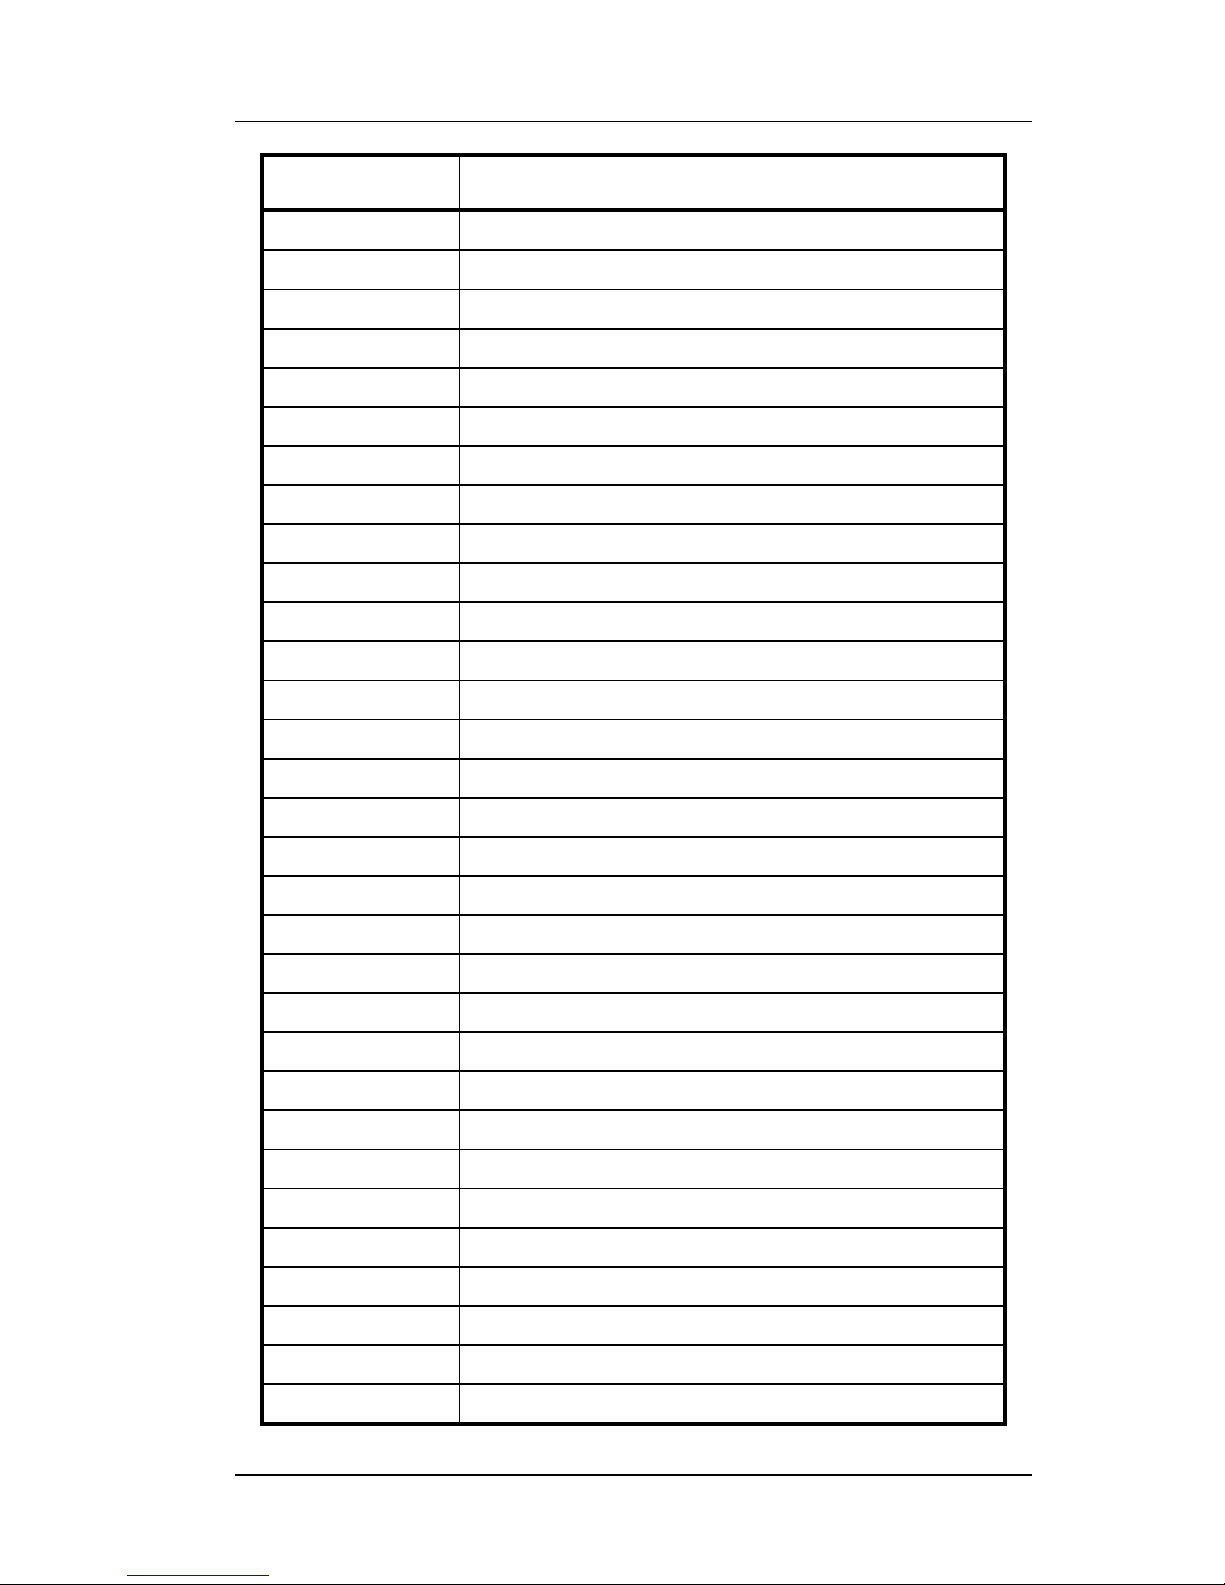
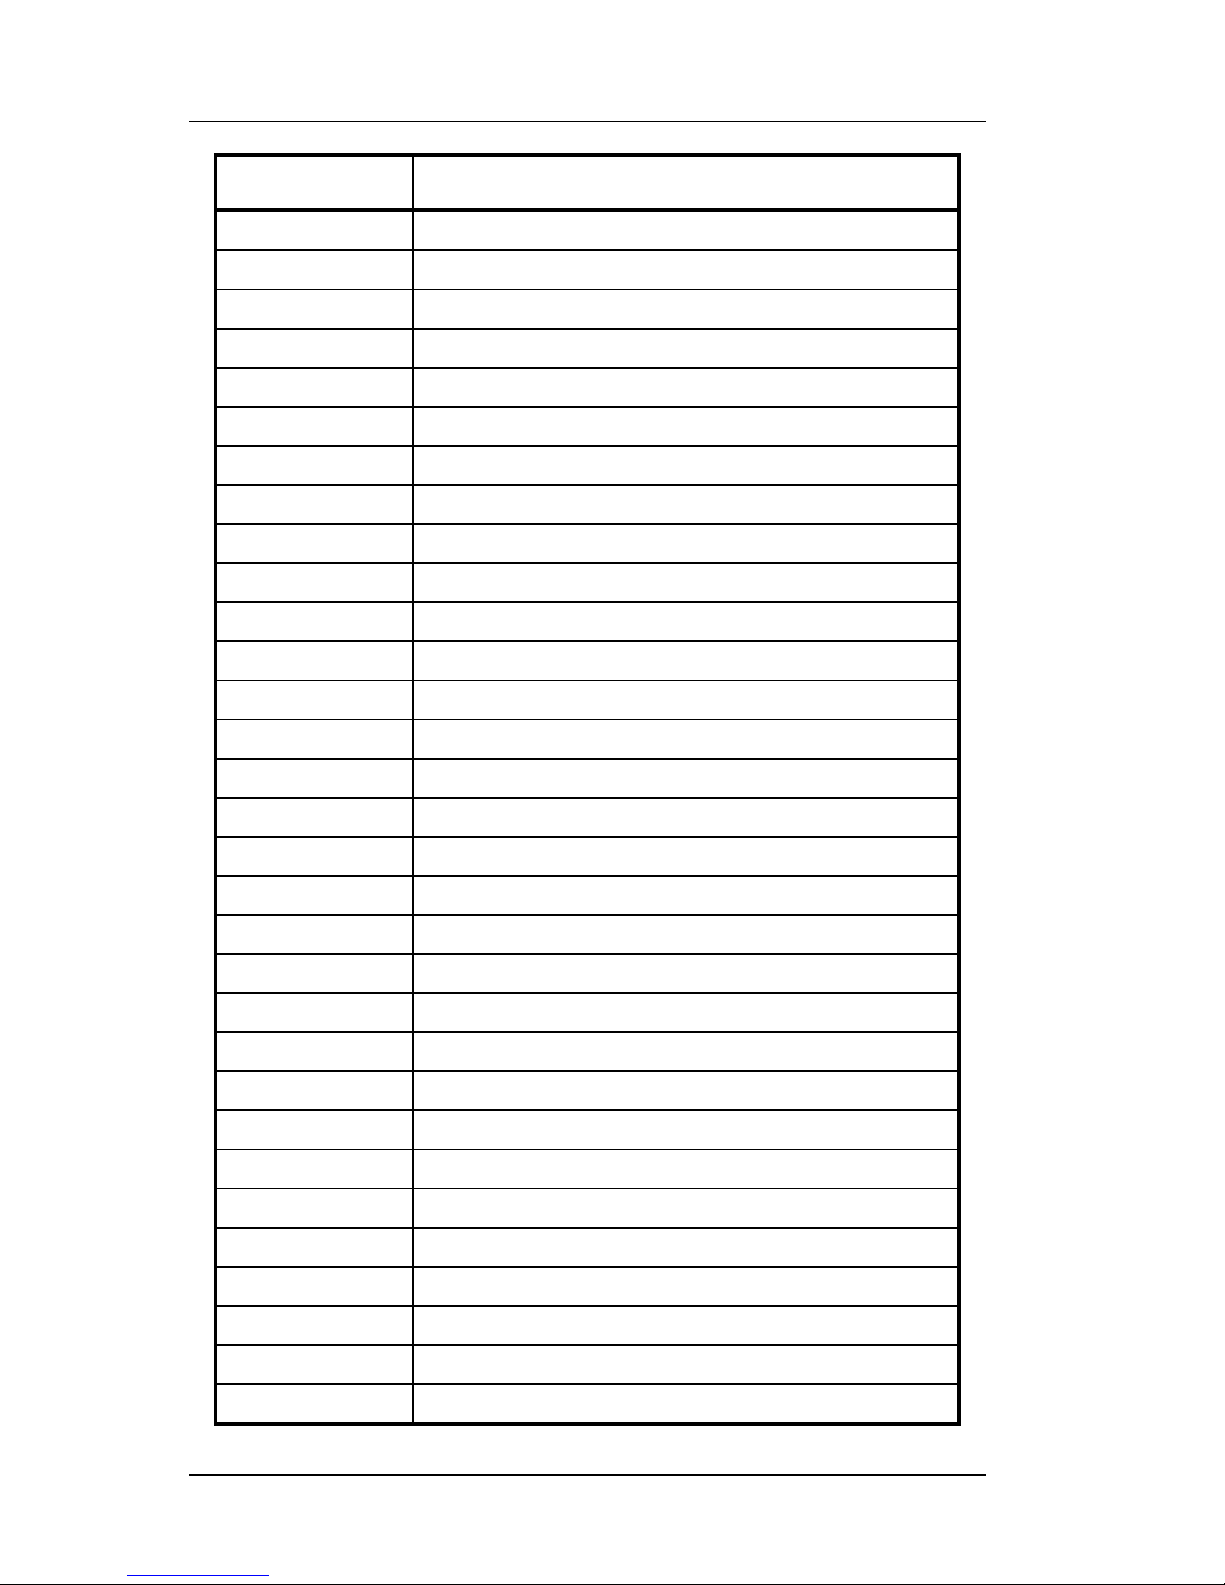
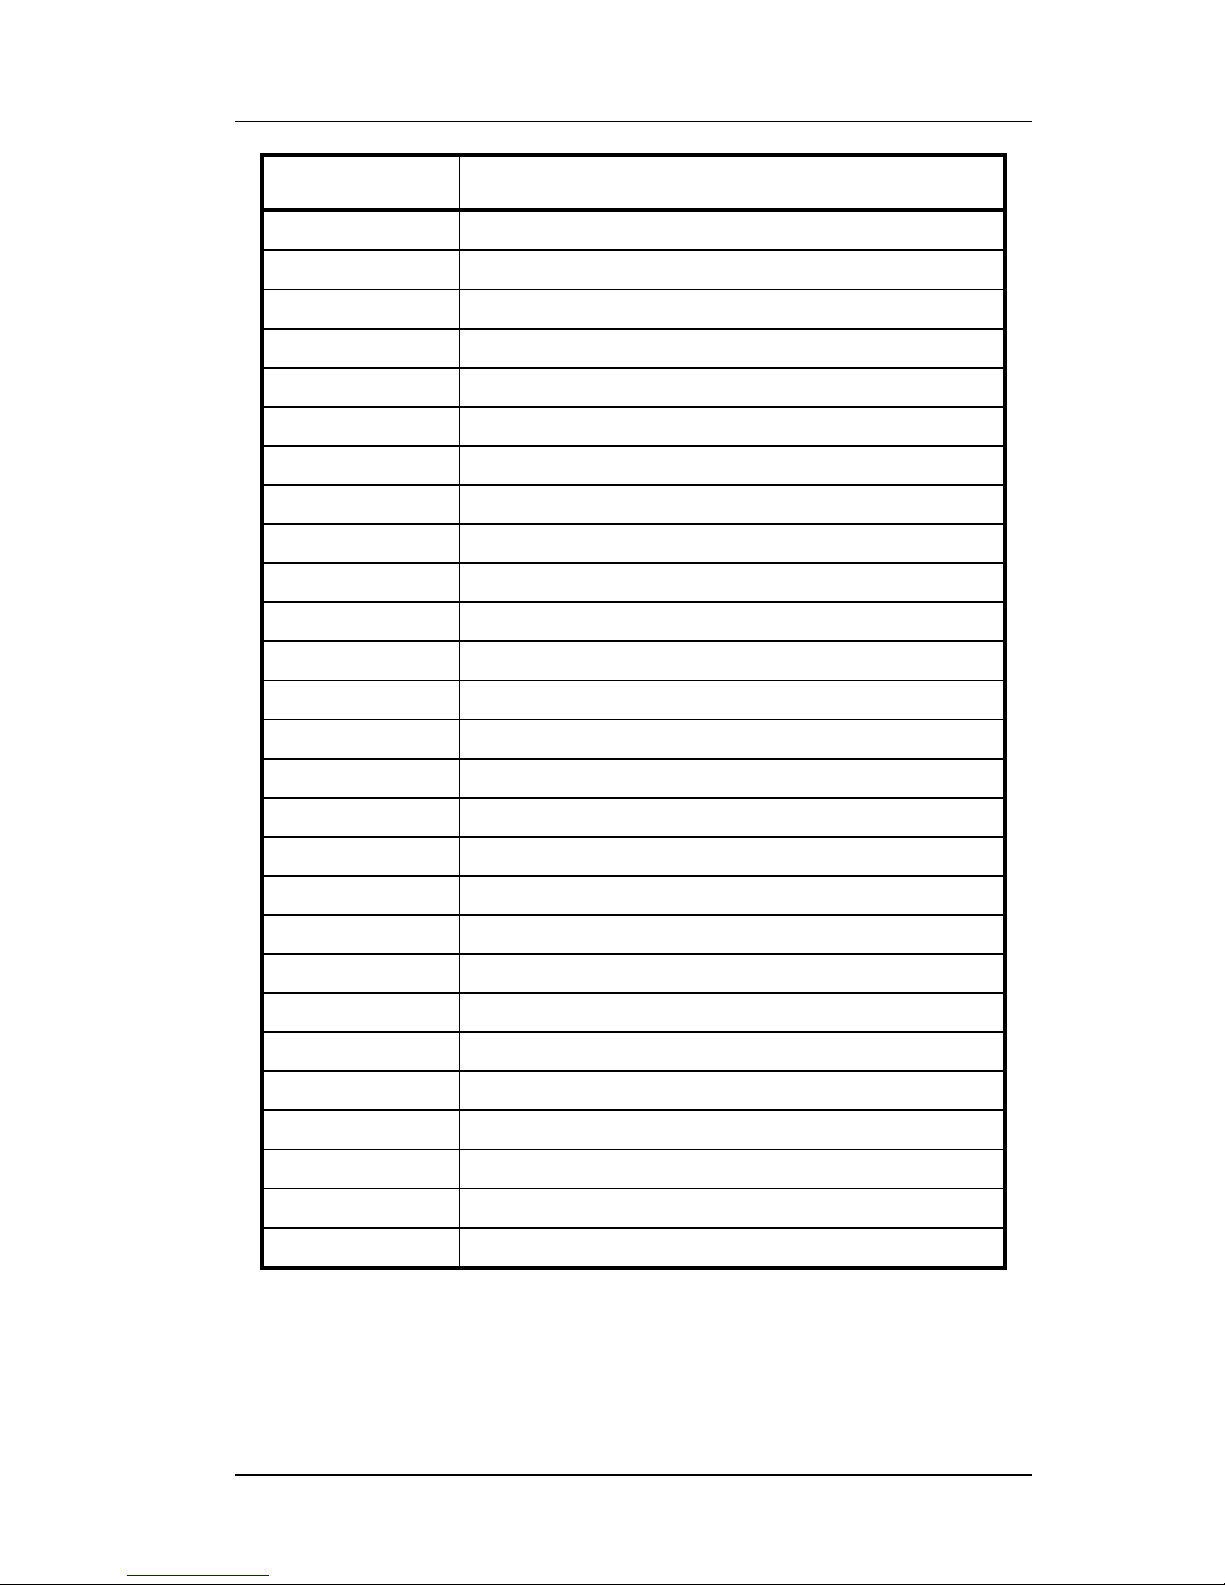
1.5.1 Function Number Look Up Codes
Function NLU
Code
Function Description
34
Add Check
182
Add to Check
184
Add to OT1
185
Add to OT2
186
Add to OT3
187
Add to OT4
183
Add to Table
27
Cancel
97
Cash Adjust Refund
157
Cash Advance
85
Change Seat
99
Clear Input
38
Clock In/Out
188
Discount Number Look Up
154
Downline to OCB
156
Enter Bar Code
26
Enter PLU
144
Finished Product Waste
91
Foreign Currency
189
Function Number Look Up
29
Guests
45
Hold Order
197
Inventory Report Number Look Up
196
Labor Report Number Look Up
98
Last Item Void
3
Loan/Pickup
42
Login/Logout
190
Media Number Look Up
5
Mgr Mode
Page 31
FS-2700 Owner’s Manual Overview
1-21
Function NLU
Code
Function Description
44
No Sale
92
Open Refund
94
Order Complete
155
Paid In
86
Paid Out 1
87
Paid Out 2
88
Paid Out 3
89
Paid Out 4
90
Paid Out 5
167
Price Change
65
Print - System Charge Acct Report
61
Print - System Customer Summary Report
66
Print - System Discount Recipient Report
169
Print - Employee Pay Report
124
Print - Employee Time Cards Report
123
Print - Employees Clocked In Report
60
Print - System Financial Report
144
Print - Finished Prod Waste Report
147
Print - Food Cost Report
56
Print - System Hourly Productivity Report
146
Print - Inv Count Sheet
142
Print - Inventory Status Report
143
Print - Inventory Totals Report
125
Print - Job Code Labor Report
126
Print - Labor Analysis Report
63
Print - System Loan/Pickup Report
62
Print - System Media Report
58
Print - System Mgr Voids Report
55
Print - System Open Check Report
59
Print - System Refund Report
57
Print - System Sales Mix Report
Page 32
Overview FS-2700 Owner’s Manual
1-22
Function NLU
Code
Function Description
64
Print - System Sales Tax Report
127
Print - Tip Report
67
Print - System X Report
68
Print – System Z Report
35
Print Check
71
Print Journal
181
Prn/Res Journal
32
Recall Check
105
Recall Order Type 1
106
Recall Order Type 2
107
Recall Order Type 3
108
Recall Order Type 4
33
Recall Table
104
Record Macro
36
Re-Order Item
171
Reprint Voucher
180
Reset Journal
80
Review Check
195
Revenue Center Report Number Look Up
75
+ Seat
76
–Seat
191
Select Keyboard
39
Sell Media
40
Spell-It Instructions
170
Split by Amount
78
Split by Item
194
Station Report Number Look Up
95
Stay Down
193
System Report Number Look Up
28
Table Number
178
Tare
Page 33
FS-2700 Owner’s Manual Overview
1-23
Function NLU
Code
Function Description
41
Tax Exempt
81
Tax Exempt 1
82
Tax Exempt 2
83
Tax Exempt 3
84
Tax Exempt 4
163
Tax Exempt 5
164
Tax Exempt 6
165
Tax Exempt 7
166
Tax Exempt 8
30
Tip
31
Tip Payout
25
Total
43
Transfer Media
192
User Report Number Look Up
131
Video Mode 1
132
Video Mode 2
133
Video Mode 3
134
Video Mode 4
135
Video Mode 5
136
Video Mode 6
137
Video Mode 7
138
Video Mode 8
24
Void
172
Void All Items
173
Xfer (Transfer) All Checks
109
Xfer (Transfer) Check From Server
37
Xfer (Transfer) Check To Server
Page 34

Overview FS-2700 Owner’s Manual
1-24
Notes
Page 35

Chapter
2
Accessing
the System
Page 36

Accessing the System FS-2700 Owner’s Manual
2-2
Page 37

FS-2700 Owner’s Manual Accessing the System
2-3
2.1 Manager Overrides
The TEC FS-2700 system has an extensive security system and can
easily be adapted to for custom security situations.
Security levels can be assigned to almost every key type and
menu choice in the system.
Access to different function levels are determined by the Security
levels assigned to each Job Code.
If an employee attempts using a function for which he has an
insufficient security setting, a prompt displays:
Enter approval ID
• To proceed, index a Manager’s user I.D. and press {TOTAL}.
Page 38

Accessing the System FS-2700 Owner’s Manual
2-4
2.2 Clocking In/Out
The FS-2700 has an optional timekeeping function that tracks
attendance records. The Timekeeping system is used only for
tracking attendance, it does not provide access to POS operations.
2.2.1 Clock In
Notes
The options for using the Timekeeping system are determined
for each employee in the User Setup table.
• Required Clock-In – If YES, this user cannot log in to the
system without first clocking in.
• Clock-In Only – If YES, this user cannot log in to the system
at all. This option is commonly used for kitchen employees
who do not enter guest checks.
Procedure
1. Index employee I.D.#.
2. Press {CLOCK~IN/OUT}.
3. Index {1} to clock-in. Press {CANCEL} to exit without clocking in.
• If only one job code is assigned, the user is clocked in.
• If more than one Job Code is assigned to the employee, the
assigned Job Codes will display for choice.
4. Index the number of the job wanted.
5. Receipt printer prints the employee’s name, Job Code clocked
in, the time and date.
Page 39

FS-2700 Owner’s Manual Accessing the System
2-5
2.2.2 Clock Out
Notes:
Employees will be required to Declare Tips when clocking out if
their Job Code has option TIPPED set to YES.
A minimum declared tip entry can be required by setting option
MIN TIP % in the System Config. table to the minimum wanted
(page 3 #3).
Procedure
1. Index employee I.D.#.
2. Press {CLOCK~IN/OUT}.
3. Index {2} for Clock Out.
• If prompted, index amount of cash tips, press {TOTAL}.
• If prompted NOT ENOUGH TIPS, index manager I.D. # and
press {TOTAL}.
4. Receipt printer prints a report with the employee’s name, Job
Code, time/date and the total hours worked both for this shift and
this week.
Page 40

Accessing the System FS-2700 Owner’s Manual
2-6
2.3 Login/Logout
Logging into the system allows access, as the user’s security level
permits, to guest check handling and Manager Mode.
NOTES
An employee can be logged into one station at a time.
Only one employee can be logged into a station at one time, and
that user’s security level determines what functions are
accessible.
• An AUTO LOGOUT function can be set for a Job Code that
will automatically log the user out after a check service round
is completed.
• An option in System Config, POS AUTOLOGOUT will
automatically log the user out if a station is not active after a
set amount of minutes.
If the employee is required to Clock In (User Setup, page 2 #1),
the Job Code entered during the clock in will also be used for the
Log In.
An employee’s shift begins with {LOGIN}, and continues until that
employee’s User Report is cleared with a Z Report.
A Job Code can be set up to require a bank loan function when
an employee logs in with the REQUIRE LOAN flag.
A password can be assigned to an employee in the User Setup
table that must be used each time the employee logs in.
The One-Touch login feature used on the FS-3600 is not
available on the FS-2700 workstation.
Page 41

FS-2700 Owner’s Manual Accessing the System
2-7
2.3.1 Login
Procedure
1. Index employee I.D. #.
2. Press {LOGIN/LOGOUT}.
3. If prompted, index the user’s password and press {TOTAL}.
4. If prompted, select the Job Code for this shift.
5. If the Job Code requires a Bank Loan, select {LOAN}.
• Index the amount of the loan and press {TOTAL}.
• Press {YES} to confirm the amount.
2.3.2 Logout
NOTE: This procedure is not necessary if the Job Code is set for
Auto Logout, or if another user logs into the workstation.
Procedure
1. Index {0} and press {LOGIN/LOGOUT}.
Page 42

Accessing the System FS-2700 Owner’s Manual
2-8
Notes
Page 43

Chapter
3
Guest Check
Functions
Page 44

Guest Check Functions FS-2700 Owner’s Manual
3-2
Page 45

FS-2700 Owner’s Manual Guest Check Functions
3-3
3.1 Guest Checks - Overview
Guest Check Numbers
• Guest checks are assigned a check number by the system.
• Blocks of check numbers are allocated to each workstation,
so the range of check numbers will always be the same for
each workstation.
Auto Create / Auto Recall Modes
After an employee has logged into the system, the workstation is
in one of two check modes. The AUTO CREATE setting in the
Job Code Setup table for the employee determines the mode.
• AUTO CREATE set to YES
∗
The workstation automatically allocates the next check.
• AUTO CREATE set to NO
∗
Sets the workstation for this employee to RECALL
MODE.
∗
This should be used only when the server is responsible
for recalling and tendering checks started by other
servers.
∗
Example: The server is the cashier for a dual drive-thru.
Guest Check Prompts
• Required prompts can be for a table number, the number of
guests in the party, and an order/tent number.
Ending a Service Round
• A service round begins when a check is created or recalled.
• The service round is completed when the check clears the
screen by the server pressing {TOTAL} or {PRINT~CHECK}, or
when the check is tendered with a {MEDIA} key.
∗
If a media is used to partially tender a check, the service
round will end using {TOTAL}.
Page 46

Guest Check Functions FS-2700 Owner’s Manual
3-4
3.2 New Check Prompts
All checks are tracked by a system-assigned check number. In
addition, other check information can be required and attached to the
check. These options are table number, number of guests, and an
order/tent number.
3.2.1 Table Number
A table number can be required for the Order Type by the REQ
TABLE flag in the Order Type table. The Order Type of the
check is determined by the Job Code of the User logged in.
• This setting requires a table number entry before the check
is sent.
∗
Table number entry is not required if immediately paying
out the check.
An additional setting, PROMPT TABLE in the Station Setup
table, can require a table number entry before a menu item is
entered.
∗
With this option set, the table number entry is required if
immediately paying out the check.
When a table number is assigned to a check, it can be recalled
by table number as well as the check number.
Procedure
1. Index the table number for this order.
• Press {TABLE~#}.
Page 47

FS-2700 Owner’s Manual Guest Check Functions
3-5
3.2.2 Guest Count
A guest count can be required for the Order Type by the REQ
GUEST CNT flag in the Order Type table. The Order Type is
determined by the Job Code of the User logged in.
• This setting requires a number of guest entry before the
check is sent.
• An additional setting, PROMPT # GUEST in the Station
Setup table, can require a guest count entry before a menu
item is entered.
A default entry can be assigned to an Order Type using the
DEFAULT GUEST COUNT flag in the Order Type table, so the
server does not have to make an entry.
This key type does not apply if the workstation is set up to track
check cover by Meal Count rather than Guest Count. That
option is GUEST CNT in the Station Setup table.
Procedure
1. Index the number in the party for this guest check.
2. Press {GUESTS}.
OR
1. Press {GUESTS}.
2. Screen prompts:
Enter guest count
3. Index the number in party and press {TOTAL}.
• To accept the default guest count, press {TOTAL} without
entering a number first.
Page 48

Guest Check Functions FS-2700 Owner’s Manual
3-6
3.2.3 Order Type
All checks must be assigned to an Order Type. Order Types are
determined by the server’s Job Code.
An entry for the Order Type must be completed before a menu
item can be entered on the check.
Procedure
1. Before entering a menu item, press an {ORDER~TYPE} key for this
check.
• Pressing an {ORDER~TYPE} key will also override a default
Order Type assigned to the Job Code for one order only.
Page 49

FS-2700 Owner’s Manual Guest Check Functions
3-7
3.2.4 Order Number
Order numbers are also known as TENT numbers. They can be
used when pre-numbered order cards are given to guests to
place on the table so food can be delivered to the correct table.
An Order Number can be required for checks of a certain Order
Type by setting the PROMPT ORD NUM flag in the Order Type
table.
When Order Number is required for a check, a prompt will
automatically display when the service round is completed.
When the REQ TABLE flag in the Order Type table is YES, the
PROMPT ORD NUM flag does not function.
Procedure
1. Enter menu items on to the check.
2. End the service round by pressing {TOTAL}, {PRINT~CHECK} or a
{MEDIA} key.
3. Prompt line displays message:
Enter order number
4. Index the order number and press {TOTAL}.
5. The service round is completed.
Page 50

Guest Check Functions FS-2700 Owner’s Manual
3-8
3.2.5 Override Meal Period
Meal Period times are set up for each day of the week in the Meal
Period Setup table. The current setting can be overridden for the
current check only or for all checks until the System Z report is done.
The change can affect one terminal or all terminals.
For One Check Only
1. Press the {MEAL~PERIOD~#} key wanted for this check.
• The override setting reverts to the programmed Meal Period
setting after the check is sent.
All Checks Today
1. Press {STAY~DOWN}.
2. Press the {MEAL~PERIOD~#} key wanted.
3. Screen prompts:
Broadcast changes?
1 – Yes, 0 - No
4. Index {1} and press {TOTAL} for the change to be effective at all
stations in the system.
Index {0} and press {TOTAL} for the change to affect this station
only.
• The override setting will be effective until the Meal Period is
changed again, or until the next System Z report is done.
Page 51

FS-2700 Owner’s Manual Guest Check Functions
3-9
3.2.6 Add Guest Information
An 8-character field can be added to a check using the GUEST INFO
field in the Order Type table.
The information entered is saved with the check. It prints on the
remote kitchen slip and the guest receipt.
When the check is recalled using {RECALL~CHECK}, the
information entered displays at the top of the screen.
Procedure
1. Press an {ORDER~TYPE} key set for GUEST INFO.
2. The QWERTY keyboard is active (see page 1-7 for the layout).
Enter up to 8-characters of Guest Information for this check.
3. Press {ENTER} on the QWERTY keyboard.
Add Extra Guest Information
This option allows four lines of Guest Information to be entered in
addition to the 8-character field. Up to 20 characters can be entered
for each line.
• To use, turn on the EXTRA GUEST INFO flag in the Order
Type table. The GUEST INFO field must also be set.
• The Extra Guest Information entry prints on the guest receipt
but not the remote kitchen slip.
Page 52

Guest Check Functions FS-2700 Owner’s Manual
3-10
3.3 Entering Menu Items
Menu items can be entered after any new-check prompts have been
satisfied.
3.3.1 Preset Menu Item
1. Press the {MENU~ITEM} key for the item wanted.
2. If prompted, index a Manager Code and press {TOTAL}.
3. The menu item is added to the check.
3.3.2 More than One Preset Item
1. Index the quantity of the item wanted.
2. Press the {MENU~ITEM} key for the item.
• If the quantity entered exceeds the HALO setting for the
item, message displays:
Amount too large
3.3.3 Enter Item by PLU #
1. Index the PLU # of the item wanted, using a numeric keypad.
2. Press {ENTER~PLU}.
3.3.4 Select from Category List
The {CATEGORY} key displays a list of all Menu Items within the
assigned Category.
1. Press {CATEGORY}. Use {PgDn} to scroll thru the list if more than
page is present.
2. Index the number of the Menu Item wanted. It is added to the
check.
Page 53

FS-2700 Owner’s Manual Guest Check Functions
3-11
3.3.5 Open Priced Menu Item
An open priced Menu Item is one that has the flag OPEN PRICE in
the Menu Setup table to YES. If the flag PREFIX PRICE is set to
YES, the price is entered prior to entering the item.
With PREFIX PRICE to Yes
1. Index the price for this item.
2. Press the {MENU~ITEM} key for the Open Priced Menu Item.
With PREFIX PRICE to No
1. Press the {MENU~ITEM} key for the Open Priced Menu Item.
2. Screen prompts:
Enter sales price
3. Index the price for this item and press {TOTAL}.
3.3.6 Scaleable Menu Item
Use the SCALEABLE flag in the Menu Setup table to set an item to
require a weight entry.
Procedure
1. Press the {MENU~ITEM}of the scaleable Menu Item.
2. If a scale is connected to the FS-2700, the weight will be entered
from the scale.
3. If a scale is not connected, prompt will display:
Enter weight
4. Index the number of pounds of the item, press {TOTAL}.
Page 54

Guest Check Functions FS-2700 Owner’s Manual
3-12
3.3.7 Entering Menu Item Modifiers
A modifier can only be entered on a check following a Menu Item.
Three methods are available for servers to enter menu item
modifiers:
From a Preset Key
• On the FS-2700, a modifier can be set as a preset key if the
POP-UP field for its Category is set to NO.
• On a FS-3600, a modifier can only be entered from a preset
key if the USAGE field for its Category is set to Special
Instructions.
From a Forced Display List
• A Forced Display attached to the Menu Item automatically
displays after the Menu Item is entered.
Using {Spell-It~Instructions}
• This method is used when an item must be modified but
there is not a preprogrammed item with the description. The
server types the needed modifier.
• The information is not retained with the check.
Page 55

FS-2700 Owner’s Manual Guest Check Functions
3-13
Enter Modifiers With a Preset Key
A modifier can only be preset on the keyboard if its Category has the
POP-UP field set to NO. BUT, if a Menu Item is programmed to
require a modifier, make sure the modifier is preset on the keyboard
or it will not be possible to order the item.
Procedure
1. Enter the primary {MENU~ITEM}.
2. Press the preset {MENU~ITEM} modifier.
• Modifiers cannot be entered on a check before a primary
Menu Item is entered.
Page 56
Guest Check Functions FS-2700 Owner’s Manual
3-14
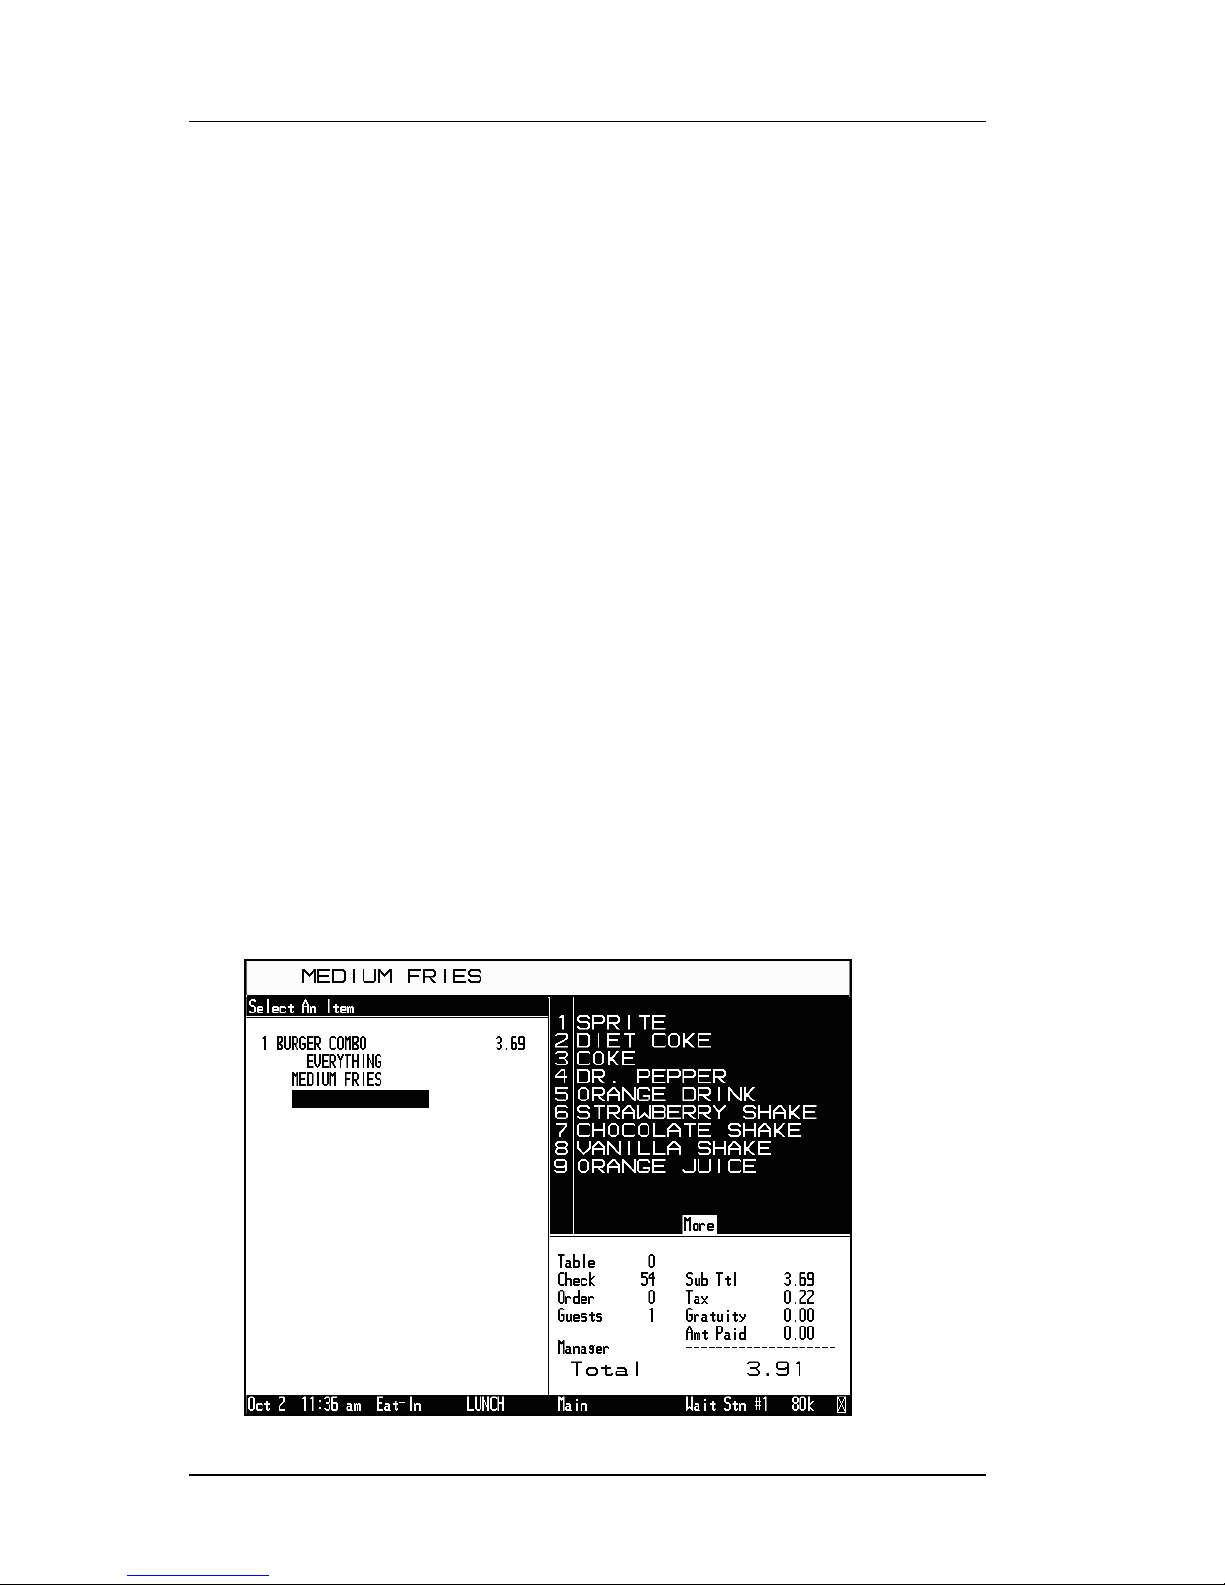
Enter Modifiers With Forced Display
The number of items that may be entered from a modifier screen is
set in the Menu Setup table.
Procedure
1. Press the {MENU~ITEM} key for the item wanted.
• It is added to the check.
2. A list of modifiers display. Press a key to choose a modifier.
3. The modifier screen will clear according to its setting in the Menu
Item’s programming.
• If this Forced Display allows one selection, the screen will
clear after one choice is made.
• If this Forced Display allows more than one selection, the
screen will clear after that number of choices are made.
• If a limit is not set (if it is zero), up to 18 selections from the
Forced Display list can be entered. The screen will continue
to redisplay the list until the {TOTAL} key is used to exit.
• If MORE displays at the bottom of the list, there are more
choices. Use {PgDn} to scroll thru the list.
4. When all choices are made from the Forced Display(s), press
{TOTAL}.
MORE
indicates
there are
additional
choices.
{PgDn}
to display
more
items.
Page 57

FS-2700 Owner’s Manual Guest Check Functions
3-15
Enter Modifiers With Spell-It Instructions
The server types Spell-It Instructions when a Menu Item needs a
modifier that is not preprogrammed.
• Spell-It Instructions can only be entered on a check after a
Menu Item has been entered.
• The modifier entered with Spell-It Instructions is not retained
with the check so it does not print on the guest receipt.
Procedure
1. Enter the Menu Item.
2. Press {SPELL~IT~INSTR}.
• The QWERTY keyboard is active (see page 1-7 for the
layout)
3. Type a modifier, up to 15 alphanumeric characters.
4. Press {ENTER} on the QWERTY keyboard.
• The entry will print on remote printers following the Menu
Item.
Page 58

Guest Check Functions FS-2700 Owner’s Manual
3-16
3.3.8 Enter Items by Seat Numbers
Seat numbers enable items on the check to be sorted and printed on
the remote printers by table position.
To use Seat numbers for sorting on remote printers, the following
options should be set:
• USE SEAT # in the System Config table.
• SORT ORDERS in the System Config table should be set to
the Seat Number option.
With +SEAT and –SEAT
Procedure
1. When using seat numbers, the system assigns the current seat
number to 1. The next menu item entered will be assigned to the
current seat number.
• Use the {+~SEAT} to change the seat number from 1 if
necessary.
2. Enter the menu item(s) for this seat number.
3. Use the {+~SEAT} and {-~SEAT} keys to change the seat
number as needed for the next menu item(s).
4. Enter the menu items(s) for this seat number.
5. Continue until all items are entered on the check.
Page 59

FS-2700 Owner’s Manual Guest Check Functions
3-17
With Seat Select
{SEAT~SELECT} presets seat numbers on the keyboard. Each preset
key is programmed with a specific seat number.
Procedure
1. Press {SEAT~SELECT~#}.
2. Enter menu item(s).
3. Continue until all items are entered.
Page 60

Guest Check Functions FS-2700 Owner’s Manual
3-18
3.3.9 Enter by Menu Item Size
Menu Item Size Levels are used for ordering Menu Items, such as
soft drinks, which come in different sizes.
Two ways to enter a different size menu item:
• Press the {MENU~ITEM~SIZE~#} key prior to the first modifier
item in order to change its size level. Example:
∗
{MENU~ITEM~SIZE~2} then {F.FRIES}.
• Press a preset menu item of a certain size, example
{SM~F.FRIES} or {MED~F.FRIES}.
When ordering priced modifiers, an option STAYDOWN SIZE in
the Menu table can be set so the size level remains the same
until all modifiers are entered.
Sample Procedure
1. Press a menu item, for example: {BURGER}.
2. A Forced Display gives choice of {MED~FRIES} (size 2 in this
example) or {LGR~FRIES}(size 3).
• Enter MED FRIES
• The STAYDOWN SIZE is set to YES in the Menu table.
3. The next Forced Display shows choice of soft drinks and
{MENU~ITEM~SIZE~#} keys for each price size.
• Select a soft drink. The size will default to Menu Item Size 2.
• Or, to order a Size 3 soft drink, press the
{MENU~ITEM~SIZE~#} key, then select the soft drink wanted.
Page 61

FS-2700 Owner’s Manual Guest Check Functions
3-19
3.3.10 Remove Items from Checks
Remove Last Item
1. Enter menu items.
2. Press {LAST~ITEM~VOID}.
3. The last menu item entered on the check is removed.
Remove One Item
Before an item has been sent/stored, the security level in the
Function Setup table only applies if the option SEC EC VOID in
the System Config. table is set (page 10 #1).
After a menu item has been sent/stored and the check recalled,
the {VOID} key can only be used according to the security level
set in the Function Setup table.
Procedure
1. Enter menu items.
2. Press {VOID}.
3. If prompted, index a Manager Code and press {TOTAL}.
4. Use the up and down arrow keys to highlight the item to be
removed from the check.
• Highlighting a primary Menu Item automatically highlights the
item’s modifiers.
5. Press {VOID}. The item is removed from the check.
Page 62

Guest Check Functions FS-2700 Owner’s Manual
3-20
Remove All Items Before Sending
After a menu item has been sent to remote printers, the
{VOID~ALL~ITEMS} key can only be used according to the security
level set in the Function Setup table.
Procedure
1. Enter menu items.
2. Press {VOID~ALL~ITEMS}.
3. The entire check is voided.
Page 63

FS-2700 Owner’s Manual Guest Check Functions
3-21
3.4 Sending Items to Remote Printers
3.4.1 Printer Mode Options
When items are sent to print at the remote printers depends on the
setting of the MODE option in Printer Setup - Station Printer Setup.
Printers can be set up for modes in Station Printer Setup as
follows:
• Immediate – prints each line as it is entered on to the check.
• By Round – prints items entered in this round when the
service round is ended with {TOTAL}, {PRINT~CHECK} or a
{MEDIA} key.
• On Demand – prints items entered this round only when the
{PRINT~CHECK} key is pressed.
∗
This option is more commonly used for guest receipt
printers.
• Video – sends each line to a video controller as it is entered
on to the check.
Page 64

Guest Check Functions FS-2700 Owner’s Manual
3-22
3.4.2 With {HOLD~ORDER}
This feature allows remote orders to be grouped from different guest
checks into a single remote order. Set the following options to use
this feature:
The {HOLD~ORDER} key type is used to prompt the server to hold
remote printing.
• When the server’s response is Yes, items from the current
check are held.
• When the server’s response is No, items from the different
checks print as a single order.
LAST TICKET field in the Station Setup table sets the default for
the {HOLD~ORDER} key to None, Yes or No.
• {HOLD~ORDER} is a toggle key. This setting decides what the
initial answer is. The key toggles between Yes and No with
each depression.
Procedure (Sample)
This sample procedure uses the setting of the LAST TICKET field as
Yes and combines two guest checks on the remote printer(s).
1. Enter items for first guest check.
2. Press {HOLD}.
3. Screen prompts:
Hold Order: Yes
• YES prevents this order from printing on the remote
printer(s) this round.
4. End service round by pressing {PRINT~CHECK}, {TOTAL} or
{MEDIA}.
5. Check clears the screen.
6. Enter items for the second guest check.
7. Press {HOLD~ORDER}.
8. Screen prompts:
Hold Order: Yes
Page 65

FS-2700 Owner’s Manual Guest Check Functions
3-23
9. This time – press {HOLD~ORDER} again to change to response to
No.
• NO will send this check’s and the previous check’s items to
the remote printer(s) for this round.
10. End service round by pressing {PRINT~CHECK}, {TOTAL} or
{MEDIA}.
11. Both checks print to the remote kitchen printer as a single order.
• The check number of the last check prints on the header.
• All check numbers print at the bottom of the remote slip.
Page 66

Guest Check Functions FS-2700 Owner’s Manual
3-24
3.4.3 Send Items on Demand
The ORD CHECK ON DMD (Order Check on Demand) setting in the
Order Type table can be used to print items on remotes only when
the {ORDER~COMPLETE} key is pressed.
This option allows orders to be prepared for multi-person orders.
With this option set, no Menu Items on checks of this Order Type
will print to the kitchen printers unless {ORDER~COMPLETE} is
pressed.
Procedure
1. Enter menu items for first remote order.
2. Press {ORDER~COMPLETE}.
• The order remains on the screen.
• The items entered this round print on the remote printer(s).
3. Enter menu items for the next remote order.
4. Press {ORDER~COMPLETE}.
5. Continue entering items and pressing {ORDER~COMPLETE} until all
remote orders are entered.
6. Press key to end order entry, {PRINT~CHECK}, {TOTAL} or a
{MEDIA} key.
Page 67

FS-2700 Owner’s Manual Guest Check Functions
3-25
3.5 End Service Round
Ending the service round sends menu items to kitchen printers (if
they have not already been printed) and clears the check from the
screen.
If the flag in the Order Type table, STORE OPEN CHECK is NO
for the check’s Order Type, the service round can only be
finalized by tendering the check with a {MEDIA} key.
Procedure
1. Enter all items for this service round.
2. Complete any required prompts (Table #, # Guest, Order #).
3. End the service round by pressing one of the following key types.
• {TOTAL}
∗
Sends menu items entered this round to remote printers.
∗
Clears the check from the screen.
∗
Prints the guest receipt if PRINT CHECK/ROUND in the
Order Type table is YES.
∗
Check remains open.
• {PRINT~CHECK}
∗
Sends menu items entered this round to remote printers.
∗
Clears the check from the screen.
∗
Prints the guest receipt.
∗
Check remains open.
• {MEDIA}
∗
Sends menu items entered this round to remote printers.
∗
Clears the check from the screen.
∗
Prints the guest receipt if PRINT CLOSED CHECK
option in the Order Type table is YES.
∗
Closes the check.
Page 68

Guest Check Functions FS-2700 Owner’s Manual
3-26
3.6 Recall a Check
The RECALL OTHER USER CHECKS field in the Job Code
table can be set to allow users such as cashiers to recall checks
entered by other employees.
A particular check can only be opened at one workstation at a
time.
3.6.1 By Check Number
By Check Number
1. Index the check number.
2. Press {RECALL~CHECK}.
Using List of Open Checks
1. Press {RECALL~CHECK}.
2. A numbered list of all open checks accessible by this server
displays.
• If the word MORE displays at the bottom of the list, press
{PgDn} to display more checks.
3. Index the number of the check wanted.
Recall by Order Type
1. Press {RECALL~ORDER~TYPE~#} of the Order Type wanted.
2. A numbered list of all open checks of that Order Type that are
accessible by this server displays.
3. Index the number of the check wanted.
Page 69

FS-2700 Owner’s Manual Guest Check Functions
3-27
3.6.2 By Table Number
By Table Number
1. Index the table number of the check wanted.
2. Press {RECALL~TABLE}.
Using List of Tables with Open Checks
1. Press {RECALL~TABLE}.
2. A numbered list of all open checks with table numbers that are
accessible by this server displays.
• If the word MORE displays at the bottom of the list, press
{PgDn} to display more checks.
3. Index the number of the table wanted to recall.
• If the table has separate checks, a list of each check will
display. Index the number of the separate check wanted.
3.6.3 Recall Table with Separate Checks
1. Recall the check.
2. List of separate check numbers display.
3. Index the number of the check wanted to recall.
Page 70

Guest Check Functions FS-2700 Owner’s Manual
3-28
3.6.4 Using a Bar Code Scanner
If the workstation is connected to a bar code scanner and bar codes
are being printed on the guest checks, scan the guest check.
3.6.5 Recall with Dual Drive Thru
A Dual-Drive Thru application uses two options:
The MONITOR STATION field in the Station Setup table enables
a workstation’s orders of a certain Order Type to be recalled at
another specific station.
• Example: Drive Thru Order Taker #1 can forward orders to
Drive-Thru Cashier #1. Drive Thru Order Taker #2 can
forward orders to Drive Thru Cashier #2.
The {RECALL~OT#} key type which is used to recall checks of a
specific order type.
Example
1. Order is entered at Drive Thru Order Taker Station.
2. Cashier at Drive Thru Cashier Station presses {RECALL~OT} key
programmed for an Order Type named DRIVE THRU.
3. Orders display on Drive Thru Cashier Station in the order they
were entered. First order is in upper left corner of window.
Page 71

FS-2700 Owner’s Manual Guest Check Functions
3-29
3.7 Splitting a Check
Only items that have been sent/stored can be split to separate
checks. If new items are entered, the check cannot be split.
3.7.1 Split By Item
Procedure
1. Recall the check.
2. Press {SPLIT~BY~ITEM}.
3. Screen prompts:
Enter number of checks
4. Index the total number of checks to create from this check and
press {TOTAL}.
5. Use the up and down arrow keys to highlight an item to go to the
first new check.
• Highlighting a primary Menu Item automatically highlights the
item’s modifiers.
6. Press {TOTAL}. A + symbol displays to the right of the item’s
price.
• If an item is tagged in error, press {TOTAL} again.
7. Continue tagging items until all items for the first new check are
done.
8. Press {SPLIT~BY~ITEM}.
9. Continue steps #5 – #9 until the last new check is split.
10. End the service round by pressing {TOTAL}.
Page 72

Guest Check Functions FS-2700 Owner’s Manual
3-30
3.7.2 Split By Amount
Procedure
1. Recall the check.
2. Press {SPLIT~BY~AMOUNT}.
3. Screen prompts:
Enter number of checks
4. Index the total number of checks to create from this check and
press {TOTAL}.
5. Top of screen shows “Check 1” to indicate the first split, and the
check total divided by the number of checks entered in step 4.
Prompt line displays:
Enter Amount
6. Press {TOTAL} to accept the default amount for this check, or
index the amount wanted and press {TOTAL}.
7. Screen continues to prompt for each check, with a default
amount (remaining check total divided by the remaining number
of checks) as necessary until the last check.
8. When the last check is reached, all the check items clear the
screen, and the remaining balance is displayed:
BalXfer x.xx
9. Complete the function by pressing {TOTAL}.
10. The new checks are created. The first (original) check contains
all the menu items, tax and gratuity and shows the total amount
that was transferred. Each new check contains an item
“Bal Xfer” and the amount transferred to it from the original
check.
Page 73

FS-2700 Owner’s Manual Guest Check Functions
3-31
3.8 Transferring a Guest Check
3.8.1 Change a Check’s Table #
Procedure
1. Recall the check.
2. Index the number of the new table, press {TABLE~#}.
3. Prompt line displays message:
Change table?
1 - YES, 0 - No
4. Index {1} for YES and press {TOTAL}.
5. The table number of the check is changed.
Page 74

Guest Check Functions FS-2700 Owner’s Manual
3-32
3.8.2 Transfer to a Server
The server who created the check does this procedure. The server
receiving the check must have logged in today.
Procedure
1. Recall the check. Should be recalled by the server responsible
for the check.
2. Press {XFER~CHK~TO~SVR} key.
3. Screen prompts:
Enter ID
4. Index the I.D. number of the server the check is being
transferred to and press {TOTAL}.
5. If the default Order Type for the new server requires a table
number and the check does not have one assigned, screen
prompts:
Enter table number
6. Index the table number and press {TOTAL}.
7. If the default Order Type for the new server requires a # of guest
entry and the check does not have one assigned, screen
prompts:
Enter guest count
8. Index the number of guests and press {TOTAL}.
9. Press the {TOTAL} key to the end the procedure. Check is
transferred.
Page 75

FS-2700 Owner’s Manual Guest Check Functions
3-33
3.8.3 Transfer from a Server
The server who takes the check from the server/bartender who
created it uses this procedure.
Procedure
1. Press {XFER~CHK~FROM~SVR} key.
2. Screen prompts:
Enter check number
3. Index the check number being picked up and press {TOTAL}.
4. If the default Order Type for the new server requires a table
number and the check does not have one assigned, screen
prompts:
Enter table number
5. Index the table number and press {TOTAL}.
6. If the default Order Type for the new server requires a # of guest
entry and the check does not have one assigned, screen
prompts:
Enter guest count
7. Index the number of guests and press {TOTAL}.
8. Press the {TOTAL} key the end the procedure. Check is
transferred.
Page 76

Guest Check Functions FS-2700 Owner’s Manual
3-34
3.8.4 Transfer all Checks
This procedure is used by the server who takes all open checks from
the server/bartender who created them.
Procedure
1. The server picking up the checks should be logged in to the
station.
2. Press {XFER~ALL~CHKS} key.
3. Screen prompts:
Enter ID
4. Index the user I.D. of the server/bartender to whom the checks
are currently assigned.
5. Each check briefly displays on the screen. All checks from the
originating server are transferred.
Page 77

FS-2700 Owner’s Manual Guest Check Functions
3-35
3.9 Combining Checks
3.9.1 Combine Stored Checks
This procedure adds two or more checks together that have already
been stored (from a previous service round).
1. Recall the first check.
2. Press {ADD~CHECK}.
3. Screen displays a numbered list of this server’s checks.
4. Index the number for the check wanted.
• Items from the check number entered are added to the first
check.
5. Repeat steps 2 – 5 as needed to combine more checks.
6. End the service round by pressing {TOTAL}, {MEDIA} or
{PRINT~CHECK}.
Page 78

Guest Check Functions FS-2700 Owner’s Manual
3-36
3.9.2 Add New Check to Stored Check
This procedure is used to add the current check to a stored check.
The current check can be a new check (in the first service round).
1. Enter items for a new check, or recall a stored check.
2. Press {ADD~TO~CHECK}.
3. Screen displays a numbered list of this server’s checks.
4. Index the number for the check wanted.
• Items from the current check are added to the check number
entered. That check now displays on the screen.
5. Repeat steps 2 – 5 as needed to combine more checks.
6. End the service round by pressing {TOTAL}, {MEDIA} or
{PRINT~CHECK}.
3.9.3 Add to Stored Check by Order Type
This procedure is identical to using {ADD~TO~CHECK} except it
restricts the choices to the server’s open checks of a certain Order
Type. The current check can be new (in the first service round).
1. Enter items for a new check, or recall a stored check.
2. Press {ADD~TO~CHK~OT#}.
3. Screen displays a numbered list of this server’s checks that are
of the particular Order Type.
4. Index the number for the check wanted.
• Items from the current check are added to the check number
entered. That check now displays on the screen.
5. Repeat steps 2 – 5 as needed to combine more checks.
6. End the service round by pressing {TOTAL}, {MEDIA} or
{PRINT~CHECK}.
Page 79

FS-2700 Owner’s Manual Guest Check Functions
3-37
3.9.4 Add to Stored Check Using Table #
This procedure is identical to using {ADD~TO~CHECK} except it is used
on checks with assigned table numbers. The current check can be
new (in the first service round).
1. Enter items for a new check, or recall a stored check.
2. Press {ADD~TO~TABLE}.
3. Screen displays a numbered list of this server’s checks that have
assigned table numbers.
4. Index the number for the table wanted.
• If there are separate checks for the table, the screen will
display a numbered list of the checks. Index the number of
the check wanted.
• Items from the current check are added to the check of the
table number entered. That check now displays on the
screen.
5. Repeat steps 2 – 5 as needed to combine more checks.
6. End the service round by pressing {TOTAL}, {MEDIA} or
{PRINT~CHECK}.
Page 80

Guest Check Functions FS-2700 Owner’s Manual
3-38
3.9.5 Combining Checks to One Table #
This procedure will either add items from both checks to the resulting
check, or add a separate check to the table number. It depends on
the setting ONE CHK/TBL in the System Setup/System Config table.
1. Recall the check.
2. Index the number of the new table, press {TABLE~#}.
3. Prompt line displays message:
Change table?
1- YES, 0 - No
4. Index {1} for YES and press {TOTAL}.
5. Screen prompts:
Add Check
1 – YES, 0 - No
6. Index {1} for YES and press {TOTAL}.
7. Depending on setting of ONE CHECK/TABLE option:
• If YES – items from both checks are combined for this table.
• If NO – there are two separate checks created for this table.
8. End the service round by pressing {TOTAL}, {MEDIA} or
{PRINT~CHECK}.
Page 81

FS-2700 Owner’s Manual Guest Check Functions
3-39
3.10 Check Adjustments
3.10.1 Void Items on Stored Checks
Remove Single Items
The same procedure is used to void items before or after sending.
After a menu item has been sent/stored and the check recalled, the
{VOID} key can only be used according to the security level set in
the Function Setup table.
Procedure
1. Recall the check.
2. Press {VOID}.
3. If prompted, index a manager approval I.D. and press {TOTAL}.
4. Use the up and down arrow keys to highlight the item to be
removed from the check.
• Highlighting a primary Menu Item automatically highlights the
item’s modifiers.
5. Press {VOID}.
6. The item is removed from the check.
Remove All Items
The same procedure is used to void all items before or after sending.
After a check has been sent/stored and the check recalled, the
{VOID~ALL~ITEMS} key can only be used according to the security
level set in the Function Setup table.
Procedure
1. Recall the check.
2. Press {REMOVE~ALL~ITEMS}.
3. If prompted, index a manager approval I.D. and press {TOTAL}.
4. The entire check is voided.
Page 82

Guest Check Functions FS-2700 Owner’s Manual
3-40
3.10.2 Add a Discount or Surcharge
Notes
Dollar or Percent
• Discounts can be programmed to adjust the check by either
a dollar amount or a percentage amount using the
PERCENT option in the Discount Setup table.
Discount Tax Status
• For a discount to apply to a menu item, the discount must be
set to the same tax status as the menu item.
• A menu item’s tax status is set by its Category and the Order
Type under which the check is entered.
Discount or Surcharge
• A discount can be programmed as a surcharge with the SVC
CHARGE option, so the amount is added to the check rather
than subtracted.
Item or Subtotal
• A discount is set as an Item or Subtotal discount with the
ITEM DISC option in the Discount Setup table.
• An Item Discount applies only to the previous item entered
on the check. The item can be a specific Menu Item or any
item of a specific Category.
• A Subtotal or ticket Discount applies to all items on the
check that are discountable. Items discountable are those
set to the same Tax status as the discount.
Reset Totals Flag on Subtotal Discounts
• Keep in mind that any discount will only apply to Menu Items
set to the same tax status as the discount.
• The RESET TOTALS flag in the Discount table determines
the amount of each item that is available for discounting after
a discount has already been applied to the item.
∗
YES – after a discount has been applied to items, further
discounting of those items is not allowed.
Page 83

FS-2700 Owner’s Manual Guest Check Functions
3-41
∗
NO – after a discount has been applied, additional discounts can be entered and applied to the same items.
Automatic Discount
• A discount can also be linked to a Media type so it is auto-
matically entered on a check when the check is tendered.
Enter a Discount
• A discount can be entered on a check using a preset
{DISCOUNT} key.
• A discount can also be entered by indexing the Discount I.D.
number then pressing the {DISCOUNT~NLU} key.
Page 84

Guest Check Functions FS-2700 Owner’s Manual
3-42
Item Discount
An item discount is one programmed to one item or one category. It
is entered on a check immediately following the item.
1. Enter the item to the check.
2. Press the {DISCOUNT} key wanted or index the Discount I.D.
number wanted and press {DISCOUNT~NLU}.
3. If prompted, index a manager I.D. and press {TOTAL}.
4. If prompted, index the amount for the discount and press
{TOTAL}.
5. Continue entering items to the check.
Subtotal Discount
A subtotal discount is one programmed to adjust all discountable
items on the check.
1. Enter item(s) to the check.
2. Press the {DISCOUNT} key wanted or index the Discount I.D.
number wanted and press {DISCOUNT~NLU}.
3. If prompted, index a manager I.D. and press {TOTAL}.
4. If prompted, index the amount for the discount and press
{TOTAL}.
5. End the service round by pressing {TOTAL}, {MEDIA} or
{PRINT~CHECK}.
Page 85

FS-2700 Owner’s Manual Guest Check Functions
3-43
Discount for Recipient
This procedure is commonly used for Employee Meal discounts.
The RECIPIENT field in the Discount table is used to prompt the
server for an I.D. number, and the CHK RECIP ID field is used to
check the User Setup table for a valid I.D. number.
Procedure
1. Enter item(s) to the check.
2. Press the {DISCOUNT} key programmed for Recipient feature.
3. Screen prompts:
Enter recipient ID
4. Index the I.D. number of the employee receiving the discount.
5. End the service round by pressing {TOTAL}, {MEDIA} or
{PRINT~CHECK}.
• The employee’s name, the discount name and the
discounted amount is listed on the Discount Recipient
Report.
Page 86

Guest Check Functions FS-2700 Owner’s Manual
3-44
3.10.3 Exempt Tax from a Check
Additional menu items cannot be added to a check after using a tax
exempt key.
Procedure
1. Enter item(s) or recall the check.
2. To exempt tax:
• Press {TAX~EXEMPT} to remove all tax from the check.
• Press a {TAX~EXEMPT~#} to remove a specific tax rate
(1 through 8) from the check.
3. End the service round by pressing {TOTAL}, {MEDIA} or
{PRINT~CHECK}.
Page 87

FS-2700 Owner’s Manual Guest Check Functions
3-45
3.10.4 Add a Tip
A charge tip can also be entered when the check is tendered by
defaulting an overtender entry to the tip amount.
Auto Gratuity
The Auto Gratuity feature is set using the AUTO GRAT GSTS field in
the Order Type table. When the number of guests is at least the
number entered there, the system automatically adds a gratuity.
Procedure
1. Check must have # guests entered which equals or exceeds
AUTO GRAT GSTS field for the Order Type.
• Index the number and press {GUESTS}.
2. Enters item(s) to the check.
3. Press {PRINT~CHECK} to end the service round.
• The auto gratuity is calculated based on the TIP field in the
System Config table.
Page 88

Guest Check Functions FS-2700 Owner’s Manual
3-46
Add Charge Tip
The default tip percentage is set in the TIP field of the System Config
table.
Procedure
1. Enter item(s) or recall the check.
2. Press the {TIP} key and then press {TOTAL}.
3. End the service round by pressing {TOTAL}, {MEDIA} or
{PRINT~CHECK}.
Change Default Charge Tip Amount
Procedure
1. Enter item(s) or recall the check.
2. Index the dollar amount of the tip.
3. Press {TIP}.
4. End the service round by pressing {TOTAL}, {MEDIA} or
{PRINT~CHECK}.
Remove Default Charge Tip Amount
Procedure
1. Enter item(s) or recall the check.
2. Press {TIP}.
3. Index {0}.
4. Press {TOTAL}.
5. End the service round by pressing {TOTAL}, {MEDIA} or
{PRINT~CHECK}.
Page 89
FS-2700 Owner’s Manual Guest Check Functions
3-47
3.11 Tender the Check
An Amount Tendered can be entered prior to pressing a preset
{MEDIA} key.
If an amount tendered is not entered prior to pressing a preset
{MEDIA} key, operations are determined by the options SPEED
TENDER and PAY IN FULL in the Media Setup table.
Speed
Tender
Pay In
Full
{MEDIA}
Key Tenders for:
YES YES Amount of transaction.
YES NO The default DENOMINATION setting.
NO YES
Screen prompts: Enter Amount?
Index amount for the tender and press
{TOTAL}
, or just press
{TOTAL}
to tender
for the transaction amount.
NO NO
Screen prompts: Enter Amount?
Index amount for the tender and press
{TOTAL}
.
3.11.1 Tender with a Preset Key
Procedure
1. Enter item(s) or recall the check.
2. Index the amount tendered.
3. Press the {MEDIA} key for the media type used.
• Press {TOTAL} if needed for the media type.
• Change due displays on the screen.
Page 90

Guest Check Functions FS-2700 Owner’s Manual
3-48
3.11.2 Tender with {
MEDIA~NLU
}
The numeric entry indexed prior to pressing {MEDIA~NLU} is
recognized as the media’s I.D., so an amount tendered is not
used.
If using the {MEDIA~NLU} key with split tendering, make sure the
SPEED TENDER option is set to NO, so the user is prompted for
the amount of the tender.
See the chart on the prior page for how the SPEED TENDER
and PAY IN FULL options work since the amount tendered
cannot be entered prior to selecting the media with the
{MEDIA~NLU} key.
Procedure
1. Enter item(s) or recall the check.
2. Index the media I.D. number wanted and press {MEDIA~NLU}.
• If SPEED TENDER is NO, screen prompts:
Enter amount:
3. Index the amount and press {TOTAL}.
Page 91

FS-2700 Owner’s Manual Guest Check Functions
3-49
3.11.3 Tender With Tip Entry
Procedure
1. Enter item(s) or recall the check.
2. Index the amount of the tip received and press {TIP}.
3. Press the preset {MEDIA} key or index the media I.D. and press
{MEDIA~NLU}.
3.11.4 Overtender to Tip
This option uses the POST TO TIP option in the Media Setup table
set to YES.
With Preset {MEDIA}
1. Enter item(s) or recall the check.
2. Index the total amount received, including the amount of the tip.
3. Press the {MEDIA} key.
• The amount tendered over the check amount is automatically posted as the charge tip.
With {MEDIA~NLU}
SPEED TENDER and PAY IN FULL in the Media Setup table
should be set to NO if using {MEDIA~NLU}.
1. Enter item(s) or recall the check.
2. Index the media I.D. number wanted and press {MEDIA~NLU}.
3. Screen prompts:
Enter amount:
4. Index the total amount received, including the amount of the tip.
5. Press {TOTAL}.
Page 92

Guest Check Functions FS-2700 Owner’s Manual
3-50
3.11.5 Split Tender
A check may be split tendered by up to eight media types.
If using integrated credit card software, only one media type
used can be a credit card and the credit card media must be the
last tender used.
With Preset {MEDIA}
1. Enter item(s) or recall the check.
2. Index the amount for the first media type; press the {MEDIA} key
wanted.
• The new check total displays.
3. Index the amount for the next media type; press the {MEDIA} key
for that type.
• The new check total displays.
4. Continue until the check is paid.
With {MEDIA~NLU}
The SPEED TENDER option in the Media Setup table should be
set to NO if using {MEDIA~NLU}.
1. Enter item(s) or recall the check.
2. Index the media I.D. number for the first media type and press
{MEDIA~NLU}.
3. Screen prompts:
Enter amount:
4. Index the amount received in this media including the amount of
the tip.
5. Press {TOTAL}.
Page 93

FS-2700 Owner’s Manual Guest Check Functions
3-51
3.11.6 Partial Tender
This feature enables tendering part of the check but keeps the check
open. The PARTIAL TENDER flag by Order Type must be set to
YES.
Procedure
1. Enter item(s) or recall the check.
2. Index the amount tendered for the partial payment, press the
{MEDIA} key.
• The check remains on the screen.
3. Press {PRINT~CHECK} or {TOTAL} to end the service round.
Page 94

Guest Check Functions FS-2700 Owner’s Manual
3-52
3.11.7 Tender to Charge Account
This feature uses the CHARGE ACCT field in the Media Setup table.
Procedure
1. Enter item(s) or recall the check.
2. Press the {MEDIA} key programmed for the charge account.
3. If prompted, index the amount to be posted to the charge
account and press {TOTAL}.
4. Screen prompts:
Enter acct
5. Index account (up to 9 characters) on the keypad that displays
and press {TOTAL}.
• The account number, media type and amount are posted to
the Charge Account Report.
Page 95
FS-2700 Owner’s Manual Guest Check Functions
3-53
3.12 Corrections to Closed Checks
Closed checks retained in the check file can be recalled and
adjustments to them can be made after they have been tendered.
The length of time closed checks are available is set with the
TICKET PURGE field in the System Config table.
Make sure the security setting for the
{VOID}
key is sufficient to
appropriately restrict this function. It is set in the Function Setup
table, page 3. That setting is applied when the
{VOID}
key is used on
a paid check.
3.12.1 Refund a Menu Item
Procedure
1. Index the number of the closed check.
2. Press {RECALL~CHECK}.
• Check displays on the screen.
3. Press {VOID}.
4. If prompted, index a manager I.D. number and press {TOTAL}.
5. Use the up and down arrow keys to highlight the item (and its
modifiers) to be removed from the check.
6. Press {VOID} again. The item is removed from the check.
7. Repeat steps 3 through 6 to refund addition items.
8. Press the {MEDIA} key originally used to tender the check.
9. Screen prompts:
Refund?
10. Press any key to complete the transaction.
Page 96

Guest Check Functions FS-2700 Owner’s Manual
3-54
3.12.2 Change a Discount
Procedure
1. Index the number of the closed check.
2. Press {RECALL~CHECK}.
3. Check displays on the screen.
4. Press {VOID}.
5. If prompted, index a manager I.D. number and press {TOTAL}.
6. Use the up and down arrow keys to highlight the discount.
• NOTE: Highlighting an item discount will also highlight the
item to which it was applied.
7. Press {VOID} again. The discount is removed from the check.
• NOTE: Voiding an item discount also voids the item to
which it was applied.
8. Enter the correct discount to the check.
9. Press the {MEDIA} key originally used to tender the check.
10. If the check total is less than the original total, the screen
prompts:
Refund?
11. Index {1} to refund the amount of the voided items.
Page 97

FS-2700 Owner’s Manual Guest Check Functions
3-55
3.12.3 Change Media Type
The server who originally paid out the check should do this procedure so User reports will be correct.
Procedure
1. Login the server who rang the original items.
2. Index the number of the closed check.
3. Press {RECALL~CHECK}.
4. Check displays on the screen.
5. Press {VOID}.
6. If prompted, index a manager I.D. number and press {TOTAL}.
7. Use the up and down arrow keys to highlight the media.
8. Press {VOID}.
9. Press the correct {MEDIA} key.
3.12.4 Change a Credit Card Tip
This procedure applies to tips entered when the system is using
integrated credit card software.
1. Follow the procedure above to void the original tender.
2. Tender the check with the correct tip.
Page 98

Guest Check Functions FS-2700 Owner’s Manual
3-56
3.13 Enter a Refund Check
This function creates a “negative” check. Items entered are subtracted from reports. This function can also be used to refund
individual items rather than using the {VOID} function on the closed
check.
Procedure
1. Login the server who rang the original items.
2. Press {OPEN~REFUND}.
3. If prompted, index a manager I.D. number and press {TOTAL}.
4. Enter items to be refunded.
5. Press the {MEDIA} key from which to subtract the item’s totals.
Page 99

FS-2700 Owner’s Manual Guest Check Functions
3-57
3.14 Review a Closed Check
This function is used to display and/or print checks that have been
tendered.
Closed checks can also be recalled and printed by indexing the
check number and pressing {RECALL~CHECK}.
A total of 250 checks can be displayed with this function.
Procedure
1. Press {REVIEW~CHECK}.
2. The last check to which the user has access displays.
3. Use the arrow keys to scroll through the closed checks.
4. To print a check, press {PRINT}.
5. To exit, press {DONE}.
Page 100

Guest Check Functions FS-2700 Owner’s Manual
3-58
Notes
 Loading...