

Page 1
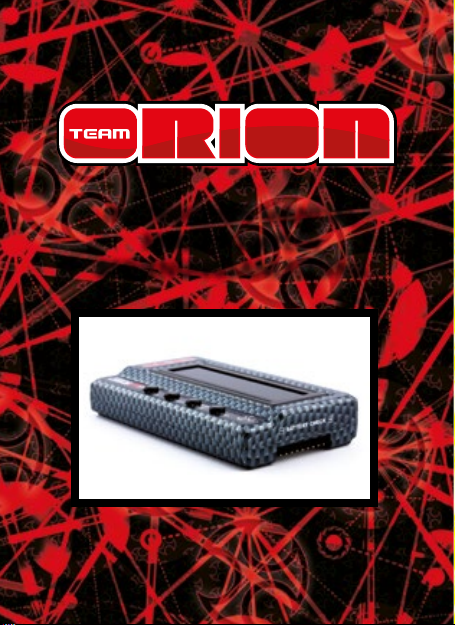
INSTRUCTION MANUAL
MODE D’EMPLOI
BEDIENUNGSANLEITUNG
Page 2

INSTRUCTION MANUAL · ENGLISH
Warranty .............................................................................. 3
Features ............................................................................... 4
Keys and Ports ..................................................................... 5
Connecting the ESC to the program box .......................... 5
Powering up the Program Box .......................................... 6
ESC setting proles memory ............................................. 6
Modifying the parameters ................................................. 6
Restore Factory Default Settings ...................................... 7
Check Battery Charge Status ............................................. 7
Computer Software ............................................................ 7
2 Copyright Team Orion © 2014
Page 3

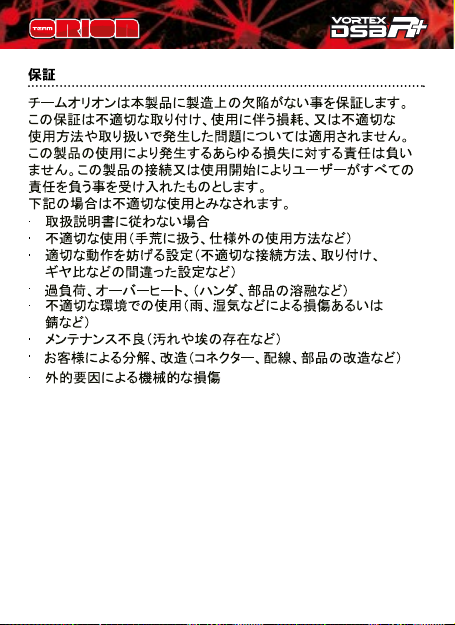
WARRANTY
Team Orion guarantees this product to be free from
manufacturing and workmanship defects. The warranty
does not cover incorrect installation, components worn by
use, or any other problem resulting from incorrect use or
handling of the product. No liability will be accepted for any
damage resulting from the use of this product. By the act of
connecting and operating this product, the user accepts all
resulting liability. Is considered incorrect use:
• Failure to follow instructions.
• Improper use of the product (abusive use, out of spec,
etc.)
• Failure to adapt settings for proper function (improper
connections, wrong gearing, installation, setup, etc.).
• Overload, overheating (desoldering, melting, etc.).
• Running in inadequate conditions (damage or rust from
rain, humidity, etc.).
• Improper maintenance (presence of dirt, etc.).
• Disassembly, modication by the user (modifying original
connectors, wires, components, etc.).
• Mechanical damage due to external causes.
www.teamorion.com 3
Page 4

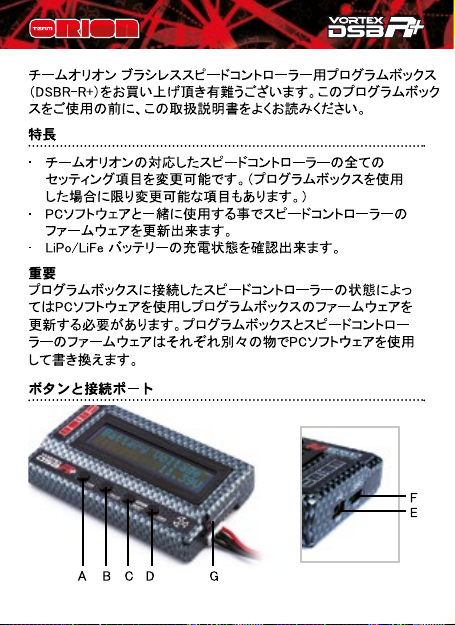
Thank you for purchasing a Team Orion DSB-R+ brushless
ESC programming box. Please read these instructions
thoroughly before using it.
FEATURES
• Adjust all the parameters of Team Orion ESC (certain
settings are only available when using the program box).
• Use in conjunction with the computer software to update
or modify the ESC’s rmware.
• Check the charge status of your LiPo/LiFe batteries.
Important!
In certain cases, such as incompatible ESC/box software
versions, you may need to update the program box rmware
using the computer software. The program box and ESC
rmware are two separate rmwares which can be updated
using the computer software.
F
E
A B C D G
4 Copyright Team Orion © 2014
Page 5

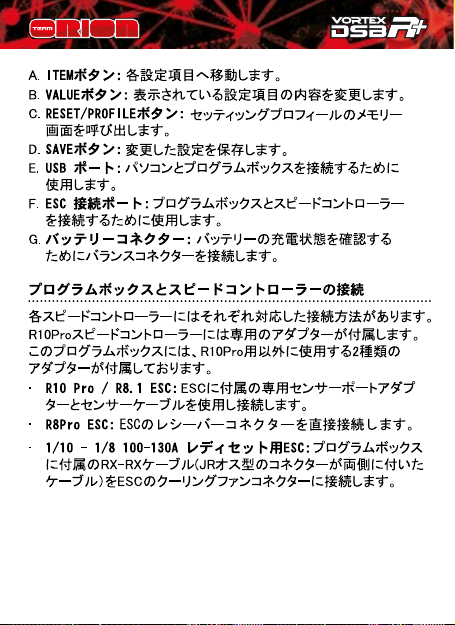
KEYS AND PORTS
A. ITEM key: navigate between the various adjustable
parameters
B. VALUE key: modify the current parameter setting
C. RESET/PROFILE key: go to the memory prole selection
screen
D. SAVE key: save the modications to the ESC memory
E. USB port: used to connect the program box to a PC
computer
F. ESC connection port: used to connect the ESC to the
program box
G. Battery connector: used to connect the battery’s
balancing plug to check its charge status
CONNECTING THE ESC TO THE PROGRAM BOX
The dierent ESC types require dierent connection
methods to work with the program box.
• R10 Pro / R8.1 ESC w/dual sensor ports: use the special
sensor adapter (supplied with the ESC) and a regular
sensor wire connected to the top sensor port of the ESC.
• R8Pro ESCs: connect directly to the program box
• 1/10 – 1/8 100-130A RTR ESC: use the JR male-male cable
supplied with the program box and plug it into the cooling
fan connector located on the ESC.
www.teamorion.com 5
Page 6

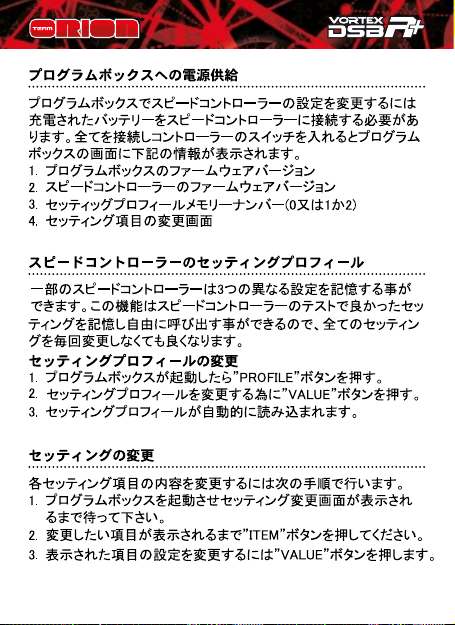
POWERING UP THE PROGRAM BOX
A charged battery, connected to the ESC is required as
power source. Once the ESC is connected to the program
box, switch on the ESC and the program box will also power
on. Information is displayed in the following order.
1. Program box rmware version.
2. ESC rmware version
3. Current setting proles memory (0, 1 or 2)
4. Parameters display
ESC SETTING PROFILES MEMORY
Some ESC allow you to memorize three dierent setting
proles. Thanks to this, you can select a dierent prole
to make experimentations and not have to modify a set of
settings which already works adequately.
To change the prole:
1. After the startup procedure is complete, press the
“prole” key.
2. Press the “value” key to switch prole (0, 1 or 2).
3. The settings are automatically loaded.
MODIFYING THE PARAMETERS
Follow this procedure to modify the parameters:
1. Wait for the power up procedure to complete
2. Press the “item” key to switch between the dierent
parameters.
3. Press the “value” key to change the setting of the current
parameter.
6 Copyright Team Orion © 2014
Page 7

4. After you have made the modications, make sure you
save the changes by pressing the “save” key.
Note: available parameters vary depending on the ESC type.
Refer to the ESC user manual.
RESTORE FACTORY DEFAULT SETTINGS
You can restore the factory default settings for the current
prole by pressing the “save” key while “Restore Default” is
displayed on the screen.
CHECK BATTERY CHARGE STATUS
The program box can check the charge status of your
batteries. To use this function, connect your LiPo/LiFe
battery to the program box using the balancing connector
of the battery. The display shows the total battery voltage,
charge percentage and also a graphical representation of
the battery charge status.
Note: make sure to respect the polarity as indicated on the
program box
COMPUTER SOFTWARE
The computer software allows you to update the program
box and ESC rmware (which are two separate rmware)
and modify the ESC parameters (as with the program box).
You can nd the latest version of the computer software on
our www.teamorion.com/R10-downloads.html website. All
of the available ESC and program box rmware are included
www.teamorion.com 7
Page 8

inside the computer software, you don’t need to download
them separately. Every time an update is released it includes
everything you need.
Note:
a) even when using the computer software, the program box
cannot power the ESC, a charged battery connected to the
ESC is required.
b) when a new PC software is released, it doesn’t mean
that an update is available for the program box or all the
ESC types. Don’t try updating your program box or ESC
unnecessarily.
Use the computer software to update the program box
rmware:
1. Download the software from our website and install it.
2. Launch the software.
3. Connect the program box to the computer using the
supplied USB cable.
4. In the software, in the device tab, select the program box.
5. Click on the rmware upgrade button and then on the
upgrade version drop down menu to select the new
software version.
6. Click the upgrade button to ash the new rmware.
Use the computer software to update/modify the ESC
rmware:
1. Download the software from our website and install it.
2. Launch the software.
3. Connect the program box to the computer using the
supplied USB cable.
8 Copyright Team Orion © 2014
Page 9

4. Connect the ESC to program box and power it on.
5. In the software, in the device tab, select ESC speed
controller
6. Click on the rmware upgrade button and then on the
upgrade version drop down menu to select the new
software version.
7. Click the upgrade button to ash the new rmware.
Use the computer software to modify the ESC
parameters:
1. Download the software from our website and install it.
2. Launch the software.
3. Connect the program box to the computer using the
supplied USB cable.
4. Connect the ESC to program box and power it on.
5. In the software, in the device tab, select ESC speed
controller
6. Click on the basic/advance buttons and then on the drop
down menus to modify the settings.
7. Click the apply button to save the changes to the ESC
memory.
www.teamorion.com 9
Page 10

BEDIENUNGSANLEITUNG · DEUTSCH
Garantie ............................................................................. 11
Eigenschaften .................................................................... 12
Tasten und Anschlüsse ..................................................... 12
Den Regler an die Programmierbox anschliessen ........ 13
Programmierbox starten ................................................. 14
Speicherprole des Reglers ............................................. 14
Parameter ändern ............................................................ 14
Auf Standardeinstellungen zurücksetzen ..................... 15
Akku-Status prüfen .......................................................... 15
Computer Software .......................................................... 15
10 Copyright Team Orion © 2014
Page 11

GARANTIE
Team Orion garantiert, dass dieses Produkt frei ist von
Herstellungs- und Bearbeitungsfehlern. Die Garantie deckt
nicht inkorrekte Installation, Gebrauchsabnützung oder
jegliche andere Probleme, die durch inkorrekte Anwendung
des Produkts entstanden sind. Jegliche Haftung für Schäden,
die durch den Gebrauch dieses Produkts entstehen,
wird abgelehnt. Mit dem Gebrauch dieses Produkts
übernimmt der Anwender jegliche Haftung. Nicht korrekte
Anwendungen sind:
• Nicht befolgen der Anleitung.
• Nicht korrekter Gebrauch des Produkts (Missbrauch,
Überlastung etc)
• Falsche Einstellungen für korrekte Funktion (falscher
Anschluss, falsche Übersetzung, Installation etc.)
• Überlastung, Überhitzung (schmelzen, ablöten etc)
• Anwendung bei nicht adäquaten Bedingungen
(Beschädigung oder Rost durch Schmutz, Feuchtigkeit etc.)
• Falsche Pege (Anwesenheit von Schmutz etc.)
• Demontage/Modikation des Produkts durch den
Anwender (Ändern der Originalstecker, Kabel,
Komponenten etc.)
• Mechanische Beschädigung von aussen
www.teamorion.com 11
Page 12
Vielen Dank, dass Sie sich für die Team Orion DSB-R+ ReglerProgrammierbox entschieden haben. Bitte lesen Sie diese
Anleitung genau durch, bevor Sie das Produkt verwenden.
EIGENSCHAFTEN
• Stellen Sie alle Parameter Ihres Team Orion Reglers
ein (einige Einstellungen sind nur mit Hilfe dieser
Programmierbox zugänglich)
• Mit Hilfe der Computer-Software kann die Firmware des
Reglers aktualisiert werden
• Prüfen Sie den Ladezustand Ihrer LiPo/LiFe Akkus
WICHTIG: Je nach Regler-Typ, den Sie an die Programmierbox anschliessen wollen, müssen Sie die Firmware der
Programmierbox zuerst mit der PC-Software aktualisieren.
Die Programmierbox und der Regler sind je mit einer
unterschiedlichen Firmware ausgestattet, die unabhängig
voneinander aktualisiert werden können.
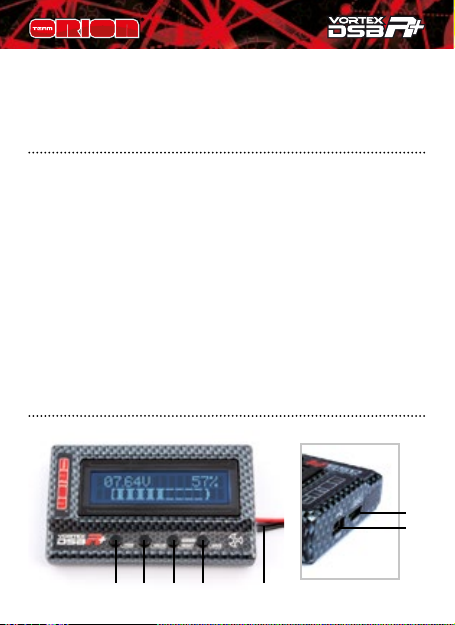
TASTEN UND ANSCHLÜSSE
F
E
12 Copyright Team Orion © 2014
A B C D G
Page 13

A. ITEM: navigieren Sie mit dieser Taste durch die
verschiedenen Einstellungsparameter
B. VALUE: ändern Sie mit dieser Taste den Wert eines
Parameters
C. RESET/PROFILE: geht zum Auswahlmenu für gespeicherte
Prole
D. SAVE: speichert die Änderungen im Regler
E. USB Anschluss: für den Anschluss der Programmierbox an
den Computer (PC)
F. ESC: für den Anschluss der Programmierbox an den Regler
G. Akku-Anschluss: für die Verbindung mit einem Balancer-
Stecker eines Akkus, um dessen Ladezustand zu prüfen
DEN REGLER AN DIE PROGRAMMIERBOX ANSCHLIESSEN
Je nach Regler wird die Programmierbox unterschiedlich
angeschlossen. Ein spezieller Adapter liegt dem R10Pro Regler
bei, zwei weitere Adapter werden mit der Programmierbox
ausgeliefert.
• R10Pro / R8.1 Regler mit Dual Sensor Port: verwenden
Sie den Sensor Port Adapter, der dem Regler beiliegt,
zusammen mit einem herkömmlichen Sensor-Kabel
• R8Pro Regler: direkter Anschluss an die Programmierbox
• 1/10 – 1/8 100-130A RTR Regler: verwenden Sie das
JR Adapterkabel, das der Programmierbox beiliegt, um
den Regler über dessen Ventilator-Anschluss mit der
Programmierbox zu verbinden.
www.teamorion.com 13
Page 14

PROGRAMMIERBOX STARTEN
Ein voller Akku, an den Regler angeschlossen, wird als
Stromquelle für die Programmierbox verwendet. Schliessen
Sie den Regler an die Programmierbox an und schalten Sie
ihn ein. Die Programmierbox schaltet sich so ebenfalls ein.
Die Programmierbox zeigt die folgenden Informationen an:
1. Firmware-Version der Programmierbox
2. Firmware-Version des Reglers
3. Aktueller Prol-Speicher (0, 1 oder 2)
4. Anzeige der Einsellungen
SPEICHERPROFILE DES REGLERS
Einige Regler erlauben es, drei verschiedene Prole zu
speichern. So können Sie einen Speicherplatz gebrauchen,
um zu experimentieren und müssen nicht ein Setup
abändern, das bereits gut funktioniert. Zu einem anderen
Prol wechseln:
1. Nach dem Start drücken Sie die PROFILE-Taste
2. Drücken Sie die VALUE-Taste, um zu einem anderen Prol
zu wechseln (0, 1 oder 2)
3. Die Einstellungen werden geladen
PARAMETER ÄNDERN
Folgen sie den Anweisungen, um eine Einstellung zu ändern:
1. Warten Sie ab, bis der Startvorgang abgeschlossen ist
2. Drücken Sie die ITEM-Taste, um einen Parameter
auszuwählen
3. Drücken Sie die VALUE-Taste, um den Wert des
entsprechenden Parameters zu ändern
14 Copyright Team Orion © 2014
Page 15

4. Nachdem Sie die Änderung vorgenommen haben,
müssen Sie zum Speichern die SAVE-Taste drücken
Bemerkung: die verfügbaren Einstellungen variieren je nach
Regler-Modell.
AUF STANDARDEINSTELLUNGEN ZURÜCKSETZEN
Sie können das aktuelle Prol auf die Standardeinstellungen
zurücksetzen, indem Sie im Menu “Restore Default” auf die
SAVE Taste drücken.
AKKU-STATUS PRÜFEN
Mit der DSB-R+ Programmierbox können Sie den Status
Ihres Akkus prüfen. Um diese Funktion zu verwenden,
müssen Sie den Balancer-Stecker des Akkus mit dem AkkuAnschluss der Programmierbox verbinden. Das Display zeigt
nun die Gesamt-Spannung des Akkus und den Ladezustand
in Prozenten .
Bemerkung: Beachten Sie die Polarlität +/- wie auf der
Programmierbox aufgedruckt.
COMPUTER SOFTWARE
Mit der Computer PC-Software können Sie die Firmware
der Programmierbox und des Reglers ändern/aktualisieren
(zwei verschiedene Firmwares). Sie können ebenfalls die
Einstellungen des Reglers mit der PC-Software verändern,
genau gleich wie mit der Programmierbox.
Sie nden die neuste Version der PC-Software auf unserer
www.teamorion.com 15
Page 16

Homepage www.teamorion.com/r10-downloads.html. Alle
verfügbaren Firmware-Updates für Programmbox und für
den Regler sind in der PC-Software enthalten. Sie müssen
nicht separat heruntergeladen werden. Bei jedem Update
wird das gesamte Software-Package aktualisiert.
Bemerkung:
a) Auch wenn Sie die Computer-Software zum Ändern der
Regler-Einstellungen verwenden, muss ein voller Akku an
den Regler angeschlossen sein. Die Programmierbox kann
den Regler nicht mit Strom versorgen.
b) Wenn eine neue PC-Software heruntergeladen werden
kann, bedeutet dies nicht, dass auch eine neue ReglerFirmware verfügbar ist. Aktualisieren Sie Ihren Regler oder
die Programm-Box nur, wenn dies erforderlich ist.
Mit dem Computer die Firmware der Programmierbox
aktualisieren:
1. Laden Sie die Software von der Webseite herunter und
installieren sie
2. Starten Sie die Software
3. Verbinden Sie die Programmierbox mit Hilfe des
mitgelieferten USB-Kabels mit Ihrem Computer
4. Wählen Sie in der Registerkarte “Device” der Software die
“Program Box” aus
5. Klicken Sie auf die Registerkarte “Software” und wählen
dann aus dem Dropdown-Menu “Choice Version” die neue
Software-Version aus
6. Klicken Sie nun auf die “Upgrade” Taste, um die neue
Firmware auf der Box zu installieren.
16 Copyright Team Orion © 2014
Page 17

Mit dem Computer die Firmware des Reglers
aktualisieren:
1. Laden Sie die Software von der Webseite herunter und
installieren sie
2. Starten Sie die Software
3. Verbinden Sie die Programmierbox mit Hilfe des
mitgelieferten USB-Kabels mit Ihrem Computer
4. Verbinden Sie den Regler mit der Programmierbox und
schalten Sie ihn ein
5. Wählen Sie in der Registerkarte “Device” der Software den
“ESC Speed Controller” aus
6. Klicken Sie auf die Registerkarte “Software” und wählen
dann aus dem Dropdown-Menu “Choice Version” die neue
Software-Version aus
7. Klicken Sie nun auf die “Upgrade” Taste, um die neue
Firmware auf der Box zu installieren.
Mit dem Computer die Regler-Einstellungen ändern:
1. Laden Sie die Software von der Webseite herunter und
installieren sie
2. Starten Sie die Software
3. Verbinden Sie die Programmierbox mit Hilfe des
mitgelieferten USB-Kabels mit Ihrem Computer
4. Verbinden Sie den Regler mit der Programmierbox und
schalten Sie ihn ein
5. Wählen Sie in der Registerkarte “Device” der Software den
“ESC Speed Controller” aus
6. Klicken Sie auf die Registerkarten “Basic/Advance” und
ändern dann im Dropdown Menu die Einstellungen
7. Klicken Sie auf die Taste “Apply”, um die Änderungen im
Regler zu speichern
www.teamorion.com 17
Page 18

MODE D‘EMPLOI · FRANCAIS
Garantie ............................................................................. 19
Caracteristiques ................................................................ 20
Touches et Connecteurs ................................................... 21
Raccordement du variateur au boîtier .......................... 21
Mise en route du boîtier .................................................. 22
Mémoire prolS de réglages ............................................ 22
Modication des paramètres .......................................... 22
Remettre en conguration d’usine ................................. 23
Contrôle de l’état de charge des batteries .................... 23
Logiciel PC .......................................................................... 23
18 Copyright Team Orion © 2014
Page 19

GARANTIE
Team Orion garanti que ce produit ne comporte pas de
défauts de fabrication. Cette garantie n’est pas valable
lors d’une mauvaise utilisation, d’usure due à l’utilisation
ou tout autre problème résultant d’une utilisation ou
d’une manipulation inappropriée du produit. Aucune
responsabilité ne sera assumée pour un quelconque
dommage résultant de l’utilisation du produit. Du fait
de connecter et d’utiliser ce produit, l’utilisateur accepte
toutes les responsabilités découlant de son utilisation. Sont
considérés comme mauvaise utilisation:
• Ne pas suivre les instructions.
• Utilisation inadaptée (abus, utilisation extrême, etc.) :
• Réglages inadaptés (mauvaises connexions, rapport
inadapté, mauvaise installation, etc.).
• Surcharge, surchaue (éléments dessoudés, brûlés, etc.).
• Conditions d’utilisation inappropriées (humidité, pluie,
etc.).
• Mauvais entretien (présence de saleté, etc.).
• Démontage, modications par l’utilisateur (modication
des connecteurs, câbles, composants, etc.).
• Dommage dus aux chocs
www.teamorion.com 19
Page 20
Nous vous remercions pour l’acquisition de ce boîtier
de programmation DSB-R+. Lisez attentivement ces
instructions avant d’utiliser le boîtier.
CARACTERISTIQUES
• Permet de régler tous les paramètres des variateurs
Team Orion (certains réglages ne peuvent être accédés
qu’avec le boîtier).
• En combinaison avec le logiciel PC, permet la mise à jour
et la modication du micrologiciel du variateur.
• Permet le contrôle de l’état de charge des batteries LiPo/
LiFe.
Important: il se peut que vous deviez mettre à jour
le micrologiciel du boîtier à l’aide du logiciel PC si le
micrologiciel du variateur et du boîtier sont incompatibles.
Le micrologiciel du variateur et du boîtier sont mis à jour
indépendamment avec le logiciel PC.
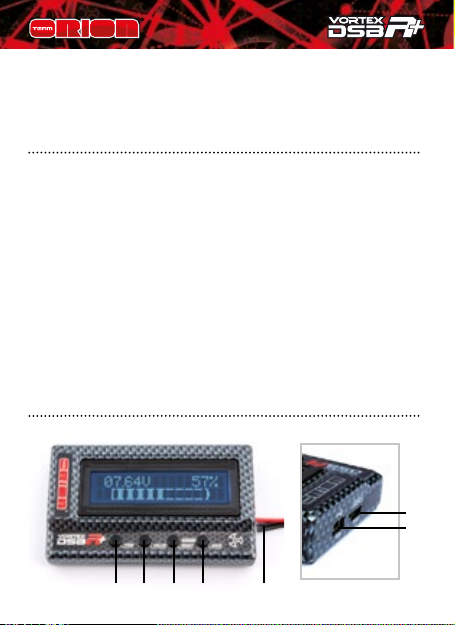
F
E
20 Copyright Team Orion © 2014
A B C D G
Page 21

TOUCHES ET CONNECTEURS
A. Touche ITEM: naviguer entre les diérents paramètres
B. Touche Value: changer la valeur de réglage du paramètre
actuel
C. Touche Reset/Prole: ache l’écran de sélection de
mémoire de prol de réglages
D. Touche Save: sauvegarde les modications
E. Port USB: sert à raccorder le boîtier à l’ordinateur
F. Connecteur pour le variateur: sert à raccorder le
variateur au boîtier
G. Connecteur batterie: sert à raccorder la che
d’équilibrage de la batterie pour vérier son état de charge.
RACCORDEMENT DU VARIATEUR AU BOÎTIER
Les diérents types de variateurs se connectent de façon
diérente au boîtier de programmation.
• R10Pro / R8.1 avec double port sensor: utilisez
l’adaptateur fourni avec le variateur et un câble sensor
branché dans le conneteur supérieur du variateur.
• R8Pro: raccordez le variateur directement au boîtier.
• RTR 1/10 – 1/8 100-130A: utilisez le câble JR mâle-mâle
fourni avec le boîtier, branché sur le connecteur du
ventilateur localisé sur le variateur.
www.teamorion.com 21
Page 22

MISE EN ROUTE DU BOÎTIER
Une batterie chargée et raccordée au variateur est utilisée
comme source de courant. Une fois le variateur raccordé au
boîtier, enclenchez le variateur, le boîtier s’allume.
Les informations sont achées dans cet ordre:
1. Version du micrologiciel boîtier
2. Version du micrologiciel variateur
3. Mémoire de prol de réglages actuelle (0, 1 ou 2)
4. Achage des paramètres
MÉMOIRE PROFILS DE RÉGLAGES
Certains variateurs permettent de mémoriser 3 prols de
réglages diérents. Ceci permet de changer de mémoire pour
faire des essais et éviter de dérégler un prol qui donne déjà
des résultats satisfaisants.
Pour changer de prol:
1. Une fois la mise en route eectuée, pressez la touche
«prole».
2. Pressez la touche «value» pour changer de prol (0,1 ou 2).
3. Les réglages sont chargés automatiquement.
MODIFICATION DES PARAMÈTRES
Suivez cette procédure pour modier les paramètres du
variateur:
1. Attendez que la procédure de mise en route se termine.
2. Pressez la touche «item» pour naviguer entre les
paramètres.
22 Copyright Team Orion © 2014
Page 23

3. Pressez la touche «value» pour modier le réglage du
paramètre actuel.
4. Une fois les modications eectuées, pressez la touche
«save» pour enregistrer les modications.
Note: les paramètres disponibles varient selon le type de
variateur. Référez-vous au mode d’emploi du variateur pour
connaître les paramètres modiables.
REMETTRE EN CONFIGURATION D’USINE
Vous pouvez remettre en conguration d’usine les réglages
du prol mémoire actuel en pressant la touche «save» alors
que le texte «Restore Default» est aché à l’écran.
CONTRÔLE DE L’ÉTAT DE CHARGE DES BATTERIES
Le boîtier vous permet aussi de contrôler l’état de charge
des batteries. Pour ce faire, il sut de brancher la che
d’équilibrage de la batterie LiPo/Life sur le boîtier. L’achage
indique la tension totale de la batterie, le pourcentage de
charge restante ainsi qu’une représentation graphique de
l’état de charge.
Note: faites attention à respecter la polarité, tel qu’indiqué
sur le boîtier du régulateur.
LOGICIEL PC
Le logiciel PC vous permet de mettre à jour le micrologiciel
du boîtier de programmation et du variateur (qui sont
deux choses séparées) et de modier les paramètres du
www.teamorion.com 23
Page 24

variateur (comme avec le boîtier seul). Vous pouvez trouver
la dernière version du logiciel sur notre site www.teamorion.
com/R10-downloads.html.
Tous les micrologiciels des variateurs et du boîtier sont
contenus dans le logiciel, il n’y a pas besoin de télécharger
d’autres composants. Chaque fois qu’une mise à jour est
disponible, elle contient toutes les données.
Note:
a) même lorsque vous utilisez le logiciel PC, le boîtier seul
ne peut pas alimenter le variateur. Il faut qu’une batterie
chargée soit raccordée au variateur.
b) lorsqu’une mise à jour du logiciel est mise en ligne, cela
ne veut pas dire qu’il y a obligatoirement une mise à jour
pour le boîtier ou votre variateur. N’essayez pas de mettre à
jour le boîtier ou le variateur inutilement.
Utilisation du logiciel PC pour la mise à jour du
micrologiciel du boîtier
1. Téléchargez et installez le logiciel PC.
2. Lancez le logiciel.
3. Raccordez le boîtier au PC à l’aide du câble USB fourni.
4. Dans le logiciel, cliquez sur l’onglet «device» et
sélectionnez «program box».
5. Cliquez sur le bouton «rmware upgrade» puis sur le
menu déroulant «upgrade version» pour sélectionner le
nouveau micrologiciel.
6. Cliquez sur le bouton «upgrade» pour installer le
nouveau micrologiciel.
24 Copyright Team Orion © 2014
Page 25

Utilisation du logiciel PC pour la mise à jour/
modication du micrologiciel du variateur
1. Téléchargez et installez le logiciel PC.
2. Lancez le logiciel.
3. Raccordez le boîtier au PC à l’aide du câble USB fourni.
4. Dans le logiciel, cliquez sur l’onglet «device» et
sélectionnez «ESC speed controller».
5. Cliquez sur le bouton «upgrade version» puis sur le
menu déroulant «upgrade version» pour sélectionner le
nouveau micrologiciel.
6. Cliquez sur le bouton «upgrade» pour installer le
nouveau micrologiciel.
Utilisation du logiciel PC pour la modication des
paramètres du variateur
1. Téléchargez et installez le logiciel PC.
2. Lancez le logiciel.
3. Raccordez le boîtier au PC à l’aide du câble USB fourni.
4. Dans le logiciel, cliquez sur l’onglet «device» et
sélectionnez «ESC speed controller».
5. Cliquez sur les boutons «basic» ou «advance» puis sur
les menus déroulants pour modier les paramètres.
6. Cliquez sur le bouton «apply» pour sauvegarder les
modications.
www.teamorion.com 25
Page 26
26 Copyright Team Orion © 2014
27
28
28
29
30
30
30
31
31
31
32
32
33
Page 27
www.teamorion.com 27
Page 28
28 Copyright Team Orion © 2014
Page 29
www.teamorion.com 29
Page 30
30 Copyright Team Orion © 2014
Page 31
www.teamorion.com 31
Page 32
32 Copyright Team Orion © 2014
Page 33
www.teamorion.com 33
Page 34

34 Copyright Team Orion © 2014
Page 35

www.teamorion.com 35
Page 36

www.teamorion.com
www.facebook.com/teamorion
www.youtube.com/teamorioncom
Copyright Team Orion © 2014
 Loading...