


INSTRUCTION MANUAL
MODE D’EMPLOI
BEDIENUNGSANLEITUNG

2 Copyright Team Orion © 2015
CONNECTIONS
1) Battery
2) Servo
3) Receiver
4) Switch
5) Vortex dDrive
6) Battery Connector
1
5
6
3
2
4
SET
ON/OFF

www.teamorion.com 3
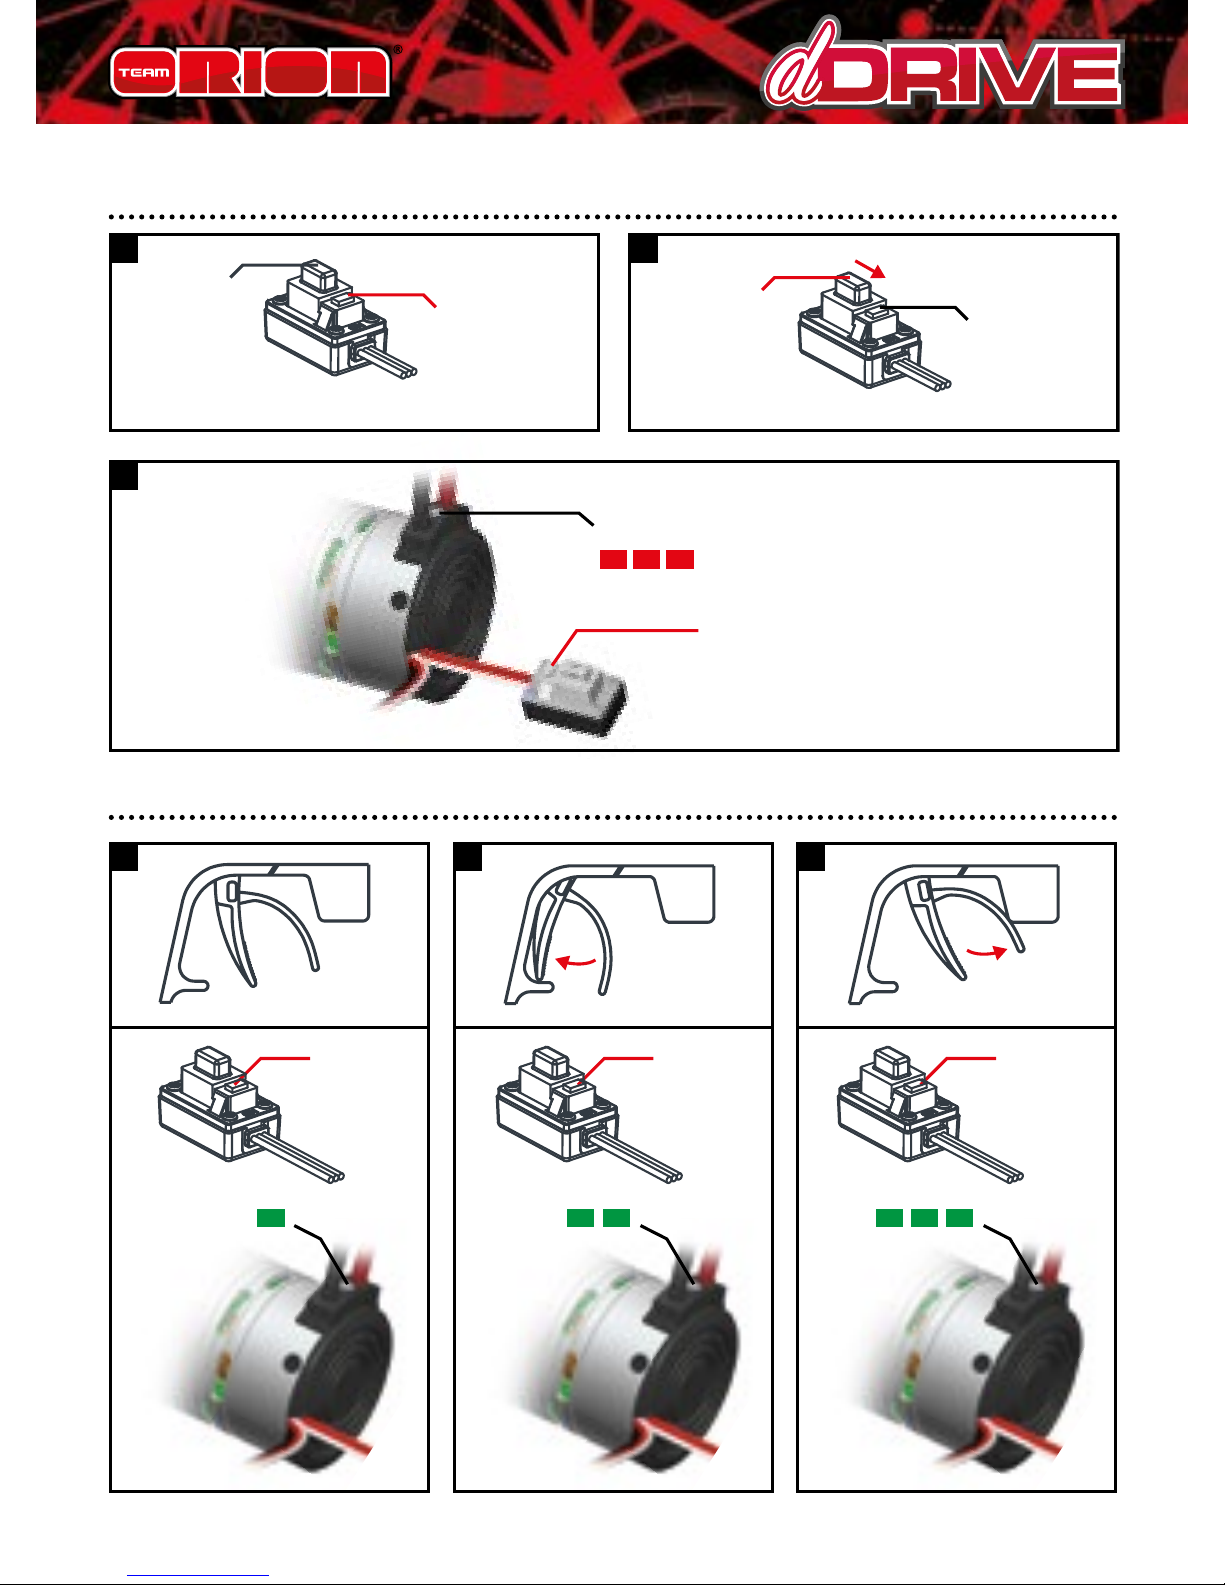
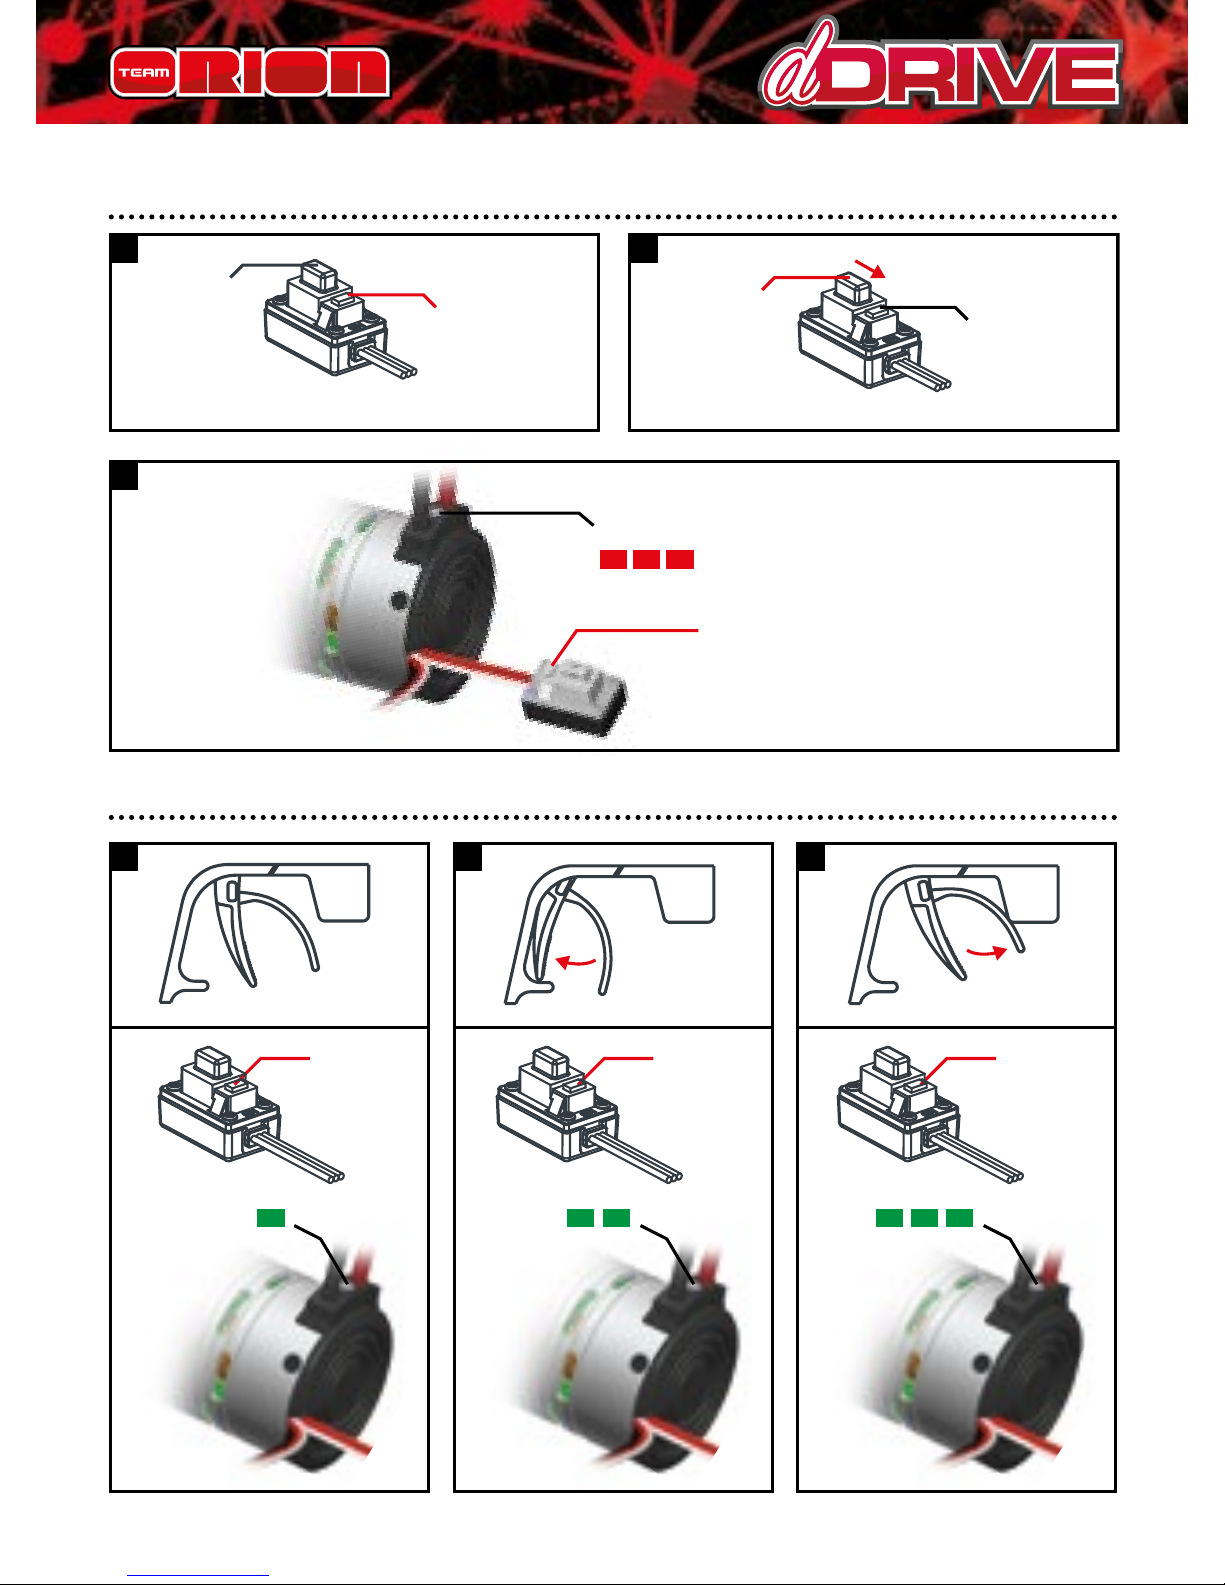
CALIBRATION STEP 1
1
3
2
LED
ON/OFF
Press and
hold the
SET button
Switch ON
Keep
pressing
the SET
button
Release as
soon as soon as
the red LED
starts to blink
LED
1 2
LED LED
3
Press
once
Press
once
Press
once
CALIBRATION STEP 2

4 Copyright Team Orion © 2015
PROGRAMMING YOUR ESC
2 2
3
3 3
1
7
4
6
5
Connect the battery
Enter Program Mode
Choose the parameter you want to change
OR
Reset all programmable items
Press the
SET button
for 1s
Press the
SET button
for 5s
Press the SET button
1 time to select the
1st parameter...
...press the SET button
2 times to select the
2nd parameter etc.
Switch ON
Switch OFF
ESC to complete
the procedure
LED blinks 1 time
LED blinks
1 time
LED blinks 2 times
LED
blinks
Press the SET button
for 3s to modify
the setting of the
parameter
Press the SET button
for 3s to save the
new setting
Use the SET button
to change the setting
of the parameter.
Press 1 time
LED blinks
2 times
Press 2 times etc.

www.teamorion.com 5
AVAILABLE AND DEFAULT SETTINGS
Parameter
Setting
1 2 3 4 5 6 7 8 9
1. Running Mode
Forward
with
Brake
Forward/
Reverse
with
Brake
2. Low Voltage
Cut-Off Threshold
No
Cut-Off
2.6V/Cell 2.8V/Cell 3.0V/Cell 3.2V/Cell 3.4V/Cell
3. Start Mode(Punch) Level1 Level2 Level3 Level4
4. Max Brake Force 25% 50% 75% 100%
More information on page 11-12-13

6 Copyright Team Orion © 2015
Thank you for purchasing a Team Orion dDrive brushless
power unit. This unique system combines the brushless
motor and ESC inside a single aluminum case. Please read
these instructions thoroughly before using your dDrive.
WARNINGS
Read the ENTIRE instruction manual to become familiar
with the features of the product before operating. This
is a sophisticated hobby product. It must be operated
with caution and common sense and requires some basic
mechanical ability. This product is not intended for use by
children without direct adult supervision. Do not attempt
disassembly, use with incompatible components or augment
product in any way. This manual contains instructions for
safety, operation and maintenance. It is essential to read
and follow all the instructions and warnings in the manual,
prior to assembly, setup or use, in order to operate correctly
and avoid damage or serious injury.
• Use extra caution in case of water exposure
• Always use only compatible batteries.
• Always power o the dDrive when not in use.
• Always disconnect the battery when not in use.
• The dDrive will become hot during use, be careful before
touching or handling it.
Failure to exercise caution while using this product could
result in product malfunction, electrical issues, excessive
heat, FIRE, and ultimately injury and property damage.
Not for children under 14 years. This is not a toy.
INSTRUCTION MANUAL · ENGLISH

www.teamorion.com 7
LIMITED WARRANTY
Team Orion warrants to the original purchaser that the
product purchased is free from defects in materials and
workmanship at the date of purchase. Team Orion reserves
the right to change or modify this warranty without notice
and disclaims all other warranties, express or implied. This
warranty is limited to the original purchaser and is not
transferable. Replacement as provided under this warranty
is the exclusive remedy of the purchaser. This warranty
covers only the products purchased from an authorized
dealer. Third party transactions are not covered by this
warranty. Proof of purchase is required for warranty
claims. Team Orion makes no warranty or representation,
express or implied, about non infringement, merchantability
or tness for a particular purpose of the product. The
purchaser acknowledges that they alone have determined
that the product will suitably meet the requirements of the
purchaser’s intended use.
Team Orion’s sole obligation hereunder shall be that it will,
at its option, repair or replace any product determined by
Team Orion to be defective in the event of a defect, this is
the purchaser’s exclusive remedy. Replacement decisions
are at Team Orion’s sole discretion. This warranty does
not cover cosmetic damage or damage due to acts of God,
accident, misuse, abuse, negligence, commercial use, or
modication of or to any part of the product. This warranty
does not cover damage due to improper installation,
operation, maintenance or attempted repair by anyone.
Team Orion will not be liable for special, indirect or
consequential damages, loss of prots or production or

8 Copyright Team Orion © 2015
commercial loss in any way connected with the product,
whether claim is based in contract, warranty, negligence, or
strict liability. Further, in no event shall the liability of Team
Orion exceed the individual price of the product on which
liability is asserted. As Team Orion has no control over use,
setup, nal assembly, modication or misuse, no liability
shall be assumed nor accepted for any resulting damage
or injury. By the act of use, setup or assembly the user
accepts all resulting liability. If you as the purchaser or user
are not prepared to accept the liability associated with the
use of this product, you are advised to return this product
immediately in new and unused condition to the place of
purchase.
Instructions for disposal of WEEE by users in the
European Union
This product must not be disposed of with other waste.
Instead, it is the user’s responsibility to dispose of their
waste equipment by handing it over to a designated
collections point for the recycling of waste electrical and
electronic equipment. The separate collection and recycling
of your waste equipment at the time of disposal will help to
conserve natural resources and ensure that it is recycled in
a manner that protects human health and the environment.
For more information about where you can drop o your
waste equipment for recycling, please contact your local city
oce, your household waste disposal service or where you
purchased the product.

www.teamorion.com 9
FEATURES
• Designed for on-road and o-road 1/10 scale cars
• Splash proof
• Forward and reverse function
• 4 pole brushless motor
• 45A ESC
• High power built-in BEC system
• Easy set-up via the setup button located on the switch
• Adjustable parameters
• Multiple protection systems: battery low voltage cut-o,
overheating, radio signal loss, stuck motor
INSTALLATION - CONNECTION
ATTACHMENT: Attach the dDrive to the car’s motor mount
using 3mm metric screws. If a motor was already tted to
your car, you will likely be able to re-use the same screws.
Adjust the motor so that there is about 0.5mm play between
the gear and pinion.
WARNING! If the motor screws are too long, you risk
shorting and damaging the motor!
GEARING: You can use the original pinion that came with
your car. However, you may also need to change the gearing
to get optimal performance. If the dDrive overheats use a
smaller pinion, if the car is slow and the motor temperature
is low, you can use a bigger pinion to increase performance.

10 Copyright Team Orion © 2015
CONNECTION: The dDrive is equipped with a battery
connector, a receiver plug and a power/setup switch.
Connect the ESC receiver plug to the channel 2 of your
receiver and secure the switch with double-sided tape to the
car chassis.
BATTERY: Use a 2S LiPo 7.4V (recommended) or 6-7 cell
NiMH 7.2-8.4V battery as a power source. The battery must
be equipped with a Deans® type connector compatible
with the one installed on the ESC. Using low grade batteries,
adapters or modifying the ESC connectors, can cause loss of
performance, damage, or void the warranty.
ESC CALIBRATION
In order to ensure proper function, the ESC must be
calibrated to your transmitter inputs. It is recommended to
center the trims and reset all settings inside the transmitter
before proceeding with the calibration. Follow the procedure
below to calibrate your ESC
A. Switch o the ESC and switch the transmitter on,
B. Press and hold the SET button (located on the ESC’s
switch), then switch on the ESC. Release the SET button as
soon as the red LED starts to ash.
C. Calibrate the throttle points by pressing the SET button
once after each step.
1. neutral point (1 green ash)
2. full throttle (2 green ashes)
3. full brakes/reverse (3 green ashes)
D. The motor will run 3 seconds after the last step is
completed.

www.teamorion.com 11
STATUS LED FUNCTION
• In the neutral position, no LED are lit.
• The red LED lights when the car is moving forward,
backwards or when braking.
• At full throttle the green LED is lit.
AUDIO WARNING TONES
1. Input voltage problem: ESC checks the input voltage as
it is switched on, if a problem is detected, the ESC emits
repeatedly two beeps with a 1 second pause and the
green LED ashes simultaneously (xx-xx-xx).
2. Radio signal problem: ESC checks the radio signal input as
it is switched on, if a problem is detected, the ESC emits
repeatedly a beep with a 2 second pause and the green
LED ashes simultaneously (x-x-x).
ESC ADVANCED SETUP
You can adjust certain parameters by using the SET button
located on the ESC’s switch. To adjust the parameters, follow
the procedure below.
A. Switch on the ESC.
B. Press the SET button and release it when the green LED
starts ashing.
C. Use the SET button to cycle between the various
adjustable parameters. The number of green ashes
indicates the parameter, one ash = running mode, two
ashes = low voltage cut-o and so on. The ESC will cycle
through all the adjustable parameters in a loop.
D. Once the green LED is ashing the number of times

12 Copyright Team Orion © 2015
relative to the parameter you wish to modify, press the
SET button until the red LED starts ashing, indicating the
current setting for that parameter, one ash = setting one,
two ashes = setting two, etc.
E. Press the SET button to change the current setting value,
the ESC will cycle through all the available settings.
F. Once the red LED is ashing the number of times relative
to the setting you wish to use, press the SET button for 3
seconds. The setting is saved.
G. Switch o the ESC to exit programming mode
ADJUSTABLE PARAMETERS
Running Mode
1) “Forward Only with Brake” this mode is meant for
competition use. In this mode the car can go forward and
brake, there is no reverse.
2) “Forward/Reverse with Brake” this is the basic all-around
mode. In this mode the car can go forward and reverse
and can also brake. When you move the throttle to the
reverse position while the car is moving forward, brakes
are applied until the car is fully stopped, reverse cannot
engage while the car is moving. To engage reverse, once the
car has stopped, release the brakes and move the throttle
to the reverse position again. While braking or in reverse,
if the throttle is moved to the forward position, the car will
immediately accelerate forward.

www.teamorion.com 13
Low Voltage Cut-o
This function helps to prevent battery over-discharge. The
ESC continuously monitors the battery’s voltage. If the
voltage becomes lower than the threshold for 2 seconds,
the output power is shut o and the red LED ashes twice
repeatedly.
Start mode “punch”
This parameter sets the initial throttle punch when the car
accelerates. Level1 gives a softer initial acceleration and level
9 gives a stronger initial acceleration.
Braking strength
This parameter adjusts the maximum breaking force. A
higher value provides stronger braking, but it can also
cause the wheels to lock causing loss of control of the car.
Stronger brakes make the ESC work harder and run hotter,
overloading the ESC can cause the overheat protection to
activate.
Restore Default Settings
With the throttle in the neutral position, press and hold the
SET button for 5 seconds, the red and green LED will ash
simultaneously indicating that the parameters have been
reset to the factory default values.

14 Copyright Team Orion © 2015
TROUBLESHOOTING
In case of malfunction, check the connections, settings and
installation. Make sure that the batteries are also charged
and functional.
NOTE: Using low power NiMH batteries can cause the dDrive
to overheat and have low performance. Use of LiPo batteries
is recommended.
Recommended working temperature: For optimal
performance, adjust the gearing and ESC settings so that the
outer case temperature is comprised between 60-80°C max
(140-175°F max).
Overheating and/or stutter: Make sure that the car’s
transmission runs freely. Check the gearing, use a smaller
pinion if necessary.
Low performance: Make sure that the car’s transmission
runs freely. Check the gearing, if the motor temperature is
low, you can use a bigger pinion to increase performance.
Do not use the dDrive if the case, connectors or wires are
damaged. Stop using the dDrive immediately if it overheats
excessively, melts or emits smoke.
If you are unable to solve the issue, stop using the ESC and
seek assistance from your local Team Orion reseller.

www.teamorion.com 15
CONNEXIONS
1) Accu
2) Servo
3) Récépteur
4) Interrupteur
5) Vortex dDrive
6) Connecteur batterie
1
5
6
3
2
4
SET
ON/OFF
16 Copyright Team Orion © 2015
CALIBRATION ETAPE 1
1
3
2
LED
ON/OFF
Maintenir
pressé
Maintenir
pressé
Enclencher
Relâcher lorsque la
LED rouge clignote
LED
1 2
LED LED
3
Pressez
une fois
Pressez
une fois
Pressez
une fois
CALIBRATION ETAPE 2

www.teamorion.com 17
PROGRAMMATION DU VARIATEUR
2 2
3
3 3
1
7
4
6
5
Brancher la batterie
Mode de programmation
Sélectionnez le paramètre que vous voulez modifier
Remise en configuration d‘usine
Pressez le
bouton
pendant 1sec
Pressez le
bouton
pendant 5sec
Pressez une fois pour
sélectionner le 1er
paramètre
Pressez deux fois pour
sélectionner le 2ème
paramètre
Enclencher
Eteignez le
variateur pour
compléter la
procédure
La LED
clignote
La LED
clignote
une fois
Pressez pendant
3sec pour modifier
le paramètre
Pressez pendant 3
secondes pour
sauvegarder la
modification
Modifiez le réglage
en pressant le bouton
1 pression
La LED
clignote
2 fois
2 pressions etc.
La LED clignote 1 fois La LED clignote 2 fois
OU

18 Copyright Team Orion © 2015
PARAMÈTRES
Plus d’informations aux pages 24-25
Parameter
Setting
1 2 3 4 5 6 7 8 9
1. Running Mode
Forward
with
Brake
Forward/
Reverse
with
Brake
2. Low Voltage
Cut-Off Threshold
No
Cut-Off
2.6V/Cell 2.8V/Cell 3.0V/Cell 3.2V/Cell 3.4V/Cell
3. Start Mode(Punch) Level1 Level2 Level3 Level4
4. Max Brake Force 25% 50% 75% 100%

www.teamorion.com 19
Nous vous félicitons pour l’achat d’un système Team Orion
dDrive. Veuillez lire attentivement ce mode d’emploi avant
l’utilisation.
MISES EN GARDE
Lisez la totalité du mode d’emploi an de vous familiariser
avec les caractéristiques du produit avant de le faire
fonctionner. Ceci est un produit de loisirs sophistiqué. Il
doit être manipulé avec prudence et bon sens et requiert
des aptitudes de base en mécanique. Ce produit n’est pas
destiné à être utilisé par des enfants sans la surveillance
directe d’un adulte. N’essayez pas de démonter le produit,
de l’utiliser avec des composants incompatibles ou d’en
améliorer les performances. Ce manuel comporte des
instructions relatives à la sécurité, au fonctionnement et
à l’entretien. Il est capital de lire et de respecter la totalité
des instructions et avertissements du manuel avant
l’assemblage, le réglage et l’utilisation, ceci an de manipuler
correctement l’appareil et d’éviter tout dégât matériel ou
toute blessure grave.
• Soyez vigilants en cas d’exposition à l’eau.
• Toujours utiliser des batteries compatibles.
• Toujours éteindre le dDrive après l’utilisation.
• Toujours débrancher la batterie après l’utilisation.
• Le dDrive chaue pendant l’utilisation, faites attention
avant de le toucher ou de le manipuler.
Uniquement pour utilisateurs de 14 ans et plus. Ceci
n’est pas un jouet.
MODE D‘EMPLOI · FRANCAIS

20 Copyright Team Orion © 2015
GARANTIE LIMITEE
Team Orion se réserve le droit de modier les instructions,
les garanties et autres documents à tout moment. Cette
garantie n’est valable que pour l’acquéreur initial du produit
et n’est pas transmissible. Un échange tel que prévu par
cette garantie, n’est possible que pour l’acquéreur initial.
Cette garantie couvre uniquement les produits achetés
chez un revendeur agrée. Les transactions tierces ne sont
pas couvertes par cette garantie. Une preuve d’achat est
nécessaire pour toutes les demandes de couverture en
garantie. Team Orion ne donne aucune garantie, implicite
ou explicite, quant à la non-contrefaçon, à la qualité
marchande ou à l’aptitude du produit à une quelconque
application. L’acquéreur reconnait qu’il a déterminé seul que
le produit répondra de manière appropriée aux exigences
de l’utilisation qu’il en envisage. Dans le présent cadre, la
seule obligation de Team Orion consistera, à sa discrétion, à
remplacer tout produit qui aura été reconnu défectueux par
ses soins. Il s’agit là du seul recours de l’acquéreur en cas de
défaut. Les décisions de remplacement relèvent de la seule
discrétion de Team Orion. Cette garantie ne couvre pas les
dommages esthétiques ou les dommages dus à des cas de
force majeure, acte divin, à des accidents, à une utilisation
incorrecte ou abusive, à la négligence, à une utilisation
commerciale ou à la modication d’un quelconque élément
du produit. Cette garantie ne couvre pas les dommages
dus à une utilisation, une manipulation ou un entretien
incorrects ou encore à une tentative de réparation.
Team Orion ne saurait être tenu pour responsable d’un

www.teamorion.com 21
quelconque préjudice spécial, indirect ou immatériel,
manque à gagner, baisse de production ou perte
commerciale liée d’une quelconque façon au produit et ce,
qu’une telle réclamation soit fondée sur un contrat, une
garantie, une négligence ou une responsabilité directe. Par
ailleurs, la responsabilité de Team Orion ne saurait en aucun
cas dépasser le prix unitaire du produit pour lequel elle est
engagée. Etant donné que Team Orion ne peut exercer de
contrôle quant à l’utilisation, au réglage, à l’assemblage nal,
à la modication ou à l’utilisation incorrecte du produit,
Team Orion décline toute responsabilité en cas de dommage
ou de blessure en résultant. En utilisant, en réglant ou en
assemblant le produit, l’utilisateur accepte d’endosser toute
responsabilité en découlant.
INSTRUCTIONS RELATIVES A L’ELIMINATION DES DECHETS
POUR LES UTILISATEURS RÉSIDANT DANS L’UNION
EUROPÉENNE
Ce produit ne doit pas être éliminé avec d’autres déchets.
Il incombe à l’utilisateur d’éliminer les équipements usagés
en les remettant à un point de collecte désigné en vue
du recyclage des déchets d’équipements électriques et
électroniques. La collecte et le recyclage séparés de vos
équipements usagés au moment de leur mise au rebut
aideront à préserver les ressources naturelles et à assurer
le recyclage des déchets de manière à protéger la santé
humaine. et l’environnement. Pour plus d’informations sur
les points de collecte de vos équipements usagés en vue du
recyclage, veuillez contacter votre mairie, votre service de
collecte des ordures ménagères ou le magasin dans lequel
vous avez acheté le produit.

22 Copyright Team Orion © 2015
CARACTERISTIQUES
• Conçu pour les voitures 1/10 piste ou tout-terrain
• Résistant à l’eau
• Marche avant et marche arrière
• Moteur 4 poles brushless
• Variateur 45A
• Système BEC haute-puissance
• Réglage facile grâce au bouton de réglage
• Divers paramétrages disponibles
• Systèmes de sécurité : coupure tension batterie faible,
surchaue, perte de signal radio, blocage moteur
INSTALLATION ET CONNEXION
FIXATION: xez le dDrive sur le support moteur de la
voiture en utilisant des vis métriques de 3mm. Si un moteur
était déjà installé, vous pouvez probablement ré-utiliser les
mêmes vis. Ajustez un jeu d’environ 0.5mm entre le pinion
et la couronne.
ATTENTION! Si les vis de xation sont trop longues, elles
peuvent court-circuiter et endommager le moteur.
RAPPORT DE TRANSMISSION: vous pouvez utiliser le pinion
d’origine fourni avec la voiture. Toutefois, il se peut aussi que
vous deviez le remplacer an d’obtenir des performances
optimales. Si le dDrive surchaue, utilisez un pinion plus
petit. Si la voiture est trop lente et le boîtier reste froid, vous
pouvez utiliser un pinion plus grand pour augmenter les
performances.

www.teamorion.com 23
CONNEXION: le dDrive est équipé d’un connecteur batterie,
d’une che récepteur et d’un interrupteur avec bouton
de réglage. Branchez la che récepteur dans le canal 2 du
récepteur et xez l’interrupteur sur le chassis à l’aide de
scotch double-face.
BATTERIE: utilisez une batterie LiPo 2S 7.4V ou NiMH 6-7
éléments 7.2-8.4V. La batterie doit être équipée d’une
che Deans® compatible avec celle du régulateur. Utiliser
des batteries de mauvaise qualité, des adaptateurs ou
modier les connecteurs peut provoquer une baisse des
performances, des dommages ainsi qu’une perte de la
garantie.
CALIBRAGE DU REGULATEUR
An d’assurer un fonctionnement optimal, vous devez
calibrer le régulateur au signal de l’émetteur. Centrez les
trim et désactivez les fonctions spéciales qui pourraient être
actives. Suivez cette procédure pour calibrer le régulateur:
A. Eteignez le régulateur et enclenchez l’émetteur
B. Enclenchez le régulateur tout en pressant le bouton SET
situé sur l’interrupteur. Relâchez le bouton dès que la LED
rouge clignote.
C. Calibrez les gaz en appuyant une fois sur le bouton à
chaque étape.
1. Neutre (1 ash)
2. Plein gaz (2 ashs)
3. Freins/marche arrière (3 ashs)
D. Le régulateur est fonctionnel 3 secondes après que le
calibrage ait été eectué.

24 Copyright Team Orion © 2015
FONCTIONNEMENT DES LED D’ETAT
• Au neutre aucune LED ne s’allume.
• La LED rouge s’allume lorsque la voiture avance, recule
ou freine.
• La LED verte s’allume lorsque les gaz sont à fond.
SIGNAUX SONORES
1. Problème d’alimentation: le régulateur contrôle la tension
de la batterie lorsqu’il est enclenché. Si un problème est
détecté, le régulateur émet deux signaux sonores avec 2
secondes de pause entre les répétitions (xx-xx-xx).
2. Problème de signal radio: le régulateur contrôle le signal
radio lorsqu’il est enclenché. Si un problème est détecté,
le régulateur émet un signal sonore avec 2 secondes de
pause entre les répétitions (x-x-x).
PARAMETRAGE AVANCE DU REGULATEUR
Divers paramètres du régulateur peuvent être modiés en
utilisant le bouton de réglage situé sur l’interrupteur.
Pour modier les paramètres en utilisant le bouton de
réglage, suivez la procédure ci-dessous.
A. Enclenchez le régulateur.
B. Pressez sur le bouton de réglage et relâchez-le lorsque la
LED verte clignote.
C. Pressez à nouveau sur le bouton pour passer d’un
paramètre à l’autre. Le nombre de ash indique le
paramètre actuellement sélectionné, 1 ash= mode de
fonctionnement, 2 ash = low voltage cut-o et ainsi de
suite. Le régulateur cycle en boucle entre les paramètres.

www.teamorion.com 25
D. Lorsque la LED verte clignote le nombre de fois indiquant
le paramètre que vous désirez modier, pressez sur le
bouton jusqu’à ce que la LED rouge clignote, indiquant le
réglage actuel. Un ash veut dire réglage n°1, deux ash
réglage n°2 et ainsi de suite.
E. Pressez sur le bouton pour modier le réglage actuel, le
régulateur cycle en boucle entre les réglages disponibles.
F. Une fois que la LED clignote le nombre de fois relatives au
réglage désiré, appuyez sur le bouton pendant 3 secondes
pour sauvegarder la modication.
G. Eteignez le régulateur pour sortir du mode
programmation.
NB : Vous ne pouvez modier qu’un paramètre à la fois.
Pour sauvegarder une modication et pouvoir modier un
autre paramètre, il faut éteindre et rallumer le régulateur.
PARAMETRES
Running Mode (mode de fonctionnement)
1) “Marche avant avec frein” ce mode est destiné à la
compétition. Dans ce mode il n’y a pas de marche arrière.
2) “Marche avant/arrière avec frein” ce mode est le mode
basique passe partout. Dans ce mode, la voiture peut
avancer, reculer et freiner. Lorsque vous tirez/poussez le
manche des gaz en position marche arrière pendant que
la voiture avance, le régulateur freine la voiture jusqu’à ce
qu’elle soit totalement arrêtée. Une fois la voiture à l’arrêt,
relâchez le manche des gaz puis tirez/poussez le en position
marche arrière à nouveau pour enclencher la marche
arrière. Lorsque la voiture recule ou pendant que vous

26 Copyright Team Orion © 2015
freinez, si vous tirez/poussez le manche des gaz en position
marche avant, la voiture repart en avant instantanément.
Low Voltage Cut-O (coupure tension faible)
Avec ce système, le régulateur contrôle constamment la
tension de la batterie. Si la tension de la batterie passe en-
dessous du seuil prédéni pendant 2 secondes, le régulateur
coupe l’alimentation et la LED rouge clignote deux fois à
répétition.
Start Mode “Punch” (acceleration)
Ce paramètre déni la puissance de l’accélération. Le niveau
1 donne une accélération moins puissante et le niveau 9
donne l’accélération la plus puissante.
Max Braking Strength (puissance freinage)
Ce paramètre déni la puissance du freinage. Une valeur
plus élevée donne un freinage plus puissant mais peut
causer des blocages de roues et des pertes de maîtrise.
Restore Default Settings (paramètres d’usine)
Pour remettre le régulateur en conguration d’usine, avec
les gaz au neutre, appuyez sur le bouton de réglage pendant
5 secondes. Les LED verte et rouge clignotent, indiquant la
remise à zéro.

www.teamorion.com 27
DEPANNAGE
En cas de disfonctionnement, vériez les connexions, les
réglages et l’installation. Assurez-vous que les batteries sont
chargées et fonctionnelles.
NOTE: Utiliser des batteries NiMH peu puissantes peut
provoquer des surchaues ou des performances faibles,
l’utilisation de batteries LiPo est recommandée.
Temperature de fonctionnement optimale: Pour un
fonctionnement optimal, ajustez le rapport et les réglages
an que la température extérieure du boîtier soit comprise
entre 60-80°C max (140-175°F max).
Surchaue et/ou accoups: Vériez que la transmission
tourne librement. Vériez le rapport de transmission, si
nécessaire utilisez un pinion plus petit.
Performances faibles: Vériez que la transmission tourne
librement. Vériez le rapport de transmission, si le moteur
est froid ou tiède, utilisez un pinion plus grand.
N’utilisez pas le régulateur si le boîtier, les connecteurs
ou les ls sont endommagés. Cessez immédiatement
l’utilisation si le régulateur surchaue, fond ou émet de la
fumée.
Si vous n’arrivez pas à résoudre le problème demandez
l’assistance de votre revendeur Team Orion local.

28 Copyright Team Orion © 2015
1) ANSCHLÜSSE
1) Akku
2) Servo
3) Empfänger
4) Schalter
5) Vortex dDrive
6) Steckverbindung zum Akku
1
5
6
3
2
4
SET
ON/OFF
www.teamorion.com 29
KALIBRIERUNG SCHRITT 1
1
3
2
LED
EIN/AUS
SET Taste
drücken
und halten
Einschalten
SET Taste
stetig
halten
Loslassen, sobald
die rote LED blinkt
LED
1 2
LED LED
3
1 mal
drücken
1 mal
drücken
1 mal
drücken
KALIBRIERUNG SCHRITT 2

30 Copyright Team Orion © 2015
DEN REGLER PROGRAMMIEREN
2 2
3
3 3
1
7
4
6
5
Akku einstecken
Programmiermodus starten
Wählen Sie den Parameter, den Sie ändern möchten
Alle Einstellungen zurücksetzen
SET Taste
während
1s drücken
SET Taste
während
5s drücken
Drücken Sie die SET
Taste 1 mal, um den
ersten Parameter zu
wählen...
...drücken Sie die SET
Taste 2 mal, um den
zweiten Parameter zu
wählen...
Einschalten
Regler ausschalten, um
den Vorgang
abzuschliessen
LED
blinkt
LED blinkt 1 mal
LED blinkt
1 mal
LED blinkt 2 mal
Drücken Sie die SET
Taste während 3s,
um den Parameter
zu ändern.
SET Taste während
3s drücken, um die
Einstellung zu
speichern.
Ändern Sie die
Einstellung mit der
SET Taste.
1 mal drücken
LED blinkt
2 mal
2 mal drücken etc.
ODER

www.teamorion.com 31
EINSTELLUNGEN
Mehr Informationen auf den Seiten 36-38
Parameter
Setting
1 2 3 4 5 6 7 8 9
1. Running Mode
Forward
with
Brake
Forward/
Reverse
with
Brake
2. Low Voltage
Cut-Off Threshold
No
Cut-Off
2.6V/Cell 2.8V/Cell 3.0V/Cell 3.2V/Cell 3.4V/Cell
3. Start Mode(Punch) Level1 Level2 Level3 Level4
4. Max Brake Force 25% 50% 75% 100%

32 Copyright Team Orion © 2015
Vielen Dank für den Kauf der Team Orion dDrive
Antriebseinheit. Dieses Gerät kombiniert den Brushless
Motor und Regler in einem einzigen Aluminium-Gehäuse.
Bitte lesen Sie die Anleitung vor dem Gebrauch genau durch.
WARNUNGEN
Lesen Sie die Anleitung vor dem Gebrauch vollständig durch,
damit Sie alle Eigenschaften des Produkts verstehen. Dies ist
ein hochentwickeltes Hobby-Produkt. Es muss mit Vorsicht
und gesundem Menschenverstand betrieben werden und
benötigt gewisse mechanische Grundfähigkeiten. Dieses
Produkt eignet sich nicht für die Verwendung durch Kinder
ohne direkte Überwachung eines Erwachsenen. Versuchen
Sie nicht das Produkt zu zerlegen, es mit inkompatiblen
Komponenten zu verwenden oder auf jegliche Weise
abzuändern. Diese Bedienungsanleitung enthält
Anweisungen für Sicherheit, Betrieb und Wartung. Es ist
unbedingt notwendig, vor Zusammenbau, Einrichtung oder
Verwendung alle Anweisungen und Warnhinweise zu lesen
und zu befolgen, damit es bestimmungsgemäß betrieben
werden kann.
• Seien Sie beim Kontakt mit Wasser vorsichtig
• Nur mit kompatiblen Akkus verwenden
• Den Regler immer ausschalten, wenn nicht in Gebrauch
• Akku-Verbindung trennen, wenn nicht in Gebrauch
• Der Regler wird im Gebrauch heiss. Seien Sie vorsichtig,
wenn Sie ihn berühren.
BEDIENUNGSANLEITUNG · DEUTSCH

www.teamorion.com 33
Unaufmerksamkeit oder falscher Gebrauch des Produktes
kann zu Fehlfunktionen, elektrischen Störungen, große
Hitzeentwicklung, FEUER, und tödliche Verletzungen und
Sachbeschädigungen führen.
Nicht geeignet für Kinder unter 14 Jahren. Dies ist kein
Spielzeug.
GARANTIE
Team Orion garantiert, dass das Produkt zum Zeitpunkt des Kaufs
frei von Material- und Montagefehlern ist. Team Orion behält sich
das Recht vor, diese Garantiebestimmungen ohne Ankündigung
zu ändern oder modizieren und widerruft dann bestehende
Garantiebestimmungen. Die Garantie wird nur dem Erstkäufer
(Käufer) gewährt und kann nicht übertragen werden. Der Anspruch
des Käufers besteht in der Reparatur oder dem Tausch im Rahmen
dieser Garantie. Die Garantie erstreckt sich ausschließlich auf
Produkte, die bei einem autorisierten Team Orion Händler erworben
wurden. Verkäufe an dritte werden von dieser Garantie nicht
gedeckt. Garantieansprüche werden nur angenommen, wenn ein
gültiger Kaufnachweis erbracht wird. Team Orion übernimmt keine
Garantie für die Verkaufbarkeit des Produktes, die Fähigkeiten und
die Fitness des Verbrauchers für einen bestimmten Einsatzzweck
des Produktes. Der Käufer allein ist dafür verantwortlich, zu
prüfen, ob das Produkt seinen Fähigkeiten und dem vorgesehenen
Einsatzzweck entspricht.
Es liegt ausschließlich im Ermessen von Team Orion, ob das
Produkt, bei dem ein Garantiefall festgestellt wurde, repariert
oder ausgetauscht wird. Dies sind die exklusiven Ansprüche des
Käufers, wenn ein Defekt festgestellt wird. Team Orion behält
sich vor, alle eingesetzten Komponenten zu prüfen, die in den
Garantiefall einbezogen werden können. Die Entscheidung zur

34 Copyright Team Orion © 2015
Reparatur oder zum Austausch liegt nur bei Team Orion. Die
Garantie schließt kosmetische Defekte oder Defekte, hervorgerufen
durch höhere Gewalt, falsche Behandlung des Produktes, falscher
Einsatz des Produktes, kommerziellen Einsatz oder Modikationen
irgendwelcher Art aus. Die Garantie schließt Schäden, die durch
falschen Einbau, falsche Handhabung, Unfälle, Betrieb, Service oder
Reparaturversuche, die nicht von Team Orion ausgeführt wurden
aus.
Team Orion ist nicht für direkte oder indirekte Folgeschäden,
Einkommensausfälle oder kommerzielle Verluste, die in irgendeinem
Zusammenhang mit dem Produkt stehen verantwortlich,
unabhängig ab ein Anspruch im Zusam- menhang mit einem
Vertrag, der Garantie oder der Gewährleistung erhoben werden.
Team Orion wird darüber hinaus keine Ansprüche aus einem
Garantiefall akzeptieren, die über den individuellen Wert des
Produktes hinausgehen. Team Orion hat keinen Einuss auf
den Einbau, die Verwendung oder die Wartung des Produktes
oder etwaiger Produktkombinationen, die vom Käufer gewählt
werden. Team Orion übernimmt keine Garantie und akzeptiert
keine Ansprüche für in der Folge auftretende Verletzungen
oder Beschädigungen. Mit der Verwendung und dem Einbau
des Produktes akzeptiert der Käufer alle aufgeführten
Garantiebestimmungen ohne Einschränkungen und Vorbehalte.
Wenn Sie als Käufer nicht bereit sind, diese Bestimmungen im
Zusammenhang mit der Benutzung des Produktes zu akzeptieren,
werden Sie gebeten, dass Produkt in unbenutztem Zustand in der
Originalverpackung vollständig bei dem Verkäufer zurückzugeben.
Anweisungen zur Entsorgung von Elektro- und
Elektronik-Altgeräten für Benutzer in der EU
Dieses Produkt darf nicht zusammen mit anderem Abfall entsorgt
werden. Stattdessen ist der Benutzer dafür verantwortlich,
unbrauchbare Geräte durch Abgabe bei einer speziellen

www.teamorion.com 35
Sammelstelle für das Recycling von unbrauchbaren elektrischen
und elektronischen Geräten zu entsorgen. Die separate Sammlung
und das Recycling von unbrauchbaren Geräten zum Zeitpunkt
der Entsorgung hilft, natürliche Ressourcen zu bewahren und
sicherzustellen, dass Geräte auf eine Weise wiederverwertet werden,
bei der die menschliche Gesundheit und die Umwelt geschützt
werden. Weitere Informationen dazu, wo Sie unbrauchbare Geräte
zum Recycling abgeben können, erhalten Sie bei lokalen Ämtern, bei
der Müllabfuhr für Haushaltsmüll sowie dort, wo Sie das Produkt
gekauft haben.
HIGHLIGHTS
• Entwickelt für den On-Road und O-Road Einsatz (1/10)
• Spritzwasserdicht
• Vorwärts- und Rückwärts-Funktion
• 4-Pol Brushless Motor
• 45A Fahrtenregler
• Eingebautes Hochleistungs-BEC System für eine stabile
Stromversorgung von Empfänger und Servo
• Einfaches Setup über die Taste am Ein/Aus-Schalter
• Zahlreiche Einstellungsmöglichkeiten
• Verschiedene Schutzvorrichtungen: Auto-Abschaltung
bei zu tiefer Akkuspannung, Überhitzungsschutz,
Signalverlust, blockierter Motor
INSTALLATION IM FAHRZEUG
Befestigen Sie die dDrive Einheit an der Motorhalterung
Ihres Fahrzeugs mit metrischen 3mm Schrauben. Wenn
bereits ein Motor eingebaut war, verwenden Sie die gleichen
Schrauben. Sorgen Sie dafür, dass das Hauptzahnrad und

36 Copyright Team Orion © 2015
Ritzel ein Spiel von ca. 0.5mm aufweisen. WARNUNG:
Wenn die Motorschrauben zu lange sind, kann der Motor
kurzgeschlossen und dauerhaft beschädigt werden.
UNTERSETZUNG: Sie können mit der dDrive Einheit in den
meisten Fällen weiterhin die Standard-Untersetzung ihres
Fahrzeugs verwenden (Ritzel und Hauptzahnrad bleiben
unverändert). Wenn die Einheit zu warm wird, müssen Sie
ein kleineres Ritzel verwenden, wenn das Auto zu langsam
ist und die Temperatur nicht zu hoch, können Sie ein
grösseres Ritzel einsetzen.
ANSCHLÜSSE: die dDrive Einheit ist mit einem Anschluss
für den Akku und einem für den Empfänger ausgestattet.
Sie verfügt auch über einen Ein/Aus-Schalter mit SetupTaste. Verbinden Sie den Regler-Anschluss mit dem zweiten
Kanal des Empfängers und befestigen Sie den Schalter mit
doppelseitigem Klebeband auf dem Chassis des Fahrzeugs.
AKKU: Verwenden Sie entweder einen 2S LiPo- oder 6-7
Zellen NiMH-Akku als Stromquelle. Der Akku muss einen
Deans-Stecker aufweisen, der mit dem Stecker des dDrive
kompatibel ist. Akkus schlechter Qualität oder das Abändern
der Steckverbindungen kann die Leistung mindern, die
Einheit beschädigen und die Garantie erlischt.
KALIBRIEREN DES REGLERS
Um den Regler verwenden zu können muss er mit Hilfe der
Fernsteuerung kalibriert werden. Zentrieren Sie alle Trimmer
an der Fernsteuerung und setzen Sie alle Einstellungen

www.teamorion.com 37
zurück, bevor Sie mit der Kalibrierung beginnen. Befolgen
Sie die folgenden Schritte, um den Fahrtenregler zu
kalibrieren:
A. Schalten Sie den Regler aus und die Fernsteuerung ein.
B. Drücken und halten Sie die SET Taste (auf dem Ein/Aus-
Schalter des Reglers). Schalten Sie den Regler ein. Lassen
Sie die SET Taste los, sobald die rote LED blinkt.
C. Kalibrieren Sie die Gas-Funktion, indem Sie nach jedem
Schritt die SET Taste betätigen:
1. Gashebel in Neutralposition – (LED blinkt 1 mal grün)
2. Vollgasposition (LED blinkt 2 mal grün)
3. Brems/Rückwärts-Position (LED blinkt 3 mal grün)
D. Der Motor dreht nach dem letzten Schritt während 3
Sekunden.
FUNKTIONSWEISE DER STATUS-LED
• In Neutralposition leuchtet keine LED
• Die rote LED leuchtet, wenn das Fahrzeug vorwärts oder
rückwärts fährt oder bremst.
• Bei Vollgas leuchtet die grüne LED
WARNTÖNE
1. Problem mit der Eingangsspannung: Der Regler prüft
die Eingangsspannung beim Einschalten. Wenn ein
Problem erkannt wird, ertönen wiederholt zwei Piepstöne
im Abstand von 1 Sekunde. Dabei blinkt die grüne LED
wiederholt zwei mal (xx-xx-xx).
2. Problem mit dem Eingangssignal: Der Regler prüft das
Eingangssignal beim Einschalten. Wenn ein Problem

38 Copyright Team Orion © 2015
erkannt wird, ertönt wiederholt ein Piepston im Abstand
von 2 Sekunden. Dabei blinkt die grüne LED wiederholt
zwei mal (x-x-x).
ERWEITERTE REGLER-EINSTELLUNGEN
Sie können diverse Einstellungen mit der Setup-Taste am
Ein/Aus-Schalter des Reglers vornehmen. Folgen Sie hierzu
den Anweisungen:
A. Schalten Sie den Regler ein
B. Drücken und halten Sie die Setup bis die grüne LED blinkt.
C. Drücken Sie die SET Taste, um durch die verschiedenen
Einstellungsparameter zu scrollen. Die grüne LED zeigt
an, welcher Parameter gewählt ist (1mal blinken=running
mode, 2mal blinken=low voltage cut-o etc).
D. Wenn die grüne LED den gewünschten Parameter anzeigt,
drücken Sie die SET Taste bis die rote LED blinkt. Die rote
LED zeigt die aktuelle Einstellung des Parameters an. 1mal
blinken=Einstellung 1, 2mal blinken=Einstellung 2 etc
E. Drücken Sie die SET Taste, um den Wert zu verändern.
F. Wenn die rote LED die gewünschte Einstellung anzeigt,
drücken Sie die SET Taste während 3 Sekunden. Die
Einstellung wird gespeichert.
G. Schalten Sie den Regler aus, um den Vorgang
abzuschliessen.
Wiederholen Sie diesen Vorgang mit jedem Parameter, den
Sie verändern möchten.

www.teamorion.com 39
EINSTELLBARE PARAMETER
Fahrmodus
1) “Nur vorwärts mit Bremse”: dieser Modus wird für den
Wettbewerb empfohlen. Der Regler weist in diesem Modus
keinen Rückwärtsgang auf.
2) “Vorwärts/Rückwärts mit Bremse”: dieser Modus ist die
empfohlene Grundeinstellung. Damit verfügen Sie über
eine Vorwärts-, Rückwärts- und Brems-Funktion. Wenn Sie
den Gasknüppel in Rückwärtsposition bringen, während
das Fahrzueg in Fahrt ist, wird zuerst die Bremse aktiviert,
bis das Fahrzeug still steht. Der Rückwärtsgang kann nicht
direkt eingelegt werden. Zuerst müssen Sie den Gasknüppel
loslassen und danach wieder in Rückwärtsposition bringen.
Wenn Sie bremsen oder rückwärts fahren, können sie sofort
in den Vorwärtsgang übergehen.
3) “Vorwärts/Rückwärts”: dieser Modus ist für Crawler-
Fahrzeuge vorgesehen. Dabei schaltet der Regler direkt
von Vorwärts auf Rückwärts und umgekehrt; es gibt keine
Bremse. Wird dieser Modus in schnellen/starken Autos
verwendet, kann der Regler beschädigt werden und die
Garantie Garantie erlischt.
Tiefspannungs-Schutz
Diese Funktion schützt den Akku vor Tiefentladung. Der
Regler überwacht die Akku-Spannung kontinuierlich.
Wenn die Spannung während 2 Sekunden tiefer ist als die
Einstellung, unterbricht der Regler die Funktion und die rote
LED blinkt wiederholt zwei mal.

40 Copyright Team Orion © 2015
Start Modus “Punch”
Dieser Parameter stellt das Anfahrverhalten bei
der Beschleunigung ein. Level 1 ergibt ein sehr
feinfühliges Anfahrverhalten, Level 4 eine stärkere
Beschleunigungsphase.
Maximale Bremskraft
Damit kann die maximale Bremskraft festgelegt werden.
Ein höherer Wert ermöglicht stärkeres Bremsen, doch es
kann zum Blockieren der Räder und Kontrollverlust über
das Fahrzeug führen. Eine stärkere Bremse führt zudem zu
stärkerer Wärmeentwicklung des Reglers. Eine Überlastung
kann zur Aktivierung der Überhitzungs-Schutzfunktion
führen.
Zurücksetzen des Reglers
Drücken Sie die SET Taste während 5 Sekunden und halten
Sie gleichzeitig den Gasknüppel in Neutralposition. Die
rote und grüne LED werden gleichzeitig blinken und damit
anzeigen, dass alle Einstellungen zurückgesetzt worden sind.

www.teamorion.com 41
FEHLERSUCHE
Bei einer Fehlfunktion prüfen Sie die Steckverbindungen,
Einstellungen und die korrekte Installation der Einheit.
Prüfen Sie, ob der Akku geladen und funktionsfähig ist.
BEMERKUNG: Leistungsschwache NiMH-Akkus können dazu
führen, dass die dDrive Einheit überhitzt und wenig Leistung
hat. Wir empfehlen den Gebrauch von LiPo Akkus.
Optimale Betriebstemperatur: Passen Sie Untersetzung
und die Einstellungen so an, dass die Aussentemperatur des
Gehäuses maximal 60-80°C besträgt (140-175°F max).
Überhitzen oder stottern: Stellen Sie sicher, dass
der Antrieb leichtgängig funktioniert. Prüfen Sie die
Untersetzung und verwenden Sie bei Bedarf ein kleineres
Ritzel.
Geringe Leistung: Stellen Sie sicher, dass der Antrieb
leichtgängig funktioniert. Prüfen Sie die Untersetzung. Wenn
der Motor nicht zu heiss wird, können Sie ein grösseres
Ritzel verwenden.
Verwenden Sie die dDrive Einheit nicht, wenn das Gehäuse,
die Steckverbindungen oder Kabel beschädigt sind. Stoppen
Sie den Gebrauch sofort, wenn die dDrive Einheit überhitzt,
schmilzt oder Rauch aus dem Gehäuse austritt.
Wenn Sie das Problem nicht lösen können, verwenden Sie
die dDrive Einheit nicht mehr und suchen Hilfe bei Ihrem
Team Orion Händler.

Copyright Team Orion © 2015
www.teamorion.com
www.facebook.com/teamorion
www.youtube.com/teamorioncom
 Loading...