

Page 1
Owner’s Manual
Page 2
Thank you for choosing the Team Magic E4JR. The E4JR includes a large selection of the important
specialty parts when compared to the previous versions. Before you start building your new E4JR, we
suggest you read though the instruction manual first. Be sure to check all assembly and performance
tips before you start. We hope you enjoy the building processes.
General Building Tips:
Read the instruction manual before building.
Clear a work area and try to work on a light color towel to avoid missing dropped parts.
Don't over-tighten fasteners. Many assembly problems are caused by over-tightening screws or nuts. Don't use too
large a grip. Please go slowly and feel the resistance build. Just snug it up.
When it doesn't fit, please double check. If an assembly is not going together correctly, then either there really is a
bad fit (e.g. a part is damaged or defective) or a mistake in assembly. Always re-read the instructions when there are
any problems. If you cannot figure out what's wrong, always ask dealer, distributor or Team Magic. Don't use force
beyond what the instructions call for.
Using the right tools makes assembly much easier. The instructions below finely indicate you what tools to get to
make things easier. We don't want to scare you by saying that all these tools are required, but you will have a easier
time if you have them. Borrow them from a friend to check if necessary.
The assembly is arranged so that you will open the bag and finish that bag before you go on to the next bag.
A Good Dealer Is Extremely Important!!
A good hobby dealer can help you with most assembly problems you might encounter. This is the main reason why
you should buy your kits from a good dealer rather than from the cheapest dealer. Bring your problematic parts to
the dealer and, most likely, you'll walk away soon thereafter with the problem solved. If you think that you really don't
have the mechanical skills to complete the assembly, you may pay your dealer to finish the job for you.
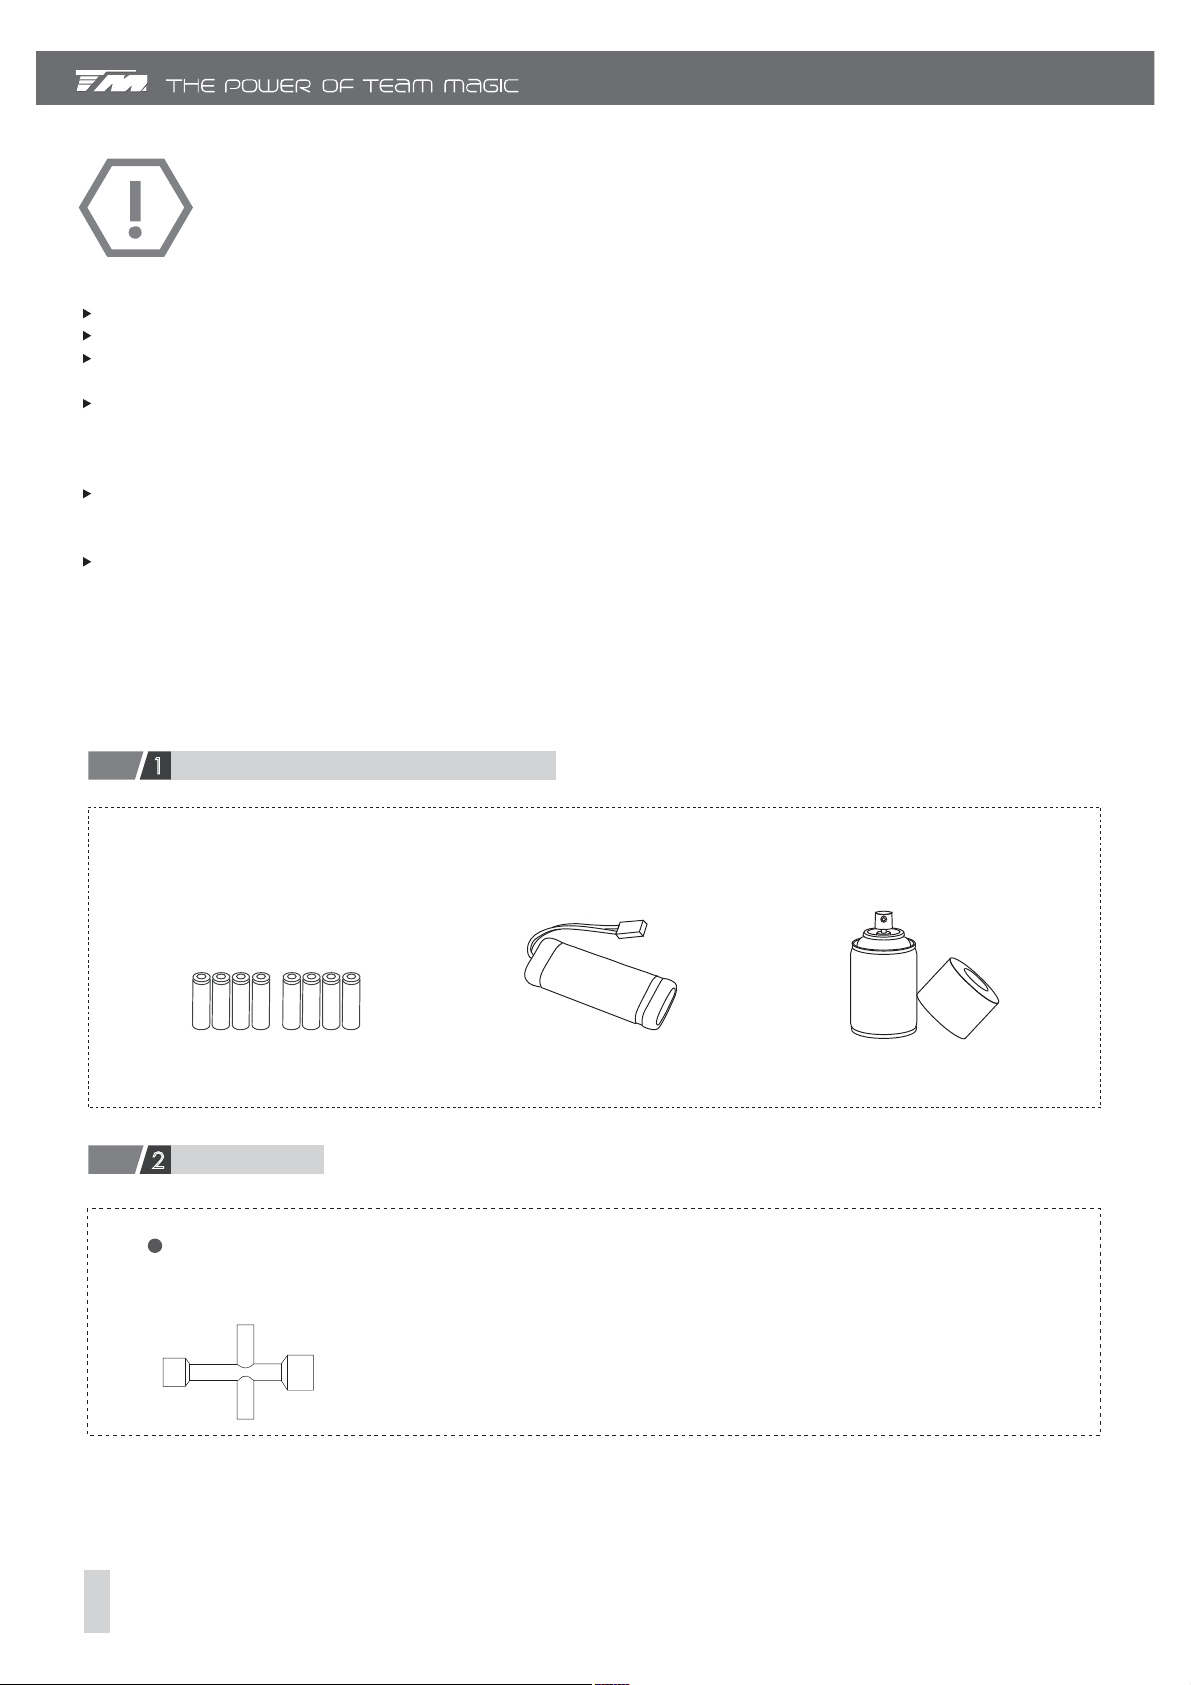
Additional Items Needed For Operation
1
AA-size Battery ( For Transmitter )
Tools Supplied
2
Cross Wrench
(4, 5, 5.5 & 7mm)
#116043
7.2V Battery Pack Body Paint
01
Page 3
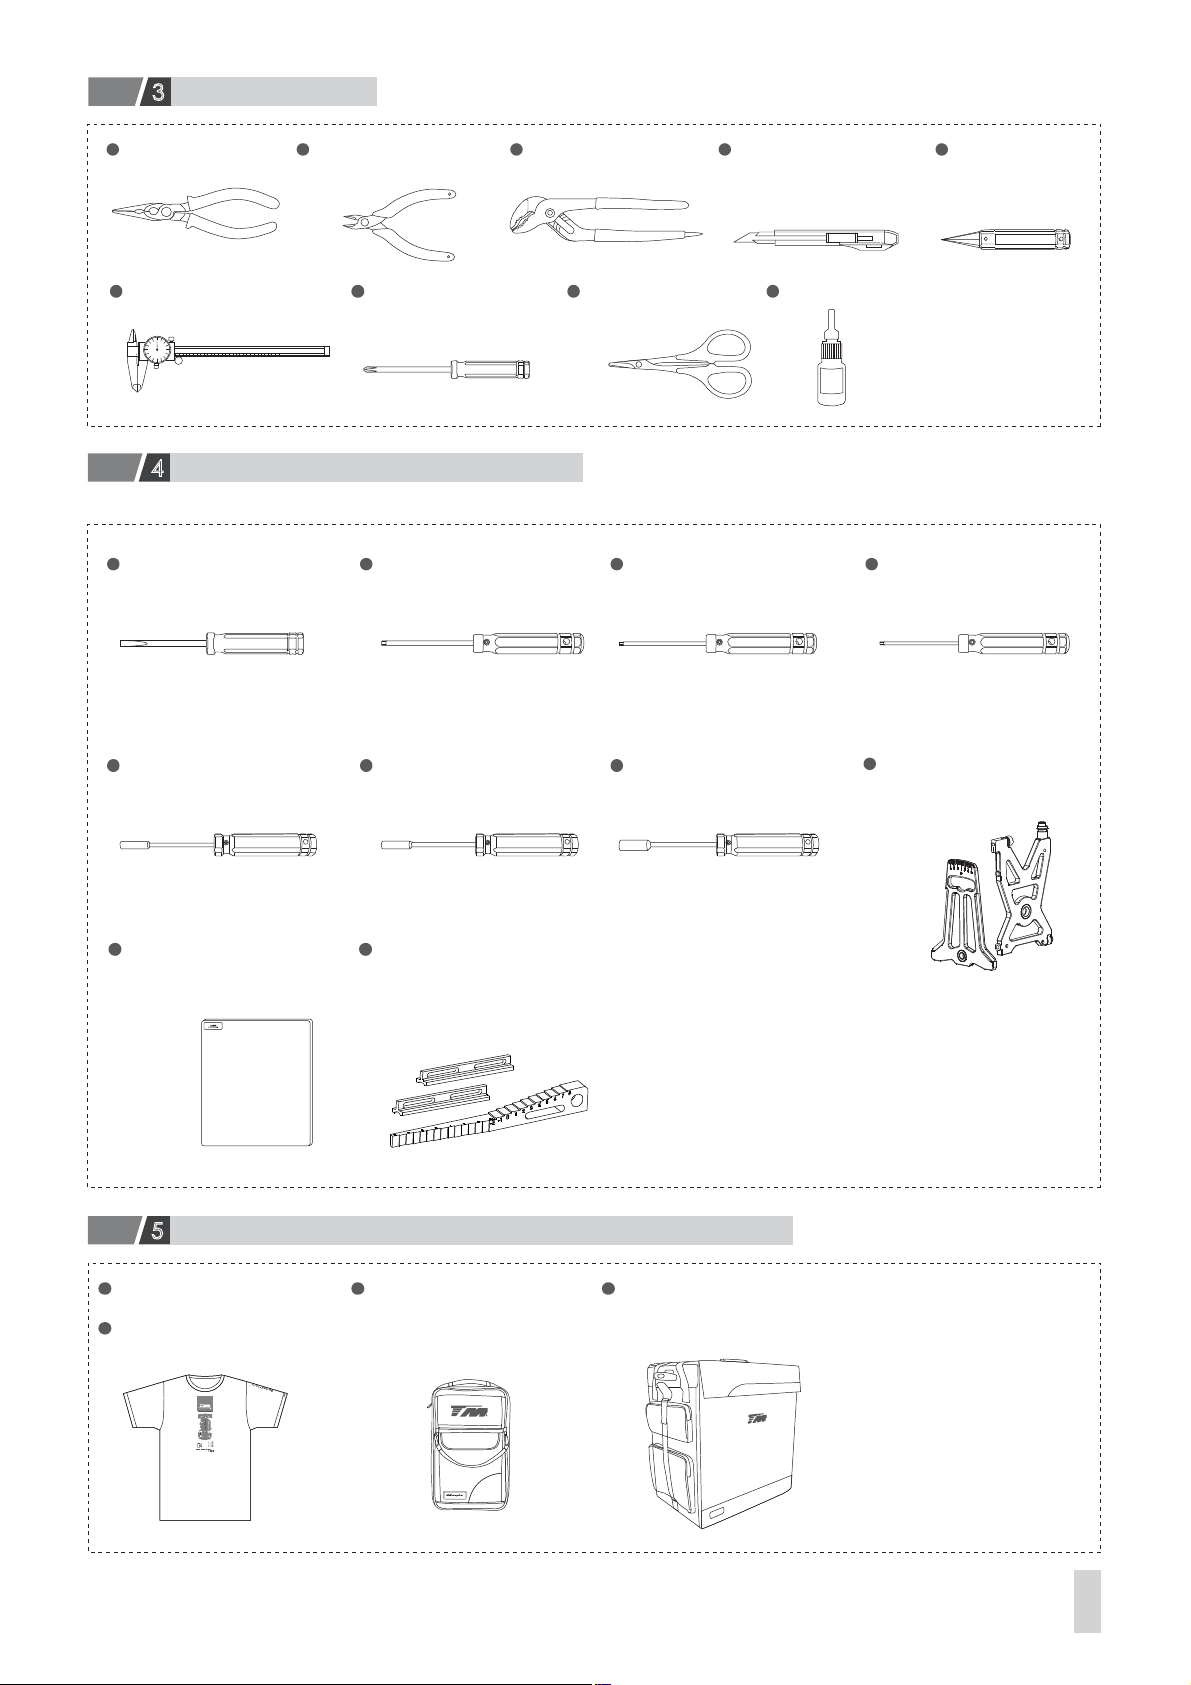
Extra Stuff Needed
3
Needlenose Pliers
Caliper
Helpful Items (suggested, but not required)
4
TM Black HC Carb Tuning
Slotted Screw Driver (4mm)
#117023
Cutting Pliers
(used to hold shock shafts)
Small Phillips Screwdriver
(for pivoting body
mount screws)
TM Black HC Hex Wrench
Metric Size 1.5mm
#117002-1M
Tongue and Groove Pliers
(for body cutting)
#116006
TM Black HC Hex Wrench
Metric Size 2.0mm
#117002-2M
2.5mm
Hobby Knife
(Warning!! This knife cuts
nylon parts and fingers with
equal ease. Be careful.)
TM Black
HC Body Reamer
(0~18mm)
#117030
Thread LockBody Scissors
TM Black HC Hex Wrench
Metric Size 2.5mm
#117002-3M
2.0mm 1.5mm
TM Black HC Metric Ball
Stud Nut Driver 5mm
#117009
TM 1/10 Setup Board
(420x360mm)
#116051
Cool Items ( It would be good to have these items with your E4 )
5
TM Racing T Shirt (Orange)
#119223
TM Racing T Shirt (Black)
#119224
TM Black HC Nut Driver
5.5mm (for 3mm nut)
#117010
Hard Coated Alum.
Ride Height & Droop Gauge
(w/support blocks)
#116039-2
TM Transmitter Bag (Black)
#119206
TM Black HC Nut Driver
7mm (for 4mm nut)
#117011
5.5mm5.0mm
TM Formula 8 (F8)
Car Bag
7.0mm
1/10 Touring Car Cambertoe
Setup Gauge
(for 4mm wheel shaft)
#H7101
#119220
Team
www.team magic.com.tw
02
Page 4
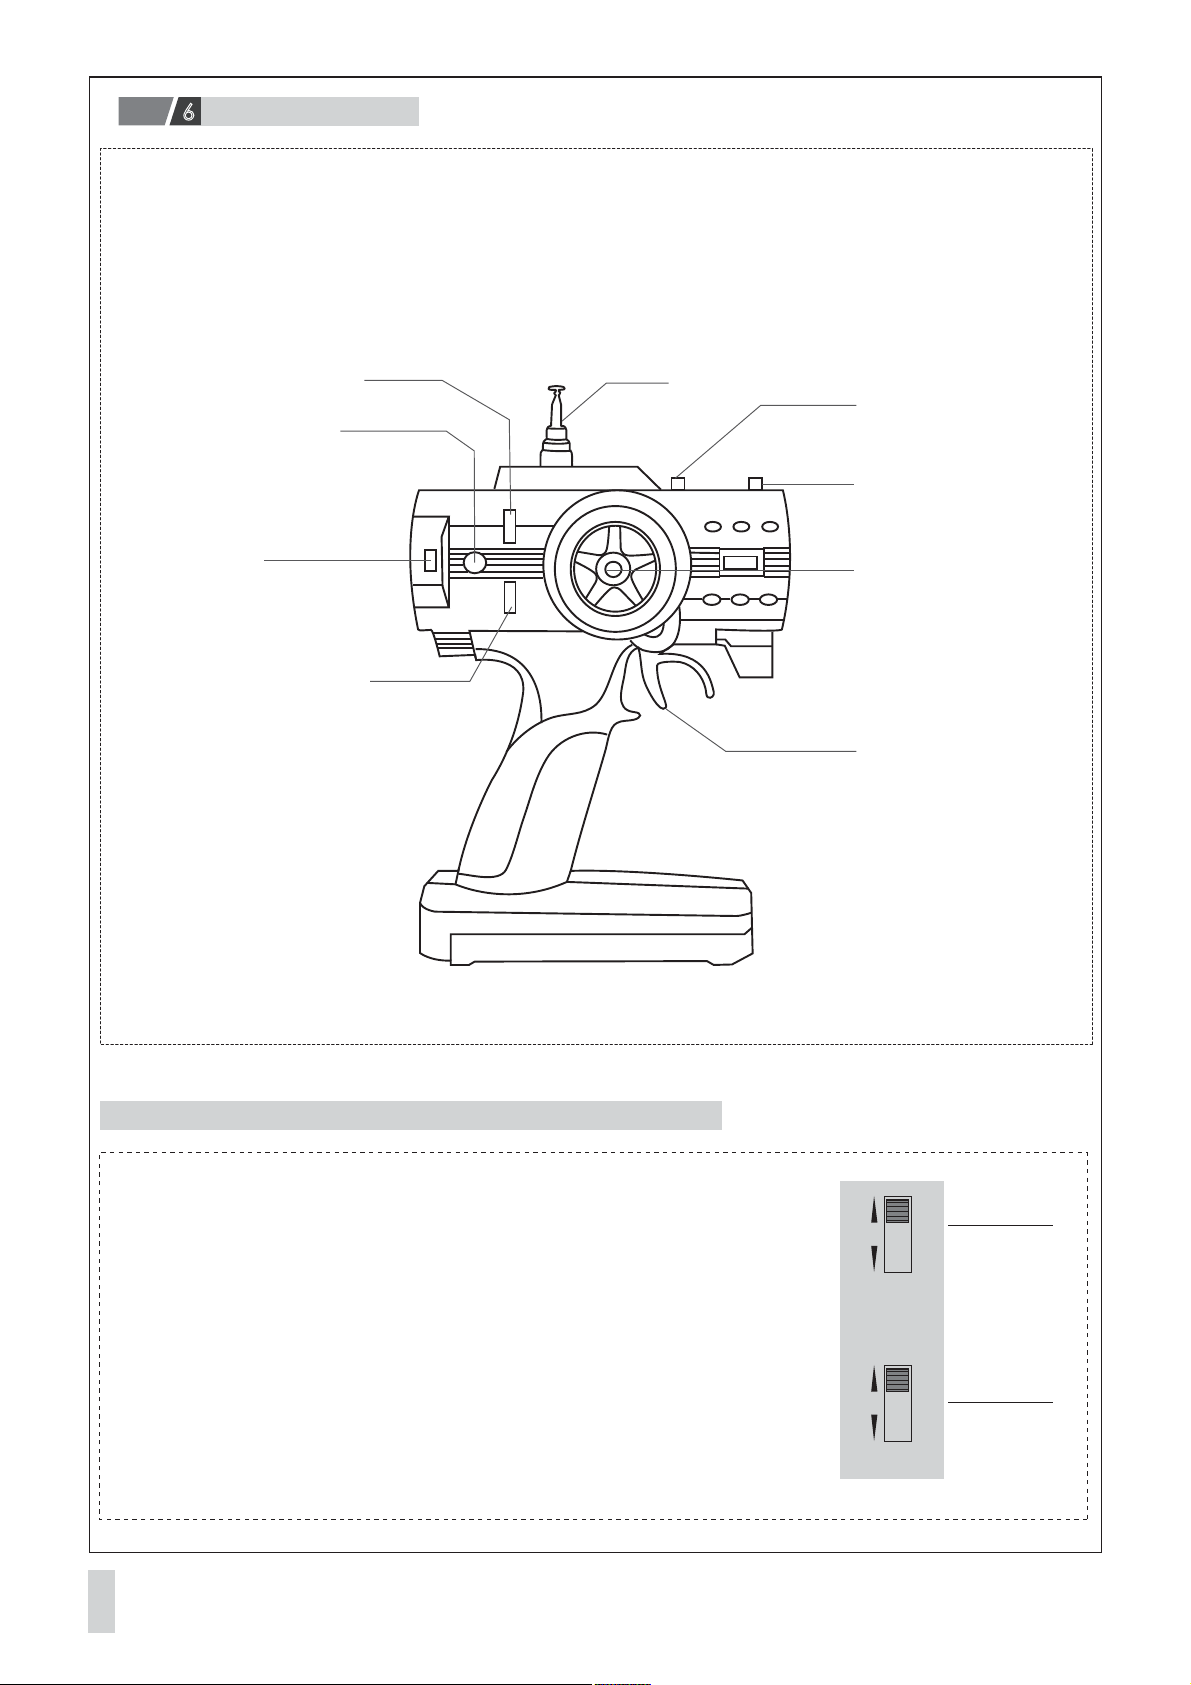
Tramsmitter Function
6
ST Servo Reversing Switch
Battery Level Indicator
If the Red led flashes , replace batteries.
Power Switch
When slid upward,the power is turned on.
TH Servo Reversing Switch
Antenna
Steering Trim
Adjusts the steering in small
increments so the model will run straight.
Throttle Trim
Adjusts the throttle in small increments
so the model will not move at neutral
Steering Wheel
Tum model to left or right
Throttle Trigger
Control the speed of the model and
movement forward and backward
Servo Reverse
This function reverses the rotation direction of the Steering and Throttle servos.
When the trim position deviates from the center, the de - viation will be on opposite
side when the servo is reversed
03
N
ST.
R
N
TH.
R
Steering
N Side: Nomal
R Side: Reverse
Throttle
N Side: Nomal
R Side: Reverse
Page 5
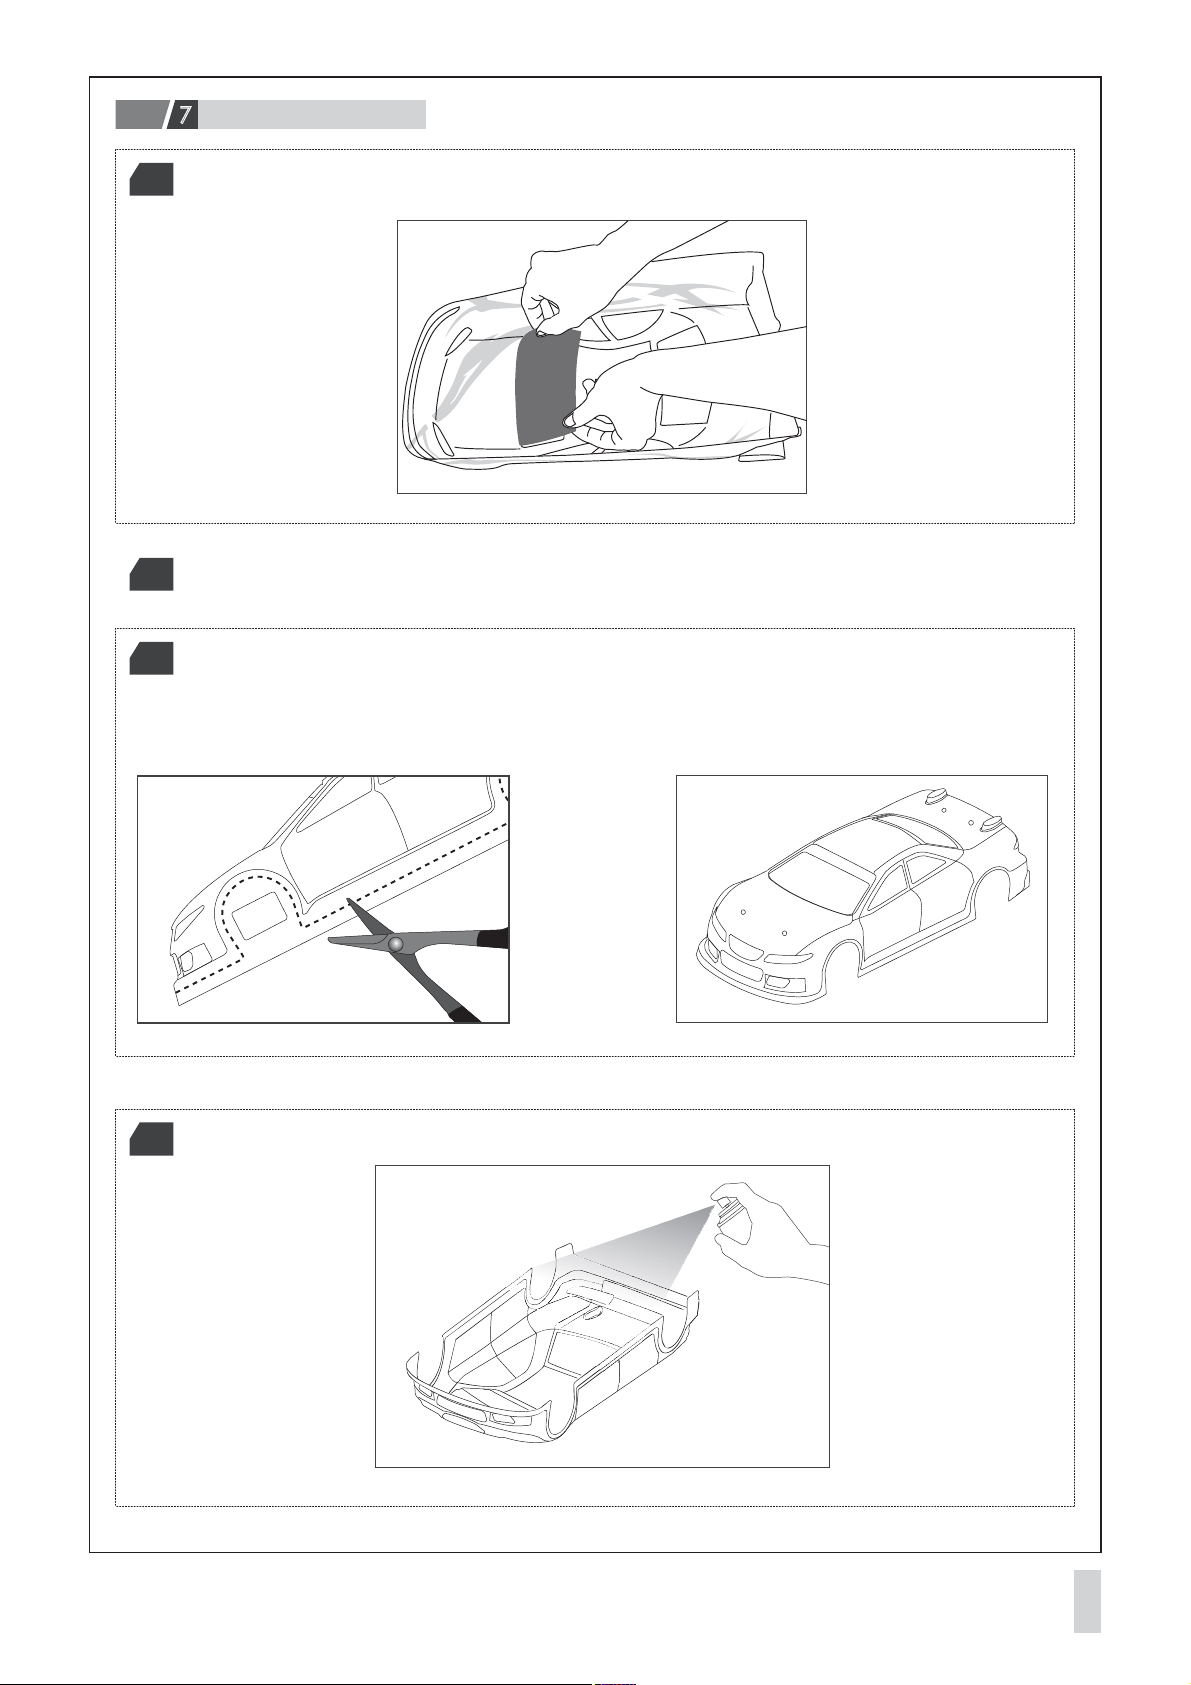
Operating Procedure
7
Please put on window masks on each window.
01
Please use model scissors to cut.
02
Please use model reamer & scissors to cut the body first. Please cut through the cutting line
03
shown on the body & try to put the body on the car to fit. Use body reamer to open the holes
for body post.
After you cut all the necessary part, please choose your favorite color to paint the main color.
04
04
Page 6
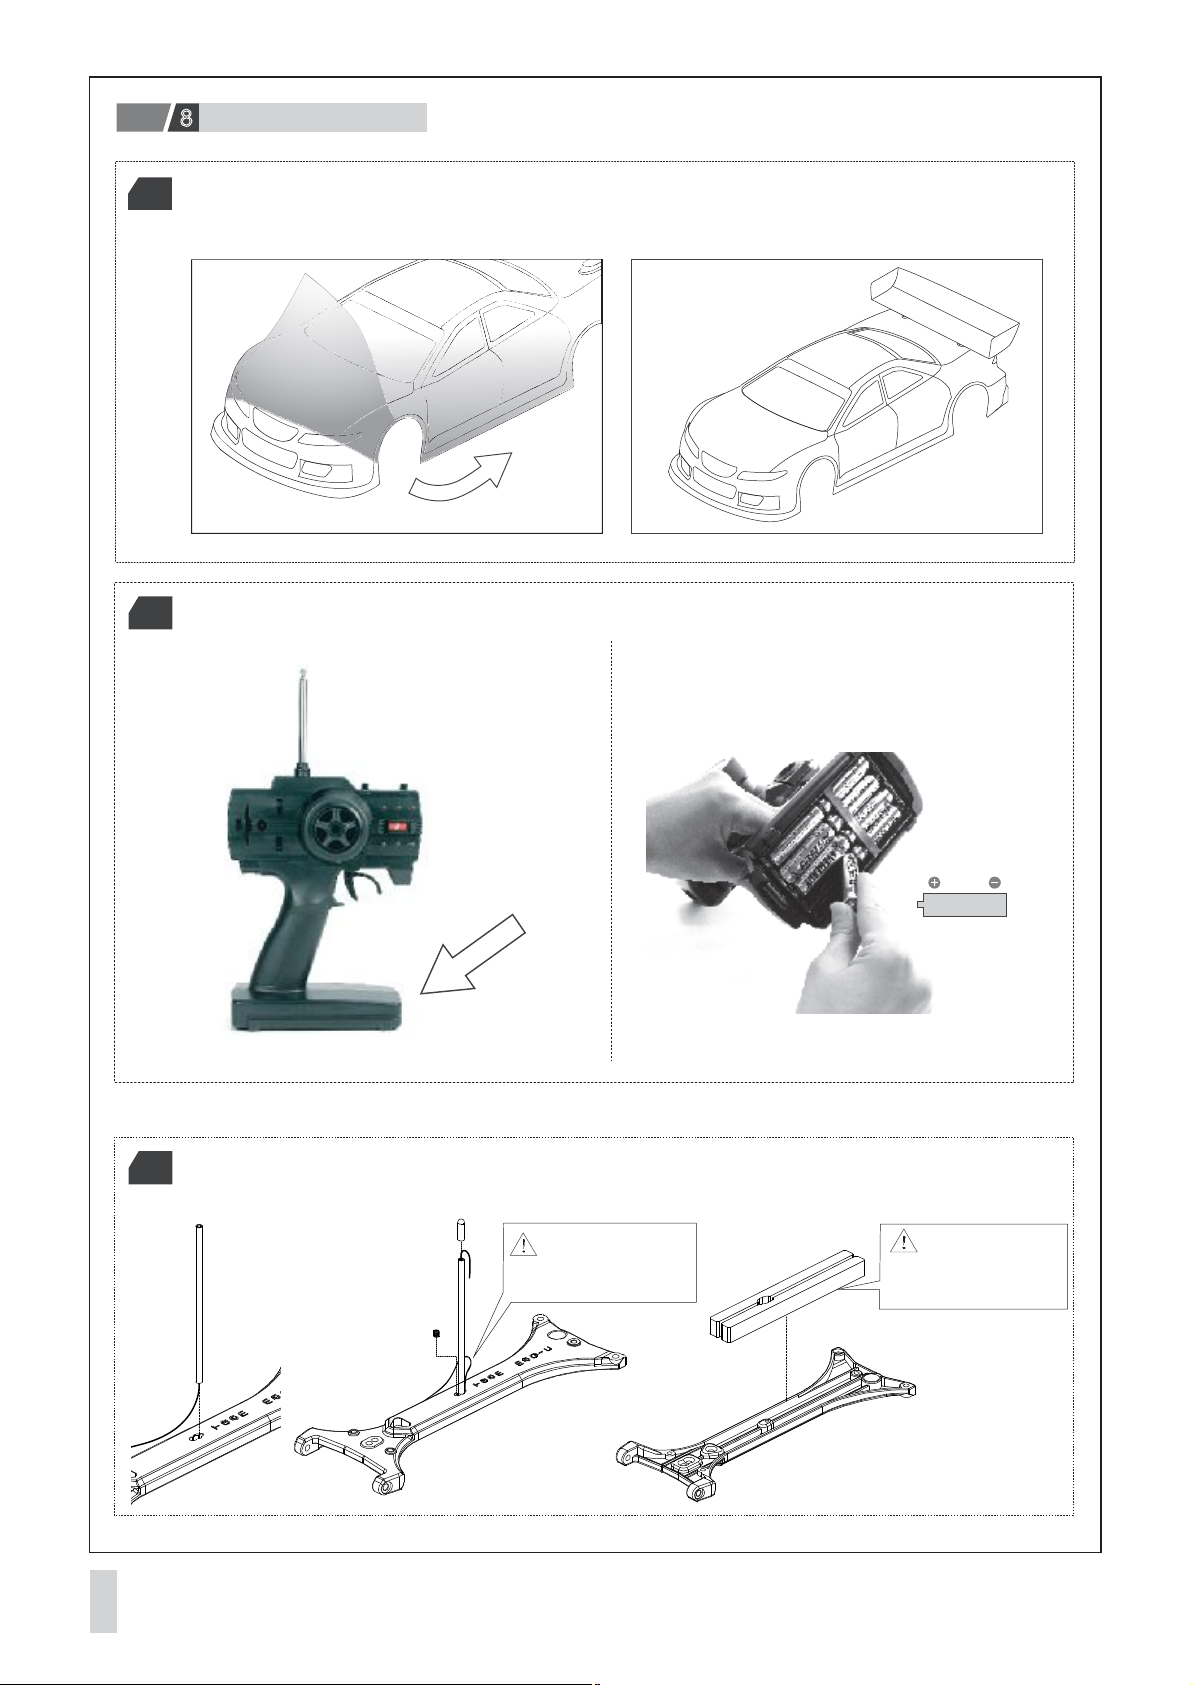
Operating Procedure
8
After finish the painting job, please try to remove the protective paint-then-peel over spray film.
05
Then, you can try to put the stickers on the body.
Install 8pcs AA batteries to the H.A.R.D. transmitter.
06
Insert the antenna wire into the tube as shown. Fasten the tube with a set screw and put on
07
the tube cap.
Notice there is a small
space for wire to go through.
Optional The cushion foam
usage depends on the battery type.
AA
05
Page 7
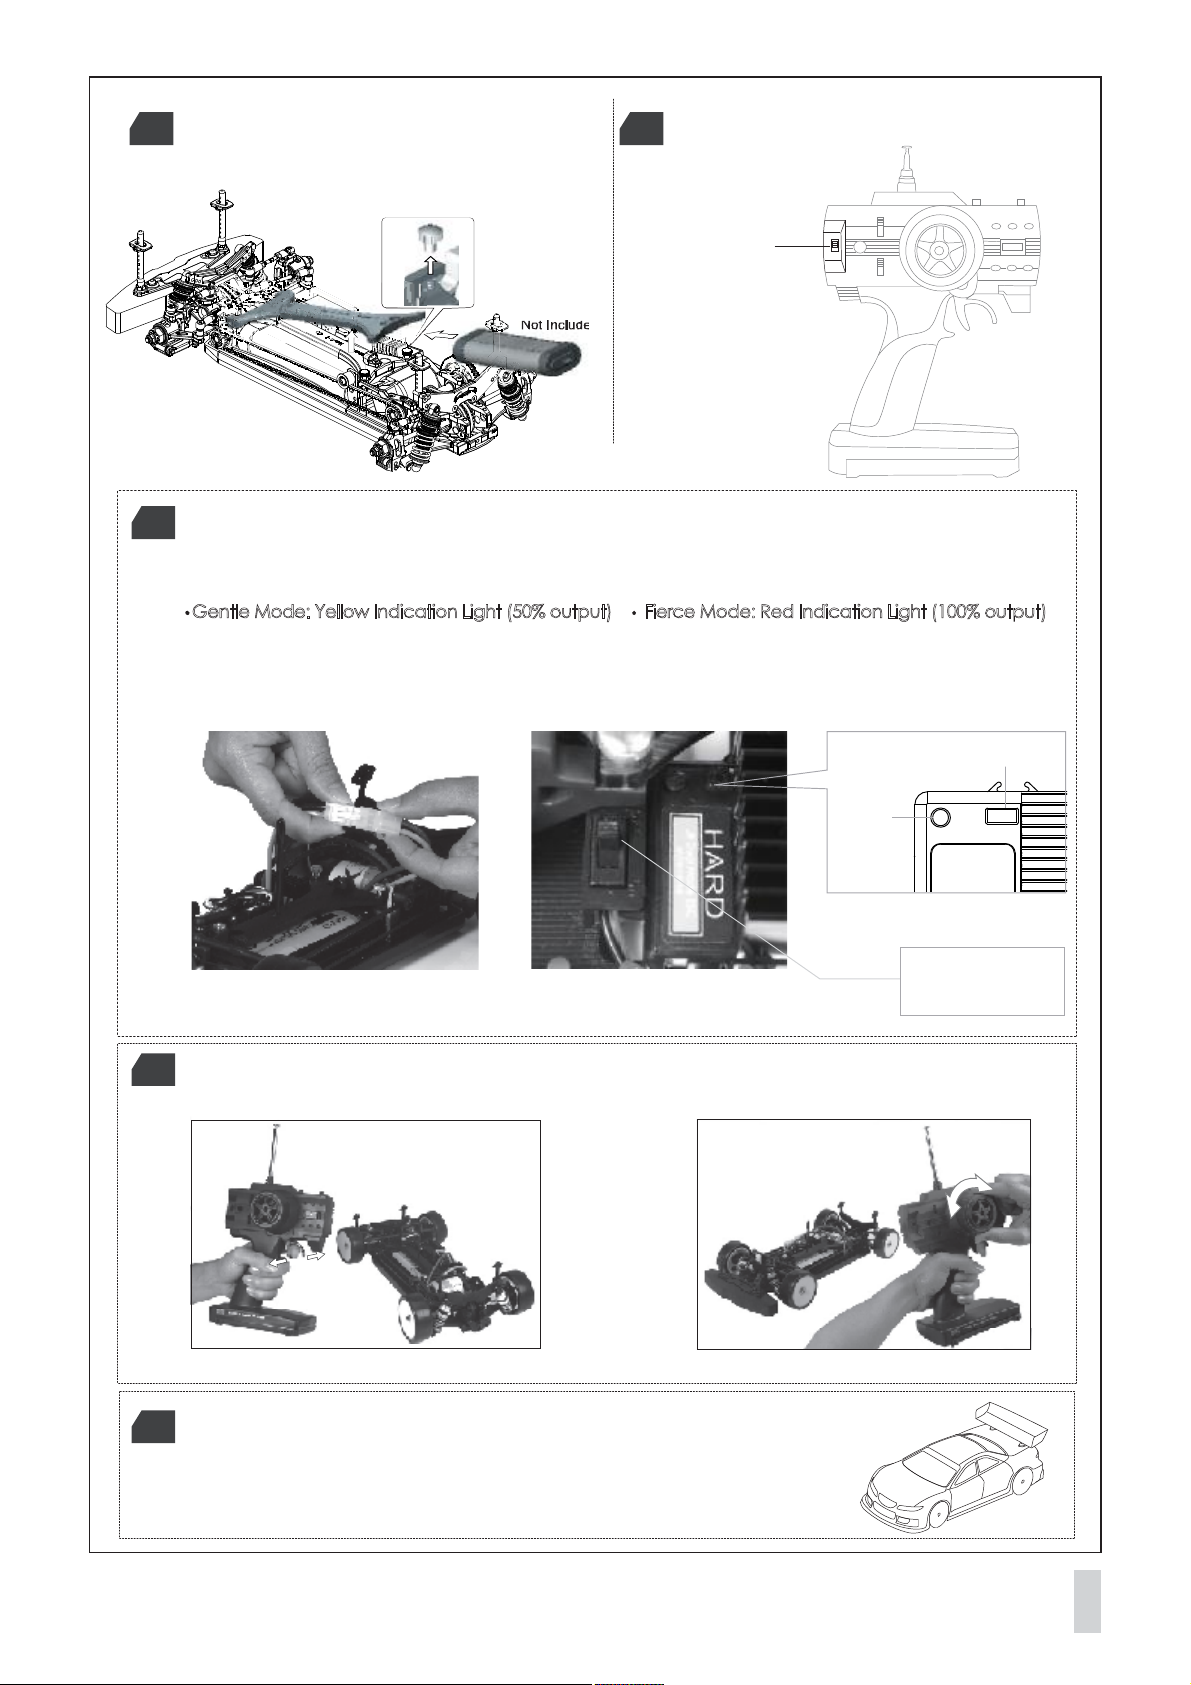
Thumb nuts are used to fasten the battery
08 09
holder. Use appropriate charger to charge the
included receiver battery pack.
Turn on the transmitter first.
Switch
Not Included
Connect the battery pack to the speed controller. Finally, switch on the speed controller power.
10
H.A.R.D. Dual Mode Speed Controller is the most advanced speed controller at the market.
There are two modes available: Gentle & Fierce.
Gentle Mode: Yellow Indication Light (50% output) Fierce Mode: Red Indication Light (100% output)
After switch on, the speed controller will auto-reset the throttle neutral position within 5 seconds
with beep sound. Push the button for 3 seconds on the speed controller to switch the mode.
Rotate the transmitter wheel for left and right.
11
Pull the trigger for acceleration and push the trigger for brake and reverse.
LED Light
Red 100%
Yellow 50%
Mode Switch Button
Switch
Put on the body & use body clips to secure the body.
12
06
Page 8
low
1 2 3 4 5
low
1 2 3 4 5
high
high
Best Lap:
FRONT SHOCKS
1 32
2.5
1.5
mm
3
2
1
12
R mmF mm
12
Down Stop
CamberAngle
Castor
Ride Height mm
mmDown Stop
Front Drive
Notes
DiffOne-WaySolid
1.41.3 1.5 1.6
1.2
1.1
mmStabilizer
mmStabilizer Length
Piston
Hole Size mm
#of Holes
Oil wt.
Oil Brand
Springs
Oring
Bladder note
Front mm
REAR
1 32
12
34
CamberAngle
Ride Height mm
Front
123
mmRear
Rear
Hole Size mm
#of Holes
123
Thread Length
123
mm
Down Stop
12
R mmF mm
FToeAngle RToeAngle
1
mm
2
1 2
2.5
1.5
Rear Hub Toe
Notes
mmDown Stop
1.41.3 1.5 1.61.21.1
mmStabilizer
mmStabilizer Length
mmShim
Steering System
Single Dual
Wheel Hubs
F Widthspacer
R Widthspacer
FrontWidth
RearWidth
R Upright spacer
Front
mm
Rear
mm
mm
mm
mm
mm
Electronics
Transmitter
Receiver
Servo
ESC
Battery
Motor
Brand
Turns
Brushes
Springs
Timing
07
FRONT PULLEY
1 2 3 4 5
LOOSE MEDIUM TIGHT
T REAR PULLEY T
1 2 3 4 5
DIFF.
LOOSE MEDIUM TIGHT
Spur&Pinion
Spur (S)
Pinion (P)
Final Drive Ratio(R)
S
=
P
X
2.0588=R
Body
Wing
Page 9
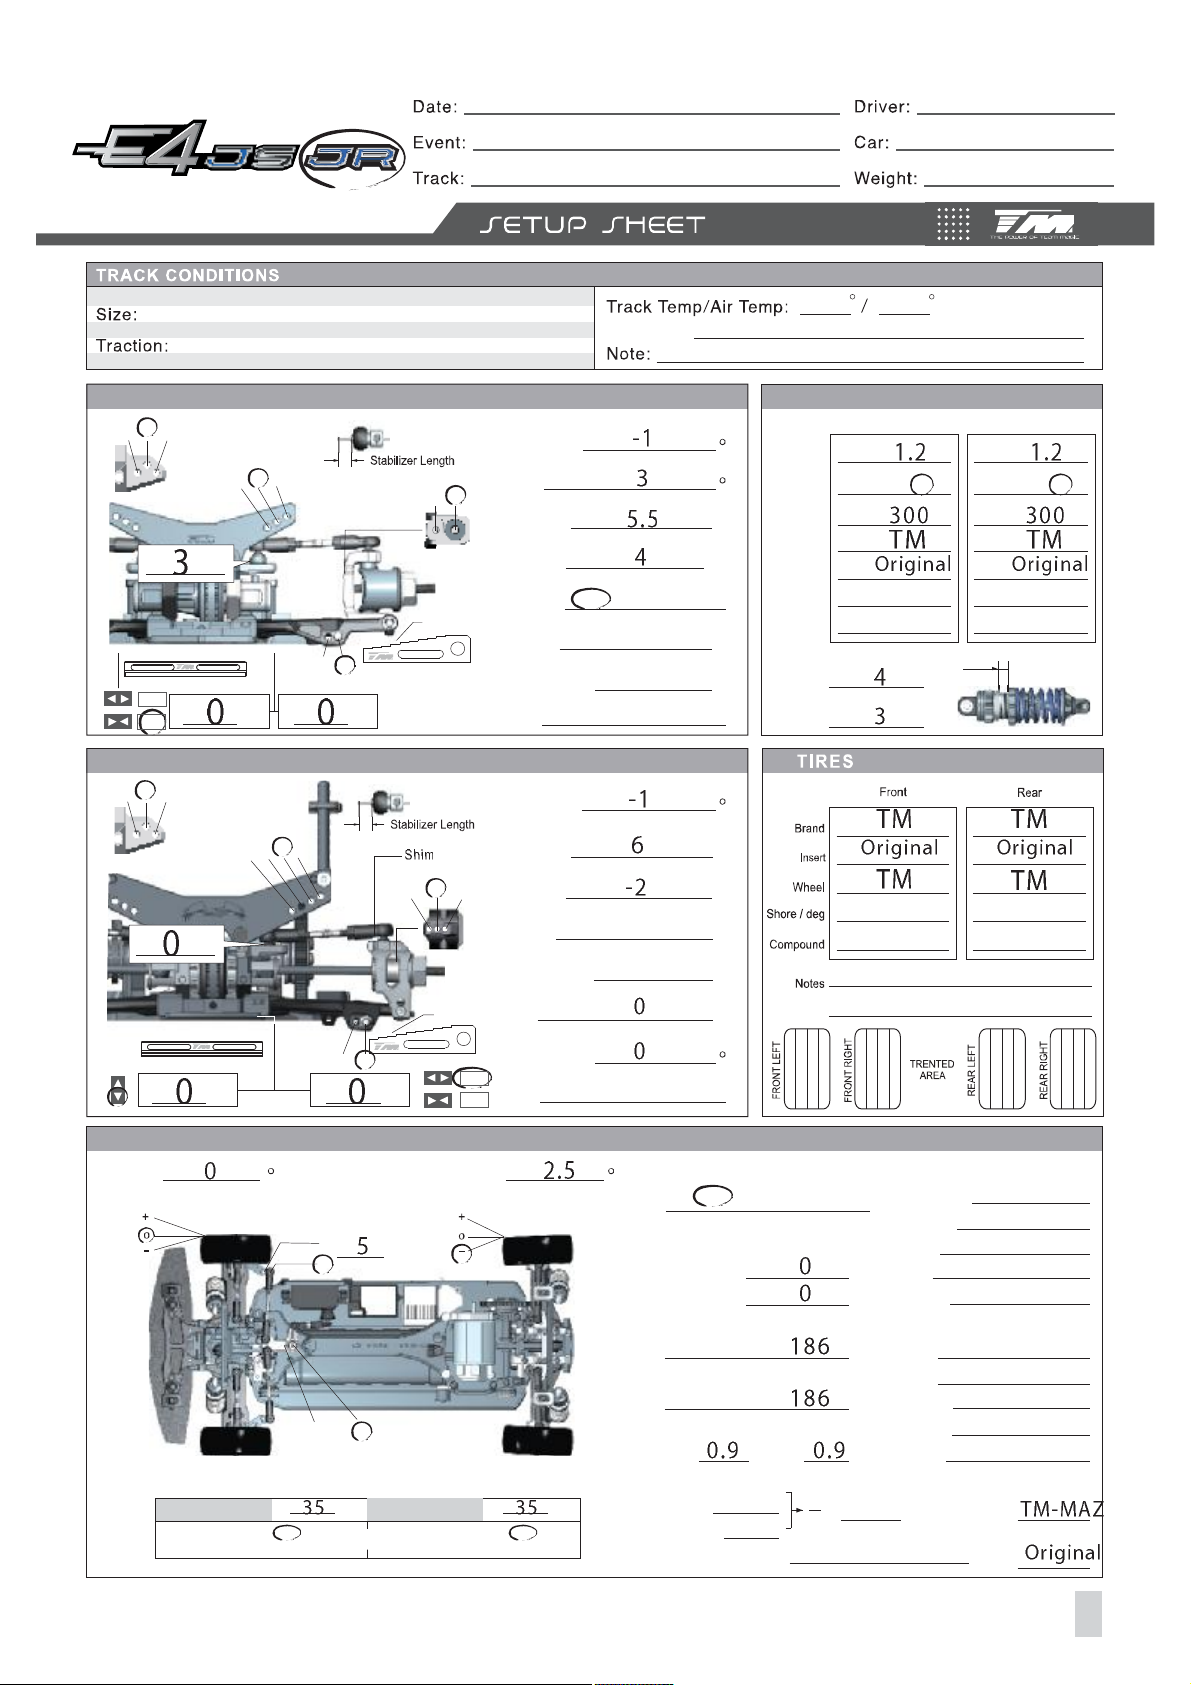
low
1 2 3 4 5
low
1 2 3 4 5
high
high
Best Lap:
FRONT SHOCKS
1 32
2.5
1.5
mm
3
2
1
12
R mmF mm
12
Down Stop
CamberAngle
Castor
Ride Height mm
mmDown Stop
Front Drive
Notes
DiffOne-WaySolid
1.41.3 1.5 1.6
1.2
1.1
mmStabilizer
mmStabilizer Length
Piston
Hole Size mm
#of Holes
Oil wt.
Oil Brand
Springs
Oring
Bladder note
Front mm
REAR
1 32
12
34
CamberAngle
Ride Height mm
Front
123
mmRear
Rear
Hole Size mm
#of Holes
123
Thread Length
123
mm
Down Stop
12
R mmF mm
FToeAngle RToeAngle
1
mm
2
1 2
2.5
1.5
Rear Hub Toe
Notes
mmDown Stop
1.41.3 1.5 1.61.21.1
mmStabilizer
mmStabilizer Length
mmShim
Steering System
Single Dual
Wheel Hubs
F Widthspacer
R Widthspacer
FrontWidth
RearWidth
R Upright spacer
Front
mm
Rear
mm
mm
mm
mm
mm
Electronics
Transmitter
Receiver
Servo
ESC
Battery
Motor
Brand
Turns
Brushes
Springs
Timing
FRONT PULLEY
1 2 3 4 5
LOOSE MEDIUM TIGHT
T REAR PULLEY T
1 2 3 4 5
DIFF.
LOOSE MEDIUM TIGHT
Spur&Pinion
Spur (S)
Pinion (P)
Final Drive Ratio(R)
S
=
P
X
2.0588=R
Body
Wing
08
Page 10
Page 11
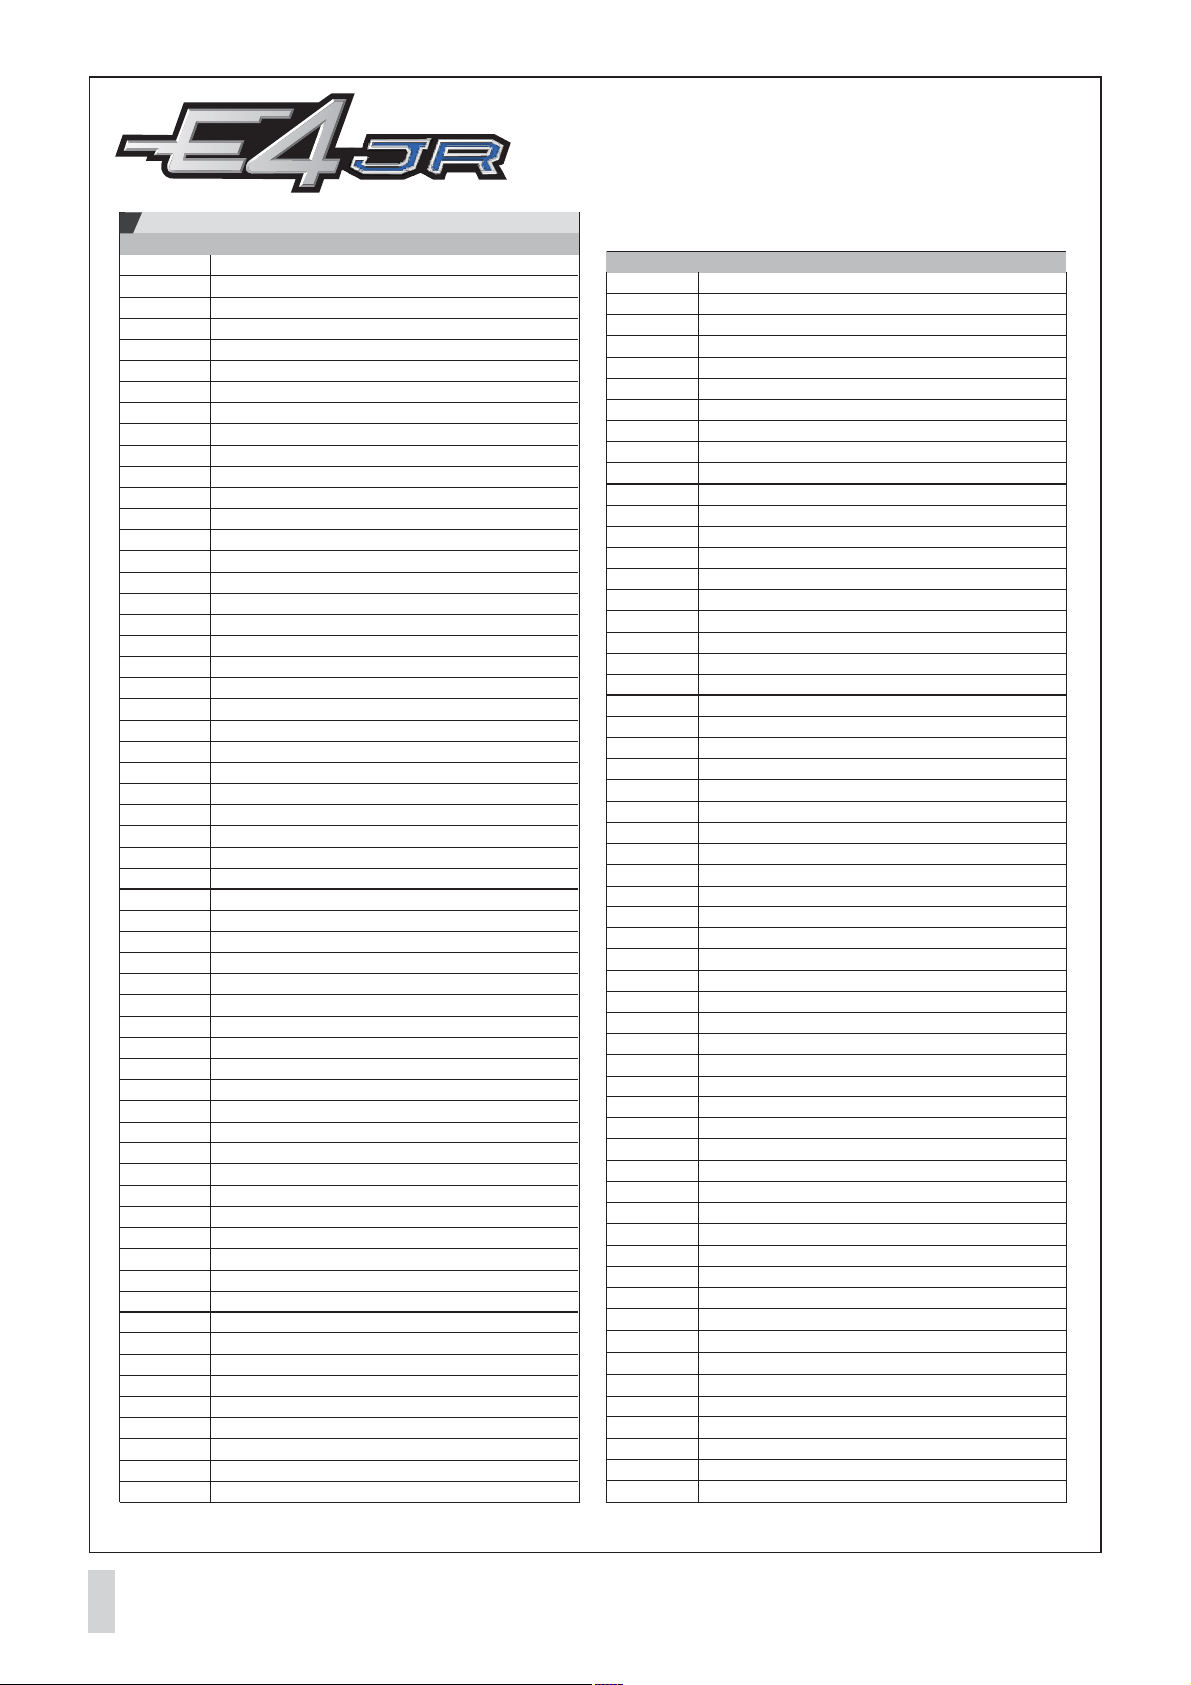
E4JR Spare Parts
Item No. Item Description
503104
503115
503117
503120
503125
503127
503130
503138
503141
503144
503145
503146
503147
503148
503150
503152
503154
503155
503156
503163
503165
503167
503169
503180
503183
503191
503196
503197
503202
503203
503205
503210
503212
503213
503214
503218
503219
503224
503226
503228
503235
503236
503250
503250-1
503250-2
503250-3
503250-4
503251
503252
503253
503254
503255
503256
503257
503258
503259
503260
503261
503262
E4 Alum. Hinge Pin Ball (4)
E4 Front Rear Hinge Pin Mount Set
E4 5x4mm Ball Stud (6)
E4 Hinge Pin Mont Nylon Ball Cap (4)
E4 Front Steering Block Set
E4 Steering Block 5x10mm Ball Stud (4)
E4 Front Lower Outer Hinge Pin (2)
E4 5x7mm Ball Stud (6)
E4 Middle Shaft Mount
E4 Pulley O-Ring 7x2mm (10)
E4 Bumper Post Set
E4 Bumper Mount
E4 Foam Bumper
E4 Front Body Post Set
E4 Rear Bracket
E4 Rear Hub Carrier (2)
E4 Rear Hub Carrier Washer (4)
E4 Ball Diff Pulley 35T
E4 Ball Diff Steel Ball 2.5mm (12)
E4 Spur Gear 110T
E4 Rear Belt
E4 Rear Body Post Set
E4 Main Shaft Upper Mount Set
E4 Shock Spring Mount & Ball Cup (4)
E4 Shock Spring (2)
E4 New Shock Bladder (4)
E4 Lightweight Front Bulkhead Upper Mount
E4 Lightweight 17T Side Pulley
E4 Front Lightweight Ball Diff Outdrive Set
E4 New Ball Diff Plate (2)
E4 Rear Lightweight Ball Diff Outdrive Set
E4 Single Bell Crank Steering System
E4 New Wide Side Belt
E4 New Caster Block Ball Stud (4)
E4 Caster Block Lower Screw (4)
E4 Lightweight Rear Front Hinge Pin Mount
E4 Speedo & Motor Vent Mount
E4 Lightweight Rear Bulkhead Upper Mount
E4 Special Servo Disc Ball Cup (2)
E4 New Wide Rear Belt
E4 Lightweight Caster Block Set (3 degree)
E4 Nylon 17T Center Pulley
E4J Shock Set (2)
E4J Shock Cap Set (2)
E4J Shock Shaft & Piston Set (2)
E4J Shock Body Set (2)
E4J Shock Body Hardware Set (2)
E4J Front Nylon Shock Tower
3.1x6.5x3mm Nylon Washer (6)
E4J Front Nylon Bulkhead Set
E4J Front Lower Arm Set
E4J Nylon Quick Release Battery Holder
E4J Battery Holder Screw (2)
E4J Upper Deck / Belt Tensioner Mount
E4J Belt Tensioner Set
E4J Front Lower Inner Hinge Pin (2)
E4J Front Front Nylon Hinge Pin Mount
E4J Alum. Front/Rear CVA Shaft (2)
E4J Wheel Adater (4)
Item No. Item Description
503263
503264
503265
503266
503267
503268
503269
503270
503271
503272
503273
503274
503275
503276
503277
503278
503279
503280
503281
503282
503283
503284
503285
503186F
H6801
H6802
H6803
H6804
H6805
111007F
111120
111160
115024
116202
116206
126303S
126306
126306BU
126306S
126308
126308BU
126308C
126310
126312BU
126314BU
126403S
150508
150612
150814
151015
151218
116131- 4A
150308TF
K1005
K6301
K6302
E4J Alum. Middle Shaft
E4J Ball Diff Screw & Spring Set
E4J Rear Lower Outer Hinge Pin (2)
E4J Rear Lower Arm Set
E4J Motor Mount
E4J Rear Nylon Bulkhead Set
E4J Rear Lower Inner Hinge Pin (2)
E4J Nylon Main Shaft Left Mount
E4J Rear Rear Nylong Hinge Pin Mount
E4J Alum. 7075 Main Shaft
E4J Spur Gear Holder
E4J Rear Nylon Shock Tower
E4J Servo Mount
E4J Front Chassis
E4J Main Chassis
E4J Rear Chassis
E4JS Rear Hub Carrier Nylon Wahser (4)
3.1x6.5x5mm Nylon Washer (6)
E4J Nylon Front Upper Linkage (2)
E4J Nylon Steering Linkage (2)
E4J Nylon Rear Upper Linkage (2)
E4 37T Pinion Gear
E4 24mm Mounted Rubber Tire (Dish Wheel) (4)
E4 Servo Saver (for Futaba)
HT2PGX 2 Channel AM 27MHz / 2 H3003 Servo
HR132JE 2 Channel AM Receiver 27MHz w/o Crystal
H.A.R.D. HS3003 Servo
H.A.R.D. JR Dual Mode ESC (w/reverse)
H.A.R.D. X3 Motor
3mm Flat Locknut(10)
R6 R-clip (10)
4mm Special Wheel Lock Nut (4)
4mm Short Thread Ball Stud & Ball Cup (for 3mm rod) (5)
E-clip 2.5 (10)
2x10mm Pin (10)
3x3mm Set Screw (6)
3x6mm Steel FH Screw (6)
3x6mm Steel Button Head Screw (6)
3x6mm Set Screw (6)
3x8mm Steel F.H. Screw (6)
3x8mm Steel Button Head Screw (6)
3x8mm Steel Cap Screw (6)
3x10mm Steel F.H. Screw (6)
3x12mm Button Head Screw (6)
3x14mm Button Head Screw (6)
4x3mm Set Screw
5x8x2.5mm Bearing (2)
6x12x4mm Bearing (4)
8x14x4mm Bearing (2)
10x15x4mm Bearing (4)
12x18x4mm Bearing (4)
3x14mm Alum. 7075 Adjustable Rod (2)
3x8mm Thrust Bearing Flat (1)
Special 3mm Servo Holding Screw (5)
Black Grease (for thrust bearing as well, 4g)
Ball Diff Lube (4g)
11
Page 12
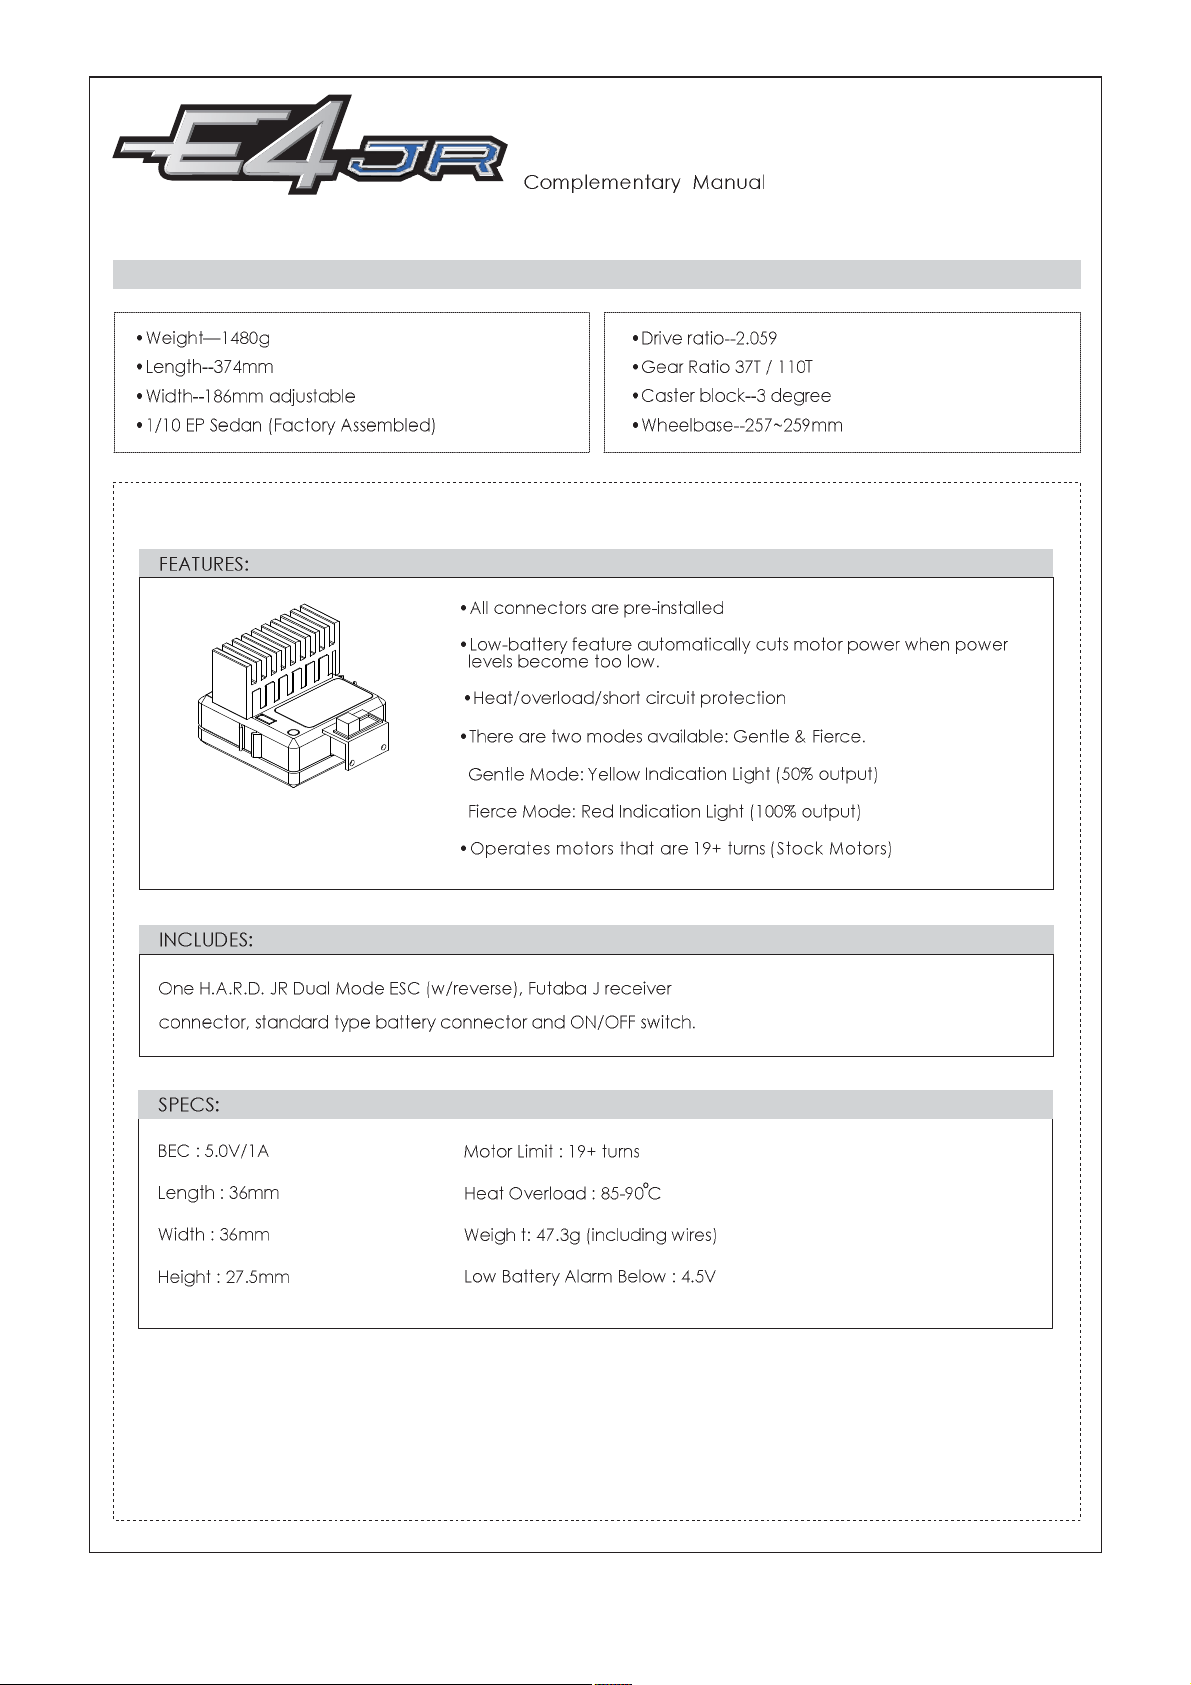
E4JR Main Spec:
H6804 H.A.R.D. JR Dual Mode ESC (w/reverse)
Page 13
Cautions !!
To prevent any serious personal injury or damage to property, please be responsible when operating this radio controlled car.
Team Magic and its distributors have no control over damage resulting from shipping, improper construction or improper usage.
Team Magic accepts no responsibility for damages resulting from the use of improper building equipment and operations. By the
act of assembling or operating this product, the user accepts all liability. If the buyer is not prepared to accept this liability, then
he/she should return this product in a new, unassembled and unused condition to the place of purchase.
This is not a toy. It is a high speed r/c car for persons age 15 and older.
Choose the right place to drive your r/c model
Don't run on streets or highways. This could cause serious accidents.
Don't run r/c cars near people or animals.
Don't run in the house. There is a high risk of fire.
Don't run nearby hospitals or schools. Loud noises may disturb others.
Always inspect your model before operation
Always make sure that no one else is using the same frequency when you are using
Always make sure your transmitter and batteries are fully charged to avoid losing control of the model.
Based on continuous product development, the up-to-date specifications of the kit may vary. We reserve all rights to change
any specification without prior notice.
www.teammagic.com.tw
Page 14

60952
 Loading...