

Page 1

DMG MORI serviceCAM DG_2684 User Manual
1. Introduction
It supports Wi-Fi hot-spot feature which can connect with DMG device and a ny mobile.
2. Features
Supports video resolution 720P (1280x720)
Video compression H.264
Image format JPEG
Comply with IEEE802.11 b/g/n/ac for 2.4G and 5G
Support WPA/WPA2 (PSK)
Support Hot-spot function
SD card functions as USB disk drive when connect with PC
Support max. 32G SD card memory size
Support 1/4” HD CMOS sensor, auto white balance.
Rechargeable Lithium battery 18650 2600mAh
Support battery charger cradle
Auto SMB function
Support snapshot and video recording
Provide battery capacity status LED indicators
One brightness level of white light
Laser pointer meets Class II (output power level less or equal to 1mW)
Electric Characters: (Tested by battery 18650 3.7V 2600mA)
1/9
standby current: <[email protected]
Normal operation current: [email protected] (Hot-spot and live view by mobile APP)
Only white light on: [email protected]
Only laser pointer on: [email protected]
Page 2
DMG MORI serviceCAM DG_2684 User Manual
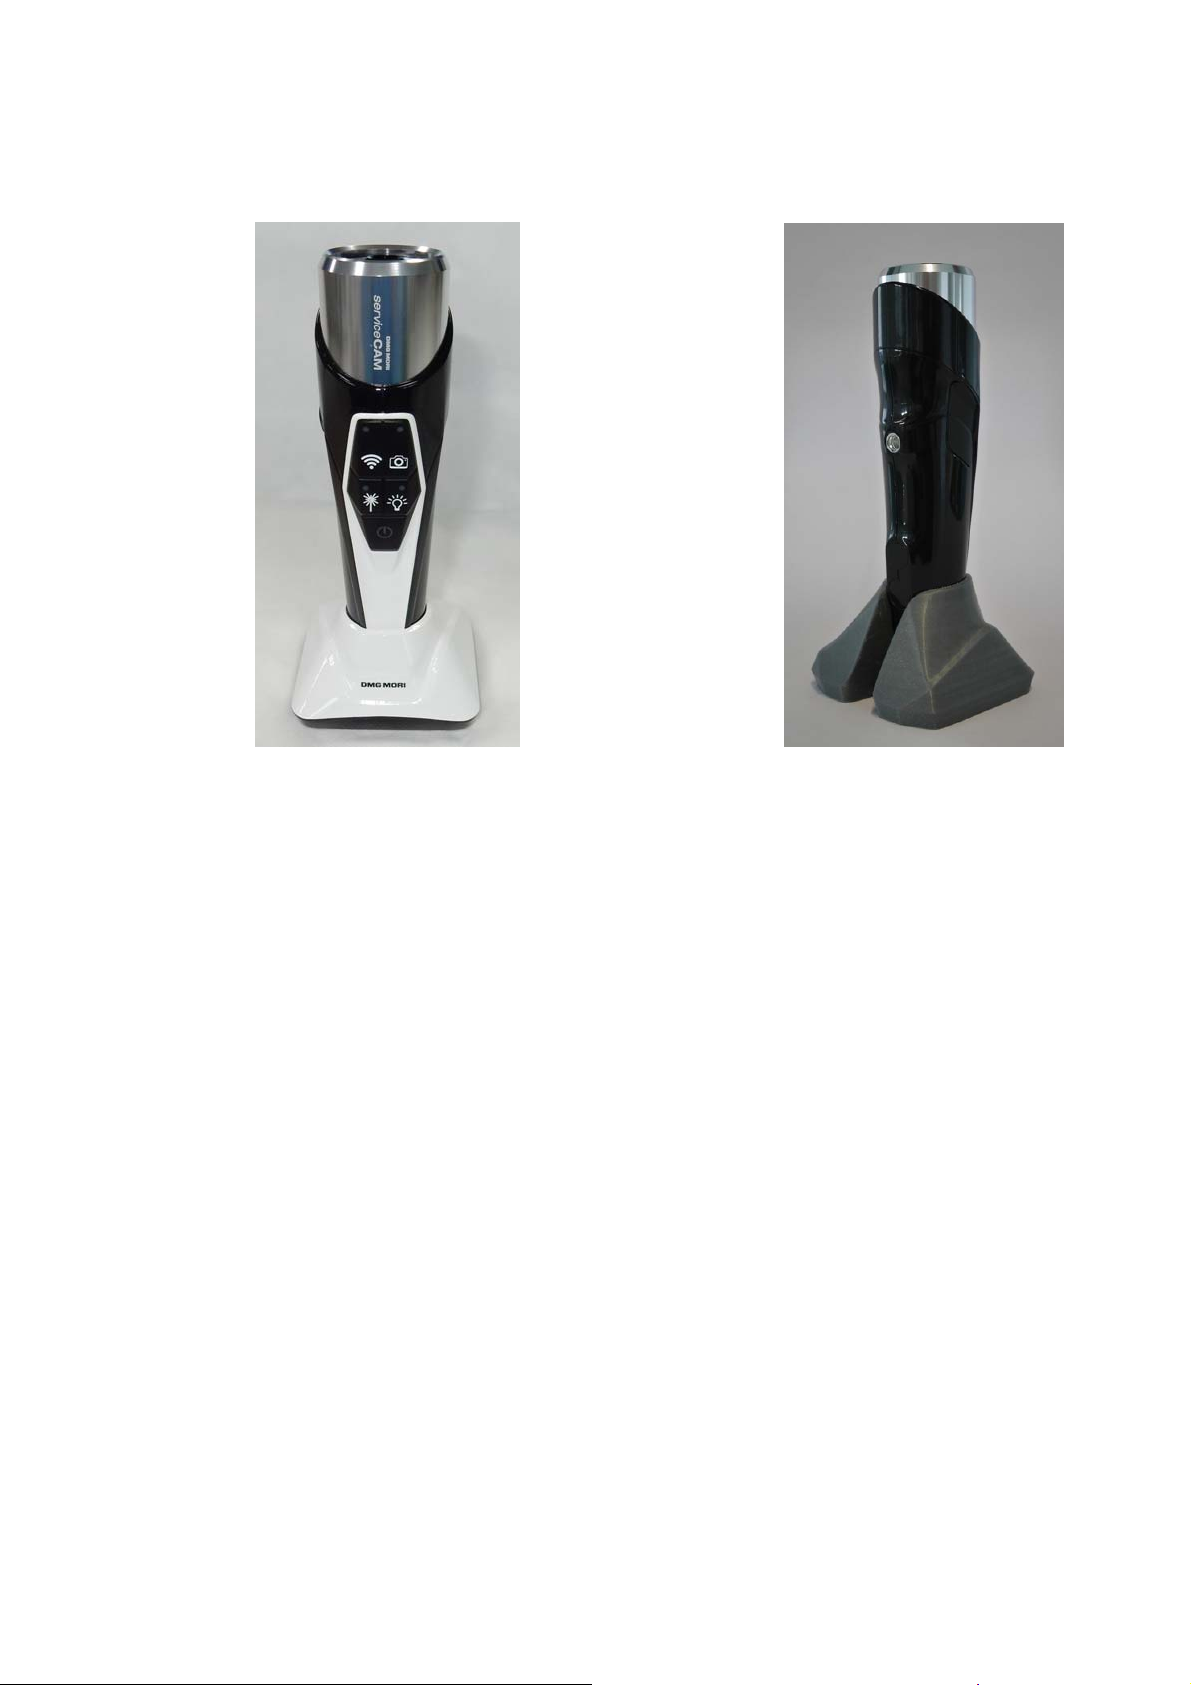
3. DMG Camera Appearance
(Frontview)(Rearandlateralsideview)
2/9
Page 3
DMG MORI serviceCAM DG_2684 User Manual
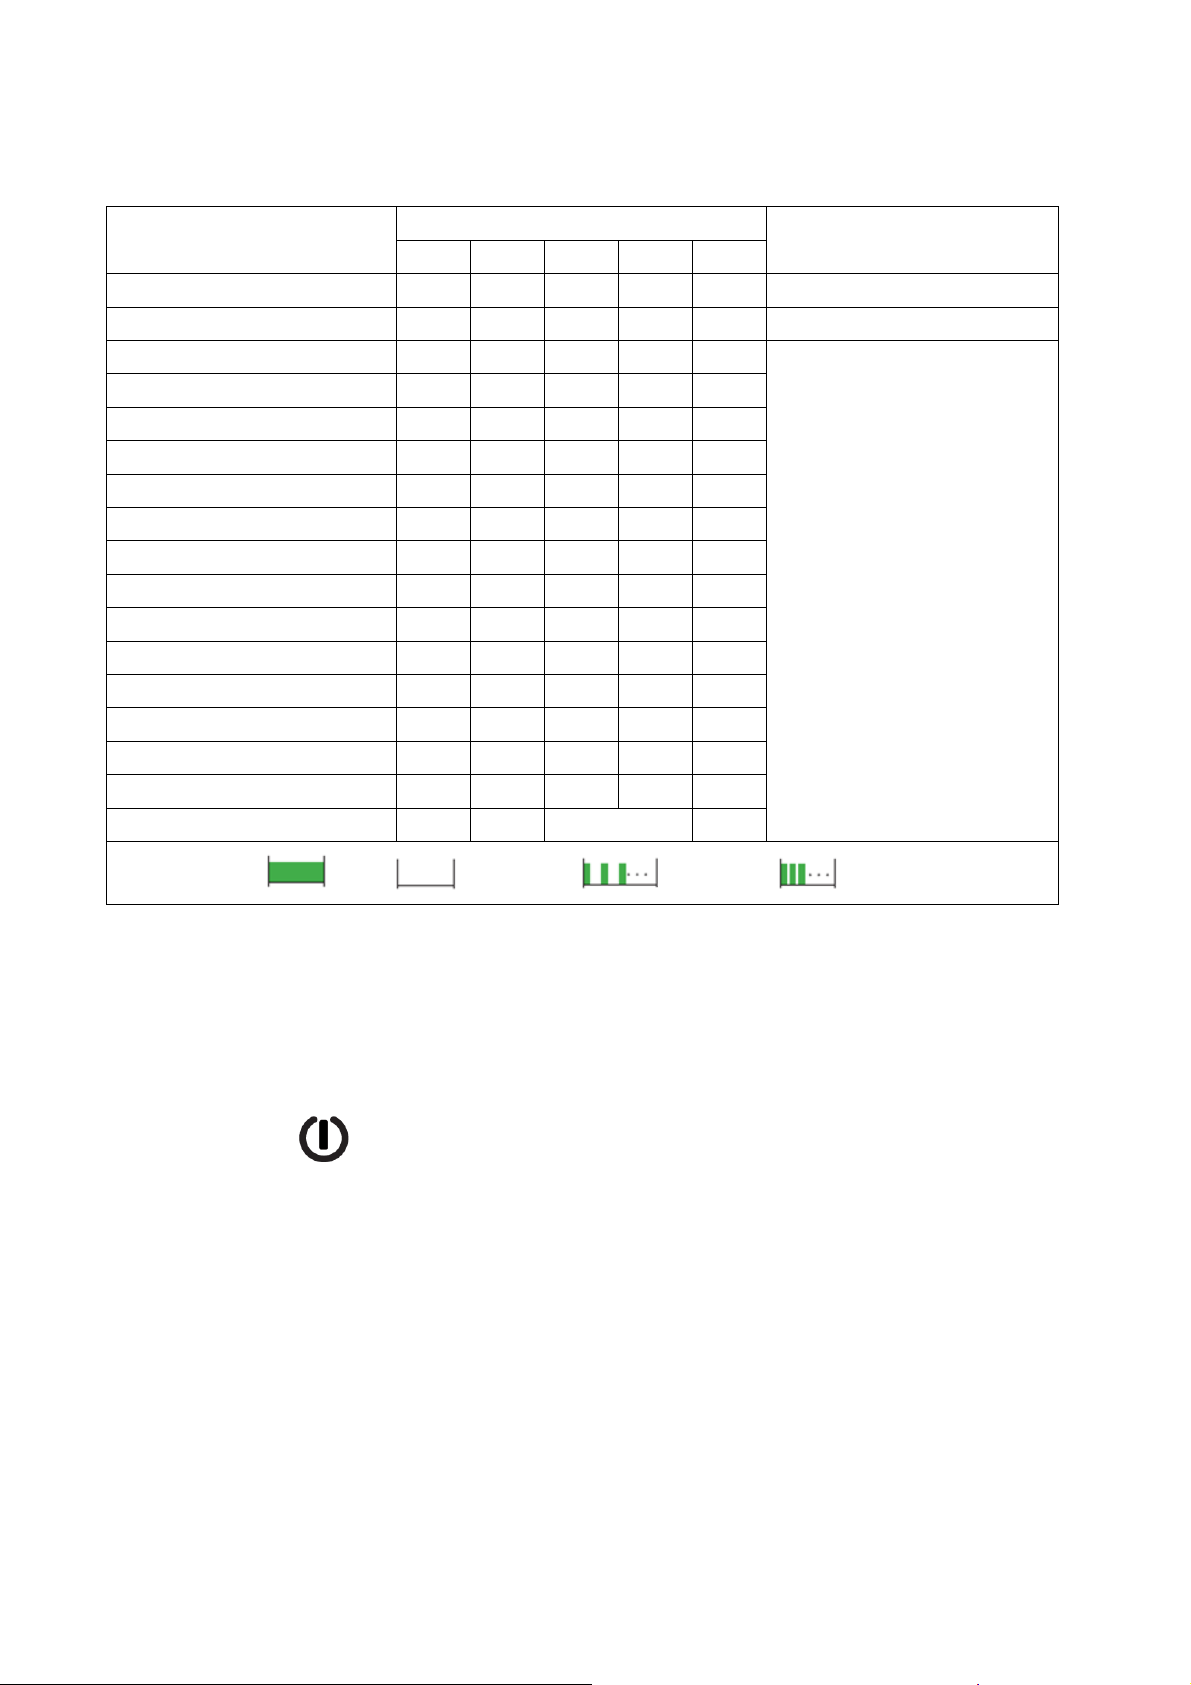
4. Function Keys and LED Indicators
WHEN
Power off, both laser and light inactive OFF OFF OFF OFF OFF
Power off, low battery, both laser and light inactive OFF OFF OFF OFF OFF
Power off, battery charging, both laser and light inactive OFF
Power off, one of laser or light is active OFF OFF OFF OFF
Power off, low battery, one of laser or light is active OFF
Power off, battery charging, one of laser or light is active OFF
Power on, battery voltage > 3.7V, system just boot
Power on, 3.7V > battery voltage > 3.4V, system just boot
Power on, 3.4V > battery voltage, system just boot
Power on, low battery, system just boot
Power on, battery charging, system just boot
Power on, WiFi initialize
Power on, system ready
Power on, snapshot
Power on, recording
Power on, SMB file transfer (recording maybe continuous)
Firmware update process *3
PWR (BLUE) PWR (RED)*1 WIFI SNAPSHOT BATTERY*2
Blink Slow
ON
ON
ON Blink Slow
ON Blink Slow
ON ON
ON TBD Blink Slow
ON TBD ON
ON TBD ON Blink Once TBD
ON TBD ON Blink Slow TBD
ON TBD ON Blink Fast TBD
ON TBD Interlaced Blink Fast/Slow TBD
LED STATUS
ON
ON
OFF OFF OFF
OFF OFF OFF
OFF OFF
OFF OFF
OFF OFF
ON (3 LED)
ON (2 LED)
OFF OFF
OFF OFF
OFF OFF
ON (1 LED)
ON (1 LED)
OFF
OFF
TBD
TBD
TBD
TBD
TBD
TBD
TBD
REMARK
*1
PWR (RED) LED status depends on battery voltage
battery voltage > 3.4V LED OFF
3.4V > battery voltage LED Blink slow
Battery Charging LED ON
*2
BATTERY LED “ON” depends on battery voltage
battery voltage > 3.7V 3 LED ON
3.7V > battery voltage > 3.4V 2 LED ON
3.4V > battery voltage 1 LED ON
*3
From the beginning, both LEDs interlaced blink fast and then
change to interlaced blink slow
LED PATTERN: ON OFF BlinkSlow BlinkFast
There are total five keys that user can operate the DMG torch camera via these keys and total seven LED to
indicates the DMG torch camera operation situation.
A. Power key
a) Power key is used to turn on or off the DMG torch camera and WiFi.
b) There are two LEDs (blue and red) beside of the power key.
1) Power blue LED: (LED located at left side of power key, TOP VIEW)
CAMERA ON: alway s ON
CAMERA OFF: always OF F
2) Power red LE D: (LED located at right side of power key, TOP VIEW)
3/9
Page 4

DMG MORI serviceCAM DG_2684 User Manual
When battery is under charging, always ON
Battery charging finished (here power cable may connected), always OFF
When battery is detected low, but without under charging, always blink (ON/0.5s -
OFF/0.5s, repeatedly) for 10 minutes. And then, all torch function, except la ser pointer,
will SHUT OFF automatically.
When battery is greater than battery low level, but without under charging, always OFF.
B. Laser key
a) There is no LED indicator of laser pointer function.
b) Laser pointer is valid only if the laser key is pressed. When laser key is released, the laser
pointer also stop emission.
C. White LED key
a) There is no LED indicator of laser pointer function.
White LED provides one brightness level - low and high brightness.
b) When white LED key is pressed, the brightness level is repeated as low-high-off.
D. WIFI key
a) WIFI key is used to turn on or off the WIFI function while the system is power on (power blue
LED is on).
4/9
b) When WIFI function is disable, the WIFI blue LED is OFF
c) When WIFI builds connection, the WIFI blue LED blinks slowly. (ON/0.5s - OFF/0.5s, repeatedly)
d) When WIFI connection h as been build, the WIFI blue LED is ON
e) When firmware upd ate via SD card, WIFI blue LED and Snapshot blue LED will interlaced-blink.
Its blinking frequency changes from quickly to slowly. (final speed: ON/0.5s - OFF/0.5s,
Page 5

DMG MORI serviceCAM DG_2684 User Manual
repeatedly)
** More detail refer to section Firmware Update
E. Snapshot key
a) Snapshot key is used take a photo (short press) or take a video recording.(long press). Here
long press means user must press and hold the key at least two seconds.
b) There is a snapshot blue LED to indicate DMG torch camera situation:
1) Normal condition, snapshot blue LED is OFF
2) When take a photo, snapshot blue LED is blink once (OFF - ON/0.5s - OFF)
3) When take a video recording, snapshot blue LED is blink slowly (ON/0.5s - OFF/0.5s,
repeatedly)
4) When transmit SD card data via WiFi, LED will blink quickly (ON/0.25s - OFF/0.25s,
repeatedly)
5) When firmware update via SD card, WIFI blue LED and Snapshot blue LED will
interlaced-blink. Its blinking frequency changes from quickly to slowly. (final speed: ON/0.5s
- OFF/0.5s, repeatedly)
** More detail refer to section Firmware Update
F. Battery capacity indicator LED
a) There are three blue LE D to indicate the battery capacity.
b) When battery voltage level is equal or less than 3.4V, only the most right LED ON (Top view).
c) When battery voltage level is equal or less than 3.7V, but greater than 3.4V, only the most right
and middle LED ON (Top view).
d) When battery voltage level is greater than 3.7V, all three LED ON (Top view).
5. System Power On Process
A. Press the power key and the power blue LED will be ON.
5/9
Page 6

DMG MORI serviceCAM DG_2684 User Manual
B. After about 2~3 seconds, The WIFI blue LED will blink slowly. (ON/0.5s - OFF/0.5s, repeatedly) to
initialize the WIFI function.
C. After WIFI initialized, the WIFI blue LED will remain ON.
D. Now user can connect the client device with DMG torch camera.
6. How To Live View Via Mobile APP Utility - VLC
A. Select and connect the hot spot SSID of DMG torch camera. Default SSID is DMG_Camera + S/N ,
here “S/N” is unique number of DMG torch camera.
B. Enter the hot spot login password. Default password is 00000000
C. Open the APP and select functio n “Open Streaming”.
D. Enter the command as like below:
rtsp://192.168.11.1/DMG_Camera/h264
E. Now, user can enjoy the live view from his own mobile.
F. Wifi default setting is 2.4G and ch.1
7. Take Photos, Video Recording and SMB Function
When DMG torch camera is running live view, user can press snapshot key to take photos or video
recording.
A. Press snapshot key and release it soon, normally less than one second, the DMG torch camera will
take a photo and save the photo into the SD card. At the same time, the snapshot blue LED will blink
one time.
B. Press snapshot key and hold it more than two seconds, the DMG torch camera will take a video
recording and save the photo into the SD card. At the same time, the snapshot blue LED will blink
continuously.
C. To stop the video recording, press snapshot key and hold it more than two seconds ag ain.
D. During video recording process, press snapshot key and release it soon, normally less than one
second, the DMG torch camera will take a photo but does not stop recording. The photo is also saved
into the SD card.
6/9
Page 7

DMG MORI serviceCAM DG_2684 User Manual
E. When generates a photo or video file and saves into SD card, the SMB file copy will be done
immediately and the snapshot indicator blue LED will blink in quickly speed.
F. If recording time is greater than 5 minutes, we will generate a saved file per 5 minutes. SMB file copy
will perform immediately while the video or photo file creates no matter user stop recording or not.
G. When snapshot indicator is flashing quickly, user still can stop or start the video recording or to take a
photo.
8. Battery And Cradle
A. DMG torch camera use rechargeable Lithium battery 18650 2600mAh
B. User can charge battery via below methods:
a) Put the DMG torch cam era into the cradle holder.
1) DMG torch camera will auto power off when it had been put into cradle holder.
2) DMG torch camera remain power off when it had been taken out from cradle holder.
b) Connect USB cable with DMG torch camera.
1) The SD card will be fun ction as a USB driver if the US B cabl e connects with P C, and all key
function are disabled
.
9. How To Use DMGTool Utility
7/9
Page 8

DMG MORI serviceCAM DG_2684 User Manual
10. How To Upda te The Firmware And Restart System
The firmware of DMG torch camera can be updated via SD card. User can download the updated file from
DMG website. (Camera will only recognized the unique file name “update720p.bi n”)
A. Save the file into SD card which memory size cannot greater than 32G, and do not change the file
name which you download from DMG website.
B. Power off the DMG torch camera.
C. Insert the above SD card into SD card socket of DMG torch camera.
D. Power on the DMG torch camera
E. DMG torch camera will start the firmware update process. Here user can find the WIFI blue LED and
Snapshot blue LED will interlaced-blink from quickly frequency to slowly as below:
F. After the firmware update finished, DMG torch came ra will auto restart system and the WIFI blue LED
and Snapshot blue LED are all off for about 2~3 seconds. And at the same time, the updated
firmware file will be deleted automatically..
G. System auto restart
a) The WIFI blue LED will blink slowly. (ON/0.5s - OFF/0.5s, repeatedly) to initialize the WIFI
function.
b) After WIFI initialized, the WIFI blue LED will remain ON.
c) Now user can connect the client device with DMG torch camera.
8/9
Page 9

DMG MORI serviceCAM DG_2684 User Manual
Note: This equipment has been tested and found to comply with the limits for a Class B digital device,
pursuant to part 15 of the FCC Rules. These limits are designed to provide reasonable protection
against harmful interference in a residential installation. This equipment generates, uses and can
radiate radio frequency energy and, if not installed and used in accordance with the instructions, may
cause harmful interference to radio communications. Howeve r, there is no guarantee that interference
will not occur in a particular installation. If this equipment does cause harmful interference to radio or
television reception, which can be determined by turning the equipment off and on, the user is
encouraged to try to correct the interference by one or more of the following measures:
—Reorient or relocate the receiving antenna.
—Increase the separation between the equipment and receiver.
—Connect the equipment into an outlet on a circuit different from that to which the receiver is
connected.
—Consult the dealer or an experienced radio/TV technician for help.
This device complies with part 15 of the FCC Rules. Operation is subject to the following two
conditions: (1) This device may not cause harmful interference, and (2) this device must accept any
interference received, including interference that may cause undesired operation.
The device has been evaluated to meet general RF exposure requirement. The device can be used in
portable exposure condition without restriction.
Note: The Grantee is not responsible for any changes or mo difications not expressly approved by the
party responsible for compliance. such modifications could void the user's authority to operate the
equipment.
9/9
 Loading...