

Page 1
TF3303W
WIFI Borescope
USER’S MANUAL
INTRODUCTION
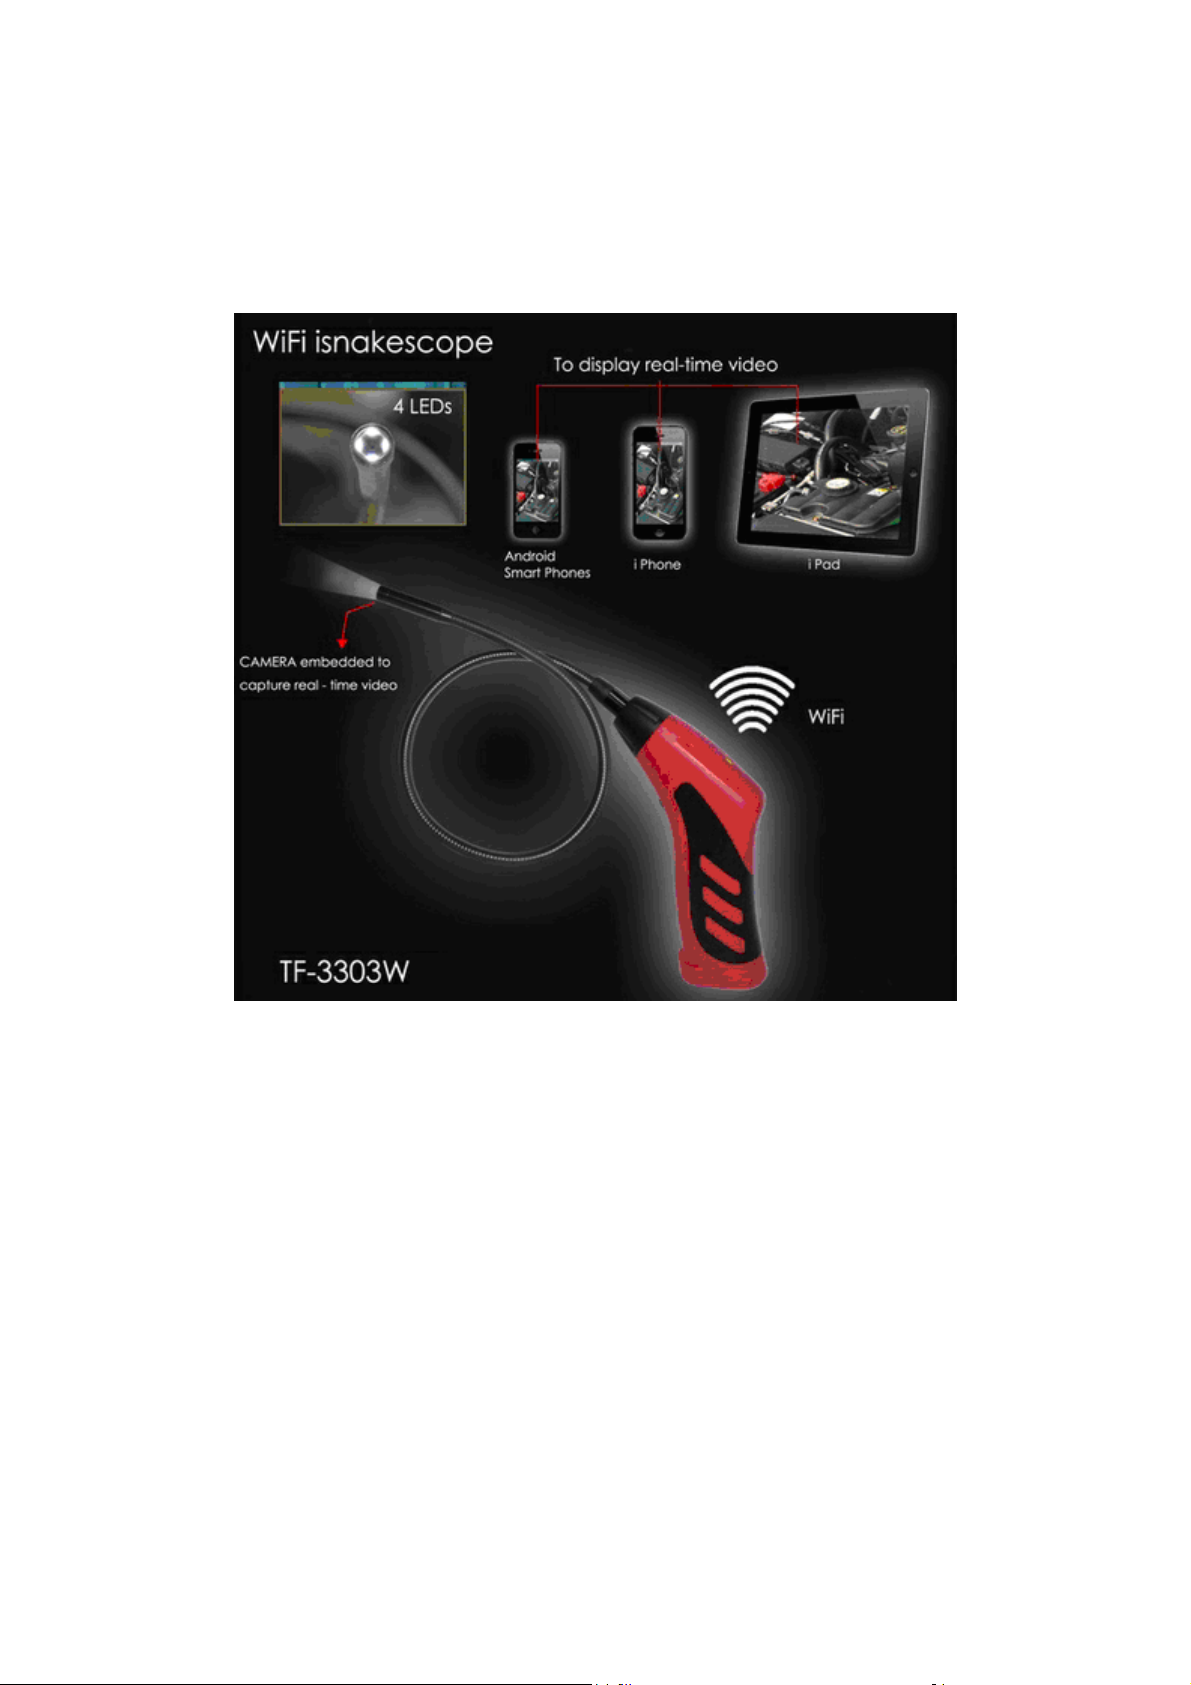
This Wifi iSNAKESCOPE is a unique instrument that can wirelessly stream high-quality video from a
camera at the tip of a long probe to the screen of a nearby iPhone® or iPad® or Android™ smartphone or tablet
computer.
Application Possibility include inspections of hard-to-reach or hard-to-see areas like crowded engine
compartments, equipment enclosures or HVAC ductwork.
To receive the video, the smartphone or the tablet computer must install and run a free app
(”iSNAKESCOPE”), downloadable from the iTunes® App Store., or from the Google Play Store.
Soft buttons on each app allow the user to record inspection video clips and take snapshots of the video
stream and store them on the iPhone, iPad or Android device. A saved clip or snapshot can be shared immediately
by attaching it to a text message, or shared later via e-mail or Skype™. All transfers between iSNAKESCOPE and
the iPhone/iPad or Android device are wireless, via an ad hoc WiFi hot spot (without Internet access) generated by
the instrument.
1
Page 2
PRODUCT OVERVIEW
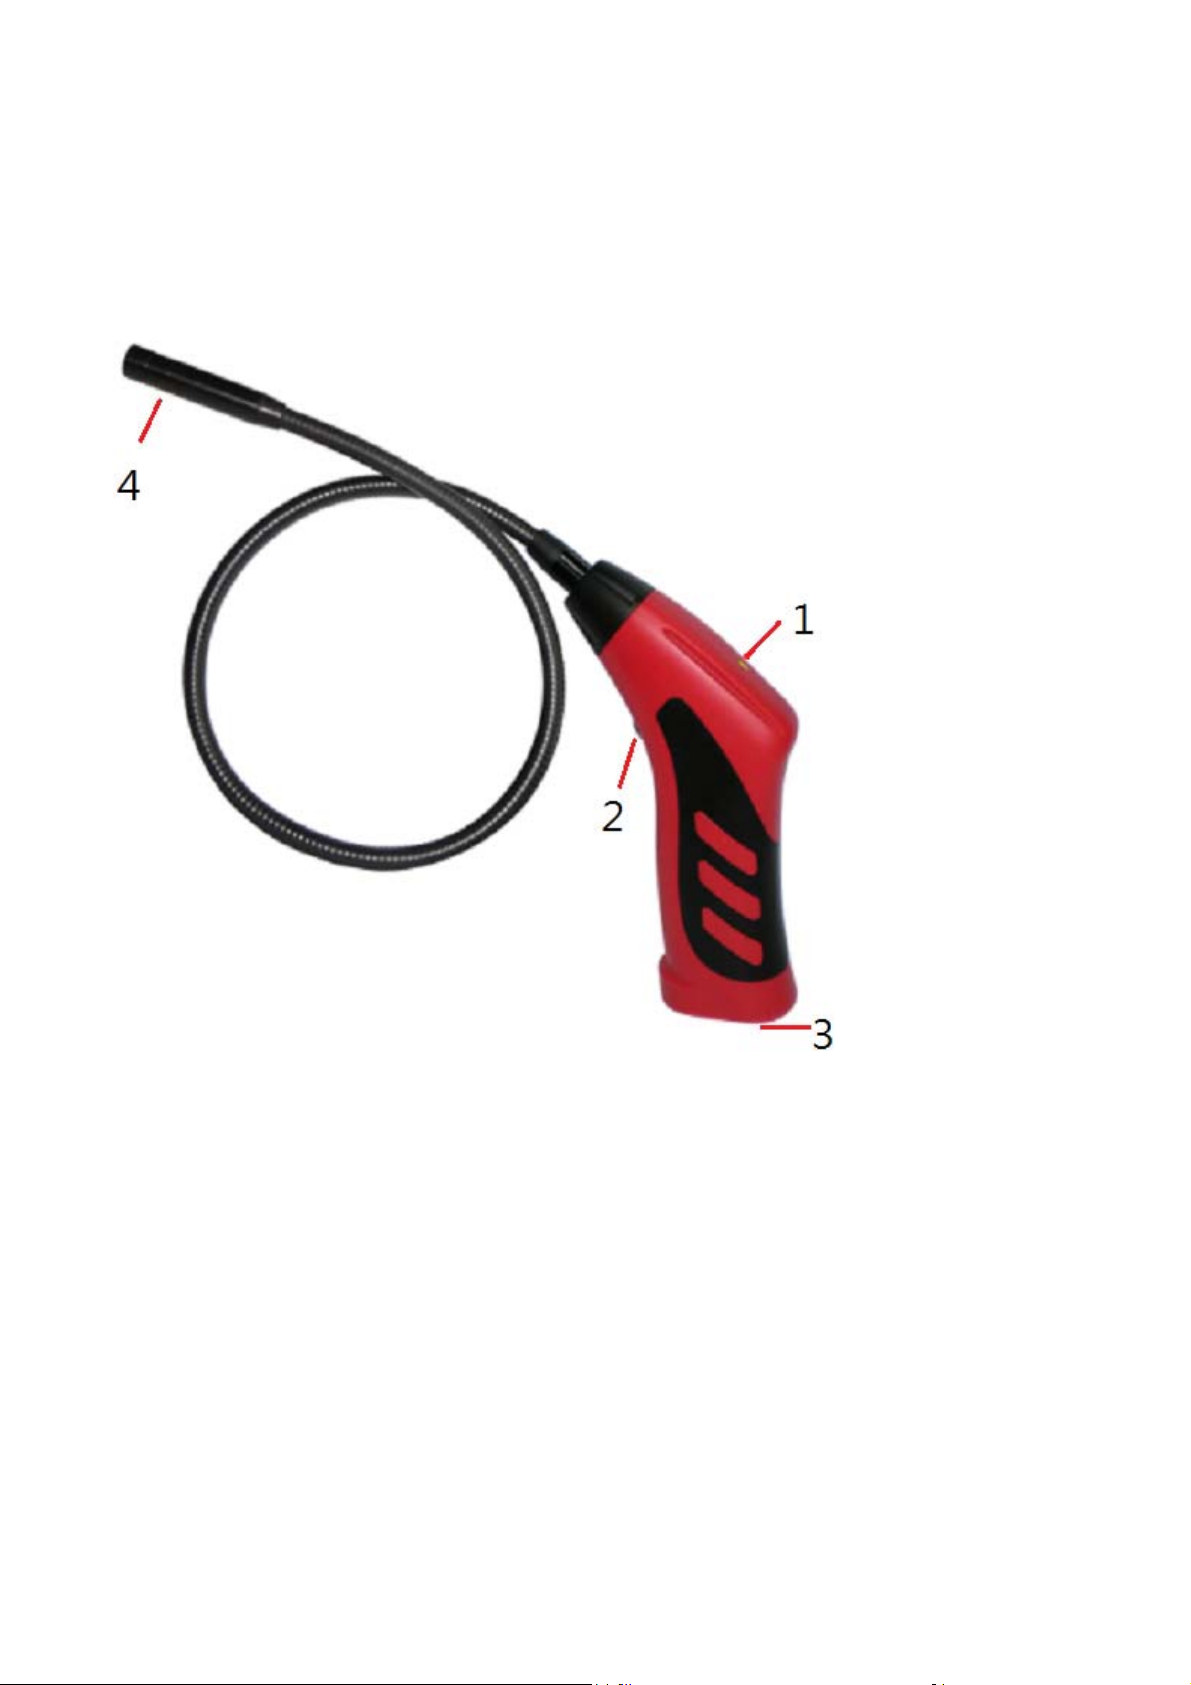
Fig. 1 shows the controls, indicators and physical features of the iSNAKESCOPE instrument.
Fig. 2 shows the unit’s standard accessories. Familiarize yourself with the names and functions of all
components before moving on to the Setup Instructions and Operating Instructions.
Fig. 1.
iSNAKESCOPE physical features, indicators, controls.
1. WiFi status light: Green light on = No signal , Green light slow flash=signal sent ,but connection failed,
Green light quick flash=signal sent and connected, Green and red light on both= low battery
2. Power switch/brightness adjustment thumbwheel, for camera and LEDs
3. Battery room
4. Camera and LEDs
5. Magnetic pickup
6. 45° mirror
7. Pickup hook
2
Page 3
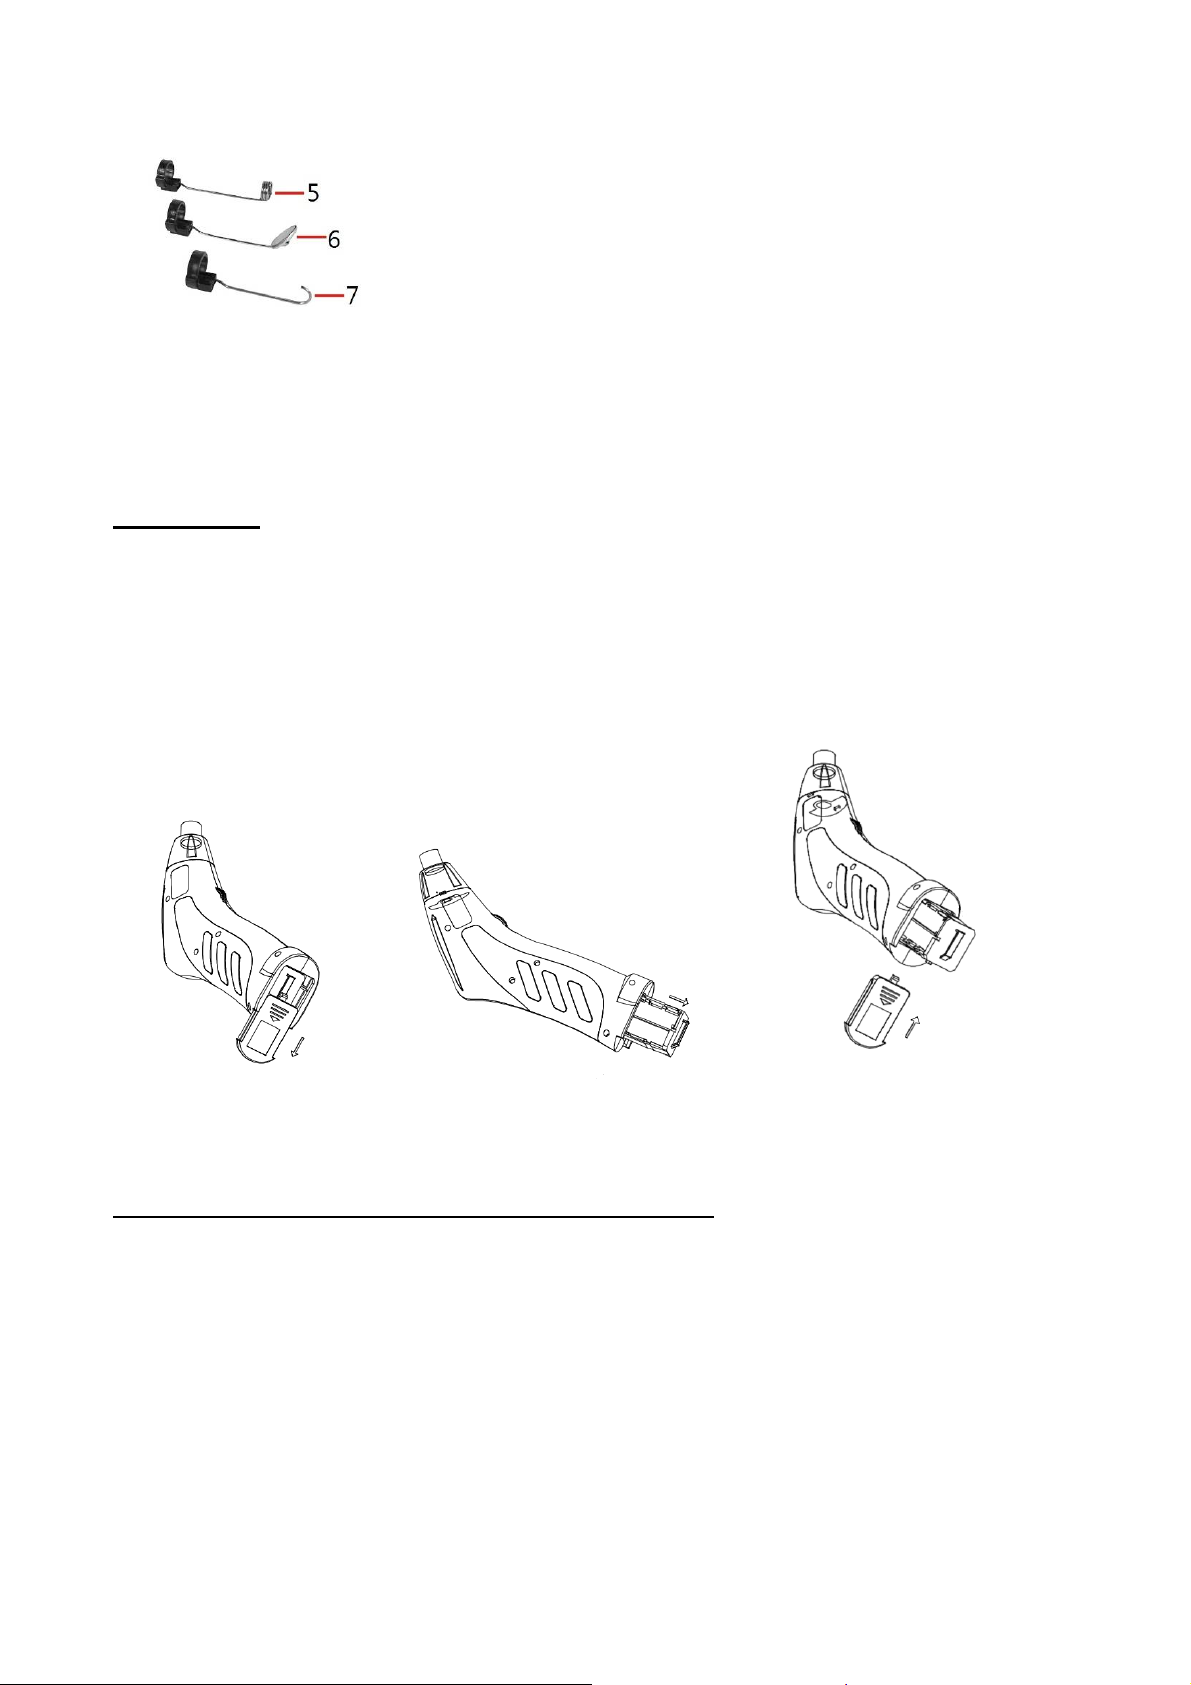
Fig. 2.
iSNAKESCOPE’s standard accessories
Installation
Please install the batteries before using the product, choose the accessory according to the actual
situation. Steps of installation as following
:
To Install Batteries
1. Remove the cover. (Fig3)
2. Remove battery compartment (Fig4) and insert 4 new AA (1.5 V) batteries into the proper slots in the
battery compartment. Proper battery orientation is indicated on the battery compartment.
3. Reinstall battery compartment and battery cover.( Fig5)
Fig3 Fig4 Fig5
DOWNLOAD THE APP (APPLE iOS AND ANDROID DEVICES)
¾ To download the free Apple app that enables iSNAKESCOPE (the instrument):
First, make sure that your iPhone or iPad is connected to the Internet. Then touch the App Store icon to visit the
Apple App Store. Then enter “iSNAKESCOPE” in the Search box. When iSNAKESCOPE’s landing page
appears, touch the Free App link at the upper left of the page.
You will be prompted to sign in to the iTunes Store using your Apple ID and password. If you do not have an
Apple ID, you can create one now.
Before downloading the app, you will be shown Apple’s Privacy Policy page. Select the box indicating that “I
have read and agree to these terms and conditions.” Then touch Agree. Doing so will return you to the landing
page of the iSNAKESCOPE app and begin downloading it.
3
Page 4

¾ To download the free A n droi d app th at enables iSNAKESCOPE (the instrument):
Make sure that your device is connected to the Internet.
Go to the Google Play Store and enter “iSNAKESCOPE” in the Search box at the top of the store’s home page.
On the APPS screen that appears next, touch the iSNAKESCOPE icon.
On the iSNAKESCOPE app’s landing page that appears next, touch the Install button at upper right.
On the next screen, touch the “Accept & download” button.
While the app downloads, on the following screen check the “Allow automatic updating”box
The installation should take less than a minute. Installation is complete when you receive a notification that
“iSNAKESCOPE” [has been] “Successfully installed.”
To activate the iSNAKESCOPE app and begin displaying inspection video on you r Apple iOS or Andro id device,
you must disconnect from the Internet and establish connectivity between your device and iSNAKESCOPE 's ad
hoc WiFi network by following the Operating Instructions for your platform in the next section.
OPERATING INSTRUCTIONS
APPLE iOS PLATFORM VIEWING VIDEO
1. Turn on iSNAKESCOPE by rolling the power switch/brightness adjustment thumbwheel (Fig. 1, Callout
2) to the right until you hear a click. The WiFi status light on top of the unit will glow slow flashing for
30 seconds while
2. When the light turns slow flashing, power on your device and touch the Settings icon (Fig. 6 the top
button at the right side)to open your Settings screen(Fig. 7).
3. Touch the WiFi row to enter the WiFi Networks screen. The
the list of available networks. Touching the
enabling wireless transmission of probe video to a nearby iPhone or iPad running the
Be aware that while you are connected to the ad hoc
will not have Internet connectivity.
4. The first time you try to connect to the hot spot, you will be prompted to enter the app’s password (the
default password is 12345678). Thereafter, you will not be asked for a password; the
will already have a check mark.
5. Touch the button on your iPhone/iPad to back out of the Settings screen., choose
then the WiFi status light on top will glow quick flashing.
the functions can be used now.
iSNAKESCOPE prepares to generate an ad hoc hot spot (without Internet connectivity).
iSNAKESCOPE hot spot should appear in
iSNAKESCOPE row connects the instrument to the network,
iSNAKESCOPE app.
iSNAKESCOPE WiFi network, your iPhone/iPad
iSNAKESCOPE line
iSNAKESCOPE and
The connection has been established , and all of
4
Page 5
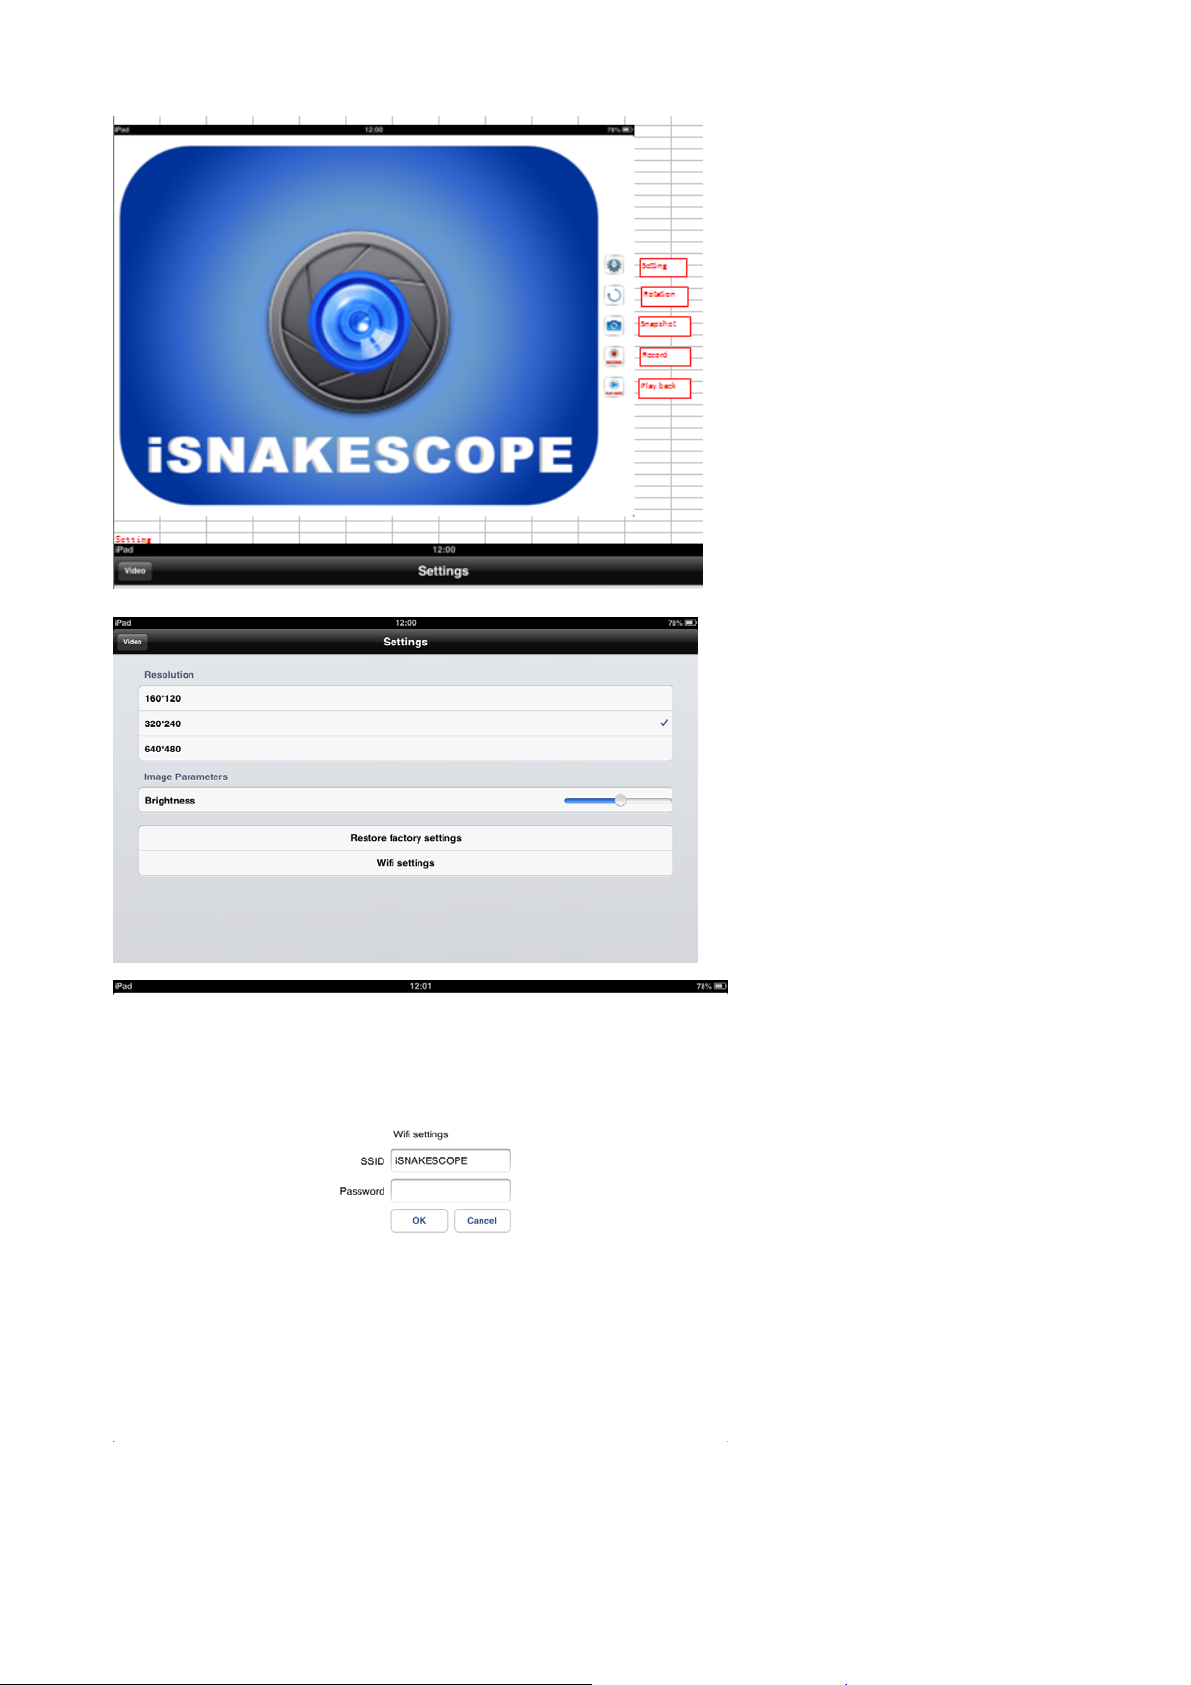
Fig6
Fig. 7
Fig. 8
6. Let’s go ahead to learn the five soft buttons at the right side of the
iSNAKESCOPE app. The second
5
Page 6
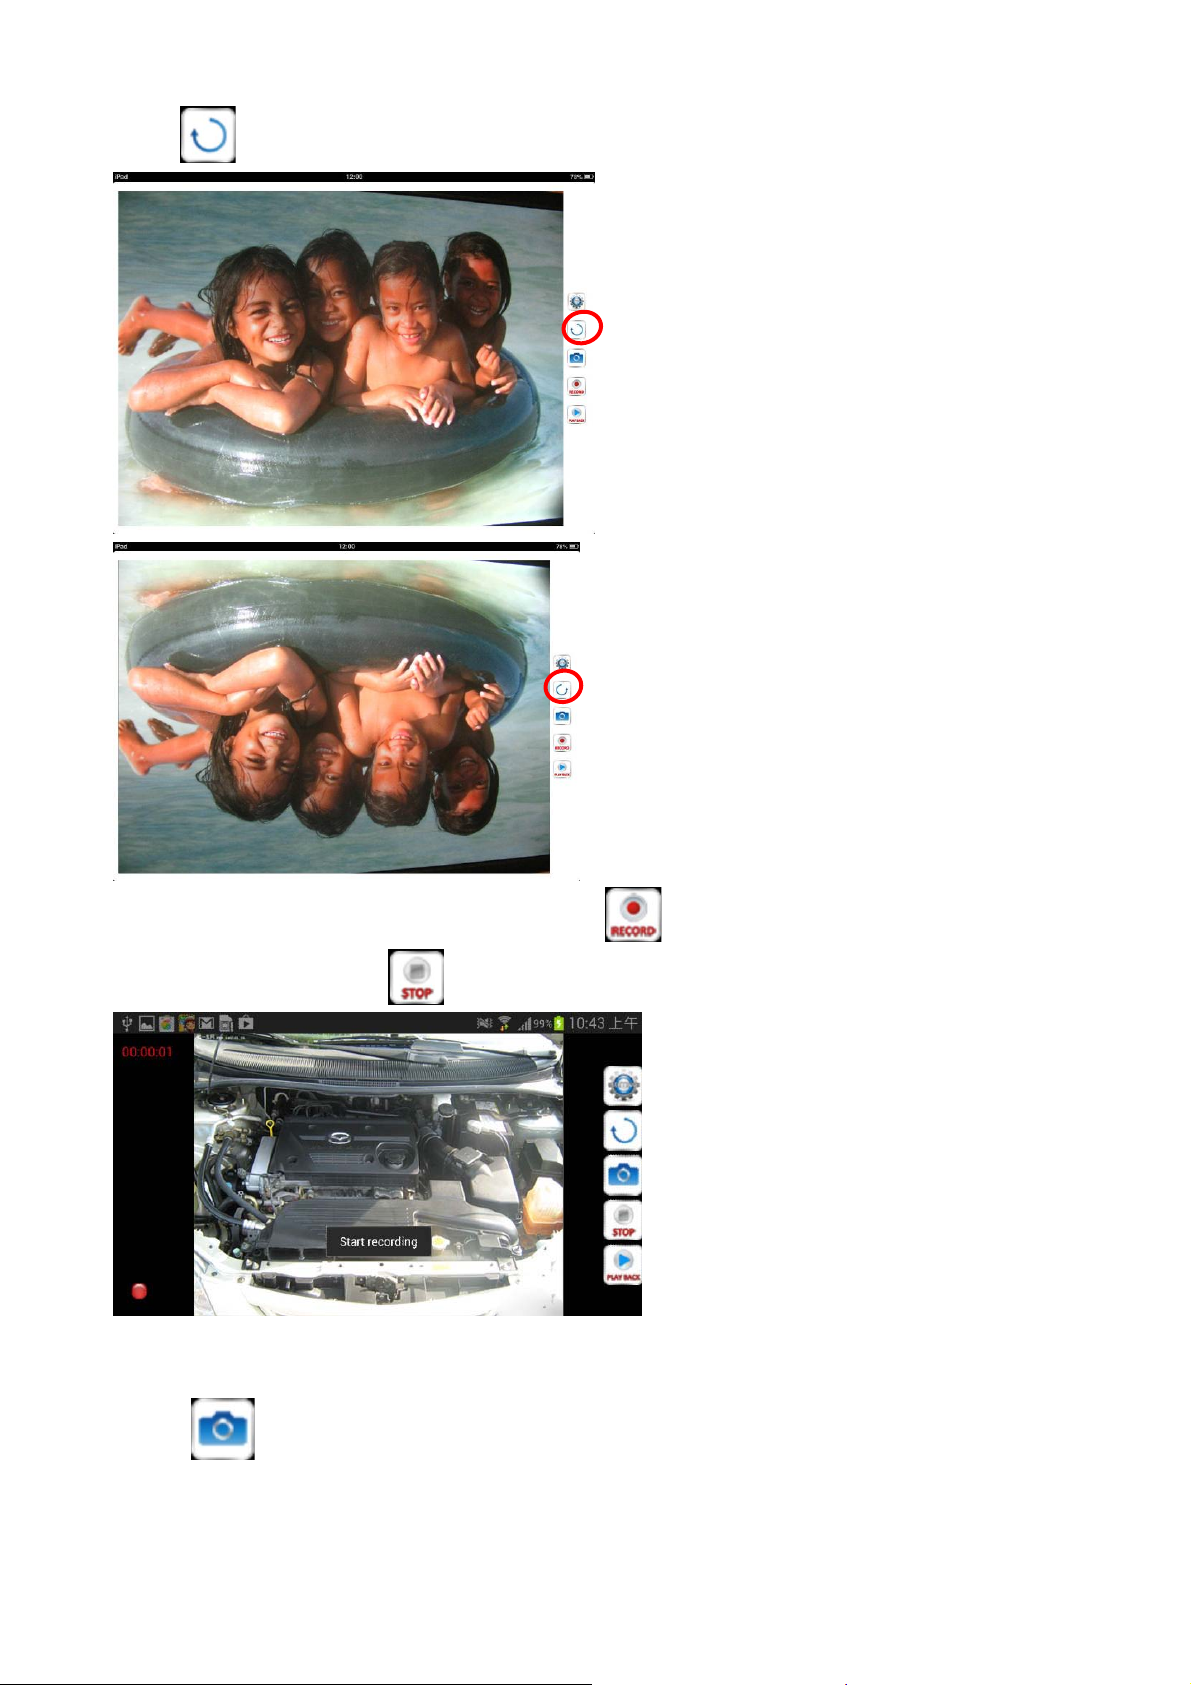
button can turn the image upside down( Fig. 9),and the icon of the button will change(Fig. 10) ,too.
Fig. 9
Fig. 10
7.Enabling live video activates you can just touch the
you need to stop, you can press
button to stop it.,
button , the button will change(Fig. 11)when
Fig. 11
8.To save a still image (also called a screen grab) of live video or paused video, touch the SNAP SHOT soft
button at the side of the app. The familiar sound of a camera shutter confirms that a picture was
taken. Pictures are stored as .jpg files within the Photos folder of your iPhone/iPad.
6
Page 7
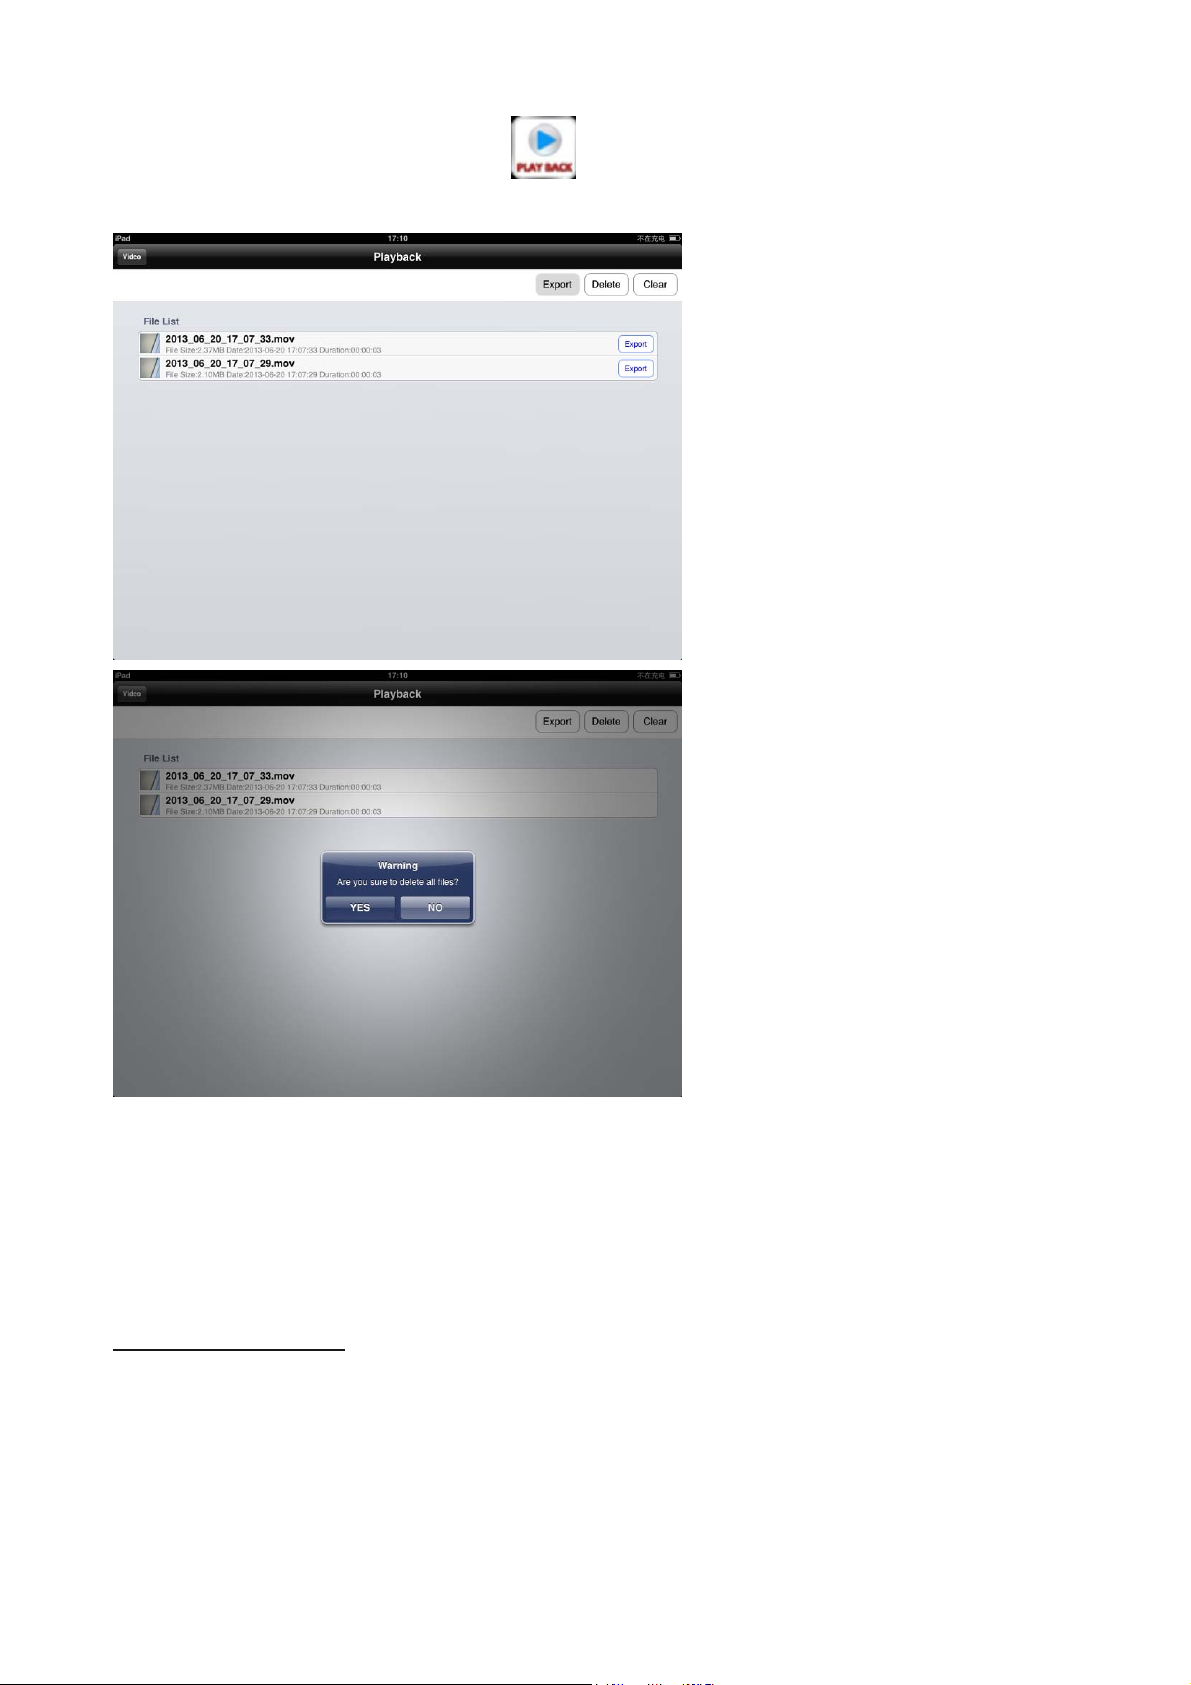
9.T o view your movies or pictures, touch the button ,and the results will list on the screen for
you to choose .( Fig. 12 ) If the result is not what you need ,you just can delete it .( Fig. 13)
Fig. 12
Fig. 13
While your iPhone/iPad is connected to
iSNAKESCOPE ad hoc WiFi network, your mobile device will not
have Internet access. So if you want to share any snapshots immediately, you must do so by attaching them to
text messages you send over your cellular network. After you have disconnected your device from the
iSNAKESCOPE network, you can connect to another WiFi network with Internet access and share your
pictures using e-mail or Skype.
ADVANCED SETTINGS
T o open the
iSNAKESCOPE app’s advanced settings screen (shown at right), touch the Setting button at upper
right.
As the screen shot shows, you can change
iSNAKESCOPE WiFi Service Set Identifier (SSID) or password or
adjust its video settings while watching live video in the window in the middle of the screen.( Fig. 8)
The default WiFi SSID for the unit is
iSNAKESCOPE. The default WiFi password is 12345678.
You can change either value to any combination of letters and numbers that is at least eight digits long.
7
Page 8
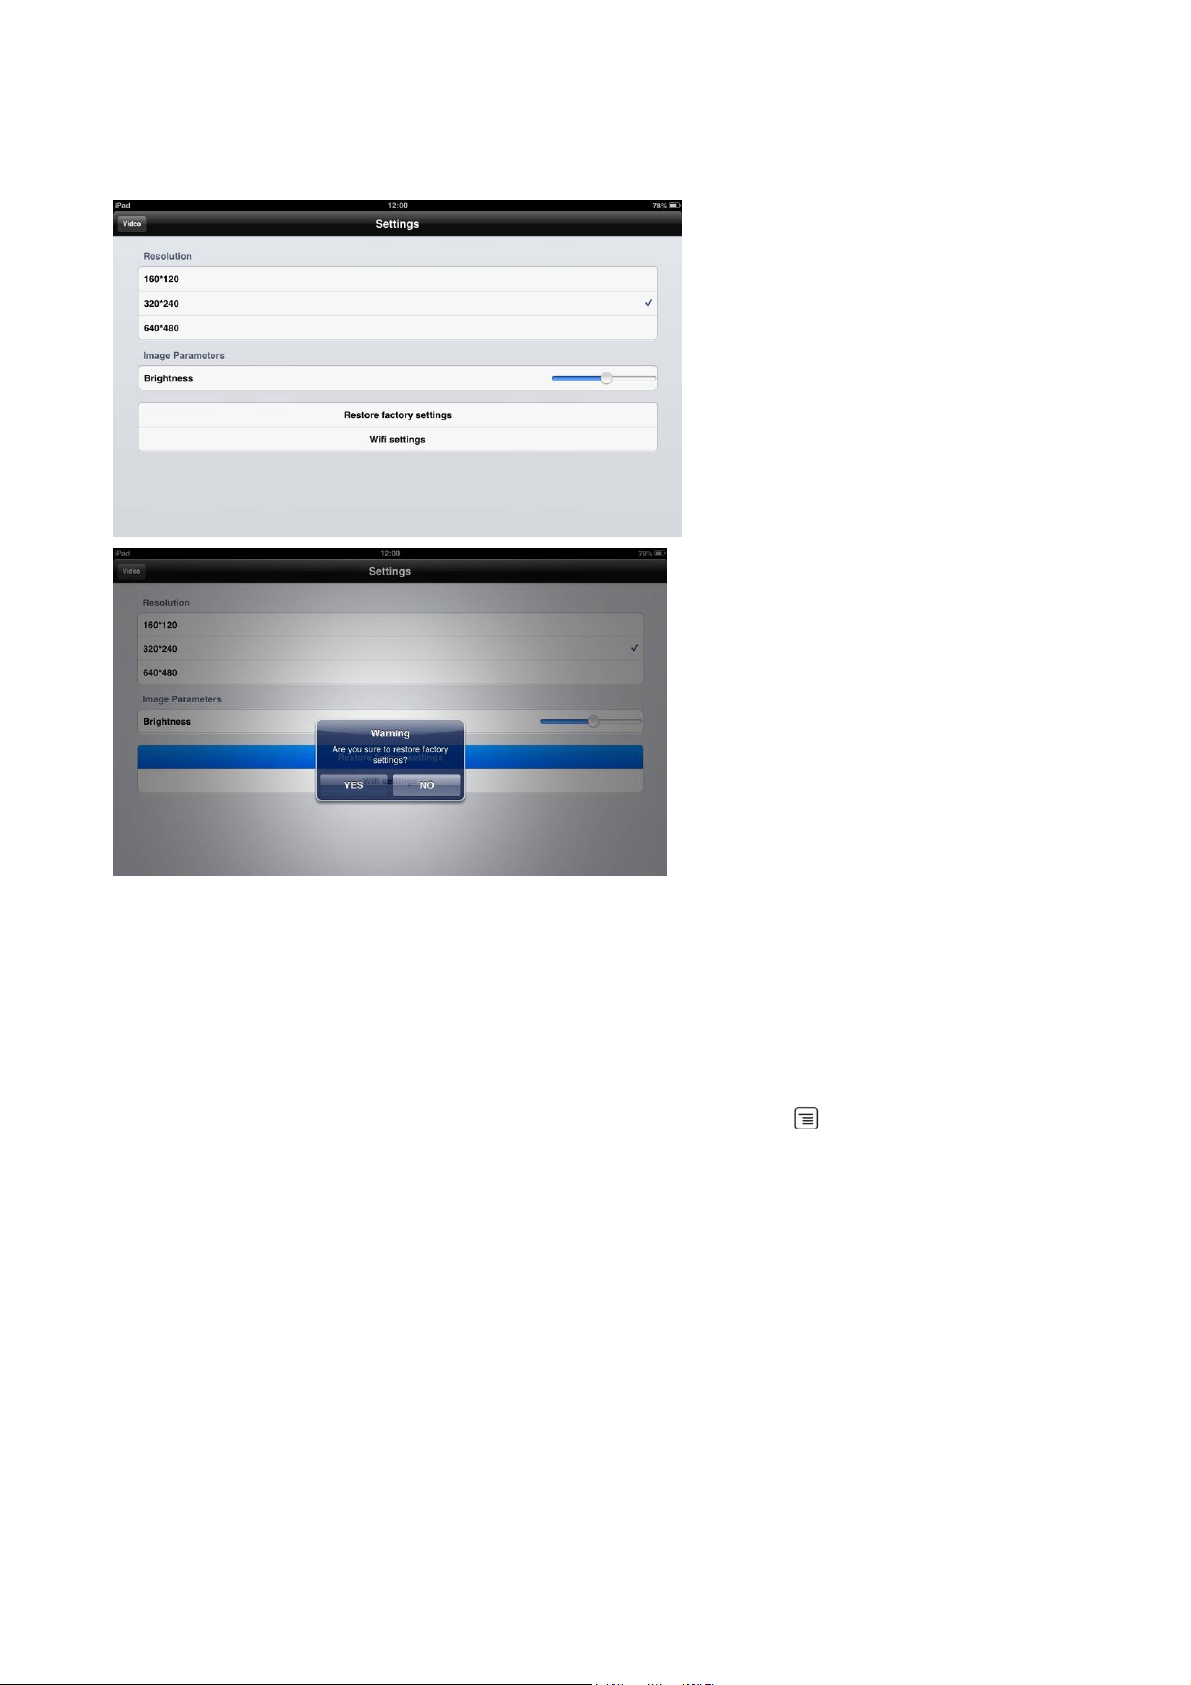
In addition to WIFI ,there are Resolution and Brightness two kind of setting.. ( Fig. 14) ,touch the button and
flow the leading ,you can choose the appropriate one, And if you need to return the beginning setting, just
touch the “restore factory setting “ button(Fig. 12) and answer yes ,you can turn back the beginning setting.
Fig. 14
Fig. 15
ANDROID PLATFORM VIEWING VIDEO
1) Turn on iSNAKESCOPE by rolling the power switch/brightness adjustment thumbwheel (Fig. 1, Callout 2 to
the right until you hear a click. The WiFi status light on top of the unit will glow red for 30 seconds while
iSNAKESCOPE prepares to generate an ad hoc hot spot (without Internet connectivity).
2) When the light turn slow flashing, power on your device and touch the
(Menu) button at lower left,
followed by the System Settings line.
3) Touch the ON soft button on the right side of the Wi-Fi row to enable WiFi connectivity.
4) Touch the left side of the Wi-Fi row to enter the Wi-Fi Networks screen. iSNAKESCOPE’s hot spot should
appear in the list of available networks. Touch the iSNAKESCOPE row, and then the Connect soft button at
the right of the next screen. When “Connected” appears in the iSNAKESCOPE row, your Android device
is ready to receive wifi (
Fig. 16) transmissions of probe video. Be aware that while you are connected to the
ad hoc iSNAKESCOPE WiFi network, your device will not have Internet connectivity.
5) The first time you try to connect to the hot spot, you may be prompted to enter the app’s password (the
default password is 12345678). Thereafter, you will not be asked for a password; the iSNAKESCOPE row
will already have a check mark(
Settings screen., choose
Fig. 17). Touch the button on your ANDROID device to back out of the
iSNAKESCOPE and then the WiFi status light on top will glow quick flashing.
The connection has been established , and all of the functions can be used now
8
Page 9
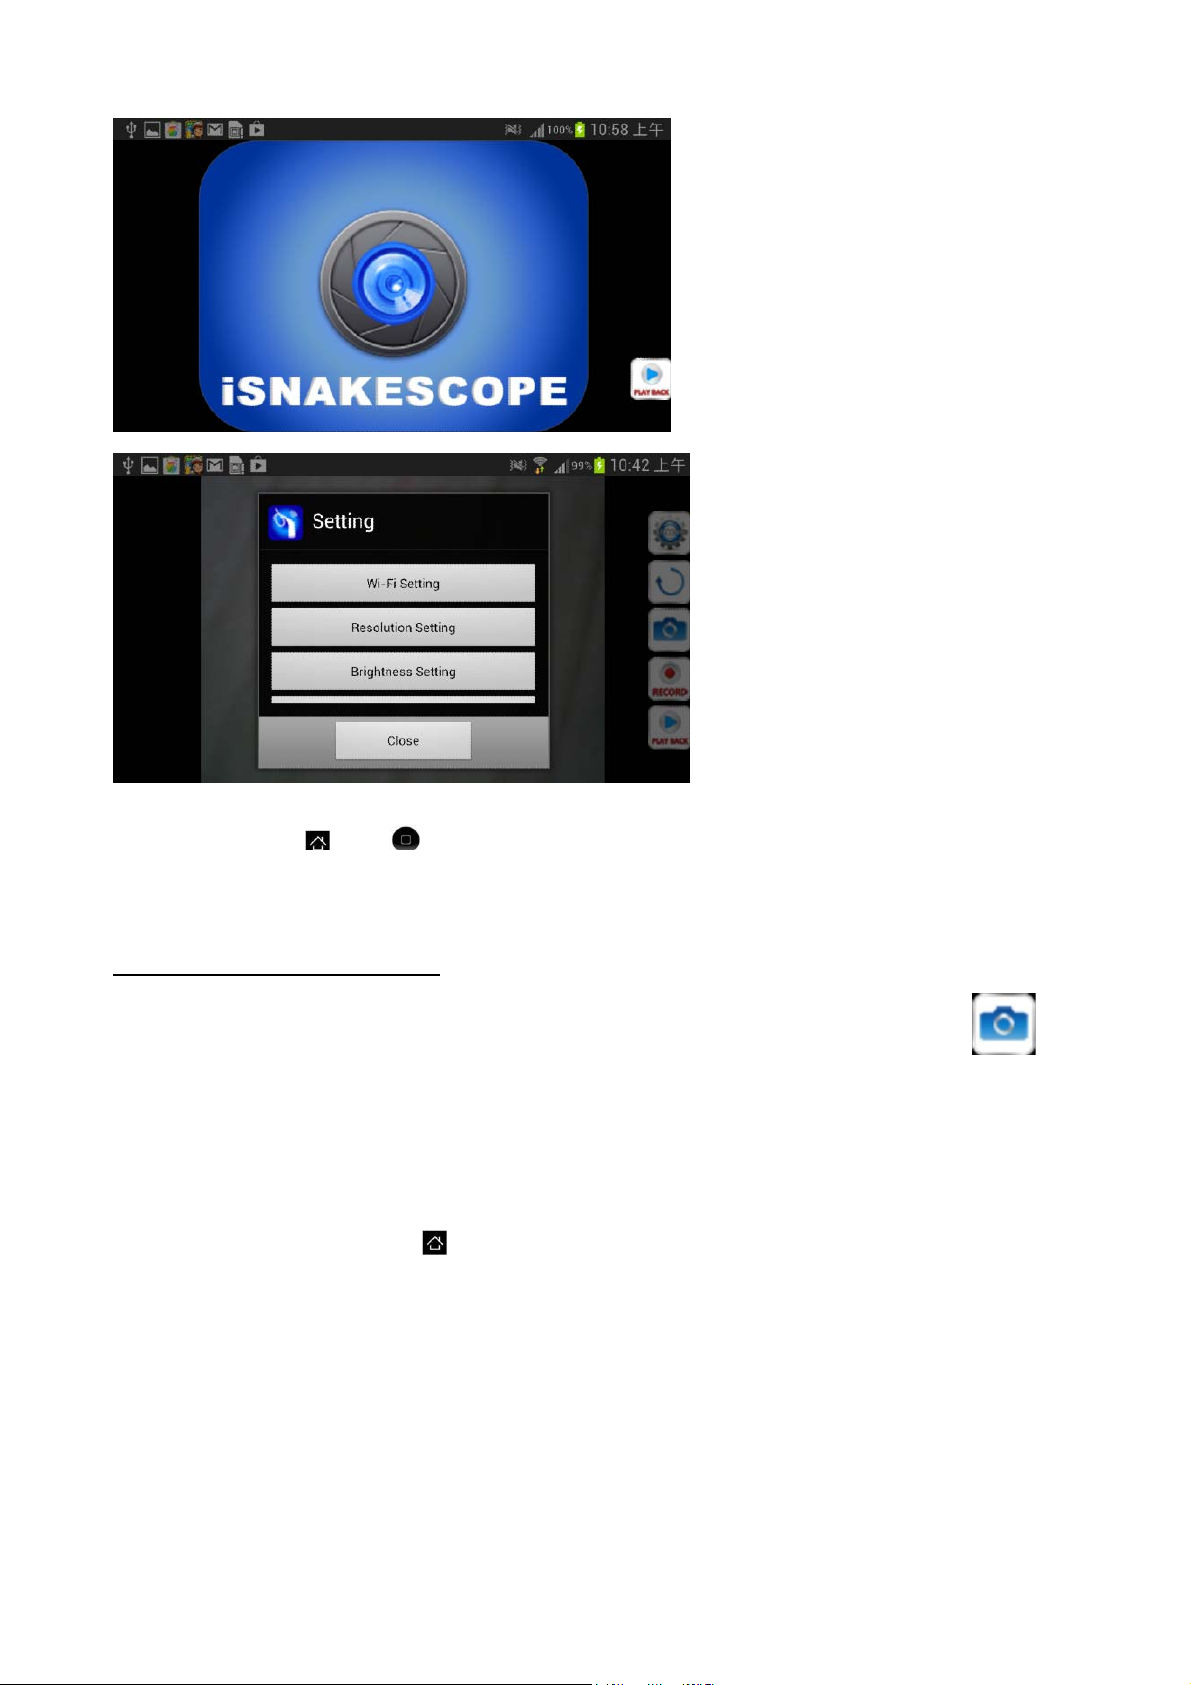
Fig. 16
Fig. 17
6) Touch the Home
or button on your device to exit the Wi-Fi networks screen.
7) Locate the iSNAKESCOPE icon among your apps and touch it. The screen at right will appear, with live
video in the main viewing area.
T AKING AND VIEWING PHOTOS
To save a still image (also called a screen grab) of live video or paused video, touch the SNAP SHOT
soft
button at the right side of the app. The familiar sound of a camera shutter confirms that a picture was taken. All
photos you take are immediately and permanently stored as .jpg files in a dedicated “iSNAKESCOPE” subfolder
of the “SD card” folder of your Android device. Any photos you take will be saved to this folder even if no SD
card is installed in your device, or an SD card is installed and it is full. If an SD card is missing or full, when you
touch the SNAP SHOT button an on-screen prompt will advise “Image Saved in Album!”
To view your pictures, touch the
button on your device to exit the iSNAKESCOPE app. Locate your
iSNAKESCOPE subfolder and open it. The files of all of the photos you have taken on that phone using the
iSNAKESCOPE app are stored as tiles. Touch any tile to view the corresponding photo(
Fig. 18).
9
Page 10
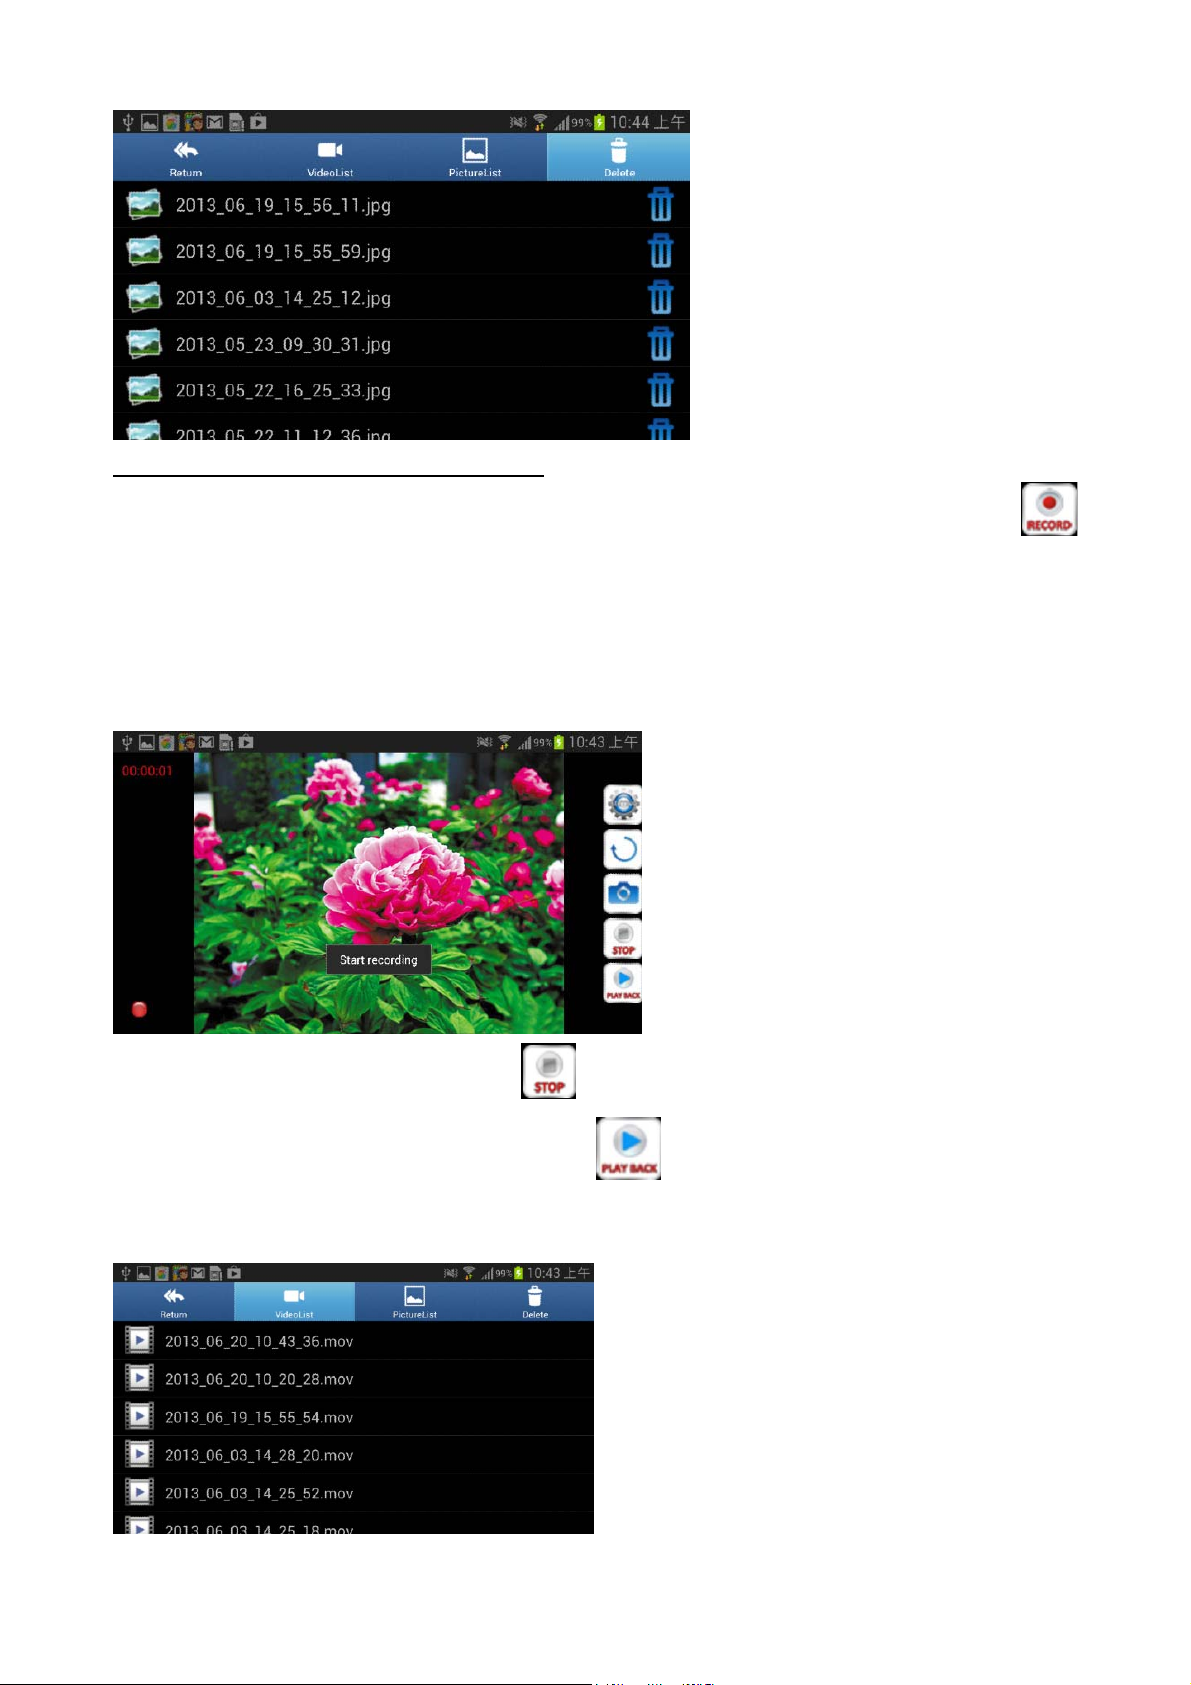
RECORDING AND PLAYING BACK VIDEOS
Fig. 18
¾ To record a clip of live probe video appearing on the screen of your Android device, touch the soft
(RECORD) button on the right side of the app window. causes a red button to appear in the lower left corner
of the screen, 2) superimposes the message, Video Recording starts. on the display(
Fig. 19) starts a running
clock indicating the clip’s duration so far in the upper left corner of the window, and 3) begins storing
an .mov video clip in the RecordVideo subfolder of the sdcard folder of your Android device (even if no SD
card is installed in your device, or an SD card is installed and it is full.)
Fig. 19
¾ To stop recording the video clip, touch the
(STOP) button on the right side of the app window.
¾ To prepare to play back a video clip, touch the soft
app window. This will cause the screen at right to appear(
(PLAY BACK) button at the bottom right of the
Fig. 20):
Fig. 20
10
Page 11
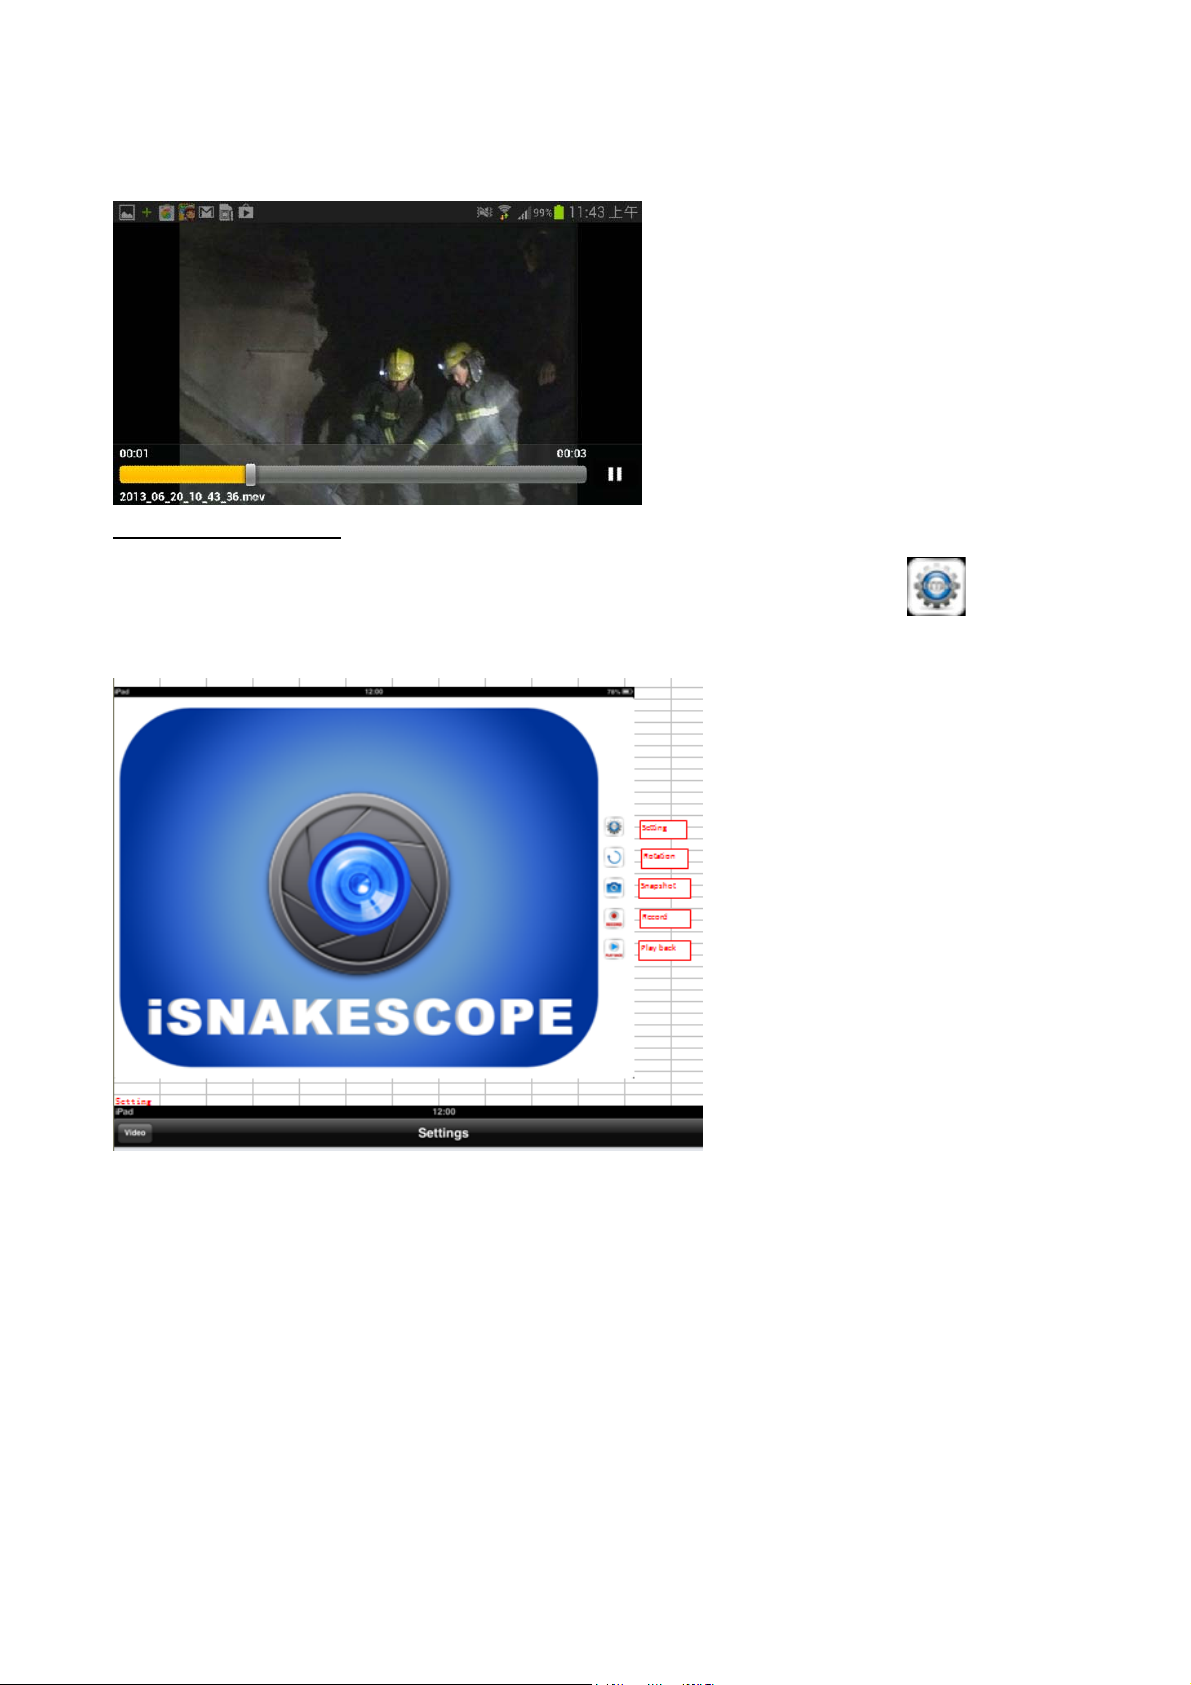
¾ To play back a video clip, touch its row. This will cause the video to begin playing, superimpose the message
Video Playback starts. on the display(
Fig. 18), start a running clock indicating the playback position in the
upper left corner of the app window.
Fig. 21
ADVANCED SETTINGS
To change the iSNAKESCOPE Android app’s advanced settings(
Fig. 21), touch the top (SETTING)
button at the upper right of the app. The following screen will appear.
Fig. 22
Touching the Wi-Fi Setting row produces the following screen(
Fig. 23).
11
Page 12
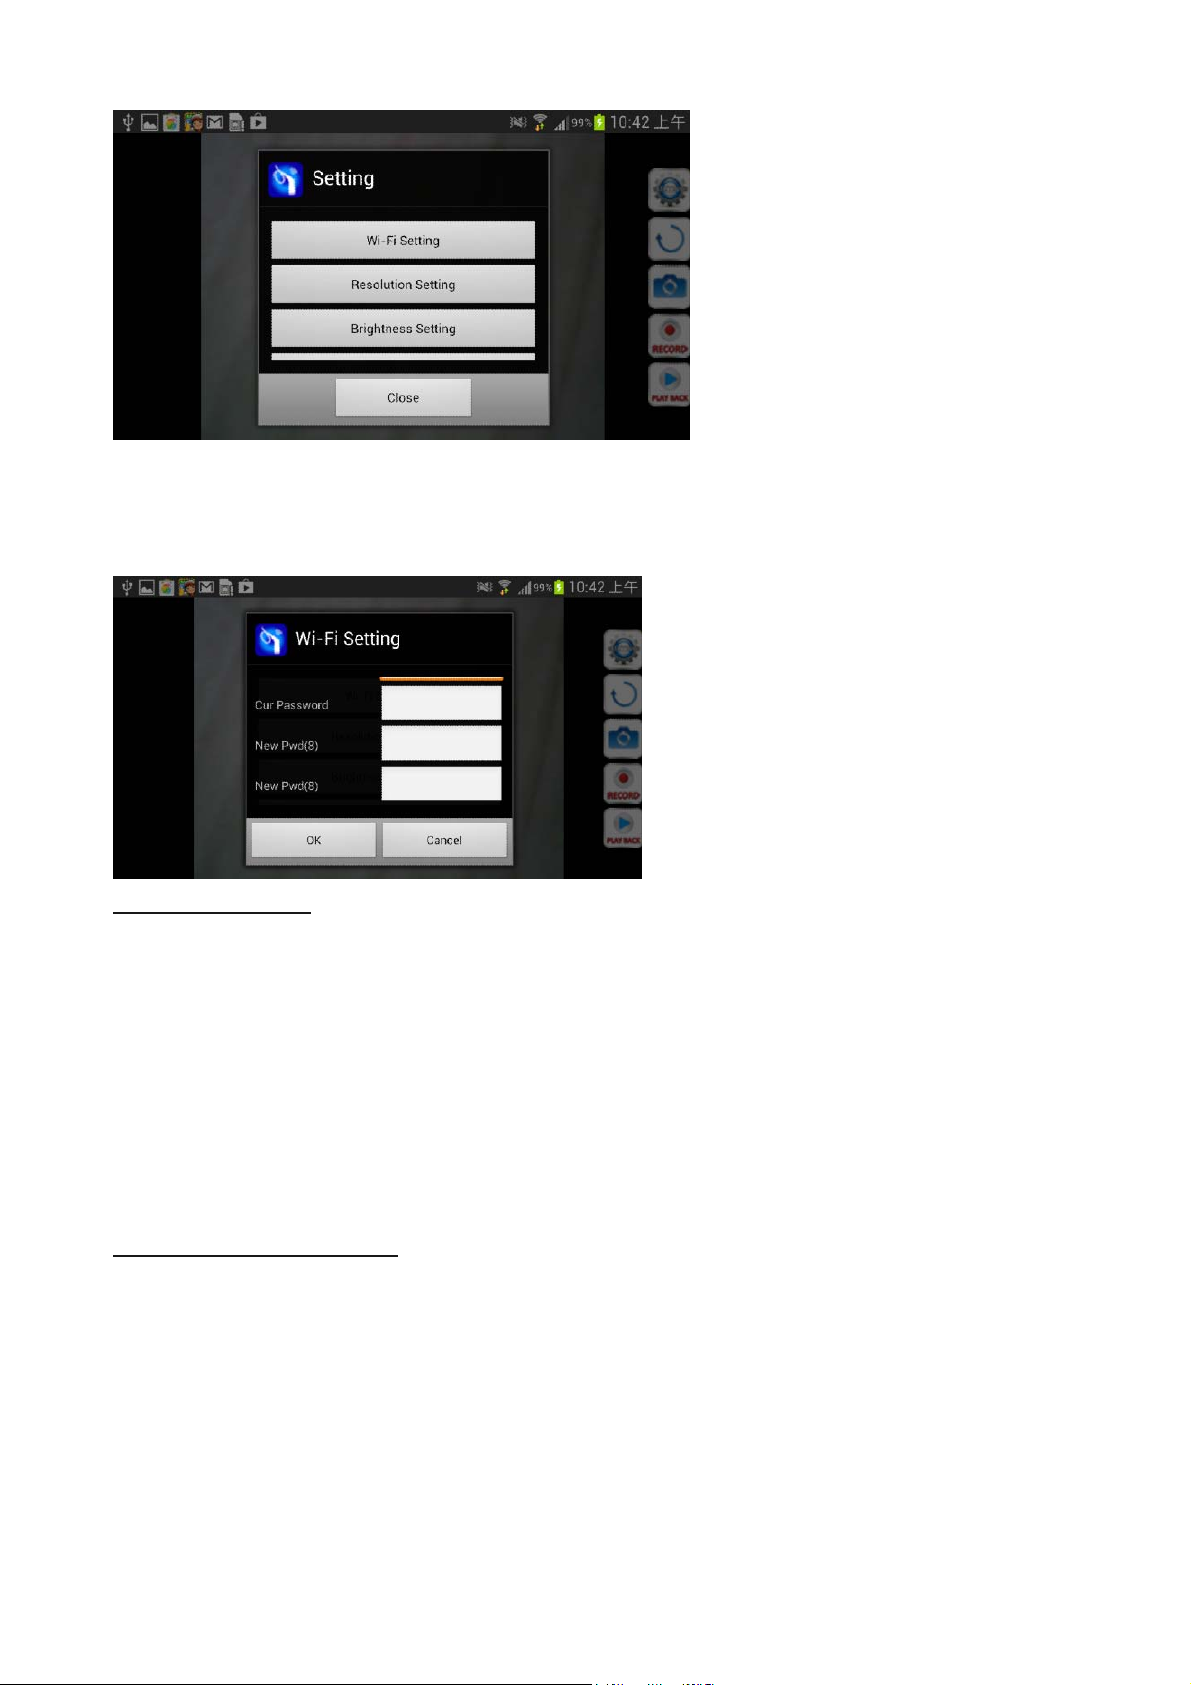
Fig. 23
Using this screen, you can change either the default WiFi Service Set Identifier (SSID) of iSNAKESCOPE or
password of 12345678 to any string of at least eight letters from A to Z and numbers from 0 to 9. If you make a
change, remember to touch the OK button to save the setting.
(Fig. 24).
Fig. 24
USING THE PROBE
If you are unfamiliar with video borescopes, be aware that professional users like contractors and technicians
typically insert a borescope probe into an orifice (a hole in a wall or an engine’s cylinder, for example) or into
an inaccessible or hazardous area (the back or an equipment rack or an engine compartment, for example) to
view components or environments that would otherwise be invisible. Use the brightness adjustment
thumbwheel (Fig. 1, Callout 2) to match the intensity of camera lighting to the application environment.
In practice, professionals usually insert flexible-obedient probes like the one that comes with
iSNAKESCOPE
head-on into an orifice or area as a first step. They then pull the probe out and adjust its bend one or more times
until the camera in the tip is pointing directly at the target or area of interest. With the probe inserted, you can
twirl it until video appears right-side up, but in many cases you cannot change the probe’s angle of approach
very much.
INSTALLING ACCESSORIES
iSNAKESCOPE comes with three accessories (see left photo below) in a Ziploc bag that attach to the
camera-tipped end of the probe. Each accessory has a specific purpose:
• The 45° mirror lets the probe see around corners.
• The pickup hook lets you retrieve otherwise inaccessible items seen by the probe—for example, a wedding
ring accidentally dropped down a sink drain.
• The magnetic hook lets you retrieve lost or dropped metal objects—nuts and bolts, for example—located by
the probe.
12
Page 13

Fig. 25
To attach an accessory:(
Fig. 25)
1. Hold its metal stem with your thumb and index finger.
2. Slide the accessory—plastic clasp first—past the camera head at the probe tip until the clasp is in the
channel 1/4 in. from the end of the probe.
3. Squeeze the clasp until you hear a click (see right photos on previous page), indicating that the two halves
have joined.
To detach an accessory:
1. Use the nail of your index finger to unhook the clasp, opening it up.
2. Hold the accessory’s metal stem with your thumb and i ndex finger and slide the accessory and clasp past the
camera head.
3. Put the accessory back in the Ziploc bag it came in.
SPECIFICATIONS
Image Sensor 1/9” VGA CMOS
Video Resolution 640 x 480 pixels (VGA)
Frame Rate
Video Streaming Format
30fps
MJPG
Operation T em perature 0 ~ 45℃
Mobile Surveillance
Security (WiFi) Password Setup
WiFi Range 60 ft. (18m), max (unobstructed)
Camera Lighting 4 white LEDs
Camera Head Diameter 8.0 mm (Optional Camera Head Diameter available)
Gooseneck Length 70 ± 2 cm
Min. bending radius 45mm
Dust & Water Resistance Rating IP67 (Probe & Camera Head only)
,Operating Humidity 15-85% RH
Operating Voltage 6V
Storage Temperature
Life of full battery approx 2.5 fours
Power Supply 4*1.5V AA battery(not included)
Accessories hook, magnet & mirror attachments.
iPad / iPad2 / iPhone3/iPad Mini / iPhone4 / iPhone 4S /
iPhone5/Android Smart Phones
-10-50 °C
13
Page 14

14
 Loading...