

Page 1
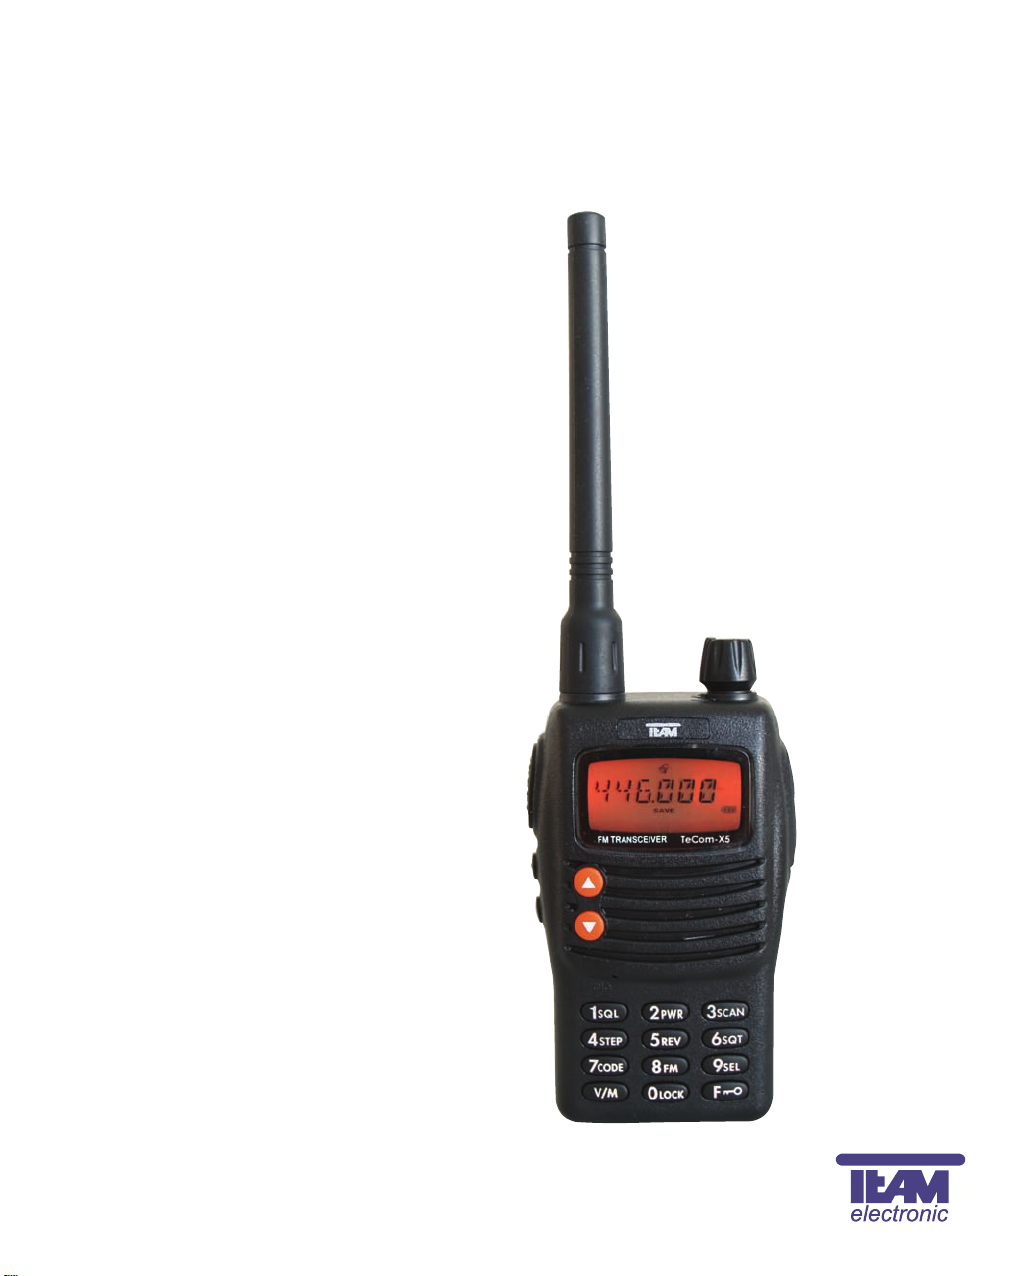
TeCom-X5
Handfunkgerät
Handheld Transceiver
Transceptor Portátil
Ricetrasmettitore Palmare
PMR
FreeNet
UHF
VHF
Bedienungsanleitung
Manual
Manual Instrucciones de Uso
Manual d’Uso
Page 2

Sehr geehrte Kundin, sehr geehrter Kunde,
es freut uns, dass Sie sich für den Kauf eines TEAM TeCom-X5 entschieden haben. Um einen
einwandfreien Betrieb zu gewährleisten und um die verfügbaren Funktionen im vollen Umfang
nutzen zu können, bitten wir Sie die nachfolgende Bedienungsanleitung vor Inbetriebnahme
des Gerätes gründlich zu lesen.
Das TeCom-X5 ist in den folgenden vier Versionen erhältlich.
TeCom-X5 Freenet - Art-Nr. PR8062
Das FreeNet-Funkgerät darf jeder anmelde- und gebührenfrei in den Ländern gemäß der beiliegenden Konformitätserklärung betreiben. Es sind die sechs FreeNet-Kanäle auf 149 MHz mit
der maximal zulässigen Ausgangsleistung von 500 mW programmiert. Eine Veränderung der
programmierten Frequenzen, der Sendeleistung oder der Bandbreite des Geräts ist nicht zulässig und führt zum Erlöschen der Betriebsgenehmigung.
TeCom-X5 PMR - Art-Nr. PR8061
Das PMR-Funkgerät darf jeder anmelde- und gebührenfrei in den Ländern gemäß der beiliegenden Konformitätserklärung betreiben. Es sind die acht PMR-Kanäle auf 446 MHz mit der
maximal zulässigen Ausgangsleistung von 500 mW programmiert. Eine Veränderung der programmierten Frequenzen, der Sendeleistung oder der Bandbreite des Geräts ist nicht zulässig
und führt zum Erlöschen der Betriebsgenehmigung.
TeCom-X5 (VHF-COM) - Art.-Nr. PR8064
Das Betriebsfunkgerät ist genehmigungs- und gebührenpflichtig und darf nur in den Ländern
gemäß der beiliegenden Konformitätserklärung betrieben werden. Es dürfen nur behördlich
genehmigte Funkfrequenzen zwischen 146-174 MHz, Sendeleistungen und Bandbreiten programmiert werden. Die Programmierung darf nur von einem autorisierten Fachhändler durchgeführt werden.
TeCom-X5 (UHF-COM) - Art.-Nr. PR8063
Das Betriebsfunkgerät ist genehmigungs- und gebührenpflichtig und darf nur in den Ländern
gemäß der beiliegenden Konformitätserklärung betrieben werden.Es dürfen nur behördlich
genehmigte Funkfrequenzen zwischen 410-470 MHz, Sendeleistungen und Bandbreiten programmiert werden. Die Programmierung darf nur von einem autorisierten Fachhändler durchgeführt werden.
Für die Programmierung des TeCom-X5 benötigen Sie die optional erhältliche Software T-UP15
(CD-ROM für Windows XP und Datenüberspielkabel). Das Datenüberspielkabel ist wahlweise
mit einem seriellen 9-Pin Anschlussstecker (T-UP15) oder mit einem USB-Verbindungsstecker
(T-UP15 USB) erhältlich.
Inhaltsverzeichnis
Seite
ALLGEMEIN 4
Vor Inbetriebnahme 4
Lieferumfang 4
Pflege 4
Übersicht der Funktionen 4 - 5
GRUNDFUNKTIONEN 6
Anschluss der Antenne 6
Akkupack 6
Laden des Akkupacks 6
Ein- und Ausschalten 6
Einstellen der Lautstärke 6
Kanalwahl 6
Senden 6
Empfang 7
TASTENFUNKTIONEN 7 - 8
PTT Sendetaste 7
Multifunktionstaste 7
Monitortaste 7
Rauschsperre 7
Sendeleistung 7
Suchlauf 8
Radio 8
MENÜ 9 - 13
01 APO (Automatische Ausschaltung) 02 APRO (Optionale Funktion)
03 BANK (Speicherbank) 04 BATSAV (Batteriesparfunktion)
05 BCLO (Sendesperre) 06 BEEP (Warnton)
07 SCR NO (Verschlüsselungsarten) 08 DC VLT (Spannung)
09 DW (Frequenzüberwachung Radio) 10 LAMP (Leuchte)
11 LOCK (Tastatursperre) 12 MSGSET (Programmierung Begrüßungstext)
13 NAME (Frequenzanzeige) 14 NM SET (Programmierung Kanalname)
15 OFFSET (nicht verfügbar) 16 OPN MSG (Info beim Einschalten)
17 PSWD (Passwortfunktion Ein/Aus) 18 PSWD W (Programmierung Passwort)
19 ROGER (Quittungston) 20 SCN MD (Modus Suchlauf)
21 STE (Nebentonunterdrückung) 22 TOT (Sendezeitbegrenzung)
23 TXSTOP (Sendesperre) 24 VOX (VOX Ein / Aus)
25 VOX D (VOX Verweilzeit) 26 VOX S (VOX Empfindlichkeit)
27 VXB (Vox Sendeblockade) 28 WIDNAR (Bandbreite; nur Anzeige)
5-TON SELEKTIVRUF 13
ANSCHLUSS 13
TECHNISCHE DATEN 50
CTCSS / DCS 51
Page 3
ALLGEMEIN
Vor Inbetriebnahme
Bitte überprüfen Sie die Ware sofort beim Empfang auf Vollständigkeit gemäß der folgenden Liste.
Informieren Sie Ihren Händler sofort bei Unvollständigkeit.
Lieferumfang:
1 x TeCom-X5 inkl. Antenne 1 x Ladegerät 1 x Handschlaufe
1 x Akkupack 1 x Bedienungsanleitung 1 x Gürtelclip
Pflege
Für die optimale Lebensdauer und Funktionstüchtigkeit Ihres Geräts sollten Sie die folgenden
Hinweise beachten.
Versuchen Sie nicht das Gehäuse zu öffnen. Unsachgemäßes Öffnen des Geräts kann Schaden
zur Folge haben. Des weiteren verlieren Sie jegliche Gewährleistungsansprüche.
Verwenden Sie zum Laden des Akkupacks nur das im Lieferumfang enthaltene Ladegerät.
Bewahren Sie das Gerät niemals an Plätzen auf die dem direkten Sonnenlicht oder anderen
Hitzequellen ausgesetzt sind. Hohe Temperaturen können die Lebensdauer bestimmter
elektronischer Bauteile beeinträchtigen und Plastikteile können schmelzen.
Bitte bewahren Sie das Gerät nicht in staubigen oder verschmutzen Räumen auf.
Setzen Sie das Gerät keiner Flüssigkeit aus. Regenwasser oder Feuchtigkeit kann zu einer
Korrodierung der Bauteile und Platinen führen.
Sollte das Gerät ungewöhnlich heiß werden, ungewöhnliche Gerüche abgeben oder es zu einer
Rauchentwicklung kommen, schalten Sie bitte das Gerät sofort ab und entnehmen den
Akkupack. Kontaktieren Sie bitte sofort Ihren Händler.
Senden Sie niemals ohne Antenne. Eine Beschädigung der Endstufe wird sonst die Folge sein.
Übersicht der Funktionen
> Max. Ausgangsleistung
FreeNet : 500 mW PMR : 500 mW
VHF : 5 W * UHF : 4 W *
> 128 Kanäle verfügbar
UHF : 400 - 470 MHz VHF : 136 - 174 MHz
PMR : 8 Kanäle PMR 446 MHz FreeNet: 6 Kanäle FreeNet 149 MHz
> Bandbreite
FreeNET / PMR: 12,5 kHz
UHF / VHF : 12,5 / 25 kHz
> 5-Ton Selektivruf
> Scrambler
> 50 CTCSS und 107 DCS
> LCD Anzeige mit Hintergrundbeleuchtung
> Automatischer Geräteabschaltung (APO)
> Scrambler (8 Verschlüsselungen)
> 8 Kanal Speicherbänke (automatische Zuteilung)
> Batteriesparfunktion
> Sendeblockade auf besetzten Kanälen
> FM radio
> Tastatursperre
> Passwort Funktion
> Sendezeitbegrenzung
> VOX
> Relaiston 1450Hz / 1750Hz / 2315Hz
1
8
7
6
5
4
3
2
9
11
10
13
12
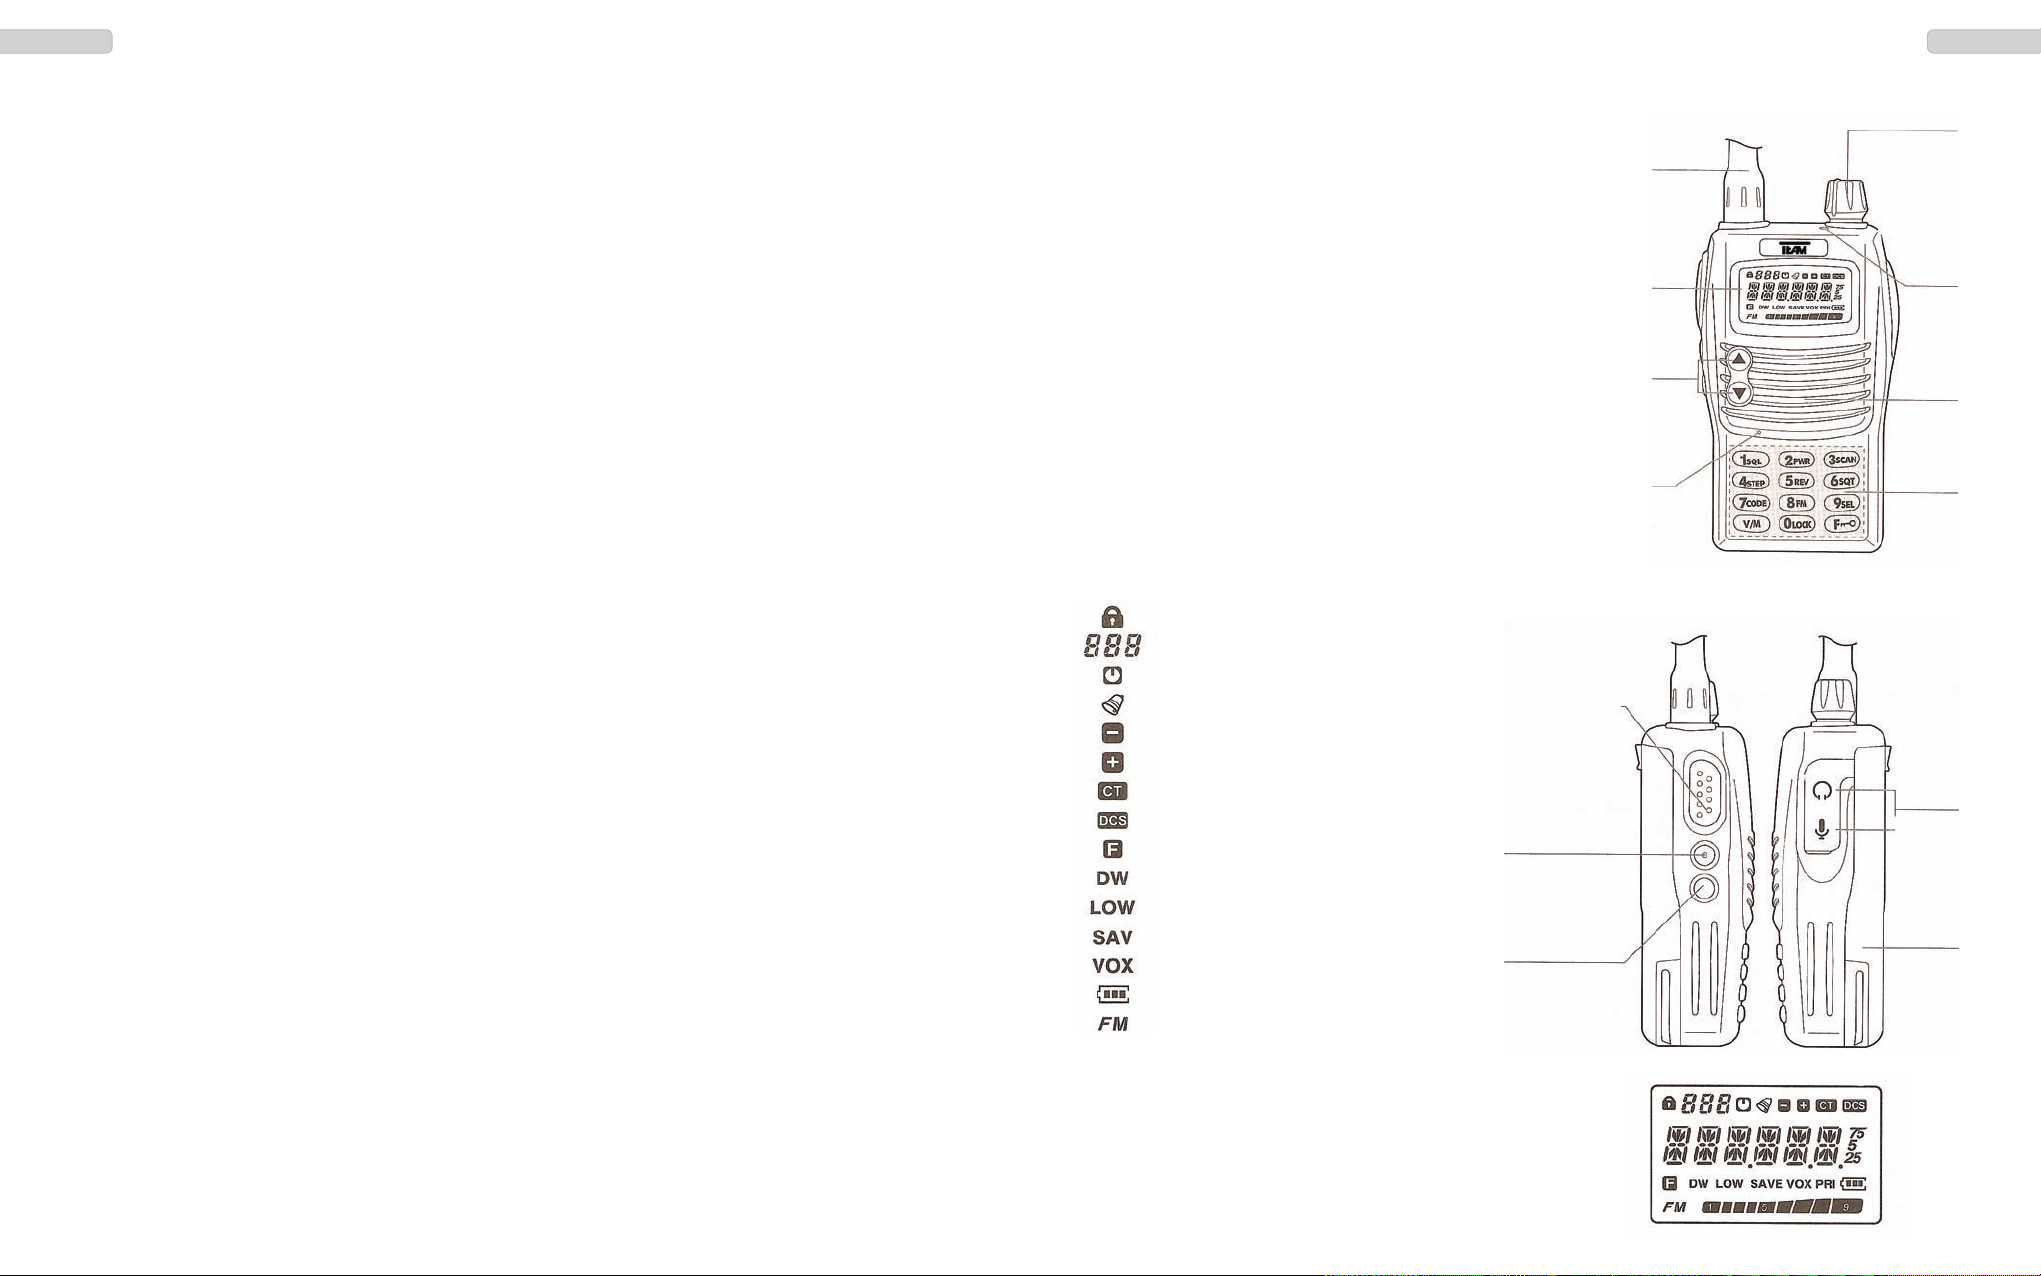
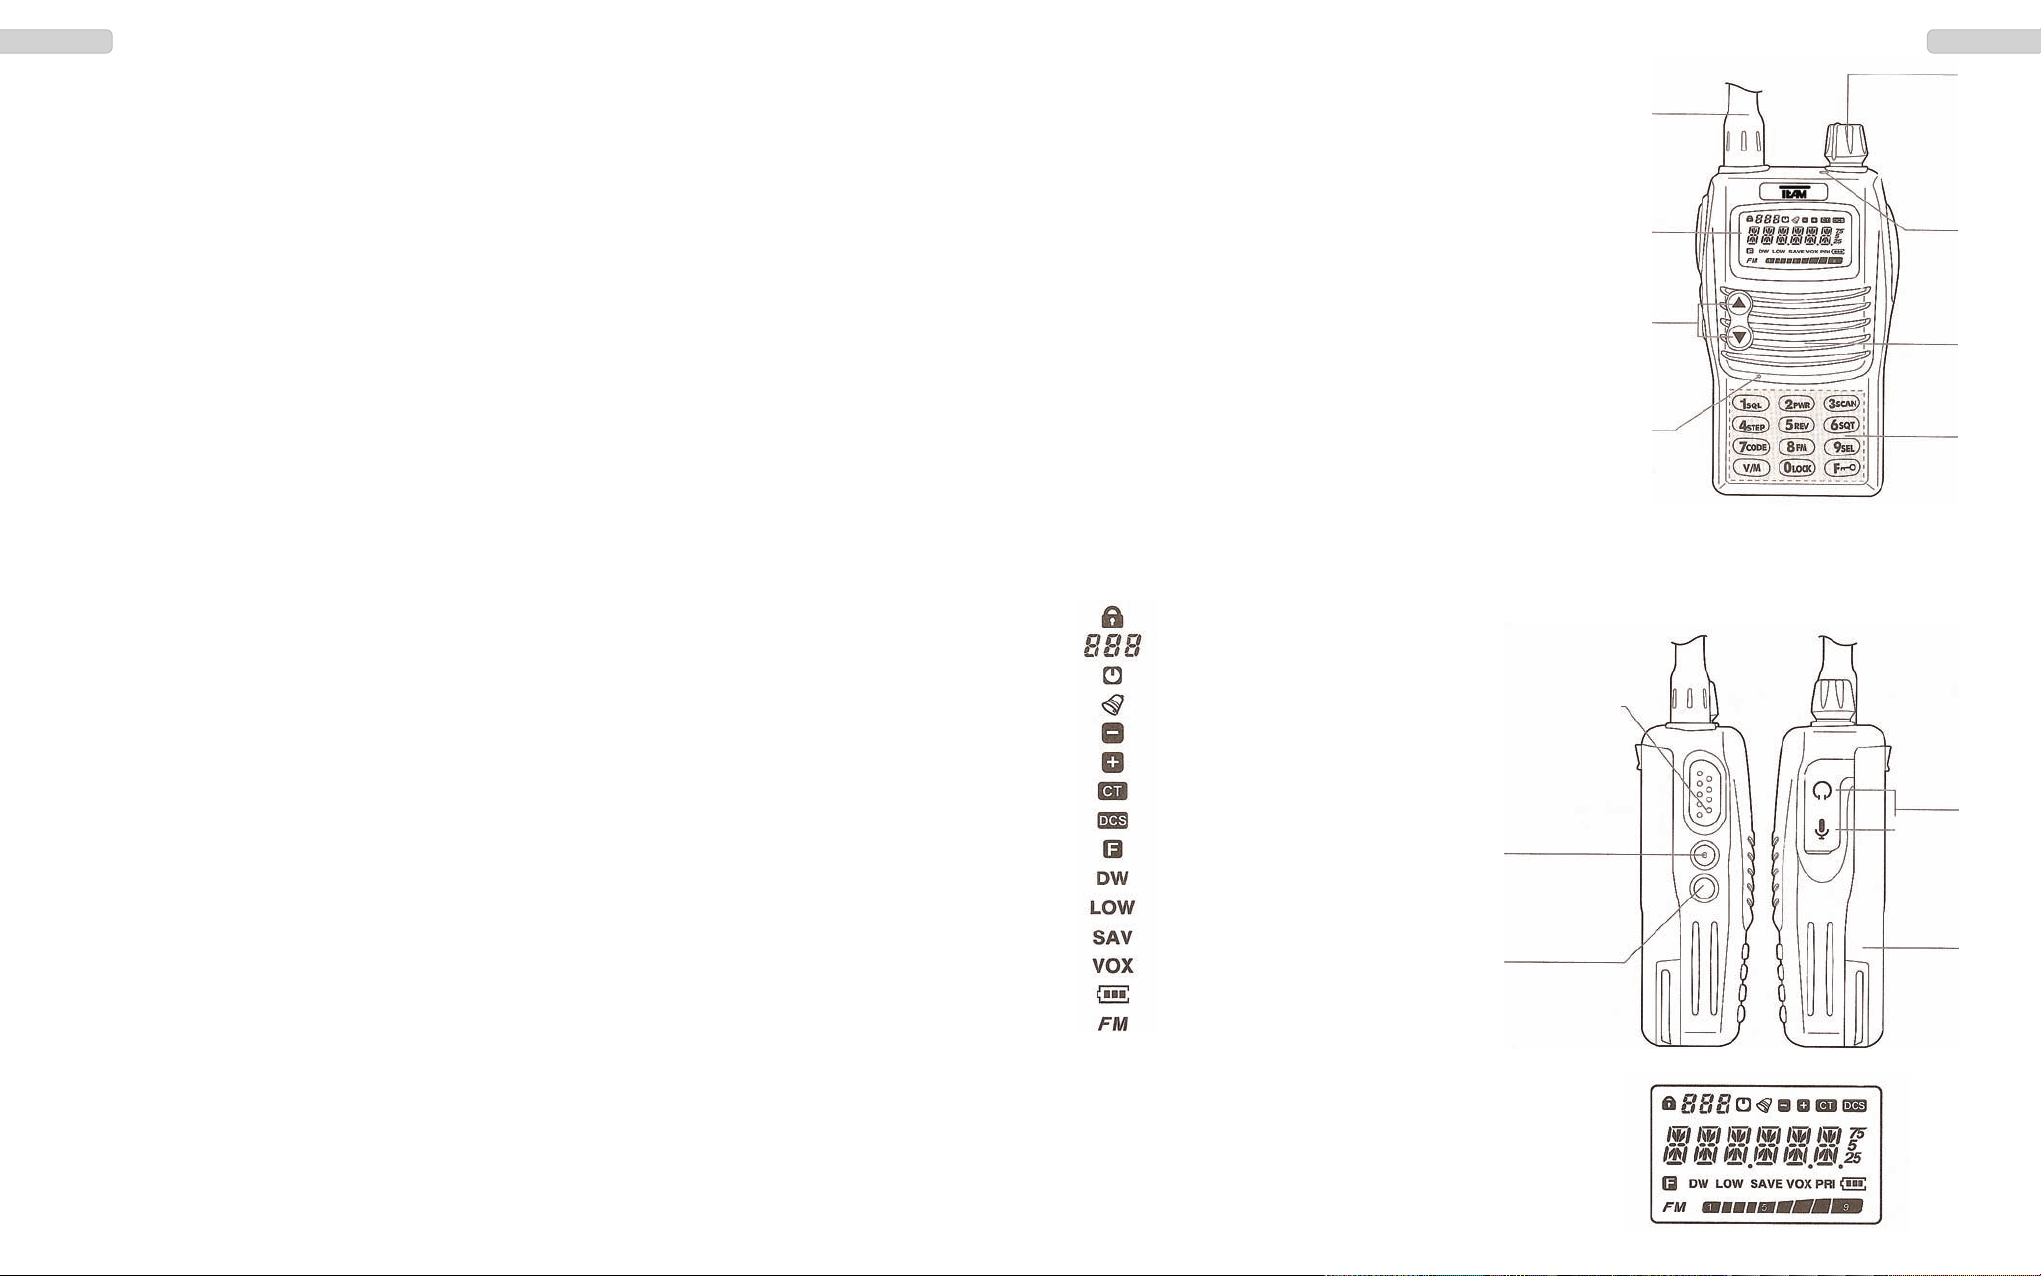
1 - Antenne
2 - LCD Anzeige
3 - Hoch / Runter Wahltasten
4 - Mikrofon
5 - Ein/Aus - Lautstärkeregler
6 - LED Leuchte
7 - Lautsprecher
8 - Tastatur
9 - PTT-Sendetaste
10 - Multi-Funktionstaste
11 - Monitortaste
12 - Anschlussbuchse
13 - Akkupack (1200 mAh / 7,4 V)
Menü
Sendeleistung
Batteriesparfunktion
VOX
Batterieanzeige
DCS Kodierung
CTCSS Kodierung
Beep Ton
Speicherbank, Menüfunktion
Tastatursperre
PRI
Kanalsuchlaufliste
FM Radio
Monitor während Radio
APO - Automatische
nicht verfügbar
nicht verfügbar
4 5
DeutschDeutsch
Page 4

GRUNDFUNKTIONEN
Anschluss der Antenne
In der PMR-Version ist die Antenne fest mit dem Gerät verbunden.
Akkupack
Um den Akkupack (13) an das Gerät zu montieren, fügen Sie die Führungsnasen am Fuß des
Akkupacks in die entsprechenden Führungslöcher am unteren Ende der Gerätrückseite ein.
Drücken Sie den Akkupack am oberen Ende gegen das Gerät bis der Akkupack einrastet.
Um den Akkupack zu entfernen, drücken Sie bitte den Verschluss auf der Rückseite des Akkupacks
nach unten und entfernen den Akkupack aus dem Gerät.
Laden des Akkupacks
Vor dem ersten Betrieb sollte der Akkupack komplett geladen werden. Die durchschnittliche Ladedauer beträgt etwa 3 Stunden. Während des Ladevorgangs leuchtet die LED rot. Ist der Ladevorgang beendet leuchtet die LED grün. Nehmen Sie den Akku nach Ende des Ladevorgangs aus der
Ladeschale. Überladen des Akkus verkürzt dessen Lebensdauer.
Ein- und Ausschalten
Um das Gerät einzuschalten, drehen Sie den Ein- / Ausschalter (5) im Uhrzeigersinn über die Sperre
hinweg. Bei aktiviertem Beep-Ton wird der Einschaltevorgang akustisch bestätigt.
Um das Gerät auszuschalten, drehen Sie bitte den Ein- / Ausschalter (5) gegen den Uhrzeigersinn
über die Sperre hinweg.
Einstellen der Lautstärke
Um nach dem Einschalten die optimale Lautstärke einstellen zu können, drücken Sie bitte die
Monitortaste (11) und stellen mit dem kombinierten Ein-/Aus-/Lautstärkeregler (5) die gewünschte
Lautstärke ein.
Kanalwahl
Für die Kanalwahl stehen die Tastatur (8) und die Kanalwahltasten Hoch / Runter (3) zur
Verfügung.
Via Tastatur kann die gewünschte Kanalnummer direkt angewählt werden, durch Eingabe der dreistelligen, gewünschten Kanalnummer. Bei einer Fehleingabe wird der zuletzt eingestellte Kanal
gewählt.
Bei der Kanalwahl mit Hilfe der Kanalwahltasten Hoch / Runter (3), werden die Kanäle in der
programmierten Reihenfolge durchlaufen. Nach der höchsten Kanalnummer wird die Reihe wieder
ab der niedrigsten Kanalnummer weitergeführt.
Bei aktivierter Speicherbankfunktion werden nur die Kanäle der gewählten Speicherbank durchlaufen. Für mehr Informationen bezüglich der Speicherbankfunktion siehe Seite 9.
Senden
Zum Senden halten Sie bitte die Sendetaste (9) bis kurz nach Beendigung Ihrer Nachricht gedrückt.
Für eine optimale Signalübertragung sprechen Sie bitte mit mittellauter Stimme in einem Abstand
von ca. 10 cm zum Mikrofon (4).
Während des Sendevorgangs leuchtet die Kontroll-LED (6) rot auf.
Nach dem Loslassen der Sendetaste kehrt das Gerät automatisch wieder in den Empfangsmodus
zurück.
Empfang
Beim Empfang eines Signales leuchtet die Kontroll-LED (6) grün auf.
Wenn der Kanal mit einer CTCSS- / DQT-Kodierung belegt ist, werden alle Signale die nicht mit
derselben Kodierung versehen sind stummgeschaltet. D.h. die grüne Kontroll-LED leuchtet jedoch
ist kein Signal im Lautsprecher hörbar.
TASTENFUNKTIONEN
PTT Sendetaste
Die Sendetaste (11) befindet sich auf der linken Geräteseite. Drücken der Sendetaste schaltet das
Gerät in den Sendemodus. Während des Sendens leuchtet die LED (6) rot auf.
Multifunktionstaste
Die Multifunktionstaste (10) befindet sich unterhalb der Sendetaste (9). Sie wird per Software wahlweise mit einer der folgenden Funktionen belegt:
Senden 5-Ton Selektivruf
1450 kHz Relaiston
1750 kHz Relaiston
2315 kHz Relaiston
Monitortaste
Die Monitortaste (11) befindet sich auf der linken Seite unterhalb der Multifunktionstaste (10).
Während des Drückens der Monitortaste, wird die Rauschsperre deaktiviert. Damit ist es möglich
selbst schwache Signale, welche von der Rauschsperre ausgefiltert werden, zu hören.
Rauschsperre
Die Empfindlichkeit der Rauschsperre kann zwischen 0 und 9 eingestellt werden, wobei die Stufe 0
der geringsten Empfindlichkeit entspricht. Die Rauschsperre ist bei dieser Einstellung komplett
geöffnet. Auf der Stufe 9 muss das Signal sehr stark sein um die Rauschsperre zu deaktivieren.
Zum Einstellen der Rauschsperre drücken Sie die Sperrtaste, im Tastenfeld unten rechts, gefolgt von der
SQL-Taste (Zifferntaste 1). In der Anzeige erscheint SQL X, wobei X der aktuellen Empfindlichkeitsstufe
(0 - 9) entspricht. Stellen Sie die gewünschte Empfindlichkeitsstufe (0 - 9) mit Hilfe der Kanalwahltasten
Hoch / Runter (3) ein und bestätigen Sie Ihre Auswahl durch Drücken einer beliebigen Taste.
Sendeleistung
Die Sendeleistung kann auf die drei Stufen LOW / MID / HIGH eingestellt werden. In den Versionen
PMR und FreeNet beträgt die Leistungsstufe HIGH 500 mW. In den Betriebsfunkversionen kann die
max. Sendeleistung gemäß der Zulassungsurkunde entsprechend angegepasst werden.
Zum Wählen der gewünschten Sendeleistung (niedrig / mittel / hoch) drücken Sie die Sperrtaste, im
Tastenfeld unten rechts, gefolgt von der PWR-Taste (Zifferntaste 2). In der Anzeige erscheint die
aktuelle Sendestufe LOW / MID / HIGH. Wählen Sie die gewünschte Sendestufe mit Hilfe der
Kanalwahltasten Hoch / Runter (3) und bestätigen Sie Ihre Auswahl durch Drücken einer
beliebigen Taste.
Die Auswahl der Sendeleistungsstufe LOW wird in der Anzeige durch das gleichnamige Symbol
angezeigt.
6 7
DeutschDeutsch
Page 5

Suchlauf
Die Suchlauffunktion wird zum Auffinden besetzter Kanäle der Kanalsuchlaufliste eingesetzt. Die
programmierten Kanäle können per Software oder via Tastenkombination der Kanalsuchlaufliste
hinzugefügt werden. Kanäle der Suchlaufliste sind in der Anzeige an dem Symbol PRI, platziert
links neben der Batteriestandanzeige, erkennbar.
Zum Hinzufügen bzw. Entfernen eines Kanals aus der Kanalsuchlaufliste, drücken Sie bitte die
Sperrtaste, im Tastenfeld unten rechts, gefolgt von der LOCK-Taste (Tastennummer 0).
Zum Starten des Suchlaufes drücken Sie die Sperrtaste, im Tastenfeld unten rechts, gefolgt von der
SCAN-Taste (Zifferntaste 3).
Gestoppt wird die Suchlauffunktion durch Drücken einer beliebiger Taste, mit Ausnahme der
Kanalwahltasten Hoch / Runter (3).
Für den Kanalsuchlauf stehen drei Betriebsmodi (SE / CO / TO) zur Verfügung. Mehr Informationen
siehe Seite 12.
Radio
Das TeCom-X5 ist mit einem FM-Radio ausgerüstet. Via Software können 25 Radiofrequenzen
abgespeichert werden. Ebenso ist es möglich freie Frequenzen direkt über die Tastatur einzustellen.
Zum Ein- bzw. Ausschalten des Radios drücken Sie die Sperrtaste (im Tastenfeld unten rechts)
gefolgt von der FM-Taste (Tastennummer 8). Im Speicherfrequenz-Modus wird der aktuelle
Radiokanal als zweistellige Ziffer links über der Frequenz angezeigt, sofern Frequenzen programmiert wurden.
Zum Umschalten zwischen freier Frequenzwahl und Abruf der gespeicherten Frequenzen dient die
V/M-Taste (Tastenfeld, unten links).
Freie Frequenzeingabe:
Der gewünschte Sender im Frequenzbereich 70 MHz bis 107,9 MHz kann direkt über die Tastatur
eingegeben werden. Es ist ebenso möglich sich der Sendefrequenz in 100-kHz Schritten mit Hilfe
der Kanalwahltasten Hoch / Runter (3) anzunähern.
Zum Auffinden einer besetzten Radiofrequenz steht ebenso die Suchfunktion zur Verfügung.
Starten Sie den Suchlauf durch Drücken der Sperrtaste (Tastenfeld unten rechts) gefolgt von der
SCAN-Taste (Tastennummer 3). In der Anzeige erscheint solange SCN. UP bis ein besetzer Kanal
gefunden wurde. Der aktive Suchlauf wird durch einen blinkenden Punkt neben dem Buchstaben N
angezeigt. Zum Abbrechen der Suchfunktion irgendeine Taste drücken.
MENÜ
Allgemeine Funktionseinstellungen, welche direkt am Gerät verändert werden können, sind im
Menü zusammengefasst.
Folgende Schritte führen zur erfolgreichen Einstellungsänderung einer Funktion:
1. Zum Öffnen des Menüs drücken Sie die Sperrtaste (Tastenfeld unten rechts) gefolgt
von der SEL-Taste (Tastennummer 9).
2. Zum Wählen der gewünschten Funktion drücken Sie die Kanalwahltasten Hoch / Runter (3).
3. Zum Öffnen der Einstellmöglichkeiten der gewählten Funktion drücken Sie Sperrtaste
(Tastenfeld unten rechts).
4. Zum Wählen der gewünschten Funktion drücken Sie die Kanalwahltasten Hoch / Runter (3).
5. Zum Bestätigen der Einstellung und Fortfahren im Menü drücken Sie bitte die Sperrtaste.
Zum Bestätigen und Verlassen des Menüs drücken Sie bitte die V/M-Taste (Tastenfeld unten links).
Wird keine Taste innerhalb von 10 Sekunden gedrückt, wird die Einstellung automatisch gespeichert und das Menü wird verlassen.
Die folgenden Einstellungsmöglichkeiten stehen zur Verfügung.
01 APO
Automatische Ausschaltung
Einstellmöglichkeiten : Off (Aus), 1 - 15 H (Stunden)
02 APRO
Optionale Funktion
Einstellmöglichkeiten : Off (Aus) / SCRAMB (Sprachverschleierung) / COMP (Kompander)
Bei Aktivierung der Scrambler Funktion wird die in Funktion 07 SCR NO gewählte ScramblerKodierung (1 - 8) verwendet.
Die Funktion COMP (Kompander) dient der Signalverbesserung durch kombinierte Kompressorund Expanderfunktion
03 BANK
Speicherbank
Einstellmöglichkeiten : No Bank (Aus) / BANK 1 - 8 (Speicherbank 1 - 8; abhängig von den programmierten Frequenzen)
Die Zuteilung der programmierten Kanäle zu den Frequenzen erfolgt automatisch. Ist die
Speicherbankfunktion deaktiviert (No Bank), werden alle programmierten Kanäle in Reihe angezeigt.
Wird eine der max. acht verfügbaren Speicherbänke eingestellt, werden nur die Kanäle der
gewählten Speicherbank angezeigt.
BANK 1 : Kanäle 1 - 16 BANK 2 : Kanäle 17 - 32
BANK 3 : Kanäle 33 - 48 BANK 4 : Kanäle 49 - 64
BANK 5 : Kanäle 65 - 80 BANK 6 : Kanäle 81 - 96
BANK 7 : Kanäle 97 - 112 BANK 8 : Kanäle 113 - 128
8 9
DeutschDeutsch
Page 6

04 BATSAV
Batteriesparfunktion - Ein / Aus
Im aktivierten Zustand erscheint das Symbol SAVE in der Anzeige - wenn kein Signal empfangen wird schaltet das Gerät in den Schlafmodus.
05 BCLO
Sendesperre auf besetzten Kanälen
Einstellmöglichkeiten: OFF; QT / DCS; WAVE
OFF : keine Sendesperre auf besetzten Kanälen
WAVE : Sperre bei Signal
QT / DCS : Sperre bei Signal mit gleicher Kodierung
06 BEEP
Warnton - Ein / Aus
Jede Funktionseingabe per Tastendruck, außer Senden und Drücken der programmierbaren
Funktionstaste, wird durch eine Doppelton bestätigt. Im aktivierten Zustand erscheint das
Glocken-Symbol in der Anzeige
07 SCR NO - Scrambler Nummer (Sprachverschleierungsart) SCR 1 - 8
Nur relevant wenn die Funktion Scramber unter 02 APRO aktiviert ist.
08 DC VLT
Zeigt die aktuelle Spannung des Akkupacks an.
09 DW
Kanalüberwachung bei aktivierter Radiofunktion - Ein / Aus
Im aktiven Zustand überwacht das Gerät permanent den aktuell eingestellten Funkkanal während das Radio eingeschaltet ist. Taucht ein Funksignal auf, wird die Radiofunktion solange
deaktiviert bis das Funksignal verschwindet.
10 LAMP
Beleuchtung der LCD-Anzeige - OFF / KEY / CONT
OFF : keine Beleuchtung
KEY : nach Tastendruck leuchtet die Anzeige für 5 Sekunden
CONT : Beleuchtung permanent eingeschaltet
11 LOCK
Tastatursperre - K + S / PTT / KEY / ALL
Durch langes Drücken (ca. 2 Sekunden) der Sperrtaste (Tastenfeld unten rechts) wird die
Tastatursperre aktiviert bzw. deaktiviert. Der aktive Zustand wird in der Anzeige durch das
Schloss Symbol angezeigt, in der linken oberen Ecke.
K + S : alle Tasten des Tastenfeldes, sowie die Kanalwahltasten sind gesperrt - Sendetaste,
sowie die Monitor- und programmierte Funktionstaste sind aktiv
PTT : Sperre Sendetaste - in der Anzeige erscheint P LOCK
KEY : alle Tasten des Tastenfeldes sind gesperrt - Kanalwahltasten, Sendetaste, sowie die
Monitor- und programmierte Funktionstaste sind aktiv
ALL : alle Funktionen sind gesperrt
12 MSGSET
Programmierung des Anzeigetextes, welcher beim Einschalten des Gerätes erscheint.
Es können max. 5 Zeichen verwendet werden, bestehend aus
a) Leerzeichen,
b) den Ziffern 0 - 9,
c) den Buchstaben A- Zund
d) den Symbolen *, _ und +.
Zum Einstellen des gewünschten Zeichens die Kanalwahltasten verwenden.
Zum Vorrücken auf die nächste Stelle die Nummertaste 9 drücken. Zum Zurückgehen die
Nummerntaste 7 drücken.
Zum Löschen des eingetragenen Textes die Taste V/M (Tastenfeld untere Reihe links) drücken.
13 NAME
Anzeigeart - FREQ / ALPHA
ALPHA : Die programmierte Frequenz wird als Kanalnummer (z.B. CH - 001) angezeigt.
FREQ : Wenn programmiert, wird der programmierte Kanalname angezeigt; ansonsten die
Kanalnummer.
14 NM SET
Kanalname Programmierung des Anzeigetextes, welcher beim Einschalten des Gerätes erscheint.
Es können max. 5 Zeichen verwendet werden, bestehend aus
a) Leerzeichen,
b) den Ziffern 0 - 9,
c) den Buchstaben A- Zund
d) den Symbolen *, _ und +.
Zum Einstellen des gewünschten Zeichens die Kanalwahltasten verwenden.
Zum Vorrücken auf die nächste Stelle die Nummertaste 9 drücken. Zum Zurückgehen die
Nummerntaste 7 drücken.
Zum Löschen des eingetragenen Textes die Taste V/M (Tastenfeld untere Reihe links) drücken.
15 OFFSET
nicht verfügbar
16 OPN MSG
Anzeigetext beim Einschalten des Gerätes - OFF / MSG / DC
OFF : kein Anzeigetext
MSG : es erscheint der in 12 MSGSET programmierte Text
DC : Betriebspannung des Akkupacks
17 PSWD
Passwortschutz - Ein / Aus
Im aktivierten Zustand wird das per Software oder per Menüfunktion 18 PSWD W programmierte
Passwort nach dem Einschalten des Gerätes abgefragt. Die Passworteingabe ist erforderlich um
das Gerät in Betrieb nehmen zu können.
10 11
DeutschDeutsch
Page 7

18 PSWD W
Passwort Entwerfen
Für das vierstellige Passwort stehen die Tastenziffern 0 - 9 zur Verfügung. Zum Löschen des
bisherigen Passwortes die V/M-Taste (Tastenfeld unten links) drücken.
19 ROGER
Quittungstonfolge - Ein / Aus
Im aktiven Zustand wird die dreiteilige Quittungstonfolge automatisch nach dem Loslassen der
PTT-Taste (9) gesendet.
20 SCN MD
Es stehen drei Suchlaufarten zur Auswahl.
TO : Time-Operated-Scan – Zeitgesteuerter Kanalsuchlauf
Im TO-Modus verweilt das Gerät für eine bestimmbare Zeit (programmierbar mit der
Software) auf einem besetzten Kanal um dann fortzufahren, unabhängig ob auf dem
besetzten Kanal weiterhin Signale empfangen werden oder nicht.
CO : Carrier-Operated-Scan – Signalgesteuerter Kanalsuchlauf
Im CO-Modus verweilt das Gerät solange auf einem besetzten Kanal bis das Signal verstummt, bevor die Kanalsuchlauffunktion fortfährt.
SE : Search-Scan - Einfacher Kanalsuchlauf
Im SE-Modus wird die Kanalsuchlauf-Funktion beendet sobald ein besetzter Kanal gefunden wird. Das Gerät verweilt auf dem besetzten Kanal und beendet die Suchlauffunktion.
21 STE
(Side Tone Eliminate) - On / Off
Zum filtern von ungewünschten Nebengeräuschen, welche nach dem Loslassen der Sendetaste
unter manchen Umständen zu hören sind. Diese Funktion ist sehr nützlich beim Tragen von
Ohrhörern.
22 TOT
Sendezeitbegrenzung - Off (Aus) / MIN 1 - 7
Im aktivierten Zustand wird der Sendebetrieb automatisch nach der gewählten Zeit (1 - 7 Min.)
abgebrochen. Zum Zurücksetzten die Sendetaste loslassen.
23 TXSTOP
Sendeblockade - ON (Ein) / OFF (Aus)
24 VOX
Sprachgesteuerte Signalübertragung - Ein / Aus
Im aktivierten Zustand wird die Signalübertragung automatisch beim Sprechen gestartet. Das
Drücken der PTT-Taste ist nicht nötig.
25 VOX D
Verweilzeit im Modus der Signalübertragung nach dem Ende der Signalübertragung
Einstellmöglichkeiten - 15 / 25 / 35 / 45
15 : 1 Sekunde 25 : 2 Sekunden 35 : 3 Sekunden 45 : 4 Sekunden
26 VOX S
Empfindlichkeit der VOX-Funktion
Einstellmöglichkeiten: Stufen 1 - 8; Stufe 8 entspricht der größten Empfindlichkeit
27 VXB
Sendeblockade bei besetzten Kanälen für die VOX Funktion. Einstellungen - Ein / Aus
28 WIDNAR
Bandbreite - nicht verfügbar
Die eingestellte Bandbreite kann nur über die Software verändert werden.
5-TON SELEKTIVRUF
Das TeCom-X5 verfügt über eine 5-Ton Selektivruf Funktion, deren Parameter mit der Software
TeCom-X5 eingestellt werden.
Allgemeine Funktionsweise:
Jedes Gerät wird mit einer eigenen, fünfstelligen Gerätekennung (5-Ton ID) programmiert. Zu
sendende 5-Tonfolgen werden via Tastatur frei eingeben. Die eigene Gerätekennung wird mit
der gewählten 5-Tonfolge in Reihe geschickt. Stimmen bei einem Gerät dessen Gerätekennung
mit der gesendete 5-Tonfolge überein, so wird die Gerätekennung des Senders in der Anzeige
dargestellt und das Gerät reagiert in der programmierten Art und Weise, z.B. der Lautsprecher
öffnet, das Klingelzeichen ertönt oder eine automatische Empfangsbestätigung wird zurück
gesendet.
Hinweis: Zum Funktionieren des 5-Ton Selektivrufes muss die Funktionstaste (10) mit der der
Option Optional Signal Call belegt werden.
Zum Senden einer 5-Tonfolge beachten Sie bitte folgende Schritte:
1. Drücken sie die Funktionstaste (10).
2. Geben Sie die 5-Tonfolge, die der Gerätekennung des zu rufenden TeCom-X5
entspricht, über die Tastatur ein. Es stehen die Ziffern 0 - 9 zur Verfügung.
3. Drücken Sie die Sendetaste (9). Wird die Geräte-Kennung eines anderen
TeCom-X5 gesendet, welches auch die 5-Ton Selektivruffunktion eingeschaltet hat, so öffnet
bei dem anderen Funkgerät der Lautsprecher und in der Anzeige erscheint die
Gerätekennung des Senders. Ist die Beep-Funktion (06 BEEP) aktiviert. Ertönt ein
Klingelzeichen.
Stimmt die gesendete Geräte-Kennung nicht mit der Kennung des Empfängers überein, öffnet der Lautsprecher nicht.
ANSCHLUSS
Das TeCom-X5 verfügt über einen Kenwood-kompatiblen Zubehör-Anschluss (3,5 / 2,5 mm Stereo / Stereo), an den auch das Datenübertragungskabel für die Software TeCom-X5 angeschlossen wird.
Weiteres passendes Zubehör finden Sie im aktuellen TEAM-Katalog.
12 13
DeutschDeutsch
Page 8

Dear Customer,
Thank you for buying a TEAM TeCom-X5. TEAM Electronic stands for high-quality radio com-
munication.
To fully understand the various functions and the possible settings and to ensure the proper
operation of the radio, we recommend to read this manual prior to first time use.
The TeCom-X5 is available in these four versions:
PR8056 TeCom-X5 FreeNet : programmed with 6 FreeNet** channels, 500 mW tx power,
bandwidth 12.5 kHz, no registration or fees apply
PR8069 TeCom-X5 PMR : programmed with 8 PMR* channels, 500 mW tx power,
bandwidth 12.5 kHz, no registration or fees apply
PR5058 TeCom-X5 UHF : commercial radio; 128 channels programmable; registration and
fees apply; only assigned frequencies and parameters are allowed
to be programmed; bandwidth 12.5 kHz or 25 kHz;
max. TX power 4 W; UHF 400 - 470 MHz
PR5058 TeCom-X5 VHF : commercial radio; 128 channels programmable; registration and
fees apply; only assigned frequencies and parameters are allowed
to be programmed; bandwidth 12.5 kHz or 25 kHz;
max. TX power 5 W; VHF 136 - 174 MHz
Programming of the TeCom-X5 is done via the additional software T-UP15. A data transfer cable is
included in the scope of delivery.
* = PMR Frequencies ** = FreeNet Frequencies
1 - 446.00625 MHz 1 - 149.0250 MHz
2 - 446.01875 MHz 2 - 149.0375 MHz
3 - 446.03125 MHz 3 - 149.0500 MHz
4 - 446.04375 MHz 4 - 149.0875 MHz
5 - 446.05625 MHz 5 - 149.1000 MHz
6 - 446.06875 MHz 6 - 149.1125 MHz
7 - 446.08125 MHz
8 - 446.09375 MHz
Table of Contents
page
GENERAL 16
Scope of Delivery 16
Maintenance 16
Features 16 - 17
BASIC FUNCTIONS 18
Antenna 18
Battery Pack 18
Charging 18
On / Off 18
Volume 18
Channel Selection 18
Transmit 18
Reception 18
KEYPAD FUNCTIONS 19 - 20
PTT Transmit Key 19
Mult-Function Key 19
Monitor Key 19
Squelch 19
TX Power 19
Scan 19
Radio 20
MENU 20 - 24
01 APO (Automatic Power Off) 02 APRO (Optional Function)
03 BANK (Memory Bank) 04 BATSAV (Battery Save Function)
05 BCLO (Busy Ch. Lockout) 06 BEEP (Beep Tone)
07 SCR NO (Scrambler Type) 08 DC VLT (Info Voltage)
09 DW (Frequency Watch) 10 LAMP (Display Light)
11 LOCK (Keylock) 12 MSGSET (Greeting Message)
13 NAME (Display Type) 14 NM SET (Channel Name)
15 OFFSET (not available) 16 OPN MSG (Opening Screen)
17 PSWD (Passwort) 18 PSWD W (Password Set)
19 ROGER (Roger Tone) 20 SCN MD (Scan Mode)
21 STE (Signal Transmit End) 22 TOT (Time Out Timer)
23 TXSTOP 24 VOX
25 VOX D (Vox Delay Time) 26 VOX S (Vox Sensitivity)
27 VXB (Block Vx on Busy Ch.) 28 WIDNAR (Bandwidth)
5-TONE SELECTIVE CALLING 25
ACCESSORY JACK 25
CTCSS/DCS 50
SPECIFICATIONS 51
14 15
EnglishEnglish
Page 9
GENERAL
Scope of Delivery
Unpack the equipment carefully. We recommend you to identify the listed items before discarding
the packing material. If any items are missing or have been damaged during shipment, please contact the dealer immediately.
Supplied Accessories
1 x Antenna (attached with PMR version) 1 x Belt clip 1 x Battery
1 x Charger 1 x Manual
Maintenance
For optimal performance and functionality of the TeCom-X5, please pay attention to the following
advices.
Do not open the case of the radio. Improper opening may cause damages and warranty claims
are forfeited.
For charging of the rechargeable battery pack, only use the charger SLG-TeCom-X5 that is inclu-
ded in the scope of delivery.
Never expose the radio to direct sunlight or other heat sources. High temperatures will diminish
the longevity of certain components and plastic parts may melt and deform. lzen.
Never store the radio in dusty or dirty areas.
Do not expose the radio to any liquid. Humidity max cause corrosion of the pcb and its compo-
nents.
Should the radio generate unusual heat or emit unusual smell or even smoke, please turn the
radio off immediately and remove the battery pack. Contact your dealer.
Never transmit without antenna. A damage of the power amplifier may be the result.
Features
> max. tx power
FreeNet : 500 mW PMR : 500 mW
VHF : 5 W * UHF : 4 W *
> 128 channels available
UHF : 400 - 470 MHz VHF : 136 - 174 MHz
PMR : 8 Channels PMR 446 MHz FreeNet: 6 Channels FreeNet 149 MHz
> bandwidth
FreeNET / PMR: 12.5 kHz
UHF / VHF : 12.5 / 25 kHz
> 5-tone selective calling > transmit blockage on occupied channels
> scrambler > FM radio
> 50 CTCSS and 107 DCS > key lock
> LCD display with background illumination > Password function
> automatic turn off(APO) > TOT
> scrambler (eight different codes) > VOX
> channel bank store > Repeater Tone 1450 Hz / 1750 Hz / 2315 Hz
> battery saving function
1
8
7
6
5
4
3
2
9
11
10
13
12
1 - antenna
2 - LCD
3 - Up / Down keys
4 - microphone
5 - On/Off - volume
6 - LED
7 - speaker
8 - key pad
9 - PTT
10 - multi-function key
11 - monitor key
12 - connection jack
13 - battery pack (1200 mAh / 7.4 V)
menu
tx power
battery saving function
VOX
battery status
DCS code
CTCSS code
beep tone
memory bank, menu function
key lock
PRI
item of channel scan list
FM radio
monitor while radio
APO
not available
not available
16 17
EnglishEnglish
Page 10

BASIC FUNCTIONS
Antenna
Due to governmental regulations, the antenna in the PMR version is fixed, i.e. non-detachable.
Battery Pack
To attach the battery pack (13) onto the radio, place the bulges at the bottom of the battery pack
into the according holes an the bottom, rear of the radio.
Press the battery pack at the top part against the radio until the battery pack snaps in.
To remove the battery pack, press down the latch and remove the battery pack.
Charging
Prior to first use, the battery pack has to be charged completely. Acompletely empty battery pack
needs to be charged for approximately three hours. During the charging process, the LED lights
red. Once charging is completed, the LED lights green.
Remove the battery pack out of the charger. Overcharging reduces the battery packs longevity.
On / Off
To turn the radio on, turn the On / Off switch (5) clockwise beyond the barrier. A beep tone is emitted if the beep tone function is activated.
To turn off the radio, please turn the On / Off switch (5) counterclockwise beyond the barrier.
Volume Control
To set a comfortable volume level after turning the radio on, hold the monitor key (11) while adjusting the volume level with the combined On/Off-Volume key (5).
Channel Selection
For channel selection use the key pad (8) or the Up / Down (3) keys.
Via key pad enter the channel number in a three digit format, e.g. 001 for channel 1. Upon a misentry, the last selected channel will be set.
With the Up / Down (3) keys, the channels are passed through in the consecutive order. After
the highest channel number, the sequence starts again with the lowest number.
Upon actived memory bank function (03 BANK), only the channels of the selected memory bank
are passed through. For more information about the memory bank function see page 21.
Transmit
For transmission keep pressing the PTT key (9) until the end of message.
For best sound quality, talk into the microphone (4) with normal voice at a distance of approximatly
10 cm.
During transmission the control LED (6) lights red.
Upon release of the PTT key (9) the radio returns automatically into reception mode.
Reception
Upon reception of a signal, the LED (6) lights green.
If the selected frequency is decoded with a CTCSS- / DCS-code, all signals that are encoded with a
different code will be muted. The green LED will light but no signal will be audible.
KEYPAD FUNCTIONS
PTT Key
The PTT key (9) is located at the left side of the radio. Pressing the PTT key will switch the radio
into transmission mode. The LED (6) will light red.
Multi-Function Key
The multi function key (10) is located under the PTT key (9). It can be programmed with one of
these functions: transmit 5-tone selective call
1450 kHz repeater tone
1750 kHz repeater tone
2315 kHz repeater tone
Monitor Key
The monitor key (11) is located on the left side of the radio under the multi-function key (10). When
pressing the monitor key, the squelch is deactivated and a constant noise is audible.
With this function, it is possible to hear very weak signals that would not pass the squelch.
Squelch
The sensivity level of the squelch can be set between 0 and 9, whereas the level 0 corresponds to
the least sensitive level. The squelch is completely open at level 0.
At level 9, the signal has to be very strong to pass the squelch.
To set the squelch level, press the F-key (key pad, lower row, right) followed by the SQL-key (number key 1). The display shows SQL X, where X represents the actual squelch level (0 - 9). Set the
desired squelch level with the Up / Down (3) keys and confirm your selection by pressing any
key.
TX Power
For the tx power selection there are three levels available LOW / MID / HIGH. In the versions PMR
and FreeNet, the tx power level HIGH is set to 500 mW. In the COM versions, the high tx power
can be adjusted according to the assigned power of the registration.
To select a tx power level (Low / Mid / High), press the F key (key pad, lower row, right) followed by
the PWR key (number key 2). The display shows the actual tx power level. Select the wanted
power level with the UP / Down keys (3) and confirm your selection by pressing any key.
The tx power level LOW is indicated in the display with the symbol LOW.
Scan
Use the scan function to find occupied channels of the channel list. Channels can be added or removed from the channel list via software or key operation at the radio. Channels of the channel list are
indicated in the display by the symbol PRI, which is located next to the battery status symbol.
To add or remove a channel from the channel list, press the F key (key pad, lower row, right), followed
by the LOCK key (number key 0).
To start thescan function press the F key (key pad, lower row, right), followed by the SCAN key (number key 3).
Stop the scan function by pressing any key, with exception of the Up / Down keys (3).
There are three scan modes (SE / CO / TO) available. For more information see page 23.
18 19
EnglishEnglish
Page 11

Radio
The TeCom-X5 has a radio function. Via software, 25 radio frequencies can be stored. It is also
possible to manually select frequencies via the keypad.
To turn on / off the radio, press the F key (keypad, lower row, right), followed by the FM key (number 8). In the fixed channel mode, the actual radio channel number is displayed above the frequency, provided that channels have been programmed.
To switch between manual frequency mode and fixed channel mode press the V/M key (keypad,
lower row, left).
Manual Frequency Mode:
The wanted radio station within the frequency range of 70 MHz to 107,9 MHz, can be directly entered via the keypad. It is also possible to step to the wanted frequency in 10-kHz steps with the Up
/ Down (3) keys.
To find an occupied radio station the scan function can be used. Start the scan function by pressing
the F-key (keypad, lower row, right), followed by the SCAN-key (number 3). The display reads SCN.
UP until an occupied channel has been found. The active scan function is indicated by a blinking
dot next to the letter N.
To stop scanning press any key.
Zum Auffinden einer besetzten Radiofrequenz steht ebenso die Suchfunktion zur Verfügung.
Starten Sie den Suchlauf durch Drücken der Sperrtaste (Tastenfeld unten rechts) gefolgt von der
SCAN Taste (Tastennummer 3). In der Anzeige erscheint solange SCN. UP bis ein besetzer Kanal
gefunden wurde. Der aktive Suchlauf wird durch einen blinkenden Punkt neben dem Buchstaben N
angezeigt. Zum Abbrechen der Suchfunktion irgendeine Taste drücken.
MENU
General settings that can be altered directly via the radio are organized in the menu.
Follow these steps to change a setting:
1. To open the menu press the F key (keypad, lower row, right), followed by the SEL key (number 9).
2. Select the wanted function with the Up / Down keys (3).
3. To access the available settings for the selected function, press the F key (keypad, lower row, right).
4. Select the wanted setting with the Up / Down keys (3).
5. To confirm your selection and continue in the menu press the F key (keypad, lower row, right).
To confirm and leave the menu press the V/M key (keypad, lower row, left).
If no key is pressed within 10 seconds, the selected settings will be automatically stored and the
the menu will be left.
These functions are available.
01 APO
Automatic Power-Off
Settings : Off, 1 - 15 H (hours)
The radio will automatically power off after the set time
02 APRO
Optional Functions
Settings : Off / SCRAMB / COMP
SCRAMB : upon activation, the radio uses the scrambler coding (1 - 8) that is set in menu
function 07 SCR NO.
COMP : the compander improves the signal-qualitiy by combining compressor and expander.
03 BANK
Memory Bank
Settings : No Bank / BANK 1 - 8 (depend on the programmed frequencies)
The allocation of frequency to memory bank is done automatically.
If this function is deactivated (No Bank), all programmed channels are displayed in their order. If
a memory bank is selected, only the channels of this bank are displayed.
BANK 1 : channel 1 - 16
BANK 2 : channel 17 - 32
BANK 3 : channel 33 - 48
BANK 4 : channel 49 - 64
BANK 5 : channel 65 - 80
BANK 6 : channel 81 - 96
BANK 7 : channel 97 - 112
BANK 8 : channel 113 - 128
04 BATSAV
Battery Save Function - On / Off
If no signal is present on the selected channel, the radio switches into standby mode after a certain time.
05 BCLO
Busy Channel LockOut - is a signal present on the selected channel, transmission is blocked
until the channel is clear again.
settings: OFF; QT / DCS; WAVE
OFF : no lockout on busy channels
WAVE : lockout on all signals
QT / DCS : lockout on signals with the same coding
06 BEEP
warnt tone - On / Off
Any entry, except pressing the PTT key and the programmable function key, is confirmed by a
double-tone. In the activated state, the bell symbol is shown in the display.
07 SCR NO
select scrambler type SCR 1 - 8
This setting is only relevant when function 02 APRO is activated.
08 DC VLT
Shows actual voltage level of the battery pack.
20 21
EnglishEnglish
Page 12

09 DW
Channel monitoring with activated radion function - On / Off
While the radio is on, the selected channel is monitored. Upon reception of a signal, the radio is
deactivated until the signal disappears.
10 LAMP
Illumination of the LCD - OFF / KEY / CONT
OFF : no illumination
KEY : after entry, the display is illuminated for 5 seconds
CONT : illumination is constantly on
11 LOCK
Key lock
settings: - K + S / PTT / KEY / ALL
Press the keylock key (keypad, lower row to the right) to activated or deactivate the keylock
function. The activated state is indicated by a key symbol in the upper left corner.
K + S : all key of the keypad, as well as the channel selection keys are locked - PTT key, as
well as the monitor and programmable function keys are activated
PTT : transmission is blocked - the display shows P LOCK
KEY : all keys of the keypad are locked - channel selection keys, as well as PTT, monitor
and programmable function keys are activated
ALL : all functions are locked
12 MSGSET
Programming of the welcome message that appears shorty after turning on the radio
5 symbols are available:
a) blank character,
b) the digits 0 - 9,
c) the letters A- Zand
d) the symbols asterix *, underscore _ and plus +.
Select the symbols with the channel selection keys.
To proceed to the next space press the number key 9. To move the cursor backwards press the
number key 7.
To delete the actual entry press the V/M key (keypad, lower row left side).
13 NAME
display types are FREQ and ALPHA
ALPHA : The programmed frequency is displayed as a channel number, e.g. CH - 001.
FREQ : The programmed channel name is displayed. If no channel name is programmed,
the channel number is shown.
14 NM SET
Channel Name Programming of the welcome text that appears after turning the radio on. The text message can
contain a maximum of five symbols composed out of :
a) blank character,
b) the digits 0 - 9,
c) the letters A- Zand
d) the symbols asterix *, underscore _ and plus +.
Select the symbols with the channel selection keys.
To proceed to the next space press the number key 9. To move the cursor backwards press the
number key 7.
To delete the actual entry press the V/M key (keypad, lower row left side).
15 OFFSET
not available
16 OPN MSG
temporary message after turning the radio on - OFF / MSG / DC
OFF : no message text is displayed
MSG : in 12 MSGSET programmed text is displayed
DC : voltage of the battery pack
17 PSWD
password protection - On / Off
Requires entry of the programmed password if function is activated. The password is programmed via software or directly at the radio via the menu function 18 PSWD W.
The radio cannot be operated if the correct password is not entered.
A forgotten password can be retrieved via software.
18 PSWD W
password creation
Create a 4-digit password out of the numbers 0 - 9. Confirm your entry by pressing the F key
(keypad, lower row right side).
To delete the entry press the V/M key (keypad, lower row left side).
19 ROGER
roger beep - On / Off
In the activated state, the three-tone roger beep is sent after release of the PTT key (9).
20 SCN MD
there are three scan modes available :
TO : Time-Operated-Scan
Is an occupied channels scanned, remains the radio for a certain period of time, which is
programmable via software, on this channel before scanning is continued regardless if the
signal is still present or not.
CO : Carrier-Operated-Scan
The radio remains on an occupied channel until the signal ends. Then, scanning continous.
SE : Search-Scan
Is an occupied channel scanned, stops the scan function and the radio remains on this channel.
22 23
EnglishEnglish
Page 13

21 STE
Side Tone Eliminate - On / Off
Under certain circumstances, a clicking sound can be heard upon releasing the PTT key. The
function STE reduces this noise, which is useful when the radio is operated with a headset.
22 TOT
Time-Out-Timer - Off / MIN 1 - 7
Restricts transmission time to set time period (1 - 7 minutes). After expiration of set time limit,
transmission is aborted. For reset, release PTT key.
23 TXSTOP
transmission blockage - ON / OFF
24 VOX
voice operated signal transmission - On / Off
VOX allows hand-free operation. Transmission starts automatically once the signal strength reaches a certain level.
25 VOX D
VOX delay
determines how long the VOX function will be still active after the signal stopped.
settings: 15 / 25 / 35 / 45
15 : 1 second 25 : 2 seconds 35 : 3 seconds 45 : 4 seconds
26 VOX S
VOX sensitivity
settings: level 1 - 8;
level 1 = most sensitive, i.e. transmission starts easily after a low signal
level 8 = least sensitive, i.e. signal has to be very strong for the transmission to start
27 VXB
VOX lockout on busy channels - On / Off
28 WIDNAR
bandwidth - not available
The bandwidth can only be set via software.
5-TON SELECTIVE CALLING
The TeCom-X5 contains a 5 tone selective calling function, which parameters are set via software. To send a 5-tone decode, press the programmable function key (10) and enter the 5-tone
encode via keypad. Then, press the PTT key (9) to send your message.
General Description:
Each radio is programmed with an individual radio ID (5-Tone ID). This ID code, which serves
also as a decode, is always sent with the encode.
The 5-Tone encodes are entered via keypad. This way, all possible encodes can be sent without
memory storage restrictions.
The own ID is always sent with the encode. If the sent 5-tone encode matches the ID code of
the other radio, the sent ID code will be displayed by the receiving radio and the radio reacts in
the programmed way, e.g. the speaker unmutes, a beep tone is audible or an automatic acknowledgement is sent.
Important: For the selective calling function to work, the programmable function key (10) has to
be set to Optional Signal Call.
For more information on how to program the 5-tone function, read the T-UP15 software manual.
CONNECTOR
The TeCom-X5 has a Kenwood-compatible accessory jack (3.5 / 2.5 mm - stereo / stereo) for
connecting headphones, microphones and the data transfer cable, required for programming the
radio via software.
Suitable accessory can be found in the actual TEAM catalogue.
24 25
EnglishEnglish
Page 14

26 27
EspañolEspañol
Estimado cliente,
Gracias por adquirir el TeCom-X5 TEAM. TEAM Electronic es conocido por la gran calidad de
sus aparatos de radiocomunicación.
Para entender todas las funciones, los posibles ajustes y para asegurar el funcionamiento adecuado de la radio, le recomendamos que lea este manual antes de utilizar la radio.
El TeCom-X5 está disponible en estas cuatro versiones:
PR8056 TeCom-X5 FreeNet : programado con 6 canales FreeNet**, potencia TX 500 mW,
ancho de banda 12,5 kHz. No necesita licencia ni pago de tasas.
PR8069 TeCom-X5 PMR : programado con 8 canales PMR*, potencia TX 500 mW, ancho de
banda 12,5 kHz. No necesita licencia ni pago de tasas.
PR5058 TeCom-X5 UHF : radio comercial; 128 channels programmable. Necesita licencia y
pago de tasas. Solo se permite la programación de las frecuencias
y parámetros asignados. Ancho de banda: 12,5 kHz ó 25 kHz;
máx. Potencia TX: 4 W; UHF 400 - 470MHz.
PR5058 TeCom-X5 VHF : radio comercial; 128 canales programables; registro y pago de
tasas obligatorios. Sólo se permite la programación de las frecuencias y parámetros asignados. Pasos: 12,5 kHz ó 25 kHz; máx.
potencia TX 5 W; VHF 136 - 174MHz
La programación del TeCom-X5 se hace mediante software adicional T-UP15. La entrega
incluye un cable de transferencia de datos.
* = Frecuencias PMR ** = Frecuencias FreeNet
1 - 446.00625 MHz 1 - 149.0250 MHz
2 - 446.01875 MHz 2 - 149.0375 MHz
3 - 446.03125 MHz 3 - 149.0500 MHz
4 - 446.04375 MHz 4 - 149.0875 MHz
5 - 446.05625 MHz 5 - 149.1000 MHz
6 - 446.06875 MHz 6 - 149.1125 MHz
7 - 446.08125 MHz
8 - 446.09375 MHz
SUMARIO
Pág.
GENERAL 28
Embalaje 28
Mantenimiento 28
Características 28
DESCRIPCIÓN 29
FUNCIONES BÁSICAS 30
Antena 30
Batería 30
Carga 30
On / Off 30
Volumen 30
Selección de Canal 30
Transmisión 30
Recepción 30
FUNCIONES DEL TACLADO ALFANUMERICO 31 - 32
Tecla de transmisión PTT 31
Tecla multifuncional 31
Tecla monitor 31
Squelch 31
Potencia TX 31
Escaneo 31
Radio 32
MENÚ 32 - 36
01 APO (Apagado automático) 02 APRO (Función Opcional)
03 BANK (Banco de memoria) 04 BATSAV (Función Ahorro Batería)
05 BCLO (Bloqueo canal ocupado) 06 BEEP (Tono Beep)
07 SCR NO (Tipo secrafonía) 08 DC VLT (Info Voltaje)
09 DW (Cronómetro Frecuencia) 10 LAMP (Lámpara)
11 LOCK (Bloqueo Teclado) 12 MSGSET (Mensaje Bienvenida)
13 NAME (Tipo Visualización) 14 NM SET (Indicador de canal)
15 OFFSET (no disponible) 16 OPN MSG (Abrir Mensaje)
17 PSWD (Password) 18 PSWD W (Ajuste Password)
19 ROGER (Tono Roger) 20 SCN MD (Modo Escaneo)
21 STE (Final señal transmisión) 22 TOT (Limitador Tiempo Transmisión)
23 TXSTOP 24 VOX
25 VOX D (Tiempo demora Vox) 26 VOX S (Sensibilidad Vox)
27 VXB
(Bloquear Vx canal ocupado) 28 WIDNAR (Separación entre canales)
LLAMADA SELECTIVA 5 TONOS 37
CONECTOR ADICIONAL 37
CTCSS/DCS 50
ESPECIFICACIONES 51
Page 15

28 29
EspañolEspañol
GENERAL
Embalaje
Desembale el equipo con cuidado. Por favor, compruebe que estén todos los elementos de la
lista antes de deshechar el embalaje. Si le falta alguno de ellos o viene dañado, pongáse en
contacto inmediatamente con el proveedor.
Accesorios suministrados
1 x Antena (fija en la versión PMR)
1 x Clip
1 x Batería
1 x Cargador
1 x Manual
Mantenimiento
Para un funcionamiento y una funcionalidad óptima del TeCom-X5, le aconsejamos lo siguiente:
No abra el chasis de la radio. Abrirlo inadecuadamente podría causar daños que no cubriría la
garantía del aparato.
Para cargar el pack de baterías recargables, utilice sólo el cargador SLG-TeCom-X5 incluido en
el paquete.
No exponga nunca la radio a los rayos del sol u otras fuentes de calor. Las altas temperaturas
podrían acortar la vida de algunos de los componentes y las partes de plástico podrían derretirse y deformarse.
No coloque nunca la radio en zonas con altos niveles de polvo o suciedad.
No exponga la radio a ningún líquido. La humedad podría causar corrosión de la pcb y sus
componentes.
Si la radio genera una calor inusual o emite un olor o humo, por favor, apáguela inmediatamente y extraiga la batería. Acontinuación, póngase en contacto con su distribuidor.
No transmite nunca sin antena; podría producirse un daño irreversible.
Características
> máx. potencia tx
FreeNet : 500 mW PMR : 500 mW
VHF : 5 W * UHF : 4 W *
> 128 canales disponibles
UHF : 400 - 470 MHz PMR : 8 canales PMR 446 MHz
VHF : 136 - 174 MHz FreeNet: 6 Channels FreeNet 149 MHz
> Separación entre canales
FreeNET / PMR : 12.5 kHz
UHF / VHF : 12.5 / 25 kHz
> 5 tonos de llamada selectiva > transmisión bloqueo de canales ocupados
> secrafonía > radio FM
> 50 Códigos CTCSS y 107 DCS > bloqueo de teclado
> Display LCD con retroiluminación > función Password
> Apagado automático (APO) > TOT (Limitador Tiempo Transmisión)
> Secrafonía (ocho códigos diferentes) > VOX
> Almacenaje banco de canal > Tono repetidor 1450 Hz / 1750 Hz / 2315 Hz
> función ahorro de batería
1
8
7
6
5
4
3
2
9
11
10
13
12
1 - antena
2 - LCD
3 - Teclas Up / Down
4 - micrófono
5 - volumen On/Off
6 - LED
7 - altavoz
8 - teclado alfanumérico
9 - PTT
10 - tecla multifunción
11 - tecla monitorización
12 - jack
13 - batería (1200 mAh / 7.4 V)
menú
potencia tx
función ahorro de batería
VOX
estado batería
códigos DCS
códigos CTCSS
tono beep
banco memoria, función menú
bloqueo de teclado
PRI
elemento de la lista escaneo
radio FM
monitorización en función radio
APO
no disponible
no disponible
Page 16

30 31
EspañolEspañol
FUNCIONES BÁSICAS
Antena
Debido a regulaciones gubernamentales, la antena en la versión PMR es fija, es decir, no se
puede extraer del aparato.
Batería
Para colocar la batería (13) en la radio, coloque los pins situados en la parte inferior de la batería en los agujeros correspondientes, por la parte trasera de la radio.
Presione la batería por la parte superior hasta que encaje.
Para extraer la batería, presione el cierre y sáquela.
Carga
Antes del primer uso, deberá cargar la batería al completo. Una batería vacía necesita tres
horas de carga aproximadamente. Durante el proceso de carga, la luz LED se iluminará en rojo.
Una vez se haya cargado completamente, el LED se pondrá en verde.
Extraiga la batería del cargador. La sobrecarga acorta la vida de la batería.
On / Off
Para encender la radio, gire el conmutador On / Off (5) en el sentido de las agujas del reloj
hasta la marca. Un tono beep se emitirá si la función tono beep está activada.
Para apagar la radio, gire el conmutador On / Off en el sentido de las agujas del reloj (5) hasta
la marca.
Control de Volumen
Para establecer un nivel de volumen adecuado, después de haber encendido la radio, pulse la tecla
monitorización (11) mientras ajusta el nivel de volume con las teclas de volumen ON / OFF (5).
Selección de Canal
Para seleccionar un canal utilice el teclado alfanumérico (8) o las teclas / Down (3). Si utiliza el teclado, introduzca el número de canal de tres dígitos, p. ej. 001 para el canal 1.
Si utiliza las teclas / Down (3), los canales iran pasando en orden consecutivo. Después
del último número de canal, la secuenca volverá a empezar por el número más bajo.
Si tiene activada la función bancos de memoria (03 BANK), sólo iran pasando los canales del
banco de memoria seleccionado. Si necesita más información sobre la función banco de memoria vaya a la página 33.
Transmisión
Para transmitir, mantenga pulsado el PTT (9) hasta que finalice el mensaje.
Para conseguir una buena calidad de sonido, hable por el micrófono (4) con voz normal y a una
distancia de aproximadamente 10 cm.
Durante la transmisión, el control LED (6) se iluminará en rojo. Una vez haya soltado el PTT (9)
la radio volverá automáticamente a modo recepción.
Recepción
Una vez recibida la señal, el LED (6) se iluminará en verde.
Si la frecuencia seleccionada está descodificada con un código CTCSS- / DCS, todas las señales que están codificadas con un código diferente se silenciaran. El LED verde estará iluminado,
pero no habrá ninguna señal audible.
Funciones del Teclado Alfanumérico
PTT
El PTT (9) está situado en la parte izquierda de la radio. Al pulsar el PTT, la radio se pondrá en
modo transmisión y el LED (6) se iluminará en rojo.
Tecla multifunción
La tecla multifunción (10) se encuentra situada bajo el PTT (9). Puede programarse con alguna
de las siguientes funciones: transmisión llamada selectiva 5 tonos
tono 1450 kHz
tono 1750 kHz
tono 2315 kHz
Tecla monitorización
La tecla monitorización (11) está situada en la parte izquierda de la radio, por debajo de la tecla
multifunción (10). Al pulsar la tecla monitorización, se desactivará el squelch y se escuchará un
ruido constante.
Con esta función, es posible escuchar señales muy débiles que no pasarían por el squelch.
Squelch El nivel de sensibilidad del squelch se puede ajustar de 0 a 9. El nivel 0 corresponde al
nivel menos sensible, con lo que estará completamente abierto.
En el nivel 9, la señal debe ser muy fuerte para pasar por el squelch.
Para ajustar el nivel del squelch, pulse la tecla F (teclado alfanumérico, fila inferior a la derecha)
seguida de la tecla SQL (tecla número 1). El display mostrará SQL X, donde X representa el
nivel actual del squelch (0 - 9). Ajuste le nivel de squelch deseado mediante las teclas /
Down y confirme su selección pulsando cualquier otra tecla.
Potencia TX
Para seleccionar la potencia tx existen tres niveles disponibles LOW / MID / HIGH. En las
versiones PMR y FreeNet, el nivel de potencia tx HIGH viene ajustado a 500 mW. En las versiones COM, la potencia tx se puede ajustar de acuerdo a la potencia de registro asignada.
Para seleccionar un nivel de potencia tx (Low / Mid / High), pulse la tecla F (teclas alfanuméricas, fila inferior a la derecha) seguida de la tecla PWR (tecla núm. 2). El display mostrará el
nivel de potencia tx actual. Seleccione el nivel de potencia deseado con las teclas / Down
(3) y confirme su selección pulsando culquier tecla.
El ajuste de nivel bajo (LOW) de potencia tx aparecerá indicado en el display con el símbolo LOW.
Escaneo
Utilice la función escaneo para encontrar canales ocupados de la lista de canales. Se puede
añadir o quitar canales de la lista de canales, bien mediante software/ PC, bien mediante tecla
función de la radio. Los canales de la lista de canales aparecen indicados en el display mediante el símbolo PRI, situado al lado del símbolo de estado de la batería.
Para añadir o eliminar un canal de la lista de canales, pulse la tecla F (teclado alfanumérico, fila
inferior, a la derecha), seguida de la tecla LOCK (tecla núm. 0).
Para empezar con la función escaneo, pulse la tecla F (teclado alfanumérico, fila inferior a la
derecha), seguida de la tecla SCAN (tecla núm. 3).
Detenga la función escaneo pulsando cualquier tecla, exceptuando las teclas / Down (3).
Hay tres modos de escaneo (SE / CO / TO) disponibles. Para más información ver página 35.
Page 17

32 33
EspañolEspañol
Radio
El TeCom-X5 tiene función radio. Puede almacenar hasta 25 frecuencias de radio mediante software.
También es posible seleccionar manualmente frecuencias mediante el teclado alfanumérico.
Para encender / apagar la radio, pulse la tecla F (teclado alfanumérico, fila inferior, a la derecha),
seguida de la tecla FM (núm. 8). En modo de canal fijo, la radio actual aparecerá por encima de
la frecuencia, ya que hay canales programados.
Para cambiar de modo de frecuencia manual a modo de canal fijo, pulse la tecla V/M (teclado
alfanumérico, fila inferior a la izquierda).
Modo Frecuencia Manual:
Dentro de un rango de frecuencia de 70 MHz a 107,9 MHz, se puede introducir la estación de
radio mediante el teclado. También es posible pasar a la frecuencia deseada en 10 kHz pasos
con las teclas / Down (3).
Para encontrar una estación de radio ocupada, puede utilizar la función escaneo. Empiece la
función escaneo pulsando la tecla F (teclado alfanumérico, fila inferior, a la derecha), seguida
de la tecla SCAN (núm. 3). En el display aparecerá SCN; y UP hasta que se haya encontrado
un canal ocupado. La función escaneo activo vendrá inicada con un punto parpadeante al lado
de la letra N.
Para detener el escaneo pulse cualquier tecla.
MENÚ
Los ajustes generales que se pueden modificar directamente desde la radio están organizados
dentro de un menú.
Siga los siguientes pasos para modificar un ajuste:
1. Para abrir el menú pulse la tecla F (teclado alfanumérico, fila inferior, a la derecha), seguida de
la tecla SEL (núm. 9).
2. Seleccione la función deseada con las teclas / Down (3).
3. Para acceder a los ajustes disponibles para la función seleccionada, pulse la tecla F (teclado
alfanumérico, fila inferior, a la derecha).
4. Seleccione el ajuste deseado con las teclas / Down (3).
5. Para confirmar su selección y continuar en el menú, pulse la tecla F (teclado alfanumérico, fila
inferior, a la derecha).
Para confirmar y salir del menú, pulse la tecla V/M (teclado alfanumérico, fila inferior, a la
izquierda).
Si no hay ninguna tecla pulsada durante 10 segundos, los ajustes seleccionados se almacenaran automáticamente y saldrá del menú.
Las funciones siguientes estarán disponibles:
01 APO
Apagado automático
Ajustes: Off, 1 - 15 H (horas)
La radio se apagará atuomáticamente después del tiempo establecido
02 APRO
Funciones opcionales
Ajustes : Off / SCRAMB / COMP
SCRAMB : una vez activado, la radio utiliza la codificación de la secrafonía (1 - 8) ajustada en
el menú función 07 SCR NO.
COMP : el compresor-expansor mejora la calidad de la señal combinando el compresor y el
expansor.
03 BANCO
Banco de memoria
Ajustes: Ningún Banco / BANCO 1 - 8 (depende de las frecuencias programadas)
La asignación de la frecuencia al banco de memoria se hará automáticamente.
Si esta función está desactivada (ningún Banco), todos los canales programados se visualizarán
en orden. Si se selecciona un banco de memoria, sólo se visualizarán los canales de este banco.
BANCO 1 : canal 1 - 16
BANCO 2 : canal 17 - 32
BANCO 3 : canal 33 - 48
BANCO 4 : canal 49 - 64
BANCO 5 : canal 65 - 80
BANCO 6 : canal 81 - 96
BANCO 7 : canal 97 - 112
BANCO 8 : canal 113 - 128
04 BATSAV
Función ahorro de batería - On / Off
Si no hay ninguna señal en el canal deseado, la radio cambia a modo standby después de un
periodo determinado de tiempo.
05 BCLO
Bloqueo de canal ocupado - si la señal está en el canal seleccionado, la transmisión se detendrá hasta que el canal esté libre de nuevo.
ajustes: OFF; QT / DCS; WAVE
OFF : no bloquear en canales ocupados
WAVE : bloquear todas las señales
QT / DCS : bloquear señales con la misma codificación
06 BEEP
tono de aviso - On / Off
Cualquier entrada, menos la pulsación del PTT y la tecla de función programable, se deberá confirmar con un tono doble. Si está activado, aparecerá el símbolo de una campana en el display.
07 SCR NO
seleccionar tipo secrafonía SCR 1 - 8
Este ajuste sólo funciona cuando la función 02 APRO está activada.
08 DC VLT
Muestra el nivel de voltaje actual de la batería
Page 18

34 35
EspañolEspañol
09 DW
Monitorización de canal con función de radio activada - On / Off
Mientras la radio esté encendida, el canal seleccionado está siendo motorizado. Después de
recibir una señal, la radio se desactivará hasta que aparezca la señal.
10 LAMP
Iluminación del LCD - OFF / KEY / CONT
OFF : no hay iluminación
KEY : después de una entrada, el display se ilumina durante 5 segundos
CONT : está permanentemente iluminada
11 LOCK
Bloqueo de teclado
ajustes: - K + S / PTT / KEY / ALL
Pulse la tecla bloqueo de teclado (teclado alfanumérico, fila inferior a la derecha) para activar o
desactivar la función bloqueo de teclado. Si está activado se indicará con un símbolo de una
llave en la esquina superior izquierda.
K + S : todas las teclas del teclado alfanumérico, como también las teclas de selección de
canal se bloquearán - tanto el PTT como las teclas de motorización y función pro-
gramación permanecerán activas.
PTT : transmisión bloqueada - en el display aparecerá P LOCK.
KEY : todas las teclas del teclado alfanumérico estarán bloqueadas - las teclas de selecci-
ón de canal, como el PTT, la función monitorización y función programación perma-
necerán activadas.
ALL : todas las funciones estarán bloqueadas.
12 MSGSET
Al programar el mensaje de bienvenida que aparece inmediatamente antes de encender la
radio, se pueden utilizar cinco clase de símbolos:
a) caracter en blanco,
b) dígitos 0 - 9,
c) letras A- Zy
d) los símbolos asterisco *, guión bajo _ y más +.
Seleccione los símbolos con las teclas de selección de canal.
Para proceder al espacio siguiente, pulse la tecla número 9. Para mover el cursor hacia atrás,
pulse la tecla núm. 7.
Para eliminar la entrada actual, pulse la tecla V/M (teclado alfanumérico, fila inferior, parte
izquierda).
13 NOMBRE
FREQ y ALPHAson tipos de visualización
ALPHA : La frecuencia programada se visualiza como un número de canal, p. ej. CH - 001.
FREQ : El nombre de canal programado se visualizará. Si no hay ningún nombre de canal
programado, se mostrará el número de canal.
14 NM SET
Nombre de canal - Al programar el texto de bienvenida que aparece al poner en marcha la radio. El
próximo mensaje de texto puede contener un máximo de cinco símbolos y puede contener:
a) caracter en blanco,
b) dígitos de 0 - 9,
c) letras A- Zy
d) los símbolos asterisco *, guión bajo _ y más +.
Seleccione los símbolos con la tecla selección de canal.
Par proceder al próximo espacio, pulse la tecla núm. 9. Para mover el cursor hacia atrás, pulse
la tecla número 7.
Para eliminar la entrada actual, pulse la tecla V/M (teclado alfanumérico, fila inferior, parte
izquierda).
15 OFFSET
no disponible
16 OPN MSG
mensaje temporal después de haber encendido la radio - OFF / MSG / DC
OFF : no se visualiza ningún mensaje de texto
MSG : en 12 MSGSET el texto programado se visualiza
DC : voltaje de la batería
17 PSWD
protección por password - On / Off
Requiere una entrada del password programado si la función está activada. El password se programa mediante software o directamente en la radio por la función menú 18 PSWD W.
La radio no puede funcionar si el password correcto no se ha introducido.
En caso de haber olvidado su password, lo puede recuperar mediante software.
18 PSWD W
creación de un password
Cree un password de 4 dígitos con los números de 0 - 9. Confirme su entrada pulsando la tecla
F (teclado alfanumérico, parte inferior derecha).
Para eliminar la entrada, pulse la tecla V/M (teclado alfanumérico, fila inferior izquierda).
19 ROGER
roger beep - On / Off
En estado activado, el beep roger de tres tonos se enviará depués de haber soltado el PTT (9).
20 SCN MD
hay tres modos de escaneo disponibles:
TO : Time-Operated-Scan - Si los canales ocupados están escaneados, la radio que está pro-
gramada mediante software, permanece durante un periodo de tiempo en este canal antes
de continuar el escaneo, sin tener en cuenta si la señal está presente o no.
CO : Carrier-Operated-Scan - La radio permanece en un canal ocupado hasta que finaliza la
señal. Entonces, el escaneo continua.
SE : Search-Scan - Si un canal ocupado está escaneado, la función escaneo se detiene y la
radio pemanece en ese canal.
Page 19

36 37
ItalianoEspañol
21 STE
Eliminar Tono Lateral - On / Off
Bajo ciertas circunstancias, se escuchará un sonido de clic después de soltar el PTT. La función
STE reduce el ruido, muy útil cuando la radio está funcionando con auriculares.
22 TOT
Limitador de Tiempo de Transmisión (Time-Out-Timer - Off / MIN 1 - 7)
Limita el tiempo de transmisión a un periodo de tiempo establecido (1 - 7 minutos). Después de
expirar el límite de tiempo establecido, se detiene la transmisión. Para reset, suelte el PTT.
23 TXSTOP
bloqueo de transmisión - ON / OFF
24 VOX
transmisión de señal por voz - On / Off
VOX permite funcionamiento manos libres. La transmisión comienza automáticamente, una vez
que la fuerza de la señal alcance un cierto nivel.
25 VOX D
demora VOX
determina durante cuánto tiempo la función VOX estará todavía activa después de que la señal
se detenga.
ajustes: 15 / 25 / 35 / 45
15 : 1 segundo 25 : 2 segundos 35 : 3 segundos 45 : 4 segundos
26 VOX S
sensibilidad VOX
ajustes: nivel 1 - 8;
nivel 1 = el más sensible, p.ej. transmisión empieza fácilmente después de una señal baja.
nivel 8 = el menos sensible, p.ej. la señal tiene que ser muy fuerte para que empiece la señal.
27 VXB
bloqueo del VOX en canales ocupados - On / Off
28 WIDNAR
tono repetidor - no disponible
El ancho de banda solo se puede ajustar mediante software.
LLAMADA SELECTIVA 5 TONOS
El TeCom-X5 contiene una función de llamada selectiva de 5 tonos, cuyos parámetros se han
ajustado mediante software.
Descripción General:
Cada radio viene programada con una radio individual ID (5 tonos ID). Este código ID se envia
siempre codificado y sirve también como descodificador.
La codificación de los 5 tonos se introducen mediante el teclado. De esta manera, todas las
codificaciones posibles se pueden enviar sin restricciones de almacenaje de memoria.
La propia ID siempre se envía codificada. Si las codificaciones de 5 tonos coinciden con el código
ID de la otra radio, el código ID enviado se visualizará en la radio receptora y la radio reacionará
en el modo programado, p. ej. el altavoz seguirá funcionando, un tono beep se escuchará
o se enviará un aviso automático.
Importante: Para que la función llamada selectiva funcione, la tecla de función programable
(10) debe estar ajustada en Llamada de Señal Opcional.
CONECTOR ADICIONAL
El TeCom-X5 posee un jack adicional compatible con KENWOOD (3,5 / 2,5 mm - estéreo / estéreo) para conectar auriculares, micrófonos y cable de transferencia de datos, requeridos para
programar la radio mediante software.
Puede encontrar una amplia gama de accesorios adecuados en nuestro catálogo.
Page 20

38 39
ItalianoItaliano
Gentile cliente,
Grazie per avere acquistato un prodotto TEAM. TEAM Electronic è sinonimo di alta qualità
nella radio comunicazione.
Per comprendere al meglio le varie funzioni, le possibili impostazioni e il corretto funzionamentodella radio, vi consigliamo di leggere attentamente il manuale .
TeCom-X5 è disponibile nelle seguenti versioni:
PR8056 TeCom-X5 FreeNet : programmed with 6 FreeNet** channels, 500 mW tx power,
bandwidth 12.5 kHz, no registration or fees apply
PR8069 TeCom-X5 PMR : programmed with 8 PMR* channels, 500 mW tx power,
bandwidth 12.5 kHz, no registration or fees apply
PR5058 TeCom-X5 UHF : commercial radio; 128 channels programmable; registration and
fees apply; only assigned frequencies and parameters are allowed
to be programmed; bandwidth 12.5 kHz or 25 kHz;
max. TX power 4 W; UHF 400 - 470 MHz
PR5058 TeCom-X5 VHF : commercial radio; 128 channels programmable; registration and
fees apply; only assigned frequencies and parameters are allowed
to be programmed; bandwidth 12.5 kHz or 25 kHz;
max. TX power 5 W; VHF 136 - 174 MHz
La programmazione del TeCom-X5 è possibile tramite software T-UP15.
Compreso di cavetto trasferimento dati.
* = Frequenze PMR ** =FreeNet Frequenze
1 - 446.00625 MHz 1 - 149.0250 MHz
2 - 446.01875 MHz 2 - 149.0375 MHz
3 - 446.03125 MHz 3 - 149.0500 MHz
4 - 446.04375 MHz 4 - 149.0875 MHz
5 - 446.05625 MHz 5 - 149.1000 MHz
6 - 446.06875 MHz 6 - 149.1125 MHz
7 - 446.08125 MHz
8 - 446.09375 MHz
Contenuto Confezione
page
GENERALE 40
Contenuto confezione 40
Manutenzione 40
Caratteristiche 40 - 41
FUNZIONI DI BASE 42
Antenna 42
Pacco Batteria 42
On / Off 42
Volume 42
Selettore canale 42
Trasmissione 42
Ricezione 42
Chiave 42
FUNZIONE BLOCCO 43
Tasto Trasmissione PTT 43
Tasto multifunzione 43
Tasto Monitor 43
Squelch 43
TX Power 43
Scan 43
Radio 43
MENU 44 - 48
01 APO (Automatic Power Off) 02 APRO (Funzione Opzionale)
03 BANK (Memory Bank) 04 BATSAV (Funzione salva batteria)
05 BCLO (Busy Ch. Lockout) 06 BEEP (Beep Tone)
07 SCR NO (Scrambler Type) 08 DC VLT (Info Voltaggio)
09 DW
(Visualizzazione Frequenza) 10 LAMP (Luce Display)
11 LOCK (Tasto blocco) 12 MSGSET (Messaggio di benvenuto)
13 NAME (Display Type) 14 NM SET (Nome canale)
15 OFFSET (non disponibile) 16 OPN MSG (accensione schermo)
17 PSWD (Passwort) 18 PSWD W (Password Set)
19 ROGER (Roger Tone) 20 SCN MD (Scan Mode)
21 STE
(fine segnale di trasmissione) 22 TOT (Tempo scaduto)
23 TXSTOP 24 VOX
25 VOX D (Vox Delay Time) 26 VOX S (Sensibilità Vox)
27 VXB (Block Vx on Busy Ch.) 28 WIDNAR (Larghezza di banda)
5-TONI CHIAMATA 49
ACCESSORI JACK 49
CTCSS/DCS 50
SPECIFICAZIONI 51
Page 21

menu
tx power
Funzione salva batteria
VOX
Stato batteria
Codici DCS
Codici CTCSS
beep tono
memory bank, funzione menu
Tasto blocco
Scansione canali in lista
FM radio
monitor while radio
APO
non disponible
non disponible
40 41
ItalianoItaliano
GENERALE
Contenuto confezione
Togliere le parti della radio con attenzione. Si raccomanda di verificare gli elementi prima di
eliminare l’imballo, Se alcuni elementi risultano mancanti o sono stati danneggiati durante il trasporto, si prega con tatto immediatamente il rivenditore.
Accessori
1 x Antenna (fissa per versione PMR) 1 x clip cintura 1 x Batteria
1 x Caricatore 1 x Manuale
Manutenzione
Per prestazioni ottimali e la funzionalità del TeCom-X5, si prega di prestare attenzione
ai seguenti consigli.
Non smontare in nessun caso la radio. Questa operazione può recare danni all’apparato
e non rendere più valida la garanzia.
Per la ricarica della batteria, usare solamente il caricature SLG-TeCom-X5 incluso nella
confezione.
Non esporre mai la radio alla luce diretta del sole o ad alter fonti di calore. Le alte temperature
diminuiscono la longevità di alcuni componenti e le parti in plastica possono deformarsi.
Non conservare mai la radio in luoghi polverosi o sporchi.
Non esporre la radio a qualsiasi liquido, i componenti interni potrebbero corrodersi.
Se la radio dovesse rilasciare odori insoliti o generare calore, togliere immediatamente
la batteria e contattare il rivenditore.
Non trasmettere mai senza l’antenna, la radio potrebbe danneggiarsi.
Caratteristiche
> max. tx power
FreeNet : 500 mW PMR: 500 mW
VHF : 5 W * UHF : 4 W *
> 16 channels available
UHF : 400 - 470 MHz VHF : 136 - 174 MHz
PMR : 8 Canali PMR 446 MHz FreeNet: 6 Canali FreeNet 149 MHz
> lunghezza di banda
FreeNET / PMR: 12.5 kHz
UHF / VHF : 12.5 / 25 kHz
> funzione salva batteria
> scrambler
> FM radio
> 5-toni selettive chiamata
> transmissione blocco canale occupato
> 50 CTCSS and 107 DCS
> tasto blocco
> LCD display retro illuminazione
> Password
> spegnimento automatico(APO) > TOT
> scrambler (otto differenti codici) > VOX
> channel bank store > Ripetitore Tono 1450 Hz / 1750 Hz / 2315 Hz
1
8
7
6
5
4
3
2
9
11
10
13
12
1 - antenna
2 - LCD 2 6
3 - Tasto Up / Down
4 - microfono
5 - On/Off - volume 3 6 - LED 7
7 - altoparlante
8 - Tastiera
9 - PTT 4 8
10 - Tasto multi-functionzione
11 - monitor
12 - connettore jack
13 - batteria (1200 mAh / 7.4 V)
PRI
Page 22

42 43
ItalianoItaliano
FUNZIONI DI BASE
Antenna
A causa dei regolamenti governativi l’antenna è fissa. (non staccabile).
Pacco Batteria
Per collegare la batteria (13) sulla radio. Infilare la batteria nella
parte inferiore della radio, poi premere sulla parte suriore fino a farla
scattare.
Per rimuovere la batteria, premere verso il basso il fermo.
Ricarica
Prima del primo utilizzo, la batteria deve essere caricata per almeno 3 ore, durante la ricarica
il led rosso rimane acceso, a ricarica ultimata si accenderà il led verde.
Una volta terminata la ricarica, togliere la batteria dal caricatore.
On / Off
Per accendere la radio ruotare in senso orario il tasto On / Off (5).
Quando la radio si accende, emette un breve segnale acustico.
Per spegnere la radio bisogna ruotare in senso antiorario il tasto On / Off (5).
Volume Control
Per impostare il volume dopo l’accensione, bisogna tenere premuto il tasto monitor (11) invece
per regolare il volume, ruotare il tasto On/Off-Volume (5).
Selezione Canale
Per selezionare un canale, premere i tasti (8) oppure Up / Down tasto (3).
Per selezionare un canale con la tastiera digitare 3 cifre, es. 001 per il canale 1.
Premendo Up / Down (3), I canali scorrono in ordine, terminato il giro ripartono dal canale 1.
Con la funzione memoria, vengono visualizzati solo I canali memorizzati, per maggiori informazioni vedi pag. 45.
Trasmissione
Per trasmettere, bisogna premere il tasto PTT(9) fino alla fine del messaggio.
Per una migliore qualità del suono, bisogna parlare con voce normale ad una distanza di circa
10 cm dal microfono (4).
Durante la trasmissione rimarrà acceso il led di controllo (6) luce rossa.
A seguito di rilascio del tasto PTT (9) la radio ritorna in modalità di ricezione.
Ricezione
Al momento di ricezione rimarrà acceso il LED (6) luce verde.
Se la frequenza selezionata viene decodificata con un codice CTCSS- / DCS-, tutti i segnali con
un codice diverso non saranno uditi.
FUNZIONE BLOCCO
Tasto PTT
Il tasto PTT (9) è posto sulla parte destra della radio. Preremendo il tasto PTT la radio va in
modalità di trasmissione. Il LED (6) emette una luce verde.
MultiFunzione
Il tasto funzione (10) si trova sotto il tasto PTT (9). Può essere programmato con una di
queste funzioni: trasmettere 5-toni di chiamata
1450 kHz repeater tone
1750 kHz repeater tone
2315 kHz repeater tone
Tasto Monitor
Il tasto monitor (11) si trova sul lato sinistro della radio sotto il tasto multi-funzione (10).
Quando si preme il tasto monitor lo squelce viene disattivato e la radio emette un suono costante.
Con questa funzione è possible udire I segnali molto deboli.
Squelch
Il livello di sensibilità dello squelce può essere impostato da 0 a 9, è completamente
Aperto al livello 0.
Al livello 9, il.
Per impostare il livello squelce, premere il tasto F (tastiera in basso a destra) seguito dal tasto
SQL. Il display mostra SQL X, dove X rappresenta il livello attuale dello squelce (0 - 9).
Impostare Il livellu con I tasti Up / Down (3) e confermare premendo un tasto qualsiasi.
TX Power
Per selezionare la Potenza di trasmissione ci sono tre livelli LOW / MID / HIGH. Nella versione
PMR e FreeNet, il livello di Potenza HIGH è fissato a 500 mW. Nella versione COM, si può
impostare la Potenza desiderata.
Per selezionare un livello (Low / Mid / High), premere il tasto F (sulla tastiera in basso a destra)
Seguito dal tasto PWR (tasto numero 2). Il display mostra il livello attuale impostato. Selezionare
Il livello di Potenza con il tasto UP / Down (3) e confermare premendo un tasto qualsiasi.
Il livello basso di Potenza è indicato sul display con il simbolo LOW.
Scan
Utilizzare la funzione scansione per trovare I canali occupati. I canali possono essere aggiunti
alla Lista reamite software. I canali della lista sono indicati sul display dal simbolo PRI che si
trova accanto al simbolo della batteria.
Per aggiungere o rimuovere un canale dalla lista premere il tasto F (tastiera in basso a destra)
Seguito dal tasto bloc (tasto numero 0).
Per avviare la funzione premere il tasto F (tastiera in basso a destra), seguito dal tasto
scan(tasto 3).
Interrompre la funzione di scansione premendo un tasto qualsiasi, ad eccezione dei tasti Up /
Down (3).
Ci sono tre modalità di scansione disponibili(SE / CO / TO) . Per maggiori informazionisee page 47.
Page 23

44 45
ItalianoItaliano
Radio
Il TeCom-X5 ha una funzione radio. Tramite software, si possono impostare 25 frequenze. E’
anche possible impostare manualmente le frequenze con la tastiera. Per accendere e spegnere
la radio premere il tasto F (tastiera in basso a destra), seguito dal tasto FM numero 8. Il numero
del canale viene visualizzato sul display sopra la frequenza, a condizione che I canali siano stati
programmatic. Per passare alla modalità di frequenza manuale premeri I tasti V/M (tastiera in
basso,A sinistra). Modo manuale frequenza: La stazione radio ha voluto all’interno della gamma
di frequenze 70 MHz a 107,9 MHz, può essereinserita tramite tastiera. E’ anche possibile il passaggio della frequenza in dieci passi Khz con i tasti Up / Down (3). La funzione di scansione può essere utilizzata per trovare un canale occupato. Avviare la funzione premendo il tasto F
(tastiera in basso a destra) seguito dal tasto SCAN (3). Il display legge SCN fin che un canale
occupato non è stato trovato. La funzione di scansione attiva È indicate da un punto lampeggiante accanto alla lettera N. Per interrompere la scansione, premere un tasto qualsiasi.
MENU
Impostazioni generali che possono essere modificate sulla radio.
Seguire I seguenti passi per modificare un impostazione:
1. Per aprire il menu premere il tasto F(in basso a destra), seguito dal tasto sel (9).
2. Selezionare la funzionevoluta con I tasti Up / Down (3).
3. Per accedere alle funzioni disponibili per la funzione selezionata, premere il tasto F (tastiera
in basso a destra).
4. Selezionare l’impostazione con I tasti Up / Down (3).
5. Per confermare l’impostazione premere il tasto FPer confermare e uscire dal menu premere il
tasto V/N (tastiera in basso a sinistra).Se nessun tasto viene premuto per 10 secondi, le
impostazioni vengono automaticamente memorizzate.
Queste funzioni sono disponibili.
01 APO
Automatic Power-OffImpostazioni: Off, 1 - 15 H (hours)La radio si spegne automaticamente
dopo il tempo impostato
02 APRO
Funzioni opzionali
Impostazioni : Off / SCRAMB / COMP
SCRAMB : all’accensione la radio non utilizza la codifica scrambler (1 - 8) che si trova nel
menu 07 SCR NO.
COMP : Il compander migliora la qualità del segnale.
03 BANK
Memory Bank
Settings : No Bank / BANK 1 - 8 (dipendono dalla frequenza programmata)
L’assegnazione delle frequenze, viene fatta automaticamente.
Se questa funzione è disattivata (No Bank), tutti I canali vengono visualizzati nel loro ordine.
Vengono visualizzati solo i canali del banco memorizzato.
BANK 1 : canale 1 - 16 BANK 2 : canale 17 - 32
BANK 3 : canale 33 - 48 BANK 4 : canale 49 - 64
BANK 5 : canale 65 - 80 BANK 6 : canale 81 - 96
BANK 7 : canale 97 - 112 BANK 8 : canale 113 - 128
04 BATSAV
Funzione salva batteria - On / Off
Se nessun segnale è presente sul canale selezionato, la radio passa in modalità standby
05 BCLO
Busy Channel LockOut – e’ un segnale presente sul canale selezionato, la trasmissione è bloccata fino quando il segnale non torna chiaro.
impostazioni: OFF; QT / DCS; WAVE
OFF : Nessun blocco sul canale occupato
WAVE : Blocco su tutti i segnali
QT / DCS : Blocco su segnali con la stessa codifica
06 BEEP
Avviso tono On / Off
Qualsiasi funzione, tranne il tasto PTT e il da un doppio tono. Viene visualizzato sul display con
il simbolo della campana.
07 SCR NO
selezione scrambler tipo SCR 1 - 8
Questa impostazione è rilevante solo quando è attiva la funzione02 APRO.
08 DC VLT
Mostra il livello effettivo della batteria.
09 DW
Funzione monitoraggio canali attivata con - On / Off
Mentre la radio è accesa il canale selezionato è monitorato. Al momento della ricezione
di un segnale, viene disattivato, fino quando il segnale sparisce.
10 LAMP
Illuminazione del display LCD - OFF / KEY / CONT
OFF : illuminazione spenta
KEY : Dopo l’entrata, il display si illumine per 5 secondi.
CONT : l’illuminazione è costante.
Page 24

46 47
ItalianoItaliano
11 BLOCCO
Tasto di blocco
impostazioni: - K + S / PTT / KEY / ALL
Premere il tasto in basso a destra, per attivare/disattivare il blocco tastiera.
Quando è attivato, è segnalato dal simbolo chiave sul display..
K + S : Tutti I tasti principali della tastiera, così come I tasti selezione canali sono bloccati -
PTT, invece il monitor e i tasti funzione sono attivati.
PTT : La trasmissione è blocata - il display mostra P LOCK
KEY : Tutti I tasti della tastiera sono bloccati, mentre sono attivi il tasto PTT e monitor.
ALL : Tutte le funzioni sono bloccate.
12 MSGSET
Programmazione del messaggio di benvenuto.
5 I simboli sono disponibili:
a) blank character,
b) the digits 0 - 9 ,
c) the letters A- Z and
d) il simbolo asterix *, sottolinea _ and plus +.
Selezionare I simboli con il selettore cambio canale.
Per procedure alla stampa premere il tasto9. Per spostare il cursore indietro, premere Il tasto 7.
Per eliminare la stampa premere V/M (Tastiera, in basso a sinistra).
13 Nome
display types are FREQ and ALPHA
ALPHA : La frequenza impostata viene visualizzata con un numero canale, es. CH - 001
FREQ : Il nome del canale memorizzato viene visualizzato sul display.
14 NM SET
Nome canale Il messaggio di benvenuto può contenere massimo cinque simboli:
a) Carattere spazio,
b) Le cifre 0 - 9 ,
c) Le lettere A- Z e
d) i simboli asterix *, sottolineato _ and plus +.
Selezionare I simboli con il tasto cambio canale.
Per procedure alla stampa premere il tasto 9 . Per spostare il cursore indietro, premere il tasto 7.
Per cancellare l'entrata reale premi il tasto V/M (Tastiera, in basso a sinistra).
15 OFFSET
Non disponibile
16 OPN MSG
Messaggio temporaneo dopo l’accensione della radio - OFF / MSG / DC
OFF : Il messaggio non viene visualizzto
MSG : in 12 MSGSET il testo programmato viene visualizzato
DC : voltaggio della batteria
17 PSWD
password - On / Off
Se la funzione è attivata, richiede la password d’ingresso. La password può essere
Programmata tramite software oppure direttamente sulla radio con la funzione 18 PSWD W.
La radio non può essere utilizzata se la password non è corretta.
La password se dimenticata, può essere recuperate tramite software.
18 PSWD W
creazione password
Creare password con almeno 4 cifre da 0 - 9. Confermare premendo il tasto F (sulla tastiera, in
basso a destra).
Per eliminare la password premere il tasto V/M (tastiera in basso a sinistra).
19 ROGER
roger beep - On / Off
Se attivato il roger beep, viene inviato dopo il rilascio del tasto PTT (9).
20 SCN MD
Ci sono tre modalità di scansione:
TO : Time-Operated-Scan - E’ una scansione canali occupati, permette di impostare il tempo di
scansione di un
canale, programmabile tramite software.
CO : Carrier-Operated-Scan - La radio rimane sul canale occupato fino quando riceve il segnale,
poi riparte la scansione.
SE : Search-Scan - Quando trova un canale occupato, termina la scansione.
21 STE
Side Tono Eliminate - On / Off
Utile quando si utilizza un auricolare.
22 TOT
Time-Out-Timer - Off / MIN 1 - 7
Limit ail tempo di trasmissione (1 - 7 minuti). Dopo il tempo impostato La trasmissione viene
interrotta. Per azzerare, premere il tasto PTT.
23 TXSTOP
Blocco trasmissione - ON / OFF
24 VOX
Trasmissione a commando vocale - On / Off
Il VOX permette di operare a mani libere, la trasmissione si avvia automaticamente quando il
segnale vocale raggiunge un certo livello.
25 VOX D
VOX ritardo
Determina quanto la funzione VOX rimane attiva dopo la ricezione del segnale.
impostazioni: 15 : 1 second / 25 : 2 seconds / 35 : 3 seconds / 45 : 4 seconds
Page 25

48 49
26 VOX S
VOX sensibilità
Impostazioni: level 1 - 8;
level 1 = più sensibili, i.e. la trasmissione si avvia facilmente dopo un segnale basso
level 8 = meno sensibile, i.e. per trasmettereil segnale deve essere molto forte
27 VXB
VOX blocco su canale occupato - On / Off
28 WIDNAR
Larghezza di banda – non disponibile
La larghezza di banda, può essere impostata tramite software.
Italiano
5-TONO DI CHIAMATA SELETTIVA
Il TeCom-X5 contiene 5 toni di chiamata selettiva, impostabili tramite software
Descrizioni generali:
Ogni radio viene programmata con un’identificazione individuale ID (5-Tone ID). Questo codice
ID Per codificare e decodificare la radio.
I 5 codici sono inseriti tramite tastiera, in questo modo possono essere inviati senza restrizioni
di memoria.
L’ID personale viene sempre trasmesso con la codifica. Se il codice 5 verrà inviato, verrà
visualizzato dalla radio ricevente se programmata, es. l’altoparlante verrà disattivato e si udirà
un segnale acustico
Importante: Per la funzione di chiamata seletiva il tasto (10) deve essere Impostato su Optional
Signal Call.
CONNETTORE
Il TeCom-X5 ha gli accessory compatibili Kenwood jack (3.5 / 2.5 mm - stereo / stereo)
Si possono collegare cuffie, microfoni e il cavetto di programmazione gli accessori si possono
trovare sul catalogo TEAM.
Page 26

Technische Daten / Specifications / Especificaciones / Caratteristiche
Frequenz Bereich / Frequency Range UHF: 400 - 470 MHZ
Rango de Frecuencia / Range di Frequenza VHF: 136 - 174 MHz
Betriebstemperatur / Working Temperate -20°C - +50°C
Temperatura Funcionamiento / Temperatura di Lavoro
Betriebsspannung / Operating Voltage DC 7.4V
Voltaje Funcionamiento / Voltaggio
Gewicht / Weight / Peso 220g
Antennen Impedanz / Antenna impedance 50Ω
Impedancia de Antena / Antenna Impedenza
Sender / Transmitter / Transmisor / Transmissore
Frequenz Stabilität / Frequency Stability ±2.5PPM
Estabilidad Frecuencia / Stabilità di frequenza
Sendeleistung / Output Power UHF: max 4 W
Potencia RF Portadora / Potere dell'uscita VHF: max. 5 W
Max. Frequenz Hub / Max Frequency Deviation ≤ 2.5kHz (N)
Desviación Máx. Frecuencia / Deviazione ≤ 5kHz (W)
Audio Verzerrung / Audio Distortion ≤ 3%
Deformación Audio / Audio Distorsione
Nachbarkanalleistung / Adjacent Channel Power ≥ 60dB
Potencia de Canal Adyacent / Potere a canale adiacente
Nebenwellen-Abstrahlung / Radiated Harmonics -45dBm
Radiación Espuria / Spurie Radiation
Empfänger / Receiver Receptor / Ricezione
Empfindlichkeit / RF Sensitivity (SINAD) W: 0.223uV>12dB
Sensibilidad / Sensibilità N: 0.223uV>12dB
Audio Verzerrung / Audio Distortion ≤ 3%
Deformación Audio / Audio Distorsione
Nebenkanal Auswahl / Adjacent Channel Selectivity ≥ 60dB
Selección Canal Adyacente / Selettività a canale adiacente
Intermodulation / Intermodulation Rejection ≥ 60dB
Intermodulación / Intermodulazione
Nebenwellenabstrahlung / Spurious radiation ≥ 60dBm
Radiación Espuria / Spurie Radiation
Widerstand / Spurious response rejection ≥ 60dB
Resistencia / Resistance
210 DCS frequency codes N/I
D017 D122 D245 D356 D506 D731
D023 D131 D246 D364 D516 D732
D025 D132 D251 D365 D523 D734
D026 D134 D252 D371 D526 D743
D031 D143 D255 D411 D532 D754
D032 D145 D261 D412 D546
D036 D152 D263 D413 D565
D043 D155 D265 D423 D606
D047 D156 D266 D431 D612
D051 D162 D271 D432 D624
D053 D165 D274 D445 D627
D054 D172 D306 D446 D631
D065 D174 D311 D452 D632
D071 D205 D315 D454 D645
D072 D212 D325 D456 D654
D073 D223 D331 D462 D662
D074 D225 D332 D464 D664
D114 D226 D343 D465 D703
D115 D243 D346 D466 D712
D116 D244 D351 D503 D723
50 CTCSS frequency code (Hz)
67.0 94.8 131.8 171.3 203.5
69.3 97.4 136.5 173.8 206.5
71.9 100.0 141.3 177.3 210.7
74.4 103.5 146.2 179.9 216.1
77.0 107.2 151.4 183.5 225.7
79.7 110.9 156.7 186.2 229.1
82.5 114.8 159.8 189.9 233.6
85.4 118.8 162.2 192.8 241.8
88.5 123.0 165.5 196.6 250.3
91.5 127.3 167.9 199.5 254.1
50 51
Page 27

Zum Vertrieb und Betrieb in
For sale and use in
Para venta y uso en
TeCom-X5 FreeNet : DE
TeCom-X5 PMR : AT, BG, CH, CY, CZ, DE, DK, EE,
ES, FI, FR, GB, GR, HU, IE, IT*, LT,
LU, NL, NO, PL, PT, RO, SE, SI, SK
TeCom-X5 UHF-COM : AT, BG, CH, CY, CZ, DE, DK, EE,
ES, FI, FR, GB, GR, HU, IE, IT*, LT,
LU, NL, NO, PL, PT, RO, SE, SI, SK
TeCom-X5 VHF-COM : AT, BG, CH, CY, CZ, DE, DK, EE,
ES^, FI, FR, GB, GR, HU, IE, IT*, LT,
LU, NL, NO, PL, PT, RO, SE, SI, SK
^ La banda de frecuencias VHF permitida en Espana es de 147 - 174 MHz
* In Italia il passo di canalizzazione a 25 kHz non è consentito
TEAM Electronic GmbH
Bolongarostrasse 88; D-65929 Frankfurt am Main, Germany
phone ++49 / 69 / 300 950 0 - fax ++49 / 69 / 31 43 82
www.team-electronic.de - team-electronic@t-online.de
WEEE - Reg. Nr. DE 91930360 8 ( EAR ), 50635 ( ERA)
GRS-Nr. 10001374
DSD 2617305, ARA2284
Irrtümer und technische Änderungen sind vorbehalten. / Mistakes and technical changes are reserved. (V 01-09)
 Loading...