

Page 1
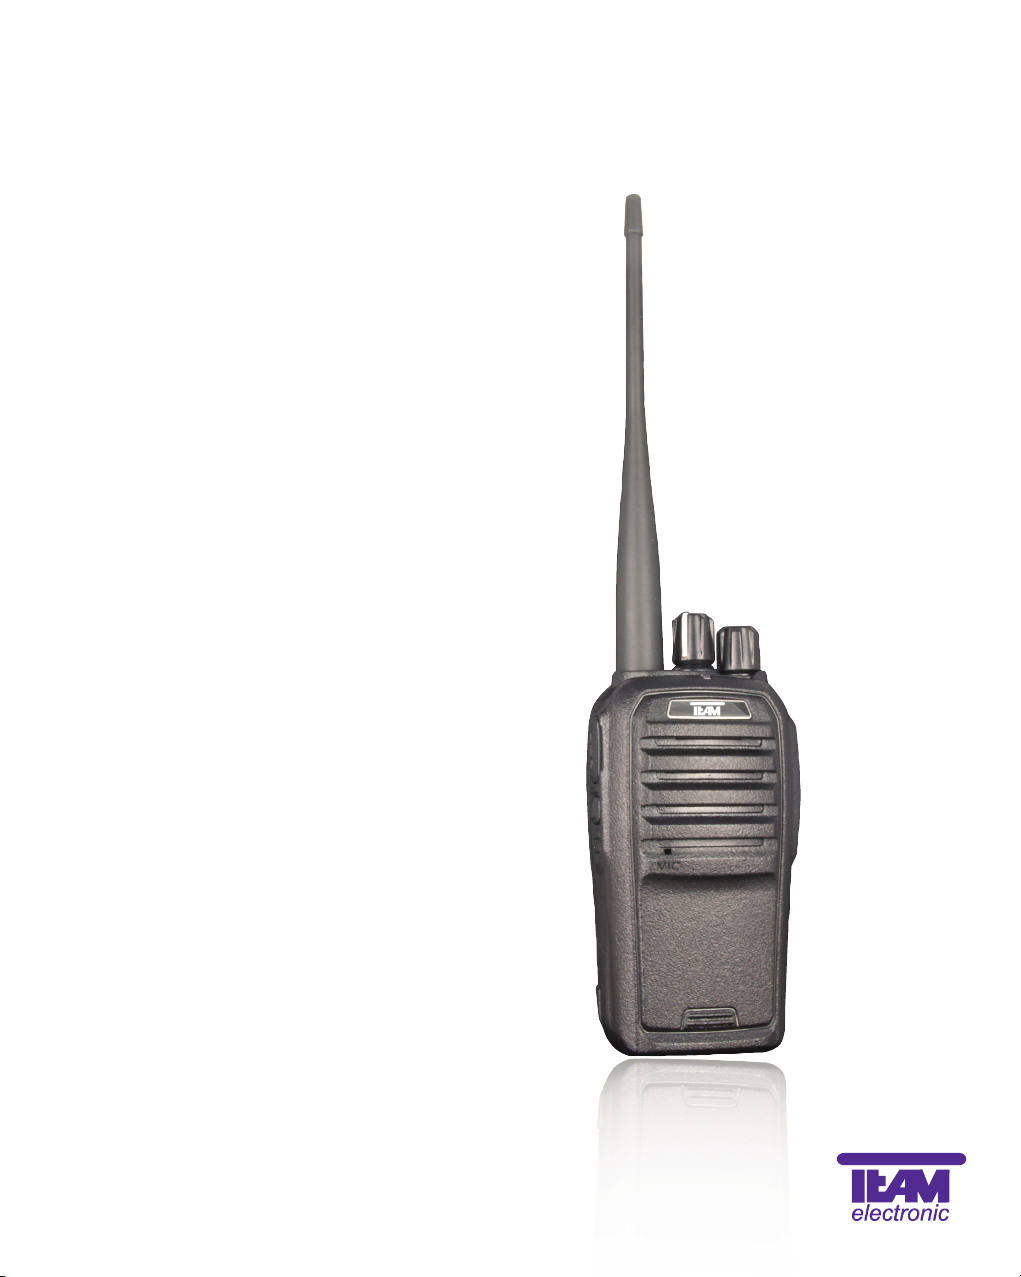
TeCom-SL
Handfunkgerät
Handheld Transceiver
Transceptor Portátil
Ricetrasmettitore Palmare
PMR
FreeNet
UHF
VHF
Bedienungsanleitung
Manual
Manual Instrucciones de Uso
Manual d’Uso
Page 2

Sehr geehrte Kundin, sehr geehrter Kunde,
es freut uns, dass Sie sich für den Kauf eines TEAM TeCom-SL entschieden haben. Um einen
einwandfreien Betrieb zu gewährleisten und um die verfügbaren Funktionen im vollen Umfang
nutzen zu können, bitten wir Sie die nachfolgende Bedienungsanleitung vor Inbetriebnahme des
Gerätes gründlich zu lesen.
Das TeCom-SL ist in den folgenden vier Versionen erhältlich.
TeCom-SL Freenet - Art-Nr. PR8079
Das FreeNet-Funkgerät darf jeder anmelde- und gebührenfrei in den Ländern gemäß der beiliegenden Konformitätserklärung betreiben. Es sind die sechs FreeNet-Kanäle auf 149 MHz mit der
maximal zulässigen Ausgangsleistung von 500 mW programmiert. Eine Veränderung der programmierten Frequenzen, der Sendeleistung oder der Bandbreite des Gerätes ist nicht zulässig und
führt zum Erlöschen der Betriebsgenehmigung.
TeCom-SL PMR - Art-Nr. PR8078
Das PMR-Funkgerät darf jeder anmelde- und gebührenfrei in den Ländern gemäß der beiliegenden Konformitätserklärung betreiben. Es sind die acht PMR-Kanäle auf 446 MHz mit der maximal
zulässigen Ausgangsleistung von 500 mW programmiert. Eine Veränderung der programmierten
Frequenzen, der Sendeleistung oder der Bandbreite des Geräts ist nicht zulässig und führt zum
Erlöschen der Betriebsgenehmigung.
TeCom-SL VHF-COM - Art.-Nr. PR8081
Das Betriebsfunkgerät ist genehmigungs- und gebührenpflichtig und darf nur in den Ländern gemäß
der beiliegenden Konformitätserklärung betrieben werden. Es dürfen nur behördlich genehmigte
Funkfrequenzen zwischen 146-174 MHz, Sendeleistungen und Bandbreiten programmiert werden.
Die Programmierung darf nur von einem autorisierten Fachhändler durchgeführt werden.
TeCom-SL UHF-COM - Art.-Nr. PR8080
Das Betriebsfunkgerät ist genehmigungs- und gebührenpflichtig und darf nur in den Ländern
gemäß der beiliegenden Konformitätserklärung betrieben werden.Es dürfen nur behördlich genehmigte Funkfrequenzen zwischen 450-470 MHz, Sendeleistungen und Bandbreiten programmiert
werden. Die Programmierung darf nur von einem autorisierten Fachhändler durchgeführt werden.
Für die Programmierung des TeCom-SL benötigen Sie die optional erhältliche Software (CD-ROM
für Windows XP und USB-Datenüberspielkabel), erhältlich in den Versionen T-UP22 COM (für die
VHF- und UHF-COM Geräte) und T-UP22 PMR/FN (für die PMR und FreeNet Versionen).
Inhaltsverzeichnis
Seite
ALLGEMEIN
Vor Inbetriebnahme 4
Lieferumfang 4
Pflege 4
Übersicht der Funktionen 4
Bedienelemente 5
GRUNDFUNKTIONEN 6
Anschluss der Antenne 6
Akkupack 6
Laden des Akkupacks 6
Ein- und Ausschalten 6
Einstellen der Lautstärke 6
Kanalwahl 6
Senden 7
Empfang 7
TASTENFUNKTIONEN
PTT Sendetaste 7
Funktionstaste 7
WEITERE FUNKTIONEN
Suchlauf 8
VOX 8
CTCSS/DCS 8
Rauschsperre 8
Warnton 8
Sprachansage 8
Scrambler 9
Compander 9
Epilogue 9
Sendesperre 9
Sendezeitbegrenzung 9
Batteriesparfunktion 9
Incept Alarm 9
Vol Inhibit 9
Bandbreite 9
ANSCHLUSS 9
CTCSS / DCS 34
TECHNISCHE DATEN 35
* = PMR Frequenzen ** = FreeNet Frequenzen
1 - 446,00625 MHz 1 - 149,0250 MHz
2 - 446,01875 MHz 2 - 149,0375 MHz
3 - 446,03125 MHz 3 - 149,0500 MHz
4 - 446,04375 MHz 4 - 149,0875 MHz
5 - 446,05625 MHz 5 - 149,1000 MHz
6 - 446,06875 MHz 6 - 149,1125 MHz
7 - 446,08125 MHz
8 - 446,09375 MHz
2 3
DeutschDeutsch
Page 3
ALLGEMEIN
Vor Inbetriebnahme
Bitte überprüfen Sie die Ware sofort beim Empfang auf Vollständigkeit gemäß der folgenden Liste.
Informieren Sie Ihren Händler sofort bei Unvollständigkeit.
Lieferumfang:
1 x TeCom-SL inkl. Antenne 1 x Ladegerät
1 x Akkupack 1 x Bedienungsanleitung 1 x Gürtelclip
Pflege
Für die optimale Lebensdauer und Funktionstüchtigkeit Ihres Geräts sollten Sie die folgenden
Hinweise beachten.
wVersuchen Sie nicht das Gehäuse zu öffnen. Unsachgemäßes Öffnen des Geräts kann Schäden
zur Folge haben. Des weiteren verlieren Sie jegliche Gewährleistungsansprüche.
wVerwenden Sie zum Laden des Akkupacks nur das im Lieferumfang enthaltene Ladegerät.
wBewahren Sie das Gerät niemals an Plätzen auf die dem direkten Sonnenlicht oder anderen
Hitzequellen ausgesetzt sind. Hohe Temperaturen können die Lebensdauer bestimmter
elektronischer Bauteile beeinträchtigen und Plastikteile können schmelzen.
wBitte bewahren Sie das Gerät nicht in staubigen oder verschmutzen Räumen auf.
wSetzen Sie das Gerät keiner Flüssigkeit aus. Regenwasser oder Feuchtigkeit kann zu einer
Korrodierung der Bauteile und Platinen führen.
wSollte das Gerät ungewöhnlich heiß werden, ungewöhnliche Gerüche abgeben oder es zu einer
Rauchentwicklung kommen, schalten Sie bitte das Gerät sofort ab und entnehmen den
Akkupack. Kontaktieren Sie bitte sofort Ihren Händler.
wSenden Sie niemals ohne Antenne. Eine Beschädigung der Endstufe könnte die Folge sein.
Übersicht der Funktionen
> Max. Ausgangsleistung
FreeNet : 500 mW PMR : 500 mW
VHF : 5 W * UHF : 4 W *
> 16 Kanäle verfügbar
UHF : 450 - 470 MHz VHF : 136 - 174 MHz
PMR : 8 Kanäle PMR 446 MHz FreeNet: 6 Kanäle FreeNet 149 MHz
> Bandbreite
FreeNET / PMR: 12,5 kHz
UHF / VHF : 12,5 / 25 kHz
> Compander
> Scrambler (Sprachverschleierung)
> 39 CTCSS und 83 DCS Kodierungen
> VOX (nur mit angeschlossenem Ohrhörer)
> Kanalsuchlauf
> Alarmton
> Sendezeitbegrenzung
> Batteriesparfunktion
> Signalende-Verbesserung
> Rauschsperre
> Sendeleistung-Umschaltung
> Sendezeitbegrenzung
> Sprachansage
> Warnton
1
6
4
3
2
7
9
8
11
10
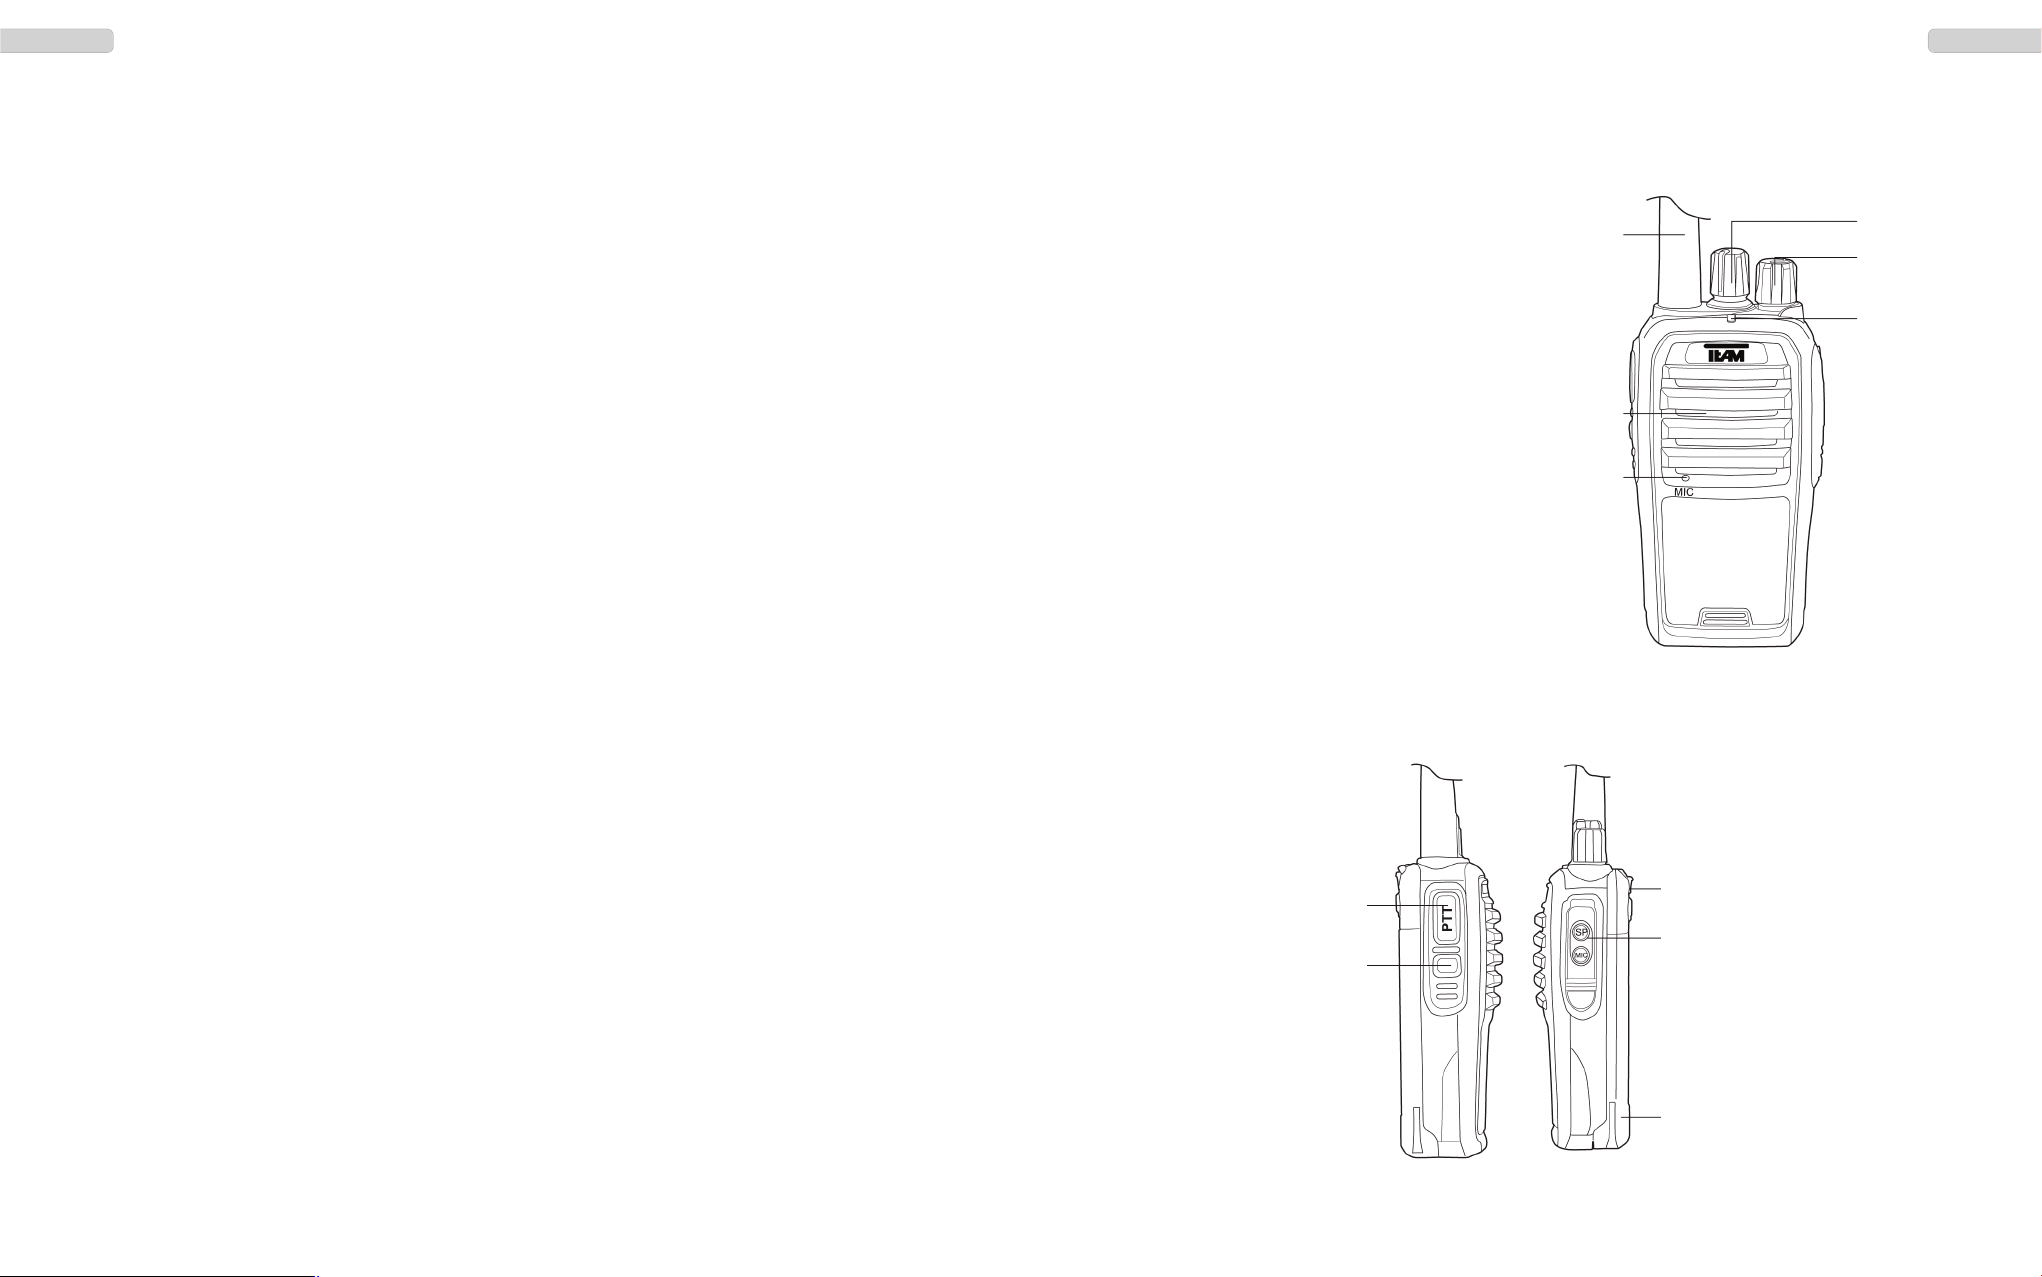
1 - Antenne
2 - Lautsprecher
3 - Mikrofon
4 - Kanalwahldrehschalter
5 - Ein/Aus - Lautstärkeregler
6 - LED Leuchte
7 - PTT Sendetaste
8 - Funktionstaste (Monitor, Alarm,
Sendeleistung)
9 - Batterieverschluss
10 - Anschluss für Ohrhörer-Mikrofon,
PC-Verbindungskabel
11 - Li-Ion Akkupack (1800 mAh / 7,4 V)
4 5
DeutschDeutsch
5
BEDIENELEMENTE
Page 4

GRUNDFUNKTIONEN
Anschluss der Antenne
Hinweis: Wie gesetzlich gefordert, ist in der PMR-Version die Antenne fest mit dem Gerät verbunden.
Bei allen anderen Versionen, den Antennenfuß gerade auf das Gewinde setzen und im
Uhrzeigersinn festdrehen.
Zum Lösen der Antenne, die Antenne gegen den Uhrzeigersinn am Antennenfuß, nicht an der
Spitze, drehen.
Akkupack
Zum Montieren des Akkupacks (11), diesen auf die Führungsschienen am Gerät legen. Dann den
Akkupack, mit dem Daumen zur Geräteoberseite drücken, bis er einrastet.
Um den Akkupack zu entfernen, drücken Sie bitte den Verschluss auf der Rückseite des Gerätes,
welcher mit „PUSH“ beschriftet ist, nach unten und schieben den Akkupack mit dem Daumen der
zweiten Hand aus der Halterung.
Laden des Akkupacks
Vor dem ersten Betrieb sollte der Akkupack komplett geladen werden. Die durchschnittliche Ladedauer beträgt etwa 3 Stunden.
Verbinden Sie das Kabel des Netzadapters mit der Ladeschale und stecken dann den Netzadapter
in eine 220 V Steckdose. In Betriebsbereitschaft leuchtet die LED grün. Stellen Sie nun das Gerät
in die Ladeschale. Achten Sie darauf, dass das Gerät richtig platziert ist. Während des
Ladevorgangs leuchtet die LED rot. Ist der Ladevorgang schaltet die LED auf grün um. Nehmen Sie
das Gerät nach Ende des Ladevorgangs aus der Ladeschale.
Überladen des Akkus verkürzt dessen Lebensdauer.
Ein- und Ausschalten
Um das Gerät einzuschalten, drehen Sie den kombinierte Ein-/Ausschalter und Lautstärkeregler (5)
im Uhrzeigersinn über die Sperre hinweg. Bei aktiviertem Beep-Ton und aktivierter Sprachansage
wird der Einschaltevorgang akustisch bestätigt und der aktuelle Kanal angesagt.
Um das Gerät auszuschalten, drehen Sie bitte den Ein- / Ausschalter (5) gegen den Uhrzeigersinn
über die Sperre hinweg.
Einstellen der Lautstärke
Zum Einstellen der Lautstärke dient der kombinierte Ein-/Ausschalter und Lautstärkeregler (5). Um
nach dem Einschalten die optimale Lautstärke einstellen zu können, drücken Sie bitte die mit der
Monitorfunktion belegte Funktionstaste (8) und stellen mit dem kombinierten Ein-/Aus/Lautstärkeregler (5) die gewünschte Lautstärke ein.
Hinweis: Die Belegung der Funktionstaste wird per Softwareprogrammierung geändert. Es stehen
die Funktionen Alarm, Monitor und Sendeleistungsumschaltung zur Verfügung.
Kanalwahl
Für die Kanalwahl steht der Kanalwahldrehschalter (5) zur Verfügung. Bei aktiviertem Beep-Ton
und aktivierter Sprachansage wird die Kanalwahl akustisch bestätigt und angesagt.
Hinweis:
Bei aktiviertem Kanalsuchlauf, ist der Kanal 16 automatisch mit dieser Funktion belegt und somit
nicht für die Kommunikation verfügbar.
Senden
Zum Senden halten Sie bitte die Sendetaste (7) bis kurz nach Beendigung Ihrer Nachricht gedrückt.
Für eine optimale Signalübertragung sprechen Sie bitte mit mittellauter Stimme in einem Abstand
von ca. 10 cm zum Mikrofon (3).
Während des Sendevorgangs leuchtet die Kontroll-LED (6) rot. Nach dem Loslassen der Sendetaste
kehrt das Gerät automatisch wieder in den Empfangsmodus zurück.
Empfang
Während des Empfangs eines Signales leuchtet die Kontroll-LED (6) grün.
Wenn der Kanal mit einer CTCSS- / DQT-Kodierung belegt ist, werden alle Signale die nicht mit
derselben Kodierung versehen sind stummgeschaltet. Die grüne Kontroll-LED leuchtet, jedoch ist
kein Signal im Lautsprecher hörbar.
TASTENFUNKTIONEN
PTT Sendetaste
Die Sendetaste (7) befindet sich auf der linken Geräteseite. Drücken der Sendetaste aktiviert den
Sendemodus. Während des Sendens leuchtet die LED (6) rot auf.
Funktionstaste
Die Multifunktionstaste (8) befindet sich unterhalb der Sendetaste (7). Sie kann per Software wahlweise mit einer der folgenden Funktionen belegt werden:
Aus
keine Funktionsbelegung
Alarm
Durch Drücken der Funktionstaste (5) wird ein dauerhafter Alarmton am eigenen Gerät ausgelöst
und Sende- und Empfangsbetrieb sind blockiert. Auch nach einem Kanalwechsel bleibt die
Funktion aktiviert.
Zum Abschalten des Alarms erneut die Funktionstaste drücken oder das Gerät ausschalten.
Monitor
Aktivierung der Monitorfunktion deaktiviert die Rauschsperre und das typische Dauerrauschen ist
zu hören. Schwache Signale, die mit aktivierter Rauschsperre ausgefiltert werden, sind nun zu
hören, ebenso CTCSS/DCS kodierte Signale.
Sendeleistung
Die niedrige Sendeleistung (Low) wird durch einen Beep-Ton und die hohe Sendeleistung durch
einen Doppelton (High) angekündigt.
In den Versionen PMR und FreeNet beträgt die hohe Sendeleistung (High) 500 mW. In den
Betriebsfunkversionen kann die max. Sendeleistung, gemäß der Zulassungsurkunde entsprechend, via Software angegepasst werden (UHF max. 4 W und VHF max. 5 W).
6 7
DeutschDeutsch
Page 5

WEITERE FUNKTIONEN
Die Einstellungsänderungen der folgenden Funktionen werden via Software vorgenommen.
Suchlauf
Die Suchlauffunktion wird zum Auffinden von Signalen auf Frequenzen der Kanalsuchlaufliste eingesetzt. Die programmierten Kanäle können per optionaler Software der Kanalsuchlaufliste hinzugefügt werden. Die Suchlauffunktion wird via Sofware aktiviert bzw. deaktiviert.
Bei aktivierter Funktion ist der Kanal 16 mit der Suchlauffunktion belegt. Dieser Kanal ist dann nicht
für die Funkkommunikation verfügbar.
Zum Starten des Kanalsuchlaufs, den Kanalwahldrehschalter (4) auf Kanal 16 stellen. Der aktive
Zustand wird durch ein konstantes grünes Doppelblinken angezeigt. Wird ein besetzer Kanal gefunden, pausiert die Suchlauffunktion und das Gerät verweilt bis nach Signalende für eine gewisse Zeit
auf dem Kanal. Dann wir d die Suchlauffunktion fortgesetzt.
Mit Verlassen des Kanals 16, wird der Kanalsuchlauf beendet.
VOX
Für den sprachgesteuerten Sendebetrieb (VOX) schließen Sie bitte ein passendes OhrhörerMikrofon an die Buchse (10) an. Die Aktivierung und Einstellung der VOX Funktion wird via
Software vorgenommen.
Bei aktiver VOX Funktion schaltet das Gerät automatisch in den Sendebetrieb, sobald das
Sprachsignal einen gewissen Pegel erreicht hat. Die VOX-Empfindlichkeit kann auf einer Skala von
1-9 via Software den individuellen Bedürfnissen angepasst werden. Weiterhin steht eine VOXSendesperre bei Signalempfang zur Verfügung.
CTCSS/DCS
Die 39 CTCSS und 166 DCS Kodierungen (83 x einfach und 83 x umgekehrt) dienen der Blockade
unerwünschter Signale. D.h. bei aktivierter Kodierung werden nur Signale mit der entsprechenden
Kodierung im Lautsprecher hörbar.
Jedem Kanal kann via Software eine Empfangs- und eine Sendekodierung zugewiesen werden.
Hinweis: kodierte Signale sind für andere Teilnehmer unter Umständen hörbar, z.B. mit Hilfe der
Monitorfunktion, und sind somit nicht geeignet für ein privates Funknetz.
Rauschsperre
Via Software kann die Empfindlichkeit der Rauschsperre zwischen 0 und 9 eingestellt werden,
wobei die Stufe 0 der geringsten Empfindlichkeit entspricht. Die Rauschsperre ist bei dieser
Einstellung komplett geöffnet. Auf Stufe 9 muss das Signal sehr stark sein um die Rauschsperre zu
deaktivieren.
Warnton
Bei aktivierter Warntonfunktion wird das jede Einstellungsänderung am Gerät, d.h. Einschalten und
das Umschalten des Kanals durch einen kurzen Beepton bestätigt.
Diese Funktion wird via Software aktiviert bzw. deaktiviert.
Sprachansage
Bei aktivierter Sprachansage wird die Kanalnummer nach dem Umschalten in englischer Sprache
angesagt. Ebenso wird mit der Ansage: „Please charge the battery.“ auf den geringen Ladezustand
des Akkus hingewiesen. Diese Funktion wird via Software aktiviert bzw. deaktiviert.
Scrambler
Die Sprachverschleierung (Scrambler) ist via Software für jeden Kanal individuell einstellbar.
Bei aktiver Scrambler Funktion ist das verschlüsselte Signal für Empfänger ohne passende
Entschlüsselung schlecht verständlich, d.h. sehr stark verzerrt. Somit wird das Mithören anderer
Teilnehmern, welche nicht als Empfänger bestimmt sind erschwert.
Hinweis: Da es allgemein verschiedene Scrambler-Verschlüsselungsraten gibt, kann es mit Geräten
anderer Hersteller oder anderen Modellen Kompatibilitätsprobleme geben.
Compander
Für die Signal-Optimierung steht die Compander Funktion, d.h. sendeseitige Kompression und
empfangsseitige Expansion, zur Verfügung. Diese Funktion kann für jeden Kanal individuell via
Software aktiviert bzw. deaktiviert werden.
Epilogue
Eine weitere Funktion für die Signaloptimierung steht mit der Epilogue-Funktion zur Verfügung.
Eventuell auftretende Störgeräusche am Ende des Signals, wie z.B. Klickgeräusche, können reduziert
werden. Diese Funktion ist individuell für jeden Kanal einstellbar.
Sendesperre
Diese Funktion verhindert das versehentliche Senden auf besetzten Kanälen. Wird die Sendetaste (7)
während des Empfangs eines Signales auf dem aktuell eingestellten Kanal gedrückt, ertönt bei aktivierter Warnton-Funktion eine lauter Beepton und der Sendemodus ist blockiert. Die Sendesperre (Busy
Lock) kann für jeden Kanal individuell via Software aktiviert bzw. deaktiviert werden.
Sendezeitebegrenzung
Allgemein: Im Sendebetrieb ist der Stromverbrauch höher als im Empfangs- bzw. Ruhezustand.
Überlanges Senden reduziert somit die Akku-Kapazität sehr schnell und erhitzt das Gerät übermäßig. Um überlanges Senden zu verhindern, kann die max. Sendezeit via Software zwischen 15 und
600 Sekunden in 15-Sekunden-Intervallen eingestellt werden.
Batteriesparfunktion
Zwecks Stromsparung kann die Umschaltung in den StandBy-Betrieb gesteuert werden. Via
Software sind die Auswahlmöglichkeiten 1:1, 1:2; 1:3 und 1:4 verfügbar.
Incept Alarm
Nach dem Empfang eines Signals ertönt ein lauter Warnton, der den Benutzer, welcher sich nicht in
unmittelbarer Nähe des Funkgerätes befindet, über den Signalempfang informiert. Ein- und
Ausschaltung dieser Funktion geschieht via Software.
Bandbreite
Für die Betriebsfunkversionen UHF- und VHF-COM sind via Software die Bandbreiten 12,5 kHz (Narrow),
20 kHz (Middle) und 25 kHz (Wide) wählbar. In Deutschland sind für den Betriebsfunk 20 kHz Bandbreite
vorgeschrieben.
ANSCHLUSS
Das TeCom-SL verfügt über eine Kenwood-kompatible Anschlussbuchse (10) für den Anschluss
von Zubehör, wie z.B. Ohrhörer-Mikrofone (3,5/2,5 mm - Stereo/Stereo) und das PC-Übertragungskabel für die Software. Passendes Zubehör finden Sie auf der Webseite www.team-electronic.de.
8 9
DeutschDeutsch
Page 6

10 11
EnglishEnglish
Dear Customer,
We are proud that you decided to purchase a TEAM TeCom-SL. Please read the following instructions prior to the first use for your safety, a smooth operation of the radio and full knowledge of
your radios capabilities.
The TeCom-SL is available in these four versions:
TeCom-SL FreeNet : programmed with 6 FreeNet** channels, 500 mW tx power,
PR8079 bandwidth 12.5 kHz, no registration or fees apply
TeCom-SL PMR : programmed with 8 PMR* channels, 500 mW tx power,
PR8078 bandwidth 12.5 kHz, no registration or fees apply
TeCom-SL UHF-COM : commercial radio; 256 channels programmable; registration and
PR8088 fees apply; only assigned frequencies and parameters are allowed
to be programmed; bandwidth 12.5 / 20 / 25 kHz;
max. TX power 4 W; UHF 400 - 470 MHz
TeCom-SL VHF-COM : commercial radio; 256 channels programmable; registration and
PR8081 fees apply; only assigned frequencies and parameters are allowed
to be programmed; bandwidth 12.5 / 20 / 25 kHz;
max. TX power 5 W; VHF 136 - 174 MHz
Programming of the TeCom-SL is done via the additional software T-UP22. A USB data transfer
cable is included in the scope of delivery. The software is available in the versions T-UP22 COM
for the commercial versions VHF- and UHF-COM and T-UP22 PMR/FN for PMR and FreeNet.
* = PMR Frequencies ** = FreeNet Frequencies
1 - 446.00625 MHz 1 - 149.0250 MHz
2 - 446.01875 MHz 2 - 149.0375 MHz
3 - 446.03125 MHz 3 - 149.0500 MHz
4 - 446.04375 MHz 4 - 149.0875 MHz
5 - 446.05625 MHz 5 - 149.1000 MHz
6 - 446.06875 MHz 6 - 149.1125 MHz
7 - 446.08125 MHz
8 - 446.09375 MHz
Table of Contents
page
GENERAL
prior to first use 12
scope of delivery 12
maintenance 12
overview of the functions 12
elements 13
BASIC FUNCTIONS
antenna connection 14
battery pack 14
charging of the battery 14
on / off 14
volume 14
channel selection 14
transmission 15
reception 15
KEY FUNCTIONS 15
PTT transmission key 15
function key 15
ADDITIONAL FUNCTIONS
scan 16
VOX 16
CTCSS/DCS 16
squelch 16
warn tone 16
voice annunciation 16
scrambler 17
compander 17
epilogue 17
transmission blockage 17
time-out-timer 17
battery saving functions 17
incept alarm 17
vol inhibit 17
bandwidth 17
CONNECTION 17
CTCSS / DCS 34
SPECIFICATIONS 35
Page 7

12 13
EnglishEnglish
GENERAL
Scope of Delivery
Unpack the equipment carefully. Identify and check the listed items. Keep packaging, manual and
declaration of conformity in a save place. If any items have been damaged during shipment or are
missing, please contact your dealer immediately.
Supplied Accessories
1 x antenna (attached with PMR version) 1 x belt clip 1 x battery pack
1 x charger 1 x manual
Maintenance
For best performance and functionality of the TeCom-SL, please pay attention to the following advices.
w Do not open the case of the radio. Improper opening may cause damages and warranty claims
are forfeited.
w For charging of the rechargeable battery pack, only use the charger SLG-TeCom-SL that is inclu-
ded in the scope of delivery.
w Never expose the radio to direct sunlight or other heat sources. High temperatures will diminish
the longevity of certain components and plastic parts may melt and deform.
w Never store the radio in dusty or dirty areas.
w Do not expose the radio to any liquid. Humidity max cause corrosion of the pcb and its compo-
nents.
w Should the radio generate unusual heat or emit unusual smell or even smoke, please turn the
radio off immediately and remove the battery pack. Contact your dealer.
w Never transmit without antenna. A damage of the power amplifier may be the result.
Overview of the Functions
> Max. tx power
FreeNet : 500 mW PMR : 500 mW
VHF : 5 W * UHF : 4 W *
> 16 channels available
UHF : 450 - 470 MHz VHF : 136 - 174 MHz
PMR : 8 channels PMR 446 MHz FreeNet: 6 channels FreeNet 149 MHz
> bandwidth
FreeNET / PMR: 12.5 kHz
UHF / VHF : 12.5 / 20 / 25 kHz
> compander
> scrambler
> 39 CTCSS and 83 DCS codes
> VOX (only with connected earphone)
> scan
> alarm tone
> busy lock
> battery saving function
> epilogue function
> squelch
> tx power switch
> time out timer
> voice annunciation
> warn tone
1 - antenna
2 - speaker
3 - microphone
4 - channel selector knob
5 - on/off - volume control
6 - LED light
7 - PTT transmit key
8 - function key (monitor, alarm,
tx power switch)
9 - battery pack latch
10 - connection for ear-/microphone,
pc-connection cable,
11 - Li-Ion battery pack (1800 mAh / 7,4 V)
1
6
4
3
2
7
9
8
11
10
5
Page 8

14 15
EnglishEnglish
BASIC FUNCTIONS
Antenna
Due to governmental regulations, with the PMR version the antenna is fixed, i.e. non-detachable. All
other versions have a detachable antenna. To mount antenna, place the antenna-base onto the
connection thread at the top of the radio, and turn tight in clockwise direction.
For detachment, turn the antenna at the base - not at the tip - counterclockwise.
Battery Pack
To mount the battery pack (11) onto the radio, place the grooves at the rear of the battery pack onto
the battery compartment of the radio-case and push the battery pack into final position until it locks in.
To remove the battery pack, press down the latch (9) and slide the battery pack out of its position.
Charging
Prior to first use, the battery pack (11) has to be fully charged. A complete charging cycle takes
approximately 5 hours.
Connect the cable of the power supply with the base of the charger before connecting with a 220 V
plug. The green LED should light up. Now, place the radio with the attached battery pack (11) into
the charger. Pay attention to proper placement. During the charging process, the LED lights red.
Once charging is completed, the LED lights green. Take the radio out of the base. Overcharging
reduces the battery packs longevity.
On / Off
To switch on the radio, turn the combined on/off-volume switch (5) clockwise beyond the barrier. If
the warn tone and the voice annunciation are activated, a beep tone is emitted and the actual channel number is announced.
To switch off the radio, turn the on/off-volume knob (5) counterclockwise beyond the barrier.
Volume Control
Use the combined on/off-volume knob (5) for volume control. Turning clockwise increases the volume level and turning counterclockwise reduces it.
To set a comfortable volume level after turning the radio on, hold the function key (8) - key has to
be programmed with the monitor function - while adjusting the volume level with the combined
on/off-volume switch (5).
Note:
The function key (8) can be programmed via software with one of these functions: monitor, tx-power
high/low and alarm.
Channel Selection
For channel selection use the channel selector (5). If the warn tone and the voice annunciation are
activated, a beep tone is emitted and the actual channel number is announced once the channel
has changed.
Note:
The scan function operates on channel 16. When scan is activated, channel 16 is no longer available for radio communication.
If no frequency is programmed on the selected channel, a constant warn tone is audible.
Transmit
For transmission press the PTT key (7) until the end of the message.
For best sound quality, talk into the microphone (3) at a middle volume level at a distance of approximatly 10 cm. During transmission the control LED (6) lights red.
Upon release of the PTT key (7) the radio returns automatically into reception mode. Once a signal
is present on the selected frequency, the LED lights green.
Reception
Once a signal is present on the selected frequency, the LED lights green.
Note:
If the selected frequency is decoded with a CTCSS-/DCS-code, all signals that are encoded with a
different code will be muted. The green LED will light but no signal will be audible.
KEYPAD FUNCTIONS
PTT Key
The PTT key (7) is located at the left side of the radio. Pressing the PTT key will activate transmission mode. The LED (6) will light red.
Function Key
The function key (8) is located under the PTT key (7). It can be programmed with one of these
functions:
Off
no function available
Alarm
By pressing the function key (5) a constant alarm tone is audible. Transmission and reception
modes are blocked and alarm remains active upon change of channel. To turn off the alarm, press
the function key (5) or turn the radio off.
Monitor
The monitor function deactivates the squelch and the typical constant noise is audible. Weak
signals that would not pass the squelch and signals that are CTCSS/DCS encoded can be heard
with the monitor function.
TX Power
The low tx power is indicated by a single warn tone and the high tx power by a double-tone.
Note:
With the versions PMR and FreeNet, the low tx power are fixed to 300 mW and the high value to
500 mW. With the COM versions the max. tx power is 4 W for UHF and 5 W for VHF. The low
and high tx power values can be set via software according to the commercial radio licence.
Page 9

16 17
EnglishEnglish
ADDITIONAL FUNCTIONS
The following functions are managed via software. This applies to activation and change of settings.
scan
The scan function searches signals on the programmed frequencies that are added to the scan list.
A programmed channel can be added or deleted from the scan list via software.
If the scan function is actived, channel 16 is reserved for this function and communication is no longer possible on this channel.
To start the scan function, select channel 16 with the channel selector (4). The active scan mode is
indicated by a constant, blinking green double-light. Once a signal is detected, the scan function is
paused and the radio remains on the channel until the end of the signal. Then, after a certain time,
the scan function continuous.
To end the scan function leave channel 16 by switching to another channel.
VOX
VOX, the voice-activated transmission mode, is available with a connected ear-microphone only.
This function needs to activated via software.
As soon as the voice reaches a certain volume level, transmission starts automatically, no pushing
of the PTT key is required. The VOX sensitivity can be set according to the individual need in the
range between 1-9.
To deactive the VOX function while receiving signals, the function VOX Inhibit can be activated.
CTCSS/DCS
39 CTCSS and 166 DCS (83 plus 83 reversed) codes are available to filter-out unwanted signals,
i.e. with activated CTCSS/DCS coding, only signals with the matching code are audible. Signals
with differing codes are muted.
Each channel can be assigned to one CTCSS/DCS code for the transmission frequency and one
code for the reception frequency.
Note: CTCSS/DCS does not guarantee privacy. Encoded signals are received by radios that do not
use CTCSS/DCS. Also, using the monitor function makes CTCSS/DCS encoded signals audible.
squelch
The squelch sensitivity can be set via software, on a scale between 0 and 9. With the value 0, the
squelch is turned off and the entire frequency is audible. With value 9, only the strongest signals
will pass through the filter.
warn tone
A short beep tone is audible when another channel is selected or when the radio is turned on.
The warn tone function has to be activated via software.
voice annunciation
With activated voice annunciation, the selected channel is announced in english language. A critically low battery level is announced with the wording „Please charge the battery.“
Activate and deacitvate this function via software.
scrambler
The scrambling function can be assigned to each individual channel via software.
When transmitting, the scrambling function removes a certain frequency part of the signal. For
receivers without activated scrambler, the signal sounds distorted and voice messages are often not
understandable. When receiving, the scrambling function adds the removed frequency part to the
signal and, therefore, the signals sounds complete.
Note: Since there are many different scrambling procedures, the scrambler function from differing
radio models or radios from different manufacturers might not be compatible.
compander
For signal improvement, the compander function compresses the signal upon transmission and
expands it upon reception. This function can be activated for each channel individually.
epilogue
A further signal improvement function is the epilogue function. Sometimes disturbing noises at the
end of the signal, e.g. a clicking sound, can be surpressed with this function.
This function can be activated for each channel individually.
busy lock
This function prevents transmission during reception of a signal. When the PTT key is pushed while
a signal is present on the selected channel, transmission is blocked and a warn tone is emitted.
This function can be activated for each channel individually.
time-out-timer
In general, the power consumption in transmission mode is higher than in reception or standby mode.
Further, overlong transmission reduces the battery capacity quicker and the radios temperature
increases quicker.
To prevent overlong transmission, the time-out-timer can be set via software between 15 and 600
seconds in 15-seconds-steps.
battery save
The battery save function prolongs the battery capacity by switching to the standby mode in the
avaiable ratios 1:1, 1:2; 1:3 and 1:4.
incept alarm
If the radio has to be placed out-of-reach and the operator wants to be informed about an incoming call,
the incept alarm function can be activated via software. After the receipt of a call, a loud warning tone is
emitted to inform the radio operator, who might be in further distance from the radio, about the call.
bandwidth
For the commercial radio version UHF and VHF, the bandwidths 12.5 kHz (narrow), 20 kHz (middle)
and 25 kHz (wide) can be selected via software. For the PMR and FreeNet version, the bandwidth 12.5
kHz is fixed.
CONNECTION
The TeCom-SL is equipped with a Kenwood compatible connector (3.5/2.5 mm - Stereo/Stereo) for
earphone/microphones and also the pc connection cable for the software T-UP22. Accessory can
be found on our website www.team-electronic.de.
Page 10

18 19
EspañolEspañol
Estimado cliente,
Gracias por adquirir el TeCom-SL TEAM. TEAM Electronic es conocido por la gran calidad de sus
aparatos de radiocomunicación.
Para entender todas las funciones, los posibles ajustes y para asegurar el funcionamiento adecuado de la radio, le recomendamos que lea este manual antes de utilizar la radio.
El TeCom-SL está disponible en estas cuatro versiones:
PR8079 TeCom-SL FreeNet : programado con 6 canales FreeNet**, potencia TX 500 mW,
ancho de banda 12,5 kHz. No necesita licencia ni pago de tasas.
PR8078 TeCom-SL PMR : programado con 8 canales PMR*, potencia TX 500 mW,
ancho de banda 12,5 kHz. No necesita licencia ni pago de tasas.
PR8088 TeCom-SL UHF : radio comercial; 256 canales programables. Necesita licencia y
pago de tasas. Solo se permite la programación de las frecuencias
y parámetros asignados. Ancho de banda: 12,5 / 20 / 25 kHz;
máx. Potencia TX: 4 W; UHF 400 - 470 MHz.
PR8081 TeCom-SL VHF : radio comercial; 256 canales programables; registro y pago de
tasas obligatorios. Sólo se permite la programación de las
frecuencias y parámetros asignados. Pasos: 12,5 / 20 / 25 kHz; máx.
potencia TX 5 W; VHF 136 - 174 MHz
La programación del TeCom-X5 se hace mediante software adicional T-UP22. La entrega incluye un
cable de transferencia de datos. El software está disponible en las versiones T-UP22 COM para las
radios comerciales VHF y UHF- COM; y el T-UP22 PMR/FN para PMR y FreeNet.
* = Frecuencias PMR ** = Frecuencias FreeNet
1 - 446.00625 MHz 1 - 149.0250 MHz
2 - 446.01875 MHz 2 - 149.0375 MHz
3 - 446.03125 MHz 3 - 149.0500 MHz
4 - 446.04375 MHz 4 - 149.0875 MHz
5 - 446.05625 MHz 5 - 149.1000 MHz
6 - 446.06875 MHz 6 - 149.1125 MHz
7 - 446.08125 MHz
8 - 446.09375 MHz
Tabla de contenidos
Página
GENERAL
Antes del primer uso 20
Embalaje 20
Mantenimiento 20
Vista general de las funciones 20 - 21
FUNCIONES BÁSICAS
Conexión de la antena 22
Pack de Baterías 22
Carga de la batería 22
On / off 22
Volumen 22
Selección de canal 22
Transmisión 23
Recepción 23
FUNCIONES DE LAS TECLAS
Tecla de transmisión PTT 23
Tecla función 23
FUNCIONES ADICIONALES
Escaneo 24
VOX 24
CTCSS/DCS 24
Squelch 24
Tono de aviso 24
Aviso por voz 24
Secrafonía 25
Compresor 25
Epílogo 25
Bloqueo de transmisión 25
Time-out-timer 25
Funciones ahorro de batería 25
Incept alarm 25
Inhibición del volumen 25
Espaciado de canal 25
CONEXIÓN 25
CTCSS / DCS 34
ESPECIFICACIONES 35
Page 11

20 21
EspañolEspañol
GENERAL
Embalaje
Desembale el equipo con cuidado. Por favor, compruebe que estén todos los elementos de la lista
antes de deshechar el embalaje. Si le falta alguno de ellos o viene dañado, pongáse en contacto
inmediatamente con el proveedor.
Accesorios suministrados
1 x Antena (fija en la versión PMR) 1 x Clip 1 x Batería
1 x Cargador 1 x Manual
1 x manual
Mantenimiento
Para un funcionamiento y una funcionalidad óptima del TeCom-SL, le aconsejamos lo siguiente:
No abra el chasis de la radio. Abrirlo inadecuadamente podría causar daños que no cubriría la
garantía del aparato.
Para cargar el pack de baterías recargables, utilice sólo el cargador SLG-TeCom-SL incluido en el
paquete.
No exponga nunca la radio a los rayos del sol u otras fuentes de calor. Las altas temperaturas
podrían acortar la vida de algunos de los componentes y las partes de plástico podrían derretirse
y deformarse.
No coloque nunca la radio en zonas con altos niveles de polvo o suciedad.
No exponga la radio a ningún líquido. La humedad podría causar corrosión de la PCB y sus
componentes.
Si la radio genera una calor inusual o emite un olor o humo, por favor, apáguela inmediatamente y
extraiga la batería. A continuación, póngase en contacto con su distribuidor.
No transmite nunca sin antena; podría producirse un daño irreversible.
Vista general de las Funciones
> máx. potencia tx
FreeNet : 500 mW PMR : 500 mW
VHF : 5 W * UHF : 4 W *
> 16 canales disponibles
UHF : 450 - 470 MHz VHF : 136 - 174 MHz
PMR : 8 canales PMR 446 MHz FreeNet: 6 Canales FreeNet 149 MHz
> Separación entre canales
FreeNET / PMR : 12.5 kHz
UHF / VHF : 12.5 / 20 / 25 kHz
> Compresor
> Secrafonía
> 39 Códigos CTCSS y 83 DCS
> VOX (solo con auricular conectado)
> Escaneo
> Tono de alarma
> Bloqueo ocupado
> Función ahorro de batería
> Función epílogo
> Squelch
> Conmutador de potencia TX
> Time-out-Timer
> Aviso por voz
> Tono de aviso
1 - Antena
2 - Altavoz
3 - Micrófono
4 - Selector canal rotatorio
5 - On/Off & Control Volumen
6 - LED
7 - Pulsador PTT
8 - Botón de función (monitor, alarma,
interruptor de potencia de transmisión)
9 - cierre de pack de baterías
10 - conexión para auricular/micrófono para
cable de conexión a PC
11 - Pack de baterías Li-Ion (1800 mAh/7,4 V)
1
6
4
3
2
7
9
8
11
10
5
Page 12

FUNCIONES BÁSICAS
Antena
Debido a regulaciones gubernamentales, la antena en la versión PMR es fija, es decir, no se puede
extraer del aparato. Para montar la antena, coloque la base de antena en la rosca de conexión en
la parte superior de la radio, y gire con fuerza en el sentido de las agujas del reloj.
Para desmontarla, gire la antena desde la base – no desde la punta- en el sentido contrario a las
agujas del reloj.
Batería
Para colocar la batería (11) en la radio, coloque los pins situados en la parte trasera de la batería
en el compartimento de la batería, dentro de la carcasa de la radio y presione la batería por la
posición final hasta que encaje.
Para extraer la batería, presione el cierre hacia abajo (9) y extráigala.
Carga
Antes del primer uso, deberá cargar el pack de batería (11) al completo. Una carga completa dura
aproximadamente 5 horas.
Conecte el cable de alimentación a la base del cargador antes de conectarlo a una toma de 220 V.
El LED verde se iluminará. A continuación, coloque la radio con el pack de batería incluido (11) en el
cargador. Por favor, compruebe que esté colocada adecuadamente. Durante el proceso de carga, el
LED se iluminará en rojo. Una vez se haya completado la carga, el LED se volverá a iluminar en
verde. Extraiga la radio de la base, ya que la sobrecarga reduce la longevidad de la batería.
On / Off
Para encender la radio, gire el conmutador de volumen on/off (5) en el sentido de las agujas del
reloj hasta la raya. Si el tono de aviso y el aviso por voz están activados, se emitirá un tono beep y
se visualizará el número de canal actual.
Para apagar la radio, gire el botón de volumen on/off en el sentido contrario a las agujas del reloj
hasta la raya.
Control del volumen
Utilice el botón combinado de volumen on/off (5) para el control de volumen. Girándolo en el sentido de las agujas del reloj aumentará el nivel de volumen y girándolo en el sentido contrario, lo disminuirá.
Para establecer un nivel de volumen confortable después de encender la radio, mantenga pulsada
la tecla función (8) – la tecla se tiene que programar previamente con la función monitor- mientras
ajusta el nivel de volumen con el conmutador de volumen combinado on/off (5).
Nota: La tecla función (8) se puede programar mediante software con una de estas funciones:
monitor, potencia TX high/low y alarma.
Selección de canal
Para seleccionar un canal utilice el selector de canal (5). Si el tono de aviso y el aviso por voz
están activados, se emitirá un tono beep y el número de canal actual se podrá visualizar una vez
que el canal ha cambiado.
Nota: La función escaneo funciona en el canal 16. Cuando la función escaneo está activada, el
canal 16 no estará disponible para la radiocomunicación. Si no se ha programado ninguna frecuencia en el canal seleccionado, se escuchará un tono de aviso continuo.
Transmisión
Para transmitir pulse la tecla PTT (7) hasta el final del mensaje.
Para una mejor calidad de sonido, hable por el micrófono (3) a un nivel de volumen medio a una
distancia de aproximadamente 10 cm. Durante la transmisión el control LED (6) se iluminará en
rojo.
Al soltar la tecla PTT (7) la radio volverá automáticamente al modo recepción. Una vez la señal
esté presente en la frecuencia seleccionada, el LED se iluminará en verde.
Recepción
Una vez que una señal esté presente en la frecuencia seleccionada, se iluminará el LED en verde.
Nota: Si la frecuencia seleccionada está descodificada con un código CTCSS / DCS, todas las
señales que estén codificadas con un código diferente se silenciarán. El LED en verde permanecerá iluminado, pero no habrá ninguna señal audible.
FUNCIONES DEL TECLADO
Tecla PTT
La tecla PTT (7) está situada en la parte izquierda de la radio. Pulsando la tecla PTT se activará el
modo transmisión. El LED se iluminará en rojo.
Tecla Función
La tecla función (8) está situada debajo de la tecla PTT (7). Se puede programar con una de estas
funciones:
Off
Ninguna función disponible
Alarma
Pulsando la tecla función (5) se escuchará un tono de alarma continuo. Los modos transmisión y
recepción estarán bloqueados y la alarma permanecerá activa hasta cambiar de canal. Para
desactivar la alarma, pulse la tecla función (5) o apague la radio.
Monitorización
La función Monitorización desactiva el squelch, con lo que se escuchará el típico ruido continuo.
Las señales débiles que no pasen el squelch y las señales que están codificadas con códigos
CTCSS/DCS se podrán escuchar con la función monitorización.
PotenciaTX
La potencia baja TX se indica con un sólo tono de aviso y la alta, con un tono doble.
Nota: para las versiones PMR y FreeNet, la potencia baja TX está establecida en 300 mW y la alta,
en 500 mW. Con las versiones COM, la máxima potencia TX es de 4 W para UHF y 5 W para
VHF. Los valores de las potencias bajas y altas TX se pueden establecer mediante software, de
acuerdo a la licencia de radio comercial.
22 23
EspañolEspañol
Page 13

FUNCIONES ADICIONALES
Las funciones siguientes son las que se controlan mediante software, lo que significa activar y
cambiar ajustes.
Escaneo
La función escaneo busca señales en las frecuencias programadas que se añadirán a la lista de
escaneos. Un canal programado se puede añadir o eliminar de la lista de escaneo mediante software.
Si la función escaneo está activa, el canal 16 estará reservado para esta función y la comunicación
no será posible en este canal.
Para comenzar la función escaneo, seleccione el canal 16 con el selector de canal (4). El modo de
escaneo activo se indicará mediante una doble iluminación parpadeante en verde. Una vez que se
haya detectado la señal, la función escaneo se detendrá y la radio permanecerá en el canal hasta
el final de la señal. Entonces, después de un periodo determinado de tiempo, continuará la función
escaneo.
Para finalizar la función escaneo salga del canal 16 cambiando a otro canal.
VOX
VOX, el modo de transmisión activado por voz, estará disponible con sólo un microauricular. Esta
función se debe activar mediante software.
Tan pronto como la voz alcance un cierto nivel de volumen, la transmisión empieza automáticamente, es decir, no necesitará pulsar la tecla PTT. La sensibilidad del VOX puede establecerse de
acuerdo a las necesidades de cada persona dentro del rango de 1-9.
Para desactivar la función VOX mientra recibe señales, la función Inhibir VOX puede activarse.
CTCSS/DCS
Hay 39 códigos CTCSS y 166 DCS (83 plus 83 reversos) para filtrar las señales indeseadas, p. ej
con codificación CTCSS/DCS activada, sólo señales con código coincidentes serán audibles. Las
señales con códigos distintos se silenciarán.
Cada canal puede asignarse a uno de los códigos CTCSS/DCS para la frecuencia de transmisión y
un código para la frecuencia de recepción.
Nota: Los códigos CTCSS/DCS no garantizan privacidad. Las radios reciben señales codificadas
que no utilizan estos códigos. También, el uso de la función monitorización hace que los las señales codificadas CTCSS/DCS sean audibles.
Squelch
La sensibilidad del squelch se puede establecer mediante software en una escala de entre 0 y 9.
Con el valor 0, el squelch se apagará y la frecuencia entera será audible. Con el valor 9, sólo las
señales más fuertes se filtrarán.
Tono de aviso
Se escuchará un tono beep corto cuando otro canal sea seleccionado o cuando la radio se encienda. La función tono de aviso se deberá activar mediante software.
Aviso por voz
Con el aviso por voz activado, el canal seleccionado se anunciará en el idioma inglés. Cuando el
nivel de la batería es bajo, le avisará con la frase “Por favor, cargue la batería”.
Esta función se activa y desactiva mediante software.
Secrafonía
La función secrafonía se puede asignar a cada uno de los canales mediante software.
Al transmitir, la función secrafonía elimina una cierta parte de la señal. Para receptores sin la
secrafonía activada, la señal se escuchará distorsionada y los mensajes de voz podrían no
entenderse muy bien. Al recibir, la función secrafonía añade la parte de frecuencia eliminada
a la señal, con lo cual la señal se escuchará completamente.
Nota: ya que hay diferentes procedimientos de secrafonía, la función secrafonía de diferentes modelos de radio o radios de diferentes proveedores podría no ser compatible.
Compresor
Para una mejora en la señal, la función Compresor comprime la señal hasta la transmisión y
la expande hasta la recepción. Esta función se puede activar para cada uno de los canales.
Epílogo
La función Epílogo es una función que mejora mucho más la señal. A veces, los ruidos molestos al final de la señal, como un chasquido, se puede suprimir con esta función.
Esta función se puede activar para cada uno de los canales.
Bloqueo ocupado
Esta función previene la transmisión durante la recepción de una señal. Cuando la tecla PTT está
pulsada mientras una señal está presente en el canal seleccionado, la transmisión se bloqueará y
se emitirá un tono de aviso. Esta función se puede activar para cada uno de los canales.
Time-out-timer
En general, el consumo de potencia en modo de transmisión es más elevado que en recepción o en modo standby. Además, las transmisiones prolongadas reducen la capacidad de la
batería mucho más rápido y la temperatura de las radios aumenta también más rápido.
Para prevenir transmisiones prolongadas, el time-out-time puedes establecerse mediante
software entre 15 y 600 segundos en pasos de 15 segundos.
Ahorro de batería
La función de ahorro de batería prolonga la capacidad de la batería pulsando el modo
standby en los ratios disponibles 1:1, 1:2; 1:3 y 1:4.
Alarma incept
Si la radio se ha de colocar fuera del alcance del operador y éste quiere estar informado de
las llamadas entrantes, la función Alarma Incept puede activarse mediante software.
Después de la recepción de una llamada, se emitirá un tono de aviso alto para informar al
operador, el cual podría estar situado a una gran distancia de la radio, de la llamada.
Espaciado de canales
Para la radio comercial versión UHF y VHF, los espaciados de canales 12,5 kHz (estrecho),
20 kHz (medio) y 25 kHz (ancho) pueden seleccionarse mediante software. Para las versiones PMR y FreeNet, el espaciado de canales es fijo a 12,5 kHz.
CONEXIÓN
El TeCom-SL viene equipado con un conector compatible con Kenwood (3,5/2,5 mm –
Estéreo/Estéreo) para auriculares/microauriculares y también con cable de conexión a PC
para el software T-UP22.
24 25
EspañolEspañol
Page 14

26 27
ItalianoItaliano
Gentile cliente,
Nel congratularci con voi per l’acquisto del ricetrasmettitore TEAM TeCom-SL, raccomandiamo di
leggere questo manuale prima dell’uso, per la vostra sicurezza, la conoscienza e il buon funzionamento della radio.
Il TeCom-SL è disponibile nelle seguenti versioni:
TeCom-SL FreeNet : programmabile con 6 canali FreeNet**, 500 mW tx power,
PR8079 larghezza di banda 12.5 kHz, nessuna registrazione uso libero
TeCom-SL PMR : programmabile con 8 canali PMR*, 500 mW tx power,
PR8078 larghezza di banda 12.5 kHz, nessuna registrazione uso libero
TeCom-SL UHF-COM : commercial radio; 256 canali programmabili
PR8088 utilizzo solamente con frequenze assegnate.
Larghezza di banda 12.5 / 20 / 25 kHz;
max. TX power 4 W; UHF 400 - 470 MHz
TeCom-SL VHF-COM : commercial radio; 256 canali programmabili
PR8081 utilizzo solamente con frequenze assegnate.
Larghezza di banda 12.5 / 20 / 25 kHz;
max. TX power 5 W; VHF 136 - 174 MHz
La programmazione del TeCom-SL viene effettuata utilizzando il software T-UP22. Il cavo usb per
il trasferimento dati è incluso nella confezione del software. Il software è disponibile nelle versioni
T-UP22 COM per la versione commerciale VHF- UHF-COM e T-UP22 PMR/FN per PMR e
FreeNet.
* = Frequenze PMR ** = Frequenze FreeNet
1 - 446.00625 MHz 1 - 149.0250 MHz
2 - 446.01875 MHz 2 - 149.0375 MHz
3 - 446.03125 MHz 3 - 149.0500 MHz
4 - 446.04375 MHz 4 - 149.0875 MHz
5 - 446.05625 MHz 5 - 149.1000 MHz
6 - 446.06875 MHz 6 - 149.1125 MHz
7 - 446.08125 MHz
8 - 446.09375 MHz
Contenuto
pagina
GENERALE
Primo utilizzo 28
Dotazione 28
Manutenzione 28
Panoramica delle funzioni 28 29
FUNZIONI DI BASE
Connessione antenna 30
battery pack 30
carica della batteria 30
on / off 30
volume 30
selezione canali 30
trasmissione 30
ricezione 31
FUNZIONI TASTI
PTT 31
Funzioni tasti 31
FUNZIONI AGGIUNTIVE
scan 32
VOX 32
CTCSS/DCS 32
squelch 32
tono 32
annuncio vocale 32
scrambler 32
compander 33
epilogo 33
blocco trasmissione 33
time-out-timer 33
funzione salva batteria 33
allarme 33
larghezza di banda 33
CONNESSIONI 33
CTCSS / DCS 34
CARATTERISTICHE 35
Page 15

28 29
ItalianoItaliano
GENERALE
Contenuto della confezione
Disimballare il contenuto con attenzione. Identificare e controllare gli elementi indicati.
Conservare la confezione, il manuale e la dichiarazione di conformità in un luogo sicuro. Se
qualche elemento risulta danneggiato o mancante, contattare immediatamente il rivenditore.
Accessori in dotazione
1 x antenna (fissa per la versione PMR) 1 x clip cintura 1 x batteria
1 x caricatore 1 x manuale
Manutenzione
Per ottenere migliori prestazioni con il TeCom-SL, si prega di fare attenzione alle seguenti
avvertenze.
- Non aprire l’involucro della radio. Questa operazione potrebbe danneggiarla e cessare la
validità della garanzia.
- Per la ricarica della batteria utilizzare solamente il caricatore originale SLG-TeCom-SL
incluso nella confezione.
- Non esporre la radio alla luce diretta del sole o fonti di calore, l’esposizione diretta potrebbe causare danni ai componenti di pastica.
- Non conservare la radio in ambienti sporchi o polverosi.
- Non tenere la radio in zone umide, l’umidità potrebbe provocare la corrosione di alcuni
componenti.
- Se la radio dovesse generare calore, fumo e odore, togliere immediatamente la batteria e
contattare il rivenditore.
- Non trasmettere senza antenna, la Radio Potrebbe danneggiarsi.
Descrizione delle funzioni
> Max. tx power
FreeNet : 500 mW PMR : 500 mW
VHF : 5 W * UHF : 4 W *
> 16 canali disponibili
UHF : 450 - 470 MHz VHF : 136 - 174 MHz
PMR : 8 canali PMR 446 MHz FreeNet: 6 canali FreeNet 149 MHz
> larghezza di banda
FreeNET / PMR: 12.5 kHz
UHF / VHF : 12.5 / 20 / 25 kHz
> compander
> scrambler
> 39 codici CTCSS e 83 DCS
> VOX (solo con il micro auricolare)
> scan > squelch
> tono d’allarme > tx power switch
> blocco > time out timer
> funzione salva batteria > voce
> epilogo > tono
1 - antenna
2 - speaker
3 - microfono
4 – manopola selettore canale
5 - on/off - volume
6 - LED light
7 - PTT
8 – funzioni tasti (monitor, allarme,
tx power switch)
9 – blocco batteria
10 – connessione microfono, pc.
11 - Li-Ion battery pack (1800 mAh / 7,4 V)
1
6
4
3
2
7
9
8
11
10
5
Page 16

30 31
ItalianoItaliano
FUNZIONI DI BASE
Antenna
L’antenna nella versione PMR è fissa(per legge) non staccabile. Tutte le altre versioni hanno l’antenna staccabile. Per montare l’antenna, posizionarla sulla filettatura e ruotarla in senso orario.
Per staccarla, ruotare in senso antiorario.
Batteria
Per montare la batteria(11), posizionare le scanalature sul retro della batteria e spingerla contro la
radio. Per rimuoverla premere il fermo(9) e far scorrere la batteria.
Ricarica
Prima del primo utilizzo, la batteria(11) deve essere completamente carica. Il ciclo completo di carica dura circa 5 ore.
Collegare il cavo di alimentazione alla base prima di connettere la spina alla presa 220V. Il Led
verde si accende, poi posizionare la batteria. Durante la carica il Led è di colore rosso.
Quando la carica è completata il led acceso è di colore verde. Togliere la radio dalla base.
On / Off
Per accendere la radio, ruotare il tasto on/off-volume (5) in senso orario. Se il tono vocale è attivato
la radio emetterà un suono e annuncerà il numero del canale attuale.
Per spegnere la radio, ruotare il tasto on/off-volume (5) in senso anti-orario.
Volume Control
Utilizzare il tasto on/off-volume (5) per il controllo del volume. Per alzare il livello ruotare il tasto in
senso orario, ruotando il tasto in senso contrario il volume si riduce .
Per impostare il livello di volume dopo aver acceso la radio, tenere premuto il tasto funzione (8).
Note:
Il tasto funzione (8) può essere programmato via software con una di queste funzioni: monitor, txalta / bassa potenza e di allarme.
Selezione Canale
Per la selezione dei canali, utilizzare il tasto (5). Se il tono vocale è attivo, una voce annuncerà il
numero del canale selezionato.
Note:
La funzione di scansione opera sul canale 16. Quando la scansione è attivata, il canale 16 non è
più disponibile per la comunicazione radio.
Se verrà selezionato il canale 16, si udirà un tono costante.
Trasmissione
Per trasmettere premere il tasto PTT (7) fino alla fine del messaggio.
Per una migliore qualità del suono, parlare nel microfono (3) ad un livello di volume medio ad una
distanza di circa 10 cm. Durante la trasmissione il LED rosso di controllo (6) sarà acceso.
Al rilascio del tasto PTT (7) la radio ritorna automaticamente in modalità di ricezione. Una volta che
un segnale è presente sulla frequenza selezionata si accende la luce LED verde.
Ricezione
Ogni volta che un segnale è presente sulla frequenza selezionata, si accende il LED verde.
Note:
Se la frequenza selezionata viene decodificata con un codice CTCSS-/DCS, tutti i segnali che vengono codificati con un codice diverso non verranno uditi. Il LED verde si accende ma nessun segnale è udibile.
FUNZIONI TASTIERA
TASTO PTT
IL tasto PTT (7) è posizionato sul lato sinistro della radio. Tenendo premuto il tasto PTT si attiverà la trasmissione. Il LED rosso(6) si accenderà.
Tasto funzione
Il tasto funzione (8) si trova sotto il tasto PTT (7). Può essere programmato con una di queste
funzioni.
Off
Nessuna funzione
Allarme
Premendo il tasto (5) si udirà un tono costante di allarme. Modalità di trasmissione e ricezione
sono bloccati e l'allarme rimane attivo in caso di cambio canale. Per disattivare l'allarme, premere il tasto funzione (5) o spegnere la radio.
Monitor
La funzione di controllo disattiva lo squelch e il tipico rumore costante è udibile. I segnali deboli
che non passano lo squelch e quelli codificati CTCSS / DCS possono essere ascoltati con la
funzione monitor.
TX Power
La bassa potenza tx è indicata da un unico segnale e l'alta potenza tx da un doppio tono.
Nota: Con la versione PMR e Freenet, la bassa potenza tx è a 300 mW e l'alta di 500 mW. Con
le versioni COM il max. tx potenza è 4 W per UHF e 5 W per VHF. I bassi valori di potenza e di
alta TX possono essere impostati via software secondo la licenza radio commerciale.
Page 17

32 33
ItalianoItaliano
FUNZIONI AGGIUNTIVE
Le seguenti funzioni sono gestite via software. Questo vale per l'attivazione e la modifica delle
impostazioni.
scan
Ricerca i segnali sulle frequenze programmate che vengono aggiunti alla lista di scansione. Un
canale programmato può essere aggiunto o eliminato dalla lista di scansione via software.
Se la funzione di scansione è attivata, il canale 16 è riservato per questa funzione e la comunicazione non è più possibile su questo canale. Per avviare la funzione di scansione, selezionare il
canale 16 con il selettore di canale (4). La modalità di scansione attiva è indicata da una luce lampeggiante verde. Una volta che viene rilevato un segnale, la funzione di scansione è in pausa e la
radio rimane sul canale fino al termine del segnale. Poi la scansione continua.
Per terminare la funzione di scansione passare a un altro canale.
VOX
VOX, l’attivazione della trasmissione tramite voce è disponibile solamente con il micro-auricolare
collegato. Questa funzione viene attivata via software.
Non appena la voce raggiunge un certo livello di volume, la trasmissione inizia automaticamente,
nessuna spinta del tasto PTT è richiesta. La sensibilità è impostata secondo necessità nel range
tra 1-9.
CTCSS/DCS
39 CTCSS e 166 DCS (83 più 83) codici sono disponibili per filtrare i-segnali indesiderati, cioè con
CTCSS attivo / codifica DCS, solo i segnali con il codice corrispondente sono udibili. I segnali con
codici diversi sono disattivati.
Ciascun canale può essere assegnato ad un codice CTCSS / DCS per la frequenza di trasmissione
e un codice per la frequenza di ricezione.
Nota: CTCSS / DCS non garantiscono la privacy. I Segnali codificati sono ricevuti da radio che non
utilizzano CTCSS / DCS.
squelch
La sensibilità dello squelch può essere impostata via software, su una scala tra 0 e 9. Con il valore
0, il silenziamento viene spento e la frequenza intera è udibile. Con valore 9, soltanto i segnali più
forti passeranno attraverso il filtro.
Tono di avviso
Un breve segnale acustico viene emesso quando un canale viene selezionato o quando la radio
viene accesa.
La funzione di segnale di avviso deve essere attivato via software
Annuncio vocale
Con l’annuncio vocale, il canale selezionato viene annunciato in lingua inglese. Un livello di batteria
quasi scarica è annunciato con la dicitura "Si prega di caricare la batteria."
Attivare e disattivare questa funzione via software.
compander
Per il miglioramento del segnale, la funzione compander comprime il segnale dopo la trasmissione
e lo espande alla ricezione. Questa funzione può essere attivata per ogni canale.
epilogo
Un ulteriore funzione di miglioramento del segnale è la funzione epilogo. Talvolta il segnale potrebbe essere disturbato, ad esempio da un ticchettio.
Questa funzione può essere attivata per ogni canale.
busy lock (blocco)
Questa funzione impedisce la trasmissione durante la ricezione di un segnale. Quando il tasto PTT
viene premuto mentre è presente un segnale sul canale selezionato, la trasmissione viene bloccata
e viene emesso un segnale. Questa funzione può essere attivata per ogni canale.
time-out-timer
In generale, il consumo di energia in modalità di trasmissione è superiore che in ricezione o standby. Inoltre, la trasmissione overlong riduce la capacità della batteria più rapidamente e la temperatura della radio aumenta rapidamente.
Per prevenire la trasmissione troppo lunga, il time-out-timer può essere impostato via software tra
15 e 600 secondi.
battery save (risparmio batteria)
La funzione di risparmio della batteria prolunga la capacità della batteria passando alla modalità di
attesa in rapporti 1:1, 1:2, 1:3 e 1:4
allarme
Se la radio deve essere posizionato fuori portata dell'operatore e vuole essere informato su una
chiamata in arrivo, la funzione di allarme può essere attivata via software. Dopo la ricezione di una
chiamata, viene emesso un segnale forte per informarlo.
Bandwidth (larghezza di banda)
Per la radio versione commerciale UHF e VHF, la larghezza di banda 12.5 kHz, 20 kHz e 25 kHz
può essere selezionata via software. Per la versione PMR e Freenet, la larghezza di banda 12,5
kHz è fissa.
CONNESSIONI
Il TeCom-SL è dotato di un connettore compatibile Kenwood (3.5/2.5 mm - Stereo / Stereo) per auricolare / microfono e cavo di collegamento PC per il software T-UP22. (Accessorio opzionale).
Page 18

34 35
ItalianoItaliano
Technische Daten / Specifications / Especificaciones / Caratteristiche
Frequenz Bereich / Frequency Range UHF: 400 - 470 MHZ
Rango de Frecuencia / Range di Frequenza VHF: 136 - 174 MHz
Betriebstemperatur / Working Temperate -20°C - +50°C
Temperatura Funcionamiento / Temperatura di Lavoro
Betriebsspannung / Operating Voltage DC 7.4V
Voltaje Funcionamiento / Voltaggio
Gewicht / Weight / Peso 220g
Antennen Impedanz / Antenna impedance 50Ω
Impedancia de Antena / Antenna Impedenza
Sender / Transmitter / Transmisor / Transmissore
Frequenz Stabilität / Frequency Stability ±2.5PPM
Estabilidad Frecuencia / Stabilità di frequenza
Sendeleistung / Output Power UHF: max 4 W
Potencia RF Portadora / Potere dell'uscita VHF: max. 5 W
Max. Frequenz Hub / Max Frequency Deviation ≤ 2.5kHz (N)
Desviación Máx. Frecuencia / Deviazione ≤ 5kHz (W)
Audio Verzerrung / Audio Distortion ≤ 3%
Deformación Audio / Audio Distorsione
Nachbarkanalleistung / Adjacent Channel Power ≥ 60dB
Potencia de Canal Adyacent / Potere a canale adiacente
Nebenwellen-Abstrahlung / Radiated Harmonics -45dBm
Radiación Espuria / Spurie Radiation
Empfänger / Receiver Receptor / Ricezione
Empfindlichkeit / RF Sensitivity (SINAD) W: 0.223uV>12dB
Sensibilidad / Sensibilità N: 0.223uV>12dB
Audio Verzerrung / Audio Distortion ≤ 3%
Deformación Audio / Audio Distorsione
Nebenkanal Auswahl / Adjacent Channel Selectivity ≥ 60dB
Selección Canal Adyacente / Selettività a canale adiacente
Intermodulation / Intermodulation Rejection ≥ 60dB
Intermodulación / Intermodulazione
Nebenwellenabstrahlung / Spurious radiation ≥ 60dBm
Radiación Espuria / Spurie Radiation
Widerstand / Spurious response rejection ≥ 60dB
Resistencia / Resistance
83 DCS frequency codes N/I
D023 D114 D174 D315 D445 D631
D025 D115 D205 D331 D464 D632
D026 D116 D223 D343 D465 D654
D031 D125 D226 D346 D466 D662
D032 D131 D243 D351 D503 D664
D043 D132 D244 D364 D506 D703
D047 D134 D245 D365 D516 D712
D051 D143 D251 D371 D532 D723
D054 D152 D261 D411 D546 D731
D065 D155 D263 D412 D565 D732
D071 D156 D265 D413 D606 D734
D072 D162 D271 D423 D612 D743
D073 D165 D306 D431 D624 D754
D074 D172 D311 D432 D627
39 CTCSS frequency code (Hz)
67.0 88.5 114.8 151.4 203.5
69.3 91.5 118.8 156.7 210.7
71.9 94.8 123.0 162.2 218.1
74.4 97.4 127.3 167.9 225.7
77.0 100.0 131.8 173.8 233.6
79.7 103.5 136.5 179.9 241.8
82.5 107.2 141.3 186.2 250.3
85.4 110.9 146.2 192.8
Page 19

Zum Vertrieb und Betrieb in
For sale and use in
Para venta y uso en
TeCom-SL FreeNet : DE
TeCom-SL PMR : AT, BG, CH, CY, CZ, DE, DK, EE,
ES, FI, FR, GB, GR, HU, IE, IT, LT,
LU, NL, NO, PL, PT, RO, SE, SI, SK
TeCom-SL UHF-COM : AT, BG, CH, CY, CZ, DE, DK, EE,
ES, FI, FR, GB, GR, HU, IE, IT*, LT,
LU, NL, NO, PL, PT, RO, SE, SI, SK
TeCom-SL VHF-COM : AT, BG, CH, CY, CZ, DE, DK, EE,
ES^, FI, FR, GB, GR, HU, IE, IT*, LT,
LU, NL, NO, PL, PT, RO, SE, SI, SK
^ La banda de frecuencias VHF permitida en Espana es de 147 - 174 MHz
* In Italia il passo di canalizzazione a 25 kHz non è consentito
TEAM Electronic GmbH
Bolongarostrasse 88; D-65929 Frankfurt am Main, Germany
phone ++49 / 69 / 300 950 0 - fax ++49 / 69 / 31 43 82
www.team-electronic.de - team-electronic@t-online.de
WEEE - Reg. Nr. DE 91930360 8 ( EAR ), 50635 ( ERA )
GRS-Nr. 10001374
DSD 2617305, ARA 2284
Irrtümer und technische Änderungen sind vorbehalten. / Mistakes and technical changes are reserved. (V 09-12)
 Loading...