

Team Electronic TeCom-PRO Freenet, PR8102, TeCom-PRO, PR8029, TeCom-PRO Commercial User Manual
Page 1
TeCom-PRO
TeCom-PRO
FreeNet
Funkgerät / Radio
FreeNet
Funkgerät / Radio
Bedienungsanleitung
Manual
TeCom-PRO
TeCom-PRO
VHF Betriebsfunkgerät
Commercial Radio
VHF Betriebsfunkgerät
Commercial Radio
Page 2

24
25
Advanced Functions 31
Channel Mode 31
Scan all Available Channels (01) 31
Scan Priority Channels (02) 31
VOX Sensitivity (03) 31
TX Power (04) 32
Squelch (05) 32
Scrambler (06) 32
Background Light On / Off (07) 32
Background Color (08) 33
Conrmation Tone On / Off (09) 33
ANI (Automatic Number Identication) On / Off (10) 33
Key Lock (11) 33
Time-Out-Timer (12) 34
Scan Types (13) 34
Voice Annunciation (14) 34
Name (15) 34
Frequency Mode 35
RX-TX Frequency Difference (15) 35
CTCSS-Code RX and TX (16) 35
CTCSS-code RX (18). 35
CTCSS- / DCS-Code RX (17) 35
CTCSS/DCS TX-Code (18) 36
+/- Shift Up (19) 36
Frequency Steps (20) 36
Programming Mode 36
1. Channel Number 37
2. Reception Frequency 37
3. CTCSS/DCS RX-Code 37
4. Transmitting Frequency 38
5. CTCSS/DCS TX-Code 38
6. Busy Channel Lockout 38
7. Priority Channel Scan 38
8. TX Power HI/LO 38
9. Bandwidth 38
10. Name 38
CCIR Selective Call 38
Diagrams 39
Functions in Channel Mode 39
Additional Functions in Frequency Mode 40
CTCSS/DCS Codes 41
Specications 41
GENERAL 26
Unpacking 26
Maintenance 26
Legend - Control Elements and Other Parts 27 - 28
MANUAL 29
Basic Functions 29
Antenna 29
Battery Pack 29
Turn Power On / Off 29
Adjustment of Volume 29
Transmit 29
Emergency Alarm 29
Calling Tone 29
Key Lock 29
Frequency Inversion 30
Store Manually Set Frequency 30
Delete Stored Frequency 30
Delete all Settings of the Frequency Mode 30
Delete all Settings 31
1750 kHz Call Tone 31
Dear Customer,
Thank you for purchasing a TEAM brand handheld transceiver. Please read his manual to ensure
proper use and a long life of your radio.
The TeCom-PRO is available in two versions:
TeCom-PRO Freenet – Item No. PR8102
The FreeNet version is only permitted in Germany. It does not require a licence and no fees apply.
It is programmed with the six FreeNet channels on 149 MHz and a Tx power of max. 500 mW.
With this version, it is not permitted to change any settings of the frequencies, the Tx power or the
bandwidth.
TeCom-PRO (COM) - Item No. PR8029
The commercial version requires a licence, to be obtained at your country’s governmental agency in
charge of telecommunication, and fees apply. The radio can only be programmed to the approved
frequencies, Tx power and bandwidth by an authorized TEAM dealer.
For the list of countries, where the TeCom-PRO can be used, see the declaration of conformity.
Thank you & best regards,
TEAM Electronic GmbH
Page 3
26
27
GENERAL
Unpacking
Carefully unpack the giftbox and check the content for completeness. If any items are missing or
damaged, please contact your dealer immediately.
Scope of Delivery:
1 x TeCom-PRO
1 x SMA-Antenna
1 x Battery Pack
1 x Charger-Mould and Adapter
1 x Belt Clip
1 x Manual
Maintenance
Please follow these instructions for your radios longevity.
Please do not open the radio. Damages may occur.
For charging the battery pack of the TeCom-PRO, please use only the charger that is included
in the scope of delivery.
Do not expose the radio to direct sunlight or heat. High temperatures can shorten the life of
certain electronic parts in your radio. Further, plastic parts can be deformed.
Please do not store the radio in dusty or dirty areas.
Always keep the radio dry. Please do not expose your TeCom-XP to liquids of any kind, corriosion of the
electronic circuits can occur.
In case the radio omits smoke or an unusual smell or is very hot, please turn the radio off and
remove the battery pack instantly. Contact your dealer immediatly.
Never transmit without an antenna. A damage of the power amplier may occur.
Features
+ Max. Output Power FreeNet : 500 mW / VHF COM : 5 Watt
+ 128 Programmable Channels
+ Channel Spacing FreeNet : 12.5 kHz / Commercial Version 12.5 / 25 kHz
+ Automatic Numbering Identication (ANI) code
+ VOX-Function
+ All Channel Scan
+ Priority Channel Scan
+ Scrambler Function
+ Three Color LCD Backlight
+ Emergency Alarm
+ PC-Programmable
+ 50 CTCSS and 105 DQT Codes ( Normal / Inversed )
+ Time-Out-Timer ( TOT )
+ Busy Channel Lockout
+ CCIR 5-Tone Selective Calling
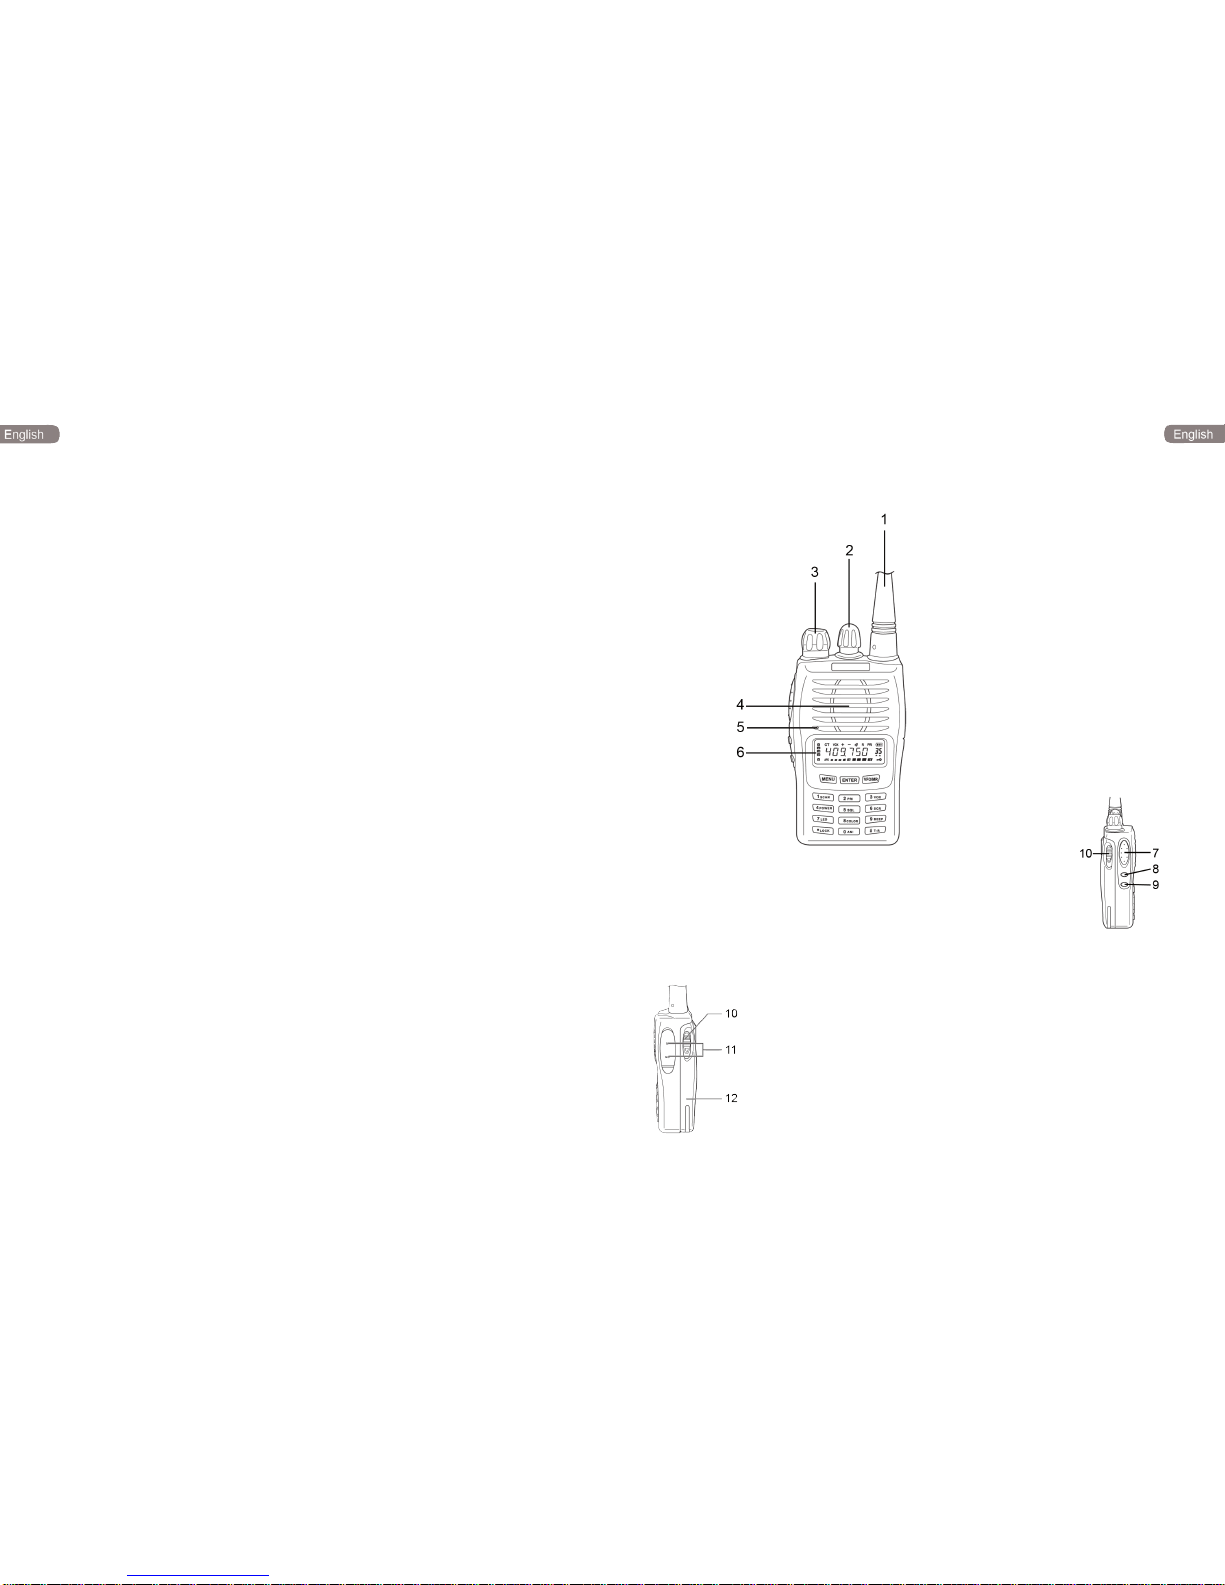
1 Antenna
2 Rotary Channel Selector
3 ON / OFF and Volume Knob
4 Speaker
5 Microphone
6 LC Display
7 PTT key
8 Monitor key
9 Call key
10 Battery Pack Lock
10 Battery Pack Lock
11 Jacks for external Ear- / Microphone
12 Battery Pack
Legend - Controls and Other Parts
Page 4

28
29
MANUAL
Basic Functions
Antenna
Place the base of the antenna into the SMA socket and turn the antenna clockwise until it ts tight.
To remove the antenna turn the antenna counter-clockwise.
Battery Pack
To attach the battery pack to the radio, place the leading parts into the holes an the bottom of the radio.
Next, press the battery pack at the upper part (belt clip holder) against the radio until the battery pack
locks in.
To remove the battery pack from the radio, push down the clips on the left and right side of the battery
pack with your thumb and index nger until the battery pack is released.
Turn Power On / Off
To power on the radio, turn the On / Off switch clockwise beyond the barrier. A beep tone will be heard
followed by the words „Power On“ and the actual channel number if the functions beep tone and voice
annunciation have been activated. In the LC display all available function symbols can be seen for
approximatly 1 seconds.
To power off the radio, turn the On / Off switch counter-clockwise above the barrier.
Adjustment of Volume
To be able to set a comfortable volume level after turning the radio on, keep holding the monitor key
while adjusting volume to the desired level.
Transmit
To transmit, keep pressing the PTT key until you are nished with your message. For best sound
qualitiy, speak with a middle loud voice with a distance of approximately 4 inches to the microphone.
During transmission, the control LED lights up red.
After release of the PTT key, the radio return to reception mode.
Emergency Alarm
To send the emergency alarm, press the monitor key and the call key simultaneously. The alarm will
sound on the transmitting radio and on all receiving radios that are set to the same channel. To stop
the emergency alarm press the PTT key.
Calling Tone
To send a calling tone, hold the calling tone key for 2 seconds. Receiving radios set to same channel
and code will receive the calling tone.
Key Lock
To acitvate the key lock function, hold the the key lock key for 2 seconds. In the LC display a key
symbol will appear in the lower right corner. When the key lock function is activated, only the PTT-,
monitor- and calling keys are available. All remaining functions are disabled.
To deactivate the key lock function, please hold the key lock key [* LOCK] for approximately 2 seconds.
In the display, „UNLOCK“ will appear for a short while until the key symbol dissappears.
Key Pad:
13 Menu ( MENU )
14 Conrmation ( ENTER )
15 Multi Functional Key ( VFO / MR )
16 Scan ( 1 SCAN )
17 Priority Scan ( 2 PRI )
18 VOX ( 3 VOX )
19 TX Power ( 4 POWER )
20 Squelch ( 5 SQL )
21 Scrambler ( 6 SCR )
22 Background-Light On / Off / Auto ( 7 LED )
23 Background-Light Color ( 8 COLOR )
24 Multi-Tone ( 9 BEEP )
25 Keylock ( *LOCK )
26 ANI-Code ( 0 ANI )
27 Frequency Reverse
Page 5

30
31
Frequency Inversion
This function is only useful for the commerical radio version.
To inverse the transmission and receiption frequency, hold the frequency-inversion key [# T-R] for
about 2 seconds. The letter R will be visible in the upper row of the LC display.
To deactivate the frequency inverse function, hold the frequency inversion key [# T-R] until the letter
R in the LC display disappears.
Attention:
Channel- / Frequency-Mode Switch
The TeCom-XP PRO can be switched between the channel mode and the frequency mode by holding
the conrmation key [ENTER] when powering on the radio. This feature is only available in the
commercial version.
Channel Mode
The programmed channel number is displayed (CH--001 - CH--128).
Frequency Modes
The actual frequency is shown in the display. There are two different frequency modes available. To
switch between these two modes press the VFO/MR key [VFO/MR].
manual : the frequency can be set via key pad or by the rotary channel selector.
programmed : the programmed frequency can be seen in the middle of the display. On the right side,
the channel number is shown. The channels are changed with the rotary channel
selector.
Store Manually Set Frequency
This feature is only available in the commercial radio version.
In the manual frequency mode, select the frequency that you want to store. Press the menu key
[MENU], followed by the VFO/MR key [VFO/MR]. The channel number on the right side starts blinking.
Set the channel number where the frequency should be stored with the rotary channel selector and
conrm your entry by pressing the VFO/MR key [VFO/MR].
Delete Stored Frequency
This feature is only available in the commercial radio version.
In the programmed frequency mode, power the radio off. Hold the VFO/MR key while turning the radio
back on. The symbol „DEL?“ appears in the display and the channel number on the right side starts
blinking. Set the channel to be deleted with the rotary channel selector and conrm your selection
with the conrmation key [ENTER]. The symbol „YES ?“ appears in the display. To delete the channel
press the conrmation key [ENTER]. For a short time the symbol „DELETE“ shows in the display.
More channels can now be deleted if necessary.
To leave the delete mode, press the menu key [MENU] or the VFO/MR key [VFO/MR ].
Delete all Settings of the Frequency Mode
This feature is only available in the commercial radio version.
Hold the menu key [MENU] while powering the radio on. The symbol „RESET?“ appears in the LC
display. Conrm your selection by pressing the conrmation key [ENTER] and select the option
„VFO ?“ with the rotary channel selector. Delete all settings of the frequency mode by pressing the
conrmation key [ENTER].
Delete all Settings
This feature is only available in the commercial radio version.
Hold the menu key [MENU] while powering the radio on. The symbol „RESET?“ appears in the LC
display. Conrm your selection by pressing the conrmation key [ENTER] and select the option „FULL?“
with the rotary channel selector. Delete all settings by pressing the conrmation key [ENTER].
1750 kHz Call Tone
The 1750 kHz Call Tone, for repeater operation, can be send by holding the orange button while
pressing the PTT key (for ham radio).
Advanced Functions
Channel Mode
In the following, the advanced functions, their parameters and the menu navigation will be explained.
The three keys above the numerical key pad ( [MENU], [ENTER] and [VFO/MR] are used for the
navigation through the menu.
[MENU] opens the menu. To select a menu function, press one of the numerical keys, which have
menu function.
[ENTER] conrms your selection.
[VFO/MR] closes the menu.
The actual selection is displayed. TeCom-PRO contains 21 functions in total. The functions 1 - 10 can
be selected via the keypad or the rotary channel selector, while the functions 11 - 21 can only be set
with the rotary channel selector.
Scan all Available Channels (01)
To scan all available channels, starting from the current channel, press the menu key [MENU] followed
by the channel scan key [2 SCAN]. On occupied channels, the scan function stops. When and how the
scan function continues, depends on the setting of Scan Types (see further down).
To stop the scan function press the PTT key or the conrmation key [ENTER].
Scan Priority Channels (02)
All programmed channels can be added to the scan list. The function Scan Priority Channel scans only
the channels of the scan list. Channels can be added to the list via the software or the programming
mode (step #7).
To activate the Priority Channel Scan press the menu key [MENU] and the Priority Scan Key [1 SCAN].
All channels of the scan list are constantly scanned in ring mode for signals. How the scan function reacts
once an occupied channel is detected, depends on the setup of the function Scan Type (see below).
To deactivate the priority scan function press the PTT key or the conrmation key [ENTER].
VOX Sensitivity (03)
The VOX sensitivity consists of 9 levels with increasing sensitivity from 1 to 9. To turn off the VOX
function, set the value „OFF“.
To set the VOX function press the menu key [MENU] followed by the VOX key [3 VOX]. The display
reads „VOX ?“. To enter the VOX mode press the conrmation key [ENTER]. Now, set the desired
value via the key pad or the channel selector. Store your selection by pressing the conrmation key
[ENTER] and the VFO/MR key. To leave the menu press the VFO/MR key again.
Page 6

32
33
TX Power (04)
You can select between the TX powers HI and LO. The change of setting affects all channel. To change
the transmit power for an individual channel see instructions for programming mode (step #8).
In the freenet version, the programmed value for the low TX power (LO) is 300 mW and for the high
TX power (HI) 500 mW.
The TeCom-PRO has a maximum transmit power of 5 Watt. For the commercial version, the authorized
TEAM dealer can set the values for TX-Power Low (LO) and TX-Power High (HI) via software according
to the permit.
To set the desired transmit power for the selected channel, press the menu key [MENU] followed by the
TX power key [4 POWER]. The display reads „POW ?“. Conrm your selection with the conrmation
key [ENTER] and set the desired value (H / L) with the channel selector. To store the conrmation key
[ENTER] and set the desired value (H / L) with the channel selector. To store the setting press the
conrmation key [ENTER] followed by the VFO/MR key [VFO/MR].
To leave the menu press VFO/MR [VFO/MR] again.
Squelch (05)
The TeCom-PRO contains a 9-level squelch function (1 - 9). The higher the number the more sensitive
the squelch is. To deactivate the squelch function set the value 0.
To set the squelch level press the menu key [MENU] followed by the squelch key [5 SQL]. The display
reads „SQL ?“. Conrm your selection by pressing the conrmation key [ENTER] and set the desired
value via the keypad or the channel selector.
Store the setting by pressing the conrmation key [ENTER] followed by the VFO/MR key [VFO/MR].
Scrambler (06)
The scramber function distorts the signal with the effect that only two radios with activated scrambler
function can clearly communicate. All others will hear the signal „scrambled“.
To activate / deactivate the scrambler function press the menu key [MENU] followed by the scrambler
key [6 SCR]. The display reads „SCRM ?“. Conrm your selection by pressing the conrmation key
[ENTER] and make your selection with the channel selector. To store the setting press the conrmation
key [ENTER] followed by the VFO/MR key [VFO/MR].
To leave the menu press the VFO/MR key.
Background Light On / Off (07)
For the background light of the LCD, there are three possible settings:
ON : The background light is continually on.
OFF : The background light is off.
AUTO: After powering on, turning the channel selector, or pushing any of the keys the LC display will
be alluminated for approximately 8 seconds.
To set the background light press the Menu key [MENU] followed by the background light key [7 LED].
The display reads „LED ?“. Conrm your selection by pressing the conrmation key [ENTER] and set
your selection (ON / OFF / AUTO) with the rotary channel selector.
To store the setting and leave the menu, press the conrmation key [ENTER] once, followed by
pressing the VFO/MR key [VFO/MR] twice.
Background Color (08)
There are three different colors available for the background light :
LIGHT 1 : Purple
LIGHT 2 : Orange
LIGHT 3 : Blue
To set the desired color press open the menu by pressing the menu key [ MENU ] followed by the
background color key [ 8 COLOR ]. The display reads „ LIGHT ?“. Conrm this selection by pressing
the conrmation key [ ENTER ] and make your selection with the rotary channel selector. Store your
setting by pressing the conrmation key [ ENTER ] followed by the VFO/MR key [ VFO/MR ].
To leave the menu press the VFO/MR [ VFO/MR ] key again.
Conrmation Tone On / Off (09)
To conrm your selection made by pressing keys or turning the channel selector, an acoustic
conrmation tone can be activated.
To activate / deactivate the conrmation tone open the menu by pressing the menu key [MENU]
followed by the conrmation tone key [9 BEEP]. The display reads „BEEP ?“. Conrm your selection
by pressing the conrmation key [ENTER] and make your selection (ON / OFF) with the channel
selector. Store your setting by pressing the conrmation key [ENTER] followed by the VFO/MR key
[VFO/MR].
To leave the menu press the VFO/MR key [VFO/MR].
ANI (Automatic Number Identication) On / Off (10)
The ANI function is comparable to caller ID. If the transmitting radio has an ANI code and if this
function is activated, the code can be seen in the display. The ANI code will be programmed with the
software T-UP7.
To activate / deactivate the ANI function press the menu key [MENU] followed by the ANI key [0 ANI].
The display reads „ANI ?“. Press the conrmation key [ENTER] and make your selection (ON / OFF)
with the channel selector.
To store your selection press the conrmation key [ENTER] followed by the VFO/MR key [VFO/MR].
To leave the menu press the VFO/MR key [VFO/MR].
Key Lock (11)
There are two different key lock modes available.
Manual : To activate / deactivate the key lock function press the key lock key [* LOCK] for
approximately 2 seconds.
Auto : After 25 seconds after the last operation, the key lock will be activated automatically.
To deactivate the key lock, the key lock key needs to be pressed for approximately 2
seconds.
To set the desired function (Manual / Auto) press the menu key [MENU] and turn the channel selector
until the symbol „KEYBO?“ appears in the display. Conrm your selection by pressing the conrmation
key [ENTER] and make your selection with the channel selector.
To store your selection press the conrmation key [ENTER] followed by the VFO/MR key [VFO/MR].
To leave the menu press the VFO/MR key [VFO/MR].
Page 7

34
35
Time-Out-Timer (12)
To avoid overly transmitting, the TeCom-PRO is equipped with the Time-Out-Time feature (TOT). The
following settings are available : OFF; 30s, 60s, 90s, 120s, 150s, 180s, 210s, 240s and 270s.
To set the Time-Out-Timer open the menu by pressing the menu key [MENU] and turn the channel
selector until the symbol „TOT ?“ appears in the display. Conrm your selection with the conrmation
key [ENTER] and set the desired value with the channel selector.
To store your selection press the conrmation key [ENTER] followed by the VFO/MR key [VFO/MR].
To leave the menu press the VFO/MR key [VFO/MR].
Scan Types (13)
How the scan function reacts once an occupied channel is detected, is determined by the choosen
Scan Type. There are three different types available :
TO : Time-Operated-Scan
The radio stays on the channel where a signal has been detected for a certain time, to be programmed
with the software, regardless if the signal continues or ends.
CO: Carrier-Operated-Scan
The radio remains on the channel until the carrier signal ends. Then scanning continues.
SE: Search-Scan
The scan function stops once a signal has been detected and stays on the channel.
To set the scan type open the menu with the menu key [MENU] and turn the channel selector until the
display reads „SCANS?“. Conrm your selection with the conrmation key [ENTER] and make your
selection (TO / CO / SE) with the channel selector.
To store the setting press the conrmation key [ENTER] followed by the VFO/MR key [VFO/MR].
To leave the menu press the VFO/MR key [VFO/MR].
Voice Annunciation (14)
All changes of settings can be announced in english or german language. The language has to be
selected via the software.
To activate/deactivate this function press the menu key [MENU] and turn the channel selector until the
symbol „VOICE?“ appears in the display. Make your selection (ON / OFF) with the channel selector.
To store the setting press the conrmation key [ENTER] followed by the VFO/MR key [VFO/MR].
To leave the menu press the VFO/MR key [VFO/MR].
Name (15)
It is possible to program a name for the selected channel in the programming mode (step #10). To
make this name visible in the display the Name-Function has to be activated.
This function is only available in the channel mode. To activate / deactivate this function press the
menu key [MENU] and turn the channel selector until the symbol reads „NAME?“. Make your selection
(ON / OFF) and store your selection by pressing the menu key [MENU] followed by the VFO/MR key
[VFO/MR].
To leave the menu press the VFO/MR key [VFO/MR].
Frequency Mode
ATTENTION:
The following functions are only available in frequency mode.
Due to governmental regulations, no frequency mode is available in the FreeNet version.
In the frequency mode, you can switch between the programmed frequency, with the channel number
shown on the right side of the display, and the freely programmable frequency. To switch between
those two modes press the VFO/MR key.
In the mode of the freely programmable frequency you can set any frequency, within the given range
(VHF: 136 - 149 MHz) in steps of 5kHz / 6.25kHz / 10kHz / 12.5kHz / 25 kHz. More information about
how to set the frequency steps can be found in the paragraph Frequency Steps (20).
Some of the following functions work differently, depending on the selected mode.
RX-TX Frequency Difference (15)
With this function you can read the difference between the reception and the transmitting frequencies,
in the Programmed Frequency Mode. If the transmitting frequency is higher than the reception
frequency
Set the radio to Programmed Frequency Mode. Press the menu key [MENU] and turn the channel
selector until the display reads „DIFFR?“. Then, press the enter key [ENTER]. The difference between
reception frequency and transmitting frequency is displayed.
To leave the menu press the conrmation key [ENTER].
CTCSS-Code RX and TX (16)
In the freely programmable frequency mode, the same CTCSS code can be programmed for transmission and reception with this function.
In the freely programmable frequency mode, press the menu key [MENU] and turn the channel selector until the display reads „C--CDC?“. Press the enter key [ENTER] and select one of the 50 available
CTCSS codes. To turn off the CTCSS function select OFF. To conrm your selection press the enter
key [ENTER] or wait a few seconds for automatic conrmation.
Hint : Any change of setting in this function will adapted the setting in CTCSS-code TX (17) and
CTCSS-code RX (18).
CTCSS- / DCS-Code RX (17)
To read the CTCSS- / DQT-RX-code in the Programmed Frequency Mode, press the menu key [MENU]
and turn the channel selector until the display reads „R--CDC?“. Conrm your selection by pressing
the enter key [ENTER]. The programmed CTCSS code for the reception mode is displayed.
In the mode of the freely programmable frequency, one of the 50 available CTCSS codes can be
programmed for the RX mode.
Press the menu key [MENU], select the option „R--CDC?“ with the channel selector and conrm your
selection by pressing the enter key [ENTER]. Next, select one of the 50 available CTCSS codes for
the RX mode. Conrm your selection by pressing the enter key [ENTER].
Page 8

36
37
CTCSS/DCS TX-Code (18)
The setup of this functions follows the aforementioned procedure, described in CTCSS/DCS RX-Code
(18).
+/- Shift Up (19)
In the mode of the freely programmable frequency, the transmission frequency can be quickly shifted
for 1 MHz up or down of the receiving frequency with this function.
To shift the transmission frequency press the menu key [MENU] and select the option „S--D“ with
the channel selector. Conrm your selection with the conrmation key [ENTER]. Select one of the
following settings :
S-D O: no shift
S-D + : shifted up
S-D - : shifted down
Conrm your selection with the conrmation key [ENTER], followed by pressing the VFO/MR key
[VFO/MR] twice.
Frequency Steps (20)
In frequency mode, press the menu key [MENU], select the option „STEP?“ by turning the channel
selector and conrm your selection with the conrmation key [ENTER].
The following settings are available : 5kHz / 6,25kHz / 10kHz / 12,5kHz / 25kHz. To conrm the
selection press the conrmation key [ENTER] once and the VFO/MR key [VFO/MR] twice.
Bandwidth (21)
There are two bandwiths available : narrow ( 12.5 kHz ) and wide ( 25 kHz ).
In frequency mode press the menu key [MENU] and select the option „N/W“ with the channel selector.
Press the conrmation key [ENTER] and select the desired option (WIDE or NARROW) with the
channel selector. To conrm the selection press the conrmation key [ENTER] once and the VFO/MR
key [VFO/MR] twice.
Programming Mode
The programming mode is only available for the commercial radio version.
The TeCom-PRO contains a programming mode, that allows to program channels and their relevant
settings. The programming mode can be activated via software.
The 10-step programming procedure of a channels contains the following settings:
1. Channel Number 6. Busy Channel Lockout
2. Receiving Frequency 7. Priority Channel Scan
3. CTCSS/DCS RX-Code 8. TX-Power High / Low
4. Transmitting Frequency 9. Bandwidth
5. CTCSS/DCS TX-Code 10. Channel Name
To enter the programming mode hold the monitor key [MONI] and the menu key [MENU] simultaneously
while turning the radio on. The LC-display reads „SELF“. Start the programming procedure by pressing
the conrmation key [ENTER]. After programming a step, press the enter key [ENTER] to proceed to
the next step. The current step is displayed on the right side. After completion of all ten steps turn the
radio off and back on again to return to operation mode.
Hints:
> It is possible to program more than one channel once you are in programming mode.
> It is not necessary to program all ten steps. Once steps 1 and 2 are programmed, the channel is
stored and available in the operation mode. If the transmission frequency is left blank there is no
transmission possible. All other parameters will be set by default.
> To cancel the programming procedure of a channel press the menu key [MENU].
In the following the programming of all ten settings will be explained.
1. Channel Number
Set the channel number by turning the channel selector. The display reads „CH-XXX“ where XXX
stands for the channel number (001 - 128). To conrm your selection and move to the next step press
the enter key [ENTER].
2. Reception Frequency
Enter the RX-frequency for reception via the keypad or the channel selector. The radio only accepts
entries within the given range of frequency (136 – 174 MHz).
To change the frequency steps, press the call button. The steps 5kHz, 6.5 kHz, 10 kHz, 12.5 kHz and
25 kHz are available. The setting of the reception frequency is the only mandatory entry.
To conrm your selection press the enter key [ENTER].
3. CTCSS/DCS RX-Code
There are 50 CTCSS and 105 DCS codes available. The digital DCS codes can be reversed, thus,
there are two times 105 DCS codes available.
To select one of the following options, press the keylock key [*LOCK].
OFF : No code has been selected
67.0 : CTCSS-coding system
D023N : DCS-coding system - To invert the code press the inverse key [ # T-R ]. the
display will read D023I, with I standing for inverted.
After setting a coding system, select a code by turning the channel selector and conrm your
selection by pressing the conrmation key [ENTER].
4. Transmitting Frequency
To program the transmitting frequency follow the procedure as described under 2. Reception Frequency.
An entry is not mandatory but in this case no transmission will be possible on this channel.
To conrm your selection press the enter key [ENTER].
5. CTCSS/DCS TX-Code
To program the CTSS/DCS code for the transmission frequency, follow the procedure as described
under 3. CTCSS/DCS RX-Code.
To conrm your selection press the enter key [ENTER].
If no transmitting frequency ( 4. ) has been programmed, this step will be skipped.
Page 9

38
39
6. Busy Channel Lockout
This function prevents transmission on occupied channels. The following options are available:
OFF : Function deactivated
1 : Signal – Is a signal received, transmission will be blocked until the signal ends, regardless of
the used code.
2 : CTCSS/DCS – Transmission is only blocked if the CTCSS/DCS code of the incoming signal
is identical to the own code.
Make your selection by turning the channel selector and conrm by pressing the enter key [ENTER].
The defaut setting is OFF.
7. Priority Channel Scan
Decide if the channel should be added to the priority channel scanning list or not. The options ADD
and DEL can be selected with the channel selector.
The entry will be stored once the enter key [ENTER] has been pushed. The default setting is YES.
8. TX Power HI/LO
One of the two TX powers (HI and LO), which can be set by your dealer via software, can be
assigned the channel. Make your selection with the channel selector and conrm by pressing the
enter key [ENTER].
9. Bandwidth
On of the following options can be set with the channel selector:
W : Wide – 25 kHz
N : Narrow – 12.5 kHz
.
Conrm your selection by pressing the enter key [ENTER]. The default setting is WIDE.
10. Name
Instead of the default channel number, a channel name can be edited.
The name can be composed of max. six digits. The character is to be selected with the channel
selector. After conrming the selection by pressing the number key [# T-R], the next digit can be set.
The following symbols are available :
Digits 0 -9 Hyphen ( - )
Letters A – Z Empty Space
End the name programming procedure by pressing the conrmation key [ENTER ].
All ten available parameter have been programmed. To return to operation mode, turn the radio off
and then back on. To continue programming other channels start from step 1 again.
CCIR Selective Call
This function has to be programmed via software. More information about the possible settings can
be found in the manual of the software.
A selective call to one specied radio can be sent prior to the signal. The caller ID is displayed on the
receiving radio.
MENU
SCAN ?
Channel Scan
All Programmed Channels
ENTER
ENTER
To End Press
ENTER
NAME?
Settings Channel Name :
ON / OFF
ENTER
ENTER
To store setting and leave
menu press VFO/MR twice
Channel
Selector
Channel Selector
VOICE?
Settings Annunciation :
ON / OFF
ENTER
ENTER
To store setting and leave
menu press VFO/MR twice
Channel
Selector
Channel Selector
SCANS?
Settings Scan Types :
TO / CO / SE
ENTER
ENTER
To store setting and leave
menu press VFO/MR twice
Channel
Selector
Channel Selector
TOT ?
Settings Time-Out-Timer :
OFF, 30 - 270s
ENTER
ENTER
To store setting and leave
menu press VFO/MR twice
Channel
Selector
Channel Selector
KEYBO?
Settings Keylock :-
MANUAL, AUTO
ENTER
ENTER
To store setting and leave
menu press VFO/MR twice
Channel
Selector
Channel Selector
ANI ?
Settings ANI :
ON / OFF
ENTER
ENTER
To store setting and leave
menu press VFO/MR twice
Channel
Selector
Channel Selector
BEEP ?
Settings Beep Tone :
ON / OFF
ENTER
ENTER
To store setting and leave
menu press VFO/MR twice
Channel
Selector
Channel Selector
LIGHT ?
Settings Backlight Color :
1 / 2 / 3
ENTER
ENTER
To store setting and leave
menu press VFO/MR twice
Channel
Selector
Channel Selector
LED ?
Settings Backlight :
AUTO / ON / OFF
ENTER
ENTER
To store setting and leave
menu press VFO/MR twice
Channel
Selector
Channel Selector
SCRM ?
Settings Scrambler :
OFF / ON
ENTER
ENTER
To store setting and leave
menu press VFO/MR twice
Channel
Selector
Channel Selector
SQL ?
Settings Squelch :
0 - 9
ENTER
ENTER
To store setting and leave
menu press VFO/MR twice
Channel
Selector
Channel Selector
POW ?
Settings TX-Power :
H / L
ENTER
ENTER
To store setting and leave
menu press VFO/MR twice
Channel
Selector
Channel Selector
VOX ?
Settings Sensitivity :
OFF, 1 - 9
ENTER
ENTER
To store setting and leave
menu press VFO/MR twice
Channel
Selector
Channel Selector
PRI ?
Channel Scan
Priority Scan List
ENTER
ENTER
To End Press
ENTER
Channel
Selector
Channel
Selector
Diagram
Functions in Channel Mode
01
02
03
04
05
06
07
08
09
10
11
12
13
14
15
Page 10

40
41
Additional Functions in Frequency Mode
N/W ?
Settings Bandwidth :
NARROW/WIDE
ENTER
ENTER
To store setting and leave
menu press VFO/MR twice
Channel
Selector
Channel Selector
STEP?
Settings Frequency Steps:
5/6,25/10/12,5/25kHz
ENTER
ENTER
To store setting and leave
menu press VFO/MR twice
Channel
Selector
Channel Selector
S-D ?
Settings TX Shift :
0 / + / -
ENTER
ENTER
To store setting and leave
menu press VFO/MR twice
Channel
Selector
Channel Selector
T-CDC ?
CTCSS TX :
OFF, 67,0 - 254,1 Hz
ENTER
ENTER
To store setting and leave
menu press VFO/MR twice
Channel
Selector
Channel Selector
R-CDC?
CTCSS RX :
OFF, 67,0 - 254,1 Hz
ENTER
ENTER
To store setting and leave
menu press VFO/MR twice
Channel
Selector
Channel Selector
C-CDC ?
CTCSS TX & RX :
OFF, 67,0 - 254,1 Hz
ENTER
ENTER
To store setting and leave
menu press VFO/MR twice
Channel
Selector
Channel Selector
DIFFR?
Settings TX-RX
Difference : 0 - 99,995 MhZ
ENTER
ENTER
To store setting and leave
menu press VFO/MR twice
Channel
Selector
Channel Selector
15
16
17
18
19
20
21
MENU
General
Range of Frequency : FreeNet 149.0250 - 149.1125 MHz
VHF COM 136 - 174 MHz
Operating Temperature : -20°C ~ +50°C
Power Supply : DC 7.2 V
Mode : Simplex or Semi-Duplex
Dimensions : 100 mm x 55 mm x 32 mm ( Antenna not included )
Weight : 220 g ( incl. Battery Pack )
Specications
Page 11

Page 12

TeCom-PRO
TeCom-PRO
Service :
TEAM Electronic GmbH
Bolongarostrasse 88
D-65929 Frankfurt am Main
fon ++49 - 69 - 300 90 500
fax ++49 - 69 - 31 43 82
team-electronic@t-online.de
www.team-electronic.de
For Use and Sale in :
TeCom-PRO FreeNet (PR8102)
Germany
TeCom-PRO Commercial (PR8029)
Austria, Belgium, Czech Republic,
Denmark, Finland, France, Germany,
Great Britain, Greece, Hungary, Italy,
Lithuania, Luxembourg, the Netherlands,
Norway, Poland, Portugal, Spain, Sweden
 Loading...