

Page 1

electronic
TeCom-508
Public Mobile Radio
Bedienungsanleitung
Operation Instruction
Mode d’emploi
Manuale d’istruzioni
Manual de usuario
Page 2
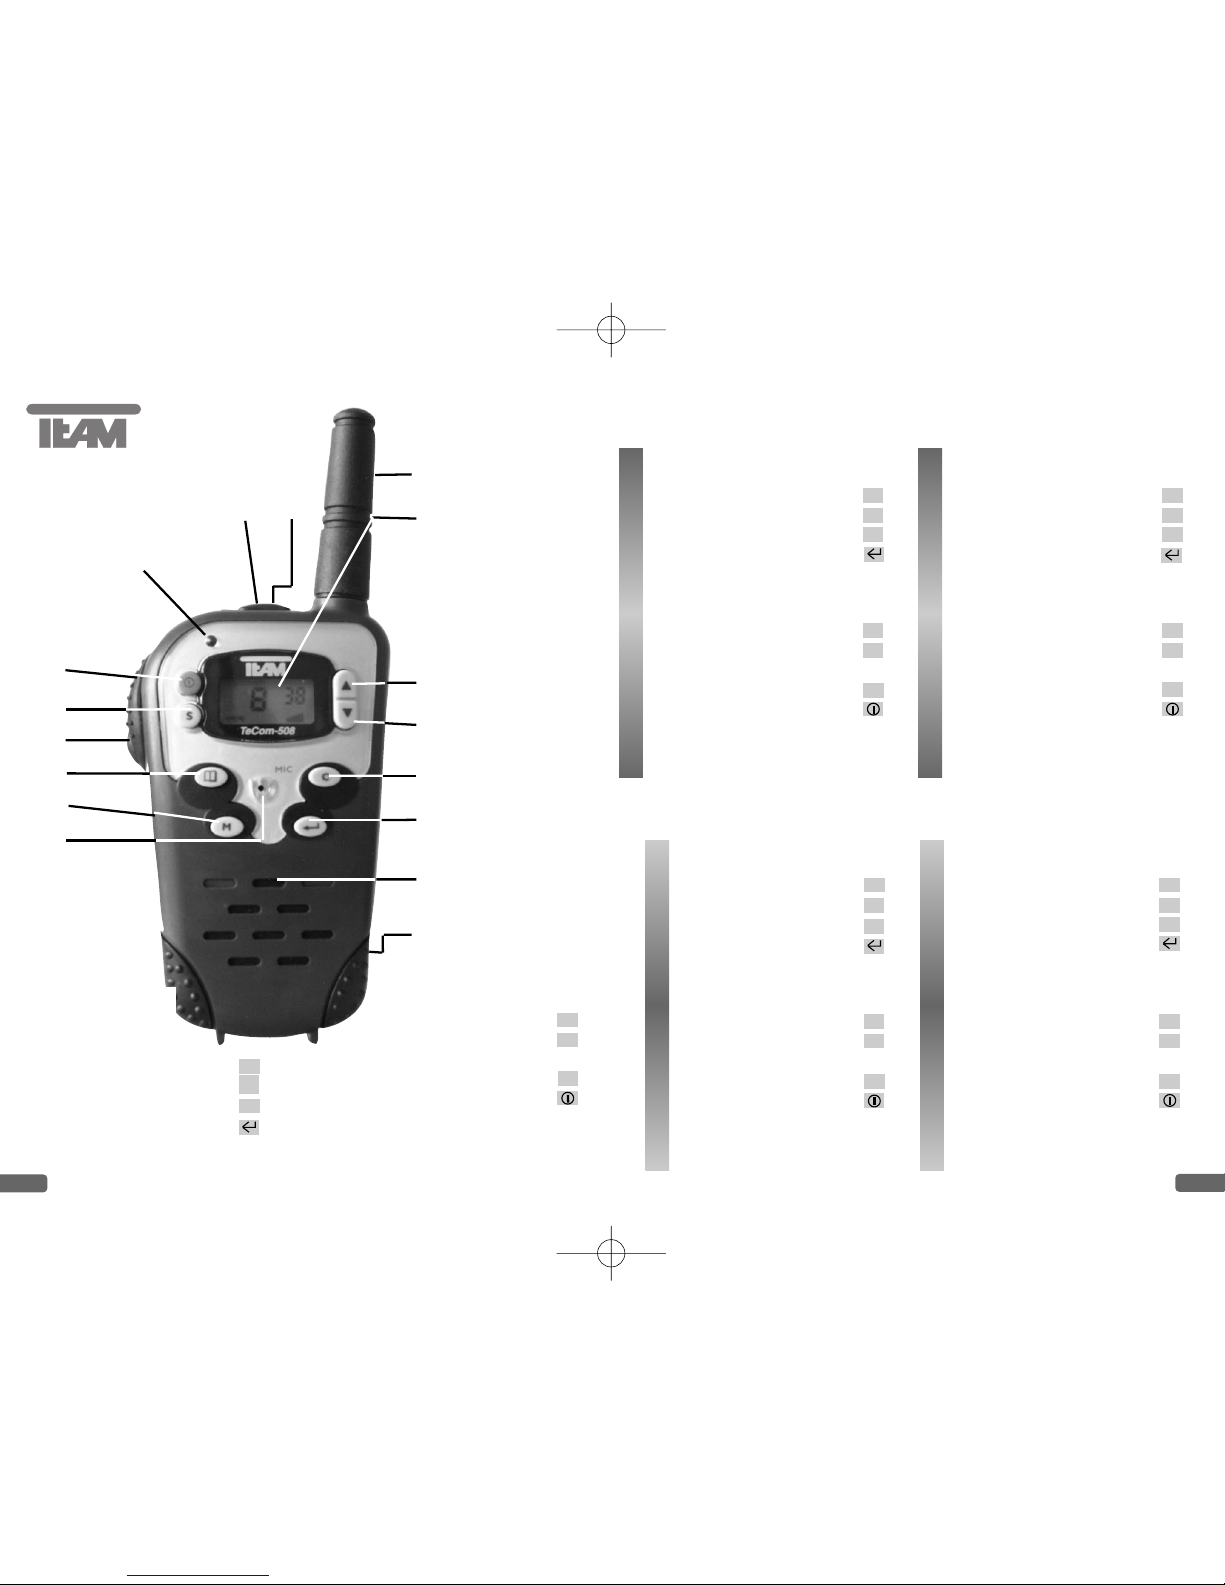
1.) Antenne
2.) Affichage LCD
3.) Touche vers le haut
4.) Touche vers le bas
5.) Touche d’appel
6.) Touche d’entrée
7.) Haut-parleur
8.) Compartiment des piles
9.) Microphone
10.) Touche Monitor
11.) Touche Menu
12.) Touche PTT
13.) Touche Scan
14.) Touche Marche/Arrêt
15.) Lampe TX
16.) Prise SP./MIC
17.) Clip de ceinture
Français Page 26 - 35
1.) Antenna
2.) Indicatore LCD
3.) Tasto crescente
4.) Tasto discendente
5.) Tasto della suoneria
6.) Tasto di conferma
7.) Altoparlante
8.) Alloggio pile
9.) Microfono
10.) Tasto Monitor
11.) Tasto Menu
12.) Tasto PTT
13.) Tasto Scan
14.) Tasto Marcia/Arresto
15.) Spia TX
16.) Presa per SP./MIC
17.) Clip della cintura
Italiano Pagina 36 - 46
1
2
3
4
5
6
7
8
9
10
11
12
13
14
15
17
electronic
TeCom-508
2
3
▲ ▲
▲▲
C
C
M M
1.) Antena
2.) Pantalla LCD
3.) Tecla ascendente
4.) Tecla descendente
5.) Tecla de tono de llamar
6.) Tecla Enter
7.) Altavoz
8.) Compartimento para baterias
9.) Microfono
10.) Pulsador monitor
11.) Tecla Menu
12.) PTT
13.) Tecla Scan
14.) Encendido / Apagado
15.) LED de transmsion
16.) Clavija SP./MIC
17.) Pinza de cinturon
Espanol Pagina 47 - 57
▲
▲
C
M
9.) Mic: Mikrofon
10.) Monitor-Taste
11.) Menü-Taste
12.) PTT-Taste
13.) Scan-Taste
14.) Ein/Aus-Taste
15.) TX-LED
16.) Buchse SP./MIC
17.) Gürtelclip
1.) Antenne
2.) LCD-Anzeige
3.) Aufwärts-Taste
4.) Abwärts-Taste
5.) Ruftontaste
6.) Eingabe-Taste
7.) Lautsprecher
8.) Batteriefach
▲
▲
C
M
Funktionen
Features
English Page 16 - 25
Funciones
Fonctiones Funzioni
1.) Antenna
2.) LCD Screen
3.) Up Key
4.) Down Key
5.) Call Tone Key
6.) Enter Key
7.) Speaker
8.) Battery Compartment
9.) Mic: Microphone
10.) Monitor Key
11.) Menu Key
12.) PTT Key
13.) Scan Key
14.) On/Off Key
15.) TX LED
16.) Jack SP./MIC
17.) Belt Clip
▲
▲
C
M
16
S
S
S
S
S
TeCom-508_Manual 10.07.2003 15:05 Uhr Seite 2
Page 3

17
Table of Contens
Page
Controls & Connectors 2 - 3
LC-Display .17
Setting up the TEAM TeCom-508
Removing and mounting of the belt clip 17 - 18
Inserting the batteries 18
Operation of the TEAM TeCom-508
1) Switching On/Off 18
2) Battery level indicator 18 - 19
3) Volume level adjustment 19
4) Disabling the noise suppression 19 - 20
5) Voice transmission 20
6) Call tone transmission 20
7) LCD window illumination 20
8) Key lock function 20 - 21
9) Channel selection 21
10) CTCSS 21 - 22
11) Channel scan function 22
12) Dual watch function 22 - 23
13) VOX function 23
14) Charging of accumulators in the unit 24
Additional Information
Safety 24
Service 24 - 25
Conformity 25
CTCSS codes 15
English
16
LC-Display
channel number
VOX function
channel scan
CTCSS-
code number
battery control
key lock
dual watch
Volume &
VOX-sensitivity
SCAN Indicates active channel scan function
DW Indicates active dual watch function
BUSY Indicates incoming receiver signals
Indicates the actual battery level
Indicates active key lock function
Indicates the actual volume level
VOX Indicates active VOX function
The channel number can be set by the user
between 1 - 8
English
reception
The CTCSS-code number can be set by the user
between 0 -38
Setting up the TEAM TeCom-508
Removing and mounting of the belt clip
To remove the belt clip, turn the rear panel
toward you. The latch of the belt clip is located
near the headset socket SP./MIC ( 16 ). Pull the
latch with your fingernail towards you and hold
it. Then, by pulling the belt clip towards the top
of the antenna, remove the belt clip ( 17 ).
TeCom-508_Manual 10.07.2003 15:05 Uhr Seite 16
Page 4

To insert the belt clip, push the notch of the clip into the notch on
the rear panel of the unit. Then push the clip towards the unit’s
bottom side until the belt clip latches.
Inserting the batteries
To insert the batteries, turn the rear panel
toward you and remove the belt clip if necessary. The battery compartment lid ( 8 ) is located right below the type plate. Push down the
latch of the lid and pull it toward you.
Now insert 4 AAA( = Micro ) alkaline batteries or
the optional accu-pack of the Twin Power Pack 508 into the battery compartment according to the indicated polarity signs.
T o close the battery compartment ( 8 ), place the guide pins, located at the bottom of the battery compartment lid, into their holes.
Next, push the latch against the unit until it snaps in.
Operation of the TEAM TeCom-508
1) To Turn the Unit On/Off
To turn on the unit, depress the On/Off key ( 14 ) for about 1
or 2 seconds. Two short receipt tones can be heard from the
speaker ( 7 ). During the short initial self-test, which takes approximately 1 second, all symbols can be seen on the display. Now
the unit is in receive mode.
To switch off the unit, depress the On/Off key ( 14 ) for about
1 or 2 seconds. Along tone can be heard and all symbols disappear from the display. The last settings remain in memory.
2) Battery level indicator
The battery symbol in the lower left corner of the display indicates
the battery level. As long as both bars are visible inside the icon,
the batteries are sufficiently charged. If the supply voltage drops
below 4.4 V, the left bar disappears. If the supply voltage drops
below 4.2 V, the other bar disappears also, and the battery symbol
English
starts blinking and a melody can be heard every 14 seconds. That
means that you have to change or charge the batteries. The unit
will automatically shut off if the supply voltage drops below 3.8 V.
The TeCom-508 is equipped with a battery-saving-function. If there
is no signal on the actual channel for at least 6 seconds, and if no
key is pressed during this period, the battery-saving-function starts
automatically. While this function is active, the unit checks the
actual channel for incoming signals in regular intervals. The current consumption in the power down mode drops down to 13 mA.
If you don’t use the unit it is better to switch it off. Should you not
use the unit for a longer period of time, we recommend you to
remove the batteries.
3) Volume level adjustment
The bar meter in the lower right corner of the display shows the
current volume level. Press the up key ▲ ( 3 ) to increase the volume level adjustment for one step. Press the down key ▼ ( 4 ) to
decrease the volume level adjustment for one step. Pressing the
keys for one second will make the volume level adjustment change
quickly. The pitch of the confirmation tone depends on the current
volume level. The limits of the volume range are indicated by two
high signal tones.
4) Disabling the noise suppression
The receiver is equipped with a circuit ( squelch ) that mutes the
receiver if there is no station available on the actual channel to
reduce the noise. If a signal is received, the squelch immediately
turns on the speaker, so you can hear the station. In case the
squelch lets signals pass, the LED turns green and the symbol
BUSY, to the right of the battery symbol, appears and indicates
that the channel is occupied. The squelch function can be disabled, with the monitor function, to hear weak stations that are normally suppressed by the squelch. To turn off the noise suppression, press the monitor key M ( 10 ). The symbol ( = BUSY ) will
appear in the display. If there is no station on the actual channel,
English
18 19
TeCom-508_Manual 10.07.2003 15:05 Uhr Seite 18
Page 5

you hear a noise in the speaker. To reactivate the squelch press
the monitor key M ( 10 ) again. If there is no station on the actual
channel, the symbol ( = BUSY ) disappears from the display.
5) Voice transmission
Radio contact is only possible with stations that work on the same
channel. Before transmitting, listen whether the actual channel is
free. Do not send signals on occupied channels. To transmit
depress and hold the PTT key ( 12 ). During transmission, the TX
control lamp ( 15 ) is red and all keys are disabled, except for the
ON/OFF key. The sensitivity of the built-in microphone ( 9 ) is set
for speaking at a distance of 2 - 3 inches. Speaking too loud will
cause distortions and makes the signal difficult to understand. On
completion of the transmission release the PTT key and the set
will return to receive mode.
6) Call tone transmission
By pressing the call tone key C ( 5 ), you can transmit a call signal. The call signal will be transmitted for three seconds and is
also audible in the internal speaker ( 7 ). All stations in the neighbourhood that are on the same channel will hear it. Once the call
tone is finished, the unit will switch back to receive mode.
7) LCD window illumination
By pressing the enter key ( 6 ), the backlight of the LC display
is turned on for four seconds. The LCD backlight will also be
switched on if the menu key ( 11 ) is pressed.
8) Key lock function
The key lock function disables all keys except for the PTT key , the
call tone key and the ON/OFF key. To enable the key lock function, depress the enter key ( 6 ) for 2 seconds until the key lock
symbol appears in the display to the right of the the channel number, accompaned by a confirmation tone. To deactivate the key lock,
English
depress the enter key ( 6 ) again for 2 seconds until the keylock symbol disappears.
9) Channel selection
The TeCom-508 has 8 channels. The following instructions show
how to select a channel:
Depress the menu key ( 11 ) one time, until the number of the
actual channel flashes in the LCD window. The channel selection
must be done as long as the channel number is still flashing, otherwise the unit returns to the normal mode without changing the
channel. Press the up key ▲ ( 3 ) to increase the channel num-
ber by one, and press the down key ▼ ( 4 ) to decrease the channel number by one. Pressing the keys for one second will make
the channel number change quickly. The pitch of the confirmation
tones depends on the current channel number. The channels step
in a ring like system. To terminate the channel selection and to
return to the normal receiving mode, press the enter key ( 6 ).
No channel selection is possible in key lock mode.
10) CTCSS
CTCSS stands for continuous tone coded squelch system and is
used to suppress unwanted signals on the actual channel. With
CTCSS a tone in the frequency range of 67 – 250 Hz with a low
level is added to the signal. With CTCSS, all sent signals contain
a CTCSS code and all incoming signals will be filtered for this set
CTCSS code, i.e. only signals with the selected CTCSS code will
be received.
TeCom-508 has 38 different CTCSS codes available. When using
the code number 0, the CTCSS function is disabled. With TeCom508 it is possible to set for each channel individual CTCSS codes.
To activate the CTCSS function press the menu key ( 11 )
twice. The CTCSS number in the upper right corner of the display
will start blinking. To set the CTCSS code use the up- and down
keys ( 3 & 4 ). To confirm your selection press :
English
20 21
TeCom-508_Manual 10.07.2003 15:05 Uhr Seite 20
Page 6

a) the enter key ( 6 ),
b) the PTT key ( 12 ),
c) the call tone key C ( 5 ), or
d) the menu key ( 11 ).
13) VOX function
While the VOX function is active, the unit switches automatically
to transmit mode when the sound level at the microphone ( 9 ) is
above a certain threshold. If the volume level at the microphone
( 9 ) remains below this threshold for a certain time, which is
called the VOX delay time, the radio switches back to receive
mode. Thus, you can communicate without having a hand at the
unit.
If the squelch is open because of a received signal the VOX function is disabled. The following instructions show how to activate
the VOX function and how to work with it:
Depress the menu key ( 11 ) three times until the VOX symbol
( = VOX ) flashes in the LCD. Now, the VOX sensitivity needs to
be set. To increase or decrease the VOX sensitivity, use the upand down-keys ▲ ( 3 ) and ▼ ( 4 ).
The bar meter in the lower right corner of the display, which normally indicates the volume level, shows the current VOX sensitivity . The pitch of the confirmation tone does not depend on the current VOX sensitivity . At the ends of the adjustment range two high
signal tones are audible. If the VOX sensitivity is set to the lowest
possible value, so that no bar is visible, the VOX function is deactivated.
To return to the normal receiving mode, press :
a) the enter key ( 6 ) once,
b) the PTT key ( 12 ) once, or
c) the menu key ( 11 ) twice.
a) the enter key ( 6 )
b) the call tone key C ( 5 ), or
c) press the menu key ( 11 ) another three times.
The table of the CTCSS frequencies can be found on page 15.
11) Channel scan function:
If the channel scan function is activated, the unit runs through all
channels, until it has found an occupied one. In this case, the
squelch opens, and the unit stops on that channel. To start the
channel scan function press the scan key S ( 13 ). The scan symbol (= SCAN ) will appear on the bottom of the display. The scanning stops on every occupied channel. It continous searching 4
seconds after the signal has dropped below the squelch threshold.
To deactivate the scan function and to stay on the actual channel,
press the :
a) scan key S ( 13 )
b) enter key ( 6 ).
12) Dual watch function
This function allows you to monitor two channels at a time. The
following instructions show how to activate the dual watch function:
First, select the first survey channel. Then, press the menu key
( 11 ) four times until the dual watch symbol ( = DW ) starts blinking in the LCD. Now, select the second channel with the keys ▲
( 3 ) or ▼ ( 4 ). The dual watch symbol ( = DW ) appears constantly and the receiver switches twice per second between the
two selected channels. If one of the two selected channels
receives a signal, the receiver remains on that channel until the
signal ends, before it goes back to switching back and forth
between the selected channels.
To deactivate the dual watch function, press :
English English
22 23
TeCom-508_Manual 10.07.2003 15:05 Uhr Seite 22
Page 7

14) Charging the TeCom-508 with the double-desktop charger
Twin Power 508
The optional accessory pack T win Power Pack 508 has to be purchased separately. It is not included in the set. It contains the
desktop charger Twin Power 508, the adapter and 2 accu-packs.
Follow the following steps when using the charger :
Make sure the set is turned off when charging the batteries. The
desktop charger Twin Power 508 can only be used with the supplied accu-pack. It is not possible to use the charger with any
usual kind of rechargeable batteries. New accu-packs need to be
charged for 14 hour prior to the first use. After that, it takes
approximately 6 hours to fully recharge empty batteries.
Insert the accu-pack into the TeCom-508. Connect the adapter
with an outlet ( 220 V / 50 Hz ) and the charger’s power jack.
Insert the set properly into the charger. Make sure that the contacts of the charger touch the contacts of the set, positioned at the
lid of the battery compartment. The LED of the corresponding
charging slot will light red if the set is positioned properly.
During the charging process, no symbols will be seen in the display of the TeCom-508. Also, the end of the charging process is
not indicated.
Safety
The unit radiates RF energy in transmitting mode. To reduce the
exposure to the lowest possible value and to benefit the most of
the set’s features, keep the following in mind :
In transmission mode, keep the unit in a vertical position at a distance of 2 to 3 inches away from your face. Keep the antenna at
a distance of at least 1 inch away from your head and your body.
Service
The condition of the batteries must be tested from time to time.
Empty batteries should be removed immediately from the set.
English
They can leak and damage the device. Always replace the batteries as a complete set.
Empty batteries do not belong into the waste bin, but must be
returned to a suitable collecting depot or to a special dealer, for
the sake of the environment.
There are no user-adjustable or user-serviceable parts inside the
radio. The casing must not be opened. Independent repairs or
adjustments must not be carried out, since each modification or
unauthorized intervention will immediately cancel all and any
guarantee or repair claims, they are also likely to result in nonconformity to ETS regulations which will render the set to become
illegal.
In the event a defect becoming apparent, contact a properly
equipped and authorised TEAM dealer or TEAM directly
Conformity
The transceiver TEAM TeCom-508 complies with the rules of the
European Directive R&TTE and meets the European Telecommunication Standards EN 300 296-1/-2, EN 301 489-5 & EN
60950.
Channel number Frequency (MHz)
1 446.00625 5 446.05625
2 446.01875 6 446.06875
3 446.03125 7 446.08125
4 446.04375 8 446.09375
This product is meant for distribution and sale in the following
European countries:
Austria, Belgium, Denmark, Finland, France, Germany, Greece,
Italy, Luxemburg, Netherlands, Norway, Portugal, Spain, Sweden,
Great Britain, Switzerland.
English
24 25
TeCom-508_Manual 10.07.2003 15:05 Uhr Seite 24
Page 8

Optionales Zubehör • additional accessories
accessoires optionelles • accessori addizionali
accesorios opcionales
Twin Power Pack 508
Inhalt : 1 Doppel-Standladegerät mit Adapter und 2 Akkupack
content : 1 double desktop-charger with adapter and 2 accu-packs
contenu : 1 chargeur double avec adapteur et 2 paquet des piles
rechargeables
soddisfare :1 doppio caricatore con l’adattatore e 2 pacchetti delle
batterie ricaricabili
contenido : 1 cargador de sobremesa doble con el adaptador y 2 paquete
de la batería
Art.-Nr. 2034
OEM-TC
Ohrhörermikrofon Ohrbügel, Befestigungsclip und PTT-Taste
microphone / headset with earpiece, clip and PTT-button
oreillette / microphone avec clip de fixation et touche PTT
microfono / auricolare archetto con clip e tasto PTT
micrófono / auricular con el clip y un botón de PTT
1 Pin - 3.5 mm - Stereo
Art.-Nr. PR2035
MH-900
universal Mobilhalter für die Windschutzscheibe
universal cradle for the windshield
berceau universel pour le pare-brise
culla universale per il parabrezza
horquilla universal para el parabrisas
Art.-Nr. LP2060
59
Neoprentasche
• Neopren-Gürteltasche • neoprene-belt-carrying bag • sac
de néoprène pour la ceinture •
sacchetto trasportante di neoprene per la cinghia • funda
de neopreno para el cinturón
Art.-Nr. LP2054
58
TeCom-508_Manual 10.07.2003 15:06 Uhr Seite 58
Page 9

61
KXM-446TC
• Kehlkopfmikrofon mit Ohrhörer, Befestigungsclip und abgesetzter PTT-Taste
• throat microphone with an earphone, a clip and a remote PTT-button
• microphone de gorge avec une oreillette, une clip de fixation et une touche PTT
• microfono della gola con un auriculare, una clip e un tasto de PTT
• micrófono por laringe con un auricular, unl clip y un botón de PTT
1 Pin - 3,5 mm - Stereo
Art.-Nr. PR2036
HXM-446TC
• Kehlkopfmikrofon mit flachem Lautsprecher für den Helm, Befestigungsclip
und abgesetzter PTT-Taste
• throat microphone with a flat speaker for the helmet, a clip and a remote
PTT-button • microphone de gorge avec une haut-parleur plat pour le casque,
une clip de fixation et une touche PTT
• microfono della gola con un altoparlane
per un casco, un clip e un tasto de PTT
• micrófono por laringe con un altavoz plano
para un casco, un clip y un botón de PTT
1 Pin - 3,5 mm - Stereo
Art.-Nr. PR2037
HS-105TC
• Kopfhörer-Mikrofon mit Befestigungsclip und PTT-Taste
• microphone / headset with a clip and a PTT-button
• oreillette / microphone avec clip de fixation et touche PTT
• microfono / auricolare con clip e tasto PTT
• micrófono / auricular con un clip y un botón de PTT
1 Pin - 3,5 mm - Stereo
Art.-Nr. PR2035
DM-485TC
• Lautsprechermikrofon
• speaker-microphone
• haut-parleur / microphone
• altoparlante / microfono
• micrófono de altavoz
1 Pin - 3,5 mm - Stereo
Art.-Nr. PR2038
Bitte nur geeignete Orginal TEAM Zubehörteile verwenden.
Please, use original TEAM accessories only.
N’utilisez que des accessoires TEAM originaux, s’il vous plaît!
Solamente utilizzare degli accessori TEAM originali, per favore!
Utilice los accesorios originales de TEAM solamente, por favor.
60
TeCom-508_Manual 10.07.2003 15:06 Uhr Seite 60
Page 10

electronic
TEAM TeCom-508 for sale and use in :
• Austria • Belgium • Denmark • Finland
• France • Germany • Greece • Italy
• Luxembourg • Netherlands • Norway
• Portugal • Spain • Sweden • Switzerland • U.K.
TEAM Electronic GmbH
Bolongarostrasse 88
D-65929 Frankfurt / Main
Telefon 069 / 300 950 0
Fax 069 / 31 43 82
eMail TEAMGerman@aol.com
Home Page www.team-electronic.de
 Loading...