

Page 1

Operation Instruction
electronic
Talk & Radio TR-446
Public Mobile Radio
+ FM Radio
Page 2
1
2
3
4
5
4
6
7
8
9
10
electronic
2
Talk & Radio TR-446
PMR + FM-Radio
Page 3

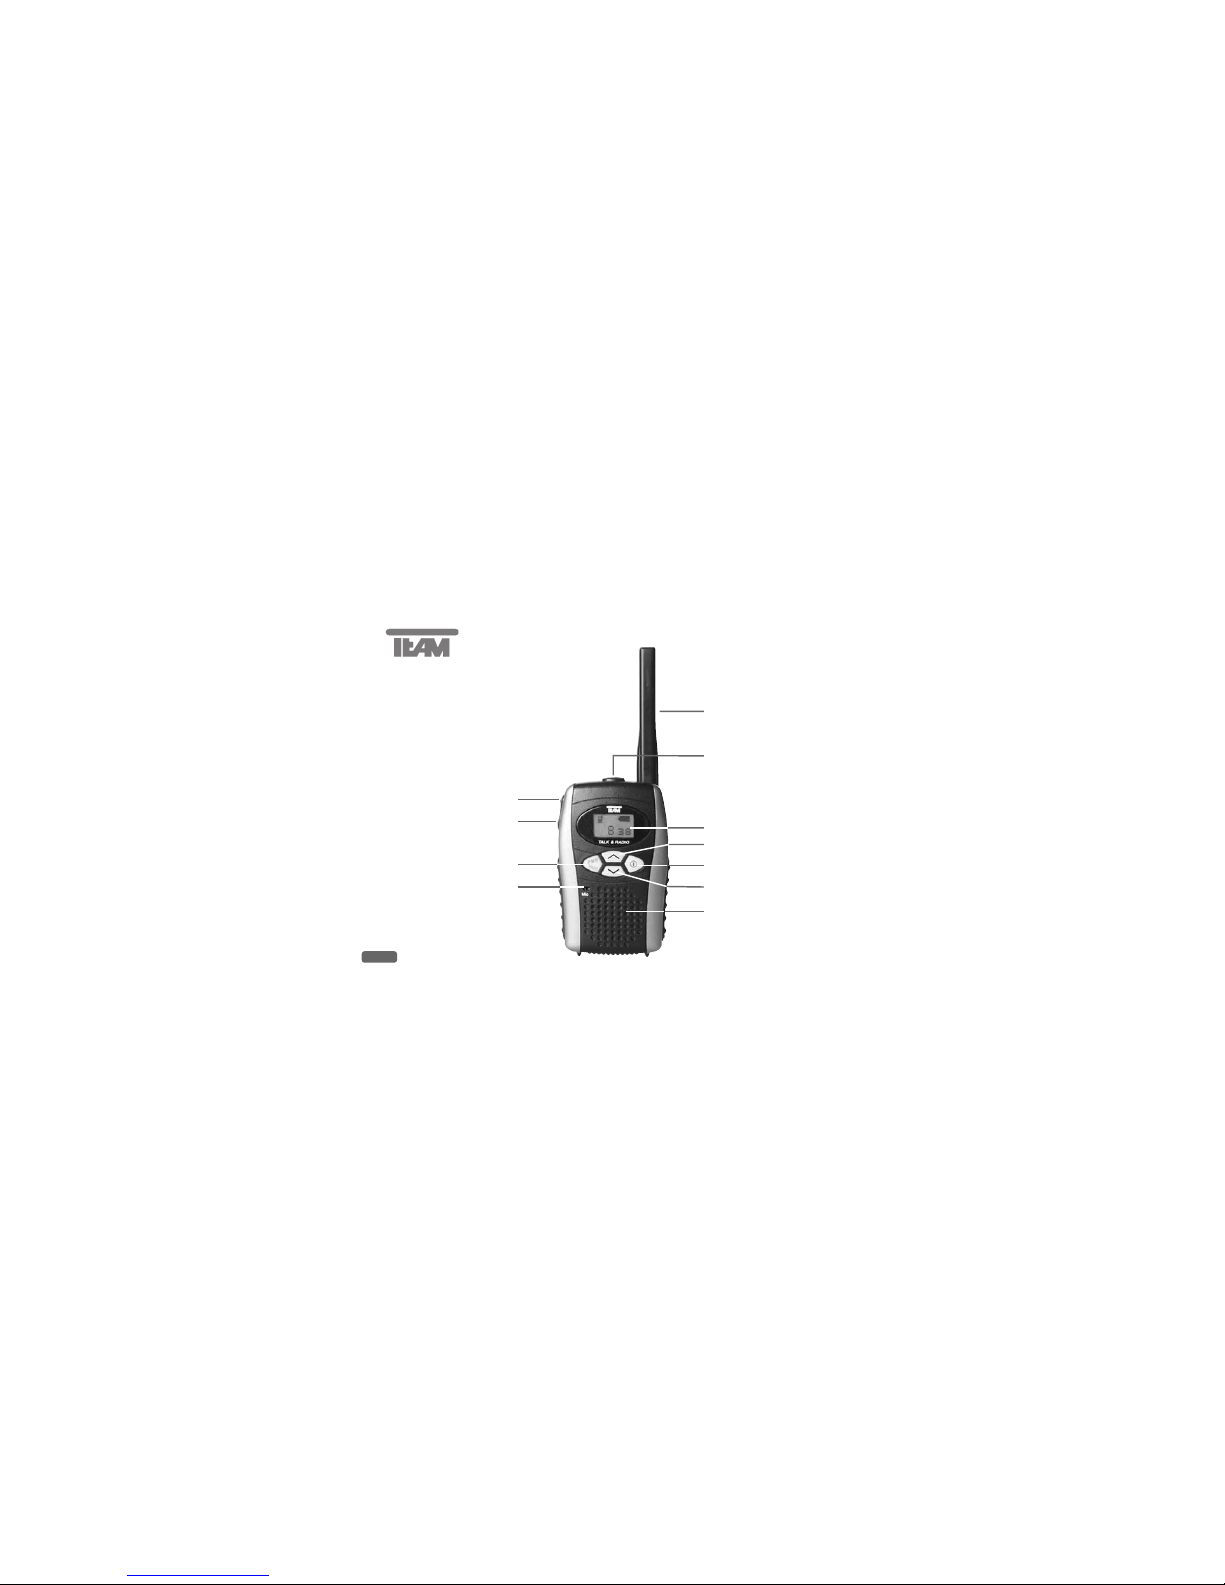
1.) Antenna
2.) Jack SP./MIC
3.) LCD Screen
4.) Up & Down Key
5.) Confirmation & On/Off Key
6.) Speaker
7.) Mic: Microphone
8.) Switch PMR/Radio
9.) PTT Key
10.) Call Tone Key
3
Page 4

Page
Controls & Connectors ............................. 2 - 3
LC-Display ..................................................... 23
Setting up
1) Inserting the batteries ................................. 24
2) Switching On/Off: ................................ 24 - 25
3) LCD illumination ......................................... 25
4) Key lock function ................................. 25 - 26
5) Automatic abortion of functions .................. 26
6) Up ▲ and Down
▼ keys ............................ 26
7) Socket for external ear- & microphone ..... 26
8) Battery indication......................................... 27
9) Power save function.................................... 27
10) Receipt tones.............................................27
PMR operation
1) Channel selection ....................................... 28
2) Activating of the CTCSS function &
selection of the CTCSS tone .............. 28 - 29
3) Volume adjustment ..................................... 29
4) Squelch adjustment ............................ 29 - 30
5) Setting of the VOX function ................ 30 - 32
6) Selection of the call melody ....................... 32
7) Monitor function .................................. 32 - 33
8) Activating of the channel scan function 33 - 34
9) Transmitting ................................................ 34
English
22
Page
Radio operation
1) Frequency selection .................................. 35
2) Volume adjustment ................................... 36
3) Adjustments for the return
to the PMR operation ......................... 36 - 37
Additional Information
Safety ................................................. 37 - 38
Service ...................................................... 38
Conformity ................................................. 38
Frequency tables & accessories ............... 75
Contens
Specifictions are subject to change without any
prior notice or obligation.
Page 5

23
A Appears if normal PMR status is activated or if Vox is switched on.
G Appears if FM-Radio switched on.
C Indicates the actual condition of the batteries.
E Indicates the selected PMR channel 1 - 8.
B Appears if key lock function is activated
H Indicates the selected frequency of the FM broadcasting station.
F Indicates the selected CTCSS Code 1 - 38.
D Indicates receiving signals or for transmitting mode.
English
A
B
C
D
EF
G
H
o
I
R
T
LC-Display
PMR-Operation
Main Screen
Radio-Operation
Main Screen
Page 6

Setting up the TEAM Talk & Radio TR-446
1) Inserting the batteries:
Turn the unit in that way that the rear panel lies in front of you. Rotate the belt clip a quarter turn counter-clockwise, so that the battery compartment lid is accessible now. The
locking of the battery compartment lid is located at the bottom side of the unit. Push the
locking aside and turn it down. Then you can take the lid off.
Now insert 4 alkaline or rechargeable AAA( = Micro ) cells into the battery compartment
according to the polarity signs inside. If you use rechargeable cells we recommend the
NiMH type.
To close the battery compartment put the lid onto the compartment in that way that the
two guide bolts at the top of the lid grip into the two corresponding guide holes at the top
of the battery compartment. Then secure the lid by pushing the locking on it until it snaps
in. Finally rotate the belt clip back into its original position
2) Switching On/Off:
Depress the confirmation CONFIRM and On/Off key ( 5 ) for about 1 or 2 seconds to
switch the transceiver on. Ashort receipt tone sounds from the loudspeaker ( 6 ) and the
display illumination lights up in red and green. For a short period the graphic display ( 3 )
shows all points. Now the unit is either in PMR reception mode or in FM radio mode. The
display will show the corresponding main screen of the actual mode.
To switch the unit off depress the confirmation and On/Off key ( 5 ) again for about 1
or 2 seconds. The loudspeaker gives a short tone and all symbols disappear from the
display. The last settings remain memorised, even if the batteries are removed.
English
24
Page 7

Note: The On/Off operation of the confirmation and On/Off key ( 5 ) is disabled after
the last activation. This factory setting has been made to avoid an unwanted On/Off
switching of the unit. The disabling of the On/Off function will be cancelled after the key
( 5 ) is not pressed for at least 2 seconds.
3) LCD illumination:
The LC display illumination is switched on at every pressure on any key, and it will be
automatically shut off after 15 seconds.
There are three different colours available for the display illumination. The setting can be
performed from the PMR main screen as well as from the FM radio main screen. In radio
operation depress out of the keys ( 4 ) Down ▼ once or Up ▲ 4 times.
In PMR operation depress out of the keys ( 4 ) Down ▼ once or Up ▲ 9 times. The display shows the writing . Depress briefly the confirmation and On/Off key ( 5 ).
Then the display shows the writing , or . By the help of the
Up/Down keys ( 4 ) these writings can be changed in a ring like system in the corresponding direction. The display illumination colour changes accordingly to the setting.
“LED C0“ means green, “LED C1“ means red and “LED C2“ means red and green. By
the help of the confirmation key ( 5 ) the desired colour will be selected, and the display
returns to the main screen of the original mode.
4) Key lock function:
The key lock function can be activated from the PMR main screen as well as from the
FM radio main screen. Depress and hold the confirmation key ( 5 ). While you hold this
key, press also the Up key ▼ ( 4 ). Then two short confirmation tones sound from the
English
25
LED
LED C0
LED C1
LED C2
Page 8

speaker ( 6 ), and the key symbol appears in the display. Now all keys except the
PTT key( 9 ) are ignored. The speaker gives two short tones at every pressure on any
locked key, except the confirmation key ( 5 ).
To stop the key lock function depress and hold the confirmation key ( 5 ). While you hold
this key, press also the Up key ▲ ( 4 ). Then one single short confirmation tone sounds
from the speaker, and the key symbol disappears in the display. Now all keys are
unlocked again.
5) Automatic abortion of functions:
If you select in the main screen for PMR or FM radio operation a function, you have to
insert all necessary entries within 5 seconds, otherwise the function will be aborted and
not executed. Instead the display returns to the main screen from which the function has
been selected before.
6) Up ▲ and Down ▼ keys:
If you depress briefly the keys Up ▲ and Down ▼ ( 4 ), the corresponding values ( volume, channel ) are changed for one step up or down. If you hold these keys for 1 or 2
seconds, the values change quickly into the corresponding direction. Some values run
in a ring like system, others remain constantly after they have reached the highest or
lowest value. In this case you will hear from the speaker a triple confirmation tone.
7) Socket for external earphone-microphone:
The socket ( 2 ) ( ø 2.5 mm ) on the top side of the unit can be used to connect an external earphone-microphone, e.g. ORM-MS. While the socket is used the internal speaker
( 6 ) and the internal microphone Mic ( 7 ) are switched off.
English
26
Page 9

8) Battery indication:
In case of completely charged batteries the battery symbol is filled-in. At 5.1 V supply voltage one third of the filling disappears, at 4.7 V one other third, and at 4.1 V there
is only the frame remaining. Now it is time to change or charge the batteries or accus,
otherwise errors of functions and displayed information may occur. The current consumption in transmit mode amounts to 270 mA, in PMR reception mode with closed
squelch 40 mA, in FM reception mode 60 mA and in power save mode 15 mA.
9) Power save function:
The power save mode is only active in PMR mode. If the squelch is not opened by a signal for at least 20 seconds, and if there is no key entry during this time, the unit falls into
the power down mode. In this condition the current consumption goes down from 40 mA
to 15 mA.
10) Receipt tones:
If a signal is found on the actual channel in PMR operation or the actual frequency in FM
radio operation the receipt tones are switched off. Otherwise every pressure of a key is
indicated by a short tone.
PMR operation of the TEAM Talk & Radio TR-446
With the help of the toggle switch PMR/RADIO ( 8 ) you can switch the unit between two
types of operation PMR operation and FM radio operation. The actual mode is indicated by the actual main screen. Switch the unit to PMR operation so that the main screen
of PMR mode is visible now. If the unit receives an audible signal of a station the symbol
( D ) appears in the lower left corner of the display.
English
27
R
Page 10

1) Channel selection:
To select a channel depress out of the keys ( 4 ) Down ▼ 9 times or Up ▲ once. The
display shows the writing . Then depress briefly the confirmation and On/Off key
( 5 ). Then the display shows the writing , where the “8“ stands for the actual
channel number. By the help of the Up/Down keys ( 4 ) the channels 1 to 8 of the PMR
band can be changed in the wanted direction in a ring like system. In France the channels 1 and 2 are not allowed for operation. Press the confirmation key ( 5 ) to select the
desired channel, and the display will return to the main screen of the PMR mode. The
channel number is located now at the position ( E ).
2) Activating of the CTCSS function and selection of the CTCSS tone:
The CTCSS function serves to suppress signals of unwanted stations on the actual
channel. If this function is active the unit works as follows:
The other station is only audible in the speaker, if it adds to its modulation signal a
certain tone in the frequency range from 67 Hz to 250 Hz with low level.
In transmit mode the unit adds itself to its modulation signal a tone of the same fre-
quency so that the muting device of the counter station can open also.
If the function is inactive you can hear every station on the channel, and in transmit
mode no tone is added to the modulation signal.
To select the CTCSS function depress out of the keys ( 4 ) Down ▼ 8 times or Up ▲
2 times. The display shows .Then depress briefly the confirmation and On/Off key
( 5 ). Then the display shows the writing , where the “22“ stands for the actual
CTCSS tone code. By the help of the Up/Down keys ( 4 ) the code numbers 0 to 38
English
28
CH
CH
8
Code
Code
22
Page 11

can be changed in the wanted direction in a ring like system. Press the confirmation key
( 5 ) to select the desired code number, and the display will return to the main screen of
the PMR mode. If the code number is different from zero, it will be visible in the PMR
main screen at the position ( F ). That means that the CTCSS function has been activated with the CTCSS tone corresponding to the code number.
If the selected code is “00“, there will be no code number visible in the lower right corner
of the PMR main screen. That means that the CTCSS function is switched off now. In the
table in the annex you find the corresponding CTCSS frequencies to the Code numbers.
3) Volume adjustment:
To adjust the volume level of the reproduction of incoming signals depress out of the
keys ( 4 ) Down ▼ 7 times or Up ▲ 3 times. The display shows the writing . Then
depress briefly the confirmation key ( 5 ). Then the display shows a loudspeaker symbol
with one or several points or bars . The number of those points or bars shows
the actual setting of the volume adjustment. By the help of the Up/Down keys ( 4 ) this setting can be changed and watched in the display. The volume level of the tones depends
from the actual setting of the volume adjustment. At the highest or lowest value you hear
a triple confirmation tone. Press the confirmation key ( 5 ) to select the desired setting of
the volume adjustment, and the display will return to the main screen of the PMR mode.
4) Squelch adjustment:
To adjust the threshold level of the noise suppression ( squelch ) in reception mode
depress out of the keys ( 4 ) Down ▼ 6 times or Up ▲ 4 times. The display shows the
writing . Then depress briefly the confirmation key ( 5 ). Then the display shows
English
29
VOL
SQ
Page 12

the writing with one or several points or bars. The number of those points or bars
shows the actual setting of the squelch sensitivity level. The more points or bars appear,
the lower the level can be for opening the squelch. By the help of the Up/Down keys ( 4 )
this setting can be changed and watched in the display. At the highest or lowest value
you hear a triple confirmation tone. Press the confirmation key ( 5 ) to select the desired
setting of the squelch sensitivity level, and the display will return to the main screen of
the PMR mode.
5) Activating and setting of the VOX function:
If the VOX function ( = voice activated transmission ) is active, the transmitter is switched
on if the sound level at the microphone Mic ( 7 ) exceeds a certain intensity. After a certain time, within which the sound level at the microphone remains below this intensity
value, the radio switches automatically back to receive mode. During reception of an
incoming signal or in radio operation the VOX function is inhibited. Thus you can communicate without the necessity of having a hand at the unit.
To activate the VOX function depress out of the keys ( 4 ) Down ▼ 5 times or Up ▲ 5
times. The display shows the writing . Then depress briefly the confirmation key
( 5 ). Then the display shows . Below it is a microphone symbol. On the left side of
the writing “on“ you see an arrow, which can be moved with the help of the Up/Down
keys ( 4 ) either on the left side of the microphone symbol or back on the left side of the
writing “on“. For the activation of the VOX function put the arrow on the left side of the
writing “on“ and then depress the confirmation key ( 5 ). After this entry the display returns
to the main screen of the PMR mode. On the position of the transceiver symbol ( A )
English
30
VOX
Page 13

you see the microphone symbol now. This indicates that the VOX function is active
now. If you talk loud enough into the microphone Mic ( 7 ), a short tone comes from the
speaker and in the display you see at the position ( D ) the symbol . 1 to 2 seconds
after you have finished your message the unit switches back to receive mode, which is
indicated by two short tones and the disappearance of the symbol .
To deactivate the VOX function depress out of the keys ( 4 ) Down ▼ 5 times or Up ▲
5 times. The display shows the writing . Then depress briefly the confirmation key
( 5 ). Then the display shows . On the left side of the writing “off“ you see an arrow,
which can be moved with the help of the Up/Down keys ( 4 ) either on the left side of the
microphone symbol or back on the left side of the writing “off“. For the deactivation of the
VOX function put the arrow on the left side of the writing “off“ and then depress the confirmation key ( 5 ). After this entry the display returns to the main screen of the PMR
mode. On the position of the microphone symbol ( A ) you see the transceiver symbol
again. This indicates that the VOX function is no longer active.
The adjustment of the threshold of the sound level at which the transmitter starts to work,
can be executed at inactive or active VOX function. To this end depress out of the keys
( 4 ) Down ▼ 5 times or Up ▲ 5 times. The display shows . Then depress briefly
the confirmation key ( 5 ). Now put the arrow on the left side of the microphone symbol
below and then depress the confirmation key ( 5 ). Then the display shows the
microphone symbol with one or several points or bars. The number of those points or
bars shows the actual setting of the VOX sound level threshold. The more points or bars
appear, the louder you have to speak to start the transmission. By the help of the
Up/Down keys ( 4 ) this setting can be changed and watched in the display.
English
31
T
T
VOX
VOX
Page 14

At the highest or lowest value you hear a triple confirmation tone. Press the confirmation
key ( 5 ) to select the desired setting of the sound level threshold, and the display will
return to the main screen of the PMR mode.
6) Selection of the call melody:
To select a call melody depress out of the keys ( 4 ) Down▼ 4 times or Up ▲ 6 times.
The display shows the writing . Then depress briefly the confirmation and On/Off
key ( 5 ). Then the display shows a music note symbol and a digit. The digit
stands for the number of the actual call melody. By the help of the Up/Down keys ( 4 )
the call melody numbers can be changed from 1 to 8 in the wanted direction in a ring
like system. If you don’t press any key for 1 or 2 seconds the call melody will be played
in full length in the speaker. Then the display will return to the main screen of the PMR
mode. By pressing the confirmation key ( 5 ) you select the desired call melody at once,
and the display will return to the main screen of the PMR mode earlier.
7) Monitor function:
The noise suppression ( squelch ) in reception mode is designed to cut off the disturbing
noise, which the receiver produces on free channels, and to let pass only the speech signals of a counter station to the speaker. In case of very weak signals it may occur, that
the squelch remains closed. If you want to make also these signals audible, you can
inhibit the squelch ( monitor function ). To this end depress out of the keys ( 4 ) Down ▼
3 times or Up ▲ 7 times. The display shows the writing . Then depress briefly the
confirmation key ( 5 ). Now the squelch is always open and you can hear on free channels
a noise. In the display you can see , where the “8“ stands for the actual channel
English
32
Tone
MON
on?
MON
8
Page 15

number. This is the main screen for PMR monitor operation. In this condition you can only
adjust the volume level setting ( Para 3 ) or the squelch sensitivity setting ( Para 4 ). This
can be done by the help of the Up/Down keys ( 4 ). T o adjust the volume level of the repro duction of incoming signals depress out of the keys ( 4 ) Down ▼ 2 times or Up ▲ once.
See Para 3 for the further instructions. To adjust the squelch sensitivity setting for incoming signals depress out of the keys ( 4 ) Down ▼ once or Up ▲ 2 times. See Para 4 for
the further instructions. To reactivate the squelch, depress in the main screen for PMR
monitor operation the confirmation key ( 5 ), and the display will return to the main screen
of the PMR mode.
8) Activating of the channel scan function:
In channel scan mode the unit looks for occupied channels on which the squelch opens.
At the same time it examines whether the demodulated reception signal contains also a
CTCSS tone. If the unit has found one, it identifies its corresponding code number and
shows it in the display at the position ( F ). To activate the scan function depress out of
the keys ( 4 ) Down ▼ 2 times or Up ▲ 8 times. The display shows the writing .
Then depress briefly the confirmation key ( 5 ). Then the display shows . On the
left side of the writing “UP“ you see an arrow, which can be moved with the help of the
Up/Down keys ( 4 ) either on the left side of the writing “DOWN“ or back on the left side
of the writing “UP“. For the final activation of the channel scan function put the arrow on
one of both writings and then depress the confirmation key ( 5 ). The display returns to
the main screen of the PMR modebut without a CTCSS code number. According to the
chosen direction the channel scan starts stepping upwards or downwards. The unit stops
English
33
Scan
on?
UP
DOWN
▼
Page 16

on every occupied channel, where the squelch opens, for 10 seconds. If there is in the
demodulated signal also a CTCSS tone, it will show also the corresponding CTCSS code
number. 10 seconds later or after the signal has dropped below the squelch threshold the
channel scan function continues searching. By pressing the confirmation key ( 5 ) the
channel scan function is terminated and the unit remains on the actual channel. If the unit
has been on an occupied channel where a CTCSS coded station has made a transmission, the display will take over this CTCSS code. If the station had no CTCSS code or the
channel was free, the unit keeps the CTCSS setting which has been active before starting the channel scan.
9) Transmitting:
For speech transmission depress and hold the transmit key PTT ( 9 ) on the left side of the
unit. In the display appears the symbol ( D ). If the channel scan function had been
active, it would be terminated now. The sensitivity of the built-in microphone Mic
( 7 ) has been set to give good results speaking normally at a distance of 2 inches.
Speaking too loudly will cause distortions and make the signal difficult to understand. On
completion of the transmission release the transmit key PTT ( 9 ) and the unit will revert to
receiving mode and in the display the will disappear. For call melody transmission on
the actual channel depress the call tone key CALL( 10 ) above the PTTkey. The unit transmits the actual call melody in full length, no matter how long you press the call tone key
CALL( 10 ). It is only audible at the counter station. In the display appears ( D ). Speech
transmission is impossible now. After finishing transmission the unit switches back to
receiving mode with a short melody in the speaker ( 6 ) and in the display will disappear.
English
34
T
T
T
T
Page 17

Radio operation of the TEAM Talk & Radio TR-446:
With the help of the toggle switch PMR/RADIO ( 8 ) you can switch the unit between two
types of operation PMR operation and radio operation. The actual mode is indicated by
the actual main screen. Switch the unit to FM radio operation so that the main screen of
radio mode is visible now.
1) Frequency selection:
To select the frequency depress out of the keys ( 4 ) Down ▼ 4 times or Up ▲ once. The
display shows the writing . Then depress briefly the confirmation key ( 5 ). Then
the display shows the actual frequency in MHz. By a short depression of the Up/Down
keys ( 4 ) the FM band frequency can be changed from 87.5 MHz to 108.0 MHz in 0.1MHz-steps in a ring like system into the wanted direction. If there is a FM station on the
actual frequency, it will be audible. Otherwise the squelch mutes the audio reproduction.
By depressing the confirmation key ( 5 ) the desired frequency is selected and the display returns to the main screen of the FM radio mode. If you depress and hold the keys
Up/Down keys ( 4 ) for 1 or 2 seconds, you activate the frequency scan function. The
frequency steps automatically in runs in 0.1-MHz-steps in a ring like system into the
wanted direction, until the unit finds a FM station which can open the squelch. In this
case the display switches back to the main screen of the FM radio mode. But the frequency scan function remains internally still active. 10 seconds after the station has
been found or after the depression of the Up/Down keys ( 4 ) the frequency scan function continues searching in the originally selected direction. By pressing the confirmation
key ( 5 ) the frequency scan function is completely terminated and the unit remains on
the actual FM frequency.
English
35
Freq
Page 18

2) Volume adjustment:
To adjust the volume level of the reproduction of incoming signals depress out of the keys
( 4 ) Down ▼ 3 times or Up ▲ 2 times. The display shows . Then depress briefly
the confirmation key ( 5 ). Then the display shows . The number of those points
or bars shows the actual setting of the volume adjustment. The volume level of the tones
depends from the actual setting of the volume adjustment. At the highest or lowest value
you hear a triple confirmation tone. By the help of the Up/Down keys ( 4 ) this setting can
be changed and watched in the display. Press the confirmation key ( 5 ) to select the
desired setting of the volume adjustment, and the display will return to the main screen
of the FM radio mode.
3) Adjustments for the return to the PMR operation:
The unit remains also in FM radio mode ready to receive signals on the actual PMR channel. On receiving of an incoming signal the unit can either switch to PMR operation or it
can request from you to choose between PMR operation and FM radio operation. To
select one of these two return modes depress out of the keys ( 4 ) Down ▼ 2 times or Up
▲ 3 times. The display shows the writing . Then depress briefly the confirmation
key ( 5 ). Then the display shows . On the left side of the writing “Auto“ you see
an arrow, which can be moved with the help of the Up/Down keys ( 4 ) either on the left
side of the writing “Manu“ or back on the left side of the writing “Auto“. The setting “Auto“
has the effect, that the unit switches itself automatically to PMRoperation on reception of
a signal on the actual PMR channel. The setting “Manu“ has the effect, that the unit gives
a short tone to inform the user about the reception of a signal on the actual PMR
English
36
VOL
PMR
Auto
Manu
▼
Page 19

channel so that he can choose between PMR operation or FM radio operation. T o select
the desired return mode put the arrow on one of both writings and then depress the confirmation key ( 5 ). In the case that you have selected the setting “Auto“ ( = automatic
return ), and the unit receives a signal, there will be a short tone from the speaker and
the display will show the main screen of the PMR mode. It will not turn back to FM radio
operation until you press the toggle switch PMR/RADIO ( 8 ). In the case that you have
selected the setting “Manu“ ( = manual return ), and the unit receives a signal, there will
be a short tone from the speaker and the display will show the symbols . On the left
side of the transceiver symbol you see an arrow, which can be moved with the help of
the Up/Down keys ( 4 ) either on the left side of the radio symbol or back on the left side
of the transceiver symbol. The display illumination flashes every second for a period of
10 seconds. On selection of the transceiver symbol the unit switches over to PMR operation ( main screen ) and on selection of the radio symbol to FM radio operation ( main
screen ). To select the desired mode put the arrow on one of both symbols and then
depress the confirmation key ( 5 ). Pressing on the transmit key PTT ( 9 ) or on the call
tone key CALL ( 10 ) results in both return modes, automatic and manual return, a
switching from FM radio mode to PMR mode and transmission. On releasing the keys
the unit will revert to FM radio mode both return modes.
Safety:
The unit radiates in transmit mode RF energy. To reduce the exposure at the lowest possible value, and to benefit as much as possible of the features of the unit, you should
take into account the following advice:
English
37
Page 20

In transmission mode keep the unit in a vertical position at a distance of 2 to 3 inches
from your face. Keep the antenna at a distance of at least 1 inch away from your head
and your body. If you carry the unit on your body and if the unit is in transmit mode, make
sure that the antenna is kept at a distance of at least 1 inch away from your body.
Service:
The condition of the batteries must be tested from time to time. Worn out batteries must be
removed from the unit immediately. They can leak and damage the device. The batteries
should always be replaced as a complete set. Worn out batteries do not belong in the
waste bin, but must be returned to a suitable collecting depot or to a special dealer, for the
sake of the environment. There are no user adjustable or user serviceable parts inside the
radio. The casing must not be opened. Independent repairs or adjustments must not be
carried out, since each modification or unauthorised intervention will immediately cancel all
and any guarantee or repair claims, they are also likely to result in nonconformity to ETS
regulations which will render the set to become illegal. In the event a defect becoming
apparent, contact a properly equipped and authorised TEAM dealer or TEAM directly.
Conformity:
The transceiver TEAM Talk & Radio TR-446 complies with the rules of the European
Directive R&TTE and meets the European Telecommunication Standards ETS 300 296
& ETS 300 279.
This product is meant for distribution and sale in the following European countries:
Austria, Belgium, Denmark, Finland, France, Germany, Greece, Luxemburg,
Netherlands, Portugal, Spain, Sweden, Great Britain, Switzerland.
English
38
Page 21

Kanalnummer / Channel Nbr.
Numéro du canal / Numero del canale
Freq. MHz
1 446.00625 MHz
2 446.01875 MHz
3 446.03125 MHz
4 446.04375 MHz
5 446.05625 MHz
6 446.06875 MHz
7 446.08125 MHz
8 446.09375 MHz
CTCSS-Code Freq. Hz
1 67.0
2 71.9
3 74.4
4 77.0
5 79.7
6 82.5
7 85.4
8 88.5
9 91.5
10 94.8
11 97.4
12 100.0
13 103.5
14 107.2
15 110.9
16 114.8
17 118.8
18 123.0
19 127.3
CTCSS-Code Freq. Hz
20 131.8
21 136.5
22 141.3
23 146.2
24 151.4
25 156.7
26 162.2
27 167.9
28 173.8
29 179.9
30 186.2
31 192.8
32 203.5
33 210.7
34 218.1
35 225.7
36 233.6
37 241.8
38 250.3
Bitte nur geeignete Original TEAM
Zubehörteile verwenden.
Please use original TEAM accessories only.
N’utilisez que des accessoires TEAM origin-
aux, s’il vous plaît!
Solamente utilizzare degli accessori TEAM
originali, per favore!
75
Als optionales Zubehör gibt es den Zubehörpack ZP/TR-446 als Komplettset. Das Paket enthält
ein Steckerladegerät mit Tischladeschale, ein Satz ( 4 Stück ) Akkus und ein Ohrhörermikrofon.
We offer also as an optional accessory the complete set ZP/TR-446. The set contains a plug-in
charger with desktop charging shell, a set of rechargeable batteries ( 4 pieces ) and one earphone-microphone combination.
Nous offrons comme accessoires additionnelles un ensemble complète ZP/TR-446. Cet ensemble contient un chargeur avec une coupe de charge, un jeu d’accus ( 4 pièces ) et un microphone auriculaire.
Esisto anche come accessorio il pacchettino complesso ZP/TR-446. Il pacchettino contiene un caricatore con coppella di carica, un complesso ( 4 pezzi ) pile ricaricabili ed un microfono auricolare.
Page 22

TEAM Talk & Radio TR- 446
for sale and use in :
• Austria • Belgium • Denmark • Finland
• France • Germany • Greece
• Luxembourg • Netherlands •
Portugal • Spain• Sweden
• Switzerland • U.K.
Nachdruck oder Vervielfältigung auch Auszugsweise nur mit ausdrücklicher
Genehmigung von TEAM Electronic GmbH.
electronic
TEAM Electronic GmbH
Bolongarostrasse 88
D-65929 Frankfurt / Main
Telefon 069 / 300 950 0
Fax 069 / 31 43 82
eMail TEAMGerman@aol.com
Home Page www.team-electronic.de
 Loading...