

Team Electronic PR8056 TeCom-X5 PMR, PR8069 TeCom-X5 FreeNet, PR5058 TeCom-X5 UHF User Manual
Page 1

TeCom-X5
PMR
FreeNet
UHF
VHF
User’s Manual
Page 2

Dear Customer,
Thank you for buying a TEAM TeCom-X5. TEAM Electronic stands for high-quality radio communication.
To fully understand the various functions and the possible settings and to ensure the proper
operation of the radio, we recommend to read this manual prior to first time use.
The TeCom-X5 is available in these four versions:
PR8056 TeCom-X5 FreeNet : programmed with 6 FreeNet** channels, 500 mW tx power,
bandwidth 12.5 kHz, no registration or fees apply
PR8069 TeCom-X5 PMR : programmed with 8 PMR* channels, 500 mW tx power,
bandwidth 12.5 kHz, no registration or fees apply
PR5058 TeCom-X5 UHF : commercial radio; 128 channels programmable; registration and
fees apply; only assigned frequencies and parameters are allowed
to be programmed; bandwidth 12.5 kHz or 25 kHz;
max. TX power 4 W; UHF 400 - 470 MHz
PR5058 TeCom-X5 VHF : commercial radio; 128 channels programmable; registration and
fees apply; only assigned frequencies and parameters are allowed
to be programmed; bandwidth 12.5 kHz or 25 kHz;
max. TX power 5 W; VHF 136 - 174 MHz
Programming of the TeCom-X5 is done via the additional software T-UP???????????. A data
transfer cable is included in the scope of delivery.
* = PMR Frequencies ** = FreeNet Frequencies
1 - 446.00625 MHz 1 - 149.0250 MHz
2 - 446.01875 MHz 2 - 149.0375 MHz
3 - 446.03125 MHz 3 - 149.0500 MHz
4 - 446.04375 MHz 4 - 149.0875 MHz
5 - 446.05625 MHz 5 - 149.1000 MHz
6 - 446.06875 MHz 6 - 149.1125 MHz
7 - 446.08125 MHz
8 - 446.09375 MHz
Page 3

GENERAL
Scope of Delivery
Maintenance
BASIC FUNCTIONS
Antenna
Battery Pack
On / Off
Volume
Channel Selection
Transmit
Reception
Keys
PTT Transmit Key
Multifunctional Key
Monitor Key
Squelch
TX Power
Scan
Radio
Table of Contents
page
MENU
01 APO (Automatic Power Off) 02 APRO (Optional Function)
03 BANK (Memory Bank) 04 BATSAV (Battery Save Function)
05 BCLO (Busy Ch. Lockout) 06 BEEP (Beep Tone)
07 SCR NO (Scrambler Type) 08 DC VLT (Info Voltage)
09 DW (Frequency Watch) 10 LAMP (Display Light)
11 LOCK (Keylock) 12 MSGSET (Greeting Message)
13 NAME (Display Type) 14 NM SET (Channel Name)
15 OFFSET (not available) 16 OPN MSG (Opening Screen)
17 PSWD (Passwort) 18 PSWD W (Password Set)
19 ROGER (Roger Tone) 20 SCN MD (Scan Mode)
21 STE (Signal Transmit End) 22 TOT (Time Out Timer)
23 TXSTOP 24 VOX
25 VOX D (Vox Delay Time) 26 VOX S (Vox Sensitivity)
27 VXB (Block Vx on Busy Ch.) 28 WIDNAR (Bandwidth)
5-TONE SELECTIVE CALLING
ACCESSORY JACK
SPECIFICATIONS
CTCSS/DCS
PCB LAYOUT AND PARTS
Page 4

GENERAL
Scope of Delivery
Unpack the equipment carefully. We recommend you to identify the listed items before discarding
the packing material. If any items are missing or have been damaged during shipment, please contact the dealer immediately.
Supplied Accessories
1 x Antenna (attached with PMR version) 1 x Belt clip 1 x Battery
1 x Charger 1 x Manual
Maintenance
For optimal performance and functionality of the TeCom-X5, please pay attention to the following
advices.
Do not open the case of the radio. Improper opening may cause damages and warranty claims
are forfeited.
For charging of the rechargeable battery pack, only use the charger SLG-TeCom-X5 that is inclu-
ded in the scope of delivery.
Never expose the radio to direct sunlight or other heat sources. High temperatures will diminish the
longevity of certain components and plastic parts may melt and deform. lzen.
Never store the radio in dusty or dirty areas.
Do not expose the radio to any liquid. Humidity max cause corrosion of the pcb and its components.
Should the radio generate unusual heat or emit unusual smell or even smoke, please turn the
radio off immediately and remove the battery pack. Contact your dealer.
Never transmit without antenna. A damage of the power amplifier may be the result.
Features
> max. tx power
FreeNet : 500 mW PMR : 500 mW
VHF : 5 W * UHF : 4 W *
> 16 channels available
UHF : 400 - 470 MHz VHF : 136 - 174 MHz
PMR : 8 Channels PMR 446 MHz FreeNet: 6 Channels FreeNet 149 MHz
> bandwidth
FreeNET / PMR: 12.5 kHz
UHF / VHF : 12.5 / 25 kHz
> 128 programmable channels > battery saving function
> 5-tone selective calling > transmit blockage on occupied channels
> scrambler > FM radio
> 50 CTCSS and 107 DCS > key lock
> LCD display with background illumination > Password function
> automatic turn off(APO) > TOT
> scrambler (eight different codes) > VOX
> channel bank store > Repeater Tone 1450 Hz / 1750 Hz / 2315 Hz
Page 5
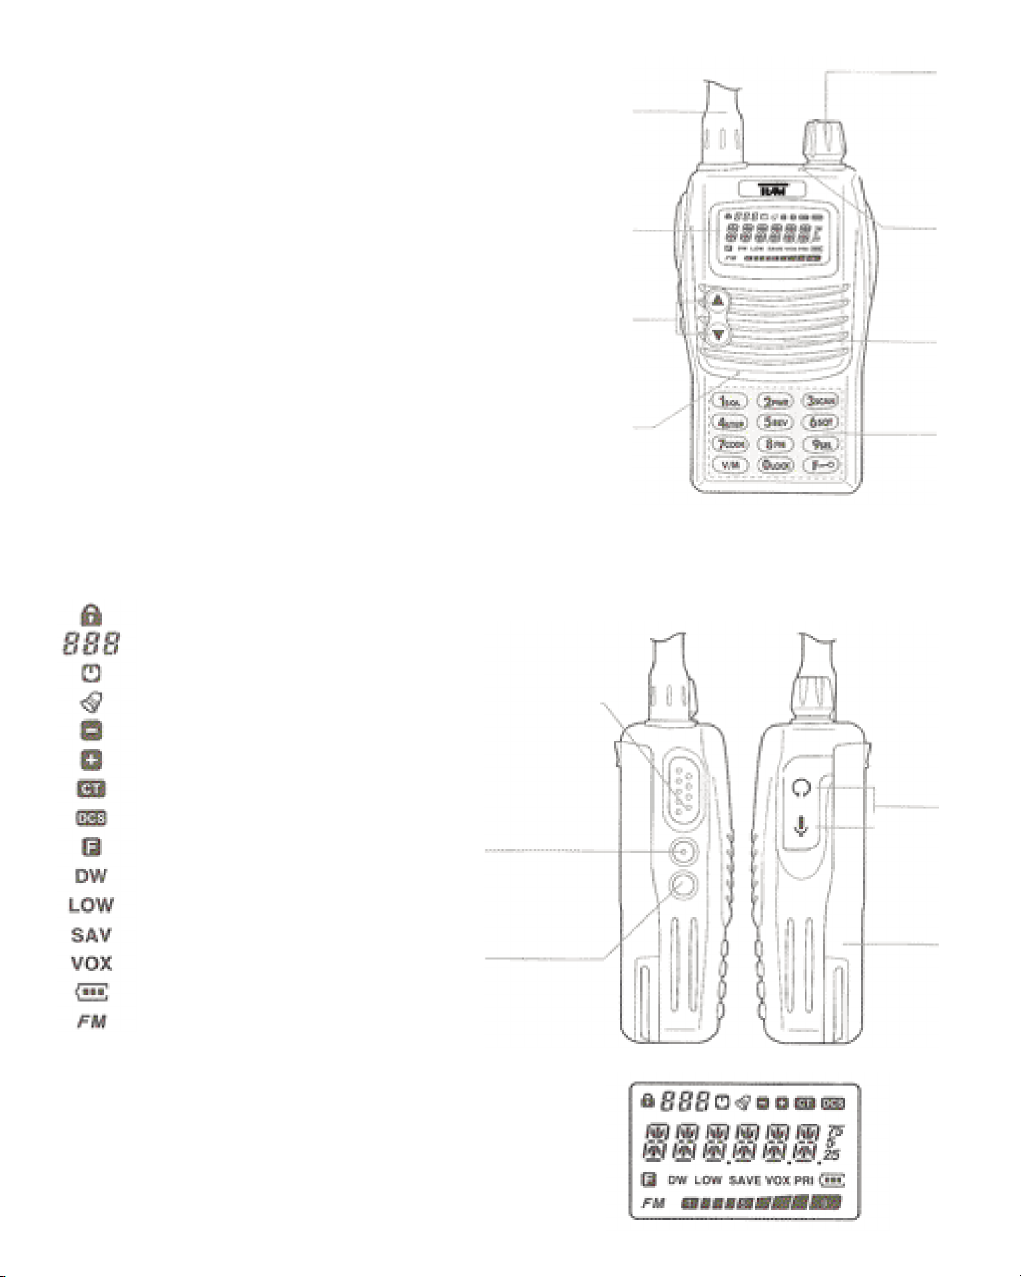
1 - antenna
2 - LCD
3 - Up / Down keys
4 - microphone
5 - On/Off - volume
6 - LED
7 - speaker
8 - key pad
9 - PTT
10 - multi-function key
11 - monitor key
12 - connection jack
13 - battery pack (1200 mAh / 7.4 V)
key lock
memory bank, menu function
APO
beep tone
not available
not available
CTCSS code
DCS code
menu
monitor while radio
tx power
battery saving function
VOX
battery status
FM radio
PRI
item of channel scan list
10
11
5
1
2
6
3
7
4
8
9
12
13
Page 6

BASIC FUNCTIONS
Antenna
Due to governmental regulations, the antenna in the PMR version is fixed, i.e. non-detachable.
Battery Pack
To attach the battery pack (13) onto the radio, place the bulges
at the bottom of the battery pack into the according holes an the bottom, rear of the radio.
Press the battery pack at the top part against the radio until the battery pack snaps in.
To remove the battery pack, press down the latch and remove the battery pack.
Charging
Prior to first use, the battery pack has to be charged completely. A completely empty battery pack
needs to be charged for approximately three hours. During the charging process, the LED lights
red. Once charging is completed, the LED lights green.
Remove the battery pack out of the charger. Overcharging reduces the battery packs longevity.
On / Off
To turn the radio on, turn the On / Off switch (5) clockwise beyond the barrier. A beep tone is emitted if the beep tone function is activated.
To turn off the radio, please turn the On / Off switch (5) counterclockwise beyond the barrier.
Volume Control
To set a comfortable volume level after turning the radio on, hold the monitor key (11) while adjusting the volume level with the combined On/Off-Volume key (5).
Channel Selection
For channel selection use the key pad (8) or the Up / Down (3) keys.
Via key pad enter the channel number in a three digit format, e.g. 001 for channel 1. Upon a misentry, the last selected channel will be set.
With the Up / Down (3) keys, the channels are passed through in the consecutive order. After
the highest channel number, the sequence starts again with the lowest number.
Upon actived memory bank function (03 BANK), only the channels of the selected memory bank
are passed through. For more information about the memory bank function see page XXXXXXXX.
Transmit
For transmission keep pressing the PTT key (9) until the end of message.
For best sound quality, talk into the microphone (4) with normal voice at a distance of approximatly
10 cm.
During transmission the control LED (6) lights red.
Upon release of the PTT key (9) the radio returns automatically into reception mode.
Reception
Upon reception of a signal, the LED (6) lights green.
If the selected frequency is decoded with a CTCSS- / DCS-code, all signals that are encoded with a
different code will be muted. The green LED will light but no signal will be audible.
Page 7

Key Pad Functions
PTT Key
The PTT key (11) is located at the left side of the radio. Pressing the PTT key will switch the radio
into transmission mode. The LED (6) will light red.
Multi-Function Key
The multi function key (10) is located under the PTT key (6). It can be programmed with one of
these functions: transmit 5-tone selective call
1450 kHz repeater tone
1750 kHz repeater tone
2315 kHz repeater tone
Monitor Key
The monitor key (11) is located on the left side of the radio under the multi-function key (10). When
pressing the monitor key, the squelch is deactivated and a constant noise is audible.
With this function, it is possible to hear very weak signals that would not pass the squelch.
Squelch
The sensivity level of the squelch can be set between 0 and 9, whereas the level 0 corresponds to
the least sensitive level. The squelch is completely open at level 0.
At level 9, the signal has to be very strong to pass the squelch.
To set the squelch level, press the F-key (key pad, lower row, right) followed by the SQL-key (number key 1). The display shows SQL X, where X represents the actual squelch level (0 - 9). Set the
desired squelch level with the Up / Down (3) keys and confirm your selection by pressing any
key.
TX Power
For the tx power selection there are three levels available LOW / MID / HIGH. In the versions PMR
and FreeNet, the tx power level HIGH is set to 500 mW. In the COM versions, the high tx power
can be adjusted according to the assigned power of the registration.
To select a tx power level (Low / Mid / High), press the F-key (key pad, lower row, right) followed by
the PWR key (number key 2). The display shows the actual tx power level. Select the wanted
power level with the UP / Down keys (3) and confirm your selection by pressing any key.
Setup of tx power level LOW is indicated in the display with the symbol LOW.
Scan
Use the scan function to find occupied channels of the channel list. Channels can be added or removed from the channel list via software or key operation at the radio. Channels of the channel list are
indicated in the display by the symbol PRI, which is located next to the battery status symbol.
To add or remove a channel from the channel list, press the F-key (key pad, lower row, right), followed
by the LOCK key (number key 0).
To start thescan function press the F-key (key pad, lower row, right), followed by the SCAN key (number key 3).
Stop the scan function by pressing any key, with exception of the Up / Down keys (3).
There are three scan modes (SE / CO / TO) available. For more information see page XXXX.
Page 8

Radio
The TeCom-X5 has a radio function. Via software, 25 radio frequencies can be stored. It is also
possible to manually select frequencies via the keypad.
To turn on / off the radio, press the F-key (keypad, lower row, right), followed by the FM key (number 8). In the fixed channel mode, the actual radio channel number is displayed above the frequency, provided that channels have been programmed.
To switch between manual frequency mode and fixed channel mode press the V/M key (keypad,
lower row, left).
Manual Frequency Mode:
The wanted radio station within the frequency range of 70 MHz to 107,9 MHz, can be directly entered via the keypad. It is also possible to step to the wanted frequency in 10-kHz steps with the Up
/ Down (3) keys.
To find an occupied radio station the scan function can be used. Start the scan function by pressing
the F-key (keypad, lower row, right), followed by the SCAN-key (number 3). The display reads SCN.
UP until an occupied channel has been found. The active scan function is indicated by a blinking
dot next to the letter N.
To stop scanning press any key.
Zum Auffinden einer besetzten Radiofrequenz steht ebenso die Suchfunktion zur Verfügung.
Starten Sie den Suchlauf durch Drücken der Sperrtaste (Tastenfeld unten rechts) gefolgt von der
SCAN-Taste (Tastennummer 3). In der Anzeige erscheint solange SCN. UP bis ein besetzer Kanal
gefunden wurde. Der aktive Suchlauf wird durch einen blinkenden Punkt neben dem Buchstaben N
angezeigt. Zum Abbrechen der Suchfunktion irgendeine Taste drücken.
MENU
General settings that can be altered directly via the radio are organized in the menu.
Follow these steps to change a setting:
1. To open the menu press the F-key (keypad, lower row, right), followed by the SEL key (number 9).
2. Select the wanted function with the Up / Down keys (3).
3. To access the available settings for the selected function, press the F-key (keypad, lower row, right).
4. Select the wanted setting with the Up / Down keys (3).
5. To confirm your selection and continue in the menu press the F-key (keypad, lower row, right).
To confirm and leave the menu press the V/M key (keypad, lower row, left).
If no key is pressed within 10 seconds, the selected settings will be automatically stored and the
the menu will be left.
These functions are available.
01 APO
Automatic Power-Off
Settings : Off, 1 - 15 H (hours)
The radio will automatically power off after the set time
Page 9

02 APRO
Optional Functions
Settings : Off / SCRAMB / COMP
SCRAMB : upon activation, the radio uses the scrambler coding (1 - 8) that is set in menu
function 07 SCR NO.
COMP : the compander improves the signal-qualitiy by combining compressor and expander.
03 BANK
Memory Bank
Settings : No Bank / BANK 1 - 8 (depend on the programmed frequencies)
The allocation of frequency to memory bank is done automatically.
If this function is deactivated (No Bank), all programmed channels are displayed in their order. If
a memory bank is selected, only the channels of this bank are displayed.
BANK 1 : channel 1 - 16
BANK 2 : channel 17 - 32
BANK 3 : channel 33 - 48
BANK 4 : channel 49 - 64
BANK 5 : channel 65 - 80
BANK 6 : channel 81 - 96
BANK 7 : channel 97 - 112
BANK 8 : channel 113 - 128
04 BATSAV
Battery Save Function - On / Off
If no signal is present on the selected channel, the radio switches into standby mode after a certain time.
05 BCLO
Busy Channel LockOut - is a signal present on the selected channel, transmission is blocked
until the channel is clear again.
settings: OFF; QT / DCS; WAVE
OFF : no lockout on busy channels
WAVE : lockout on all signals
QT / DCS : lockout on signals with the same coding
06 BEEP
warnt tone - On / Off
Any entry, except pressing the PTT key and the programmable function key, is confirmed by a
double-tone. In the activated state, the bell symbol is shown in the display.
07 SCR NO
select scrambler type SCR 1 - 8
This setting is only relevant when function 02 APRO is activated.
08 DC VLT
Shows actual voltage level of the battery pack
Page 10

09 DW
Channel monitoring with activated radion function - On / Off
While the radio is on, the selected channel is monitored. Upon reception of a signal, the radio is
deactivated until the signal disappears.
10 LAMP
Illumination of the LCD - OFF / KEY / CONT
OFF : no illumination
KEY : after entry, the display is illuminated for 5 seconds
CONT : illumination is constantly on
11 LOCK
Key lock
settings: - K + S / PTT / KEY / ALL
Press the keylock key (keypad, lower row to the right) to activated or deactivate the keylock
function. The activated state is indicated by a key symbol in the upper left corner.
K + S : all key of the keypad, as well as the channel selection keys are locked - PTT key, as
well as the monitor and programmable function keys are activated
PTT : transmission is blocked - the display shows P LOCK
KEY : all keys of the keypad are locked - channel selection keys, as well as PTT, monitor
and programmable function keys are activated
ALL : all functions are locked
12 MSGSET
Programming of the welcome message that appears shorty after turning on the radio
5 symbols are available:
a) blank character,
b) the digits 0 - 9,
c) the letters A - Z and
d) the symbols asterix *, underscore _ and plus +.
Select the symbols with the channel selection keys.
To proceed to the next space press the number key 9. To move the cursor backwards press the
number key 7.
To delete the actual entry press the V/M key (keypad, lower row left side).
13 NAME
display types are FREQ and ALPHA
ALPHA : The programmed frequency is displayed as a channel number, e.g. CH - 001.
FREQ : The programmed channel name is displayed. If no channel name is programmed,
the channel number is shown.
14 NM SET
Channel Name Programming of the welcome text that appears after turning the radio on. The text message can
contain a maximum of five symbols and can contain :
Page 11

a) blank character,
b) the digits 0 - 9,
c) the letters A - Z and
d) the symbols asterix *, underscore _ and plus +.
Select the symbols with the channel selection keys.
To proceed to the next space press the number key 9. To move the cursor backwards press the
number key 7.
To delete the actual entry press the V/M key (keypad, lower row left side).
15 OFFSET
not available
16 OPN MSG
temporary message after turning the radio on - OFF / MSG / DC
OFF : no message text is displayed
MSG : in 12 MSGSET programmed text is displayed
DC : voltage of the battery pack
17 PSWD
password protection - On / Off
Requires entry of the programmed password if function is activated. The password is programmed via software or directly at the radio via the menu function 18 PSWD W.
The radio cannot be operated if the correct password is not entered.
A forgotten password can be retrieved via software.
18 PSWD W
password creation
Create a 4-digit password out of the numbers 0 - 9. Confirm your entry by pressing the F key
(keypad, lower row right side).
To delete the entry press the V/M key (keypad, lower row left side).
19 ROGER
roger beep - On / Off
In the activated state, the three-tone roger beep is sent after release of the PTT key (9).
20 SCN MD
there are three scan modes available :
TO : Time-Operated-Scan
Is an occupied channels scanned, remains the radio for a certain period of time, which is
programmable via software, on this channel before scanning is continued regardless if the
signal is still present or not.
CO : Carrier-Operated-Scan
The radio remains on an occupied channel until the signal ends. Then, scanning continous.
SE : Search-Scan
Is an occupied channel scanned, stops the scan function and the radio remains on this channel.
Page 12

21 STE
Side Tone Eliminate - On / Off
Under certain circumstances, a clicking sound can be heard upon releasing the PTT key. The
function STE reduces this noise, which is useful when the radio is operated with a headset.
22 TOT
Time-Out-Timer - Off / MIN 1 - 7
Restricts transmission time to set time period (1 - 7 minutes). After expiration of set time limit,
transmission is aborted. For reset, release PTT key.
23 TXSTOP
transmission blockage - ON / OFF
24 VOX
voice operated signal transmission - On / Off
VOX allows hand-free operation. Transmission starts automatically once the signal strength reaches a certain level.
25 VOX D
VOX delay
determines how long the VOX function will be still active after the signal stopped.
settings: 15 / 25 / 35 / 45
15 : 1 second 25 : 2 seconds 35 : 3 seconds 45 : 4 seconds
26 VOX S
VOX sensitivity
settings: level 1 - 8;
level 1 = most sensitive, i.e. transmission starts easily after a low signal
level 8 = least sensitive, i.e. signal has to be very strong for the transmission to start
27 VXB
VOX lockout on busy channels - On / Off
28 WIDNAR
bandwidth - not available
The bandwidth can only be set via software.
Page 13

5-TON SELECTIVE CALLING
The TeCom-X5 contains a 5 tone selective calling function, which parameters are set via software.
General Description:
Each radio is programmed with an individual radio ID (5-Tone ID). This ID code is always sent
with the encode and it serves also as a decode.
The 5-Tone encodes are entered via keypad. This way, all possible encodes can be sent without
memory storage restrictions.
The own ID is always sent with the encode. If the sent 5-tone encode matches the ID code of
the other radio, the sent ID code will be displayed by the receiving radio and the radio reacts in
the programmed way, e.g. the speaker unmutes, a beep tone is audible or an automatic acknowledgement is sent.
Important: For the selective calling function to work, the programmable function key (10) has to
be set to Optional Signal Call.
CONNECTOR
The TeCom-X5 has a Kenwood-compatible accessory jack (3.5 / 2.5 mm - stereo / stereo) for
connecting headphones, microphones and the data transfer cable, required for programming the
radio via software.
Suitable accessory can be found in the actual TEAM catalogue.
Page 14

50 CTCSS frequency code (Hz)
67.0 94.8 131.8 171.3 203.5
69.3 97.4 136.5 173.8 206.5
71.9 100.0 141.3 177.3 210.7
74.4 103.5 146.2 179.9 216.1
77.0 107.2 151.4 183.5 225.7
79.7 110.9 156.7 186.2 229.1
82.5 114.8 159.8 189.9 233.6
85.4 118.8 162.2 192.8 241.8
88.5 123.0 165.5 196.6 250.3
91.5 127.3 167.9 199.5 254.1
210 DCS frequency codes N/I
D017 D122 D245 D356 D506 D731
D023 D131 D246 D364 D516 D732
D025 D132 D251 D365 D523 D734
D026 D134 D252 D371 D526 D743
D031 D143 D255 D411 D532 D754
D032 D145 D261 D412 D546
D036 D152 D263 D413 D565
D043 D155 D265 D423 D606
D047 D156 D266 D431 D612
D051 D162 D271 D432 D624
D053 D165 D274 D445 D627
D054 D172 D306 D446 D631
D065 D174 D311 D452 D632
D071 D205 D315 D454 D645
D072 D212 D325 D456 D654
D073 D223 D331 D462 D662
D074 D225 D332 D464 D664
D114 D226 D343 D465 D703
D115 D243 D346 D466 D712
D116 D244 D351 D503 D723
Page 15

Specification
General
Frequency Range UHF: 400 - 470 MHZ
VHF: 136 - 174 MHz
Working Temperate -20°C - +50°C
Operating Voltage DC 7.4V
Operate Mode Simplex or Semi-duplex
Channel space 2.5 khz
Weight incl. battery and antenna 220g
Antenna impedance 50W
Transmitter
Frequency Stability ±2.5PPM
Output Power H/M/L UHF: max 4 W
VHF: max. 5 W
Max Frequency Deviation £ 2.5khz (N)
Audio Distortion £ 3%
Modulation type FM
Adjacent Channel Power ? 60dB
Radiated Harmonics -45dBm
Frequency error 200Hz
Receiver
RF Sensitivity(SINAD) W: 0.223uV>12dB
N: 0.223uV>12dB
Audio Distortion £ 3%
Adjacent Channel Selectivity ? 60dB
Intermodulation Rejection ? 60dB
Spurious radiation ? 60dBm
Spurious response rejection ? 60dB
 Loading...