


1:10 SCALE 2WD ELECTRIC PRO RACING TRUCK

Notice
This manual is written in english language only. If you need a manual in your language please visit our
website or contact your distributor!
Diese Anleitung wurde in englischer Sprache verfasst. Sollten sie eine Anleitung in ihrer Sprache
benötigen, besuchen sie unsere website oder konaktieren sie ihren Vertriebsagenten.
Questo manuale è stato scritto in inglese. Se avete bisogno del manuale nella tua lingua, si prega di
visitare il nostro sito web o contattate il proprio distributore.
Este manual está escrito en Inglés. Si necesita el manual en su idioma, por favor visite nuestro sitio
web o contacte con su distribuidor.
Ce manuel est écrit en langue anglaise. Si vous avez besoin d'un manuel dans votre langue
s'il vous plaît visitez notre site web ou contactez votre distributeur!
Deze handleiding is geschreven in het Engels taal beschikbaar. Als u een handleiding in uw eigen
taal kunt u terecht op onze website of neem contact op met uw distributeur!
Thank you for purchasing this TS2 Competition Truck by Team C. This manual shows instructions and
tips to built and maintain your TS2. Please take some time to read through to get familiar with the shown
steps.
We continually improve our products, due to that, actual parts my be different to the illustrations.
Please check our website for the latest versions manuals and tips before you start to built this model.
Generall Information
THIS IS NOT A TOY!
Not suitable for children under 14 years of age without adult supervision.
This is a high performance vehicle, for safety reason don’t run on public streets, in crowded areas,
environmentally areas or near children or animals.
This model contains rotationg parts and parts which become hot during operation. Care must been
taken to avoid damage or injuries.
This product may require some assembly and routine maintance.
This product is covered by warranty based on material defectives. Crash damage or maintenance
failures are not covered under warranty.
Batteries should be used in good condition only, and need to be fully charged.
Nitro models should be driven outside of buildings only. Inhaling exhaust gases could cause health
damage.
Keep chemicals stored out of the range of small children.
Make sure your model and equipment is in perfect condition before you use it, to ensure savety
and fun while driving.
DIGITAL
PROPORTIONAL
RADIO CONTROL
SYSTEM
DIGITAL
PROPORTIONAL
RADIO CONTROL
SYSTEM
反向开关
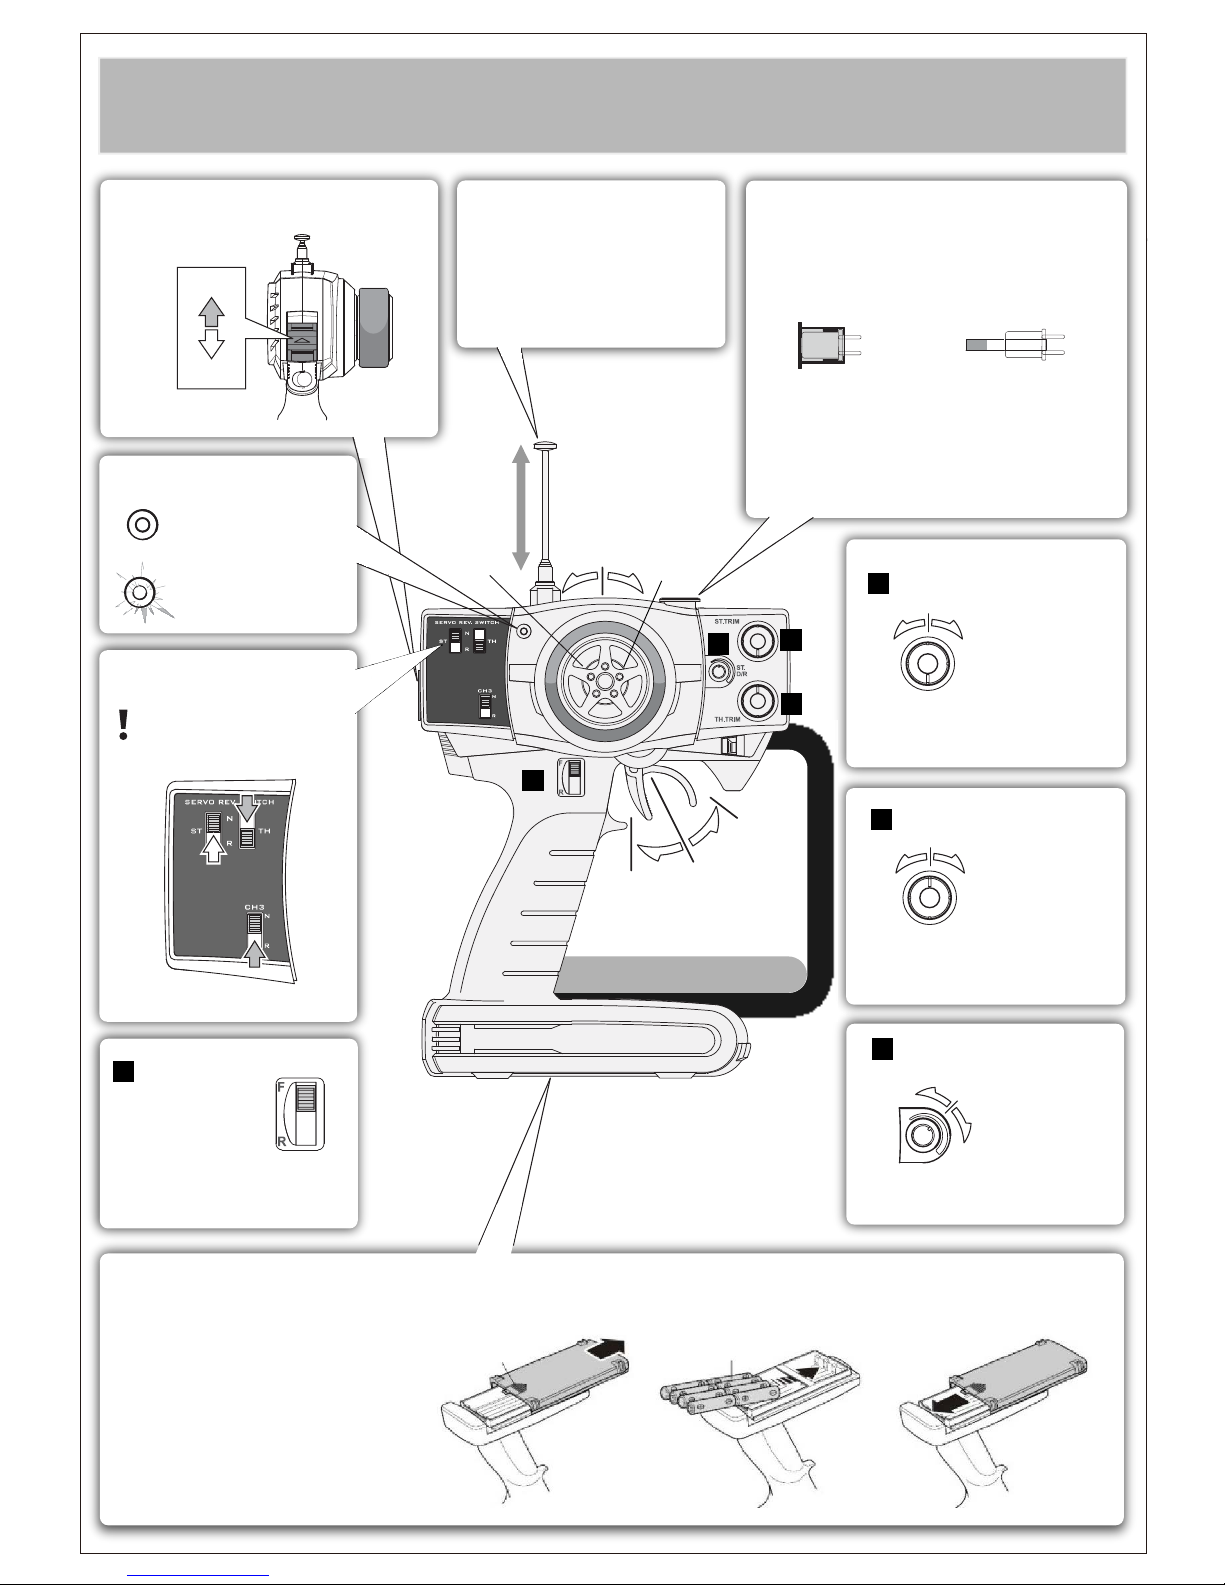
Transmitter Preparation
27MHzTransmitter Crystal(TX)
Transmitter crystal(TX)
Power Switch
ON
OFF
Antenna
Extend the antenna to the maximum
Length for best performance
The crystal can be replaced to change frequencies.
Note : You must also change receiver crystals!
Do not use AM crystals
Receiver crystal(RX)
Steering Trim
To be used for trimming the steering
operation
Throttle Trim
Steering Dual Rate
To be used to adjust steering servo throw
AA Alkaling Batteries
8X
Open battery cover at the bottom of transmitter.
Install batteries. Follow the direction of batteries
designated in the inside of battery box.
Transmitter Battery Installation
This switch is used for optional parts.
3ch Switch
Reverse Switch
Low Batteries(Light Blinks)
Good Batteries
Battery Level Indicator
Left turn
Straight (neutral)
Right turn
Brake
Forward
Stop(Neutral)
To be used for throttle operation
Throttle Trigger
Battery Cover
Servo Factory Settings
1
1
2
3
2
To be used for trimming the throttle
operation
3
4
4
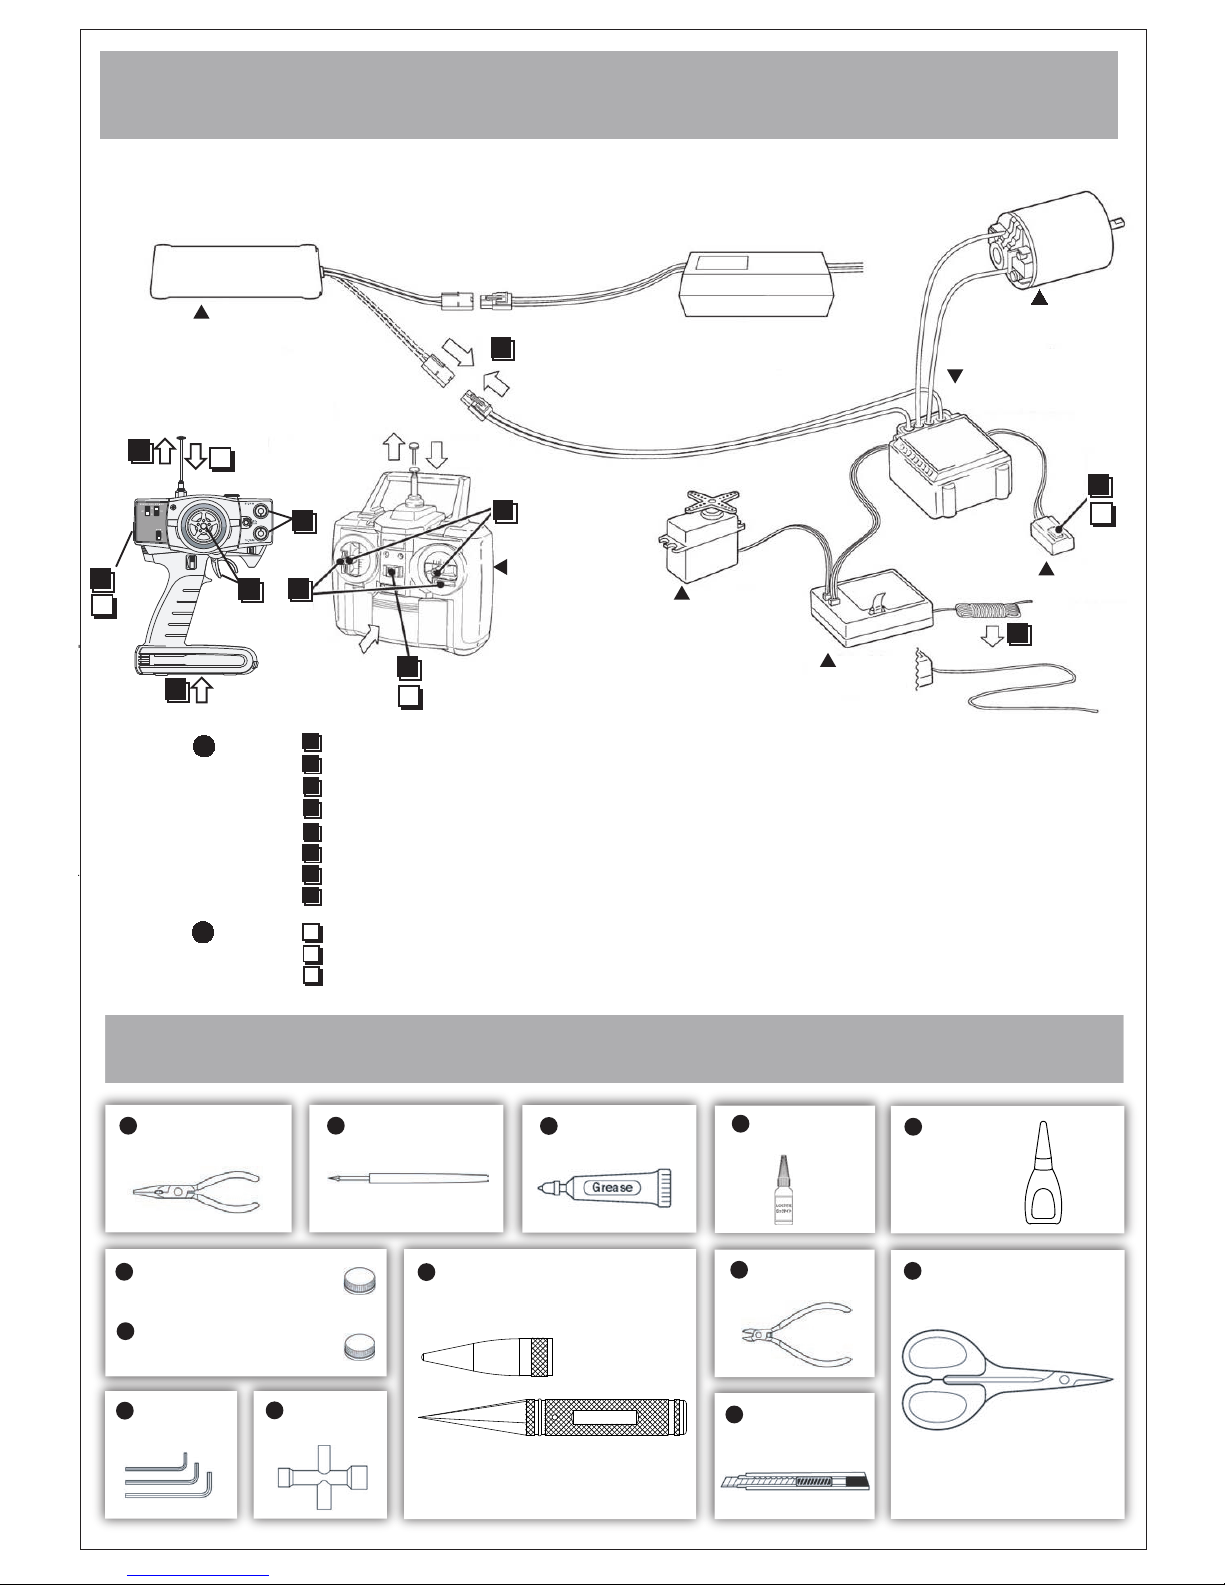
Transmitter Preparation
Battery
A new Ni-MH battery must be charged before it is used.Refer to the charger instruction manual for charging.
Set up the radio control system as indicated below.
6
5
8
Servo
Receiver
Transmitter
10
4
Switch
7
9
Electronic Speed
Controller
Motor
DIGITAL
PROPORTIONAL
RADIO CONTROL
SYSTEM
11
2
ON
OFF
6
10
ON
OFF
5
8
1
3
Tools required
Needie Nose Pllers
Awl
Grease
Screw Cement
Instant Glue
Hex Wrench
Differential Grease
Molybdenum Grease(Black)
Hex Wrench
Body Reamer
No need to pre-drill precise holes
(1mm to 15mm)can be drilled
Wire Cutters
Sharp Hobby knife
ROUND CUTTER
For trimming bodies!
Start
Finish
Install batteries.(Transmitter)
Extend the antenna.(Transmitter)
Connect the battery
Extend the antenna.(Reveiver)
Center the trims.
Switch on.(Transmitter)
Switch on.(Reveiver)
Make sure the servos are in command.
Switch off.(Reveiver)
Switch off.(Transmitter)
Retract the antenna(Transmitter)
1
8
7
2
5
3
4
6
9
10
11
H154
H162
H096
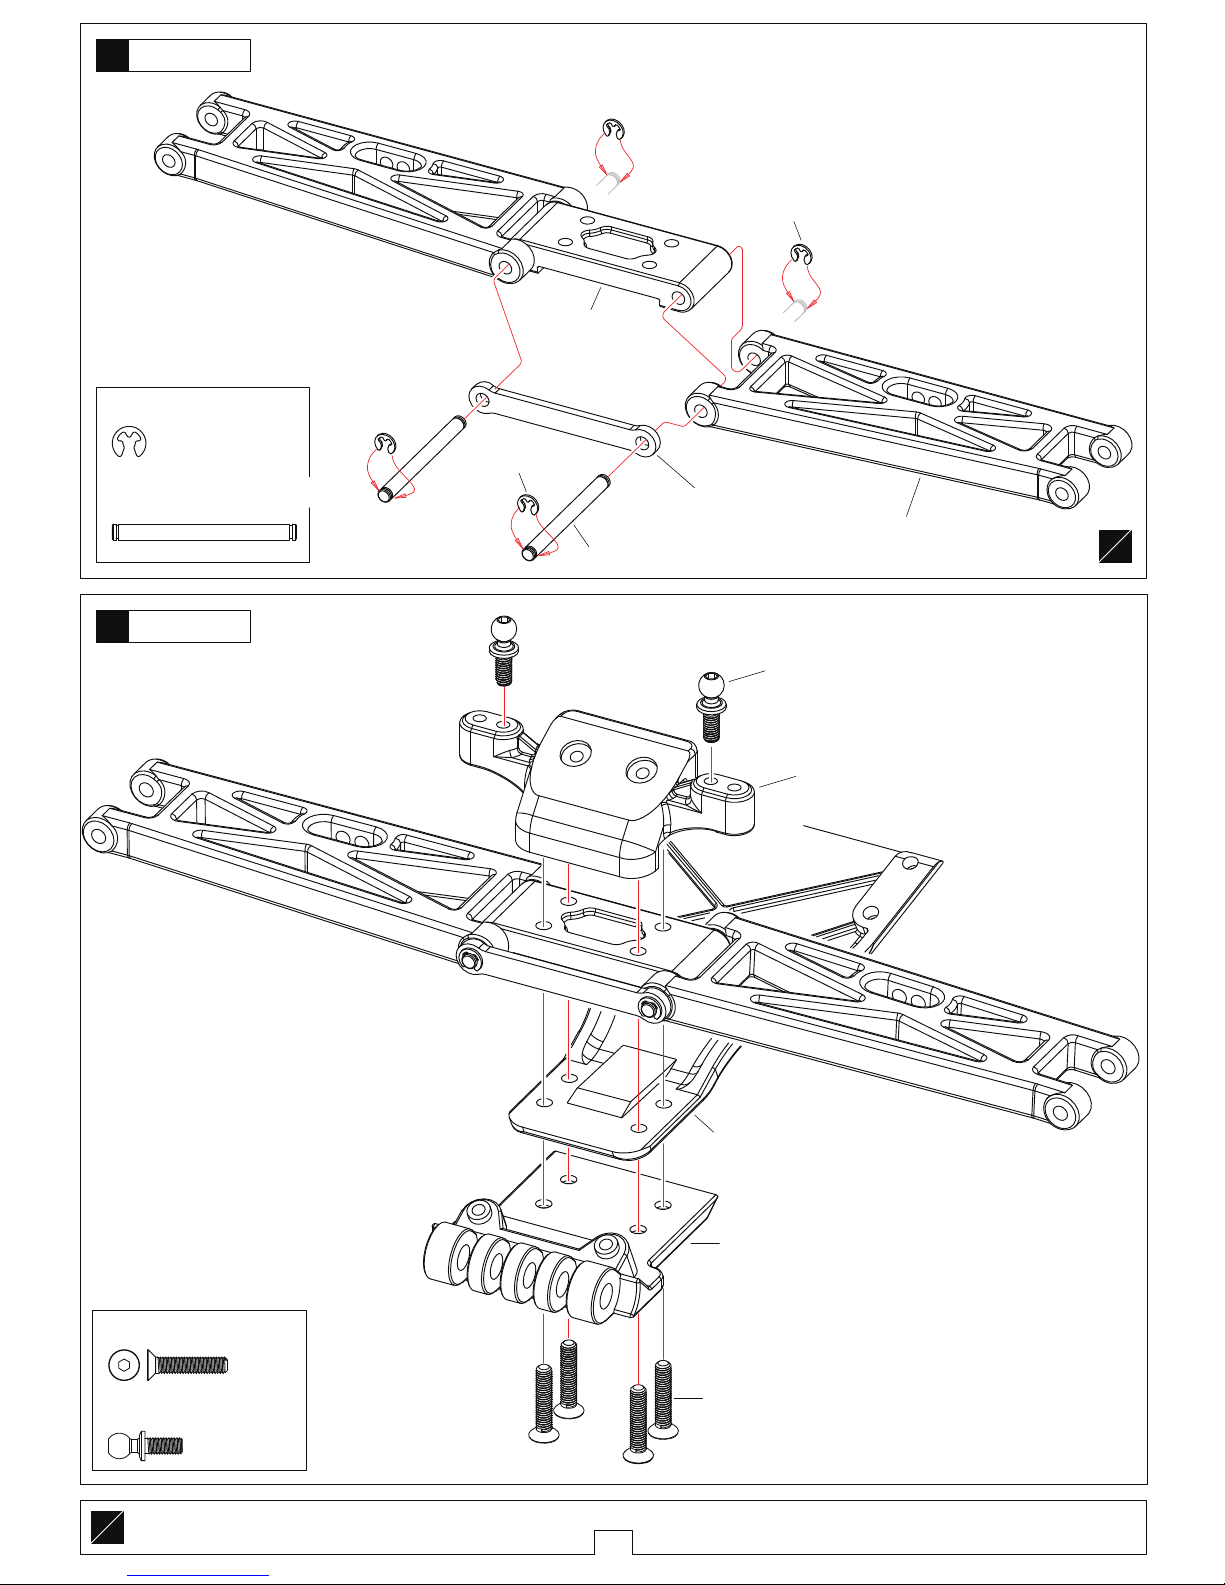
1
1
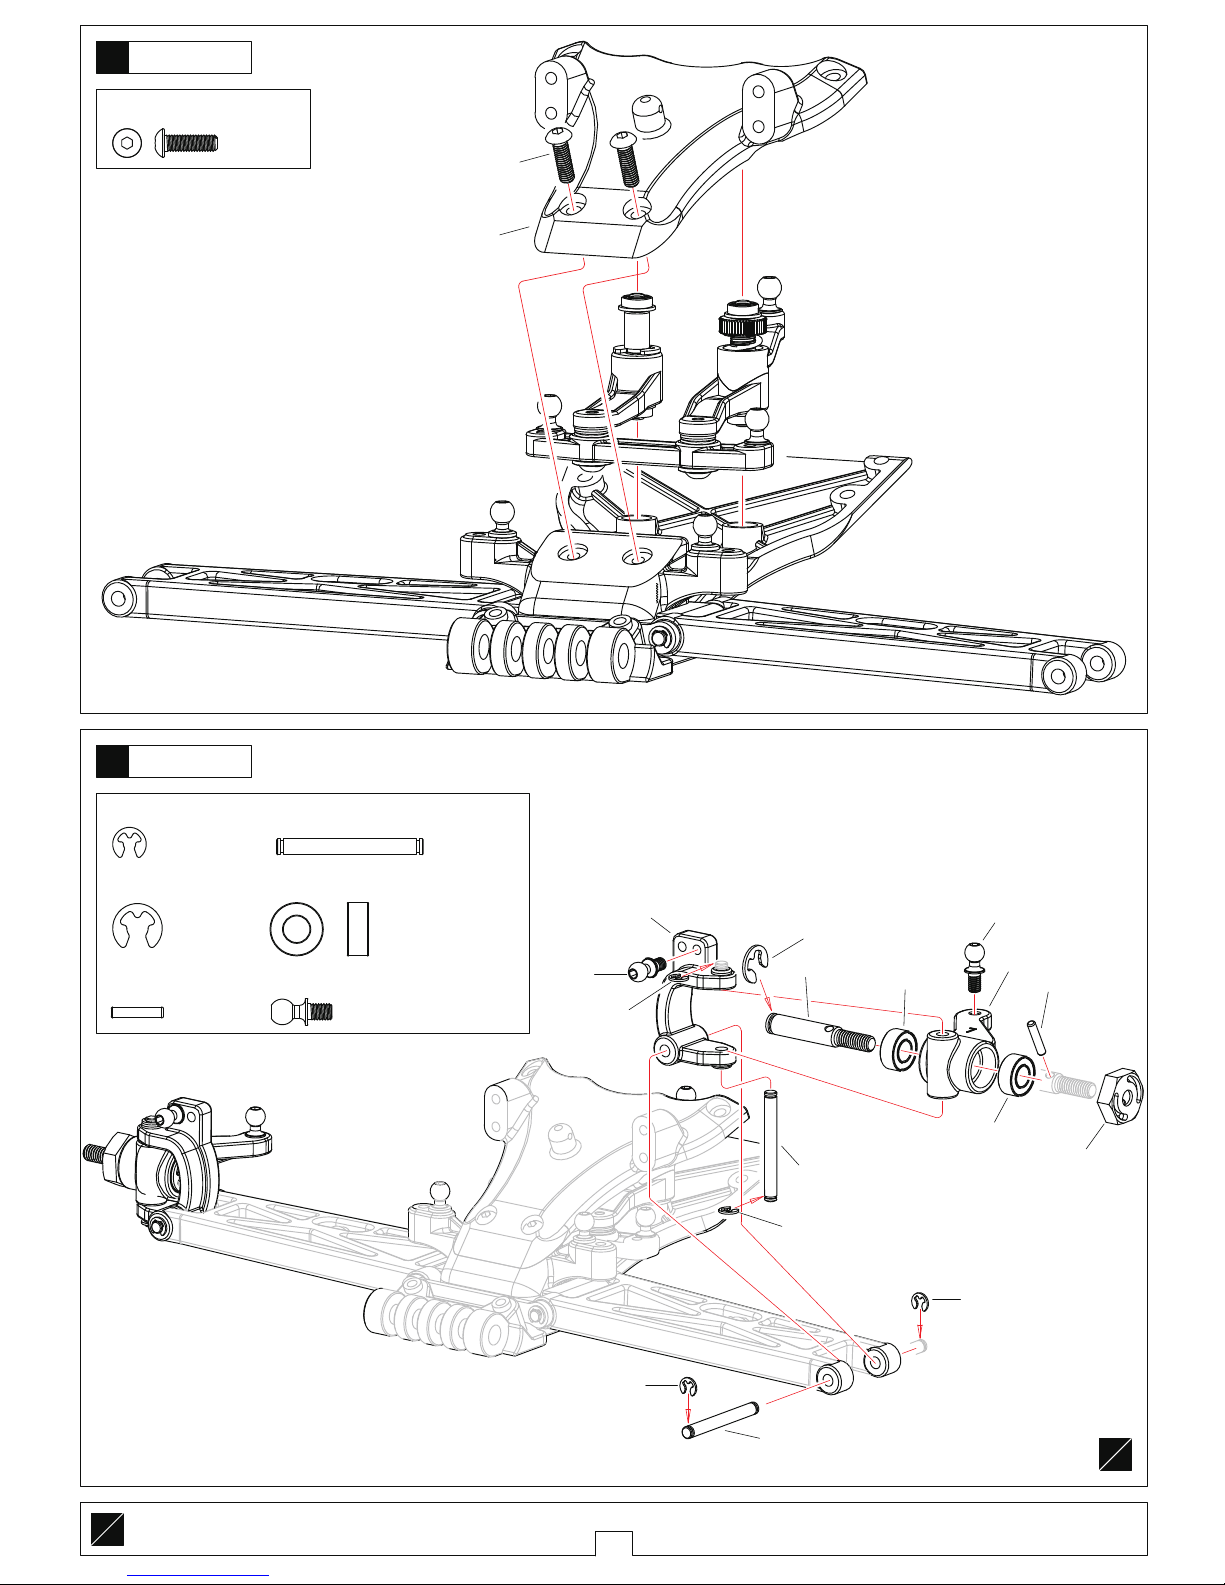
Front Suspension
T02014
T02056 3x34.5
T02056 2.3
L
R
T02056 3x34.5 Hinge pin front inner
………………………4
……2
T02056 2.3 E-ring
…………4
T02083 M3x15 Screw
T02092 Ball stud-Long
…………………2
TG2003
T02056 2.3
T02037
T02092
T02083 M3x15
TS2023
T02008
T02015
L
R
Assemble Both Left And Right
2
Front Suspension
4.0mm
T02043 4.0 E-ring
……………………1
…………………4
T02080 3x6x2.5 Ball Bearing
T02044 Block Carrier
T02044 M3x10 Screw
…………………………2
……………2
T02093 Ball stud-Short
……………………2
T02061 Ball stud-Silvery
…………………1
……………………2
T02044 3x7x0.8 Washer
T02043
T02043
T02043
T02043
T02043
T02080
T02080
T02061
T02080
T02080
T02023
T02023
T02023
T02044
T02044
T02093
T02024
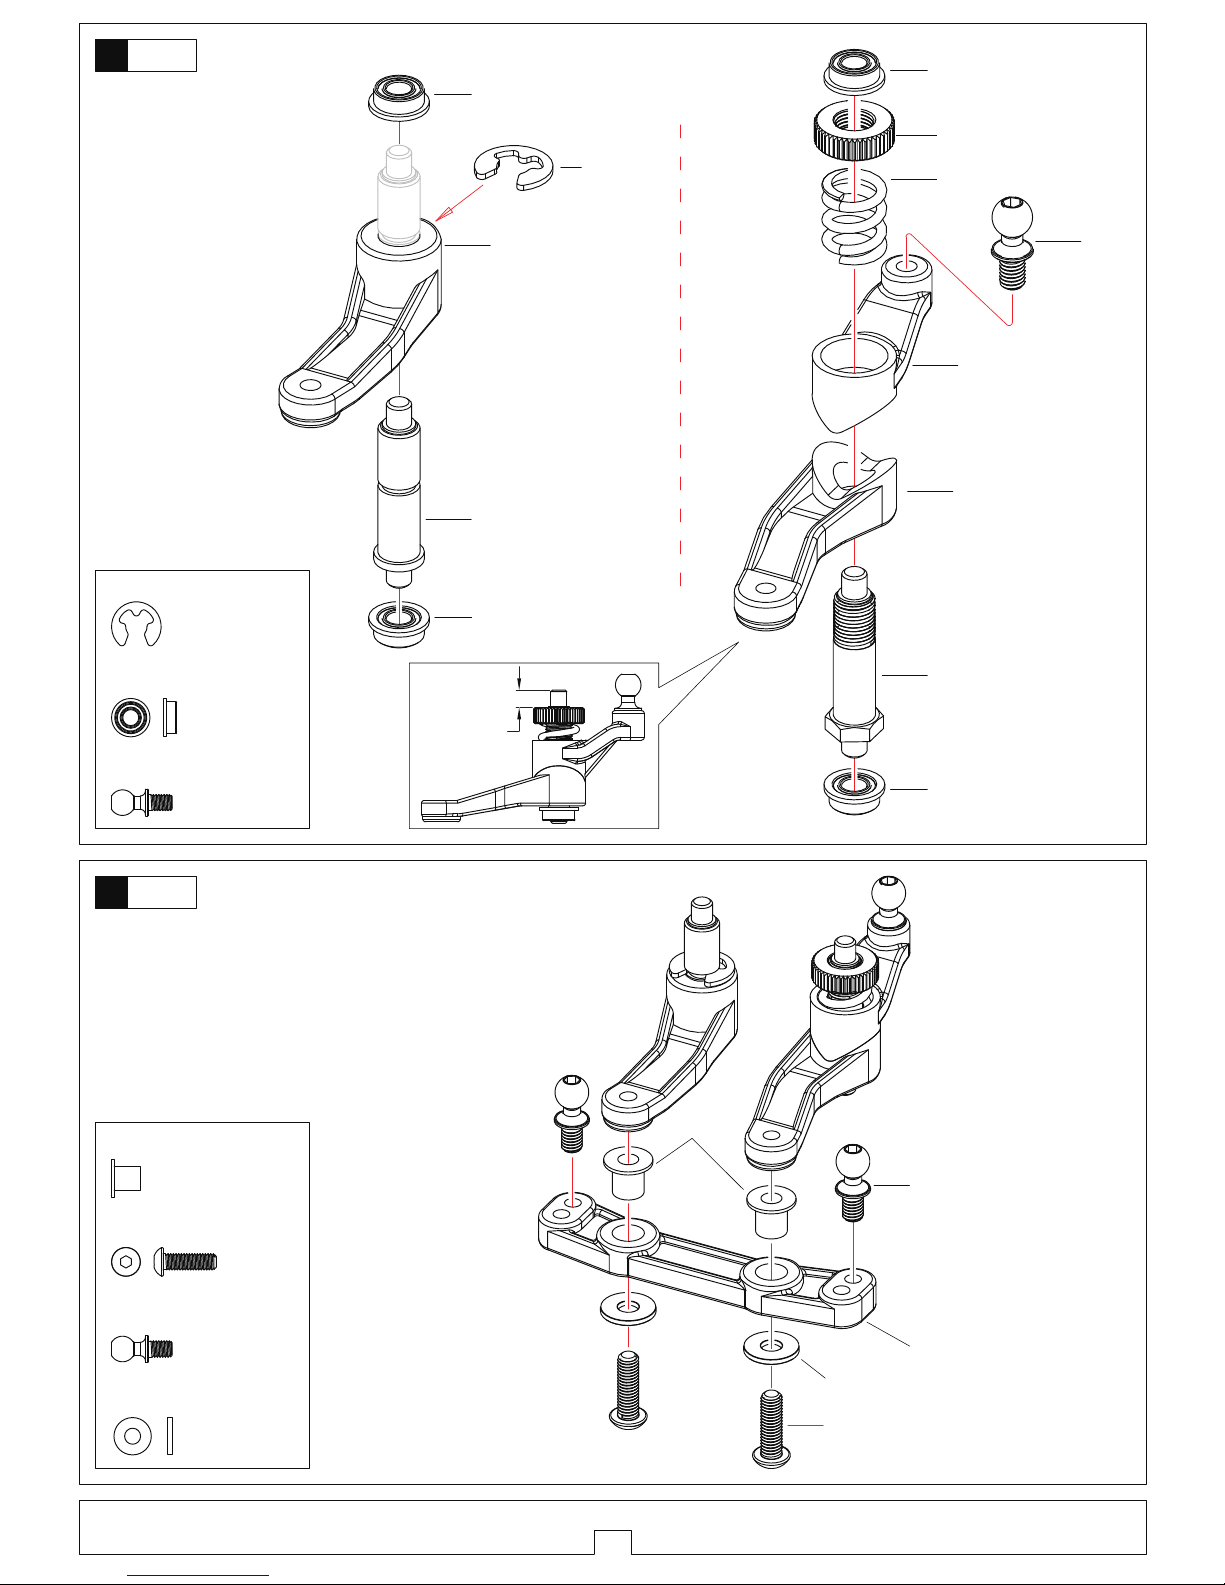
2
T02044 3x7x0.8
3
Buffer
4
Buffer
3
…………8
T02054 2.3 E-ring
T02093 Ball stud-Short
……………………………4
…………2
T02100 5x10x4 all bearing
………………………4
T02054 3x27.5 Hinge pin front outer
…………4
T02042 2x9.8 Shaft
…………2
T02042 4.0 E-ring
T02082 M3x10 Screw
……………2
T02082 M3x10
T02019
L
R
L
R
Assemble Both Left And Right
5
Front Suspension
6
Front Suspension
T02054 3x27.5
T02054 3x27.5
T02054 2.3
T02054 2.3
T02054 2.3
T02042 4.0
T02100 5x10x4
T02042
T02042 2x9.8
T02100 5x10x4
T02012
T02093
T02034
T02093
T02011
T02054 2.3
True-to -scale diagram
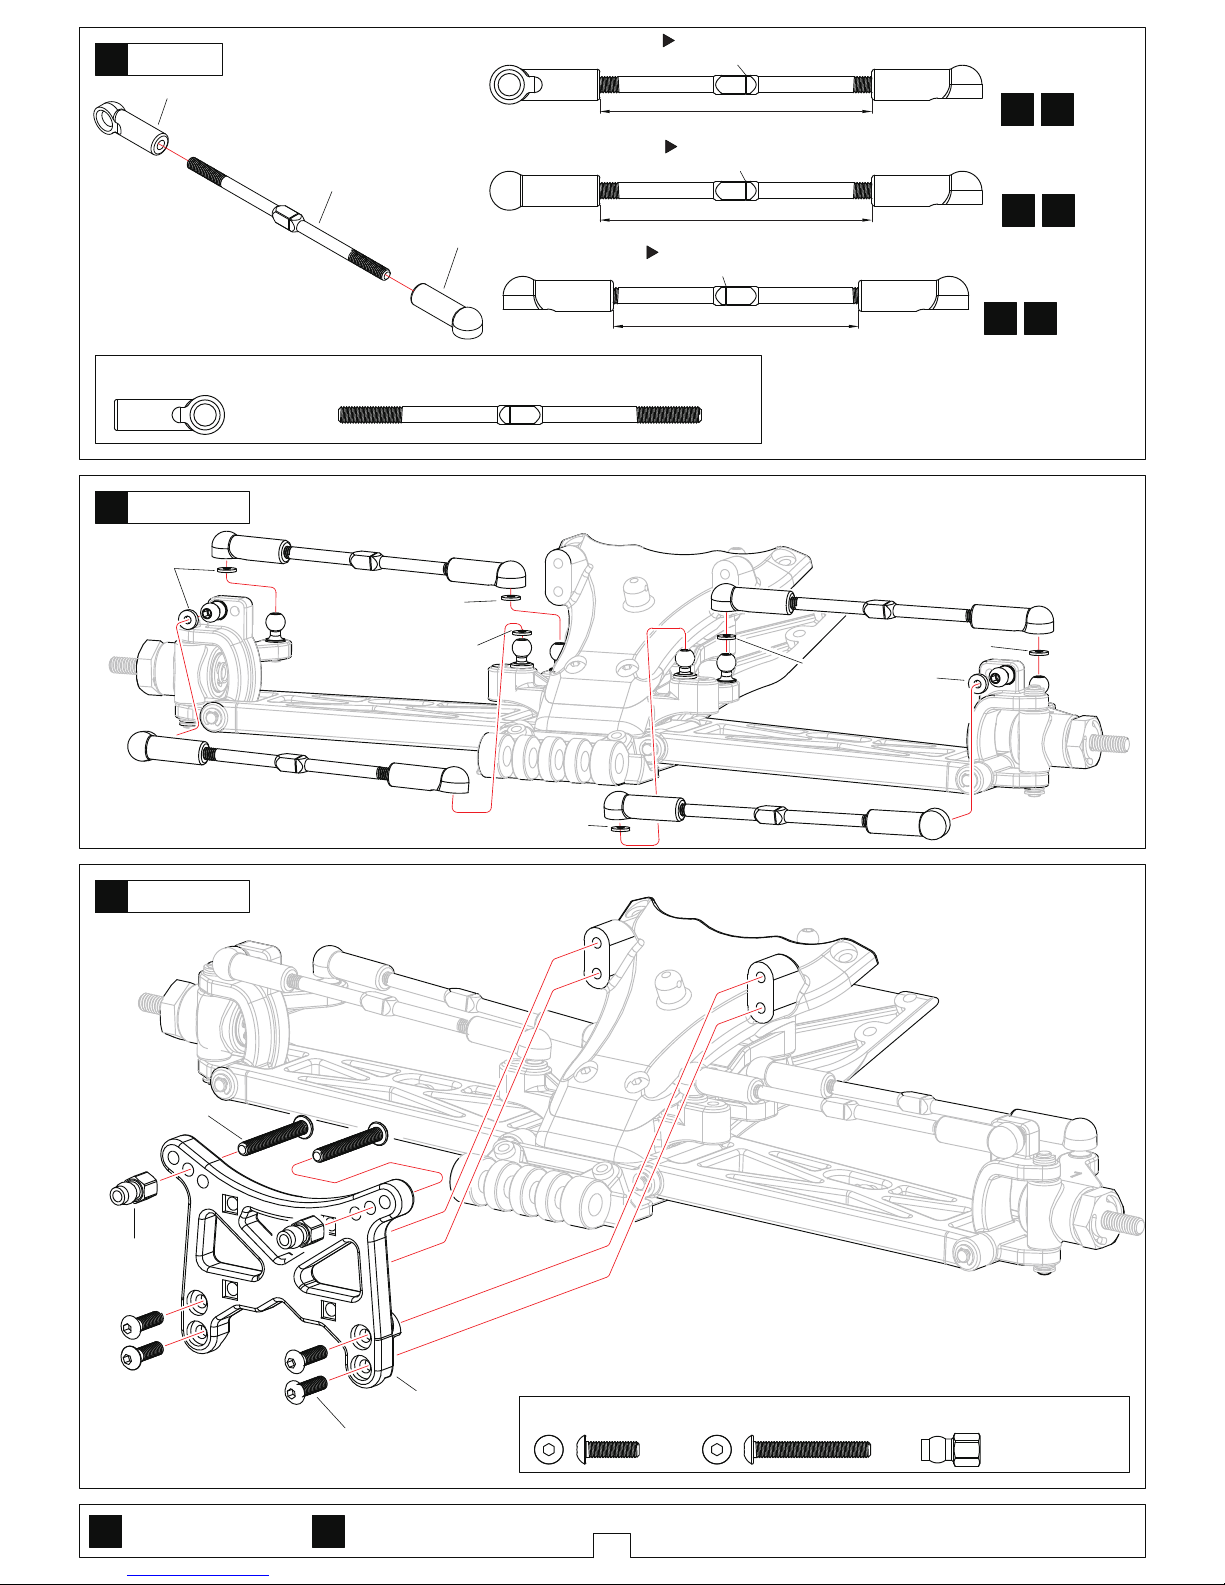
4
T02029 4.8mm Ball End-Long
TG2024 3x68 Turnbuckle
…………8
……4
Front Upper-Right
Front Upper-Left
Steering Tip
Assemble as many times as specified
……4
T02082 M3x10 Screw…2T02082 M3x22 Screw
T02063 5mm Ball stud
……………………2
T02063
T02082 M3x10
T02082 M3x22
TG2005
Turnbuckle
Front Suspension
Front Suspension
Projection.Note direction
Projection.Note direction
Projection.Note direction
approx.51mm
approx.51mm
approx.46mm
TG2024
T02029
T02029
1:1
1:1
1:1
1:1
x2
x1
x1
x1
7
8
9
T02092
T02092
T02093
T02093
T02093
T02093
T02093
Ball stud sponge
Ball stud sponge
Ball stud sponge
Ball stud sponge
Ball stud sponge
Ball stud sponge
Ball stud sponge
Screw
Cement
Screw
Cement
Screw
Cement
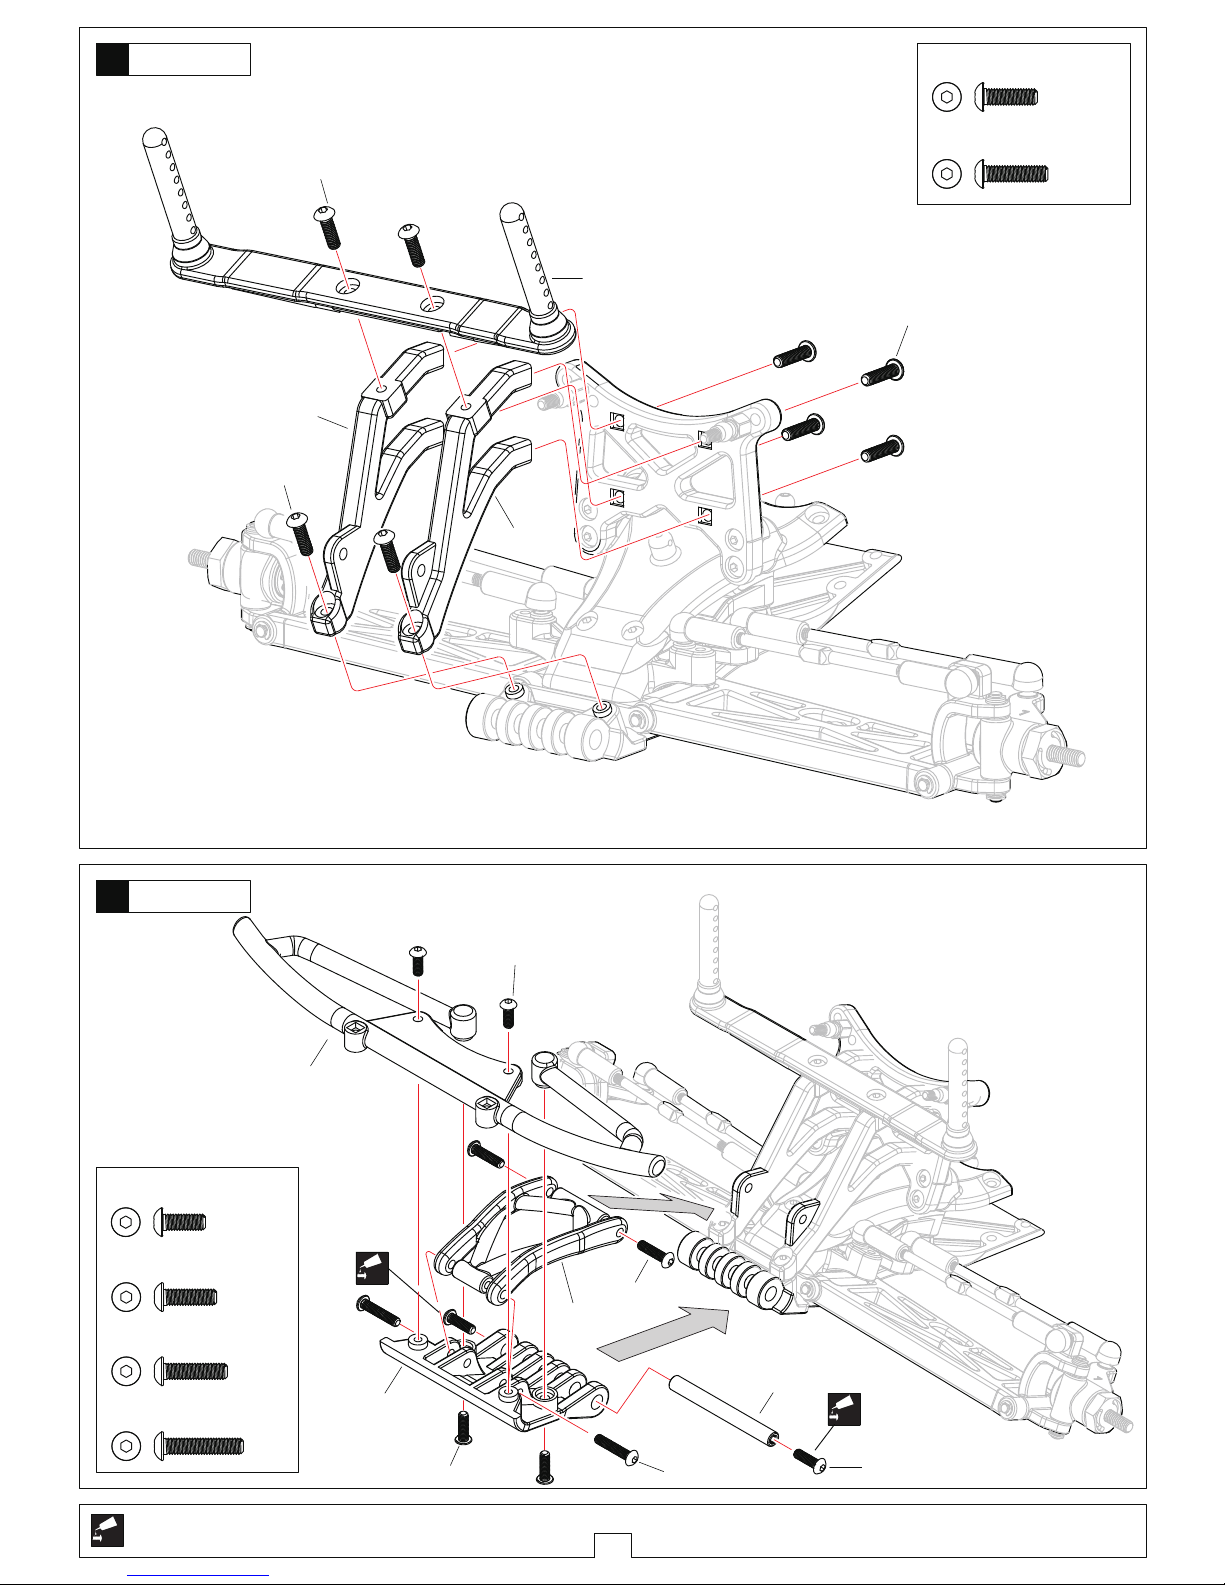
Apply threadlocker(screw cement)
5
…………4
TS2022/TS2024 M3x10 Screw
…………4
TS2024 M3x12 Screw
…………4
TS2023 M3x8 Screw
TS2024 M3x12 Screw
………2
TS2024 M3x15 Screw
……2
TS2023 M3x10 Screw
………2
Front Suspension
Front Suspension
10
11
TS2024 M3x10
TS2022 M3x10
TS2024 M3x12
TS2022
TS2024
TS2023 M3x8
TS2024 M3x12
TS2023
TS2023
TS2024 M3x15
TS2024
TS2023
TS2023 M3x10
TS2023 M3x8
TS2024

6
…………6
T02082 M3x10 Screw
T02092 Ball stud-Long
…………………2
…………4
T02082 M3x10 Screw
T02092
T02082 M3x10
T02018
………………2
T02083 M3x8 Screw
…………2
T02055 3x48 Hinge Pin Rear Inner
T02083 M3x8
T02055
TG2004
T02009
T02014
T02014
Front Suspension
Rear Suspension
Assemble Both Left And Right
Rear Suspension
后悬吊系统
12
13
L
R
L
R
14
T02082 M3x10
T02082 M3x10
TS2020

7
T02007 M2.5x25 Screw
…1
T02048 2.37mm Ball
……………………12
T02098 5x8x2.5 ball bearing
T02007 M2.5 Nylon Nut
……………2
……………1
T02099 10x15x4 ball bearing
………2
2.37钢珠
T02049 17x23x1 Washer
……2
T02007 2.5x25
T02098 5x8x2.5
T02099 10x15x4
T02099 10x15x4
T02007
T02007 M2.5
T02047
T02046
T02046
T02098 5x8x2.5
T02049 17x23x1
T02049 17x23x1
T02048 2.37
T02004
T02050 2.6x6x3
……………4
T02083 M3x10 Screw
T02083 M3x10
15
Rear Suspension
16
Differential
Apply Grease

Apply Grease
Apply threadlocker(screw cement)
Screw
Cement
Screw
Cement
approx.18mm
T02100 5x10x4 Ball bearing
………………4
T02051 5x16.8 Idler gear shaft
T02041 5x8x6.7 Top shaft spacer
……………1
………………1
…………1
T02082 M3x12 Screw
………4
T02082 M3x25 Screw
T02084 M4 Flanged Nylon Nut
……………1
T02082(3x12)
T02006
T02006
T02100
T02100
TS2031
T02100
T02100
T02052
T02041
T02051
T02082(3x25)
T02082(3x25)
T02036
T02084
T02040
T02039
T02039
T02038
T02038
TG2001(86T)
8
Transmission
Motor Mount
Spur Gear
<Right>
<Left>
17
18
19
Screw
Cement

9
Tighten the screws with one sheet of paper
inserted between both gears.
T02081 3x7x0.8 Washer
T02083 M3x8 Screw
T02082 M3x5 Screw
H479 M3x3 Screw
………………2
……2
…………1
………2
T02082 M3x10 Screw
……………2
………………2
T02083 M3x8 Screw
T02081 3x7x0.8
T02082 M3x5
H479 M3x3
T02083 M3x8
H479
T02005
T02005
T02083 M3x8
T02082 M3x10
Motor
Rear Suspension
20
21

10
…………6
TS2025/T02082 M3x10 Screw
…2
T02082 M3x22 Screw
T02063 5mm Plastic Ball stud
……………………2
………………2
T02083 M3x8 Screw
T02063
T02082 M3x22
T02082 M3x10
T02082 M3x10
TS2025 M3x10
T02083 M3x8
T02026
TS2025
Rear Suspension
T02082 M3x22
<Right>
<Left>
………………2
T02034 2x9.8 Shaft
T02100 5x10x4 Ball Bearing
………………4
TG2012
T02100
T02100
T02034
T02034
……………2
T02093
T02013
T02093 Ball stud-Short
Rear Suspension
Assemble Both Left And Right
22
23
L
R
L
R

11
T02057 3x30.5 Hinge pin Rear outer
…………4
…………2
T02057 2.3 E-ring
T02013 3.1x6x1 Plastic Washer
………………………4
Assemble Both Left And Right
Rear Suspension
Rear Suspension
T02093
T02093
T02029 4.8mm Ball End-Long
TG2024 3x72 Turnbuckle
…………4
…………2
T02029
T02029
TG2024
approx.53mm
Projection.Note direction
T02057 2.3
T02057 3x30.5
T02013
L
R
L
R
24
25
1:1
x2
Ball stud sponge

……………………4
………………………8
TG2013 / TG2014 2.3 E-ring
T02096 Shock Piston
………………4
T02097 2.8x1.9 O-ring
…………………8
T02097 3.1x1 Plastic Washer
T02062 5.8x6 Ball stud
T02031 5.8 Ball End
…………………4
………………………4
TG2025/TG2026 8x1 O-ring
Shock Absorber
TG2013
Put a little oil
TG2014
T02096
TG2013
TG2013
TG2014
TG2014
T02096
…………………4
Silicone Oil
Shock Absorber
Front-Short
Rear-Long
Put a little oil
Front-Short
Rear-Long
Front-Short
Rear-Long
12
Assemble as many times as specified
T02097(2.8x1.9)
T02097(3.1x1)
T02062
T02031
T02031
TG2025/TG2026
T02073
T02097(2.8x1.9)
T02097
TG2026
TG2026
T02067
T02097(2.8x1.9)
T02097(3.1x1)
T02097(2.8x1.9)
T02097
TG2025
TG2025
TG2025
T02062
T02031
26
27
x2
x2
x2 x2
x2
x4

13
Compress the spring and install
TG2017
TG2018
T02082 M3x15 Screw
……2
T02084 M3 Nylon Nut
………………2
Front-Short
Rear-Long
Shock Absorber
Assemble as many times as specified
Assemble Both Left And Right
Front Suspension
TG2025/TG2026 12x1 O-ring
…………4
for adjusting the spring tension
TG2025/TG2026
T02031
T02031
x2
x2
28
L
R
x2
L
R
29
x4
T02082 M3x15
T02084 M3

14
T02082 M3x15 Screw
……2
T02084 M3 Nylon Nut
……………2
T02084 M3
T02082 M3x15
Assemble Both Left And Right
Rear Suspension
Rear Suspension
L
R
L
R
30
31
…………6
TS2022/TS2008 M3x10 Screw
…………6
TS2025/TS2026 M3x12 Screw
TS2022 M3x10
TS2022
TS2025 M3x12
TS2025
TS2026 M3x12
TS2026
TS2026
TS2008
TS2008 M3x10

15
T02030 4.8 Ball End-Short
……………2
T02030 M3x10 Screw
……………1
T02081 3x7x0.8 Washer
………………4
T02082 M3x8 Screw
…………4
…………………1
SANWA
T02035 1.5 Servo spacer
……2
T02030
T02027
T02028
T02061
T02081
T02035
T02082(2.6x8)
Steering Servo-H(24T)
Steering Servo-S(23T)
Select for your servo
Sanwa servo
T02028
T02082 M2.6x8 Screw
…………1
Steering Servo-F(25T)
T02061 Ball stud - silvery
T02082
…………2
TS2025 M3x12 Screw
…………4
TS2025 M3x10 Screw
X
Steering Servo-F(25T)
32
Rear Suspension
33
Steering Servo
X
Must be purchased separately
X
TS2025 M3x10
TS2025 M3x12

Must be purchased separately
X
16
………………2
T02083 M3x8 Screw
T02087
T02087
Electronic speed controller
Receiver
Double-sided Tape
Steering Servo
Receiver/Electronic speed controller
……………………1
TS2020 M3x5 Screw
TS2020
T02083 M3x8
34
35
X
X

17
…………4
TS2022 M3x10 Screw
TS2022 M3x10
TS2022
TS2022
If using loose battery cells,
Please put the battery panel conversely.
TS2021 M3x10 Screw
T02086 Small clip
……………2
…………2
T02086
TS2021 M3x10
TS2021
TG2007
TG2007
Must be purchased separately
Body Mount
Battery
T02083 M3x8
………………2
T02083 M3x8 Screw
X
X
36
37
TG2008

18
T02084 M4 Flanged Nylon Nut
……………4
Tyre
Body
T02084 M4
T02084 M4
Glue
Assemble Both Left And Right
Assemble as many times as specified
TS2028
TS2029
38
39
x4
L
R
L
R
x4
Must be purchased separately
X
X
TS2027

19
TS2022 Small clip
……………8
Body
TS2022
TS2022
41
Mask the windows from the inside.
Paint the body shell from the inside
using spray colors.
Body
40

20
T02005
T02040
T02082
T02005
TG2001
TS2031
T02004
T02006
T02006
T02007
T02007
T02011
T02012
T02013
TG2003
TG2004
T02023
T02023
T02024
T02027
T02028
T02029
T02029
T02030
T02031
T02031
T02031
T02034
T02036
T02038
T02038
T02039
T02041
T02042
T02034
T02043
T02043
T02043
T02043
T02044
T02044
TG2024
TG2024
T02046
T02046
T02047
T02048
T02049
T02049
T02050
T02051
T02052
TG2011
T02054
T02055
T02056
T02057
TG2012
T02093
T02061
T02093
T02054
T02054
T02093
T02061
T02062
T02062
TG2014
TG2013
TG2025
TG2025
T02096
T02073
TG2025
T02063
T02097
TG2017
TG2018
T02097
TG2026
T02082
T02082
T02082
T02081
T02082
T02082
T02082
T02082
T02082
T02083
T02039
T02081
T02073
T02096
T02084
T02084
TG2026
T02084
T02080
T02080
T02100
T02100
T02099
T02099
T02098
T02100
T02100
T02100
T02100
T02100
T02093
T02031
TG2026
T02034
T02080
T02098
TG2026
TG2025
TG2006
TS2020
TS2021
TS2022
TS2022
TS2022
TS2022
TS2023
TS2023
TS2023
TS2023
TS2024
TS2024
TS2024
TS2024
TS2024
TS2025
TS2025
TS2025
TS2025
T02008
T02009
T02014
T02014
T02014
T02015
T02018
T02019
TG2005
TG2006
TG2007
TG2007
TG2008
TG2008
T02026
T02037
T02092
T02092
T02063
T02063
T02082
T02082
T02082
T02082
T02082
T02082
T02082
T02082
T02082
T02082
T02082
T02083
T02083
T02083
T02083
T02083
T02084
T02084
T02086
T02087
T02087
T02087
Exploded View
TS2022
TS2022
TS2029
TS2029
TS2028
TS2028
TS2026 M3x12
TS2026
TS2008
T02084
T02084

TG2001
TG2003
2pcs
Front lower arms
TG2004
2pcs
Rear lower arms
TG2005
1pcs
TG2006
TG2007
1pcs
Battery plate
Front shock tower
1pcs
Rear shock tower
1pcs
86T Spur Gear
Sponge
1pcs
1pcs
Body-Lexan
TG2008
2pcs
2pcs
2pcs
Wing angie shim
Wing bracket
Battery column
2pcs
Front body mount
T02014
T02005
Gear Cover
T02006
1pcs
Differential-L
T02007
1pcs
T02004
1pcs
52T Gear
T02008
1pcs
Front chassis plate
T02009
1pcs
Main Chassis plate
T02011
1pcs
C-type holder L
T02012
1pcs
Steering block-R
T02013
Rear hub carriers-L
1pcs
Rear arm mount-R
T02015
T02018
1pcs
Rear brace mount
T02019
T02023
T02024
1pcs
Steering Rack
1pcs
Gear Cover Button
1pcs
1pcs
Differential-R
M2.5x25 Screw
M2.5 Nylon Nut
1pcs
1pcs
1pcs
Rear chassis plate
1pcs
Steering block-L
1pcs
Rear hub carriers-R
1pcs
1pcs
Rear arm mount-F
1pcs
Servo saver lower
1pcs
Servo saver upper
3.1x6x1 Plastic Washer
4pcs
Differential Nut Mount
1pcs
Front upper suspension arm mount
Front alight suspension
arm mount
1pcs
C-type holder R
1pcs
1pcs
Front brace mount
1pcs
Servo saver - L
T02026
1pcs
Motor guard
1pcs
Front bumper
Parts list for TS2 Short-Course-1
TS2020
TS2023
TS2025 TS2026
TS2021 TS2022
TS2027
TS2024
1 Set
Battery Mount
M3x5 1pcs
Body Mount Set Front Bumper Set-A Front Bumper Set-B
Rear Bumper Set-A Rear Bumper Set-B
TS2028 TS2029
2pcs
Rim Tyre Tyre Sponge
2pcs 2pcs
TS2008
Rear Fender Plates 1Set
TS2031
1pcs
28T Spur Gear

TG2012
TG2024
4pcs
3x68 turnbuckle
2pcs
3x72 turnbuckle
2pcs
Rear CVD
T02029
4.8 Ball End - Long
T02030 T02031
T02027
1pcs
Steering
T02028
2pcs
Servo plate
T02034
4pcs
Hexagonal
T02035
2pcs
1.0 Servo spacer
6pcs
2pcs
4.8 Ball End-Short
2pcs
1.5 Servo spacer
2pcs
3x10 Screw
1pcs
5.8 Ball End
Below Spring mount end
4pcs
2x9.8 Pin
servo horn-F
1pcs
Steering servo
horn-H
1pcs
Steering
servo horn-S
螺丝
2pcs
钢针
T02049
2pcs
T02050
T02054 T02055
T02051
1pcs
idler gear shaft
T02052
1pcs
Gear 20T
T02056 T02057
T02092 T02093 T02061 T02062 T02063
2pcs
2pcs
2pcs
3x30.5 Hinge pin Rear outer
Ball stud-Long
2pcs
3x34.5 Hinge pin front inner
2pcs
4pcs
5mm Ball stud
2.3 E-ring
17x23x1 Washer
4pcs
3x27.5 Hinge pin front outer
3x48 Hinge pin Rear inner
2.3 E-ring
4pcs
1pcs
2.6x6x3 Stop push ball bearing
T02036
1pcs
Motor plate
T02037
1pcs
Front hinge pin barce
T02038
2pcs
Slipper pad
T02039
T02040 T02041
1pcs
5x8x6.7 Top shaft spacer
T02042
T02043
T02044
2pcs
Block Carrier
T02046
T02047
T02048
12pcs
2.37mm Ball
2pcs
Slipper hub
2pcs
Front wheel axle
3x7x0.8 Washer
2pcs
1pcs
Differential Spring
2pcs
2x9.8 Pin
3x10 Screw
2pcs
1pcs
Slipper Spring
4.0 E-ring
2pcs
1pcs
Buffer column-A
1pcs
Buffer column-B
1pcs
Buffer Nut
1pcs
Buffer Spring
4.0 E-ring
1pcs
Differential connecting hub
2.3 E-ring
4pcs
Ball stud-Short
5pcs
2pcs
Ball stud-Silvery
4pcs
5.8x6 Ball stud
Parts list for TS2 Short-Course-2
2pcs
Upper cover nylon cap
Ball stud sponge
2pcs
Ball stud sponge
5pcs
Short 1pcs
Long 1pcs

TG2013
2pcs
3x44.5 Front Shock Absorber Shaft
TG2014
2pcs
3x53.5 Rear Shock Absorber Shaft
TG2025
2pcs
T02096
4pcs
Shock piston
Front damper case
2.3 E-ring
4pcs
2.3 E-ring
4pcs
2pcs
Shock Absorber below cover
2pcs
8x1 O-ring
2pcs
Shock Absorber top cover
TG2026 T02097 TG2017 TG2018
3.5 Press washer
8pcs
2.8x1.9 O-ring
4pcs
3.1x1mm Plastic Washer
4pcs
2pcs
Rear Shock Absorber Spring
2pcs
Front Shock Absorber Spring
T02098 T02099 T02100 T02080
4pcs
3x6x2.5 Ball Bearing
T02081 T02082
T02084
T02085
6pcs
5x10x4 Ball bearing
6pcs
6pcs
3x7x0.8 Washer
10pcs
T02083
5x8x2.5 Ball bearing
10x15x4 Ball bearing
T02073
4pcs
Diaphragm
TG2027 TG2028
Front Shock Absorber
2 Set
Rear Shock Absorber
2 Set
Tu0219
3x25 Screw
3x10 Screw
3x12 Screw
3x15 Screw
3x5 Screw
3x8 Screw
3x22 Screw
8pcs
8pcs
8pcs
8pcs
8pcs
8pcs
8pcs
2.6x8 Screw
8pcs
3x15 Screw
3x8 Screw
3x10 Screw
3x8 Screw
8pcs
8pcs
8pcs
8pcs
M4 Flanged Nylon Nut
M3 Nylon Nut
6pcs
2.3 E-ring
4.0 E-ring
6pcs
8pcs
8pcs
T02086 T02087
Small clip
8pcs
Antenna pipe set
Antenna pipe set cover
1pcs
1pcs
Double-sided tape
1pcs
C-Type-Holder 25 Degree-Left/Right
Tu0220
C-Type-Holder 30 Degree-Left/Right
1pcs
Parts list for TS2 Short-Course-3
2pcs
12x1 O-ring
Spring adjuster
2pcs
2pcs
Rear damper case
2pcs
Shock Absorber below cover
2pcs
8x1 O-ring
2pcs
Shock Absorber top cover
2pcs
12x1 O-ring
Spring adjuster
2pcs
1pcs1pcs 1pcs
OP OP

Tu0221
Rear arm mount F/R 1Set
Tu0222
Front arm mount 1Set
Tu0223
Rear arm mount -Ball 8pcs
Servo mount 2pcs
Tu0224
Hex mount
5.1x8x0.2 Washer
M2x5 Screw
Front hinge pin brace Brass battery tray 1pcs
Tu0228Tu0226Tu0225
4pcs
4pcs
4pcs
1pcs
Motor mount
Tu0229
1pcs
Tu0236
Rear hub carriers
2pcs
Tu0237
Rear Hub 1 Degree-Left/Right
1pcs
1pcs
Tu0238
Ceramic Ball 2.37mm
12pcs
Tu0239
Carbon Rear Chassis
1pcs
Tu0243
Carbon Front Shock Tower-Truck
1pcs
Tu0244
Carbon Rear Shock Tower-Truck
1pcs
Aluminium Motor Gear-15T
1pcs
3x3 Screw
H475
H476 H477
H478 H479 H480 H481
1pcs
3x3 Screw
1pcs
3x3 Screw
1pcs
3x3 Screw
1pcs
3x3 Screw
1pcs
3x3 Screw
1pcs
3x3 Screw
1pcs
Aluminium Motor Gear-16T
1pcs
Aluminium Motor Gear-17T
1pcs
Aluminium Motor Gear-18T
1pcs
Aluminium Motor Gear-21T
1pcs
Aluminium Motor Gear-20T
1pcs
Aluminium Motor Gear-19T
1pcs
M3x3
1pcs
3x3 Screw
H482
Aluminium Motor Gear-22T
1pcs
Parts list for TS2 Short-Course-4
Tu0282
Short-Couse Conversion KIT
5.1x8x0.2 Washer
Truck CVD for ae rim
1.6x11 Spring Pin
Aluminum Washer
Tu0234
4pcs
2pcs
2pcs
2pcs
OP OPOP OP
OP OP OP OP
OP
OP
OP
OPOP
OP OP
OP OP
OP OPOPOP OP
OP
OP

Date
Driver
Track / City
/
SETUP SHEET for the TeamC TS2
Comments
Front Suspension
Ride height
Rear Suspension
/
Radio/Batteries
Shock Mounting&Camber link
Servo
Esc
Batteries
Motor
Notes
Motor
Pinion/Spur /
Front Tires&Wheels
Front Tires
WheelsInserts
Rear Tires&Wheels
Rear Tires
WheelsInserts
Ride height
Shock Mounting&Camber link
Event
Camber
°
25°
30°
Caster
Bump Steep Spacer
Toe-in (+)/Out (-) °
# Washers
mm
Camber
°
Aluminum(Opt)
Normal
# Washers
mm
# Washers
mm
Conditions
Smooth
Bumpy
Low traction
Med traction
High traction
Sandy
Soft dirt
Grass
Hard soil
Clay
Wet
Dry
Dusty
Other
Front Shocks
mm
mm
Spring(color)
Piston #
Oil wt
Black
Long
Medium
Short
Wheelbase
Rear Shocks
Spring(color)
Piston #
Oil wt
Black
1
2
3
1
2
1
2
1
2
2
1
1
2
3
1
2
3
4
1
2
4
3
1
2
123
mm
mm
TS2

HOBBYPRO COMPANY LTD.
Flat C-D, 5/F.,
Speedy Ind. BLDG.,
114 How Ming Street,
Kwun Tong, KLN., Hong Kong.
Team C Headquarter
www.teamcracing.net
Team C America
www.teamcamerica.com
Team C Europe
www.teamceurope.com
 Loading...