

Team PR8116 TeCom-LC PMR, TeCom-LC Series, PR8119 TeCom-LC VHF-COM, PR8118 TeCom-LC UHF-COM User Manual
Page 1

TeCom-LC
Handfunkgerät
Handheld Transceiver
Transceptor Portátil
PMR
FreeNet
UHF-COM
VHF-COM
Bedienungsanleitung
Manual
Manual Instrucciones de Uso
Page 2

DeutschDeutsch
Sehr geehrte Kundin, sehr geehrter Kunde,
es freut uns, dass Sie sich für den Kauf eines TEAM TeCom-LC Handfunkgerät entschieden haben. Um einen einwandfreien Betrieb zu gewährleisten und um die verfügbaren Funktionen im vollen Umfang nutzen zu können, bitten wir Sie die
nachfolgende Bedienungsanleitung vor Inbetriebnahme des Gerätes gründlich zu
lesen.
Das TeCom-LC ist in den folgenden vier Versionen erhältlich.
TeCom-LC PMR - Art-Nr. PR8116
Das analoge PMR-Funkgerät darf Jeder anmelde- und gebührenfrei in den Ländern
gemäß der beiliegenden Konformitätserklärung betreiben. Es sind die acht PMRKanäle auf 446 MHz mit der maximal zulässigen Ausgangsleistung von 500 mW
programmiert. Mit der optional erhältlichen Software T-UP32 PMR-FN können keine
anderen, als die erlaubten PMR- Frequenzen programmiert werden. Eine Änderung
der Sendeleistung oder der Bandbreite ist nicht möglich.
TeCom-LC Freenet - Art-Nr. PR8117
Das analoge FreeNet-Funkgerät darf jeder anmelde- und gebührenfrei in Deutschland betreiben. Es sind die sechs FreeNet-Kanäle auf 149 MHz mit der maximal
zulässigen Ausgangsleistung von 500 mW programmiert. Mit der optional erhältlichen Software T-UP32 PMR-FN können keine anderen, als die erlaubten FreeNetFrequenzen programmiert werden. Eine Änderung der Sendeleistung oder der
Bandbreite ist nicht möglich.
TeCom-LC UHF-COM - Art.-Nr. PR8118
Das analoge Betriebsfunkgerät ist genehmigungs- und gebührenpflichtig und darf
nur in den Ländern gemäß der beiliegenden Konformitätserklärung betrieben werden. Es dürfen nur behördlich genehmigte Funkfrequenzen zwischen 450-470 MHz,
Sendeleistungen und Bandbreiten programmiert werden. Die Programmierung darf
nur von einem autorisierten Fachhändler durchgeführt werden.
TeCom-LC VHF-COM - Art.-Nr. PR8119
Das analoge Betriebsfunkgerät ist genehmigungs- und gebührenpflichtig und darf
nur in den Ländern gemäß der beiliegenden Konformitätserklärung betrieben werden. Es dürfen nur behördlich genehmigte Funkfrequenzen zwischen 136-174 MHz,
Sendeleistungen und Bandbreiten programmiert werden. Die Programmierung darf
nur von einem autorisierten Fachhändler durchgeführt werden.
Inhaltsverzeichnis
Seite
ALLGEMEIN
Vor Inbetriebnahme 4
Pflege 4
Übersicht der Elemente und Funktionen 5 - 6
GRUNDFUNKTIONEN
Antenne 7
Akkupack 7
Laden des Akkupacks 7
Ein- und Ausschalten 7
Einstellen der Lautstärke 8
Kanalwahl 8
Senden 8
Empfang 8
TASTENFUNKTIONEN
PTT Sendetaste 9
Multifunktionstasten 9-11
SOFTWARE FUNKTIONEN
Kanaleinstellungen 12-13
Allgemeine Einstellungen 13-14
Kanalsuchlauf Einstellungen 15-16
DTMF 16-17
Notiz 18
Geräteinformationen 18
Rückstellung der werkseitigen Einstellungen 18
ANSCHLUSS 18
Für die Programmierung des TeCom-LC benötigen Sie die optional erhältliche Software, T-UP32 PMR-FN für die PMR- und FreeNet-Version, sowie T-UP32 COM für
die Betriebsfunkversionen VHF- und UHF-COM (CD-ROM für Windows 7/8/10 und
USB-Datenüberspielkabel).
CTCSS / DCS 54
TECHNISCHE DATEN 55
Page 3

DeutschDeutsch
ALLGEMEIN
Vor Inbetriebnahme
Bitte überprüfen Sie die Ware sofort beim Empfang auf Vollständigkeit gemäß der
folgenden Liste. Informieren Sie Ihren Händler sofort bei Unvollständigkeit.
Lieferumfang:
Pflege
Für die optimale Lebensdauer und Funktionstüchtigkeit Ihres Geräts sollten Sie die
folgenden Hinweise beachten.
wVersuchen Sie nicht das Gehäuse zu öffnen. Unsachgemäßes Öffnen des Ge-
räts kann Schäden zur Folge haben. Des weiteren verlieren Sie jegliche Gewähr-
leistungsansprüche.
wVerwenden Sie zum Laden des Akkupacks nur das im Lieferumfang enthaltene
Ladegerät.
wBewahren Sie das Gerät niemals an Plätzen auf, welche dem direkten Sonnen-
licht oder anderen Hitzequellen ausgesetzt sind. Hohe Temperaturen können die
Lebensdauer bestimmter elektronischer Bauteile beeinträchtigen und Plastikteile
können schmelzen.
wBitte bewahren Sie das Gerät nicht in staubigen oder verschmutzen Räumen auf.
wSetzen Sie das Gerät keinen Flüssigkeiten aus. Feuchtigkeit kann zu Korrodie
rung der Bauteile und Platinen führen.
wSollte das Gerät ungewöhnlich heiß werden, ungewöhnliche Gerüche abgeben
oder es zu einer Rauchentwicklung kommen, schalten Sie bitte das Gerät sofort
ab und entnehmen den Akkupack. Kontaktieren Sie bitte sofort Ihren Händler.
wSenden Sie niemals ohne Antenne. Eine Beschädigung der Endstufe könnte die
Folge sein.
4 5
Übersicht der Elemente und Funktionen
> Max. Ausgangsleistung
FreeNet : 500 mW PMR : 500 mW
VHF : 5 W UHF : 4 W
> 16 Kanäle verfügbar
COM I:
UHF: 400 - 470 MHz VHF: 136 - 174 MHz
COM II:
UHF: 450 - 470 MHz VHF: 147 - 174 MHz
PMR : 8 Kanäle PMR 446 MHz FreeNet : 6 Kanäle FreeNet 149 MHz
> Bandbreite
FreeNET / PMR : 12,5 kHz
UHF / VHF : 12,5 / 20 / 25 kHz
> 50 CTCSS / 116 DCS-N / 116 DCS-I Kodierungen
> Sendesperre auf besetzten Kanälen
> wählbare Sendeleistung Hoch / Niedrig (per Software einstellbar in COM Version)
> Kanalsuchlauf - Scan Add/Del
> Rauschsperre - Squelch 0-9
> DTMF (max. 16 Enkodierungen, Dekodierungen (Self ID, Kill, Stun)
> PTT-IT: BOT, EOT, BOTH
> VOX: On/Off; Empfindlichkeit; Verzögerung, Deaktivieren mit PTT, Warnton
> Signalverbesserung - Tail Eliminate (120° / 180° / 240° / Freq Eliminate Tail)
> Warnton
> Sendezeitbegrenzung TOT (15-600s in 15-Sekunden Schritten)
> Batteriesparfunktion - Power Save (1:4/1:8/1:16)
> Sprachansage in englisch
> 2 programmierbare Doppelfunktionstasten (kurz Drücken / Halten); Funktionen:
Rauschunterdrückung Aus (Squelch Off), Monitor, Status Sendeleistung (Current
Channel Power Inquiry), Kanalsuchlauf (Scan), Frequenzumkehrung
(Reverse), RX-TX Frequenzabgleichung (Talk Around), Status Batteriespannung
(Check Power), DTMF-Ruf 1/2 (Call 1/2), Sendeleistungsumstelllung Hoch/Niedrig
(Power Change), Alarmton (Alert Key), VOX
Hinweis:
alle Einstellungen können mit der optionalen Programmiersoftware eingestellt werden.
Das Gerät wird werkseitig ohne VOX, DTMF und Tail Eliminate ausgeliefert. Die programierbaren Doppelfunktionstasten sind in den Geräteversionen PMR und FreeNet
mit einer Funktion, Rauschunterdrückung Aus (Squelch Off) und Kanalsuchlauf (Scan),
steuerbar durch kurzes Drücken der Taste, belegt. In den Betriebsfunkversionenen ist
nur die Funktionstaste PF1 mit der Funktion Rauschunterdrückung Aus (Squelch Off)
belegt.
Page 4
DeutschDeutsch
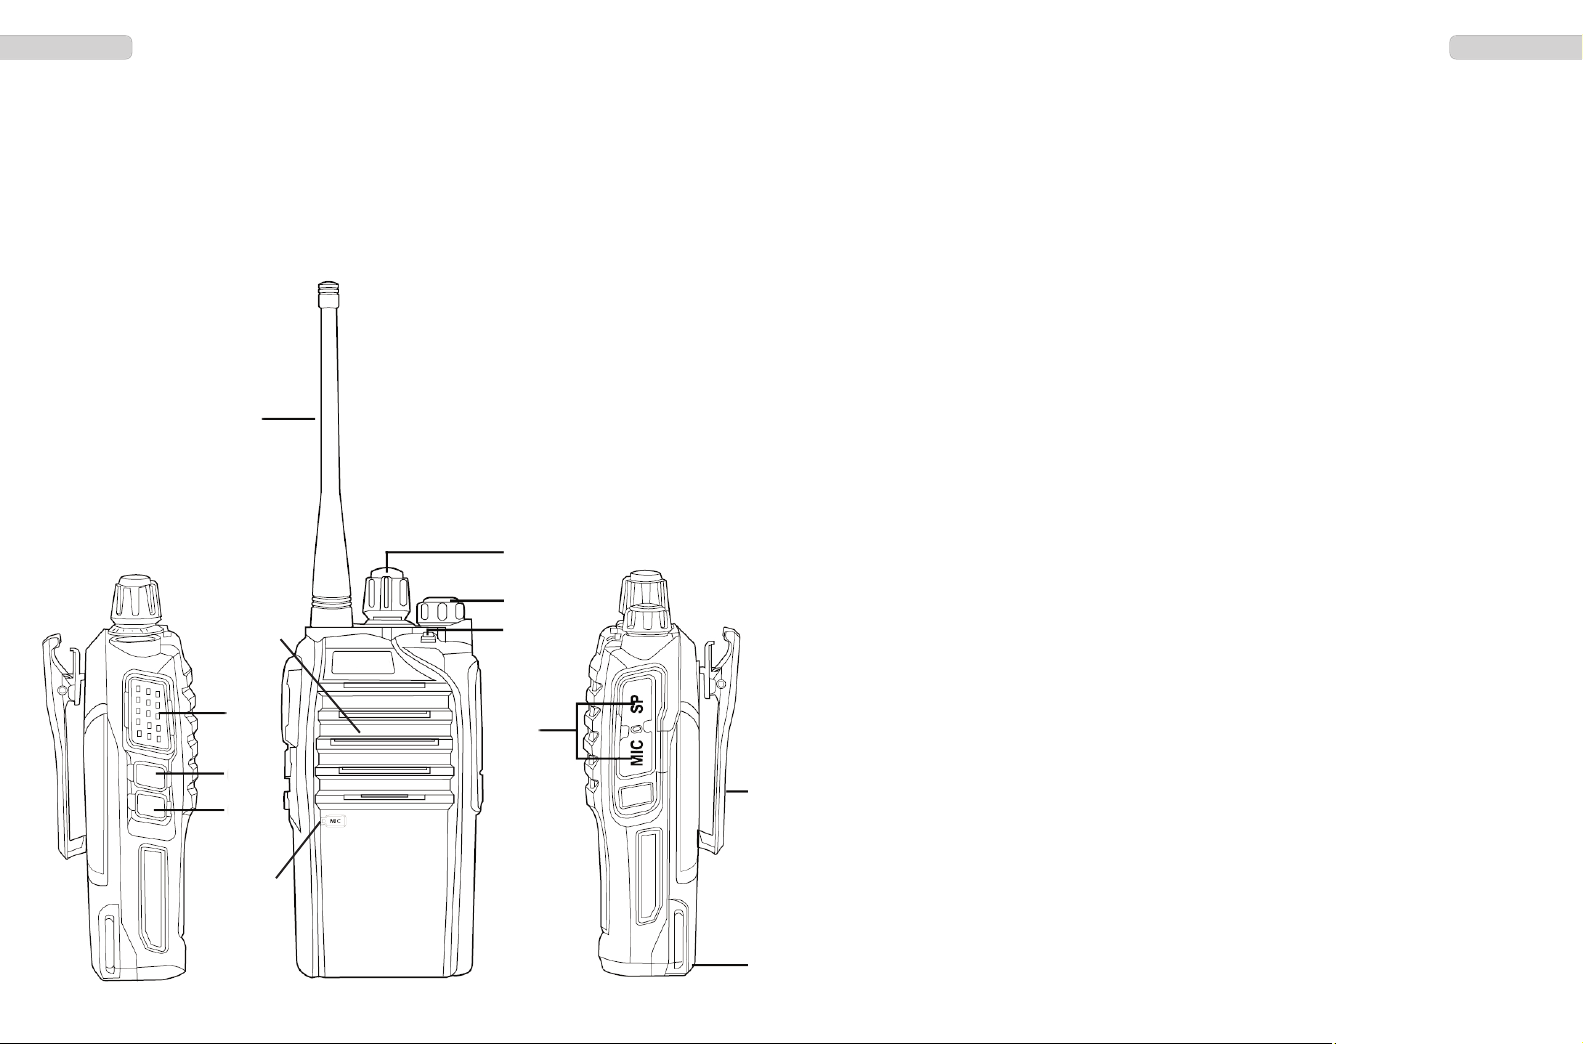
1 - Antenne
2 - Ein/Aus und Lautstärke
3 - Kanalwahldrehschalter
4 - Mikrofon
5 - Lautsprecher
6 - LED Leuchte
7 - PTT-Sendetaste
8 - Doppel-Funktionstaste PF1
9 - Doppel-Funktionstaste PF2
10 - Ohrhörer-Mikrofon Anschluss
11 - Akkupack Li-Ion, 1300 mAh
mit Gürtelclip
1
5
7
8
9
3
2
6
10
11
GRUNDFUNKTIONEN
Antenne
Hinweis: In der PMR-Version ist die Antenne fest mit dem Gerät verbunden. Bei allen
anderen Versionen ist die Antenne abnehmbar. Drehen Sie die Antenne im Uhrzeigersinn auf das Antennengewinde.
Akkupack
Zum Montieren des Akkus legen Sie diesen flach auf die Geräterückseite, den unteren Teil überstehend, mit den drei Ladekontakten auf der Außenseite. Schieben Sie
nun die dreiteilige Haltevorrichtung am oberen Ende des Akkus in die Halterung. Der
Verschluss schnappt ein.
Zum Entfernen des Akkus den Verschluss in Pfeilrichtung drücken und gleichzeitig
den Akku aus der Halterung schieben.
Gürtelclip
Für die Montage des Gürtelclips auf der Geräterückseite verwenden Sie bitte nur die
im Lieferumfang enthaltenen Schrauben.
Laden des Akkupacks
Vor dem ersten Betrieb sollte der Akkupack (11) komplett geladen werden. Zum
Laden des Akkupacks verwenden Sie nur das im Lieferumfang enthaltene Ladegerät.
Die durchschnittliche Ladedauer beträgt etwa 5 Stunden. Nehmen Sie den Akku nach
Ende des Ladevorgangs aus der Ladeschale. Überladen des Akkus verkürzt dessen
Lebensdauer.
Schließen Sie das Ladegerät mit dem im Lieferumfang enthaltenen Netzadapter an
das 220 V Stromnetz an. Die LED blinkt abwechselnd rot und grün.
Stellen Sie das Gerät mit montiertem Akkupack in die Ladeschale. Achten Sie darauf,
dass der Akkupack korrekt in den Führungsschienen der Ladeschale steckt
Während des Ladevorgangs leuchtet die LED rot. Ist der Ladevorgang beendet,
leuchtet die LED grün.
4
6 7
Ein- und Ausschalten
Um das Gerät einzuschalten, drehen Sie den Ein- / Ausschalter (2) im Uhrzeigersinn
über die Sperre hinweg. Es ertönt ein kurzer Warnton und der aktuelle Kanal wird bei
aktivierter Sprachansage benannt.
Um das Gerät auszuschalten, drehen Sie bitte den Ein- / Ausschalter gegen den Uhrzeigersinn über die Sperre hinweg.
Page 5

DeutschDeutsch
Einstellen der Lautstärke
Drehen Sie den kombinierten Ein/Aus-Schalter und Lautstärkeregeler im Uhrzeigersinn um die Lautstärke zu erhöhen und gegen den Uhrzeigersinn um die Lautstärke
zu verringern.
Um nach dem Einschalten die optimale Lautstärke einstellen zu können, aktivieren
Sie bitte die Squelch-Off-Funktion (in der werkseitigen Programmierung ist die Multifunktionstasten PF1 (8) mit der Squelch-Off-Funktion belegt.) und stellen mit dem
kombinierten Ein-/Aus-/Lautstärke-Regler (2) die gewünschte Lautstärke ein.
Kanalwahl
Für die Kanalwahl stehen der Kanalwahldrehschalter (3) zur Verfügung. Die maximal
16 Kanäle werden in der programmierten Reihenfolge durchgeschaltet.
Bei Auswahl eines nicht-programmierten Kanals ertönt ein sich wiederholender kurzer
Warnton.
Senden
Zum Senden halten Sie bitte die Sendetaste (8) bis kurz nach Beendigung Ihrer
Nachricht gedrückt. Für eine optimale Signalübertragung sprechen Sie bitte mit mittellauter Stimme in einem Abstand von ca. 10 cm zum Mikrofon (4).
Während des Sendevorgangs leuchtet die Kontroll-LED (6) rot auf.
Nach dem Loslassen der Sendetaste kehrt das Gerät automatisch wieder in den Empfangsmodus zurück.
Empfang
Beim Empfang eines Signales leuchtet die Kontroll-LED (6) grün auf.
Ist die Empfangsfrequenz mit einer CTCSS- / DCS-Kodierung belegt ist, sind nur Signale mit derselben Kodierung hörbar. Signale mit einer anderen CTCSS-/DCSKodierung werden ausgefiltert.
TASTENFUNKTIONEN
PTT Sendetaste (8)
Die Sendetaste (8) befindet sich auf der linken Geräteseite. Drücken der Sendetaste
schaltet das Gerät in den Sendemodus. Während des Sendens leuchtet die LED (6)
rot auf.
Per Software Programmierung kann die Funktion PTT-ID aktiviert werden. Hierbei
werden beim Drücken und/oder Loslassen der PTT-Taste ein bzw. zwei DTMF Ruftonkodierungen automatisch ausgesendet.
Multifunktionstasten (9) (10)
Die Triplefunktionstasten PF1 (8) und PF2 (9) befindet sich unterhalb der Sendetaste
(7). Jede Taste kann mit max. zwei Funktionen belegt werden, die durch kurzes oder
langes Drücken der Taste aktiviert werden. Nach dem kurzen Drücken ertönt ein kurzer Ton, nach dem langen Drücken ertönt ein kurzer Doppelton. Zusätzlich wird bei
der Taste PF1 (8) durch sehr langes Drücken (ca. 3 Sekunden) die VOX Funktion
gesteuert und bei der Taste PF2 (9) die programmierte VOX-Empfindlichkeit angesagt
wenn die VOX Funktion per Software Programmierung aktiviert wurde.
Ist keine Funktion programmiert ertönt ein kurzer Warnton.
Die Tasten können per Software wahlweise mit folgenden Funktionen belegt werden:
Squelch Off (Rauschunterdrückung Aus), Monitor, Current Channel Power Inquiry
(Sendeleistungsansage), Scan (Kanalsuchlauf), Reverse (Frequenzumkehrung),
Talk Around (Relaisbetriebunterbrechung), Check Power (Batteriespannung), Call
1/2 (Rufton), Power Change (Sendeleistungsumstellung), Alert Key (Alarmton)
Für die Steuerung einiger Funktionen ist die Aktivierung der Sprachansage erforderlich.
In der werkseitigen Vorbelegung ist die Taste PF1 bei kurzem Drücken mit der
Rauschsperre Aus Funktion (Squelch Off) belegt. Die PF2 Taste ist in der PMR und
FreeNet Version mit der Kanalsuchlauf Funktion (Scan) programmiert.
Squelch Off
Die Rauschunterdrückung wird ausgeschaltet und das typische Kanalrauschen ist
hörbar wenn kein Signal vorhanden ist. Diese Funktion wird verwendet um sehr
schwache Signale, welche von der Rauschunterdrückung ausgefiltert werden, hören
zu können.
Monitor
Die Monitorfunktion deaktiviert kurzzeitig die CTCSS/DCS Funktion. Somit werdenalle Signale ungeachtet ihrer CTCSS/DCS Kodierung hörbar.
8 9
Page 6

DeutschDeutsch
Current Channel Power Inquiry
Kündigt die gewählte Sendeleistung (hoch/niedrig) an - “Low Power” (niedrige Sendeleistung) / “High Power” (hohe Sendeleistung).
Scan / Priority Scan
Es werden alle für den Kanalsuchlauf aktivierten Kanäle solange ringförmig durchsucht, bis ein Signal gefunden wird. Dann verweilt das Gerät auf diesem Kanal und
fährt dann nach Signalende und Ablauf einer Wartezeit (Dropout Delay Time) fort.
Das Hinzufügen zu bzw. Entfernen aus der Kanalsuchlaufliste geschieht mit der optionalen Software T-UP32. Während des Suchlaufes blinkt die LED grün. Zum Abschalten des Kanalsuchlaufes muss erneut die Funktionstaste gedrückt werden. Die
Suchlauffunktion wird nach Auffinden eines Signales nicht automatisch deaktiviert.
Per Programmierung kann die Verweildauer auf einem besetzten Kanal nach Signalende bestimmt werden (Dropout Delay Time), sowie die Verweildauer nach Sendeende (TX Dwell Time).
Ein Vorrangskanal kann per Programmierung bestimmt werden. Hierfür gibt es die
Wahlmöglichkeit zwischen einem bestimmten Kanal (fixed) und dem jeweils aktuellen
Kanal (selected).
Ist auf dem Vorrangskanal kein Signal vorhanden, wird dieser in bestimmbaren Zeitabständen (Look Back Time A; 1-5s) auf Signale geprüft.
Ist auf dem Vorrangskanal ein Signal mit ungleicher CTCSS/DCS-Kodierung vorhanden, wird dieser in bestimmbaren Zeitabständen (Look Back Time B; 1-5s) überprüft.
Für das Verhalten beim Drücken der Sendetaste während des Kanalsuchlaufes stehen vier Möglichkeiten zur Verfügung: Selected / Selected +Talk / Priority / Priority +
Talk Back - für Erläuterungen siehe hierzu Kanalsuchlaufeinstellungen.
Reverse
Diese Funktion ist nur relevant für die Betriebsfunkversionen UHF- und VHF-COM
bei Verwendung unterschiedlicher Empfangs- und Sendefrequenzen. Für den gewählten Kanal werden bei aktivierter Funktion die Sende- und Empfangsfrequenz
ausgetauscht bzw. umgekehrt.
Talk Around
Diese Funktion ist nur relevant für die Betriebsfunkversionen UHF- und VHF-COM bei
Verwendung unterschiedlicher Empfangs- und Sendefrequenzen im Relaisbetrieb.
Im aktiven Zustand wird die Sendefrequenz auf die Empfangsfrequenz umgestellt.
Die Kommunikation mit weiter entfernten Teilnehmern über eine Relaisstation wird
deaktiviert und die direkte Kommunikation mit Teilnehmern im unmittelbaren Umfeld
wird dadurch möglich.
Check Power
Der aktuelle Ladezustand des Akkus wird auf einer Skala von 1-10 mit den Worten
“Battery Capacity Remain” gefolgt von einer Zahl 1-10 angesagt.
Call 1/2
Der programmierte Rufton (Call 1/2) wird durch Drücken der Taste gesendet.
Insgesamt können 16 Ruftöne programmiert werden. Jedem Kanal können individuell
zwei Ruftöne zugewiesen werden.
Power Change
Die Sendeleistungen Hoch und Niedrig (HIGH/LOW) können umgeschaltet werden.
Bei den Geräteversionen PMR und FreeNet beträgt die Sendeleistung bei der Einstellung HIGH 500 mW. Bei den Betriebsfunkversionen UHF- und VHF-COM werden
die Werte für HIGH und LOW per Programmierung gemäß der Gerätezulassung programmiert.
Alert Key
Es wird ein Dauerton ausgesendet, der auch am eigenen Gerät zu hören ist. Bei aktivierter Alarmtonfunktion sind die Sendetaste und die Funktionstasten, sowie der Kanalwahlschalter deaktiviert. Die Alarmtonfunktion kann nur durch Ausschalten des
Gerätes deaktiviert werden.
VOX
Für die VOX Funktion muss ein Ohrhörer-Mikrofon an das Gerät angeschlossen sein.
Die per Software aktivierte VOX Funktion mit den möglichen Parametern Verweildauer nach Signalende (delay) und Empfindlichkeit (Level) wird durch sehr langes
Drücken (3 Sekunden) der Taste PF1 (8) aktiviert/deaktiviert.
Hinweis: die VOX Funktion muss mit der Software aktiviert werden um am Gerät ein
bzw. ausgeschaltet werden zu können.
Im VOX Modus schaltet das Gerät automatisch in den Sendebetrieb, sobald das Signal die gewählte Signalstärke (Level 1-9) übertrifft. Die programmierte Empfindlichkeit
kann durch sehr langes Drücken (3 Sekunden) der Taste PF2 abgerufen werden.
Nach Signalende verweilt das Gerät für die gewählte Zeitdauer (0,3 / 0,5 / 1 / 1,5 / 2
/ 3 s) noch im Sendebetrieb bevor es automatisch in den Empfangsbetrieb umschaltet.
Mit der Einstellung Cancel Operation kann die VOX Funktion durch Drücken der PTTTaste deaktiviert werden.
Bei der Aktivierung des VOX Proceed Tone wird jedes automatische Umschalten in
den Sendebetrieb mit einem kurzen Ton angekündigt.
10 11
Page 7

DeutschDeutsch
SOFTWARE FUNKTIONEN
Folgende Funktionen und Einstellungen werden per Software verwaltet. Für die PMR
und FreeNet Varianten steht die optionale Software T-UP32 PMR-FN zur Verfügung,
für die Betriebsfunkvarianten die Version T-UP32 COM.
Die Funktionen werden gemäß der Software Struktur beschrieben.
Kanaleinstellungen
(Channel Information)
Die folgenden Einstellungen sind für jeden einzelnen Kanal individuell verfügbar.
Empfangsfrequenz (RX Freq) / Sendefrequenz (TX Freq)
In der anmelde- und gebührenfreien PMR und FreeNet Version können nur die jeweiligen PMR bzw. FreeNet Frequenzen programmiert werden.
In den COM Versionen werden die gewünschten Betriebsfunkfrequenzen manuell
eingegeben.
CTCSS/DCS Empfangsfrequenz- (Decode) und Sendefrequenz Kodierung (Encode)
Die Empfangs- und Sendefrequenz kann mit einer CTCSS oder einer DCS Kodierung
versehen werden. Es stehen insgesamt 50 CTCSS Kodierungen und 232 DCS Kodierungen (116 DCS-N und 116 DCS-I) zur Verfügung.
Umschaltung Sendeleistung (Tx Power)
Die Sendeleistungseinstellungen LOW und HIGH können individuell für jeden Kanal
festgelegt werden.
Kanalsuchlauf (Scan Add/Del)
Individuell wird für jeden einzelnen Kanal festgelegt ob dieser Teil der Kanalsuchlaufliste ist oder nicht. Die Option Add fügt den Kanal der Suchlaufliste hinzu, die Option
Del schließt diesen aus.
Bandbreite (Channel Spacing N/M/W)
Für PMR und FreeNet ist die Bandbreite auf 12,5 kHz festgelegt.
In den Betriebsfunkversionen stehen die Bandbreiten N (12,5 kHz), M (20 kHz) und
W (25 kHz) zur Verfügung.
Sendesperre auf besetzten Kanälen (BCL)
Im aktivierten Zustand ist wird der Sendebetrieb blockiert wenn auf der gewählten
Frequenz ein Signal vorhanden ist.
Selektivruf (Option Signaling)
Aktiviert/deaktiviert die Verwendung des Selektivrufes auf dem Kanal.
12 13
Signal Relation (Signal Relation)
Es wird die Regel für das Öffnen der Rauschsperre beim Signalempfang festgelegt.
Bei der Einstellung AND (und) müssen CTCSS/DCS Kodierung sowie die Einstellung
für die Ruftonart DTMF übereinstimmen bevor die Rauschsperre bei Signalempfang
öffnet.
Bei der Einstellung OR (oder) müssen CTCSS/DCS Kodierung oder die Einstellung
für die Ruftonart DTMF übereinstimmen bevor die Rauschsperre bei Signalempfang
öffnet.
Selektivruf 1/2 (Call 1/2)
Pro Kanal können zwei Selektivrufe verwendet werden. Wählen Sie aus der Liste der
programmierten Encodes (siehe DTMF /
rungen aus.
PTT-ID
PTT-ID ermöglicht es automatisch beim Drücken und/oder Loslassen der Sendetaste
eine Kodierung zu senden. Es gibt die Einstellmöglichkeiten BOT (Senden beim
Drücken der PTT Taste), EOT (Senden beim Loslassen der Sendetaste) und BOTH
(Senden beim Drücken und Loslassen der PTT Taste). Die Kodierungen für BOT und
EOT werden unter DTMF / Encode programmiert.
Weiterhin können die Funktion Reverse und Talk Around (siehe Abschnitt Multifunktionstasten) individuell aktiviert werden.
Allgemeine Einstellungen
(Function Setup)
Diese Grundeinstellungen betreffen alle programmierten Kanäle.
Sendezeitbegrenzung (Time Out Timer - TOT)
Um überlanges Blockieren des Kanals, sowie das Überhitzen des Akkus zu vermeiden kann die Sendezeitbegrenzung aktiviert werden. Nach Ablauf der bestimmbaren
Zeit (15-600s in 15-Sekunden-Schritten) schaltet das Gerät automatisch in den Empfangsmodus. Das erneute Senden ist wieder nach Drücken der Sendetaste möglich.
Warnton vor Ablauf der Sendezeitbegrenzung (TOT Warning Time)
Vor Ablauf der Sendezeitbegrenzung ertönt ein Warnton. Die Zeitpunkt vor Ablauf
der Sendezeitbegrenzung kann zwischen 5-10 Sekunden eingestellt werden.
Rauschsperre (SQ Level 0-9)
Die Rauschsperre bestimmt ab welcher Empfangssignalstärke das Signal im Lautsprecher übertragen wird. Bei dem Wert 0 ist die Rauschsperre komplett ausgeschaltet, d.h. das typische Rauschen des Kanals ist beständig zu hören. Bei dem Wert 9
muss das Signal sehr stark sein um im Lautsprecher hörbar zu sein.
Autodial Memory) die gewünschten Kodie-
Page 8

DeutschDeutsch
Sprachansage (Voice Prompt)
Die englische Sprachansage verkündet das Einschalten des Gerätes, den aktuellen
Kanal beim Ein- und Umschalten, sowie einige der Funktionen die für die Funktionstastenbelegung zur Verfügung stehen. In der Voreinstellung ist die Sprachansage aktiviert.
Signal Optimierung (Tail Eliminate)
Beim Umschalten zwischen Sende- und Emfangsbetrieb kann manchmal ein Klickgeräusch auftreten. Dies kann bei der Verwendung von Ohrhörern störend sein. Mit
der Funktion Tail Eliminate kann diese Erscheinung reduziert werden. Es stehend
die Optionen Silence / 120° / 180° / 240° zur Auswahl.
Signal Optimierung ohne Verwendung von CTCSS/DCS (Eliminate Squelch Tail
when no CTCSS/DCS)
Wenn keine CTCSS/DCS Kodierung verwendet wird, kann trotzdem diese Signaloptimierung verwendet werden.
Die Einstellung OFF (Aus) deaktiviert die Signaloptimierung ohne CTCSS/DCS. Für
die Signaloptimierung ohne die Verwendung von CTCSS/DCS stehen die Einstellungen 55,2 Hz und 259,2 Hz zur Verfügung.
Hinweis: nur wenn die Kommunikationspartner die gleich Einstellung verwenden,
kann diese Einstellung optimal funktionieren.
Batteriesparbetrieb (Power Save)
Um Batteriespannung zu sparen verfügt das TeCom-LC über eine Batteriesparfunktion. Nach einer gewissen Zeit ohne Betrieb schaltet das Gerät automatisch in den
sogenannten Schlafmodus (Standby) in dem eine reduzierte Spannung ausreicht um
das Gerät im eingeschalteten Zustand zu halten. Das Verhältnis zwischen normalem
Betriebsmodus und Schlafmodus ist wählbar zwischen 1:4 / 1:8 / 1:16, wobei 1:16
die max. Energieeinsparung ermöglicht.
Freisprechbetrieb (VOX)
Für die VOX Funktion stehen folgende Einstellunge zur Verfügung.
Empfindlichkeit (Level) : 0-9
Zeitverzögerung (Delay) : 0,3-3 Sekunden
VOX Deaktivierung (Cancel Operation) : durch Drücken der Sendetaste wird die
VOX Funktion deaktiviert
VOX Warnton (VOX Proceed) : Das Starten des VOX gesteuerten
Sendens wird durch eine Warnton
angekündigt.
Kanalsuchlauf Einstellungen
(Scan Information)
Die folgenden Einstellung bestimmen das Kanalsuchlaufverhalten beim einfachen
Suchlauf und beim Vorrangskanalsuchlauf.
Priority (Vorrangskanal)
None (kein Auswahl) / Fixed (bestimmt) / Selected (aktueller Kanal)
Die Verwendung eines Vorrangskanales kann bestimmt werden. Wird die Einstellung
Fixed gewählt, ist der Vorrangskanal unter der Einstellung Priority Channel (Vorrangs-
kanal) zu bestimmen. Soll der jeweils gewählte Kanal als Vorrangskanal festgelegt
werden, muss die Einstellung Selected verwendet werden.
Look Back Time A
Diese Einstellung ist für den Vorrangskanalsuchlauf relevant.
Ist auf dem Vorrangskanal kein Signal vorhanden, wird dieser in bestimmbaren Zeitabständen (Look Back Time A; 1-5s) auf Signale geprüft.
Look Back Time B
Diese Einstellung ist für den Vorrangskanalsuchlauf relevant.
Ist auf dem Vorrangskanal ein Signal mit ungleicher CTCSS/DCS-Kodierung vorhanden, wird dieser in bestimmbaren Zeitabständen (Look Back Time B; 1-5s) überprüft.
Revert Channel
Diese Einstellung bestimmt die Kanalwahl beim Drücken der PTT-Taste während des
Kanalsuchlaufes.
Last Called
Beim Drücken der PTT-Taste wird auf dem Kanal gesendet auf dem ein Signal gefunden wurde. Wird die PTT-Taste während des Suchlaufes gedrückt ohne das ein
Signal gefunden wurde, schaltete das Gerät auf den Ursprungskanal auf dem der
Kanalsuchlauf gestartet wurde. Der Kanalsuchlauf wird nach Signalende und Ablauf
der Verweilzeit (TX Dwell Time) weitergeführt. Zum Beenden des Suchlaufes muss
die Funktionstaste gedrückt werden.
Selected
Beim Drücken der PTT-Taste kehrt das Gerät auf den Ursprungskanal zurück auf
dem der Suchlauf gestartet wurde.
Selected + Talk Back
Stoppt der Kanalsuchlauf auf einem besetzten Kanal und wird die PTT Taste innerhalb der Verweilzeit (TX Dwell Time) gedrückt, wird auf dem besetzen Kanal gesendet. Nach Ablauf der Verweilzeit sendet das Gerät beim Drücken der PTT-Taste
auf dem Ursprungskanal auf dem der Suchlauf gestartet wurde.
14 15
Page 9

DeutschDeutsch
Priority
Beim Drücken der PTT-Taste kehrt das Gerät auf den per Software programmierten
Vorrangskanal zurück.
Priority + Talk Back
Stoppt der Kanalsuchlauf auf einem besetzten Kanal und wird die PTT Taste innerhalb der Verweilzeit (TX Dwell Time) gedrückt wird auf dem besetzen Kanal gesendet. Nach Ablauf der Verweilzeit wechselt das Gerät beim Drücken der PTT-Taste
auf den Vorrangskanal.
Dropout Delay Time
Die Kanalsuchlauffunktion pausiert für die Signaldauer auf einem Kanal. Nach Signalende verweilt das Gerät für einen bestimmbaren Zeitraum (Dropout Delay Time,
1-5s) bevor der Kanalsuchlauf fortfährt.
TX Dwell Time
Wird während des Kanalsuchlaufes gesendet, verweilt der Kanalsuchlauf nach Loslassen der PTT-Taste für einen bestimmbaren Zeitraum (TX Dwell Time, 1-5s) weiterhin bevor der Kanalsuchlauf dann fortfährt.
Priority Channel
Einstellung des Vorrangskanals wenn unter Priority die Einstellung Fixed gewählt
wurde. Wählen Sie einen der programmierten Kanäle aus dem Menü.
DTMF Selektivruf
Mit dem DTMF Selektivruf sind Einzel- und Gruppenrufe möglich. Bei entsprechender
Einstellung öffnet der Lautsprecher nur bei dem Emfang der geräteeigenen Kodierung
(Decode). Im Gegenzug können bis zu 16 verschiedene Rufkodierungen (Encode )
programmiert werden.
Aus den maximal 16 programmierten Rufkodierungen können in den Kanaleinstellungen maximal zwei Selektivrufe jedem Kanal zugeteilt werden. In der Tastaturbelegung
müssen dann die Rufe 1 und 2 aktiviert werden. Beim Drücken der entsprechenden
Ruftontaste (Call 1/2) wird dann die zugewiesenen Selektivrufkodierung abgeschickt.
Das empfangende Gerät wird akustisch informiert über den Eingang des Selektivrufes
und sendet dann im Gegenzug eine Empfangsbestätigung, deren Empfang akustisch
am eigenen Gerät bestätigt wird. Nach Ablauf dieses Protokolles ist die Einzelruf-Verbindung für die gegenseitige Kommunikation geöffnet. Sie wird erst nach Ablauf der
automatischen Rückstellzeit (Auto Reset Timer), welche nach Signalende anfängt zu
laufen wieder geschlossen.
16 17
Anmerkung: Selektivruf zwischen Geräten verschiedener Herstellern ist aufgrund verschiedener Einstellungen oft fehlerhaft bzw. nicht möglich. Es ist auf jeden Fall darauf
zu achten, dass alle übereinstimmenden Einstellungen, wenn möglich gleich sind. Unterschiedliche Laufzeiten, Verzögerungen, etc. können zu Fehlfunktionen führen.
Folgende DTMF Selektivrufeinstellungen sind möglich:
ENCODE
DTMF Speed : Sendedauer des Selektivrufes, 50-500ms
First Digit Delay : Zeitdauer zwischen Drücken der Ruftaste und Absenden
der Kodierung; 100-2500 ms
D Code Assignment : D Code / 1-16 s
* and # Tone : Off / 100 / 500 / 1000 ms
First Digit Time : Länge des ersten Tones des Tonrufes;
Off/100/500/1000 ms
DTMF Side Tone : schaltet die Tonruffolge am eigenen Gerät stumm
Begin of TX Code : BOT Kodierung für die PTT-ID
End of TX Code : EOT Kodierung für die PTT-ID
DECODE
Self ID (Decode) : geräteeigene Rufkodierung (Decode)
Group Code () : Gruppenrufzeichen; A / B / C / D / * / #
Auto Reset Timer : bestimmt wann der Selektivruf beendet wird nach
Signalende; Off / 1-15 s
Decoding Response : Off / Beep Tone / Beep Tone and Response
Stun : bei Empfang der eingegebenen Kodierung wird der
Sende- und Emfangsbetrieb deaktiviert
Kill : bei Empfang der eingegebenen Kodierung wird das
Gerät ausgeschaltet.
AUTODIAL MEMORY
Encodes 1-16 : maximal 16 Sendekodierungen (Encodes) sind möglich
Page 10

Deutsch
Notiz (Embedded Message)
Es kann eine kurze Notiz, bestehend aus max 64 Zeichen, erstellt werden, die beim
Auslesen der Gerätedaten dann wieder ausgelesen wird.
Geräteinformationen (Local Message)
Es werden Informationen über die Geräteversion, Seriennummer, das Produktsdatum
angezeigt, soweit diese ab Werk programmiert wurden. Das Gerät muss beim Abrufen
der Daten angeschlossen sein.
Rückstellung der werkseitigen Einstellungen (RESET)
Zum Rückstellen der Gerätedaten auf die werkseitigen Einstellungen halten Sie die
PTT- und die PF1-Taste gleichzeitg gedrückt während Sie das Gerät einschalten. Es
ertönt ein mittellanger Ton.
Hinweis: speichern Sie individuell programmierte Gerätedaten sofort nach dem Übertragen auf das Gerät um diese im Falle einer versehentlichen Geräte-Rückstellung wieder auf das Gerät überspielen zu können.
ANSCHLUSS
Das TeCom-LC verfügt über einen Motorola-kompatiblen Zubehör-Anschluss (3,5 / 2,5
mm - Stereo / Stereo), der auch für das Datenübertragungskabel zum Programmieren
mit der Software T-UP32 verwendet wird.
Weiteres passendes Zubehör finden Sie im aktuellen TEAM-Katalog.
Technische Änderungen vorbehalten
18 19
Page 11

EnglishEnglish
Dear Customer,
Thank you for buying a TEAM TeCom-LC handheld transceiver. TEAM Electronic
stands for high-quality radio communication.
To fully understand the various functions and the possible settings and to ensure the proper
operation of the radio, we recommend to read this manual prior to first time use.
The TeCom-LC is available in these three versions:
PR8116 TeCom-LC PMR : programmed with 8 PMR* channels,
500 mW tx power, bandwidth 12.5 kHz,
no registration or fees apply
PR8118 TeCom-LC UHF-COM : commercial radio; 16 channels programmable;
registration and fees apply; only assigned
frequencies and parameters are allowed to be
programmed; bandwidth 12.5 kHz or 20 kHz;
max. TX power 4 W; UHF 450 - 470 MHz
PR8119 TeCom-LC VHF-COM : commercial radio; 16 channels programmable;
registration and fees apply; only assigned
frequencies and parameters are allowed
to be programmed; bandwidth 12.5 kHz or 20 kHz;
max. TX power 5 W; VHF 136 - 174 MHz
(for Spain 147-174 MHz)
With the optional programming software T-UP32, the various functions and settings of
the TeCom-LC can be programmed. The software is available in the versions PMR-FN,
COM and COM II for Windows 7 / 8 / 10. A USB data cable is included in the scope of
delivery.
* = PMR Frequencies
1 - 446.00625 MHz
2 - 446.01875 MHz
3 - 446.03125 MHz
4 - 446.04375 MHz
5 - 446.05625 MHz
6 - 446.06875 MHz
7 - 446.08125 MHz
8 - 446.09375 MHz
Table of Contents
page
GENERAL
Scope of Delivery 22
Maintenance 22
Overview of elements and functions 23-24
BASIC FUNCTIONS
Antenna 25
Battery Pack 25
Charging 25
On / Off 25
Volume 26
Channel Selection 26
Transmission 26
Reception 26
KEY FUNCTIONS
PTT key 27
Multi function keys 27-29
SOFTWARE FUNCTIONS
Channel settings 30-31
General Settings 31-32
Scan Settings 33-34
DTMF 34-35
Embedded Message 36
Local Message 36
Reset 36
CONNECTOR 36
CTCSS / DCS 54
SPECIFICATIONS 55
20 21
Page 12

EnglishEnglish
GENERAL
Scope of Delivery
Unpack the equipment carefully. We recommend you to identify the listed items before discarding the packing material. If any items are missing or have been damaged
during shipment, please
contact
your
dealer immediately.
Maintenance
For best performance and functionality of the TeCom-LC, please pay attention to
the following advices.
w Do not open the radio case. Improper opening may cause damages and
warranty claims are forfeited.
w For charging of the rechargeable battery pack, only use the charger SLG-
TeCom-LC that is included in the scope of delivery.
w Never expose the radio to direct sunlight or other heat sources. High temperatures
will diminish the longevity of certain components and plastic parts may melt and
deform.
w Never store the radio in dusty or dirty areas.
w Do not expose the radio to any liquid. Humidity max cause corrosion of the pcb
and its components.
w Should the radio generate unusual heat or emit unusual smell or even smoke,
please turn off the radio immediately and remove the battery pack. Contact your
dealer.
w Never transmit without antenna. A damage of the power amplifier may be the result.
Overview Elements and Functions
> max. tx-power
PMR : 500 mW
VHF : 5 W UHF : 4 W
> 16 channels available
COM I:
UHF: 400 - 480 MHz VHF: 136 - 174 MHz
COM II:
UHF: 450 - 470 MHz VHF: 147 - 174 MHz
PMR : 8 channels PMR - 446 MHz
> bandwidth:
PMR : 12.5 kHz
UHF / VHF : 12.5 / 20 / 25 kHz
> 50 CTCSS / 116 DCS-N / 116 DCS-I
> BCL - transmission blockage on busy channels
> selectable tx-powers High / Low (adjustable via software only with COM version)
> scan - Add/Del
> squelch - 0-9
> DTMF (max. 16 encodes, decodes (Self ID, Kill, Stun)
> PTT-ID: BOT, EOT, BOTH
> VOX: On/Off, sensitivity; delay, cancel VOX operation, VOX proceed tone
> signal improvement - Tail Eliminate (120° / 180° / 240° / Freq Eliminate Tail)
> warning tone
> TOT time-out-timer (15-600s in 15-seconds-steps)
> Power Save - battery saving function (1:4/1:8/1:16)
> voice annunciation in english
> 2 programmable multi-function keys (short press / hold); functions:
Squelch Off, Monitor, Current Channel Power Inquiry, Scan, Reverse (frequency),
Talk Around (rx-tx frequency adaption), Check Power, Call 1/2 (DTMF), Power
Change, Alert Key, VOX
Note:
all settings can be programmed with the optional software T-UP32. By default VOX,
DTMF and Tail Eliminate are not activated. By default, the two multi-function-keys
PF1/PF2 (8) / (9) of the PMR and FreeNet radio are programmed with one single
function - Squelch Off (8) and Scan (9). For the commercial versions UHF-COM and
VHF-COM only the PF1 key (8) is programmed with Squelch Off. To activated / deactivate them, press the accoring key shortly.
22 23
Page 13
EnglishEnglish
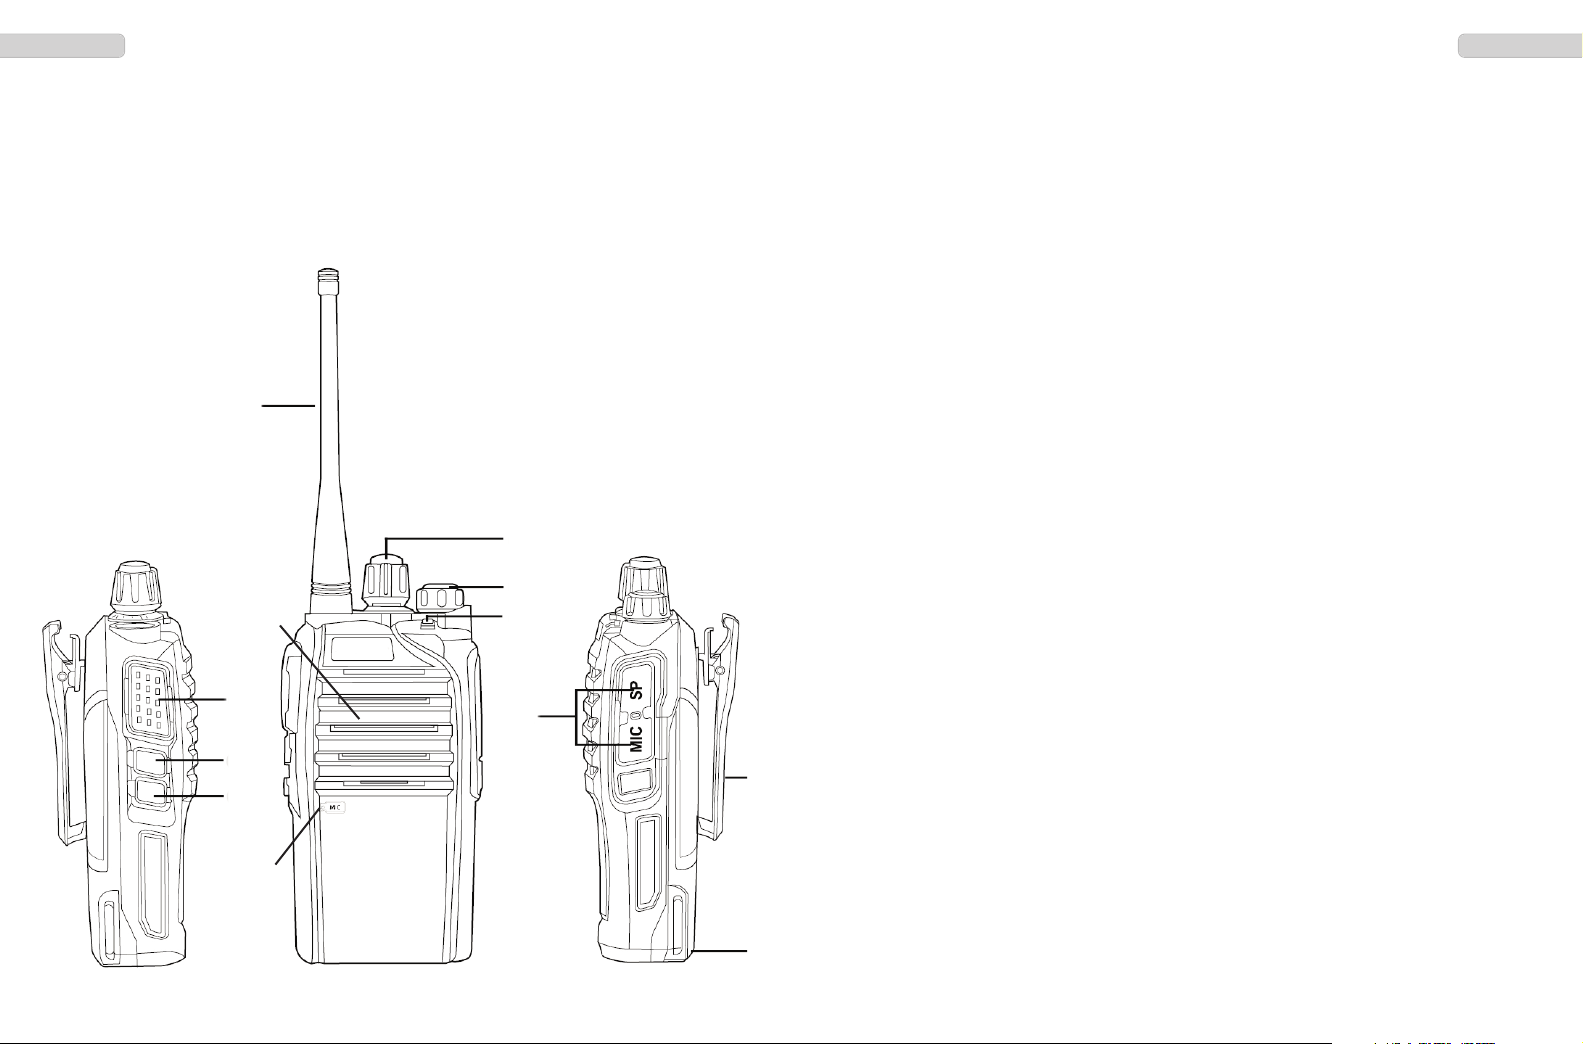
1 - antenna
2 - On/Off and volume
3 - rotary channel selector
4 - microphone
5 - speaker
6 - LED
7 - PTT key
8 - multi function key PF1
9 - multi function key PF2
10 - ear- / microphone connector
11 - battery pack Li-Ion, 1300 mAh
with battery clip
1
3
2
5
6
7
10
8
11
9
Antenna
Please note: by law, the antenna of the PMR version must be fixed. With all other
versions the annenta can be removed.
Mount the antenna onto the radio by turning the antenna threat clockwise onto the
antenna socket.
Battery Pack
To mount the battery pack onto the radio, place the battery pack flat-bottomed, with
the three contacts on top, onto the rear of the radio, the lower part standing over the
radio edge. Now, push the three guide noses, on the top of the battery pack, into the
counter part. The lock will snap-in.
To remove the battery pack, push the lock, located on the bottom of the battery pack,
down and, at the same time, push the battery out.
Belt Clip
For mounting the belt clip on the rear of the radio, please use only the screws that
are included in the scope of delivery.
Charging of the Battery Pack
Prior to the first usage, the battery pack (11) has to be charged completely. For charging, use only the charger SLG-TeComLC that is included in the scope of delivery. A
full charging cycle takes about five hours. Remove the battery pack at the end of the
charging process of the base station. Overcharging will shorten the battery pack’s
longevity.
Connect the power supply that is included in the scope of delivery with the charger
and the 220V power system. The LED will switch between red and green.
Place the radio with the mounted battery pack into the charger. Pay attention that the
battery pack is placed correctly. The guiding grooves at the sides of the battery pack
have to be placed into the couter parts of the base station.
During charging, the LED lights red. Once the charging process is completed, the
LED lights green.
BASIC FUNCTIONS
4
24 25
On / Off
To power on the radio, turn the combined On/Off-Volume knob (2) clockwise over the
threshold. A short beep tone is emitted and, if voice annunciation is activated, you can
hear “power on”, followed by the actual channel number.
To turn off the radio, turn the On/Off switch counterclockwise over the threshold.
Page 14

EnglishEnglish
Volume
Turn the combined On/Off-Volume knob (2) clockwise to increase, and counterclockwise the decrease the volume level.
To set a comfortable volume level after powering-on the radio, activate the SquelchOff function and adjust the volume accordingly. By preset, the multi function key PF1
is programmed with this function.
Channel Selection
For channel selection use the rotary channel selector (3). The 16 available channels will
be switched in consecutive order.
Upon selection of a non-programmed channel, a repetious beep tone will be emitted.
Transmission
For signal transmission, hold the PTT key (7) as long as you are talking. For best signal quality, talk with a clear, loud voice at a distance of 10 cm into the microphone.
During the transmission, the LED (6) illuminates red.
After the release of the PTT key (7), the radio returns to reception mode.
Reception
During signal reception the LED (6) illuminates green. .
If the reception frequency uses a CTCSS/DCS code, only signals with the same
coding will be audible. Signals with a different coding will not pass the squelch and
will not be audible.
KEY FUNCTIONS
PTT Key (7)
The PTT key (7) is located on the left side of the radio. As long as the PTT key is pushed,
the radio is in transmission mode. During transmission the LED (6) illuminates green.
With the optional software, the function PTT-ID can be set up. This function will trans-
mit a DTMF call, triggered by the PTT key. A DTMF call will be transmitted when pressing and/or releasing the PTT key.
Multi Function Keys (8) (9)
The triple-state multi function keys (8) (9) are located below the PTT key (7). The
three different triggers are released by 1) pushing the key shortly (short beep),
2) holding the key for 1 second (short double beep) and 3) holding it for 3 seconds.
Each key can be programmed with two functions. The 3rd function is preset with VOX
On/Off for the PF1 key (8) and announcement of the VOX sensitivity for the key PF2
(9). If the VOX function is not activated via software, the key PF2 (9) will also just announce the deactivated state of the VOX function. Please note that voice annunciation must be activated.
If no function is programmed, a short beep tone will be emitted when pressing the keys.
The keys can be programmed with these functions:
Squelch Off, Monitor, Current Channel Power Inquiry, Scan, Reverse, Talk
Around, Check Power, Call 1/2, Power Change, Alert Key
With activated voice annunciation, some functions are announced: With others a beep
tone will declare the active/inactive state.
By preset, the key PF1 (8) is programmed with the Squelch Off function and the PF2
key with the Scan function for PMR and FreeNet. The commercial radios are only programmed with the PF1 (Squelch Off).
Squelch Off
The squelch function is deactivated and the typical frequency noise is audible if no
signal is present. Use this function to listen to very weak signals that would not pass
the squelch.
Monitor
The monitor function will deactivate the CTCSS/DCS squelch for signals. If a
CTCSS/DCS code has been programmed for the channel, signals with another
CTCSS/DCS code will be audible when using the monitor function.
Current Channel Power Inquiry
With activated voice annunciation, the current tx-power setting High or Low for the
selected channel is announced.
26 27
Page 15

EnglishEnglish
Scan / Priority Scan
All channels of the scan list are continously scanned until a signal has been detected.
Then, the scan function pauses on the channel where a signal has been detected
and continues scanning once the signal ends and the Dropout Delay Time has been
expired. Adding to or deleting from the scan list can only be done via the optional
software T-UP32. By default, all channels are added to the scan list. During scanning
the LED blinks slowly green. To stop the scan function, the function key has to be
pushed again. Scanning will not stop automatically once a signal has been detected.
The scan function offers a variety of parameters.
Dropout Delay Time : Once a signal ends, the radio will remain for a certain time
(1-5s) on the channel before scanning continues.
TX Dwell Time : After the end of transmission, the radio will remain on the
(1-5s) channel before scanning continues.
Priority : Activates the priority channel function. It is either the
(None/Selected/Fixed) selected or a fixed channel, which is defined unter Priority
Channel.
Look Back Time A : If a signal on a non-priority channel been scanned, the
(1-5s) radio will continously check the priority channel for signals
in certain time intervals
Look Back Time B : If a signal with a differing CTCSS/DCS code been
(1-5s) detected on the priority channel, the radio will continously
check the priority channel for signals with the same
CTCSS/DCS code in certain time intervals
For the operation of the PTT key (7) during the active state of the scan function, there
are five options available:
Last Called / Selected / Selected +Talk / Priority / Priority + Talk Back for more informations about these settings check Scan Settings.
Reverse
This function is only relevant for the COM versions UHF- and VHF-COM when using
different frequencies for transmission and reception. If activated, the function will reverse the tx and rx frequencies.
Talk Around
This function is only relevant for the COM versions UHF- and VHF-COM when using
different frequencies for transmission and reception when operating in repeater mode.
If activated, the function will adapt the tx frequency to the rx frequency. The communication through the repeater is then disrupted and contact to local radios is possible.
Check Power
The actual capacity of the battery pack is announced on a scale between 1-10.
Call 1/2
The programmed DTMF call (Call 1/2) will be transmitted. A maximum of 16 DTMF
calls can be programmed. For each channel, two calls can be assigned.
Power Change
Switch between the tx-power High and Low with the power change function.
With the PMR version the values for High and Low are both 500 mW. For the COM
versions the values can be adjusted according to the licence with a max. value of
4 W for UHF and 5 W for VHF.
Alert Key
An alarm tone is transmitted on the frequency and emitted at the own radio. In active
state, all function keys including the PTT key, as well as the channel selector are deactivated.
To stop the Alert Key function, press the function key again.
VOX
The VOX function is only available when an ear-/microphone is connected to the radio.
To activate/deactivate the VOX function, press the multi function key PF1 (8) for approximately three seconds. Please note that the VOX function must be activated via
software programming to be available.
These VOX settings are available and have to be programmed via software:
Delay : once the signal ends, the radio remains in tx mode for the
(0.3-3s) set delay time
Level : the sensitivity level determines how strong a signal has to
(1-9) be, for the the automatic transmission to start. On level 9
the signal can be very weak to trigger the VOX function.
On level 1 the signal has to be very, very strong for the VOX
to start. Pressing the PF2 key for 3 seconds, with activated
VOX function, will anounce the current VOX sensitivity level.
Cancel Operation : Pressing the PTT key (7) will deactivate the VOX function.
VOX Proceed Tone : A beep tone will announce each VOX signal transmission.
28 29
Page 16

SOFTWARE FUNCTION
The following settings are managed by the optional software. T-UP32 PMR is for programming the PMR radio version. T-UP32 COM and COMII are for the commercial
radio versions UHF and VHF.
The functions are listed in the order as they appear in the software.
Channel Information
These settings are available for each channel.
RX Freq - reception frequency / TX Freq - transmission frequency
For the PMR version, only the eight designated PMR frequencies can be selected.
No other frequencies can be programmed.
In the COM versions, the frequency can be manually programmed according to the
assigned frequencies of the licence.
CTCSS/DCS reception- (Decode) and transmission-frequency code (Encode)
A CTCSS/DCS code can be assigned to each tx and rx frequency.
In total, there are 50 CTCSS und 232 DCS codes (116 DCS-N and 116 DCS-I) available.
Tx Power - switch tx-power HIGH/LOW
The tx-power settings LOW and HIGH can be assigned individually for each channel.
Scan Add/Del - scan
Activates/deactivates a channel for the scan function. It adds the channel to the scan
list or deletes the channel from it.
Channel Spacing N/M/W - bandwidth
In the PMR version the bandwidth is fixed to 12.5 kHz.
For the commercial versions UHF-COM and VHF COM, the bandwidths N (12.5 kHz),
M (20 kHz) and W (25 kHz) are available. Please check your licence which value has
to be set for your radio.
BCL - busy channel lockout
Transmission is blocked if a signal is present on the selected channel.
Option Signaling - DTMF
Activates/deactives the DTMF calling function for channel. For DTMF to work the key
assignment and the DTMF parameters have to be programmed.
EnglishEnglish
Signal Relation
Sets the squelch rule for signal reception when using DTMF and CTCSS/DCS.
AND : the DTMF and the CTCSS/DCS codes of the received signal have to match
the own settings for the squelch to open.
OR : the DTMF or the CTCSS/DCS code of the received signal have to match the
own setting for the squelch to open.
Call 1/2 - DTMF call 1/2
For each channel, two DTMF calls can be programmed. Select out of the list of programmed encodes (see DTMF
PTT-ID
With PTT-ID a DTMF code can be transmitted automatically when the PTT key is
pushed and/or released. The setting Beginning-Of-Transmission transmits the BOT
code when pushing the PTT key. The selection End-Of-Transmission will transmit the
EOT code when releasing the PTT key and BOTH will transmit the BOT and EOT
code. Go to DTMF / Encodes for the settings.
Furthermore, the functions Reverse and Talk Around (see multi function keys) can be
individually assigned to each channel.
These basic settings concern all programmed channels.
Time Out Timer - TOT
To prevent overlong blockage of the channel and overheating of the battery pack
(transmission generates heat), use the time-out-timer function TOT. After expiration
of the TOT time (5-600s in 15-second-steps), the radio automatically stops transmission. To be able to transmit again, the PTT key needs to be released and pushed
again.
TOT Warning Time
Prior to expiration of the TOT time a warning tone is emitted. The TOT warning time
can be set between 5-10 seconds.
SQ Level 0-9 - squelch
A signal must have a certain strength to pass the squelch and be audible. At the level
0 the squelch is deactivated and the typical frequency noise is audible when no signal
is present.
At the highest level (9), a signal must be very strong to pass the squelch. Most signals
will be filtered-out.
/ Autodial Memory).
Function Setup
30 31
Page 17

EnglishEnglish
Voice Prompt - voice annunciation
The english voice annunciation announces the boot up of the radio, the selected
channel, as well as some functions that are are available for programming of the multi
function keys. By default this function is activated.
Tail Eliminate - signal optimization
When switching between transmission and reception, under certain conditions a
clicking noise is present. This can be quite disturbing when using an ear-microphone.
To reduce this noise, the end of signal will be cut off. The available options are:
Silence / 120° / 180° / 240°.
Note: this feature will only get the best results when communicating radios use the
same settings.
Eliminate Squelch Tail when no CTCSS/DCS
The aforementioned feature is also available for signals that do not use CTCSS/DCS.
For those signals use this feature.
The available options are: Off / 55,2 Hz / 259,2.
Note: this feature will only get the best results when communicating radios use the
same settings.
Power Save - battery saving function
This features will save battery capacity. After a certain time without any operation,
the radio switches to standby mode, where a limited capacity is required to keep the
basic radio functions running.
The ratio between the normal mode and standby mode can 1:4 / 1:8 / 1:16, with 1:16
providing the greatest energy saving.
VOX - automatic voice transmission
These settings are available for VOX operation:
Level (sensitivity)) : 0-9
Delay : 0.3-3 seconds
Cancel Operation : pressing the PTT key deactivates VOX operation
VOX Proceed : automatic transmission is announced by a beep tone
Scan Information
The following settings define the behavior of the scan and priority scan function.
Priority (activate priority scan)
None / Fixed / Selected
The priority channel can be either fixed or changing. The fixed channel is defined
with the setting Priority Channel and the changing channel is always the actual, selected channel.
Look Back Time A
This setting is only relevant for the priority scan.
Has a signal been detected on a non-priority channel, the scan function will pause
and remain on this busy channel. Nevertheless, the priority channel will be scanned
for signals in certain intervals that are defined with the setting Look Back Time A
(1-5s).
Look Back Time B
This setting is only relevant for the priority scan.
Has a signal with an uncorrespondent CTCSS/DCS code been detected on the priority channel, scanning will continue but will check the priority channel for signals with
a correspondent CTCSS/DCS code in certain intervals, Look Back Time B (1-5s).
Revert Channel
This setting determines the channel that will be selected when pressing the PTT key
(7) during scan.
Last Called
Has a signal been detected on a channel and the PTT key (7) is pushed, the radio
will transmit on the scanned channel. Has no signal been scanned yet and the PTT
is pushed, the radio will switch to the channel where scan has been started.
Scanning will continue after the signal ends and the TX Dwell Time has been expired. To stop scanning press the multi function key that has been programmed with
the scan function.
Selected
When pressing the PTT key, the radio switches back to the channel where the scan
function has been started.
Selected + Talk Back
If the scan function pauses on a busy channel and the PTT key (7) will be pushed
within the TX Dwell Time, the radio will transmit on the scanned channel. If the PTT
key is pushed after the expiration of the TX Dwell Time, the radio will switch to the
channel where the scan function has been started.
32 33
Page 18

EnglishEnglish
Priority
The radio will switch to the priority channel once the PTT key (7) is pushed, regardless if a signal has been detected or not.
Priority + Talk Back
If the scan function pauses on a busy channel and the PTT key (7) will be pushed
within the TX Dwell Time, the radio will transmit on the scanned channel. If the PTT
key is pushed after the expiration of the TX Dwell Time, the radio will switch to the
priority channel.
Dropout Delay Time
The scan function pauses as long as a signal is present on a channel. Once the signal
ends, the radio will remain on this channel for a certain time, the Dropout Delay Time
(1-5s), before the scan function continues.
TX Dwell Time
Will the PTT key (7) be pushed during scanning, the scan function pauses. Once the
PTT key is released, the radio will remain on the channel for a certain time, the TX
Dwell Time (1-5s), before scanning continues.
Priority Channel
Select the fixed priority channel out of all programmed channels. This setting is only
activated if the option Priority has been set to Fixed.
DTMF Selective Call
The DTMF selective calling function of the TeCom-LC allows single calls and group
calls with a maximum of 16 encodes. With the according settings, the speaker unmutes
only upon reception of the proper DTMF decode.
The DTMF encode (Self ID) can be composed of a maximum of 10 digits, encodes can
contain up to 16 digits, the letters A-D and the symbols # and * included. A maximum
of 16 encodes (Autodial Memory) can be programmed.
Each channel can transmit a maximum of two DTMF codes (Call 1/2). The codes have
to be assigned to the multi function keys that are set up with the function Call 1 and
Call 2. When pressing the Call key, the assigned DTMF code is transmitted. Depending
on the setup, the receiver will be acoustically informed about the incoming DTMF call
and it will transmit a call-received confirmation signal in return. After this single call protocol, the channel is open for communication until the reset time (Auto Reset Time)
which starts counting-down after the end of the signal, has been expired.
34 35
Note: Selective calling between radios of different manufacturers is sometimes not satisfactory or even malfunctioning due to different settings between the radios. Please
pay attention that all matching settings use the same values. Different time intervals
for reset time, delay time, etc. can cause malfunctioning.
The following DTMF settings are available:
ENCODE
DTMF Speed : transmission duration for the DTMF call; 50-500ms
First Digit Delay : duration between pushing the PTT key and start of
transmission of the DTMF code; 100-2500 ms
D Code Assignment : D Code / 1-16 s
* and # Tone : Off / 100 / 500 / 1000 ms
First Digit Time : duration of the first digit of the DTMF code;
Off/100/500/1000 ms
DTMF Side Tone : mutes/unmutes the DTMF tones at the radio
Begin of TX Code : BOT code for PTT-ID
End of TX Code : EOT code for PTT-ID
DECODE
Self ID (Decode) : DTMF decode
Group Code : group call letters and symbols: A / B / C / D / * / #
Auto Reset Timer : determines when the selective call will end after end of
the signal; Off / 1-15 s
Decoding Response : Off / Beep Tone / Beep Tone and Response
Stun : upon reception of stun code, tx and rx will be deactivated,
(for reactivation stun code+# must be received)
Kill : upon reception of kill code, the radio will power-off
(for revival kill code+# must be received)
AUTODIAL MEMORY
Encodes 1-16 : 16 encodes with a maximum a 16 symbols are possible
Page 19

Embedded Message
A message, composed of a maximum of 64 symbols, can be composed and saved to
the radio. This message will be displayed if the radio data is transferred to the computer
via software.
Local Message
Information about radio version, serial number, production date, etc. are possible.
Please note that not all information will be available for all radios.
The radio has to be connected to the computer for reading the data.
RESET
To reset the radio data to the factory preset hold the PTT key (7) and the PF1 key (8)
at the same time when powering on the radio. A medium-long tone will be emitted.
Note: if you change the preset settings of the radio with the optional software T-UP32
please save your individual settings before transferring them to the radio to avoid data
loss in case of an unvoluntary reset.
EnglishEnglish
CONNECTOR
The TeCom-LC has a Kennwood-compatible connection (3.5/2.5 mm - stereo /stereo)
for ear-/microphones, headsets and the USB software data transfer cable.
Accessories can be found on our web site www.team-electronic.de.
36 37
Technical data subject to change without notice.
Page 20

EspañolEspañol
Estimado cliente,
Muchas gracias por comprar nuestro transceptor portátil TEAM TeCom-LC. TEAM Electronic es sinónimo de radiocomunicaciones de alta calidad.
Para comprender totalmente las diferentes funciones y los posibles ajustes y para asegurar el uso apropiado del transceptor, le recomendamos que lea este manual antes
de usar el equipo por primera vez.
TeCom-LC está disponible en 3 versiones:
PR-8116 TeCom-LC PMR: Programado con 8 canales PMR*,
potencia transmisión 500 mW,
ancho de banda 12.5 kHz, no requiere de licencia.
PR-8118 TeCom-LC UHF-COM: Equipo comercial; 16 canales programables;
requiere de licencia y/o canon; sólo se permiten
programar frecuencias asignadas y parámetros ;
ancho de banda 12.5 kHz ó 20 kHz; potencia
máxima de salida 4 W; UHF 450-470 MHz.
PR-8119 TeCom-LC VHF-COM: Equipo comercial; 16 canales programables;
requiere de licencia y/o canon; sólo se permiten
programar frecuencias asignadas y parámetros ;
ancho de banda 12.5 kHz ó 20 kHz; potencia
máxima de salida 5 W; VHF 147-174 MHz.
Con el software opcional de programación T-UP32 se pueden programar las variadas
funciones y ajustes del TeCom-LC. El software está disponible en las versiones PMR
y comerciales para Windows 7 / 8 / 10. Un cable de datos USB está incluido con el
software.
* = Frecuencias PMR
1 - 446.00625 MHz
2 - 446.01875 MHz
3 - 446.03125 MHz
4 - 446.04375 MHz
5 - 446.05625 MHz
6 - 446.06875 MHz
7 - 446.08125 MHz
8 - 446.09375 MHz
Tabla de contenidos
página
GENERAL
Embalaje 40
Mantenimiento 40
Visión general de elementos y funciones 41-42
FUNCIONES BÁSICAS
Antena 42
Batería 42
Cargar 43
Encender/Apagar 43
Volumen 43
Selección de canales 43
Transmisión 43
Recepción 43
TECLAS DE FUNCIÓN
Botón PTT 44
Teclas multifunción 44-46
FUNCIONES POR SOFTWARE
Ajustes de canales 47-48
Ajustes generales 48-49
Ajustes escaneo 50-51
DTMF 51-52
Mensajes incorporados 53
Mensaje local 53
Reset 53
CONECTOR 53
CTCSS / DCS 54
ESPECIFICACIONES 55
38 39
Page 21

EspañolEspañol
GENERAL
Embalaje
Desembale el equipo con cuidado. Por favor, compruebe que estén todos los elementos de la lista antes de desechar el embalaje. Si le falta alguno de ellos o viene
dañado, póngase en contacto inmediatamente con el proveedor.
Mantenimiento
Para mejor rendimiento y funcionalidad del TeCom-LC preste atención a estos consejos:
w No abra el chasis de la radio. Abrirlo inadecuadamente podría causar daños que
no cubriría la garantía del aparato.
w Para cargar el pack de baterías recargables, utilice solo el cargador SLG-
TeCom-LC incluido en el paquete.
w No exponga nunca la radio a los rayos del sol u otras fuentes de calor. Las altas
temperaturas podrían acortar la vida de algunos de los componentes y las partes
de plástico podrían derretirse o deformarse.
w No coloque nunca la radio en zonas con altos niveles de polvo o suciedad.
w No exponga la radio a ningún líquido. La humedad podría causar corrosión en la
PCB y sus componentes.
w Si la radio generase una calor inusual o emite olor o humo, por favor, apáguela
inmediatamente y extraiga la batería. A continuación, póngase en contacto con
su distribuidor.
w No transmita nunca sin antena; podría producirse daños irreversibles.
Visión general de elementos y funciones
> Potencia máx. TX
PMR : 500 mW
VHF : 5 W UHF : 4 W
> 16 canales disponibles
UHF : 450 - 470 MHz VHF : 147 - 174 MHz
PMR : 8 canales PMR 446
> Ancho de banda
PMR : 12.5 kHz
UHF / VHF : 12.5 / 20 / 25 kHz
> 50 códigos CTCSS / 116 DCS-N / 116 DCS-I
> BCL. Bloqueo de transmisión en canales ocupados
> Selección potencia alta/baja (ajustable por software sólo en las versiones
comerciales)
> SCAN – Añadir / Eliminar
> Squelch – 0 ~ 9
> DTMF (máximo 16 codificaciones, decodificaciones (Self ID, Kill, Stun)
> PTT-ID: BOT, EOT, BOTH
> VOX: On/Off, sensibilidad, retardo, cancelación operación VOX, tono proceder VOX
> Mejora de la señal – Eliminar cola (120° / 180° / 240°)
> Tono de aviso
> TOT. Limitador del tiempo de transmisión (15-600 seg en saltos de 15 seg)
> Ahorro de energía – Funciones de ahorro de batería (1:4 /1:8/1:16)
> Anuncios por voz en inglés
> 2 teclas multifunción programables (pulsación corta/larga). Funciones:
Squelch Off, Monitor, Current Channel Power Inquiry, Scan, Reverse (frequency),
Talk Around (rx-tx frequency adaption), Check Power, Call 1/2 (DTMF), Power
Change, Alert Key, VOX. Se detallan más adelante.
Nota:
Todos los ajustes pueden ser programados con el software opcional T-UP32. Por
defecto VOX, DTMF y Tail Eliminate (eliminar cola) no están activados. Por defecto
las 2 teclas multifunción PF1/PF2 (8) / (9) del transceptor PMR están programadas
con una simple función – Squelch OFF (8) y SCAN (9). En las versiones comerciales
UHF-COM y VHF-COM sólo la tecla PF1 (8) está programada con Squelch OFF.
Para activar/desactivarlas pulse la tecla brevemente.
40 41
Page 22
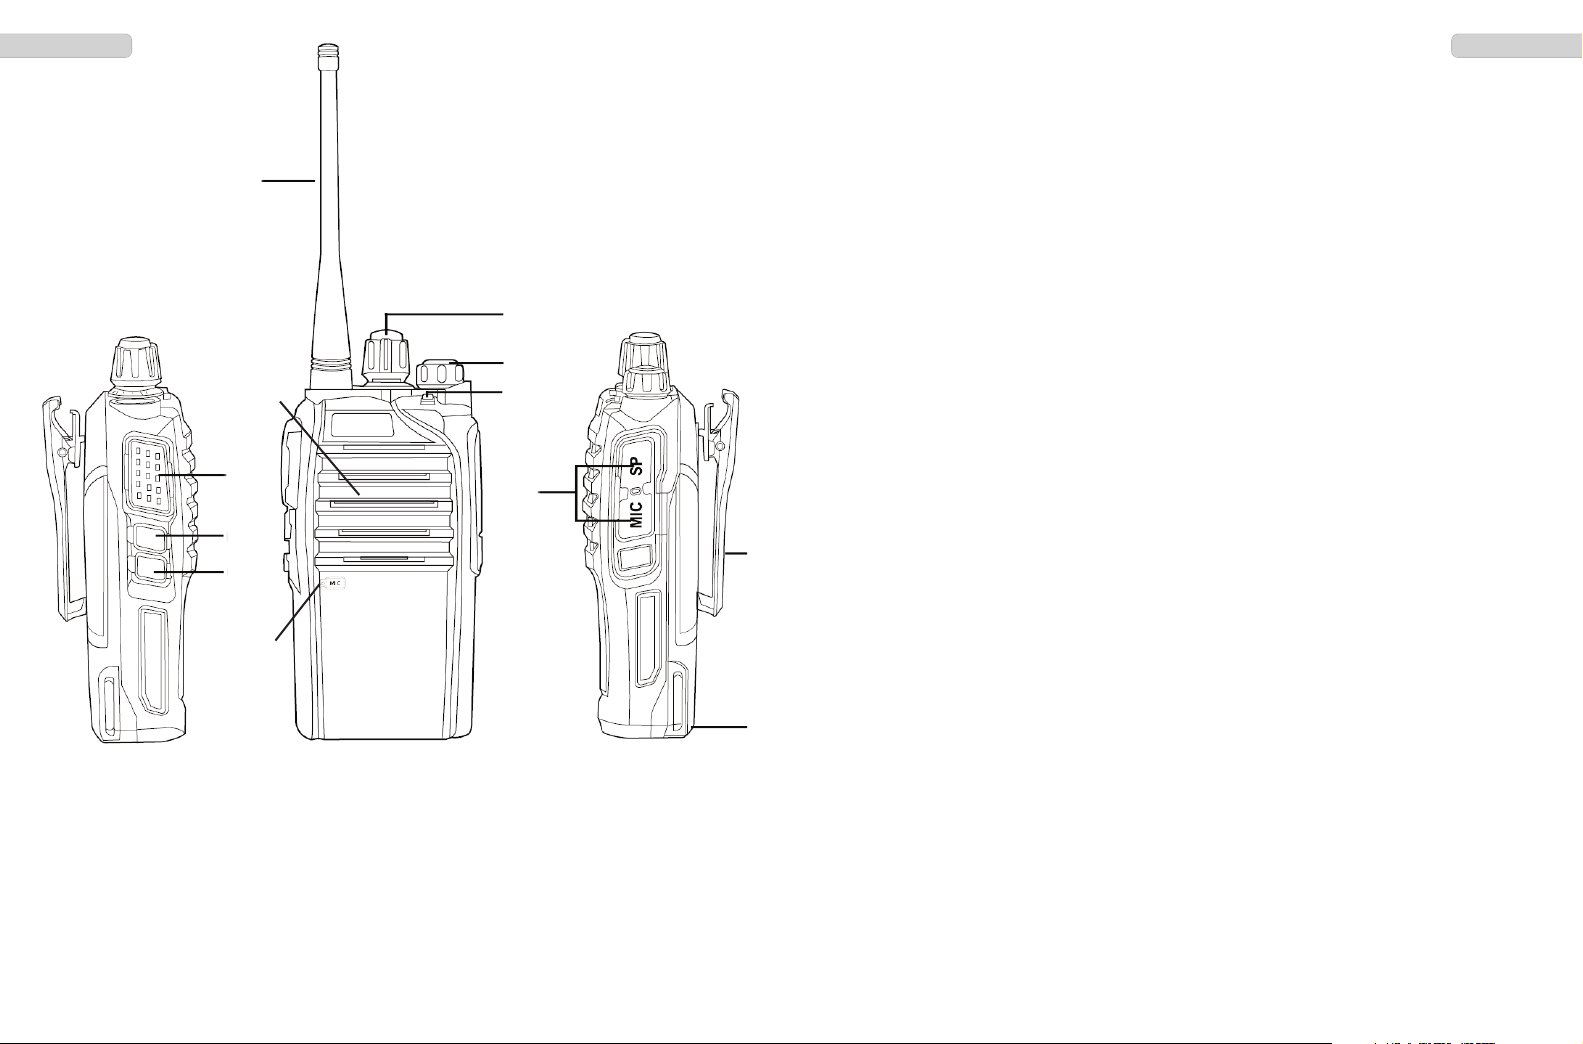
1. Antena
2. Encender / Apagar y volumen
3. Selector rotativo de canales
4. Micrófono
5. Altavoz
1
6. LED
7. Botón PTT
8. Tecla multifunción PF1
9. Tecla multifunción PF2
10. Conector microauricular
11. Batería Li-Ion 1300 mAh con clip de batería
3
Clip para cinturón
Para el montaje de la pinza para el cinturón en la parte posterior de la radio, por favor, utilice
sólo los tornillos que le suministramos.
Cargar la batería
Antes del primer uso, la batería (11) tiene que ser cargada completamente. Para cargar use
solamente el cargador SLG-TeCom-LC que incluimos en el embalaje. Un ciclo completo de
carga dura unas 5 horas. Extraiga la batería de la base al final del proceso de carga. Sobrecargar acortará la vida de la batería.
Conecte el alimentador incluido en el embalaje con el cargador a una toma de 220 V. El LED
cambiará de rojo a verde. Coloque el transceptor con la batería en el cargador. Asegúrese que
la batería está bien colocada. Las ranuras de guía a los lados de la batería tienen que ser colocados con las de la estación base. Durante la carga, el LED está en rojo. Una vez el proceso
de carga a finalizado el LED estará en verde.
EspañolEspañol
2
5
6
7
10
8
11
9
4
FUNCIONES BÁSICAS
Antena
Atención: por ley, la antena de la versión PMR debe ser fija. Con las otras versiones la antena
se puede quitar. Monte la antena en la radio girándola en dirección de las agujas del reloj en la
base de conexión de la antena.
Batería
Para montar la batería en la radio, colóquela por la parte plana, con los tres contactos en la
parte superior, en la parte trasera de la radio, en la parte inferior de pie sobre el borde. Entonces,
empuje los tres pins de la parte superior de la batería en el compartimento. El cierre encajará.
Para extraer la batería, presione el cierre situado en la parte inferior de la batería hacia abajo
y, al mismo tiempo, empuje la batería hacia fuera.
42 43
Encender/Apagar
Para encender el transceptor gire el botón combinado ON/OFF – Volumen (2) en dirección agujas del reloj. Sonará un pequeño beep y, si los anuncios por voz están activados, se escuchará
un ‘Power on’ seguido del nº de canal actual.
Para apagar el transceptor, gire el botón ON/OFF en sentido contrario a las agujas del reloj.
Volumen
Gire el botón combinado ON/OFF – Volumen (2) en dirección agujas del reloj para subir el volumen y en dirección contraria para bajarlo.
Para ajustar un nivel de volumen agradable después de poner en marcha el equipo, active la
función Squelch OFF y ajuste el volumen adecuadamente. Por defecto la tecla multifunción
PF1 está programada con esta función.
Selección de canales
Para seleccionar canales use el mando selector rotatorio (3). Los 16 canales disponibles (8 en versión PMR) se irán cambiando en orden consecutivo.
Tras la selección de un canal no programado se emitirá un pitido repetidamente.
Transmisión
Para transmisión de señales, mantenga pulsada el botón PTT (7) durante el tiempo
que esté hablando. Para obtener la mejor calidad de señal hable con voz alta y clara
a una distancia de unos 10 cm del micrófono. Durante la transmisión el LED (6) se
iluminará rojo. Cuando suelte el botón PTT el transceptor pasará a modo recepción.
Recepción
Durante la recepción de alguna señal el LED verde se iluminará.
Si la frecuencia de recepción usa un código CTCSS/DCS sólo se escucharán las señales con la misma codificación. Señales con otras codificaciones no pasarán el
Squelch y no serán audibles.
Page 23

EspañolEspañol
TECLAS DE FUNCION
Botón PTT (7)
Está ubicado en la parte izquierda de la radio. Mientras esté pulsado la radio estará
en modo de transmisión. Durante la transmisión el LED (6) se ilumina rojo. Con el
software opcional puede ajustarse la función PTT-ID. Esta función transmitirá una
señal DTMF desencadenada por la tecla PTT. Una llamada DTMF será transmitida
cuando pulse o suelte la tecla PTT.
Teclas multifunción (8) (9)
Las teclas multifunción de triple estado están situadas debajo del botón PTT (7). Los
tres diferentes desencadenadores son: 1) pulsación corta de la tecla (beep corto),
2) mantener pulsado durante 1 segundo (doble beep corto) y 3) mantener pulsado
durante 3 segundos. Cada tecla puede ser programada con dos funciones. La tercera
función está predefinida con VOX ON/OFF en la tecla PF1 (8) e indicación de la sensibilidad del VOX en la tecla PF2 (9). Si la función VOX no está activada vía software
la tecla PF2 (9) también indicará que el VOX está desactivado. Tenga en cuenta que
los anuncios por voz deberán estar activados.
Si no hay ninguna función programada sonará un pequeño beep cuando pulse las teclas.
Las teclas pueden ser programadas con estas funciones (se detallan más adelante):
Squelch Off, Monitor, Current Channel Power Inquiry, Scan, Reverse (frequency), Talk
Around (rx-tx frequency adaption), Check Power, Call 1/2 (DTMF), PowerChange, Alert
Key.
Con los anuncios por voz activados algunas funciones son anunciadas. Con otras
un beep indicará el estado activado/desactivado.
Por defecto, la tecla PF1 (8) está programada con la función Squelch OFF y en la
versión PMR la tecla PF2 (9) está programada con la función SCAN. Las versiones
comerciales sólo tienen programada la tecla PF1.
Squelch OFF
La función Squelch está desactivada y el típico ruido es audible si no hay ninguna
señal. Use esta función para escuchar señales muy débiles que no pasan el Squelch.
Monitor
La función monitor desactivará el squelch CTCSS/DCS para señales. Si un código
CTCSS/DCS ha sido programado para el canal, señales con otro código
CTCSS/DCS serán audibles cuando use la función monitor.
Currrent Channel Power Inquiry
Con los anuncios de voz activados, anuncia el ajuste de la potencia de transmisión
High / Low (Alta / Baja) del canal seleccionado.
44 45
Scan / Priority Scan
Todos los canales de la lista de escaneo son continuamente escaneados hasta que
se detecta una señal. Entonces, la función escaneo se detiene en el canal donde la
señal ha sido detectada y continua escaneando una vez la señal termina y el Dropout
Delay Time (tiempo de espera) ha expirado. Añadir o borrar de la lista sólo se puede
hacer con el software opcional T-UP32. Por defecto todos los canales están en la
lista de escaneo. Durante el escaneo el LED parpadea lentamente en verde. Para
detener la función de escaneo se debe pulsar de nuevo la tecla de función. El escaneo no se detendrá automáticamente hasta que haya detectado una señal.
La función de escaneo ofrece una variedad de parámetros:
Dropout Delay Time Una vez la señal termina, la radio permanecerá un cierto
(1-5 seg) tiempo en el canal antes de continuar con el escaneo
TX Dwell Time Después del final de la transmisión, la radio permanecerá
(1-5 seg) un cierto tiempo en el canal antes de continuar con el escaneo
Priority Activa la función de escaneo prioritario. O bien es el canal
(None/Selected/Fixed) seleccionado o un canal fijado, el cual está definido bajo
‘Priority channel’.
Look Back Time A Si ha sido escaneada una señal en un canal no prioritario,
(1-5 seg) la radio chequeará continuamente el canal prioritario para
señales en ciertos intervalos de tiempo
Look Back Time B Si una señal con un código CTCSS/DCS ha sido detectada
(1-5 seg) en el canal prioritario, la radio chequeará continuamente el
canal prioritario para señales con el mismo CTCSS/DCS
en ciertos intervalos de tiempo.
Para el funcionamiento de la tecla PTT (7) durante la función de escaneo, hay cinco
opciones disponibles: Last Called / Selected / Selected +Talk / Priority / Priority + Talk Back
Para más información sobre estos ajustes consulte Información Escaneo.
Reverse
Esta función sólo es relevante para las versiones comerciales cuando usan frecuencias diferentes para trasmisión y recepción. Si está activado, esta función invertirá
las frecuencias de transmisión y recepción.
Talk Around
Esta función sólo es relevante para las versiones comerciales cuando usan frecuencias diferentes para trasmisión y recepción cuando operan en modo repetidor. Si
está activado esta función adaptará la frecuencia de transmisión a la frecuencia de
recepción. La comunicación a través del repetidor es entonces interrumpida y el contacto con las radios locales es posible.
Page 24

EspañolEspañol
Check Power
Anuncia la capacidad de la batería en una escala entre 1 y 10.
Call 1/2
Se transmitirá la llamada programada DTMF (Call 1/2). Un máximo de 16 llamadas
DTMF pueden ser programadas. Para cada canal, dos llamadas pueden ser asignadas.
Power Change
Conmuta entre potencia de transmisión Alta (High) o Baja (Low). En la versión
PMR los valores de potencia Alta y Baja son los mismos (500 mW). Para las versiones comerciales los valores pueden ser ajustados de acuerdo con la licencia
con un máximo de 4 W para UHF y 5 W para VHF.
Alert Key
Un tono de alarma se transmite en la frecuencia y la emite en la propia radio. En
estado activo, todas las teclas de función incluyendo PTT así como el mando selector de canales, son desactivados.
Para detener la función Alert Key pulse de nuevo la tecla de función.
VOX
La función VOX sólo está disponible cuando hay un microauricular conectado.
Para activar/desactivar la función VOX pulse la tecla multifunción PF1 (8) durante
unos 3 segundos. Tenga en cuenta que la función VOX debe activarse mediante el
software de programación para estar disponible.
Estos ajustes VOX están disponibles y deben programarse por software.
Delay Cuando la señal termina, el transceptor permanece en
(0.3 – 3 seg) transmisión durante el tiempo especificado.
Level El nivel de sensibilidad determina la fuerza de la señal para
(1-9) que la transmisión empiece de forma automática. En nivel
9 la señal puede ser muy débil para desencadenar la función VOX. En nivel 1 la señal debe ser muy fuerte para que
VOX se conecte. Pulsando la tecla PF2 durante 3 segundos
(con la función VOX activada) anuncia el nivel de sensibilidad actual del VOX
Cancel Operation Pulsando el botón PTT (7) se desactiva la función VOX
VOX Proceed Tone Un beep anunciará cada señal de transmisión VOX
46 47
Los siguientes ajustes son gestionados por el software opcional. T-UP32 PMR es el
software de programación para el equipo PMR. T-UP32 COMII son para los equipos
comerciales UHF y VHF.
Las funciones están detalladas en el orden en que aparecen en el software
RX Freq – Frecuencia de recepción / TX Freq – Frecuencia de transmisión
Para la versión PMR sólo se pueden seleccionar 8 frecuencias PMR designadas.
No se pueden programar otras frecuencias.
En las versiones comerciales la frecuencia puede ser programada manualmente de
acuerdo con las frecuencias asignadas de la licencia.
CTCSS/DCS reception – (Decode) and transmission-frequency code (Encode)
Se puede asignar un código CTCSS/DCS en cada frecuencia de transmisión y de
recepción. En total hay 50 CTCSS y 232 códigos DCS (116 DCS-N y 116 DCS-I) disponibles.
Tx Power – switch tx-power HIGH/LOW
Se pueden asignar los ajustes de potencia HIGH (Alta) y LOW (Baja) por cada canal.
Scan Add/Del – scan
Activa/Desactiva un canal para la función de escaneo. Añade el canal a la lista de
escaneo o lo borra.
Channel Spacing N/M/W – bandwidth
En la versión PMR el ancho de banda está fijado en 12.5 kHz.
En las versiones comerciales UHF-COM y VHF-COM están disponibles los anchos
de banda N (12.5 kHz), M (20 kHz) y W (25 kHz). Verifique su licencia para saber
qué valor debe ajustar en su radio.
BLC – busy channel lockout
La transmisión se bloquea si hay una señal presente en el canal seleccionado.
Option Signaling – DTMF
Activa/Desactiva la función de llamada DTMF por canal. Para trabajar DTMF se tiene
que programar la asignación de clave y los parámetros DTMF.
FUNCIONES DE SOFTWARE
Información de canal
Estos ajustes están disponibles por cada canal.
Page 25

EspañolEspañol
Signal relation
Asigna la regla del squelch para la recepción de señales cuando usa DTMF y
CTCSS/DCS.
AND: el DTMF y los códigos CTCSS/DCS de la señal recibida tienen que coincidir
con los ajustes propios para abrir el squelch.
OR: el DTMF o los códigos CTCSS/DCS de la señal recibida tienen que coincidir
con los ajustes propios para abrir el squelch.
CALL 1/2 - DTMF call 1/2
Se pueden programar dos llamadas DTMF para cada canal. Selecciónelas de la lista
de codificaciones programadas. (ver DTMF / Autodial Memory)
PTT-ID
Con PTT-ID, se puede transmitir automáticamente un código DTMF cuando pulsa
y/o suelta PTT. El ajuste Begining-Of-Transmission transmite el código BOT cuando
pulsa el botón PTT. El ajuste End-Of-Transmission transmitirá el código EOT cuando
suelte el botón PTT y el ajuste BOTH transmitirá los códigos BOT y EOT. Vea DTMF
/ Encodes para ver los ajustes.
Además las funciones Reverse y Talk Around (ver teclas multifunción) pueden ser asignadas individualmente a cada canal.
Configuración funciones
Estos ajustes básicos se refieren a todos los canales programados.
Time Out Timer – TOT
Use la función TOT para evitar el bloqueo demasiado largo del canal y el sobrecalentamiento de la batería (la transmisión genera calor). Cuando expira el tiempo establecido TOT (5-600 seg en pasos de 15 seg) la radio automáticamente deja de
transmitir. Para volver a transmitir debe soltar y volver a pulsar el botón PTT.
TOT Warning Time
Antes de que expire el tiempo establecido TOT se emite un tono de aviso. El tiempo
del aviso TOT puede configurarse entre 5-10 segundos.
Voice Prompt – voice annunciation
Los anuncios por voz (en inglés) anuncian el arranque del transceptor, el canal seleccionado así como algunas funciones que están disponibles para programar las
teclas multifunción. Por defecto esta función está activada.
Tail eliminate – signal optimization
Cuando pasa de transmisión a recepción, en ciertas condiciones puede escucharse
un chasquido. Esto puede ser muy molesto cuando se utiliza un microauricular. Para
reducir este ruido, el fin de la señal será cortado. Las opciones disponibles son: Silence / 120° / 180° / 240°.
Nota: esta característica sólo obtendrá los mejores resultados cuando comuniquen
equipos que usen el mismo ajuste.
Eliminate Squelch Tail when no CTCSS/DCS
La característica mencionada también está disponible para las señales que no utilizan CTCSS / DCS. Para aquellas señales use esta función.
Las opciones disponibles son: Off / 55.2 Hz / 259.2
Nota: esta característica sólo obtendrá los mejores resultados cuando comuniquen
equipos que usen el mismo ajuste.
Power save – battery saving function
Esta característica ahorrará consumo de la batería. Después de un cierto tiempo sin
operar la radio pasa a modo standby el cual requiere muy poco consumo para mantener las funciones básicas en funcionamiento.
La radio, entre el modo normal y el modo standby puede tener un ahorro de 1:4 / 1:8
/ 1:16, con 1:16 como el mayor ahorro de energía.
VOX – automatic voice transmission
Estos ajustes están disponibles para operación VOX:
Level (sensibilidad): 0-9
Delay (retardo): 0.3 – 3 segundos
Cancel operation: pulsando PTT se desactiva la operación VOX
VOX proceed tone: la trasmisión automática se anuncia con un tono beep.
SQ Level 0-9 – squelch
Una señal debe tener una cierta fuerza para pasar el squelch y ser audible. En el
nivel 0 el squelch está desactivado y se escucha el típico ruido cuando no hay ninguna señal.
En el nivel más alto (9) una señal debe ser muy fuerte para pasar el squelch. La
mayor parte de las señales serán filtradas.
48 49
Page 26

EspañolEspañol
Información escaneo
Priority (activate priority scan)
None / Fixed / Selected
El canal prioritario puede ser fijo o cambiante. El canal fijo es definido con el ajuste
Priority Channel y el canal cambiante siempre es canal actual seleccionado.
Look Back Time A
Este ajuste sólo es relevante para el escaneo prioritario.
Si ha sido escaneada una señal en un canal no prioritario, la función de escaneo se
detendrá y permanecerá en el canal ocupado. A pesar de ello el canal prioritario será
escaneado en ciertos intervalos que están definidos en el ajuste Look Back Time A
(1-5 seg).
Look Back Time B
Este ajuste sólo es relevante para el escaneo prioritario.
Si ha sido escaneada una señal en un canal con un código CTCSS/DCS no correspondiente en el canal prioritario el escaneo continuará pero chequeará el canal prioritario para señales CTCSS/DCS correspondientes in ciertos intervalos de tiempo
que están definidos en el ajuste Look Back Time B (1-5 seg)
Revert Channel
Este ajuste determina el canal que será seleccionado cuando pulse el botón PTT (7)
durante el escaneo.
Last Called
Cuando se ha detectado una señal en un canal y se pulsa PTT, la radio transmite
en el canal escaneado. Si todavía no se ha escaneado ninguna señal y se pulsa
PTT entonces la radio cambiará al canal donde empezó el escaneo.
El escaneo continuará después que la señal finalice y el TX Dwell Time haya expirado. Para detener el escaneo pulse la tecla multifunción que haya sido programada
con la función SCAN.
Selected
Cuando pulse PTT la radio vuelve al canal donde la función de escaneo había empezado.
Selected + Talk Back
Si la función de escaneo se detiene en un canal ocupado y se pulsa PTT dentro
del tiempo establecido en el TX Dwell Time, la radio transmitirá en el canal escaneado. Si el PTT es pulsado después de TX Dwell Time, la radio pasará al canal
donde la función de escaneo había empezado.
50 51
Priority
La radio cambiará al canal prioritario una vez se pulse PTT, independientemente
de si se ha detectado alguna señal o no.
Priority + Talk Back
Si la función SCAN se detiene en un canal ocupado y se pulse PTT dentro del tiempo
establecido TX Dwell Time, la radio transmitirá en el canal escaneado. Si el PTT se
pulsa después del tiempo TX Dwell Time la radio cambiará al canal prioritario.
Dropout Delay Time
La función SCAN se detiene siempre que una señal está presente en un canal. Una
vez la señal finaliza, la radio permanecerá en este canal durante un cierto tiempo definido en el ajuste Dropout Delay Time (1-5 seg) antes de continuar con el escaneo.
TX Dwell Time
Si se pulsa PTT la función SCAN se detiene. Una vez se suelta el botón PTT, la radio
permanecerá en el canal durante un cierto tiempo definido en el ajuste TX Dwell
Time (1-5 seg) antes de continuar con el escaneo.
Priority Channel
Seleccione el canal de prioridad fijo de todos los canales programados. Este ajuste
sólo está activado si la opción Priority se ha establecido en Fixed.
Llamada selectiva DTMF
La función de llamada selectiva DTMF del TeCom-LC permite llamadas simples y llamadas de grupo con un máximo de 16 codificaciones. Con los ajustes adecuados el
altavoz se escuchará sólo cuando se decodifique el DTMF adecuado.
La codificación DTMF (Self ID) puede ser de un máximo de 10 dígitos, las codificaciones pueden contener hasta 16 dígitos, las letras A-D y los símbolos # y * incluidos. Un
máximo de 16 codificaciones (Autodial Memory) pueden ser programadas.
Cada canal puede transmitir un máximo de dos códigos DTMF (Call 1/2). Los códigos
deben ser asignados a las teclas multifunción que están configuradas con la función
Call 1 y Call 2. Cuando pulse la tecla Call, se transmite el código DTMF asociado. Dependiendo de la configuración el receptor será informado acústicamente sobre la llamada DTMF entrante y transmitirá una señal de confirmación de ‘llamada recibida’.
Después de este simple protocolo, el canal está abierto para comunicación hasta el
tiempo de restablecimiento Auto Reset Time (el cual empieza la cuenta atrás después
de finalizar la señal) ha expirado.
Page 27

EspañolEspañol
Nota: Llamadas selectivas entre radios de diferentes fabricantes a veces no son satisfactorias o incluso no funcionan correctamente debido a diferentes ajustes entres radios.
Asegúrese que todos los ajustes coincidentes usen los mismos valores. Intervalos de
tiempo diferentes de tiempo restablecimiento, retardo, etc. pueden ser motivo de mal funcionamiento.
Están disponibles los siguientes ajustes DTMF:
ENCODE (CODIFICACIÓN)
DTMF Speed : Duración de la transmisión de la llamada DTMF; 50500ms.
First Digit Delay : Duración entre la pulsación del PTT y el inicio de la
transmisión del código DTMF; 100-2500 ms
D Code Assignment : D Code / 1-16 seg.
# and * Tone : Off / 100 / 500 / 1000 ms
First Digit Time : Duración del primer dígito del código DTMF; Off / 100 /
500 / 1000ms
DTMF Side Tone : Escuchar/silenciar los tonos DTMF en la radio
Begin of TX Code : Código BOT para el PTT-ID
End of TX Code : Código EOT para el PTT-ID
DECODE (DECODIFICACIÓN)
Self ID (Decode) : Decodificación DTMF
Group Code : Letras y símbolos llamada grupo: A/B/C/D/*/#
Auto Reset Timer : Determina cuando terminará la llamada selectiva
después del final de la señal; Off / 1-15 seg.
Decoding response : Off / Beep Tone / Beep Tone and Response
Stun : Tras la recepción de un código Stun, transmisión y
recepción se desactivarán (para reactivación se debe
recibir un código Stun +#)
Kill : Tras la recepción de un código Kill, la radio se apagará
(para reactivarse se debe recibir un código Kill +#)
Embedded Message
Se puede componer y guardar en la radio un mensaje compuesto de un máximo de
64 símbolos. Este mensaje se visualizará si los datos son transferidos de la radio al
ordenador mediante software.
Local Message
Información como versión de la radio, número de serie, fecha producción, etc. son
posibles. Tenga en cuenta que no toda la información estará disponible en todas las
radios.
La radio tiene que estar conectada al ordenador para leer los datos.
RESET
Para restablecer la radio con los ajustes de fábrica pulse el botón PTT (7) y la tecla
PF1 (8) al mismo tiempo cuando la ponga en marcha. Se escuchará un tono mediolargo.
Nota: si cambia los ajustes de fábrica de la radio con el software opcional T-UP32,
por favor guarde sus ajustes individuales antes de transferirlos a la radio para evitar
pérdida de datos en caso de un reset involuntario.
CONECTOR
TeCom-LC tiene una conexión compatible Kenwood (3.5 / 2.5 mm – stereo/stereo)
para microauriculares, auriculares y cable de transferencia de datos USB requeridos
para
programar la radio mediante software.
Puede encontrar accesorios en nuestro sitio web www.teamelectronic.de
AUTODIAL MEMORY
Encodes 1-16: Son posibles 16 codificaciones con un máximo de 16 símbolos
52 53
Los datos técnicos pueden cambiar sin previo aviso.
Page 28

50 CTCSS (Hz)
Technische Daten / Specifications / Especificaciones
67.0 94.8 131.8 171.3 203.5
69.3 97.4 136.5 173.8 206.5
71.9 100.0 141.3 177.3 210.7
74.4 103.5 146.2 179.9 218.1
77.0 107.2 151.4 183.5 225.7
79.7 110.9 156.7 186.2 229.1
82.5 114.8 159.8 189.9 233.6
85.4 118.8 162.2 192.8 241.8
88.5 123.0 165.5 196.6 250.3
91.5 127.3 167.9 199.5 254.1
Frequenz Bereich / Frequency Range UHF : 450 - 470 MHZ
Rango de Frecuencia VHF : 136 - 174 MHz
VHF II : 147-174 MHz
Betriebstemperatur / Working Temperate -20°C - +50°C
Temperatura Funcionamiento
Betriebsspannung / Operating Voltage DC 7.4V
Voltaje Funcionamiento
Gewicht / Weight / Peso 236g
Antennen Impedanz / Antenna impedance 50 Ω
Impedancia de Antena
Maße / dimensions / dimensiones 60 x 107 x 39 mm
Sender / Transmitter / Transmisor
232 DCS N/I
D017
D023
D025
D026
D031
D032
D036
D043
D047
D050
D051
D053
D054
D055
D065
D071
D072
D073
D074
D114
D115
D116
D122
54 55
D125
D131
D132
D134
D135
D143
D145
D152
D155
D156
D162
D165
D172
D174
D205
D212
D217
D223
D225
D226
D243
D244
D245
D246
D251
D252
D254
D255
D261
D263
D265
D266
D271
D274
D305
D306
D311
D315
D325
D331
D332
D343
D345
D346
D351
D356
D364
D365
D371
D411
D412
D413
D423
D425
D431
D432
D445
D446
D452
D454
D455
D462
D464
D465
D466
D503
D506
D516
D523
D526
D532
D534
D546
D565
D606
D612
D624
D627
D631
D632
D645
D654
D662
D664
D703
D712
D723
D731
D732
D734
D743
D754
D765
Frequenz Stabilität / Frequency Stability ±2.5PPM
Estabilidad Frecuencia
Sendeleistung / Output Power UHF: max 4 W
Potencia RF Portadora VHF: max. 5 W
Max. Frequenz Hub / Max Frequency Deviation ≤ 2.5kHz (N)
Desviación Máx. Frecuencia ≤ 5kHz (W)
Audio Verzerrung / Audio Distortion ≤ 5%
Deformación Audio
Nachbarkanalleistung / Adjacent Channel Power ≥ 65dB
Potencia de Canal Adyacent
Nebenwellen-Abstrahlung / Radiated Harmonics -45dBm
Radiación Espuria
Empfänger / Receiver / Receptor
Empfindlichkeit / RF Sensitivity (SINAD) W: 0.224uV>12dB
Sensibilidad N: 0.224uV>12dB
Audio Verzerrung / Audio Distortion ≤ 5%
Deformación Audio
Nebenkanal Auswahl / Adjacent Channel Selectivity ≥ -8dB
Selección Canal Adyacente
Intermodulation / Intermodulation Rejection ≥ 55dB
Intermodulación
Nebenwellenabstrahlung / Spurious radiation ≥ 55dBm
Radiación Espuria
Page 29

Zum Vertrieb und Betrieb in / For sale and use in / Para venta y uso en
TeCom-LC FreeNet : DE
TeCom-LC PMR : AT, BG, CH, CY, CZ, DE, DK, EE,
ES, FI, FR, GB, GR, HU, IE, IT*, LT,
LU, NL, NO, PL, PT, RO, SE, SI, SK
TeCom-LC UHF-COM : AT, BG, CH, CY, CZ, DE, DK, EE,
ES, FI, FR, GB, GR, HU, IE, IT*, LT,
LU, NL, NO, PL, PT, RO, SE, SI, SK
TeCom-LC VHF-COM : AT, BG, CH, CY, CZ, DE, DK, EE,
ES^, FI, FR, GB, GR, HU, IE, IT*, LT,
LU, NL, NO, PL, PT, RO, SE, SI, SK
^ La banda de frecuencias VHF permitida en Espana es de 147 - 174 MHz
* In Italia il passo di canalizzazione a 25 kHz non è consentito
TEAM Electronic GmbH
Bolongarostrasse 88; D-65929 Frankfurt am Main, Germany phone
++49 / 69 / 300 950 0 - fax ++49 / 69 / 31 43 82
www.team-electronic.de - [email protected]
WEEE - Reg. Nr. DE 91930360 8 ( EAR ), 50635 ( ERA )
GRS-Nr. 10001374
DSD 2617305, ARA 2284
Irrtümer und technische Änderungen sind vorbehalten. / Mistakes and technical changes are reserved. (V1 01-16)
 Loading...