

Page 1
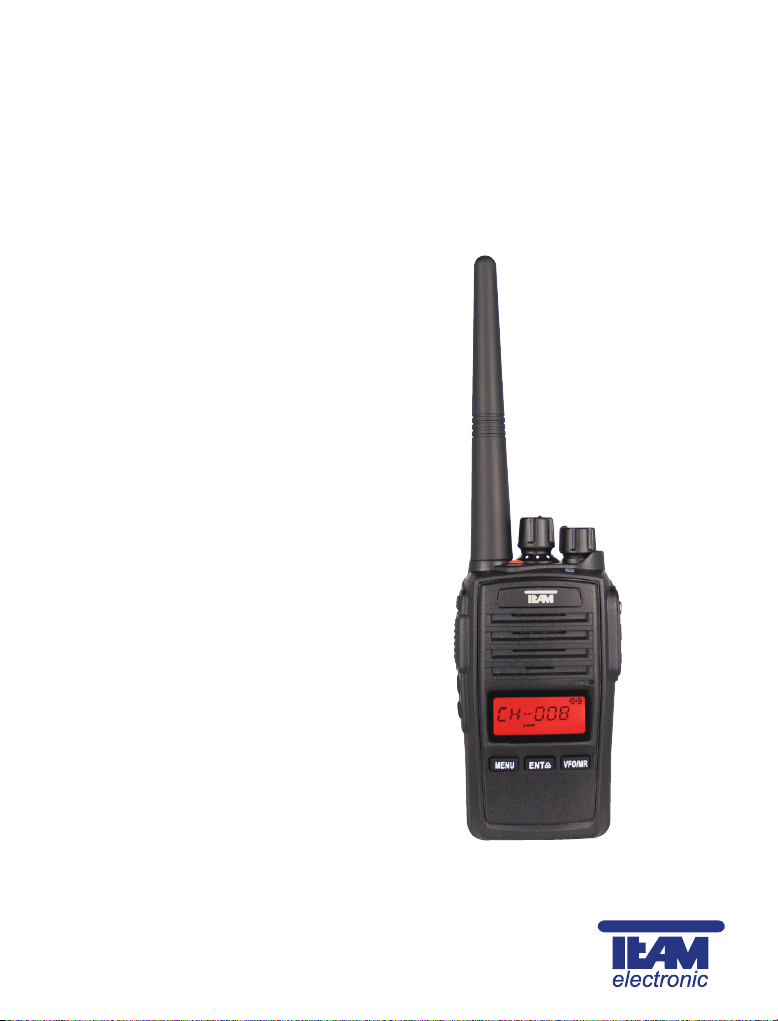
TeCom-IPZ5
Handfunkgerät
Handheld Transceiver
Transceptor Portátil
Ricetrasmettitore Palmare
Bedienungsanleitung
Manual
Manual Instrucciones de Uso
Manual d’Uso
PMR
FreeNet
UHF-COM
VHF-COM
Page 2

Sehr geehrte Kundin, sehr geehrter Kunde,
es freut uns, dass Sie sich für den Kauf eines, nach IP67 spritzwassergeschützen, TEAM TeCom-IPZ5 entschieden haben. Um einen einwandfreien Betrieb zu
gewährleisten und um die verfügbaren Funktionen im vollen Umfang nutzen zu
können, bitten wir Sie die nachfolgende Bedienungsanleitung vor Inbetriebnahme
des Gerätes gründlich zu lesen.
Das TeCom-IPZ5 ist in den folgenden vier Versionen erhältlich.
TeCom-IPZ5 PMR - Art-Nr. PR8088
Das PMR-Funkgerät darf jeder anmelde- und gebührenfrei in den Ländern
gemäß der beiliegenden Konformitätserklärung betreiben. Es sind die acht PMRKanäle auf 446 MHz mit der maximal zulässigen Ausgangsleistung von 500 mW
programmiert. Eine Veränderung der programmierten Frequenzen, der Sendeleistung oder der Bandbreite des Geräts ist nicht zulässig und führt zum Erlöschen
der Betriebsgenehmigung.
TeCom-IPZ5 Freenet - Art-Nr. PR8089
Das FreeNet-Funkgerät darf jeder anmelde- und gebührenfrei in den Ländern
gemäß der beiliegenden Konformitätserklärung betreiben. Es sind die sechs
FreeNet-Kanäle auf 149 MHz mit der maximal zulässigen Ausgangsleistung von
500 mW programmiert. Eine Veränderung der programmierten Frequenzen, der
Sendeleistung oder der Bandbreite des Geräts ist nicht zulässig und führt zum
Erlöschen der Betriebsgenehmigung.
TeCom-IPZ5 UHF-COM - Art.-Nr. PR8090
Das Betriebsfunkgerät ist genehmigungs- und gebührenpflichtig und darf nur in
den Ländern gemäß der beiliegenden Konformitätserklärung betrieben werden.
Es dürfen nur behördlich genehmigte Funkfrequenzen zwischen 440-470 MHz,
Sendeleistungen und Bandbreiten programmiert werden. Die Programmierung
darf nur von einem autorisierten Fachhändler durchgeführt werden.
TeCom-IPZ5 VHF-COM - Art.-Nr. PR8091
Das Betriebsfunkgerät ist genehmigungs- und gebührenpflichtig und darf nur in
den Ländern gemäß der beiliegenden Konformitätserklärung betrieben werden.
Es dürfen nur behördlich genehmigte Funkfrequenzen zwischen 136-174 MHz,
Sendeleistungen und Bandbreiten programmiert werden. Die Programmierung
darf nur von einem autorisierten Fachhändler durchgeführt werden.
Für die Programmierung des TeCom-IPZ5 benötigen Sie die optional erhältliche
Software, T-UP25 PMR-FN für die PMR- und FreeNet-Version, sowie T-UP25 COM
für die Betriebsfunkversionen VHF- und UHF-COM (CD-ROM für Windows XP/ 7/8
und Datenüberspielkabel). Das Datenüberspielkabel ist wahlweise mit einem seriellen 9-Pin Anschlussstecker oder mit einem USB-Verbindungsstecker erhältlich.
DeutschDeutsch
Inhaltsverzeichnis
Seite
ALLGEMEIN 4
Vor Inbetriebnahme 4
Pflege 4
Übersicht der Elemente und Funktionen 4 - 6
GRUNDFUNKTIONEN 7
Antenne 7
Akkupack 7
Laden des Akkupacks 7
Ein- und Ausschalten 7
Einstellen der Lautstärke 7
Kanalwahl 8
Senden 8
Empfang 8
TASTENFUNKTIONEN 8
PTT Sendetaste 8
Multifunktionstasten 8 - 9
Alarmtontaste 9
FUN-Taste 9
MENÜ 10 - 12
SCAN (Kanalsuchlauf), PRI (Vorangskanal-Suchlauf),
VOX, POW (Sendeleistung-Anzeige), SQL (Rauschsperre),
LED (Hintergrundbeleuchtung), BEEP (Warnton),
KEYBO (Tastatursperre), TOT (Sendezeitbegrenzung),
SCANS (Suchlaufart), VOICE (Sprachansage),
CTCSS/DCS, NAME (Kanalname), ROGER
5-TON SELEKTIVRUF 13
ANSCHLUSS 13
CTCSS / DCS 50
TECHNISCHE DATEN 51
Page 3
DeutschDeutsch
4 5
ALLGEMEIN
Vor Inbetriebnahme
Bitte überprüfen Sie die Ware sofort beim Empfang auf Vollständigkeit gemäß der
folgenden Liste. Informieren Sie Ihren Händler sofort bei Unvollständigkeit.
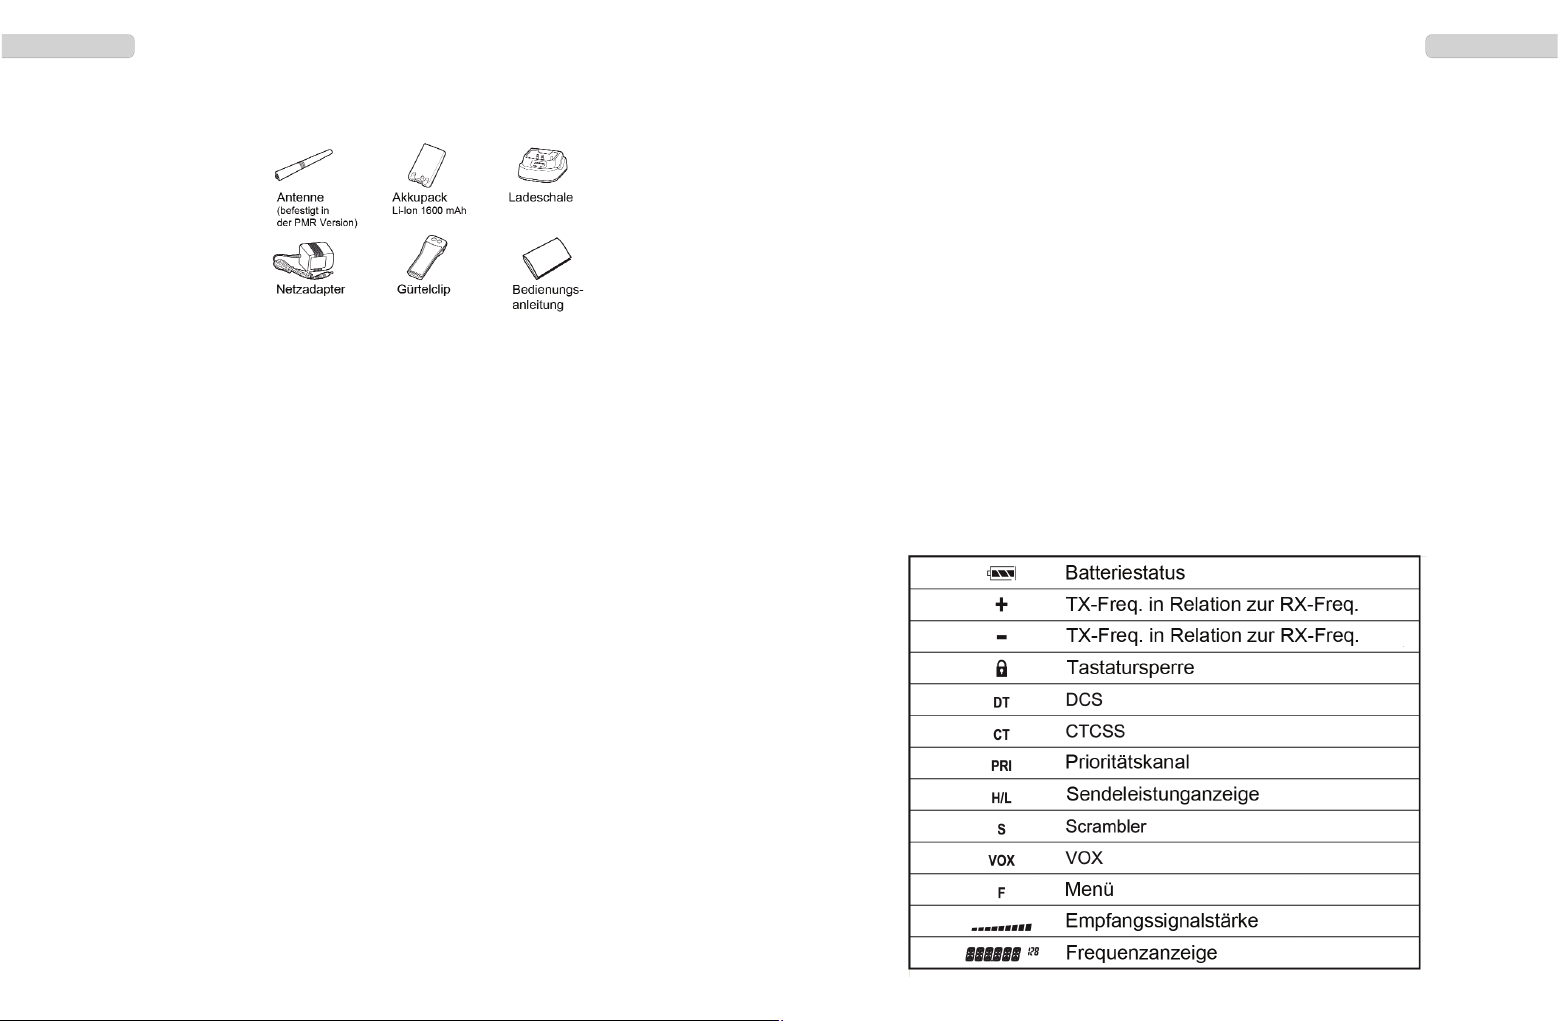
Lieferumfang:
Pflege
Für die optimale Lebensdauer und Funktionstüchtigkeit Ihres Geräts sollten Sie die
folgenden Hinweise beachten.
wVersuchen Sie nicht das Gehäuse zu öffnen. Unsachgemäßes Öffnen des Ge-
räts kann Schäden zur Folge haben. Des weiteren verlieren Sie jegliche Gewähr-
leistungsansprüche.
wVerwenden Sie zum Laden des Akkupacks nur das im Lieferumfang enthaltene
Ladegerät.
wBewahren Sie das Gerät niemals an Plätzen auf, welche dem direkten Sonnen-
licht oder anderen Hitzequellen ausgesetzt sind. Hohe Temperaturen können die
Lebensdauer bestimmter elektronischer Bauteile beeinträchtigen und Plastikteile
können schmelzen.
wBitte bewahren Sie das Gerät nicht in staubigen oder verschmutzen Räumen auf.
wSetzen Sie das Gerät keinen Flüssigkeiten aus. Feuchtigkeit kann zu Korrodie
rung der Bauteile und Platinen führen.
wSollte das Gerät ungewöhnlich heiß werden, ungewöhnliche Gerüche abgeben
oder es zu einer Rauchentwicklung kommen, schalten Sie bitte das Gerät sofort
ab und entnehmen den Akkupack. Kontaktieren Sie bitte sofort Ihren Händler.
wSenden Sie niemals ohne Antenne. Eine Beschädigung der Endstufe könnte die
Folge sein.
Übersicht der Elemente und Funktionen
> Max. Ausgangsleistung
FreeNet : 500 mW PMR : 500 mW
VHF : 5 W UHF : 4 W
> 256 Kanäle verfügbar
UHF : 400 - 470 MHz VHF : 136 - 174 MHz
PMR : 8 Kanäle PMR 446 MHz FreeNet : 6 Kanäle FreeNet 149 MHz
> Bandbreite
FreeNET / PMR : 12,5 kHz
UHF / VHF : 12,5 / 20 / 25 kHz
> 5-Ton Selektivruf (1 x Geber, 9 x Nehmer (max. 1 pro Kanal))
> Scrambler (1-8)
> Compander
> 50 CTCSS und 104 DCS
> LCD Anzeige mit Hintergrundbeleuchtung
> Scrambler (8 Verschlüsselungen)
> Batteriesparfunktion
> Tastatursperre
> Sendeblockade auf besetzten
Kanälen (BCL)
> UKW Radio
> Tastatursperre
> Sendezeitbegrenzung (TOT)
> VOX
> Relaiston 1450Hz / 1750Hz / 2315Hz
> Batteriesparfunktion
> programmierbarer Kanalname
Page 4
6 7
Laden des Akkupacks
Vor dem ersten Betrieb sollte der Akkupack (17) komplett geladen werden. Die
durchschnittliche Ladedauer beträgt etwa 3 Stunden. Während des Ladevorgangs
leuchtet die LED rot. Ist der Ladevorgang beendet leuchtet die LED grün. Nehmen
Sie den Akku nach Ende des Ladevorgangs aus der Ladeschale. Überladen des
Akkus verkürzt dessen Lebensdauer.
Ein- und Ausschalten
Um das Gerät einzuschalten, drehen Sie den Ein- / Ausschalter (5) im Uhrzeigersinn über die Sperre hinweg. Bei aktiviertem Warnton wird der Einschaltevorgang
akustisch bestätigt.
Um das Gerät auszuschalten, drehen Sie bitte den Ein- / Ausschalter gegen den
Uhrzeigersinn über die Sperre hinweg.
Einstellen der Lautstärke
Um nach dem Einschalten die optimale Lautstärke einstellen zu können, aktivieren
Sie bitte die Monitorfunktion (hierzu muss eine der Multifunktionstasten PF1/2
(10)/(11) mit der Monitorfunktion programmiert sein) und stellen mit dem kombinierten Ein-/Aus-/Lautstärke-Regler (5) die gewünschte Lautstärke ein.
DeutschDeutsch
GRUNDFUNKTIONEN
Antenne
Hinweis: In der PMR-Version ist die Antenne fest mit dem
Gerät verbunden.
Akkupack
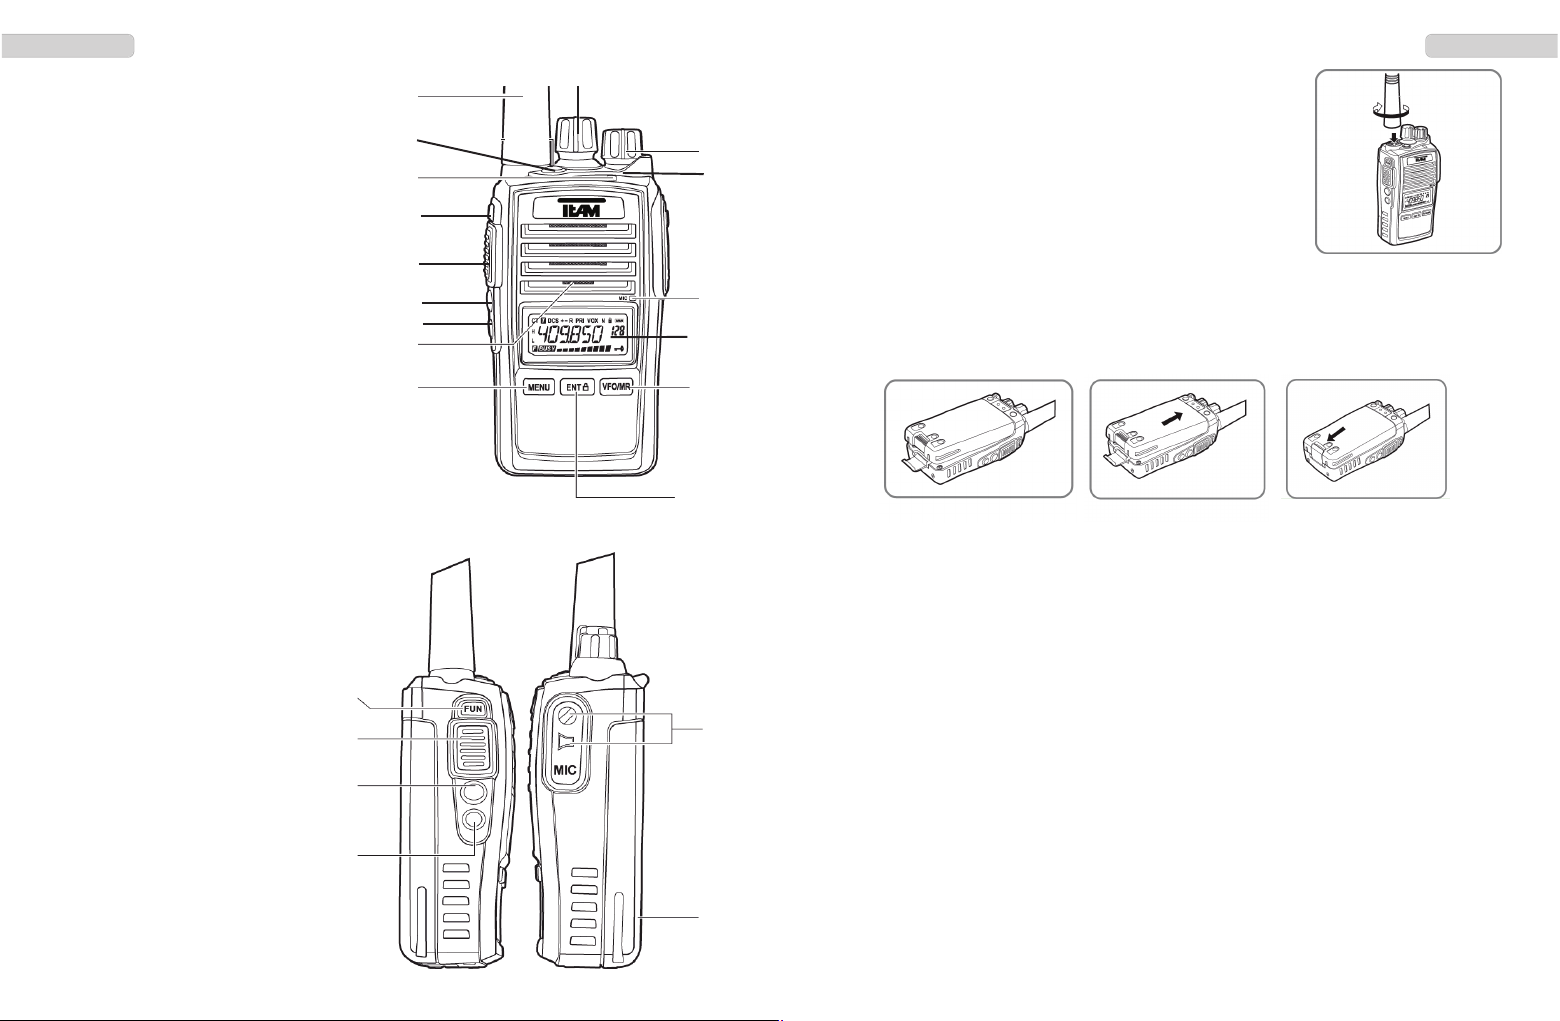
Um den Akkupack (17) an das Gerät zu montieren, legen Sie den Akku ein und
drücken den unteren Teil gegen das Gehäuse, während sie gleichzeitig den Verschluss gegen den Akku drücken bis er einschnappt.
Um den Akkupack zu entfernen, drücken Sie bitte den Verschluss auf der Rückseite des Akkupacks nach unten und entfernen den Akkupack aus dem Gerät.
9
11
10
17
16
8
1 - Antenne
2 - LCD Anzeige
3 - Kanalwahldrehschalter
4 - Mikrofon
5 - Ein/Aus - Lautstärkeregler
6 - LED Leuchte
7 - Lautsprecher
8 - FUN Taste
9 - PTT-Sendetaste
10 - Multi-Funktionstaste PF1
11 - Multi-Funktionstaste PF2
12 - Menü Taste
13 - ENT Taste
14 - VFO/MR Taste
15 - Alarm Taste
16 - Ohrhörer-Mikrofon Anschluss
17 - Akkupack Li-Ion, 1600 mAh
1
4
13
12
7
3
5
6
11
10
8
14
2
9
15
Page 5

DeutschDeutsch
8 9
Kanalwahl
Für die Kanalwahl stehen der Kanalwahldrehschalter (3) zur Verfügung. Die Kanäle
werden in der programmierten Reihenfolge durchgeschaltet.
Senden
Zum Senden halten Sie bitte die Sendetaste (9) bis kurz nach Beendigung Ihrer
Nachricht gedrückt. Für eine optimale Signalübertragung sprechen Sie bitte mit
mittellauter Stimme in einem Abstand von ca. 10 cm zum Mikrofon (4).
Während des Sendevorgangs leuchtet die Kontroll-LED (6) rot auf.
Nach dem Loslassen der Sendetaste kehrt das Gerät automatisch wieder in den
Empfangsmodus zurück.
Empfang
Beim Empfang eines Signales leuchtet die Kontroll-LED (6) grün auf.
Ist die Empfangsfrequenz mit einer CTCSS- / DQT-Kodierung belegt ist, sind nur
Signale mit derselben Kodierung hörbar. Signale mit einer anderen CTCSS-/DCSKodierung werden ausgefiltert. D.h. die grüne Kontroll-LED leuchtet jedoch ist kein
Signal im Lautsprecher hörbar.
TASTENFUNKTIONEN
PTT Sendetaste (9)
Die Sendetaste (9) befindet sich auf der linken Geräteseite. Drücken der Sendetaste schaltet das Gerät in den Sendemodus. Während des Sendens leuchtet die
LED (6) rot auf.
Multifunktionstasten (10) (11)
Die Multifunktionstasten PF1 (10) und PF2 (11) befindet sich unterhalb der Sendetaste (9). Jede Taste kann mit max. zwei Funktionen belegt werden, die durch kurzes oder langes Drücken der Taste aktiviert werden. Sie können per Software
wahlweise mit folgenden Funktionen belegt werden:
Relaiston 1450 Hz Monitor
Relaiston 1750 Hz Scan (Kanalsuchlauf)
Relaiston 2315 Hz 5-Ton Selektivruf Senden
Relaiston
Der per Software programmierte Relaiston wird durch Tastendruck ausgesendet.
Zur Auswahl stehen die Relaistöne 1450 kHz, 1750 kHz und 2315 kHz.
Monitor
Die Monitorfunktion wird per Tastendruck aktiviert und muss durch erneutes Drükken deaktiviert werden.
Scan
Bei aktiver Kanalsuchlauffunktion wird die via Software programmierte Kanalsuchlaufliste durchsucht. Diese Funktion ist nur verfügbar wenn mindestens zwei Kanäle der Kanalsuchlaufliste hinzugefügt wurden. Per Software wird bestimmt ob ein
Kanal für die Kanalsuchfunktion freigegeben ist oder nicht.
5-Ton Selektivruf Senden
Der per Software programmierte 5-Ton Selektivruf wird per Tastendruck gesendet.
Diese Funktion ist nur verfügbar wenn der 5-Ton Selektivruf eingerichtet ist und der
aktuelle Kanal mit der 5-Ton Selektivruf Funktion belegt ist.
Alarmtaste (15)
Die Alarmton-Funktion wird per Software aktiviert/deaktiviert.
Nach kurzem Drücken der orangen Alarmtontaste (15) ertönt für ca. 30 Sekunden
ein konstanter Alarmton. Danach verweilt das Gerät solange im Sendemodus bis
die Alarmtonfunktion durch Drücken der PTT-Taste beendet wird.
Ist die Alarmtonfunktion deaktiviert, ertönt nach dem Drücken der Taste, falls die
Beep-Funktion programmiert ist, ein Doppelton.
FUN-Taste (8)
Weitere Funktionen sind durch Drücken der FUN-Taste in Kombination mit anderen
Tasten abrufbar:
FUN + PTT (9)
Umstellung der Sendeleistung Hoch / Niedrig
FUN + ENT (13)
Tastatursperre Ein / Aus
Im aktiven Zustand erscheint das Schlüsselsymbol in der Anzeige.
FUN + PF1 (10)
Aktivierung / Deaktivierung der UKW-Radiofunktion.
Das Drücken PTT-Taste pausiert die Radiofunktion für die Zeit des Sendens.
Der gewünschte Sender kann mit Hilfe des Kanalwahldrehschalters (3) im Frequenzbereich 88 MHz bis 107,9 MHz direkt eingestellt werden.
Zum Auffinden einer besetzten UKW-Radiofrequenz steht die Suchfunktion zur Verfügung. Starten Sie den Suchlauf durch Drücken der PF1 (hoch)/2 (runter) Taste (11).
Per Software können max. 6 UKW-Radiokanäle gespeichert werden. Zum Abrufen dieser Kanäle verwenden Sie bitte folgende Tastenkombinationen nach dem Einschalten
der UKW-Radiofunktion durch Drücken der Tastenkombination FUN - PF1 (10):
Kanal 1: VFO/MR (14) + FUN (8) Kanal 4: VFO/MR (14) + MENU (12)
Kanal 2: VFO/MR (14) + PF1 (10) Kanal 5: VFO/MR (14) + ENT (13)
Kanal 3: VFO/MR (14) + PF2 (11) Kanal 6: VFO/MR (14) + Notruftaste (15)
Page 6

DeutschDeutsch
10 11
LED 007 - Hintergrundbeleuchtung
Auto (automatisch) / ON (Ein)/ OFF (Aus)
BEEP 008 - Warnton
ON (Ein)/ OFF (Aus); akustische Bestätigung jeder Tasteneingabe
KEYBO 010 - Tastatursperre
MANUAL (manuell) / AUTO (automatische Aktivierung nach ca. 20 Sekunden)
Bei aktiver Tastatursperre sind alle Tasten gesperrt. Nur die Sendetaste, sowie die
FUN-Taste sind verfügbar.
Der aktive Zustand wird in der Anzeige durch das Schloss Symbol angezeigt, in der
linken oberen Ecke.
TOT 011 - Sendezeitbegrenzung
Off (Aus) / 30s - 270s in 30-Sekunden-Schritten
Im aktivierten Zustand wird der Sendebetrieb automatisch nach der eingestellten
TOT-Zeit abgebrochen.
SCANS 012 - Kanalsuchlaufart
Es stehen drei Suchlaufarten zur Auswahl
TO : Time-Operated-Scan – zeitgesteuerter Kanalsuchlauf
Das Gerät verweilt für eine bestimmte Zeit auf einem besetzten
Kanal um dann fortzufahren, unabhängig ob auf dem besetzten
Kanal weiterhin Signale empfangen werden oder nicht.
CO : Carrier-Operated-Scan – signalgesteuerter Kanalsuchlauf
Im CO-Modus verweilt das Gerät solange auf einem besetzten
Kanal bis das Signal verstummt, bevor die Kanalsuchlauffunktion
fortfährt.
SE : Search-Scan - einfacher Kanalsuchlauf
Im SE-Modus wird die Kanalsuchlauf-Funktion beendet sobald ein
besetzter Kanal gefun den wird. Das Gerät verweilt auf dem besetzten Kanal und beendet die Suchlauffunktion.
VOICE 013 - Sprachansage
OFF (Aus) / English (Englisch)
Aktiviert die englische Sprachansage
C-CDC 015 - CTCSS/DCS Kodierungen für Sende- und Empfangsfrequenz
OFF (Aus) / 50 CTCSS / 104 DCS Kodierungen*
R-CDC 016 - CTCSS/DCS Kodierung für Empfangsfrequenz
OFF (Aus) / 50 CTCSS/ 104 DCS Kodierungen*
MENÜ
Folgende Einstellungen werden im Menü verwaltet. Zur Einstellungsänderung bitte
folgende Schritte befolgen:
1. Zum Öffnen des Menüs die MENÜ Taste (12) drücken.
2. Zum Auswählen der Menüpunkte den Kanalwahlschalter (3) drehen.
3. Aktivieren sie die ausgewählten Einstellung durch Drücken der ENT Taste (13).
4. Wählen Sie die gewünschte Einstellung durch Drehen des Kanalwahlschalters
(3) und bestätigen Sie die Auswahl durch Drücken der ENT Taste (13).
5. Zum Verlassen des Menüs drücken sie die VFO/MR Taste (14).
SCAN 001 - Kanal-Suchlauf
Der Kanalsuchlauf wird gestartet durch Drücken der ENT Taste (12). Es werden
die per Software für den Kanalsuchlauf freigegebenen Kanäle durchsucht.
PRI 002 - Vorrangskanal-Suchlauf
Der Vorrangskanalsuchlauf wird gestartet durch Drücken der ENT Taste (12).
Zwischen den einzelnen Kanälen der Kanalsuchlaufliste wird jeweils der Vorrangskanal eingeschoben. Der Vorrangskanal wird durch Software-Programmierung bestimmt. Statt der beispielhaften Suchlauf-Abfolge von
1 - 2 - 4 - 5 - 7 - 8 wird beim Vorrangskanalsuchlauf, mit dem festgelegten Vorrangskanal 4, folgende Reihenfolge verwendet: 4 -1 - 4 - 2 - 4 - 5 - 4 - 7 - 4 - 8.
VOX 003 - sprachgesteuerte Signalübertragung
Gain Level
Empfindlichkeit der VOX-Funktion
Einstellmöglichkeiten: Stufen 1 - 9; Stufe 9 entspricht der größten Empfindlichkeit.
Delay Time
Verweilzeit im Modus der Signalübertragung nach dem Ende der Signalübertragung
Einstellmöglichkeiten - 1 / 2 / 3 / 4 (in Sekunden)
POW 004 - Leistungseinstellung
H = hohe Sendeleistung
L = niedrige Sendeleistung
Anmerkung: bei den Versionen PMR und FreeNet beträgt die hohe Sendeleistung
500 mW und die niedrige Sendeleistung ca. 300 mW.
In den Betriebsfunkvarianten UHF- / VHF-COM können die Werte für H und L
gemäß der Zulassung durch die Behörde programmiert werden.
SQL 005 - Rauschunterdrückung
0-9; bei 0 ist die Rauschunterdrückung deaktiviert, bei 9 ist die Schwelle am höchsten eingestellt.
Page 7

DeutschDeutsch
12 13
T-CDC 017 - CTCSS/DCS Kodierung für Sendefrequenz
OFF (Aus) / 50 CTCSS/ 104 DCS Kodierungen*
* = abhängig von der Software-Programmierung werden entweder die CTCSS
oder DCS Kodierungen angezeigt. Ist keine Kodierungsart vorbelegt, werden die
CTCSS-Kodierungen angezeigt.
NAME 021 - Kanalname
ON (Ein) / OFF (Aus);
es wird der via Software programmierte Kanalname angezeigt
ROGER 022 - Roger Ton
ROGON (Ein) / ROGOFF (Aus)
Aktiviert den Rogerton.
Hinweis:
Mit der optionalen Software T-UP25 können, neben den zuvor erwähnten Einstellmöglichkeiten, weitere Parameter eingestellt werden, wie z.B. Batteriesparfunktion,
Roger-Ton, Sendesperre auf besetzten Kanälen, Compander, etc.
Für die Betriebsfunkvarianten wird die Einstellung der Sendeleistung ebenfalls mit
der Software vorgenommen.
5-TON SELEKTIVRUF
Das TeCom-IPZ5 verfügt über eine 5-Ton Selektivruf Funktion mit den Möglichkeiten
des Einzel- und Gruppenrufes, deren Parameter mit der Software T-UP25 programmiert werden.
Allgemeine Funktionsweise:
Jedes Gerät wird mit einer eigenen, fünfstelligen Gerätekennung (Decode - Nehmer),
sowie max. 9 5-Ton-Selektivruf-Kodierungen (Encode - Geber) programmiert.
Bei aktiviertem 5-Ton Selektivruf wird durch Drücken der mit 5-Ton-Selektivruf belegten Funktionstaste PF1/2 die programmierte Sendekodierung geschickt. Stimmen bei
einem Gerät dessen Gerätekennung mit der gesendete 5-Tonfolge überein, so wird
die Gerätekennung des Senders in der Anzeige dargestellt (soweit eine Anzeige vorhanden ist) und das Gerät reagiert in der programmierten Art und Weise, z.B. der
Lautsprecher öffnet, das Klingelzeichen ertönt oder eine automatische Empfangsbestätigung wird zurück gesendet.
Hinweis: Zum Funktionieren des 5-Ton Selektivrufes muss eine der Multifunkionstasten PF1/2 Funktion Option Signal Call belegt sein.
Zum Senden einer 5-Tonfolge beachten Sie bitte folgende Schritte:
1. Drücken sie die mit Option Signal Call belegten Multifunktionstaste PF1 oder PF2.
2. Drücken Sie die Sendetaste (9). Wird die Geräte-Kennung eines anderen
TeCom-IPZ5 gesendet, welches auch die 5-Ton Selektivruffunktion eingeschaltet
hat, so öffnet bei dem anderen Funkgerät der Lautsprecher und es ertönt ein Klingelzeichen, soweit die Beep-Funktion aktiviert ist.
Stimmt die gesendete Geräte-Kennung nicht mit der Kennung des Empfängers
überein, öffnet der Lautsprecher nicht.
ANSCHLUSS
Das TeCom-IPZ5 verfügt über einen Kenwood-kompatiblen
Zubehör-Anschluss (3,5 / 2,5 mm - Stereo / Stereo), der
auch für das Datenübertragungskabel zum Programmieren
mit der Software T-UP25 verwendet wird.
Weiteres passendes Zubehör finden Sie im aktuellen
TEAM-Katalog.
Page 8

14 15
Dear Customer,
Thank you for buying a splashwater-restistant, IP67 approved, TEAM TeComIPZ5. TEAM Electronic stands for high-quality radio communication.
To fully understand the various functions and the possible settings and to ensure the proper operation of the radio, we recommend to read this manual
prior to first time use.
The TeCom-IPZ5 is available in these four versions:
PR8088 TeCom-IPZ5 PMR : programmed with 8 PMR* channels, 500 mW tx
power, bandwidth 12.5 kHz, no registration or
fees apply
PR8089 TeCom-IPZ5 FreeNet : programmed with 6 FreeNet** channels,
500 mW tx power, bandwidth 12.5 kHz,
no registration or fees apply
PR8090 TeCom-IPZ5 UHF : commercial radio; 256 channels programmable;
registration and fees apply; only assigned
frequencies and parameters are allowed to be
programmed; bandwidth 12.5 kHz or 20 kHz;
max. TX power 4 W; UHF 440 - 470 MHz
PR8091 TeCom-IPZ5 VHF : commercial radio; 256 channels programmable;
registration and fees apply; only assigned
frequencies and parameters are allowed
to be programmed; bandwidth 12.5 kHz or 20 kHz;
max. TX power 5 W; VHF 136 - 174 MHz
Programming of the TeCom-IPZ5 is done via the additional software T-UP25,
which is available in the versions PMR-FN and COM for Windows XP / 7 / 8.
A data transfer cable is included in the T-UP25 scope of delivery.
* = PMR Frequencies ** = FreeNet Frequencies
1 - 446.00625 MHz 1 - 149.0250 MHz
2 - 446.01875 MHz 2 - 149.0375 MHz
3 - 446.03125 MHz 3 - 149.0500 MHz
4 - 446.04375 MHz 4 - 149.0875 MHz
5 - 446.05625 MHz 5 - 149.1000 MHz
6 - 446.06875 MHz 6 - 149.1125 MHz
7 - 446.08125 MHz
8 - 446.09375 MHz
Table of Contents
page
GENERAL 16
Scope of Delivery 16
Maintenance 16
Features 16 - 18
BASIC FUNCTIONS 19
Antenna 19
Battery Pack 19
Charging 19
On / Off 19
Volume 19
Channel Selection 19
Transmit 20
Reception 20
KEY FUNCTIONS 20
PTT Transmit Key 20
Multi-Function Keys 20
Alarm Tone Key 21
FUN-Key 21
MENU 22 - 24
SCAN (channel scan), PRI (priority channel scan), VOX,
POW (tx power), SQL (squelch), LED (backgroud light),
BEEP (warn tone), KEYBO (key lock), TOT (time-out-timer),
SCANS (scan types), VOICE (annunciation), CTCSS/DCS,
NAME (channel name), ROGER
5-TONE SELECTIVE CALLING 25
ACCESSORY JACK 25
CTCSS/DCS 50
SPECIFICATIONS 51
EnglishEnglish
Page 9
16 17
GENERAL
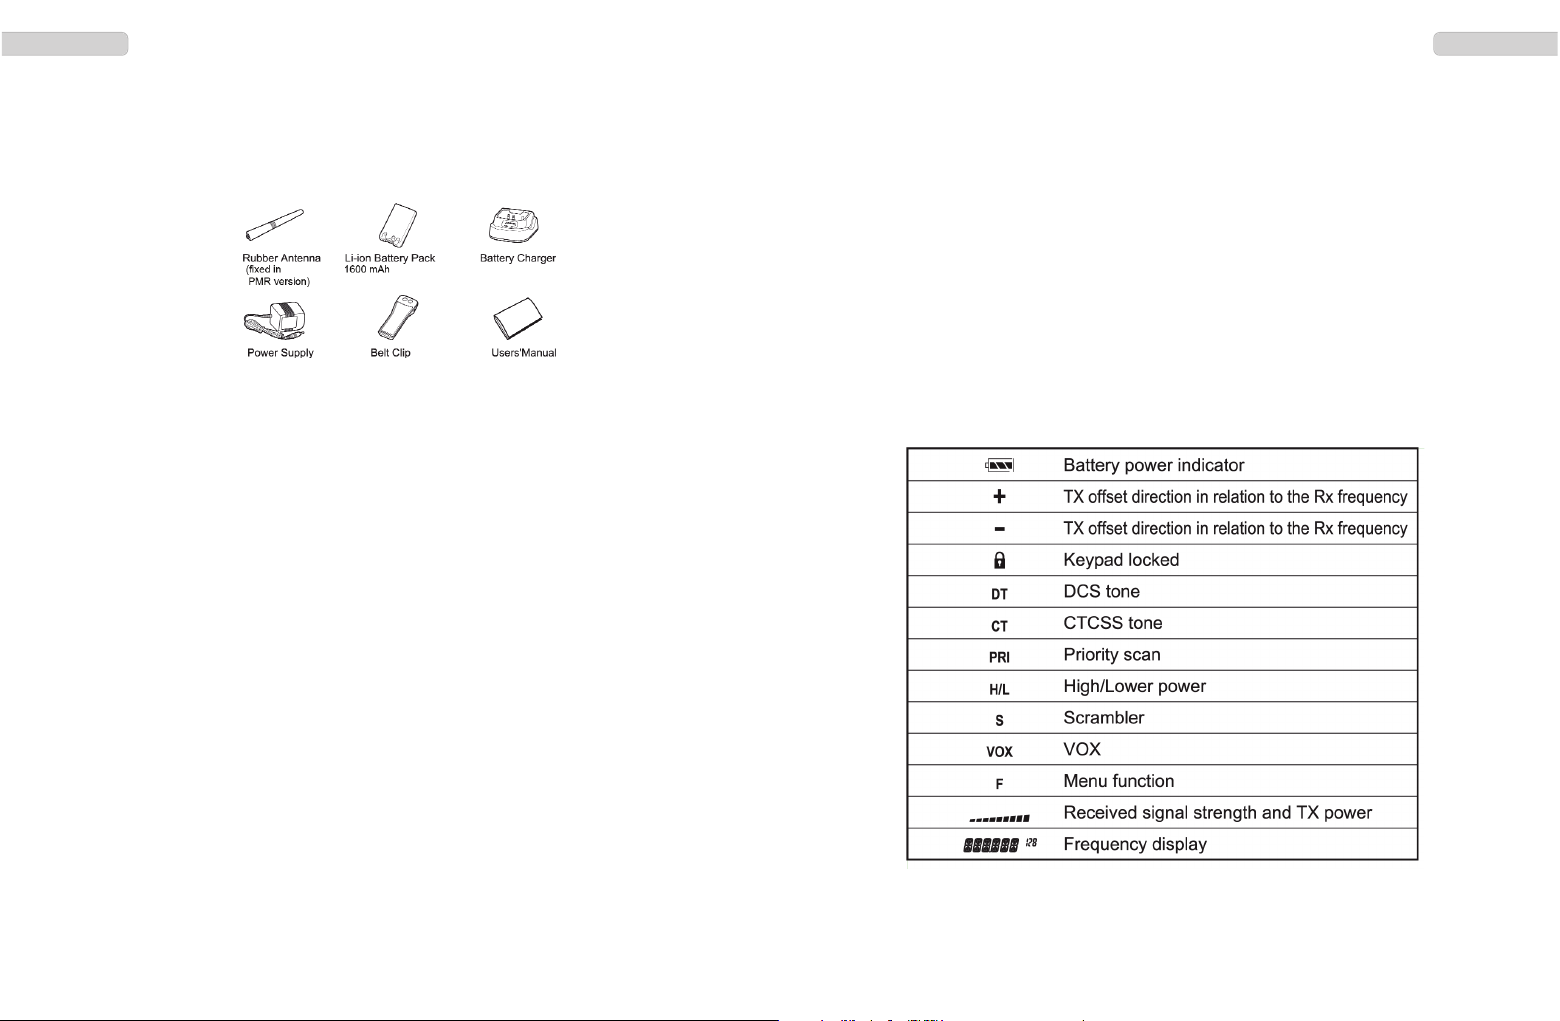
Scope of Delivery
Unpack the equipment carefully. We recommend you to identify the listed items before discarding the packing material. If any items are missing or have been damaged
during shipment, please contact the dealer immediately.
Maintenance
For optimal performance and functionality of the TeCom-IPZ5, please pay attention
to the following advices.
w Do not open the case of the radio. Improper opening may cause damages and
warranty claims are forfeited.
w For charging of the rechargeable battery pack, only use the charger SLG-
TeCom-IPZ5 that is included in the scope of delivery.
w Never expose the radio to direct sunlight or other heat sources. High temperatures
will diminish the longevity of certain components and plastic parts may melt and
deform.
w Never store the radio in dusty or dirty areas.
w Do not expose the radio to any liquid. Humidity max cause corrosion of the pcb
and its components.
w Should the radio generate unusual heat or emit unusual smell or even smoke,
please turn the radio off immediately and remove the battery pack. Contact your
dealer.
w Never transmit without antenna. A damage of the power amplifier may be the result.
Features
> max. tx power
FreeNet : 500 mW PMR : 500 mW
VHF : 5 W * UHF : 4 W *
> 256 channels available
UHF : 400 - 470 MHz VHF : 136 - 174 MHz
PMR: 8 channels PMR 446 MHz FreeNet : 6 channels FreeNet 149 MHz
> bandwidth
FreeNET / PMR : 12.5 kHz
UHF / VHF : 12.5 / 20 / 25 kHz
> 5-tone selective calling > busy channel lockout BCL
(1 decode, 9 encodes - 1 per channel) > compander
> scrambler (1-8) > transmit time limiter TOT
> 50 CTCSS and 104 DCS > programmable channel name
> LCD display with background illumination > fm radio
> battery saving function > TOT
> keylock > VOX
> repeater tone 1450 Hz / 1750 Hz / 2315 Hz
EnglishEnglish
Page 10
18 19
English
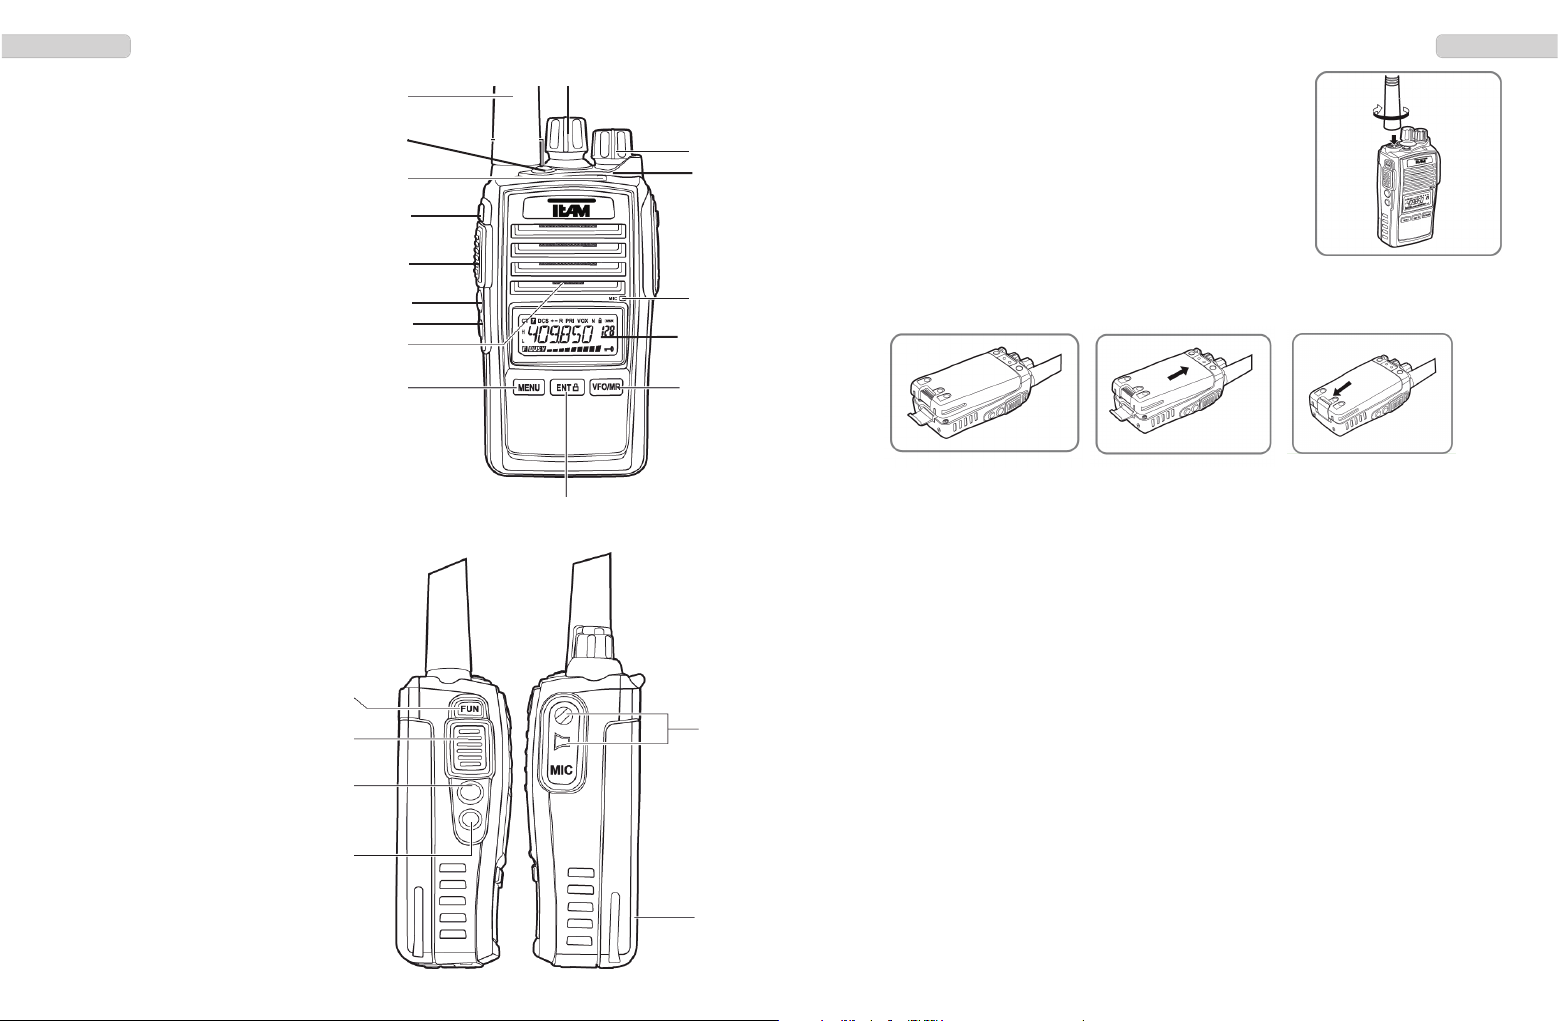
1 - antenna
2 - LCD
3 - rotary channel selector
4 - microphone
5 - On/Off - volume
6 - LED
7 - speaker
8 - FUN key
9 - PTT key
10 - multi-function key 1
11 - multi-function key 2
12 - menu key
13 - ENT key
14 - VFO/MR key
15 - alarm tone button
16 - ear-/microphone connector
17 - battery pack Li-Ion, 1600 mAh
9
11
10
17
16
8
1
4
13
12
7
3
5
6
11
10
8
14
2
9
15
BASIC FUNCTIONS
Antenna
In the PMR version, due to governmental regulations, the
antenna is fixed, i.e. non-detachable.
Battery Pack
To attach the battery pack (17), place the battery pack onto the radio and press the
bottom part close to the radio case and close the lock.
Charging
Prior to first use, the battery pack has to be charged completely. A completely
empty battery pack needs to be charged for approximately three hours. During the
charging process, the LED lights red. Once charging is completed, the LED lights
green.
Remove the battery pack out of the charger. Overcharging reduces the battery
packs longevity.
On / Off
To turn the radio on, turn the On / Off switch (5) clockwise beyond the barrier. A
beep tone is emitted if the beep tone function is activated.
To turn off the radio, please turn the On / Off switch (5) counterclockwise beyond
the barrier.
Volume Control
To set a comfortable volume level after turning the radio on, activate the monitor
function by pressing the according multi-functional key PF1/2 (11) or (12) ( which
has to be programmed via software) while adjusting the volume level with the combined On/Off-Volume key (5).
Channel Selection
For channel selection, use the rotary channel selector (3) switch.
The channels are selected in the programmed order.
English
Page 11

20 21
Transmit
For transmission hold the PTT key (9) until the end of the message.
For best sound quality, talk into the microphone (4) with normal voice at a distance
of approximatly 10 cm.
During transmission the control LED (6) lights red.
Upon release of the PTT key (9) the radio returns automatically into reception mode.
Reception
Upon reception of a signal, the LED (6) lights green.
If the selected frequency is decoded with a CTCSS- / DCS-code, all signals that
are encoded with a different code will be muted. The green LED will light but no
signal will be audible.
KEY FUNCTIONS
PTT Key
The PTT key (9) is located at the left side of the radio. Pressing the PTT key will
switch the radio into transmission mode. The LED (6) will light red.
Multi-Function Keys
The multi function keys PF1 (10) and PF2 (11) are located below the PTT key (9).
Each of them are programmable via the software T-UP25 with two of the following
functions that are activated by pressing short or long:
relais tone 1450 Hz monitor
relais tone 1750 Hz scan (channel scan)
relais tone 2315 Hz 5-tone selective calling
relais tone
Transmits the programmed relais tone, 1450 kHz, 1750 kHz or 2315 kHz.
monitor
The monitor functions remains active until the key is pressed again.
scan
Start / stop the channel scan function by pressing the key. Each channel can be
added to or deleted from the scan list by software programming.
This function is only available if at least two channels are added to the scan list.
5-tone selective calling
Transmits the via software programmed 5-tone selective encode.
This function is only available if 5-tone selective calling is enabled and if the actual
channel is set for 5-tone selective calling.
EnglishEnglish
Alarm tone button
The alarm tone button is acticated via software. If activated, a short press of the button will start a 30 second long alarm tone. Once the tone stops, the radio remains in
transmission mode until the alarm tone function is stopped by pressing the PTT key.
Is the alarm tone function not activated, a short double tone will be audible, if the warning tone function is active.
FUN-Taste (8)
Further functions are available when pressing the FUN key (8) in combination with other
keys.
FUN + PTT (9)
switch tx power high / low
FUN + ENT (13)
key lock On / Off
The key symbol appears once the function is activated. Only the PTT key (9) and
the FUN key (8) are available.
FUN + PF1 (10)
activates/deactivates the fm-radio function
Select the fm-radio frequency in the range of 88.5 MHz - 107.9 MHz by turning the
channel selector (3)
For channel scanning use the multi-function keys PF1 (10) (UP) and PF2 (11)
(DOWN).
Per software, up to 6 fm-radio frequencies can be stored. To recall these channels use
the following key combination after activating the radio function:
channel 1: VFO/MR (14) + FUN (8) channel 4: VFO/MR (14) + MENU (12)
channel 2: VFO/MR (14) + PF1 (10) channel 5: VFO/MR (14) + ENT (13)
channel 3: VFO/MR (14) + PF2 (11) channel 6: VFO/MR (14) + Notruftaste (15)
Pressing the PTT key (9), while the fm-radio is activated, will pause the fm-radio
function until the PTT key is released.
Page 12

EnglishEnglish
22 23
LED 007 - background light
Auto / ON / OFF
BEEP 008 - beep tone
ON / OFF; acoustic confirmation of each key entry
KEYBO 010 - key lock
MANUAL / AUTO (automatic activation after appr. 20 seconds)
All keys, except the PTT key (9) and the FUN key (8), are deactivated with the key
lock function.
The active state is is indicated by the key symbol in the upper left corner.
TOT 011 - time out timer
Off / 30s - 270s in 30-second-steps
Transmission will be stopped automatically after set TOT time.
SCANS 012 - channel scan types
there are three scan types availabe
TO : Time-Operated-Scan
scanning stops for a certain time on an occupied channel and
then continous, regardless if further signals are received on this
channel or not.
CO : Carrier-Operated-Scan
once an occupied channel is found, scanning stops until the
signal ends, then scanning continous.
SE : Search-Scan - einfacher Kanalsuchlauf
scanning stops as soon as an occupied channel has been detected.
VOICE 013 - voice annunciation
OFF / English
activates the english voice annuncation
C-CDC 015 - CTCSS/DCS codes for transmission and reception frequencies
OFF / 50 CTCSS / 104 DCS codes*
R-CDC 016 - CTCSS/DCS codes for reception frequencies
OFF / 50 CTCSS / 104 DCS codes*
T-CDC 017 - CTCSS/DCS codes for transission frequencies
OFF / 50 CTCSS / 104 DCS codes*
* = Depending on the software programming, either CTCSS or DCS codes are displayed. If no coding is selected, CTCSS codes are displayed.
MENU
The following settings are managed in the menu. For changes please follow these
steps:
1. Open the menu by pressing the menu key (12).
2. For selection of the functions use the rotary channel selector (3).
3. Activate your selection by pressing the ENT key (13).
4. Select the setting with the rotary channel selector (3) and confirm by pressing the
ENT key (13).
5. Exit the menu by pressing the VFO/MR key (14).
SCAN 001 - channel scan
Start the channel scan by pressing the ENT key (12). All channels that are activated for channel scanning (via software) will be part of the channel scan list.
PRI 002 - priority channel scan
After selecting the function priority scan 001, start the priority channel scan by
pressing the ENT key (12).
Between any channel of the channel scan list, the priority channel, which is set via
software, is added. The channel order of the regular scan list 1 - 2 - 4 - 5 - 7 - 8
will change, with the priority channel no. 4, to 4 -1 - 4 - 2 - 4 - 5 - 4 - 7 - 4 - 8.
VOX 003 - voice operated transmission
Gain Level
VOX sensitivity
settings: level 1 - 9; level 9 refers to greatest sensitivity
Delay Time
remaining time in VOX mode after end of signal
settings: 1 / 2 / 3 / 4 (in seconds)
POW 004 - power setting
H = high tx power
L = low tx power
with the PMR and FreeNet version, the high tx power is 500 mW, the low tx power
approximately 300 mW.
With the commercial versions UHF- / VHF-COM, the values for tx powers H and L
can be programmed according to the tx power as stated in the permit.
SQL 005 - squelch
0-9; at the value 0, the squelch is deactivated; at the level 9, the highest sensitivity is set.
Page 13

EnglishEnglish
24 25
NAME 021 - channel name
ON / OFF;
the via software programmed channel name is displayed
ROGER 022 - Roger Ton
ROGON (On) / ROGOFF (Off)
activates the roger beep
Note:
With the optional software T-UP25, the aforementioned and further functions and
settings, e.g. battery saving, roger tone, busy channel lockout, compander, etc.
are programmable.
For the commercial versions, the tx power is also programmable with the according software.
5-TONE SELECTIVE CALLING
The TeCom-IPZ5 contains a 5-tone selective calling function with single and group
calling function, which parameter are to be set via software T-UP25.
General:
Each handheld transceiver can be programmed with one 5-tone selective decode
and nine encodes (1 per channel).
Once 5-tone selective calling is activated, the encode is sent off by pressing the according multifunction key (10) or (11), which has to be programmed with the 5-tone
function. If the transmitted encode matches the programmed decode of the radio, the
receiver displays the ID code and performs according to the programming, e.g. speaker unmutes, bell rings, an automatic confirmation is sent, etc.
For sending a 5-tone selective call please follow these steps:
1. Push the according multi-functional key (10) or (11) that is programmed with
Optional Signal to sent off the 5-tone call.
2. Push the PTT key (9).
CONNECTION
The TeCom-IPZ5 is equipped with a Kenwood-compatible
accessory connection (3.5 / 2.5 mm - stereo / stereo) that
can also be used for the data transfer cable to connect to
the software T-UP25.
For further accessories please check the actual TEAM
product range or web site.
Page 14

26 27
EspañolEspañol
Estimado cliente,
Gracias por adquirir el TeCom-IPZ5 de TEAM, aprobado de acuerdo a IP67 (resistente al agua de bienvenida). La empresa TEAM Electronic es conocida por la gran
calidad de sus aparatos de radiocomunicación.
Para entender todas las funciones, los posibles ajustes y asegurar un funcionamiento
adecuado de la radio, le recomendamos que lea este manual antes de utilizar la radio
por primera vez.
El TeCom-IPZ5 está disponible en estas cuatro versiones:
PR8088 TeCom-IPZ5 PMR : programado con 8 canales FreeNet**, potencia
TX 500 mW, ancho de banda 12,5 Khz.
No necesita licencia ni pago de tasas.
PR8089 TeCom-IPZ5 FreeNet : programado con 6 canales FreeNet**, potencia
TX 500 Mw, ancho de banda 12,5 Khz.
No necesita licencia ni pago de tasas.
PR8090 TeCom-IPZ5 UHF : radio comercial; 256 canales programables. Ne-
cesita licencia y pago de tasas. Solo se permite
la programación de frecuencias y parámetros.
asignados. Ancho de banda: 12,5 KHz o 20 kHz;
potencia máxima TX: 4 W; UHF: 440 – 470 MHz.
PR8091 TeCom-IPZ5 VHF : radio comercial; 256 canales programables. Ne
cesita licencia y pago de tasas. Solo se permite
la programación de frecuencias y parámet asignados. Ancho de banda: 12,5 KHz o 20 kHz;
potencia máxima TX: 5 W; VHF: 136 – 174 MHz.
La programación del TeCom-IPZ5 se realiza mediante el software adicional T-UP25
por Windows XP / 7 / 8. La entrega incluye un cable de transferencia de datos.
* = Frecuencias PMR ** = Frecuencias FreeNet
1 - 446.00625 MHz 1 - 149.0250 MHz
2 - 446.01875 MHz 2 - 149.0375 MHz
3 - 446.03125 MHz 3 - 149.0500 MHz
4 - 446.04375 MHz 4 - 149.0875 MHz
5 - 446.05625 MHz 5 - 149.1000 MHz
6 - 446.06875 MHz 6 - 149.1125 MHz
7 - 446.08125 MHz
8 - 446.09375 MHz
Tabla de Contenidos
página
GENERAL 28
Embalaje 28
Mantenimiento 28
Características 28 - 30
FUNCIONES BÁSICAS 31
Antena 31
Batería 31
Cargador 31
On / Off 31
Volumen 31
Selección de canal 31
Transmisión 32
Recepción 32
FUNCIONES DE TECLADO 32
Tecla de transmisión PTT 32
Teclas multifunción PF1 y PF2 32
Tecla tono de alarma 32
Tecla FUN 33
MENÚ 34 - 36
SCAN (escaneo), PRI (escaneo prioridad), VOX, POW (potencia tx),
SQL (squelch), LED (luz de fondo), BEEP (beep tono),
KEYBO (bloqueo), TOT (limitador tiempo de transmisión),
SCANS (tipo de escaneo), VOICE (anuncio de voz), CTCSS/DCS,
NAME (nombre de canal), ROGER
LLAMADA SELECTIVA DE 5 TONOS 37
CONECTOR ADICIONAL 37
CTCSS/DCS 50
ESPECIFICACIONES 51
Page 15
EspañolEspañol
28 29
GENERAL
Embalaje
Desembale el equipo con cuidado. Por favor, compruebe que estén todos los elementos de la lista antes de deshechar el embalaje. Si le falta alguno de ellos o
viene dañado, póngase en contacto inmediatamente con el proveedor.
Mantenimiento
Para un funcionamiento y una funcionalidad óptima del TeCom-IPZ5, le aconsejamos lo siguiente:
> No abra el chasis de la radio. Abrirlo inadecuadamente podría causar daños que
no cubriría la garantía del aparato.
> Para cargar el pack de baterías recargables, utilice solo el cargador SLG-TeCom-IPZ5
incluido en el paquete.
> No exponga nunca la radio a los rayos del sol u otras fuentes de calor. Las altas
temperaturas podrían acortar la vida de algunos de los componentes y las partes
de plástico podrían derretirse o deformarse.
> No coloque nunca la radio en zonas con altos niveles de polvo o suciedad.
> No exponga la radio a ningún líquido. La humedad podría causar corrosión en la
pcb y sus componentes.
> Si la radio generase una calor inusual o emite olor o humo, por favor, apáguela
inmediatamente y extraiga la batería. A continuación, póngase en contacto con
su distribuidor.
> No transmita nunca sin antena; podría producirse daños irreversibles.
Características
> Potencia máx. TX
FreeNet : 500 mW PMR : 500 mW
VHF : 5 W * UHF : 4 W *
> 256 canales disponibles
UHF : 400 - 470 MHz VHF : 136 - 174 MHz
PMR : 8 canales PMR 446 MHz FreeNet: 6 canales FreeNet
149 MHz
> Ancho de banda
FreeNET / PMR : 12.5 kHz
UHF / VHF : 12.5 / (20) / 25 kHz
> Llamada selectiva mediante 5 tonos > Transmisión bloqueo de canales ocupados
> Secrafonía > Radio FM
> 50 códigos CTCSS y 104 DCS > Bloqueo de teclado
> Display LCD con retroiluminación > TOT (Limitador Tiempo de Transmisión)
> Secrafonía (ocho códigos diferentes) > VOX
> Tono repetidor 1450 /1750 /2315 Hz > Función ahorro de batería
Page 16
EspañolEspañol
30 31
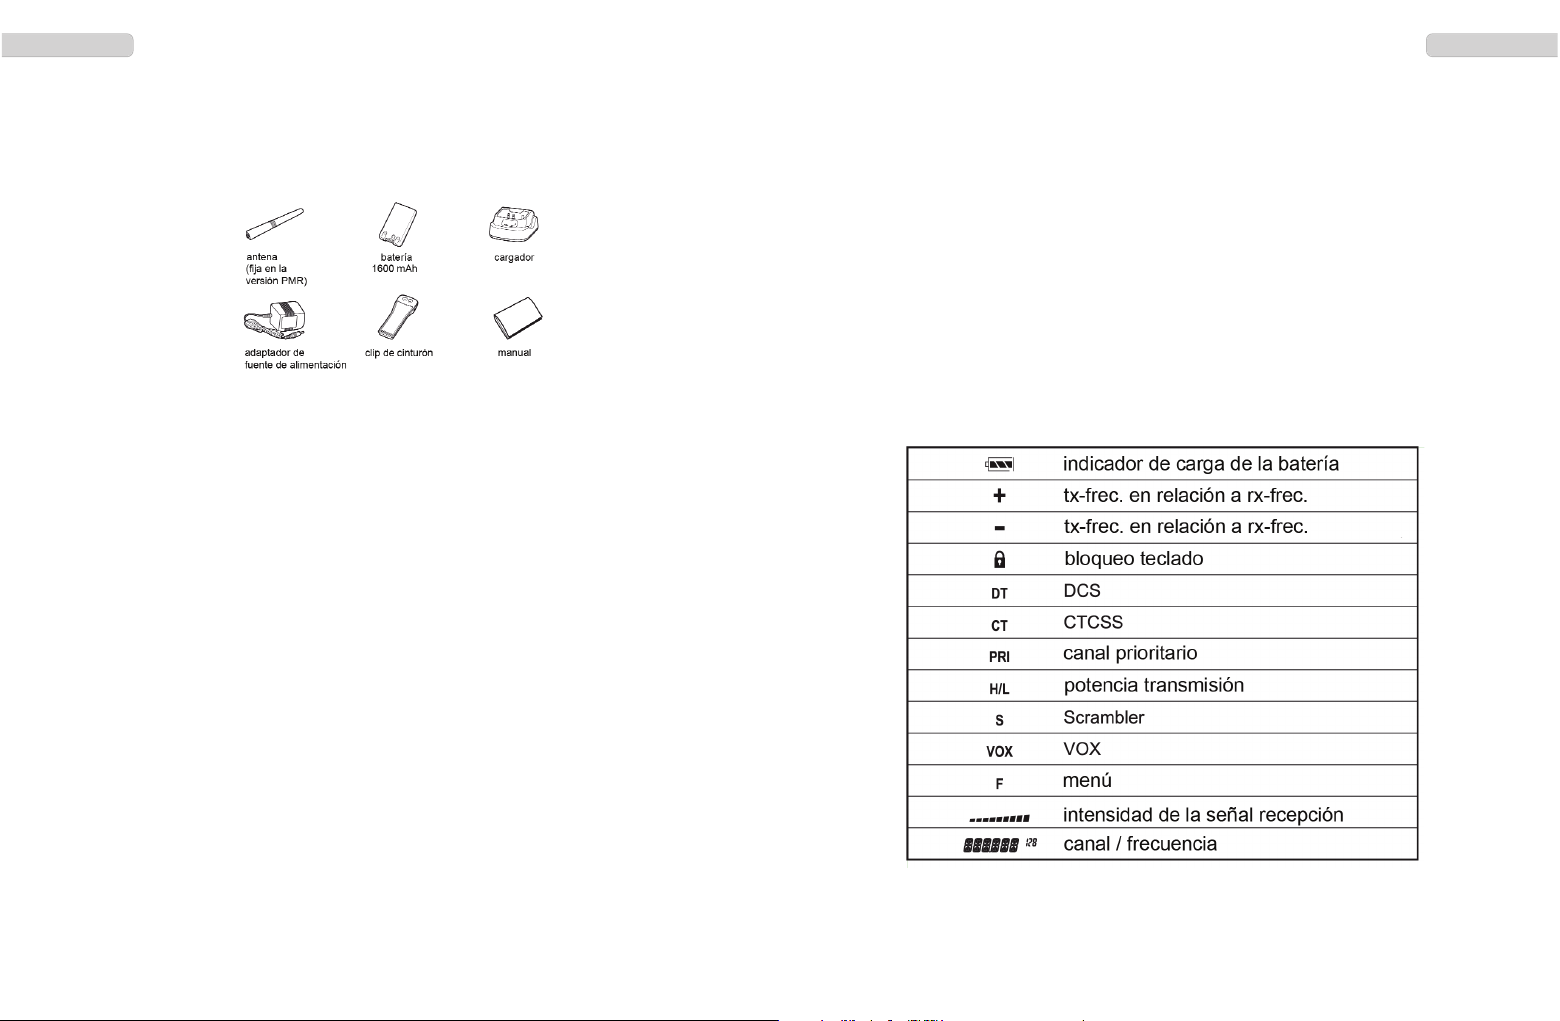
1 - antena
2 - LCD
3 - selector rotatorio de canal
4 - micrófono
5 - On/Off - volumen
6 - LED
7 - altavoz
8 - tecla FUN
9 - tecla PTT
10 - tecla multifunciónal 1
11 - tecla multifunciónal 2
12 - tecla menu
13 - tecla ENT
14 - tecla VFO/MR
15 - tecla tono de alarma
16 - ear-/microphone connector
17 - pack batería Li-Ion, 1600 mAh
9
11
10
17
16
8
1
4
13
12
7
3
5
6
11
10
8
14
2
9
15
FUNCIONES BÁSICAS
Antena
Debido a normativas gubernamentales, la antena en
la versión PMR es fija, es decir, no se puede extraer
del aparato.
Batería
Para colocar la batería (17), coloque la batería en la radio y presione la parte inferior cercana al caso de radio y cerrar el candado.
Carga
Antes del primer uso, deberá cargar completamente la batería. Una batería
vacía necesita tres horas aproximadamente. Durante el proceso de carga, la
luz LED se iluminará en rojo. Una vez se haya cargado completamente, el LED
se pondrá en verde.
Extraiga la batería del cargador. La sobrecarga acorta la vida de la batería.
On / Off
Para encender la radio, gire el conmutador On / Off (5) en el sentido de las agujas del reloj hasta la marca. El aparato emitirá un tono beep si la función tono
beep está activada.
Para apagar la radio, por favor gire el conmutador On / Off (5) en el sentido
contrario a las agujas del reloj hasta la marca.
Control de Volumen
Para establecer un nivel de volumen adecuado, después de haber encendido la
radio, pulse la tecla monitorización (programar la tecla PF1 (10) o PF2 (11) con la
función de monitor) y ajusta el nivel de volumen con el conmutador volumen
ON/OFF (5).
Selección de canal
Para seleccionar un canal gire el selector rotatorio de canal (3).
Los canales irán pasando en orden consecutivo. Después del último número de
canal, la secuencia volverá a empezar por el número más bajo.
Page 17

EspañolEspañol
32 33
Transmisión
Para trasmitir, mantenga pulsado el PTT (9) hasta que finalice el mensaje.
Para conseguir una buena calidad de sonido, hable por el micrófono (4) con voz
normal y a una distancia de aproximadamente 10 cm.
Durante la transmisión, el control LED (6) se iluminará en rojo.
Una vez haya soltado el PTT (9) la radio volverá automáticamente al modo recepción.
Recepción
Una vez recibida la señal, el LED (6) se iluminará en verde.
Si la frecuencia seleccionada está descodificada con un código CTCSS- / DCS,
todas las señales que estén codificadas con un código diferente se silenciaran. El
LED verde estará iluminado, pero no habrá ninguna señal audible.
FUNCIONES DE TECLADO
PTT
El PTT (9) está situado en la parte izquierda de la radio. Al pulsar el PTT, la radio
se pondrá en modo transmisión; y el LED (6) se iluminará en rojo.
Teclas multifunciones
Las teclas multifunciones PF1 (10) y PF2 (11) están situadas bajo el PTT (9), las
cuales pueden programarse mediante el software T-UP25 o con una de las siguientes funciones:
tono repetidor 1450 Hz monitor
tono repetidor 1750 Hz escaneo de canales*
tono repetidor 2315 Hz llamada selectiva de 5 tonos**
* Al menos 2 canales tienen que ser añadido a la lista de exploración
** Señal opcional tiene que ser activado para el canal
Tecla tono de alarma (15)
Esta función se activa/desactiva mediante software.
Después de pulsar la tecla de alarma (15) de color naranja, un tono de alarma sonará durante 30 segundos. A continuación, la unidad permanecerá en el modo de
transmisión hasta que se pulse la tecla PTT para terminar el modo alarma.
Si la función de llamada de alarma está desactivada, al pulsar el botón se escuchará un tono doble.
Tecla FUN (8)
Al pulsar la tecla FUN (8) en sucesión con otras teclas para activar funciones
adicionales:
FUN + PTT (9)
Cambio la pontecia de transmisión alta / baja
FUN + ENT (13)
key lock On / Off - bloqueo del teclado (encendido/apagado)
El símbolo de la llave aparece en la pantalla. Sólo la tecla PTT (9) y la tecla FUN
(8) son activos.
FUN + PF1 (10)
activado / desactivado la función fm-radio
Selecta la frecuencia fm en el rango de 88.5 MHz - 107.9 MHz con el selector rotativo (3) o use la función escaneo de canal con las teclas PF1 (10) / PF2 (11).
Con el software, un máximo de seis canales puede ser salvado. Para recuperar
estos canales, activar la función de radio y use estas teclas en combinación con la
tecla FUN (8).
canal 1: VFO/MR (14) + FUN (8) canal 4: VFO/MR (14) + MENU (12)
canal 2: VFO/MR (14) + PF1 (10) canal 5: VFO/MR (14) + ENT (13)
canal 3: VFO/MR (14) + PF2 (11) canal 6: VFO/MR (14) + emergencia (15)
Si pulsa la tecla PTT (9) mientras la radio está activo, la función radio hará una
pausa.
Page 18

EspañolEspañol
34 35
LED 007 - luz de fondo
Iluminación del LCD
ON : retroiluminación continua
OFF : sin retroiluminación
AUTO : retroiluminación temporal después de soltar la tecla
BEEP 008 - beep tono
Ajustes: On / Off
La pulsación de cada tecla, excepto para el PTT, se confirmará con un tono doble. En
estado activado, el símbolo de la campana aparecerá en el display.
KEYBO 010 - bloqueo
MANUAL / AUTO (activación automática después de 20 segundos)
Todas las teclas están desactivados, excepto la tecla PTT (9) y la tecla FUN (9).
El estado activo se indica mediante el símbolo de una llave en la pantalla.
TOT 011 - Limitador Tiempo de Transmisión
Limita el tiempo de transmisión; ajustes: Off / 30s - 270s en pasos de 30-segundos
Si está activado, la transmisión se detiene automáticamente después de que haya
expirado el tiempo establecido.
SCANS 012 - modos de escaneo
Hay disponibles modos de escaneo que deben seleccionarse mediante el software
opcional.
TO: tiempo
El escaneo se detiene durante un cierto tiempo en un canal ocupado
y después continua, independientemente si se reciben más señales
en este canal o no.
CO: signal
Cuando encuentra un canal ocupado, el escaneo se detiene hasta que
finaliza la señal. Entonces, continua el escaneo.
SE : escaneo
El escaneo se detiene tan pronto como se haya detectado un
canal ocupado.
VOICE 013 - anuncios de voz
OFF / english (apagado / inglés)
activado el anuncio inglés
C-CDC 015 - CTCSS/DCS códigos por las frecuencias transmisión y recepción
apagado (OFF) / 50 CTCSS / 104 DCS códigos*
MENÚ
Las siguientes opciones se administran en el menú. Siga estas instrucciones:
1. Abra el menú con la tecla MENU (12).
2. Haga su selección con el selector rotativo (3).
3. Activar su selección con la tecla ENT (13).
4. Haga su selección con el selector rotativo (3) y la confirma con la tecla ENT (13).
5. Salga del menú pulsando la tecla VFO/MR (14).
SCAN 001 - escaneo de canales
Inicie el escaneo de canales con la tecla ENT (12). Todos los canales que se activan para el escaneo de canales (mediante software) serán parte de la lista de canales escaneo.
PRI 002 - escaneo prioridad
Despúes de selectar la función escaneo prioridad 001, pulsa la tecla ENT (12)
para iniciar el escaneo prioridad.
Se añade el canal prioridad entre todos los canales de la lista de canales. Por
ejemplo 4 -1 - 4 - 2 - 4 - 5 - 4 - 7 - 4 - 8 (canal prioridad = 4 y lista de canales
escaneo = 1 - 2 - 4 - 5 - 7 - 8 ).
VOX 003
Gain Level - nivel de ganancia
Sensibilidad de la función VOX
Ajustes: nivel 1 - 9; nivel 9 es la máxima sensibilidad.
Delay Time - tiempo de retraso
En modo VOX, se puede establecer el tiempo restante en modo VOX después de
que finalice la señal.
Ajustes: 1 / 2 / 3 / 4 segundos
POW 004 - potencia TX
H = potencia alto TX
L = potencia bajo TX
En la versión PMR y FreeNet, la potencia alto es de 500 mW y la potencia bajo
es de aproximadamente 300 mW.
En las versiones VHF (máx. 5W) y UHF-COM (máx. 4W), las potencias tx pueden
ser ajustadas individualmente por un técnico.
SQL 005 - nivel squelch
0-9; Ajuste: 0 – 9. En el valor 0, el squelch está desactivado. P.ej. el canal está
completamente abierto.
Page 19

EspañolEspañol
36 37
R-CDC 016 - CTCSS/DCS códigos por las frecuencias recepción
apagado (OFF) / 50 CTCSS / 104 DCS códigos*
T-CDC 017 - CTCSS/DCS códigos por las frecuencias transmisión
apagado (OFF) / 50 CTCSS / 104 DCS códigos*
* = Dependiendo de la programación, se muestran los códigos CTCSS o DCS. Si
no se programa ningún código, los códigos CTCSS están activados.
NAME 021 - nombre de canal
Visualización del nombre de canal, en caso de que esté programado.
ROGER 022 - Tono de Roger
ROGON (encendido) / ROGOFF (apagado)
activate el tono de roger
Nota:
Todas estas funciones y ajustes adicionales, por ejemplo ahorro de batería, tono
de roger, bloqueo de canal ocupado, compander, etc. pueden programarse con el
software T-UP25.
Por las versiones comerciales (UHF-/VHF-COM), la potencia tx está programada
con el software T-UP25 COM.
LLAMADA SELECTIVA MEDIANTE 5 TONOS
El TeCom-IPZ5 tiene incorporada una función de llamada selectiva mediante 5 tonos
con llamada privada y llamada de grupo. Los parámetros de la cual se deben ajustar
mediante el software T-UP25.
General:
Cada transceptor portátil se puede programar con codificación selectiva de 5 tonos y
una decodificación.
Una vez la llamada selectiva mediante 5 tonos esté activada, se enviará la codificación pulsando la tecla PF1 (10) o PF2 (11), que se programa con la funcíon de 5
tonos.
Si la codificación coincide con la decodificación programada del transceptor portátil
en modo recepción, la radio receptora mostrará el código ID de la radio transmisora
y actua en el modo programado, como por ejemplo, volver a activar el altavoz, timbre, envio de una confirmación automática, etc.
Para el envío de llamada selectiva mediante 5 tonos, por favor, siga los siguientes
pasos:
1. Pulse la tecla que se programa (PF1 (10) o PF2 (11)) para enviar la llamada
selectiva mediante 5 tonos.
2. Pulse el PTT (9).
CONEXIÓN
El TeCom-IPZ5 vienen equipado con conexión para accesorios compatibles con Motorola (3,5 / 2,5 mm - estéreo / estéreo) que también se puede utilizar como cable de
transferencia de datos para conectarlo al software T-UP25.
Page 20

38 39
ItalianoItaliano
Gentile cliente,
Grazie per avere acquistato una radio TEAM TeCom-IPZ5, omologato secondo IP67
(restistant spruzzi d'acqua). TEAM Electronic è sinonimo di alta qualità nella Radiocomunicazione.
Per comprendere al meglio le varie funzioni, le possibili impostazioni e il corretto funzionamento della radio, vi consigliamo di leggere attentamente il manuale.
Lo TeCom-IPZ5 è disponibile nelle seguenti versioni:
PR8088 TeCom-IPZ5 PMR : programmabile con 8 PMR* canali, 500 mW
tx power, larghezza di banda 12.5 kHz, libero
uso
PR8089 TeCom-IPZ5 FreeNet : programmabile con 6 canali FreeNet**,
500 mW tx power, larghezza di banda 12.5 kHz,
libero uso
PR8090 TeCom-IPZ5 UHF : commercial radio; 256 canali programmabili;
registrazione a pagamento; utilizzabili solamente le frequenze assegnate larghezza di
banda 12.5 kHz or 20 kHz; max. TX power 4 W;
UHF 440 - 470 MHz
PR8091 TeCom-IPZ5 VHF : commercial radio; 256 canali programmabili;
registrazione a pagamento; utilizzabili solamente le frequenze assegnate larghezza di
banda 12.5 kHz or 20 kHz; max. TX power 5 W;
VHF 136 - 174 MHz
la programmazione del TeCom-IPZ5 è possibile tramite software T-UP25 (Windows
XP/7/8). Compreso di cavetto trasferimento dati.
* = Frequenze PMR ** = Frequenze FreeNet
1 - 446.00625 MHz 1 - 149.0250 MHz
2 - 446.01875 MHz 2 - 149.0375 MHz
3 - 446.03125 MHz 3 - 149.0500 MHz
4 - 446.04375 MHz 4 - 149.0875 MHz
5 - 446.05625 MHz 5 - 149.1000 MHz
6 - 446.06875 MHz 6 - 149.1125 MHz
7 - 446.08125 MHz
8 - 446.09375 MHz
Contenuto Confezione
pagine
GENERALE 40
Contenuto della confezione 40
Manutenzione 40
Caratteristiche 40 - 42
FUNZIONI DI BASE 43
Antenna 43
Batteria 43
Carica 43
On / Off 43
Volume 43
Selettore canale 43
Trasmissione 44
Ricezione 44
FUNZIONI TASTI 44
PTT Tasto di trasmissione 44
Tasto multifunzione PF1 and PF2 44
Tasto tono di allarme 45
Tasto FUN 45
MENU 46 - 48
SCAN (scansione), PRI (priorità scansione), VOX,
POW (
potenza tx), SQL (squelch), LED (illuminazione
LCD), BEEP (beep tono), KEYBO (blocco tastiera),
TOT (Limita il tempo di trasmissione ), SCANS (modo
scan), VOICE (anuncio vocale), CTCSS/DC S, NAME
(nome canale), ROGER
5-TONI DI CHIAMATA SELETTIVA 49
JACK ACCESSORI 49
CTCSS/DCS 50
CARATTERISTICHE 51
Page 21
40 41
ItalianoItaliano
GENERALE
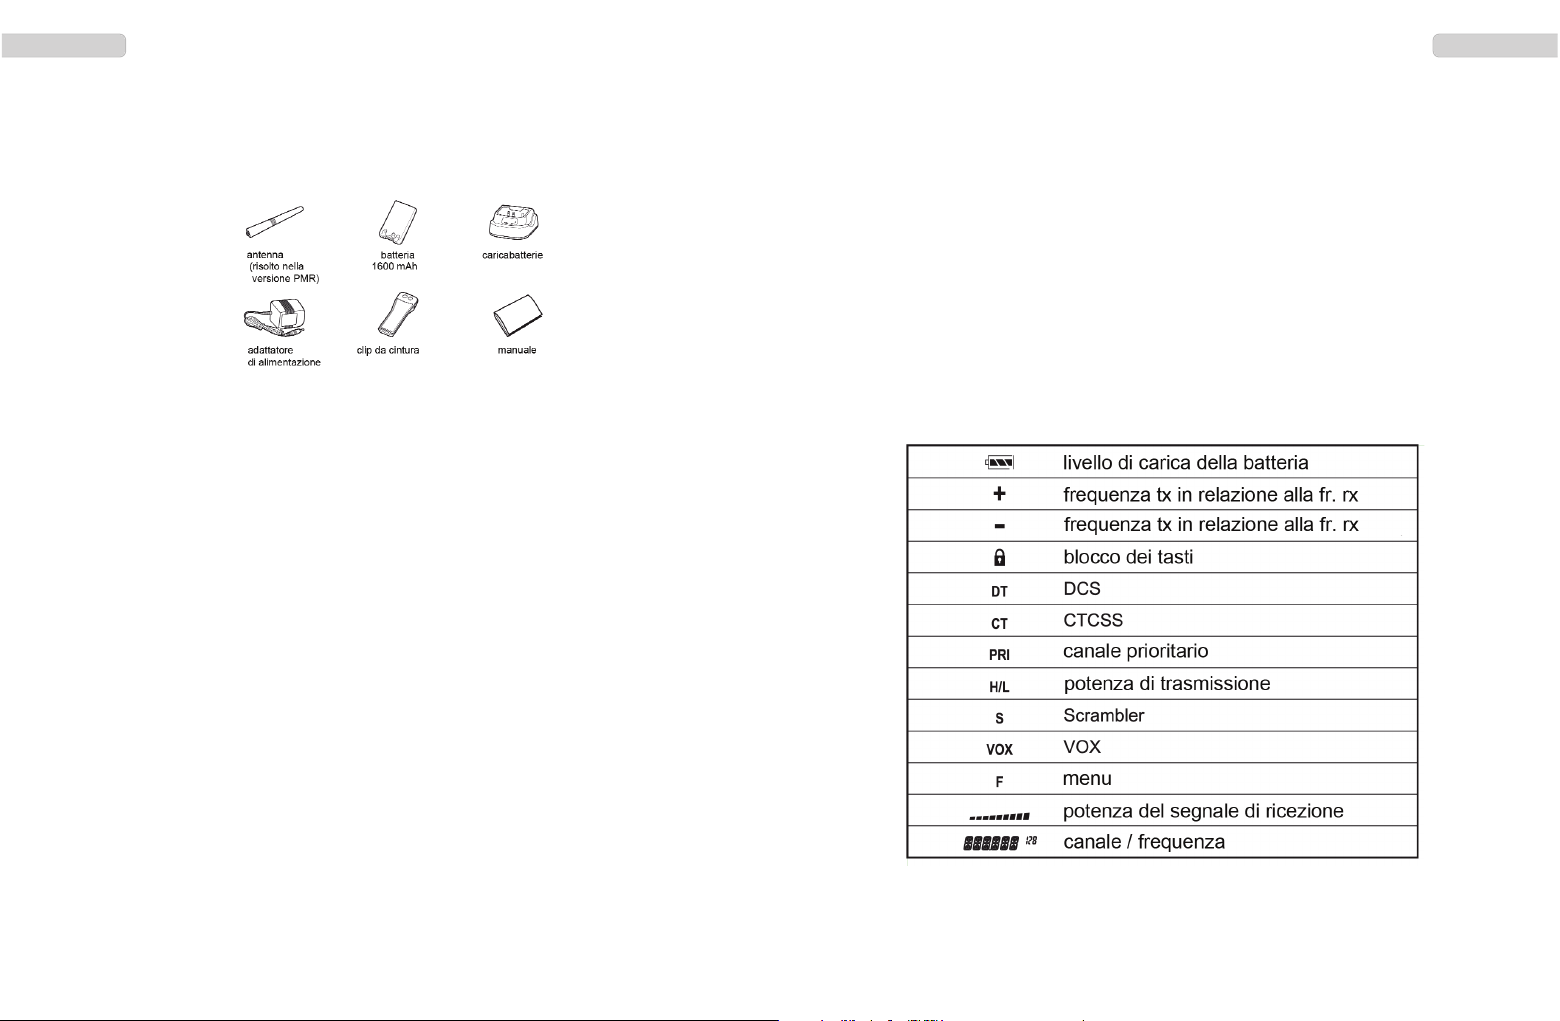
Contenuto della confezione
Togliere le parti della radio con attenzione. Si raccomanda di verificare gli elementi
prima di eliminare l’imballo. Se alcuni elementi risultano mancanti o sono danneggiati, si prega di contattare immediatamente il rivenditore.
Manutenzione
Per prestazioni ottimali e la funzionalità del TeCom-IPZ5, si prega di prestare attenzione ai seguenti consigli:
> non smontare in nessun caso la radio. Questa operazione potrebbe danneggiare
l’apparato e non rendere più valida la garanzia.
> Per la ricarica della batteria utilizzare il caricatore originale SLG-TeCom-IPZ5
incluso nella confezione.
> Non esporre in nessun caso la radio alla luce diretta del sole o ad alter fonti di
calore. Le alte temperature diminuiscono la longevità di alcuni componenti.
> Non conservare la radio in luoghi polverosi e sporchi.
> Non mettere a contatto la radio con sostanze liquide. I componenti interni potreb-
bero corrodersi.
> Se la radio dovesse emettere fumo o generare odori, rimuovere immediatamente
la batteria e contattare il rivenditore.
> Non trasmettere mai senza l’antenna montata.
Caratteristiche
> max. tx power
FreeNet : 500 mW PMR : 500 mW
VHF : 5 W UHF : 4 W
> 256 canali disponibili
UHF : 400 - 470 MHz VHF : 136 - 174 MHz
PMR : 8 Canali PMR 446 MHz FreeNet : 6 Canali FreeNet 149 MHz
> larghezza di banda
FreeNET / PMR : 12.5 kHz
UHF / VHF : 12.5 / (20) 25 kHz
> 5-toni di chiamata selettiva > blocco canale occupato
> scrambler (otto tipi) > FM radio
> 50 CTCSS e 107 DCS > blocco tasti
> LCD display illuminato > TOT
> VOX > Repeater Toni 1450 / 1750 / 2315 Hz
> funzione salva batteria
Page 22
42 43
ItalianoItaliano
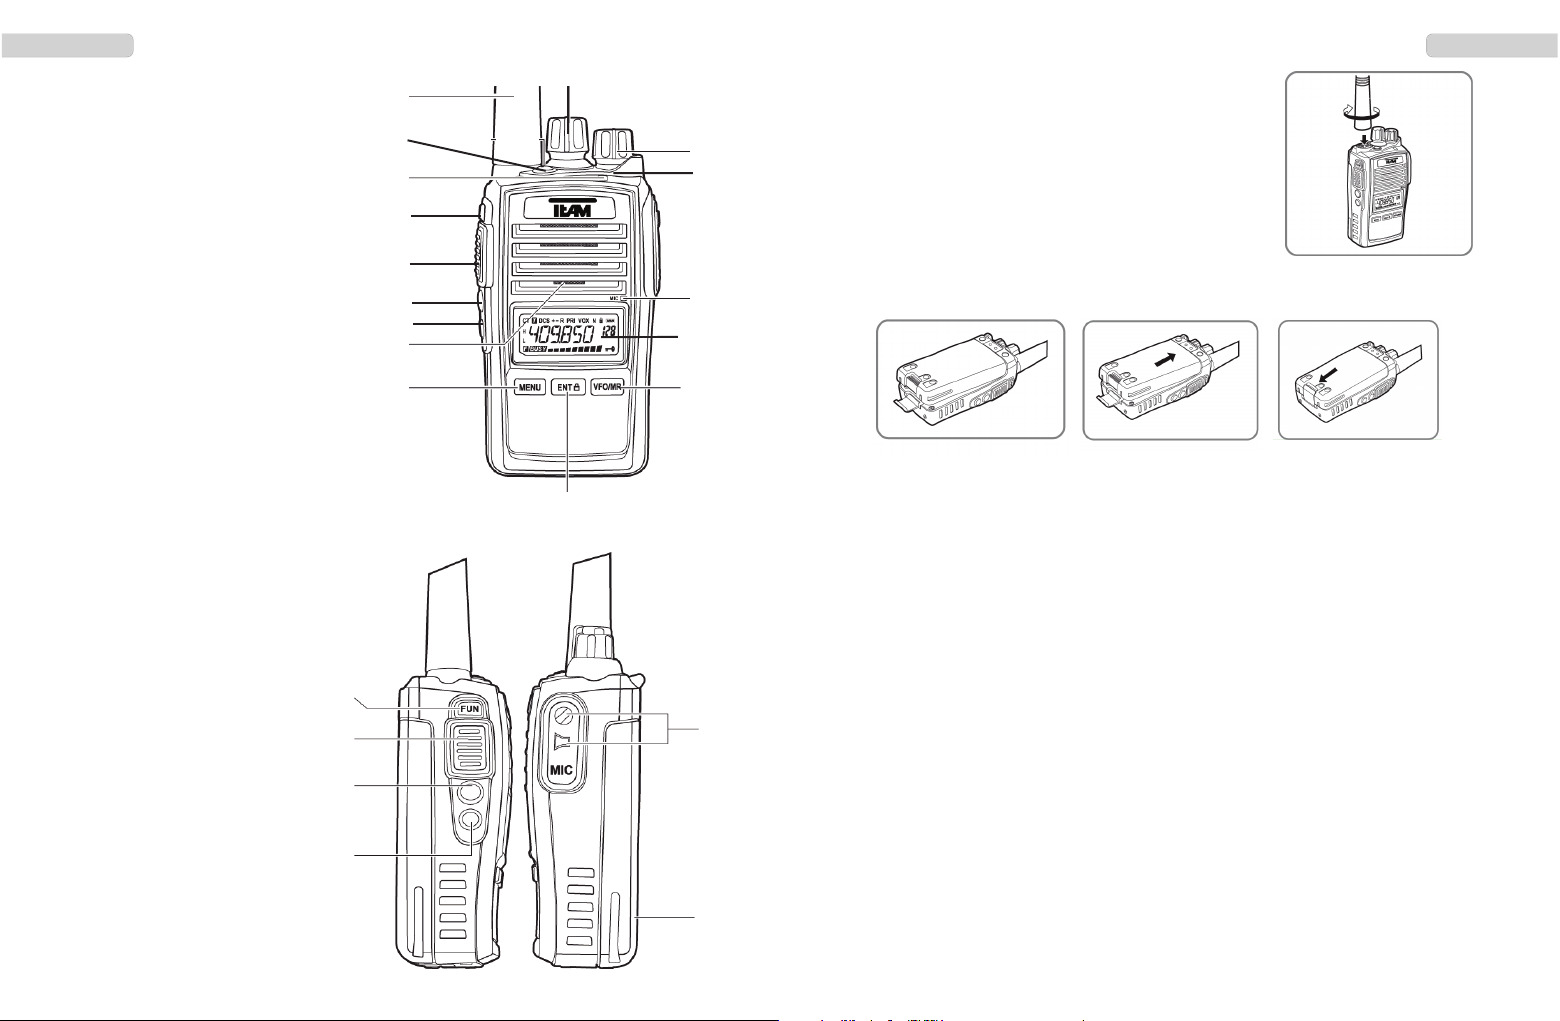
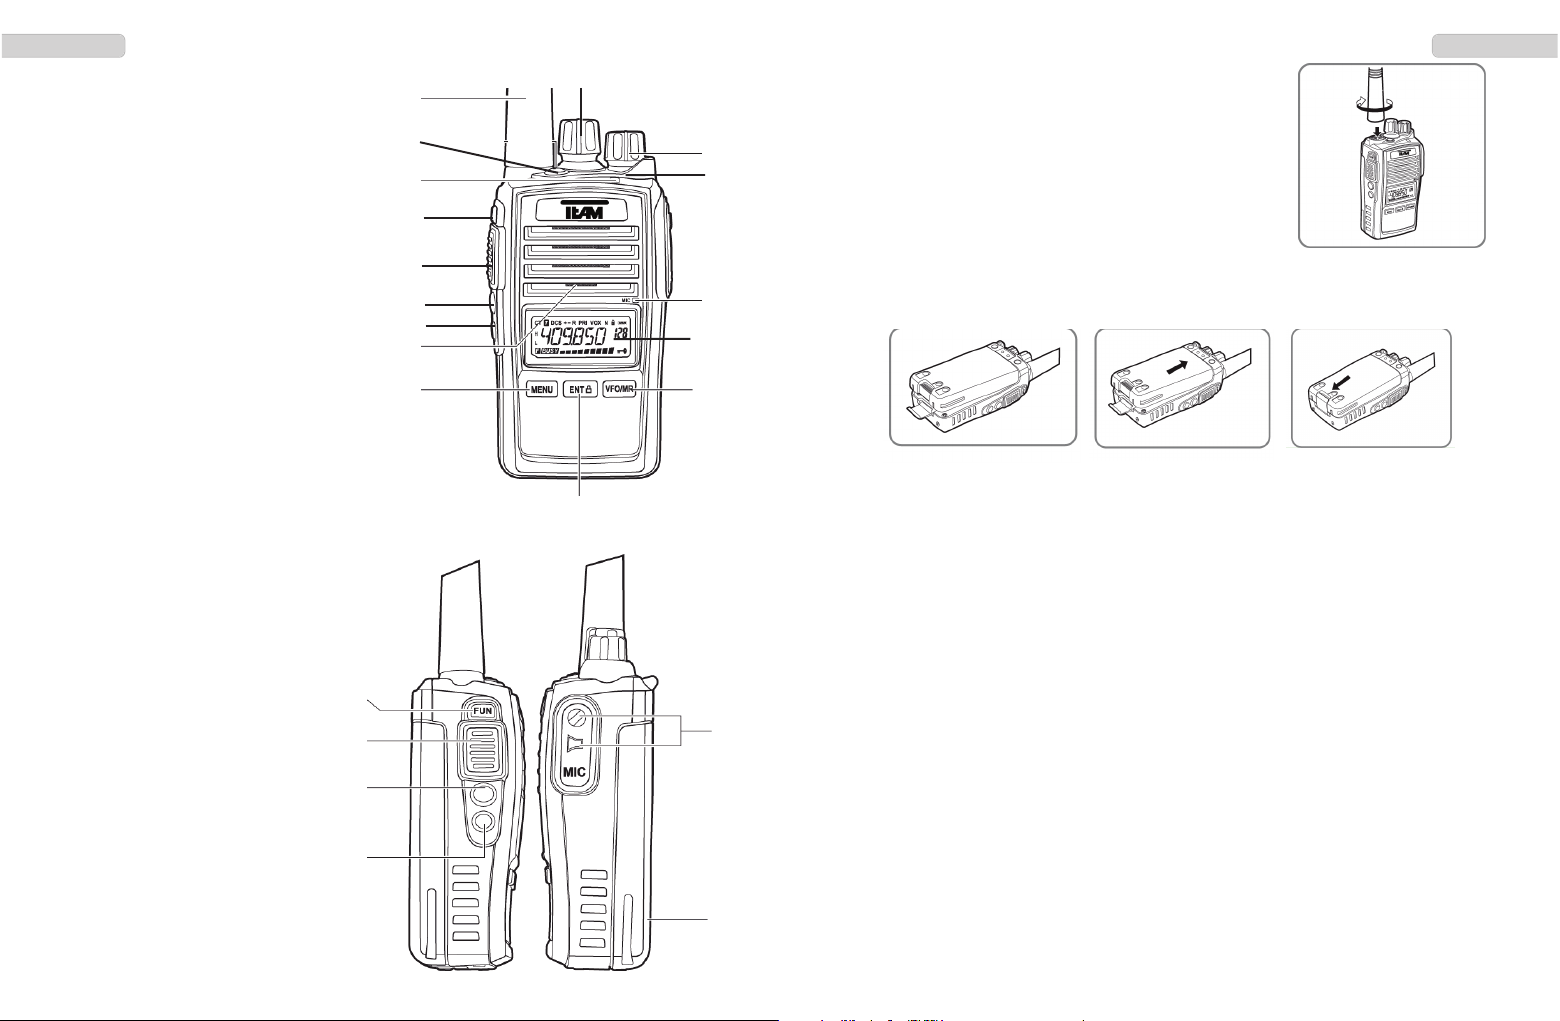
1 - antena
2 - LCD
3 - selettore di canale rotativo
4 - microfono
5 - On/Off - volumen
6 - LED
7 - altoparlante
8 - tasto FUN
9 - tasto PTT
10 - tasto multifunciónal 1
11 - tasto multifunciónal 2
12 - tasto menu
13 - tasto ENT
14 - tasto VFO/MR
15 - tasto tono di allarme
16 - connettore jack
17 - pacco batteria Li-Ion, 1600 mAh
9
11
10
17
16
8
1
4
13
12
7
3
5
6
11
10
8
14
2
9
15
FUNZIONI DI BASE
Antenna
A causa di regolamenti governativi, nella versione PMR
l’antenna è fissa.
Pacco batteria
Per montare la batteria (17) sulla radio, infilare la batteria nella parte inferiore della
radio, poi premere sulla parte superiore fino a farla scattare.
Per rimuovere la batteria, abbassare il fermo e staccarla dalla radio.
Ricarica
Prima del primo utilizzo, la batteria deve essere caricata per almeno tre ore, durante la ricarica il Led rosso rimane acceso, a ricarica ultimata si accenderà il Led
verde.
Una volta terminate la rcarica, togliere la batteria dal caricatore.
On / Off
Per accendere la radio, ruotare in senso orario il tasto On / Off(5). Quando si accende, la radio emette un segnale acustico.
Per spegnere la radio, bisogna ruotare in senso antiorario il tasto On / Off(5).
Volume Control
Per impostare il volume dopo l’accensione, bisogna tenere premuto il tasto
monitor programare il tasto PF1 (10) o PF2 (11) con la funzione monitor invece per
regolare il volume, ruotare il tasto On/Off-Volume (5).
Selettore canale
Per selezionare un canale premere I tasti Up/Down (3).
I canali sono passati in ordine consecutivo. Dopo il numero più alto, possa al numero più basso.
Page 23

44 45
ItalianoItaliano
Chiamata selettive 5-toni
Trasmette i 5 toni di selettiva via software di programmazione.
Questa funzione è disponibile solo se i 5-toni di chiamata selettiva sono abilitati, e se
il canale in uso è abilitato alle chiamate di tono selettiva.
Tasto tono di allarme
Il tasto tono di allarme si attiva via software. Se attivato, una breve pressione del
tasto fa partire un tono di allarme dalla durata di 30 secondi. Una volta terminato il
tono, la radio rimane in modalità trasmissione fino a quando, premendo il tasto
PTT, la funzione termina.
Se la funzione allarme non è attivata e la funzione di tono è attiva, si udirà un
breve doppio tono.
Tasto FUN- (8)
Ulteriori funzioni sono disponibili premendo il tasto FUN (8) in combinazione con
altri tasti.
FUN + PTT (9)
Trasformala potenza tx alta / bassa
FUN + ENT (13)
Blocco tasti On / Off
Il simbolo blocco tasti appare fino a quando la funzione è attivata . Solo il tasto
PTT (9) ed il tasto FUN (8) sono attivi.
FUN + PF1 (10)
attiva/disattiva la funzione fm-radio
Seleziona la frequenza radio fm nella gamma 88.5 MHz - 107.9 MHz ruotando il selettore canale (3)
Per la scansione canale utilizzare I tasti multi funzione PF1 (10) (UP) e PF2 (11)
(DOWN).
Tramite software, più di 6 frequenze radio possono essere memorizzate e per richiamarle su canali usare la seguente combinazione tasti dopo avere attivato la funzione
radio:
canale 1: VFO/MR (14) + 0 canale 4: VFO/MR (14) + 3
canale 2: VFO/MR (14) + 1 canale 5: VFO/MR (14) + 4
canale 3: VFO/MR (14) + 2 canale 6: VFO/MR (14) + 5
Premendo il tasto PTT (9), se la radio fm è attivata, la stessa funzione radio fm
sarà interrotta fino a quando il tasto PTT sarà rilasciato.
Trasmissione
Per trasmettere premere il tasto PTT (9) fino alla fine del messaggio.
Per una migliore qualità della voce, tenere il microfono (4) ad una distanza di circa
10 cm.
Durante la trasmissione il Led rosso (6) rimarrà acceso.
Al rilascio del PTT (9) la radio ritorna automaticamente in modalità di ricezione.
Ricezione
Al momento di ricezione rimarrà acceso il LED verde (6).
Se la frequenza selezionata viene decodificata con un codice CTCSS- / DCS, tutti I
segnali con un codice diverso non saranno uditi.. il LED verde si accende ma nessun segnale è udibile.
FUNZIONI TASTI
Tasto PTT
Il tasto PTT (9) è posto nella parte destra della radio. Premendo il tasto PTT la
radio va in modalità di trasmissione. Il LED (6) emette una luce rossa.
Tasti multi funzione
Il tasto multi funzione PF1 (10) e PF2 (11) si trovano sotto il tasto PTT (9). Sono
programmabili tramite il software T-UP26 con una delle seguenti funzioni:
tono di relais 1450 Hz monitor
tono di relais 1750 Hz scan
tono di relais 2315 Hz chiamata selettive 5-toni
Tono relais
Trasmette il tono relais di chiamata , 1450 kHz, 1750 kHz or 2315 kHz.
Monitor
La funzione monitor rimane attiva fino a quando si torna a premere il tasto.
Scan
Start / stop della funzione di scansione canale si attivano premendo il tasto. Ogni
canale può essere aggiunto o tolto dalla scansione tramite programmazione da
software.
Questa funzione è disponibile se gli ultimi due canali sono aggiunti sulla lista di
scansione.
Page 24

ItalianoItaliano
46 47
LED 006 - illuminazione LCD
impostazioni: ON / OFF / AUTO
ON : illuminazione continua
OFF : illuminazione spenta
AUTO : accesa temporaneamente dopo il rilascio del tasto.
BEEP 007 - beep tono
impostazioni: On / Off
quando questa funzione è attivata, premendo qualsiasi tasto tranne il PTT, si
udirà un doppio tono, sul display apparirà il simbolo della campanella.
KEYBO 008 - blocco tastiera
MANUAL / AUTO (attivato automaticamente dopo 20 secondi)
Tutti i tasti sono disattivati ad eccezione del tasto PTT (9) e il tasto FUN (9).
Lo stato attivo è indicato da un simbolo tasto sul display.
TOT 009 - Limita il tempo di trasmissione
impostazioni: Off / 30s - 270s a passi 30 secondi
Quando è attivo, la trasmissione viene interrotta automaticamente dopo il tempo
impostato.
SCANS 010 - modo scan
Ci sono modalità di scansione che devono essere impostate tramite software.
TO : La scansione si ferma per un certo tempo su un canale occupato e
poi continua, indipendentemente se i canali sono ricevuti su questo
canale o meno.
CO : Una volta che un canale viene trovato occupato, la scansione si
ferma fino che il segnale finisce, poi la scansione continua.
SE : La scansione si ferma non appena viene rilevato un canale
occupato.
VOICE 011 - annuncio vocale
impostazioni: OFF / english (spento / inglese)
attivato l'annuncio inglese
C-CDC 012 - CTCSS/DCS Codici per le frequenze di trasmissione e ricezione
spento (OFF) / 50 CTCSS / 104 DCS codici*
R-CDC 013 - CTCSS/DCS codici per la frequenza di ricezione
spento (OFF) / 50 CTCSS / 104 DCS codici*
MENU
I seguenti settaggi sono descritti in menu. Per cambiarli attenersi alle seguenti indicazioni:
1. Aprire il menu premendo il tasto MENU.
2. Per selezionare la funzione ruotare il selettore canale (3).
3. Attivare la funzione selezionata premendo il tasto ENT (13).
4. Selezionare il setting ruotando il selettore canale (3) e confermare premendo il
tasto ENT (13).
5. Uscire dal menu premendo il tasto VFO/MR (14).
PRI 001 - priorità scansione canale
Dopo aver selezionato la funzione priorità scansione canale 001, la stessa parte
premendo il tasto ENT (12).
Ogni canale della lista scansione canali la priorità canale, impostata via software,
è aggiunto. L’ordine canale della lista scansione regolare 1 - 2 - 4 - 5 - 7 - 8 verrà
cambiata, con la priorità canale no. 4, in 4 -1 - 4 - 2 - 4 - 5 - 4 - 7 - 4 - 8.
VOX 002
Gain Level - livello di guadagno
Sensbilità della funzione VOX
impostazioni: livello 1 - 9; livello 9 significa massima sensibilità.
Delay Time - ritardo
in modalità VOX il tempo rimasto dopo la fine del segnale, può essere impostato.
impostazioni: 1 / 2 / 3 / 4 secondi
POW 003 - impostazione potenza
H = alta potenza tx
L = bassa Potenza tx
La versione PMR e FreeNet , l’alta potenza tx è di 500 mW, la bassa potenza tx
è approssimativamente 300 mW.
Nella versione commerciale UHF-COM (max. 4 W) / VHF-COM (max. 5W), il valore della potenza tx H / L può essere programmato in accordo ai limiti consentiti.
SQL 004 - nivel squelch
impostazioni: 0 - 9; con il valore 0, lo squelch è disattivato, il canale è completamente aperto.
SCRM 005 - segnale scrambling
ON / OFF ; lo scrambling tipo (1-8) va programmato tramite software. La comunicazione tra due radio che usano questa funzione è possibile solamente se entrambe le radio usano lo stesso tipo di scrambler (1-8).
Page 25

ItalianoItaliano
48 49
T-CDC 014 - CTCSS/DCS codici per la frequenza di trasmissione
apagado (OFF) / 50 CTCSS / 104 DCS codici*
* = A seconda della programmazione, CTCSS o codici DCS è. Se non è
programmato alcun codice, codici CTCSS sono attivati .
NAME 015 - nome canale
Ogni canale può essere chiamato singolarmente. Il nome può essere composto
da 5 simboli:
a) spzio,
b) digits 0 - 9,
c) lettere A - Z and
d) asterisco (*), meno(-), sottolineare (_) e più (+).
Nota:
Tutte queste caratteristiche e impostazioni, ad esempio il risparmio della batteria,
segnale di roger, occupato blocco del canale, compander, ecc. Supplementari
possono essere programmati con il software T-UP25.
Per le versioni commerciali (UHF-/VHF-COM), la potenza tx è impostato su software T-COM UP25.
5-TONE CHIAMATA SELETTIVA
Il TeCom-IPZ5 ha la funzione di 5-toni di chiamata selettiva con chiamata privata e
chiamata di gruppo, che si impostano tramite il software T-UP25.
Generali:
Ogni ricetrasmettitore può essere programmato con decodifica di uno dei 5-toni di
selettive e nove codifiche (1 per canale). E’ possibile entrare nei 5 codici di tono tramite tastiera.
Se la codifica trasmessa corrisponde alla decodifica programmata della radio, il ricevitore visualizza il codice ID, se viene attivato ANI, ed agisce in base alla programmazione; ad esempio l‘altoparlante si attiva, suona il campanello, una conferma
automatica viene inviata, ecc
Note:
Per propria funzionalità dei 5-toni di chiamata selettiva, il tasto multi funzione PF1/2
(10) o (11) deve essere programmato con la funzione opzionale Signal Call.
Trasmettendo una chiamata con uno dei 5-toni di selettive :
1. Premere il tasto multi-functionale (10) o (11) che è programmato con
Segnale Optionale .Il display mostrerà CALL?.
2. Selezionare uno dei nove 9 possibli codici dei 5-toni premendo il numero tasto
assegnato 1 - 9. Il codice sarà visibile su display.
2. Premere il tasto PTT (9).
CONNESSIONI
Il TeCom-IPZ5 è dotato di una connessione compatibile con
le radio Motorola
(3.5 / 2.5 mm - stereo / stereo) Per gli accessori consultate
il catalogo TEAM.
Page 26

Technische Daten / Specifications / Especificaciones / Caratteristiche
Frequenz Bereich / Frequency Range UHF: 400 - 470 MHZ
Rango de Frecuencia / Range di Frequenza VHF: 136 - 174 MHz
Betriebstemperatur / Working Temperate -20°C - +50°C
Temperatura Funcionamiento / Temperatura di Lavoro
Betriebsspannung / Operating Voltage DC 7.4V
Voltaje Funcionamiento / Voltaggio
Gewicht / Weight / Peso 243g
Antennen Impedanz / Antenna impedance 50 Ω
Impedancia de Antena / Antenna Impedenza
Sender / Transmitter / Transmisor / Transmissore
Frequenz Stabilität / Frequency Stability ±2.5PPM
Estabilidad Frecuencia / Stabilità di frequenza
Sendeleistung / Output Power UHF: max 4 W
Potencia RF Portadora / Potere dell'uscita VHF: max. 5 W
Max. Frequenz Hub / Max Frequency Deviation ≤ 2.5kHz (N)
Desviación Máx. Frecuencia / Deviazione ≤ 5kHz (W)
Audio Verzerrung / Audio Distortion ≤ 5%
Deformación Audio / Audio Distorsione
Nachbarkanalleistung / Adjacent Channel Power ≥ 65dB
Potencia de Canal Adyacent / Potere a canale adiacente
Nebenwellen-Abstrahlung / Radiated Harmonics -45dBm
Radiación Espuria / Spurie Radiation
Empfänger / Receiver Receptor / Ricezione
Empfindlichkeit / RF Sensitivity (SINAD) W: 0.224uV>12dB
Sensibilidad / Sensibilità N: 0.224uV>12dB
Audio Verzerrung / Audio Distortion ≤ 5%
Deformación Audio / Audio Distorsione
Nebenkanal Auswahl / Adjacent Channel Selectivity ≥ -8dB
Selección Canal Adyacente / Selettività a canale adiacente
Intermodulation / Intermodulation Rejection ≥ 55dB
Intermodulación / Intermodulazione
Nebenwellenabstrahlung / Spurious radiation ≥ 55dBm
Radiación Espuria / Spurie Radiation
50 51
50 CTCSS (Hz)
67.0 94.8 131.8 171.3 203.5
69.3 97.4 136.5 173.8 206.5
71.9 100.0 141.3 177.3 210.7
74.4 103.5 146.2 179.9 218.1
77.0 107.2 151.4 183.5 225.7
79.7 110.9 156.7 186.2 229.1
82.5 114.8 159.8 189.9 233.6
85.4 118.8 162.2 192.8 241.8
88.5 123.0 165.5 196.6 250.3
91.5 127.3 167.9 199.5 254.1
D023
D025
D026
D031
D032
D036
D043
D047
D051
D053
D054
D065
D071
D072
D073
D074
D114
D115
D116
D122
D125
D131
D132
D134
D143
D145
D152
D155
D156
D162
D165
D172
D174
D205
D212
D223
D225
D226
D243
D244
D245
D246
D251
D252
D255
D261
D263
D265
D266
D271
D274
D306
D311
D315
D325
D331
D332
D343
D346
D351
D356
D364
D365
D371
D411
D412
D413
D423
D431
D432
D445
D446
D452
D454
D455
D462
D464
D465
D466
D503
D506
D516
D523
D526
D532
D546
D565
D606
D612
D624
D627
D631
D632
D645
D654
D662
D664
D703
D712
D723
D731
D732
D734
D743
D754
210 DCS N/I
Page 27
Zum Vertrieb und Betrieb in
For sale and use in
Para venta y uso en
TeCom-IPZ5 FreeNet : DE
TeCom-IPZ5 PMR : AT, BG, CH, CY, CZ, DE, DK, EE, ES, FI, FR, GB, GR
HU, IE, IT, LT, LU, NL, NO, PL, PT, RO, SE, SI, SK
TeCom-IPZ5 UHF-COM : AT, BG, CH, CY, CZ, DE, DK, EE, ES, FI, FR, GB, GR,
HU, IE, IT*, LT, LU, NL, NO, PL, PT, RO, SE, SI, SK
TeCom-IPZ5 VHF-COM : AT, BG, CH, CY, CZ, DE, DK, EE, ES^, FI, FR, GB,
GR, HU, IE, IT*, LT, LU, NL, NO, PL, PT, RO, SE,
SI, SK
^ La banda de frecuencias VHF permitida en Espana es de 147 - 174 MHz
* In Italia il passo di canalizzazione a 25 kHz non è consentito
WEEE - Reg. Nr. DE 91930360 8 ( EAR ), 50635 ( ERA )
GRS-Nr. 10001374
DSD 2617305, ARA 2284
TEAM Electronic GmbH
Bolongarostrasse 88; D-65929 Frankfurt am Main, Germany phone
++49 / 69 / 300 950 0 - fax ++49 / 69 / 31 43 82
www.team-electronic.de - [email protected]
Irrtümer und technische Änderungen sind vorbehalten. / Mistakes and technical changes are reserved. (V 09-11)
 Loading...