

Team ScramTalk-808 User Manual

Bedienungsanleitung
Manual
Mode d’emploi
ScramTalk-808 manual 15.06.2004 12:54 Uhr Seite 1
2
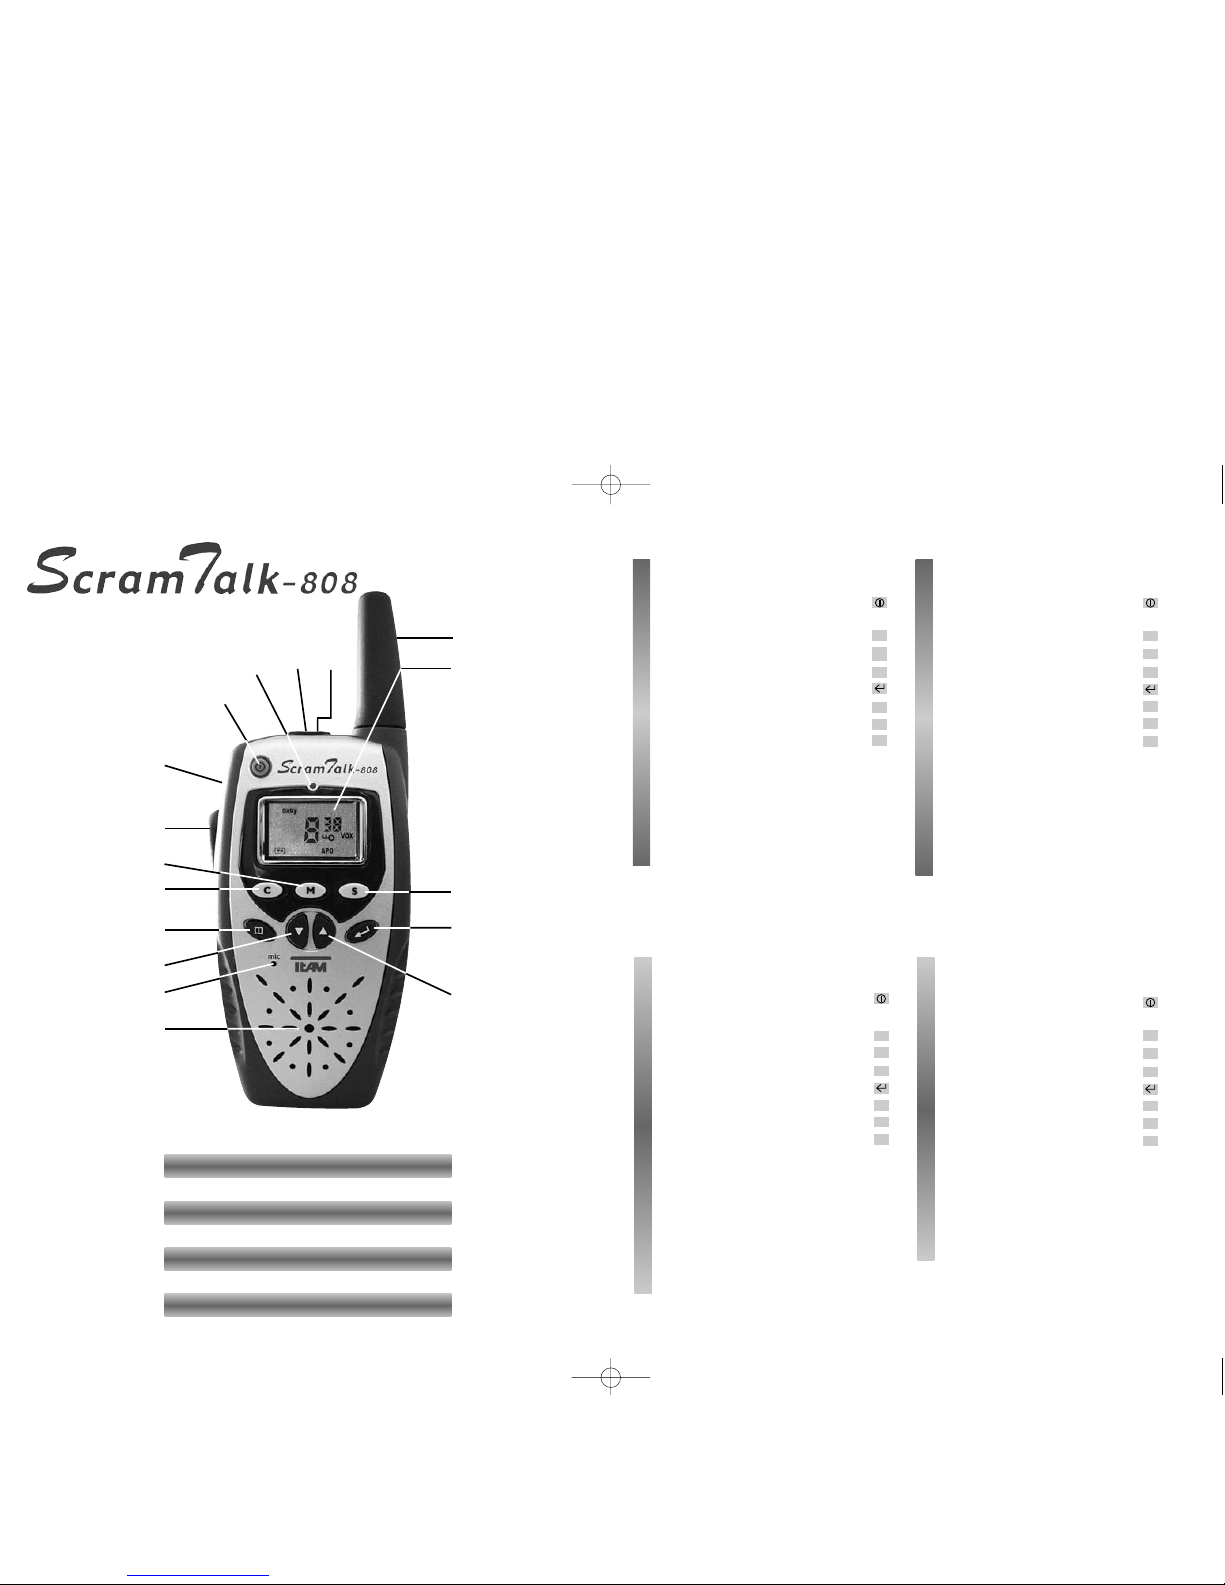
1.) Antenne
2.) Affichage LCD
3.) Touche Marche/Arrêt
4.) Touche d’emission PTT
5.) Touche Menu
6.) Touche vers le bas
7.) Touche vers le haut
8.) Touche d’entrée
9.) Touche d’appel
10.) Touche Monitor
11.) Touche recherche de canaux
12.) Microphone mic
13.) Haut-parleur
14.) Couvercle du
comartiment des piles
15.) Lampe témoin LED
à deux couleur
16.) Prise ø 3,5 mm SP./MIC
17.) Clip de ceinture
Français
▲
▲
C
M
Features
English
Fonctiones
1.) Antenna
2.) LC Display
3.) On/Off Key
4.) PTT Key
5.) Menu Key
6.) Down Key
7.) Up Key
8.) Enter Key
9.) Call Melody Key
10.) Monitor Key
11.) Scan Key
12.) Microphone mic
13.) Speaker
14.) Battery Compartment Lid
15.) Dual Color Indicator LED
16.) Jack Connector
ø 3,5 mm SP./MIC
17.) Belt Clip
▲
▲
C
M
S
S
1.) Antenne
2.) LCD-Anzeige
3.) Ein/Aus-Taste
4.) PTT-Taste
5.) Menü-Taste
6.) Abwärts-Taste
7.) Aufwärts-Taste
8.) Eingabe-Taste
9.) Rufmelodietaste
10.) Monitor-Taste
11.) Kanalsuchlauf-Taste
12.) Mikrofon mic
13.) Lautsprecher
14.) Batteriefachdeckel
15.) Zweifarben-Kontroll-LED
16.) Buchse ø 3,5 mm SP./MIC
17.) Gürtelclip
▲
▲
C
M
S
Deutsch
Funktionen
1.) Antenna
2.) Indicatore LCD
3.) Tasto Marcia/Arresto
4.) Tasto PTT
5.) Tasto Menu
6.) Tasto discendente
7.) Tasto crescente
8.) Tasto di conferma
9.) Tasto della suoneria
10.) Tasto Monitor
11.) Tasto della ricerca canale
12.) Microfono mic
13.) Altoparlante
14.) Coperchio del alloggio pile
15.) Spia LED a due colori
16.) Presa ø 3,5 mm SP./MIC
17.) Clip della cintura
Italiano
Funzioni
1
2
13
12
5
6
7
8
9
10
11
4
15
14
3
17
16
Deutsch Seite 4 - 17
English Page 18 - 30
Français Page 31 - 44
Italiano Pagina 45 - 58
▲
▲
C
M
S
3
ScramTalk-808 manual 15.06.2004 12:54 Uhr Seite 2
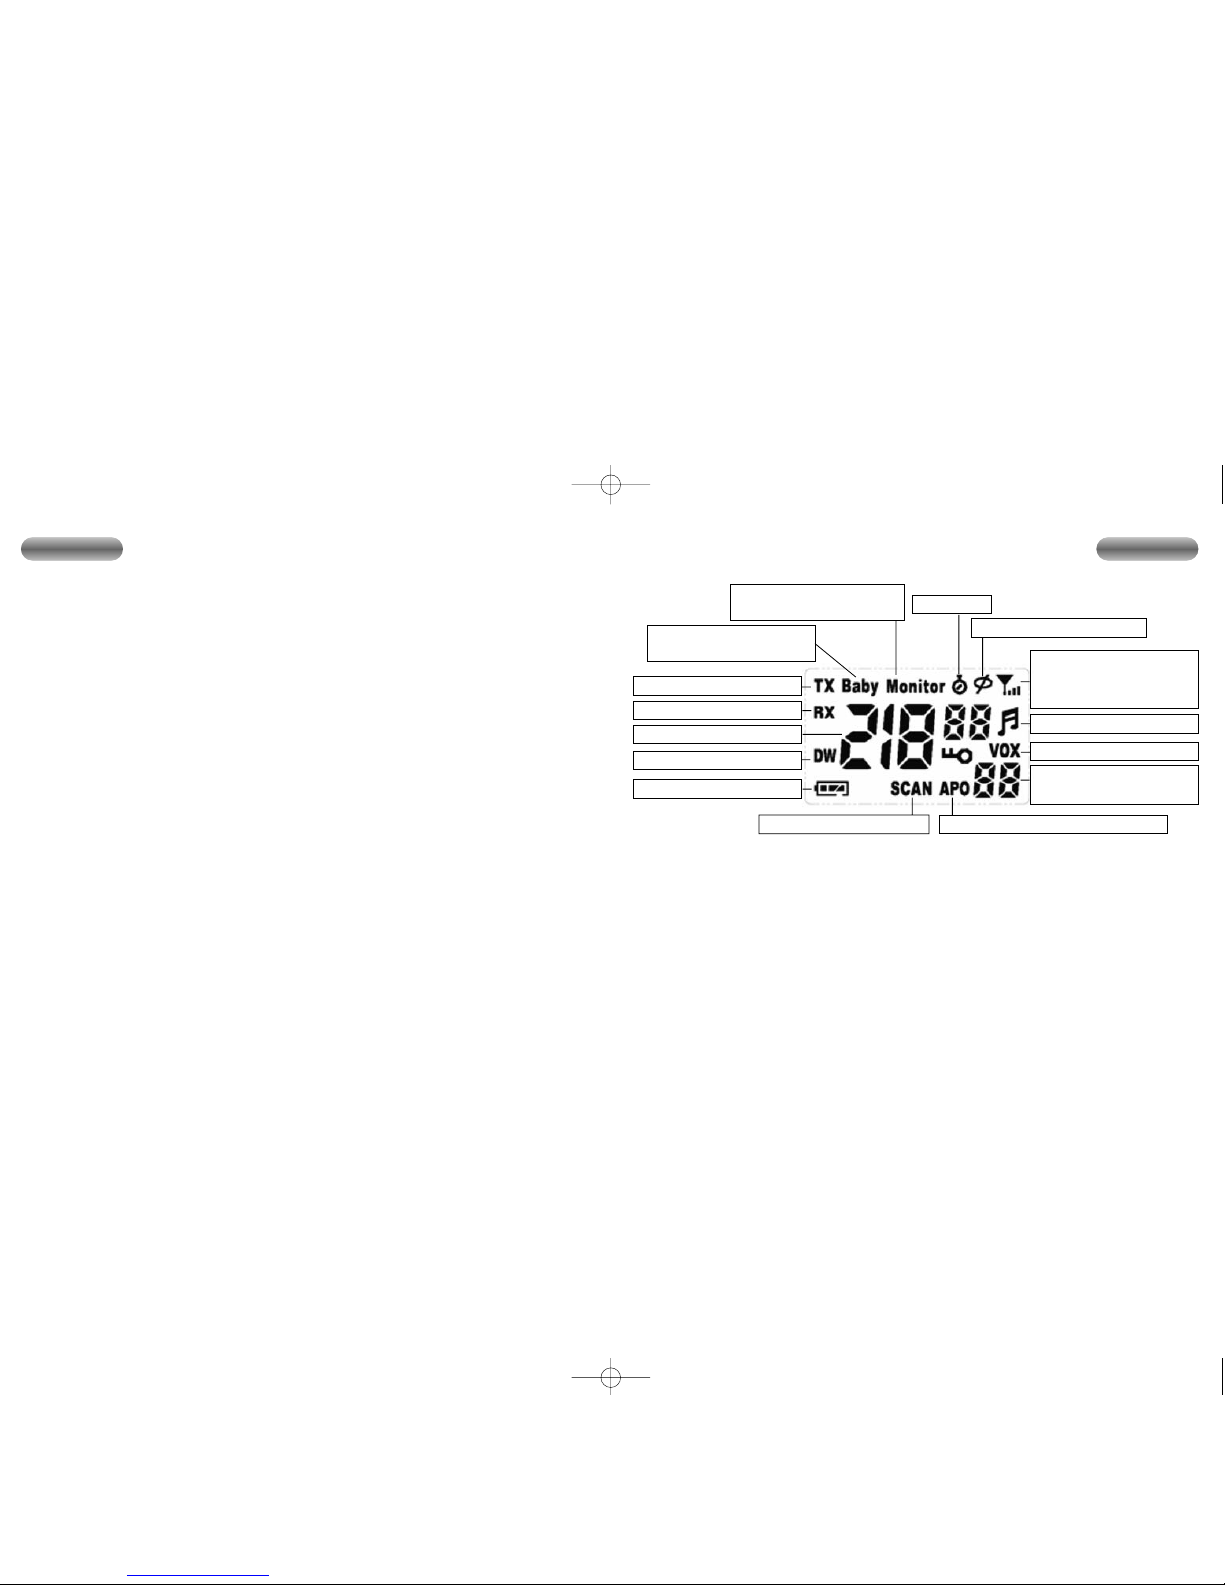
LC-Display
Page
Controls & Connectors 2 - 3
LC-Display .19
Setting up the TEAM TeCom-508
Removing and mounting of the belt clip 19
Inserting the batteries 19
Operation of the TEAM TeCom-508
I. Directly accessible functions
1) Switching On/Off 20
2) Battery level indicator 20
3) Volume level adjustment 20 - 21
4) Disabling the noise suppression 21
5) Voice transmission 21
6) Call melody transmission 21
7) LCD window illumination 22
8) Key lock function 22
9) Channel scan function 22
10) Socket for external accessory 22
11) Charging the accumlator pack with the charger 23
II. Menu-activated functions
1) Channel selection 23
2) CTCSS function 24
3) Scrambling function 24 - 25
4) Selection of the call melody 25
5) Monitoring function 25 - 26
6) Dual watch function 26 - 27
7) VOX function 27 - 28
8) Atomatic-Power-Off function 28
9) Stop-watch function 28 - 29
Additional Information
1) Safety 29
2) Service 29
3) Conformity 30
4) Technical Data 30
19
EnglishEnglish
Table of Contens
Unpack carefully your ScramTalk-808 package and check whether the supplied material matches with the items listed below. In case of loss or damage of a part contact
your carrier at once:
2 sets ScramTalk-808
2 accumulator packs
1 foldable double desktop charger
1 AC mains adaptor
1 multilingual operation manual
18
Battery indicator
Dual Watch function
Unit is transmitting
Squelch is open
Channel number indication
CTCSS tone code
number indication
VOX function
Internal reception of a
signal without detecting
a CTCSS code
Babysitter function on
the baby’s side
Call tone melody
Babysitter function on the
parent’s side
Stop watch
Scrambling function
Autmatic-Power-Off functionChannel scan function
Setting up the TEAM ScramTalk-808
1) Removing and mounting of the belt clip
To remove the belt clip, turn the rear panel toward you. The latch of the belt clip ( 17 ) is located near the headset socket SP./MIC ( 16 ). Pull the latch with your fingernail towards you and
hold it. Then, by pulling the belt clip towards the top of the antenna remove the belt clip ( 17 ).
T o insert the belt clip, push the notch of the clip into the notch on the rear panel of the unit. Then
push the clip towards the unit’s bottom side until the belt clip latches.
2) Inserting the batteries or the accumulator pack
Turn the unit that way that the rear panel lies in front of you. Remove the belt clip ( 17 ). The
locking of the battery compartment lid ( 14 ) is located at the bottom side of the unit. To open
the battery compartment you have to push the locking away from the lid and turn it down. Then
you can take the lid off.
Now insert 3 alkaline or rechargeable AAA( = Micro ) cells into the battery compartment according to the polarity signs inside. If you use rechargeable cells we recommend the NiMH type. If
you use one of the accumulator packs follow the instructions which are written on its back. Insert it in that way into the unit, that the label on the rear side remains visible, and the arrow “UP”
is pointing upwards. Please take also care that the plastic strip of the accumulator pack is
accessible. This simplifies a later removal of the accumulator pack.
To close the battery compartment put the lid ( 14 ) onto the compartment in that way that the
two guide bolts at the top of the lid grip into the corresponding guide holes at the top of the battery compartment.
Finally secure the lid by pushing the locking on it until it snaps in.
ScramTalk-808 manual 15.06.2004 12:55 Uhr Seite 18

Operation of the TEAM ScramTalk-808
I. Directly accessible functions
1) Switching the unit On/Off
Depress the On/Off key ( 3 ) for about 1 or 2 seconds to switch the transceiver on. You can
hear two short receipt tones from the loudspeaker ( 13 ). For the period of the tones the display
( 2 ) shows all symbols. Now the unit is in receive mode and basic mode. The display ( 2 ) shows
the channel number and its corresponding CTCSS code, as well as various symbols indicating
the state of certain functions.
To switch the unit off depress the On/Off key ( 3 ) again for about 1 or 2 seconds. The loudspeaker gives a long high tone and all symbols disappear from the display. The last settings
remain memorized. The unit is off now.
2) Battery level indicator
The battery symbol on the lower left side in the display shows the battery level. As long as
all three bars are visible inside the symbol, the batteries are still strong enough. If the supply
voltage drops below 3.6 V, the left bar disappears. If the supply voltage drops below 3.5 V, the
middle bar disappears. If the supply voltage drops below 3.4 V, the last bar disappears also. If
the supply voltage drops below 3.3 V, you will hear in the loudspeaker ( 13 ) every 15 seconds
three warning tones. That means that you have to change or charge the batteries. At supply voltages below 2.8 V the display will show for one second the writing ( =BA LO = battery low )
with a flashing empty battery symbol outline, and then the unit switches itself automatically off
immediately afterwards.
The current consumption in TX mode amounts to 250 mA. In RX stand-by mode without reception of a signal it is 40 mA. For this end the ScramTalk-808 is equipped with a battery save function. This function starts to work under the following conditions:
a) The functions channel scan and dual watch must be out of order.
b) For at least 5 seconds no signal is allowed to reach the receiver on the actual channel, no
key is pressed and no transmission occurs.
While this function is active the unit checks the actual channel for incoming signals in regular
intervals. The average current consumption in the power down mode drops down to 10 mA. On
receiving of a signal or pressing any key the power save mode switches itself off again.
But if you don’t use the unit it is better to switch it off. Another possibility is the use of the automatic-power-off-function ( APO function ) which generates a total shut-off after a predefined
time. In switched-off mode the current consumption is reduced to 140 µA.
If you won’t use the unit for a extended period, we recommend to take the batteries or the accumulator pack out of the battery compartment.
3) Volume level adjustment
To enter the volume adjustment mode from the basic mode you must press the up key ▲ ( 7 )
or the down key ▼ ( 6 ) first. The display will build up the writing ( = VOL) out of the channel number display 218 and the CTCSS number display 88 for 0.5 seconds. Then the display
shows for 6 seconds only the channel number, the CTCSS code number, the battery symbol
and a flashing digit on the lower right side. During this time the unit is in volume level adjustment mode. The flashing digit indicates the currently adjusted volume level. The higher the
value of the number is, the higher is the volume level. The amendment is only possible as long
as the digit flashes.
20
Press the up key ▲ ( 7 ) to increase the volume level adjustment for one step.
Press the down key ▼ ( 6 ) to decrease the volume level adjustment for one step.
Pressing the keys for one second will make the volume level adjustment change quickly.
The volume level of the confirmation tones depends from the currently adjusted volume level.
At the end of the adjustment range you will hear a ringing signal tone.
If you don’t press any of the up/down keys ( 7 ) and ( 6 ) for at least 6 s, the unit returns automatically to the basic mode with the new setting and a ringing signal tone.
If you press the enter key ( 8 ), the unit switches immediately back to the basic mode with
the new setting and a signal tone.
The up/down keys ( 7 ) and ( 6 ) are without effect if the key lock function is active.
4) Disabling the noise suppression
The unit is always in receive mode as long as it is not in transmit mode. If there is no signal on
the actual channel, the receiver would produce much noise in the loudspeaker ( 13 ). Therefore
the unit is equipped with a circuit ( squelch ) that mutes the receiver if there is no station on the
actual channel. Any incoming signal will open the squelch at once while the busy symbol
appears in the display. Normally you can hear the station in the loudspeaker now. In addition there is another type of squelch which opens only when the counter station adds to its signal a correct CTCSS tone. But this CTCSS squelch is only working, if the CTCSS function is
active. In the case where the squelch lets signals pass, the symbol RX appears also in the display and the dual colour indicator LED ( 15 ) lights up green. The squelch function can be disabled to hear also those stations which are too weak to make the squelch open by themselves
or other stations with a wrong CTCSS tone ( monitor function ). See also the chapter “CTCSS
function” for more information.
Depress shortly the monitor key M ( 10 ). Now the noise suppression is shut off. In the display
appears the symbol RX. If there is no station on the actual channel you hear a noise in the speaker or the message if the channel is occupied. 15 s later the squelch function switches itself
automatically on again. To reactivate the squelch function at once depress the monitor key M
( 10 ) again.
5) Voice transmission
Before transmitting you have to hear whether the actual channel is free. Use also the monitor
key M ( 10 ). Don’t send on occupied channels. To transmit depress and hold the PTT key ( 4 ).
During transmission the dual colour indicator TX ( 15 ) lights up red and the symbol TX appears
in the display. No key entry is possible. Hold the unit upright. The sensitivity of the built-in microphone mic ( 12 ) has been set to give good results speaking normally at a distance of 2 - 3
inches. Speaking too loudly will cause distortions and make the signal difficult to understand.
Your message will be sent out with the actual CTCSS and scrambler settings. On completion of
the transmission release the PTT key ( 4 ) and the set will revert to receiving mode.
Note: Radio contact is only possible with stations which work on the actual channel. In case of
CTCSS operation the CTCSS code number must match also. See also the chapters “Channel
selection” and “CTCSS function” for more information.
6) Call melody transmission
By pressing the call melody key C ( 9 ) you can transmit the actual call melody with the actual
CTCSS and scrambler settings one time. It is also audible in the internal loudspeaker ( 13 ). All
stations in the neighbourhood which are on the same channel will hear it. During transmission
the dual colour indicator TX ( 15 ) lights up red and the symbols TX and appear in the display. No voice transmission is possible while the call melody is sent out.
Afterwards the unit switches back to receive mode.
21
English English
ScramTalk-808 manual 15.06.2004 12:55 Uhr Seite 20
 Loading...