

Page 1
Generated by Unregistered Batch DOC TO PDF Converter
Fax +32 2 359 95 50
Reiskocher
Rice cooker
Cuiseur à riz
Rijstkoker
Arrocera eléctrica
Cozedor de arroz
Cuoci riso
I/B Version
060620
TEAM RK 2
230 V~ 700 W
2011.3.804.1511, please register!
Copies of the I/B. Please reproduce them without any
changes except under special instruction from Team
International BELGIUM. The pages must be reproduced
and folded in order to obtain a booklet A5 (+/- 148.5 mm
width x 210 mm height). When folding, make sure you
keep the good numbering when you turn the pages of
the I/B. Don’t change the page numbering. Keep the
language integrity.
Front cover page (first page)
Assembly page 1/28
Page 2
Copies of the I/B. Please reproduce them without any
Fax +32 2 359 95 50
changes except under special instruction from Team
International BELGIUM. The pages must be reproduced
and folded in order to obtain a booklet A5 (+/- 148.5 mm
width x 210 mm height). When folding, make sure you
keep the good numbering when you turn the pages of
the I/B. Don’t change the page numbering. Keep the
language integrity.
2 TEAM RK 2- 060620
Assembly page 2/28
Page 3

Copies of the I/B. Please reproduce them without any
Fax +32 2 359 95 50
changes except under special instruction from Team
International BELGIUM. The pages must be reproduced
and folded in order to obtain a booklet A5 (+/- 148.5 mm
width x 210 mm height). When folding, make sure you
keep the good numbering when you turn the pages of
the I/B. Don’t change the page numbering. Keep the
language integrity.
D
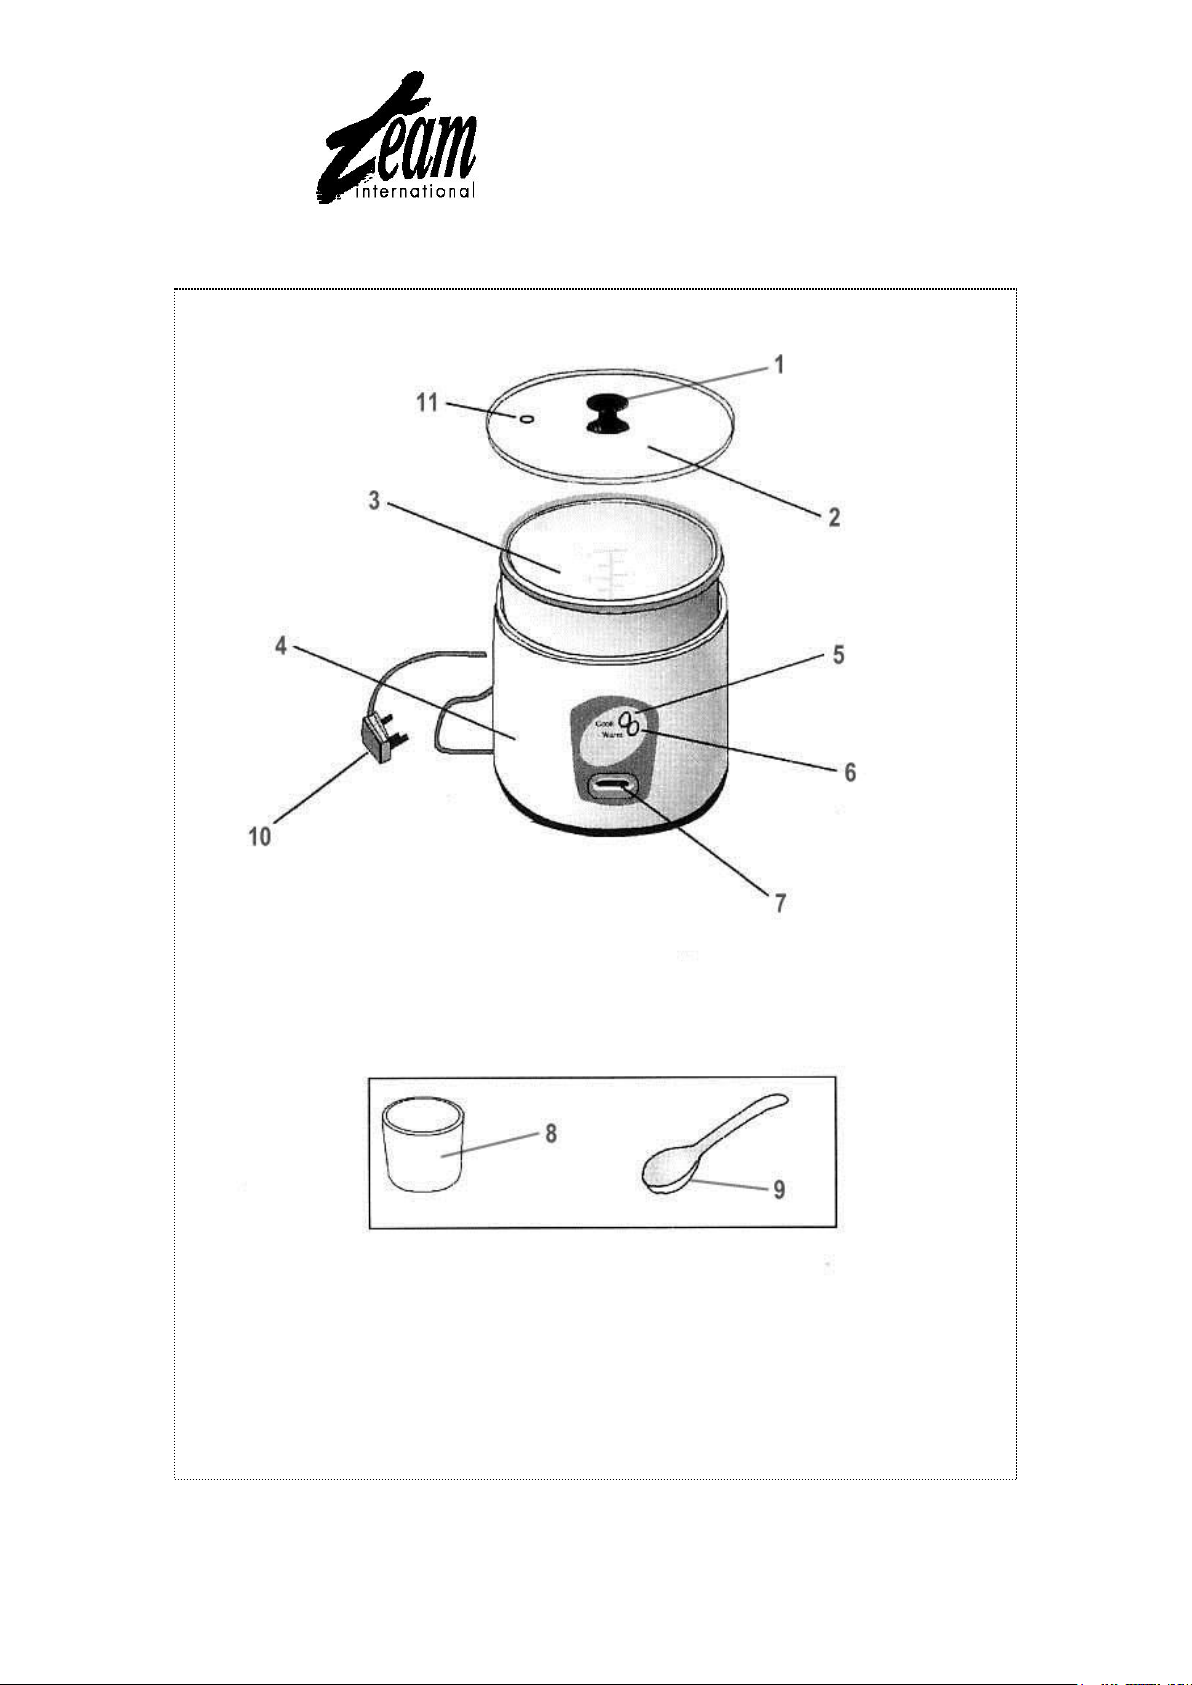
1. Griff des Deckels
2. Glasdeckel
3. Behälter
4. Gehäuse
5. Kontrollleuchte zum Kochen (COOK)
6. Kontrollleuchte zum Warmhalten
(WARM)
7. Einschalter
8. Messbecher
9. Löffel
10. Anschlussleitung
11. Dampfaustrittöffnung
GB
1. Handle of the lid
2. Glass lid
3. Cooking bowl
4. Main body
5. Cook indicator light
6. Warm indicator light
7. Switch
8. Measuring cup
9. Serving scoop
10. Power cord
11. Steam vent
FR
1. Poignée du couvercle
2. Couvercle de verre
3. Récipient de cuisson
4. Corps de l’appareil
5. Témoin lumineux de cuisson (COOK)
6. Témoin lumineux de maintien au
chaud (WARM)
7. Interrupteur
8. Gobelet doseur
9. Cuillère
10. Cordon
11. Orifice de sortie de vapeur
NL
1. Handvat van het deksel
2. Deksel
3. Kuip
4. Behuizing
5. Controlelampje voor het koken
(COOK)
6. Controlelampje voor de
warmhoudfunctie (WARM)
7. Aanschakelaar
8. Maatbeker
9. Lepel
10. Snoer
11. Stoomuitlaatopening
SP
1. Asa de la tapa
2. Tapa de vidrio
3. Recipiente de cocción
4. Cuerpo del aparato
5. Indicador de cocción(COOK)
6. Testigo luminoso de mantener el arroz
caliente (WARM)
7. Interruptor
8. Taza medidora
9. Cucharón
10. Cable eléctrico
11. Orificio de vapor
P
1. Pega da tampa
2. Tampa de vidro
3. Recipiente da cozedura
4. Corpo do aparelho
5. Sinalizador luminoso da cozedura
(COOK)
6. Sinalizador luminoso de manutenção
do aquecimento (WARM)
7. Interruptor
8. Taça medidora
9. Colher
10. Cabo
11. Orifício para a saída do vapor
I
1. Maniglia del coperchio
2. Coperchio di vetro
3. Recipiente di cottura
4. Corpo dell’apparecchio
5. Spia luminosa di cottura (COOK)
6. Spia luminosa di mantenimento del
riso caldo (WARM)
7. Interruttore
8. Tazza di misura
9. Cucchiaio
10. Cavo elettrico
11. Valvola per il vapore
3 TEAM RK 2- 060620
Assembly page 3/28
Page 4
Copies of the I/B. Please reproduce them without any
Fax +32 2 359 95 50
changes except under special instruction from Team
International BELGIUM. The pages must be reproduced
and folded in order to obtain a booklet A5 (+/- 148.5 mm
width x 210 mm height). When folding, make sure you
keep the good numbering when you turn the pages of
the I/B. Don’t change the page numbering. Keep the
language integrity.
WICHTIGE SICHERHEITSVORSCHRIFTEN
Lesen Sie aufmerksam die Gebrauchsanleitung bevor Sie Ihr Gerät benutzen.
Kontrollieren Sie, ob die Netzspannung mit der auf dem Typenschild des Gerätes
vermerkten Spannung übereinstimmt bevor Sie Ihr Gerät benutzen.
Lassen Sie Ihr Gerät niemals unter Spannung oder bei Gebrauch unbeaufsichtigt. Halten
Sie Kinder oder hilfsbedürftige Personen vom Gerät fern.
Überprüfen Sie regelmäßig, dass das Gerät nicht beschädigt ist. Bei Beschädigung der
Anschlussleitung oder des Gerätes, letzteres nicht benutzen, sondern von einem
Fachmann (*) überprüfen bzw. reparieren lassen. Eine beschädigte Anschlussleitung muss
von einem Fachmann (*) ausgewechselt werden.
Benutzen Sie das Gerät nur zu Haushaltszwecken, wie in der Bedienungsanleitung
angegeben.
Tauchen Sie das Motorgehäuse Ihres Gerätes niemals in Wasser oder andere Flüssigkeiten,
weder zum Reinigen, noch zu einem anderen Zweck. Geben Sie niemals ein Teil Ihres
Gerätes in die Spülmaschine.
Benutzen Sie das Gerät nicht in der Nähe einer Wärmequelle.
Entfernen Sie unbedingt den Stecker aus der Steckdose wenn das Gerät nicht benutzt
wird, vor Allem wenn Sie das Gerät unbeaufsichtigt lassen oder wenn Sie Teile aufsetzen
oder abnehmen oder wenn Sie das Gerät reinigen.
Benutzen Sie das Gerät nicht im Freien und bewahren Sie es an einem trockenen Platz auf.
Benutzen Sie nur Zubehör, welches vom Lieferanten empfohlen wurde. Anderes Zubehör
stellt eine Gefahr für den Benutzer dar und das Gerät könnte dadurch beschädigt
werden.
Ziehen Sie niemals an der Anschlussleitung, um das Gerät zu bewegen. Achten Sie
darauf, dass die Anschlussleitung nicht irgendwo hängen bleibt und dies zum Fall des
Gerätes führen könnte. Wickeln Sie die Anschlussleitung nicht um das Gerät oder knicken
Sie diese nicht.
Stellen Sie das Gerät auf einen Tisch oder auf eine ebene Fläche damit es nicht umfällt.
Bereiten Sie nur Reis in diesem Gerät.
Sie sollten den Behälter des Gerätes sauber halten, da dieser in direktem Kontakt mit dem
Reis ist.
Benutzen Sie das Gerät niemals ohne den Behälter.
Während des Gebrauchs können zugängliche Teile des Gerätes eine sehr hohe
Temperatur erreichen. Berühren Sie diese heißen Teile nicht. Benutzen Sie Topflappen um
das Gerät zu verstellen.
Achten Sie darauf, dass die Anschlussleitung nicht mit den heißen Teilen des Gerätes in
Kontakt kommt.
Vergewissern Sie sich, dass das Gerät nicht mit heißen Flächen in Berührung kommt.
Nehmen Sie den Deckel mit Vorsicht ab um Spritze vorzubeugen, und um zu vermeiden,
dass das Wasser überläuft.
Stecken Sie immer zuerst das Ende der Anschlussleitung ins Gerät, und dann erst den
Stecker in die Steckdose. Um das Gerät auszuschalten, ziehen Sie den Stecker aus der
Steckdose. Vergessen Sie niemals den Stecker nach dem Gebrauch aus der Steckdose zu
ziehen.
Stecken Sie den Stecker niemals in die Steckdose und ziehen Sie ihn niemals aus der
Steckdose mit nassen Händen.
(*)
Fachmann: anerkannter Kundendienst des Lieferanten oder des Importeurs, der für derartige
Reparaturen zuständig ist. Für eventuelle Reparaturen wenden Sie sich bitte an diesen
Kundendienst.
4 TEAM RK 2- 060620
Assembly page 4/28
Page 5

Copies of the I/B. Please reproduce them without any
Fax +32 2 359 95 50
changes except under special instruction from Team
International BELGIUM. The pages must be reproduced
and folded in order to obtain a booklet A5 (+/- 148.5 mm
width x 210 mm height). When folding, make sure you
keep the good numbering when you turn the pages of
the I/B. Don’t change the page numbering. Keep the
language integrity.
GEBRAUCH
1. Bevor Sie das Gerät zum ersten Mal benutzen, reinigen Sie den Behälter, den Löffel und
den Messbecher mit lauwarmem Seifenwasser. Spülen Sie und trocknen Sie diese Teile
sorgfältig ab.
2. Stellen Sie das Gerät und den abnehmbaren Behälter auf eine ebene, stabile Fläche.
3. Vergewissern Sie sich, dass das Gerät vom Netz getrennt ist.
4. Sie können mehrere Sorten Reis benutzen, wie z.B. Basmati, Risotto oder langkörnigen Reis
usw.
5. Messen Sie die gewünschte Menge Reis mit dem Messbecher. Fügen Sie butter, Öl oder
Kräuter nach Wunsch hinzu. Achtung: um das Risiko auf elektrische Schläge vorzubeugen,
kochen Sie nur im herausnehmbaren Behälter.
6. Geben Sie den Reis in den Behälter. Fügen Sie Wasser hinzu. Beobachten Sie die
Standsanzeige im Behälter um Wasser bis zum richtigen Wasserstand zu addieren. Zum
Beispiel: für 4 Tassen ungekochten Reises, gießen Sie Wasser bis zu Stand 4. Die
Weichheit/Härte wird je nach der Menge, dem Reistypen und der Kochzeit variieren. Um
den Reis weicher zu machen, fügen Sie Wasser hinzu. Um härteren Reis zu bekommen,
fügen Sie weniger Wasser hinzu.
7. Vergewissern Sie sich, dass die Außenseite des herausnehmbaren Behälters und das
Heizelement sauber und trocken sind, bevor Sie den Behälter in den Reiskocher stellen.
Lassen Sie keine Reiskörner oder andere Partikel ins Gerät fallen.
8. Stellen Sie den Behälter in den Reiskocher. Sie dürften den Behälter nach links oder nach
rechts drehen müssen, um sich zu vergewissern, dass er gut mit dem Heizelement in
Kontakt kommt.
9. Schließen Sie den Deckel. Lassen Sie den Deckel immer geschlossen wenn das Gerät in
Betrieb ist.
10. Stecken Sie den Stecker in die Steckdose. Die WARM-Kontrollleuchte geht an.
11. Senken Sie den Schalter. Die COOK-Kontrollleuchte geht an und der Kochvorgang fängt
an. Während der Reis schwellt und kocht, kommt Dampf aus der Ventilationsöffnung des
Deckels heraus. Achtung: stellen Sie Ihre Hände niemals auf die Ventilationsöffnung, da Sie
sich am Dampf verbrennen könnten.
12. Wenn der Reis gekocht ist, verstellt sich der Schalter automatisch zur Warmhaltefunktion.
Die WARM-Kontrollleuchte geht an, um anzudeuten, dass das Gerät die gewünschte
Temperatur behält. Das Gerät bleibt auf Warmhaltestand solange Sie den Stecker nicht
aus der Steckdose gezogen haben um den Reis warmzuhalten.
13. Wenn Sie den Reis aber länger als 30 Minuten nach Ablauf der Kochzeit im Gerät lassen,
rühren Sie regelmäßig um zu vermeiden, dass die untere Schicht anbrennt.
14. Entfernen Sie den Deckel und verbreiten Sie den Reis bevor Sie ihn servieren. Achtung:
Wenn Sie den Deckel hochheben, kommen Sie nicht zu nah ans Gerät, da heißer Dampf
herauskommen könnte.
15. Ziehen Sie den Stecker aus der Steckdose wenn das Gerät nicht mehr benutzt wird.
BEMERKUNGEN
Reinigen Sie den gemessenen Reis in einem separatem Behälter wenn Sie wünschen.
Um weicheren Reis zu erzielen, mischen Sie ungekochten Reis mit Wasser im
herausnehmbaren Behälter während etwa 10 bis 20 Minuten vor dem Kochvorgang.
5 TEAM RK 2- 060620
Assembly page 5/28
Page 6

Copies of the I/B. Please reproduce them without any
Fax +32 2 359 95 50
changes except under special instruction from Team
International BELGIUM. The pages must be reproduced
and folded in order to obtain a booklet A5 (+/- 148.5 mm
width x 210 mm height). When folding, make sure you
keep the good numbering when you turn the pages of
the I/B. Don’t change the page numbering. Keep the
language integrity.
UM REIS WIEDER AUFZUWÄRMEN
Um Reis wieder aufzuwärmen, fügen Sie ½ Messbecher Wasser pro Messbecher Reis, mischen
Sie und drücken Sie den Schalter bis zur COOK-Stellung. Wenn der Reis gekocht ist, schaltet das
Gerät automatisch zur WARM-Funktion.
REINIGUNG UND PFLEGE
Reinigen Sie das Gerät vor jedem Gebrauch.
Ziehen Sie den Stecker aus der Steckdose und lassen Sie das Gerät abkühlen, bevor Sie es
reinigen.
Tauchen Sie das Gerät niemals in Wasser oder andere Flüssigkeiten.
Reinigen Sie den herausnehmbaren Behälter, den Deckel und den Löffel mit lauwarmem
Wasser. Wenn Reiskörner am Boden des Behälters kleben, machen Sie diese nass um diese
zu lockern. Benutzen Sie niemals Scheuermittel oder Topfkrasser, da diese die
Antihaftbeschichtung beschädigen könnten, und den Kontakt mit dem Heizelement
stören könnten.
Um die Innen- und Außenseite des Gerätes zu reinigen, benutzen Sie ein feuchtes Tuch
und trocknen Sie alle Teile gut ab.
WICHTIGE HINWEISE
Benutzen Sie die Warmhaltefunktion nicht zu lange für kleine Mengen.
Während des Kochvorganges könnte eine feine Reisschicht am Boden des Behälters
kleben. Wenn Sie diese Kruste nicht mögen, können Sie diese leicht vom
antihaftbeschichteten Behälter entfernen und wegwerfen.
Benutzen Sie den Plastiklöffel (oder einen Holzlöffel) um den Reis zu verbreiten oder zu
entfernen. Benutzen Sie keine Metallgegenstände, da diese die Antihaftbeschichtung
beschädigen würden.
UMWELTSCHUTZ – RICHTLINIE 2002/96/EG
Zum Schutz unserer Umwelt und unserer Gesundheit sind Elektro- und Elektronik-Altgeräte nach
bestimmten Regeln zu entsorgen. Dies fordert den Einsatz sowohl des Herstellers bzw.
Lieferanten als auch des Verbrauchers.
Aus diesem Grund darf dieses Gerät, wie das Symbol auf dem Typenschild bzw. auf der
Verpackung zeigt, nicht in den unsortierten Restmüll gegeben werden. Der Verbraucher hat
das Recht, dieses Gerät über kommunale Sammelstellen zu entsorgen; von dort aus wird die
spezifische Behandlung, Verwertung bzw. das Recycling gem. den Erfordernissen der Richtlinie
sichergestellt.
6 TEAM RK 2- 060620
Assembly page 6/28
Page 7
Copies of the I/B. Please reproduce them without any
Fax +32 2 359 95 50
changes except under special instruction from Team
International BELGIUM. The pages must be reproduced
and folded in order to obtain a booklet A5 (+/- 148.5 mm
width x 210 mm height). When folding, make sure you
keep the good numbering when you turn the pages of
the I/B. Don’t change the page numbering. Keep the
language integrity.
IMPORTANT SAFEGUARDS
Please read these instructions carefully before using the appliance.
Check that your mains voltage corresponds to that stated on the rating plate of the
appliance before using the appliance.
Never leave the appliance unsupervised when in use. Keep out of reach of children or
incompetent persons.
From time to time check the appliance for damages. Never use the appliance if cord or
appliance shows any signs of damage but have it checked and repaired by a competent
qualified service
qualified service (*)
Only use the appliance for domestic purposes and in the way indicated in these
instructions.
Never immerse the appliance in water or any other liquid for any reason whatsoever.
Never place it into the dishwasher.
Never use the appliance near hot surfaces.
Always unplug the appliance from the power supply when it is not in use, especially if you
leave the appliance unsupervised or if you assemble or disassemble it or before cleaning
it.
Never use the appliance outside and always place it in a dry environment.
Never use accessories that are not recommended by the producer. They could constitute
a danger to the user and risk to damage the appliance.
Never move the appliance by pulling the cord. Make sure the cord cannot get caught in
any way. Do not wind the cord around the appliance and do not bend it.
Stand the appliance on a table or flat surface.
Only cook rice in this appliance. This appliance is not suitable for other food.
It is absolutely necessary to keep the removable cooking bowl clean at all times as it
comes into contact with rice.
Make sure the cord never comes into contact with the hot parts of the appliance
The temperature of the accessible surfaces may be very high when the appliance is in
use. Make sure not to touch these hot parts of the appliance but use the handles. Use
potholders when removing the cover or handling hot containers.
Make sure the cord does not come into contact with the hot parts of the appliance.
Lift and open the lid carefully to avoid scalding and allow water to drip into the rice
cooker.
Plug the cord into the electrical socket. To disconnect the appliance, remove the plug
from the power outlet. Never forget to unplug the appliance when it is not in use.
Never plug or unplug the appliance with wet hands.
(*)
Competent qualified electrician : after sales department of the producer or importer or any
person who is qualified, approved and competent to perform this kind of repairs in order to
avoid all danger. In any case you should return the appliance to this electrician.
(*)
. Should the cord be damaged, it must be replaced by a competent
7 TEAM RK 2- 060620
Assembly page 7/28
Page 8

Copies of the I/B. Please reproduce them without any
Fax +32 2 359 95 50
changes except under special instruction from Team
International BELGIUM. The pages must be reproduced
and folded in order to obtain a booklet A5 (+/- 148.5 mm
width x 210 mm height). When folding, make sure you
keep the good numbering when you turn the pages of
the I/B. Don’t change the page numbering. Keep the
language integrity.
USE
1. Before using for the first time, clean the removable cooking bowl, serving scoop and
measuring cup in soapy water. Rinse and dry them carefully.
2. Put the rice cooker and its removable bowl on a flat stable surface.
3. Make sure the appliance is unplugged.
4. You may use many varieties of rice including basmati, brown rice, long grain rice etc.
5. Measure the raw rice amount with the measuring cup provided. Add the desired amount
of butter, oil or seasonings. Caution: To reduce the risk of electric shock, cook only in the
removable cooking bowl provided.
6. Pour the rice in the cooking bowl. Add water. Use the water-level markings inside the
cooking bowl as a guide for adding the exact amount of water. For example, for 4 cups of
uncooked rice, fill with water to water-level marking 4. Note: Taste / hardness will vary
depending on the quality / type of rice and length of time it is cooked. For softer, fluffier
rice, add a little more water. For firmer, crunchier rice, add a little less water.
7. Before placing the cooking bowl into the rice cooker, make sure the heating plate and
outside surface of the cooking bowl are clean and dry. Do not let loose rice or particles
fall into the rice cooker.
8. Insert cooking bowl into the rice cooker. You might have to turn it slightly to the left and
right to ensure proper contact with the heating plate.
9. Place the lid on the rice cooker. Always keep the lid on the rice cooker while cooking.
10. Plug the appliance into an electrical outlet. The WARM light comes on.
11. Push down the switch. The COOK light comes on and cooking begins. As the rice expands
and cooks, steam comes out through the steam vent on the lid. Caution: Keep your face
and hands away from the steam vent as you may get burned with the hot steam.
12. Once rice is cooked, the switch pops up and the rice cooker automatically switches to
the keep warm function. The WARM light comes on and stays on, indicating serving
temperature is maintained. The unit stays in the keep warm cycle until it is unplugged.
13. If holding rice for longer than 30 minutes, stir occasionally to prevent browning of rice on
the bottom of cooking bowl.
14. Remove the lid and stir the rice before serving. Caution: When removing the lid, lift away
from your body as you may get burned with the hot steam.
15. Unplug the unit when finished.
NOTES:
Wash measured rice in a separate bowl if desired.
For softer rice, prepare rice and water in the inner pot and let soak for 10-20 minutes
before cooking.
CLEANING AND CARE
Clean the appliance after each use.
Always unplug the appliance and let it cool down before cleaning.
Never immerse it in water or any other liquid.
Wash the cooking bowl, lid, serving scoop and measuring cup in warm, soapy water. If
crusty rice sticks to the bottom of the cooking bowl, soak it to loosen rice. Do not use
abrasive cleaners or metal scouring pads—they may scratch the non-stick surface and
could result in poor contact with the heating plate.
Clean the unit by wiping the inside and outside surfaces with a damp soapy cloth and
drying thoroughly.
8 TEAM RK 2- 060620
Assembly page 8/28
Page 9

Copies of the I/B. Please reproduce them without any
Fax +32 2 359 95 50
changes except under special instruction from Team
International BELGIUM. The pages must be reproduced
and folded in order to obtain a booklet A5 (+/- 148.5 mm
width x 210 mm height). When folding, make sure you
keep the good numbering when you turn the pages of
the I/B. Don’t change the page numbering. Keep the
language integrity.
IMPORTANT TIPS:
Do not keep small amounts of rice in the keep warm cycle for extended periods of time.
During cooking, a thin crust may develop on the rice at the bottom of the bowl. If you do
not like rice with crust, you can easily peel it off from the non-stick cooking bowl and throw
it away.
Use the plastic serving scoop (or a wooden spoon) to stir and remove rice. Do not use
metal utensils that can scratch the non-stick cooking bowl.
PROTECTION OF THE ENVIRONMENT– DIRECTIVE 2002/96/EC
In order to preserve our environment and protect human health, the waste electrical and
electronic equipment should be disposed of in accordance with specific rules with the
implication of both suppliers and users. For this reason, as indicated by the symbol on the
rating label or on the packaging, your appliance should not be disposed of as unsorted
municipal waste. The user has the right to bring it to a municipal collection point performing
waste recovery by means of reuse, recycling or use for other applications in accordance with
the directive.
9 TEAM RK 2- 060620
Assembly page 9/28
Page 10
Copies of the I/B. Please reproduce them without any
Fax +32 2 359 95 50
changes except under special instruction from Team
International BELGIUM. The pages must be reproduced
and folded in order to obtain a booklet A5 (+/- 148.5 mm
width x 210 mm height). When folding, make sure you
keep the good numbering when you turn the pages of
the I/B. Don’t change the page numbering. Keep the
language integrity.
POUR VOTRE SÉCURITÉ
Lisez attentivement la notice avant l’utilisation de votre appareil.
Avant d'utiliser l'appareil, vérifiez que la tension du réseau correspond bien à celle
indiquée sur sa plaque signalétique.
Ne laissez jamais votre appareil sans surveillance lorsque celui-ci est sous tension ou en
fonctionnement. Ne le laissez ni à la portée des enfants ni à la portée de personnes non
responsables.
Vérifiez régulièrement l’état de votre appareil et s’il est endommagé de quelque façon que
ce soit, ne l'utilisez pas mais faites-le vérifier et réparer par un service qualifié compétent(*). Si
le cordon d’alimentation est endommagé, il doit être obligatoirement remplacé par un
service qualifié compétent(*).
Utilisez l'appareil uniquement pour des usages domestiques et de la manière indiquée
dans la notice.
Ne plongez jamais l'appareil dans l'eau ou dans tout autre liquide ni pour son nettoyage ni
pour toute autre raison. Ne le mettez jamais dans le lave-vaisselle.
N'utilisez pas l'appareil près de sources de chaleur.
L’appareil doit obligatoirement être débranché et refroidi avant de le nettoyer, de le
ranger, de retirer les accessoires, et plus généralement lorsqu’il n’est plus en utilisation.
Veillez à ne pas utiliser l'appareil à l'extérieur et entreposez-le dans un endroit sec.
N’utilisez pas d’accessoires non recommandés par le fabricant, cela peut présenter un
danger pour l’utilisateur et risque d’endommager l’appareil.
Ne déplacez jamais l’appareil en tirant sur le câble. Veillez à ce que le cordon
d’alimentation ne puisse être accidentellement accroché et ce, afin d’éviter toute chute
de l’appareil. Evitez d’enrouler le cordon autour de l’appareil et ne le tordez pas.
Posez cet appareil sur une table ou un support suffisamment stable pour éviter sa chute.
Ne faites cuire que du riz dans cet appareil. Cet appareil n'est pas conçu pour recevoir
d'autres aliments.
Il est indispensable de garder la cuve propre étant donné qu’elle est en contact direct
avec le riz.
Ne jamais utiliser l’appareil sans la cuve amovible.
La température des surfaces accessibles peut être élevée lorsque l'appareil fonctionne
veillez à ne pas toucher ces surfaces mais utilisez ses poignées. Faites usage de maniques
lorsque vous manipuler l’appareil.
Veillez à ce que le cordon n’entre pas en contact avec des surfaces chaudes.
Soulevez le couvercle prudemment pour éviter les éclaboussures et pour que l’eau ne
déborde pas.
Branchez le cordon de l’appareil à une prise de courant. Pour le déconnecter, retirez la
fiche de la prise de courant. N’oubliez jamais de débranchez l’appareil après l’usage.
Ne branchez ni ne débranchez jamais l’appareil avec les mains mouillées.
(*)
Service qualifié compétent: Service après vente du fabricant ou de l'importateur ou une
personne qualifiée, reconnue et habilitée à faire ce genre de réparation afin d'éviter tout
danger. Dans tous les cas, veuillez retourner l'appareil auprès de ce service.
10 TEAM RK 2- 060620
Assembly page 10/28
Page 11

Copies of the I/B. Please reproduce them without any
Fax +32 2 359 95 50
changes except under special instruction from Team
International BELGIUM. The pages must be reproduced
and folded in order to obtain a booklet A5 (+/- 148.5 mm
width x 210 mm height). When folding, make sure you
keep the good numbering when you turn the pages of
the I/B. Don’t change the page numbering. Keep the
language integrity.
UTILISATION
1. Avant d’utiliser votre appareil pour la première fois, nettoyez le couvercle, le récipient, la
cuillère et le gobelet doseur avec de l’eau tiède savonneuse. Rincez-les et séchez-les.
2. Placez le cuiseur à riz et son récipient sur une surface plate et stable.
3. Veillez à ce que votre appareil soit débranché.
4. Vous pouvez utiliser plusieurs variétés de riz, notamment du riz basmati, du riz complet, du
riz à grains longs, etc.
5. Mesurez la quantité souhaitée de riz avec le gobelet doseur. Ajoutez du beurre, de l’huile
ou des condiments selon vos goûts. Attention : pour réduire le risque de décharges
électriques, ne cuisinez que dans le récipient de cuisson.
6. Mettez le riz dans le récipient. Ajoutez de l’eau. Référez-vous aux marques graduées à
l’intérieur du récipient pour ajouter le niveau d’eau exact. Par exemple, pour 4 gobelets
de riz non cuit, versez de l’eau jusqu’au niveau 4. La douceur/dureté variera selon la
quantité, le type de riz et le délai de cuisson. Pour adoucir le riz, ajoutez un peu plus
d’eau. Pour qu’il soit plus ferme et plus croustillant, ajoutez-en moins.
7. Avant de placer le récipient dans le cuiseur de riz, veillez à ce que la résistance et la
surface extérieure soient seches et propres. Ne laissez pas tomber de grains de riz ni de
particules dans le cuiseur.
8. Insérez le récipient dans le cuiseur de riz. Il faudra peut-être le tourner légèrement à droite
et à gauche pour s’assurer qu’il est bien en contact avec la résistance.
9. Fermez le couvercle. Laissez toujours le couvercle fermé pendant que vous cuisinez.
10. Branchez la fiche du cordon d’alimentation à une prise de courant. Le voyant lumineux
WARM s’allume.
11. Abaissez l’interrupteur. Le voyant COOK s’allume et la cuisson commence. Pendant que
le riz gonfle et cuit, la vapeur sort par l'orifice du couvercle. Attention : ne posez pas vos
mains sur l’orifice de sortie de vapeur, car la vapeur pourrait vous brûler.
12. Lorsque le riz est cuit, l’interrupteur se soulève et le cuiseur de riz enclenche
automatiquement la fonction de maintien au chaud. Le voyant WARM s’allume et reste
activé, pour indiquer qu’il se maintient à la température voulue. L’unité reste en cycle de
maintien au chaud tant qu’elle est branchée et permet de conserver le riz chaud.
13. Si vous laissez chauffer le riz plus de 30 minutes, remuez-le de temps à autre pour éviter
que la couche inférieure du riz ne brûle.
14. Retirez le couvercle et remuez le riz avant de le servir. Attention : lorsque vous enlevez le
couvercle, tenez-vous à l’écart du corps de l’appareil pour éviter que la vapeur ne vous
brûle.
15. Débranchez l'appareil quand vous cessez de l’utiliser.
REMARQUES
Si vous le souhaitez, nettoyez la quantité de riz mesurée dans un autre récipient.
Pour obtenir du riz plus mou, préparez le riz et l’eau dans le récipient amovible et laissez-
les se mélanger durant 10 à 20 minutes avant de cuisiner.
11 TEAM RK 2- 060620
Assembly page 11/28
Page 12

Copies of the I/B. Please reproduce them without any
Fax +32 2 359 95 50
changes except under special instruction from Team
International BELGIUM. The pages must be reproduced
and folded in order to obtain a booklet A5 (+/- 148.5 mm
width x 210 mm height). When folding, make sure you
keep the good numbering when you turn the pages of
the I/B. Don’t change the page numbering. Keep the
language integrity.
NETTOYAGE ET ENTRETIEN
Nettoyez l’appareil avant chaque utilisation.
Débranchez l’appareil et laissez-le refroidir avant de le nettoyer.
Ne plongez jamais l’appareil dans l’eau ni dans tout autre liquide.
Nettoyez le récipient de cuisson, le couvercle et la cuillère à l’eau tiède et savonneuse. Si
des grains de riz sont collés au fond du récipient, versez un peu d’eau dans le récipient
pour qu’ils se détachent. N’utilisez jamais de produits abrasifs ni d’éponges métalliques,
afin de ne pas griffer la surface anti-adhérente ni rendre le contact avec la résistance
inefficace.
Pour nettoyer les surfaces intérieures et extérieures de l'appareil, utilisez un chiffon humide
puis séchez soigneusement toutes les parties.
CONSEILS IMPORTANTS
N’utilisez pas la fonction servant à maintenir le riz chaud pendant longtemps pour de
petites quantités.
Durant la cuisson, une fine couche de riz pourrait se répandre au fond du récipient. Si vous
n’aimez pas le riz avec une croûte, vous pouvez facilement l’enlever du récipient antiadhérent et le jeter.
Utilisez la cuillère en plastique (ou une cuillère en bois) pour remuer ou retirer le riz.
N’utilisez pas d’ustensiles métalliques, car ils pourraient griffer le récipient anti-adhérent.
PROTECTION DE L’ENVIRONNEMENT – DIRECTIVE 2002/96/CE
Afin de préserver notre environnement et notre santé, l’élimination en fin de vie des appareils
électriques et électroniques doit se faire selon des règles bien précises et nécessite
l’implication de chacun, qu’il soit fournisseur ou utilisateur. C’est pour cette raison que votre
appareil, tel que le signale le symbole apposé sur sa plaque signalétique ou sur
l'emballage, ne doit en aucun cas être jeté dans une poubelle publique ou privée destinée
aux ordures ménagères. L'utilisateur a le droit de déposer l'appareil gratuitement dans des lieux
publics de collecte procédant à un tri sélectif des déchets pour être soit recyclé, soit réutilisé
pour d’autres applications conformément à la directive.
12 TEAM RK 2- 060620
Assembly page 12/28
Page 13

Copies of the I/B. Please reproduce them without any
Fax +32 2 359 95 50
changes except under special instruction from Team
International BELGIUM. The pages must be reproduced
and folded in order to obtain a booklet A5 (+/- 148.5 mm
width x 210 mm height). When folding, make sure you
keep the good numbering when you turn the pages of
the I/B. Don’t change the page numbering. Keep the
language integrity.
VEILIGHEIDSVOORSCHRIFTEN
Lees de gebruiksaanwijzing aandachtig vooraleer u uw toestel gebruikt.
Controleer of de netspanning overeenkomt met deze van het toestel vooraleer u het
gebruikt.
Laat uw toestel tijdens het gebruik nooit zonder toezicht wanneer het in gebruik is. Houd
het toestel buiten het bereik van kinderen of van ontoerekeningsvatbare personen.
Controleer regelmatig de staat van uw toestel. Gebruik het toestel niet indien het snoer of
het toestel zelf enige beschadiging zouden vertonen maar laat het nakijken en herstellen
door een bekwame gekwalificeerde dienst (*). Een beschadigd snoer dient te worden
vervangen door een bekwame gekwalificeerde dienst (*).
Gebruik het toestel enkel voor huishoudelijk gebruik en op de wijze zoals vermeld in de
gebruiksaanwijzing.
Dompel het toestel nooit onder in water of in enige andere vloeistof, noch om het te
reinigen, noch om welke andere reden ook. Plaats het toestel nooit in de
vaatwasmachine.
Gebruik het toestel niet in de nabijheid van warmtebronnen.
Haal de stekker uit het stopcontact wanneer het toestel niet in gebruik is, vooral indien u
het toestel zonder toezicht laat, indien u het monteert of demonteert of vooraleer u het
toestel reinigt.
Gebruik het toestel niet buiten en berg het op in een droge plaats.
Gebruik geen accessoires die niet door de fabrikant aanbevolen werden. Dit kan
gevaarlijk zijn voor de gebruiker en het toestel beschadigen.
Trek nooit aan het snoer om het toestel te verplaatsen. Zorg dat het elektriciteitssnoer
nergens kan achterhaken en daardoor de val van het toestel veroorzaken. Draai het
snoer niet rond het toestel en plooi het niet.
Zet het toestel op een tafel of op een voldoende stabiel oppervlak zodat het niet valt.
Kook enkel rijst in dit toestel. Dit toestel is niet geschikt voor andere voedingsmiddelen.
U moet de afneembare kuip proper houden aangezien deze in direct contact met rijst is.
Zorg ervoor dat het snoer niet in aanraking komt met de warme onderdelen van het
toestel.
Wanneer het toestel in werking is, kunnen toegankelijke delen ervan een zeer hoge
temperatuur bereiken. Raak deze warme onderdelen niet maar gebruik de handvaten.
Gebruik pannenlappen wanneer u het toestel wenst te verplaatsen.
Zorg dat het snoer niet in aanraking komt met de warme onderdelen van het toestel.
Til het deksel voorzichtig op om spatten te vermijden en opdat het water niet zou
overlopen.
Steek altijd eerst het uiteinde van het snoer in het toestel, en dan pas de stekker ervan in
het stopcontact. Om het toestel uit te schakelen, trek de stekker uit het stopcontact.
Vergeet de stekker na gebruik nooit uit het toestel te halen.
Steek/haal de stekker nooit in/uit het stopcontact wanneer uw handen nat zijn.
(*)
Bekwame gekwalificeerde dienst: klantendienst van de fabrikant of de invoerder, die erkend
en bevoegd is om dergelijke herstellingen te doen zodat elk gevaar vermeden wordt. Gelieve
het toestel bij problemen naar deze dienst terug te brengen.
13 TEAM RK 2- 060620
Assembly page 13/28
Page 14

Copies of the I/B. Please reproduce them without any
Fax +32 2 359 95 50
changes except under special instruction from Team
International BELGIUM. The pages must be reproduced
and folded in order to obtain a booklet A5 (+/- 148.5 mm
width x 210 mm height). When folding, make sure you
keep the good numbering when you turn the pages of
the I/B. Don’t change the page numbering. Keep the
language integrity.
GEBRUIK
1. Vóór het eerste gebruik is het noodzakelijk de uitneembare kuip, de lepel en de
maatbeker met lauw zeepwater te reinigen. Spoel ze en droog ze af.
2. Plaats de rijstkoker en zijn uitneembare kuip op een stabiel en vlak oppervlak.
3. Zorg ervoor dat het toestel niet aan het stroomnet aangesloten is.
4. U kunt verschillende soorten rijst gebruiken waaronder basmati, risotto, langkorrelige rijst
enz.
5. Meet de hoeveelheid rijst aan de hand van de maatbeker. Voeg boter, olie of kruiden
naar wens toe. Opgelet: om elektrische schokken te voorkomen, gelieve enkel in de
afneembare kuip te werken.
6. Giet de rijst in de kuip. Voeg water toe. Kijk naar de peilaanduidingen aan de binnenkant
van de kuip om de juiste hoeveelheid water toe te voegen. Bijvoorbeeld: voor 4 bekers
ongekookt rijst moet u water tot peil 4 toevoegen. De zachtheid/hardheid zal naargelang
de hoeveelheid, het type rijst en de kooktijd variëren. Om de rijst te verzachten, voeg een
beetje water toe. Om hardere rijst te verkrijgen, moet u minder water toevoegen.
7. Vooraleer u de afneembare kuip in het toestel plaatst, gelieve te controleren of het
verwarmingselement en de buitenkant van de kuip droog en proper zijn. Laat geen
rijstkorrels noch andere deeltjes in het toestel vallen.
8. Plaats de afneembare kuip in de rijstkoker. U zult misschien de kuip lichtjes naar links of
naar rechts moeten draaien om zeker te zijn dat de kuip goed in contact is met het
verwarmingselement.
9. Sluit het deksel. Laat het deksel toe wanneer de koker in werking is.
10. Steek de stekker in het stopcontact. Het WARM-controlelampje gaat branden.
11. Druk de schakelaar naar beneden. Het COOK-controlelampje gaat branden om aan te
duiden dat het kookproces begonnen is. Terwijl de rijst zwelt en kookt, komt stoom uit de
ventilatieopening van het deksel. Opgelet: plaats uw hand nooit op de ventilatieopening,
daar u zich aan de stoom zou kunnen verbranden.
12. Wanneer de rijst gekookt is, springt de schakelaar naar boven en schakelt de rijstkoker
automatisch over naar de warmhoudstand. Het WARM-controlelampje blijft
aangeschakeld, om aan te duiden dat het toestel de gewenste temperatuur behoudt.
Het toestel blijft in warmhoudstand zolang het toestel aan het stroomnet aangesloten is
om de rijst warm te houden.
13. Indien u de rijst langer dan 30 minuten laat opwarmen, is het aan te raden regelmatig te
roeren om te vermijden dat de onderste laag aanbrandt.
14. Indien u de rijst langer dan 30 minuten laat opwarmen, is het aan te raden regelmatig te
roeren om te vermijden dat de onderste laag aanbrandt.
15. Neem het deksel af en meng de rijst vooraleer u opdient. Opgelet: wanneer u het deksel
afneemt, zou er stoom kunnen uitkomen; zorg er dus voor dat u niet te dicht bij het toestel
komt zodat u zich niet verbrandt.
16. Trek de stekker uit het stopcontact wanneer u het niet meer gebruikt.
OPMERKINGEN
Spoel de hoeveelheid rijst die u net gemeten hebt vooraleer u hem in de kuip giet indien
u dat wenst.
Om zachtere rijst te verkrijgen, giet rijst en water in de kuip en laat 10 à 20 minuten rusten
vooraleer u het toestel aanschakelt.
14 TEAM RK 2- 060620
Assembly page 14/28
Page 15

Copies of the I/B. Please reproduce them without any
Fax +32 2 359 95 50
changes except under special instruction from Team
International BELGIUM. The pages must be reproduced
and folded in order to obtain a booklet A5 (+/- 148.5 mm
width x 210 mm height). When folding, make sure you
keep the good numbering when you turn the pages of
the I/B. Don’t change the page numbering. Keep the
language integrity.
OM RIJST VOOR TE VERWARMEN
Om rijst voor te verwarmen,voeg ½ maatbeker koud water per maatbeker rijst, meng het
geheel en plaats de schakelaar op COOK. Wanneer de rijst gekookt is, zal de rijstkoker
automatische op WARM-stand komen te staan.
REINIGING EN ONDERHOUD
Reinig het toestel vóór elk gebruik.
Trek de stekker uit het stopcontact en laat het toestel volledig afkoelen vooraleer u het
reinigt.
Dompel het toestel nooit onder in water of enig ander vloeistof.
Reinig de afneembare kuip, het deksel en de lepel met lauw zeepwater. Indien rijstkorrels
aan de bodem van de kuip blijven plakken, kunt u ze met water loskrijgen. Gebruik nooit
schuurmiddelen of metalen sponsen, daar deze de antiaanbaklaag van de kuip zouden
kunnen beschadigen, wat ook tot een slecht contact met het verwarmingselement zou
kunnen leiden.
Om de binnen- en buitenkant van het toestel te reinigen, gelieve gebruik te maken van
een vochtige doek en vervolgens alle onderdelen goed af te drogen.
BELANGRIJKE TIPS
Gebruik de warmhoudfunctie niet te lang voor kleine hoeveelheden.
Tijdens de kooktijd zou een fijn laagje rijst aan de bodem van de kuip kunnen plakken.
Indien deze korst u stoort, kunt u deze gemakkelijk verwijderen en weggooien.
Gebruik de plastieken lepel (of een houten lepel) om de rijst uit te strijken of uit te
scheppen. Gebruik geen metalen voorwerpen daar deze de antiaanbaklaag zouden
beschadigen.
MILIEUBESCHERMING – RICHTLIJN 2002/96/EG
Om ons milieu en onze gezondheid te beschermen, moet afgedankte elektrische en
elektronische apparatuur in overeenstemming met welbepaalde regels weggegooid worden.
Dit vergt zowel de inzet van de leveranciers als van de gebruikers. Om deze reden mag uw
apparaat, zoals op het typeplaatje of op de verpakking aangegeven door het symbool ,
niet met het gewone huisvuil weggegooid worden. De gebruiker heeft het recht het toestel
naar een gemeentelijk centrum van gescheiden inzameling te brengen waar het
overeenkomstig de richtlijn hergebruikt, gerecycleerd of voor andere doeleinden gebruikt zal
worden.
15 TEAM RK 2- 060620
Assembly page 15/28
Page 16

Copies of the I/B. Please reproduce them without any
Fax +32 2 359 95 50
changes except under special instruction from Team
International BELGIUM. The pages must be reproduced
and folded in order to obtain a booklet A5 (+/- 148.5 mm
width x 210 mm height). When folding, make sure you
keep the good numbering when you turn the pages of
the I/B. Don’t change the page numbering. Keep the
language integrity.
CONSEJOS DE SEGURIDAD
Lea detenidamente las instrucciones antes de utilizar su aparato.
Antes de utilizar el aparato, compruebe que el voltaje de la red eléctrica coincide con el
del aparato.
No deje nunca su aparato sin vigilancia cuando esté en marcha. No lo deje ni al alcance
de los niños ni al de personas no responsables.
Compruebe de vez en cuando que el aparato no esté dañado. No utilice su aparato si el
cable o el aparato están dañados por el motivo que sea. Si el cable del adaptador
estuviera dañado, el adaptador entero debe ser cambiado por uno idéntico al original y
que tenga las mismas características. En caso de duda o si no encuentra un adaptador
correspondiente, diríjase a un servicio técnico cualificado (*).
Utilice el aparato solamente para usos domésticos y de la manera indicada en el modo de
empleo.
No sumerja nunca el aparato en el agua o en cualquier otro líquido ni para su limpieza ni
por cualquier otra razón. No lo introduzca nunca en el lavavajillas.
No utilice el aparato cerca de fuentes de calor.
Desenchufe el aparato y deje que se enfríe antes de guardarlo, limpiarlo, quitar los
accesorios, o más generalmente cuando no lo utilice.
Procure no utilizar el aparato en el exterior y colóquelo en un sitio seco.
No utilice accesorios no recomendados por el fabricante, ello puede provocar un riesgo
para el usuario y puede dañar el aparato.
No desenchufe nunca el aparato tirando por el cable. Procure que el cable no se
enganche en alguna parte, a fin de evitar posibles caídas del mismo. Evite enrollar el
cable alrededor del aparato y no lo tuerza.
Coloque el aparato sobre una mesa o un soporte estable para evitar su caída.
Cueza solamente arroz. Este aparato no está concebido para cocer otros alimentos.
Es indispensable mantener el recipiente limpio, ya que está en contacto con el arroz.
No utilice nunca el aparato sin el recipiente amovible.
No toque las superficies calientes del aparato, utilice las asas. Utilice guantos cuando
manipule el aparato.
Procure que el cable no entre en contacto con superficies calientes.
Quite y abra la cubierta con cuidado para evitar salpicaduras y permita que el agua se
vierta dentro de la arrocera.
Enchufe el cable en una toma de corriente. Para desconectar el aparato, retire el
enchufe de la toma de corriente. Siempre desenchufe el aparato tras su uso.
Nunca enchufe o desenchufe el aparato con las manos mojadas.
() Servicio técnico cualificado. Servicio técnico del fabricante o del importador o una
persona cualificada, reconocida y habilitada a fin de evitar cualquier peligro. En cualquier
caso devuelva el aparato al servicio técnico.
16 TEAM RK 2- 060620
Assembly page 16/28
Page 17

Copies of the I/B. Please reproduce them without any
Fax +32 2 359 95 50
changes except under special instruction from Team
International BELGIUM. The pages must be reproduced
and folded in order to obtain a booklet A5 (+/- 148.5 mm
width x 210 mm height). When folding, make sure you
keep the good numbering when you turn the pages of
the I/B. Don’t change the page numbering. Keep the
language integrity.
FUNCIONAMIENTO
1. Antes de usar su aparato por primera vez, limpie la tapa, el recipiente, el cucharón y la
taza medidora en agua jabonosa tibia. Pase por agua y seque bien
2. Coloque la arrocera y el recipiente en una superficie plana y estable.
3. Asegúrese de que el aparato esté desenchufado.
4. Puede cocer varios tipos de arroz incluido basmati, de grano largo, integral...
5. Mida la cantidad deseada de arroz con la taza medidora. Añada mantequilla, aceite, o
sazonadores según su gusto. Cuidado: para reducir el riesgo de descarga eléctrica,
cocine sólo en el tazón de cocción.
6. Coloque el arroz en el tazón. Añada agua. Use las marcas de nivel de agua del
recipiente de cocción para añadir la cantidad exacta de agua. Por ejemplo, para 4
tazas de arroz no cocido, llene de agua hasta el nivel 4. Cuidado: no ponga demasiada
agua para que no salga. El sabor y la dureza variarán dependiendo de la calidad, del
tipo de arroz y del tiempo de cocción. Para suavizar el arroz, añada un poco más de
agua. Para que el arroz quede más firme y crujiente, añada menos agua.
7. Antes de colocar el recipiente en la arrocera, asegúrese que la resistencia y la superficie
exterior del recipiente estén secas y limpias. No deje que granos de arroz o partículas
caigan dentro de la arrocera.
8. Inserte el recipiente de cocción dentro de la arrocera. Puede ser que tenga que girarlo
ligeramente para la izquierda y la derecha para asegurar el contacto adecuado con la
resistencia.
9. Coloque la tapa en la arrocera. Mantenga siempre el aparato tapado mientras cocine.
10. Enchufe el cable en la toma de corriente. El testigo luminoso WARM se enciende.
11. Presione el interruptor. La luz COOK se enciende y la cocción empieza. Como el arroz
hinche y cuece, el vapor sale por el orificio de la tapa. Cuidado: no ponga sus manos en
el orificio de salida del vapor pues puede quemarse.
12. Cuando el arroz esté cocido, el interruptor se levanta y la arrocera se conecta
automáticamente a la función de calentamiento. La luz WARM se enciende y
permanece activada, indicando que se mantiene dicha temperatura. La unidad
permanece en el ciclo de calentamiento hasta que la desenchufe.
13. Si deja el arroz por más de 30 minutos, mézclelo de vez en cuando para prevenir que se
queme la parte inferior del arroz.
14. Retire la tapa y mezcle el arroz antes de servir. Cuidado: cuando retire la tapa, no se
queme con el vapor caliente.
15. Desenchufe la unidad cuando termine.
NOTAS:
Si lo desea pueden limpiar la cantidad el arroz medido en otro recipiente.
Para arroz blando, ponga arroz y agua en el recipiente de cocción y deje que se mezcle
durante 10-20 minutos antes de cocinar.
17 TEAM RK 2- 060620
Assembly page 17/28
Page 18

Copies of the I/B. Please reproduce them without any
Fax +32 2 359 95 50
changes except under special instruction from Team
International BELGIUM. The pages must be reproduced
and folded in order to obtain a booklet A5 (+/- 148.5 mm
width x 210 mm height). When folding, make sure you
keep the good numbering when you turn the pages of
the I/B. Don’t change the page numbering. Keep the
language integrity.
LIMPIEZA Y MANTENIMIENTO
Limpie el aparato después de cada uso.
Desenchufe el aparato y déjelo enfriar antes de su limpieza.
Nunca sumerja la unidad en agua u otro líquido.
Lave el recipiente de cocción, la tapa, el cucharón en agua tibia y jabonosa. Si se pega
arroz en la base de la arrocera, derrame un poco de agua en el recipiente para que se
suelte el arroz. Nunca utilice productos abrasivos o esponjas de metal, ya que pueden
dañar la superficie antiadherente y volver el contacto con la resistencia ineficiente.
Limpie las superficies interior y exterior de la unidad con un paño humedecido y séquelas.
CONSEJOS IMPORTANTES
No mantenga pequeñas cantidades de arroz durante el ciclo de “mantener caliente”
por largo tiempo.
Durante la cocción, puede desarrollarse una pasta delgada de arroz en la base del
recipiente. Si no le gusta el arroz con corteza, puede quitarlo fácilmente del recipiente
antiadherente y tirarlo.
Use el cucharón de plástico (o uno de madera) para mezclar y retirar el arroz. No use
utensilios de metal que puedan dañar el recipiente antiadherente.
PROTECCION DEL MEDIO AMBIENTE –DIRECTIVA 2002/96/CE
Para poder preservar nuestro medio ambiente y proteger la salud humana, los residuos
eléctricos y equipos electrónicos deberían ser destruidos de acuerdo con unas normas
especificas con la implicación de ambos proveedores y consumidores. Por esta razón, como
indica el símbolo en la placa de datos técnicos, su aparato no debería ser tirado en un
contenedor municipal sino que debería ser devuelto a la tienda, o dejado en un punto de
recolección para ser reciclado o usado para otras aplicaciones conforme a la directiva.
18 TEAM RK 2- 060620
Assembly page 18/28
Page 19

Copies of the I/B. Please reproduce them without any
Fax +32 2 359 95 50
changes except under special instruction from Team
International BELGIUM. The pages must be reproduced
and folded in order to obtain a booklet A5 (+/- 148.5 mm
width x 210 mm height). When folding, make sure you
keep the good numbering when you turn the pages of
the I/B. Don’t change the page numbering. Keep the
language integrity.
PENSANDO NA VOSSA SEGURANÇA
Antes de utilizar o aparelho leia com atenção as instruções de utilização.
Confirme se a tensão eléctrica que vai utilizar é igual à indicada na placa sinalética do
aparelho.
Mantenha o aparelho sob vigilância quando em funcionamento. Nunca deixe o
aparelho ao alcance das crianças ou de pessoas que necessitem de ser vigiadas.
Verifique com regularidade o estado do aparelho e perante uma qualquer anomalia
leve-o aos serviços técnicos competentes (*). O aparelho nunca deve funcionar com o
cabo da alimentação danificado pelo que deve mandá-lo substituir a pessoas que
estejam habilitadas para o fazerem (*).
Utilize o aparelho unicamente para os fins domésticos e de acordo com as instruções de
utilização.
Nunca mergulhe o aparelho em água ou outros líquidos para a limpeza ou por qualquer
outra razão. Nunca meta o aparelho na máquina de lavar louça.
Nunca utilize o aparelho perto de fontes de calor.
O aparelho tem de estar arrefecido, desligado e com a ficha do cabo da alimentação
retirada da tomada eléctrica antes de o limpar, de arrumar o aparelho, de retirar os
acessórios ou quando não estiver a utilizar o aparelho.
Não utilize o aparelho ao ar livre e coloque-o sempre num lugar seco.
Utilize sempre acessórios recomendados por técnicos competentes. Não corra riscos.
Nunca retire a ficha do cabo da alimentação da tomada eléctrica puxando pelo cabo.
Verifique se o cabo da alimentação se encontra enrolado ou preso. Evite as quedas do
aparelho. Não enrole o cabo da alimentação à volta do aparelho e não o torça.
O aparelho tem de trabalhar em cima de uma mesa ou numa superfície plana para evitar
a sua queda.
Cozinhe só arroz. Este aparelho não está concebido para cozer outros alimentos.
Com o aparelho em funcionamento as superfícies ficam com temperaturas elevadas
pelo que não pode tocar nestas partes. Utilize as pegas na manipulação do aparelho.
Não deixe que o cabo da alimentação toque nas partes quentes do aparelho.
Levante com prudência a tampa para evitar salpicos de água quente ou que a água
saia.
Para ligar o aparelho, conecte a ficha do cabo da alimentação à tomada eléctrica.
Para desligar o aparelho retire a ficha do cabo da alimentação da tomada eléctrica.
Após a utilização do aparelho retire sempre a ficha do cabo da alimentação da tomada
eléctrica.
Com as mãos molhadas ou húmidas nunca retire ou coloque a ficha do cabo da
alimentação na tomada eléctrica. Nunca toque no aparelho com as mãos húmidas.
(*)
Serviço técnico habilitado. Serviço técnico do fabricante ou do importador ou uma pessoa
qualificada, reconhecida e habilitada para evitar qualquer perigo. Em qualquer caso devolva
o aparelho ao serviço técnico.
19 TEAM RK 2- 060620
Assembly page 19/28
Page 20

Copies of the I/B. Please reproduce them without any
Fax +32 2 359 95 50
changes except under special instruction from Team
International BELGIUM. The pages must be reproduced
and folded in order to obtain a booklet A5 (+/- 148.5 mm
width x 210 mm height). When folding, make sure you
keep the good numbering when you turn the pages of
the I/B. Don’t change the page numbering. Keep the
language integrity.
UTILIZAÇÃO
1. Antes de utilizar o aparelho pela primeira vez lave a tampa, o recipiente, a colher e a
taça medidora utilizando água morna em sabonária. Enxagúe e seque tudo muito bem.
2. Coloque o cozedor de arroz e o recipiente numa superfície plana e estável.
3. Confirme que o aparelho está com a ficha do cabo da alimentação retirada da tomada
eléctrica.
4. Pode utilizar todas as variedades de arroz tal como basmati, integral ou de grãos longos...
5. Meça com a taça medidora a quantidade de arroz que pretende cozinhar. Junte
manteiga, óleo ou outros condimentos a seu gosto. Atenção: para evitar riscos de
descargas eléctricas cozinhe apenas no recipiente de cozedura do aparelho.
6. Coloque o arroz no recipiente. Junte água. Respeite os níveis marcados no recipiente. Por
exemplo: para cozer 4 taças de arroz coloque água até ao nível 4. A suavidade/dureza
do arroz depende da quantidade, do tipo do arroz e do tempo da cozedura. Para ter o
arroz mais cozido junte um pouco mais de água e para o ter um pouco mais firme e
estaladiço junte menos água.
7. Antes de colocar o recipiente no cozedor de arroz, verifique que a resistência e a
superfície exterior estão bem secas e prontas para serem utilizadas. Não deixe cair bagos
de arroz ou o que quer que seja no cozedor.
8. Insira o recipiente no cozedor de arroz. Rode o recipiente ligeiramente para a direita e
para a esquerda para que o recipiente faça o contacto perfeito com a resistência do
aparelho.
9. Feche a tampa. Mantenha sempre a tampa fechada durante a cozedura do arroz.
10. Coloque a ficha do cabo da alimentação na tomada eléctrica. O sinalizador luminoso
WARM acende-se.
11. Puxe o interruptor. O sinalizador COOK acende-se e a cozedura do arroz inicia-se.
Enquanto o arroz engrossa e coze o vapor sai pelo orifício da tampa. Atenção: não
ponha as mãos na saída do orifício da tampa pois pode-se queimar com o vapor.
12. Assim que o arroz esteja cozido o interruptor levanta-se. O cozedor do arroz inicia
automaticamente a função de manter o arroz aquecido. O sinalizador WARM acende-se
e permanece activo indicando que o arroz se mantém à temperatura desejada. O
aparelho manter-se-á nesta função enquanto a ficha do cabo da alimentação estiver
ligada à tomada eléctrica.
13. Se o arroz ficar mais de 30 minutos na situação de aquecimento, mexa-o de tempos a
tempos para evitar que se queime.
14. Retire a tampa do recipiente e mexe o arroz antes de o servir. Atenção: ao retirar a
tampa mantenha o corpo e o rosto afastado do aparelho para evitar que se queime
com a saída do vapor.
15. Assim que deixar de utilizar o aparelho, retire a ficha do cabo da alimentação da
tomada eléctrica.
NOTAS
Passe por água fria num outro recipiente o arroz já medido se o desejar.
Para obter arroz mais macio, coloque o arroz em água no recipiente interno e deixe-o aí
ficar cerca de 10 a 20 minutos antes de o cozer.
20 TEAM RK 2- 060620
Assembly page 20/28
Page 21

Copies of the I/B. Please reproduce them without any
Fax +32 2 359 95 50
changes except under special instruction from Team
International BELGIUM. The pages must be reproduced
and folded in order to obtain a booklet A5 (+/- 148.5 mm
width x 210 mm height). When folding, make sure you
keep the good numbering when you turn the pages of
the I/B. Don’t change the page numbering. Keep the
language integrity.
LIMPEZA E MANUTENÇÃO
Sempre que utilizar o aparelho lave-o muito bem.
Antes de proceder à limpeza do aparelho, retire a ficha do cabo da alimentação da
tomada eléctrica e deixe arrefecer totalmente o aparelho.
Nunca mergulhe o aparelho em água em outros líquidos.
Lave o recipiente da cozedura, a tampa e a colher em água morna em sabonária. Caso
haja grãos de arroz colados ao fundo do recipiente é necessário colocá-los de molho
para os amaciar e os retirar com facilidade. Nunca utilize produtos abrasivos ou esponjas
abrasivas que risquem a superfície anti-aderente ou que podiam tornar o contacto com
a resistência do aquecimento ineficaz.
Para limpar as superfícies internas e externas do aparelho utilize um esfregão macio e
humedecido. Passe-o suavemente pelas partes a limpar. Depois seque muito bem as
partes lavadas.
CONSELHOS IMPORTANTES
Nunca utilize a função de manter o arroz aquecido por tempo demasiado longo se
cozeu pequena quantidade de arroz.
Durante a cozedura do arroz pode formar-se uma fina camada no recipiente. Se não
desejar esta crosta pode-a retirar e deitá-la no lixo.
Utilize a colher plástica (ou uma colher em madeira) para mexer o arroz ou o retirar do
recipiente da cozedura. Nunca utilize utensílios metálicos já que poderiam riscar a
cobertura anti-aderente do recipiente.
PROTECÇÃO DO MEIO AMBIENTE – DIRECTIVA 2002/96/CE
Para a preservação do ambiente e da nossa saúde, a eliminação no fim da vida útil dos
aparelhos eléctricos e electrónicos, deve-se efectuar no cumprimento das legislações em
vigor e pela participação de todos quer sejam produtores ou utilizadores. É por esta razão
que o vosso aparelho tem na placa sinalética o simbolo , informando que em caso
algum o aparelho deve ser colocado no caixote do lixo camarário ou privado para que não
vá para as lixeiras comuns mas sim devolvido ao revendedor ou depositado nos locais
apropriados e identificados para a recolha destes aparelhos para que uma vez recolhidos
sejam reciclados, reutilizados ou lhe sejam dados outras aplicações.
21 TEAM RK 2- 060620
Assembly page 21/28
Page 22

Copies of the I/B. Please reproduce them without any
Fax +32 2 359 95 50
changes except under special instruction from Team
International BELGIUM. The pages must be reproduced
and folded in order to obtain a booklet A5 (+/- 148.5 mm
width x 210 mm height). When folding, make sure you
keep the good numbering when you turn the pages of
the I/B. Don’t change the page numbering. Keep the
language integrity.
AVVERTENZE
Vi invitiamo a leggere attentamente queste istruzioni prima di utilizzare l’apparecchio.
Prima di mettere in funzione l’apparecchio, controllare che i dati di targa corrispondano a
quelli della vostra rete di distribuzione elettrica.
Non lasciare l’apparecchio incustodito durante il funzionamento; non lasciarlo alla
portata di bambini o persone irresponsabili.
Verificare regolarmente lo stato dell’apparecchio, qualora fosse danneggiato, farlo
controllare e riparare da un servizio qualificato
sostituito da un servizio qualificato
Quest’apparecchio dovrà essere destinato solo all’uso domestico, secondo le indicazioni
riportate nel presente libretto.
Non immergere l'apparecchio in acqua o in altro liquido, né per pulirlo né per qualsiasi
altra ragione. Non lavarlo in lavastoviglie.
Non usare l’apparecchio in prossimità di sorgenti di calore.
Togliere sempre la spina dalla presa di corrente prima di pulire l’apparecchio, di riporlo, di
togliere gli accessori, o, in generale, quando l’apparecchio non sta funzionando.
Non usare l’apparecchio all'aperto e dopo l'uso riporlo in un luogo asciutto.
Non utilizzare accessori se non quelli consigliati dal fabbricante; l’utilizzo di accessori
diversi potrebbe essere pericoloso per l’utente ed inoltre potrebbe danneggiare
l’apparecchio stesso.
Non staccare la spina dalla presa di corrente tirando sul cavo d’alimentazione. Per
evitare eventuali cadute del prodotto assicurarsi sempre che il cavo non si possa
impigliare e che sia libero da ostacoli. Non avvolgere il cavo intorno all’apparecchio e
non torcerlo.
Posizionare l’apparecchio su di un tavolo o un supporto abbastanza stabile perché non
cada.
Cuocere soltanto riso. L’apparecchio non è concepito per preparare altri alimenti.
E’ assolutamente necessario tener pulito l’apparecchio perché entra in contatto diretto
con il riso.
La temperatura delle superfici accessibili può essere elevata quando l’apparecchio sta
funzionando. Non toccare quelle parti e utilizzare le maniglie. Utilizzare manopole quando
manipolate l’apparecchio.
Il cavo non deve entrare in contatto con superfici calde.
Sollevare il coperchio con prudenza per evitare gli schizzi e perché l’acqua non
trabocchi.
Collegare l’apparecchio ad una presa di corrente. Per spegnerlo, staccare la spina dalla
presa di corrente. Non dimenticare mai di staccare la spina dopo l’uso.
Non collegare o staccare la spina dell’apparecchio con le mani bagnate.
(*) Servizio qualificato: Servizio Assistenza del fabbricante o dell’importatore o una persona
qualificata, riconosciuta ed autorizzata ad effettuare riparazioni. In ogni caso, ritornare
l’apparecchio a questo servizio.
(*)
.
(*)
.Il cavo, se danneggiato, deve essere
22 TEAM RK 2- 060620
Assembly page 22/28
Page 23

Copies of the I/B. Please reproduce them without any
Fax +32 2 359 95 50
changes except under special instruction from Team
International BELGIUM. The pages must be reproduced
and folded in order to obtain a booklet A5 (+/- 148.5 mm
width x 210 mm height). When folding, make sure you
keep the good numbering when you turn the pages of
the I/B. Don’t change the page numbering. Keep the
language integrity.
USO
1. Prima di utilizzare l’apparecchio per la prima volta, pulire il coperchio, il recipiente, il
cucchiaio e la tazza di misura con acqua tiepida saponosa. Sciacquare e seccarli.
2. Sistemare il cuoci riso e il recipiente su una superficie piatta e stabile.
3. Verificare che la spina dell’apparecchio sia staccata.
4. Si possono utilizzare vari tipi di riso, per esempio basmati, integrale, a grani lunghi, ecc.
5. Misurare la quantità desiderata di riso con la tazza di misura. Aggiungere burro, olio, e
condimenti a seconda della propria preferenza. Attenzione: per ridurre il rischio di scarica
elettrica, cucinare soltanto nel recipiente di cottura.
6. Mettere il riso nel recipiente. Aggiungere l’acqua. Riferirsi ai segni graduati all’interno del
recipiente per versare l’acqua fino al livello esatto. Per esempio, per 4 tazze di riso non
cotto, versare acqua fino al livello 4. La morbidezza/durezza del riso dipenderà dalla
quantità, dal tipo di riso e dal tempo di cottura. Per ottenere un riso morbido, aggiungere
un po’ più d’acqua. Invece per un riso duro e croccante, aggiungerne meno.
7. Prima di collocare il recipiente nel cuoci riso, badare a che la resistenza e la superficie
esterna siano ben secche e pulite. Non lasciare che grani di riso né particelle cadano nel
recipiente.
8. Inserire il recipiente di cottura nel cuoci riso. Forse bisognerà girarlo a destra o a sinistra per
essere sicuri che il contatto con la resistenza sia corretto.
9. Chiudere il coperchio. Mantenere sempre il coperchio chiuso durante la cottura.
10. Collegare la spina ad una presa di corrente. La spia luminosa WARM si accende.
11. Abbassare l’interruttore. La spia luminosa COOK si accende e la cottura comincia. Mentre
il riso si dilata e cuoce, il vapore esce dalla valvola di vapore del coperchio. Attenzione:
non posare le mani sulla valvola, perché il vapore potrebbe bruciare.
12. Quando il riso è cotto, l’interruttore si solleva e il cuoci riso attiva automaticamente la
funzione di riscaldamento. La spia WARM si accende e resta attivata, per indicare che si
mantiene alla temperatura desiderata. L’unità rimane in ciclo di riscaldamento finché non
sia staccata la spina, il che permette di conservare il riso caldo.
13. Se si lascia riscaldare il riso per più di 30 minuti, rivoltarlo ogni tanto per evitare che il riso
che si trova in fondo bruci.
14. Togliere il coperchio e mescolare il riso prima di servirlo. Attenzione: quando si toglie il
coperchio, non stare sopra il corpo dell’apparecchio per evitare di bruciarsi col vapore.
15. Staccare la spina dell’apparecchio dopo l’uso.
NOTE
Si può pulire il riso misurato in un altro recipiente.
Per ottenere riso più morbido, preparare il riso e l’acqua nel recipiente di cottura e
lasciare che si mescolino durante 10-20 minuti prima di cucinare.
PULIZIA E MANUTENZIONE
Pulire l’apparecchio prima di ogni uso.
Staccare la spina dell’apparecchio e lasciarlo raffreddare prima di pulirlo.
Non immergere mai l’apparecchio nell’acqua o in qualsiasi altro liquido.
Pulire il recipiente di cottura, il coperchio e il cucchiaio con acqua tiepida e saponosa. Se
i grani di riso sono incollati sul fondo della pentola, versare un po’ d’acqua nel recipiente
per staccarli. Non utilizzare mai prodotti abrasivi né spugne metalliche, per non graffiare la
superficie antiaderente né rendere il contatto con la resistenza inefficiente.
Staccare il cavo. Pulire la superficie interna ed esterna dell’unità con un panno umido e
saponoso, poi seccarla.
23 TEAM RK 2- 060620
Assembly page 23/28
Page 24

Copies of the I/B. Please reproduce them without any
Fax +32 2 359 95 50
changes except under special instruction from Team
International BELGIUM. The pages must be reproduced
and folded in order to obtain a booklet A5 (+/- 148.5 mm
width x 210 mm height). When folding, make sure you
keep the good numbering when you turn the pages of
the I/B. Don’t change the page numbering. Keep the
language integrity.
CONSIGLI IMPORTANTI
Non utilizzare la funzione che serve a mantenere il riso caldo durante molto tempo con
piccole quantità di riso.
Durante la cottura, uno strato sottile di riso potrebbe spargersi sul fondo del recipiente. Se
non vi piace il riso con una crosta, potete facilmente toglierlo dal recipiente antiaderente
e buttarlo via.
Utilizzare il cucchiaio di plastico (o di legno) per mescolare o togliere il riso. Non utilizzare
utensili di metallo, perché potrebbero graffiare il recipiente antiaderente.
DIRETTIVA 2002/96/CE PER LO SMALTIMENTO DELLE APPARECCHIATURE ELETTRICHE ED
ELETTRONICHE
Per preservare l'ambiente e la nostra salute, l'eliminazione dei vecchi apparecchi elettrici ed
elettronici non più utilizzati, va fatta secondo la direttiva sopra citata che impone l'obbligo al
costruttore, al commerciante ed all'utilizzatore di consegnare gli apparecchi ai centri di
raccolta specializzati, i quali saranno in grado di smaltire e riciclare i vecchi prodotti come la
legge prescrive.
Per questa ragione troverete apposto sull’etichetta segnaletica il simbolo che indica di
non gettare il vecchio apparecchio non più utilizzato, in pattumiera o nel cassonetto delle
immondizie.
Potrete smaltire il vecchio apparecchio consegnandolo direttamente al rivenditore dove
andrete ad acquistarne uno nuovo, o direttamente nei centri di raccolta specializzati messi a
disposizione dal vostro comune di residenza.
24 TEAM RK 2- 060620
Assembly page 24/28
Page 25

Copies of the I/B. Please reproduce them without any
Fax +32 2 359 95 50
changes except under special instruction from Team
International BELGIUM. The pages must be reproduced
and folded in order to obtain a booklet A5 (+/- 148.5 mm
width x 210 mm height). When folding, make sure you
keep the good numbering when you turn the pages of
the I/B. Don’t change the page numbering. Keep the
language integrity.
25 TEAM RK 2- 060620
Assembly page 25/28
Page 26

Copies of the I/B. Please reproduce them without any
Fax +32 2 359 95 50
changes except under special instruction from Team
International BELGIUM. The pages must be reproduced
and folded in order to obtain a booklet A5 (+/- 148.5 mm
width x 210 mm height). When folding, make sure you
keep the good numbering when you turn the pages of
the I/B. Don’t change the page numbering. Keep the
language integrity.
26 TEAM RK 2- 060620
Assembly page 26/28
Page 27

Copies of the I/B. Please reproduce them without any
Fax +32 2 359 95 50
changes except under special instruction from Team
International BELGIUM. The pages must be reproduced
and folded in order to obtain a booklet A5 (+/- 148.5 mm
width x 210 mm height). When folding, make sure you
keep the good numbering when you turn the pages of
the I/B. Don’t change the page numbering. Keep the
language integrity.
27 TEAM RK 2- 060620
Assembly page 27/28
Page 28
Copies of the I/B. Please reproduce them without any
Fax +32 2 359 95 50
TEAM RK 2
Deutsch
4
English
7
Français
10
Nederlands
13
Español
16
Português
19
Italiano
22
changes except under special instruction from Team
International BELGIUM. The pages must be reproduced
and folded in order to obtain a booklet A5 (+/- 148.5 mm
width x 210 mm height). When folding, make sure you
keep the good numbering when you turn the pages of
the I/B. Don’t change the page numbering. Keep the
language integrity.
Back cover page (last page)
Assembly page 28/28
 Loading...