

Page 1

From the Makers of
TTG-618
10 +
ASSEMBLY & INSTRUCTION MANUAL
Page 2

Contents
Introduction
Tools You May Need
Mechanical Parts
Plastic Parts
Tip
Solar Module Assembly
Gear Box Assembly
Gear Box Testing
Hydraulic Module Assembly
Hydraulic Module Testing
Notices!! Very Important Hydraulic Module
Storage Box Assembly
Tips: Plastic Parts Disassembly
01. Obstacle Avoiding Rover Assembly
02. Forklift Assembly
03. Monkey Assembly
04. Ostritch Assembly
P. 2
P. 2
P. 2
P. 2
P. 2
P. 3
P. 3
P. 5
P. 5
P. 7
P. 7
P. 8
P. 9
P. 9
P.12
P.14
P.17
05. Excavator Assembly
06. Scorpion Assembly
07. Dog Walker Assembly
08. Elephant Assembly
09. Buggy Assembly
10. Crocodile Assembly
11. Pterosaurs Assembly
12. T-Rex Assembly
It’s time to have FUN!
P.21
P.25
P.29
P.32
P.35
P.39
P.44
P.50
P.57
1
Page 3

Introduction
The solar and hydraulic powered robot can be transformed into twelve different animals and mechanic robots. Every model features multitude of
functional and biomimicry movements and unique modeling. Rivet-Rex12 solar hydraulic powered robot is designed to have children learn the
benefit of alternative energy and basic concept of these technologies. This product is powered by the sun and water, there are no batteries
required. The robot can move in direct sunlight and allows children to play with it outdoors and also encourage them to explore the world.
The modeling and the movement of the models are referred to natural animals which include its most obvious characteristic, such as elephant's
trunk and pteranodon's wing. While the children are playing with them, they can realize the function of these characteristic and observe how they
work. Plus, the children can use their own infinite imagination to create a brand new species.
Tools You May Need
Diagonal Cutter Screwdriver Cup & Water Tissue Paper Safety Glasses
Mechanical Parts List
Important: If any parts are missing or damage, DO NOT RETURN TO THE RETAILER.
•
E-mail us at support@elenco.com or call (800) 533-2441
Product contains functional edges and sharp points.
•
P1 P2
Motor With Connectors
QTY
Only connect wires to solar panel
Pinion Gear (yellow)
P4
QTY
1
P10
Round Shaft Rope
QTY
1
P14
Do not touch the oil while fitting the soft tube.
Cut the plastic parts when they are required.
Do not cut them in advance.
Gear With Shaft Gear (Red) Gear (Green)
P5
P11
Oil Bag
1
QTY
1
P12
QTY
1
P6
Solar Panel With Springs Soft Tube (15cm)
P3
QTY
1
Tapping Screw Sponge
P8 P9
QTY
2
Cardboard divider
Cap (Red)
QTY
1
QTY
2
P7
QTY
2
P13
QTY
1
350mm
Plastic Parts
QTY
1
QTY
2
140mm
E
DCBA
Tip:Cut Off Burrs Before Assembly
burr
burr
2
burr
Page 4

1 32
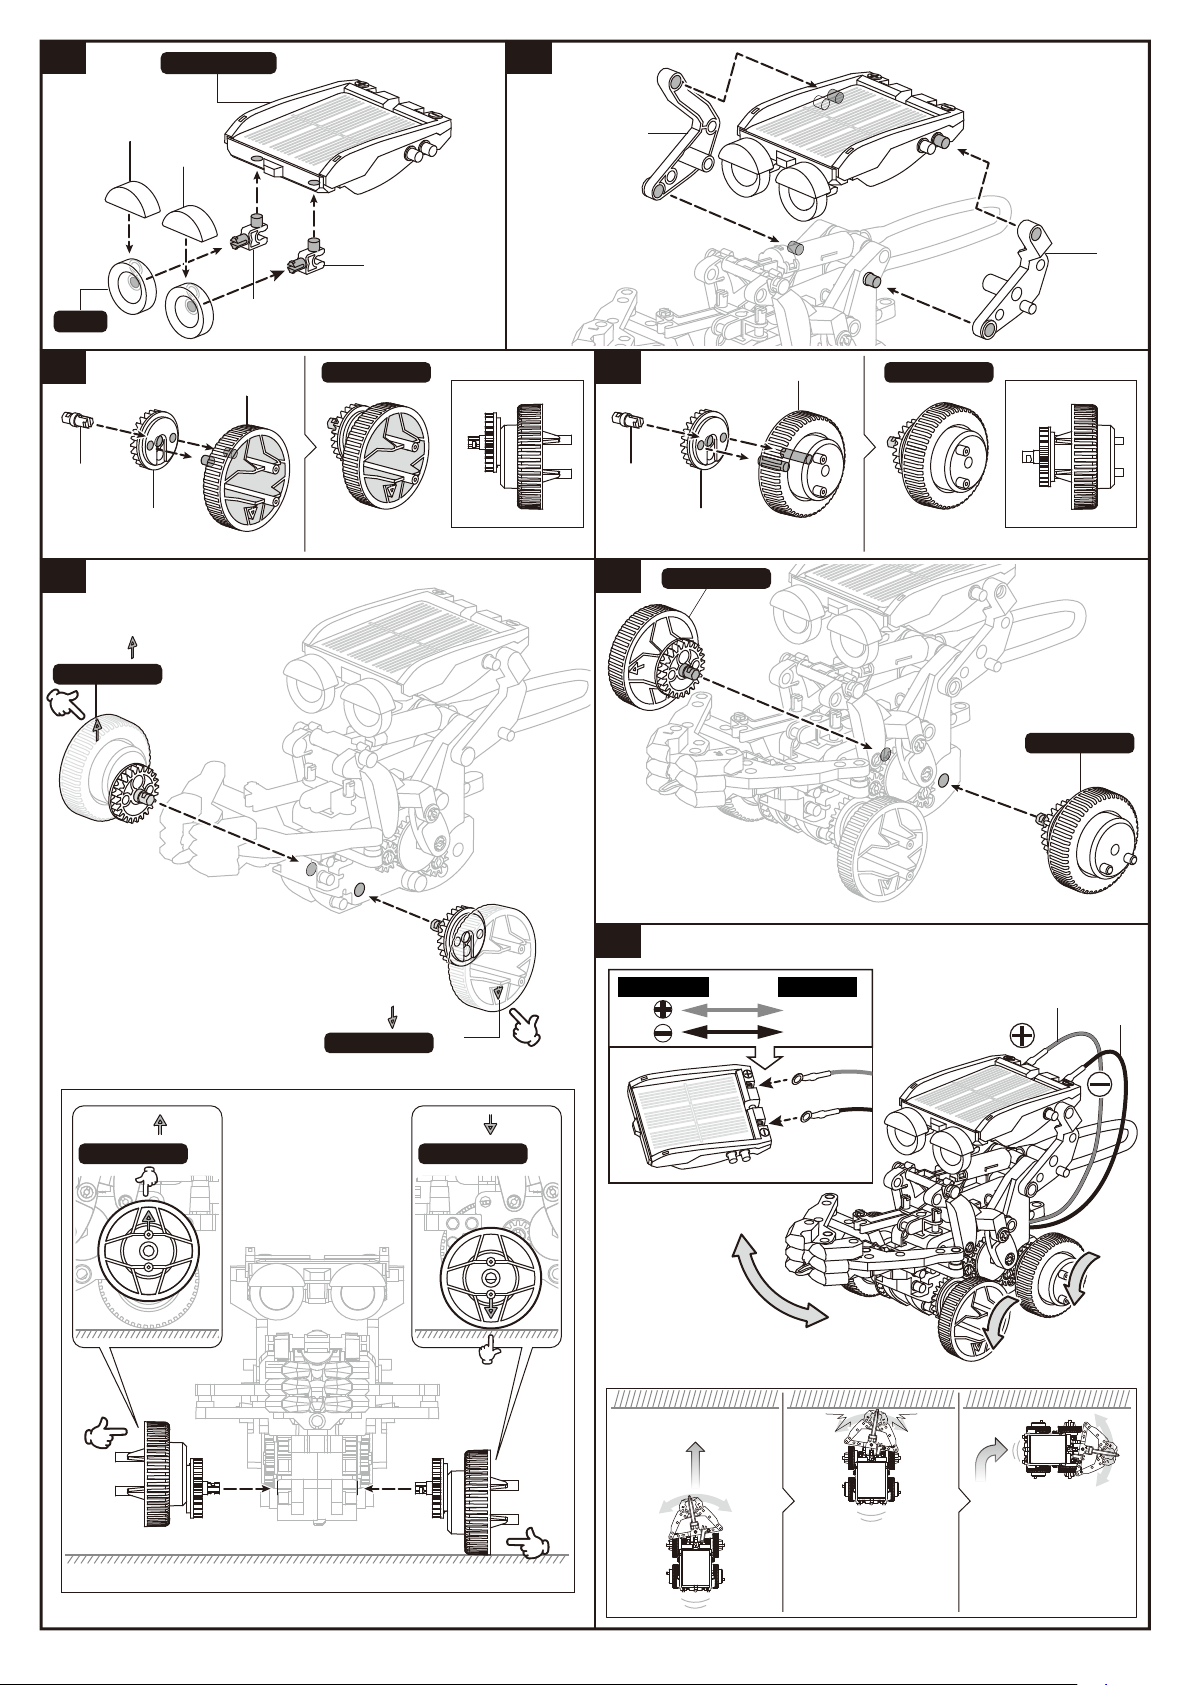
Solar Module Assembly
P9 x2
Finished Product
A14
P2
1
Gear Box Assembly
B26
B10
B3
B25
B31
Click
Click
Solar Module
Click
Click
2
P5
P10
C1
A5
3 4 5
2
P7(Green)
P1
1
P7(Green)
P4
P7
(Green)
2
1
P7
(Green)
P5
3
Page 5

6 7
A6
C1
P6(Red)
8
P8
P8
9
P6
(Red)
P7
(Green)
B18
P7
(Green)
P5
B18
B18
10
11
C14
B18
C14
B21
B21
12 13
B4
Gear Box
B2
4
Page 6

Gear Box Testing
Assembly Testing
1 2
A12
Red
Solar Module
Black
A9
Way 1 : SUN
Way 2 : 50w & up halogen
Minimum 5 inches
from bulb
3 minutes max
Eye Assembly Claw (Right) Assembly Claw (Left) Assembly
A1
B38
How To Oil The Parts
1
Tissue Paper
Gear Box
A20 A2 A8 A13
Eye
If gearbox does not work , refer back to Page 3-4 for re-assembly
Claw (Right) Claw (Left)
x2 x2 x2
Hydraulic Module Assembly
C15
P14
C18
E1
Do not spill any oil from the C18 oil sink.
Keep oil contained.
Cylinder #1 Assembly
2
P12
B17
C12
C13
Oil the part
E1
1
Cylinder #1
ClickClick
2
Click
Click
5
Page 7

Cylinder #2 Assembly3
P12
1
Oil the part
B19
E2
2
C10
C11
How To Fill Up The Cylinder #1 With Water
4
Cylinder #1
Cup & Water
Fill Cylinder #1 and Soft
5
Tube with water
Cylinder #2
Click
Click
1
Pull up the piston to the
top (as shown below).
Water
Click
Click
2
Press down the
piston to the bottom.
2
3
Re-do to fill up the
cylinder with water
3
Cylinder #1
Cup & Water
P3 (Soft Tube)
Cylinder #1
Push to the end
Pull up entirely
Cylinder #1 Cylinder #1
6
Page 8

Fill Up The Cylinder #2
6 7
With Water
Cylinder #2
Water
Press down the piston of
cylinder #2 to the bottom
Hydraulic Module Testing
Hydraulic module
Cylinder #1
Cylinder #2
Cylinder #2Cylinder #1
Cylinder #2Cylinder #1
Push to the end Push to the end
excess
air
insufficient
water
P3
(Soft Tube)
P3
(Soft Tube)
If hydraulic module experiences above failures, back to page 5-6, step 4-7 and fill up the cylinder with water
Notices!! Very Important - Hydraulic Module
Notice 1 : Ensure Hydraulic Module is without the above failures before assembly of each model
Notice 2 : During assembly of each model, Do not Push or pull Cylinder #2 when hydraulic module is installed
Example : Ostrich
Cylinder #2
Cylinder #1
Pull
excess
air
Push
water
leakage
In these cases, go back to page 6-7, step 4-7 and fill up the cylinder with water
7
Page 9

Notice 3 : To smooth the disassembly steps, take down Cylinder #1 first, then Cylinder#2
Tips - disassembly of Cylinder #1
Cylinder #1
Hold Hold
Push
2
1
1
2
Push
1
P13
4
Sorting & Storing parts
( as per the right illustration)
into the box.
Page 58
B5 B6 B7 B8 C6
Eye
x2
Claw (R)
B22
C5
x2 x2
Claw (L)
B20
B35
B34 B36 B37
A10 A11
A9
B28A12
B1
B12
B13
B23
B24
B29
B30
C19 C20 C7 B11 B9
B27
D1 D2
A3
B33
A7
D9
C4 C8
C22B14 A17
A16A15
A19 A18
B32
A4
D7
C16
D4
B15B16
D6
D3
C21
C9
D5
D8
C3
Storage Box Assembly
32
B22
B5 B6A9B7 B8 D9
x2
Claw (R)
B34
B35 B37 A15 A16 B16 B15B36
A10 A11
C17
C2
A12
Claw (L)
B27
B28
x2Eye
x4B14 A17
x2B20 x2B33
x2
D1 x44
C16
A18 A19
D2 x22
C4 C8
Color box
C17
A3
A7
D7
D4 x6
D3 x11
C2 x4
B32C5 x2 C6 x2
A4 x4
x4C22
D6 x2
x2C21
C9 x2
Color box
B1
x2
B12 B13
B29B24B23 B30
x2C20x4C19
C7 x6
B11
B9
D5 x4
D8
C3 x4
8
Page 10

Tips: Plastic Parts Disassembly
1. How to use C16- assistance tool
Solar Module Assembly
D2
D5
D6
D4
D2
D8
Push
D2D1
C16
D1
PullPull
2. Pull and Release the parts
Pull
Pull
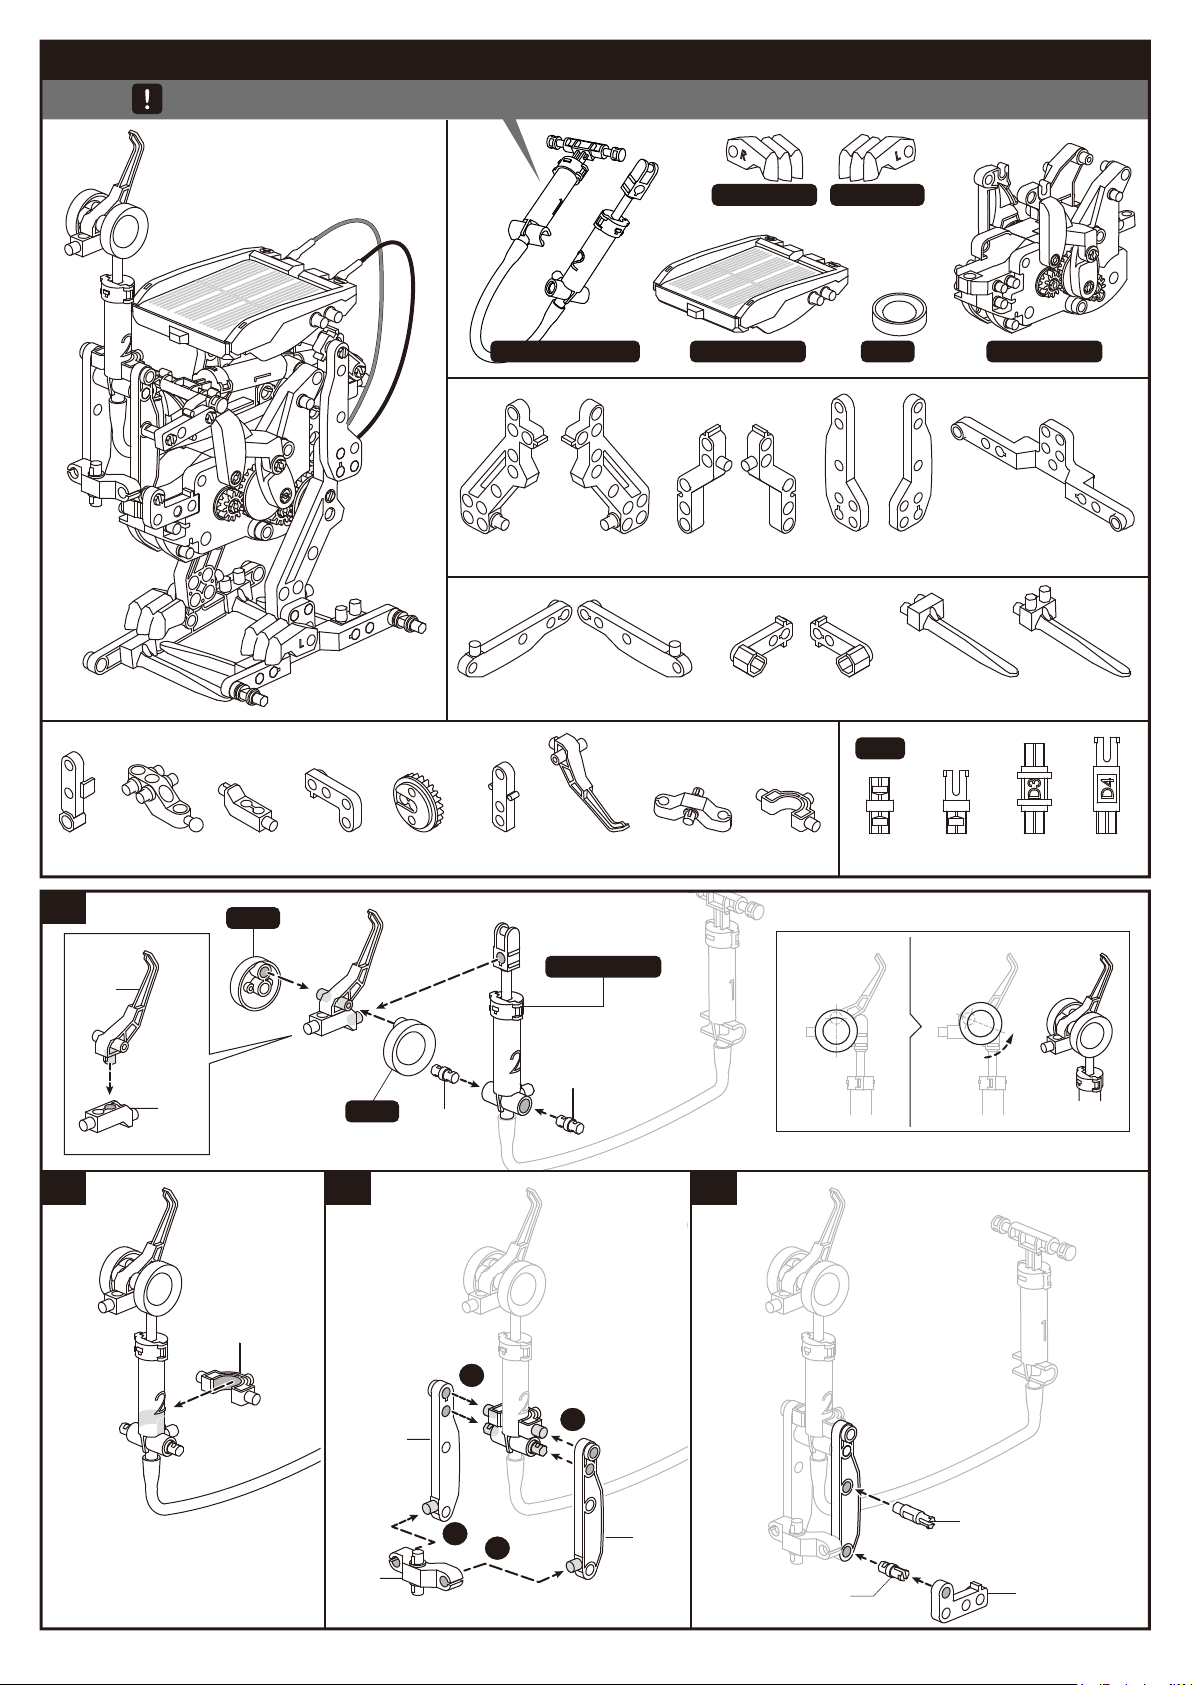
01. Obstacle Avoiding Rover Assembly
Before assembly check the air condition in the cylinder and add water if necessary
Pull
Pull
Pull
Pull
Claw (Right) Claw (Left)
Hydraulic module
A9
9
x2
Solar Module Gear Box
A12
B7 B8
Eye
C6
Page 11

1 : 1
C3x4 C5x2B22
1
Adjust the cam ( as below fig) before assembly.
2 3 4
1
Cylinder #2
D8
2
2
B33
C17
B33
D7 D8C19x4
C6
D1x6 D2x6
D5x2
B22
D2
D7
1
D2
Gear Box
5 6 7
B7 B8
D1
D1
D1
Claw (Left)
Claw (Right)
D1
Click
Click
Cylinder #1
2
ClickClick
Click
Click
1
Click
Click
D1
D1
C17
10
Page 12
8 9
Solar Module
Eye
x2
10
D2
12
Arrow ( ) up
C5
C3
(R)Front wheel
C5
D5
C19
A12
D5
Front wheel Rear wheel
11
C19
D2
C3
x2 x2
13
Rear wheel
A9
Arrow ( ) up
Front wheel
(R)
Arrow ( ) down
Arrow ( ) down
Front wheel
Rear wheel
14
Solar Module Gear Box
RED
(L)Front wheel
(L)
BLACK
Red
Black
Front View
The rover goes and turns the other way when it is blocked by objects
11
Page 13

02. Forklift Assembly
Before assembly check the air condition in the cylinder and add water if necessary
1
D2
B5 B6
D2
Gear Box Hydraulic module
A9
A12
C3x4
Solar Module
C7x3B20x2
2 3
D1
Part 1
D1
C21
A19A18
1 : 1
D7C19x4 C21x2
D1x10 D2x8
C21
B36 B37
D6x2
D1
Part 2
D1
Cylinder #2
4
Part 1
A18
D1x2
D2
D1x2
D6
D6
D7
2
1
Cylinder #2
D2
A19
Gear Box
Part 2
12
Page 14

5 6
C7
C7
C7
B20
D1
B36
B37
D1
B20
7
1
2
B5
Click
Click
Click
Click
B6
9
C19
8
Solar Module
A12
A9
10
D2
C3
x4
13
Page 15

11
Red
Solar Module Gear Box
RED
BLACK
Black
03. Monkey Assembly
Before assembly check the air condition in the cylinder and add water if necessary
Gear Box
B11 B9
B34 B35 B36 B37
A16
B22B14x2
1 2 3
Eye
Solar Module
B7 B8
D8C22x4C3x4 C7x4 B32
x2
1 : 1
D1x2
Hydraulic module
B5
D2x13 D4x4
B6
D5x2
D2
A16
B22
Cylinder #2
14
D8
2
1
Cylinder #2
2
Gear Box
Page 16

4 5
1
2
Click
Click
Click
Click
B35
B34
6 7 8
D2
C3
D2
x4
▼Left Side ▼Right Side
9 10 11
C22
C22
B8
B6
C7
Leg
D2
D2
(Left)
Arm
(Left)
12 13 14
C22
C22
B7
B5
D2
D2
Arm
(Right)
Leg
(Right)
D4
D4
C7
D4
D4
C7
C7
15
Page 17

15 16 17
B32
D1x2
Solar Module
18
19
B9
B36
B14
20
B14
Solar Module Gear Box
D5
D5
Eye
RED
BLACK
x2
B11
B37
Red
C22x4 hang on the rope
C22
Black
C22
C22
C22
P11
16
Page 18
04. Ostrich Assembly
Before assembly check the air condition in the cylinder and add water if necessary
Claw (Right) Claw (Left)
x2
Hydraulic module Solar Module Gear Box
Eye
A4x2
1
C22
B32
B14
Eye
A18A19
B5 B6
B37B14
Eye
D1
C22C3x2 C7
Cylinder #2
D1
B9
C17 D8
B11
B15 B16
B7 B8
B20x2
1 : 1
D1x18 D2x8 D3x5 D4x3
C6x2
B33x2
2 3 4
D8
1
1
B6
17
C17
B5
2
2
D2
D4
B37
Page 19

5
1
6
D2
2
7 8 9
B32
1
2
Click
Click
Click
D1x2
D1
Solar Module
A4
D3
C7
A4
D1
10 11
D4
B11
18
D4
B9
Page 20

12
D2
C3
D2
x2
13 14
D3
D1
Claw (Right) Claw (Left)
D3
B33
B20
C6 C6
Part 1 Part 2
B8
A18
D1x3
A19
B33
D3
B20
D1
D3
B7
D1x3
D1x2
D1x2
Left legRight leg
19
Page 21

15
16
D2
B16
D2
B15
1 1
17
2 2
Left legRight leg
Solar Module Gear Box
RED
BLACK
Red
Black
20
Page 22

05. Excavator Assembly
Before assembly check the air condition in the cylinder and add water if necessary
Gear Box Hydraulic module
A9
B36 B37 B27 D9
A12
C22x3
B9
A4x2
B11
C7
B34 B35
C17
C19x4
A18A19
C3x2
1 : 1
D1x14 D2x7 D4x2
A10
Solar Module
A11
A15
A7
1
1
D2
D4
D1
2
A9
D1x2
B9
A4
4
3
5
5
B27
A4
D1x2
A12
2
1
C22
B36
D1
3
3
2
D1
Part 1
C22
21
B37
C22
Page 23

3
A19
C7
D1x3
B11
B34
D1x2
4
A7
D2
5
Part 2
D4
A15
6 7
Part 2
Part 1
Gear Box
22
Page 24

8 9
D2
D2
Cylinder #2
D2
1110
D1x2
A18
12 13
D9
C17
B35
23
Page 25

14
Cylinder #1
15
16
D2
2
Click
Click
C19
Click
1
Click
A10
A11
Rear wheel
C19
C3
Rear wheel
x2
17
Solar Module Gear Box
RED
BLACK
Rear wheel
C19
Red
Black
24
Page 26

06. Scorpion Assembly
Before assembly check the air condition in the cylinder and add water if necessary
Solar Module
Hydraulic module
A15
B14x2 B15 B16
A16
A17
B32 B34 B35
B7 B8
1 2
Gear Box
A12 A11
B9
B11A18A19 D1x17 D2x16 D4x4 D5x2
A10
C22x4C4 C8
1 : 1
A4x4
A9
x2
Eye
B36 B37
C21x2C3x4 C5x2 C7x6 C9x2
B35
D2
Gear Box
B34
D2
B11
D2
B14
D5
D2
B14
B9
D5
25
Page 27

3 4
Cylinder #2
Cylinder #1
C5
Eye
C5
x2
D1
2
Click
B32
Click
Click
1
Click
5
C4
D1
C7
D1
A17
6 7
D2
C3
D2
x4
C7
C8
►Left Side ►Right Side
26
Page 28

8
D2
A4 C7
D4
D1
Part 1
x4
Part 1
A12
9
Part 1
A11
10 11
A18
Part 1
A10
Part 1
A9
A19
D1
C9
C21
D1
D1
D1
D1
C22
A15
B36
C22
C22
A16
B37
C22
D1
D1
D1
C21
D1
D1
C9
Right pincer Left pincer
27
Page 29

12
13
Right pincer
14
Left pincer
B16
B15
Solar Module
15
Solar Module Gear Box
BLACK
B7
B8
Red
Black
RED
28
Page 30

07. Dog Walker Assembly
Before assembly check the air condition in the cylinder and add water if necessary
x2
Eye
A10
B7
B8 B9 B 11
B15 B16
B20x2
Gear Box
A15 A16 A18A19
B22
B33x2
B32
Solar Module
B34 B35 B36 B37
B5 B6
1 : 1
Hydraulic module
C6x2
A4x4
C7x4 C9
1 2
C5
C5
Solar Module
D5
Eye
x2
D5
D4
D1
B36
D1
D7 D8C2x4 C3x2 C5x2
B6
D1x24
Gear Box
D2x10 D3 D4x5
B5
B37
D1
D1
D5x4
B35
D4
B34
D1
29
D3
D1
Page 31

3
C3
D2
D2
x2
4
5
B33
D4
D2
B16
Left leg
A4
A4
B15
B20
A18
D4
C7
B33
D1
D1
C6
B8
D1
D1x4
C6
B7
D1x4
D1
D1
D1
C7
B20
D2
A19
Right leg
30
Page 32

6 7 8
A16
C9
B9
D2
D1
A15
9
A4
D1
D4
2
1
Cylinder #2
D8
B22
D7
A10
D2
C2
D1
C2
A4
2
1
D1
B32
C2
D2
B11
10 11
Click
2
Click
Click
1
Click
Cylinder #1
D2
C2
C7
Solar Module Gear Box
D5
D5
C7
RED
BLACK
Red
Black
31
Page 33

08. Elephant Assembly
Before assembly check the air condition in the cylinder and add water if necessary
x2
Eye
1 : 1
D1x14
A19
C21x2
1
Gear Box
D2x14 D3x2 D4x4
A18
B22 B29 B14x4
A17
C22x2 C7x4
B7 B8
B1x2
C3x4
B12 B13
B23B24
A15
A16
Solar Module
C4 C8
B6B5A11A10
D8
C21
Hydraulic module
B34 B35
B15 B16
B22
C2x2
B24
B13
B12
2
C22
A16
B1
D1
D1
B1
3
B15
Eye
D1
B23
B29
D1
D1
A17
D8
C21
Cylinder #2
2
1
D1
Eye
2
Gear Box
C22
32
Page 34

4
5
6
B14
B14
B14
D3
B15
B34
A11
B16
Click
B35
B14
2
Click
Click
Cylinder #1
8
Solar Module
A10
D3
7
1
Click
9 1110
D2
C3
D2
x4
►Left Side►Right Side
33
Page 35

12
D2
13
C2
C7
C4
D2
D1x2
Rear Leg (R)
B8
D4
D4
D4
D4
C7
A18
D2
B6
D1x2
Front Leg (R)
14
B5
Front Leg (L)
Solar Module Gear Box
D2
C7
D1x2
A19
RED
BLACK
B7
Rear Leg (L)
D2
C7
C8
D1x2
C2
D2
Red
Black
34
Page 36

09. Buggy Assembly
Before assembly check the air condition in the cylinder and add water if necessary
Claw (Right)
A11A10
D1
Solar Module
C8
C7x5
C19x4
D5x2
D1
Gear Box
B36 B37
A3
A7
A4
C20x2
B32
B9B 11A15 A16
B34 B35
A9
C3x2
A12
D7 D8
1
Gear Box
D4
D1x2
A3
B32
Hydraulic module
C6
1 : 1
D1x25 D2x5 D3x2 D4x3
C4
2
Cylinder #2
A7
D8
D1x2
3
B11 B9
4
35
D7
Page 37

5
D1
D1
C7
C4
D1
D1
C7
D1
D1
D1
6 7
B37
D1
D1
A9
D1
1
Claw (Right)
A12
D1
D1
D1
2
B36
C7
C8
D1
C7
4
C6
D1
D4
B35
B34
push D4 to the bottom entirely
5
D1
D4
5
3
8
D2
C3
C19
x2
36
Page 38

9
10
C7
D1
A4
D2
11
12
D2
C20
C19
Click
2
Click
Click
1
Click
Rear wheel
Rear wheel
Rear wheel
x2
37
Page 39

13
14
D3
15
A10
D3
D1
16
D1
A11
Solar Module
D5
D5
17
A16
A15
Red
Black
Solar Module Gear Box
RED
BLACK
38
Page 40

1 : 1
10. Crocodile Assembly
Before assembly check the air condition in the cylinder and add water if necessary
x2
Eye
Claw (Right)x2Claw (Left)
x2
Hydraulic module
D1x24
1 2
D2x14 D3x4 D4x4
A15
D2
A16
B5B6
Cylinder #2
D5
C4 C8
B32
B1x2
C17
C21x2C5x2 C7x4
B7 B8
C3x4
B27 B28 B29 B30B15 B16
B34 B35B36 B37
B16
Gear Box
B9 B11
Gear Box
Solar Module
A17
A3
A7A4x2 B23 B24
D2
D5
B15
3
D3
A4
A17
A4
C8
39
C4
D3
D3
Page 41

4
6
B35
5
C5
Eye
D1
x2
C21
7
8
C21
D1
B9
B34
D1
B36
D1
D1
2
2
1
D1
D1D1
A7
B28
D3
B37
D1
D1
B11
D1
D1
9
2
B27
A3
D1
D1 D1
40
2
1
Page 42

10
C17
11
2
12
D1
B32
D1
1
Click
Click
Click
Click
13
14
Solar Module
A15
A16
41
Page 43

15
Solar Module
D1
B23
B1
1
B29
1
2
D1
16 17
D4
D4
D4
B24
D2
B30
B1
C3
D2
x4
D4
18 19
►Left Side
►Right Side
42
Page 44

20
Front Leg (L) Rear Leg (L)
C7
D2
C7
D2
D1
B5
Claw (Left)
Claw (Right)
21
Rear Leg (R) Front Leg (R)
D2
D1
C7
D1
B7
D2
C7
D1
22
B8
Claw (Left)
Solar Module Gear Box
RED
BLACK
B6
Claw (Right)
Red
Black
43
Page 45

11. Pterosaurs Assembly
Before assembly check the air condition in the cylinder and add water if necessary
x2
Eye
Claw (Right) Claw (Left)
Hydraulic module
Gear Box
B7 B8
Solar Module
A18A19
C8
A15 A16
C4
A17 A12A9
B9B11
B22
C7x5
B32
B16
A4x4
C6x2
B5B6
C17
B36 B37
A10
C21x2 C5x2 B29B12 B13B14x3 B1x2
C3x2
D7 D8
A11
B20x2B33x2
44
A3
C22
1 : 1
D1x34 D2x12 D3 D5x3 D6x2
B34 B35
B23
B24
A7
Page 46

1
Gear Box
C6
C7
D1
B33
D1x2
B7
B20
D1x2
2
C6
D1
B33
D1x2
C7
3
C21
D1x2
4
D2
C21
Gear Box
B8
B20
C3
D2
C7
D1
C7
D1
A4
A4
D3
5 6 7
D7
B5
D8
Cylinder #2
B6
x2
A3
D2
A7
D1
D1
D1x2
D1x2
45
D2
D2
D2
Page 47

8 9
D1x2
B35
D2
D2
B11
D1x2
B34
B9
C4
C8
10
B16
D1
D1
C17
46
Page 48

11 12
D6
D2
A19
A9
D5
Claw (Right)
2
D6
A18
D2
A12
D5
Claw (Left)
2
1
1
4
3
B32
D1
C7
B14
47
Page 49

13
14
B14
D1
A4
A10
D1
A16
D1
D1
B14
D1
A11
D1
A4
A15
15
D1
B23
B29
1 1
2
A17
D1
B1
2
1
C5
3
B37
B22
B13
B12
B24
5
Eye
2
D1B1
5
4
48
C5
C22
Eye
B36
D5
Page 50

16
17
1
2
18
Click
Click
1
Click
2
Click
Solar Module Gear Box
RED
BLACK
49
Black
Red
Page 51

12. T-Rex Assembly
Before assembly check the air condition in the cylinder and add water if necessary
x2
Eye
Claw (Right)x2Claw (Left)
x2
Hydraulic module
A10
C4
A11
C8
A15 A16
C6x2
Gear Box
B7 B8
Solar Module
A3
A17A18A19
A7
A9
B27 B28
B20X2
A12
C3x2 C5x2 C7X4B36 B37 B22A4X4
B1x2
B33X2 B15 B16
B9 B11
B23 B24
B5 B6
C16
B12 B13
1 : 1
D1x40 D2x12 D3x10 D4x4 D6x2
50
B34 B35
C17
B29 B30
D7
Page 52

1 2
Cylinder #2
D6
D6
D7
D2
D2
Gear Box
D3
A7
3
A3
5
D4
A9
A16
D1
D1
D1
B6
D1
A11
D1
D3
4
D2
D2
D2
D2
Head Part 1
6
7
Head Part 1
D3
A10
B5
D1
D1
D1
D1
C16
A15
A12
D4
Head Part 2
Head Part 2
51
Page 53

8
C4
D1
B30
B24
B1
B28
D3
Head Part 3
D3
D3
9
10
D1
B23
C8
B29
Head Part 3
B27
Head Part 4
B1
11
Head Part 4
12
13
D1
C5
Eye
D1
C5
Eye
D1
Claw (Right)
D1
B34
D1
B35
52
Claw (Left)
D1
Page 54

14
Cylinder #1
Click
Click
15
D1
Click
Click
C17
D1
D1
D1
B11
B9
53
Page 55

16
B36
D1
A17
B37
D1
17
18
C7
C7
D1
A4
19
A4
C7
D1
C7
54
Page 56

20
21
D1
D1
A4
A4
B12
22
D2
23
C3
D2
x2
B13
24
D1
B22
►Right Side
►Left Side
55
Page 57

25
D3
B8
C6
D1
D2
B33
B20
D3
D4
B15
A18
D1x3
D1x2
26
D4
B20
A19
B16
D3
D1x2
B33
D1x3
C6
D3
D1
D2
B7
56
Page 58

27
Solar Module Gear Box
RED
BLACK
Red
Black
It's time to have some FUN !
Place your Rivet-Rex12 in the sunlight and tilt the solar panel so it faces directly into the sun. The
motor should start turning and your Rivet-Rex12 will come to life. When you are not using your
Rivet-Rex12 keep it out of the sun so the motor won’t run. Also, don’t use the Rivet-Rex12 outdoors
when it’s raining.
If there is no sunlight, use a 50W halogen light bulb to simulate the sun. With adult supervision
approximately ve inches from the solar panel. The light should be enough to drive the Rivet-Rex12. CAUTION
shine the lamp on it more than three minutes as the heat may melt the plastic frame.
57
, shine the lamp
; Do not
Page 59

B5 B6 B7 B8 C6
Eye
x2
Claw (R)
x2 x2
Claw (L)
B35
B34 B36 B37
A10 A11
B27
A9
B28A12
D1 D2
B1
B12
C16
B13
B23
B24
B29
B30
C19 C20 C7 B11 B9
Color box
B22
B5 B6A9B7 B8 D9
x2Eye
x4B14 A17
B22
C5
B20
A3
B33
A7
D9
C17
C4 C8
C2
C22B14 A17
A16A15
A19 A18
B32
A4
D7
D4
B15B16
D6
D3
C21
C9
D5
D8
C3
C17
A3
D7
C2 x4
A7
D4 x6
B32C5 x2 C6 x2
Claw (R)
B35 B37 A15 A16 B16 B15B36
x2
B34
A10 A 11
A12
B1
x2
B12 B13
B29B24B23 B30
Claw (L)
B27
B28
x2B20 x2B33
A4 x4
x2
D2 x22
x4C22
C4 C8
D6 x2
x2C21
D1 x44
C16
A18 A19
D3 x 11
C9 x2
D5 x4
x2C20x4C19
C7 x6
B11
B9
D8
C3 x4
58
Page 60

150 Carpenter Ave.
Wheeling, IL 60090, USA
(847) 541-3800 or (800) 533-2441
elenco.com
CHOKING HAZARD. Small Parts. Not for
children under 3 years old.
No part of this book shall be reproduced by any means; electronic, photocopying, or
otherwise without written permission from the publisher.
Printed in Taiwan
Patents Pending
Not responsible for typographical errors.
Teach Tech
Copyright© 2019 Elenco Electronics Inc. All rights reserved.
TM
is a trademark of Elenco Electronics Inc.
753179
 Loading...