

Page 1

CAR CD /DVD /MP3 PLAYER
/RADIO RECEIVER
/WITH BLUETOOTH
MODEL:TE-AV170
INSTALLATION CONNECTION MANUAL
Page 2

1
Copyright Information
©2009 All rights reserved. This document may not in whole or in part be reproduced,
stored in a retrieval system, transmitted in any form or by any means, electronic,
mechanical, photocopying, recording, or otherwise, or reduced to any electronic medium
or machine-readable form without prior consent, in writing, from [COMPANY].
[PRODUCT] and [BRAND] are registered trademarks of [COMPANY]. The logo’s,
standards, software, and/or product names mentioned herein are manufacturer and
publisher trademarks and are used only for the purpose of identification.
Disclaimer
The publishers and author assume no responsibility whatsoever for the uses made of this
material or for decisions based on its use. Further, [COMPANY] makes no warranties,
either expressed or implied, regarding the contents of this product, its completeness,
accuracy, merchantability, or fitness for any particular purpose. Neither the publisher nor
anyone else who has been involved with the creating, production, or delivery of the
material shall be liable for any reason. [COMPANY] may make improvements and/or
changes in the products and/or options described in this document at any time and
without notice.
All brand and product names used throughout this document are trademarks or
registered trademarks of their respective companies. The brand and product names are
used in editorial fashion only and for the benefit of such companies. No such use, or the
use of any trade name, is intended to convey endorsement or other affiliation with the
document.
Product specifications are subject to change without prior notice
www.[WEBSITE]
WEEE (Waste Electrical and Electronic Equipment Directive)
If at any time in the future you should need to dispose of this product
please note that: Waste electrical products should not be disposed of with
household waste. Please recycle where facilities exist. Check with your
Local Authority or retailer for recycling advice.
Disposing of the battery / batteries
Please check local regulations for disposal of batteries or call your local city office or your
household waste disposal service or the shop where you purchased the product.
The battery / batteries should never be placed in municipal waste. Use a battery disposal
facility in your neighborhood or community, if available.
Page 3

2
Dear Customer,
Thank you for selecting our unit. In order for you to utilize this device and all its options, we
recommend that you read the corresponding instructions in this manual before the initial use of the
device, even if you’re familiar with handling electronic devices. Please pay particular attention to the
chapter “Important safety instructions”. Store this manual in a safe location for future reference. The
descriptions and features in this manual only serve as general information and do not represent a
guarantee. In order to offer you a product of the highest quality, we reserve the right to make possible
improvements or changes without prior notification.
Important Safety Instructions
Please read and strictly observe the following instructions!
The supplier waves any and all liability when these warnings are not followed:
- Never open the case of the car radio; it does not contain any serviceable parts! If the case is
open, there is a risk of fatality due to electric shock.
- Do not give your car radio and especially the accessories to children. Never let your children
use electrical devices without supervision. Children are not always able to recognize
potential hazards. Also keep the packaging films away from children. There is a danger of
suffocation.
- The car radio and the accompanying components may not be exposed to dripping or
sprayed water. Make sure that no containers filled with liquid, such as e.g. cups or bottles,
are placed in the vicinity of the device.
- Please familiarize yourself with the different functions of your device before you begin
driving. Excessively high volumes can pose a risk for you and other people in traffic.
Therefore always select the volume at such a level that environmental sounds (horns, sirens,
etc.) can still be perceived.
- Don’t use the car radio at an excessive volume. This poses a risk to your hearing.
- Please only perform lengthy changes of the device settings while the vehicle is parked. Your
concentration might be affected by the changes.
- To promote safety, certain functions are disabled unless the parking brake is on. The Unit is
designed to detect parked status and must be connected to the power supply side of the
parking brake switch. Improper connection or use of his connection may violate applicable law
and may result in serious injury or damage. To avoid the risk of damage and injury and the
potential violation of applicable laws, this unit is not for use with a video screen that is visible
to the driver.
- Only install the device in such a manner that safe driving is assured. To avoid the risk of
accident and the potential violation of applicable laws, the front Video image feature should
never be used while the vehicle is being driven. Also, other video displays should not be in a
location where it is a visible distraction to the driver. In some countries or states the viewing of
images on a display inside a vehicle even by persons other than the driver may be illegal.
Where such regulations apply, they must be obeyed and this unit’s DVD features should not
be used.
- Install the device in such a manner that it doesn't impede the driver and can't injure any of
the vehicle’s occupants in the event of emergency braking.
- Don’t flip the monitor mechanism by hand. This could damage the mechanics.
- The TFT color monitor consists of glass and liquid crystals. Don’t put any excessive pressure
on the monitor, since otherwise it might scratch, break, or sustain other damages. In addition,
the image quality might be impaired.
- Don’t touch the monitor surface with hard objects and only clean it with a soft, dry cloth and
special TFT cleaner.
- Don’t use the device for a longer period while the vehicle's engine isn't running. This could
drain the vehicle battery to the degree that the car can no longer be started. In addition, this
might reduce the lifespan of the battery.
- Don’t park your vehicle in direct sunlight for extended periods, otherwise the temperature in
the car’s interior could rise to the point that the device overheats and causes malfunctions. If
possible, cool the interior of the vehicle in order to ensure that the device will operate properly.
- Only let the device be installed by qualified vehicle technicians.
Page 4

3
- Before the final installation of the device into a DIN insertion compartment in the dashboard,
connect the cables and test the connections.
- Only use the accessories included in the delivery. Usage of unauthorized components can
cause damages.
- If you need to drill holes or make other changes for the installation, consult a specialized
workshop in your area.
- This device is designed for a vehicle power supply of 12 V with the ground on the car body
(negative pole). Check the battery voltage before installing it into a camping vehicle, bus, or
truck.
- To avoid short circuits, the battery has to be disconnected before the installation.
- Read the guidelines in this handbook for the connection of the power supply.
- Secure the installed cables with insulating tape, cable ties, or cable clamps. To protect the
cables from damage, use insulating tape when guiding them past metal components. Place
and secure all cables in such a manner that they are not in the vicinity of movable parts, such
as e.g. the parking brake, gas/brake/coupling pedals, handle bars and seat tracks.
- Don’t place any cables in the vicinity of heat sources (e.g. near the heater ventilation), since
the insulation of the cables might get damaged and result in short circuits.
- Don’t short circuit any cables. This can result in damages to the vehicle and device.
- Never establish a power supply to other devices by removing the insulation of the device’s
power supply and connecting an additional cable. Otherwise, the maximum power rating of the
cable will be exceeded and there will be a danger of overheating.
- If you have to replace the fuse, only use an identical one with the same rating.
- The connected speakers have to be high-performance speakers with a minimum output of 40
W and an impedance ranging from 4 to 8 ohm. If you connect speakers with other output or
impedance ratings, the speakers may burn, smoke, or sustain other kinds of damage.
- When the device is turned on, a control signal adjoins the blue cable of the connection A5
(ISO plug A). You can connect this to the relay of the extendable vehicle antenna (max. 100
mA, 12 V=). If your vehicle has a wire antenna inside the windshield, connect the blue cable
A5 (ISO plug A) to the pre-amplifier of the antenna.
- If an external audio amplifier is connected to the device, the blue cable of connection A5 (ISO
plug A) may not be connected to the power supply of the amplifier. Likewise, you may not
connect it to the power supply of an active car antenna. This poses a risk of short circuits and
malfunctions.
- Insulate unused connection cables with insulating tape. The same applies to unused speaker
cables. Otherwise there is a risk of short circuits.
- Dirt or condensed moisture on the lens of the CD/DVD drive may impede and even prevent
the playback of data carriers.
- In general, the playback of self-burned data carriers is possible, but it depends on the used
software and the settings made with it, so that there may be problems during playback in
individual cases. You can receive further information from the manufacturer of your software.
- Additional CD data carriers can be played back just like audio CDs. It’s possible that CDR/CD-RW data carriers can’t be played back correctly if they were recorded by a device other
than an audio CD recorder.
- In addition, it may be the case that a data carrier (CD-R/CD-RW) recorded with an audio CD
recorder can’t be played back due to the conditional features, irregular formats, or soiling of
the data carriers.
- The information recorded on the data carrier (ID3TAG) is displayed by this device.
- After inserting a CD-RW data carrier, it takes a little longer for the playback to begin than with
regular CD or CD-R data carriers. Also read the guidelines on the sleeves of the CD-R/CDRW data carriers before you insert them.
- Do not turn on or off the product in short intervals. When turning the unit off, wait for at least
10 seconds prior to turning the unit on again. Do not operate the player with scratched,
bended or broken discs and when a disc is not loaded properly, do not force it into the player
- Do not UPDATE the unit in SETTING menu by yourself until contacting with your supplier. If
your unit is working abnormally, please contact with your supplier first and let them to judge
whether it can be modified by software updating..
NOTE
- Please dispose empty batteries according the regulations in your country
- All On Screen Displays (OSD) and Pictures will be based on the English version.
- Design and Specifications may vary in the manual from the actual product in use.
Page 5

4
Table of Contents
Copyright Information………………………………………………………………………..1
Important Safety Instructions ...................................................................................... 2
Table of Contents ....................................................................................................... 4
Accessories ................................................................................................................ 5
Installation & Connection............................................................................................ 6
Operation of the Monitor............................................................................................. 7
Info Display................................................................................................................. 8
Electrical Connection.................................................................................................. 9
Front Panel ............................................................................................................... 11
Remote Control ........................................................................................................ 14
Main Menu................................................................................................................ 18
Radio Player...................................................................................................... 18
DVD Player........................................................................................................ 18
File Management............................................................................................... 19
SD/MMC Cards & USB Player .......................................................................... 19
AV-IN Mode....................................................................................................... 20
Bluetooth Section ..................................................................................................... 20
BT Main Menu................................................................................................... 20
Pairing Mode..................................................................................................... 20
Auto-connect - Disconnect ................................................................................ 21
BT Phone Book................................................................................................. 21
Call Mode.......................................................................................................... 21
Voice Transfer................................................................................................... 22
Call History Mode.............................................................................................. 22
(A2DP) Music Mode .......................................................................................... 22
Setting Control.......................................................................................................... 23
Sound Control ................................................................................................... 23
Display Control.................................................................................................. 23
RDS & Radio Control......................................................................................... 23
TA...................................................................................................................... 24
EONTA.............................................................................................................. 24
REG................................................................................................................... 24
PI....................................................................................................................... 25
Date & Time Control.......................................................................................... 25
System Information ........................................................................................... 27
Calibration......................................................................................................... 27
Handling Discs.......................................................................................................... 28
Cleaning ................................................................................................................... 28
Troubleshooting........................................................................................................ 29
Service and Warranty ............................................................................................... 29
Technical Specifications ........................................................................................... 30
GPS Antenna Installation ......................................................................................... 31
Page 6

5
Accessories
Package contains the following accessories for installation and operation of the unit.
UNIT Open and Closed
1x Mounting Bracket
1x Assemble Bar
1x Screw B15x16
4x Bolt M5
1x Nut M5
1x Flat Washer
1x Spring Washer
2x Unit E
j
ection Bars
This User Manual.
1x Unit IR-Remote
Control with One
CR2025 3Volt Cell
Battery.
ISO Wire Cable
Mounting Collar
1x Protective Carrying
Case for Detachable
Front Panel.
1x AV-IN Cable
Page 7

6
Installation & Connection
Note:
Please observe the following safety instructions for the connection of the device:
-
Read the entire installation section before connecting the device.
-
Disconnect the negative pole of the vehicle battery for the duration of the installation.
-
Observe the safety instructions by the vehicle manufacturer during this task.
-
If you need to drill holes for the installation, make sure that no parts of the vehicle are
damaged.
-
The cross section of the positive and negative cable may not be less than 2.5 mm².
-
Do not connect any of the vehicle’s plugs and cables to the radio unless you have the
appropriate specialized knowledge of this process!
- Only use the supplied cable to connect the device.
- Depending on the build of your vehicle, the installation may deviate from this
description.
- We do not assume any liability for damages caused by faulty installations or
connections, nor any subsequent damages.
- We recommend that you have the device installed by a specialized company. Then
you will have created the prerequisites for a problem-free functioning of the device. If
at any point during the installation you are unsure that you can correctly connect the
device by yourself, contact a specialist. A faulty installation may cause damages to
the device and the vehicle electronics.
1) Remove the installation frame from the device with the aid of the disassembly key, by
sliding the disassembly keys into the provided openings on the right and left side of
the device, as described in Fig A.
2) Make sure that the protrusion on the disassembly key points away from the device
during the insertion (Fig C + Fig. B.) Afterwards, the frame can be slid down over the
device towards the rear.
3) Now slide the installation frame into the installation slot provided for the car radio.
4) Now attach the installation frame by bending the installation brackets towards the
outside with a screwdriver. The frame is properly installed when it can no longer be
pulled out, yet also keeps from sliding into the installation slot.
5) Now connect the cable set and the antenna to the vehicle’s electronics corresponding
to page 6.
6) Insert the device into the installation frame until the stop.
7) The device then audibly snaps into the frame. Attach the front frame and then insert
the operating unit.
Fig. C.
Fig. B.
Fig. A.
Page 8

7
8) The device is distinguished by a high degree of output. During operation, this results
in a strong heat generation. Therefore no cables or other parts may adjoin the device.
If their insulation melts, there is the risk of a short circuit or fire.
9) Removing: Turn off the device. Remove the operating unit and place it into the case.
Clamp off the negative pole of the vehicle battery for the duration of the disassembly.
First remove the front frame of the device by inserting a flat object (e.g. the back of
the disassembly key) between the device and the panel to the right and left of the
short side of the frame and carefully levering the panel out towards the front. Then
insert the two disassembly keys into the openings on both sides of the front of the
device and slide these until the stop. Make sure that the protrusion on the
disassembly key points away from the device during the insertion. Slowly and
carefully pull out the device. Remove the cable and antenna from the device.
10) Make sure that no vehicle cable can cause a short circuit after the device has been
unplugged.
Operation of the Monitor
Open the monitor by briefly pressing the “OPEN” button. Now the monitor is opened
automatically and fixed in the flipped-open position. The monitor can be closed again by
pressing the “OPEN” button again. If the monitor doesn’t close as a result, it may not be in
the correct position. Then there will be an error message displayed.
Note:
Before beginning to drive, please familiarize yourself sufficiently with the device and avoid
longer entries during the drive for your own safety!
■If the back of monitor touches dashboard or air-conditioner inlet et. after opening the
monitor .then setup TILT level in monitor TILT menu to prevent damage from repeat touching.
Any excessive force, improper use, or incorrect handing, which result to damage to the
monitor or TILT Mechanism is NOT covered under the normal warranty terms.
Page 9

8
Info Display
Info Display when the monitor is closed.
MUTE
The loudspeakers have been
muted
LOUD
The LOUDNESS function
has been activated
HIT RADIO
(Example): RDS program
name
100.60
Frequency in the FM range
PTY
A broadcast program with
program type information is
being received
TP
A broadcast program with
traffic information is being
received
EON
EON (Enhanced Other
Networks) data are being
received
2
Preset location of the
selected station on the
station buttons
LOC
The selection of local radio
stations has been activated.
ST
An FM Stereo program is
being received
DISC
CD/DVD has been inserted
INT
Beginnings of tracks are
being played (intro)
RDM
Tracks are played back in
random sequence (Random)
TA
Readiness for traffic alerts
has been activated
AF
Alternative frequency has
been activated
RPT
A CD track is being repeated
(Repeat)
STOP
The playback has finished.
00:28
Duration of the current track
Page 10

9
Electrical Connection
1) Radio Antenna Input (75 Ohm)
2) Line Output (Rear) (Gray)
3) Line Output (Front) (Brown)
4) Dual Zone Audio Output (Gray)
5) GPS Antenna
6) Bluetooth ANT
7) Subwoofer Output (Blue)
8) Dual Zone Video Output
9) Camera Input
10)External MIC
11) ISO Cable Connection:
ISO [A3]
Driver Safety wire
(Brown), has to be connected to the
parking brake or other suitable
components of the vehicle in such a
way that the video playback of the
device is interrupted for the driver
while the vehicle is in motion.
Please consider that your insurance
coverage may be restricted or
exempted otherwise. Please consult
a specialist in your area if you have
any questions about the
connections.
ISO [A2] (Pink) Connecting to the
reverse light to switch on the rear
view camera when the reverse gear
is put in
Note on ISO-A Connector:
Depending on the manufacturer, the
contacts on your vehicle connection
may be assigned differently. This is
not a defect of the device but
caused by a deviating connector pin
assignment by the manufacturer of
your vehicle. To provide a
connection that conforms to this
device, please purchase an
appropriate adapter cable from a
specialized dealer if required.
Please consult a specialist in your
area if you have any questions
about the connections.
ISO Connecto
r
RCA Connectors
Left = White
Right = Red
Yellow = Video
ISO-A
A2 PINK Reverse light connection.
to switch on the rear view
camera when the reverse gear
is put in
A3 BROWN Driver Safety Wire
A4 YELLOW (B+). Connection for
+12V operational voltage
(diameter at least 2.5 mm²) to
permanent plus of the vehicle.
A5 BLUE To system control
terminal of an external amplifier
or Automatic Antenna (max.
100mA / 12Vdc).
A6 ORANGE To dimmer control
terminal. (head light on,
illumination dimmed)
A7 RED ACC (+).Connection for
+12V trigger voltage. Connect
to ignition key of the vehicle. If
contacts A4 and A7 are
switched, the device will “forget”
the stored stations after the
ignition is turned off.
A8 GND. ( - / Ground) Attach the
connection for the ground
(diameter at least 2.5 mm) to
the
g
round of the vehicle.
ISO-B
Front Speaker
B3 Right + (Gray)
B4 Right – (Gray/Black)
B5 Left + (White)
B6 Left – (White/Black)
Rear Speaker
B1 Right + (Violet)
B2 Right – (Violet/Black)
B7 Left + (Green)
B8 Left – (Green/Black)
Page 11
10
Note:
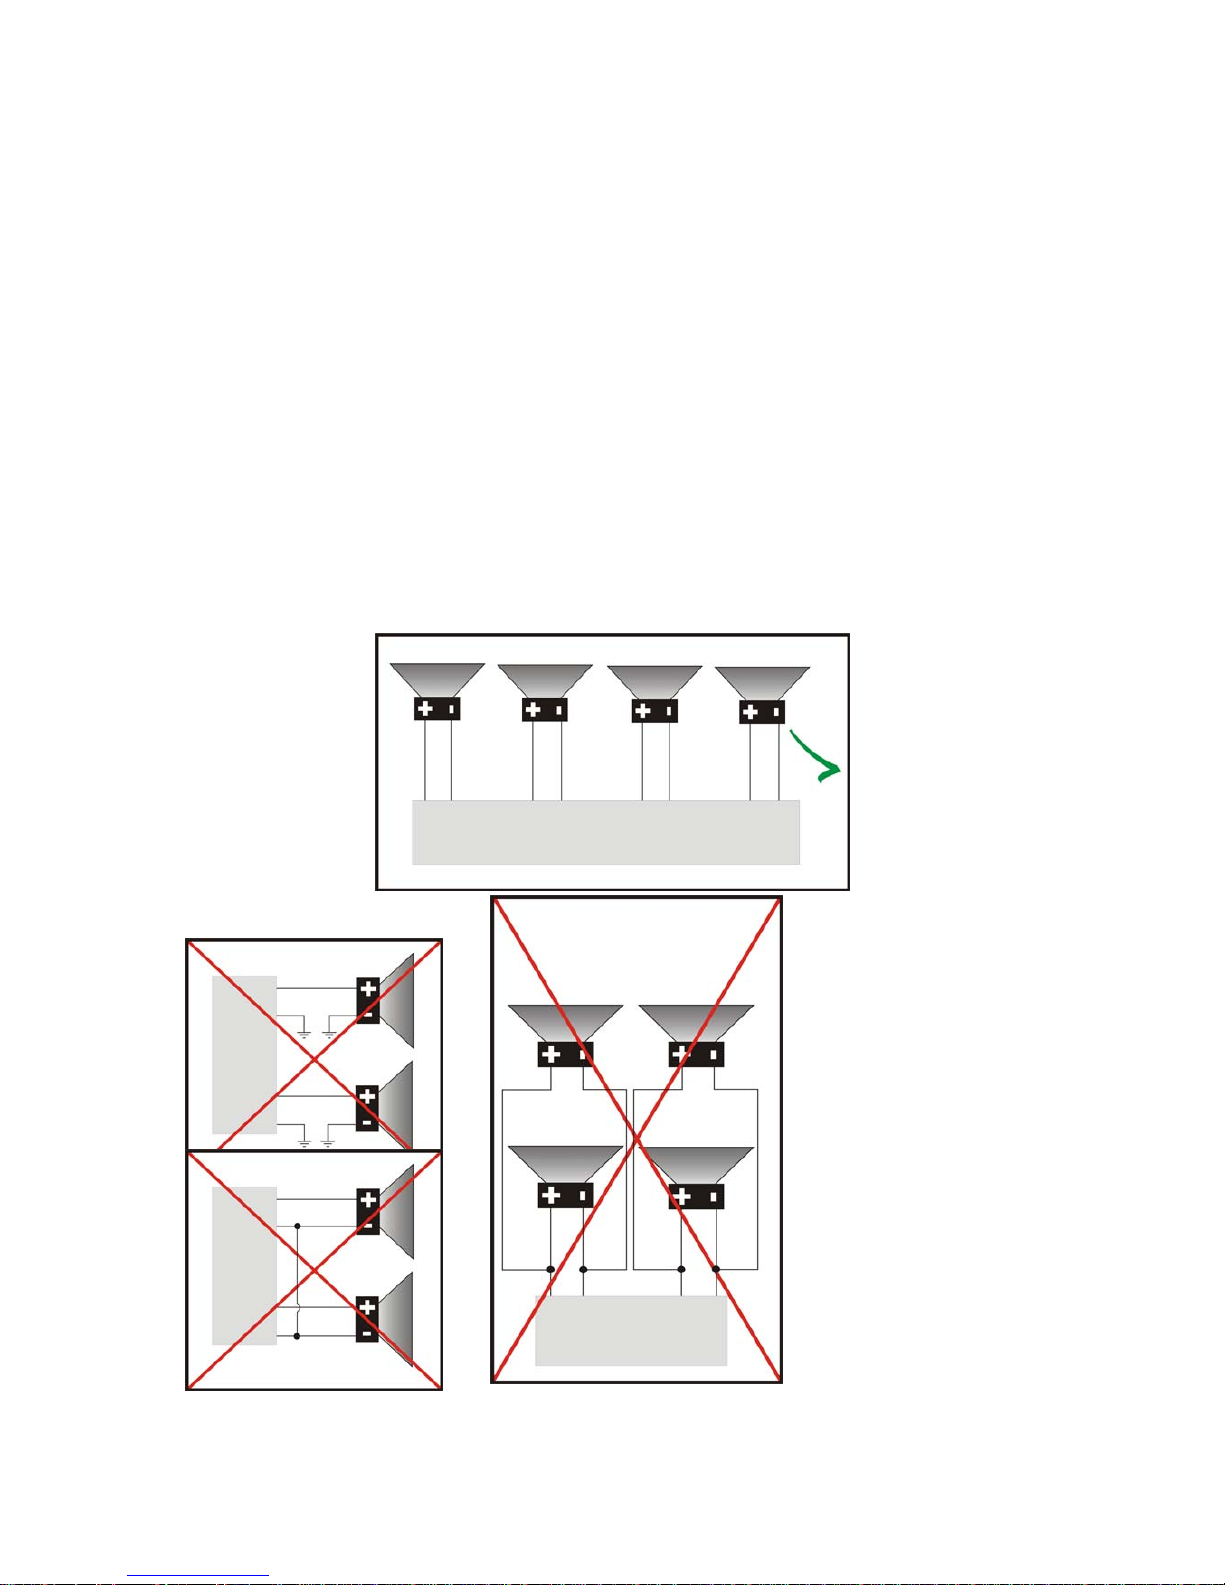
- Only use groundless loudspeakers.
- Use only loudspeakers of minimal 40Watt, using fewer watts may result in damaging
your loudspeakers at higher volumes.
- Use 4~8 Ω (Ohm impedance) loudspeakers only; using higher or lesser impedance
may damage the unit.
- Do not use 3-cable loudspeakers and do not connect the loudspeakers minus to the
car body (GND). The unit is using a BTL circuit and each loudspeaker must be
connected with insulated cables according the diagram.
- Loudspeaker cables and/or optional external power amplifiers must always be about
30cm away from the antenna and/or antenna extension parts.
Connect the speakers according the following diagram, incorrect connections will damage
the unit or your loudspeakers
Correct Connection
Left Front - Right Front | Left Rear - Right Rear
Incorrect Connections
Page 12
11
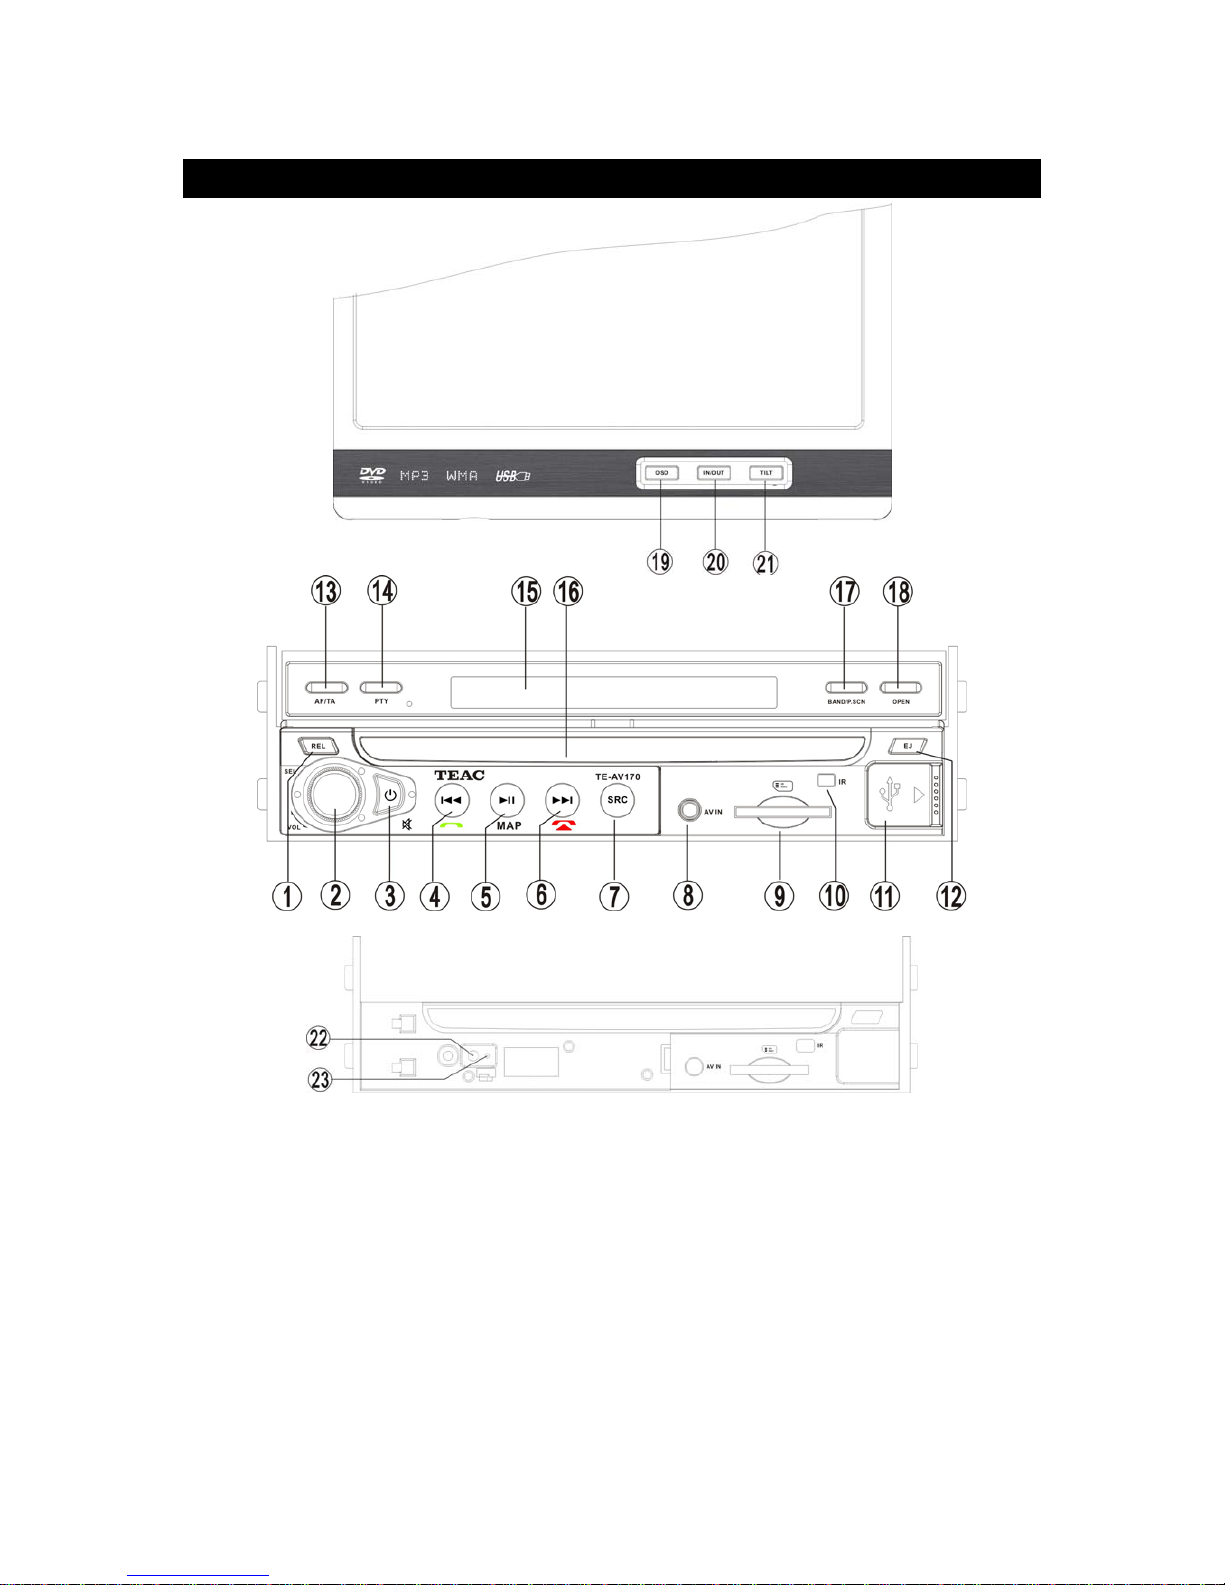
Front Panel
When the front panel is removed,
PLEASE DON’T TOUCH the contacts.
1. REL Button
Press to detach and release the front panel, the unit will be switched off automatically after a
few second when released.
Detach/Attach the Panel: Press REL button and pull out the left side to detach the panel.
To attach it, insert the right side first and then press the left side until hear a click sound.
2. VOL Knob / SEL Button
VOL Knob: Adjust the volume level by turning the knob clockwise to increase or
counterclockwise to decrease.
Page 13

12
SEL I: Short push it to enter SOUND SETTING menu to adjust the sound settings; EQ =>
BASS => TREBLE = > BALANCE => FADER => EQ. Adjust the level by click touch panel to
increase or counterclockwise to decrease.
DUAL KEY setting: When DUAL is ON, long press it to choose DUAL-C/C-DZ (Buttons on
panel and RC control radio only), DAUL-DZ (Buttons on panel and RC control DVD only)
3. POWER / MUTE Button
Press to turn on the unit, press and hold for 2 seconds to turn the unit off.
(* Press any button
except OPEN button and EJECT button on panel, and EJECT
button on remote control)
Press to MUTE the volume output, press it again to resume volume when the power is on.
4.
Buttons
In Radio mode, press to search a previous station. Press and hold for two seconds to start
search a station manually, then press to tune each frequency step downward.
In DVD / SD / USB mode, press
button to skip to the previous track. Press button and
hold for two seconds to activate fast reverse (REW) search in a track.
In BLUETOOTH mode, press to make a call after inputted a phone number or accept an
incoming call.
5.
/ PLAY / PAUSE Button
In DVD, CD, USB, SD mode, press to pause / play. Press it again to resume playback.
Long press to enter MAP mode.
6.
Buttons
In Radio mode, press to search a next station. Press and hold for two seconds to start
search a station manually, then press them to tune each frequency step upward.
In DVD / SD / USB mode, press
button to skip to the next track. Press button and hold
for two seconds to activate fast forward (FF) search in a track.
In BLUETOOTH mode, press to reject a coming call or hang up while calling.
7. SRC Buttons
Press it to select the mode: Radio, DISC (if there is a disc in unit), USB (if there is a USB
device in the unit), CARD (if there is a SD/SDHC card in the unit), AV IN, and BLUETOOTH
(if the connection is ok).
8. AV-in Jack
Receive signals by connecting to outside input device
9. SD-SDHC Slot
SD-SDHC memory card slot, for Multimedia playback files only. Insert a SD CARD into this
slot and the unit will automatically start reading and playback the card.
10. IR Sensor
IR Remote control signal receiving window. Max distance is 6-8 meters, 45 angels.
11. USB Jack
Insert a USB Flash Storage Device and music starts to play automatically. * Supported Music
File Format: MP3, WMA Files
Page 14

13
12. EJECT Button
Press to eject a disc. If the disc is not removed for about 10 seconds after eject, the disc is
reinserted automatically.
13. AF/TA Button
Press and hold for 2 seconds it to enable or disable AF (Alternate Frequency) mode.
Press once to make TA sound off, press twice enable or disable TA (Traffic Announcement)
mode.
14. PTY Button
In Radio mode press it to activate the PTY function, press it repeatedly to show PTY MUSIC
group → PTY SPEECH group → PTY off, choose your intended PTY type by pressing the
icon in the touch screen or pressing the corresponding preset digit keys on remote control.
When PTY search is on, and the selected type matches, PTY information is displayed. If PTY
code is different or not available, PTY NONE icon will blink, and PTY is automatically exited
to normal mode
15. Info Display
Information Display LCD when monitor is closed.
16. DISC Door
17. BAND/P.SCN
In Radio mode, press to change radio band in sequence of FM1 → FM2 → FM3 → MW1 →
MW2. Press and hold for 2 second to store the radio stations with strong reception
automatically (PSCN) and scan each station for about 5 seconds. Press any button to stop
this action.
18. OPEN Button
Press to open and close the TFT monitor.
WARNING: Do not obstruct the monitor while in the opening or closing cycle, this may cause
damage to the monitor mechanism and it is NOT
covered under warranty.
19. OSD Button
In DVD mode press it to enter the OSD menu.
20. IN/OUT Button
Press it to move the Monitor out/in: TILT LOAD 0 =>TILT LOAD 1 =>TILT LOAD 2 => TILT
LOAD 3
21. TILT Button
Press it to adjust the Monitor tilt angle: TILT ANGLE 0 => TILT ANGLE 1 => TILT ANGLE 2
=> TILT ANGLE 3 => TILT ANGLE 4.
22. Reset Button
Press it with a thin, sharp object .The device will then be reset to factory default settings.
23.ANTI-THEFT LED
Page 15
14
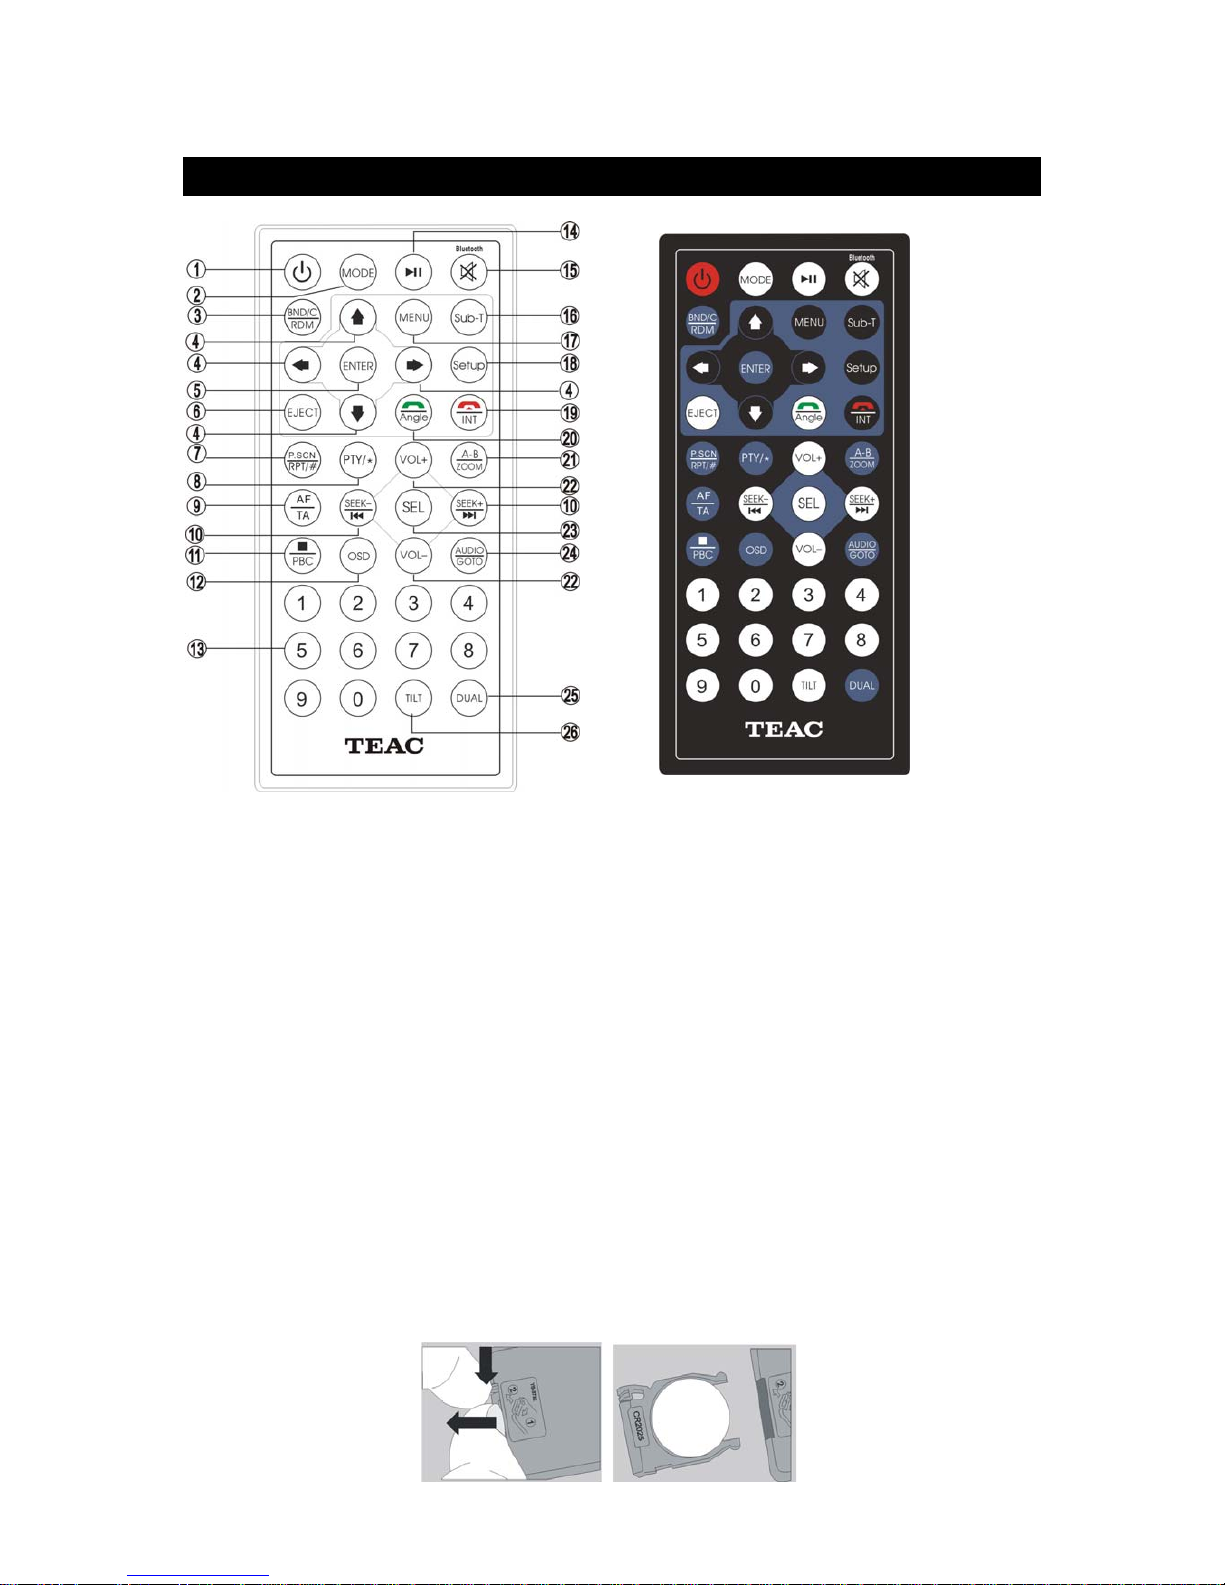
Remote Control
1: POWER
2: MODE
3: BAND/RANDOM/C
4: UP/DOWN/LEFT/RIGHT
5: ENTER
6: EJECT
7: P.SCN/RPT/#
8: PTY/*
9: AF/TA
10:BACKWARD/FAST
BACKWARD/FORWARD/
FA
S
T FORWARD
11: PBC/STOP
12: OSD
13: DIGIT NUMBERS
14: PLAY/ PAUSE
15: MUTE/BT
16: SUBTITLE
17: MENU
18: SETUP
19: INT / HANG UP
20: ANGLE / PICK UP
21: A-B/ZOOM
22: VOL+/-
23: SEL
24: AUDIO/GOTO
25: DUAL
26: TILT
Changing the battery
1. Press the catch and at the same time pull out the battery tray.
2. Insert the 1 x lithium battery, type CR 2025 3V battery with the stamped (+) mark facing
upward. Insert the battery tray into the remote control.
Warning:
Store the battery where children cannot reach. If a child accidentally swallows the battery, consult
a doctor immediately. Do not recharge, short, disassemble or heat the battery or dispose it in fire.
Do not expose or bring into contact the battery with other metallic materials. Doing this may
cause the battery to give off heat, crack or start a fire. When throwing away or saving the battery,
wrap it in tape and insulate; otherwise, the battery may give off heat, crack or start a fire.
Page 16

15
1. POWER
Power on or off.
2 MODE Button
Press it to select the mode: Radio, DISC (if there is a disc in unit), USB (if there is a USB
device in the unit), CARD (if there is a SD/SDHC card in the unit), BLUETOOTH (if the
connection is ok). And AV IN,
3. BAND/ RDM / C Button
In Radio mode, press to change radio band (FM-MW).
In DVD mode, press to play randomly.
In BLUETOOTH NUMBER DIAL mode, short press it to clear an inputted number one by one,
press it and hold for 3 or 4 seconds or clear all the inputted numbers at once.
4: Cursor
/ / / Buttons
Use the
/ / / buttons to select the menu item. the title, track or to show next frame.
5. ENTER Button
Press it to confirm selection or setting.
6. EJECT Button
Press it to eject the disc.
7. P.SCN/ RPT / # Button
In CD mode, press to repeat track/disc; In DVD mode, press to start repeat file/repeat all
playing, press and hold for two seconds to start repeat folder playing; In VCD mode when
PBC is off, press to repeat track/off.
In Radio mode: PS (Preset Scan): Press to scan all preset stations in the memory of the
current band and stay on each memory stations for about 5 seconds.
AS (Auto Save): Long press to save the stations with good reception automatically and scan
each station for about 5 seconds.
In Bluetooth mode: Press to make a # symbol.
8. PTY/ * Button
PTY: In Radio mode press to activate the PTY function, press it repeatedly to show PTY
MUSIC group → SPEECH group ı PTY off, choose your intended PTY type by pressing the
icon in the touch screen or pressing the corresponding preset digit keys on the remote
control. When PTY search is on and the selected type matches, PTY information is displayed.
If the PTY code is different or not available, PTY NONE icon will blink. PTY engaging is
automatically exit to normal mode.
In BLUETOOTH mode, press it to make a * symbol in BLUETOOTH NUMBER DIAL mode.
9. AF/TA Button
Long press it to enable or disable the AF function.
Press it to enable or disable the TA function.
10.
/ Buttons
In DVD mode, Press
button to skip to the previous track. Press button to skip to the
next track. Press and hold
or button for two seconds to activate fast forward (FF) or fast
reverse (REW) search in a track.
Page 17

16
In RADIO mode, press or button to start automatic searching, push and hold for two
seconds to start manual searching.
button Frequency up, button Frequency down.
11. STOP/PBC Button
Press it to Stop playback from the current position, press it again to final stop to the very
beginning. Press PLAY/PAUSE button to play.
Press and hold for two seconds to set PBC on/ off in VCD mode.
12. OSD Button
Press the OSD button to show the current mode information on the display.
13. Digit 0-9 Buttons
In radio mode, select the desired band; In DVD mode, select track. In Bluetooth Mode, key in
telephone number.
14. MUTE/ BT Button
MUTE: Short press this button to mute the volume output, press it again to resume volume.
Bluetooth mode: When Bluetooth is connected with a mobile phone, long press this button to
enter into the Bluetooth mode. When Bluetooth is in standby mode (disconnected), long
press it to start searching and connecting the last paired phone automatically.”
15. PLAY/PAUSE Button
In DVD mode, press it to pause playback, press again to resume.
16. SUBTITLE Button
Press it to select the subtitle language (Available only if the disc with subtitle function).
17. MENU Button
Press it to show main menu, in DVD mode, long press it to enter TITLE MENU (Enable only
if the DVD disc with title menu).
18. SETUP Button
In DVD mode press it to enter the setup menu.
19. INT /
Button
Press it to activate the intro function.
Press to reject a call or hang up while calling only if the BLUETOOTH is connected.
20. ANGLE /
Button
Press it repeatedly to change the viewing angle (Available only if the DVD disc has this
function).
In Bluetooth mode, press to make a call after inputted a phone number or accept an
incoming call
21. A-B/ZOOM Button
During playback, press it at the starting point of section you want to repeat(A), press this
button again at the ending point of the section you want to repeat (B), section A-B repeating
starts. Press it again to cancel the A-B repeat function.
Press it and hold for two seconds in VCD mode to zoom the image in or out in the sequence
of 2X->3X->4X->1/2X->1/3X->1/4X.
Page 18

17
22. VOL+/- Buttons
Press to adjust volume level.
23.SEL Button
Press it to enter the SOUND SETTING menu, and press Cursor UP/DN buttons to choose an
item and press cursor left/right buttons to set the item. Press SEL button again to exit the
menu.
Long press SEL button to enter DUAL OFF; C-DUAL; D-DUAL.
24. AUDIO/GOTO Button
In DVD mode press it to select the audio language, press and hold for two seconds to go into
the set chapter/track/time directly, press left/right button to choose the item.
In VCD mode, press it to select the sound track in the sequence of MONO L =>MONO R
=>MIX MONO =>STEREO.
25. DUAL Button
3 status of DUAL condition is toggled: DUAL OFF; C-DUAL; D-DUAL.
C-DUAL: External AV device is showing DVD/USB/SD only. All buttons on the panel is
operated for CAR radio, Bluetooth, AV-IN sections.
D-DUAL: External AV device is showing DVD/SD/USB only. All button key on the panel and
remote controller is working for DVD/USB/SD, sections for external.
DUAL Zone Out R/L :Please connect DUAL Zone Out R/L into external device ,you can
listen audio sound for DVD/USB/SD during C-DUAL,D-DUAL.
DUAL OFF: Ordinary operation.
26. TILT Button:
Press it to adjust monitor tilt angle.
Page 19
18
Main Menu
The best way to discover the program is to explore each screen in detail, and to find out how
to move from one to another. Read this chapter for a guided tour.
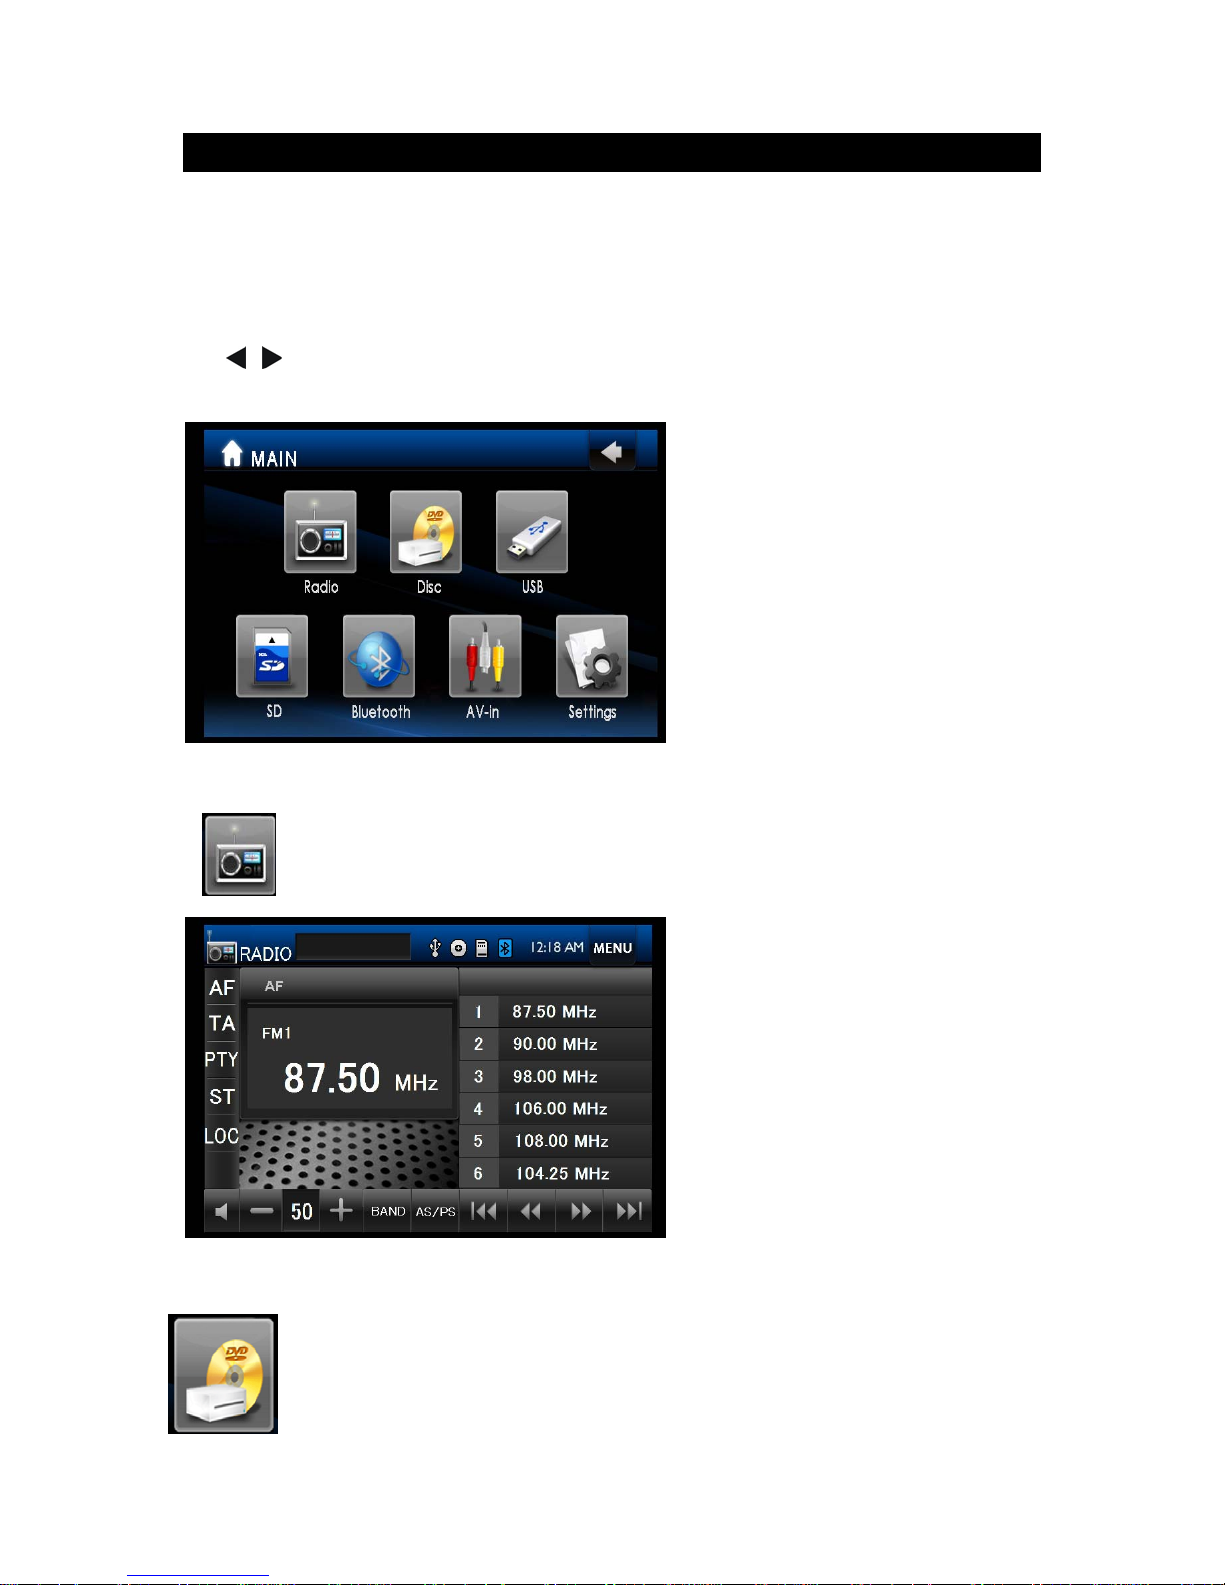
Unit starts by displaying the Main menu.
This is the root of the screen hierarchy, and you can simply access all features by tapping on
the touch screen buttons.
Tap / buttons on touch screen to change pages, then tap the icons to enter a desired
mode.
Radio Player
To start Radio, tap RADIO button on main menu screen
.
DVD Player
To start DVD Player, tap on DVD button from main menu screen.
Page 20
19
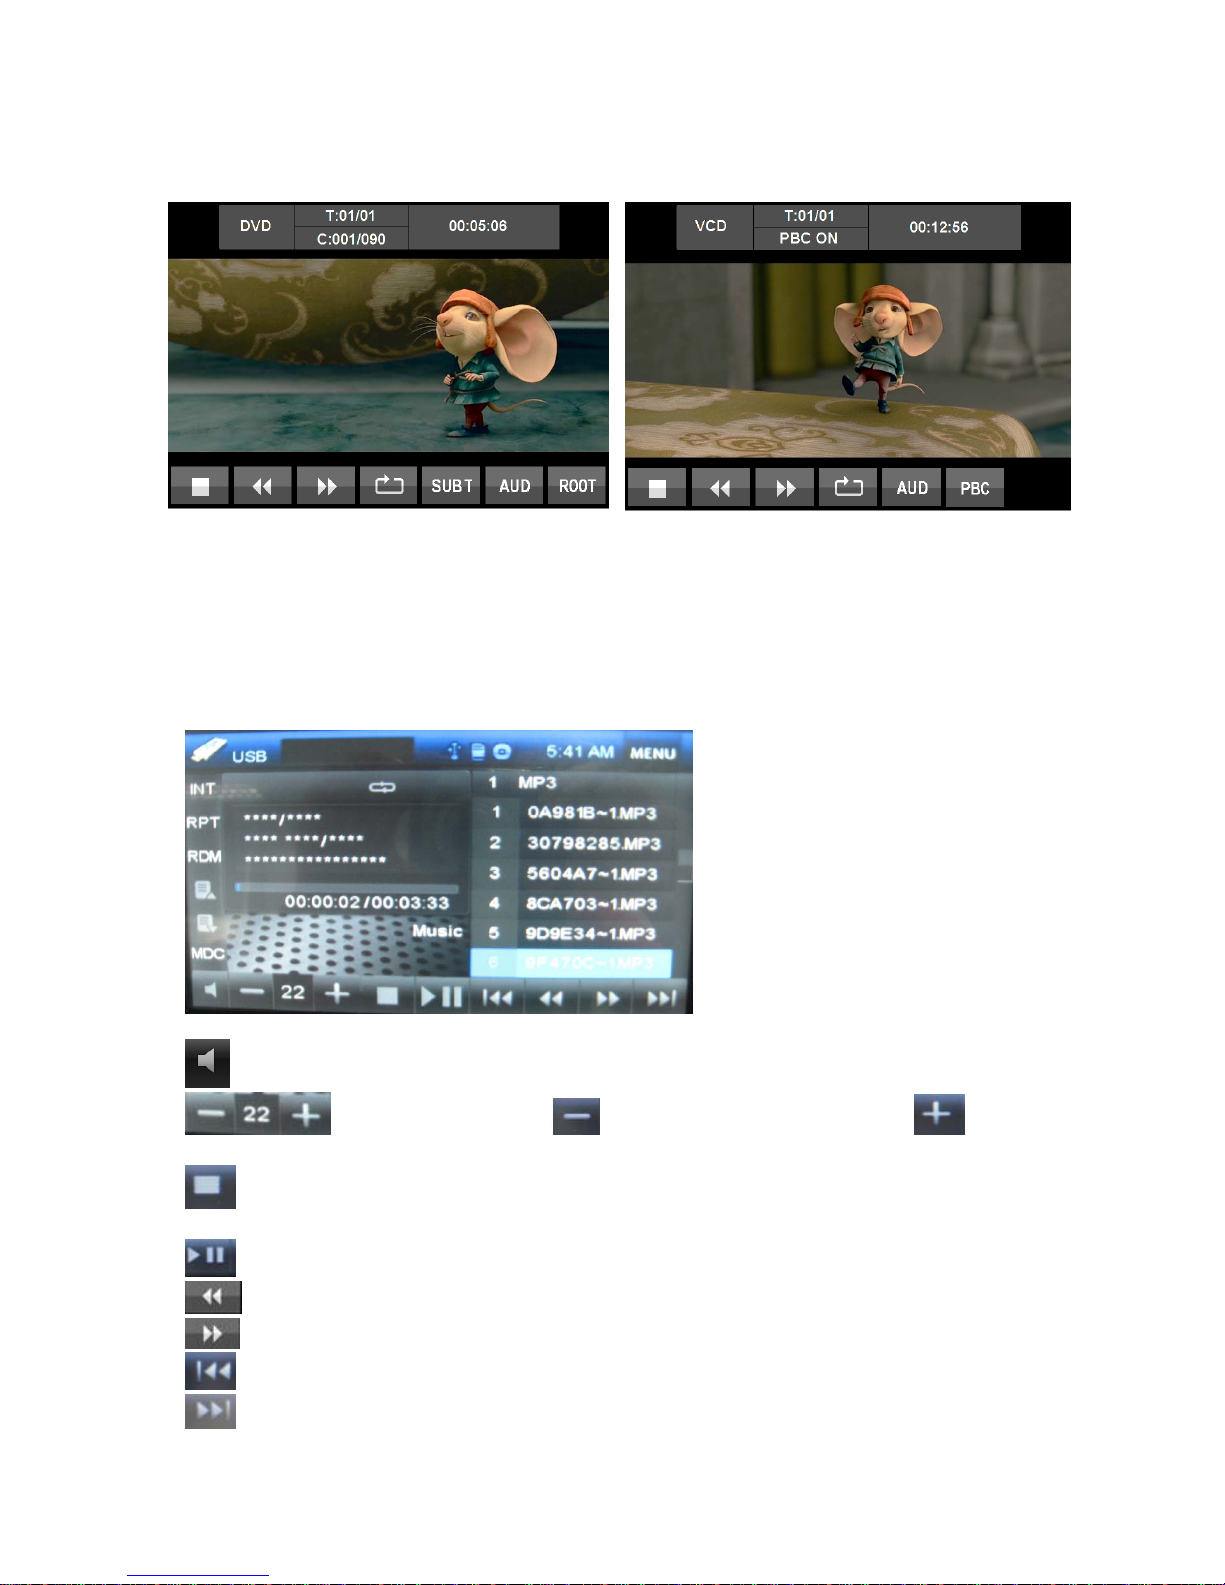
When you touch screen menu, you will not see any buttons while DVD is played. Buttons will
appear when you tap on LCD screen. Tap the screen again to hide the buttons.
Note:
1. DVD Player will start playing automatically when you insert any DVD disc, SD card or
USB device.
2. Warning displays if the vehicle is moving for driver's safety.
3. DVD Player will not only play video, but also picture and music files as well.
File Management
DVD mode plays files in a) DISC b) USB c) SD card (in main SD card slot on inner panel).
SD/MMC Cards & USB Player
Mute the sound.
Volume button. press to decrease the volume, press to
increase the volume.
Stop button. Press it to Stop playback from the current position, press it again
to final stop to the very beginning
Play/pause button. Press it to pause the track, press again to resume.
Press it button to restart a track, FR×2×4×8×20-play will be display.
Press it button to skip to the next track. FF×2×4×8×20-play will be display.
Press it to skip to the previous track.
Press it to skip to the next track.
Page 21
20
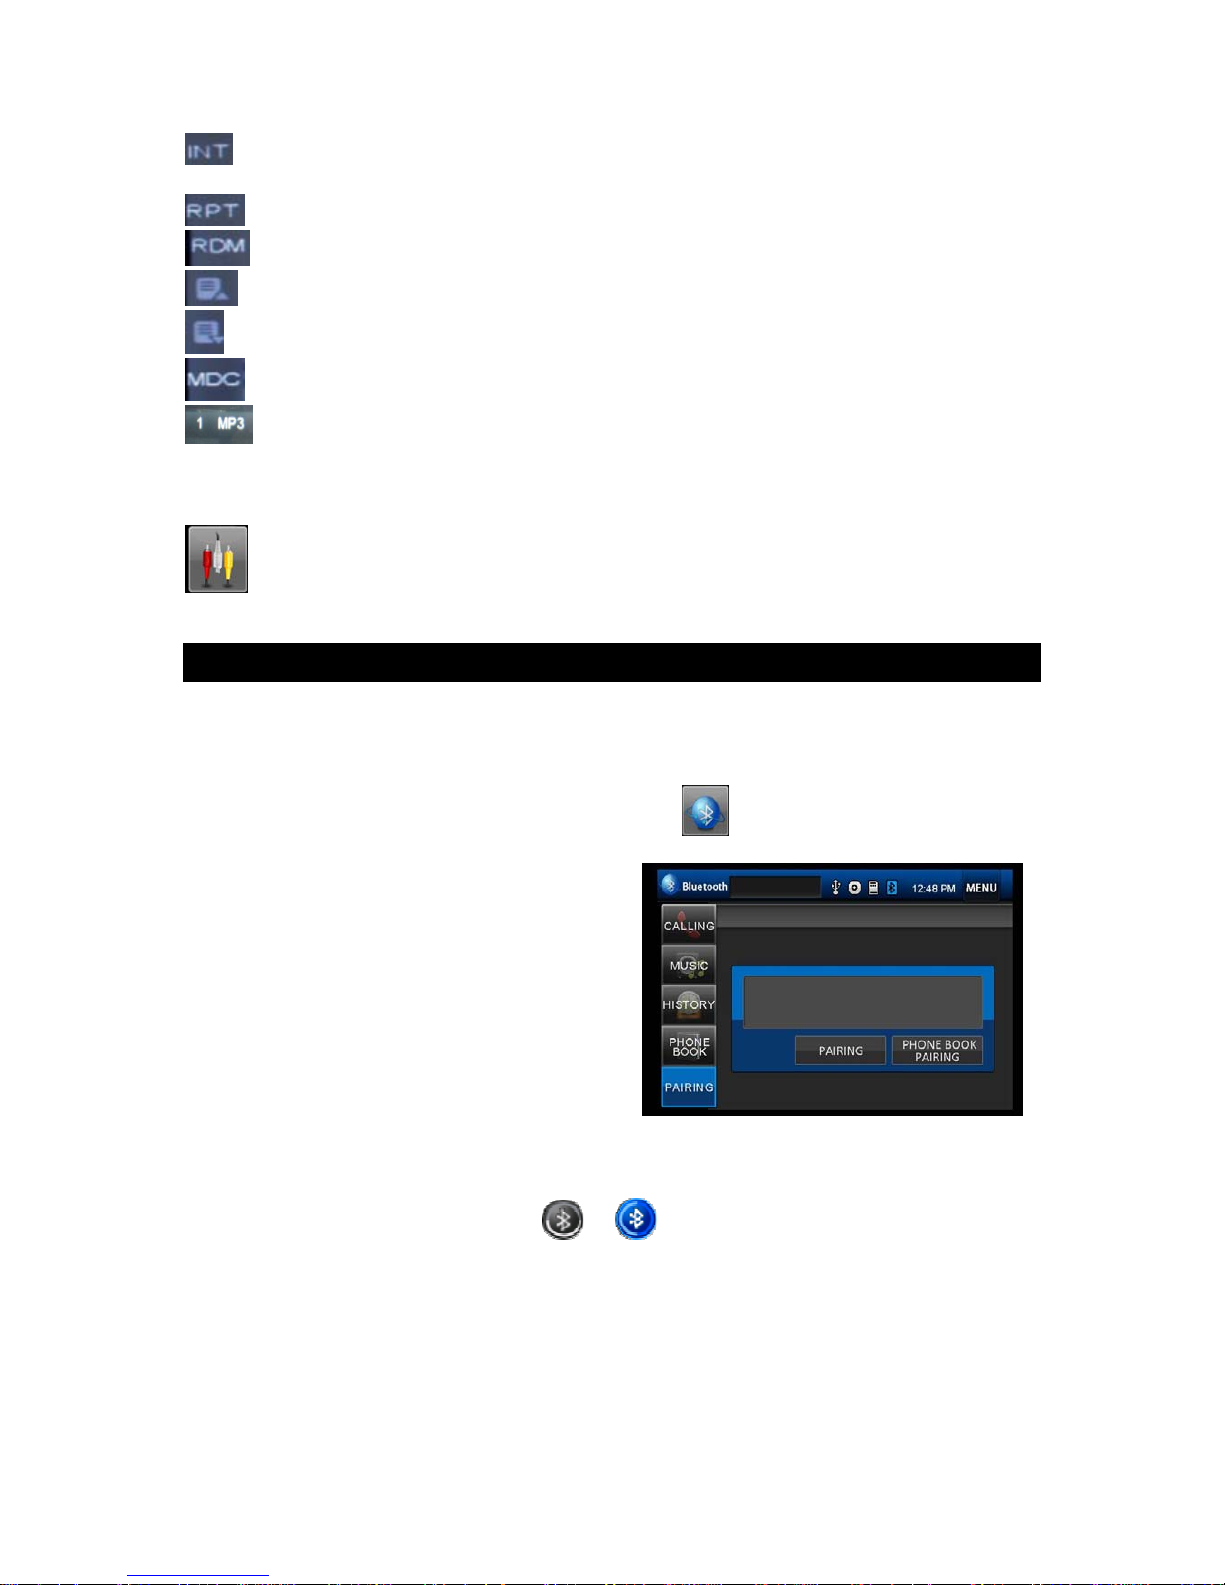
Press it to activate the intro function. You can play the beginning of every track
for 10 seconds in sequence.
Press it to repeat REP 1 => REP DIR => REP ALL
Press it to play track randomly.
Press it to enter previous page.
Press it to enter next page.
Press it to open folder and select desired folder by touch.
Press it to go back for the selection of all folders.
AV-IN Mode
To start AV-IN Mode, tap on AV-IN button from main menu screen.
Bluetooth Section
Warning: Driving and having a Telephone conversation at the same time is dangerous,
please park your car before having a telephone conversation. The supplier waves any and all
liability when this warning is not followed.
To enter Bluetooth mode, you can tap Bluetooth icon on Main menu or long press the
Bluetooth button on the Remote Control
BT Main Menu
A user can make own choice by tap the buttons.
Tap CALLING button to use phone functions.
Tap MUSIC button to start BLUETOOTH music
player.
Tap HISTORY button to check dialed, received,
missed calls.
Tap PHONEBOOK button to use phone book
functions.
Pairing Mode
At the 1
st
time when using BLUETOOTH, you need to pair the mobile phone first.
If a phone have been paired with BT before, the BT icon automatically changes its color from
gray to blue when the unit is turned on
→
A new pairing with another phone can be made by pressing the PAIRING button. Tap
PAIRING button to start pairing. According to mobile manual pairing device, after searching
new device (CARBT), select it, put in pass code "0000" and confirm OK, device paring is
finished.
The text ‘CONNECTING OK’ shows after the pairing is completed. It means device is
connected and ready for BLUETOOTH communication. Select connect to device on your
Page 22
21
mobile phone and the BLUETOOTH connection will be finished. The BLUETOOTH icon will
display on the screen.
Auto-connect - Disconnect
When power on the unit, the last paired phone will be connected to the device via Bluetooth
automatically, after searching about one minute, if the device cannot find the paired phone, it
will stop searching. When in standby mode (unconnected), long press Bluetooth button on
remote control to active auto-connect function and the device will search the last paired
phone.
If you want to disconnect the Bluetooth connection, tap the Pairing icon PAIRING button on
Bluetooth main menu
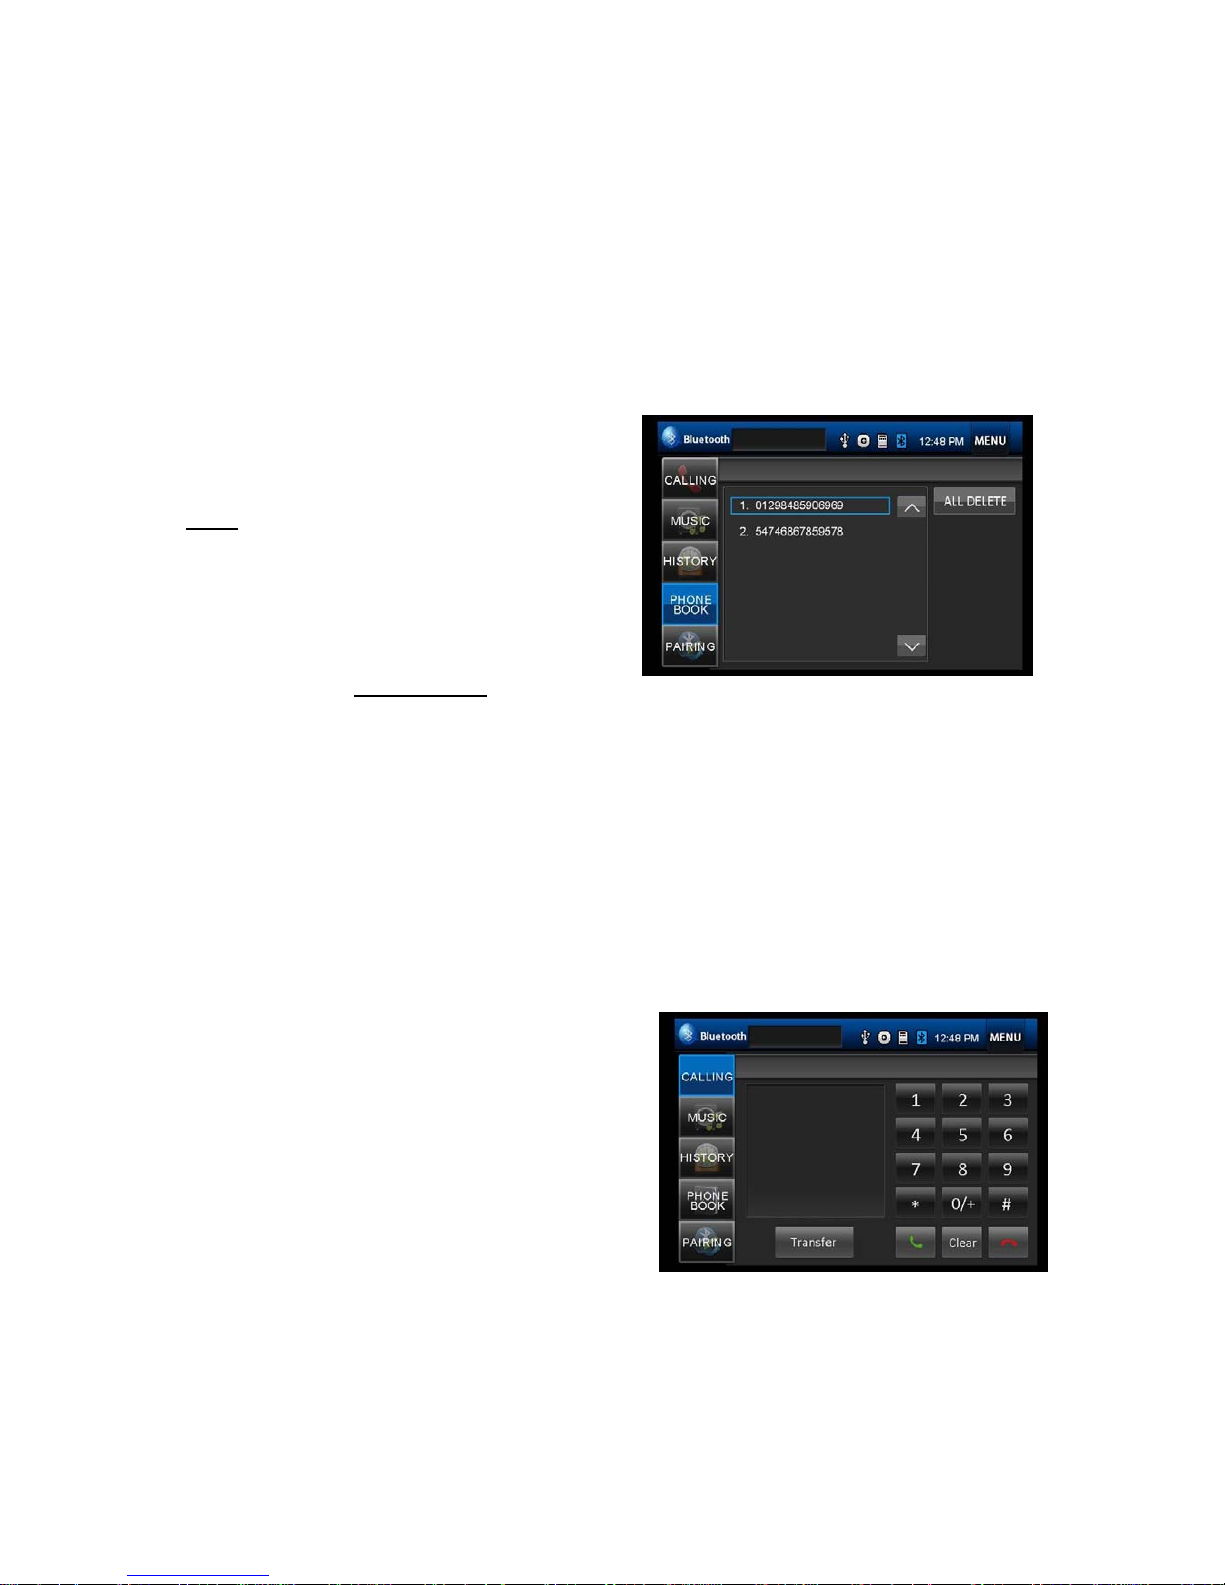
BT Phone Book
Note:
: the phonebook only supports Western
Characters. Any difference in character will be
shown as a x,* or #.
Tap PHONE BOOK button to use PHONE
BOOK Connection functions.
The phone will be disconnected
from the unit
right after you tap PHONE BOOK button, text ‘PhoneBook Pairing Start’ shows on the screen.
Send business cards via BLUETOOTH from the phone.
NOTE: Before downloading the data from phone, the pairing between a phone and the unit
must be completed.
After completing downloading PHONE BOOK data, due to different mobile phones in the
market, some phones may auto connect with the unit, but some phones will not. In any case,
you need to reconnect to Bluetooth between your mobile phone and the unit. (pairing is not
needed again, only connect)
Tap PHONEBOOK button
to use Phone Book functions from BLUETOOTH Main Menu.
The unit displays the data that have been
received from a phone. Select the phone number
and pressing SEND button to make a call to the
number existing in Phone Book.
Tap on DELETE button to delete a selected
phone number.
Simply tap on ALL DELETE button to delete all
list numbers in the Phone Book.
UP List UP Button . Down List Down Button .
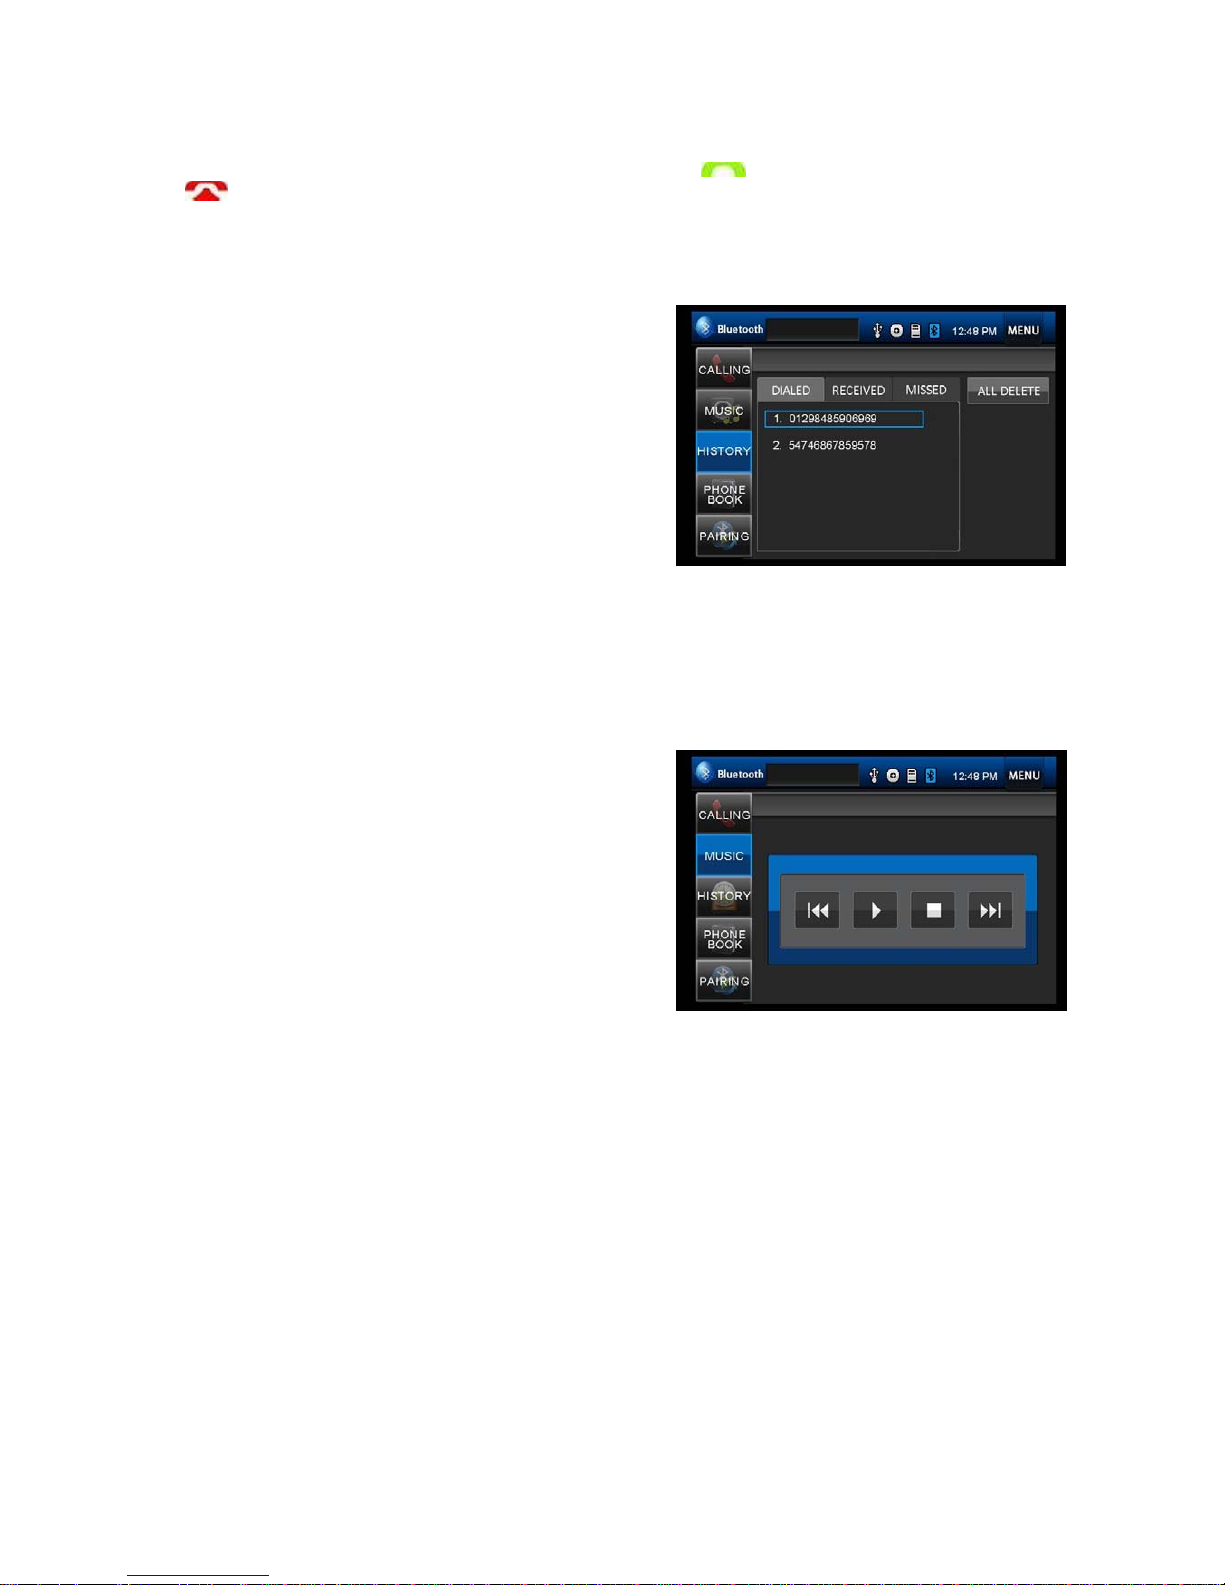
Call Mode
Tap on CALLING button to enter call mode.
Page 23
22
In Call mode, the unit can be used as your phone. Making and receiving calls are possible
with BLUETOOTH. Simply tap phone number and tap
button to make a call, and tap
button to hang up.
1.) Press CLEAR button shortly to delete a wrong digit, press the CLEAR button for 3-4
seconds to delete all the numbers at once. (RDM/C button on remote)
2) Press the SEND button for 3-4 seconds, the device automatically makes a call to the latest
call in its call log.
Voice Transfer
During a call, you can change a call from Bluetooth
mode to phone by tapping Transfer button. To have
a call in Bluetooth mode again, tap Transfer button.
Call History Mode
Tap HISTORY button to see history mode.
Outgoing/Received/Missed calls are saved in
History mode.
5 calls are saved on the list in each history, and 5
calls displayed in one page.
The calls in each category are orderly saved from the latest one.
Tap on DELETE or ALL DELETE button to delete saved dial numbers.
(A2DP) Music Mode
Tap MUSIC button to listen music in Bluetooth mode.
Tap the button for ‘music’ in Bluetooth main menu.
You can select the function with the key for play,
stop, pause, prev and next.
Tap the BACK button to quit the music mode.
A2DP (Advanced Audio Distribution Profile)
Music Player
A2DP is a function which can receive the audio
frequency signal from the mobile phone, amplified
by the car audio and played out by the car
speakers.
Notice: your mobile phone need to support A2DP.
Page 24
23
Setting Control
Your device has default system settings. You can customize the settings to suit your
personal needs. Once you change settings, your new settings will remain until you change it
again.
To start SETTING, tap on button from main menu screen.
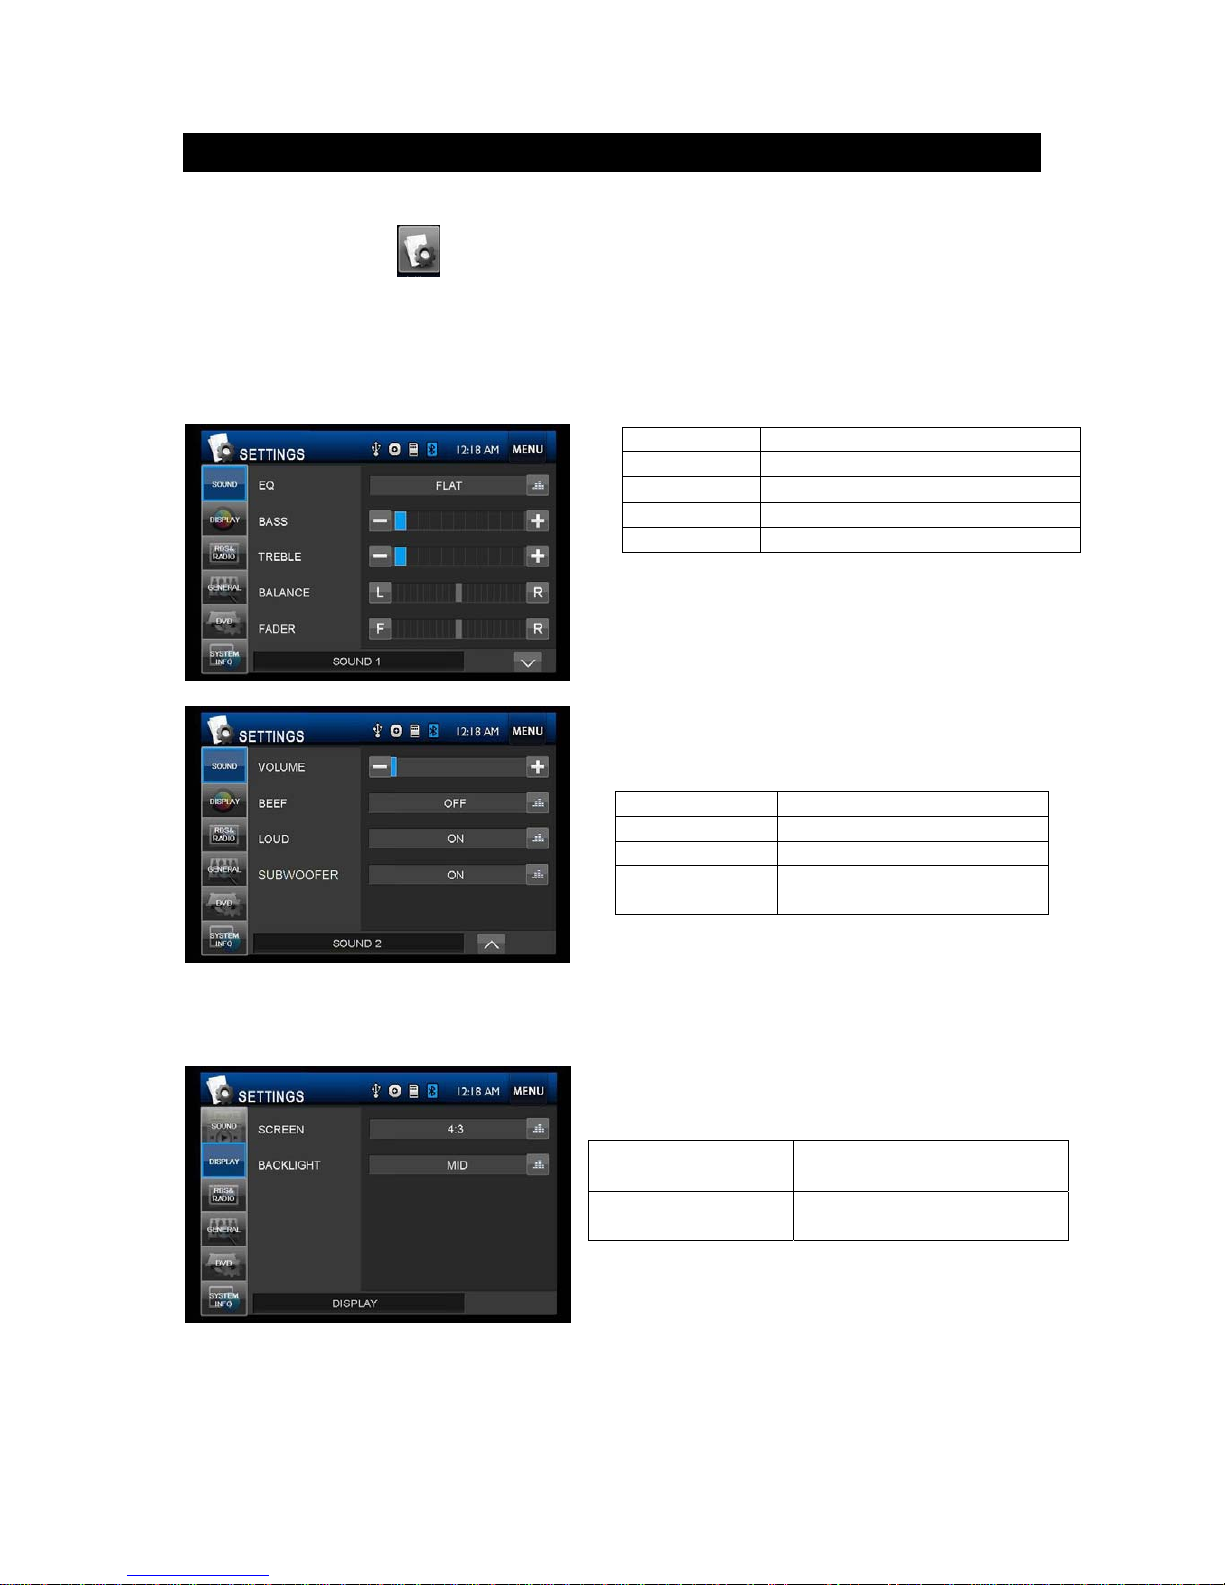
Sound Control
10 different setting is possible through sound control menu.
Tap SOUND button from setting menu screen to enter sound setting menu.
Display Control
Tap DISPLAY button from setting menu screen.
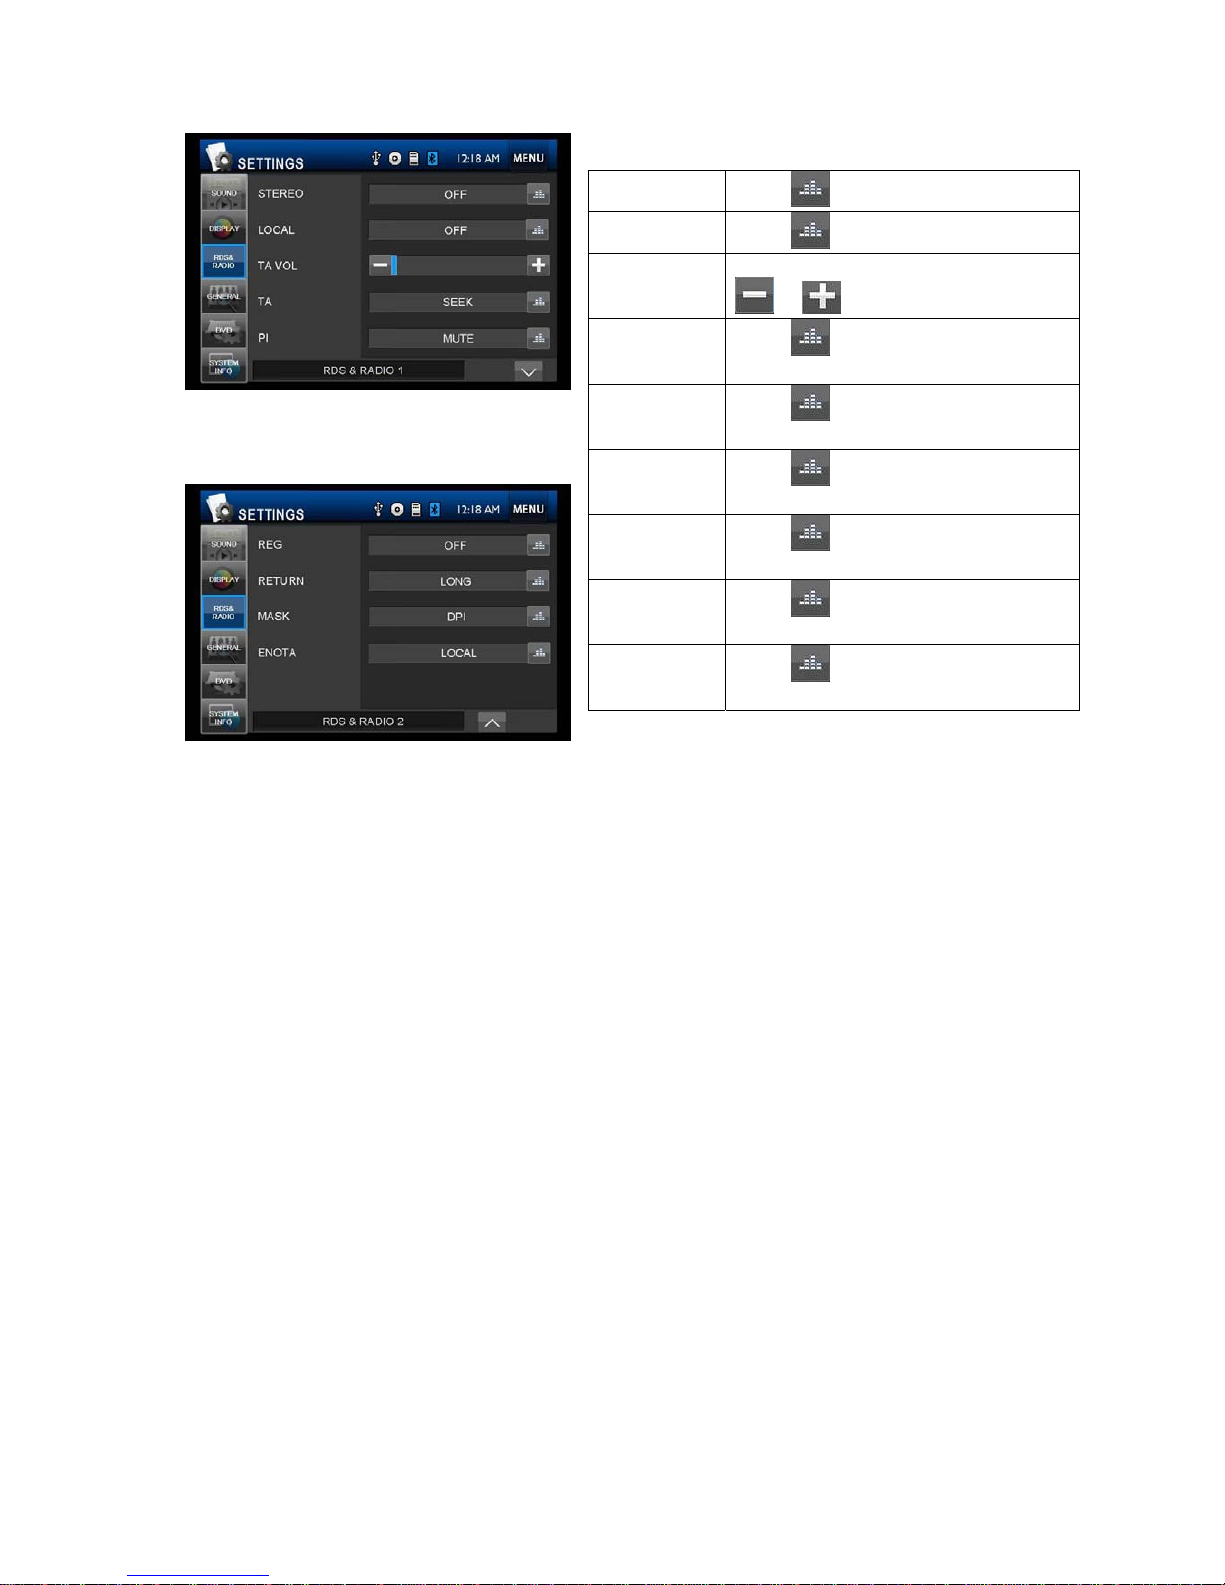
RDS & Radio Control
Tap RDS & RADIO button from setting menu screen.
EQUALIZER Select EQ mode
BASS Bass up/down
TREBLE Treble up/down
BALANCE Left/Right Balance Control
FADER Front/Back Fader Control
VOLUME Adjust the volume
BEEP Keypad sound setting
LOUDNESS Set LOUD ON/OFF
SUBWOOFER Sub Woofer Base support
setting
SCREEN Screen setting 16:9,
4:3,FULL
Backlight Backlight setting LOW,
MID, HIGH
Page 25
24
Tap Down button from RDS & RADIO
menu 1 screen. Various Radio options
can be set.
Choose location where you are using Radio to set frequency configuration.
TA
TA SEEK Mode:
When newly tuned station does not receive TP information for 5 sec, the radio retunes to
next station that has not the same station (PI) as the last station, but has the TP information.
When TP information gets lost at the current station for retune time which is set by RETUNE
SHORT( 30 sec ) or RETUNE LONG ( 90 sec), the radio start to retune to next same PI
station. When same PI station does not catch in 1 cyclic search, the radio retunes to next
station with TP information.
TA ALARM Mode.
When this mode is selected, any automatic retune mode is not activated. Only double beep
sound (ALARM) is shown. So, in this mode, the unit keeps the current station. (The higher
priority is PI rather than TP.)
EONTA
EONTA LOCAL Mode
When the field strength level of EON linked is less than the threshold level, the radio does
not switch the station.
EONTA DISTANCE Mode
EON TA switching is try to implemented by the information of current station. When EONTA
DISTANCE mode is selected, “ EONTA DX” on numeric display is indicated for a few
seconds.
REG
Regional Mode ON
STEREO
touch
to select OFF or ON
LOCAL
touch
to select OFF or ON
TA Volume
TA Volume Control (Radio) touch
or to adjust the level
RETUNE
touch
to select RETUNE
LONG/SHORT
PI
touch
to select MUTE or
SOUND
REGION
touch
to select REG
ON/OFF
MASK
touch
to select MASK
DPI/ALL
EON TA
touch
to select EONTA
LOCAL/DX
TA
touch
to select SEEK or
ALARM
Page 26
25
AF switching or PI SEEK is implemented to the station which have all PI codes the same as
current station. REG of individual segment is turned on also together with displaying “REG
ON” on numeric display for a few seconds.
*In double displaying mode, the individual segment may be deleted in case of not enoughspace in display.
Regional Mode OFF
The regional code in the format of PI code is ignored when AF switching or PI SEEK is
implemented. REG of individual seg. is turned off together with displaying “ REG OFF” on
numeric display for a few seconds.
PI
When different PI sound (DIP) is heard once in a while, the DIP’s sound will be heard for less
than 1 second.
PI MUTE Mode
Under the same situation, a mute sound will be heard for less than 1 sec.
RETUNE
The initial time of automatic TA search or PI SEARCH mode is selected. When PI
information is not caught for retune time, the radio start to retune to next same PI station.
When same PI station does not catch 1 cyclic search, the radio goes to last station and waits
for 4 -5 minute until PI code is received.
- Retune L Mode: Selected as 90 seconds.
- Retune S Mode: Selected as 30 seconds.
MASK
MASK DPI mode: masked only the AF which has Different PI.
MASK ALL mode: masked the AF which has Different PI and NO RDS signal with high field
strength.
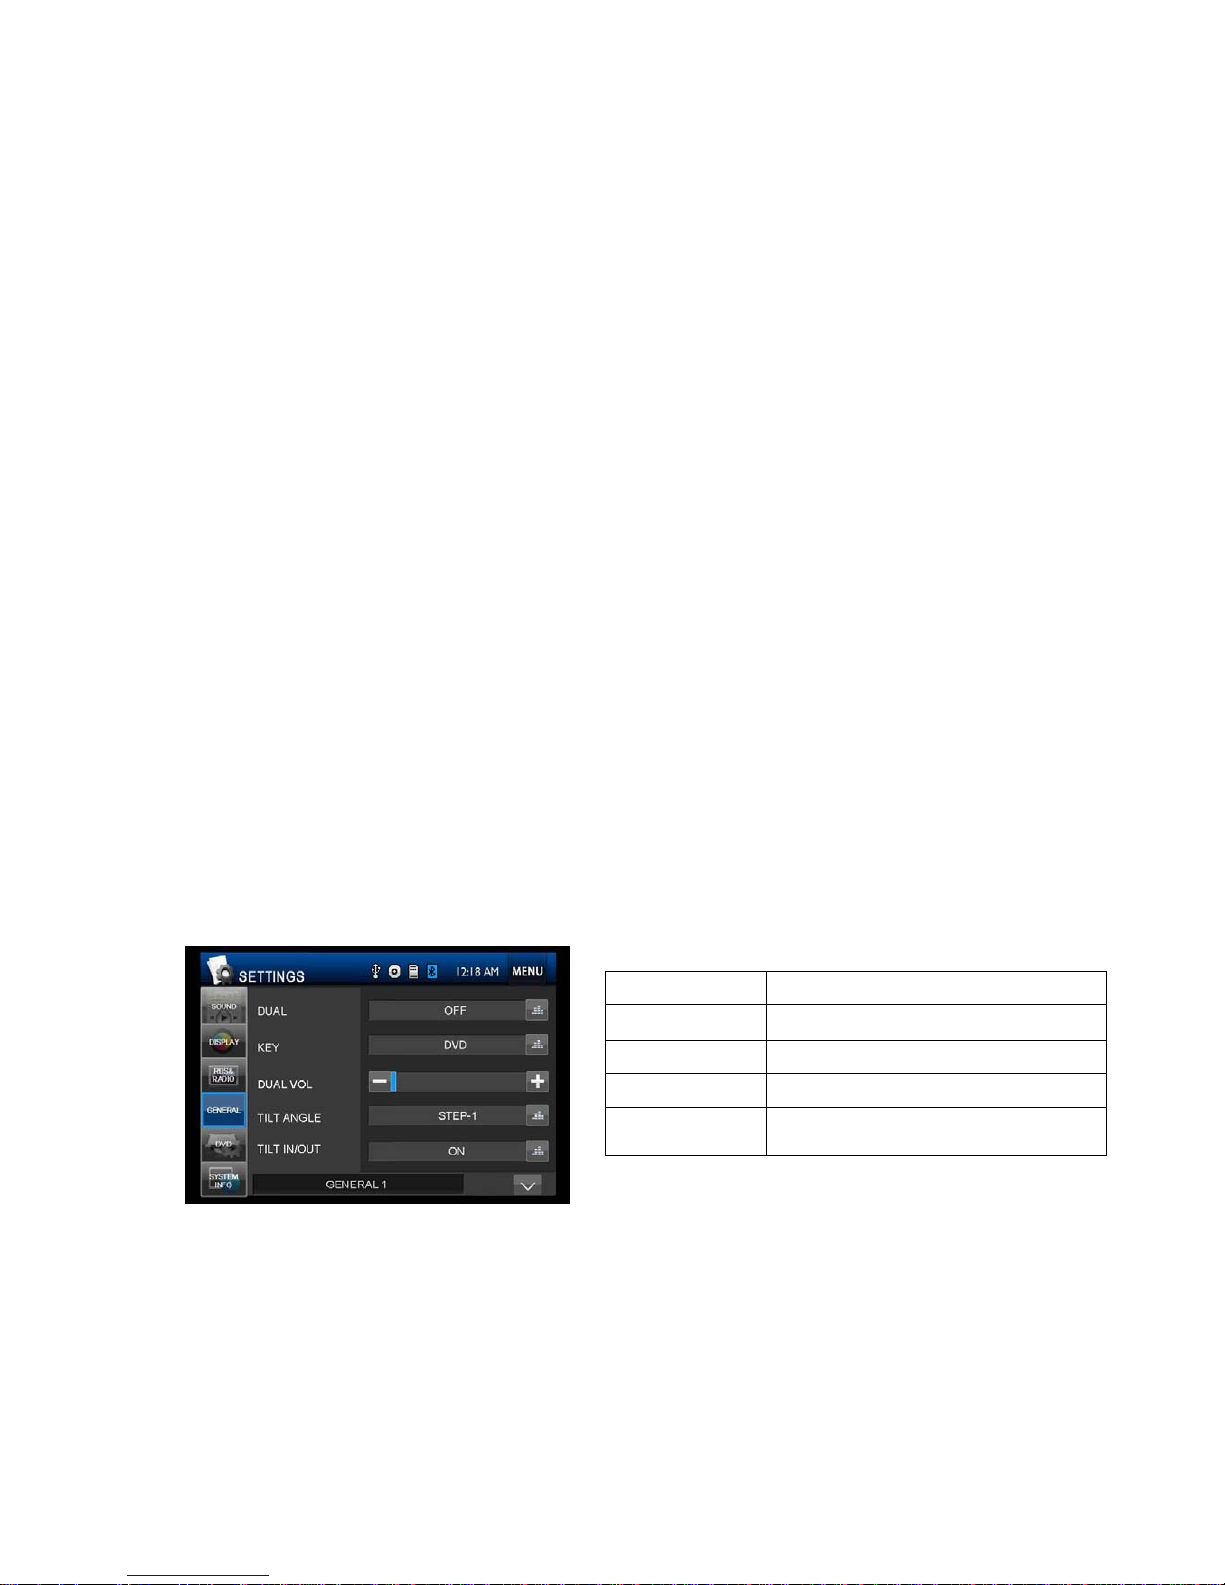
General Control
Tap GENERAL button from setting menu screen.
Date & Time Control
Tap Down button from setting GENERAL 1 screen.
DUAL Set DUAL ON/OFF
KEY Key CURRENT
TILT MODE Set TILT MODE auto or manual
TILT ANGLE adjust monitor tilt angle
CLOCK
DISPLAY
Set CLOCK display time
ON or OFF
Page 27
26
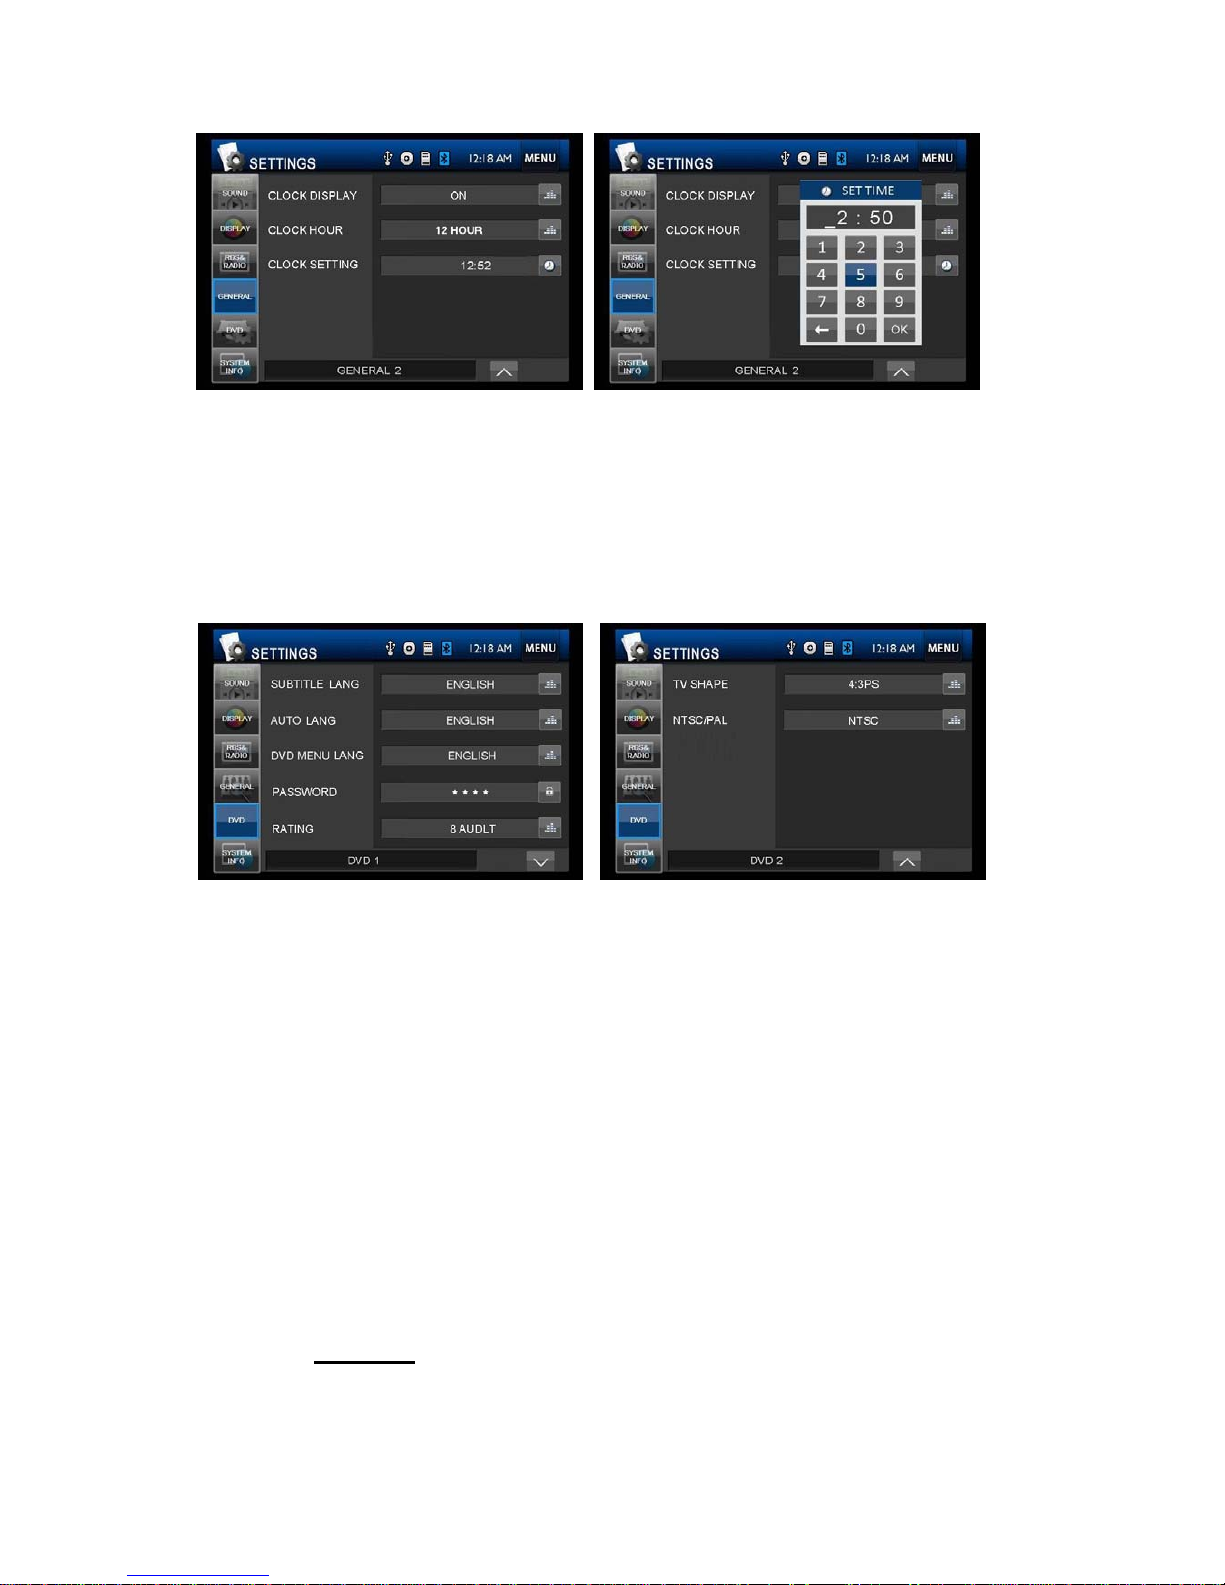
12 hour Mode/24 Hour Mode
Tap CLOCK HOUR button to change time mode to 24 hours, tap it again to 12 hours.
DVD Set up Menu
Press the DVD button on the set up menu to enter the DVD player setup menu to setup the
DVD player operation setting. Press SETUP button to enter into the system settings main
menu; press the left or right arrow buttons to move to the highlighted menu item and select
one of the Setup Pages:
[1]. Subtitle Lang Setting:
With this option you can select the preferred language for the subtitles. When the selected
language is recorded on the disc then this language will automatically be shown. If not, the
first language recorded on the disc is displayed.
[2]. Audio Lang Setting:
With this option you can select the preferred language for the audio output. When the
selected language is recorded on the disc (not all discs have multiple languages recorded)
then this language will automatically be played. If not, the first language recorded on the disc
is played.
[3]. DVD Menu Lang Setting:
With this option you can select the preferred language for the disc menu. When the selected
language is recorded on the disc then this language will automatically be selected. If not, the
first language recorded on the disc is displayed.
[4] Password:
The password for this unit is initially set to factory default 0000. If you want to change your
password, you need to enter the old password first and confirm it, and enter a new password
and confirm. WARNING
: if you forget your password, there is no possibility to reset the
password again. Do not forget your password and write it down or store the password in a
safe place.
[5] Rating / Parental Setup:
Page 28
27
For DVD discs that support the USA rating system, setting up rating control can prevent
children from watching content that might not be suitable for their age. You are asked to
enter the password when you change the rating setting. The default password is 0000.
Code Description
1.NONE Kid safe
2.G General Audiences – ALL ages admitted
3.PG
PARENTAL GUIDANCE SUGGESTED-Some material may not be suitable for
children
4.PG-13
PARENTS STRONGLY CAUTIONED-Some material may be inappropriate for
children under 13
5.PG-R Restricted, under 17 requires accompanying parent or adult guardian.
6.R RESTRICTED-Under 17 requires accompanying parent or adult guardian
7.NC-17 NO ONE 17 AND UNDER ADMITTED
8.Adult Above 17 Admitted
[6] TV Shape:
Set TFT screen mode to the correct ratio:
Three screen ratio modes are available, Normal/PS (4:3 Pan Scan), Normal/LB (4:3
Letterbox) and Wide (16:9). Different disc formats will display different images depending this
setting and the screen size used.
[7] NTSC/ PAL:
Select this menu item to set up your preferred video output format. PAL is commonly used in
Europe; NTSC is commonly used in the USA and Japan. Auto is commonly used.
[8] Default:
Factory reset. Set all values to Factory default values including memory and preset stations.
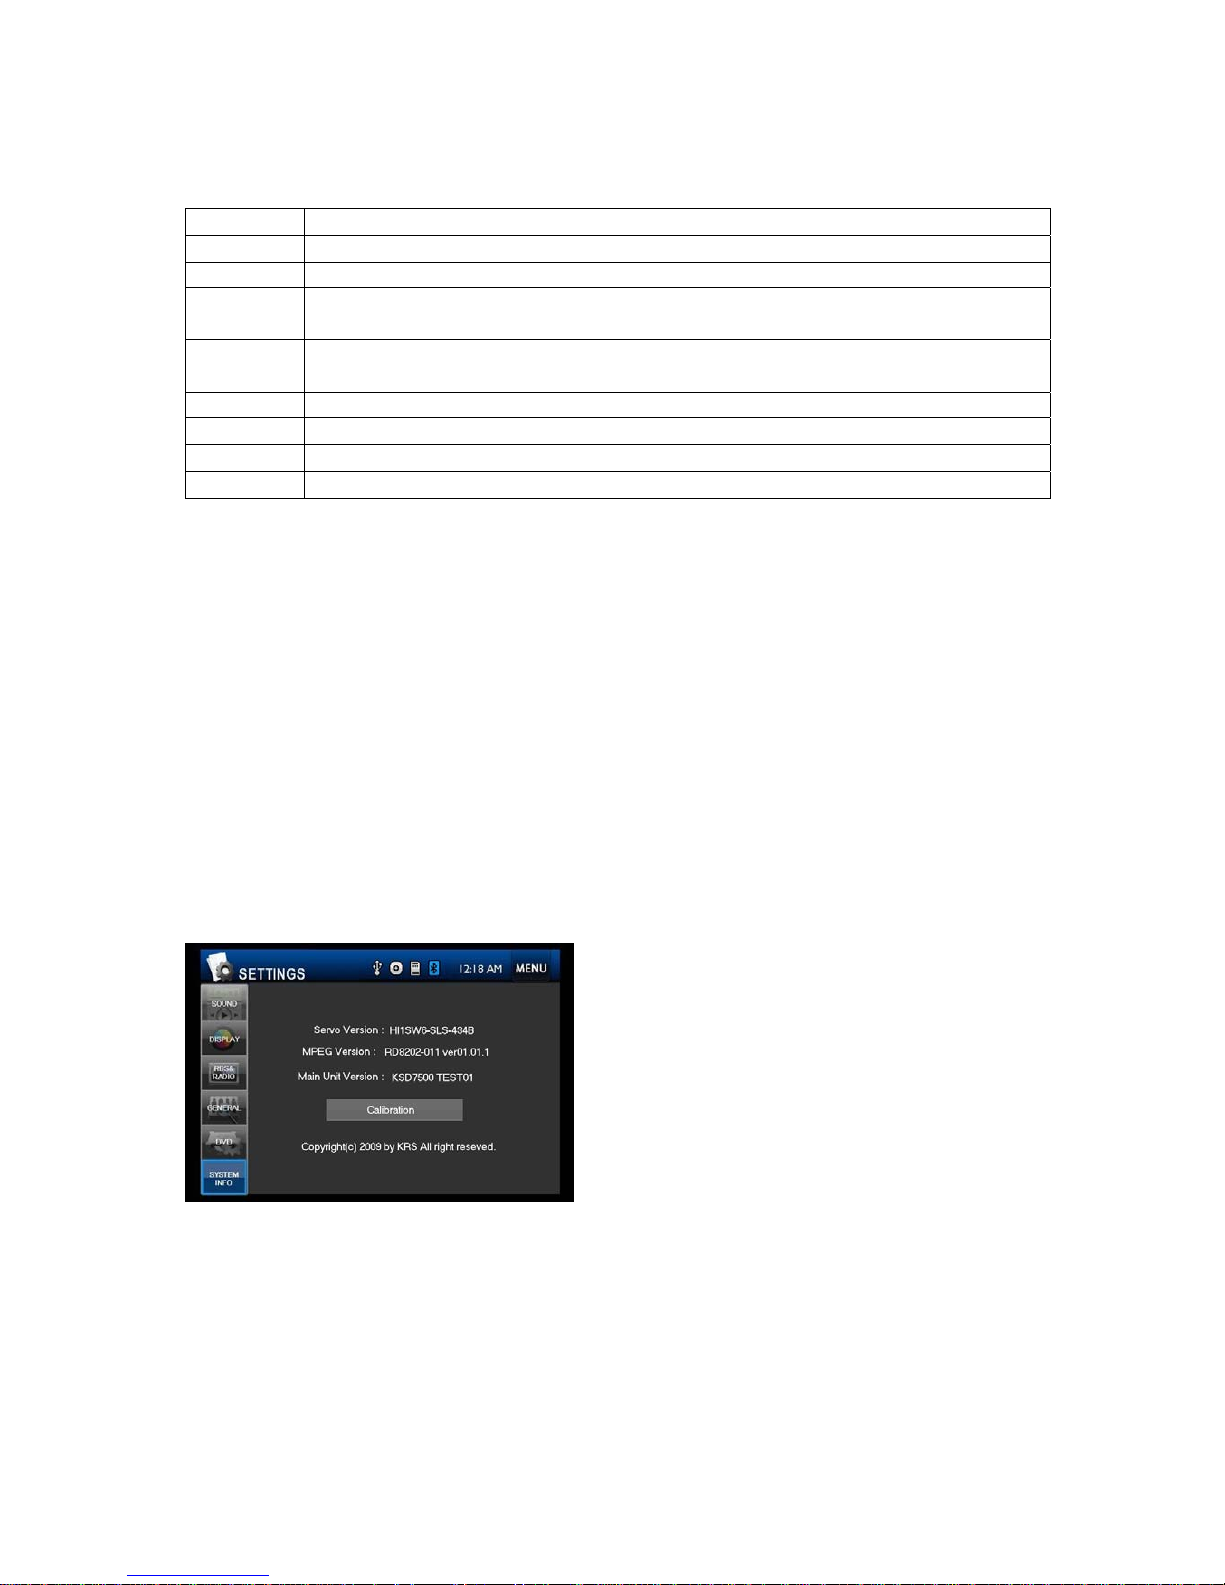
System Information
Press SYSTEM button to show the information of the system.
You can view detail system information including serial number of the software.
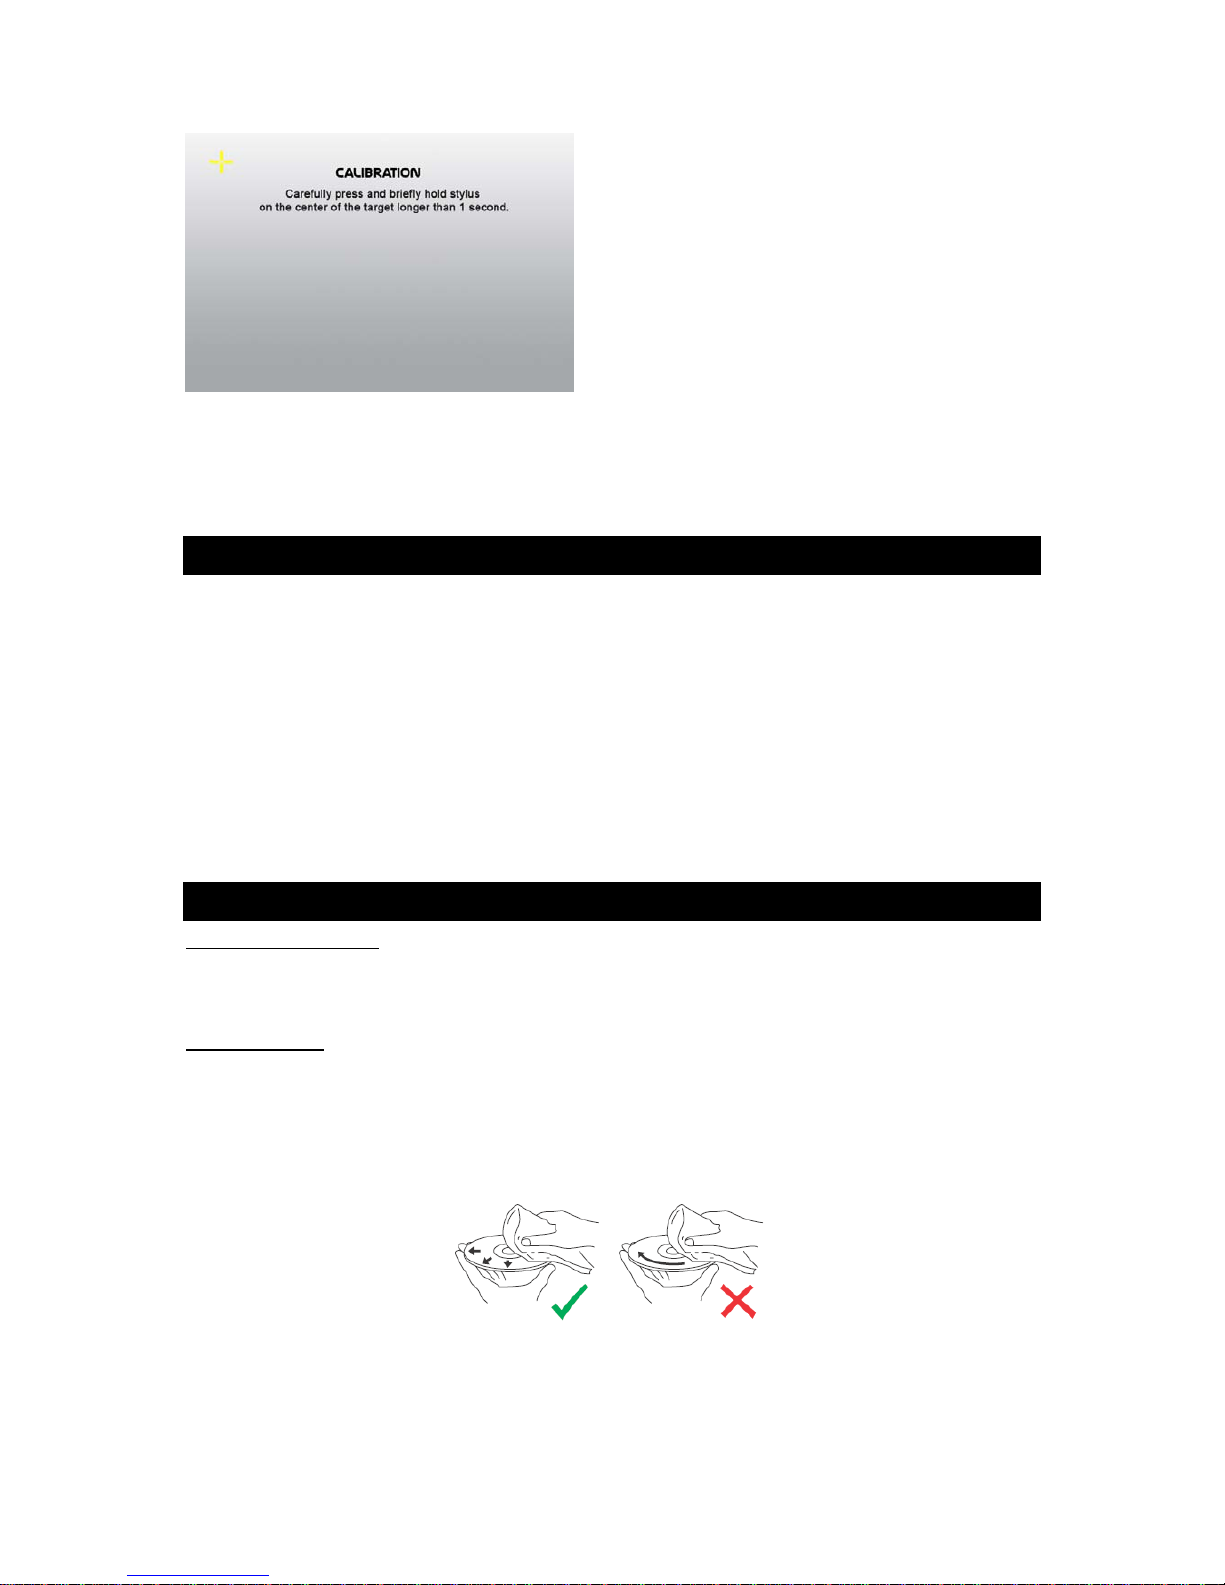
Calibration
CALIBRATION of the touch screen. CALIBRATION screen is described as below.
Page 29
28
When the target moves to another position, tap and hold at the center of the new target.
Repeat each time to complete the calibration process. When completed, tap anywhere in
screen to go back to menu screen.
Handling Discs
µ Dirty, scratched or warped discs may cause skip ping or noise.
µ Handle the disc only by the edges. To keep clean do not touch its surface.
µ Discs should be stored in their cases after use to avoid scratches.
µ Do not expose discs to direct sunlight, high humidity, high temperature or dust.
µ Prolonged exposure to extreme temperature can wrap the disc (such as leaving the discs
in your car during summertime).
µ Do not stick or write anything on either side of disc. Sharp writing instruments, or the inks
used in some felt-tip pens, may damage its surface.
µ DO NOT touch the unlabeled side. DO NOT attach any seal, label or data protection
sheet to either side of a disc.
Cleaning
Cleaning the Cabinet
Wipe with a soft cloth. If the cabinet is very dampen (not dropping wet) the cloth with a weak
solution of soapy water, and then wipe clean.
Cleaning Discs
Fingerprints should be carefully wiped from the surface of disc with a soft cloth. Unlike
conventional records, compact discs have no grooves to collect dust and macroscopic dirt,
so gently wiping them with a soft cloth should remove must panicles. Wipe in a straight
motion from the center to the edge. Never use thinner benzine, record cleaner or anti static
spray on a compact disc. Such chemicals can damage its plastic surface.
Page 30
29
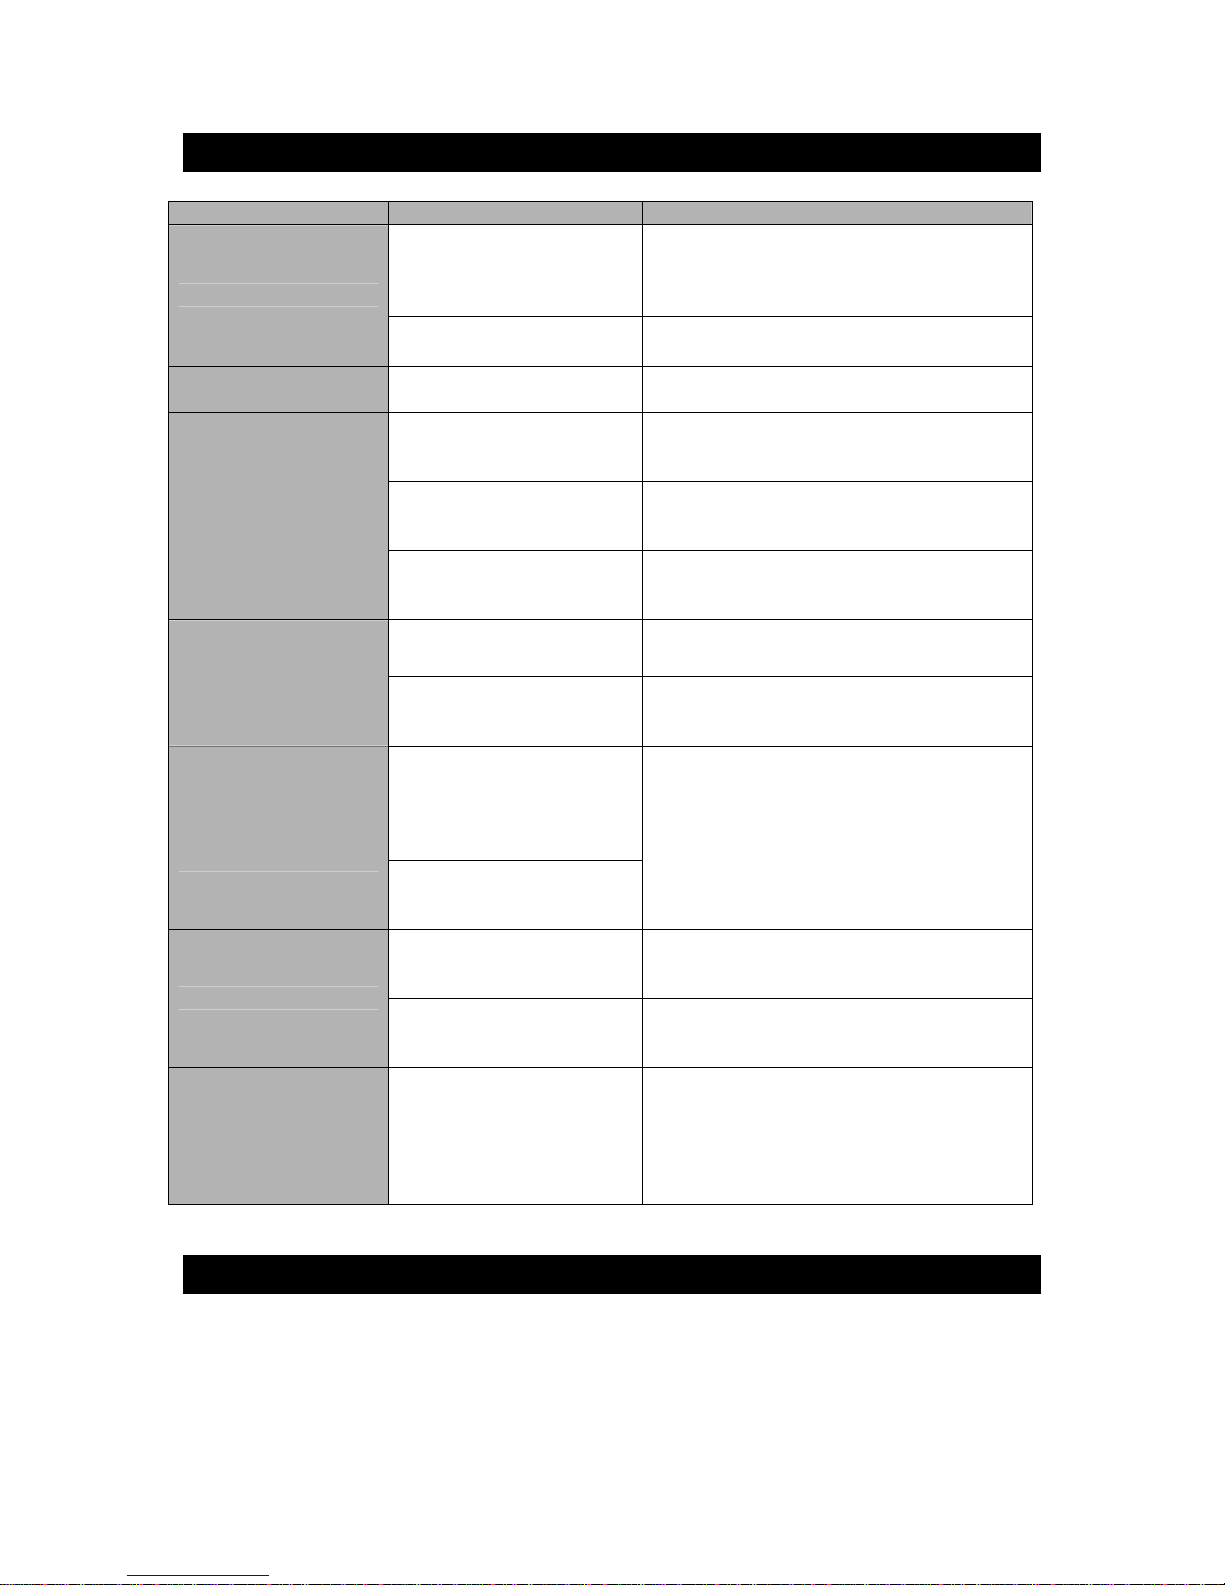
Troubleshooting
SYMPTOM CAUSE SOLUTION
THE CAR IGNITION IS
NOT ON.
IF THE POWER SUPPLY IS PROPERLY
CONNECTED TO THE CAR
ACCESSORY SWITCH THE IGNITION
KEY TO “ACC”.
NO POWER
THE FUSE IS BLOWN. REPLACE THE FUSE.
DISC CANNOT BE
LOADED.
PRESENCE OF DISC
INSIDE THE PLAYER
REMOVE THE DISC IN THE PLAYER
THEN PUT A NEW UPWARD.
INSERTING THE DISC IN
UPSIDE DOWN.
INSERT THE COMPACT DISC WITH
THE LABEL FACING
UPWARD.
COMPACT DISC IS
EXTREMELY DIRTY OR
DEFECTIVE.
CLEAN THE DISC OR TRY TO PLAY A
NEW ONE.
DISC CANNOT BE
READ.
TEMPERATURE INSIDE
THE CAR IS TOO HIGH.
COOL OFF UNTIL THE AMBIENT
TEMPERATURE RETURNS TO
NORMAL.
VOLUME IS IN MINIMUM.
ADJUST VOLUME TO A DESIRED
LEVEL.
NO SOUND
WIRING IS NOT
PROPERLY
CONNECTED.
CHECK WIRING CONNECTION.
THE BUILT-IN
MICROCOMPUTER IS
NOT OPERATING
PROPERLY DUE TO
NOISE.
THE OPERATION
KEYS DO NOT
WORK.
FRONT PANEL IS NOT
PROPERLY FIX INTO ITS
PLACE.
PRESS THE POWER BUTTON FOR
ABOUT 10 SECONDS
TO RESET THE UNIT.
THE INSTALLATION
ANGLE IS MORE THAN
30 DEGREES.
ADJUST THE INSTALLATION ANGLE
TO LESS THAN 30
DEGREES.
SOUND SKIPS.
THE DISC IS
EXTREMELY DIRTY OR
DEFECTIVE.
CLEAN THE COMPACT DISC/TRY TO
PLAY A NEW ONE.
THE RADIO DOES
NOT WORK, THE
RADIO STATION
AUTOMATIC
SELECTION DOES
NOT WORK.
THE ANTENNA CABLE
IS NOT CONNECTED
THE SIGNALS ARE TOO
WEAK.
INSERT THE ANTENNA CABLE FIRMLY
SELECT A STATION
MANUALLY.
Service and Warranty
In case of technical problems with your product, contact the sales outlet where you have
purchased this product
[COMPANY] grants you a 1-year warranty from the invoice date. In case of defects, the
buyer only has a right to subsequent performance. This subsequent performance will include
either repair or the delivery of a replacement product. Exchanged units or parts will be the
Page 31
30
property of [COMPANY]. Evidence of the warranty must be provided in the form of proper
proof of purchase (sales receipt or invoice).
Damage caused by improper handling, operation storage or by force majeure or other
external influences is not covered by the warranty. The same applies to wearing parts, e.g.
rechargeable batteries (6 months).
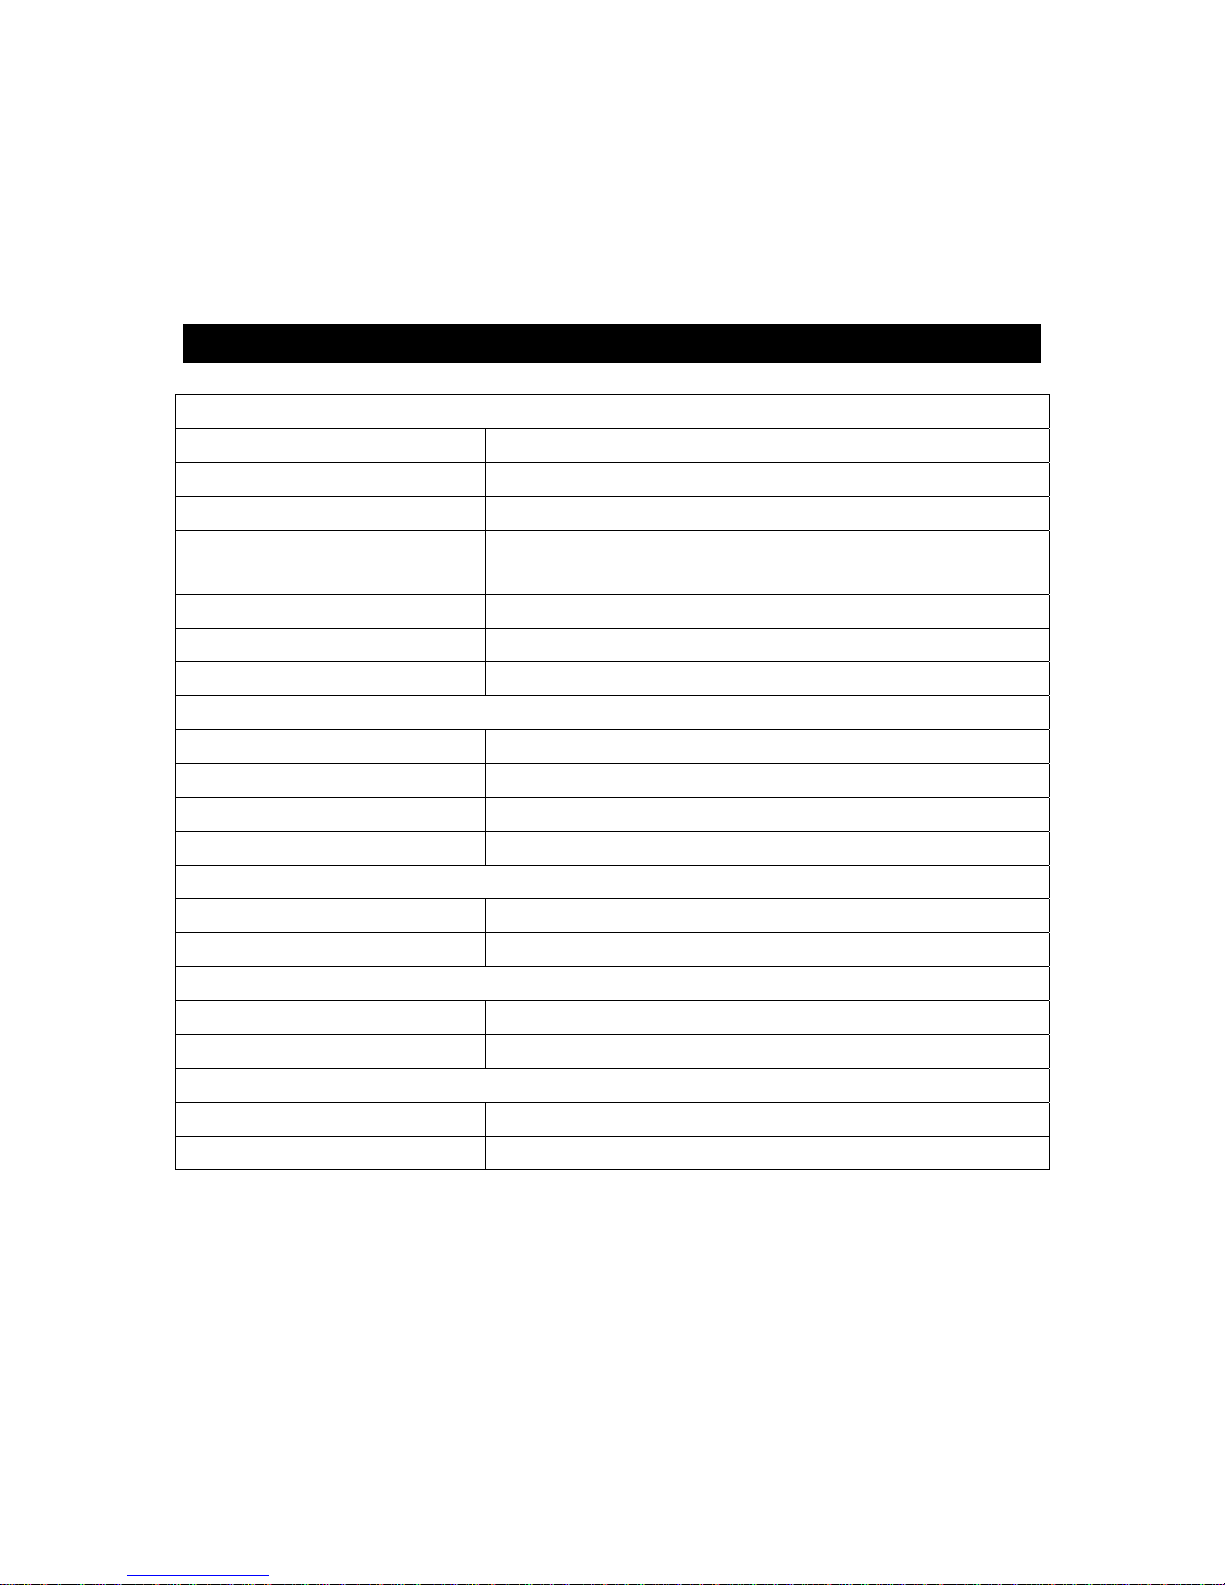
Technical Specifications
General
Power Supply: 11 ~ 16 V DC
Current Consumption: max. 10 A
Maximum Power Output: 50W x 4 Channels
Compatible Formats:
DVD/SVCD/VCD/HDCD/MP3/MP4/WMA/CDDA/PictureCD/JPEG/CD-R/ -RW/DVD±R/±RW Playback
Dimensions (L x W x H) 165 x 178 x 50 mm
Working Temperature Range:
-10℃ - +60℃
ESP Function: 10 sec. for Audio CD, 120 sec. for MP3
TFT Display
Screen Size: 7 inch
Resolution: 480x243 dot
Aspect Ratio: 4:3/16:9
Brightness: 250 cd/m2
FM Stereo Radio
Frequency Range: 87.5 – 108.0 MHz
Preset memory Stations: 18
MW Section
Frequency Range: 522 kHz - 1620 kHz
Preset Memory Stations: 12
Audio Specification
Frequency Response: 20 Hz - 20 KHz
TV Color System Color system PAL/NTSC
Specifications are subject to change without notice. Mass and dimension are approximate.
Page 32
31
GPS Antenna Installation
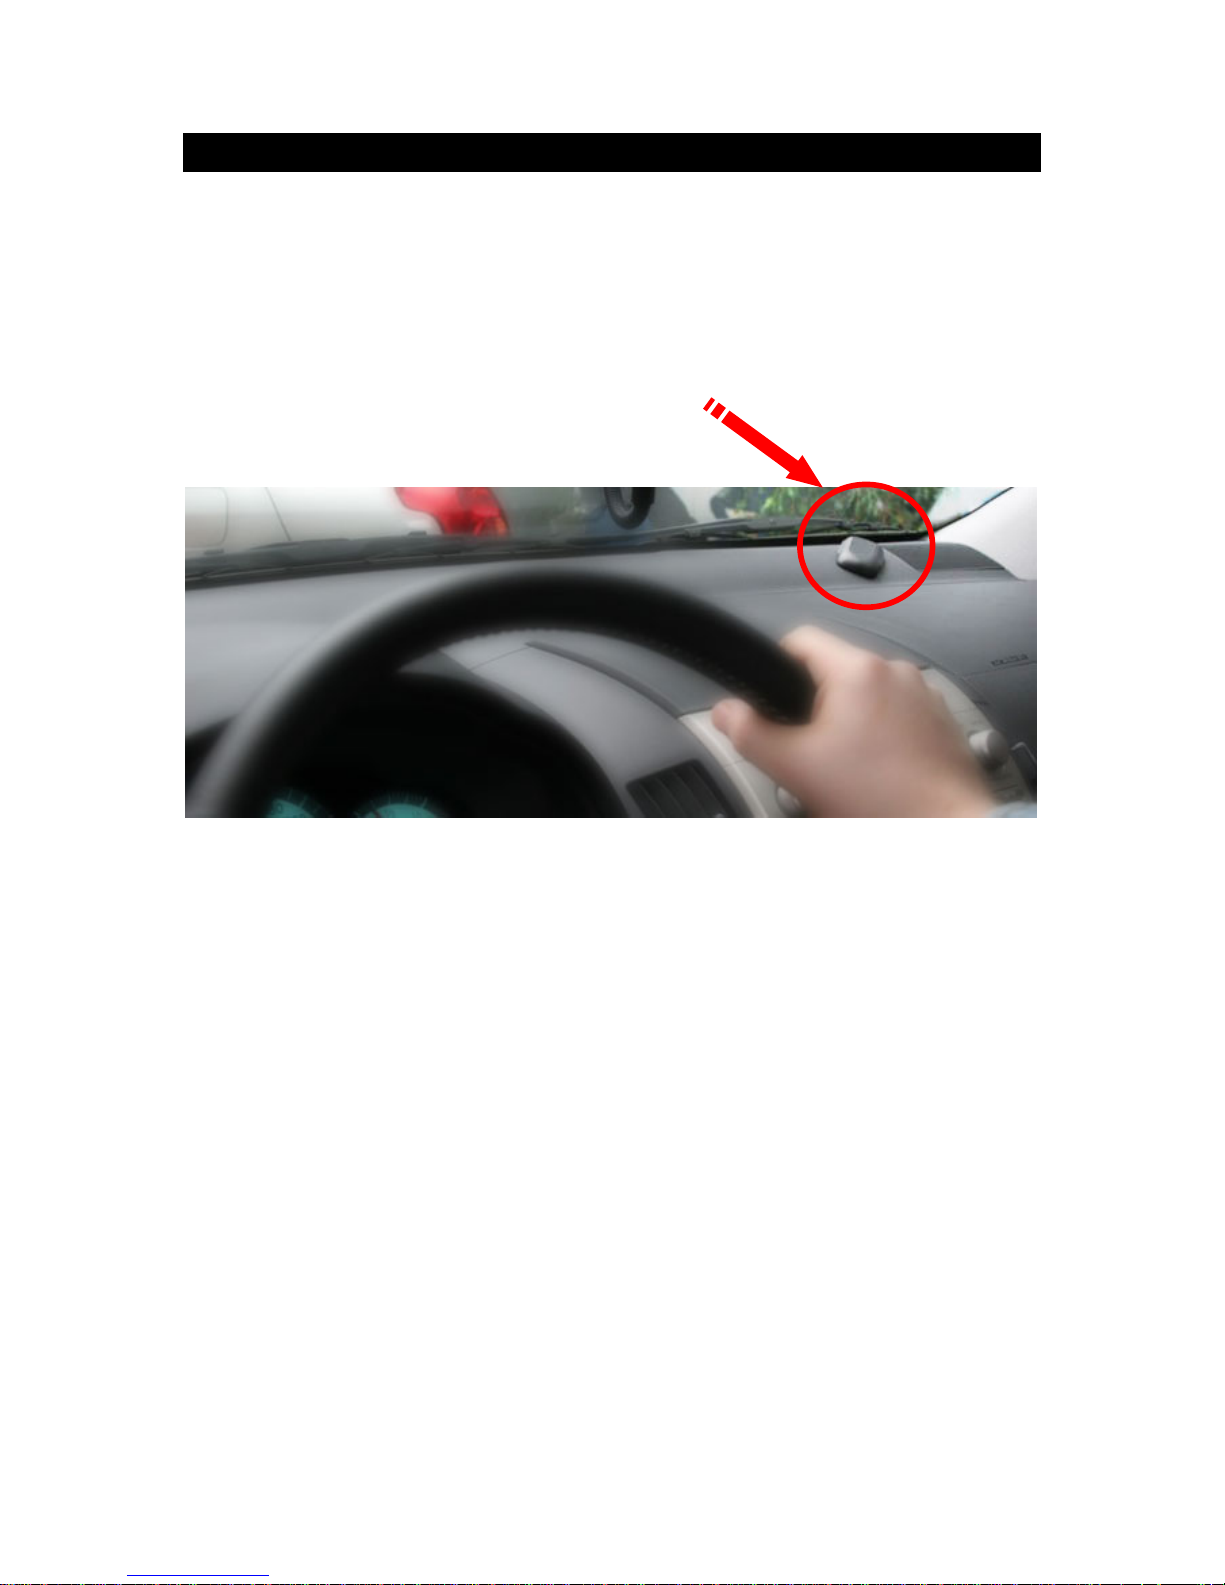
The Navigation system determines its position by communicating with the Global Positioning
Satellites through its GPS antenna. The waterproof antenna may be mounted inside or
outside of the vehicle. If you opt for interior mounting, keep in mind that the GPS antenna
can normally not "see" through metal. You can place the antenna on the front of the
dashboard close to the front windshield. The GPS antenna must be placed at least 10cm
away from any physical obstruction and Metal parts. The antenna has an internal magnet
and attaches to sheet or use double side adhesive. Route the he cable to the interior through
a front window or door seal.
Cars with electrical heating in the front windshield or with a metal coated front windshield
(heat resistant windshield) can have reduced reception of the GPS signal, please consult
your car dealer for more information. Mostly there is a special place on the front windshield
which is free of these obstacles and for the GPS antenna to receive clear signals. In rare
occasions the antenna needs to be installed outside the interior of the car, for example under
the hood’s plastic part of the windshield wipers compartment.
Page 33

32
 Loading...