

Page 1

CAR CD /DVD /MP3 PLAYER
/RADIO/SWC/GPS&RDS RECEIVER
/WITH Bluetooth
MODEL: TE-269
INSTALLATION CONNECTION MANUAL
Page 2

INSTRUCTION MANUAL
1
WEEE (Waste Electrical and Electronic Equipment Directive)
Waste electrical products should not be disposed of with household
waste. Please recycle where facilities exist. Check with your Local
Authority or retailer for recycling advice.
Disposing of the battery / batteries
Please check local regulations for disposal of batteries or call your local city office or
your household waste disposal service or the shop where you purchased the product.
The battery / batteries should never be placed in municipal waste. Use a battery
disposal facility in your neighborhood or community, if available.
Copyright Information
©2009 All rights reserved. This document may not in whole or in part be reproduced,
stored in a retrieval system, transmitted in any form or by any means, electronic,
mechanical, photocopying, recording, or otherwise, or reduced to any electronic
medium or machine-readable form without prior consent, in writing, from [COMPANY].
[PRODUCT] and [BRAND] are registered trademarks of [COMPANY]. The logo’s,
standards, software, and/or product names mentioned herein are manufacturer and
publisher trademarks and are used only for the purpose of identification.
Disclaimer
The publishers and author assume no responsibility whatsoever for the uses made of
this material or for decisions based on its use. Further, [COMPANY] makes no
warranties, either expressed or implied, regarding the contents of this product, its
completeness, accuracy, merchantability, or fitness for any particular purpose. Neither
the publisher nor anyone else who has been involved with the creating, production, or
delivery of the material shall be liable for any reason. [COMPANY] may make
improvements and/or changes in the products and/or options described in this
document at any time and without notice.
All brand and product names used throughout this document are trademarks or
registered trademarks of their respective companies. The brand and product names are
used in editorial fashion only and for the benefit of such companies. No such use, or
the use of any trade name, is intended to convey endorsement or other affiliation with
the document.
Product specifications are subject to change without prior notice
www.phonic-teacaudio.com
Page 3

INSTRUCTION MANUAL
2
WARNING!
To promote safety, certain functions are disabled unless the parking brake is on. The Unit is
designed to detect parked status and must be connected to the power supply side of the
parking brake switch. Improper connection or use of his connection may violate applicable
law and may result in serious injury or damage. To avoid the risk of damage and injury and
the potential violation of applicable laws, this unit is not for use with a video screen that is
visible to the driver.
To avoid the risk of accident and the potential violation of applicable laws, the front
Video image feature should never be used while the vehicle is being driven. Also, other
video displays should not be in a location where it is a visible distraction to the driver. In
some countries or states the viewing of images on a display inside a vehicle even by
persons other than the driver may be illegal. Where such regulations apply, they must
be obeyed and this unit’s DVD features should not be used.
Please remember to wear your seat belt at all times while operating your vehicle. If you
are ever in an accident, your injuries can be considerably more severe if your seat belt
is not properly buckled.
The supplier waves any and all liability when these warnings are not followed.
OPERATION
Only connect to a 12Vdc battery and negative grounding.
Avoid placing the product in direct sunlight, in areas with high levels of dust, high
temperatures (over 40°C) or high humidity (over 90%). In case of high temperatures,
cool down the car interior by means of ventilation or air-conditioning.
Operate in well ventilated areas.
Do not turn on or off the product in short intervals. When turning the unit off, wait for at
least 10 seconds prior to turning the unit on again. Do not operate the player with
scratched, bended or broken discs and when a disc is not loaded properly, do not force
it into the player.
Do not watch video playback while driving which will cause serious danger and risks of
traffic accident. It may violate the laws and regulations.
(There may be exceptional case, i.e., using rear view camera and navigation system)
Do not install the unit where the operation for safety driving is restrained.
Do not disassembly the unit by yourself, if need repairing, please take the unit to the
after service center.
Do not open and close the monitor manually, it may damage the monitor tilt system.
Do not touch the LCD screen by hard objects, it may damage or give scratch to the
LCD screen.
If the back of monitor touches dashboard or air-conditioner inlet etc after open the
monitor , then setup TILT level in monitor TILT menu to prevent damage from repeat
touching.
Car parking under direct sunlight may increase the temperature inside the car and the
unit may not be in proper operation, please try it again after the temperature returns to
normal.
Do not replace the fuse on the power cable without professional guidance, using
improper fuse may cause damage to the unit or even cause burn the unit.
Do not use irregular shaped Disk.
IR remote control operation may be hindered by monitor when the monitor is opened,
thus please use the remote control at the similar level of remote control receiver.
Do not install the unit where the cooling fan is blocked.
Page 4

INSTRUCTION MANUAL
3
CONTENTS
WARNING!......................................................................................................................... 2
OPERATION PRECAUTIONS ........................................................................................... 2
CONTENTS ....................................................................................................................... 3
ACCESSORIES................................................................................................................. 4
INSTALLATION.................................................................................................................. 5
WIRING CONNECTIONS .................................................................................................. 6
PANEL ............................................................................................................................... 8
REMOTE CONTROL....................................................................................................... 10
REMOVE BATTERY ........................................................................................................ 12
MAIN MENU .................................................................................................................... 13
◆RADIO PLAYER..................................................................................................... 13
CD PLAYER ........................................................................................................... 14
◆DVD PLAYER ........................................................................................................ 15
USB/SD/MMC INTERFACE ................................................................................... 16
◆AV IN MODE .......................................................................................................... 16
◆DUAL ZONE MODE............................................................................................... 16
◆SETTING CONTROL............................................................................................. 17
LANGUAGE CONTROL...................................................................................... 17
TIMECONTROL .................................................................................................. 17
RADIO FREQUENCE CONTROL....................................................................... 18
NAVIPATH CONTROL......................................................................................... 18
SYSTEM INFORMATION DISPLAY.................................................................... 19
TOOLS CONTROL.............................................................................................. 19
SWC CONTROL ................................................................................................. 19
OTHER CONTROL ............................................................................................. 20
VIDEO/CAMERA CONTROL .............................................................................. 20
SOUND CONTROL............................................................................................. 20
DESKTOP CONTROL......................................................................................... 21
OTHER FUNCTIONS ...................................................................................................... 21
Subwoofer ................................................................................................................. 21
Parking ...................................................................................................................... 22
Back View Camera .................................................................................................... 22
BLUETOOTH SECTION .................................................................................................. 22
NAVIGATION MODE ....................................................................................................... 24
SWC MODE..................................................................................................................... 24
NOTES ON DISC ............................................................................................................ 25
TROUBLESHOOTING..................................................................................................... 26
TROUBLESHOOTING..................................................................................................... 27
TECHNICIAL SPECIFICATIONS ..................................................................................... 28
Page 5

INSTRUCTION MANUAL
4
ACCESSORIES
Package contains the following accessories for installation and operation of the unit.
(1) Washer,
Spring
Washer,
M5 Nut
1
each
(4) Rubber
cushion
1
(2) Mounting
Strap
1
(5) Screw
4
(3) Bolt 1
(6) Screw
1
Note:
Product image may vary from the actual delivery.
ISO Cable
User Manual
1x AV-IN Cable
Trim ring RCA Cable External Microphone Cable
Remote Control
GPS Cable
Page 6

INSTRUCTION MANUAL
5
INSTALLATION
Note
Before starting installation of the unit, make sure the wiring is connected properly.
Use only the parts provided with the unit to ensure proper installation.
The use of unauthorized parts may cause malfunction.
Install the unit where it does not get in the driver’s way and will not injure the passenger in
case there is a sudden stop, like an emergency stop.
INSTALLATION (Figure 1)
Insert the unit into dash-board hole and fix it
If necessary, place the mount strap at the rear of the unit and fix it with provided washer
as figure 2.
Place Trim Ring over the unit and installation is completed as figure 1.
UN-INSTALLATION
Insert the supplied extraction keys into the unit and pull the unit out with keeping the
extraction keys. (as Figure. 4)
Page 7

INSTRUCTION MANUAL
6
WIRING CONNECTIONS
NOTE: Never connect cable to the system while it is connected to the battery power.
Whenever the unit is disconnected from the battery, the preset memory will be erased and
the unit will go back to its factory defaults.
Note: 1.To watch video the parking wire should be connected to break signal. 2 cables is
connected to a Hands-Free device (not included).
2. The GND of parking wire is connected with brake signal, while the GND of SWC wire is
connected with steering wheel.
3. The restriction of use SWC is the voltage between the adjacent buttons are above 0.2 V
that can be identified.
Parking wire
Note: The parking wire is connected with brake signal; for safety, the programs can be
seen on the monitor after braking the car.
Page 8

Page 9

INSTRUCTION MANUAL
7
Connecting the reversing line to taillight on the car
After connecting, when you start up the reverse gear, the unit will receive the picture from
car rear view camera.
Note:
- Only use groundless loudspeakers.
- Use only loudspeakers of minimal 40Watt, using fewer watts may result in damaging
your loudspeakers at higher volumes.
- Use 4~8 (Ohm impedance) loudspeakers only; using higher or lesser impedance
may damage the unit.
- Do not use 3-cable loudspeakers and do not connect the loudspeakers minus to the
car body (GND). The unit is using a BTL circuit and each loudspeaker must be
connected with insulated cables according the diagram.
- Loudspeaker cables and/or optional external power amplifiers must always be about
30cm away from the antenna and/or antenna extension parts.
Connect the speakers according the following diagram, incorrect connections will damage
the unit or your loudspeakers
Correct connection
Left front - Right front | Left rear - Right rear
Incorrect connections
Page 10

INSTRUCTION MANUAL
8
PANEL
Page 11

INSTRUCTION MANUAL
9
1. POWER/MUTE Button
Press it to turn on the unit. Press and hold for 2 seconds to turn the unit off .Press the
button briefly to Mute .Please note that the volume will be muted on all audio output
connector.
2. MODE Button
Press to select the mode: Radio, DISC (if there is a disc in unit), SD (if there is a SD/MMC
card in the unit), USB (if there is a USB device in the unit), AV IN, Bluetooth, DTV,
navigation, radio.
3. MENU Button
In any mode, press it to switch to the main menu quickly.
4. VOL Knob Button
Clockwise rotate VOL knob to increase the volume and counterclockwise rotate the VOL
knob to decrease the volume. Shout press the button to enter into sound setting.
5. A V-IN Jack
Put the AV plug into the AV-IN jack which was marked on front panel.
6. USB slot
USB slot, for Multimedia playback files only. Insert a USB into this slot and the unit will
automatically start reading and playback the card. * Supported Music File Format: MP3,
WMA Files.
7. OPEN Button
Press it to release the front panel.
8. IR
9. MIC
10. Info Display
Information Display LCD when operation the unit.
11. DISC slot
12. EJECT Button
Press to eject a disc. If the disc is not removed for about 10 seconds after eject, the disc is
reinserted automatically.
13. SD/MMC CARD slot
SD/MMC card slot, for Multimedia playback files only. Insert a SD/MMC CARD into this slot
and the unit will automatically start reading and playback the card. * Supported Music File
Format: MP3, WMA Files
14. RESET Button
Press it with a thin, sharp object. The device will then be reset to factory default settings.
15. ANTI-THIEF LED
16. Memory card with map slot
Page 12
INSTRUCTION MANUAL
10
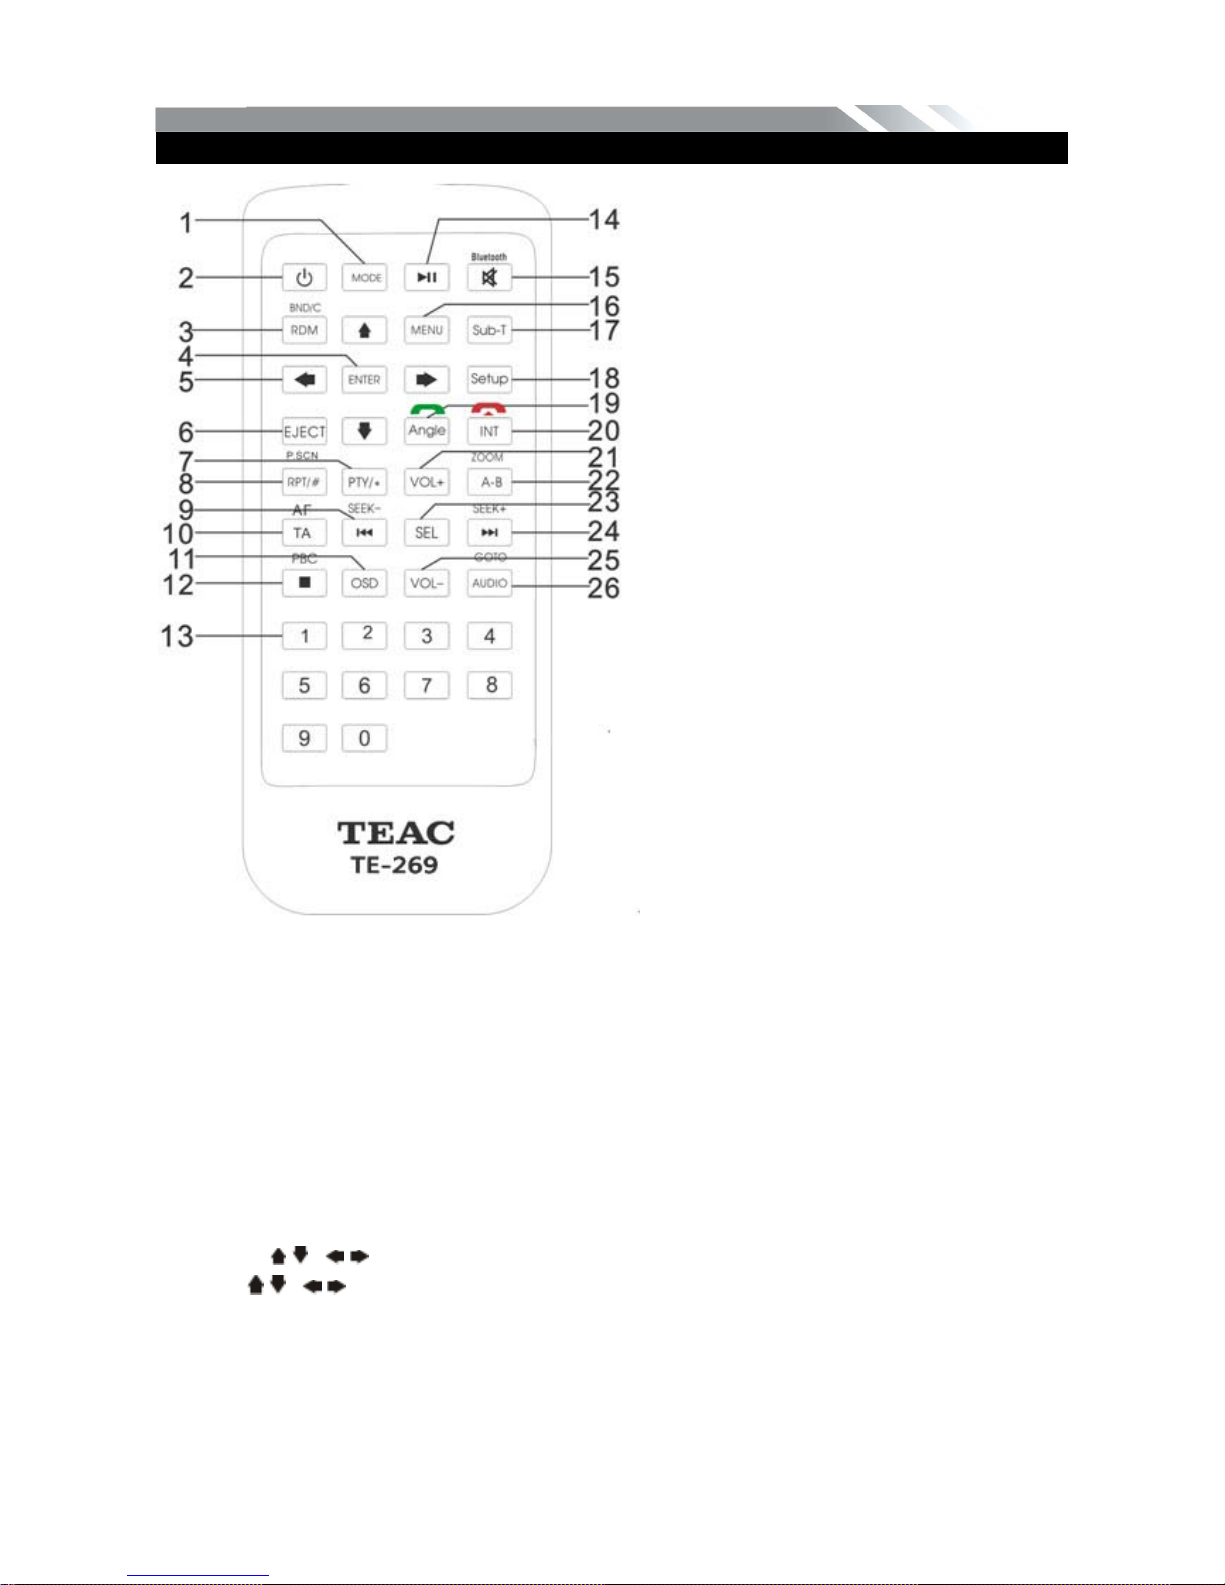
REMOTE CONTROL
1. MODE button
Press it to select the mode: Radio, DISC (if there is a disc in unit), USB (if there is a USB
device in the unit), SD (if there is a SD/MMC card in the unit), Bluetooth and AV IN.
2. POWER
Power on or off.
3. BAND/ RDM/C
In Radio mode, press to change radio band in sequence of FM1 FM2 FM3 MW1
MW2; In DVD mode, press to play randomly; In Bluetooth mode, short press it to clear the
single phone number; long press it to clear all the phone number.
4. ENTER button
When long press the GOTO and select the digit press it to confirm selection.
5: Cursor / / / buttons
Use the / / / buttons to select the DVD menu item.
6. EJECT button
Press it to eject the disc.
7. PTY/*
Press to select PTY type and input a digital key on the RC to confirm search. (only for FM
band)
In BLUETOOTH mode, press it to make a * symbol.
1: MODE
2: POWER
3: BAND/RANDOM/CLEAR
4: ENTER
5: UP/DOWN/LEFT/RIGHT
6: EJECT
7: PTY/*
8: P.SCN/RPT/#
9: BACKWARD/SEEK10: AF/TA
11: OSD
12: PBC/STOP
13: DIGIT NUMBERS
14: PLAY/PAUSE
15: MUTE/BLUETOOTH
16: MENU
17: SUBTITLE
18: SETUP
19: ANGLE/ACCEPT
20: INT/REJECT
21: VOLUME PLUS
22: A-B/ZOOM
23: SEL
24: FORWARD/SEEK+
25: VOLUME MINUS
26: AUDIO/GOTO
Page 13

INSTRUCTION MANUAL
11
8. P.SCN/ RPT /#
In SD CARD/ USB mode, press to repeat REP OFF=>REP track=>REP in folder=>REP
OFF
When playing the video, press to start repeat REP OFF=>REP track=>REP in folder=>REP
OFF
In Radio mode: PS (Preset Scan): Press to scan all preset stations in the memory of the
current band and stay on each memory stations for about 5 seconds.
In BLUETOOTH mode, press it to make a # symbol.
9. / SEEK- button
In DVD mode, Press button to skip to the previous track.
In RADIO mode, press button to start searching automatic, press and hold for two
seconds to start manual searching. button Frequency down.
10. AF/T A
Press to set TA on or off; press and hold AF/TA button for two seconds to set AF on or off.
When it turned on, radio can follow the same station when the frequency is different.(only
for FM band)
11. OSD button
When play the video press to show disc playing information;
12. STOP/PBC button
Press to stop playback from the current position, press again to final stop to the very
beginning. Press PLAY/PAUSE button to play.
Press and hold for two seconds to set PBC on/ off in VCD mode.
13. Digit 0-9 buttons
When playing the video, long press the GOTO button and press the digit to select track.
In BLUETOOTH mode, press to input phone number,long press 0 number to make a +
symbol.
14. PLAY/PAUSE button
In DVD mode, press it to break playback, press again to resume playback.
15. Mute button/Bluetooth button
: Short press to mute the volume output, press again to resume volume.
Long press this button to enter into Bluetooth mode.
16. MENU button
Press it to show main menu, in DVD mode, long press it to enter TITLE MENU (Enable only
if the DVD disc with title menu).
17. SUBTITLE button
Press it to select the subtitle language (Available only if the disc with subtitle function).
18. SETUP button
In DVD mode press it to enter the setup menu, press again to resume playback.
19. ANGLE Button/Accept Button
In DVD mode, press it repeatedly to change the viewing angle (Available only with a
recorded DVD file or DVD disc that has this function).
In BLUETOOTH mode, press to make a call after inputted a phone number or accept an
incoming call.
20. INT Button /Reject Button
Press it to activate the intro function. You can play the beginning of every track for 10
seconds in sequence.
In BLUETOOTH mode, press to reject a coming call or hang up while calling
21. VOL+ button
Page 14
INSTRUCTION MANUAL
12
Press to increase volume level.
22. A-B/ZOOM button
During playback, press it at the starting point of section you want to repeat (A), press this
button again at the ending point of the section you want to repeat (B), section A-B repeating
starts. Press it again to cancel the A-B repeat function.
Press it and hold for two seconds in DVD mode to zoom the image in or out in the sequence
of ZOOM 2-> ZOOM 3-> ZOOM 4-> ZOOM 1/2-> ZOOM 1/3-> ZOOM 1/4-> ZOOM off.
23. SEL button
Press it to enter the SOUND SETTING menu, Press SEL button again to exit the menu.
24. / SEEK + buttons
When playing video, press button to skip to the next track.
In RADIO mode, press button to start searching automatic, press and hold for two
seconds to start manual searching. button Frequency up.
25. VOL- button
Press to decrease volume level.
26. AUDIO/GOTO button
In VCD mode, press it to select the sound track in the sequence of Audio [1/2]=>Audio[2/2]
Go to: When playing video,press and hold for 2 seconds to show TIME SEARCH menu,
select number and confirm to go to certain position directly. Select number and confirm to
go to certain TITLE or CHAPTER position directly. When ACC OFF or Power OFF, turn on
the unit again, you can just select the TITLE, touch the icon on the screen to select the
CHAPTER.
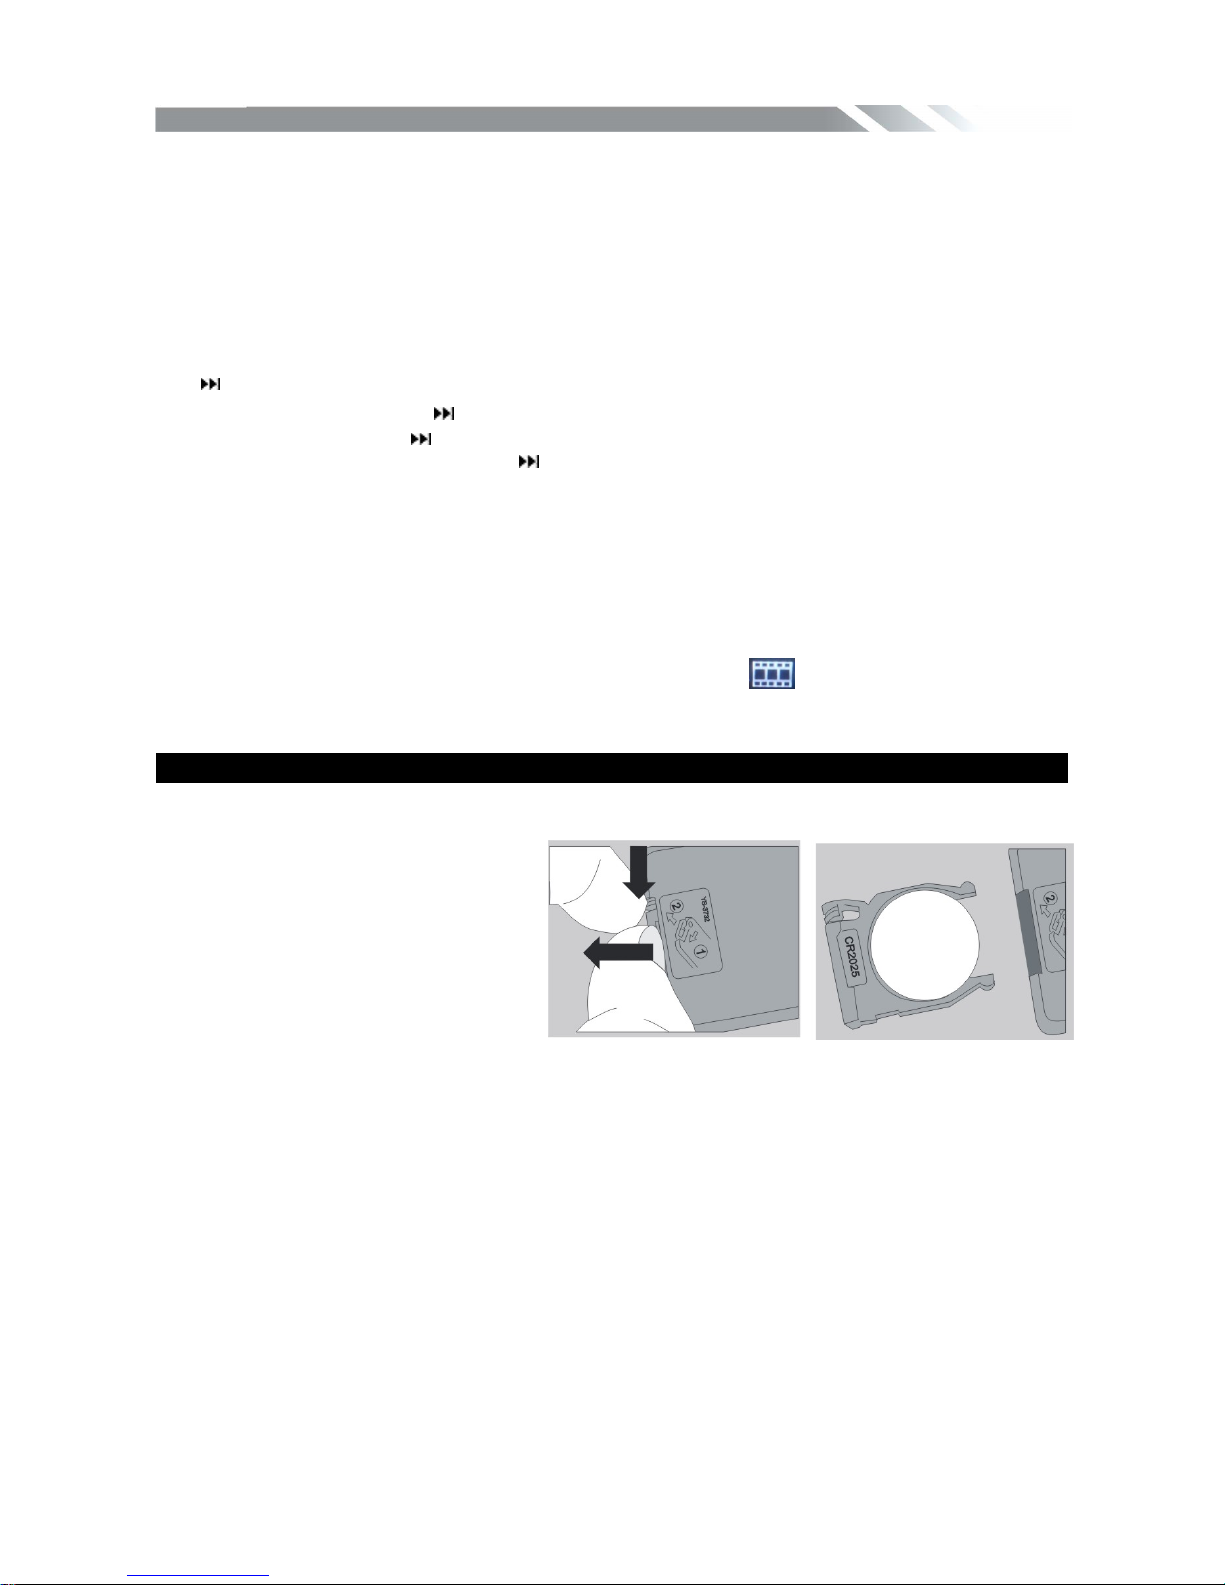
REMOVE BATTERY
Note:
The distance may vary according
to the brightness of ambient light.
If the remote is not used for an
extended period of time, remove
the battery to prevent possible
damage from battery leakage
and corrosion.
Do not place any objects
between the remote control unit and the sensor on the unit.
Do not drop the remote control onto the floor; it will damage it beyond repair.
Do not use the remote control unit, while simultaneously operating the remote control
unit of any other equipment; they may interfere resulting in improper operation.
The battery normally last for about one year although depending how often the remote
control is used. If the remote control unit isn’t working even when it is operated near the
unit, replace the battery with a new battery of the same make and use only a lithium cell
battery type: CR2025 (3V).
Dispose empty batteries in accordance with your local governmental regulations.
Do not short-circuit, disassemble, heat or dispose of fire or flames the battery.
Keep the battery out of reach of children, should the battery be swallowed, immediately
consult a doctor.
Page 15
INSTRUCTION MANUAL
13
MAIN MENU
The best way to discover the program is to explore each screen in detail, and to find out
how to move from one to another. Read this chapter for a guided tour.
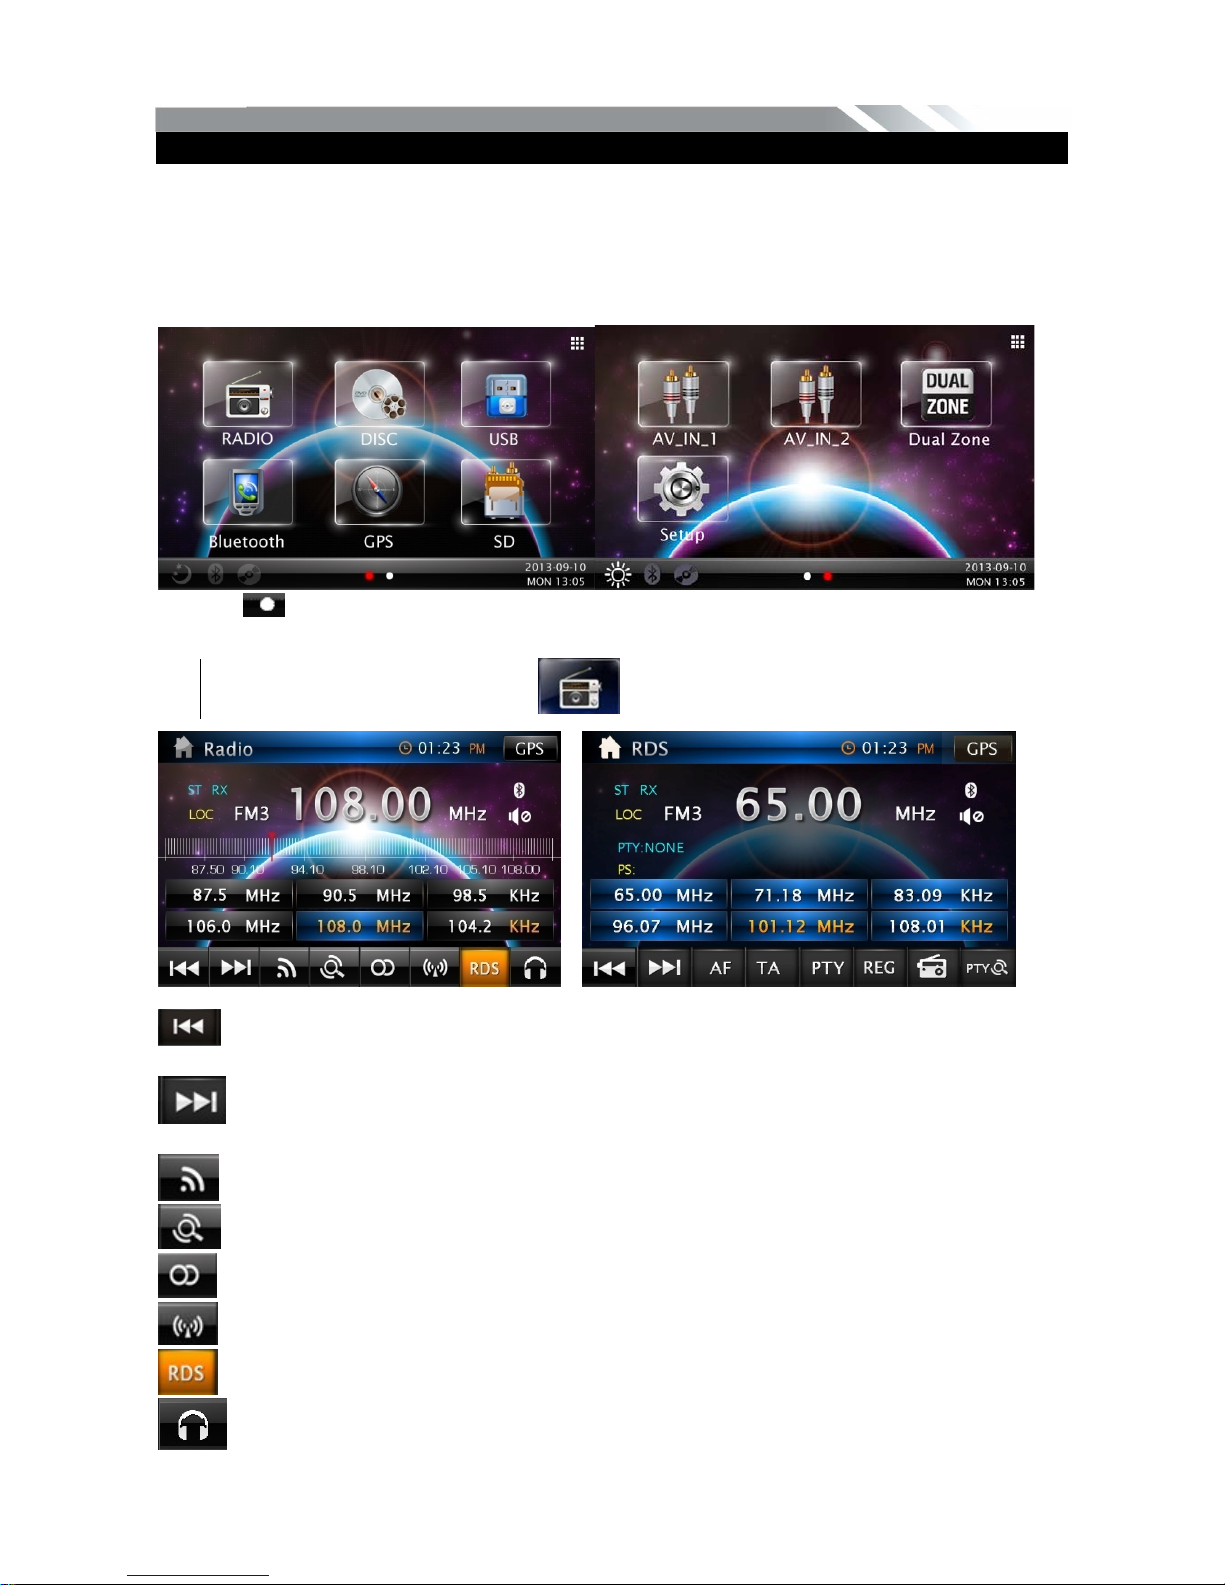
Unit starts by displaying the Main menu.
This is the root of the screen hierarchy, and you can simply access all features by tapping
on the touch screen icons.
Tap the icons to enter a desired mode.
Tap the icon to enter the right part of the screen to switch between the 2 menu pages.
◆
RADIO PLAYER
To start Radio, tap RADIO icon on main menu screen.
Touch this icon to select station backward manually. Touch and hold this icon to
select station backward automatically.
Touch this icon to select station forward manually. Touch and hold this icon to select
station forward automatically.
Touch this icon to choose the bands: FM1, FM2, FM3, MW1, MW2.
Touch this icon to search stations
Touch this icon to select stereo or mono sound reception.
Touch this icon to select reception of local station or DX for distance station.
Touch this icon to enter into RDS MENU.
Touch this icon to mute the sounds.
Page 16
INSTRUCTION MANUAL
14
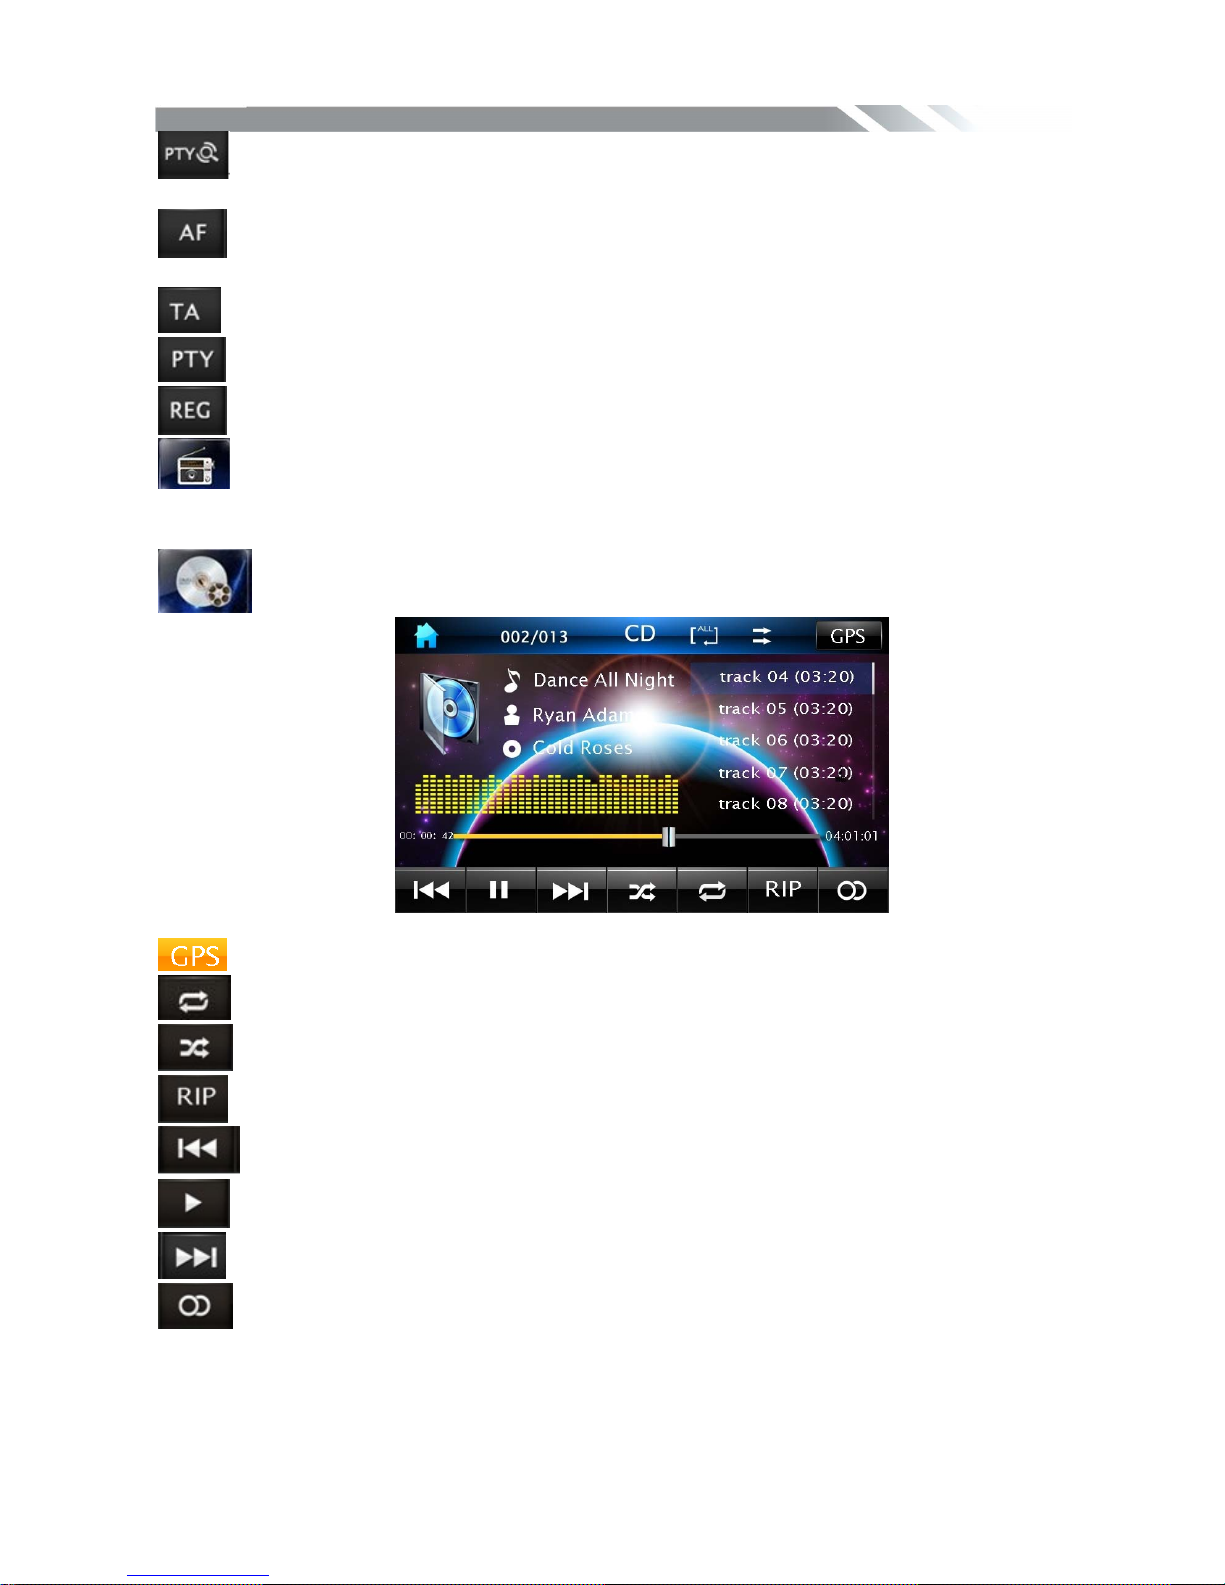
Touch this icon scan the stations and scan each station for 5 seconds. Touch and
hold it to save the stations with good reception automatically. Touch this icon again to stop.
Touch this button to switch an alternative frequency on or off. When it turned on,
radio can follow the same station when the frequency is different.
Touch this button to switch radio traffic service on or off.
Touch this button to select program type.
Touch this icon to on or off REG function.
Touch this icon to return back normal radio menu
CD PLAYER
To start CD player, tap on DISC icon from main menu screen.
Touch it to enter GPS mode.
Touch it to select: Repeat off=>Repeat track=> Repeat in folder
Touch it to turn on / off random /sequence playback.
Touch it to copy the track on the CD to USB or CD card.
Touch it to skip to the previous track.
Touch it to play/pause.
Touch it to skip to the next track.
Touch this icon to select stereo or mono sound reception.
Page 17
INSTRUCTION MANUAL
15
◆
DVD PLAYER
To start DVD Player, tap on DISC icon from main menu screen.
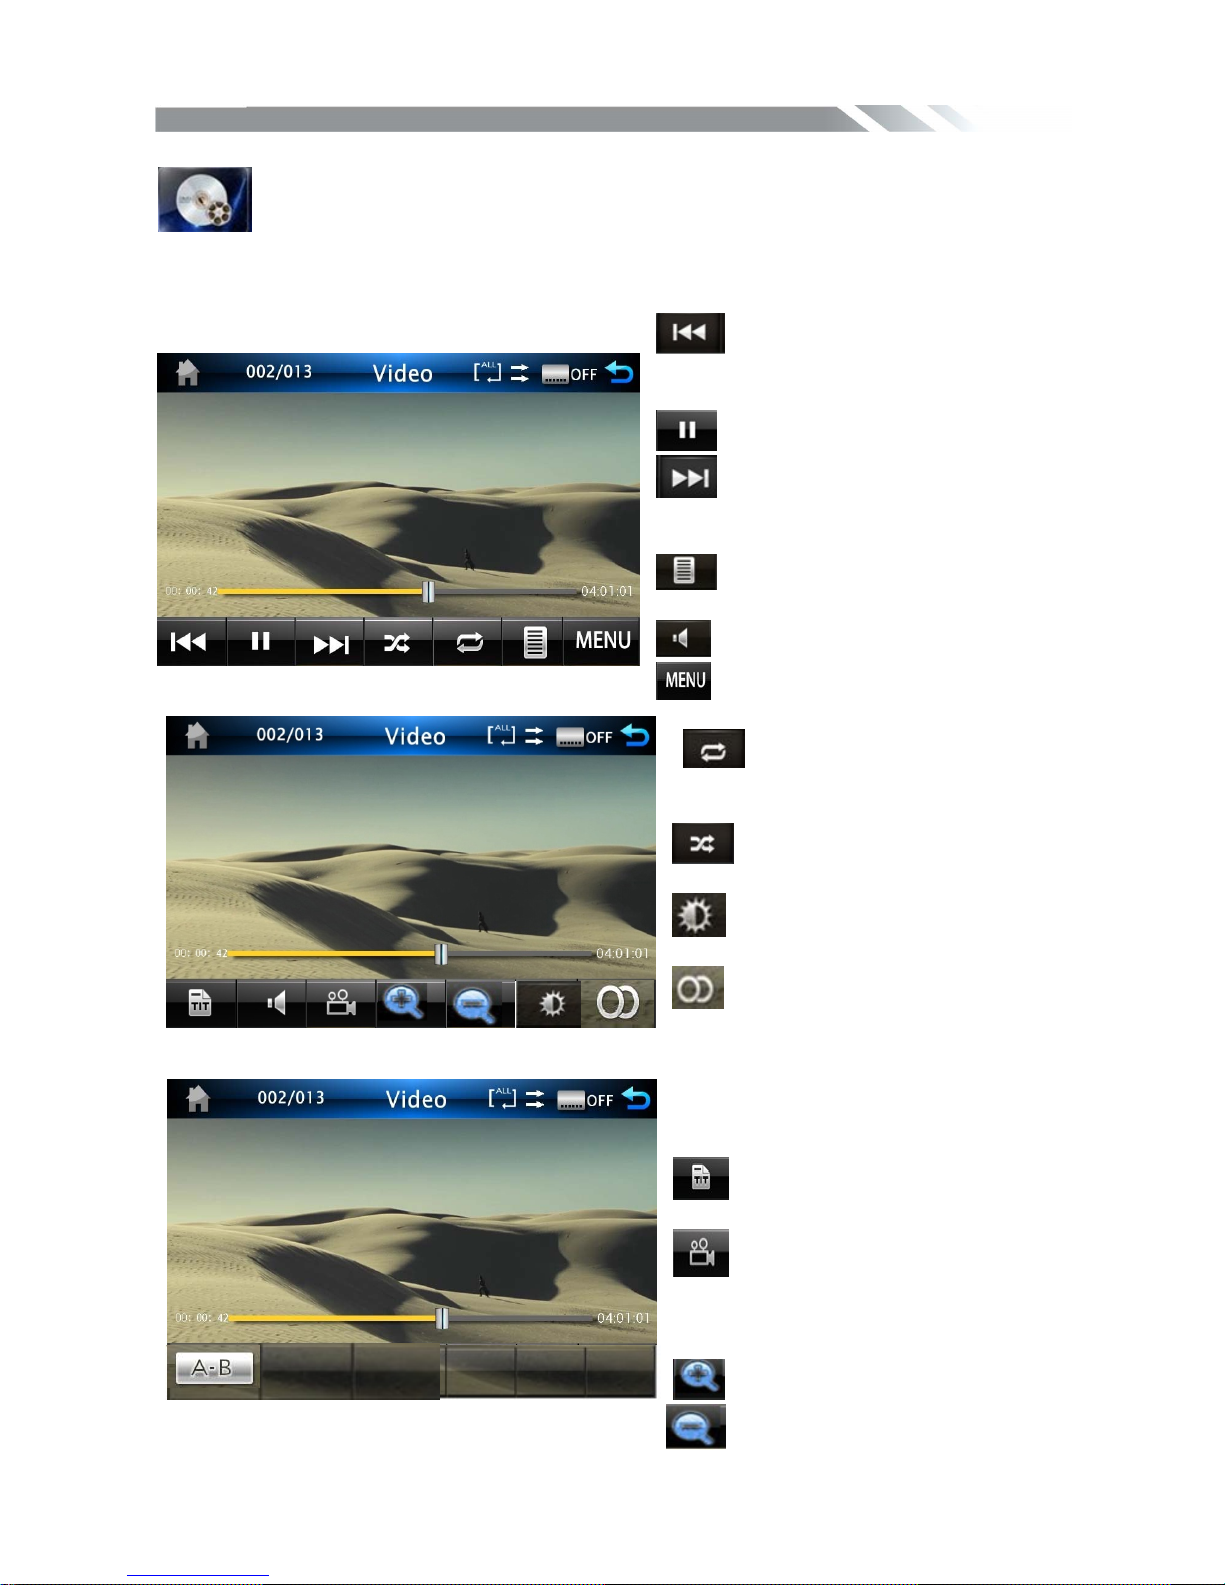
TOUCH SCREEN MENU
You will not see any buttons while DVD is played. Buttons will appear when you tap on TFT
screen. Tap the screen again to hide the buttons.
Touch it to skip to the previous
track. Touch and hold for 2 seconds to
retune to the beginning of the track.
Touch it to play/pause.
Touch it to skip to the next track.
Touch and hold for 2 seconds to activate
fast forward (FF) search in a track.
Touch it to select different
caption
Touch it to select Audio
Touch it to return to the menu title
Touch it to select: repeat track
=> repeat in folder=>repeat all=>
repeat off
Touch it to turn on / off
random/sequence playback.
Touch it to adjust the picture
texture
Touch this icon to select right or
stereo or left sound reception.
Touch it to select the section from A to
B for repeat.
Touch this button to return to the
title.
Touch it repeatedly to change
the viewing angle (Available only with a
recorded DVD file or DVD disc that has
this function).
Magnify the frame 2X 3X 4X
Reduce the frame 2X 3X 4X
Page 18
INSTRUCTION MANUAL
16
USB/SD/MMC INTERFACE
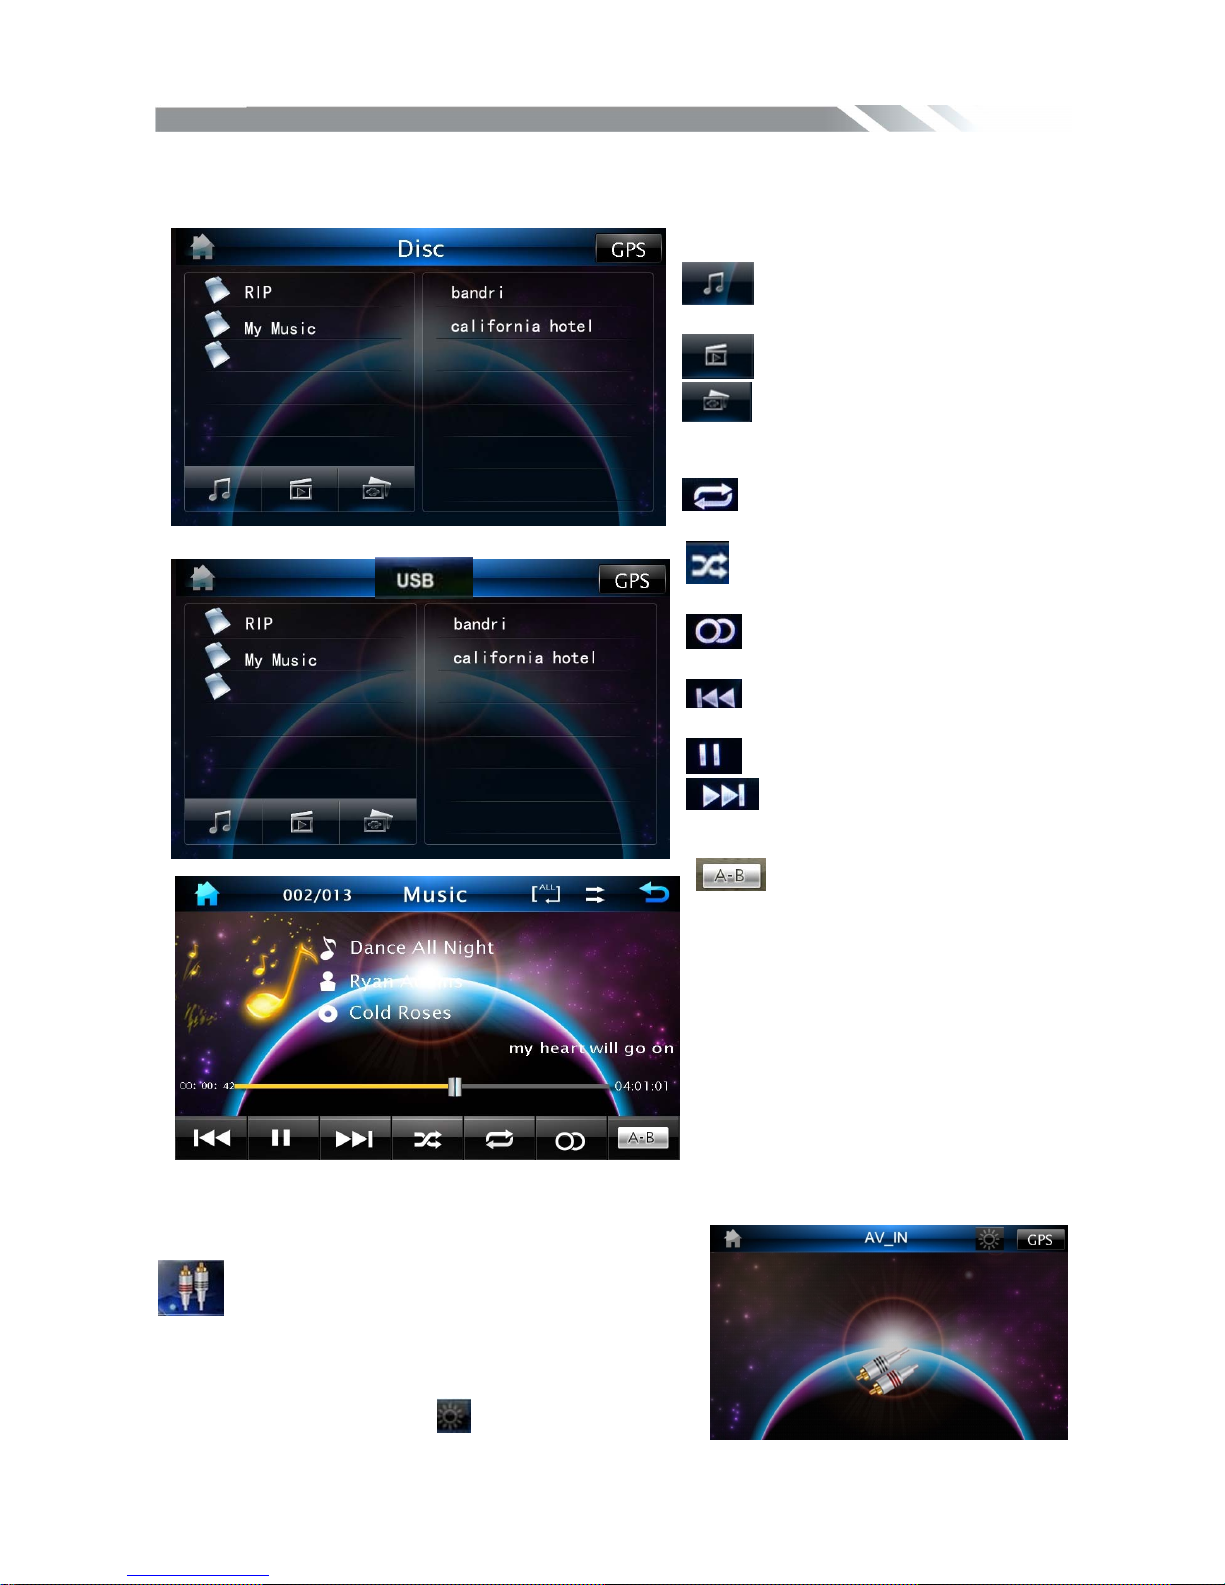
When a file disc, USB or a memory card is played, the screen will show following interface:
Touch it to select music files.
Touch it to select video files.
Touch it to select photo files.
.
Touch it to select: repeat
all=>repeat 1=> repeat off
Touch it to turn on / off random
playback.
Touch this icon to select right or
stereo or left sound reception.
Touch it to skip to the previous
track.
Touch it to play/pause
Touch it to skip to the next
track.
Touch it to select the section
from A to B for repeat.
◆
AV IN MODE
To start AV-IN Mode, tap AV-IN icon from main
menu screen. Connect the external audio/video signal
source to this unit. Select AV-IN mode in the main
menu or by pressing repeatedly Mode button on the
front panel Touch the icon
to adjust the picture
texture
Page 19
INSTRUCTION MANUAL
17
optional audio/video source into the 3.5mm input jack on the front panel. Connect an
optional audio/video source to the RCA connectors on the back of the unit.
◆
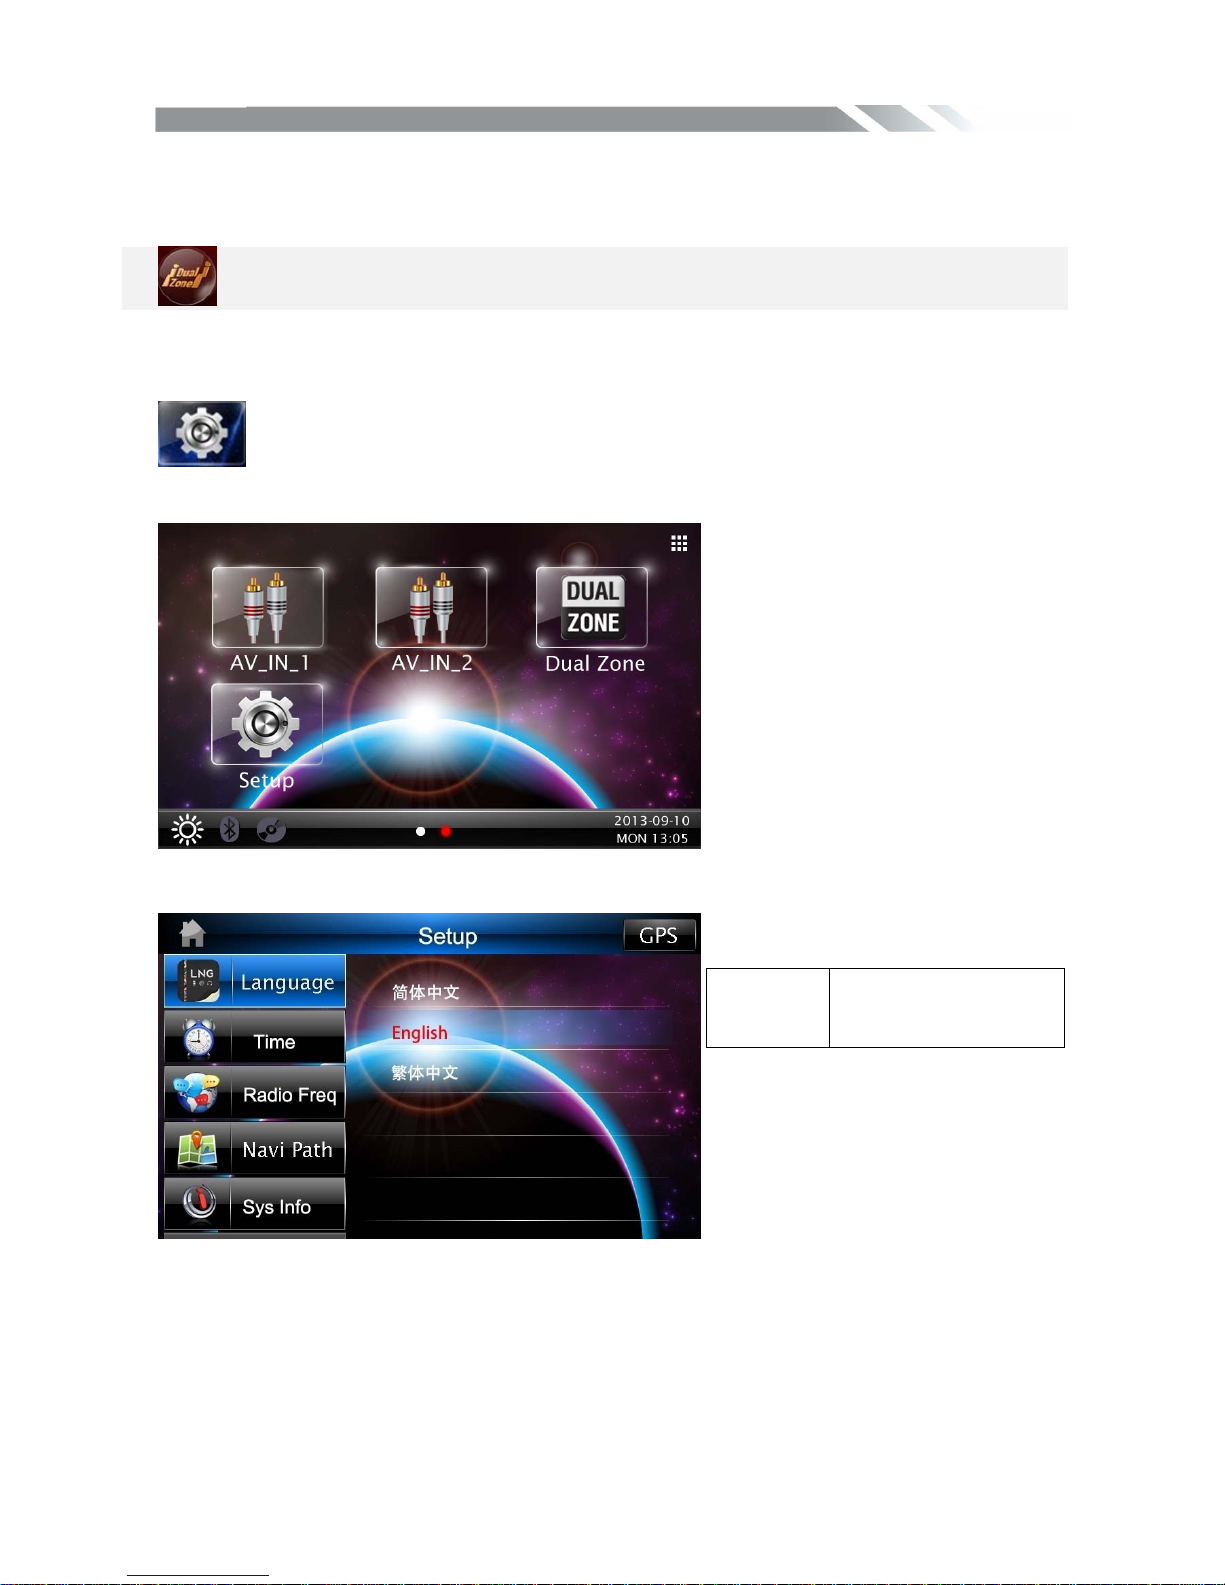
DUAL ZONE
To start dual zone Mode, front deck and background work at the same time
◆
SETTING CONTROL
To start SETTING, tap SETUP icon on main menu. Your device has default system
settings. You can customize the settings to suit your personal needs. Once you change
settings, your new settings will remain until you change it again.
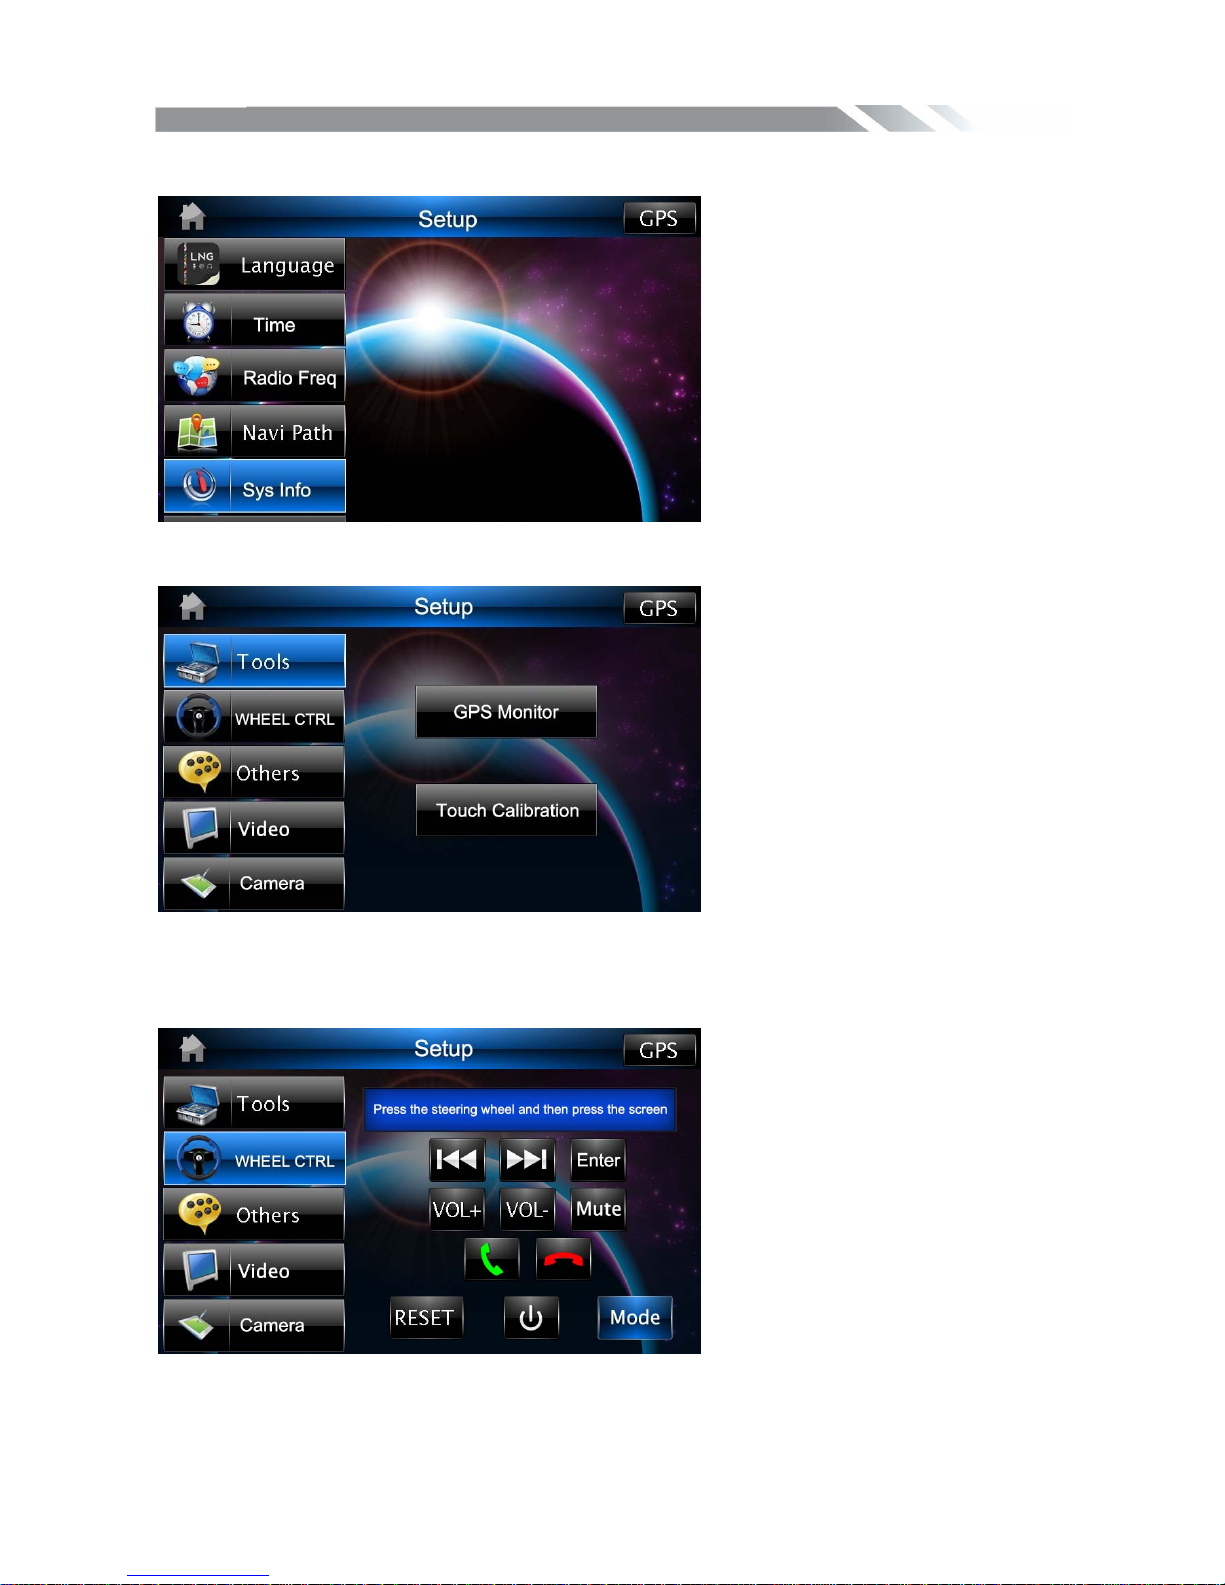
Language CONTROL
Tap language icon to show DISPLAY menu
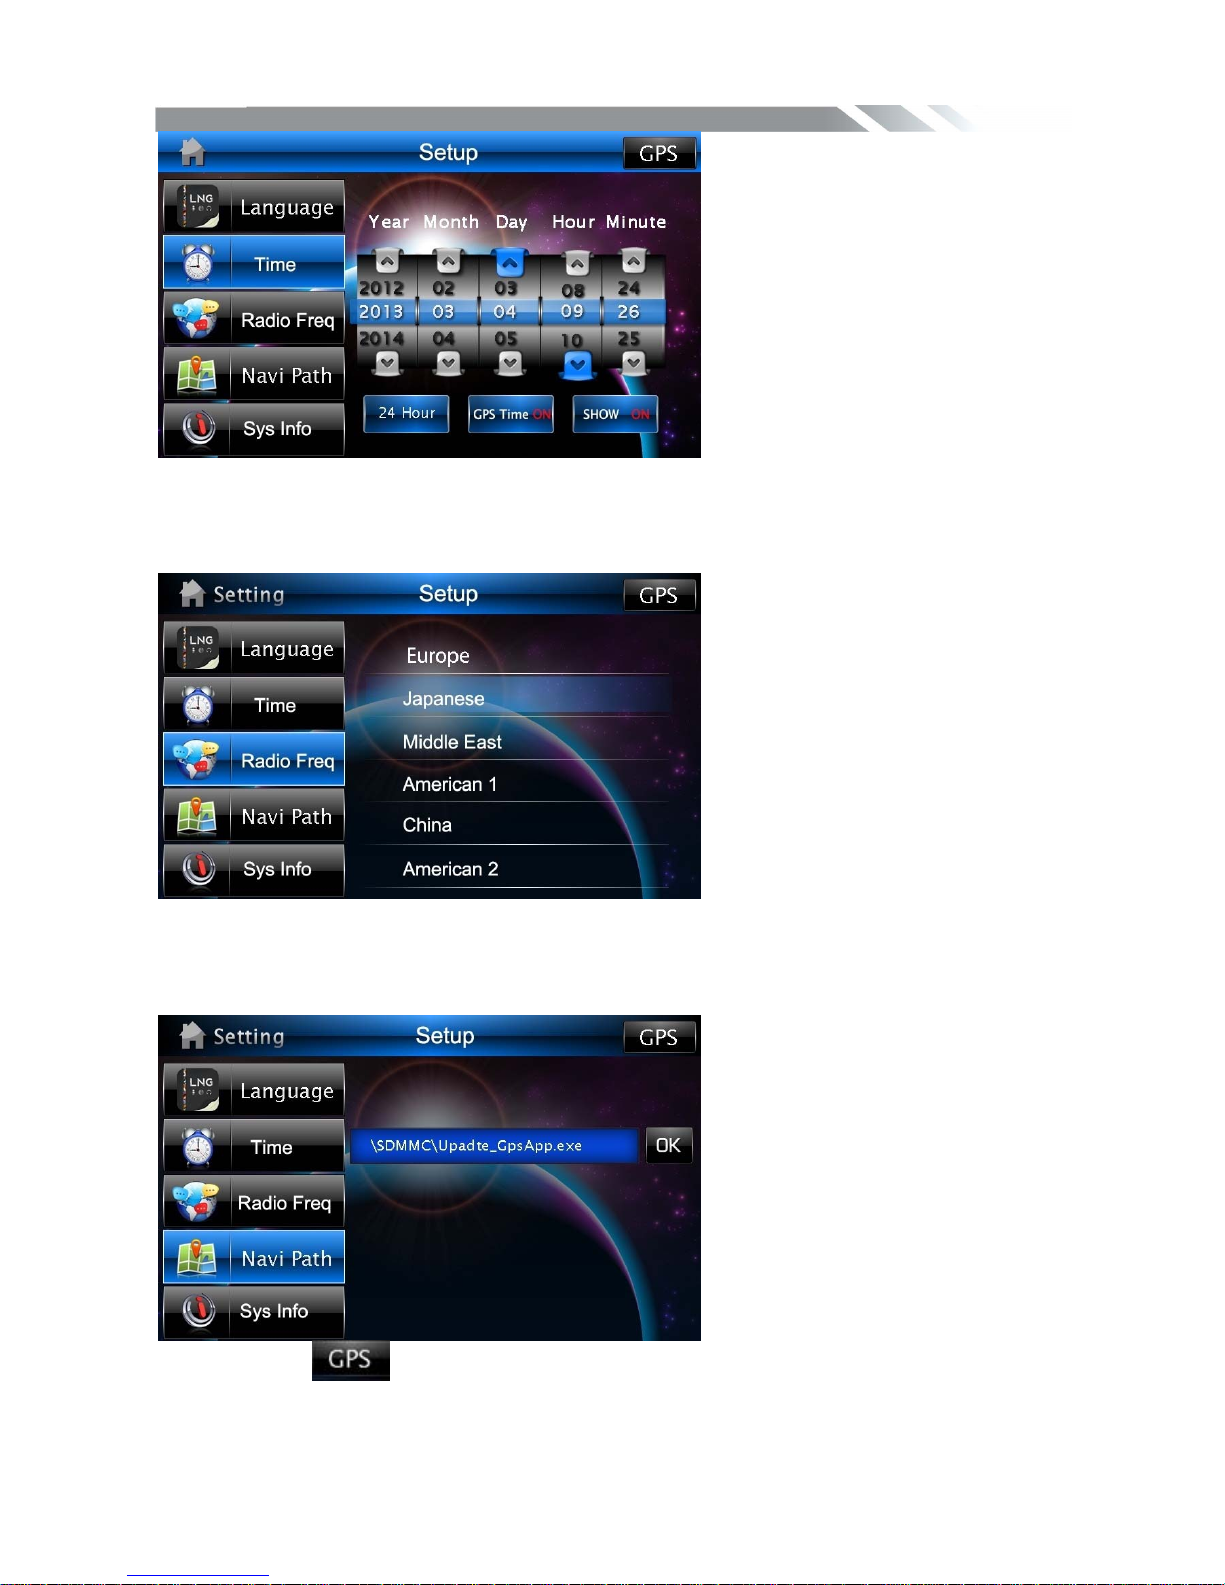
Time CONTROL
Tap Time icon to show Time menu, then through touching the on/off to set the time showing.
language Set the simple
Chinese/English/traditi
onal Chinese
Page 20
INSTRUCTION MANUAL
18
Radio Frequency CONTROL
Tap radio freq icon to show radio freq menu, then through touching the area name to select
different frequency region
Navi Path CONTROL
Tap NaviPath icon to show NaviPath menu, then set the navigation path.
Press the icon to enter into GPS mode, and we must exit the map to end the GPS
mode. Press the MENU button can just enter into the main menu cannot end the GPS.
Page 21
INSTRUCTION MANUAL
19
Sys info CONTROL
Tap sys info icon to show the syeterm information
Tools CONTROL
Tap tools icon to select the GPS monitor and touch calibration function
WHEELCTRL CONTROL
Tap WHEELCTRL icon to set SWC function
Page 22
INSTRUCTION MANUAL
20
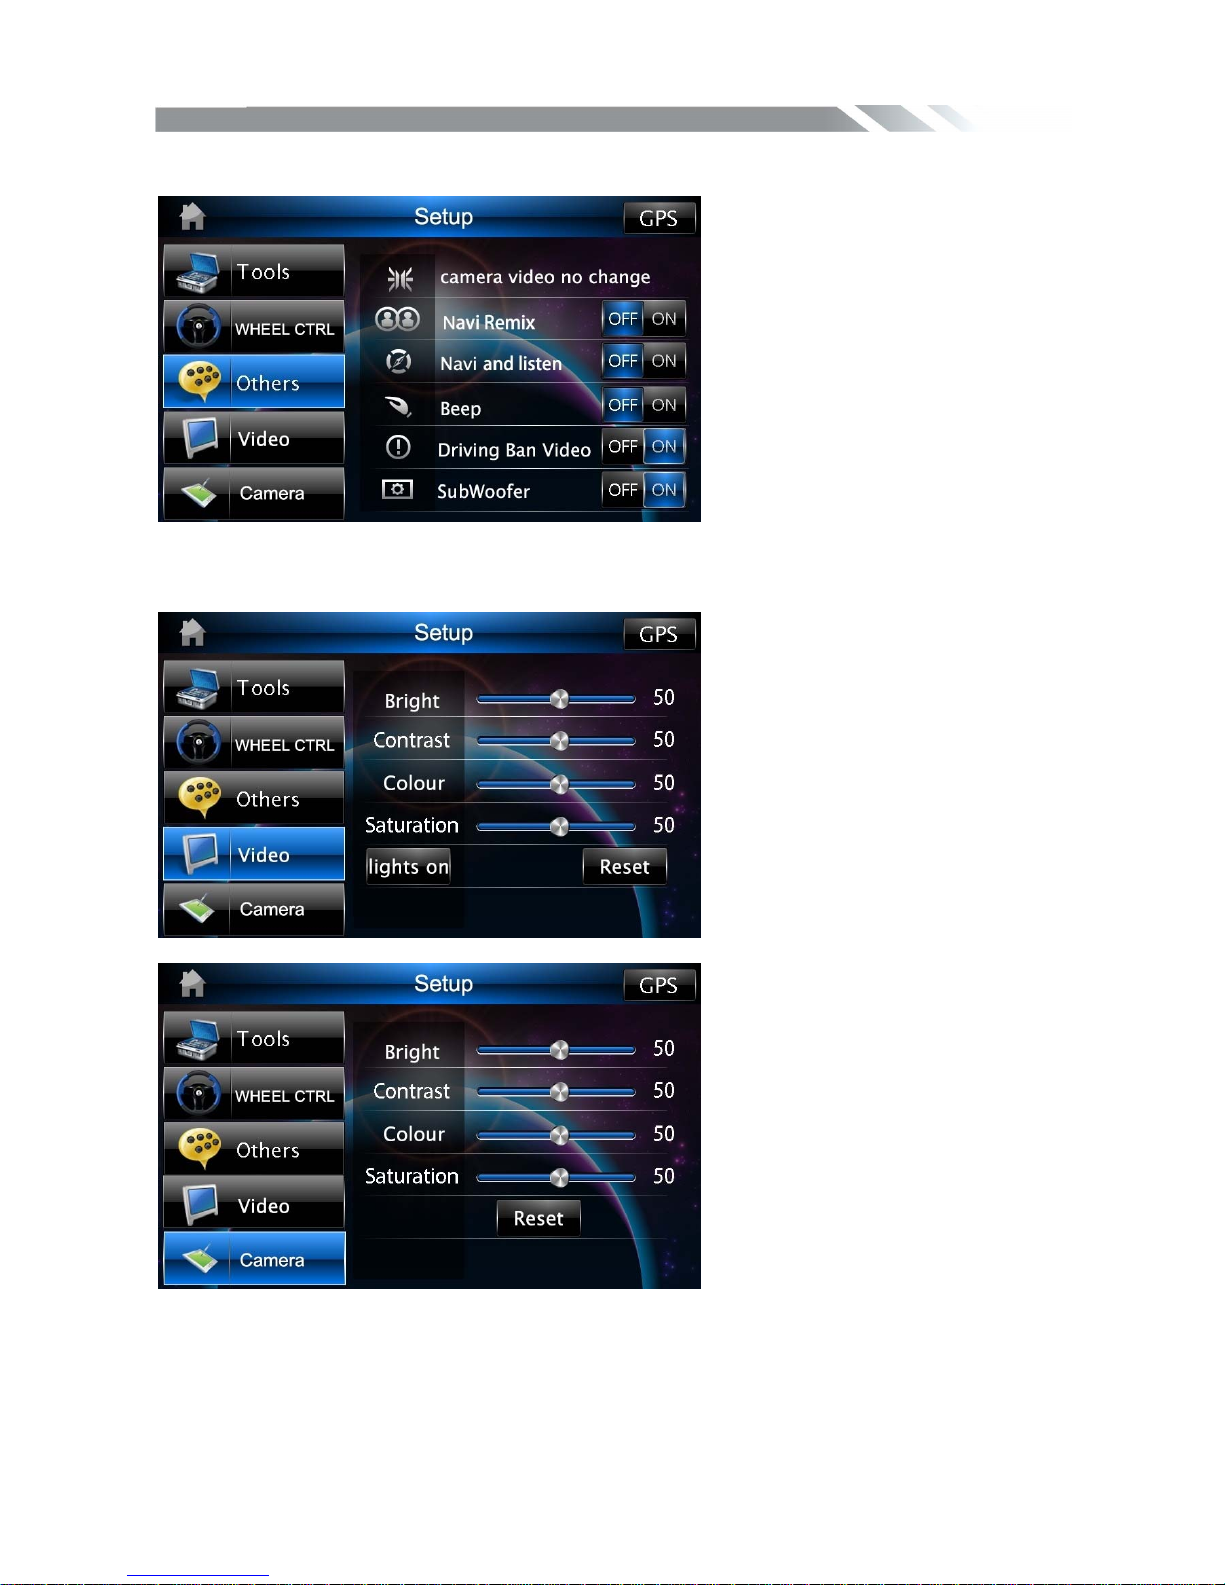
Other CONTROL
Tap other icon to show the menu to set the other function
Video/Camera CONTROL
Tap video/camera icon to show the video/camera menu to set the effect
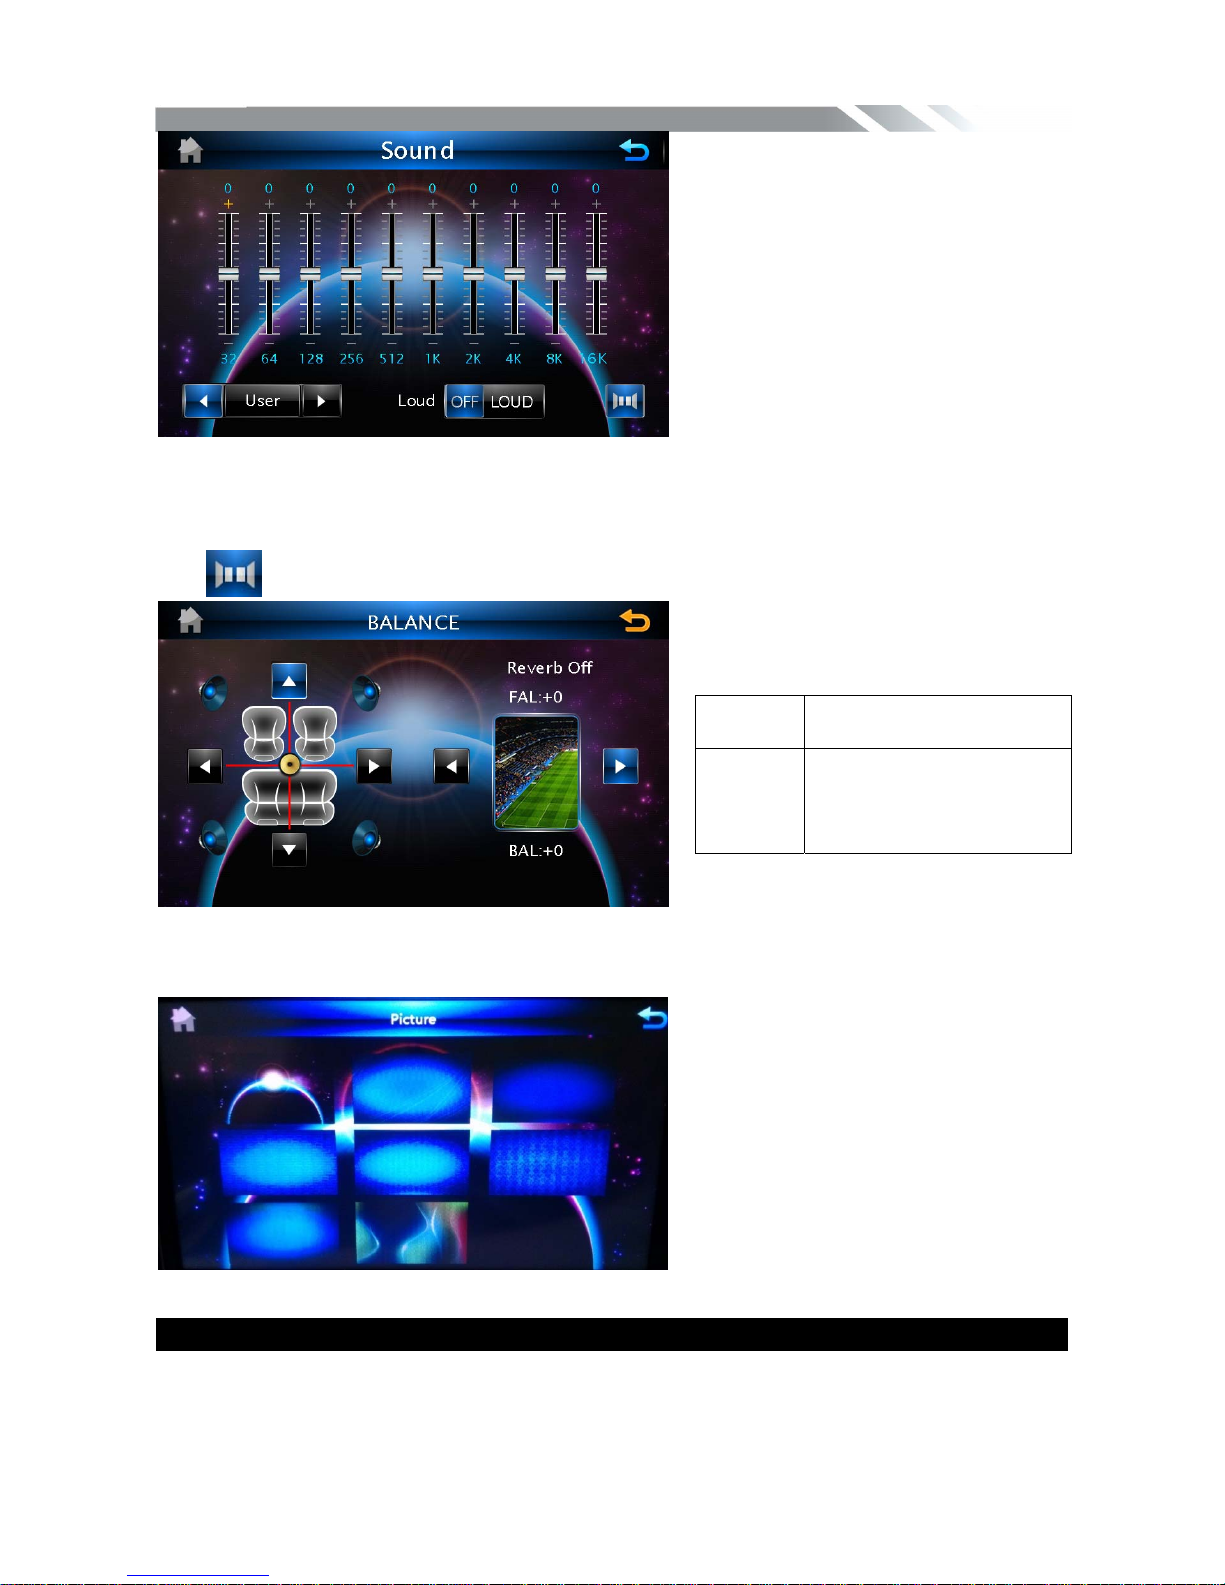
Sound CONTROL
Tap Audio icon to show audio menu, then touch the different effect to Select the digital
sound effect (close,rock,pop,live,dance,classic,soft)
Page 23
INSTRUCTION MANUAL
21
Tap icon to show BALANCE menu
Desktop CONTROL
Tap desktop icon to show desktop menu, then select the picture you desire as the wallpaper
OTHER FUNCTIONS
Subwoofer
Connect the subwoofer to the unit using sub output (see electrical diagram). Tap SETTING
icon on main menu to enter setting menu. Choose COMMON SETTING and set Mega Bass
BALANCE UP/DOWN/LEFT/RIGHT
Balance control
REVERB
ERATION
Set reverberation: original
sound, the scene, living
room, hall, caves,
bathroom, arena.
Page 24
INSTRUCTION MANUAL
22
ON to enable subwoofer.
Parking
When the car is stopped and the parking brake is working, the screen can display the video
image, otherwise the screen can't display the video image
Back View Camera
This unit is equipped with back view camera output. The camera is used to observe the
situation behind the vehicle when you are backing the car.
Please connect your back view camera with the back car video input. And connect the
reverse wire for back a car with the rear gear light. Rear view camera picture will be
enabled when you are backing the car.
BLUETOOTH SECTION
Warning: Driving and having a Telephone conversation at the same time is dangerous,
please park your car before having a telephone conversation. The supplier waves any and
all liability when this warning is not followed.
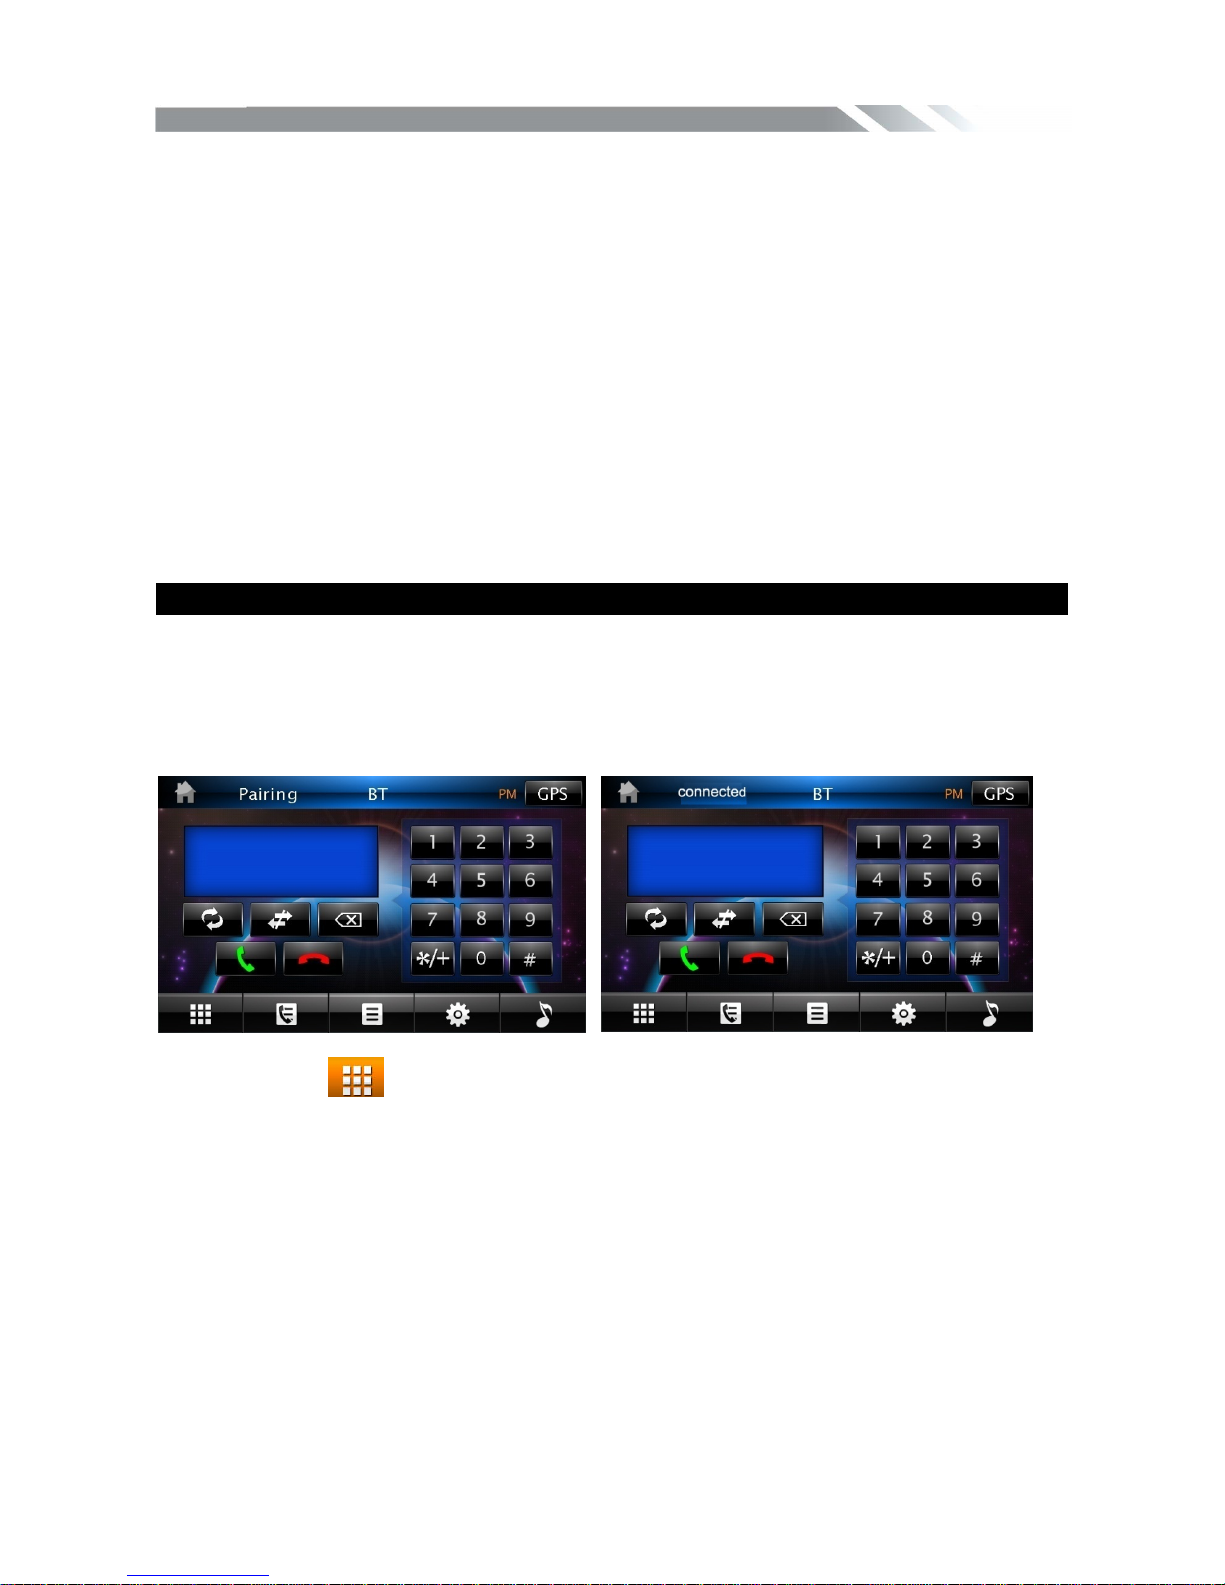
To enter Bluetooth mode, you can tap Bluetooth icon on Main menu or press mode button
on remote or on front panel.
CONNECT WITH MOBILE PHONE DEVICE
Bluetooth disconnect mode Bluetooth connect mode
1) Tap the icon
to turn to the interface as above, and open the BT function on the
mobile phone.
2) Tap the MATCH icon on the unit, select the new device(TEAC) on the phone after
searching for it, input PIN password”1234” on the phone and confirm, the phone and the
unit is connected.
Auto-connect & Disconnect
When power on the unit, the last paired phone will be remembered. Tap the CONNECT
icon on the unit, it will connect to the phone via Bluetooth automatically.
If you want to disconnect the Bluetooth connection, turn off the mobile phone Bluetooth
function or tap the DISCONNECT icon on the unit.
Edit
Tap the EDIT icon, you can set new name and pin code for the unit.
A user can make own choice by tap the icons.
Page 25
INSTRUCTION MANUAL
23
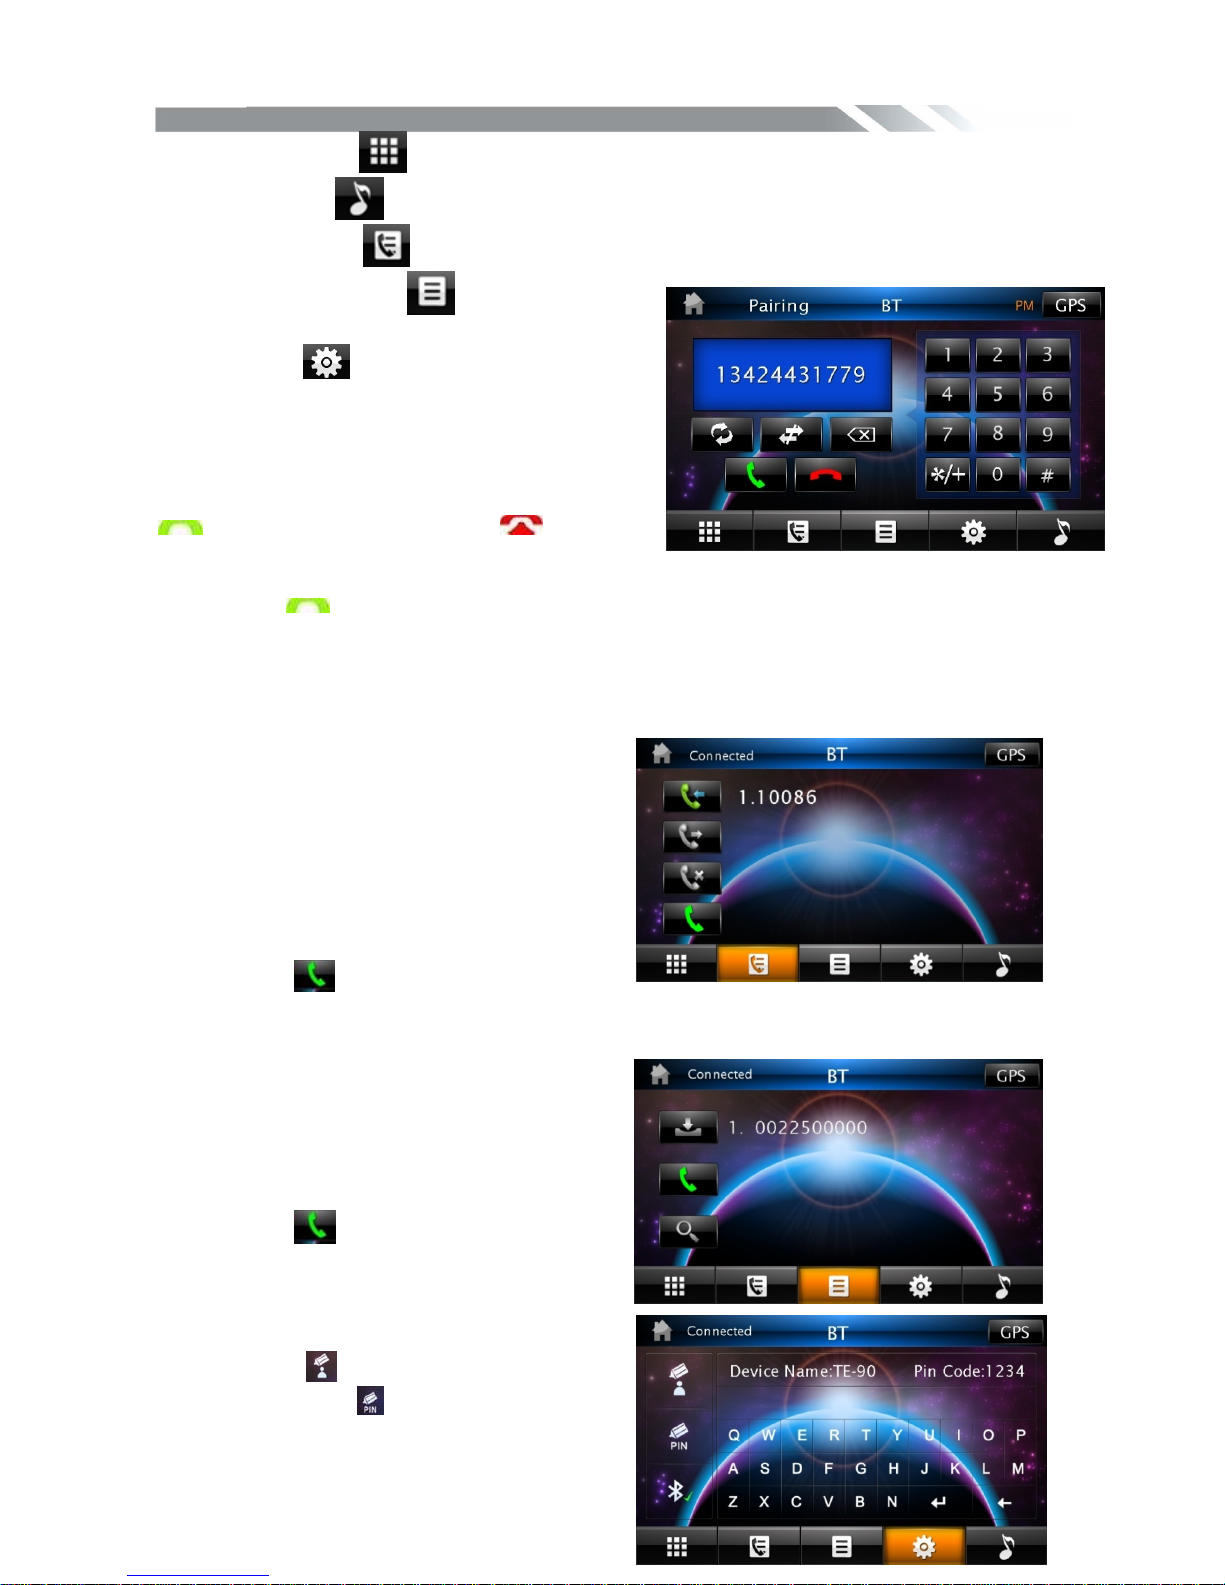
Tap CALLING icon to use phone functions.
Tap MUSIC icon to start BLUETOOTH music player.
Tap HISTORY icon to check dialed, received, missed calls.
Tap PHONEBOOK icon to use phone book
functions.
Tap EDIT icon to use edit functions
1. CALLING mode
In Call mode, the unit can be used as your phone.
Making and receiving calls are possible with
BLUETOOTH. Simply tap phone number and tap
icon to make a call, and tap icon to
hang up.
1) Tap CLEAR icon shortly to delete a wrong digit.
2) Tap the icon for 3-4 seconds, the device automatically makes a call to the latest
call in its call log.
Voice Transfer
During a call, you can change a call from Bluetooth mode to phone by tapping Transfer icon.
To have a call in Bluetooth mode again, tap Transfer icon again.
2. Call history mode
Tap HISTORY icon to see history mode.
The unit can download automatically all the
date from the mobile Phone.
Dialed /Received/Missed calls are saved In
History mode .
The calls in each category are orderly saved
from the latest one to the final one..
Tap the icon beside the phone number
you desired to make a calling.
3. BT PHONE BOOK
The unit can download the data from phone
automatically when the pairing between a
phone and the unit is completed.
The unit displays the data which have been
downloading from a phone.
Tap the icon beside the phone number
you desired to make a calling.
4. BT CONTROL
Touch the icon to edit the Device Name,
And touch the icon to edit the Pin Code.
Page 26
INSTRUCTION MANUAL
24
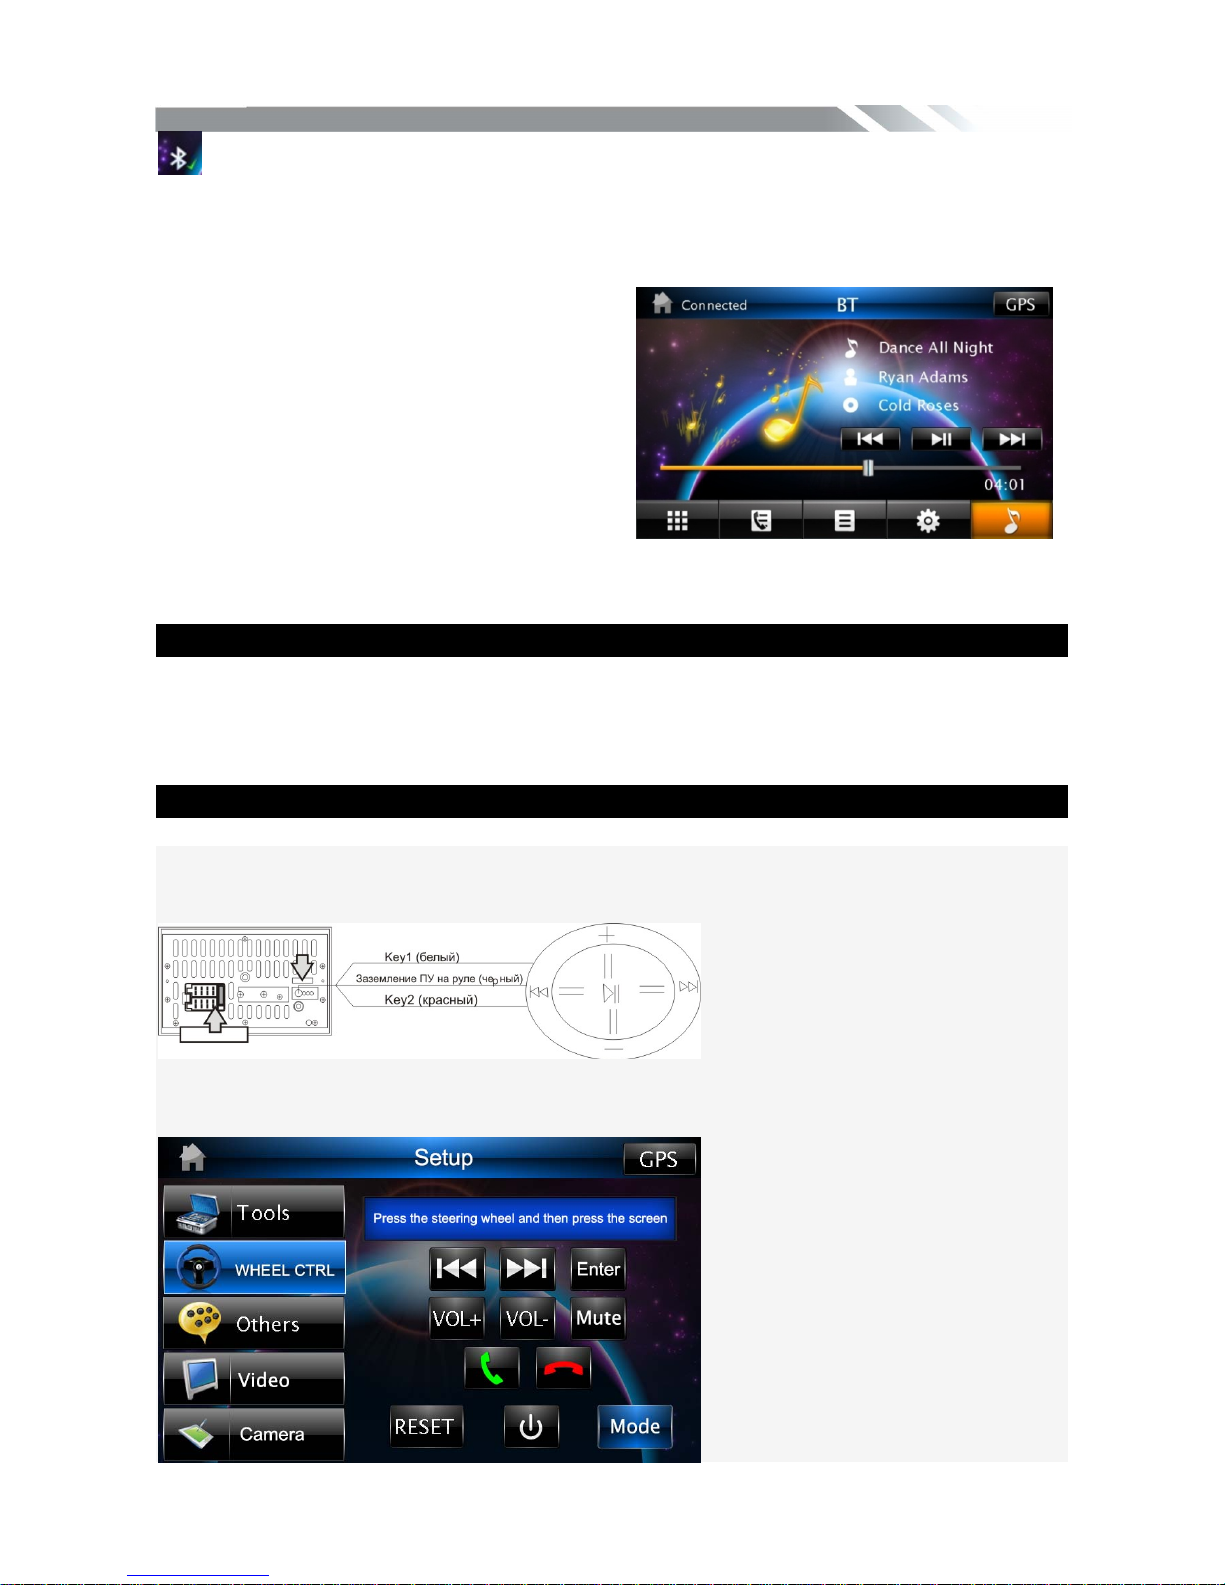
this icon indicate the Bluetooth has
opened touch it can close the luetooth.
5. BT MUSIC
Tap MUSIC icon to listen music in A2DP
mode. You can select the function with the
icon for previous, play / pause, and next.
Note: in this mode the ID3 and present
information can just display iPone, other
phone may not display this information.
NAVIGATION MODE
To start GPS Navigation, tap on NAVI icon from main menu screen.
Note: Insert Memory card with map into the Memory card slot of the rear panel, then set the
NAVI PATH in the setting menu before tapping NAVI icon. The device will warn you if
Memory card with map is not properly inserted into the Memory card slot of the rear panel.
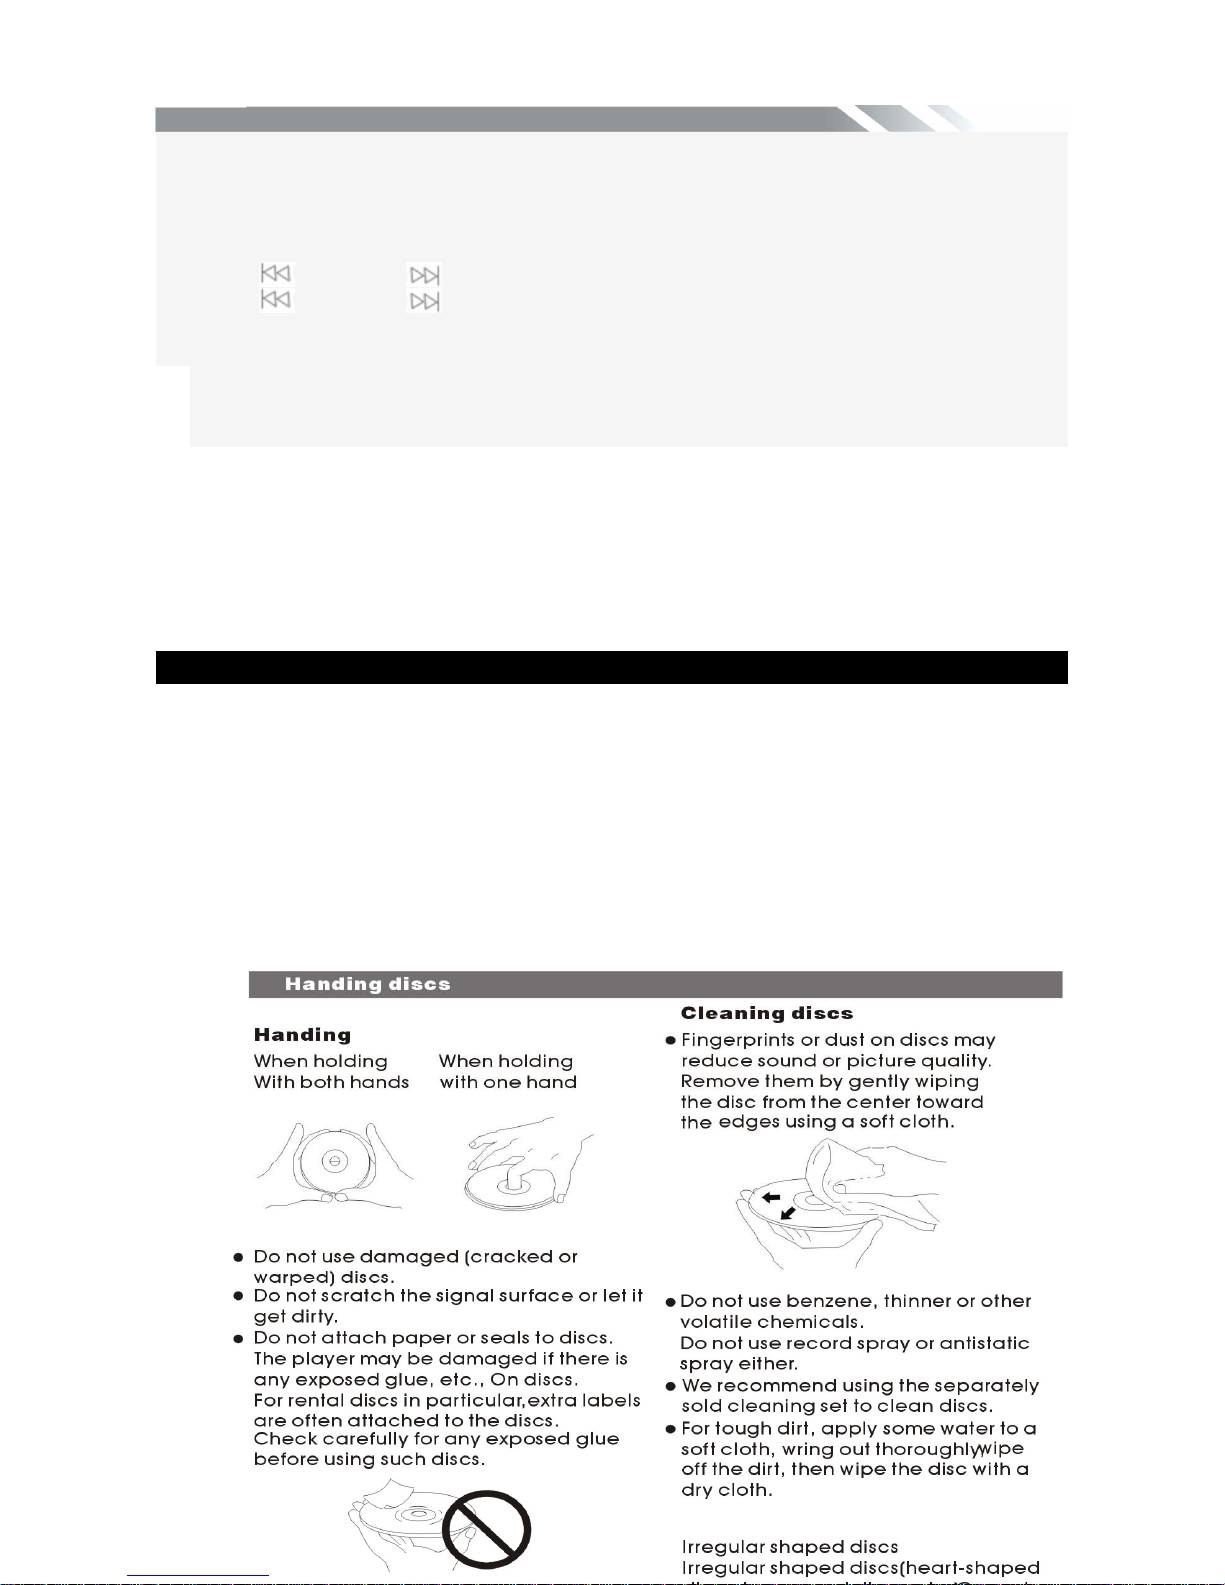
SWC MODE
To start SWC function, tap on SWC icon from setting menu screen.
1) First check whether the car has steering wheel button.
2) The steering wheel and the unit must be connected on the line
connecting the SWC. Wiring diagram below.
3) Open the unit WHEEL CTRL interface, you can in the above operation, the
interface is as follows.
Page 27
INSTRUCTION MANUAL
25
3) While holding down the button on the steering wheel and the corresponding button on
the SWC interface it will display complete setting. When all the buttons on the steering
wheel and the corresponding button on the WHEEL CTRL interface complete setting,
you can use the steering wheel button to operation the unit. Such as in radio mode,
press button or button to search station backward or forward; In DVD mode,
press button or button to select the previous or next track and activate fast
reverse (REW) search or fast forward in a track. Press VOL+ button or VOL - button
to adjust the volume.
Note:1.The “Enter” button and the “reset” button are not included in steering wheel,
press the “enter” button to confirm the select, press the “reset” button to clear the former
select.
2. The restriction of use SWC is the voltage between the adjacent buttons are
above 0.2 V that can be identified.
NOTES ON DISC
Only use groundless loudspeakers.
Use only loudspeakers of minimal 40Watt, using fewer watts may result in damaging
your loud speakers at higher volumes.
Use 4~8 (Ohm impedance) loudspeakers only; using higher or lesser impedance
may damage the unit.
Do not use 3-cable loudspeakers and do not connect the loudspeakers minus to the car
body.
(GND). using a BTL circuit and each loudspeaker must be connected with insulated
cables according the diagram.
Loudspeaker cables and/or optional external power amplifiers must always be about
30cm. away from the antenna and/or antenna extension parts.
If want to display for 6.2” TFT, parking wire must be connected to ground.
Page 28
INSTRUCTION MANUAL
26
TROUBLESHOOTING
Symptom Cause Remedy
Fuse is blown
Replace with fuse of the same amperage.
If the fuse blows again, consult your store
of purchase
Power does not turn
on.
(No sound is
produced.)
In correct wiring Consult your local retailer.
No sound output
when operating the
unit with amplifiers or
power antenna
attached.
Power antennal
lead is shorted to
ground excessive
current is required
or remote on the
amplifiers or power
antenna.
1. Turn off the unit.
2. Remove all wires attached to the power
antenna lead. Check each wire for a
possible short to ground using an ohm
meter.
3. Turn on the unit.
4. Reconnect each amplifier remote wire
to the power antenna lead one by one.
If the amplifiers turn off before all wires
are attached, use an external replay to
provide remote-on voltage (excessive
current required).
The microprocessor
has malfunctioned
due to noise, etc.
Turn off the power, Then press the [no
open] button and remove the DCP. Press
the reset button for about 2 seconds with
a thin rod.
General
Nothing happens
when buttons are
pressed.
Display is not
Accurate
Panel or main unit
Connectors
are dirty
Wipe the dirt off with a soft cloth
moistened with cleaning alcohol.
Compact disc is
dirty
Clean the compact disc without scratches
Sound is bad directly
after power is turned
on.
Compact disc is
heavily scratched or
warped
Replace with a compact disc without
scratches.
CD
Sound is bad directly
after power is turned
on.
Water droplets may
form on the internal
lens when the car is
parked in a humid
place
Let it dry for about 1 hour with the power
on.
Page 29
INSTRUCTION MANUAL
27
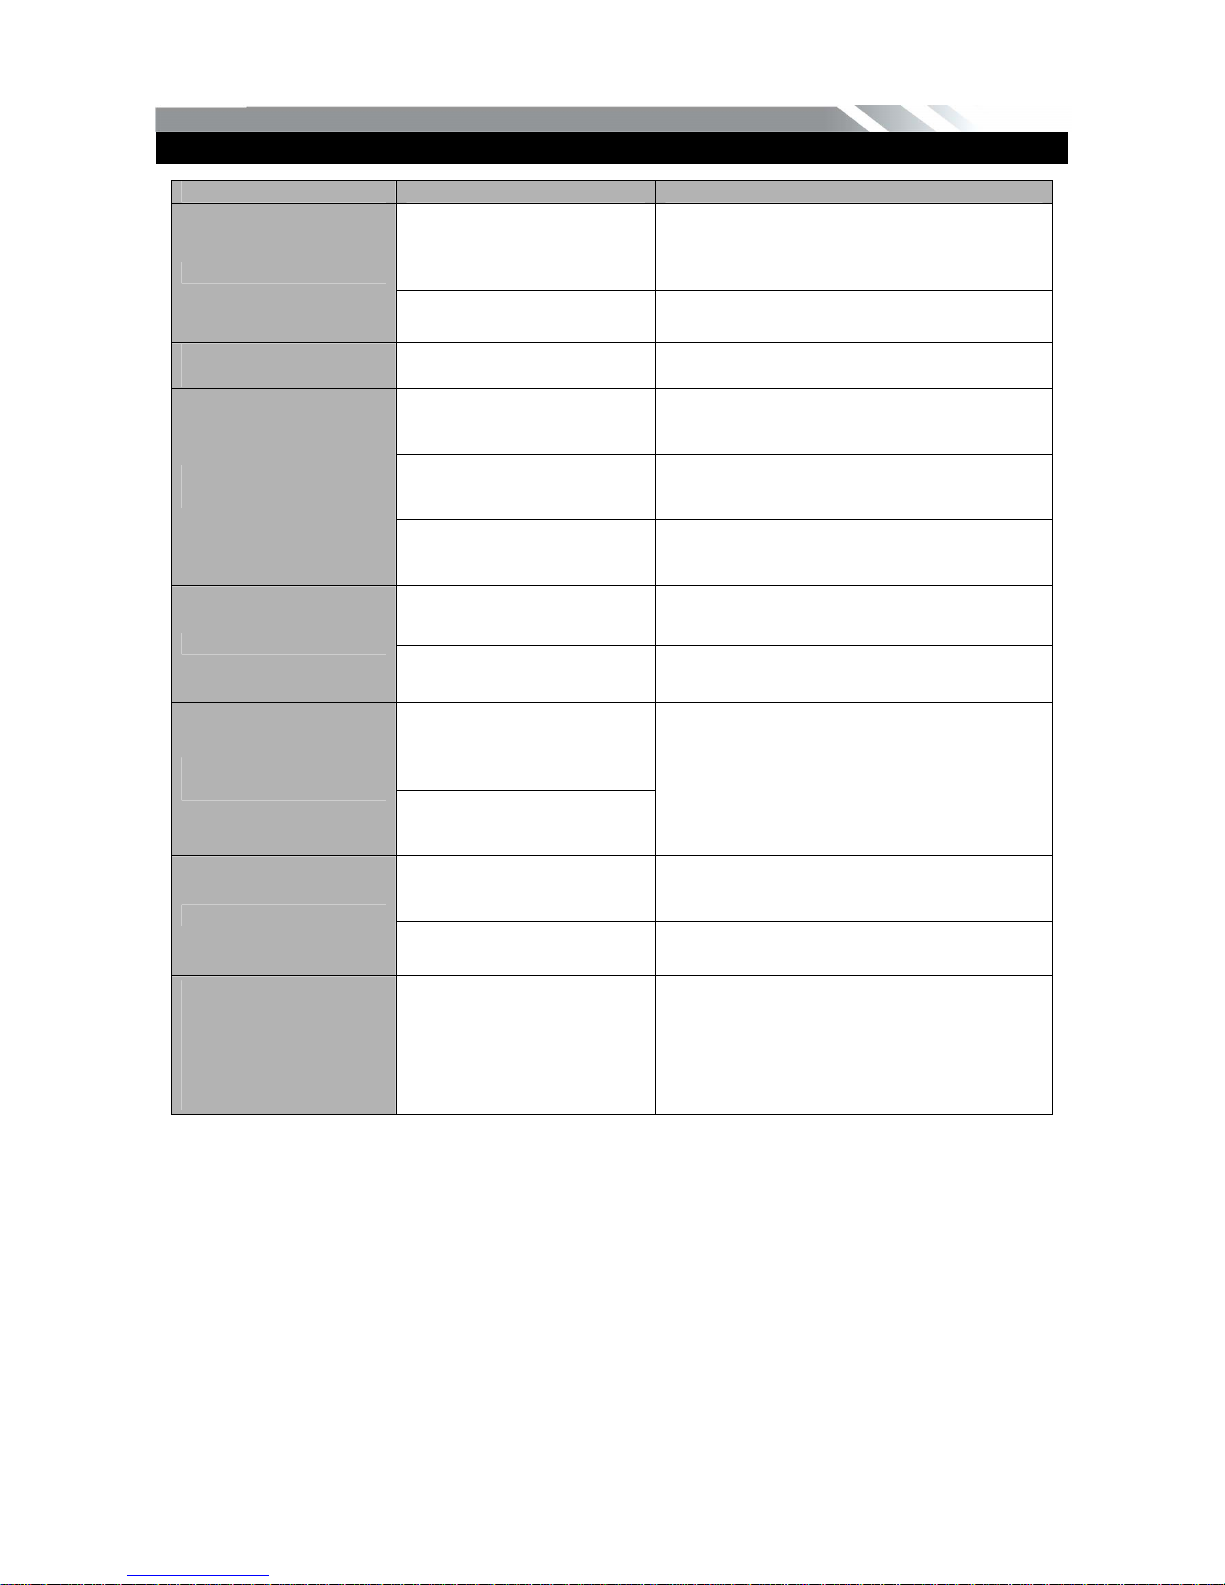
TROUBLESHOOTING
SYMPTOM CAUSE SOLUTION
THE CAR IGNITION IS NOT
ON.
IF THE POWER SUPPLY IS PROPERLY
CONNECTED TO THE CAR
ACCESSORY SWITCH THE IGNITION KEY
TO “ACC”.
NO POWER
THE FUSE IS BLOWN. REPLACE THE FUSE.
DISC CANNOT BE
LOADED.
PRESENCE OF DISC
INSIDE THE PLAYER
REMOVE THE DISC IN THE PLAYER THEN
PUT A NEW UPWARD.
INSERTING THE DISC IN
UPSIDE DOWN.
INSERT THE COMPACT DISC WITH THE
LABEL FACING
UPWARD.
COMPACT DISC IS
EXTREMELY DIRTY OR
DEFECTIVE.
CLEAN THE DISC OR TRY TO PLAY A NEW
ONE.
DISC CANNOT BE
READ.
TEMPERATURE INSIDE
THE CAR IS TOO HIGH.
COOL OFF UNTIL THE AMBIENT
TEMPERATURE RETURNS TO
NORMAL.
VOLUME IS IN MINIMUM. ADJUST VOLUME TO A DESIRED LEVEL.
NO SOUND
WIRING IS NOT
PROPERLY CONNECTED.
CHECK WIRING CONNECTION.
THE BUILT-IN
MICROCOMPUTER IS NOT
OPERATING PROPERLY
DUE TO NOISE.
THE OPERATION
KEYS DO NOT WORK.
FRONT PANEL IS NOT
PROPERLY FIX INTO ITS
PLACE.
PRESS THE POWER BUTTON FOR ABOUT
10 SECONDS
TO RESET THE UNIT.
THE INSTALLATION
ANGLE IS MORE THAN 30
DEGREES.
ADJUST THE INSTALLATION ANGLE TO
LESS THAN 30
DEGREES.
SOUND SKIPS.
THE DISC IS EXTREMELY
DIRTY OR DEFECTIVE.
CLEAN THE COMPACT DISC/TRY TO PLAY
A NEW ON E.
THE RADIO DOES
NOT WORK, THE
RADIO STATION
AUTOMATIC
SELECTION DOES
NOT WORK.
THE ANTENNA CABLE IS
NOT CONNECTED THE
SIGNALS ARE TOO WEAK.
INSERT THE ANTENNA CABLE FIRMLY
SELECT A STATION
MANUALLY.
Page 30
INSTRUCTION MANUAL
28
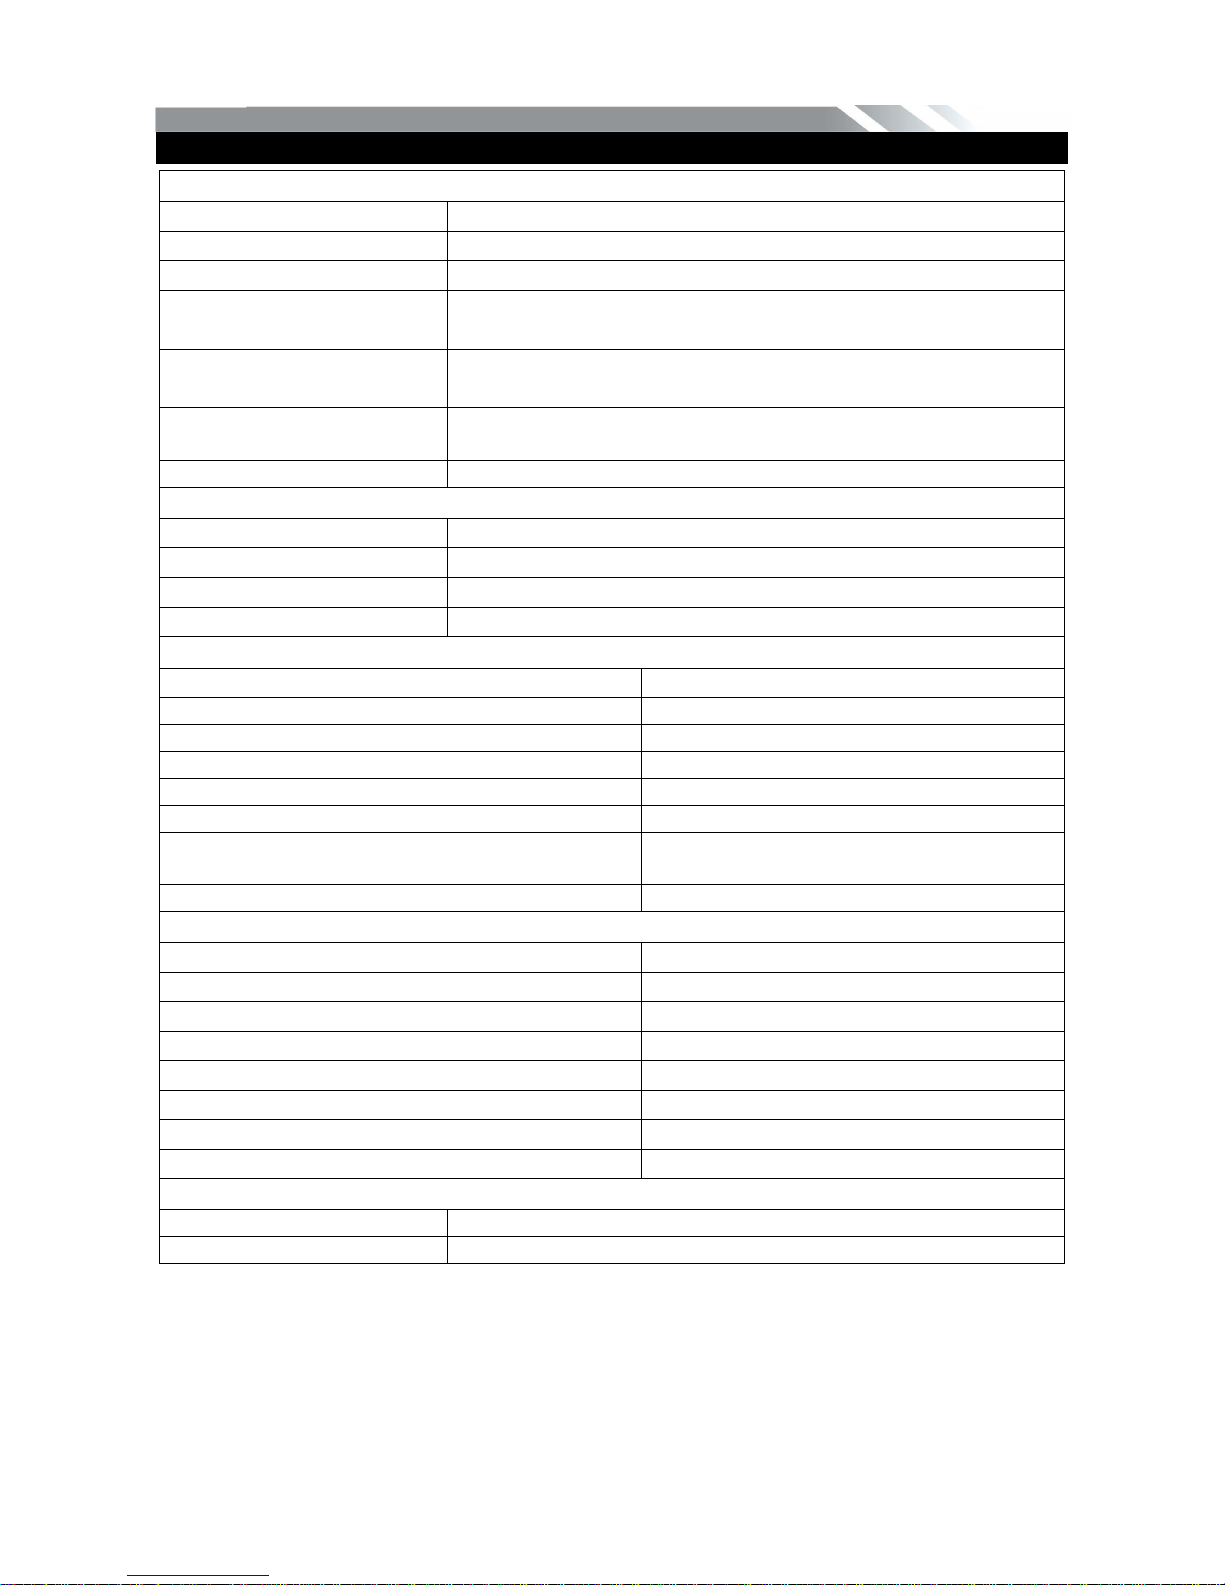
TECHNICIAL SPECIFICATIONS
General
Power supply: 11~16V DC
Current consumption: max. 15 A
Maximum power output: 50W x 4 channels (max)
Compatible formats:
DVD/SVCD/VCD/HDCD/MP3/MP4/VIDEO/CDDA/PICTUR
E CDCD-R/-RW/DVD±R/±RW PLAYBACK
Dimensions (W x D x H) /
weight:
165*178*100 mm/2 kg
Working temperature
range:
-20 ℃ - +60 ℃
ESP function: 10 sec. for Audio CD, 120 sec. for MP3
TFT display
Screen size: 6.2 inch
Resolution: 800*480 pixel
Brightness:
460 cd/㎡
Contrast ratio: 500:1
FM Stereo Radio
Frequency range(EUROPE AREA): 87.5 – 108MHz(Step 50KHz)
Frequency range(JAPANESE AREA): 76.0 – 90.0MHz(Step 100KHz)
Frequency range(MIDDLE EAST AREA): 87.5 – 108MHz(Step 50KHz)
Frequency range(AMERICA 1 AREA): 87.5 – 107.9MHz(Step 200KHz)
Frequency range(CHINA AREA): 87.5 – 108MHz(Step 100KHz)
Frequency range(AMERICA 2 AREA): 87.5 – 108MHz(Step 100KHz)
Frequency range(RUSSIA AREA) 87.5 – 108MHz(Step 50KHz)
65-74MHz(Step 10KHz)
Preset memory stations: 18
AM/MW Radio
Frequency range(EUROPE AREA): 522kHz - 1620 KHz(Step 9KHz)
Frequency range(JAPANESE AREA): 522kHz - 1629 KHz(Step 9KHz)
Frequency range(MIDDLE EAST AREA): 531kHz - 1602 KHz(Step 9KHz)
Frequency range(AMERICA 1 AREA): 530kHz - 1710 KHz(Step 10KHz)
Frequency range(CHINA AREA): 522kHz - 1620 KHz(Step 9KHz)
Frequency range(AMERICA 2 AREA): 520kHz - 1710 KHz(Step 10KHz)
Frequency range(RUSSIA AREA) 522kHz - 1620 KHz(Step 9KHz)
Preset memory stations: 12
Audio specification
Frequency response: 20 Hz-20 KHz
TV Color System Color system NTSC/ PAL
Specifications are subject to change without notice. Mass and dimension are
approximate
Page 31

www.phonic-teacaudio.com
 Loading...