

Page 1

Portable CD System
PC-D850
OWNER’S MANUAL
IMPORTANT!
WARRANTY INFORMATION INSIDE. PLEASE READ
FOR INQUIRIES CALL
1800 656 700
OR
WWW.TEAC.COM.AU
Page 2

Pleasereadthiswarrantycard.
Keep your purchase receipt to enable youtoproceed quicklyinthe eventofaWarranty Service.
WarrantyTerms &Conditions
1. TEAC warrants to the originalretailpurchaser only, that this product is free from defects in material and
workmanship undernor maldomestic use andauthorises freeservice during the warrantyperiodatany
TEAC AuthorisedCentre only.TEACwarranty only appliestoproducts purchased,usedand servicedin
Australia.
2. Subjecttothetermsherein, this warranty effectivelycoversthe equipment as specifiedinthe Warranty
Periods Tablefromthe date of purchase.
3. Allparts,ex ceptthe external cabinet, arewarranted as specified in Warranty Periods Table, andwillbe
repaired or replaced at the sole judgement of TEAC.
4. Normal customermaintenance as describedinthe owners manual is not coveredby this warranty (suchas
cleaning VCRheads etc.)
5. This warranty doesnot apply to equipment showing abuse, damage or thatitmay have been tampered
with, alteredorrepaired outside anyTEACAuthorisedService Centre. If so, the warranty will be void.
*Yournearest Authorised TEAC ServiceCentreislistedinyourOwners Manual
6. In the eventthatthis unitorany defective parts must be returnedtoTEACService Centres,acopy of this
warranty certificate andof your purchase receiptmustbeenclosedtobeavalid warranty. Such
equipmentorparts mu st be sent freightprepaid to thenearest authorised TEAC Service Centre.After the
repair,the unit will be available for collection by the owneroritwillbereturnedto the owner.The
warrantydoes not coverfreight or insurance.Inall cases of in-transit damagesor loss, aclaim must be
filedagainst thecarrier by thepurchaser.
7. In homeservice will only be providedaspartofthiswarranty if allthe followingconditions are met;
a) The productisaColourTelevision of 51cmscreen size or over.
b) The productiswithin the warranty period.
c) The productis located within the normal service area of the local TEACService Provider.
In anyother situationor circumstance, whereaninhomeservice call is made,aservicefee will be
chargedbythe Service Provider.
8. TEAC TotalCarein home serviceand installation is available at comp etitive rates.
9. No one is authorised to assume anyliabilityonbehalfofTEACorimpose any obligation on it, in
connection with the sale of anyequipment otherthanas statedinthiswarrantyand outlinedabove.
10. In no eventwill TEAC be responsibleorliablefor indirectorconsequential damages frominterrupted
operations or othercauses.
11. Warranty is not transferabletoany subsequent purchaser if the productis sold during the warranty period,
TEAC PRODUCT
Televisions /Plasma 106 cm andabove
LCDtelevisions 56cmand above
Televisions — 51cm and above
Televisions under51cm
DigitalSet Top Boxes
VCR
DVD
AudioSystems
WARRANTY REGISTRATION
WARRANTY PERIOD
(In-Home Service Included)
(In-Home Service Included)
(In-Home Service Included)
(No In-Home Service)
(No In-Home Service)
(No In-Home Service)
(No In-Home Service)
(No In-Home Service)
1 Year
1 Year
1 Year
1 Year
1 Year
1 Year
1 Year
1 Year
Page 3
Please keep this information for your own records.
Please refer to the owner’smanualto ensure that youhave followed the correctinstallationand
operating procedures.
1. Read owner’smanual carefully
2. If you require Warranty Service, please contact theTEACService Centre
3. Please have your purchase receipt as your proofofpurchaseand thefollowing details
completed foravalidWarranty.
Owner’s Name
Owner’s Address
Postcode
Model Name/No. PC-D850 Serial No.
Dealer’s Name
Dealer’s Address
Postcode
4. Please ensure that your product is packed appropriately upon return to the service centre.
If youhave any otherqueries regarding service or warranty please contactthe TEACServicebelow:
TEACTotal Care Ph: 1800 656700
www.teac.com.au
WARRANTY PROCEDURES
1
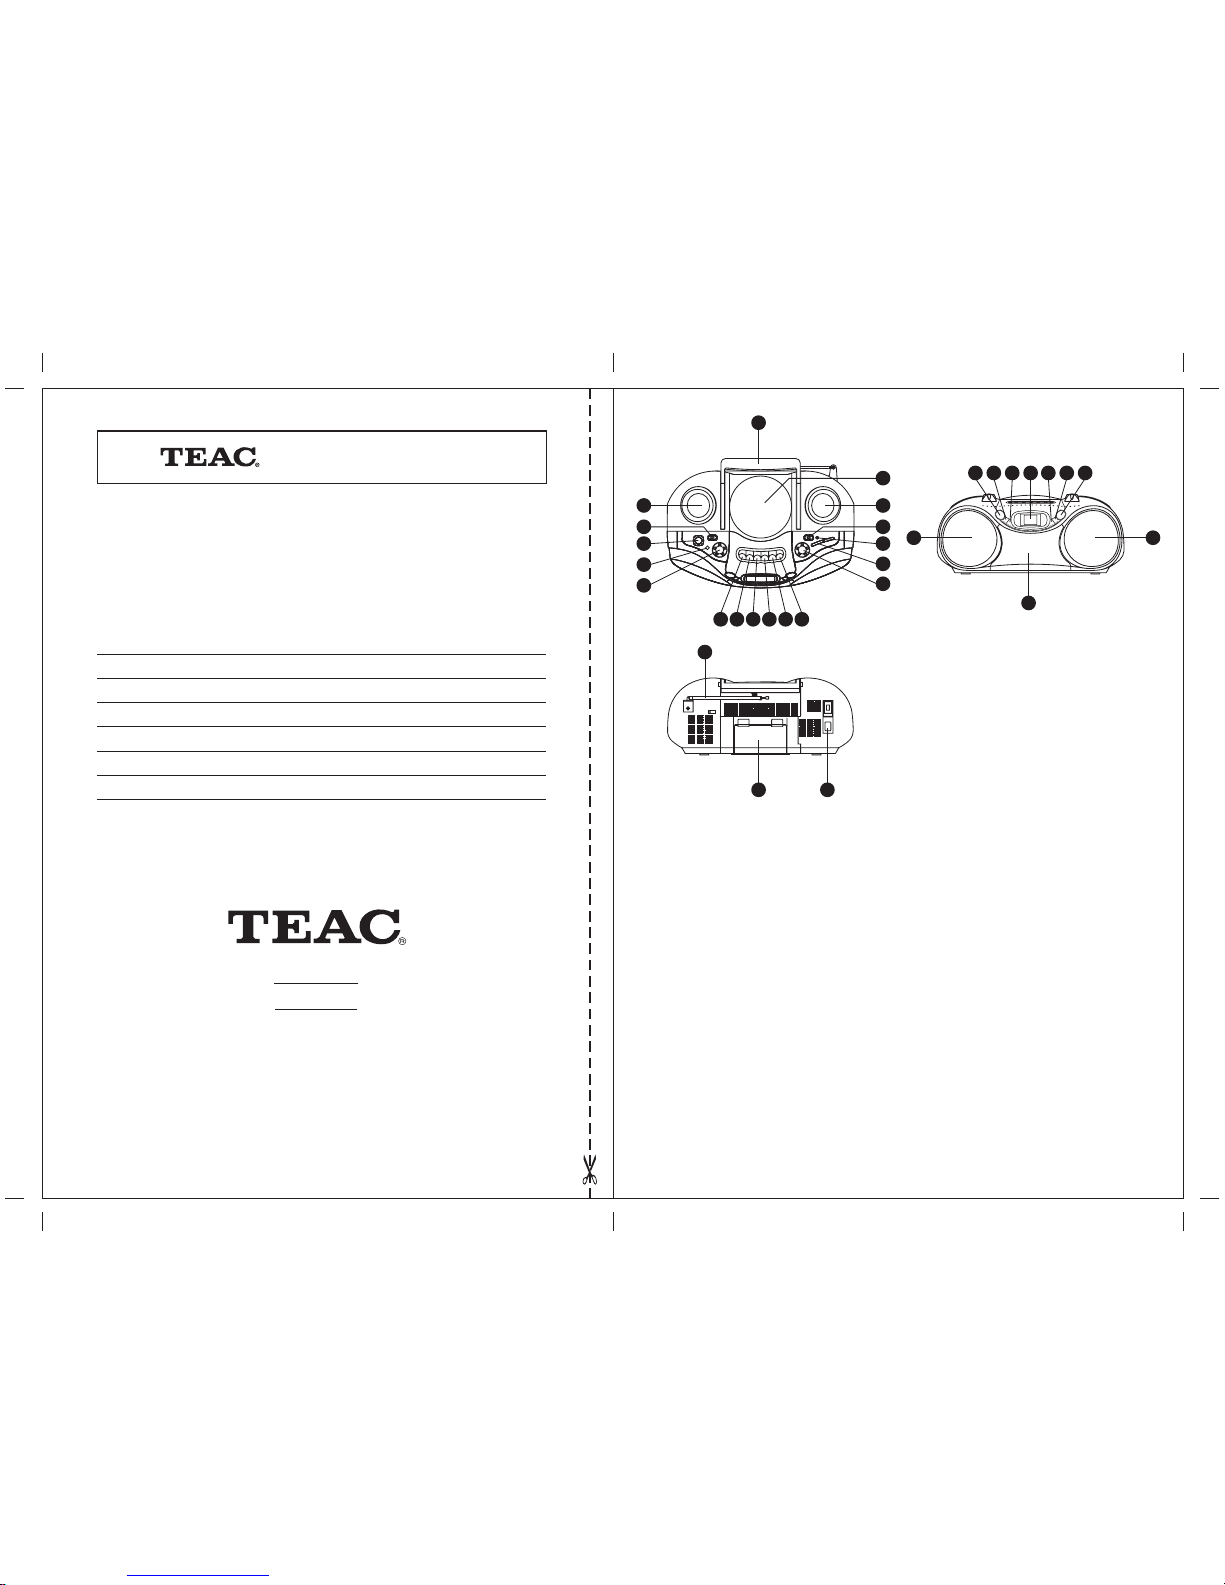
LOCATION OF CONTROL
1
101112
15
14
16
3
4
5
6
987
2
30
13
31
2426
17 18 19 21 22 2320
25
27
29 28
17.CDStop button
18.CDSkip Down button
19.CDSkip Up button
20.LCD Display
21.CDRepeatButton
22.CDProgramme Button
23.CDPlay/Pause button
24.Right Speaker
25. Cassette Door
26.LeftSpeaker
27.FMAerial
28.AC Input Socket
29. Battery Compartment
30.CDDoor
31. Headphone Jack
1. Handle
2. RightSpeakerSurround Sound
3. Band Selector
4. FM Stereo Indicator
5. Dial Scale
6. Tuning Control
7. Record Button
8. Play Button
9. Rewind Button
10. Fast Forward Button
11. Stop/Eject Button
12. Pause Button
13. VolumeControl
14. DBB Button
15. Function-CD/Tape/Radio
16. Left Speaker Surround Sound
Page 4

3
Programmed Playback
You can arrange the order of the tracks on the discs and create your own program. The
program can containupto30 tracks.
1. Press theprogram button while stop. Program appearson LCD Display.
2. Using the skip up/down buttons to select the track to be stored and then press
Program buttontostore the track.
3. Repeat step2tostore further tracks. (Max. 30 Tracks)
4. Press E/ ❙❙ to startprogram play.
5. To clear theProgram Memory, press thestop buttontostopthe disc.
Cassette recorder
Inserting and removingacassette
• Press STOP/EJ to open the cassette compartment.
• Press the cassette firmly into the holder with the visible part of the tape facing upwards.
Make surethat the cassette compartment is properly closed before you start.
• Always press STOP/EJ to stop thetape, before any other buttonispressed.
Playback
• Set thefunction selector switch FUNCTION to the TAPE position
• Press STOP/EJ and insertthe cassette.
• Press PLAY to startplayback.
• Set the volume to the desiredlevel.
• Press PAUSE to temporarily stop playback.. Release the button to start the cassette
again.
• Press STOP/EJ when you want to stop playback.
To fast forward
• Press FF to fast forwardthe cassette tape.
To rewind
• Press REW to rewind the cassette tape.
To recordacassette tape
Open the cassette compartment and insertacassette tape. Press PAUSE on the cassette
player, and then press REC.
1. To recordaradioprogramme:set thefunction change switchto RADIO, select the
desired frequency and radiostation. Press PAUSE againto beginrecording.
2. To record fromaCD: set the function change switch to CD and press PLAY/PAUSE
E❙❙ to start the CD. Press EE❙ or ❙FF to select the desired track. Press PAUSE again
to beginrecording.
Protection against accidentally erasing the cassette tape
Every time something is recorded ontoatape, previously recorded sound is erased. The
tape recorded and cassettes are equipped withasafety device which prevents the
recording button RECORD from being depressed when thetabs are removed form the
cassette and protects recordings from accidentally being erased. Remove the cassette
tabs to protect the recordings. If you want to record ontoatape without tabs, simply stick
some tape over theplaces wherethe tabs have been removed.
DIRECTION FOR USE
Battery operation
Open the battery compartment and insert8sizeCtype R14 batteriesin accordance with
thedirections above the compartment.Close the lid of the battery compartment.
Mains operation
Connect the mains cabletothe AC input on the set and toanormal wall socket.
NOTE! For battery operation, remove the mains cable fromthe set.
Radioreception
• Set thefunction selector switch FUNCTION to the RADIO position.
• Select AM, FM or FM ST using the BAND selector.
• ForFM reception, pull out the aerial and adjust the direction, length and angle to obtain
the best reception. A ferrite rod aerial is built-in for AM reception. Turn the set to find
the positionthat gives the best reception.
• Set the desired transmittingstationbyturning thestation settingdial TUNING.
• Set the volume control VOLUME to the desired volume.
• Foramore powerful bass sound, press the DBB button.(BASS BOOST).
• For private listening, headphones(not included) can be connected to the socket on
thetop of the set.
CD
Onlyplay CDs that are marked with
1 Set thefunction selector switchtothe CD position.
2. Open theCD compartment by pressing the OPEN/CLOSE button. Then insertthe
CD.
3. If theCD compartment has been opened, --is shown in thedisplay.
4. Close theCD compartment
5. If thereisnoCDinsertedorthe number of tracks on theCD can not be read, the
characters--are first shown in thedisplay and then the characters00.
6. If thereisaCDinthe compartment,afigurewill indicatethe total number of tracks
on the CD.
Playback
Press E❙❙. The display will show the number of the current track and the play indicator
is activated.
Pause
Press E❙❙. and the pause indicator will be activated in the display. Cancel the pause
functionbypressing E❙❙ again.
Stop
Press ■. The CD will stop rotating
Skiptoanew track
Press EE❙ to skiptothe next track. Press ❙FF to skiptothe previous track.
Fast-wind
Press EE❙ or ❙FF and keep the button pressed in until you have found the desired place
in the selected track (the speed increases, but the volume decreases duringfast-wind).
Repeat
Press REPEAT once during CD playback. When the indicator REPEAT1is activated
in the display, the current track is repeated. Press REPEAT twice during playback. When
theindicator REPEAT ALL is activated, the entire CD is repeated.Press REPEAT again
to terminatethe repeat function.
2
Page 5
Care and maintenance
Maintenance:
The casing can be cleaned withasoft damp cloth. Amild soap-based cleaning product
may be used if necessary, never use strong cleaning productsor chemical solutions.
Warning!
Remove theplug fromthe mains supply beforecleaning.
Cleaning the cassette recorder head:
Do not store cassettes in the cassette compartment for long periods as the ribbon may
be damaged. The ribbon mechanism shouldbecleaned at regular intervalsin order
to guarantee high performance. Moistenacotton bud with cleaning fluid for cassette
recorder heads or use isopropyl Alcohol and clean the capstan and head by carefully
dabbing them. Press PLAY to engage the mechanism, makingit easierto clean.
4
TEAC TOTAL CARE
or visit our website at http://www.teac.com.au
Freecalltelephone 1800-656700 between Monday to Friday-EST 9am to 5pm
[New Zealand: TOLL FREE 0508 347328, 8am to 4:30pm]
TEAC CORPORATION
3-7-3, Nakacho, Musashino-shi, Tokyo180-8550,Japan.Phone:(0422) 52-5081
TEAC AUSTRALIAPTY., LTD. A.B.N. 80 005408 462
HEAD OFFICE 280WilliamStreet, Melbourne,VIC3000.
NSW OFFICE Unit8,20-22 Foundry Rd, Seven hills, NSW 2147.
QLD OFFICE 335MontagueRoad, West End, QLD 4101.
WA OFFICE 273GreatEastern Highway,Belmont, WA 6104.
SA OFFICE Cnr.Sir D. Bradman & Marion Roads,Cowandilla,SA5033.
Phone:(03)9672-2400
Phone:(02)8811-4000
Phone:(07)3010-0100
Phone:(08)9479-6522
Phone:(08)8234-1044
 Loading...