

Page 1

PC-60
PORT ABLE CASSETTE RADIO
OW NER'S MANUAL
Thanks for buying a TEAC. Read this manual carefully to get the best performance from this unit.
CAUTION :
Use of controls or adjustments or performance of procedures other then those specified herein
may result in hazardous radiation exposure.
Teac PC60 (NZ)-2.p65 2006/4/10, ¤U¤È 12:151
Page 2

Page 3
Page 4
POWER SOURCE
BA TTERY POWER OPERA TION
1. Open the battery compartment (17) lid by pushing the catches downwards.
2. Install 4 x UM1 batteries carefully as indicated in battery compartment.
3. Close the battery compartment.
AC POWER OPERATION
Connect the provides power cord to the AC input socket and the plug to an AC outlet.
RADIO OPERATION
RECEPTION OF RADIO PROGRAM
1. Set the FUNCTION SWITCH (12) to the radio position. Set the desired radio band with the
BAND switch (13).
2. Tune in a desired station by tuning the TUNING KNOB (15).
3. For FM reception, pull out the antenna and adjust the direction, lenght and angle to give the
best reception.
4. Adjust the VOLUME CONTROL (4) for your desired listening level.
5. To turn off the radio, set the FUNCTION SWITCH (12) to the OFF/TAPE position.
CASSETTE T APE OPERATION
Open the cassette compartment lid by pressing the STOP/EJECT button (2). Insert the cassette with the full
reel to the right (visible through the window) and the tape slot at the top. The cassette fits into the unit only
in the correct position. Close by pushing the top of the cassette compartment lid to put the cassette in
place. Now the unit is ready to operate. To use the other side of the cassette, press the STOP/EJECT
button (2) and remove the cassette. Turn the cassette over and reinsert it as previously.
TO A VOID ACCIDENT AL ERASING
Whenever a recording is made, the sound previously recorded is erased automatically. To protect valuable
recordings from accidental erasing, the unit and cassette are equipped with safety devices. To keep the
recorded material permanently, break out the tabs on the back of cassette with a knife or screw driver. To
protect the top side of the tape from accidental erasing, break out the right side tab. To record on a cassette
from which the tabs have been removed, simply attach adhesive tape over the tab opening. The REC
button (11) will not lock in when a cassette tab has been removed.
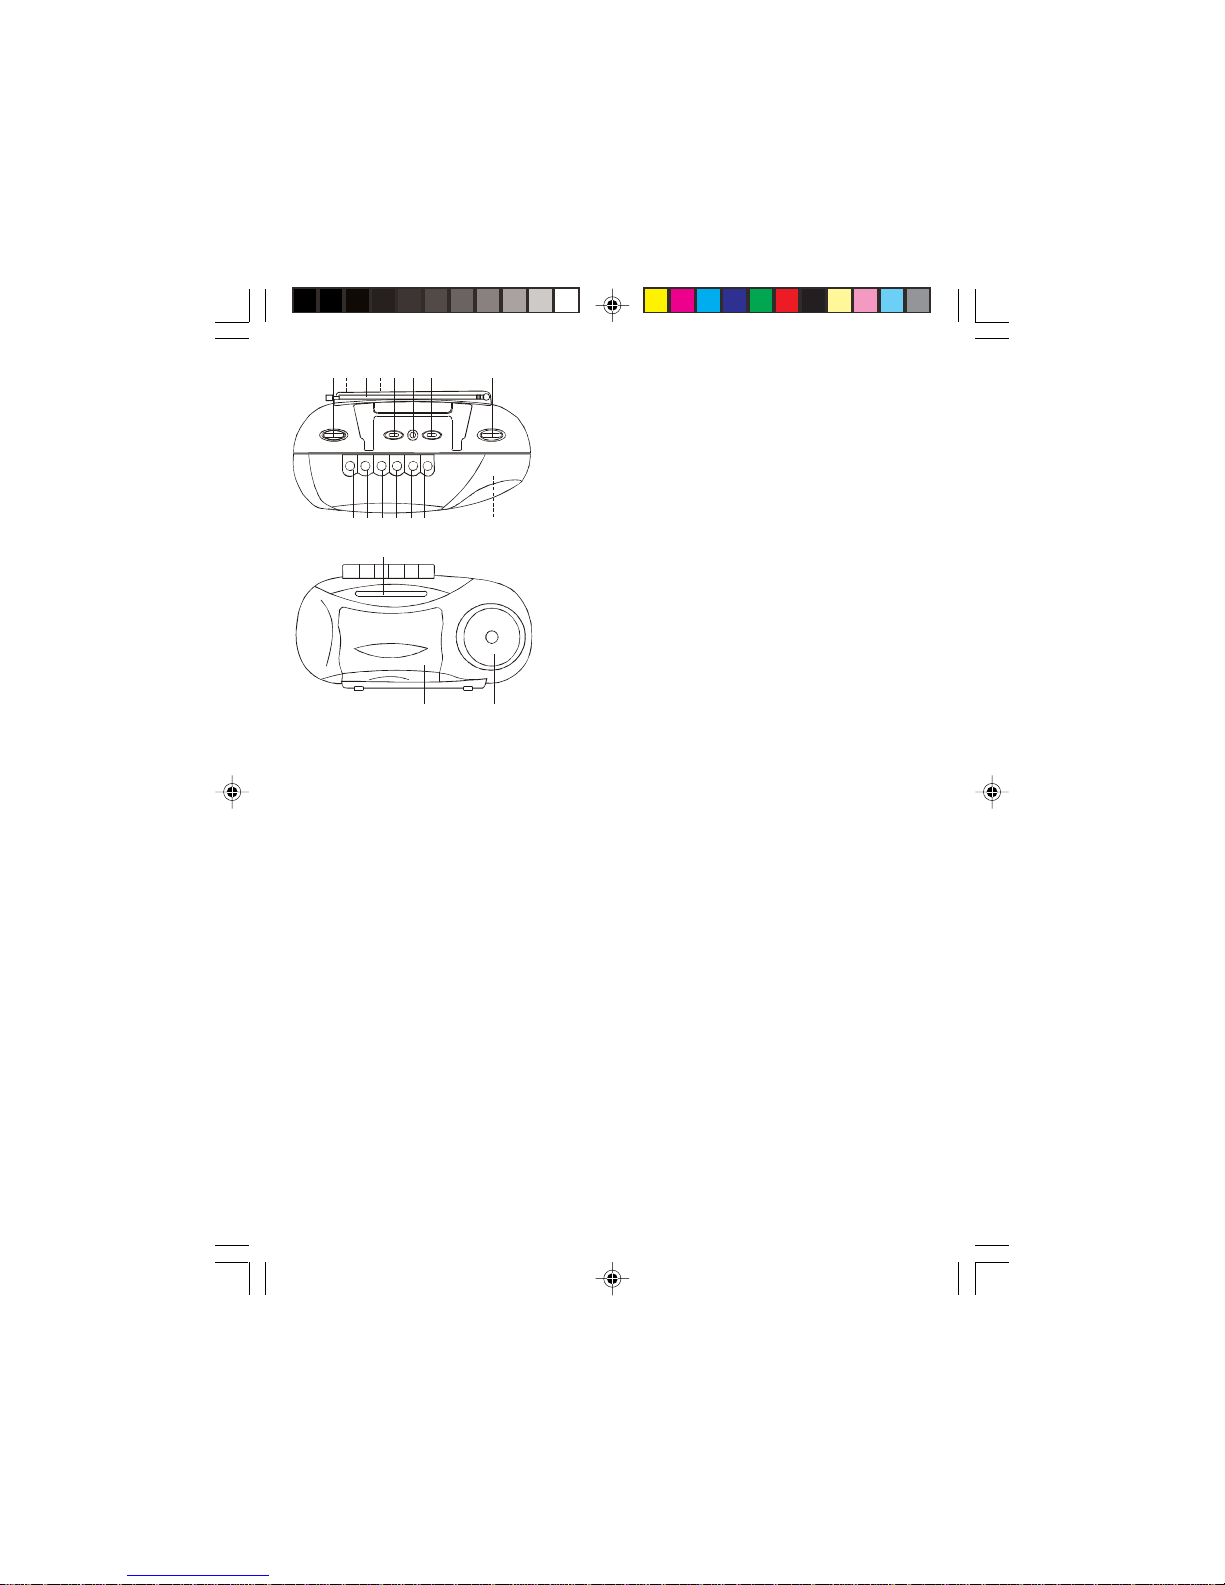
CONTROL AND THEIR FUNCTIONS
1. Rod Antenna
2. Stop/Eject Button
3. Pause Button
4. Volume Control
5. Built-In Microphone
6. Speaker
7. Cassette Door
8. Fast Forward Button
9. Rewind Button
10. Play Button
11. Record button
12. Function Switch-Radio/T a p e
13. Band Selector (AM/FM)
14. AC Socket
15. Tuning Knob
16. Phone Socket
17. Battery Compartment Door
18. Dial Pointer
4114 12 1617 13 15
23 8 91011 5
18
76
Teac PC60 (NZ)-2.p65 2006/4/10, ¤U¤È 12:152
Page 5

RECORDING
* Press the STOP/EJECT button (2) and insert the cassette.
* Set the FUNCTION SWITCH (12) to the Tape position.
* This unit has an automatic level control (ALC) circuit and does not require any adjustment of VOLUME
button (4) while recording.
* Press the STOP/EJECT button (2) to stop recording at any position. When the tape is wound
completely, the REC (11) and PLAY (10) buttons will be released automatically.
(A) RECORDING THROUGH THE BUILT-IN MICROPHONE
1. Press the REC (11) and PLAY (10) buttons simultaneously.
2. While recording, this is no need to adjust the volume control, the ALC circuit does everything.
3. Best result will be obtained by speaking within two or three feet of the microphone to minimize
pick up of extraneous room noise.
(B) RECORDING FROM THE BUILT-IN RADIO
1. Set the FUNCTION switch (12) to the RADIO position. Tune in a desired radio programme as
described in "Reception of Radio Programmes".
2. Press the REC (11) and PLAY (10) buttons simultaneously.
3. Since you can monitor throught the speakers, regardless of recording level, adjust the VOLUME
control (4) for your desired sound, during recording on AM radio, interference noise can occur which
can be reduced by replace the unit to the best position.
PAUSE BUTT ON
Depress PAUSE button (3) to stop the playback or recording temporarily. Release it to resume.
PLA YBACK
Set the FUCTION switch (12) to the Tape position.
1. Press the STOP/EJECT Button (2) and insert the recorded cassette.
2. Press the PLAY button (10).
3. Adjust the VOLUME control (4) for your desired sound level.
4. Press the STOP/EJECT button (2) to stop play back at any position. When the tape is wound
completely, the play button will be released automatically.
MAINTENANCE
To ensure continued high performance from your unit, clean the heads and pinch roller periodically.
Failure to clean these parts will result in inferror sound quality, distortion of recording, deterioration of high
frequency reproduction and inconsistant tape speed.
1. Press the STOP/EJECT button (2) and open the cassette compartment lid.
2. Press the PLAY button (10)
3. Moisten a cotton appicator with cleaner or alcohol and apply to the faces of both heads, rubbing gently
until all traces of dirt or oxide are removed. Also clean the surfaces of the pinch roller and the capstan.
4. Dry, Clean and Polish the faces of the heads with piece of soft cloth.
NOMINAL SPECIFICATIONS
Power Output : 1 Watt RMS per channel
Frequency Range : FM 88-108 MHz
AM 531-1602 KHz
T ape Speed : 4.75 cms per second
Wow and Flutter : <0.35%
Frequency Response : 125 Hz-6KHz
Dimensions : 415(L) x 100(W) x 150(H) MM
Weight : 1 KG
Power input : AC240V, 50Hz , DC6V (UM1x4)
Weight and dimensions are approximate because we continually strive to improve our products,
Teac PC60 (NZ)-2.p65 2006/4/10, ¤U¤È 12:153
Page 6
R
TEAC CO RPORATION
3-7-3 , N akacho, Mus ashino-shi, Tokyo 180-8550, Japan Phone: (0422) 5 2- 5081
TEAC AUSTRALIA PTY., LTD.
HEAD OFFICE
Phone : (03)8336 6500
SERV ICE DIVISION
MELBOURNE, VIC
30 Tullamarine Pa rk Road, Tullamarine, VIC 3043 Phone : (03)8336 6544
SYDNEY, NSW
Phone :
BRISBANE, QLD
335 Montague Road, Wes t E nd, Q LD 4101.
Phone : (07)3010 0100
PERTH, WA
273 Great E as te rn Highway , Belmont, WA 610 4.
Phone : (08)9479 6522
E-mail
Website
http://www.teac.com.au
NA TIONAL CUSTOMER SERVICE CENTRE (NCSC)
Free call: 1800 656 700
Between Mon day to Friday - EST 9 AM to 5PM
(02)9774 1075Unit 41, 65 Marigold St., Revesby, NSW 2212.
Teac PC60 (NZ)-4.p65 2006/10/19, ¤U¤È 02:146
 Loading...