

Page 1

PLAYER
PORTABLE DV D PLAYER
DV-P701
Page 2

WARRANTY REGISTRATION
Please read this warranty card.
Keep your purchase receipt to enable you to proceed quickly in the event of a Warranty Service.
Warranty Terms & Conditions
1. TEAC warrants to the original retail purchaser only, that this product is free from defects in material and
workmanship under normal domestic use and authorises free service during the warranty period at any TEAC
Authorised Service Centre only. TEAC warranty only applies to products purchased, used and serviced in
Australia.
2. Subject to the terms herein, this warranty effectively covers the equipment as specified in the Warranty Periods
Table below from the date of purchase.
TEAC PRODUCT
WARRANTY PERIOD
Plasma TV 106 cm and above 1 Year (In-Home Service Available)
LCD Televisions 59cm and above 1 Year (In-Home Service Available)
Televisions – 59cm and above 1 Year (In-Home Service Available)
All Televisions under 59 cm 1 Year (No In-Home Service)
Digital Set Top Boxes & Module 1 Year (No In-Home Service)
VCR 1 Year (No In-Home Service)
DVD & Module 1 Year (No In-Home Service)
DVD Recorder & PVR Module 1 Year (No In-Home Service)
Audio Systems 1 Year (No In-Home Service)
3. In home service will only be provided as part of this warranty if all the following conditions are met;
a) The product as indicated in the Warranty Period Table.
b) The product is within the warranty period.
c) The product is located within the normal service area of the local TEAC Authorised Service Centre.
In any other situation or circumstance, where an in home service call is made, a service fee will be charged by the
Service Provider including a travel fee if outside normal service area.
If TEAC determines that the product is not repairable on site, TEAC can complete the repair by taking the product
to a TEAC Authorised Service Centre.
Where in-home service is not available, the purchaser is required to send the product to the nearest TEAC
Authorised Service Centre for repair. In this event, a copy of this warranty card and a copy of your receipt of
purchase must be enclosed to be a valid warranty. Such equipment or part must be sent freight prepaid to your
nearest TEAC Authorised Service Centre. After the repair, the product will be available for collection by or return to
the purchaser at purchaser’s cost. The warranty does not cover freight or insurance. In all cases of transit damage or
lost, a claim must be filed against the carrier by the purchaser, even if shipment is arranged by TEAC. TEAC inhome service may also be available at a fee upon request.
4. Accessories, Remote, including power adaptors, AV box, TV tuners, etc, are warranted to be defect free for 1 year.
5. Replacement of spare parts under normal usage; except cabinet, front panel, knob, removable accessories, battery,
consumable, AC cord, connecting cord and other accessories, are warranted as specified in Warranty Periods Table,
and will be repaired or replaced at the sole judgement of TEAC.
6. The warranties hereby conferred do not extend to, and exclude, any cost associated with the installation, de-
installation or re-installation of a product (be it in-home or otherwise), including costs related to the mounting,
demounting or remounting of any screen, (and any other ancillary activities), delivery, handling, freighting,
transportation or insurance of the product or any part thereof or replacement of and do not extend to, and exclude,
any damage or loss occurring by reason of, during, associated with, or related to such installation, de-installation,
re-installation or transit.
7. Normal customer maintenance as described in the owner’s manual is not covered by this warranty (such as cleaning
VCR heads etc.)
8. Service will be provided only during normal business hours and under safety conditions and circumstances.
Page 3

9. This warranty does not apply to equipment showing abuse, damage or that it may have been tampered with, altered
or repaired outside any TEAC Authorised Service Centre. If so, the warranty will be void.
*Your nearest Authorised TEAC Service Centre is listed in your Owners Manual
10. No one is authorised to assume any liability on behalf of TEAC or impose any obligation on it, in connection with
the sale of any equipment other than as stated in this warranty and outlined above.
11. In no event will TEAC be responsible or liable for indirect or consequential damages from interrupted operations or
other causes.
12. Warranty is not transferable to any subsequent purchaser if the product is sold during the warranty period,
* Extended promotional warranty may apply to certain products (for more info please contact: [email protected])
In home service administration fee is applied after 1
st
year of warranty.
Page 4

WARRANTY PROCEDURES
Please keep this information for your own records.
Please refer to the owner’s manual to ensure that you have followed the correct installation and operating procedures.
1. Read owner’s manual carefully
2. If you require Warranty Service, please contact the TEAC Authorised Service Centre
3. Please have your purchase receipt as your proof of purchase and the following details completed for a valid
Warranty.
Owner’s Name
Owner’s Address
Postcode
Model Name/No. Serial No.
Dealer’s Name
Dealer’s Address
Postcode
4. Please ensure that your product is packed appropriately upon return to the service centre.
If you have any other queries regarding service or warranty please contact the TEAC Customer Care Centre below:
www.teac.com.au
1800 656 700
Page 5

1
CAUTION: USE OF ANY CONTROLS, ADJUSTMENTS, OR PROCEDURES OTHER
THAN THOSE SPECIFIED HEREIN MAY RESULT IN HAZARDOUS RADIATION
EXPOSURE.
POWER SUPPLY:
Connect the supplied adapter to the side of the DVD player in the slot marked “Power In”.
Plug the two-prong end of the power cord to an AC100-240V outlet. If you have difficulty
inserting the plug, turn it over and reinsert it, if the unit will not the used for a long time,
disconnect the plug from the outlet.
NOTE:
Before plugging the power cord into an AC outlet, make sure that all the connections
have been made.
Important Safety
Instructions
CAUTION: TO REDUCE THE RISK OF ELECTRIC SHOCK, DO NOT
REMOVE COVER (OR BACK). NO USE-SERVICEABLE PARTS
INSIDE. REFER SERVICING TO QUALIFIED SERVICE PERSONNEL.
The lightning flash with arrowhead symbol, within an equilateral triangle, is
intended to alert the user to the presence of uninsulated “dangerous
voltage” within the product’s enclosure that may be of sufficient magnitude
to constitute a risk of electric to
p
ersons.
The exclamation point within an equilateral triangle is intended to alert the
user to the presence of important operating and maintenance (servicing)
instructions in the literature accom
panying
the appliance.
WARNING: TO REDUCE THE RISK OF FIRE OR ELECTRIC SHOCK,
DO NOT EXPOSE THIS APPLIANCE TO RAIN OF MOISTURE.
CAUTION: Laser radiation when open. Do not stare into beam.
Page 6

2
CAUTION: These servicing instructions are for use by qualified service personnel only.
To reduce the risk of electric shock, do not perform any servicing other than that
contained in the operating instructions unless you are qualified to do so.
Refer to service manual for servicing instructions.
1) Read these instructions.
2) Keep these instructions.
3) Heed all warnings.
4) Follow all instructions.
5) Do not use near water.
6) Clean only with dry cloth.
7)
Do not block any ventilation openings. Maintain well ventilated conditions around the
product, Do not put product on bed, sofa or anything that blocks ventilation. Install
in accordance with the manufacturer’s instructions.
8) Do not install near any heat sources such as radiators, heat registers, stoves, or
other apparatus (including amplifiers) that produce heat.
9) Do not defeat the safety purpose of the polarized or grounding-type plug. A polarized
plug has two blades with one wider than the other. A grounding type plug has two
blades and a third grounding prong. The wide blade or the third prong is provided for
your safety. If the provided plug does not fit into your outlet, consult an electrician for
replacement of the obsolete outlet.
10) Protect the power cord from being walked on or pinched particularly at plugs,
convenience receptacles, and the point where they exit from the apparatus.
11) Only use attachments/accessories specified by the manufacturer.
12) Use only with the cart, stand, tripod, bracket, or table specified by
the manufacturer, or sold with the apparatus. When a cart is used,
use caution when moving the cart/apparatus combination to avoid
injury from tip-over.
13) Unplug this apparatus during lightning storms or when unused for long periods of
time.
14) Refer all servicing to qualified servic e personnel. Servicing is required when the
apparatus has been damaged in any way, such as power-supply cord or plug is
damaged, liquid has been spilled or objects have fallen into the apparatus, the
apparatus has been exposed to rain or moisture, does not operate normally, or has
been dropped.
15) Apparatus shall not be exposed to dripping or splashing and no objects filled with
liquids, such as vases, shall be placed on the apparatus.
Note: Do not touch the color TFT LCD screen by hand directly.
Important Safety
Instructions
Page 7

3
Copyright Protection
This product incorporates copyright protection technology that is protected by U.S.
patents and other intellectual property rights. Use of this copyright protection technology
must be authorized by Macrovision, and is intended for home and other limited viewing
uses only unless otherwise authorized by Macrovision. Reverse engineering or
disassembly is prohibited.
Region code information
DVD players and discs are coded by region. If the region number described on the DVD
disc does not correspond to the region number of this product, this product cannot play
the disc. The region code of this unit is 4.
IMPORTANT FOR LASER PRODUCT
S
1. CLASS 1 LASER PRODUCT
2. DANGER: Visible laser radiation when open and
interlock failed or defeated. Avoid direct exposure to
beam.
3. CAUTION: Do not open the top cover. There are no
user serviceable parts inside the unit. Leave all
servicin
g
to qualified servicepersonnel.
Important Safety
Instructions
Page 8

4
High-quality audio and video
Advanced Playing Functions
Other Special Functions
Excellent sound: Dolby Decoder delivers
great sound.
AV I n : External Audi o, Video input can be
connected to most external AV sources.
AV Out: Analog Audio output and video
out
p
ut.
High Resolution: MPEG-2 decoding
format achieves more than 500 lines of
horizontal resolution.
Power Adapter Switch: Automatically
adapts to voltage requirements in U.S and
other countries.
On-screen Display: You can choose from
English, Spanish, French etc for On-screen
Display language
.
Compatibility: Compatible with DVD,
CD, PICTURE CD and DIVX disks.
Particular Performance: Multi-speed,
fast forward, fast backward and slow
playback.
Search by Time: Search for a certain
track of a disk by selected time.
Last Memory Playback: Memorize the
stopped playback track and continue playing
disk from this spot on power on status or
without opening the disc tray cover.
Special Functions: Supports screen aspect
ratio changing, zooming in or out pictures,
multi-language caption, multi-angle.
Features
Page 9

5
Accessories List
ITEM NAME QTY
Remote Control Unit 1
Cell for Remote Control 1
Owner’s Manual 1
Power-supply Cord with AC adapter 1
Audio/Video Cable 1
Rechargeable battery pack 1
DC Adapter (Car Adapter) 1
NOTE
Accessories and their parts numbers are subject to modification without prior notice due
to improvements.
Accessories
Page 10

6
DVD Playback
CD Playback
Picture CD Playback
DIVX Playback
Contents
Important Safety Instructions
Features
Troubleshooting
Specifications
Definitions
System Setup
View of Side Panels
View of Main Unit Bottom
Power Supply Preparation
Rechargeable Battery
Notes on Discs
Playback Operation
Remote Control
Preparation and use of the RC.
System Connections
Accessories
View of Main Unit
…………………………………………..1
…………………………………………...4
…………………………………………...5
…………………………………………...7
………………………………….………..9
…………………………………………..10
…………………………………………..11
…………………………………………..13
…………………………………………..14
…………………………………………..16
…………………………………………..17
…………………………………………..20
…………………………………………..21
…………………………………………..22
…………………………………………..26
………….……………………………….28
…..………………………………………31
…………………………………………..34
……………………………………….….41
…………………………………………..42
…………………………………………..44
Page 11

7
Front View
1. TFT LCD
7” color TFT screen presents high resolution picture.
2. Speakers
Two speakers output high quality sound.
3. +/- button
Press to increase/decrease the level of the selected item.
4. MODE button
Press to change the aspect ratio or change the brightness, contrast and color level.
5. ZOOM button
Press to activate the zoom function to zoom in or out the current image.
View of Main Unit
Page 12

8
6. SETUP button
Press to access the DVD setup menu.
7. TITLE button
Press to display the disc title menu if the titles are coded in the disc
8. MENU button
Press to enter to the disc menu
9. /,/ button
/ :press the direction buttons to select items.
/: press to fast search backward and forward during disc playback.
10. /,/ button
/: press the direction button to select items.
/: press to play the previous track or the next track.
11. OK button
Press to confirm your selection.
12. STOP button
13. PLAY/PAUSE button
Press to start playback or pause the playback.
14. A-B button
Press to mark a segment to repeat between A and B.
15. Main unit Power indicator
16. Battery charge indicator
17. Remote sensor
Receive the signal from the remote control for operation.
18. Disc Tray Cover
19. OPEN button
Press to open disc tray cover.
V
iew of Main Unit
Page 13

9
Right Side View
1. VOLUME Control
For regulating the sound level of Speakers or Headphones.
2. Headphone Jack
When headphones are plugged into the unit, the speakers will automatically turn
off.
3. AUDIO input/output Jack
For connecting to an external amplifier or audio source
4. VIDEO input/output Jack
For connecting to an external monitor or video source
5. DVD/AV IN Switch
Switch to AV IN to input the external AV source; switch to DVD to play the disc
6. DC 9.5V IN Jack
For connecting to power supply, including Car Adapter.
Left Side View
1. POWER ON/OFF Switch
Switch the power on or off.
View of Side Panels
Page 14

10
View of the bottom
1. Rechargeable Battery Contacting Point
For connecting with the rechargeable battery pack.
View of Main Unit Bottom
Page 15

11
1. PWR button
Press to turn unit on or off
2. INFO button
Press for detailed information on the disc. Press the button again to remove
information from screen.
3. TITLE button
Press to display title menu if the titles are coded in the disc.
4. Direction button
Press to select menu items.
5. ENTER button
Press to confirm your selection.
6. SETUP button
Press to access the DVD player’s setup menu.
Remote Control
Page 16

12
7. 0-9 number buttons
Select numbers by pressing these buttons.
8. button
Press to go to the beginning of current track or chapter. Press twice to go to the
previous track or chapter.
9. button
Press to go to the next track or chapter.
10. SUBT button
When playing a DVD coded with multi-subtitles, press to select a subtitle language
or to turn subtitles off.
11. ANGLE button
Press to access various camera angles, if the DVD disc contains multiple camera
angles.
12. A-B button
Press to play a section of the disc from point A to point B. Press once to select the
starting point (A), press again to select the end point (B). In A-B repeat playback,
press this button to stop the repeat.
13. ZOOM button
To cycle through the zoom levels. Use the direction buttons to shift the picture while
zooming.
(the zoom icon will always be displayed when in ZOOM mode)
14. REP button
Press to repeat a chapter, track, title, or the entire disc.
15. MENU button
Display the actual DVD Disc Menu on screen in playback mode.
16. PAUSE button
Press to pause playback. Press the pause button twice or the PLAY button to
resume normal playback.
17. STOP button
Press once to stop playback. Press the PLAY button to resume normal playback.
Press the button twice to stop playback completely.
18. PLAY button
Press to start playback.
19. GOTO button
Press to select the desired disc starting time, track or title.
20. +10 button
Select number greater than 9 by pressing the (+10) button first, and then additional
number button as needed.
21. button
Press to fast search forward during playback.
22. button
Press to fast search backward during playback.
23. SLOW button
Press to activate slow playback.
24. AUDIO button
Press to access various audio languages, when the DVD disc contains multiple
audio languages.
Remote Control
Page 17

13
Battery Installation Step
With the remote control unit placed on a flat surface and follow the steps below to install
the battery.
Step1: Pull the battery holder out from the remote
control in the direction of the arrow.
Step 2: Load a new battery properly with
Its (+) sided up.
Step3: Insert the battery holder back into
remote control
Battery Property
Battery Type: CR2025 3V
Battery service Life: Approximately 1 year under normal use (at room temperature).
Using of Remote Control
1. For best results, aim the remote control directly at the player’s receiving window
within the range of 15 feet and angles of 60 degree, and without obstacles between
remote control and remote sensor.
2. Improper use of the battery may cause overheating, and explosion or ignition,
resulting in an injury or a fire. Battery leakage may damage the product.
3. Do not expose the remote control unit to direct sunlight.
4. Do not recharge, disassemble, deform or heat the battery.
5. Do not put the battery in fire or water.
6. Immediately replace used up battery.
Preparation and
use of the RC
Page 18
14
Before Connection
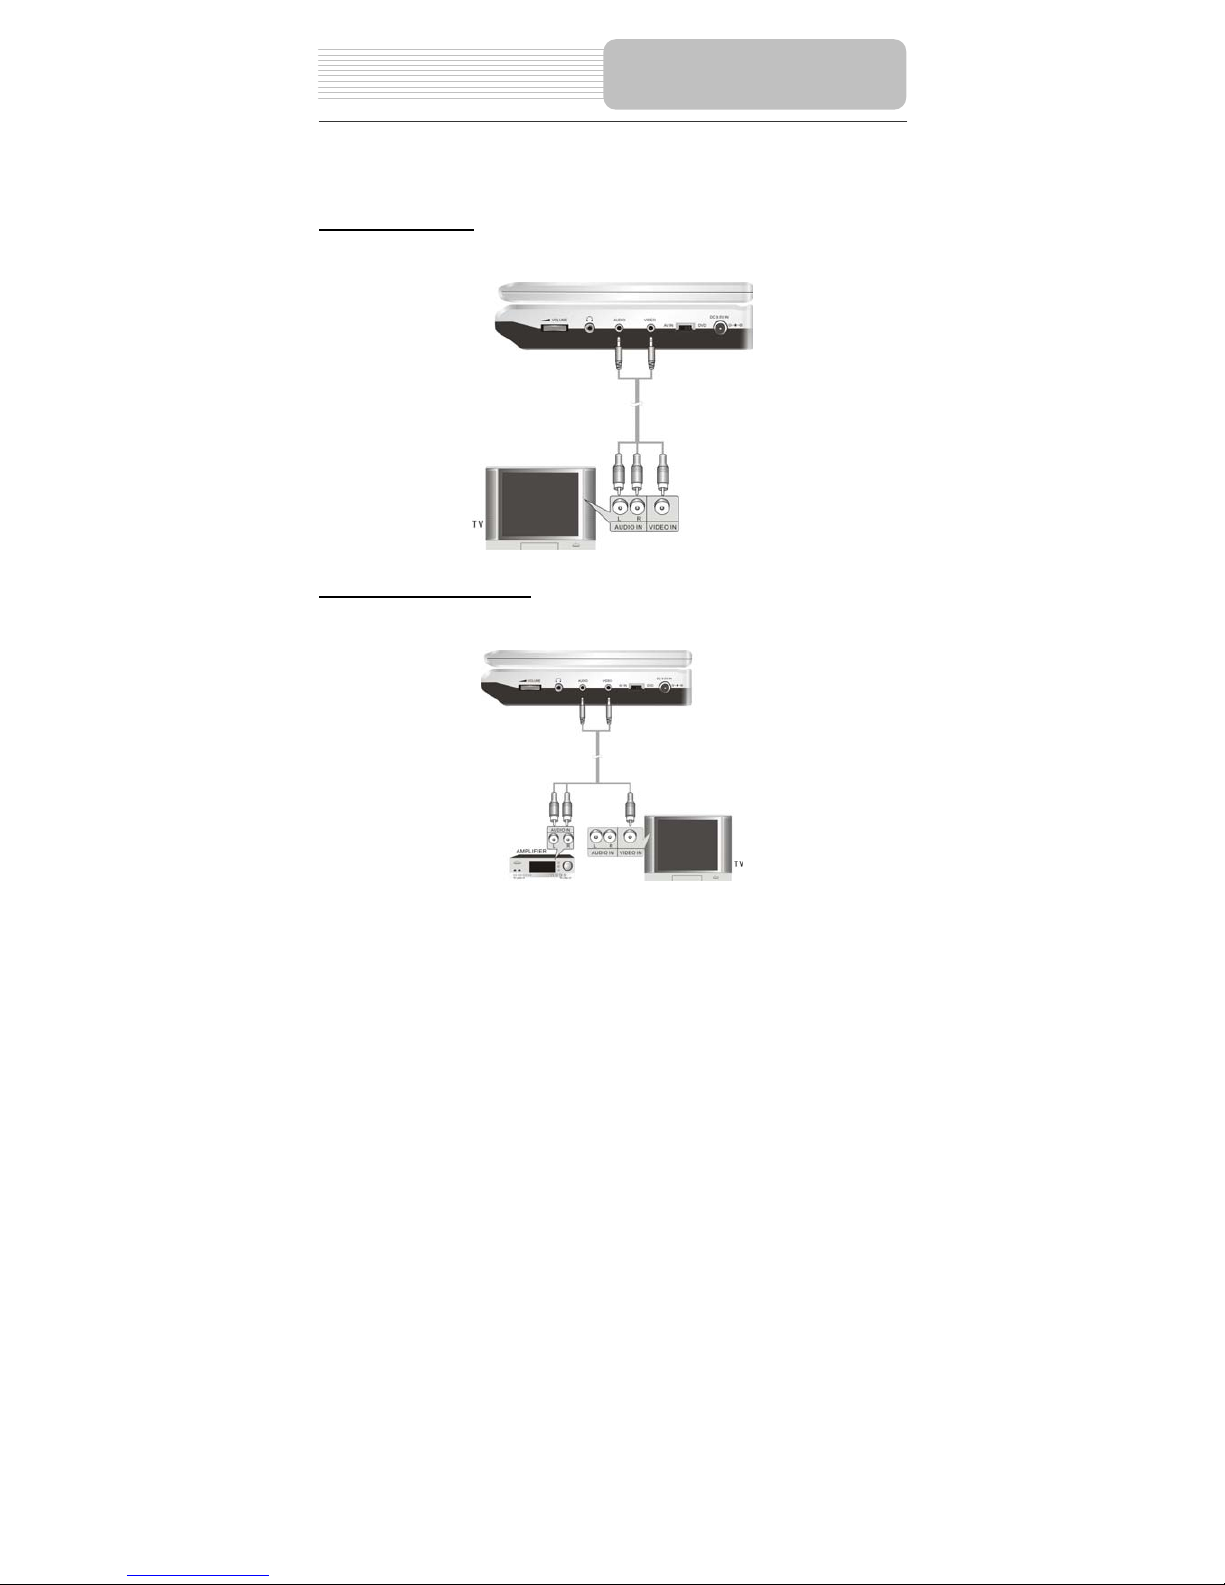
z Always ensure that the DVD player, TV and any other electrical equipment that
connecting with DVD player is switched off and unplugged from the power supply.
z Ensure that you observe the color coding when connecting audio and video cables.
Connecting to TV
Audio/Video connections
Please follow the drawings below to connect the DVD player to TV's Audio/Video inputs
with Audio/Video cables.
Connecting to Amplifier
Please refer to your Audio equipment's manual before connection.
Please follow the drawings below to connect the DVD player to AV amplifier.
System Connections
Page 19
15
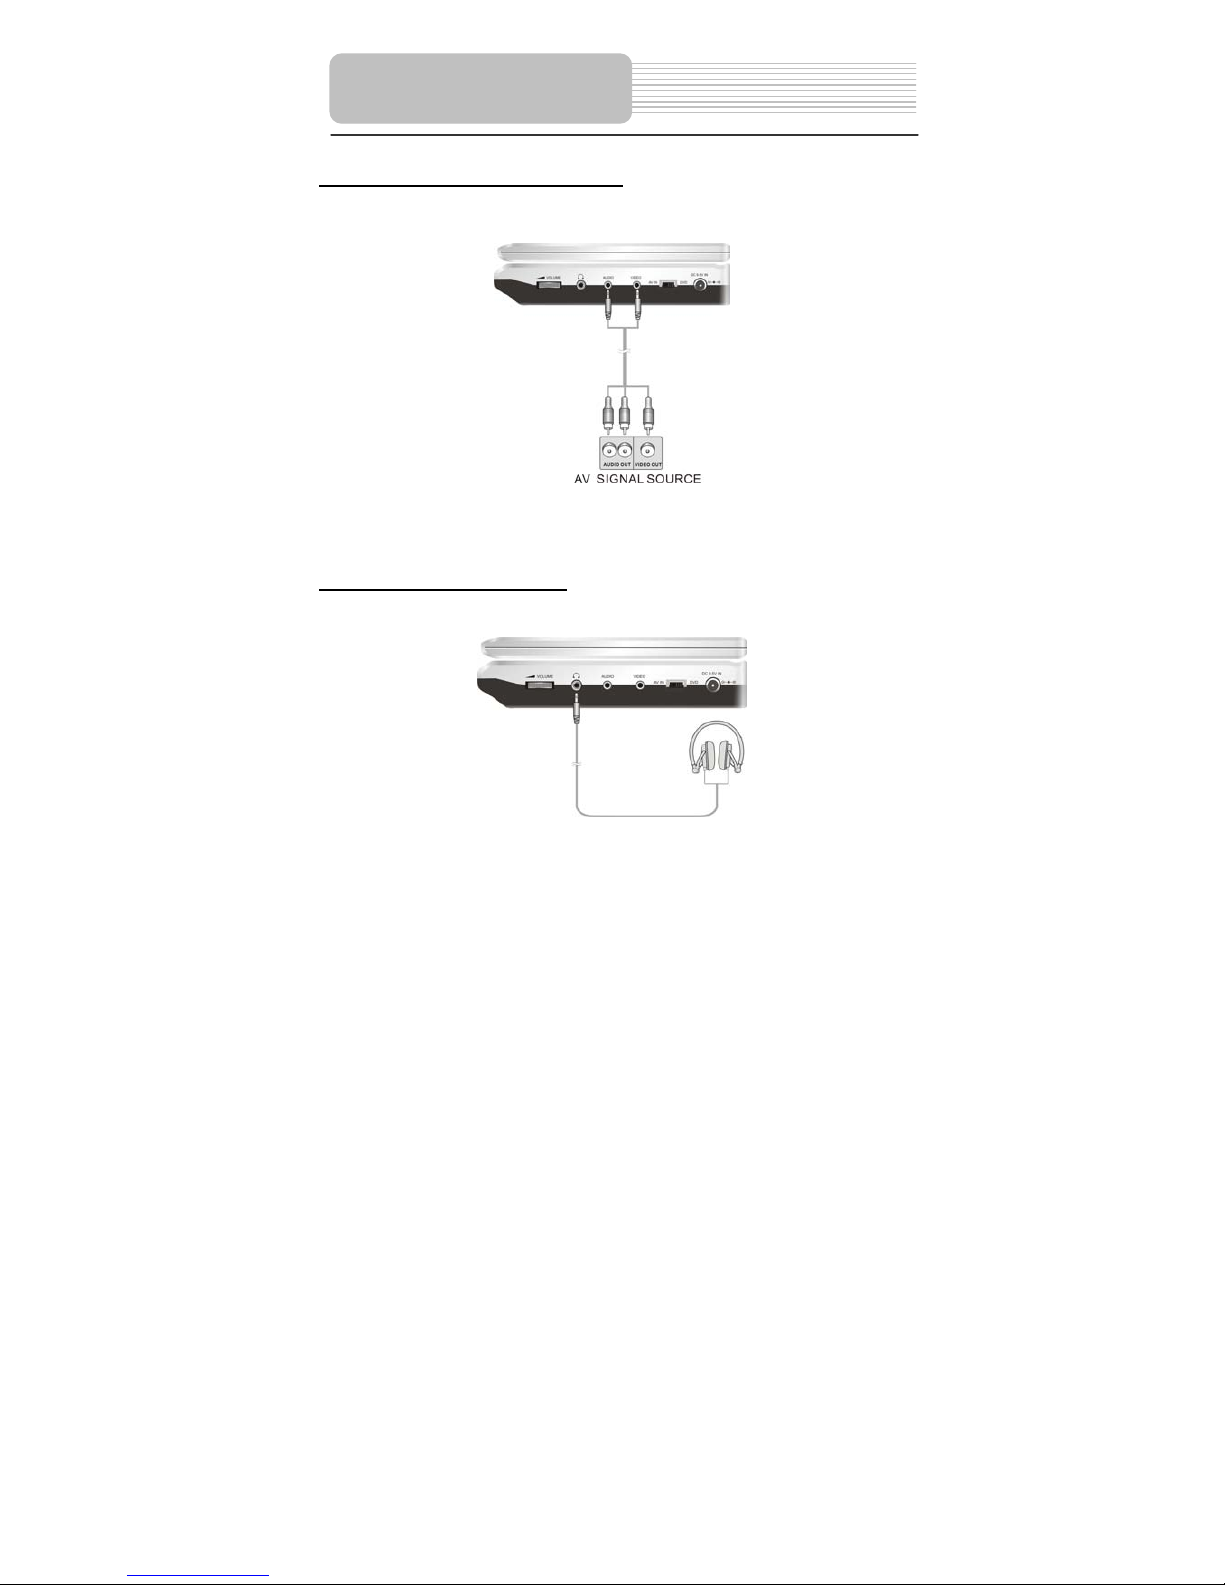
Connecting to External AV Source
The unit supports AV signal input function. Please use the audio/video cable to connect
the unit to the external AV signal source such as a DVD, VCR etc. after connecting,
switch the DVD/AV IN to AV IN.
Notes: noise m ay occur in speakers when input an external audio signal while
playing a DVD disc. Unplug the audio cord to clear the noise.
When the AV switch is set to AV IN, the unit will display a Blue Screen if no signal input.
Connecting to
Headphones
Connect the headphone to the headphone jack on the right side of the unit.
When headphones are connected, the speaker will automatically turn off.
System Connections
Page 20
16
Using of
the
AC Adapter
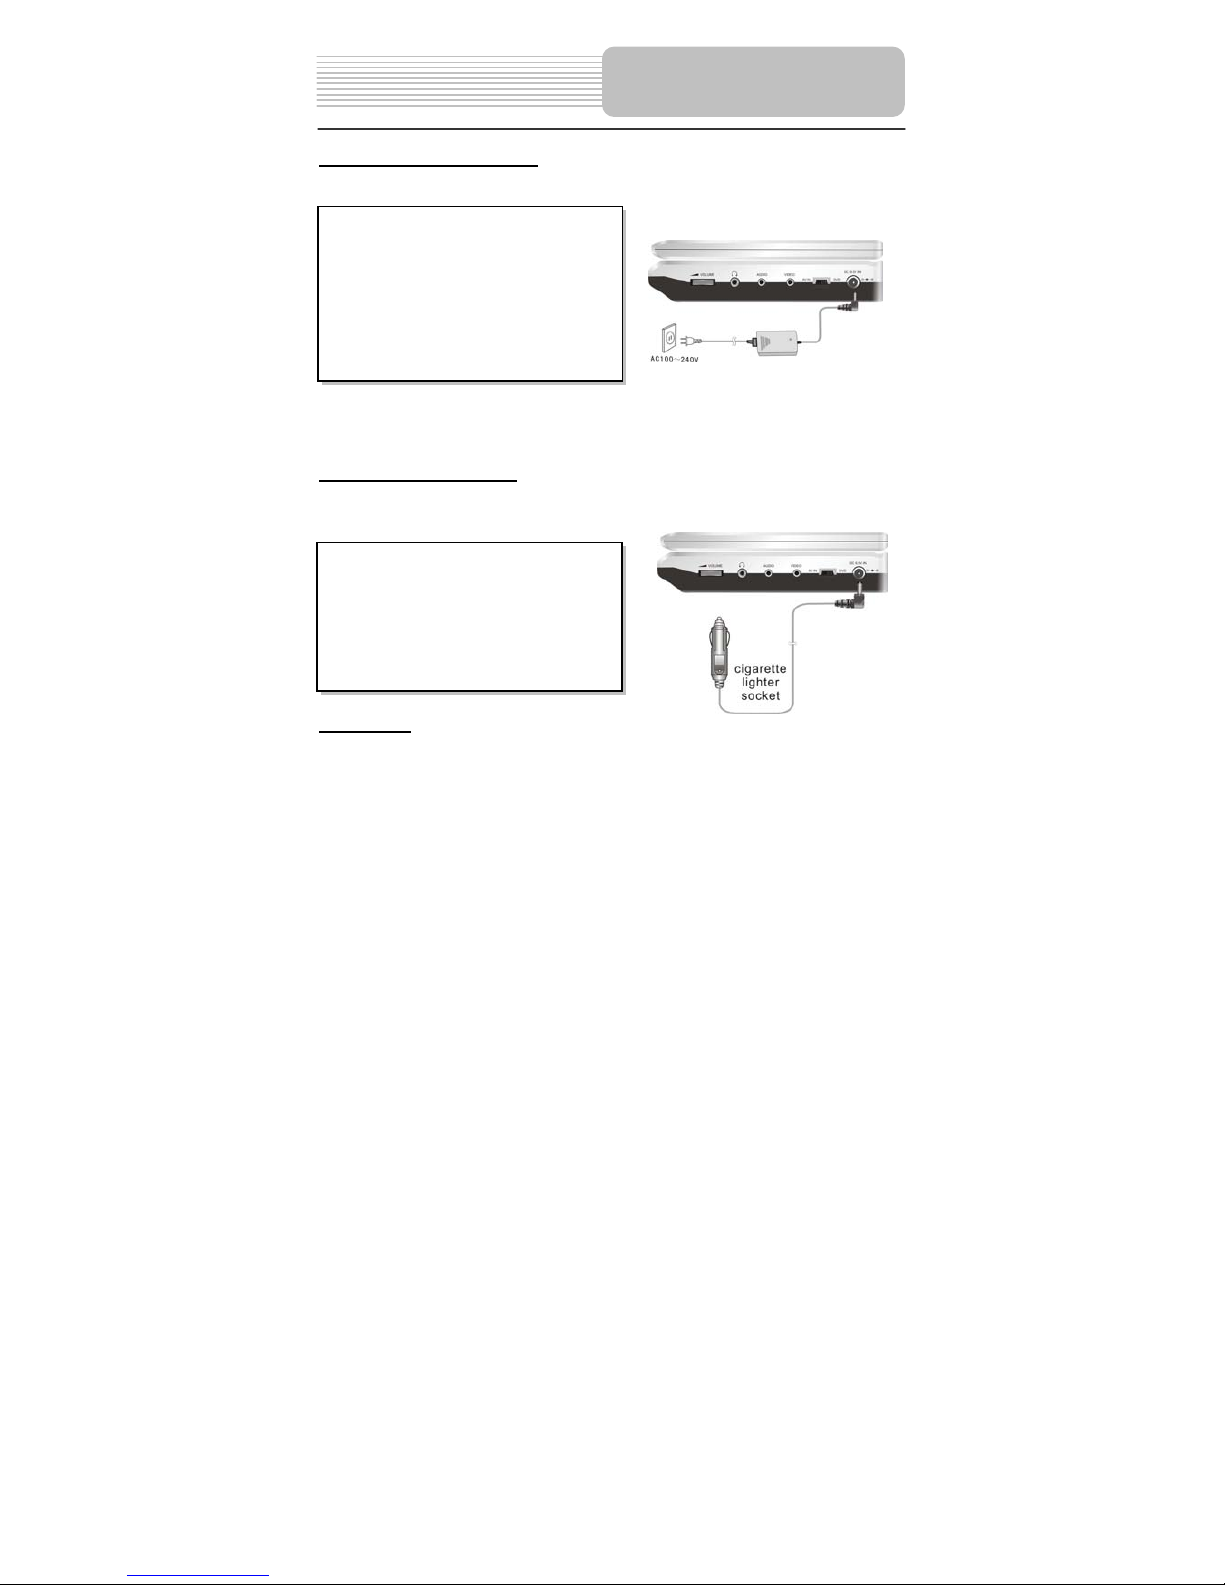
The player is supplied with an adapter. Take the following steps to use the adapter.
Note: Please
turn the player's power off before unplugging.
Note: In the case of using the adapter, the LCD screen will be lighter than with the
rechargeable battery.
Using the Car Adapter
You can use the Car Adapter while in a vehicle, take the following steps to using the car
adapter.
Attention
¾ Do not operate the unit or view video software while driving a vehicle.
¾ Place the unit in a proper position for viewing.
¾ Please detach the battery pack when using the car adapter as the power source.
¾ We advise you to disconnect the player from the Cigarette Lighter at the instant of
car start-up.
Your portable DVD player comes with a rechargeable lithium ion battery pack as an
optional accessory. Please see details in battery pack operation on the following pages.
Power Supply
Preparation
1. Connect the AC adapter in the right
side of the DVD player in the slot
marked
DC 9.5V IN (as the right figure).
2. Plug the two-prong end of the power
cord to a grounded electrical socket,
then the power indicator lights red.
Connect the Car Adapter Power Plug to
the unit's Power Jack and the other end
to the Vehicle Cigarette Lighter Socket as
the figure.
Page 21

17
About Rechargeable Battery Pack
Your portable DVD player comes with a lithium ion rechargeable battery that attaches to
the rear of the DVD player. Charge the battery fully before initial use. Charging time is
normally about 5 hours. A fully charged battery delivers about 3 hours of use, but playing
time varies from disc to disc. If the battery will not be used for a long period of time, fully
charge the battery prior to storage.
Working conditions and precautions of the battery
¾ New batteries should be fully charged before initial use.
¾ Battery should only be used and charged when temperatures are between 32 -
100F.
¾ Never put the battery in fire or water.
¾ Do not expose the battery to high temperatures or store in hot, sunny places.
¾ Maintain well-ventilated conditions around the product to avoid overheating. Don’t
put the product on a bed, sofa or anything that may block ventilation to the product.
¾ Do not short the battery terminals.
¾ Do not open the battery.
¾ Detach the battery after charging is complete. When charging the battery pack, the
charge light will turn red, when the charging is complete, the light will turn green.
¾ Detach the battery when not in use.
¾ When the battery is weak, about several minutes later, the player will power OFF
automatically.
Warning:
Do not touch any metal objects to the battery's terminals with any metal objects, as it will
put the battery in standby mode. T o exit the standby mode, connect the battery and DVD
player to AC or DC power
Rechargeable Battery
Page 22
18
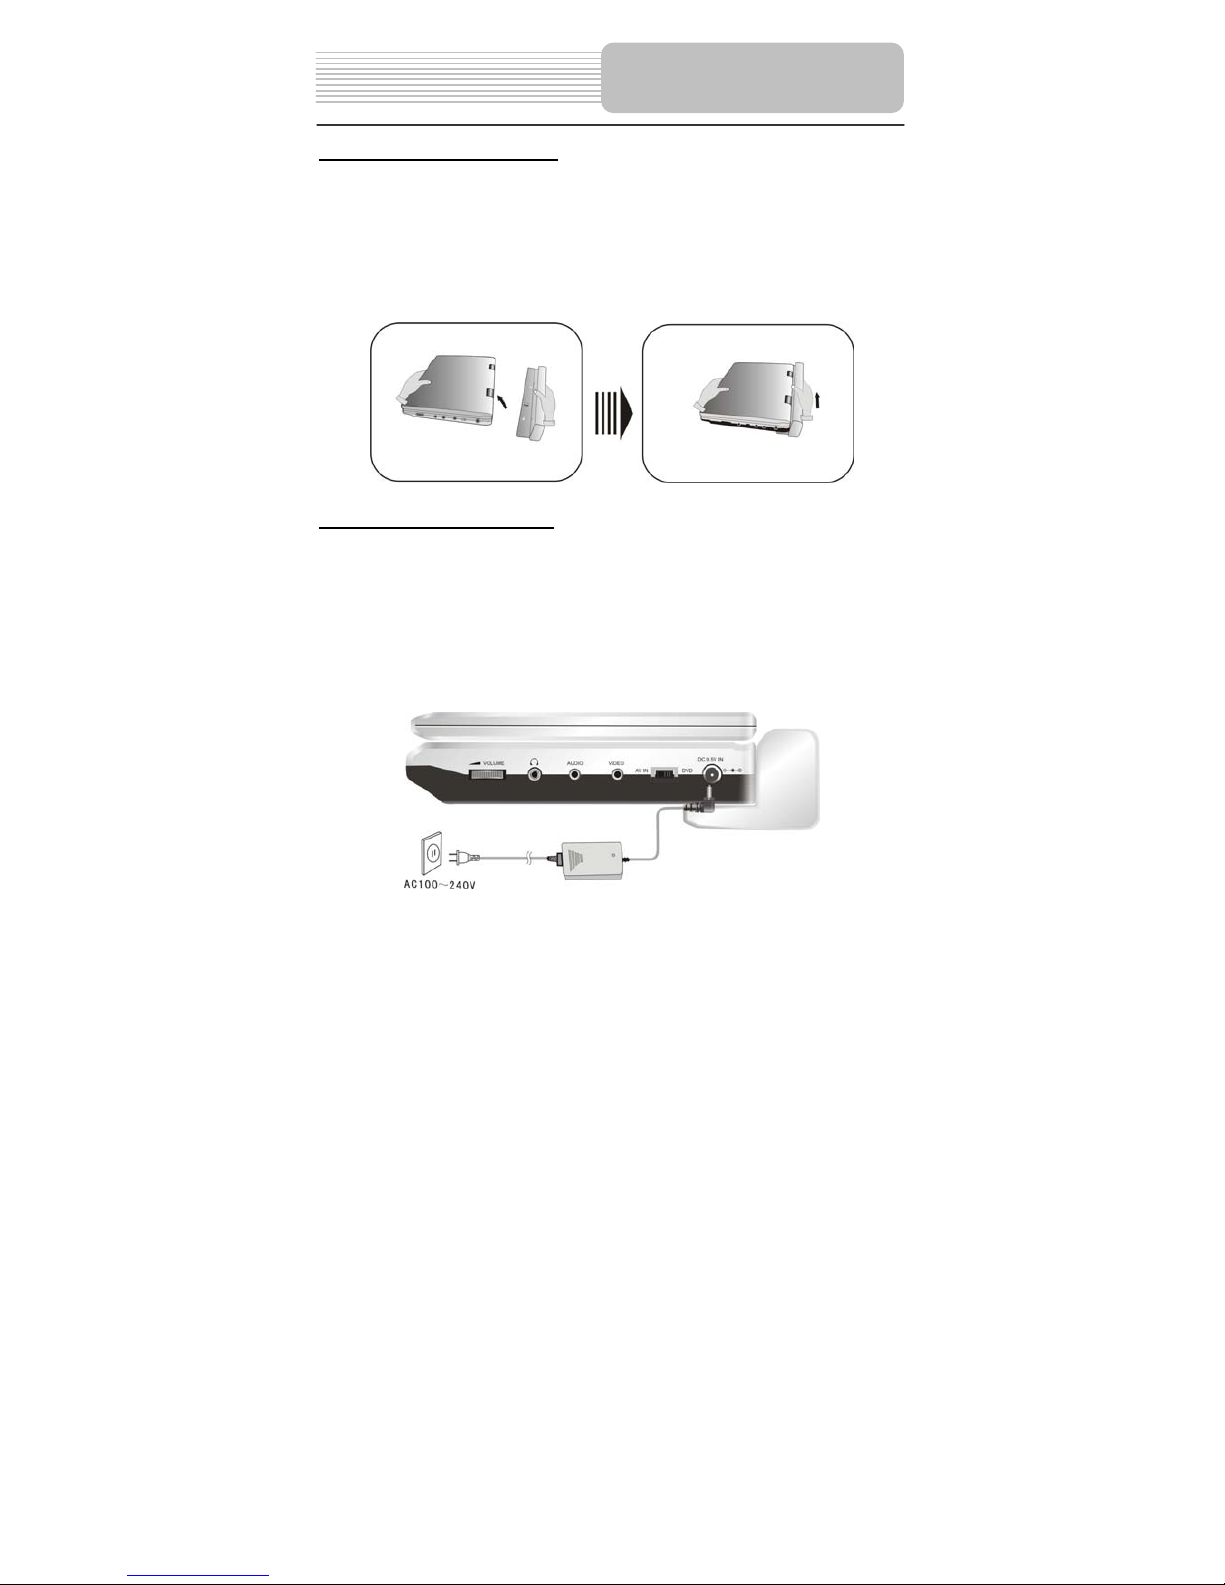
Attaching the Battery Pack
Refer to the following steps for attaching the Battery Pack:
1. Place the DVD player on a soft and smooth surface with the bottom of the unit
facing up.
2. With one hand on the DVD player to prevent it from moving, take the battery and
align the plastic tabs on the battery pack with the holes on the player, and push the
battery pack into the DVD player.
3. Slide the Battery Pack until you hear it click.
Charging the Battery Pack
The battery pack must be attached to the DVD player to charge it using the supplied AC
Power Adapter.
1. Attach the battery pack to the DVD player
2. Plug the supplied AC Power Adapter into the player’s power jack marked
with ”DC 9.5V IN”, which is located on the right side of the DVD Player.
3. Plug the other end of the AC Power Adapter Cord into a household AC Outlet as
shown below.
Rechargeable Battery
Page 23
19
Detaching the Battery Pack
If the DVD Player is not going to be used for long periods of time, the battery pack should
first be fully charged and then detached. When the DVD Player is turned OFF, the DVD
Player is still consuming some power in STANDBY mode. This will eventually discharge
the battery.
Make sure the power is turned OFF before detaching the Battery Pack.
Refer to the following steps for detaching the Battery Pack:
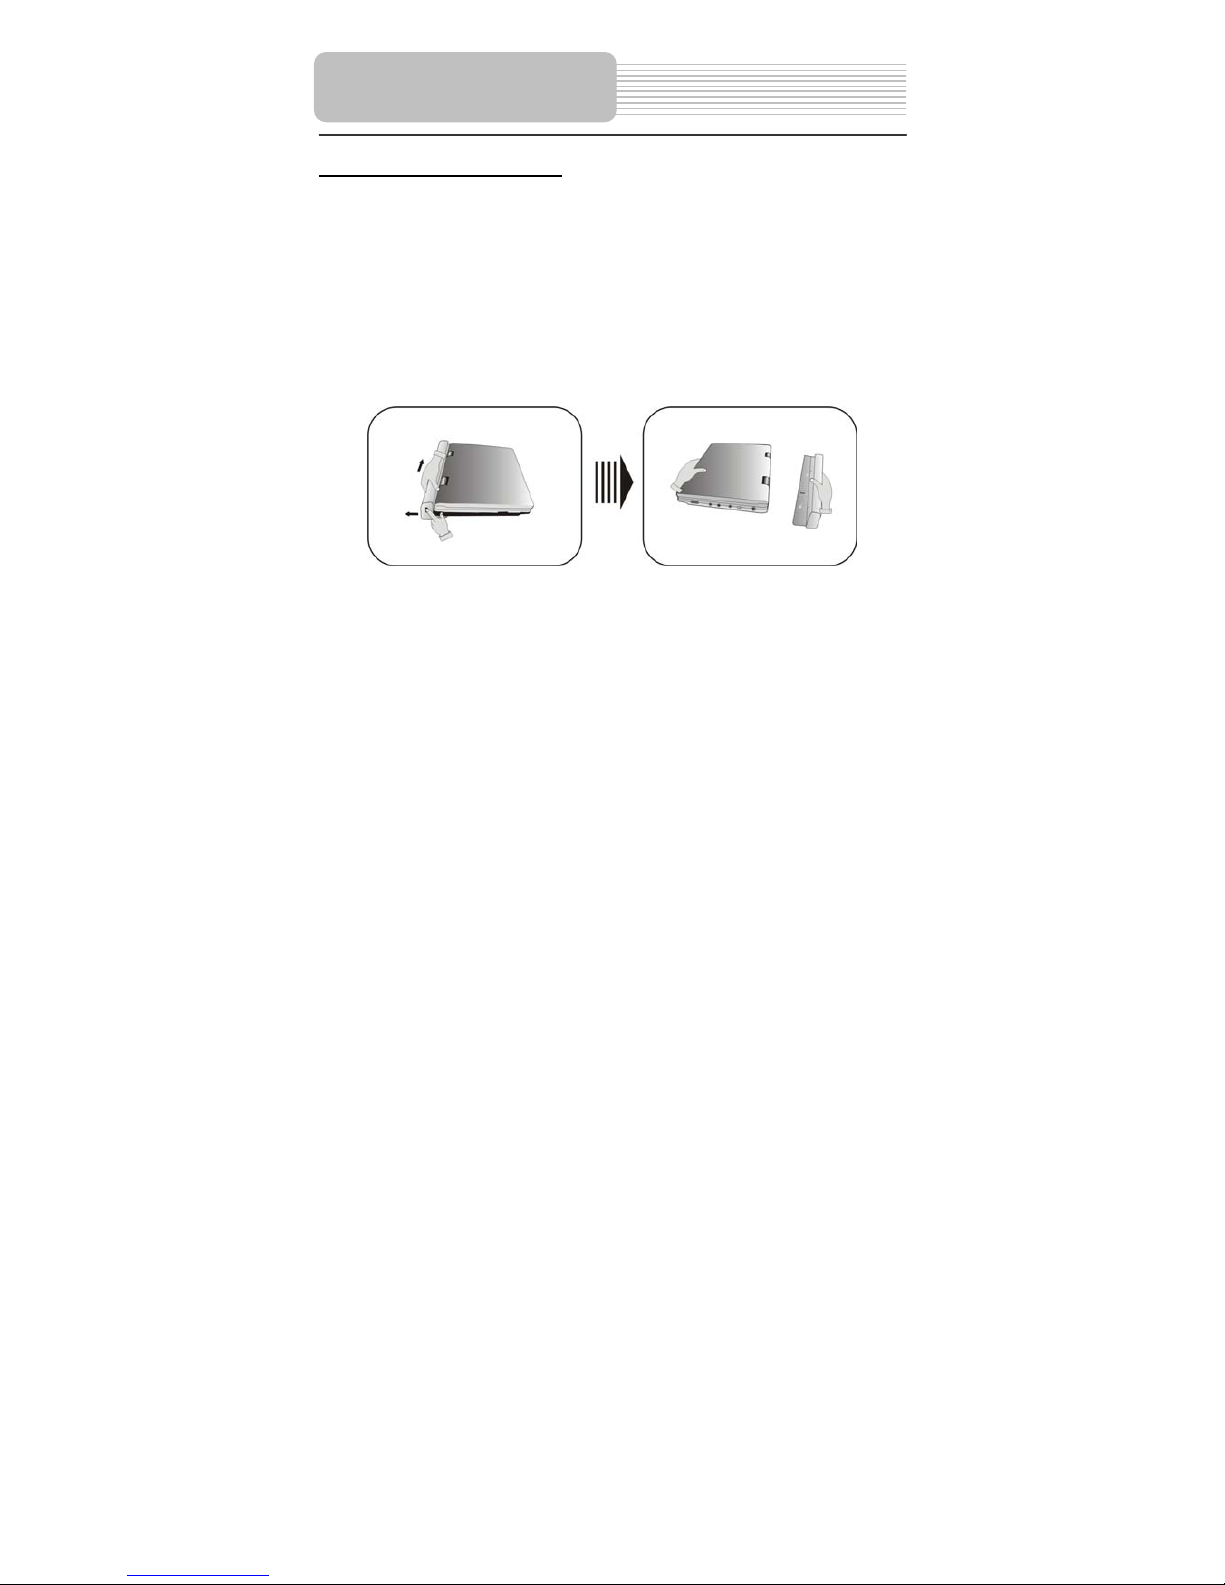
1. With one hand push the battery fastener ahead and the other hand slide the
rechargeable battery from the main unit (in the direction of drawings below).
2. Preserve the rechargeable battery in a proper place in the case of long time for
un-using.
Note: Please detach the battery pack when the Car Adapter is connecte d with the
unit.
Rechargeable Battery
Page 24
20
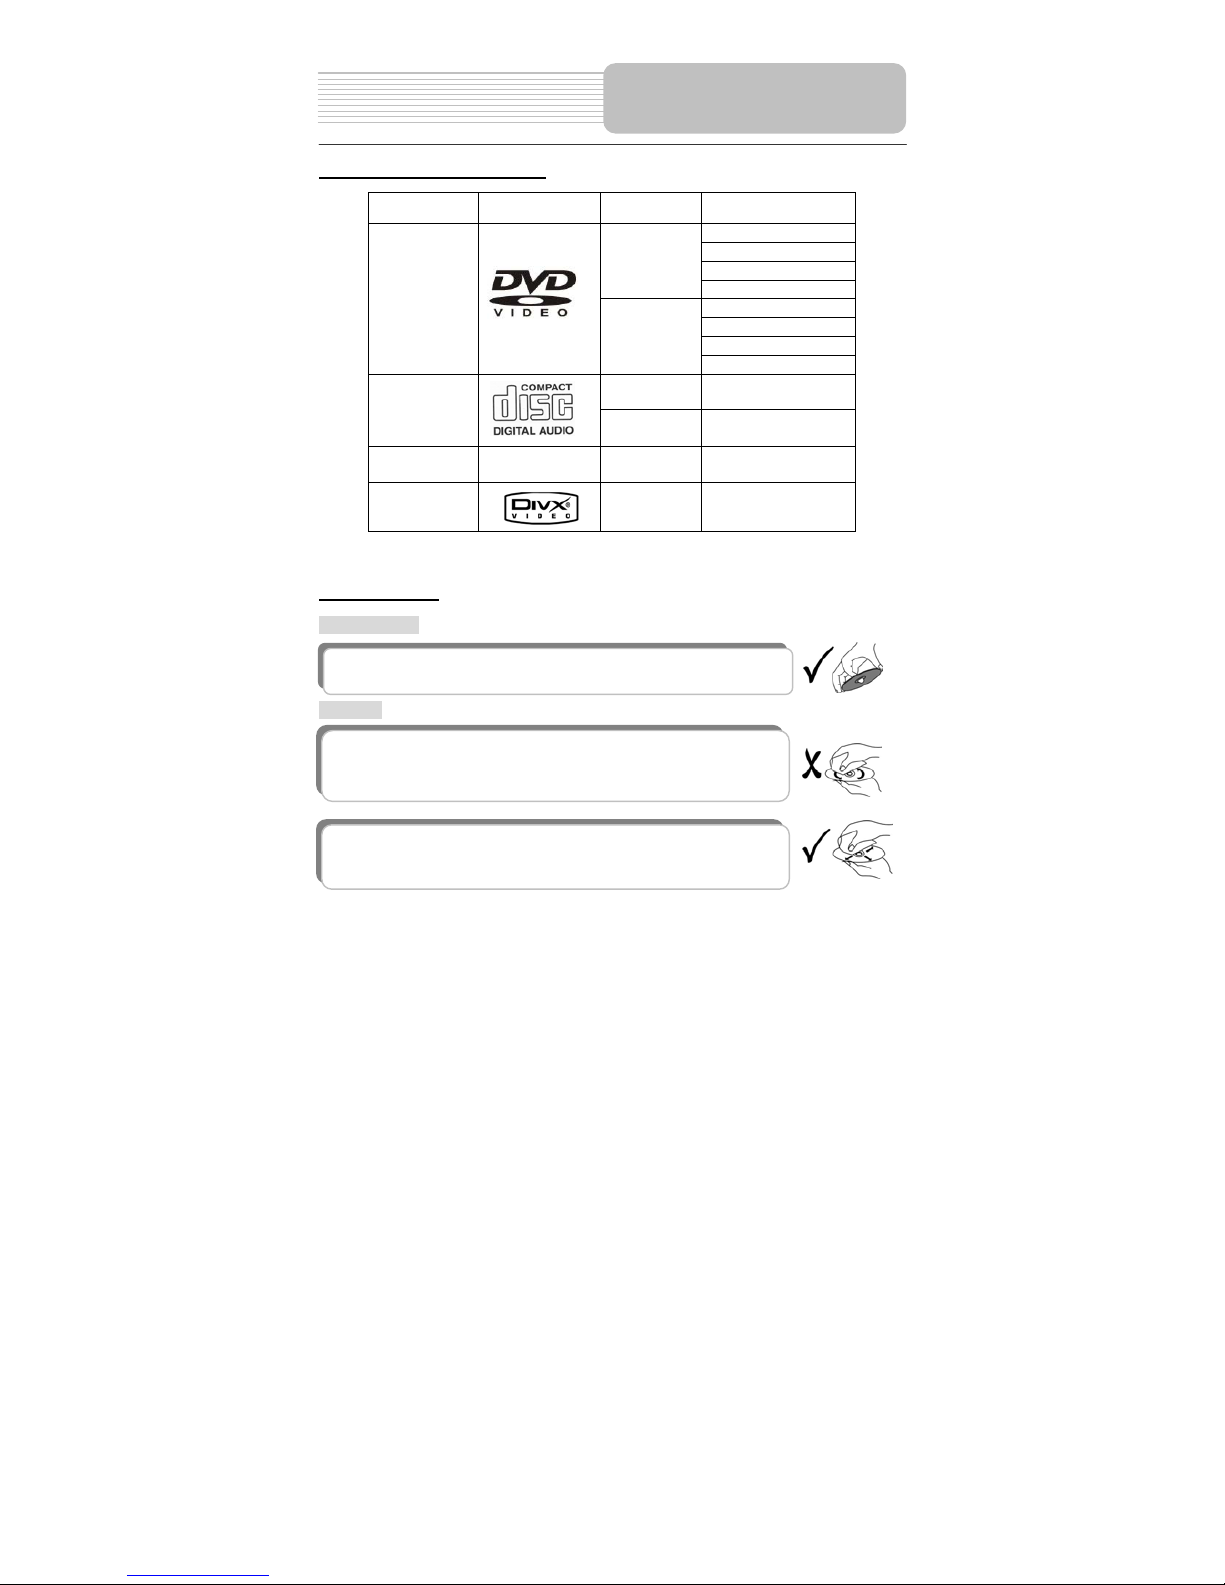
Compatible Disc Formats
DISC LOGO DIAMETER
PLAYBACK TIME/
PLAYABLE SIDES
133 min (SS-SL)
242 min (SS-DL)
266 min (DS-SL)
12cm
484 min (DS-DL)
41 min (SS-SL)
75 min (SS-DL)
82 min (DS-SL)
DVD
8cm
150 min (DS-DL)
12cm 74 min
CD
8cm 20 min
JPEG
12cm
DIVX
12cm
Operation methods of some DVD discs are specified by the software manufacturer.
Please follow the instructions of the disc.
Care of Discs
Holding Discs
Cleaning
When loading or removing discs, try not to touch their playing
surfaces as the right fig ure.
Fingerprints or stains on the disc may affect the quality of sound and
picture. To clean your discs, use a soft clean cloth to wipe them. If
necessary , moi sten a soft clot h w ith dilute d neutr al det ergent t o rem ove
heavy dirt or fingerprints.
Do not wipe in a circular direction as the figure in the right middle
(concentric scratches on the disc groove tend to cause noise). Gently
wipe from the center of the disc to the outer edge as the right figure.
Notes on Discs
Page 25
21
PLEASE READ THE FOLLOWING INSTRUCTIONS CAREFULLY BEFORE USING
YOUR DVD PLAYER FOR THE FIRST TIME.
WARNING: Do not play poor-quality discs to avoid damaging the lens.
Pre-operation
1. Connect the unit to the power supply through the provided AC adaptor.
2. Switch “POWER ON/ OFF” to “ON” on the left panel to turn the DVD player on. The
main unit power indicator lights green and the screen displays an initial image.
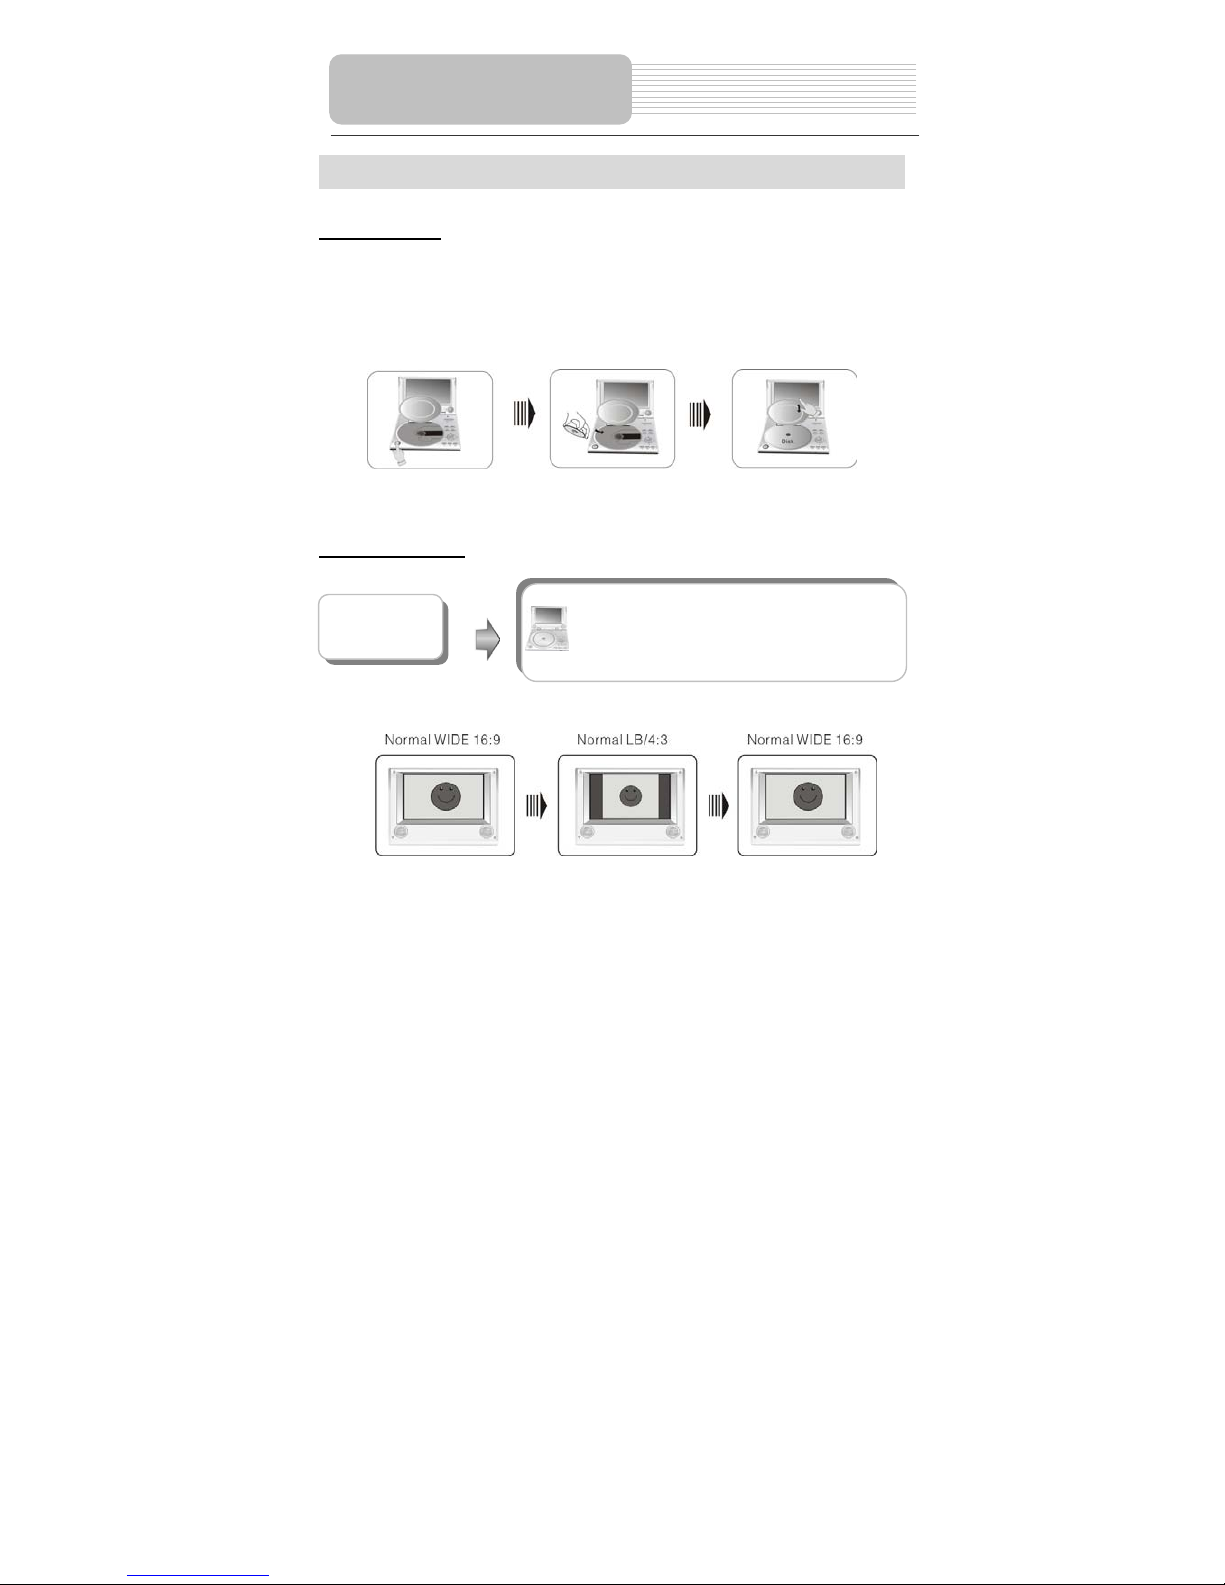
3. Press the OPEN button on the unit, put a disc in the disc tray with the printed side
facing up, then close the disc cover. (See the figure below)
4. The player will search the disc and enter the disc searching status.
5. Adjust the volume with the VOLUME control on the right panel to a suitable level.
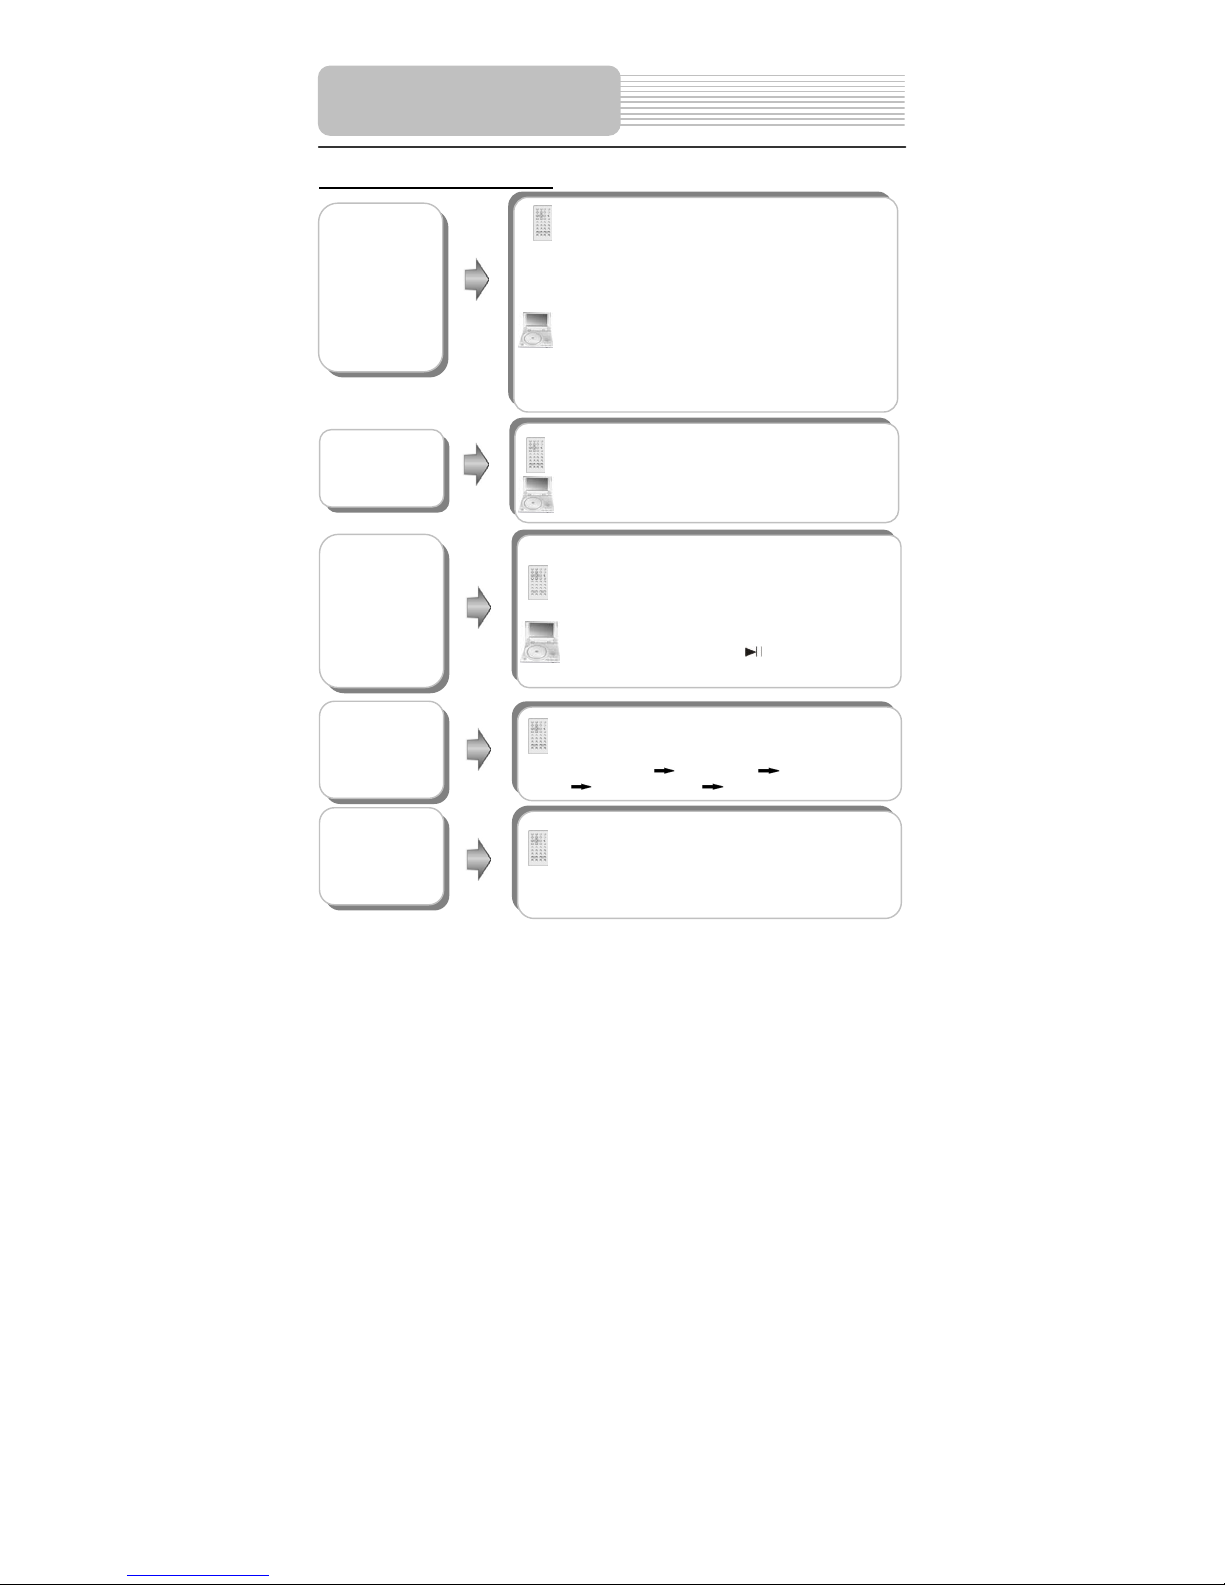
General Buttons
Playback Operation
Press the MODE button to change th e level of the
brightness, contrast and color. Please adjust these
items with + and – buttons. Press and hold the
button for 1~2 sec onds to change the aspect ra tio
between 16:9 and 4:3. See the figure below for
details:
MODE
button
Page 26
22
General Buttons (continued)
DVD Playback
Buttons Operation
Playback Operation
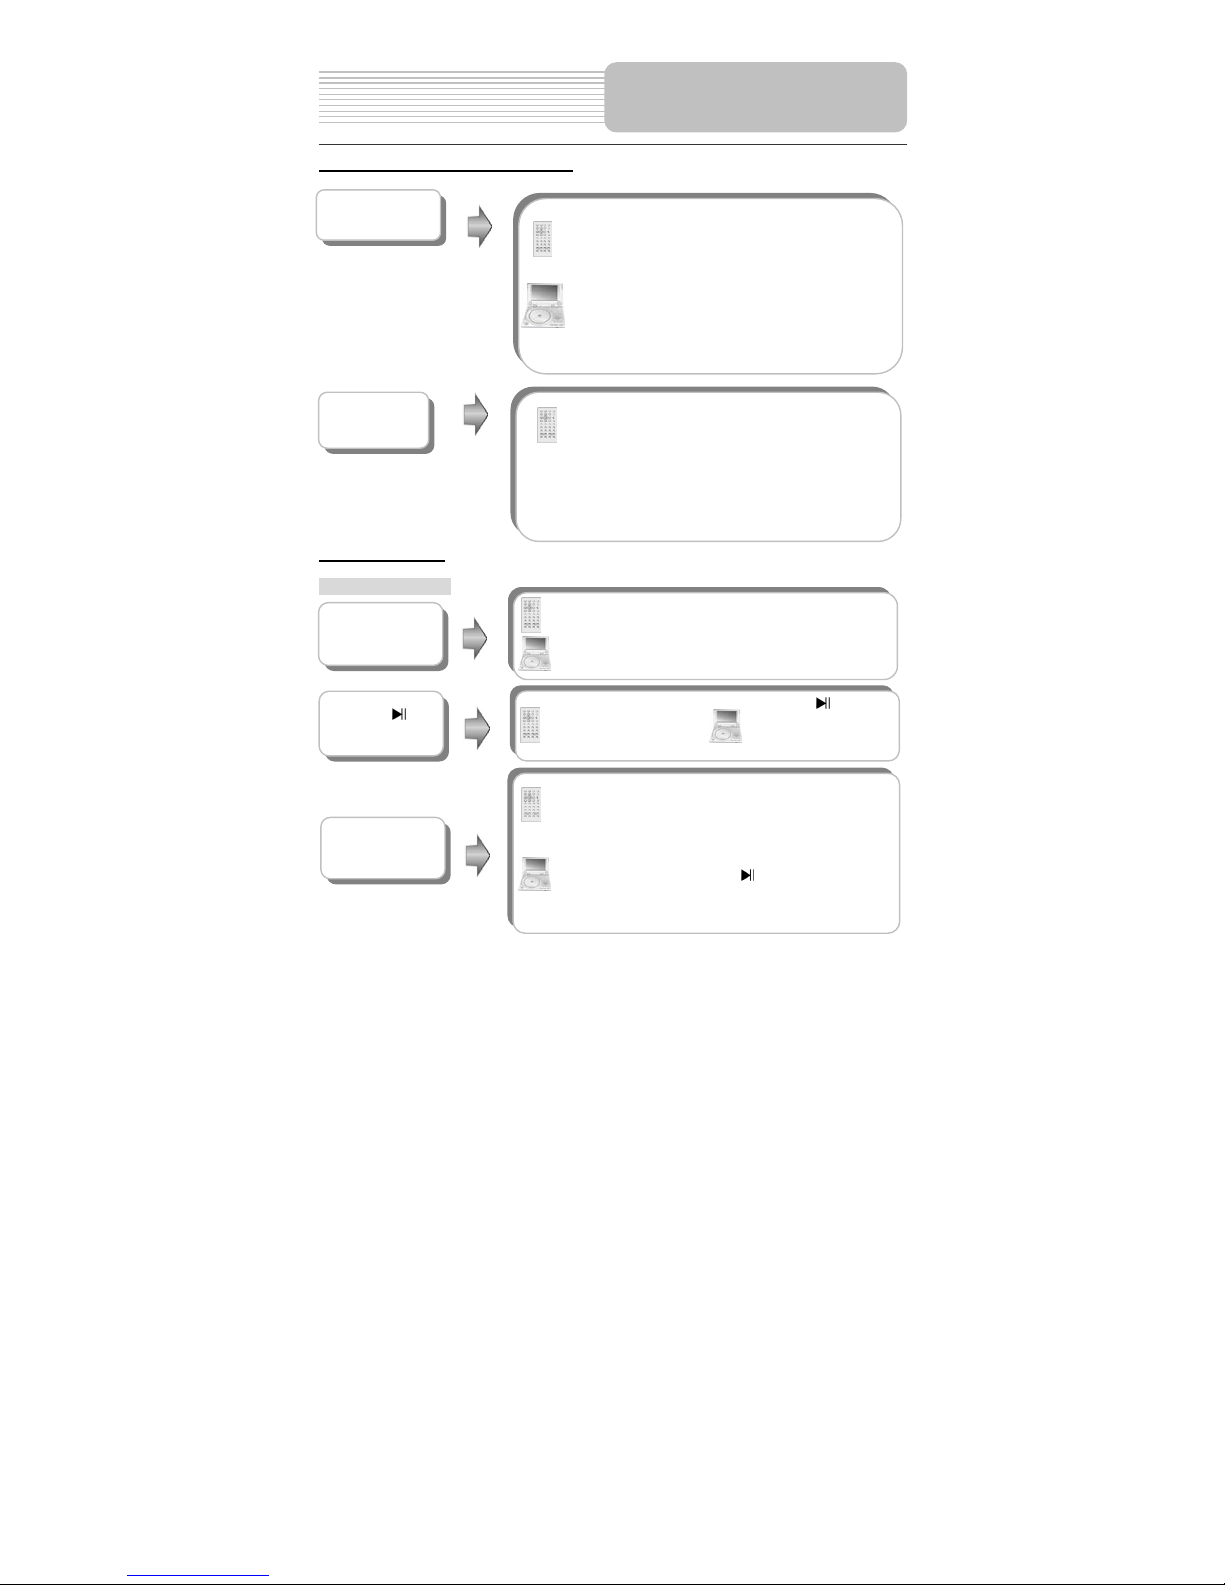
STOP/
During playback, press the STOP button once to stop
playback, then press the PLAY button to resume
normal playback from the place where it was
stopped. Press it twice repeatedly to stop playback
completely.
During playback, press the butto n on ce to stop
playback, then press the button to resume
normal playback from the place where it was
stopped. Press it twice repeatedly to stop playback
completely.
PAUSE/
Press the PAUSE button
to pause playback, and
press it again to resume
normal playback.
Press the button to
pause playback, and
press it again to resume
normal playback.
Start Playing
Load a disc, the player will search the disc and play it
automatically, press the direction buttons to
highlight the item that you prefer and press the
ENTER button (or the OK button on the front panel) to
start playback.
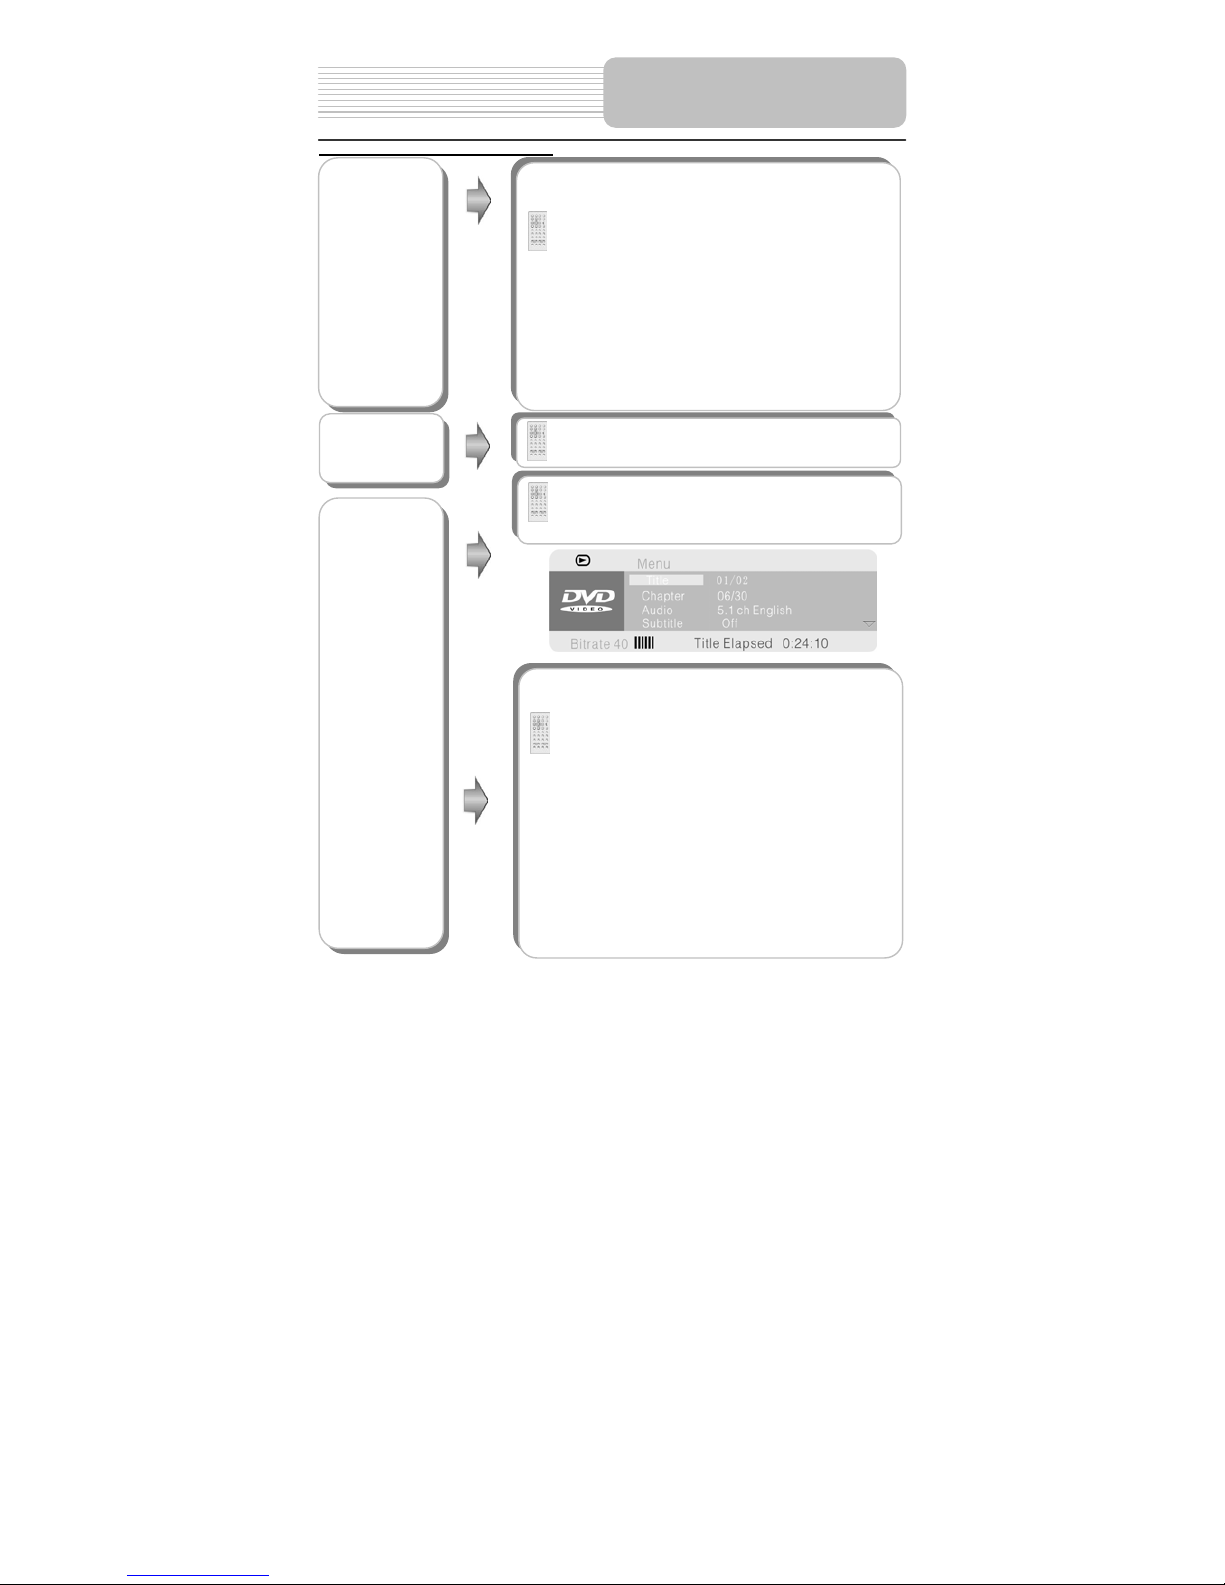
ZOOM
button
For DVD discs, press the ZOOM button to
display the image as
2x-3x-4x-1/2-1/3-1/4-normal size in s equ ence.
For JPEG discs, press the ZOOM button first,
then press the button on the remote control to
enlarge the picture as follows:
125%-150%-200%-normal size ; press the
button on the remote control to reduce the
picture as follows:75%-50%-normal size.
A-B
button
During normal playback, press the A-B button
to select the segment that you want to play
repeatedly.
Press once to select the begin ning point “A”,
press again to select the ending point “B” and
play the segment repeatedly. Press the A-B
button again to cancel the repeat segment.
This function is not available for JPEG discs.
Page 27
23
DVD Playback (continued)
Playback Operation
AUDIO button
DVD discs can contain up to 8 audio bit streams.
For example: English, French etc.
To select the audio bit stream you prefer, press
the AUDIO button during playback. The DVD
player will play the next audio bit stream every
time you press the AUDIO button in succession.
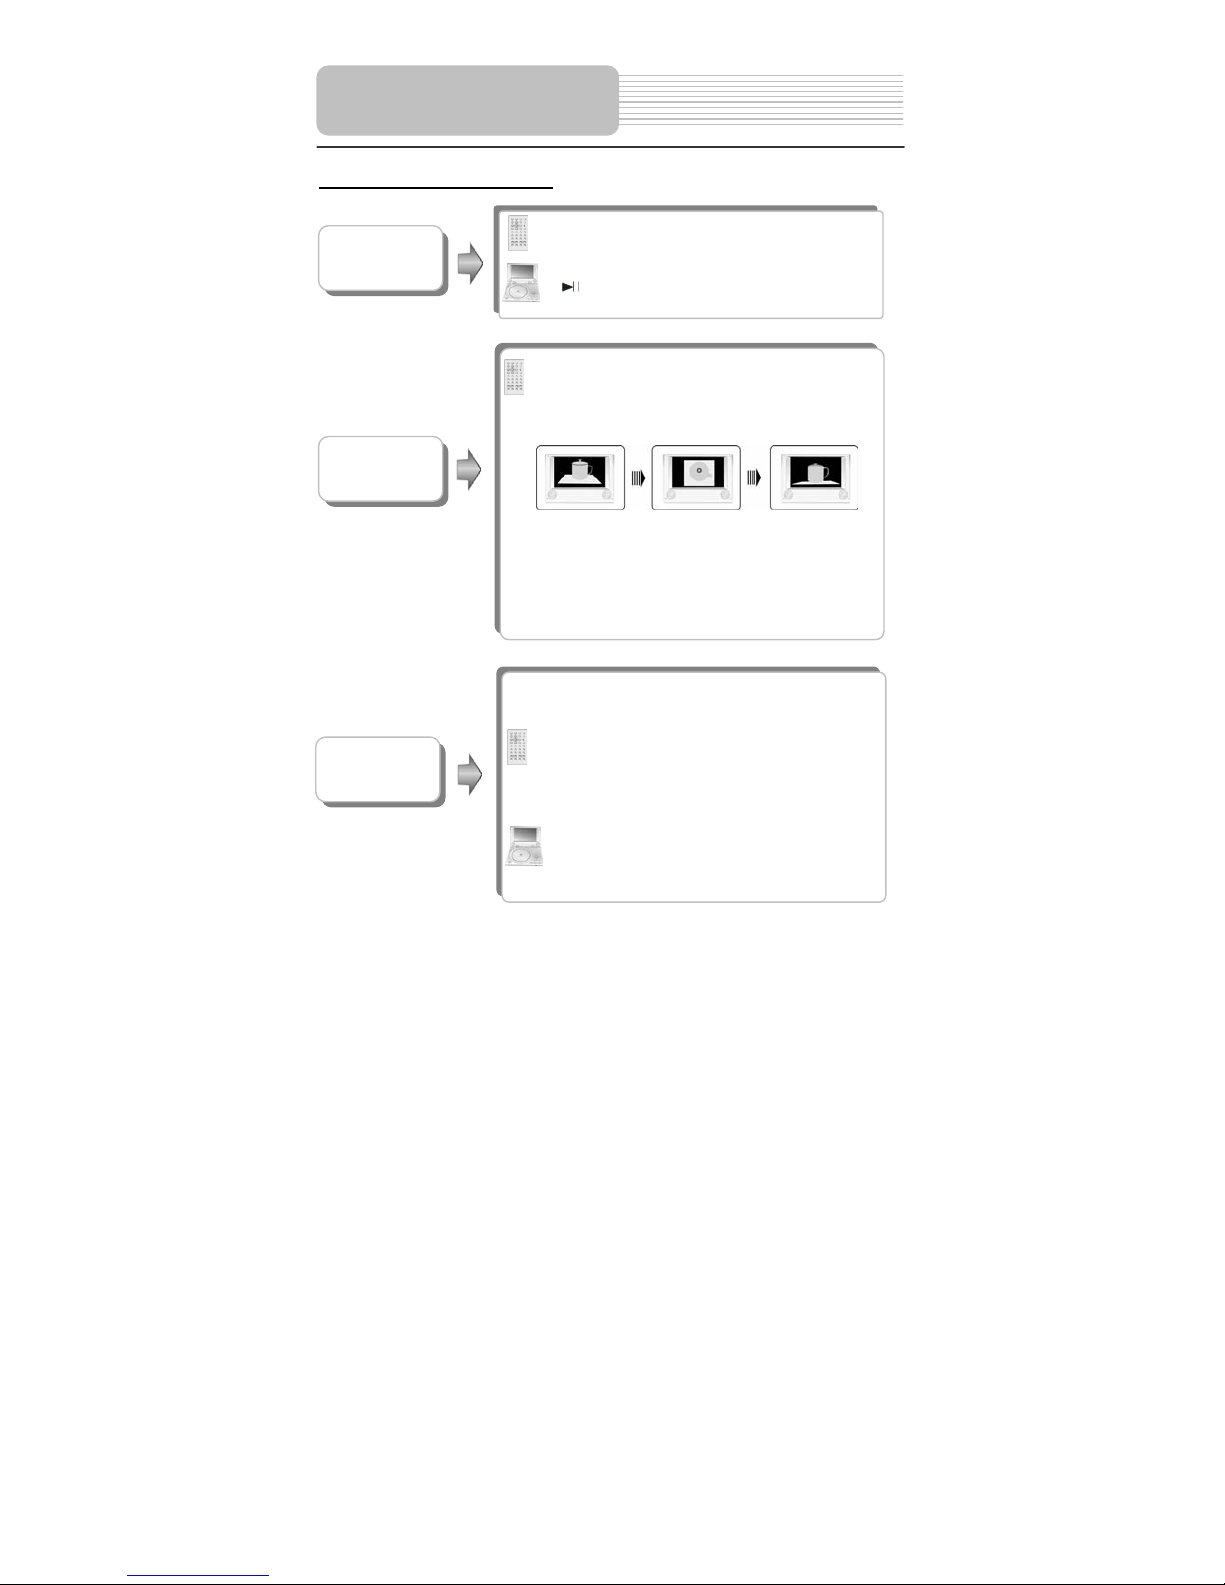
INFO button
Press the INFO button for detailed information on
the disc playing. Press it repeatedly to display as
follows:
Title elapsed Title remain Chapter elapsed
Chapter remain Display off
MENU button
Press the MENU button during playback to display
the menu on the screen. Press the MENU again to
resume the normal playback.
Press the (direction buttons) to select the
desired title or disc menu item, and press the
ENTER button (or OK button on the front panel) to
confirm. Or press the 0-9 buttons to select the item
you prefer directly, then press the ENTER button
(or OK button on the front panel) to confirm.
In the root menu, press the MENU button again to
resume normal playback. The menu function is only
available for DVD discs.
& buttons
Press the button to go to the previous chapter.
Press the button to play the next chapter.
Press thebutton to start fast forward playback.
Press it repeatedly to fast forw ard at th e spee d of 2X ,
4X, 8X, 16X, 32X in sequence. Pres s th e b utton to
start fast reverse playbac k. Pres s it rep eatedly to fast
reverse at the speed of 2X, 4X, 8X, 16X, 32X in
sequence.
Press the PLAY button (or button on the front
panel) to resume normal playback.
& buttons
Page 28
24
DVD Playback (continued)
During DVD playback, press the SUBT button to
select a subtitle language or to turn subtitle off. A
DVD disc can be recorded with at most 32 subtitles.
Press the SUBT button repeatedly, the mode of
subtitles will recycle as follows:
SUBTITLE 1/N: Subtitle 1 appears on the screen.
SUBTITLE 2/N: Subtitle 2 appears on the screen.
SUBTITLE */N: Subtitle * appears on the screen
SUBTITLE OFF: No subtitle.
N refers to the total number of subtitles that the current
disc contains.
This function is available for DVD di scs r ecorde d with
multi-subtitles
SUBT button
REP button
Press the REP button to repeat a Chapter, Title or
All in sequence.
Press the GOTO button to select desired disc
starting time, track or title.
During DVD playback, press it to display as follows.
GOTO button
Press the buttons to move the yellow light bar
to the item you prefer, then press the ENTER button
(or OK button on the front panel) to confirm:
¾ The corr esponding item is highligh ted (just for
Title, Chapter, Angle, Tt Time <Total Time>,
Ch Time <Chapter Time>), use 0-9 buttons to
select directly according to your preference.
¾ The sub-menu of the selected item is
displayed (just for A udio , Sub title, Repeat,
Time Disp.<Time Display>), use the
buttons to move the yellow light bar to the
item you prefer, then press the ENTER button
(or OK button on the front panel) to confirm.
Press the GOTO button again to resume normal
playback.
Bitrate:
This displays the datarate that the disc has been
r
ecorded
with.
Playback Operation
Page 29
25
DVD Playback (continued)
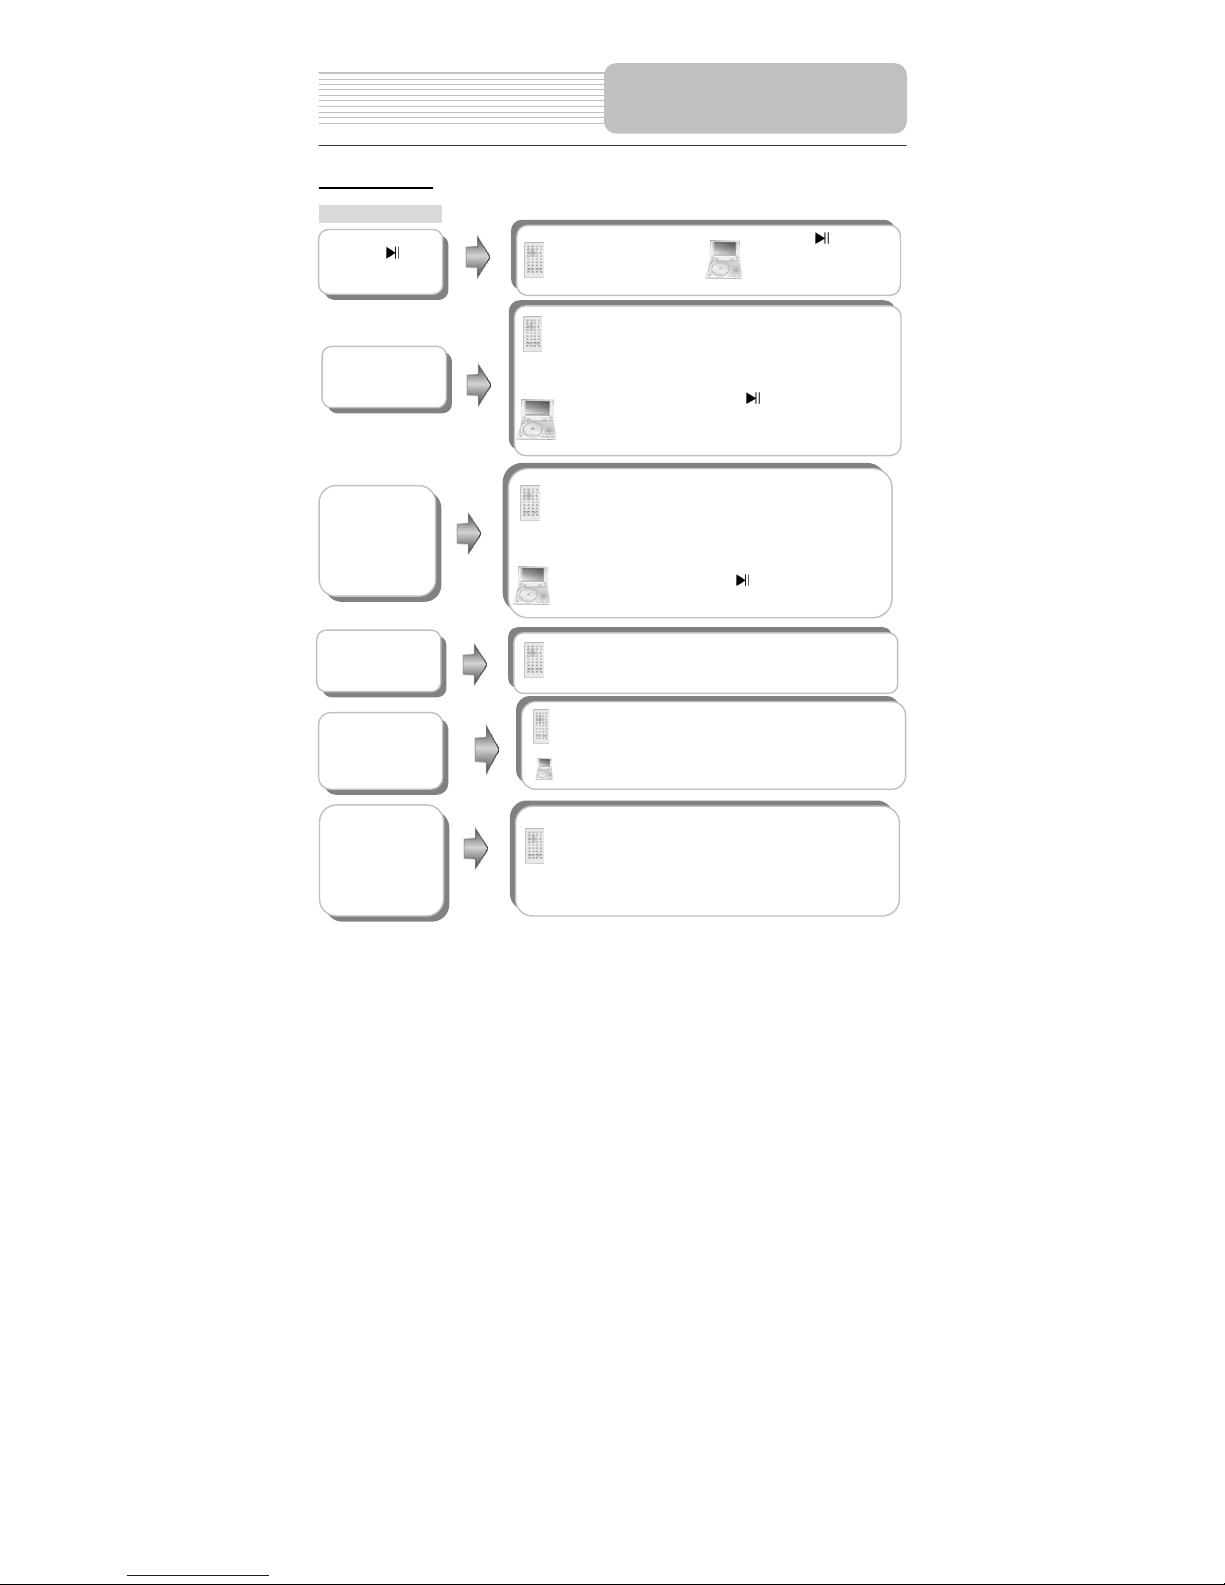
Pr ess the ANGLE button to acces s multi-angles on a
disc. Multi-angle means that a scene is shot from
different angles so that the audienc e can watch from
any angle, like the drawings below:
If there are multiple angles in a scene, you can use
the ANGLE button to select the angle you like to view.
Press the ANGLE button repeatedly to view different
angles.
This function is only available for DVD discs that are
coded with multi-angles.
ANGLE
button
Playback Operation
TITLE button
In general, the content of a DVD disc can be divided
into several titles, there can be several menus in a
title.
Press the TITLE button during playback. The title
menu will appear on the screen. Press the direction
buttons or press the 0-9 number buttons to
select the desired title or disc menu item, then press
the ENTER button to confirm.
Press the TITLE button during playback. The title
menu will appear on the screen. Press the direction
buttons to select the desired title or disc
menu item, and then press the OK button to
confirm.
SLOW button
Press the SLOW button to start slow forward and
slow rewind playback as following: s.f.1/2 – s.f.1/4 –
s.f.1/8 – s.f.1/16 – s.r.1/2 - s.r.1/4 - s.r.1/8 - s.r.1/16
(s.f.:slow forward, s.r.: slow rewind).Press the PLAY
or button (on the front panel) to resume normal
playback.
Page 30
26
CD Playback
Button Operation
REP button
Press the REP button to repeat a Track or All in
sequence.
GOTO button
Press the GOTO button to select the desired disc
starting time, track starting time or track. During CD
playback, press it repeatedly to display as follows:
Disc Go To:--:-- Track Go To:--:-- Select Track:--/N
N refers to the total track number of the disc.
Use 0-9 buttons on the remote control to select directly.
Playback Operation
Press the PAU SE button
to pause playback,
press it again to resume
normal playback.
Press the button to
pause playback, press it
again to resume normal
playback.
PAUSE/
button
STOP/
During playback, press the STOP button once to stop
playback, then press PLAY to resume normal
playback from the place where it was stopped.
Press it twice repeatedly to stop playback completely.
During playback, press the butto n on ce to stop
playback, then press the button to resume
normal playback from the place where it was
stopped. Press it twice repeatedly to stop playback
completely.
& buttons
Press the button to start fast forward playback.
Press it repeatedly to fast forw ard at th e spee d of 2X ,
4X, 8X, 16X, 32X in sequence. Press the button to
start fast reverse playbac k. Pres s it rep eatedly to fast
reverse at the speed of 2X, 4X, 8X, 16X, 32X in
sequence.
Press the PLAY button (or button on the front
panel) to resume normal playback.
&buttons
Press the button once to go to the beginning
of the current track; Press the button twice to
the previous track.
Press the button to go to the next chapter.
Page 31
27
CD Playback (continued)
Playback Operation
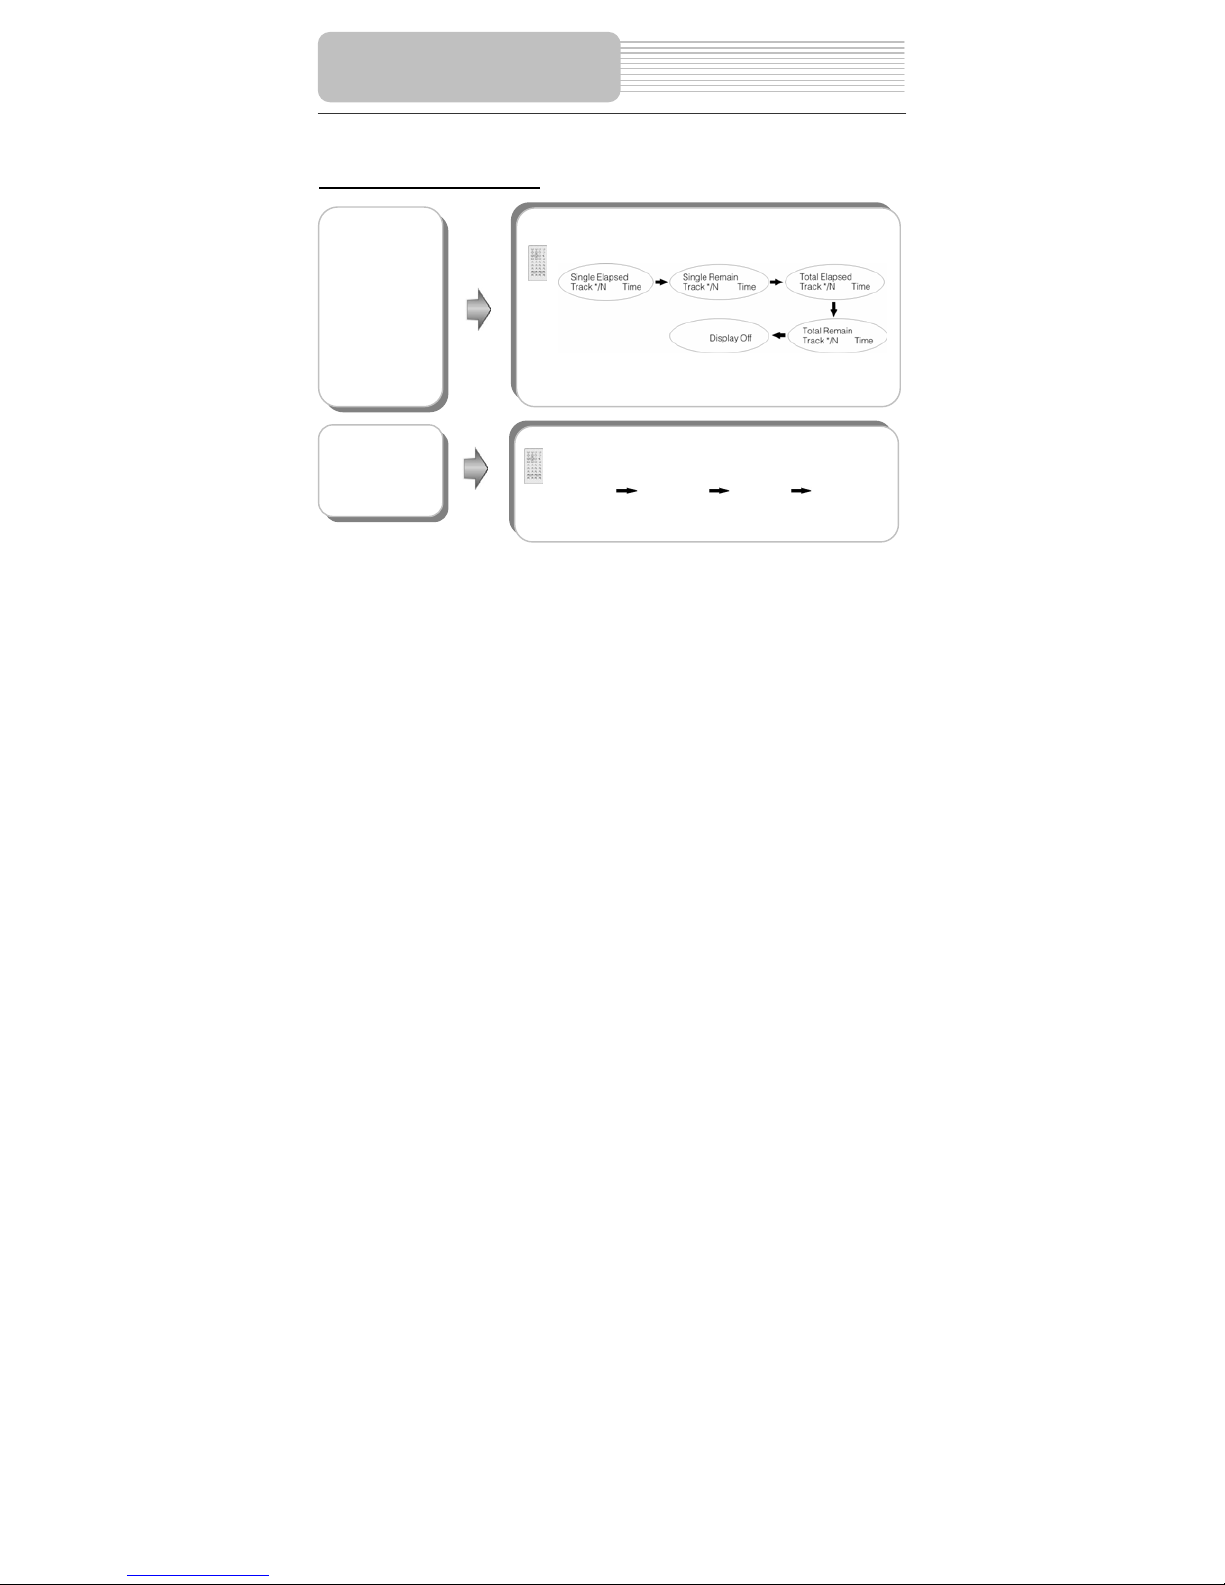
Press the INFO button for det ail ed i nformati on o n th e
disc playing. Press it repeate dly to displ ay as follow s:
Note: * refers to the playing track number.
N refers to the total track numbers of the disc.
INFO button
AUDIO button
Press the AUDIO button to select the desired sound
effect.
Press it repeatedly, the display is as follows:
Mono Left Mono Right Mix-Mono Stereo
Keep pressing for about 2 seconds to remove the
display from the screen.
Page 32
28
Picture CD Playback
Pre-operation
Note: Many discs have other items besides pictures.
Buttons Operation
playP
Playback Operation
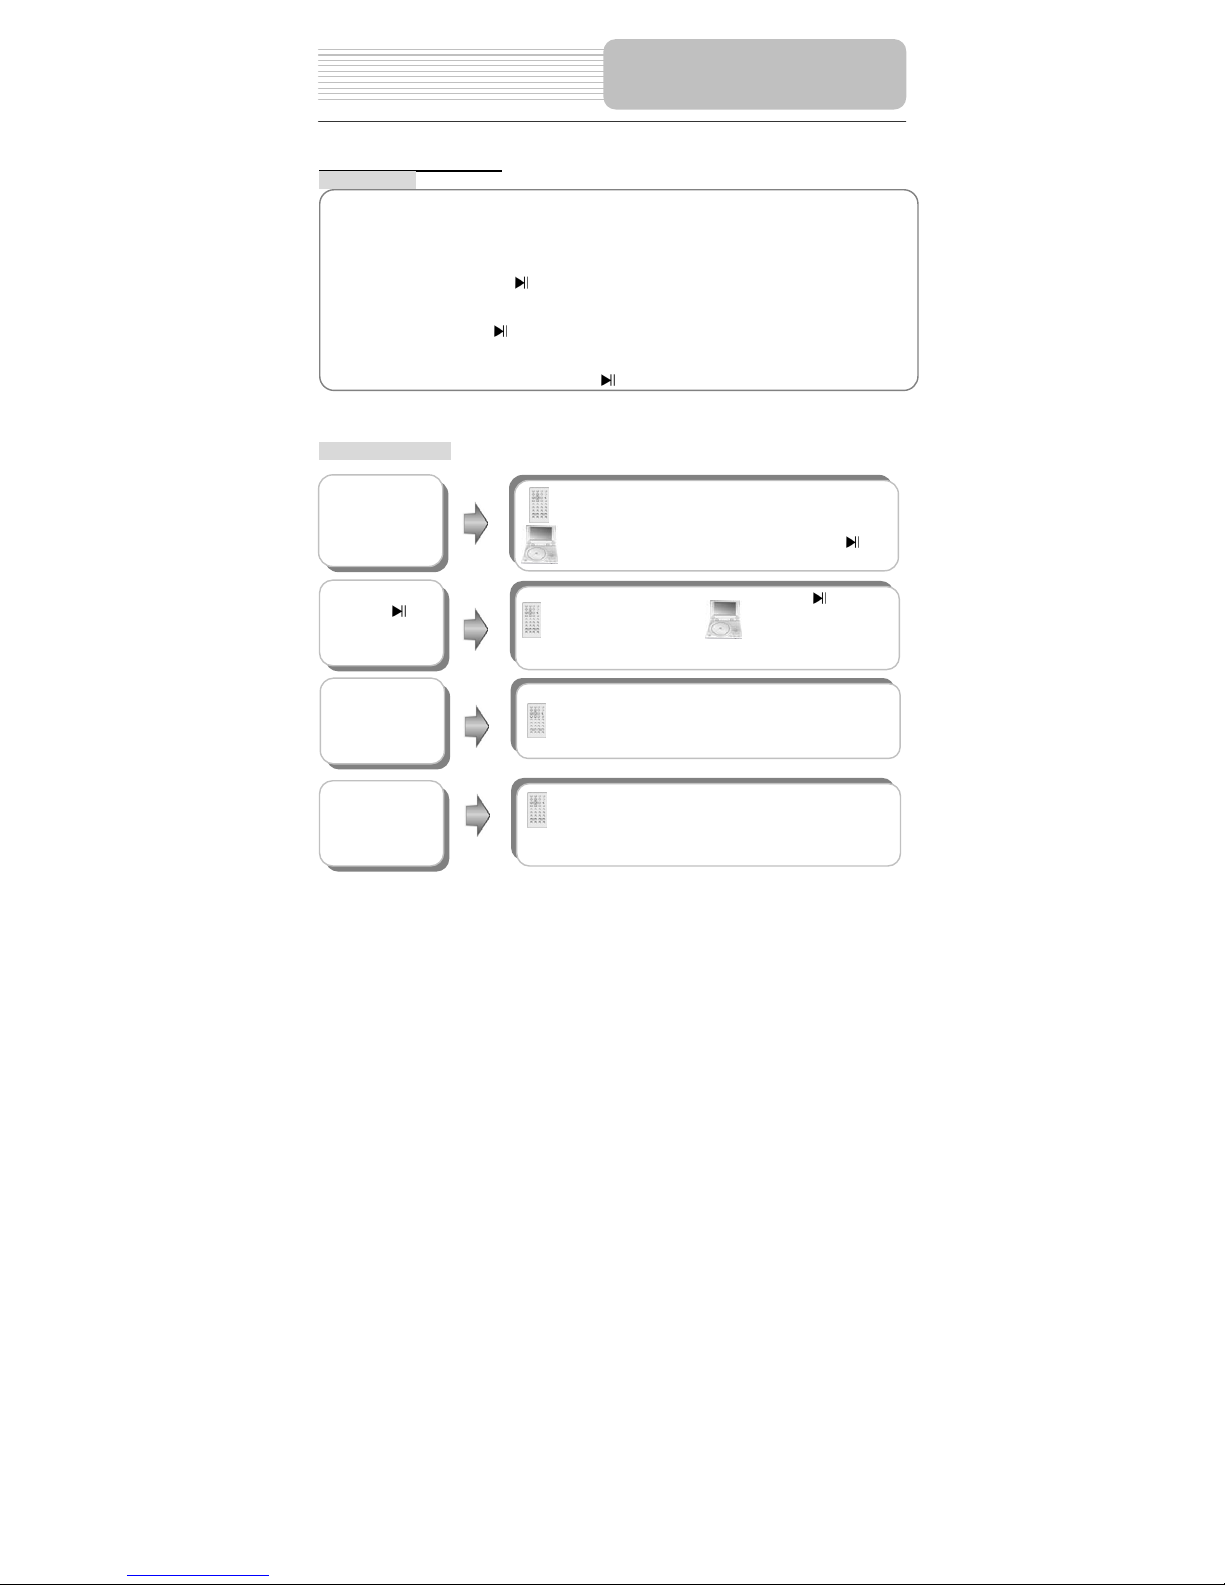
1. Load a Picture CD in the disc tray, the player will search and play the disc
automatically.
2. The screen displays the Root Folder with several subdirectories/subfolders. Use
the, buttons on the remote control to select the desired folder. Then you can
press any of the buttons below to confirm your selection: ENTER, PLAY buttons on
the remote control or , OK button on the front panel.
3. The screen enters the selected subfolder with several files. Use the , buttons on
the remote control to select the desired file. Then press the ENTER button on the
remote control or button on both remote control and front panel to confirm your
selection.
4. Press thebutton t o return to the last folder or directory. then press the ENTER
button on the remote control or the button on front panel to confirm.
INFO button
Press the INFO button for detailed information on
the disc playing.
This function is only available under folder mode.
STOP/
button
Press the STOP(on the remote control) or (on
the front panel)
button to preview the pictures while
playing as thumbnail images.
Press the PLAY(on the remote control) or (on
the front panel)
button to resume normal playback.
PAUSE
/
button
Press the PAUSE button
to pause playback. Press
it again to resume normal
playback.
Press the button to
pause playback. Press
it again to resume
normal playback.
& buttons
Press the PREV button to go to the previou s file.
Press the NEXT button to go to the next file.
Page 33
29
Picture CD Playback (continued)
Playback Operation
During playback, press the GOTO button to select
the desired file.
Press the 0-9 buttons directl y to select according to
your preference.
Press the ENTER button (or the OK button on the
front panel) to confirm.
In folder mode, press it to hi ghlight the file number
which is currently under the yellow light bar, press
the 0-9 buttons to select directly, then press the
ENTER button (or button on the front panel) to
GOTO button
MENU button
Press the MENU button during playback to return to
the root folder. Press the PLAY button or (on the
front panel) to resume normal playback.
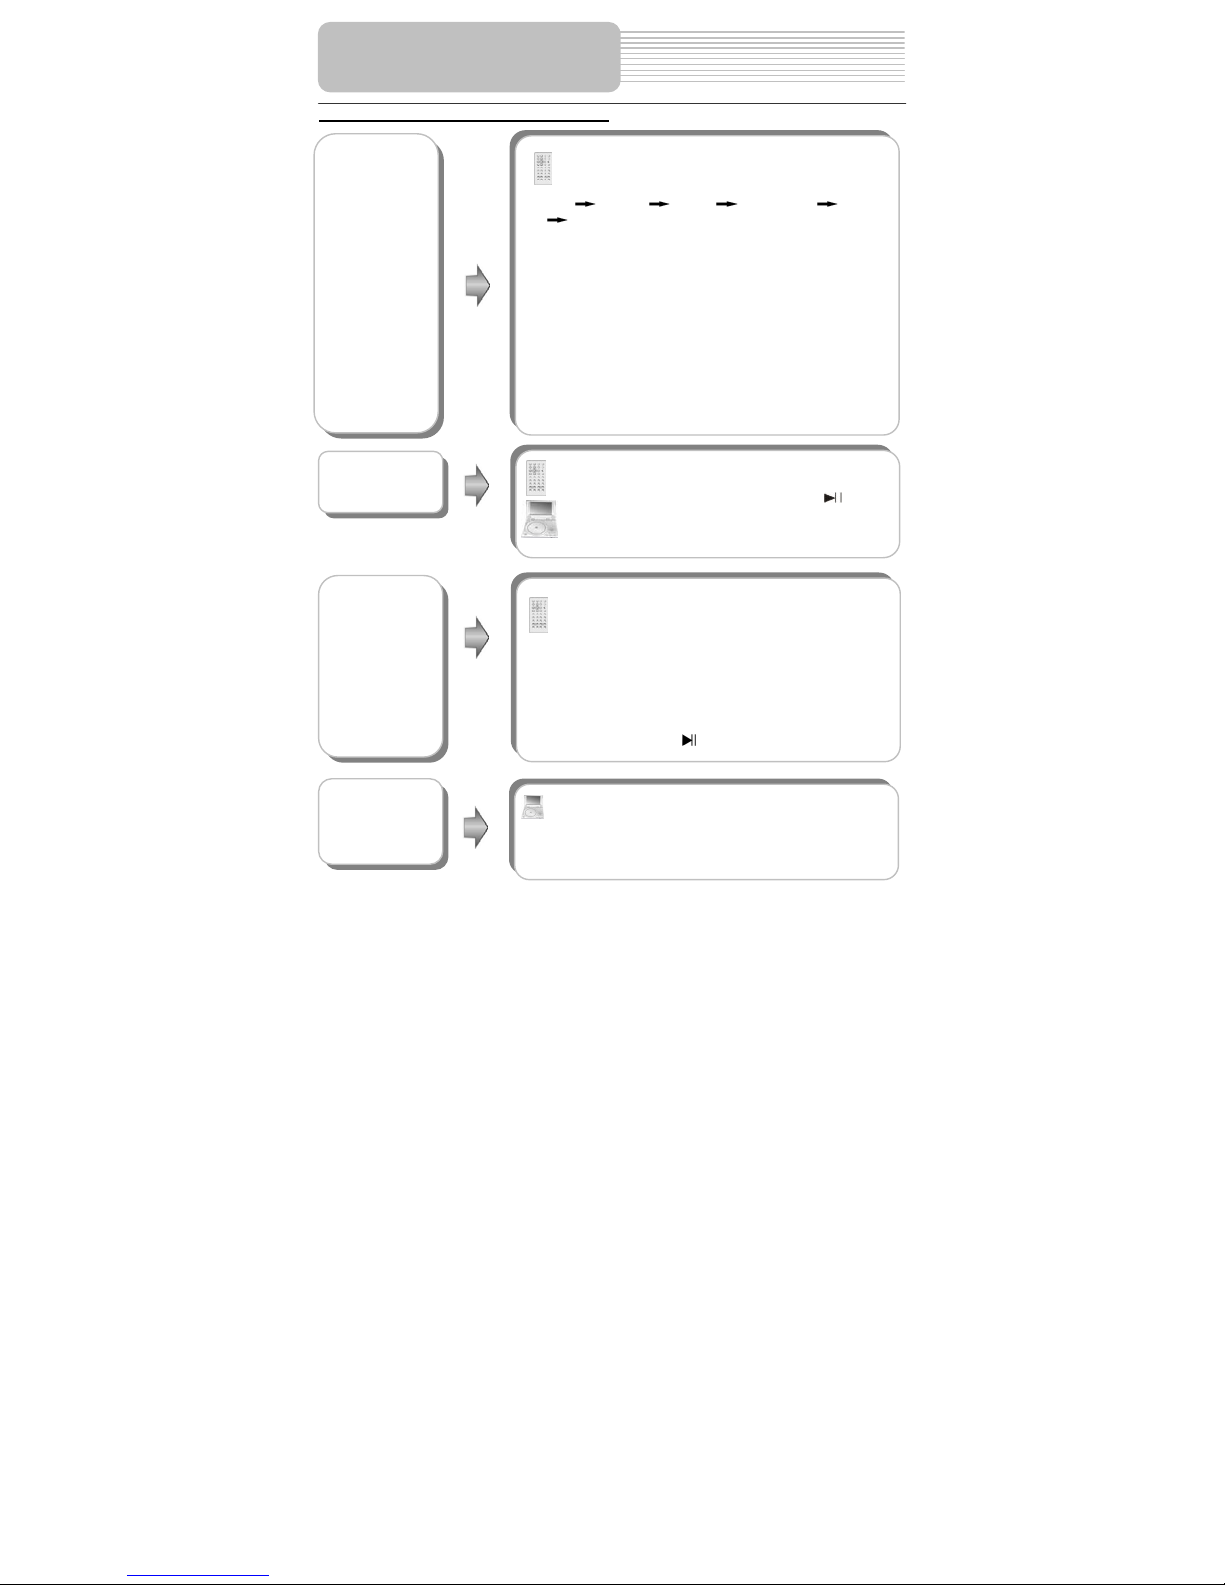
Press the REP button to repeat a file, folder in
sequence.
Press it repeatedly to display as follows:
Shuffle Random Single Repeat One Repeat
All Repeat Off
¾ Shuffle refers to Plays back the files of the current
folder in a random order. When all files have been
played, playback is stopped.
¾ Random refers to Repeatedly plays back the files
of the current folder in a random order.
¾ Single refers to the current file. As soon as it
comes to an end, play will be stopped.
¾ Repeat One refers to repeat current file.
¾ Repeat All refers to repeat all files of curr ent fold er
according to original order.
¾ Repeat Off refers to cancel repeat.
REP button
& buttons
Under the zooming or reducing status, press &
buttons to
increase or decrease the picture.
Under the normal status,
press & buttons
to rotate
the current picture clockwise or
anti-clockwise
Page 34
30
Picture CD Playback (continued)
Note:
Some picture CD discs are restricted by their designing method, and so have no
rotating, zooming etc. function.
Playback Operation
Picture Rotate
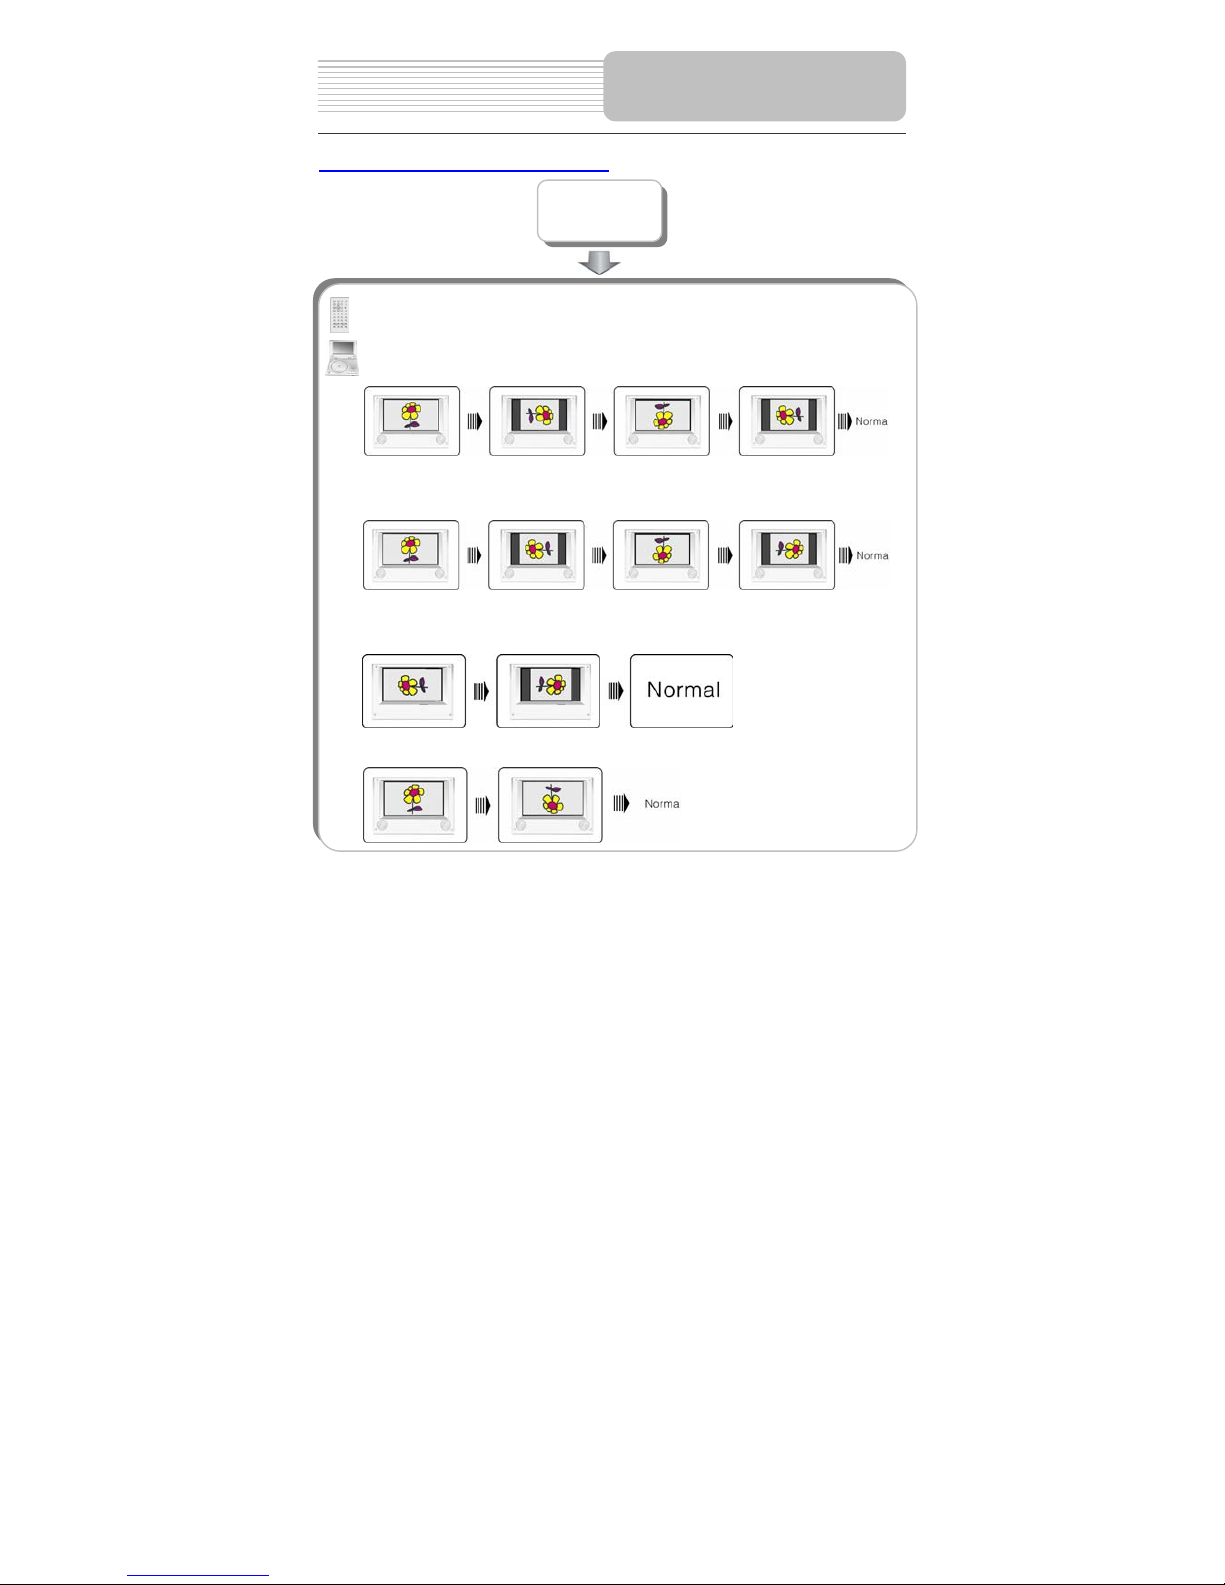
While browsing pictures, you can press the direction buttons ,,, to rotate the
current picture.
Press thebutton to rotate the current picture clockwise, as in the following
drawings:
Press thebutton to rotate the current picture anti-clockwise, as in the following
drawings:
Press the button to flip the current picture horizont a lly, as in the following drawings:
Press the button to flip the current picture vertically, as in the following drawings:
Page 35
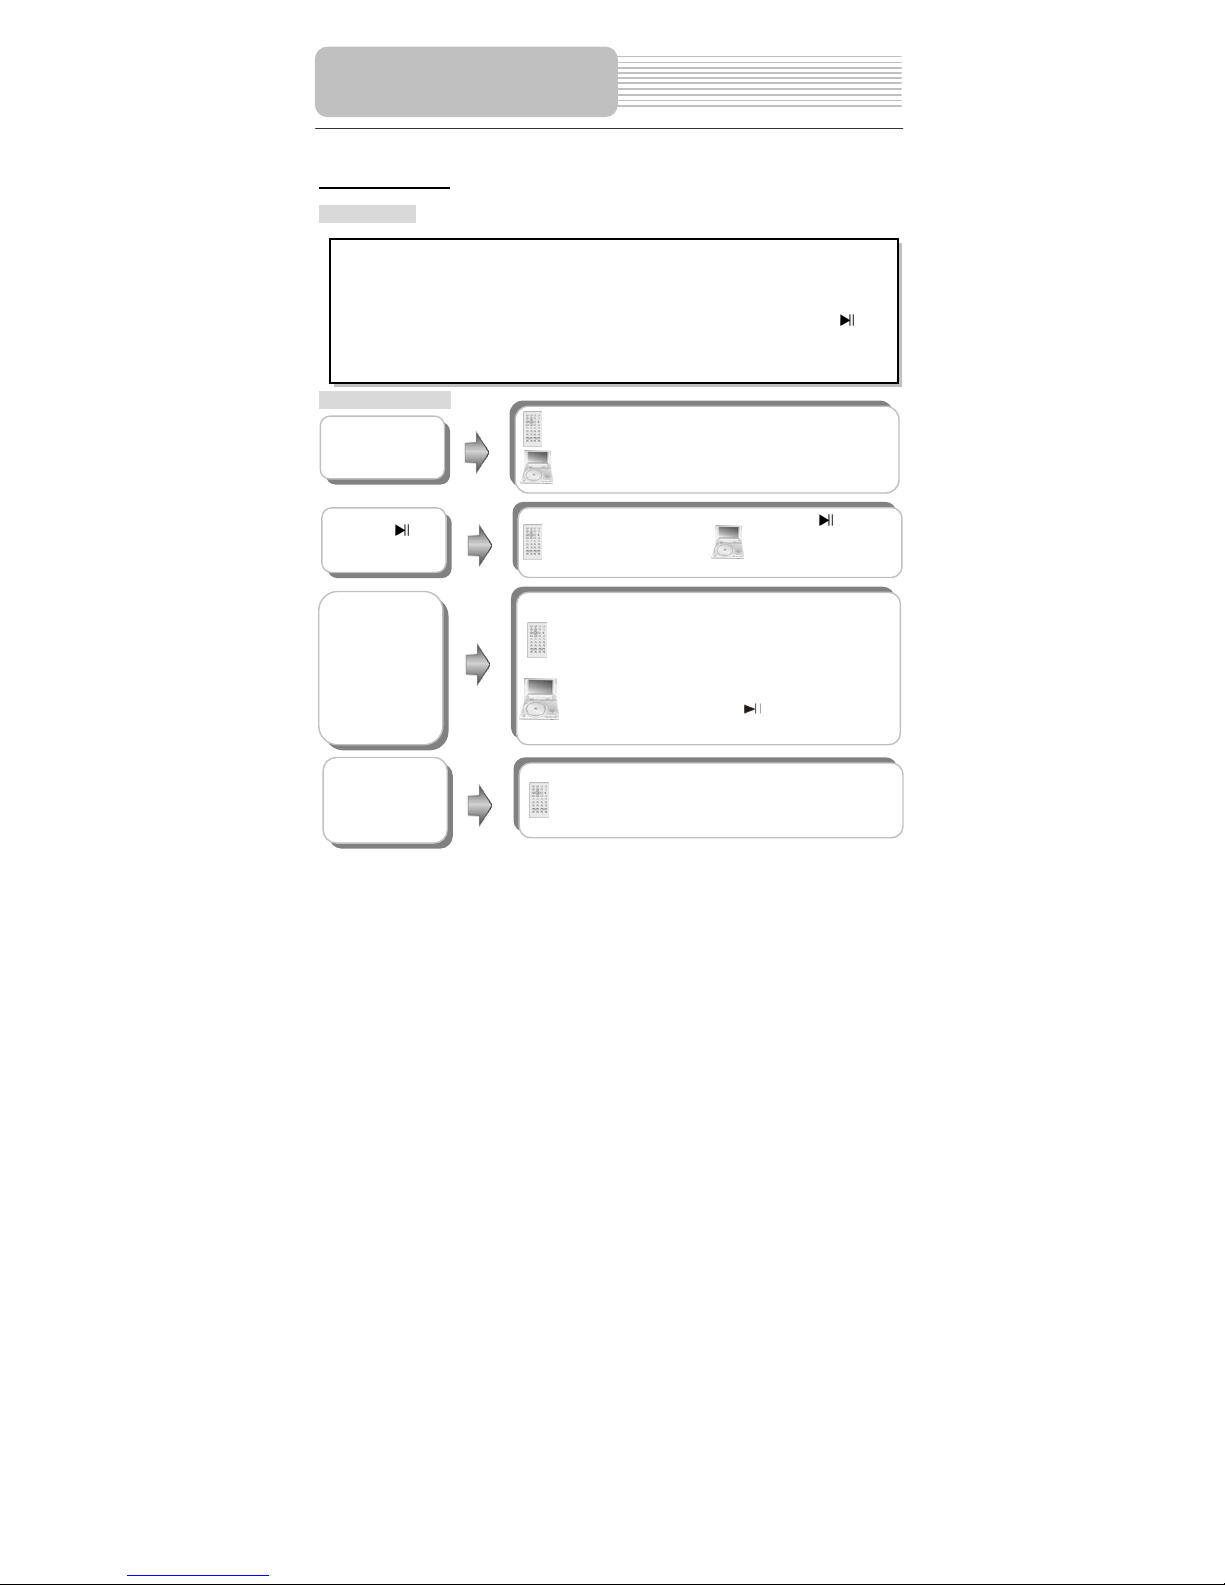
31
DIVX Playback
Pre-operation
Buttons Operation
Start Playing
Load a disc in, the player will search the disc and play
it automatically, press the direction buttons to
highlight the item that you prefer and press the
ENTER button (or the OK button on the front panel) to
start playback.
PAUSE/
Press the PAUSE button
to pause playback, and
press it again to resume
normal playback.
Press the button to
pause playback, and
press it again to resume
normal playback.
Press thebutton to start fast forward playback.
Press it repeatedly to fast forw ard at th e spee d of 2X ,
4X, 8X, 16X, 32X in sequence. Pres s th e b utton to
start fast reverse playbac k. Pres s it rep eatedly to fast
reverse at the speed of 2X, 4X, 8X, 16X, 32X in
sequence.
Press the PLAY button (or button on the front
panel) to resume normal playback.
& buttons
& buttons
Press the PREV button to go to the previou s file.
Press the NEXT button to go to the next file.
1. Load a DIVX disc in the disc tray, the player will search and play the disc
automatically.
2. The screen displays the Root Folder. Use the, buttons on the remote contr ol
to select the desired folder. Then you can press any of the buttons below to
confirm your selection: ENTER, PLAY buttons on the remote control or , OK
button on the front panel.
3. Press the button to return to the last file.
Playback Operation
Page 36
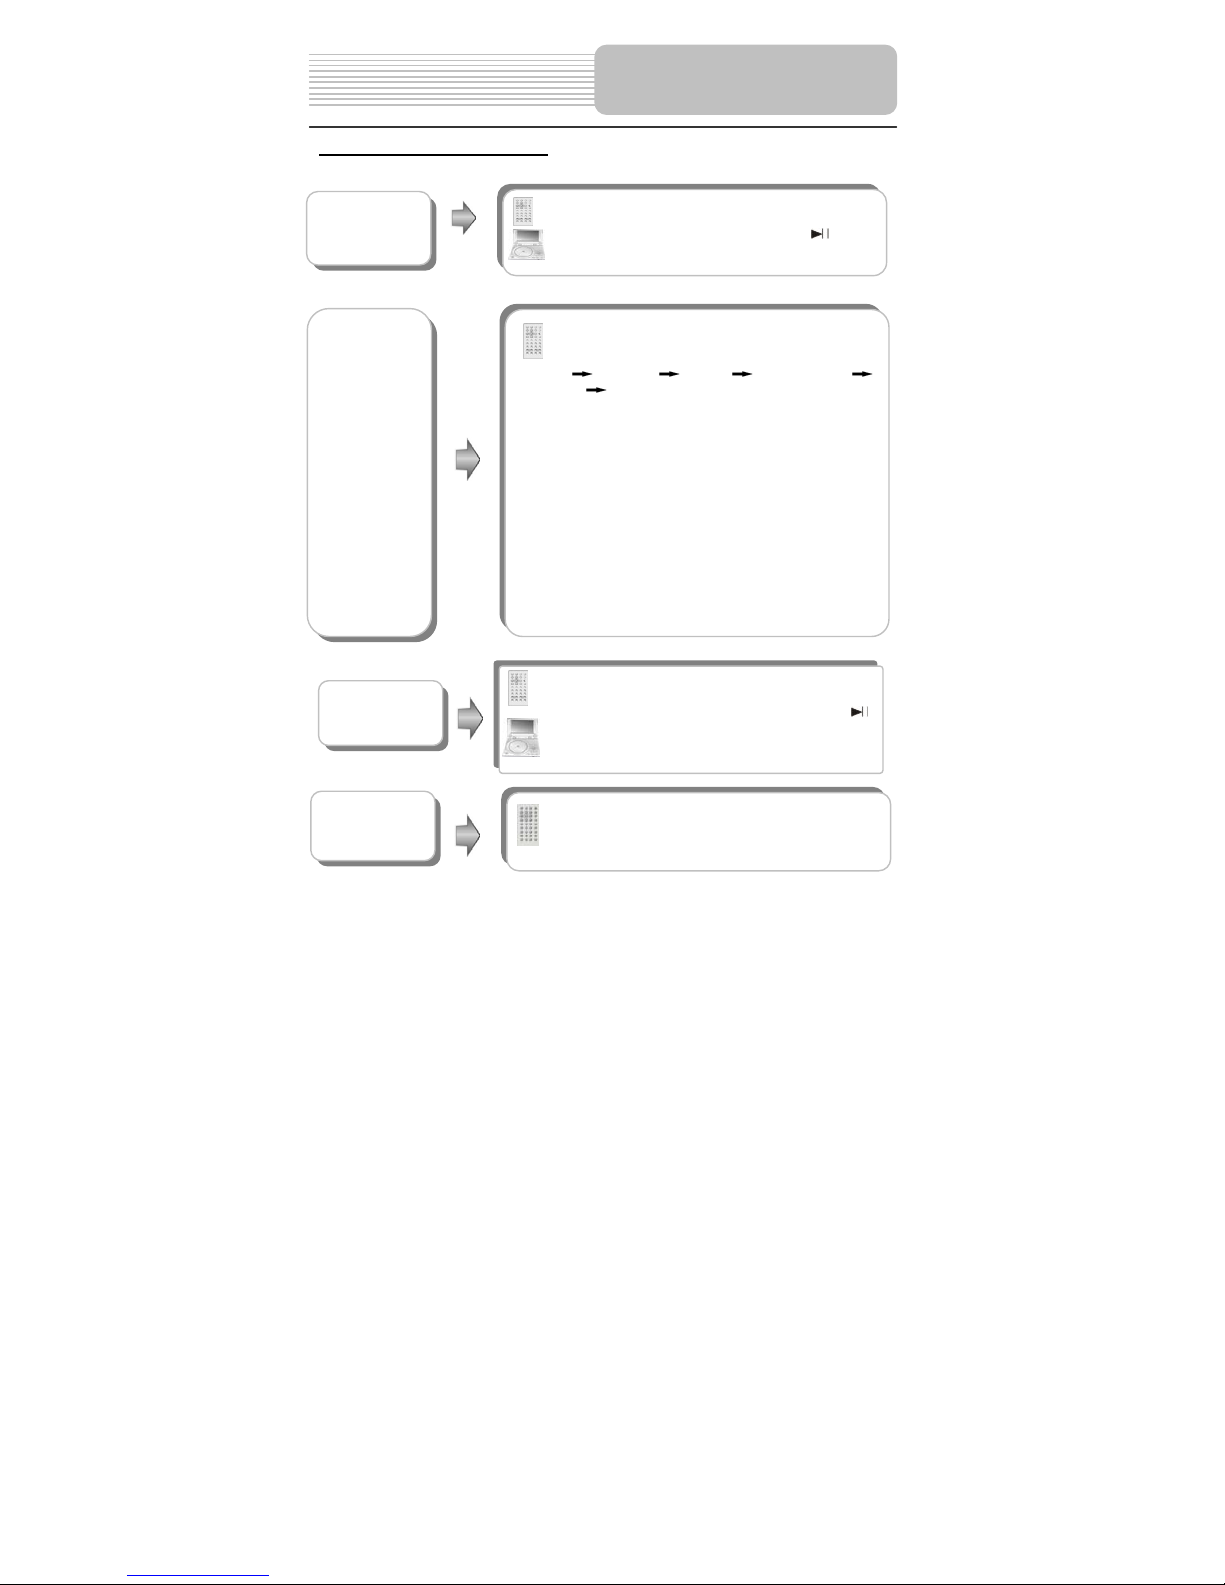
32
DIVX Playback Continued
MENU button
Press the MENU button during playback to return to
the root folder. Press the PLAY button or (on the
front panel) to resume normal playback.
Press the REP button to repeat a file, folder in
sequence.
Press it repeatedly to display as follows:
Shuffle Random Single Repeat One
Repeat All Repeat Off
¾ Shuffle Plays back the files of the current folder in
a random order. When all files have been played,
playback is stopped.
¾ Random Repeatedly plays back the files of the
current folder in a random order.
¾ Single plays the current file. As soon as it comes
to an end, play will be stopped.
¾ Repeat One refers to repeating the current file.
¾ Repeat All refers to repeat all files of the current
folder according to the original order.
¾ Repeat Off re fers to cancel repeat.
This function is only available under normal playback
mode, it doesn’t work under repeat status.
REP button
SLOW button
Press the SLOW button to start slow forward
playback as following: s.f.1/2 – s.f.1/4 – s.f.1/8 –
s.f.1/16 (s.f.:slow forward,).Press the PLAY or
button (on the front panel) to resume normal
playback.
Playback Operation
AUDIO button
Press the AUDIO button to select the desired sound
effect.
Keep pressing for about 2 seconds to remove the
display from the screen.
Page 37
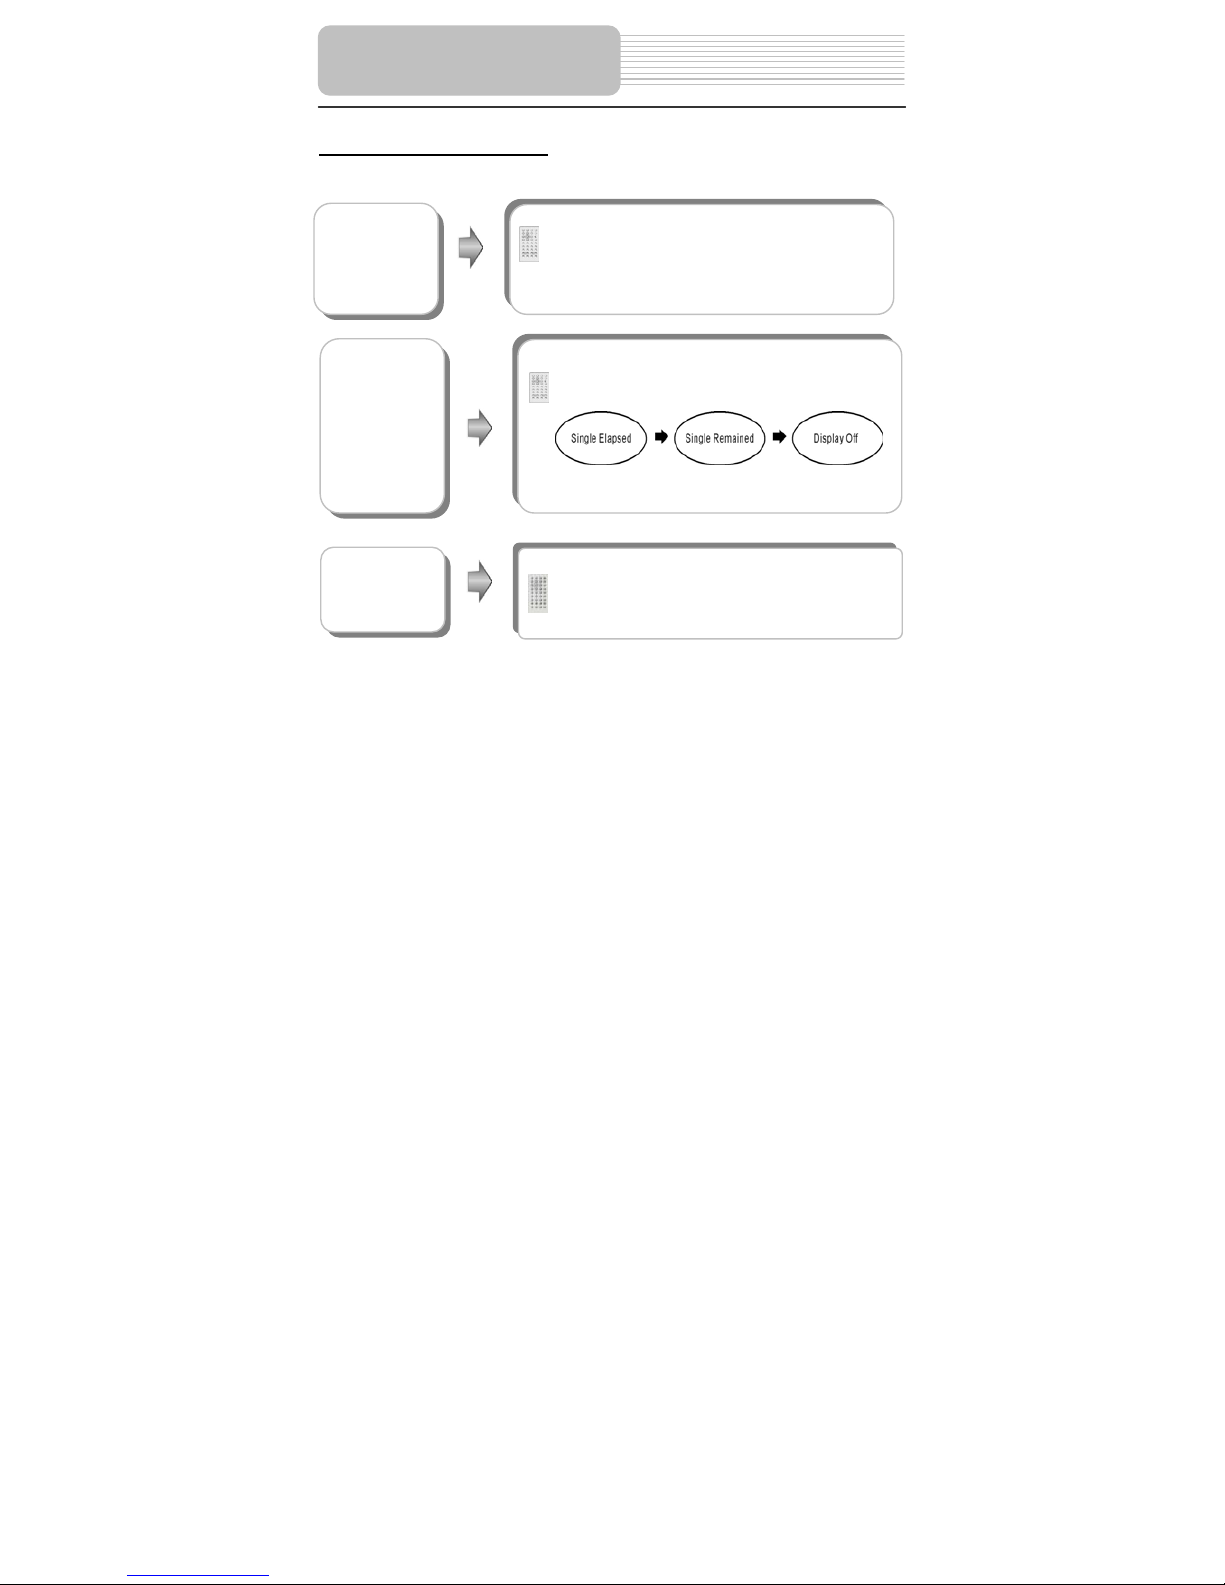
33
DIVX Playback Continued
Note: some Divx discs may not support SUBT, ANGLE or AUDIO function.
Press the INFO button for det ail ed i nformati on o n th e
disc playing. Press it repeate dly to displ ay as follow s:
GOTO button
Press the GOTO button to select the desired discs
starting track or track starting time. During DIVX
playback, press it repeatedly to display as follows:
Select:--- Go To -:--:--
Playback Operation
During playback, press the SUBT button to select a
subtitle language or to turn subtitle off.
This function is available for the disc recorded with
multi-subtitles
SUBT button
Page 38
34
General Setup Page
You can change the default settings of this unit to customize its performance to your own
preference. Read this section to learn how to set up the system.
Note: The SETUP options should be adjusted while the disc is in stop mode or No Disc
mode.
Follow the steps below to set up your system:
1. Press the SETUP button on the remote control or the front panel.
2. The setup menu will appear on the screen. It includes General Setup Page, Speaker
setup page, Dolby digital setup, Video setup page and Preference page. You can exit
the setup menu by pressing the SETUP button again at any time during setting.
3. Press the or (direction buttons) on the remote control or on the front panel to
select a sub-menu that you want to set up.
4. Press the or button on the remote control or on the front panel to select the item
that you want to set up in the sub-menu.
System Setup
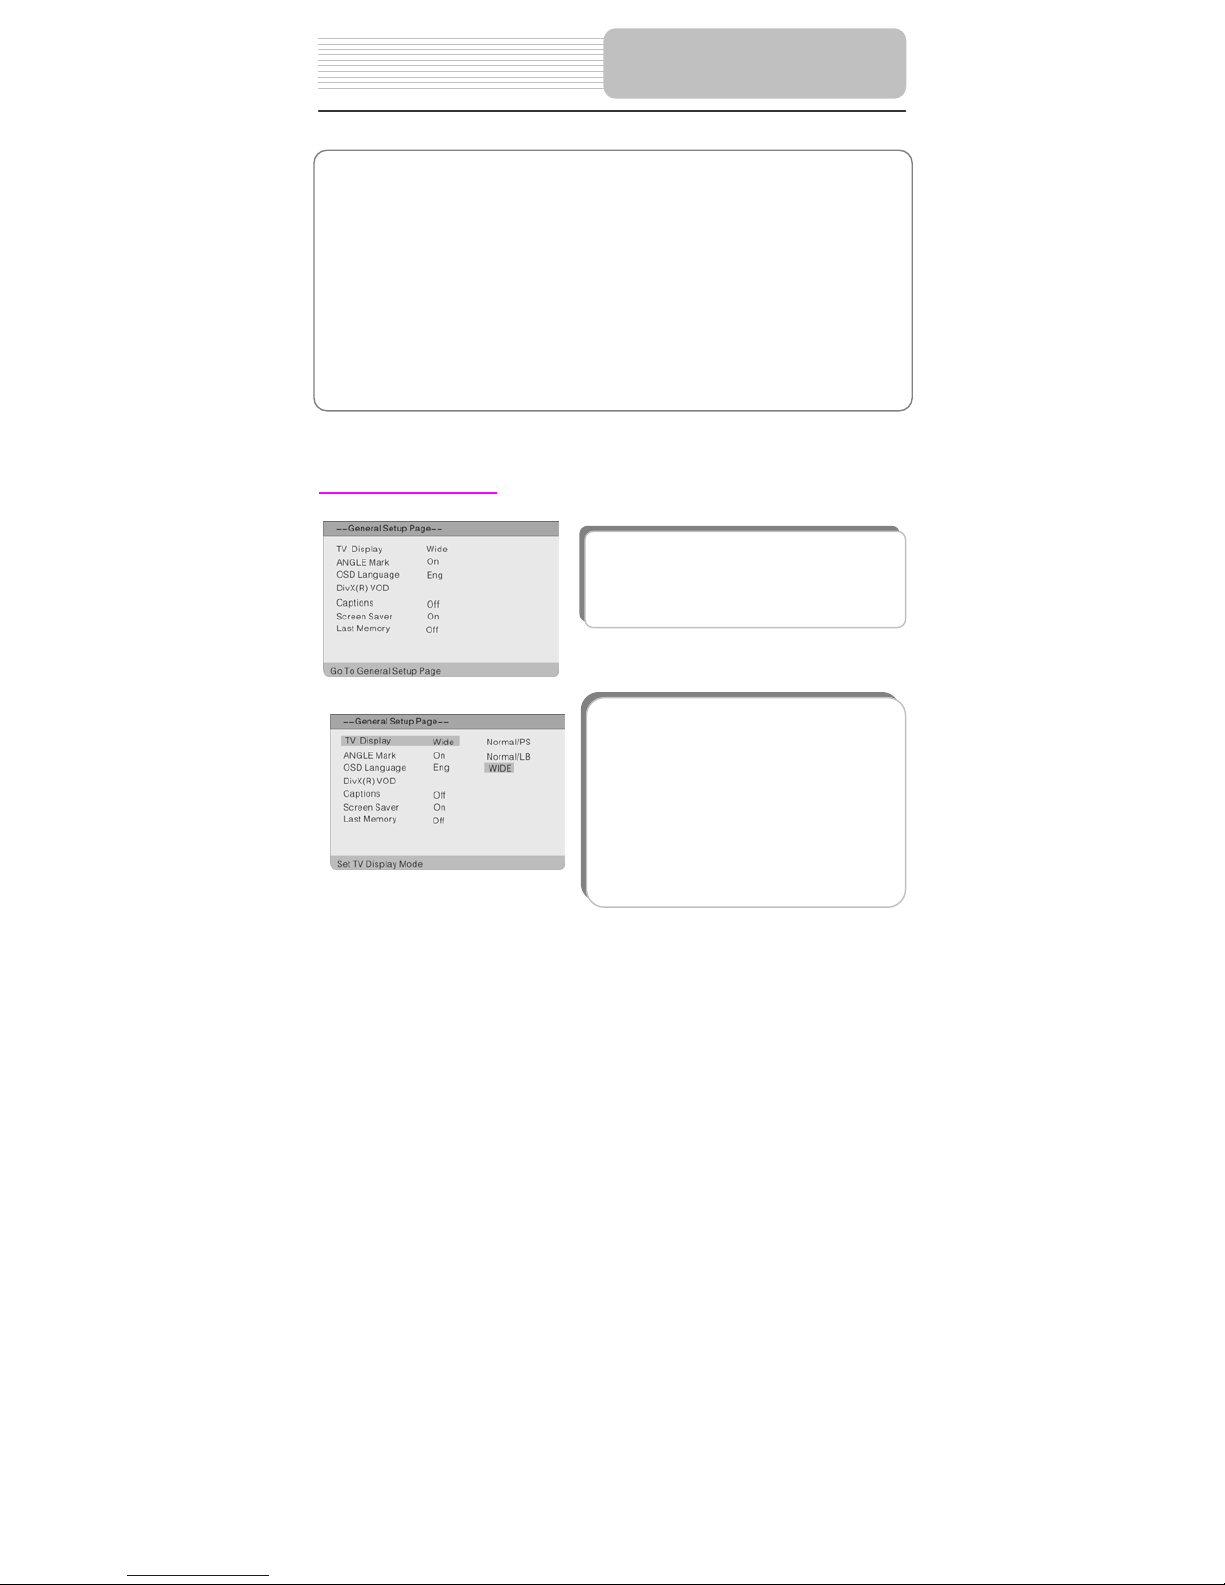
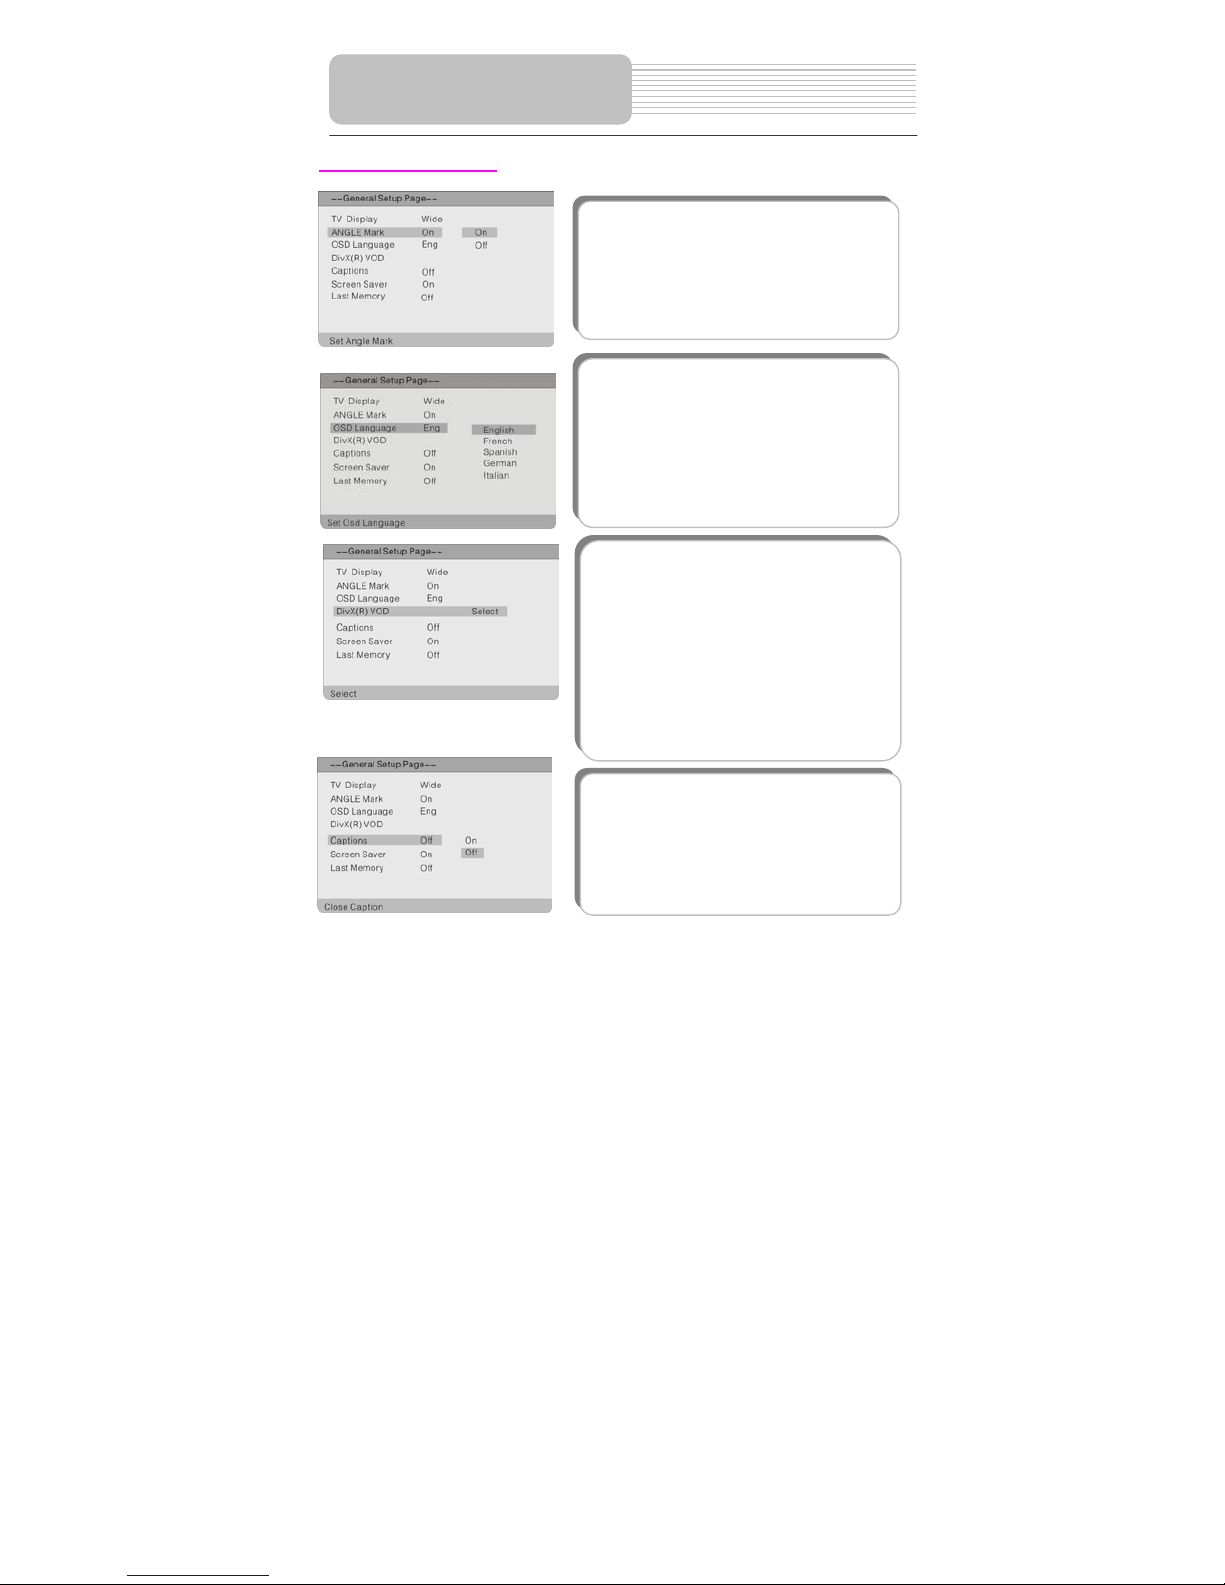
The items included in this sub-menu are shown as
the left.
1.TV Display
This item is used to set the TV display mode.
Press the or button to highlight this item.
Press the ENTER orbutton to enter the item.
It includes Normal/PS, Normal/LB and Wide, Wide
by default. Press the or button to choose the
proper one. Press the ENTER button to confirm
your selection. Press the direction button to exit
from this item.
Note: Select Normal/PS or Normal/LB when a 4:3
TV is connected.
Select Wide when a 16:9 wide screen TV is
connected.
Page 39
35
General Setup Page
System Setup
2.Angle Mark
This item is used to turn the Angle Mark on or off.
Press the or button to highlight this item.
Press the ENTER or to enter the item.
Press the or button to choose angle mark on
or off.
Press the ENTER button to confirm your selection.
Press the direction to exit this item.
3.OSD Language
This item is used to set the OSD (on-screen
display) language. Press the or button to
highlight this item. Press the ENTER or to enter
the setup of this item.
It includes English, French etc.
Press the or button to choose the proper one.
Press the ENTER button to confirm your selection.
Press the direction button to exit this item.
5.Captions
This item is used to turn the captions on or off
during playing. Press the or button to
highlight this item. Press the ENTER or to enter
the setup of this item.
The default setting of this item is off.
Press the or button to choose on or off.
Press the ENTER button to confirm your selection.
4. DIVX (R) VOD
This item is used to obtain the DIVX (R) Video On
Demand Registration code. You can use the code
Demand Registration code. You can use the code
to download the DIVX format video. The
downloaded video only can be played on this unit.
The code will update automatically after the DIVX
Video playback.
Press the or button to highlight this item.
Press the ENTER/ENT or button to highlight
SELECT.
Press the ENTER/ENT button to display the
information.
Page 40
36
General Setup Page
Speaker Setup Page
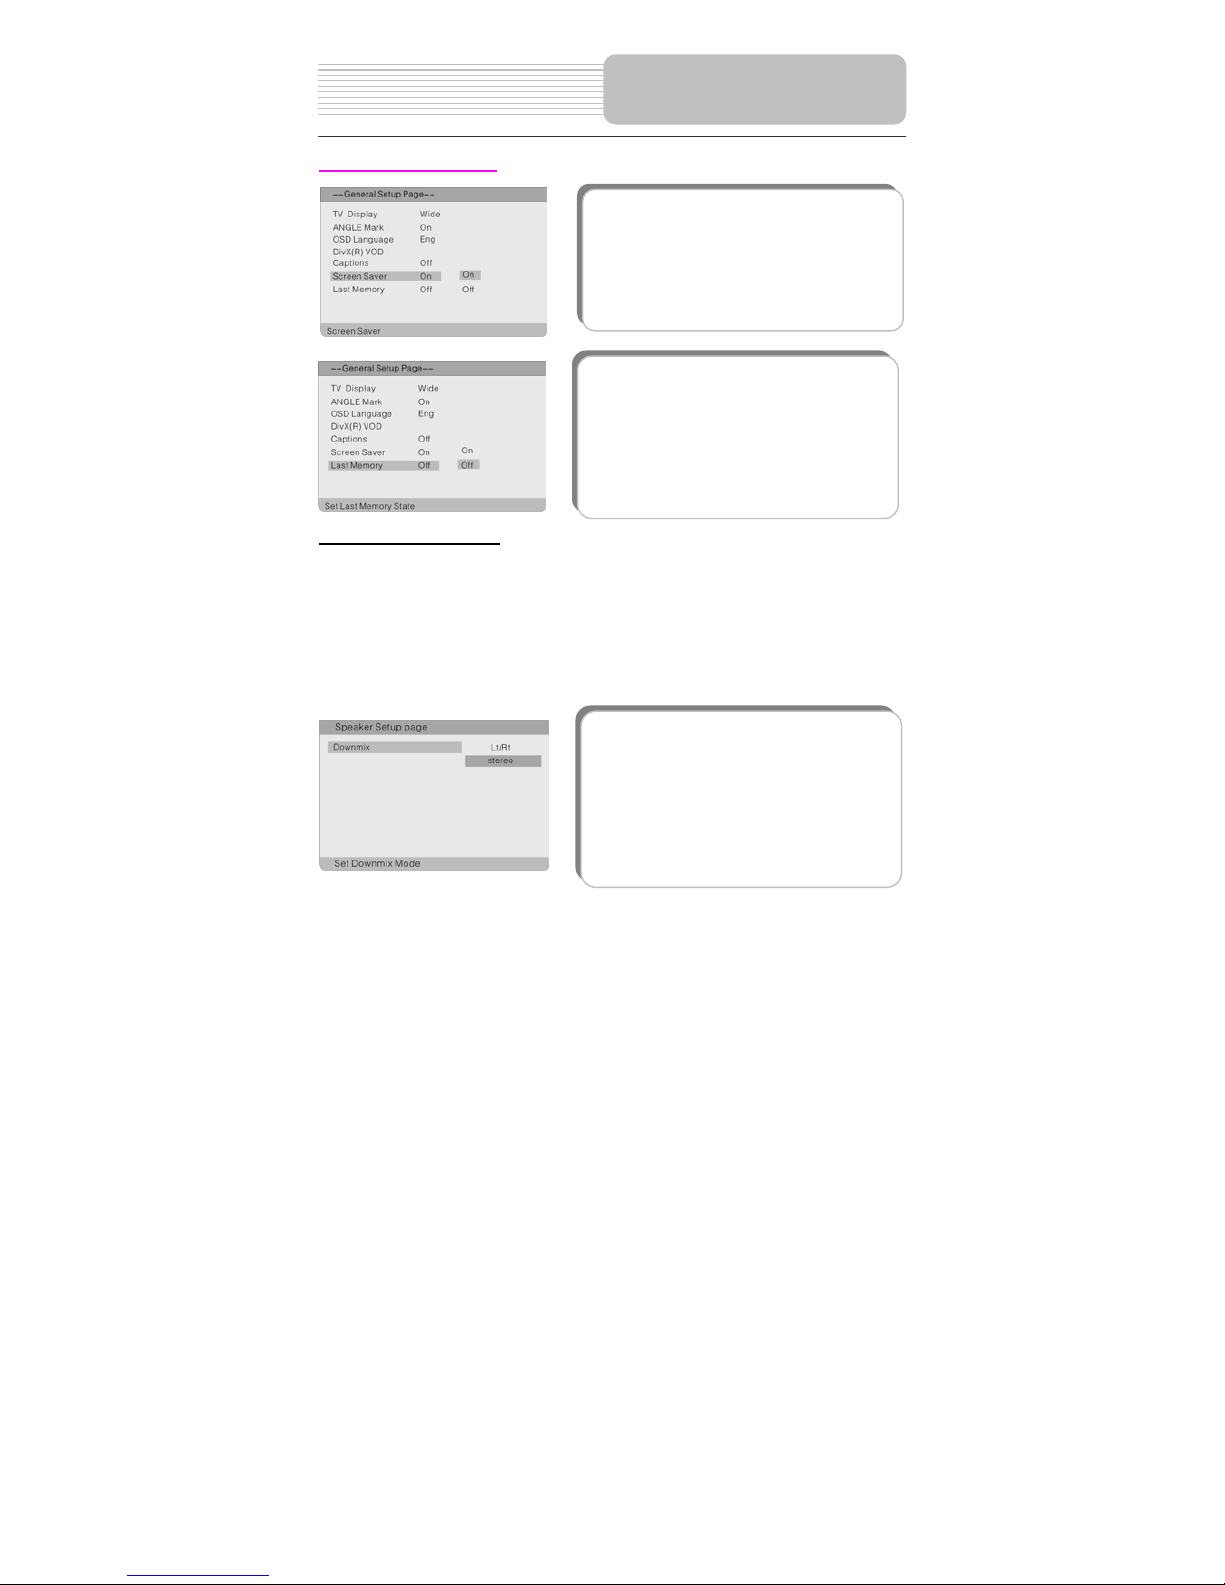
1.Downmix
This item is used to set downmix mode.
Press the or button to highlight this item.
Press the ENTER or to enter the item.
It includes Lt/Rt and stereo, stereo by default.
Note: The function of Lt/Rt is to output mixed audio
in the format provided by Dolby. The function of
stereo is to output stereo signal.
Press the or button to choose the proper one.
Press the ENTER button to confirm your selection.
Press the direction button to exit this item.
System Setup
7. Last Memory
This item is used to set last memory state.
Note: The last memory refers to resume playback
from the point that you stopped last time.
Press the or button to highlight this item.
Press the ENTER or to enter the item.
Press the or button to choose on or off.
Press the ENTER button to confirm your selection.
Press the direction button to exit this item.
6.Screen Saver
This item is used to turn the screen saver on or off.
Press the or button to highlight this item.
Press the ENTER or to enter the setup of this
item. The default setting of this item is on.
Press the or button to choose on or off.
Press the ENTER button to confirm your selection.
Press the direction button to exit this item.
Page 41
37
Dolby Digital Setup
Video Setup Page
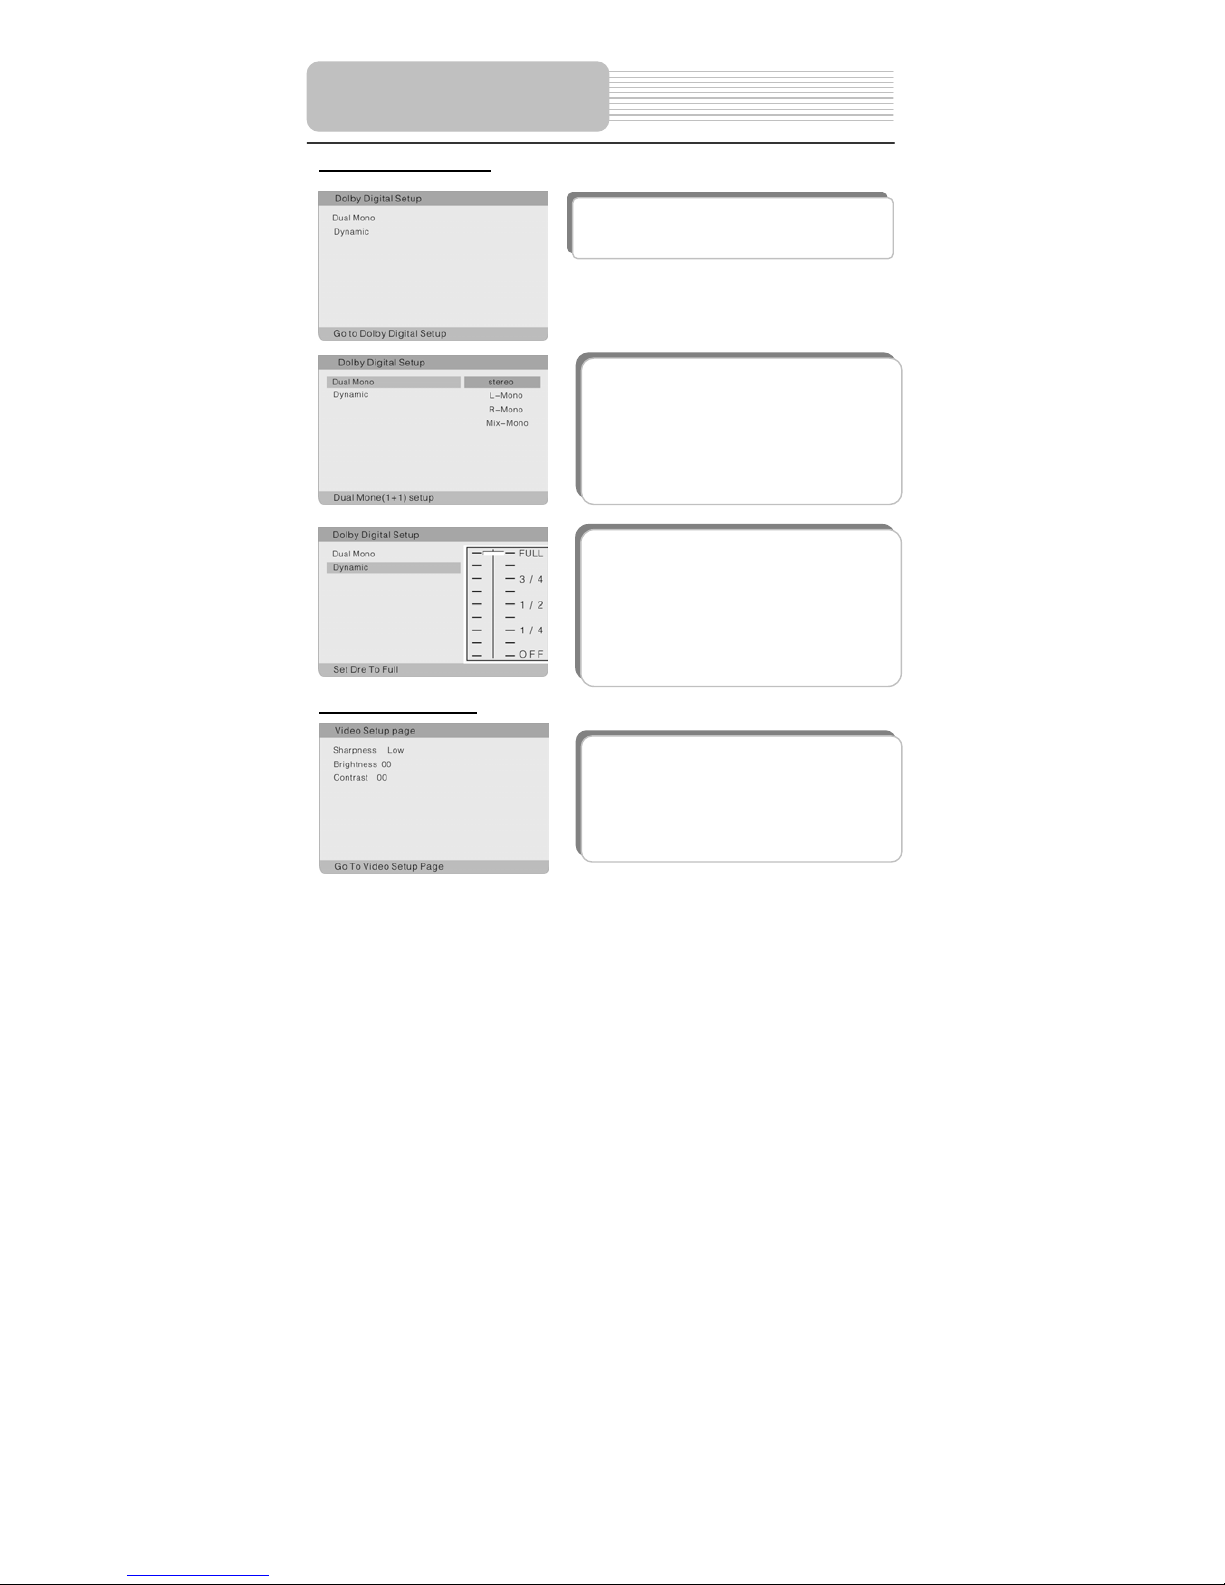
1. Dual Mono
This item is used to set the channel output mode.
Press the or button to highlight this item.
Press the ENTER or to enter the item.
It includes stereo, L-Mono, R-Mono and Mix-Mono,
Stereo by default.
Press the or button to choose the proper one.
Press the ENTER button to confirm your selection.
Press the direction button to exit this item.
2.Dynamic
This item is used to adjust linear dynamic
compression rate to get different signal
compression Effects.
Press the or button to highlight this item.
Press the ENTER or to enter the setup of this
item. Then the item will show as the left.
Press the or to choose the proper level.
Press the ENTER button to confirm your selection.
Press the direction button to exit this item.
The items included in this sub-menu are shown as
the left.
System Setup
The items included in this sub-menu are shown as
the left.
Page 42
38
Video Setup Page
Preference page
Note: To access this page of the menu please ensure there is no disc playing.
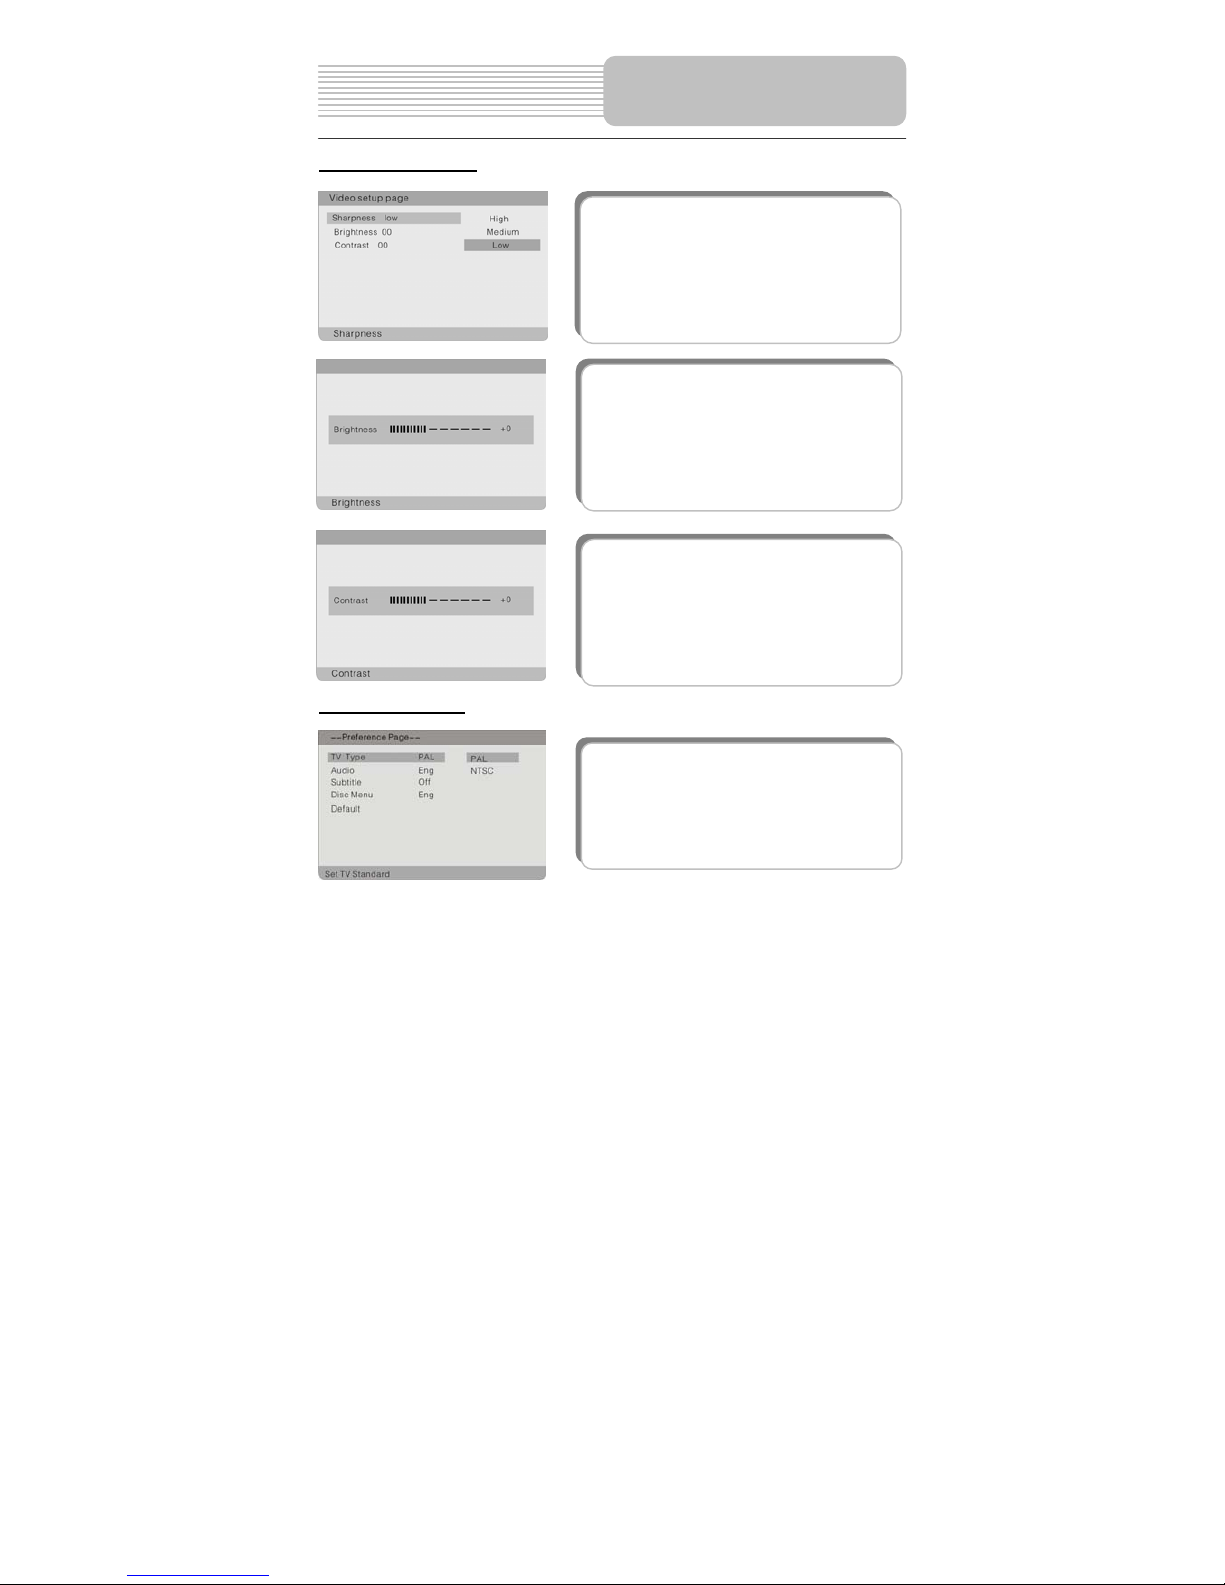
2. Brightness
This item is used to adjust brightness level of the
Screen.
Press the or button to highlight this item.
Press the ENTER or to enter the item.
Press the
or button to adjust to desired level.
The default level is 00.
Press the ENTER button to confirm your selection.
3. Contrast
This item is used to adjust contrast level of the
Screen.
Press the or button to highlight this item.
Press the ENTER or to enter the item.
Press the
or button to adjust to desired level.
The default level is 00.
Press the ENTER button to confirm your selection.
1. TV Type
To set the TV system type, (PAL,NTSC).
System Setup
1.Sharpness
This item is used to adjust the sharpness of the
Screen.
Press the or button to highlight this item.
Press the ENTER or to enter the item.
It included High, Medium and Low, Low by default.
Press or button to choose the proper one.
Press ENTER button to confirm your selection.
Press direction button to exit this item.
Page 43
39
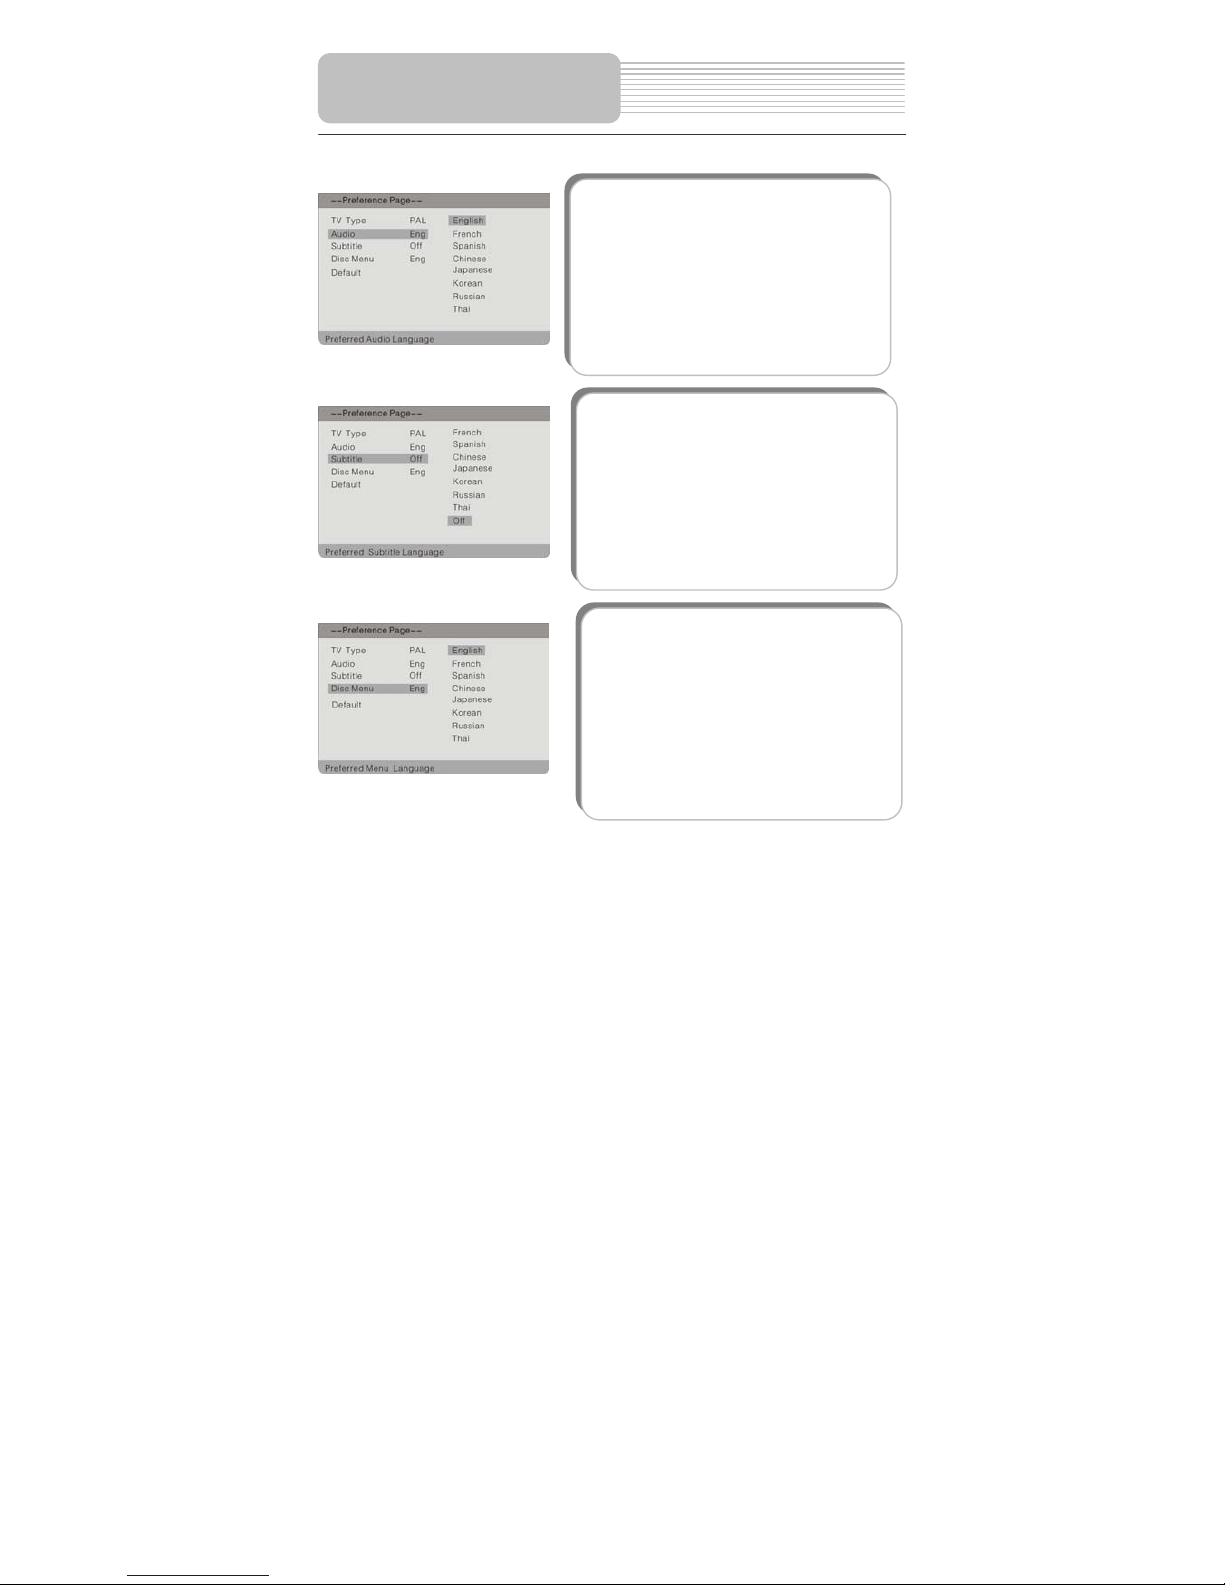
4. Disc Menu
This item is used to set the language of disc menu.
Press the or button to highlight this item.
Press the ENTER or button to enter the item.
The available languages are English, French,
Spanish, Chinese, Japanese, Korean, Russian and
Thai, English by default.
Press the or button to choose the preferred
Language.
Press the ENTER button to confirm your selection.
Press the direction button to exit this item.
Note: The above option is disc dependant.
3. Subtitle
This item is used to set the subtitle language.
Press the or button to highlight this item.
Press the ENTER or button to enter the item.
The available languages are English, French,
Spanish, Chinese, Japanese, Korean, Russian and
Thai, Off by default.
Press the or button to choose the preferred
Language.
Press the ENTER button to confirm your selection.
Press the direction button to exit this item.
Note: The above option is disc dependant.
System Setup
2. Audio
This item is used to set the audio output language.
Press or button to highlight this item.
Press the ENTER or button to enter the item.
The available languages are English, French,
Spanish, Chinese, Japanese, Korean, Russian and
Thai, English by default.
Press the or button to choose the preferred
Language.
Press the ENTER button to confirm your selection.
Press thebutton to exit this item.
Note: The above option is disc dependant.
Page 44
40
Preference page
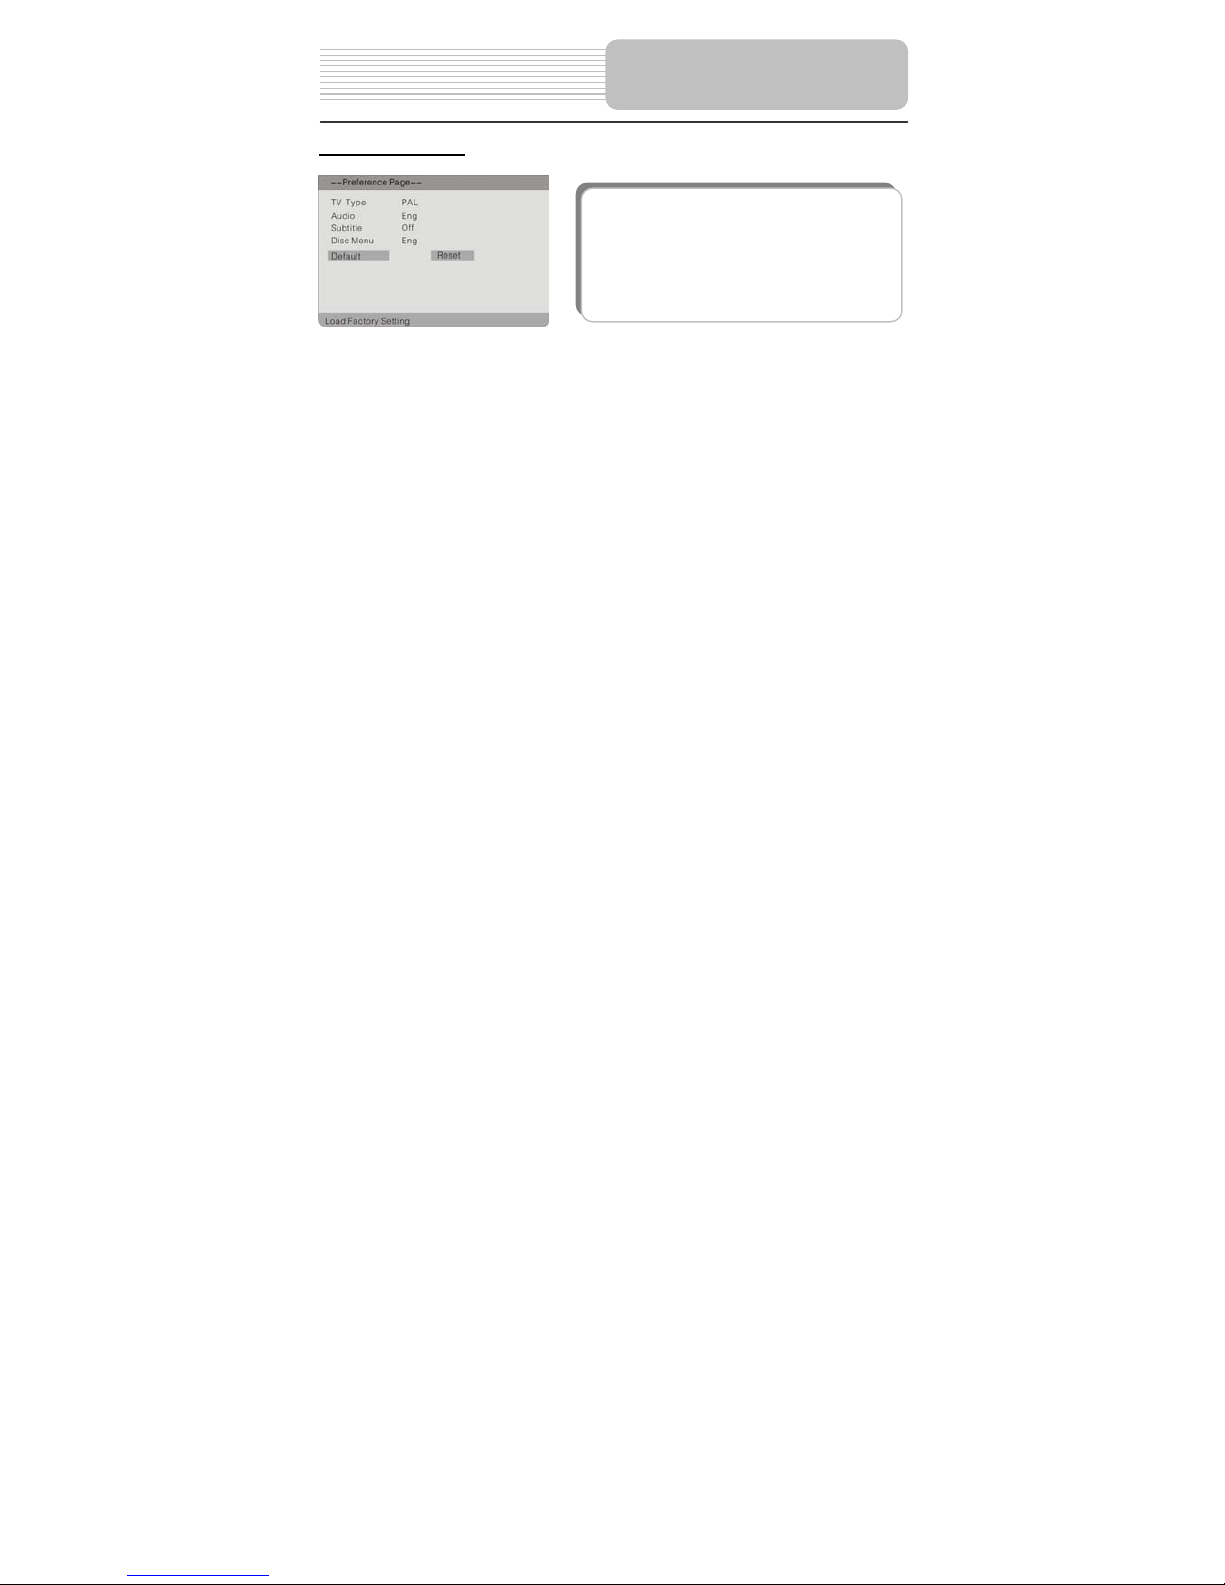
5. Default
This item is used to reset the unit.
Press the or button to highlight this item.
Press the ENTER or button to enter this item.
Press the ENTER button to reset.
Then all the settings of your unit will return to the
Original status.
System Setup
Page 45
41
Letterbox screen
This refers to a screen on which the playback picture of wide-screen DVDs appears with black
bands running along the top and bottom.
Pan & Scan screen
This refers to a screen on which the playback picture of wide-screen DVDs is cut off at the left
and right sides.
Title, Chapter (DVD)
DVDs are divided into some large sections (titles) or some small sections (chapters). Each
section is numbered: these numbers are called "Title number" or "Chapter number".
Title 1 Title 2
Chapter1 Chapter 1
Chapter2……
Track (CD)
CDs are divided into some sections (tracks). Each section is numbered; these numbers are
called "Track number".
Track 1 Track 2 Track 3
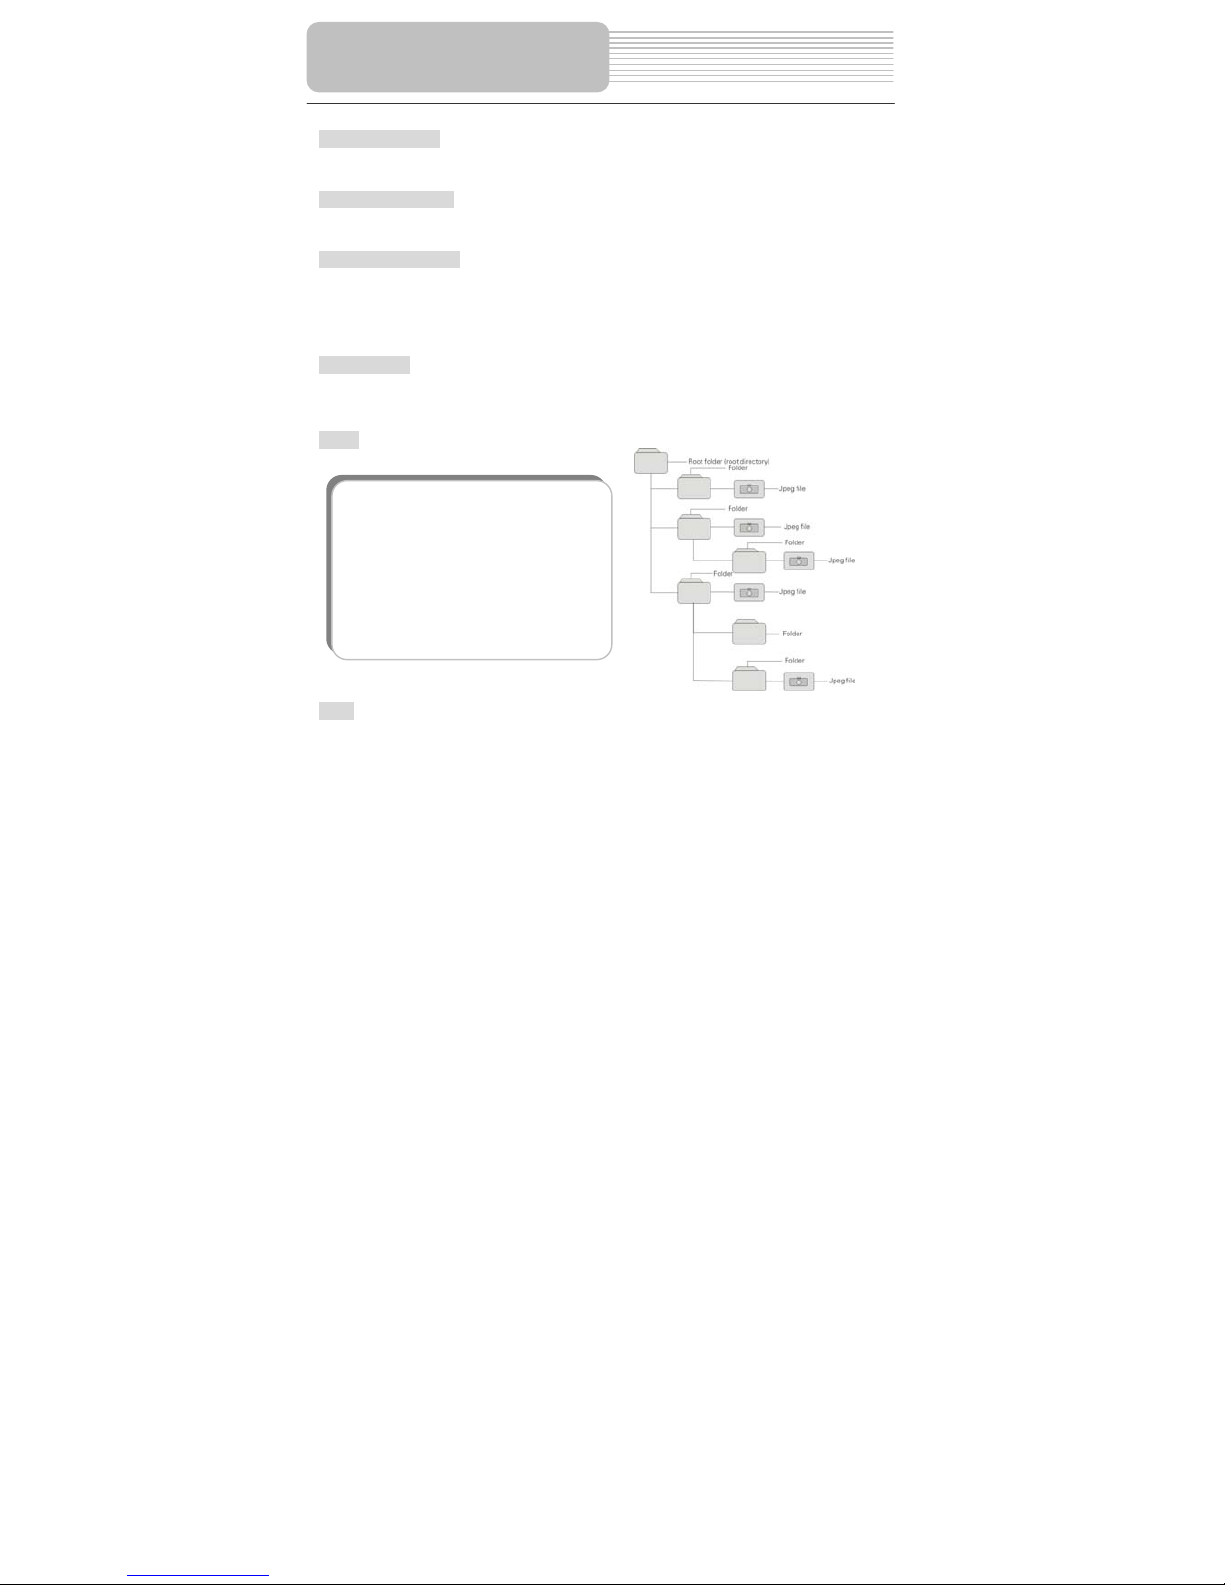
JPEG
DIVX
DIVX is the name of a revolutionary new video code which is based on the new MPEG-4
compression standard for video. You will be able to play DIVX movies using this DVD player.
JPEG is a common picture format that
has small file size and low quality loss
rate of picture. Hundreds of pictures can
be stored in a disc in this format. In order
to utilize real digital album, use film to
make a "PICTURE CD" in JPEG format.
The figure on the right displays the root
folder, folders and files.
Definitions
Page 46
42
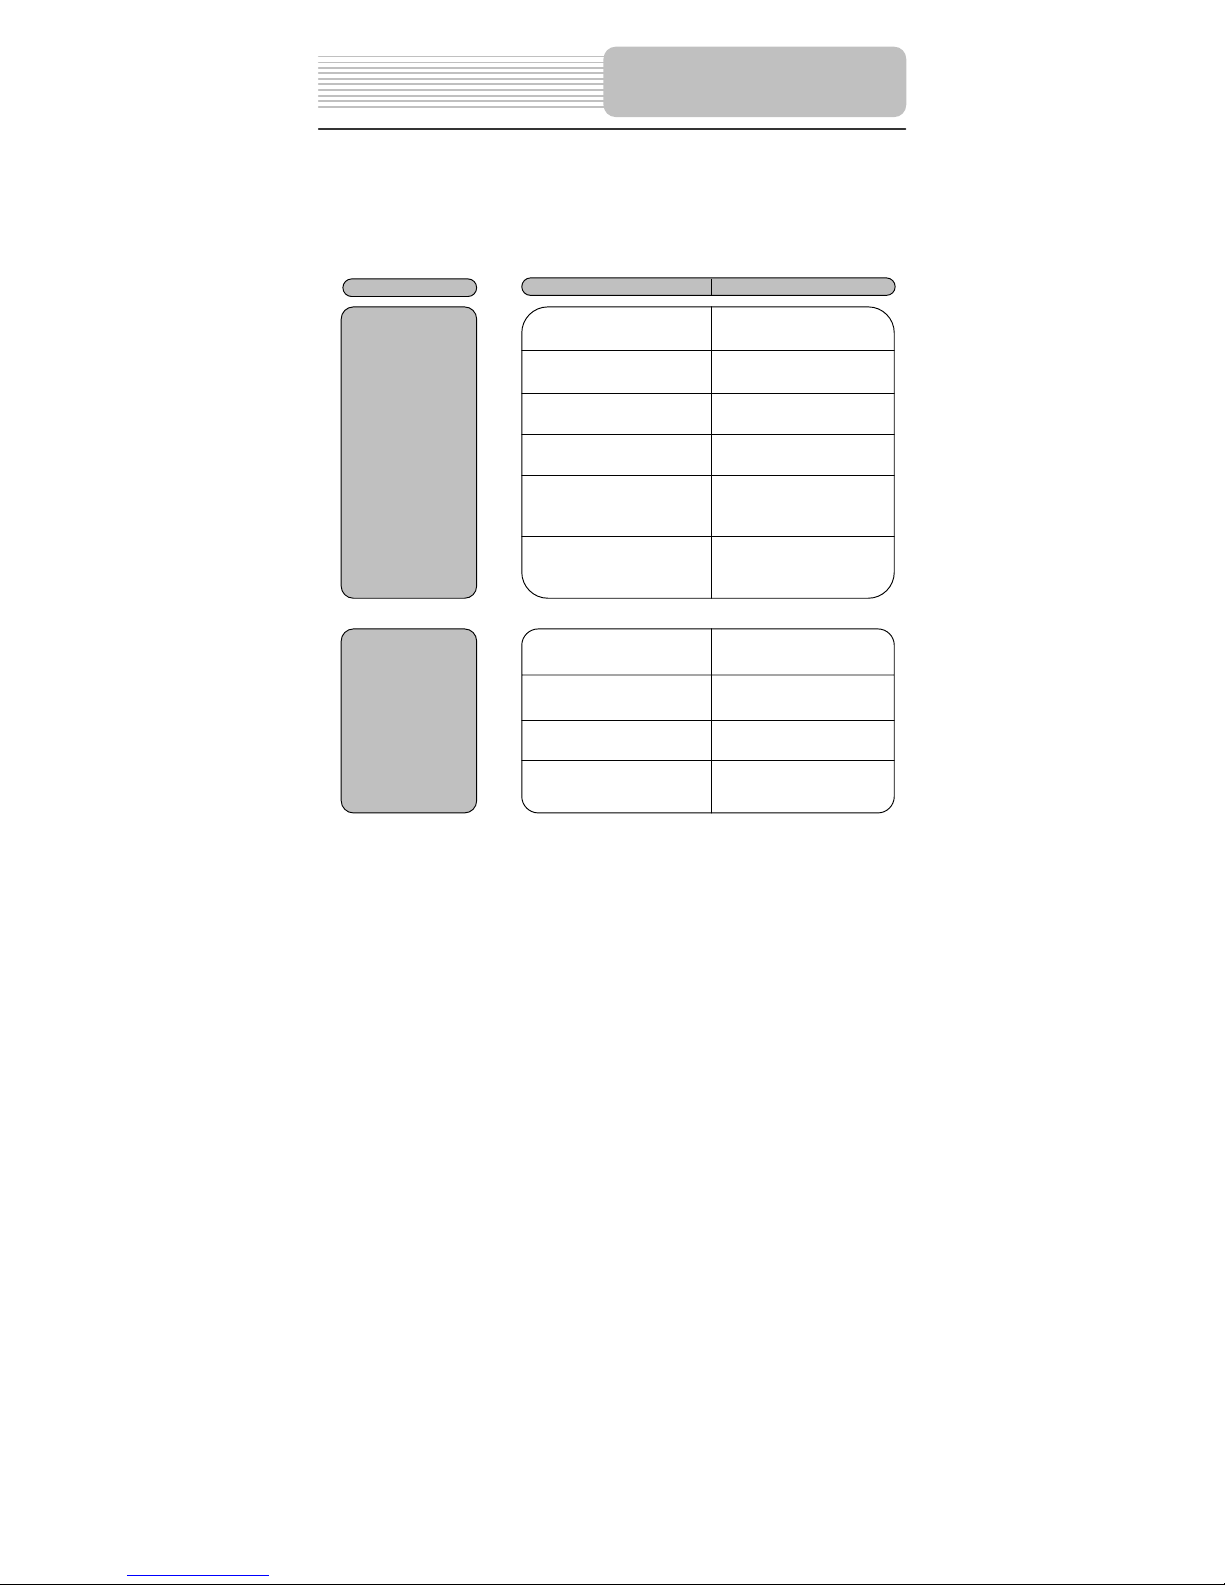
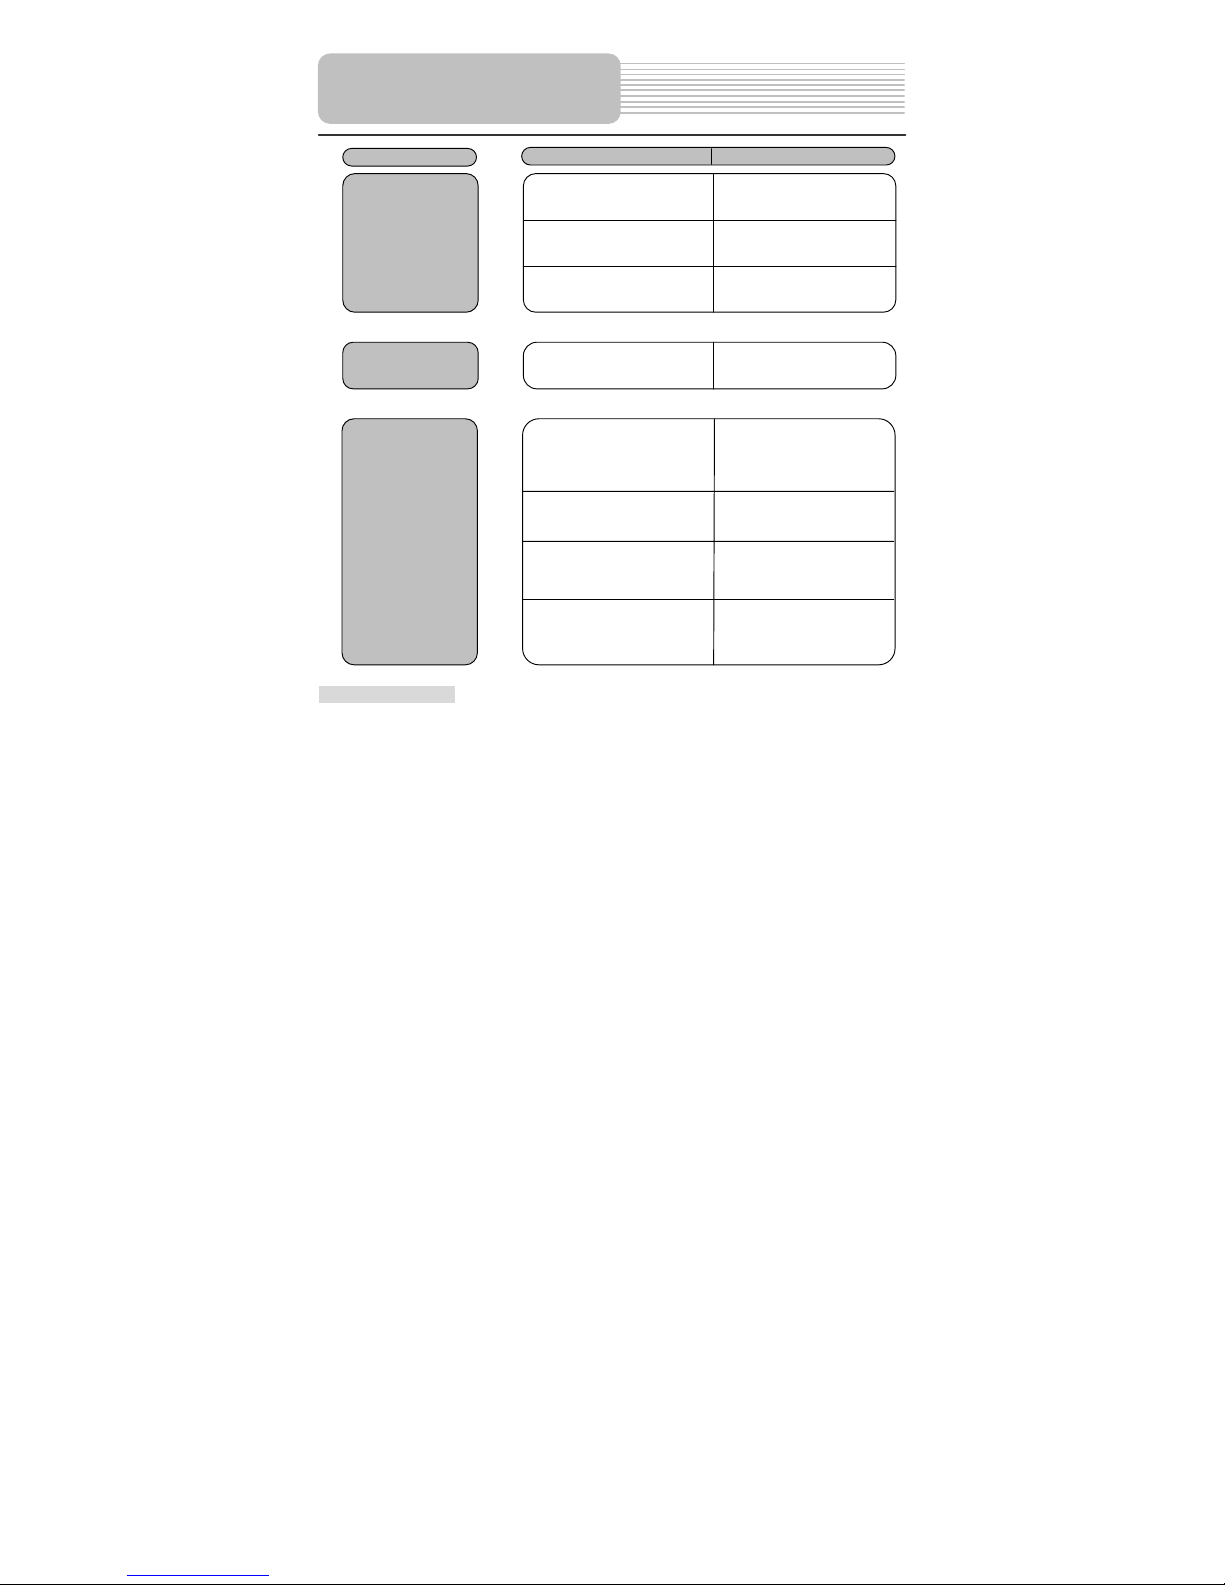
Take steps described in the tables below to solve simple problems before contacting
after-sales service.
If You Suspect Something Wrong, immediately turn the power off.
Disconnect the power connector and check that there is neither smoke nor heat from the unit
before asking for repairs. Ne ver try to repair t he un it by yours el f beca use it is dang erou s to do
so.
PROBLEM
POSSIBLE CAUSE
POSSIBLE SOLUTION
The player cannot
play.
The disc cover may not be
closed.
Close the disc cover.
There may not be any discs
in the DVD drive.
Put a disc in to the DVD drive.
The disc may not be put in
with the right way.
Put the disc in with the label
side up.
The disc may be dirty or
warped.
Clean or change the disc.
The player's region code
may not as the same as the
region code of DVD disc.
Make sure the player's
region code is the same as
the region code of DVD
disc.
There may be water on the
lens.
Remove the disc and keep
the player being powered off
for at least two hours.
There is no sound.
The system connection may
be not correct.
Connect the system
correctly.
The speaker may not be
turned on.
Turn on the speaker.
The sound setup of the DVD
disc may be not correct.
Setup the sound of the DVD
correctly.
The disc may be dirty or
warped.
Clean or change the disc.
Troubleshooting
Page 47
43
Other possibilities:
Static or other external interference may cause the player function abnormally. In order to
recover normal status, please unplug the power-supply cord and then plug it into the outlet
again to reset the player . If th e problems still exist, please cut off the power supply and consult
your service center or the qualified technician.
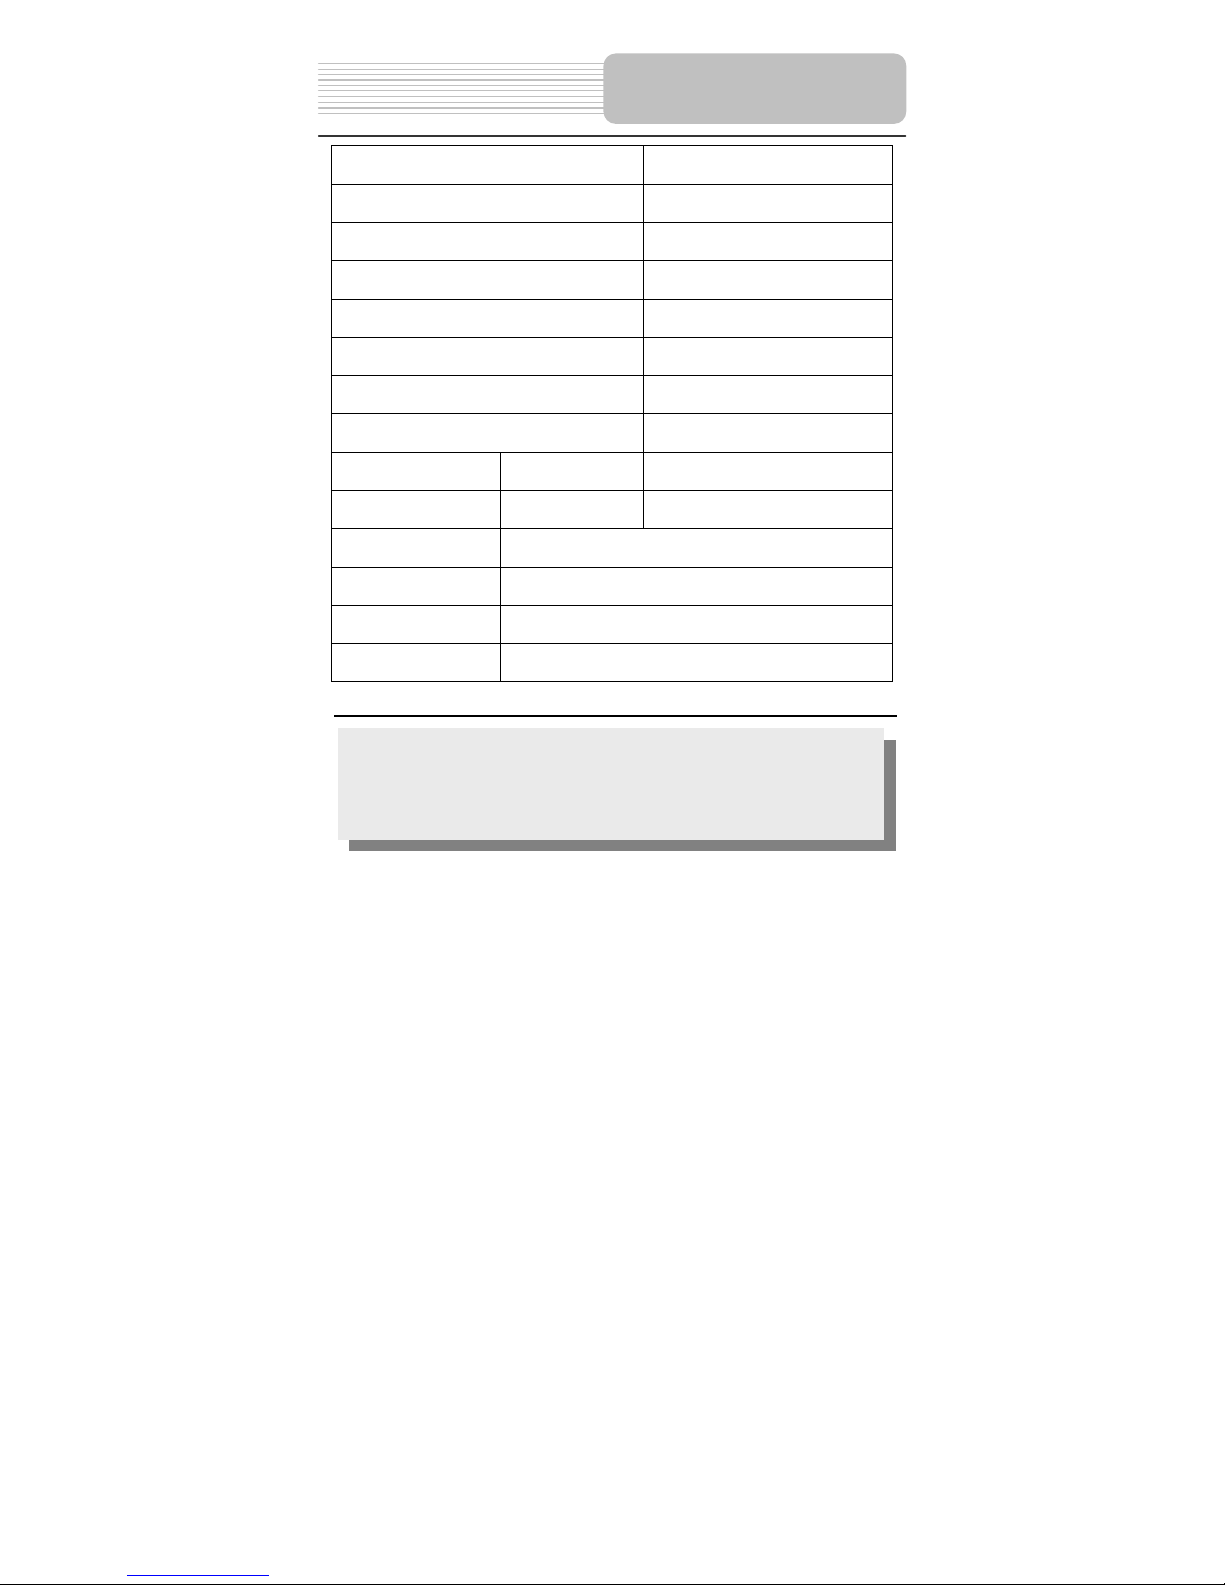
PROBLEM
POSSIBLE CAUSE
POSSIBLE SOLUTION
There is no picture.
The LCD may be off or not
be in correct video mode.
Turn on the LCD and choose
the correct video mode.
The system connection may
be not correct.
Connect the system
correctly.
The unit may be not in AV
out mode.
Switch AV tab on the bottom
of the unit to out.
Poor AV performance.
The disc may be dirty or
warped.
Clean or change the disc.
The remote control
does not work
There may be some
obstructions between the
remote control and the
player.
Remove the obstruction
between the remote control
and the player.
The remote control may not
be pointed at the player.
Point the remote control at
the player directly.
The batteries of remote
control may be out of power
or weak.
Make sure the polarity of
each battery is correct.
The batteries of remote
control may not be inserted
correctly.
Replace the batteries.
Troubleshooting
Page 48
44
DESIGN AND SPECIFICATIONS ARE SUBJECT TO CHANGE WITHOUT NOTICE
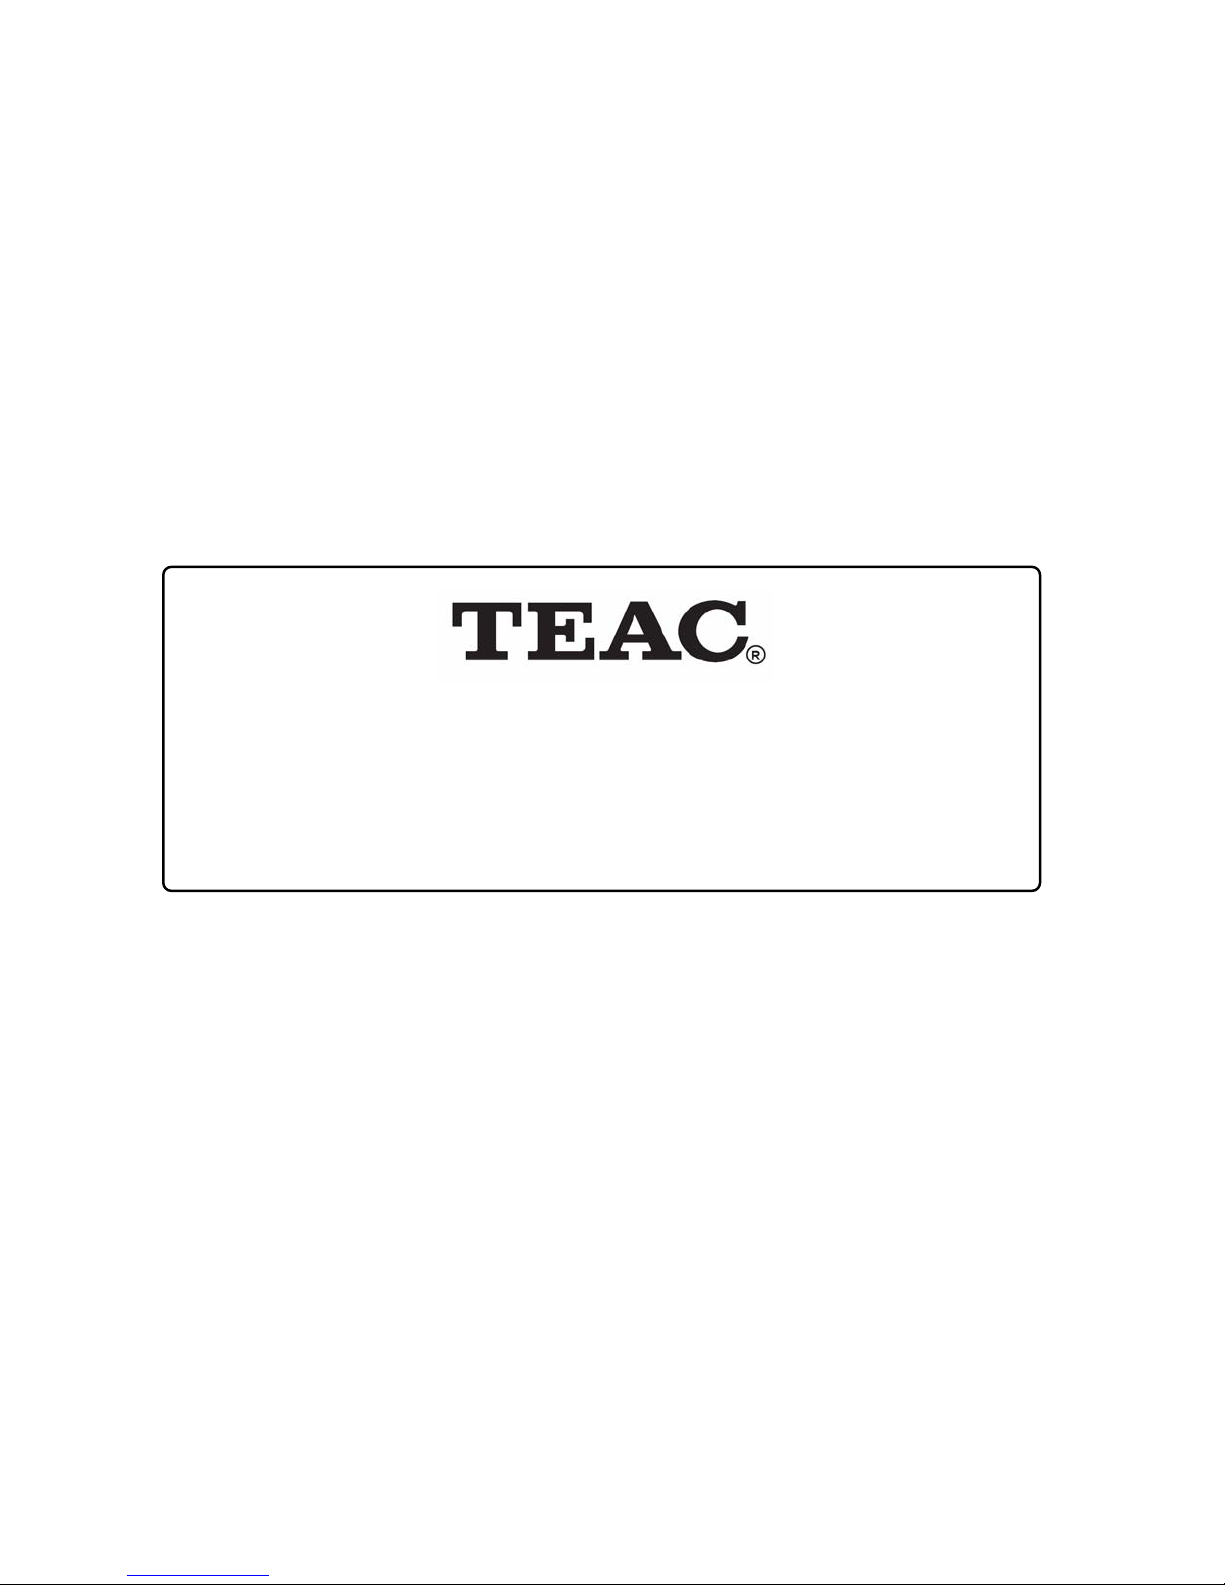
TFT screen size 7 inches
Laser Wavelength 780/650 nm
Video System PAL/NTSC
Frequency Response 20Hz~20kHz ±2.5dB
Audio Signal-to-noise Rate ≥85dB
Audio distortion+noise ≤-70dB (1kHz)
Channel Separation ≥70dB (1kHz)
Dynamic Range ≥80dB (1kHz)
Audio Out Analog Audio Out Out Level: 1.5V±
0.2
1.0
, Load: 10KΩ
Video Out Video Out
Out Level: 1V
P-P
±0.1, Load: 75Ω
Unbalanced Negative
Power AC 100-240V ~ 60/50Hz
Power Consumption < 25W
Dimensions 195mmX149mmX38.5mm (L*W*D)
Net Weight About1. 82 kg
Manufactured under license from Dolby Laboratories.
“Dolby” and the double-D symbol are trademarks of Dolby Laboratories.
Confidential unpublished works. © 1992 -1997 Dolby Laboratories, Inc.
All rights reserved.
Specifications
Page 49

TEAC AUSTRALIA PTY.,LTD.
A
.B.N.: 11 113 998 048
Name Address Service area P C Phone Fax
ACT
Associated Electronics 7 Molonglo Mall CANBERRA 2609 (02)62 80 4698 (02)62 80 5437
Name Address Service area P C Phone Fax
NSW
B & H Electronics 466 David Street ALBURY 2640 (02)60 41 3911 (02)60 21 7455
Border Video & TV Service Shop 3, 339 Urana Road ALBURY 2641 (02)60 40 2229 (02)60 40 2184
Bourkes Video & Tv Service 111 Danger Street ARMIDALE 2350 (02)67 71 1513 (02)67 71 1696
Nichols Electronics Shop 4/70 River Street BALLINA 2478 (02)66 86 9422 (02)66 81 4999
Baytech Electronics Shop 3, 270 Beach Road BATEMANS BAY 2536 (02)44 72 7023 (02)44 72 7354
Sapphire Electronics U5B/85 Bega Street BEGA 2550 (02)64 92 2522 (02)64 93 2062
Lawson Radio & TV 298 Great Western Highway BLUE MOUNTAINS 2783 (02)47 59 1254 (02)47 59 2312
Visual Audio Services 510 Chapple Street - PO BOX 76 BROKEN HILL 2880 (08)80 87 4055 (08)80 87 4055
T K Electronics Unit 2 10 O’Hart Close CHARMHAVEN 2263 (02) 43 92 0828 (02)43 93 1018
TV Technologies 20 Marcia Street COFFS HARBOUR 2450 (02)66 51 7366 (02)66 50 0152
Coogee Electronic Service 261 Arden Street COOGEE 2034 (02)93 15 8566 (02)66 50 0152
Electronics 2000 Shop 3/190 Sharp Street COOMA 2630 (02)64 52 4179 (02)64 52 4179
Lachlan Valley TV 49 Vaux Street COWRA 2794 (02)63 42 2189 (02)63 42 2189
Greg’s TV 2 Bingalong Street DALMENY 2546 (02)44 76 7544 (02)44 76 7544
Deniliquin Hi-Tech 44 Hardinge Street DENILQUIN 2710 (03)58 81 1444 (03)58 81 1444
Western Electronic Service 437 Hopkins Parade DUBBO 2830 (02)68 82 3905 (02)68 82 3870
Con Carr Retravision 126-128 Murray Street FINLEY 2713 (03)58 83 1611 (03)58 83 2114
Forbes TV & Video Repairs 132 Rankin Street FORBES 2871 (02)68 52 2921 (02)68 52 2921
Forster Electronic Services Shop 15, Forster Tower, Wallis Street FORSTER 2428 (02)65 54 5352 (02)65 54 5352
V.J. & C.M. Davey TV & 137 Meade Street GLEN INNES 2370 (02)67 32 2260 (02)67 32 2260
Ray White Television Repairs 2 Taylor Street GOULBURN 2580 (02)48 22 4050
Repairs & Spares 140 Fitzroy Street GRAFTON 2460 (02)66 42 1911 (02)66 43 3961
Griffith Home Appliance 94-98 Yambil Street GRIFFITH 2680 (02)69 62 1826
S & K Electronics 111 Banna Avenue GRIFFITH 2680 (02)69 62 2847 (02)69 64 7774
Ron Burns Electrical 8 Hillcrest Road GUNNEDAH 2380 (02)67 42 3299
Tele – Fridge Electronics 82 Conadilly Street GUNNEDAH 2380 (02)67 42 0022 (02)67 42 3878
Service Providers in Australia
please contact one of the following service providers in your area if you require service for your product.
Page 50

TEAC AUSTRALIA PTY.,LTD.
A
.B.N.: 11 113 998 048
Inverlec Electronics Shop 1,20 Glen Innes Road INVERELL 2360 (02)67 22 4522 (02)67 22 4522
Maxwell Electronics 106 Bath Road KIRRAWEE 2232 (02)95 42 300 (02)95 42 3377
AVL Electronics 2/87 Bold Street LAURIETON 2443 (02)65 59 6330 (02)65 59 6330
Leeton Appliances 99 Grevillia Street LEETON 2705 (02)69 53 4151 (02)69 53 4151
Hans Electronic Services 147 Magellan Street LISMORE 2480 (02)66 21 9311 (02)66 21 9711
Robert Peatfield 2 West Street MACKSVILLE 2447 (02)65 68 2867 (02)65 68 2867
Mullumbimby TV Service Shop 3 97-99 Stuart Street MULLUMBIMBY 2482 (02)66 84 2335 (02)66 84 3554
John Rice TV Service 13 Park Avenue MURWILLUMBAH 2484 (02)66 72 3292 (02)66 72 3292
Kaputar TV Service 27 Maitland Street NARRABRI 2390 (02)67 92 1017 (02)67 92 1017
Newcastle Quickfix/ J P Electronics Shop 5, 468 Pacific Hwy NEWCASTLE 2280 (02)49 45 4699 (02)49 45 5696
Name Address Service area P C Phone Fax
NSW
Videotel Unit 1/17 Quinns Lane
SOUTH NOWRA
2541 (02)44 21 5250 (02)44 23 3280
Ideal Electronics 145 Woodward Street ORANGE 2800 (02)63 62 8270 (02)63 62 8270
Parkes Sight 'n' Sound 67 Clarinda Street PARKES 2870 (02)68 62 4475 (02)68 63 4209
Vickery Sound 171 Brisbane Water Drive POINT CLARE 2250 (02)43 23 3623 (02)43 23 1581
Quickfix Repairs 118 Stafford Street PENRITH 2750 (02)47 22 8550 (02)47 22 9949
BJRAE Electronics 2/199 Adelaide Street RAYMOND TCE 2324 (02)49 87 7032 (02)49 87 6194
QQ Electronics Pty Ltd Unit 5, 14-38 Bellona Avenue REGENTS PARK 2143 1300 883 229 (0297 38 1311
Quickfix Repairs Shop 17 West Market Street RICHMOND 2754 (02)45 78 2111 (02)45 78 2021
Tech 1 Electronic Repairs Shop1/12 Sunset Ave SHELL HARBOUR 2528 (02)42 97 5397 (02)42 97 5398
Cherries Electronics Unit 3, 8 Walter Street SINGLETON 2330 (02)65 71 2488 (02)65 71 2488
Videtel Video, TV & Monitor 232 Marius Street TAMWORTH 2340 (02)67 61 3788 (02)67 61 3388
Peel Television Service 1 Macquarie Street TAMWORTH 2340 (02)67 66 3928 (02)67 66 9932
Colour Fix TV & Video Service 172 Bridge Street TAMWORTH 2340 (02)67 65 5539 (02)65 62 0561
Hawkins Electronic Service 94 Manning Street TAREE 2430 (02)65 52 2288 (02)65 52 4059
Household Electronics 3/39 Shearwater Drive TAYLORS BEACH 2316 (02)49 84 2060 (02)49 19 0355
That Repair Shop 122 Fitzmaurice Street WAGGA WAGGA 2650 (02)69 21 5200 (02)69 25 9491
Schuberts Electronics 53 Hastings Street WAUCHOPE 2446 (02)65 85 1533 (02)65 85 3816
ILLAWARRA Electronics Solution Shop 3, 60 Lakeside Drive WOLLONGONG 2530 (02)42 61 9234 (02)42 61 9227
United Television Service Pty Ltd 390 Keira Street WOLLONGONG 2500 (02)42 28 4555 (02)42 26 3453
Name Address Service area P C Phone Fax
QLD
McMahon Electrical Traders 23 Mabel Street ATHERTON 4883 (07)40 91 1788 (07)40 91 1741
Beerwah Electronics Peachester Road BEERWAH 4519 (07)54 94 0466 (07)54 94 0416
BTronics Shop 1/176 Callide Street BILOELA 4715 (07)49 92 6566 (07)49 92 5266
Bremer Television Service 36 Station Road BOOVAL 4304 (07)32 82 3593 (07)32 82 1214
Page 51

TEAC AUSTRALIA PTY.,LTD.
A
.B.N.: 11 113 998 048
Bowen Retravision (Northern Elect) 40 Bowen Street BOWEN 4805 (07)47 86 1633 (07)47 86 2257
Telefix Unit 9, 19 Lensworth Street COOPERS PLAINS 4108 (07)33 23 2700 (07)33 23 2730
Nielsons Radio & TV Service 68 Gavin Street BUNDABERG 4670 (07)41 53 1377 (07)41 53 1534
A1 Sound & TV Service 14 Gloucester Road BUDERIM 4556 (07)54 45 4777 (07)54 45 1311
Caboolture Video & Microwave 4/125 Morayfield Road CABOOLTURE 4510 (07)54 95 3477 (07)54 95 3477
Digital TV Service 197 Lyons Street CAIRNS 4870 (07)40 51 1711 (07)40 51 1771
Garrows Video & TV Service 4/74 Omrah Avenue CALOUNDRA 4551 (07)54 91 3238 (07)54 91 7457
Charleville Radio & TV 14 Wills Street CHARLEVILLE 4470 (07)46 54 1633 (07)46 54 2266
Jab Electronics Cnr. Ruby & Egerton Streets EMERALD 4720 (07)49 87 7770 (07)49 87 7772
Precise Electronics 1 / 4 Northview Street GOLD COAST 4218 (07)55 75 1377 (07)55 72 4689
Ready Electronics Shop 3/1 Tibbing Street GOLD COAST 4211 (07)55 96 6359 (07)55 02 2734
Tweed Television Shop 3/12 Machinery Drive GOLD COAST 2486 (07)55 24 4483
Gympie Electronic Service 18 Barter Street GYMPIE 4570 (07)54 82 7888 (07)54 83 7811
Lloyd Lawrence Electronics
5 Torquay Road
HERVEY BAY 4655 (07)41 24 3787 (07)41 24 3787
Professional VCR Sales Service 90 Mourilyan Road INNISFAIL 4860 (07)40 61 4720 (07)40 61 4720
Dunstans SBTV 37 Kingaroy Street KINGAROY 4619 (07)41 62 1547 (07)41 62 2343
Nev Robert Electronics 31 Hart Street MACKAY 4740 (07)49 57 6498 (07)49 51 3737
Sunland TV Service Unit 5 Centre One, Norval Court MAROOCHYDORE 4558 (07)54 43 6444 (07)54 43 6464
Telefix Unit 1, 96 Aerodrome Road MAROOCHYDORE 4558 (07)33 23 2700 (07)33 23 2730
Sunland TV Service Shop 4, 54 Rene Street NOOSAVILLE 4566 (07)54 74 2101
Cumners Electronics Shop 4, 131 Old Pacific Highway OXENFORD 4210 (07)55 73 5250 (07)55 73 5403
N & M TV & Video Service 50 Shiert Street PITTSWORTH 4356 (07)46 93 2886 (07)46 93 2886
C.Q. Video & TV Service 227 Berserker Street ROCKHAMTON 4701 (07)49 28 8811 (07)49 28 2698
Matthew's TV & Video Service 176 Main Street ROCKHAMPTON 4701 (07)49 28 5377 (07)49 28 5608
Top Beat Entertainment & Elec 97A Folkestone Street STANTHORPE 4380 (07)46 81 0681 (07)46 81 0682
T.I. TV Repairs 11 Summer Street THURSDAY ISLAND 4875 (07)40 90 2139 (07)40 69 2577
Clark & Webb TV & Radio 14 Grange Street TOOWOOMBA 4350 (07)46 32 7290 (07)46 32 9244
Downs Radio & TV Service (DR TV) 35 Dent Street TOOWOOMBA 4350 (07)46 32 1044 (07)46 32 1224
Townsville Electronics 197 Ingham Road TOWNSVILLE 4810 (07)47 75 7774 (07)47 79 6867
Top Beat Entertainment & Electrical 46 Wood Street WARWICK 4370 (07)46 61 2690
Name Address Service area P C Phone Fax
NT
Electrovision Services 65 Smith Street ALICE SPRINGS 870 (08)89 52 7355 (08)89 53 1810
The Television Workshop Shop 4 Elder St Centre ALICE SPRINGS 870 (08)89 52 8555 (08)89 52 5557
Dartronix Shop 2, 291 Trower Road DARWIN 810 (08)89 45 7799 (08)89 45 7733
New Age Electronics Unit 1/21 Delatour Street DARWIN 810 (08)89 48 1755 (08)89 48 1766
Eletech Service 13 Sandalwood Ave NHULUNBUY 880 (08)89 87 3828 (08)89 87 3828
Page 52

TEAC AUSTRALIA PTY.,LTD.
A
.B.N.: 11 113 998 048
Name Address Service area P C Phone Fax
SA
TCS (Total Care Services) 62 Leader Street ADELAIDE 5035 (08)83 51 1044 (08)83 51 1043
E.K. Dunstan & Co 255 Main Street CLARE 5453 (08)88 42 2144 (08)88 42 3942
Peter's Electronics 25 Lorna Street LOXTON 5333 (08)85 84 6920 (08)85 84 6920
Gambier Sound& Vision Repairs 16-18 Watson Tce MT GAMBIER 5290 (08)87 23 3955 (08)87 23 3855
Portside Technologies 28 Hallet Place PORT LINCOLN 5606 (08)86 82 1500
Pirie Antenna & TV 283B Senate Road PORT PIRIE 5540 (08)86 32 2565 (08)86 33 0091
Riverland Electronics Services 113 Renmark Avenue RENMARK 5341 (08)85 86 5600 (08)85 86 5533
Victor Electronic Service 44 Torrens Street VICTOR HARBOR 5211 (08)85 52 1471 (08)85 52 1098
Eyre Electronics 15B Forsyth Street WHYALLA 5600 (08)86 45 4764 (08)86 45 5576
Name Address Service area P C Phone Fax
TAS
Somerset Electronics 16 Douglas Street EAST DEVONPORT 7310 (03)64 27 0016
D.J. Hingston 95 James Road DEVONPORT 7310 (03)64 27 2145 (03)64 27 2145
Integrated Components 54A Albert Road HOBART 7009 (03)62 78 1932 (03)62 78 8387
K.T. National Electronics 1 Hobart Road LAUNCESTON 7249 (03)63 44 5665 (03)63 43 0466
Name Address Service area P C Phone Fax
VIC
Border Video & TV Service 362 Griffith Road ALBURY 2641 (02)60 40 2229 (02)60 40 2184
Greene's Television Services 149 Hummfray Street BALLARAT 3350 (03)53 32 6256 (03)53 32 7597
Ted Rivett Services 145 Creswick Road BALLARAT 3550 (03)53 32 6371 (03)53 33 4002
Proud’s Hi Fi 78- 80 Pall Mall BENDIGO 3550 (03)54 42 2722 (03)54 42 2522
All – Tronics 11 Edward Street BENDIGO 3550 (03)54 42 7000 (03)54 41 7502
Sound & Vision TV Service 4 Terracotta Drive BLACKBURN 3130 (03)9878 7144 (03)98 78 7344
B M Tronics 197 Murray Street COLAC 3250 (03)52 32 1504 (03)52 32 1935
Badrocks Video & Hifi Service 22/24 Barrumundi Avenue COWES 3922 (03)59 52 1752 (03)59 52 1795
T & C Electronics Service 31 Pegleg Road EAGLEHAWK 3556 (03)54 46 3000 (03)54 46 3022
Echuca TV & Video Service 1/7 Mitchell Street ECHUCA 3564 (03)54 80 7874
Central Appliance Service 222 Moorabool Street GEELONG 3200 (03)52 22 1418 (03)52 22 1418
RTD Services Pty Ltd 25-29 Fairlie Street GEELONG 3215 (03)52 78 9766 (03)52 78 3545
Linke Electrical Repairs 82 Londsdale Street HAMILTON 3300 (03)55 72 5788 (03)55 72 4090
Frank Ritchie Electrical P/L 9 Victoria Street KERANG 3579 (03)54 52 2908 (03)54 52 2908
Harold Hurren 26 Fitzroy Street KILMORE 3764 (03)57 82 1327 (03)57 82 1487
Soundwave Electronics 2B Holt Street LEONGATHA 3953 (03)56 62 3665 (03)56 62 3665
Peninsula VCR Repairs 1/8 Virginia Street MELBOURNE 3931 (03)59 75 0800 (03)59 76 2300
Page 53

TEAC AUSTRALIA PTY.,LTD.
A
.B.N.: 11 113 998 048
Ferguson Electronics 116 Orange Avenue MILDURA 3500 (03)50 23 5846 (03)50 21 2690
Bensi TV Electrical Pty. Ltd. 128 Nicholson Street ORBOST 3888 (03)51 54 1454 (03)51 54 1344
G & R Video & TV Services Pty. 24 Dunkirk Avenue SHEPPARTON 3630 (03)58 21 0258 (03)58 21 8187
Swantronics 45 Campbell Street SWAN HILL 3585 (03)50 33 1633 (03)50 33 1287
Earl & Becker 4-26 Shakespeare Street TRARALGON 3844 (03)51 74 8454 (03)51 74 8454
BM Tronics 459 Raglan Parade WARRNAMBOOL 3280 (03)55 61 6622 (03)55 62 8388
Tellycare (Nugents) 105 Queen Street WARRAGUL 3820 (03)56 22 1102 (03)56 22 1102
John B. Electronics Shop 94 High Street WODONGA 3690 (02)60 56 1066 (02)60 56 2443
Name Address Service area P C Phone Fax
WA
AB Video 50 Cockburn Road ALBANY 6330 (08)98 42 1270 (08)98 42 2728
Albany TV Service Shop 8 35-37 Campbell Road ALBANY 6330 (08)98 41 1573 (08)98 42 5958
Camtec Bunbury 1/31 Denning Road BUNBURY 6230 (08)97 91 7277 (08)97 91 7377
Excel Electronics 3 Newman Court BROOME 6725 (08)91 44 1266 (08)91 44 1266
Eclipse Kimberley Unit 4, 20 Hunter Street BROOME 6725 (08)91 92 2832 (08)92 92 8069
Elricks TV Service 62 Spencer Street BUNBURY 6230 (08)97 21 4047 (08)97 21 1161
Busselton TV & Video 65B Strelley Street BUSSELTON 6280 (08)97 54 4457 (08)97 54 4824
Electronic Plus Unit 3/11 Egan Street CARNARVON 6701 (08)99 41 3690 (08)99 41 3660
Esperance Communications 33 Norseman Road ESPERANCE 6450 (08)90 71 3344 (08)90 71 4545
Bird Electronics 14 Abraham Street GERALDTON 6530 (08)99 64 1631 (08)99 21 7584
Geraldton Radio & TV Service 26 Anzac Terrace GERALDTON 6530 (08)99 64 2777 (08)99 64 2776
Oz West Electronics 6/200 Winton Road JOONDALUP 6027 (08)93 00 1066
Printek Electronics 1 Lesueur Drive JURIEN BAY 6516 (08)96 52 1664 (08)96 52 1664
Kalgoorlie Electronics 395 Hannan Street KALGOORLIE 6430 (08)90 21 1420 (08)90 21 1420
J & P Electronics 3/88 Albany Hwy KOJONUP 6395 (08)98 31 1991 (08)98 31 1991
Tuckerbox Retravision White Gum Street/P.O. BOX 941 KUNUNNURRA 6743 (08)91 68 1100 (08)91 68 2491
Waytec Electronics Unit 3, 10 Thornborough Road MANDURAH 6210 (08)95 82 0882 (08)95 82 0352
Manjimup TV Service 88 Giblett Street / P.O. BOX 370 MANJUMUP 6258 (08)97 71 1598 (08)97 72 4025
Chris's TV & Satelite 66 Barrack Street MERREDIN 6415 (08)90 41 1484 (08)90 41 1484
G & J Suckling Radio & TV 1 Hale Street NARROGIN 6312 (08)98 81 2148 (08)98 81 3129
Proton 21A Charles Street NORTHAM 6401 (08)96 22 3168 (08)96 22 3168
TEAC Perth Service Centre 273 Great Eastern Highway PERTH 6104 (08)94 79 6499 (08)94 79 6544
Charles Hunt Electronics 25 Brodie Court ROCKINGHAM 6171 (08)63 63 5593 (08)95 24 2890
S & R TV Service Unit 7/42 Crompton Road ROCKINGHAM 6168 (08)95 92 1130 (08)95 92 3685
Page 54
TEAC CUSTOMER CARE CENTRE (TCCC)
Free call: 1800 656 700
Between Monday to Friday – EST 9AM to 5PM
 Loading...