

Page 1

OOWWNNEERR’’SS
MMAANNUUAALL
DV-B800
High Definition
Digital Terrestrial Receiver
Thanks for buying a TEAC. Read this manual carefully
to get the best performance from this Digital Receiver.
CAUTION:
Use of controls, adjustments or procedures other than
those specified herein, may void your warranty.
CAUTION : To reduce the risk of electrical shock, do not
remove the cover. No user serviceable parts inside.
Refer any servicing to qualified Service personnel.
The lightning flash with arrowhead symbol, within an equilateral triangle is intended to alert the user
to the presence of uninsulated “dangerous voltage” within the product’s enclosure that may be of
sufficient magnitude to constitute an electric shock to a person
The exclamation point with an equilateral triangle is intended to alert the user to the presence of
important operating and maintenance (servicing) instructions in the literature accompanying the
appliance (Digital Receiver)
WARNING : TO REDUCE RISK OF FIRE OR ELECTRIC SHOCK
DO NOT EXPOSE THIS PRODUCT TO RAIN OR MOISTURE.
This product has a serial number, Please record
the serial number and retain it for your records.
Page 2

PLEASE READ THIS FIRST!
Is Digital TV reception available in your home?
Generally speaking; if this receiver was on display (demonstration) by your retailer and
you live within the same area/town/city, then it should work within your home.
If you experience break-up of picture or poor performance, it is recommended that you
contact your local TV antenna installer first. They may need to check your signal quality
for digital reception. The antenna installer may advise you to upgrade your TV antenna
to a newer digital ready antenna, and install newer cabling such as RG6 quad shield
cable.
For more information on installations, visit the Digital Broadcast Australia website found at
http://www.dba.org.au.
I don’t seem to have Digital TV reception in my home,
what shall I do?
Digital TV is relatively new to Australia and it will take time for it to be available everywhere
around Australia. If Digital TV reception is not available to you, simply place together all
packaging and supplied cables back into the box neatly. Have your receipt (proof of
purchase) ready and contact your place of purchase for further details on what you
should do.
Connect your antenna lead directly into the antenna connection on the rear of the box.
Be sure to select AV or EXT input on your television by using the television remote
control.
Switch on the set-top box. If all connections are right, you will see the AUTO SEARCH
screen appears on the television.
Simply press the RED button (SUB.T) to start tuning process.
Please read the user-manual thoroughly
to enjoy this product.
How do I connect this box to my TV?
Using the RCA lead supplied (Yellow, White, Red); connect from the rear of the box (see Video
and Audio R, Audio L) directly to the AV input on your television. If you television does not
have stereo sound, then there is no need to connect the red lead.
When connecting to a high definition capable display, we recommend using the component
video lead supplied (green, red, blue) connected to Y Pb Pr labeled on the rear of the set-top
box. Your TV/Plasma must also have these same connectors.
1
2
3
4
5
Page 3

For our valued customers, we do our best for each product and services to offer. We will
support our cutomers through our local sales and service network. TEAC supports this
product via its set-top box homepage with useful information and new software.
If you have any questions about this product, please consult the web page before contacting
out Total Care Hotline 1800-656 700 EST 9am to 5pm. Please have your software version
number ready before calling us. [ Refer to MENU/SYSTEM INFORMATION page27 ]
Homepage : http://stb.teac.com.au
E-mail : [email protected]
To provide you with the convenience of usage, TEAC has the right to make changes and
improvements to the products including the user manual without any notice in advance.
Copyright 2004 TEAC Australia Pty Ltd.
Throughout this manual the letters STB are constantly used. This stands for "Set-Top Box"
and refers to your DV-B800.
DEFINITION Throughout the manual, you will find the letters STB.
This stands for Set-Top Box.
MAIN SUPPLY AC 100 ~ 230V ~ 50/60Hz 30W max.
CABLE Use standard certified cables to prevent any malfunction of
the STB.
LOCATION Keep the STB indoors and away from potential hazards, such as
houseplants, rain and direct sunlight.
CLEANING 1. Always disconnect the STB power cord from the wall socket
before cleaning it.
2. Use a light damp cloth(no solvents)to clean the case.
OVERLOADING Do not overload wall outlets, extension cords or adapters.
These can cause fire or electrical shock.
VENTILATION 1. Do not block ventilation slots of STB.
2. Do not place the STB on soft furnishings or carpets.
3. Ensure that a free airflow is maintained around the STB.
4. Do not allow the STB to be exposed to direct sunlight or a heater.
5. Do not stack other electronic equipment on top of the STB.
6. Do not place newspapers, tablecloth, or curtain(drapes) on top of
the STB as these may block the vent slots and cause hazard or
serious damage to the STB.
Do not put lit candles or any heated object on the STB.
LIQUIDS Keep liquids away from the STB.
Apparatus shall not be exposed to dripping or splashing and no
objects filled with liquids, such as vases, shall be placed on the
apparatus.
LIGHTNING 1. The Manufacture's instructions for safe guarding other
equipment connect to the STB, such as a television set,
must be followed during lightning conditions.
2. Ensure lightning protection devices for the terrestrial
antenna, and mains are installed.
Safety Instructions
This STB has been manufactured to meet Australian safety standards.
Please read the following safety instructions carefully before you handle the STB.
Support & Copyright
Page 4

Understanding the Remote Control Unit ..........................................8 ~ 9
Connecting Your Equipment..................................................................10
Front Panel......................................................................................................10
Rear Panel .......................................................................................................11
Connection......................................................................................................12 ~ 13
Setting Up Your System...........................................................................14
Menu Tree........................................................................................................14
Automatic Channel Search for Television Services....................................15
Manual Channel Search.................................................................................15
Basic Function................................................................................................16 ~ 17
Menu Operation...........................................................................................18
Main Menu .......................................................................................................18 ~ 19
Channel List ....................................................................................................19
Channel Information.......................................................................................20
Skip Channel..................................................................................................20
Program Guide................................................................................................21
Now/Next EPG ...............................................................................................21
Setup................................................................................................................22
Menu Language..............................................................................................22
Screen Type...................................................................................................23
Banner Time...................................................................................................23
Screen Save Time ..........................................................................................23
Other Setting ..................................................................................................24 ~ 26
Installation.......................................................................................................27
Channel Search..............................................................................................28 ~ 29
Change PIN Code ..........................................................................................30
Parental Lock..................................................................................................30
Receiver Lock.................................................................................................31
Factory Reset.................................................................................................31
TELETEXT Navigation....................................................................................32
Troubleshooting..........................................................................................33
Technical Specifications..........................................................................34 ~ 35
Frequently Asked Questions..................................................................36 ~ 38
Page 5

STANDBY
To switch between Operation and
Standby mode.
TV/STB
Not used
FAVORITE
To move among the favorite lists.
SLEEP
To select a preset time interval for
automatic shut off.
TELETEXT
To navigate teletext pages.
PAGE UP/DOWN
To move up or down a page in the
channel list.
ASPECT
To select your screen aspect ratio.
Press this button to toggle different modes.
SUBTITLE (Red)
To select closed caption.
Note that closed caption may not always
work as the broadcaster may not provide
this service.
INFORMATION (Green)
To display the program information box on
the screen.
VOLUME UP/DOWN
To increase or decrease the volume.
OK
To confirm your choice.
FREEZE
To freeze the picture
FORMAT
To select Video format among 1080i, 720p,
576p, 576i
OUTPUT
To select Video output among RGB, YPbPr,
D-sub
PIP.SWAP
*
To swap main picture with the sub picture
MUTE
To enable or disable the audio.
NUMERIC BUTTONS
To select the channel and enter the
channel information and PIN Code.
EPG
To display the TV/Radio program guide.
M-VIEW
To display multi angle view selection.
EVENT
To select the extended event information of
the program.
EXIT
To return to the normal viewing mode from
a menu.
MENU
To display the Main Menu on the screen or
return to the previous menu.
SOUND (Yellow)
To select the sound track list in the current
channel.
PRE-CHANNEL (Blue)
To return to the previous channel.
CHANNEL UP/DOWN
To change channels up and down.
PIP
*
To display the sub picture
PIP.POS
*
To change position of the sub picture
- 9 -
DV-B800
- 8 -
DV-B800 High Definition Digital Terrestrial ReceiverHigh Definition Digital Terrestrial Receiver
Understanding the Remote Control Unit
Understanding the Remote Control Unit
FORMAT
FREEZE
SLEEP
27
PIP.POS
26
PIP
25
CHANNEL
UP/DOWN
20
EVENT
24
PRE-CHANNEL
18
EPG
17
NUMERIC
BUTTONS
16
MUTE
STANDBY
TV/STB
INFORMATION
SUBTITLE
PAGE UP/DOWN
VOLUME UP/DOWN
OK
1
2
4
6
5
11
OUTPUT
14
PIP.SWAP
15
12
13
Remote Control Unit
1
2
3
4
5
6
7
8
9
10
11
12
13
14
15
16
17
18
19
20
21
22
23
24
25
26
27
*
Currently not use. Reserved for future use.
Note :Your DVB receiver is capable of displaying teletext on screen since it has an
embedded teletext decoder.
**AUSTEXT only available from 7 digital
10
21
EXIT
8
7
22
MENU
ASPECT
TELETEXT
23
SOUND
9
19
M-VIEW
FAV.
3
Page 6

- 11 -
DV-B800
- 10 -
DV-B800 High Definition Digital Terrestrial ReceiverHigh Definition Digital Terrestrial Receiver
5
10
Connecting Your EquipmentConnecting Your Equipment
Front Panel
ANT IN To connect the antenna here.
LOOP THROUGH Used to connect a RF signal from the STB to either the RF input jack
(antenna) on your VCR or to the antenna input of your TV.
S-VHS To connect to S-VHS (S-Video) input of the display device. Note that
no on screen display may be available on this output when either 576p
or 720p is selected.
YPbPr The 3 coloured RCA (Cinch) connectors are switchable between
Component and RGB mode. Press the OUTPUT key on the remote
controller. The letters ‘ypb’ will momentarily appear on the front
display when component video mode is selected.
VIDEO & AUDIO L/R To connect Video(CVBS) & Audio L/R to a TV, Audio Amp or Hi-Fi
system.
D-SUB To connect to a PC monitor. Press the OUTPUT key so the letters
‘dsub’momentarily appear on the front display when using this feature.
DVI To connect to the digital video input on your Plasma, LCD or computer
monitor display. Press the OUTPUT key to select RGB mode for this
feature.
USB To upgrade software using USB memory.
OPTICAL To connect S/PDIF cable for digital audio(Dolby Digital streaming out).
RS232 To connect to a personal computer for software upgrade.
Rear Panel
1
2
4
POWER To Switch between Operation and Standby mode.
IR SENSOR Point remote controller toward front on the DV-B800
REMOTE LED Remote operating
STANDBY/ON RED LED indicates STAND-BY condition
GREEN LED indicates Operating
CHANNEL- To change channels down. To move down highlight marked cursor.
CHANNEL+ To change channels up. To move up highlight marked cursor.
Volume up To volume up the sound.
Volume down To down the sound volume.
4 516
7 8
2
3
4
1
2
5
1
2
3
4
5
6
7
8
9
10
6
7
8
3
6
7
8
9
2
3
Page 7

- 13 -
DV-B800
Connecting Your Equipment
How to connect your STB to various systems
There are several ways of connecting the STB to your TV and Hi-Fi System. Consult your
local supplier for assistance in setting-up your system best suited to your requirements.
1. STB to a TV
There are various methods that may be used to connect your set-top box to the display.
For High Definition viewing your display must support either 576p, 720p or 1080i
display modes. Also the connection between the set-top box and display must be
YPbPr component, RGB Dsub15, or DVI. Other connection will provide standard
definition viewing.
(a)
Connect the set-top box via Video and Audio (for general viewing or connection to a VCR)
The 3 RCA connections (yellow, white and red) connect to the video and Audio R and
Audio L connections on the rear of the box. The other end of the cable connects to
your TV input labeled either AV or EXT. Be sure to select on your TV remote controller
to switch to AV or EXT input mode.
(b) Connect the set-top box via Component YPbPr (for high definition viewing)
The 3 RCA connections (green, blue and red) connect to the Y, Pb and Pr connections
on the rear of the box. The other end of the cable connects to your TV input labeled
Component YPbPr input. Be sure to select on your TV remote controller to switch to
component input mode. It may also be called AV or EXT key.
- 12 -
DV-B800 High Definition Digital Terrestrial ReceiverHigh Definition Digital Terrestrial Receiver
Connection
Connecting Your Equipment
STB to a TV Set
Optional connection
(c)
Connect the set-top box via S-VHS (called S-Video also)
Your will be required to purchase this cable. Simply connect one end to the box rear
(see S-VHS) and the other end to the TV’s input (it may be located on the back or side
of the TV). Be sure to press the AV selection key on the TV remote to select this input
mode.
(c)
Connect the set-top box via RGB D-Sub15 connection (for high definition viewing)
You will need to purchase a standard DB15 computer monitor cable. When connecting
this, be sure to press the OUTPUT key on the remote so the letters ‘dsub’ appear
momentarily on the front display.
(d)
Connect the set-top box via DVI connection (for high definition viewing)
ADVI cable must be purchased. Beware that different cables exist. It is recommended
that a DVI-D cable is purchased. Simply connect this cable between the set-top box
and the display. Press the OUTPUT key, you must select RGB (see front display ?
these letters will momentarily be displayed). Pressing the FORMAT key, you must
select 1080i, 720p or 576p. Refer to the screen display user manual to see what
modes are available. Make sure your screen accepts PALtiming. The DVB800 also
does not include HDCP. Some display devices support HDCP and therefore may not
be supported with your set-top box.
Page 8
- 15 -
DV-B800
- 14 -
DV-B800 High Definition Digital Terrestrial ReceiverHigh Definition Digital Terrestrial Receiver
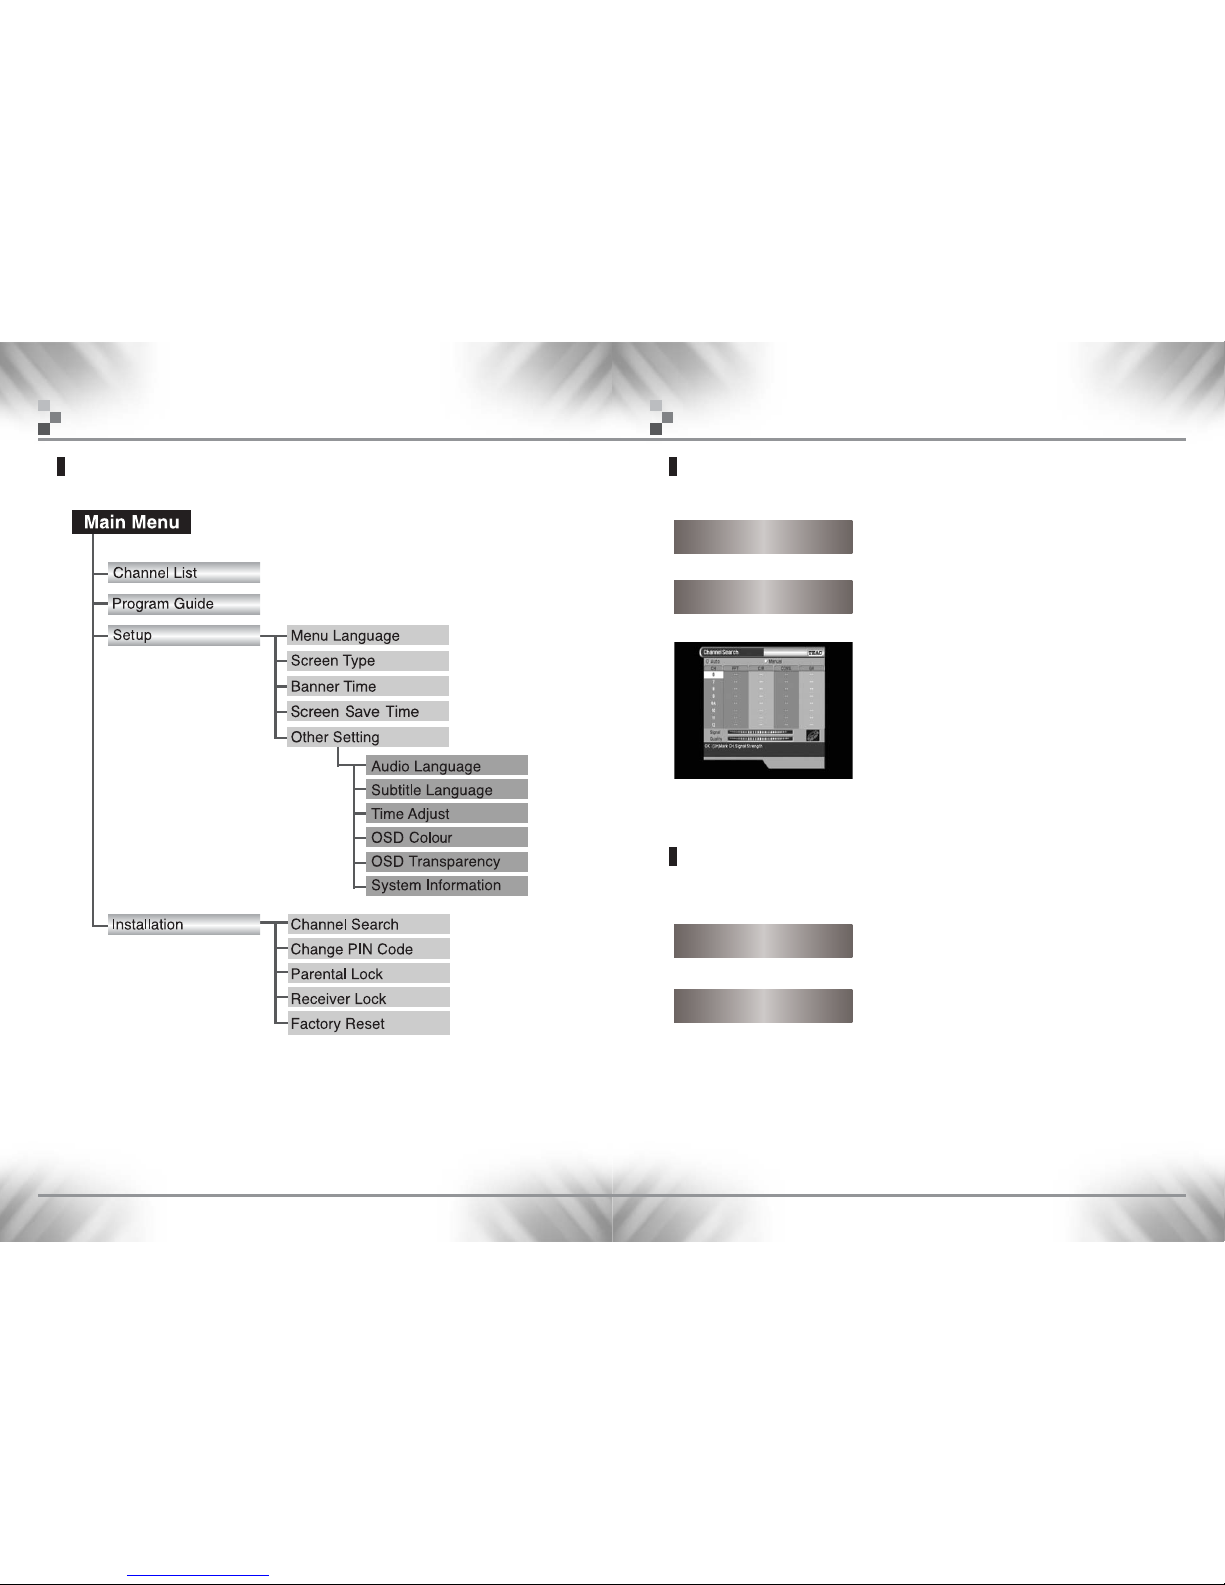
Automatic Channel Search for Television Services(1st Step)
You can automatically detect and save all channels as follows:
fi
fi
fi
• Connect STB as per pages 12 to 13 (as applicable).
•
Turn on the power of STB and other devices
connected to the STB.
•
Press RED (SUB.T) button and the STB will automatically
search all channels and save them into the channel list.
Once finished, your box is ready to be used.
•
Select Channel Search in the Installation Menu.
• Enter the PIN Code. (Factory PIN code is ‘0000’)
•
Select the television service you want to search by
pressing the UP/DOWN buttons and the OK button. A tick
will be shown beside your selection. You may select more
than one television service to manual tune.
•
Press GREEN (Manual) button and the STB will begin to
search all channels you have chosen and save them into
the channel list.
Manual Channel Search
You can automatically search and save all channels as follows :
Setting up Your System
• Select Channel Search in the Installation Menu.
• Enter the PIN Code. (Factory PIN Code is ‘0000’)
Power On
Main Menu/Installation
Channel Search / Manual
System Connection
Setting up Your System
Menu Tree
Page 9
- 17 -
DV-B800
- 16 -
DV-B800 High Definition Digital Terrestrial ReceiverHigh Definition Digital Terrestrial Receiver
Setting up Your System
Basic Function
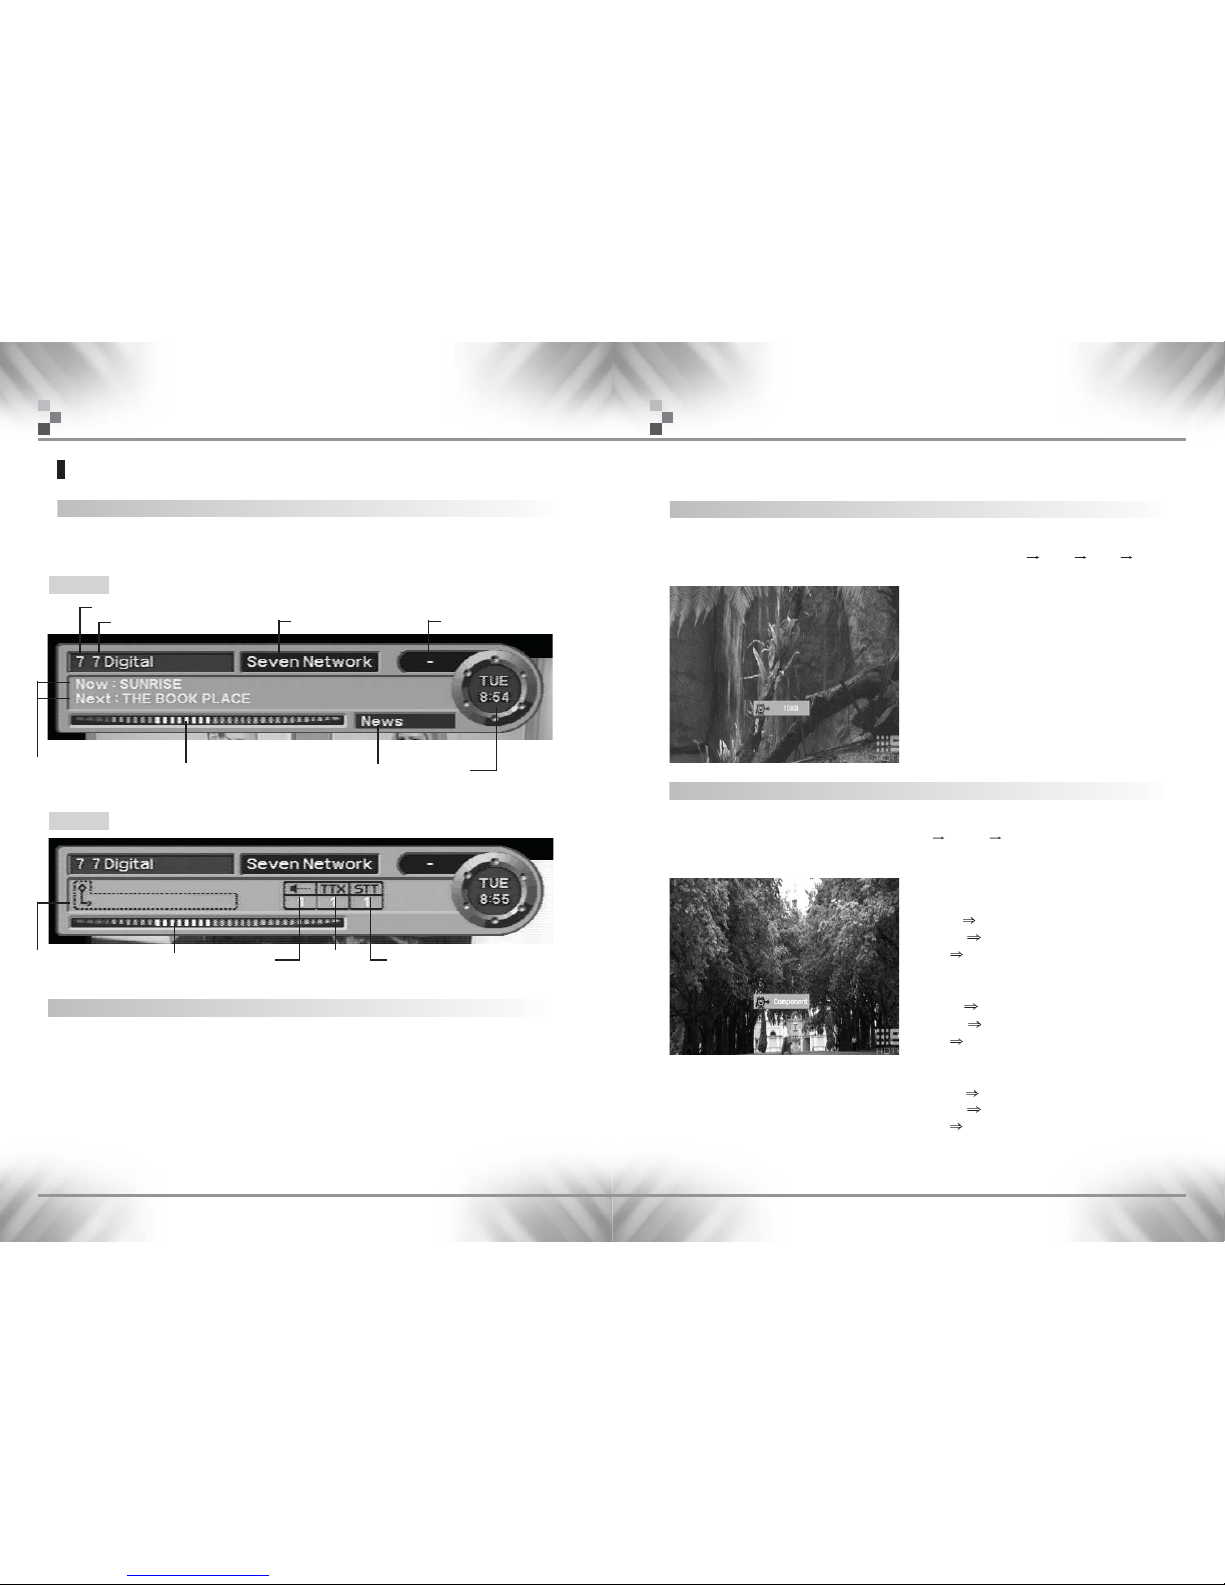
Information Screen
After the television channels have been programmed, you will see the information(banner)
box each time you switch channels.
Logical Channel Number
Channel Name
Network Name
Parental Rating
Signal Quality
Now & Next Information
“Dolby D avialable”
appears when
selection is possible
Category
Day/ Time
Indicator
Setting up Your System
Channel (Service) Change
1. Press the numeric buttons (0~9) on the remote control to select the channel no.
you want.
2. Press the OK button on the Remote Control Unit and select the channel you want from
the Channel List.
3. Press the CH+/CH- buttons on the Remote Control Unit to select the channel you want.
Sound
available
Subtitle
available
Teletext
available
Signal Quality
Banner 1
Banner 2
Dolby D available
VIDEO FORMAT
You can select Video Format by pressing the “FORMAT” button.
When you press button the format will change by the turn 1080i 720p 576p
576i(PAL).
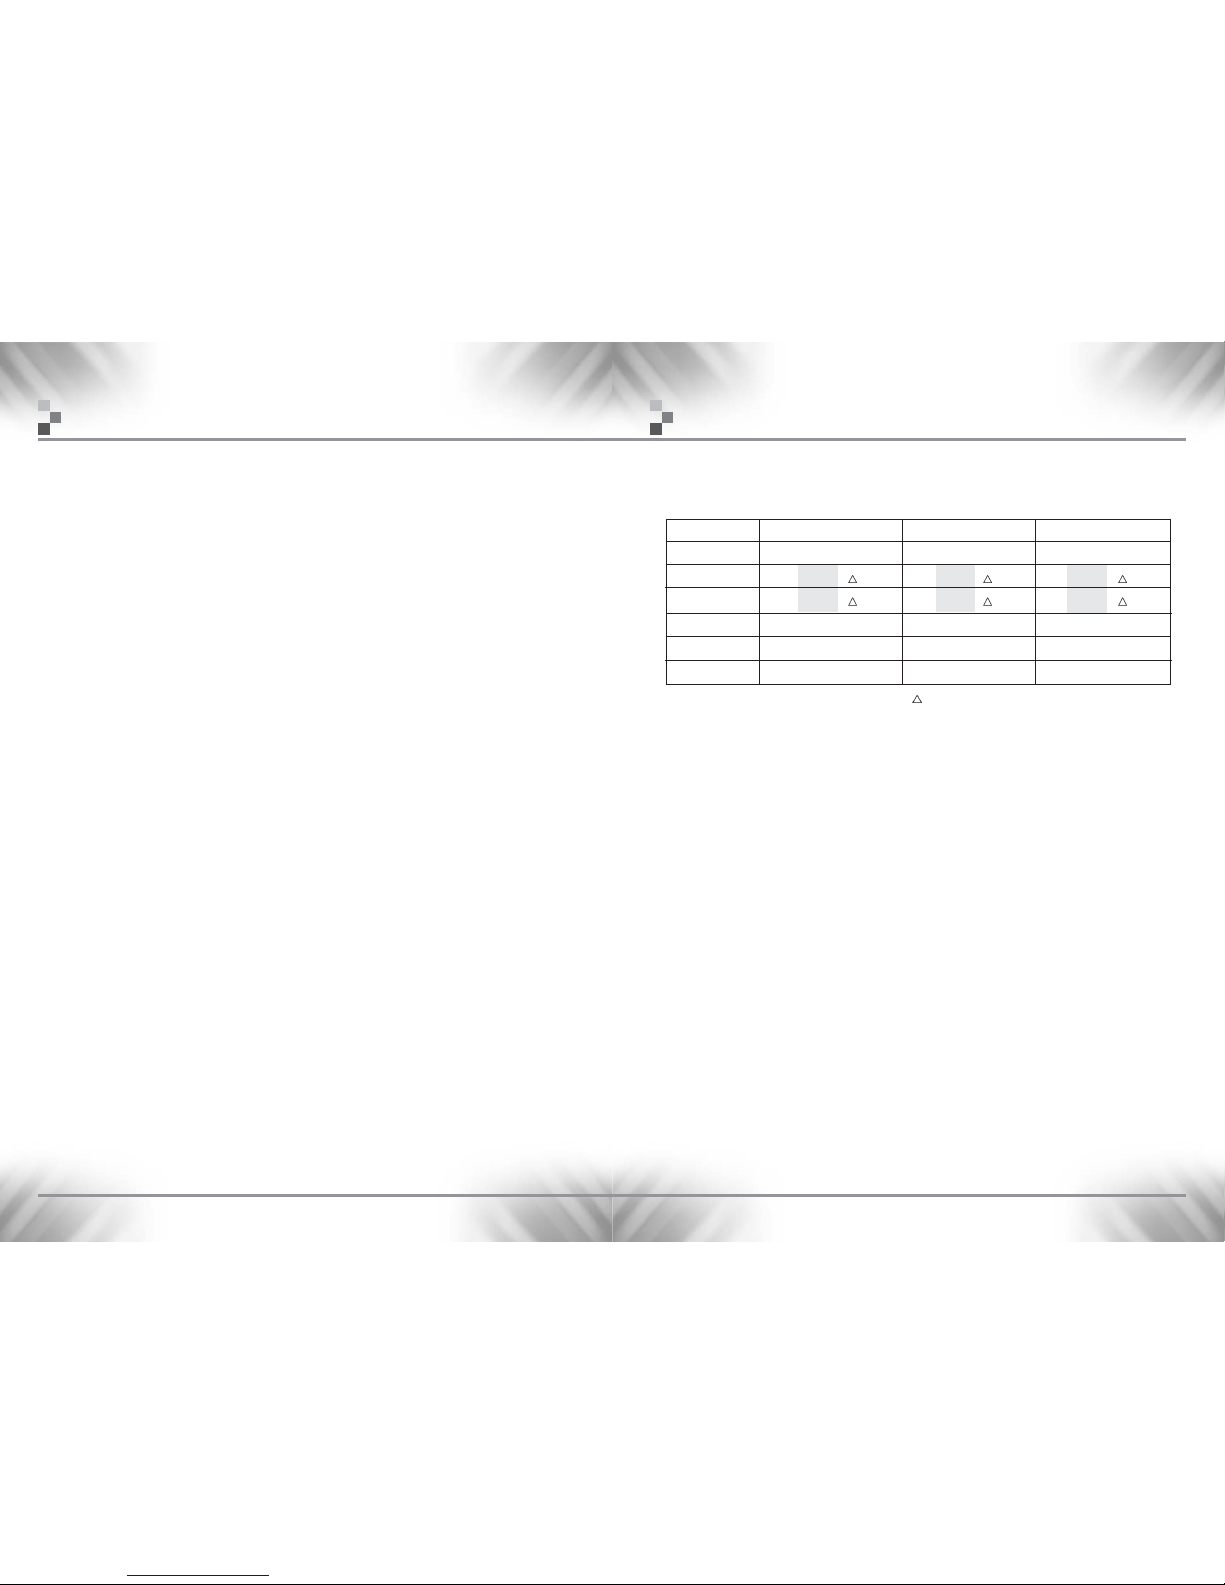
VIDEO OUTPUT(See table on page 39)
You may select one of the various Video Outputs by pressing the button “OUTPUT”.
Video Outs will chage by the turn. Component D/SUB DVI.
S-VHS, CVBS(Composite Video) will be availale with all modes except 720p mode.
Note : 1. S-VHS & CVBS(Video) output format
will not change regardless of the
selection.
2. OSD in 720p, 576p formats will not be
displayed through S-VHS & CVBS outs.
(OSD displayed only in 576i, 1080i
formats)
If You select,
Component(It is default setting):
YPbPr YPbPr
D-SUB No out
DVI No out
D/SUB:
YPbPr No Out
D-SUB activated
DVI No out
DVI:
YPbPr RGB
D-SUB No out
DVI activated
Page 10
- 19 -
DV-B800
- 18 -
DV-B800 High Definition Digital Terrestrial ReceiverHigh Definition Digital Terrestrial Receiver
Menu Operation
3. You can move into the desired submenu using UP/DOWN ( ) buttons.
4. Press the OK button to confirm your selection.
5. Press the MENU button to return to the previous menu or press the EXIT button to quit
the Menu system completely.
Note :
Press the OK button when there is no Menu
Window on the screen, and the simple channel
list will appear on the screen.
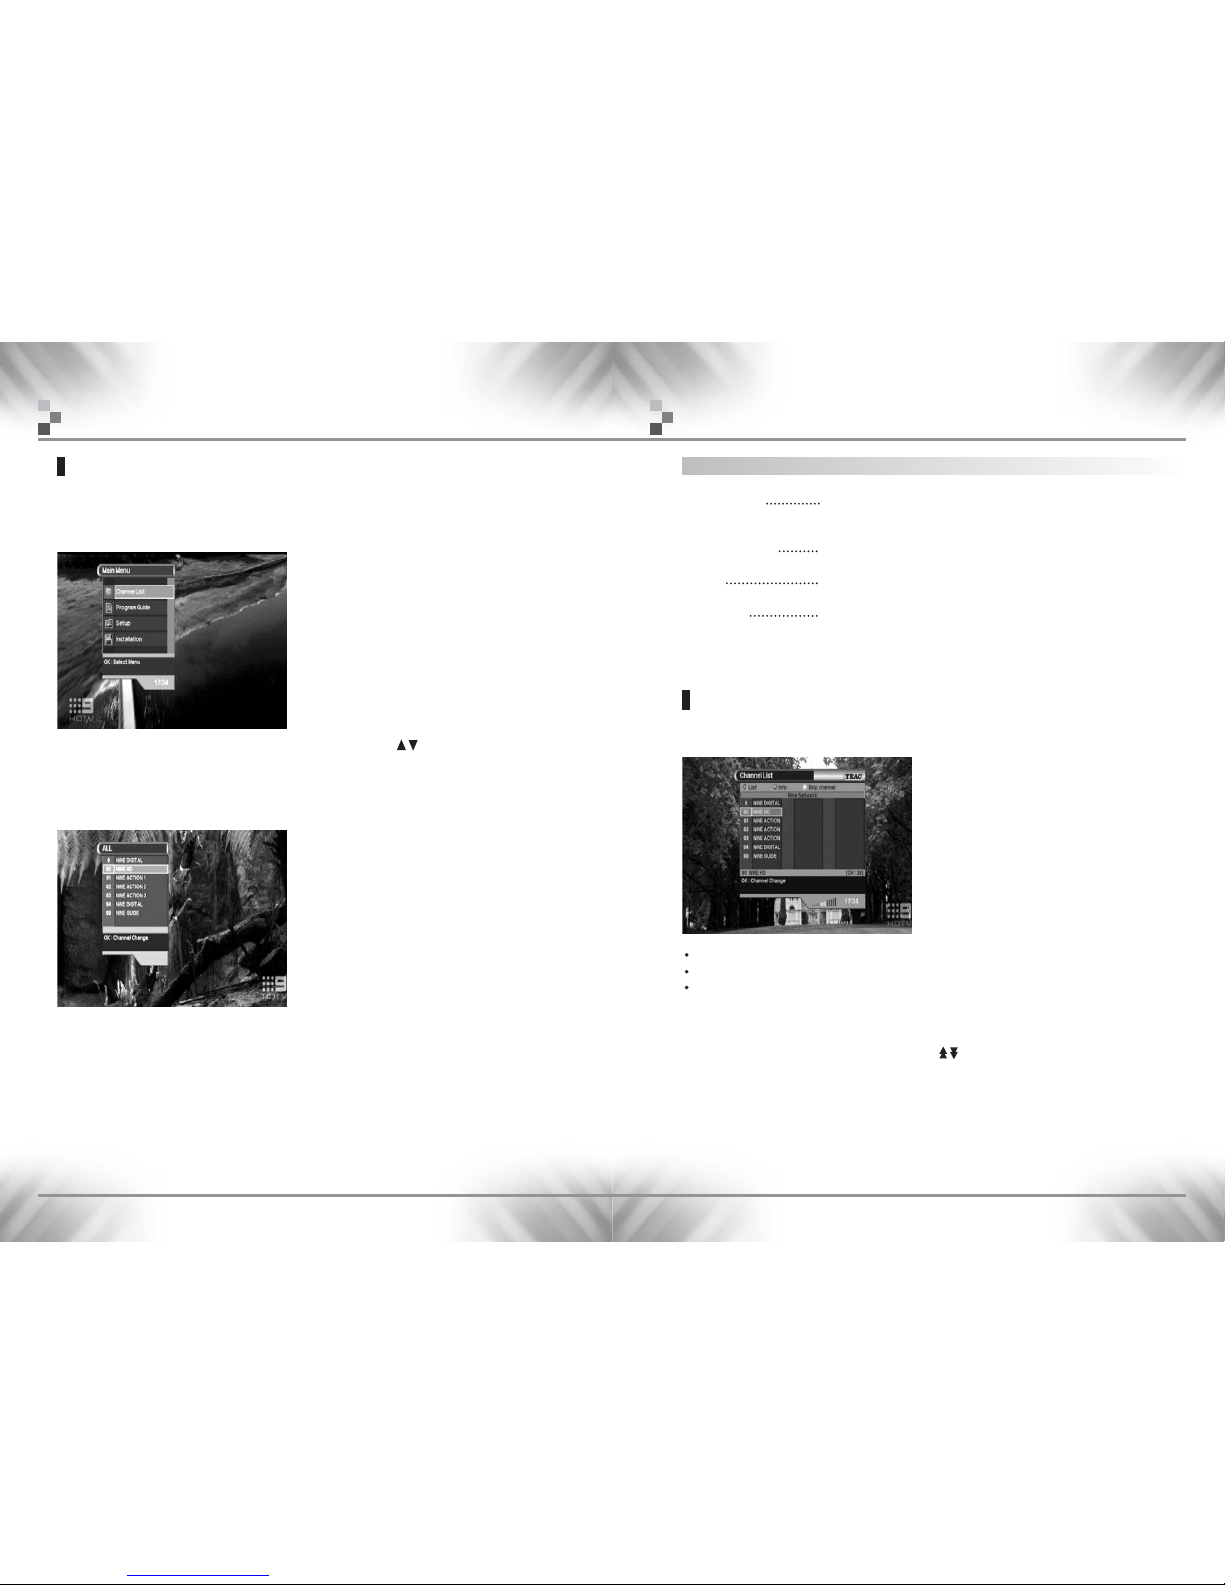
Main Menu
1. Turn on TV and your STB, after you have connected all peripheral devices to it.
2. Press the MENU button on the Remote Control Unit. You will see the Main Menu on the
TV screen as follow:
Menu Operation
Channel List
This menu consist of All Channel List, Channel Information & Skip Channel.
Select Channel List in the Main Menu. Then you will get a Channel List as follows ;
The colour buttons correspond to the following
channel function.
Red button : All Channel Lists
Green button : Channel Information
Yellow button : Skip Channel
This menu helps you to easily select the channel that you want to watch.
You can get information of channel number and the channel name.
Users can use the channel list to select which services to skip.
To watch a specific channel, first select the specific channel that you wish to watch by
using the UP / DOWN / LEFT / RIGHT buttons, and then press OK button on the Remote
Control Unit. Also use the PAGEUP/PAGEDN() buttons.
Main menu shows the following information.
Channel List
Shows the whole channel list stored in STB.
Shows the Channel Information and Channel Sorting.
Shows the information of Now, Next Programs.
Sets Menu Language, Screen Type, Banner Time, and Other Setting.
Sets Channel Search, Change PIN Code, Parental Lock, Receiver
Lock and Factory Reset.
Setup
Installation
Program Guide
Page 11
- 21 -
DV-B800
- 20 -
DV-B800 High Definition Digital Terrestrial ReceiverHigh Definition Digital Terrestrial Receiver
Menu Operation
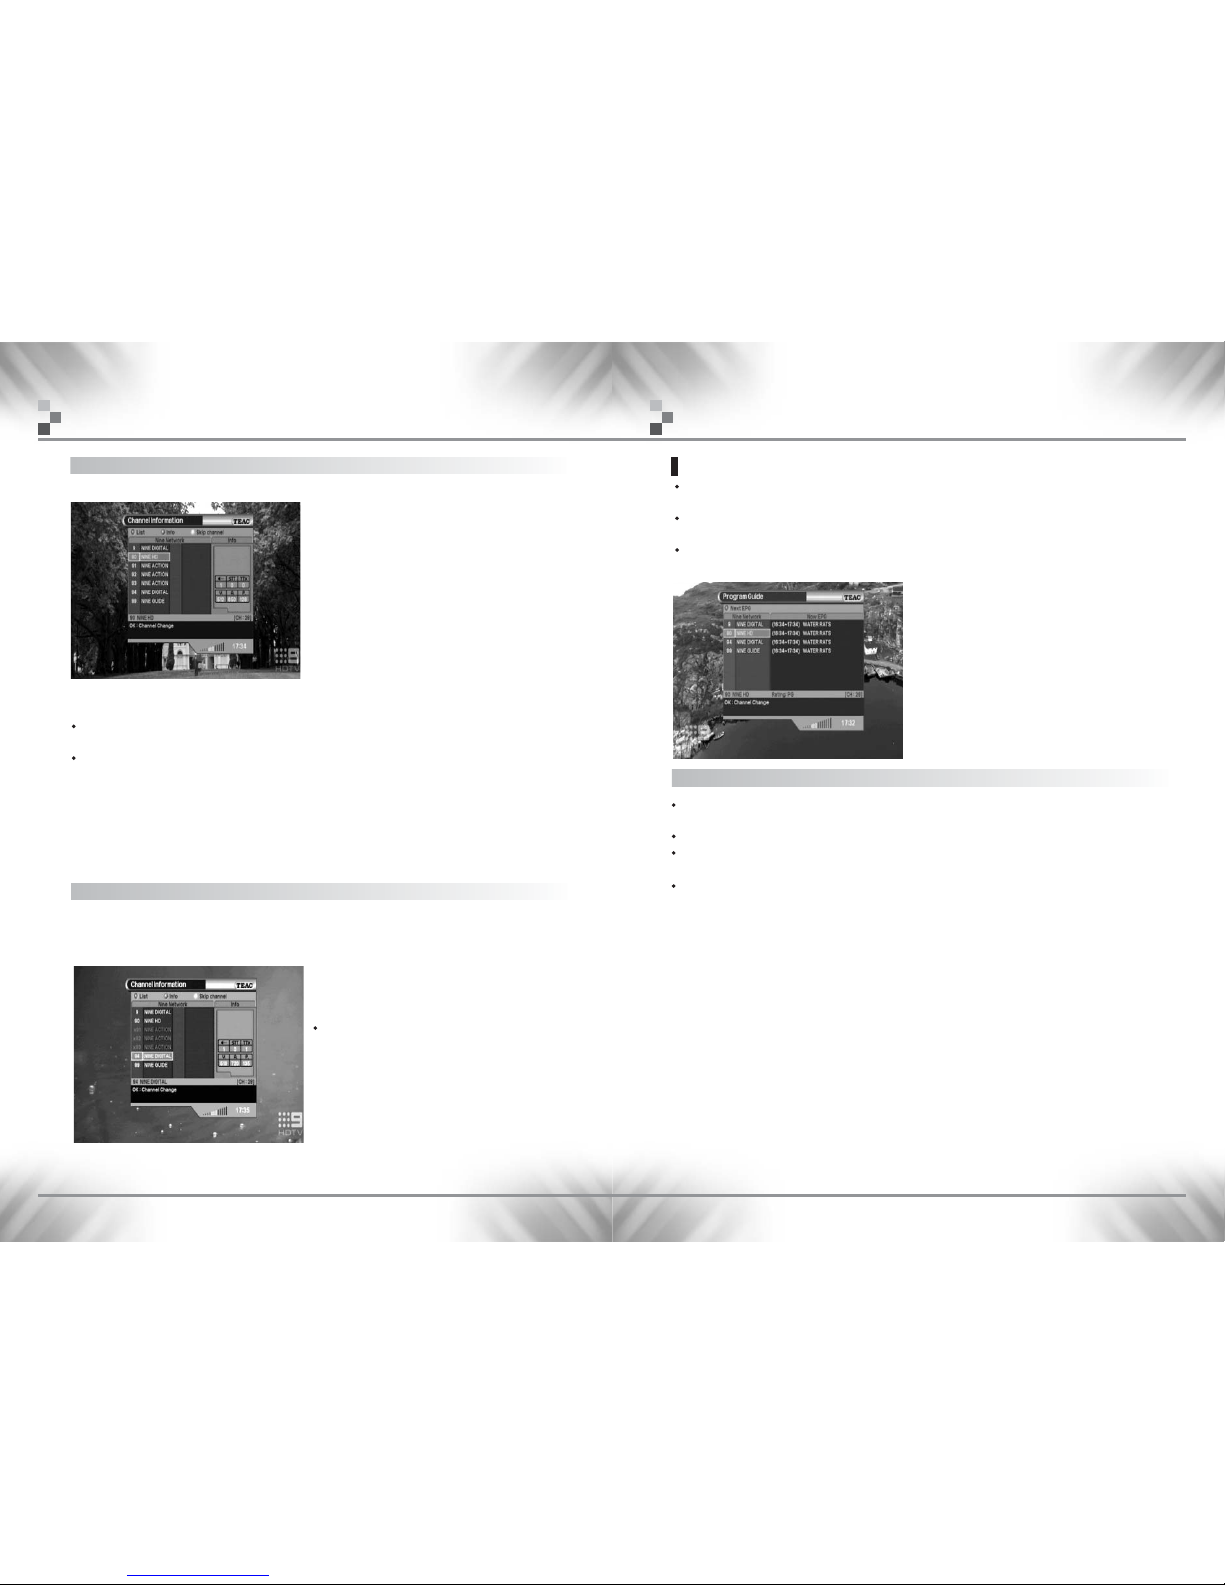
Channel Information
This mode helps you to watch the detailed information of a specific channel.
To watch a detailed information of a specific channel:
Press the Green button in the Channel List menu, and Channel Information window
will be displayed.
Press the CH+/CH- buttons to select the channel information you want.
The detailed information will appear on the right display window.
It consists of the following items: Category, Sound, Subtitle(STT), Teletext(TTX),
PID(Video, Audio and PCR) and Scrambling symbol.
Subtitle, Teletext, Scrambling symbol: These are automatically displayed when the
broadcasting station provides appropriate information.
Menu Operation
Skip Channel
Use the UP / DOWN/ LEFT/ RIGHT keys and move to the service you wish to skip.
Press the Yellow (or Orange) key to toggle the skip feature.
When you change channels, selected channels will be skipped.
Repress Yellow button to undo selection.
Program Guide
Your STB has an Electronic Program Guide(EPG) to help you navigate programs through
all the possible viewing options.
The TV Guide supplies information such as program listings and starting and ending
times for all available programs.
Select Program Guide in Main Menu or press the EPG button of Remote Control Unit
and the Program Guide screen will be displayed.
Now / Next EPG
The information may include : current time, name of the Now and Next Program,
the starting and ending time of the Now/Next Program.
Program information will be available only when it is included in the transmission.
When you press RED (SUB.T) button on the remote control unit, the Now & Next
program information will be toggled.
After moving the cursor (pressing CH+/CH-); press the OK button to swicth to that
service.
Note : To see detailed information about the event you want, press
the OK button on the appropriate event.
The EPG Service may not be available depending on the broadcaster’s
situation.
Page 12
- 23 -
DV-B800
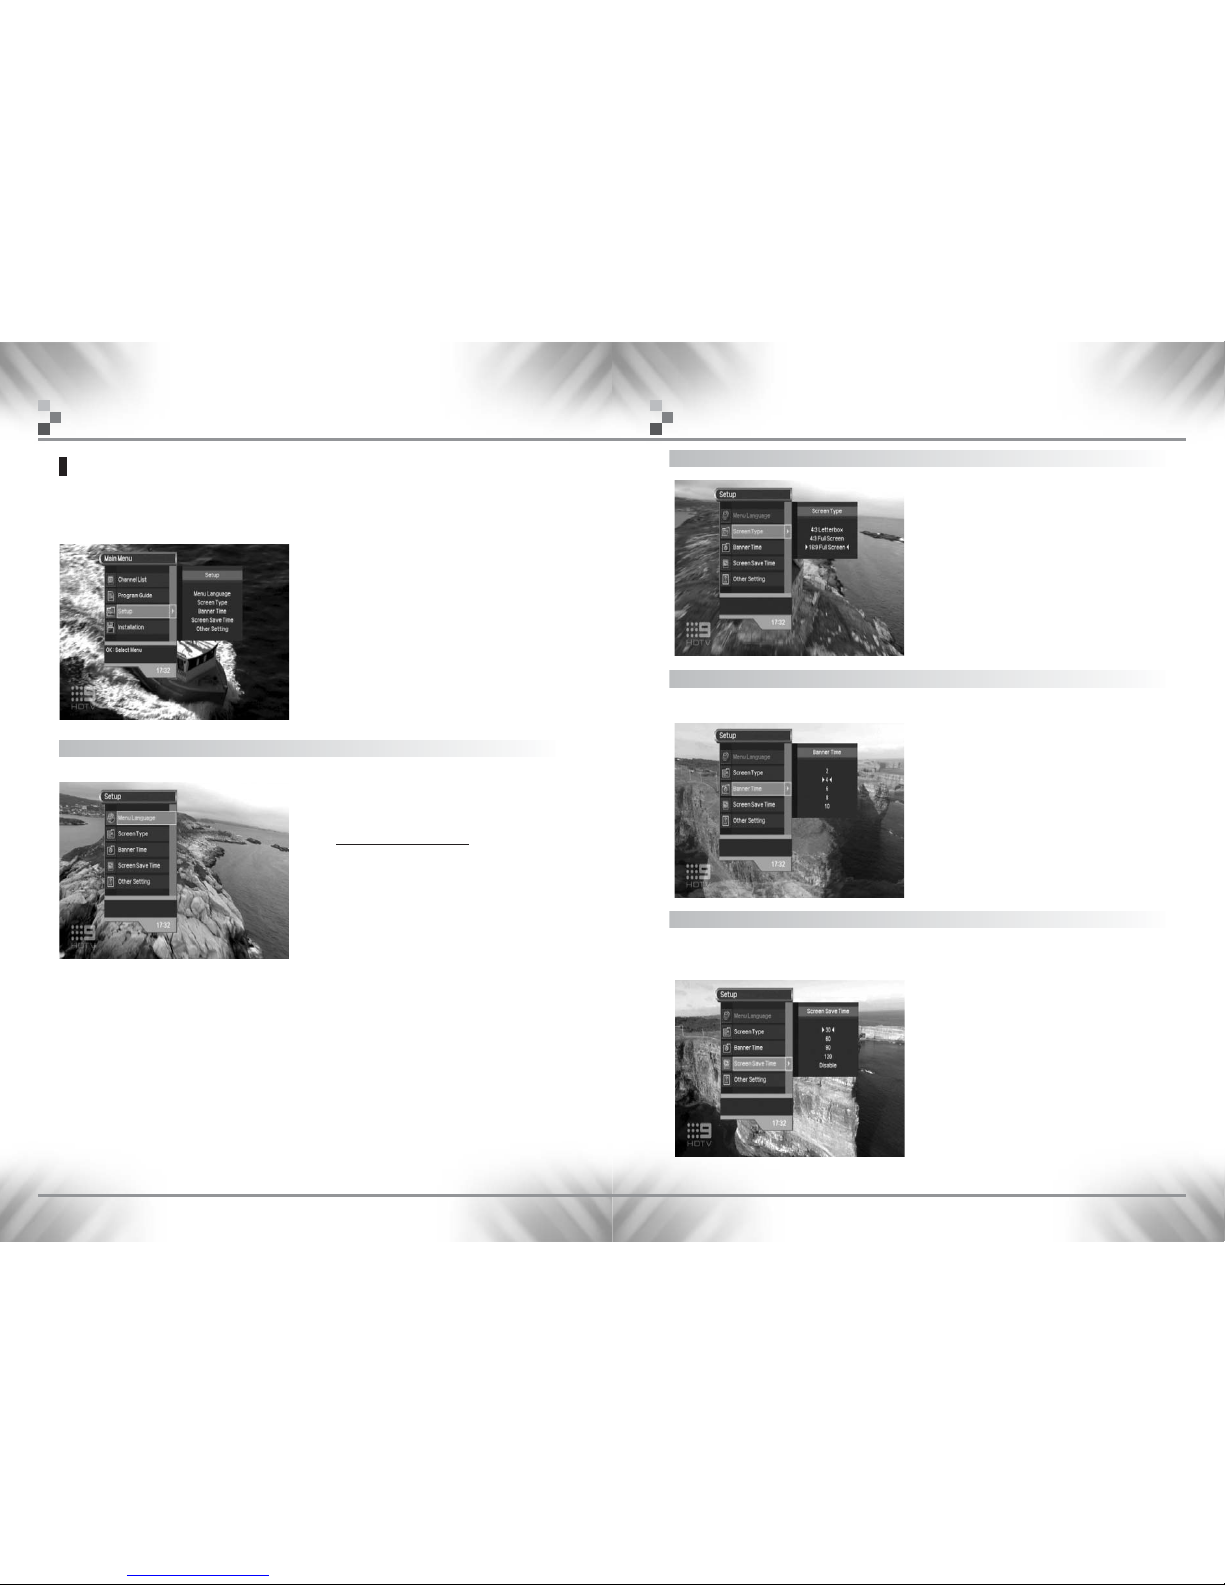
2. Screen Type
You can choose either "4:3" or "16:9"
according to your TV type.
Screen Type
4:3 Letter box
4:3 Full Screen
16:9 Full Screen
3. Banner Time
You can set the display duration of the information (banner) box displayed on the Screen.
The time ranges from 2 to approx 20 seconds.
4. Screen Save Time
This is to save your screen from possible damage caused by long-term still picture.
If you don’t select any on the menu in the limited time, the menu will be offed.
The numbers mean seconds.
Menu Operation
Note : Screen adjustment feature may be
available. Use only if absolutely
necessary.
Note :
PDP, LDC screen users recommended
to use it.
- 22 -
DV-B800 High Definition Digital Terrestrial ReceiverHigh Definition Digital Terrestrial Receiver
Setup
This menu helps you to set up Menu Language, VIDEO Output, Screen Type, Banner
Time, and Other Setting.
Select Setup in the Main Menu. The following submenu will show up on your TV.
1. Menu Language
This menu Language provided only in English.
Note : Due to the complexity of this product
only English is provided. Check
TEAC's website for future updates.
http://stb.teac.com.au
Menu Operation
Page 13
- 25 -
DV-B800
- 24 -
DV-B800 High Definition Digital Terrestrial ReceiverHigh Definition Digital Terrestrial Receiver
Menu Operation
Time Adjust
Note : Please select the state you live in.
(example: Time zone)
You can set your local time by adjusting the differences from GMT, according
to your location.
GMT : Greenwich Meantime-central European time.
OSD Colour
You can adjust the OSD Colour : Cyber, Wood, Marine and Evergreen.
Note : OSD = On Screen Graphical Displays.
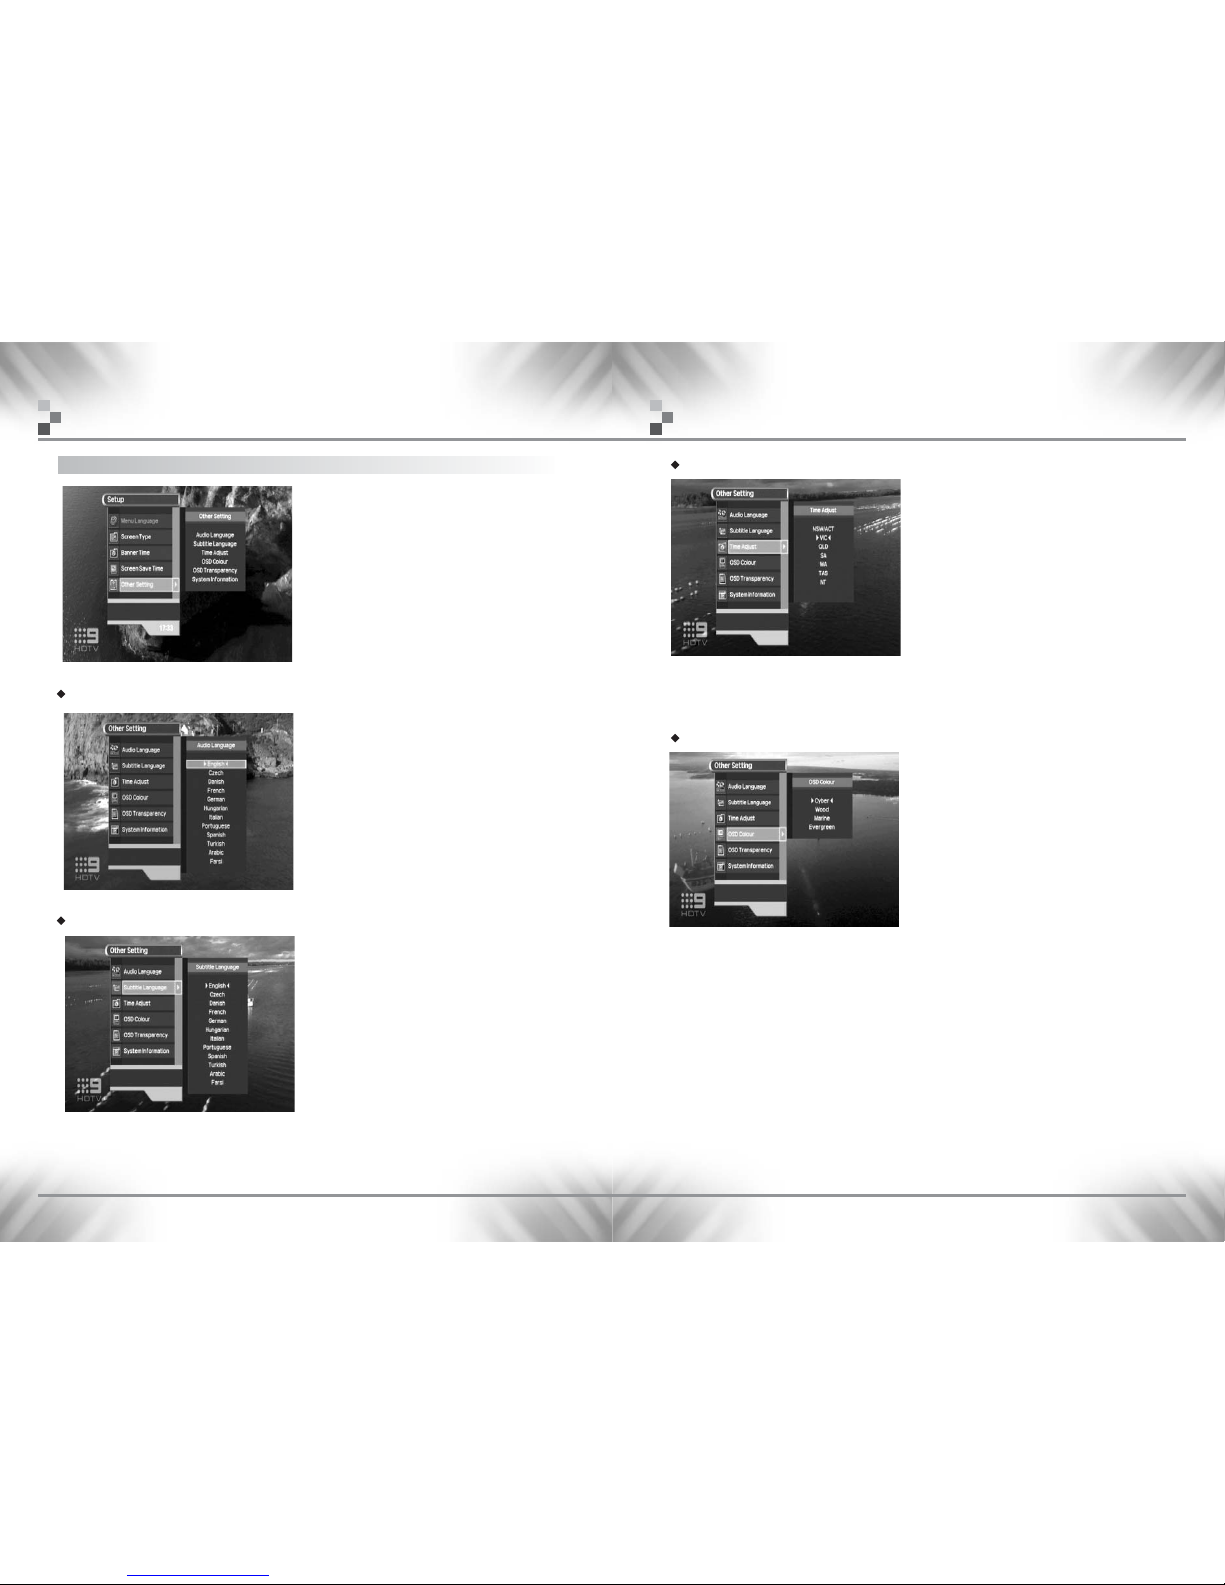
This mode helps you to setup Audio
Language, Subtitle Language, Time Adjust,
OSD Colour, OSD Transparency and System
Information.
5. Other Setting
Audio Language
Subtitle Language(DVB Bitmapped type Subtitles)
Note : Subtitle languages are only available if the broadcast network is
Transmitting extra languages.
Menu Operation
Select the default language for audio when
changing channels.
It is available for twelve languages.
Language Provided: English, Czech, Danish,
French, German, Hungarian, Italian,
Portuguese, Spanish, Turkish, Arabic and Farsi.
If any language is not selected then the default
language of current channel will be
automatically selected.
Note : This is not closed-captions.
Select the default language for subtitle when
changing channels.
Language Provided: English, Czech, Danish,
French, German, Hungarian,
Italian,Portuguese, Spanish, Turkish, Arabic
and Farsi.
Page 14
- 27 -
DV-B800
- 26 -
DV-B800 High Definition Digital Terrestrial ReceiverHigh Definition Digital Terrestrial Receiver
This Menu helps you to setup a variety of parameters necessary for receiving signal and
managing the channel information. To avoid loss of service, it is important to understand
the following table before you make changes.
Channel Search
Search Mode
AUTO (press RED SUB.T. Key) or MANUAL(press GREEN 'i' key)
The parameters required to receive digital TV are fully automatic from this product and
cannot be manually set.
FFT(2K,8K)
C/R (Code rate) 1/2 2/3 3/4 4/5 5/6 7/8
CONS(Constellation) QPSK 16-QAM, 64-QAM
G/I(Guard Interval) 1/32 1/16 1/8 1/4
Installation
Menu Operation
These are special parameters for
digital TV reception. The product will
automatically set these for you
}
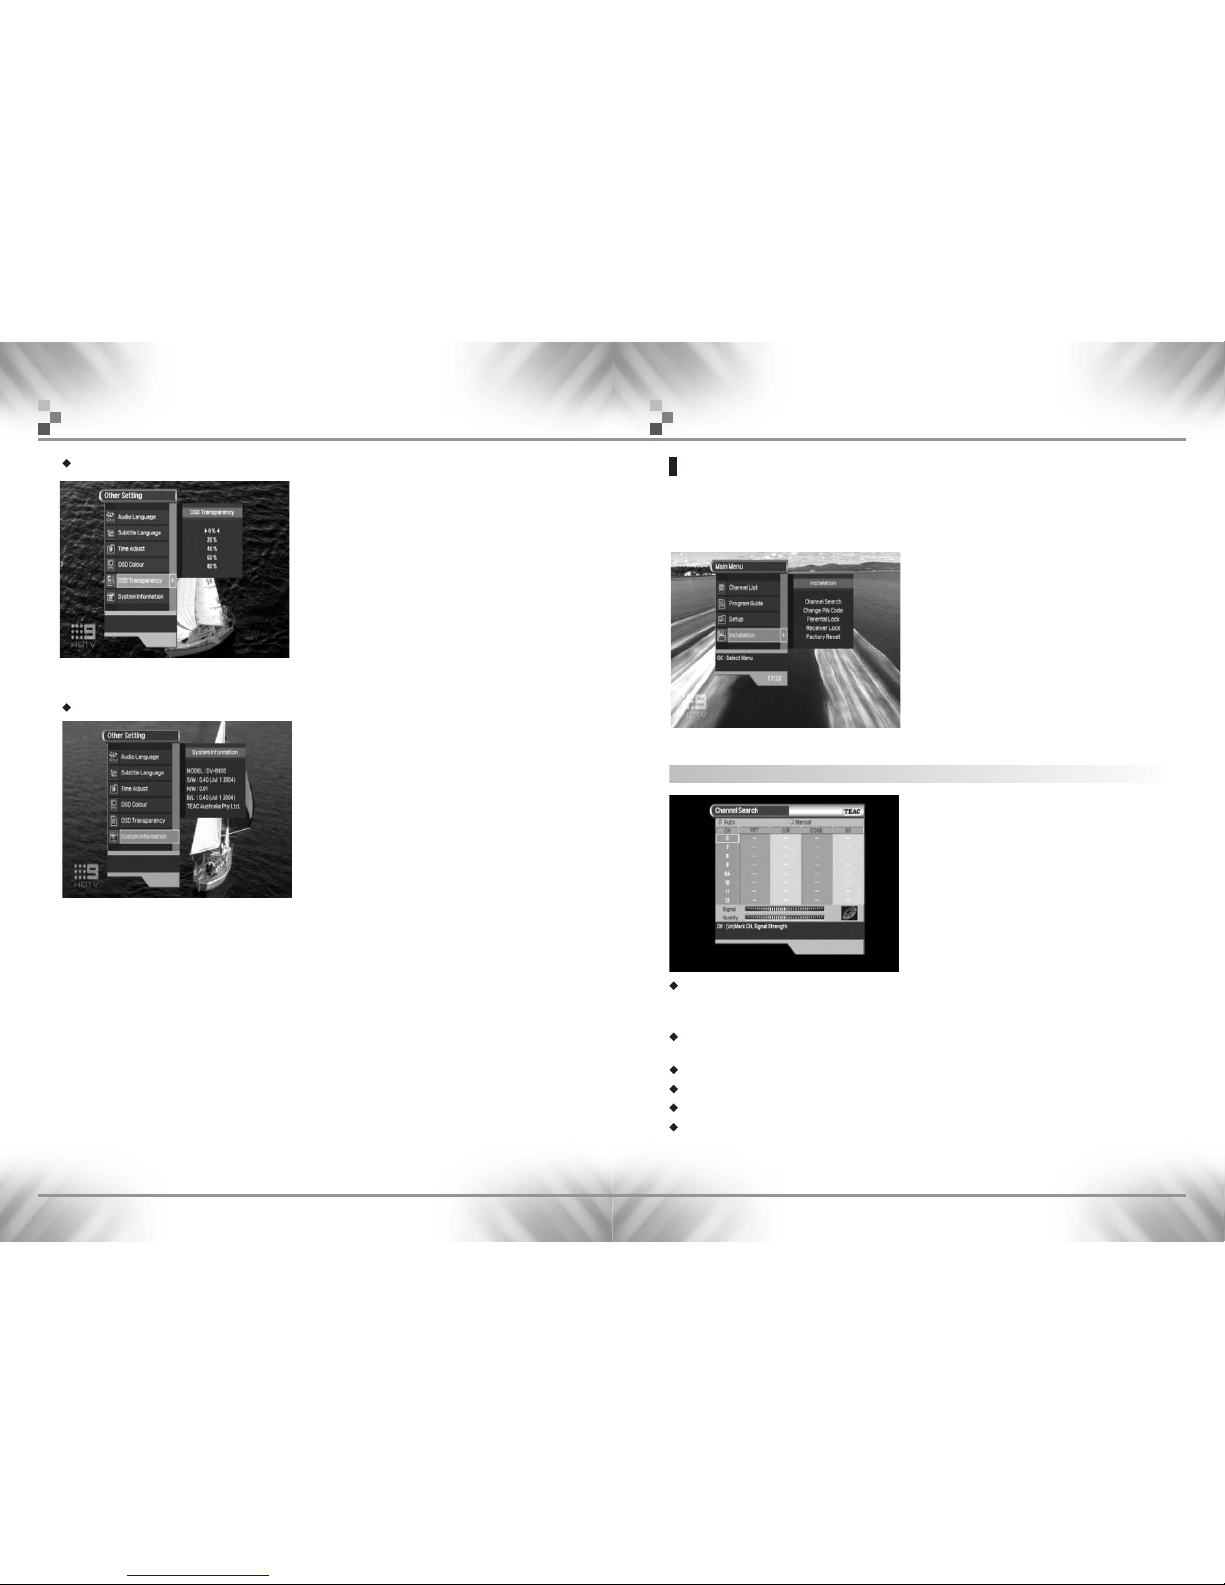
OSD Transparency
Select OSD Transparency type (0,20,40,60 or 80%).
System Information
Note:
S/W : Software Version
H/W : Hardware Version
B/L : Bootloader Version
Displays the system information: Model Name, S/W Version, H/W Version, B/L Version
and Company Name.
Note : If you contact TEAC Total Care Hotline, please have your serial number and
details (as per above) ready before speaking with our telephone operator.
Menu Operation
Page 15
- 29 -
DV-B800
- 28 -
DV-B800 High Definition Digital Terrestrial ReceiverHigh Definition Digital Terrestrial Receiver
2. Manual Channel Search
Manual channel search is more convenient to search a specific CH.
Like the Automatic Channel Search, Manual Channel Search also searches all services
broadcasted over a specific CH using its predefined information.
Press the CH+/CH- buttons to select the CH number you want to search.
Then press the OK button to place a tick (tag) beside it.
Select the CH to search manually. Each CH has its own parameter value.
Press the GREEN (Manual) button to start searching for services.
Press the MENU button to return to the previous menu.
Press the EXIT button to exit of stop searching for services.
Use the MENU button to stop Channel Search.
When the Channel Search is completed, press OK button to save the result.
Press the MENU button to return to the previous menu.
Note : The Manual Channel Search may take a few minutes, depending upon how many
CH(Networks) were ticked(tag),before press GREEN key.
Menu Operation
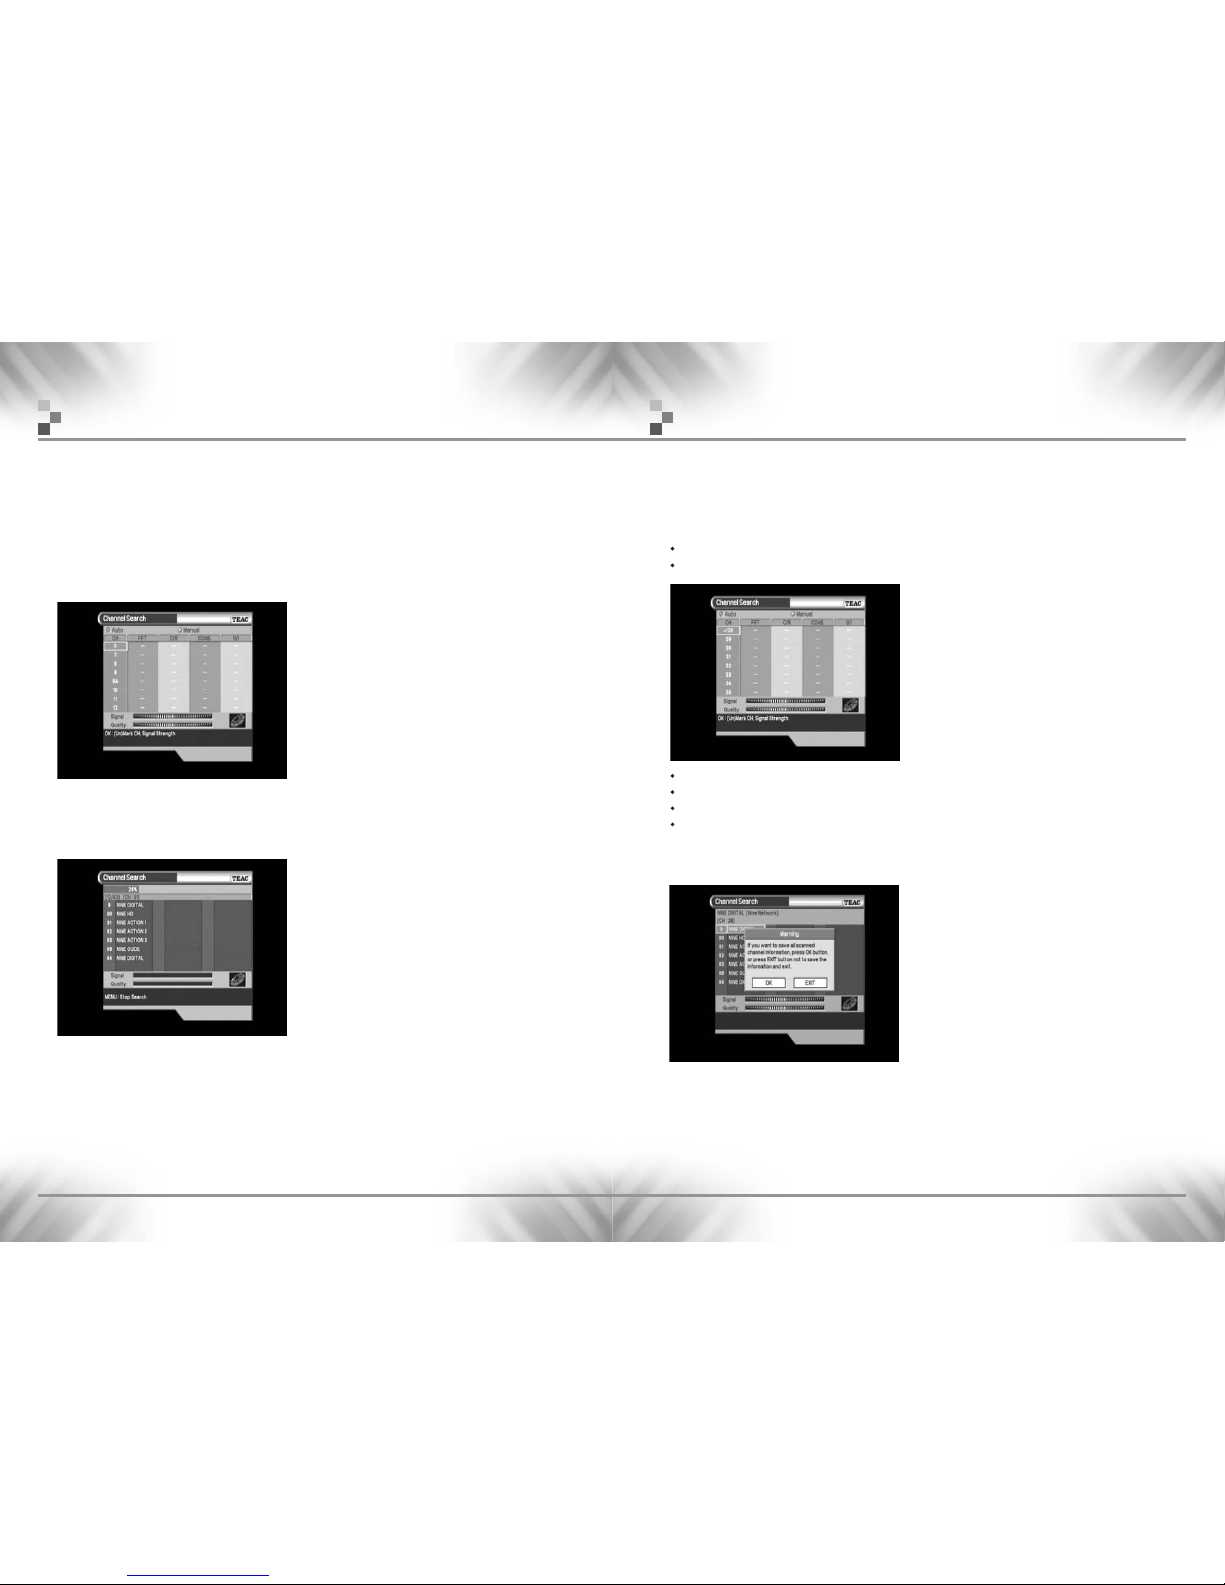
1. Automatic Channel Search
Automatic Channel Search helps you to automatically load the channel information of all CH
contained.
1. Press the CH+/CH- buttons tp select Channel Search in the installation menu and press
the OK button.
The channel search window as shown below will be displayed.
2. Press RED (SUB.T) button to start the automatic channel searching.
The bar on the top of the screen shows the progressive status of the channel search.
3. The services found will be listed once auto search has finished.
Simply press OK key to store.
Menu Operation
Page 16
- 31 -
DV-B800
- 30 -
DV-B800 High Definition Digital Terrestrial ReceiverHigh Definition Digital Terrestrial Receiver
Menu Operation
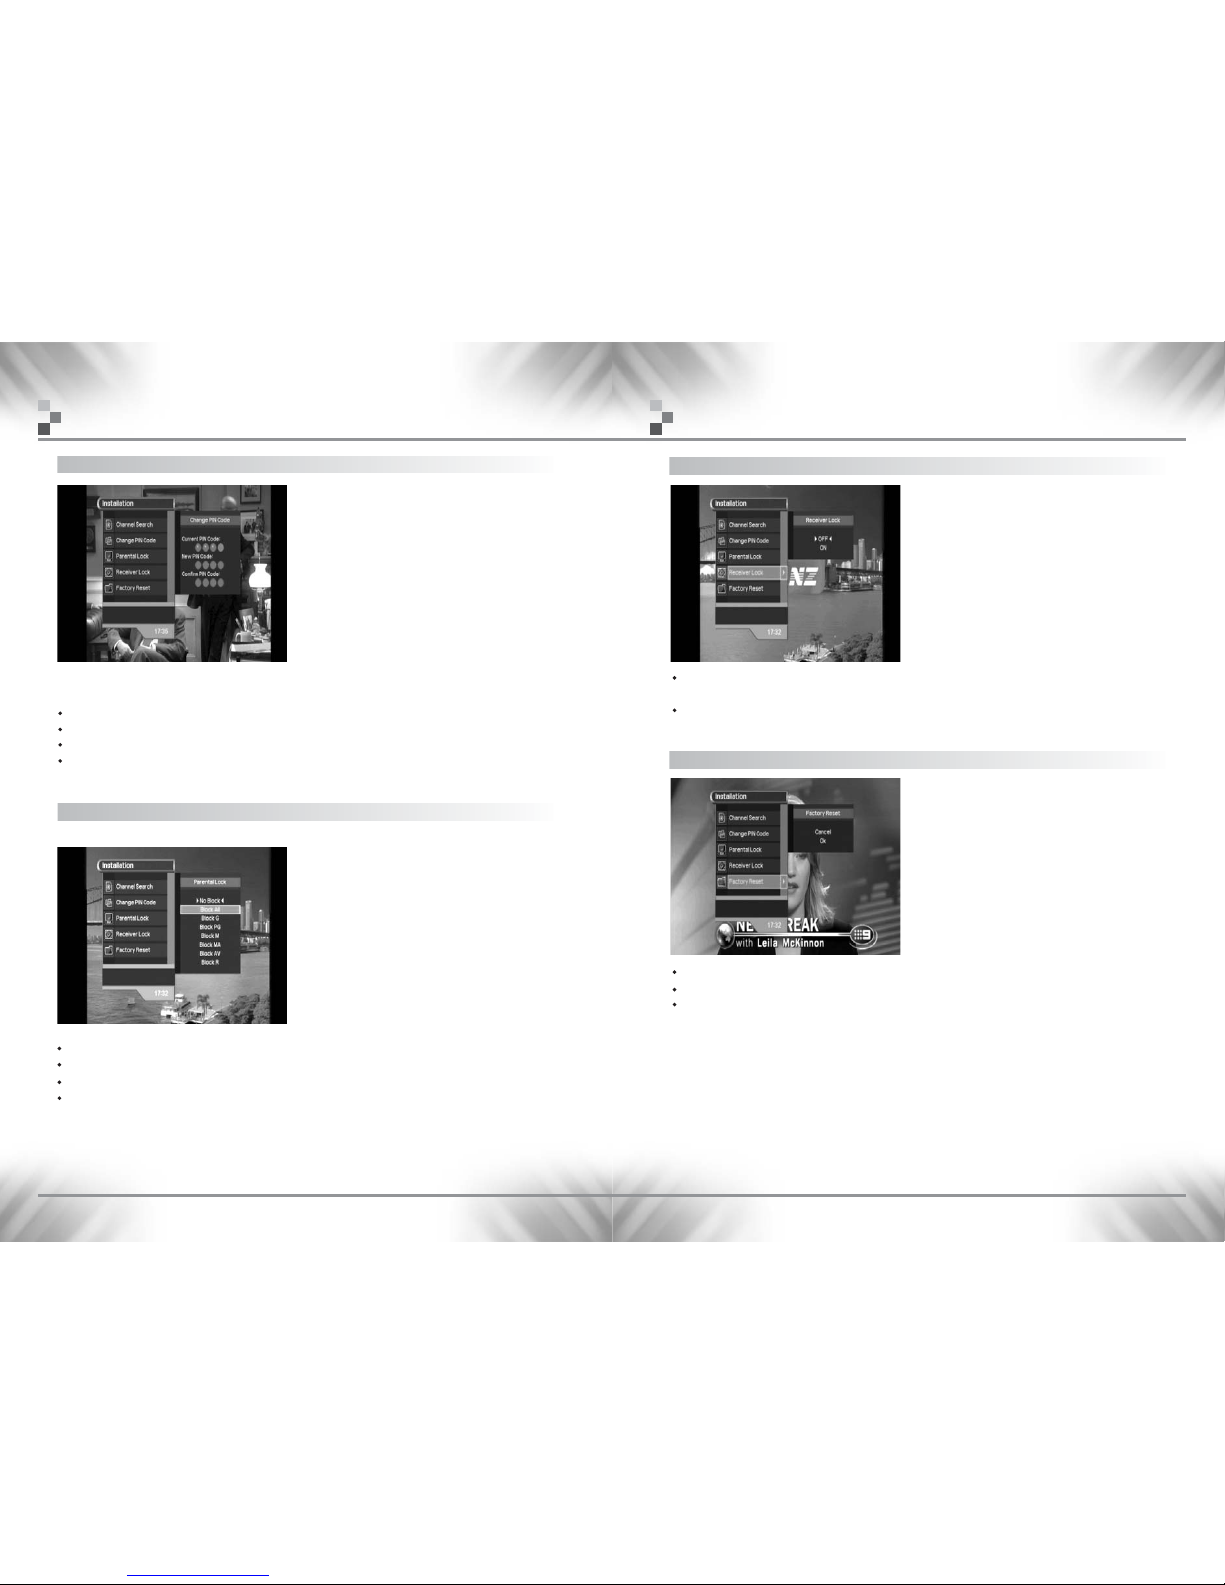
Receiver Lock
To lock the receiver, select Receiver Lock in the installation menu and select "ON" by
using the CH+/CH- and OK buttons.
Now the receiver is locked. Whenever you try to start STB, a window appears which
asks you to enter your PIN Code before picture appears on the screen.
Factory Reset
All data you are using will be deleted and the default data will be loaded.
If you select "OK", it asks your confirmation.
If you don’t want to reset, press MENU button or EXIT button to exit this menu.
Change PIN Code
Note : The pin number is required to access
the installation/Channel search and Parental
control menus.
You can change your PIN(Personal Identification Number) Code from factory
default value "0000" as follows:
Select Change PIN Code in the Installation Menu.
Then you will be asked for a New PIN Code. Enter the new PIN Code.
The system will ask you to enter it again to confirm.
If you forgot the PIN code, press SUB-T(Red), I(Green), Audio(Orange),
Pre-channel(Blue) & MENU in sequence.
Parental Lock
You can prevent children or unauthorized people from watching programs.
Use the LEFT/RIGHT buttons to move to the Parental Lock position.
Select Parental rating values you want using CH+/CH- buttons.
And then press the OK button.
Once the Parental is locked, whenever you watch the locked channel, you should
enter the PIN code.
Note : The parental rating values used in Australia refer to a set of Australian
Classification codes, which may be different to those used in other parts of
the world.
Menu Operation
Parental Rating Values
No Block : Not Classified
Block All : Lock all channels
Block G and above : General
Block PG and above : Parental Guidance
Block M and above : Mature Audience (15+)
Block MA and above : Mature Audience (15+)
Block AV and above : Adult, Strong Violence (15+)
Block R and above : Restricted 18+
Page 17
- 33 -
DV-B800
- 32 -
DV-B800 High Definition Digital Terrestrial ReceiverHigh Definition Digital Terrestrial Receiver
Troubleshooting
Check the main power cord and check that it is
plugged into a suitable power outlet.
Check whether STB is in Standby mode.
Ensure that the STB is switched on (see above).
Check the video output port (VIDEO) is firmly
connected to the TV or VCR.
Check that you have selected the correct channel or
Video Input on your TV.
Check the brightness level of the TV.
See “No Picture” above.
Check the signal level, if this is low then try to
adjust the alignment of your antenna.
See “No Picture” above.
Check the volume level of the TV and STB.
Check the Mute status of the TV and STB.
Point Remote Control Unit directly towards the STB.
Check and replace batteries.
Disconnect STB from power point for 30 seconds
and re-connect.
Adjust the direction of your antenna
Check the “Signal Strength” and the “Signal Quality” in
the channel list or channel search menu
Does not display any
message on the front panel
or STB has no power.
No Picture
Breaking Picture
No Sound
Remote Control does not operate
STB is locked and doesn’t
operate.
No or Bad Signal
Problem Solution
Something wrong with STB
About On-Screen Error Message
More Information available at http://stb.teac.com.au
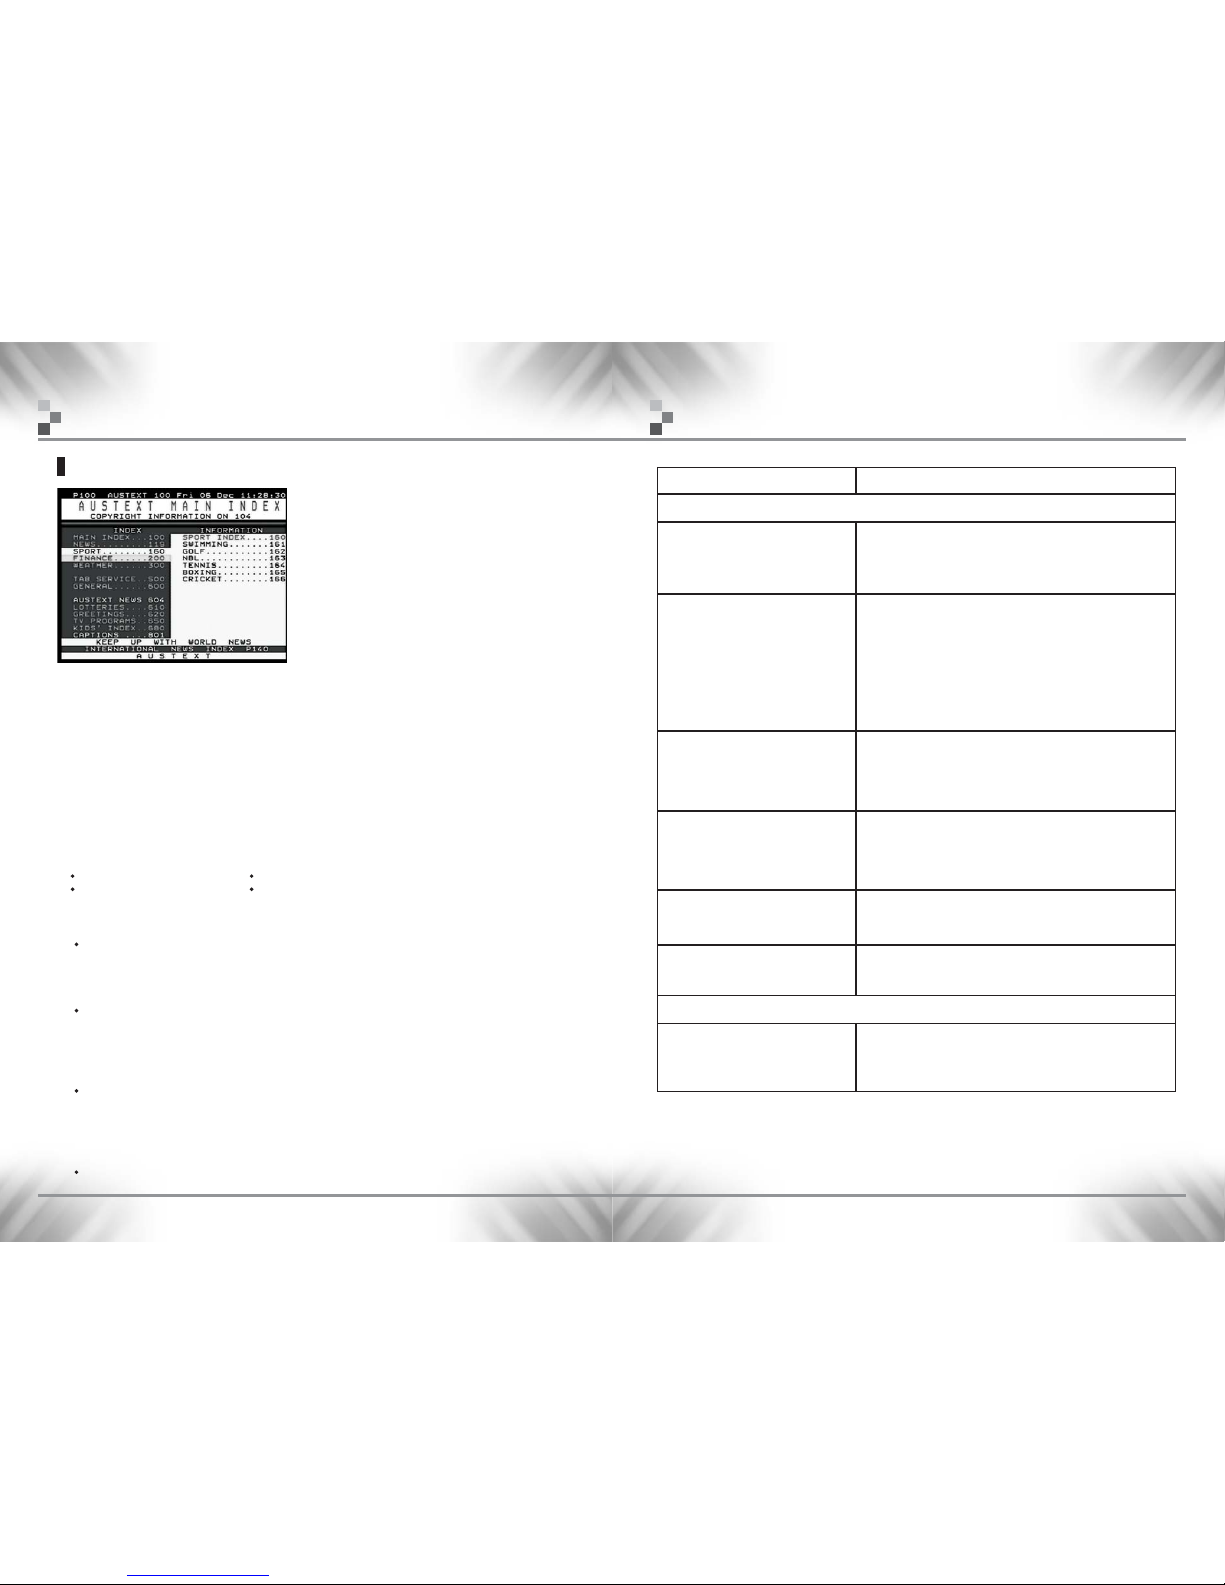
Teletext Navigation
This STB has Teletext software emulator which
enables all TV sets to navigate Teletext pages.
To start navigation of Teletext pages, press
Teletext button. When Teletext is activated,
buttons below mentioned will perform different
features by each mode.
To stop navigation & return to program press
“Teletext” button.
Note : The AUSTEXT Service is available on
the SEVEN Network.
1) Teletext button : Toggle Teletext mode
2) Menu button : Jump to page100 in Teletext mode
3) Numeric button : Direct page selection in Teletext mode
4) Up/Down button : Next/Previous Page
5) Left/Right button : Next/Previous Subpage
If two subpages with a subcode between 1 and 99 are received, the subpage mode is
automatically activated and the subpage bar appears in the bottom row.
The symbol at the left side is the subpage overwrite mode.
In this mode the display is updated with the last received subpage.
6) Color (Red, Green, Yellow, Blue) buttons
6-1) Top Text Mode : The broadcaster usually sends Teletext in a way that each Teletext
page is linked with other four pages.
Red button : link #1 Yellow button : link #3
Green button : link #2 Blue button : link #4
6-2) Display Functions Mode : To select the display functions of the Teletext decoder the
user has to press the OK button on the RCU.
Red button : Toggle Hold mode
-The stop mode holds the currently displayed subpage.
-This means, that it can not be overwritten by a new incoming page with the same
subpage number.
Green button : Toggle Reveal mode
-The text marked as "conceal" is displayed as spaces when reveal mode is off.
-Enabling reveal mode displays the concealed text.
-Broadcasters use this feature, e.g. for a Teletext quiz(the answer is sent as a
'concealed' text).
Yellow button : Change Display size
-This command switches between three possible display sizes.
-normal size (all Teletext rows are displayed).
-double size of the upper half, only the upper half of the Teletext page is displayed.
-double size of the lower half, only the lower half of the Teletext page is displayed.
Blue button : Toggle Mix mode(transparent background)
Menu Operation
Page 18

- 35 -
DV-B800
- 34 -
DV-B800 High Definition Digital Terrestrial ReceiverHigh Definition Digital Terrestrial Receiver
Technical Specifications
A/ V & Data In / Out
VIDEO : RCA 4-pin for YPbPr, RGB, CVBS
AUDIO : RCA 2-pin for Volume & Mute Control
(Resolution : 24bits, Max. 2Vrms)
D-SUB : 15Pin D-sub Type(RGB video out)
DVI : Digital Visual Interface
USB : USB Ver 1.1(Use only USB memory devices)
RS232C : Transfer rate 115,200 bps
9 Pin D-sub Type
S/PDIF : Digital Audio Optical output
Physical Specification
Size (W x H x D) : 340 x 246.4 x 60 mm
Weight (Net) : 2.07 Kg
Operating Temp. : 0°C to +45°C
Storage Temp. : -15°C to +65°C
Feature & specification may change without prior notice.
Technical Specifications
Tuner & Channel
Input Connector : IEC 169-2, Female
Frequency Range : 174 MHz to 820 MHz
Signal Level : 35dBuV to 70dBuV
Demodulation : COFDM 2K/8K-Carrier
Input Symbol Rate : 24.1 Msymbol/s FEC Decoder
Convolutional Code Rate 3/4
MPEG Transport Stream A/V Decoding
Transport Stream : MPEG-2 ISO/IEC 13818
Transport stream Specification
Profile Level : MPEG-2 MP@ML/MP@HL
Input Rate : Max 90 Mbit/s
Aspect Ratio : 4:3, 16:9
YPbPr : 1920 1080i, 1280 720p, 720 576p
MPEG : Layer I & II
Dolby Digital : Decode and Down Mixing
Output Mode : Single Channel/Dual Channel/Joint Stereo
Sampling : 32, 44.1 and 48KHz
Main Resources
Main CPU : TL956SH, 64bit, MIPS
Flash Memory : 8Mbyte
SDRAM for MPEG :
SDRAM for SYSTEM : 64Mbyte
SDRAM for GRAPHIC :
Power Supply
Input Voltage : AC 100 ~ 230V ~ 50/60Hz
Type : SMPS
Power Consumption : Max. 30W
Standby Power : Max. 4W
Protection : Separate internal fuse.
Video Resolution
Audio Decoding
Page 19

- 37 -
DV-B800
- 36 -
DV-B800 High Definition Digital Terrestrial ReceiverHigh Definition Digital Terrestrial Receiver
pages regardless of your television. To activate Closed Captions, press SUB.T key.
Q. Can I use my digital receiver on any television?
A. Yes, the box has a standard video output that may connect to your television’s AV input.
This will however only provide a standard definition picture.
Q. How do I tune in services on my digital receiver?
A. Connected the box to your TV and your aerial to the digital receiver. Then simply press
the RED button (SUB.T) and the box will automatically tune all services. Once finished,
the box is ready to use.
Q. Can I watch a multiview events on my digital receiver?
A. YES. This product has both multichannel and multiview capability. Press the M-View
button on the remote controller to navigate to 'other views.'
Also you can check the DBA website (http://www.dba.org.au) for widescreen
programming and special broadcasts.
Q. How do I know what is showing in Widescreen 16:9?
A. Check the DBA website (http://www.dba.org.au) for widescreen programming.
Q. Can I use my digital receiver on a Widescreen or Normal sized television?
A. YES.There is support for 16:9 Widescreen and 4:3 Normal formats. Press the button
called ASPECT on the remoite and it will switch formats.
Q. How do I use the EPG (Electronic Program Guide)?
A. Simply press the button labelled EPG on the remote. It will show the programs currently
showing NOW on that television network. If you would like to see what's coming on
next, press the RED button (SUB.T).
Q. How do I change on-screen display colours (as a personal preference?)
A. There is a selection of 4 colour schemes (Cyber, Wood, Marine, Evergreen). Refer to
the menu on the screen to change.
Q. What is the System Information menu on the digital receiver?
A. The system information includes the software version (S/W), hardware version (H/W)
and bootloader (B/L) version numbers. When you contact TEAC for support, please
have these details ready.
Frequently Asked Questions
Frequently Asked Questions
Q. What best described High Definition Picture?
A. High Definition picture can provide up to 4x better resolution that standard definition.
Q. Where can I find the latest information for my digital product?
A. Check http://stb.teac.com.au for all details.
Q. Should I upgrade the software inside my TEAC box?
A. If your are experiencing technical difficulties with your Product please check the website
http://stb.teac.com.au for known issues. Asoftware upgrade may be available for your
product.
Q. I do not have a computer, and would like to upgrade my box. What can I do?
A. Contact your nearest TEAC office or email us at [email protected] or telephone TEAC
Total Care on 1800 656700 9am to 5pm EST.
Q. What best describes Standard Definition Television?
A. You get DVD quality picture and CD quality sound on every network, all the time.
Q. The clock on my digital receiver is wrong. Why?
A. Make sure that your receiver is set to the correct time zone. (Refer to manual about
selecting state you live in) Unlike other electronic appliances in your house, the clock is
set by the broadcaster and not TEAC's box. Therefore if the clock is still wrong, change
to another television network to see the correct time.
Q. On my digital receiver I have some channels numbered 350, 351, 352, etc. Why?
A. The STB supports logical-channel-numbering. In some areas the broadcaster may not
be sending their channel number. The Australian requirement for STB design says that
any services without a channel allocation are to be given a number from 350 to 399.
The TEAC box will do this automatically for you.
Q. My digital receiver has new channels on it and I did not re-tune anything. Why?
A. The product supports network-updating. Therefore, if a broadcaster begins sending new
services (multichannel or multiview), the box will automatically add them in for you.
There is no need for you to re-tune anything.
Q. Can I still use it to see Closed Captions?
A. YES. The receiver has its own teletext decoder which enables you to nevigate teletext
Frequently Asked Questions
Page 20
- 39 -
DV-B800
VIDEO OUTPUT
- 38 -
DV-B800 High Definition Digital Terrestrial ReceiverHigh Definition Digital Terrestrial Receiver
Frequently Asked Questions
Q. Does the digital receiver support parental control of programs?
A. YES. The parental code can be set to block certain programs.
Q. What are MPEG Artefacts?
A. Somtimes the picture may appear to be slightly blocky. These are known as MPEG
artefacts. They are directly related to MPEG compression at the broadcast side. The
extent of artefacting is related to how fast the picture is moving, numbers of colours,
quality of the original material, the MPEG encoder used at the time, etc. This is not a
problem with the STB.
Q. I cannot get teletext to function?
A. The AUSTEXT Service is available on the Seven Network.
Q. Closed Captions don't always appear! Why?
A. Not all programs are captioned. News programs should always have captions available.
Q. Can I record Closed Captions on my VCR?
A. Yes, you may. You will need to connect the 3RCA cable(as supplied) to the Video & Audio
input on the VCR. Using the VCR remote, select ‘AV’, ‘EXT’on ‘Line In’ selection. Set the TV
to the video channel. The set top box picture will appear. Now it may be recorded.
Q. Can I record the improved picture on my VCR?
A. Refer to the above answer.
Q. I cannot get the YPbPr connection to work properly. The colours seem wrong.
What can I do?
A. Check to make sure the coloured leads are connected correctly. Secondly, press the
OUTPUT key on the remote to select component mode. The front display will momentarily
display ‘ypb’.
Q. I cannot get the DVI connection to operate. What can I do?
A. Using DVI can be tricky business. Make sure the RGB mode is selected (press OUPUT
key on remote). Secondly, make sure that your cable is correct type called DVI-D and that
your display device can accept it. Some displays also require a signal with HDCP. This
type of displau may be incompatible with this receiver.
Output selection
Component D-SUB DVI
Video Format 1080i 720p 576p 576i 1080i 720p 576p 576i 1080i 720p 576p 576i
CVBS
OX1OOX1OO X1O
S-VHS
OX1OOX1OO X1O
YPbPr
OOOOX XXXXXXX
D-SUB
XXXXOOOXX XXX
DVI
XXXXOOOXOOOX
O : Working X : Not working
1
: Video out only(no OSD)
Page 21
TEAC TOTAL CARE
info
@
teac.com.au
or visit our website at http://www.teac.com.au
Freecall telephone 1800-656700 between Monday to Friday - EST 9am to 5pm
TEAC CORPORATION 3-7-3, Nakacho, Musashino-shi, Tokyo 180-8550, Japan.
Phone : (0422)52-5081
TEAC AUSTRALIA PTY.,LTD. A.B.N. 80 005 408 462
TEAC Melbourne Office (Head office)
Former Royal Mint Building 280 William Street Melbourne VIC 3000
Phone : (03) 9672 2400
TEAC Sydney Office
Unit 8, 20-22 Foundary Rd Seven Hills NSW 2147
Phone : 1300 30 8322
TEAC Brisbane Office
335 Montague Road West End QLD 4101
Phone : (07) 30100100
TEAC Perth Office
273 Great Eastern Highway Belmont WA 6104
Phone : (08) 94796522
TEAC Adelaide Office
Cnr Sir Donald Bradman Dr & Marion Rd Cowandilla SA 5033
Phone : (08) 8234 1044
(REV.00; 2004.07.13)15100065
Manufactured under license from Dolby Laboratories.
“Dolby” and the double-D symbol are trademarks of Dolby Laboratories.
 Loading...