

Page 1

USER MANUAL
IMPORTANT !
WARRANTY INFORMATION INSIDE. PLEASE READ
www.teac.com.au
TEAC DRHN200
2.1CHANNEL DVD HI-FI SYSTEM
Page 2

WARRANTY REGISTRATION
Please read this warranty card.
Keep your purchase receipt to enable you to proceed quickly in the event of a Warranty Service.
Warranty Terms & Conditions
1. TEAC warrants to the original retail purchaser only, that this product is free from defects in material and
workmanship under normal domestic use and authorises free service during the warranty period at any TEAC
Authorised Service Centre only. TEAC warranty only applies to products purchased, used and serviced in
Australia.
2. Subject to the terms herein, this warranty effectively covers the equipment as specified in the Warranty Periods
Table below from the date of purchase.
TEAC PRODUCT
WARRANTY PERIOD
Plasma TV 106 cm and above 1 Year (In-Home Service Available)
LCD Televisions 59cm and above 1 Year (In-Home Service Available)
Televisions – 59cm and above 1 Year (In-Home Service Available)
All Televisions under 59 cm 1 Year (No In-Home Service)
Digital Set Top Boxes & Module 1 Year (No In-Home Service)
VCR 1 Year (No In-Home Service)
DVD & Module 1 Year (No In-Home Service)
DVD Recorder & PVR Module 1 Year (No In-Home Service)
Audio Systems 1 Year (No In-Home Service)
3. In home service will only be provided as part of this warranty if all the following conditions are met;
a) The product as indicated in the Warranty Period Table.
b) The product is within the warranty period.
c) The product is located within the normal service area of the local TEAC Authorised Service Centre.
In any other situation or circumstance, where an in home service call is made, a service fee will be charged by the
Service Provider including a travel fee if outside normal service area.
If TEAC determines that the product is not repairable on site, TEAC can complete the repair by taking the product
to a TEAC Authorised Service Centre.
Where in-home service is not available, the purchaser is required to send the product to the nearest TEAC
Authorised Service Centre for repair. In this event, a copy of this warranty card and a copy of your receipt of
purchase must be enclosed to be a valid warranty. Such equipment or part must be sent freight prepaid to your
nearest TEAC Authorised Service Centre. After the repair, the product will be available for collection by or return to
the purchaser at purchaser’s cost. The warranty does not cover freight or insurance. In all cases of transit damage or
lost, a claim must be filed against the carrier by the purchaser, even if shipment is arranged by TEAC. TEAC inhome service may also be available at a fee upon request.
4. Accessories, Remote, including power adaptors, AV box, TV tuners, etc, are warranted to be defect free for 1 year.
5. Replacement of spare parts under normal usage; except cabinet, front panel, knob, removable accessories, battery,
consumable, AC cord, connecting cord and other accessories, are warranted as specified in Warranty Periods Table,
and will be repaired or replaced at the sole judgement of TEAC.
6. The warranties hereby conferred do not extend to, and exclude, any cost associated with the installation, deinstallation or re-installation of a product (be it in-home or otherwise), including costs related to the mounting,
demounting or remounting of any screen, (and any other ancillary activities), delivery, handling, freighting,
transportation or insurance of the product or any part thereof or replacement of and do not extend to, and exclude,
any damage or loss occurring by reason of, during, associated with, or related to such installation, de-installation,
re-installation or transit.
7. Normal customer maintenance as described in the owner’s manual is not covered by this warranty (such as cleaning
VCR heads etc.)
8. Service will be provided only during normal business hours and under safety conditions and circumstances.
Page 3

9. This warranty does not apply to equipment showing abuse, damage or that it may have been tampered with, altered
or repaired outside any TEAC Authorised Service Centre. If so, the warranty will be void.
*Your nearest Authorised TEAC Service Centre is listed in your Owners Manual
10. No one is authorised to assume any liability on behalf of TEAC or impose any obligation on it, in connection with
the sale of any equipment other than as stated in this warranty and outlined above.
11. In no event will TEAC be responsible or liable for indirect or consequential damages from interrupted operations or
other causes.
12. Warranty is not transferable to any subsequent purchaser if the product is sold during the warranty period,
* Extended promotional warranty may apply to certain products (for more info please contact: [email protected])
In home service administration fee is applied after 1
st
year of warranty.
Page 4

WARRANTY PROCEDURES
Please keep this information for your own records.
Please refer to the owner’s manual to ensure that you have followed the correct installation and operating procedures.
1. Read owner’s manual carefully
2. If you require Warranty Service, please contact the TEAC Authorised Service Centre
3. Please have your purchase receipt as your proof of purchase and the following details completed for a valid
Warranty.
Owner’s Name
Owner’s Address
Postcode
Model Name/No. Serial No.
Dealer’s Name
Dealer’s Address
Postcode
4. Please ensure that your product is packed appropriately upon return to the service centre.
If you have any other queries regarding service or warranty please contact the TEAC Customer Care Centre below:
www.teac.com.au
1800 656 700
Page 5

1
TT
TT
T
able of Contentsable of Contents
able of Contentsable of Contents
able of Contents
Before Connection .................................................................................................................................. 2 3
For your safety...................................................................................................................................................... 2
Precautions ........................................................................................................................................................... 2
Wall Mounting Instructions ........................................................................................................................... 4
Main Set ................................................................................................................................................................ 4
Connection ..............................................................................................................................................5 7
Connecting the TV ................................................................................................................................................ 5
Connecting to a TV with HDMI jack ...................................................................................................................... 5
Connecting the Antenna ........................................................................................................................................6
Connecting Control Cable ..................................................................................................................................... 6
Connecting AUX ................................................................................................................................................... 6
Connecting the Speakers ...................................................................................................................................... 7
Connecting the AC Power Cord ............................................................................................................................7
Installation of Batteries in the Remote Control............................................................................................. 7
Control Section ....................................................................................................................................... 8
9
DVD Player (main set) .......................................................................................................................................... 8
Sub-Woofer ........................................................................................................................................................... 8
Remote Control ..................................................................................................................................................... 9
Normal playing .................................................................................................................................... 10 15
Use the Discs ..................................................................................................................................................... 10
Playing Picture CD disc ...................................................................................................................................... 14
Use the USB ....................................................................................................................................................... 15
Listening to Radio Broadcasts ................................................................................................................... 16
Clock/Timer Functions ........................................................................................................................ 17
18
Setting the Clock ................................................................................................................................................ 17
Setting the Daily Timer........................................................................................................................................ 17
Setting the Sleep Timer ...................................................................................................................................... 18
DVD Menu Options ............................................................................................................................ 19 21
Menu function setup ........................................................................................................................................... 19
General Setup Page ............................................................................................................................................ 19
Audio Setup Page ............................................................................................................................................... 19
Video Setup Page ............................................................................................................................................... 20
Preference Page ................................................................................................................................................. 21
Password Setup Page ........................................................................................................................................ 21
Protect the Disc ......................................................................................................................................... 22
Troubleshooting.......................................................................................................................................... 22
Specification........................................................................................................................................ 23
24
Page 6

2
Before ConnectionBefore Connection
Before ConnectionBefore Connection
Before Connection
Thank you for purchasing this DVD 2.1 channel component system, in order to fully utilize this system,
please read this instruction book carefully before use it.
For your safetyFor your safety
For your safetyFor your safety
For your safety
Laser ProductLaser Product
Laser ProductLaser Product
Laser Product
This product is equipped with low power laser equipment inside. For your safety, don’t take apart any covers
or try to take apart the product inside. Please contact an authorized service person for repairing.
This symbol indicates that dangerous voltage constituting a risk of electric shock is present within this
unit.
This symbol indicates that there are important operating and maintenance instructions in the literature
accompanying this unit.
Caution:Caution:
Caution:Caution:
Caution:
To prevent fire or shock hazard, do not expose this equipment to rain or moisture.
Power RequirementPower Requirement
Power RequirementPower Requirement
Power Requirement
Because the power requirement of electrical products is different in various places, before you use this
product, make sure that the power requirement of the product matches your household power.
CAUTION:
TO REDUCE THE RISK OF ELECTRIC SHOCK, DO
NOT REMOVE COVER. NO USER SERVICEABLE
PARTS INSIDE, REFER SERVICING TO QUALIFIED
SERVICE PERSONNEL.
CAUTION
RISK OF ELECTRIC SHOCK
DO NOT OPEN
PrecautionsPrecautions
PrecautionsPrecautions
Precautions
1. Before operating this system, check the voltage of this system to see if it is identical with the voltage of
your local power supply.
2. Unplug the system from the wall outlet if it is not used for a long time. To disconnect the cord, pull it out by
grasping the plug.
3. To avoid electric shock, do not open the cabinet.
4. There is no user serviceable parts inside. In case of system failure, unplug the power cord and consult
your dealer.
5. Do not place this unit on an unstable cart or sloping surface. Ensure good ventilation surrounding the
product. To prevent fire, do not cover the ventilation of the apparatus with news papers, tablecloths,
curtains, etc.
6. To prevent fire or shock hazard, do not place objects filled with liquids, such as vases, on the apparatus.
And don’t place lighted candles on the apparatus.
7. To prevent fire or shock hazard, do not expose this equipment to hot places, rain, moisture or dust.
Caution:Caution:
Caution:Caution:
Caution:
This product is equipped with low power
laser equipment inside, for your safety,
do not open the laser radiation protective
equipment. Don’t look at the laser radiation when the equipment is operating.
Page 7

3
8. Do not use this product near water, for example near a bath tub, wash bowl, kitchen sink, or laundry
tub; in a wet basement; or near a swimming pool and the like.
9. Do not place this unit close to strong magnetic field.
10.Do not place this unit close to dampness, or the moisture will affect the life of the laser head.
11.If the unit is brought directly from a cold to a warm location, or is placed in a very damp room,
moisture may condense on the lens inside the player. Should this occur, the unit will not operate
properly. Remove the disc and leave the unit turned on for about an hour until the moisture evaporates.
12.Should any solid object or liquid fall into the unit, unplug the system and have it checked by qualified
personnel before operating it again.
13. Unplug this product from the wall outlet before cleaning. Do not use liquid cleaners or aerosol cleaners.
Use a damp cloth for cleaning.
14. Do not use attachments not recommended by the product manufacturer as they may cause hazards.
15. Batteries shall not be exposed to excessive heat such as sunshine, fire or the like.
16. Where the mains plug or a appliance coupler is used as the disconnect device, the disconnect device
shall remain readily operable.
Before ConnectionBefore Connection
Before ConnectionBefore Connection
Before Connection
Page 8

4
WW
WW
W
all Mounting Instructionsall Mounting Instructions
all Mounting Instructionsall Mounting Instructions
all Mounting Instructions
1. Connect all cables and secure into place.
2. Fix the wall bracket in place using two screws ensuring the locking pin hole is facing upwards. Then screw
the second part of the bracket in place using the two screws, ensuring the locking pin hole is facing upwards.
Finally slide the unit onto the wall bracket and secure in place using the locking pin.
3. The unit can also be mounted on a stand. Place the unit on the stand and secure into place using the
screws provided.
Main SetMain Set
Main SetMain Set
Main Set
-
/
0
Page 9

5
ConnectionConnection
ConnectionConnection
Connection
Caution:Caution:
Caution:Caution:
Caution: Please turn off all the equipment power before connecting.
Connecting the TVConnecting the TV
Connecting the TVConnecting the TV
Connecting the TV
1. This DVD player has video output mode, you can choose it to connect with the TV terminal.
2. If your TV has component input terminal, then you can use the signal connecting cable to connect with the
DVD player’s component output terminal. By doing so, the picture will be more clear.
3. To avoid affecting the picture output, do not connect video, component, HDMI at the same time.
Connecting to a TV with HDMI jackConnecting to a TV with HDMI jack
Connecting to a TV with HDMI jackConnecting to a TV with HDMI jack
Connecting to a TV with HDMI jack
Use a HDMI cable to connect the HDMI jack on the DVD Player to HDMI IN on a HDMI compatible device
(e.g.: TV, Projector, Adaptor).
Note:Note:
Note:Note:
Note: If you use the HDMI, make sure that “HDMI SETUP” is set to “ON”. Please see “HDMI SETUP” for
further details.
Terminal board for the DVD player
Terminal board for the DVD player
TV
Page 10

6
Connecting the AntennaConnecting the Antenna
Connecting the AntennaConnecting the Antenna
Connecting the Antenna
1. Using the supplied wire Antenna.
2. Using the coaxial type connector .
A 75Ohm antenna with coaxial type connector should be connected to the FM 75 ohm coaxia terminal.
3. If reception is poor, connect the outside antenna.
Note: Note:
Note: Note:
Note: Before attaching a 75 ohm coaxial lead (the kind with a round wire going to an outside antenna),
disconnect the supplied FM wire antenna.
Caution:Caution:
Caution:Caution:
Caution: To avoid noise, keep antennas away from the system, the connecting cord and the AC cord.
Connecting Control CableConnecting Control Cable
Connecting Control CableConnecting Control Cable
Connecting Control Cable
Connect signal line between the main set and the sub-woofer back board.
Connecting AUXConnecting AUX
Connecting AUXConnecting AUX
Connecting AUX
This sub-woofer has two audio input terminals, you can use signal line to connect audio input terminals of this
unit and audio output terminals of other equipment respectively, then you can hear the sound sources.
Caution:Caution:
Caution:Caution:
Caution:Press the function select button
FUNCTIONFUNCTION
FUNCTIONFUNCTION
FUNCTION
on the unit or the button
AUXAUX
AUXAUX
AUX
on the remote control to
select AUX function. When you are connecting AUX audio terminals, please press this function
button.
ConnectionConnection
ConnectionConnection
Connection
-/0
Terminal board for Sub-Woofer
Terminal board for Main Set
Terminal board for Sub-Woofer
Auxiliary Equipment
Page 11
7
Connecting the SpeakersConnecting the Speakers
Connecting the SpeakersConnecting the Speakers
Connecting the Speakers
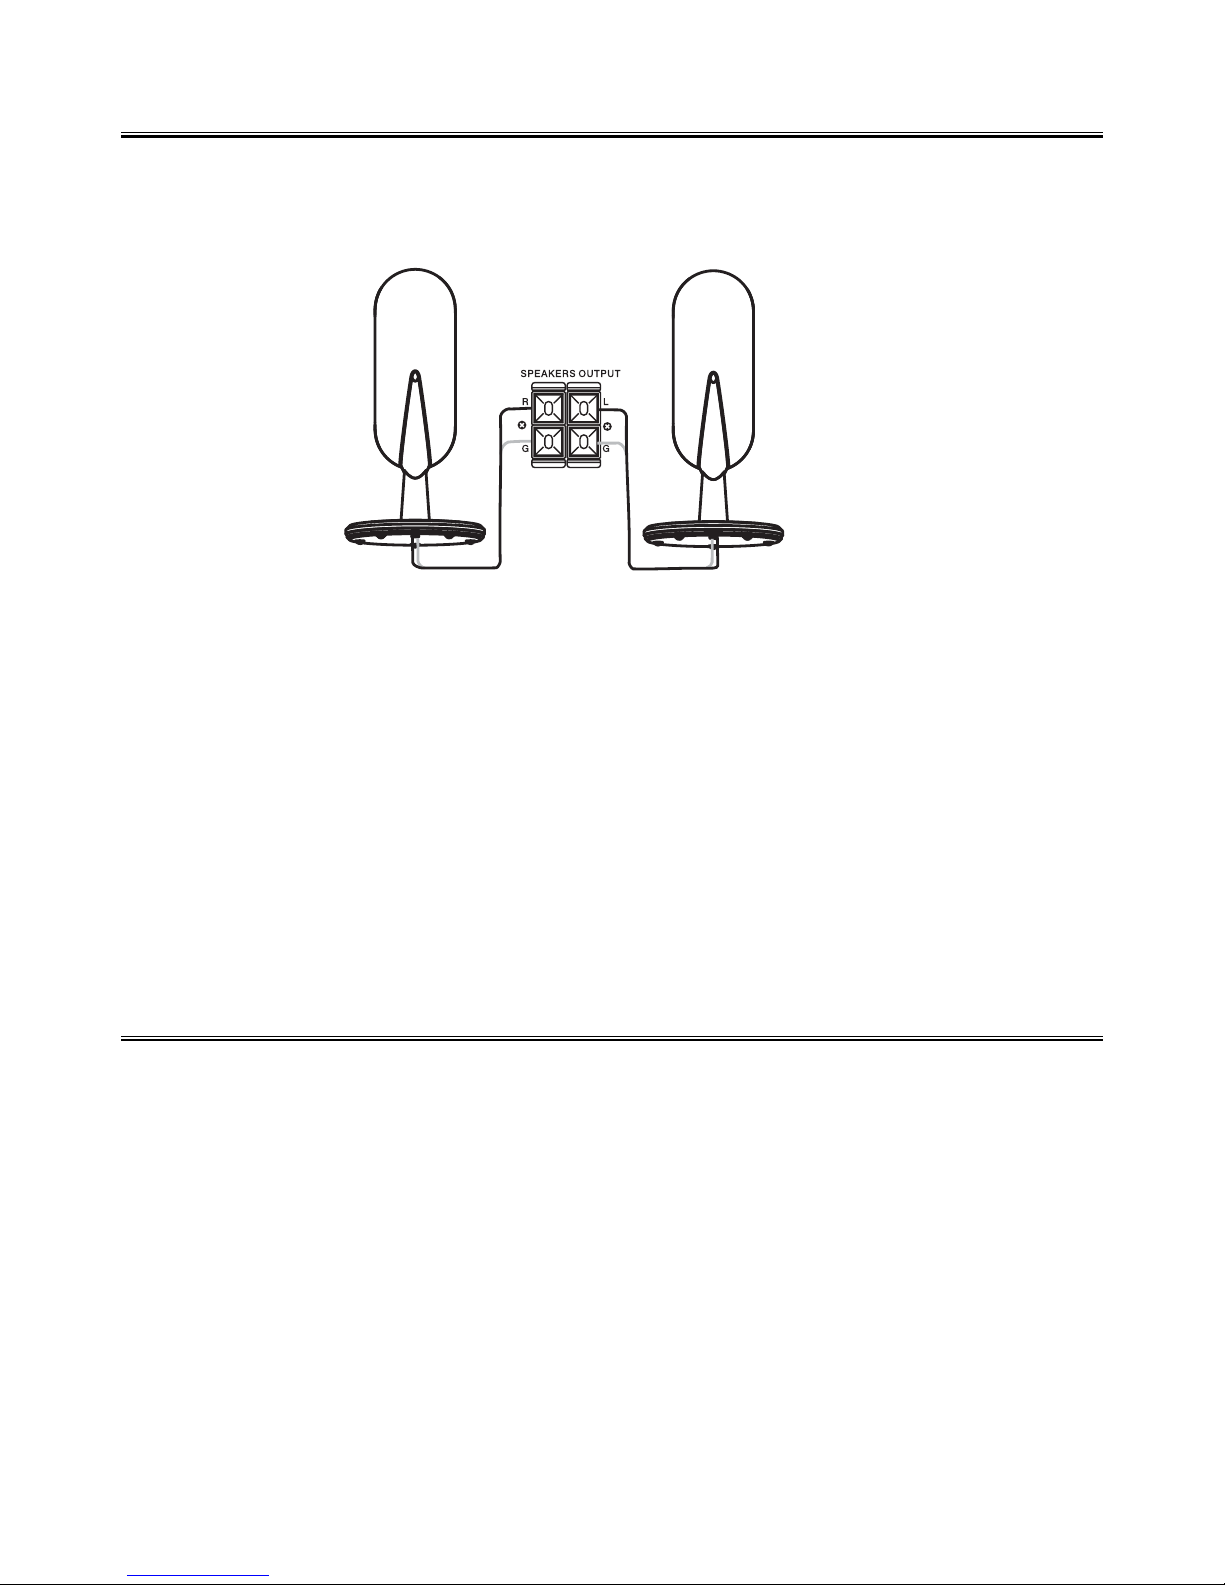
Connect the speaker cords between the terminals as shown below.
Connect the cords with a red line to the (+) (L) (R) terminals and cords with a silver line to the (-) (G) terminals.
Right Speaker Box Back View Left Speaker Box Back View
Connection precautionsConnection precautions
Connection precautionsConnection precautions
Connection precautions
1. This unit has a high power output and wide dynamic range. If speakers other than those supplied are used,
they must be chosen according to speaker specification, or the speakers can be damaged.
2. Before connecting or removing mains power, please turn off the power on the unit and turn the volume to
minimum or it may damage the speakers.
Connecting the AC Power CordConnecting the AC Power Cord
Connecting the AC Power CordConnecting the AC Power Cord
Connecting the AC Power Cord
Insert the AC power cord into a wall outlet, and your system is at your command!
Caution:Caution:
Caution:Caution:
Caution: Be sure to unplug the power cord from the outlet when going away or the system is not in use for an
extended period of time.
Installation of Batteries in the Remote ControlInstallation of Batteries in the Remote Control
Installation of Batteries in the Remote ControlInstallation of Batteries in the Remote Control
Installation of Batteries in the Remote Control
1. Remove the battery compartment cover.
2. Insert two batteries (size AAA) correctly, so that the + and - polarities match the polarity diagrams in the
battery compartment.
* About half a year of normal operation can be expected when using normal batteries.
* When the batteries are exhausted, the commander can no longer operate the system.
Replace both batteries at the same time with new ones.
* Don’t use an old battery with a new one.
* Don’t use different types of batteries together.
* When the unit is not used for a long period of time, remove the batteries to avoid damage caused by battery
leakage and corrosion.
ConnectionConnection
ConnectionConnection
Connection
Page 12
8
CC
CC
C
ontrol Sectionontrol Section
ontrol Sectionontrol Section
ontrol Section
DVD Player (main set)DVD Player (main set)
DVD Player (main set)DVD Player (main set)
DVD Player (main set)
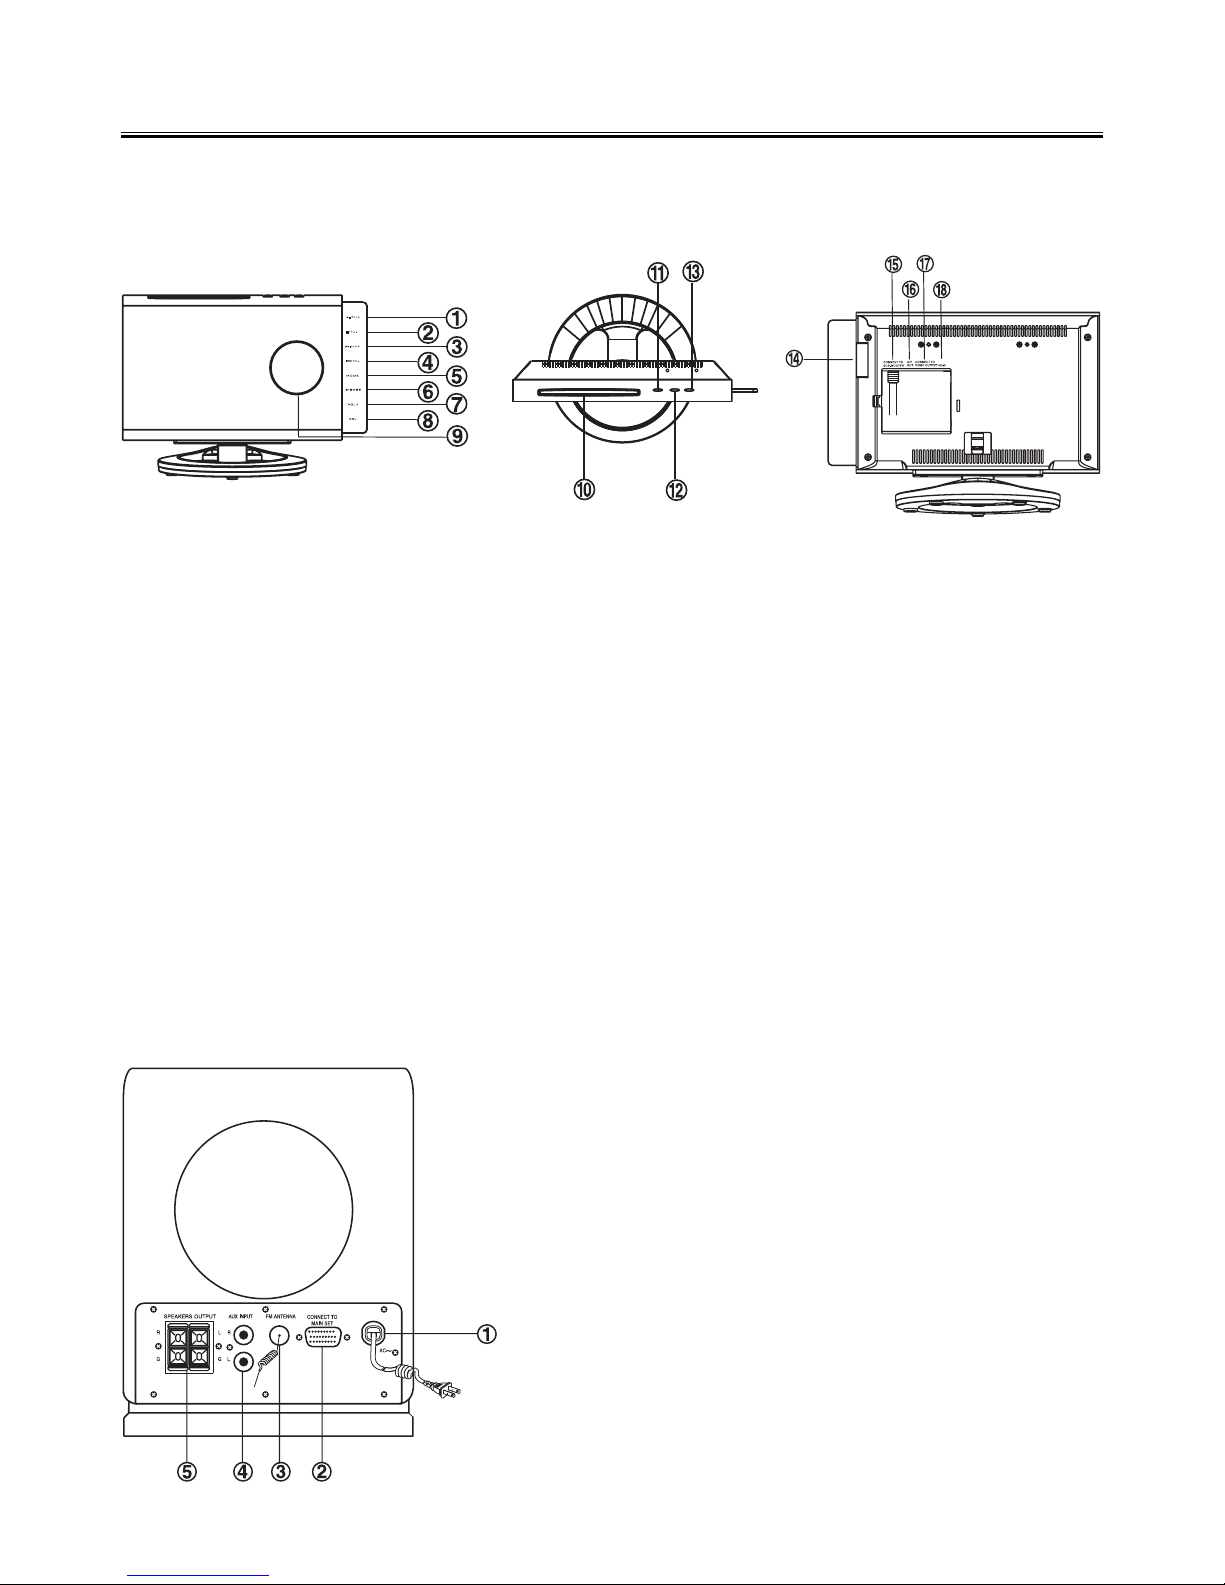
Face ViewFace View
Face ViewFace View
Face View
T T
T T
T
op Vop V
op Vop V
op V
iewiew
iewiew
iew
Back ViewBack View
Back ViewBack View
Back View
1. AC Power Cord
2. Power Control Cable Socket
3. FM Antenna
4. AUX Input Terminal
5. L&R Speaker Output Terminals
1. Play/Pause (BF)
Tuning Forward
2. Stop (
LL
LL
L)
Tuning Backward
3. Next (
GG
GG
G )
Channel Select Forward
4. Previous (
HH
HH
H)
Channel Select backward
5. Mode
6. S-Bass
7. Volume Up
8. Volume Down
9. VFD Display Lens
10. Disc Door
11. Eject
12. Function
13. Standby
14. USB Jack
15. Power Control Cable Socket
16. A / V Out
17. Component Video Output
18. HDMI Jack
Sub-WooferSub-Woofer
Sub-WooferSub-Woofer
Sub-Woofer
Page 13
9
Remote ControlRemote Control
Remote ControlRemote Control
Remote Control
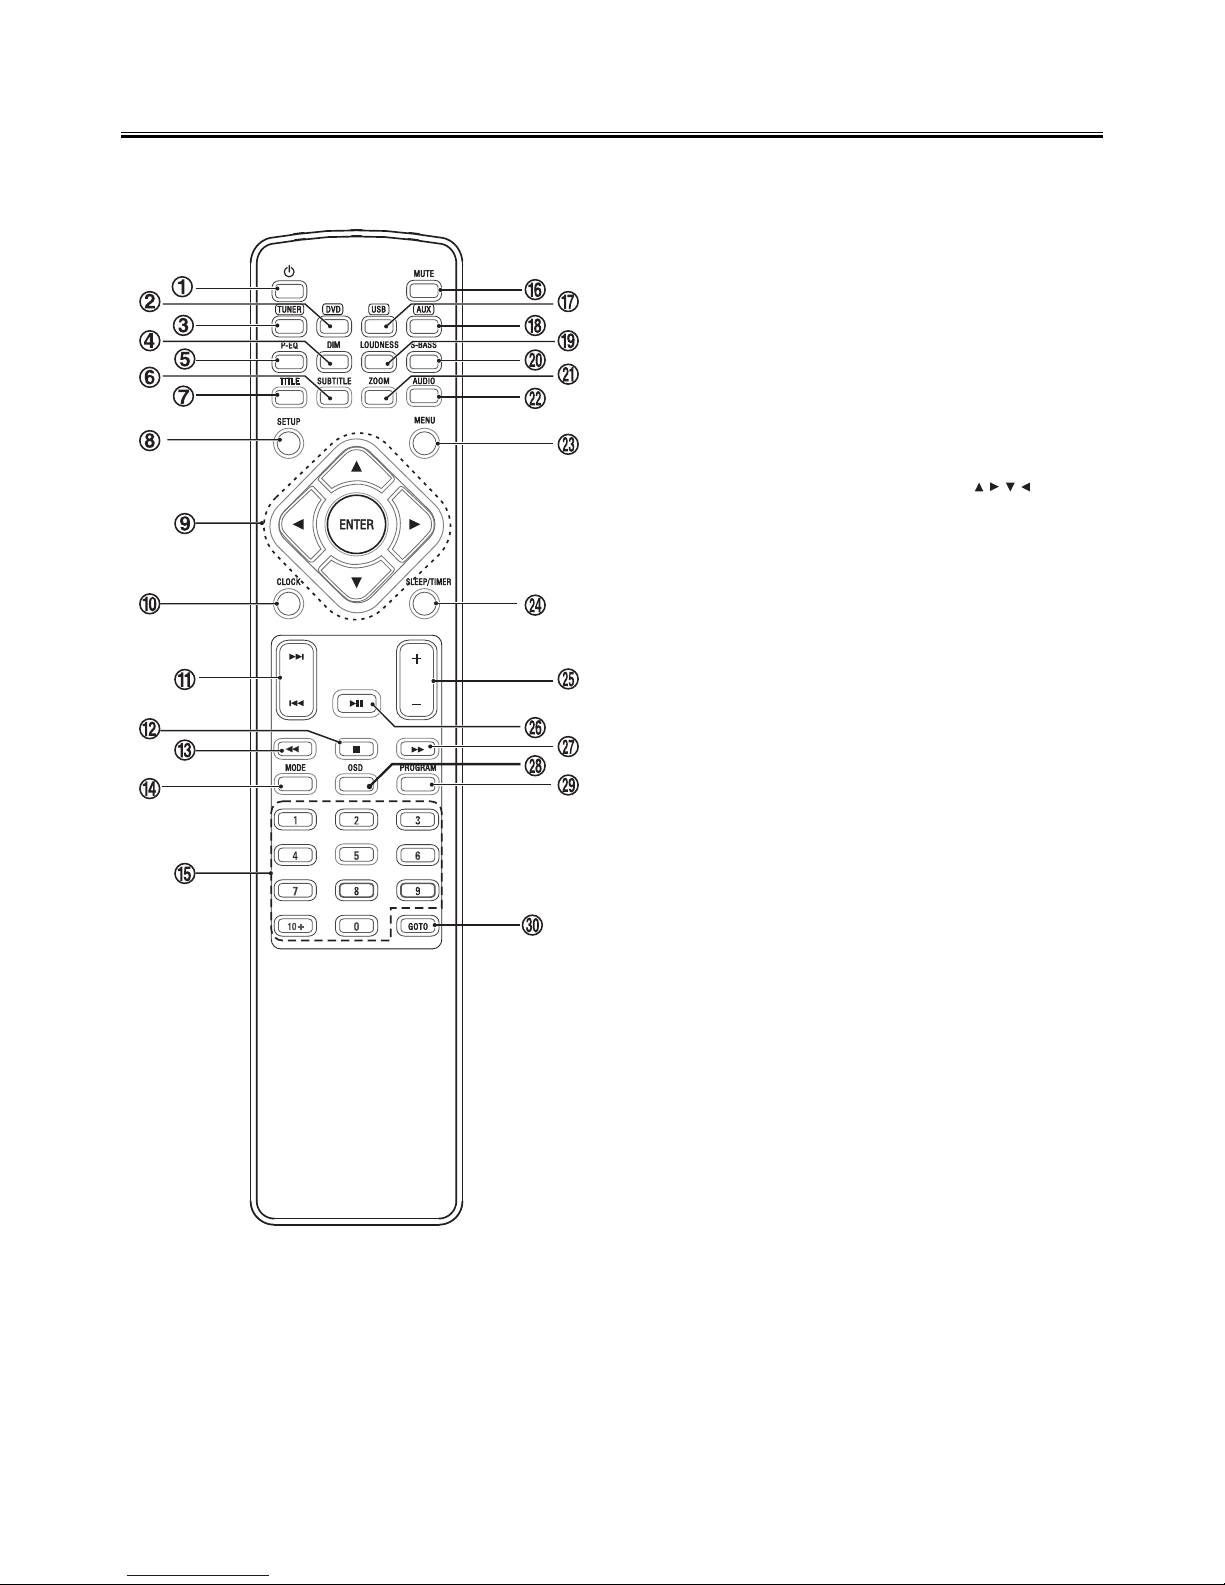
1. Standby Button
2. DVD Function Button
3. Tuner Function Button
4. Dim Button
5. Preset Equalizer Button
6. Subtitle Button
7. Title Button
8. Setup Button
9. Direction Button (
, , , )
Enter Button
10. Clock Button
11. Next Button (
G)
Previous Button (
H)
12. Stop Button (
L)
13. Fast Backward Button (
D)
14. Mode Button
15. Number Button
16. Mute Button
17. USB Function Button
18. AUX Function Button
19. Loudness Button
20. Super Bass Button
21. Zoom Button
22. Audio Button
23. Menu Button
24. Sleep Button
TimerButton
25. Volume Up Button
Volume Down Button
26. Play/Pause Button (
BF)
27. Fast Forward Button (
C)
28. OSD Button
29. Program Button
30. Goto Button
Control SectionControl Section
Control SectionControl Section
Control Section
Page 14
10
Normal playingNormal playing
Normal playingNormal playing
Normal playing
Use the DiscsUse the Discs
Use the DiscsUse the Discs
Use the Discs
Operate the keys on the unitOperate the keys on the unit
Operate the keys on the unitOperate the keys on the unit
Operate the keys on the unit
In power on mode, press the function button (
FUNCTIONFUNCTION
FUNCTIONFUNCTION
FUNCTION
) to select the function you want.
Place the disc into the disc tray (with the printed side face to you) ,then press it downward lightly.
The unit will read the disc and the disc type will display on the TV screen then play it automatically.
When the disc playing, press the eject button (K on the unit) to take the disc out ,press this button
again , the disc will goes into the disc tray . The unit will read the disc and play it automatically .
Operate the keys on the remote controlOperate the keys on the remote control
Operate the keys on the remote controlOperate the keys on the remote control
Operate the keys on the remote control
1. You can use all the functions on the panel of the unit or the remote control after turning the
system power on.
TT
TT
T
urning the System Onurning the System On
urning the System Onurning the System On
urning the System On
Press the standby button
((
((
(
STST
STST
ST
ANDBYANDBY
ANDBYANDBY
ANDBY
) )
) )
) to turn the system on from standby mode.
Caution:Caution:
Caution:Caution:
Caution: When turning the system on, the system will continue in the mode it was in when it
was turned off last time.
TT
TT
T
urning the System Ofurning the System Of
urning the System Ofurning the System Of
urning the System Of
ff
ff
f
Press the standby button
((
((
(
STST
STST
ST
ANDBYANDBY
ANDBYANDBY
ANDBY
))
))
) again to turn the system off (called Standby Mode), the
clock will display on the VFD.
Caution:Caution:
Caution:Caution:
Caution: Be sure to unplug the power cord from the outlet when going away or the system is
not in use for an extended period of time.
2. In power on mode, press the disc function button (
DVDDVD
DVDDVD
DVD
) to select DVD function.
3. In power on mode, press the tuner function button (
TUNERTUNER
TUNERTUNER
TUNER) to select FM function.
4. This unit has several brightness levels for you to adjust the VFD screen to light or dark. Press
the VFD darkness select button (
DIMDIM
DIMDIM
DIM), then you can choose the lighting level you desire.
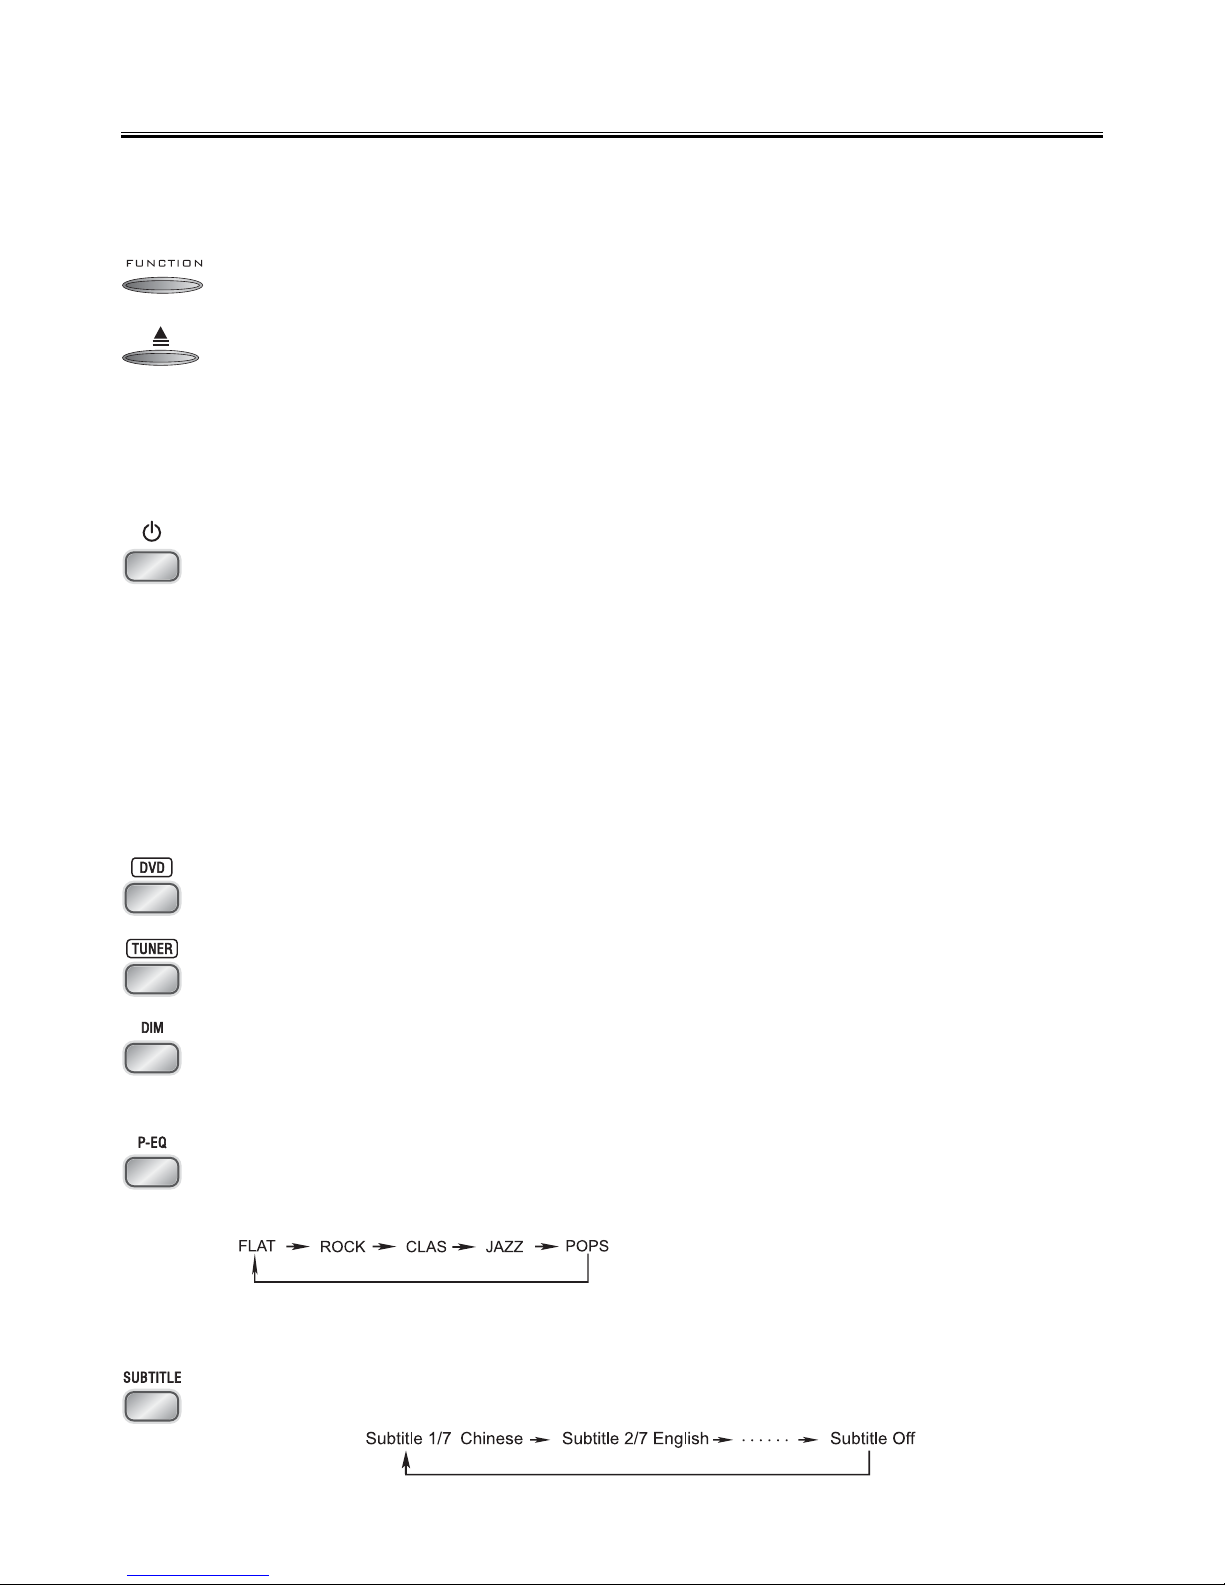
5. You can adjust the sound reproduced simply by choosing from different preset equalizations.
Each press of the preset equalizer button (
P-EQP-EQ
P-EQP-EQ
P-EQ) will select one of the following different
preset equalizations:
6. When you are playing the DVD disc, you can repeatedly press the subtitle button
(
SUBTITLESUBTITLE
SUBTITLESUBTITLE
SUBTITLE
) to
select the subtitle language to display on the TV screen if available.
FLAT : Normal sound
ROCK : For rock
CLAS : For classic
JAZZ : For jazz
POPS : Vocal sound is intensified
Page 15
11
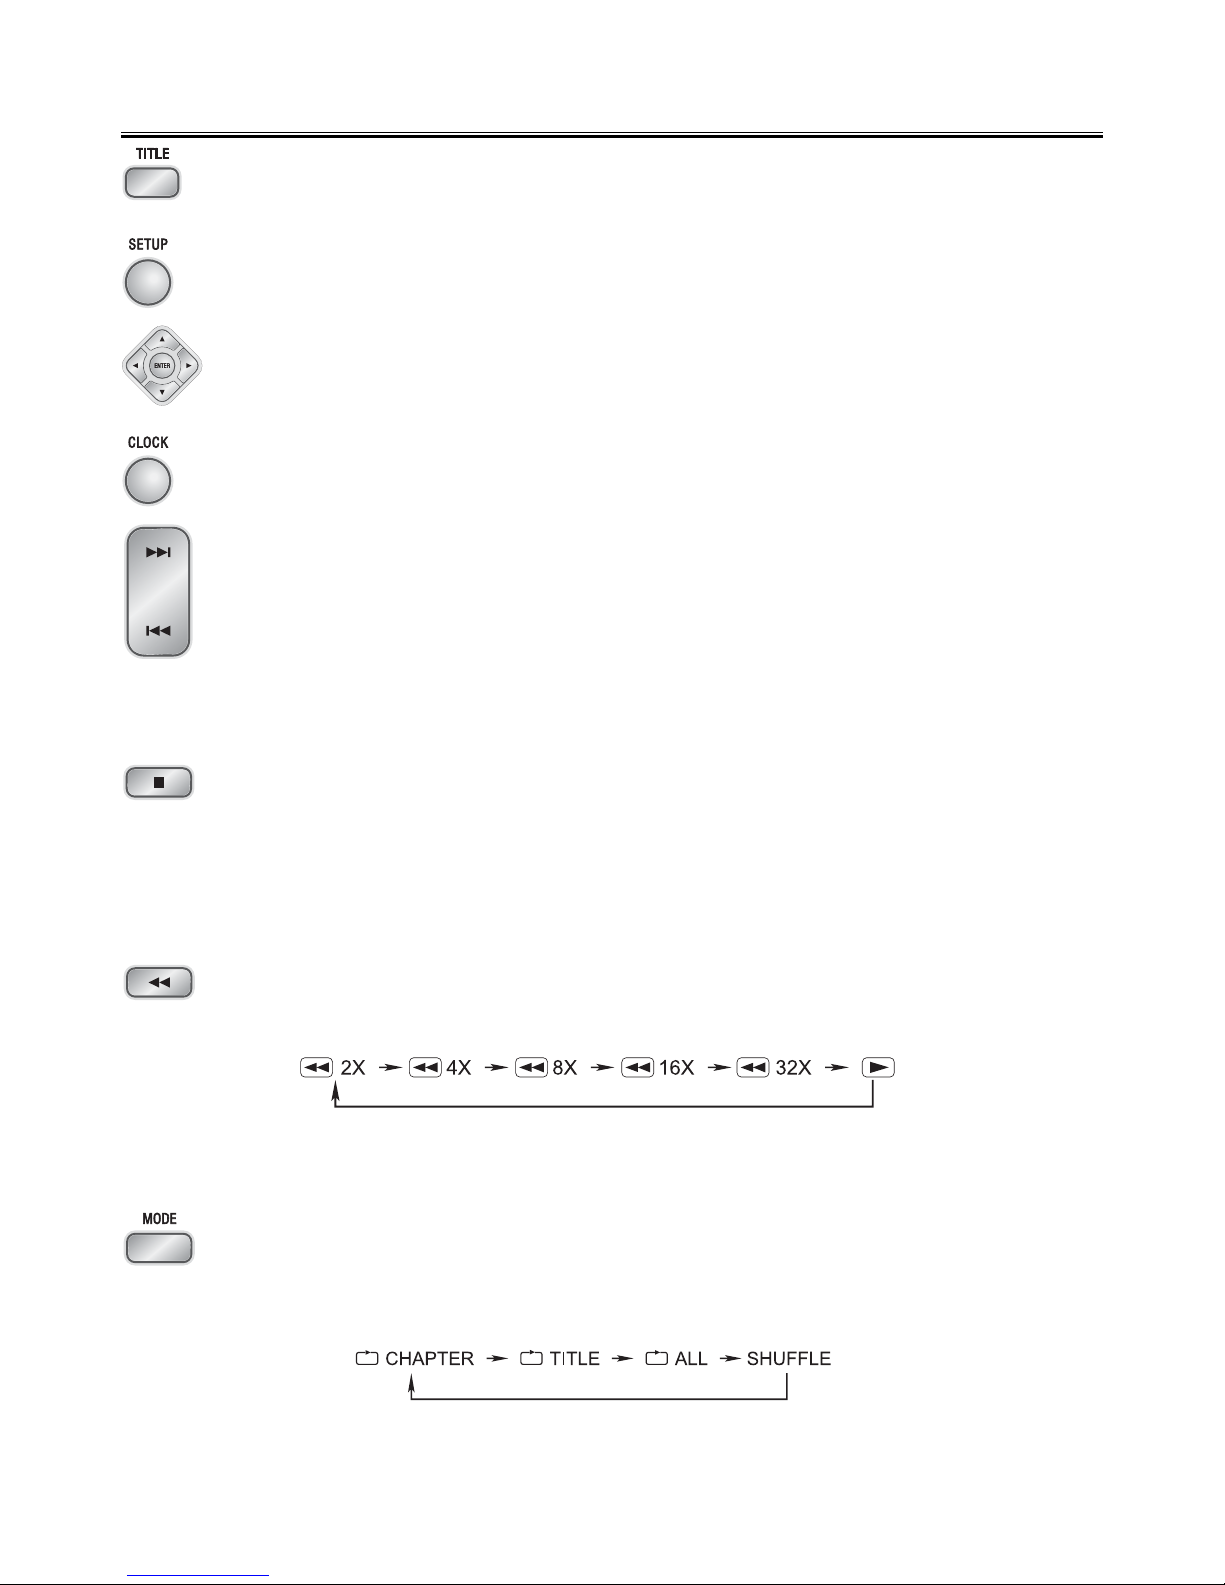
7. In play mode, press the title button (
TITLETITLE
TITLETITLE
TITLE
) to go back to the title menu.
8. Press the setup button (
SETUPSETUP
SETUPSETUP
SETUP
) to set the function of this unit.
9. Press the direction buttons (S,T,W,X) to move the cursor to illuminate the desired selection.
Press the confirmation button (
ENTERENTER
ENTERENTER
ENTER
) to confirm the menu selection.
10.In standby mode, press the clock button
(
CLOCKCLOCK
CLOCKCLOCK
CLOCK) to set the clock.
11.When playing a DVD disc, press the next button (
G) to skip to the next chapter or title.
When playing a Video CD disc, press the next button (
G) to skip to the next track.
(You can also operate the key “
G” on the panel of the unit.)
When playing DVD disc, press the previous button (
H) to skip to the previous chapter or title.
When playing Video CD disc, press the previous button (
H) to skip to the previous track.
(You can also operate the key “
H” on the panel of the unit.)
12.Press the stop button (
L) to stop playing, the unit will store the last playing time in the memory
automatically, then press the play/pause button (
BF), the unit will resume to last memory time
and continue playback automatically.
If you press the stop button (
L) twice to stop the disc playing.
(You can also operate the key “
L” on the panel of the unit.)
13.Press the fast backward button (
D) once by once to select one of the variety of different
speeds to fast backward play or select normal speed to play. Each time you press the button,
the screen shows.
Note:Note:
Note:Note:
Note: Press the BF button to resume normal playback.
14.One title, one chapter, one track or all the disc repeat play can be set by pressing the mode
button. (You can also operate the key “
MODEMODE
MODEMODE
MODE
” on the panel of the unit.)
When playing a DVD disc, this function can be used to play a title, chapter or disc repeatedly.
Repeatedly press the mode button, the screen shows orderly:
Normal playingNormal playing
Normal playingNormal playing
Normal playing
Page 16
12
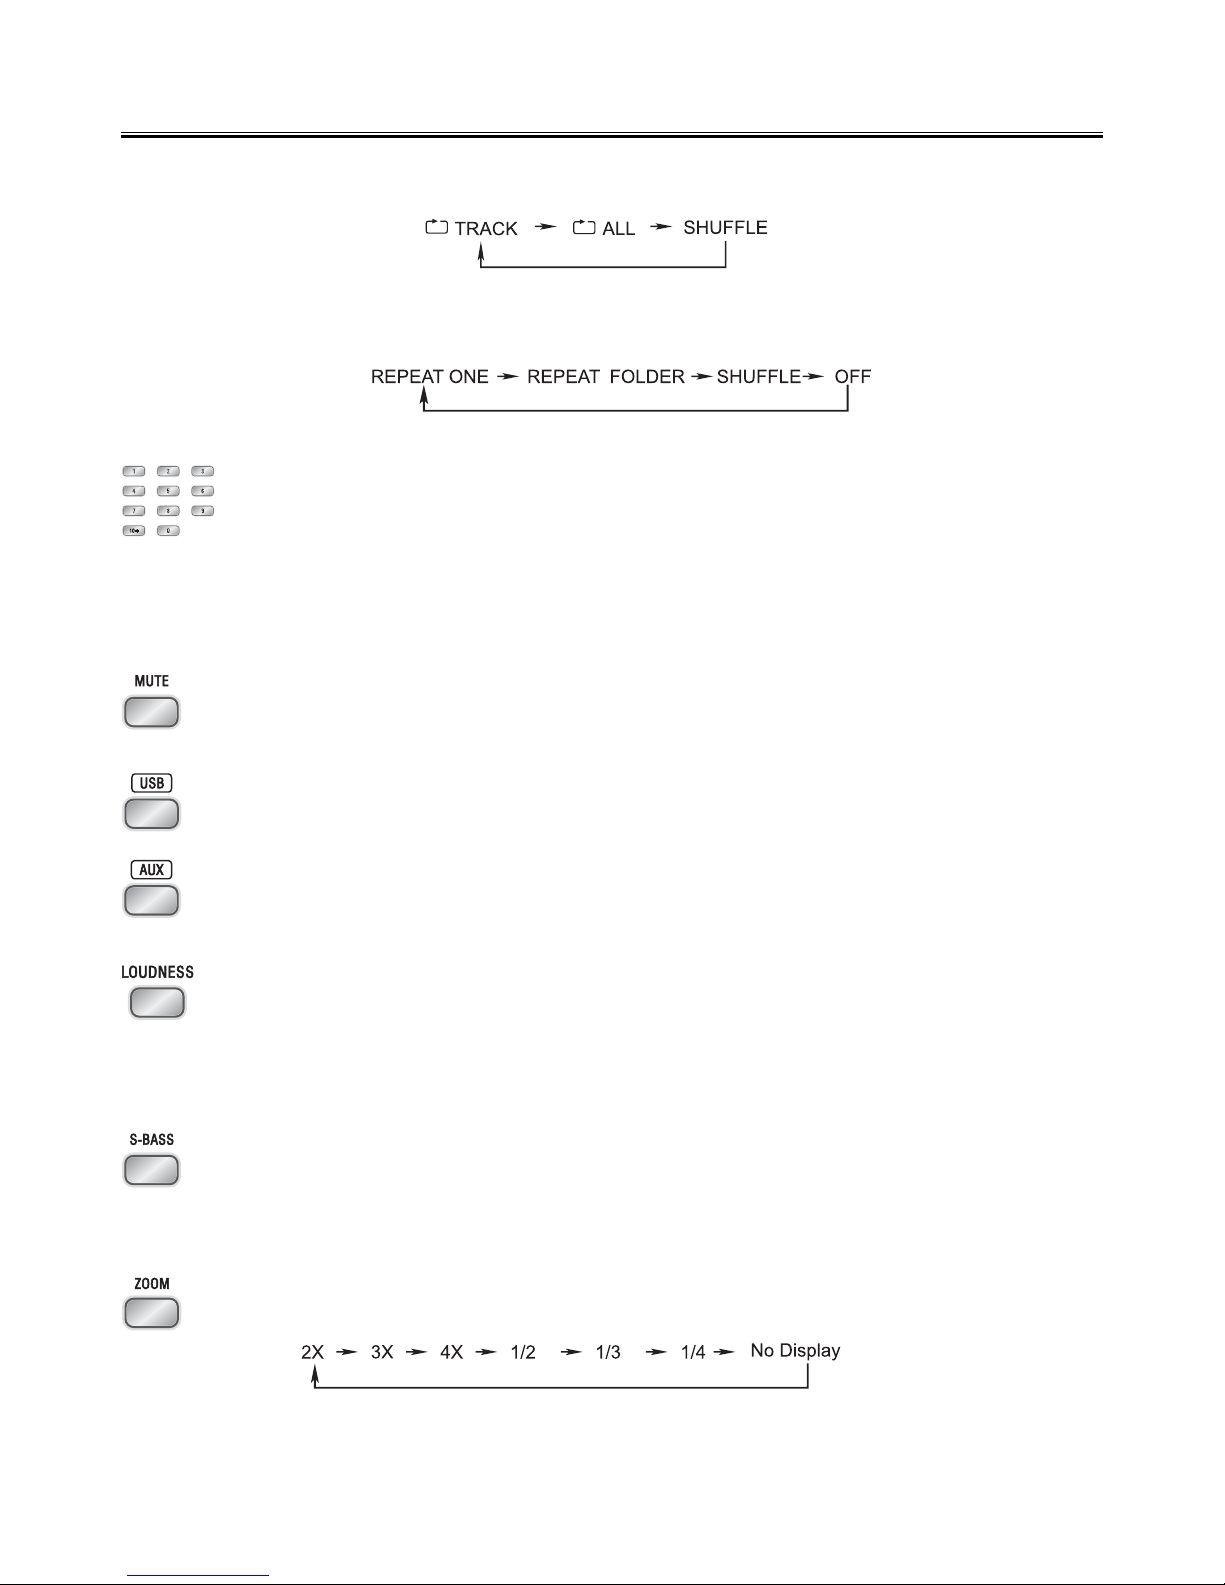
When playing a CD disc, this function can be used to play a track or folder repeatedly.
Repeatedly press the mode button, the screen shows orderly:
When playing MP3 disc, this function can be used to play a track or folder repeatedly.
Repeatedly press the mode button, the screen shows orderly:
15. Load a Video CD disc in PBC ON mode (the MENU button turns the PBC function ON/OFF).
You can select tracks or chapters with the number buttons (
0-9,10+0-9,10+
0-9,10+0-9,10+
0-9,10+
).
If the track or chapter number is less than 10, press the number buttons 0-9.
If the track or chapter number is over 10, press 10+ button and press the one of the number
buttons 0-9.
Note:Note:
Note:Note:
Note: If the track or chapter number over 20, press 10+ button twice and press the one of the
number buttons 0-9.
16. Press the mute button in play mode, all sound will be muted, press the button again to resume
sound.
17. In power mode, press the USB function button
(
USBUSB
USBUSB
USB) to select USB function.
18. In power mode, press the AUX function button (
AUXAUX
AUXAUX
AUX) to select AUX function.
19. This unit has a loudness function, it can automatically increase the bass sound at low volume
(the higher the volume, the smaller bass increase), which improves the output sound. You
only need to press the loudness button (
LOUDNESS LOUDNESS
LOUDNESS LOUDNESS
LOUDNESS ) to obtain the loudness function when it
is playing.
20. Press the super bass button to reinforce the bass sound to maintain rich, full bass at low volume,
press this button again to cancel the effect.
(You can also operate the key “
S-BASSS-BASS
S-BASSS-BASS
S-BASS ” on the panel of the unit. )
21. This function can be used while playing a film or a still picture.
Press the zoom button (
ZOOMZOOM
ZOOMZOOM
ZOOM) repeatedly when playing, the screen shows :
Use the S,T,W,X buttons to move around the enlarged picture.
Note:Note:
Note:Note:
Note: This function is not available for CD ,WMA or MP3 playback.
Normal playingNormal playing
Normal playingNormal playing
Normal playing
Page 17
13
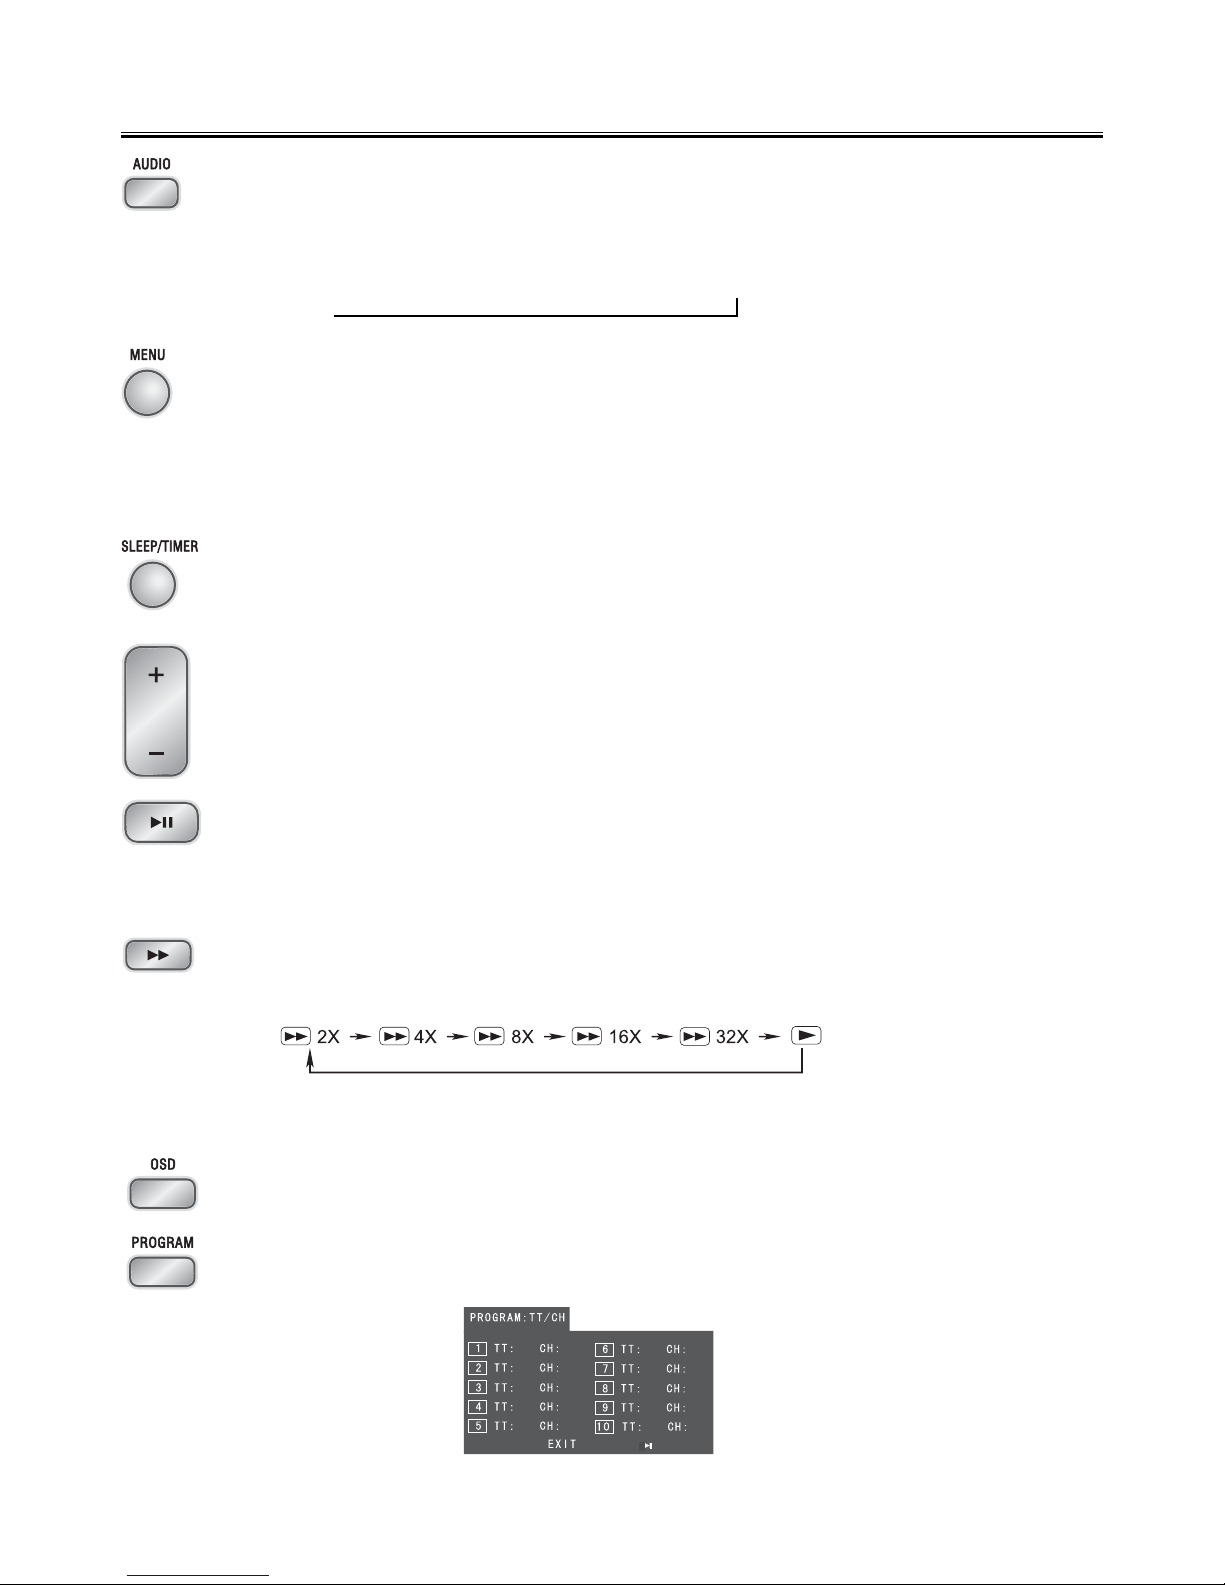
22. When playing a the Video CD, you can choose MONO (LEFT MONO, RIGHT Mono),
“STEREO” audio output by pressing vocal mode select button (
AUDIOAUDIO
AUDIOAUDIO
AUDIO
).
When playing DVD disc recorded with several languages, you can repeatedly press the
language select button (
AUDIOAUDIO
AUDIOAUDIO
AUDIO
) to select one of languages to play.
23. If the Video CD has a menu, you can set the playback control function to “PBC ON” mode by
pressing the menu button
(
MENUMENU
MENUMENU
MENU
). The unit reads the disc and the menu will display on the TV
screen, then use the number buttons to select the desired track.
When playing DVD disc, press the root button
(
MENUMENU
MENUMENU
MENU) to return to the root menu for previous
layer.
24. If you want to set the daily timer or the sleep timer, press the sleep/timer button
(
SLEEP/TIMERSLEEP/TIMER
SLEEP/TIMERSLEEP/TIMER
SLEEP/TIMER)
.
25. Press the volume up button to increase the volume. Press the volume down button to decrease
the volume.
(You can also operate the keys
“
VOL+ VOL+
VOL+ VOL+
VOL+
” “
VOL-VOL-
VOL-VOL-
VOL-
” on the panel of the unit.)
26. In stop mode, press the play/pause button (BF) to start playing the disc.
When playing disc, press the play/pause button (
BF) to temporarily stop the playing, press
the button again, it will continue to play.
(You can also operate the key “
BF” on the panel of the unit.)
27. Press the fast forward button (
C) repeatedly to select one of the variety of different speeds to
fast forward play or select normal speed to play. Each time you press the button, the screen
shows.
Note:Note:
Note:Note:
Note: Press the BF button to resume normal playback.
28. Press the OSD button to display the playing information of the disc on the TV screen.
29. If your DVD disc has one or more music chapters or titles, you can setup playing order for the
disc using this button. Press the program button
(
PROGRAMPROGRAM
PROGRAMPROGRAM
PROGRAM), TV display will be as follows:
Audio 1/4 Audio 2/4 Audio 3/4 Audio 4/4
Normal playingNormal playing
Normal playingNormal playing
Normal playing
K
JJ
J
Note: TT: Title
CH:Chapter
Page 18
14
Note: Note:
Note: Note:
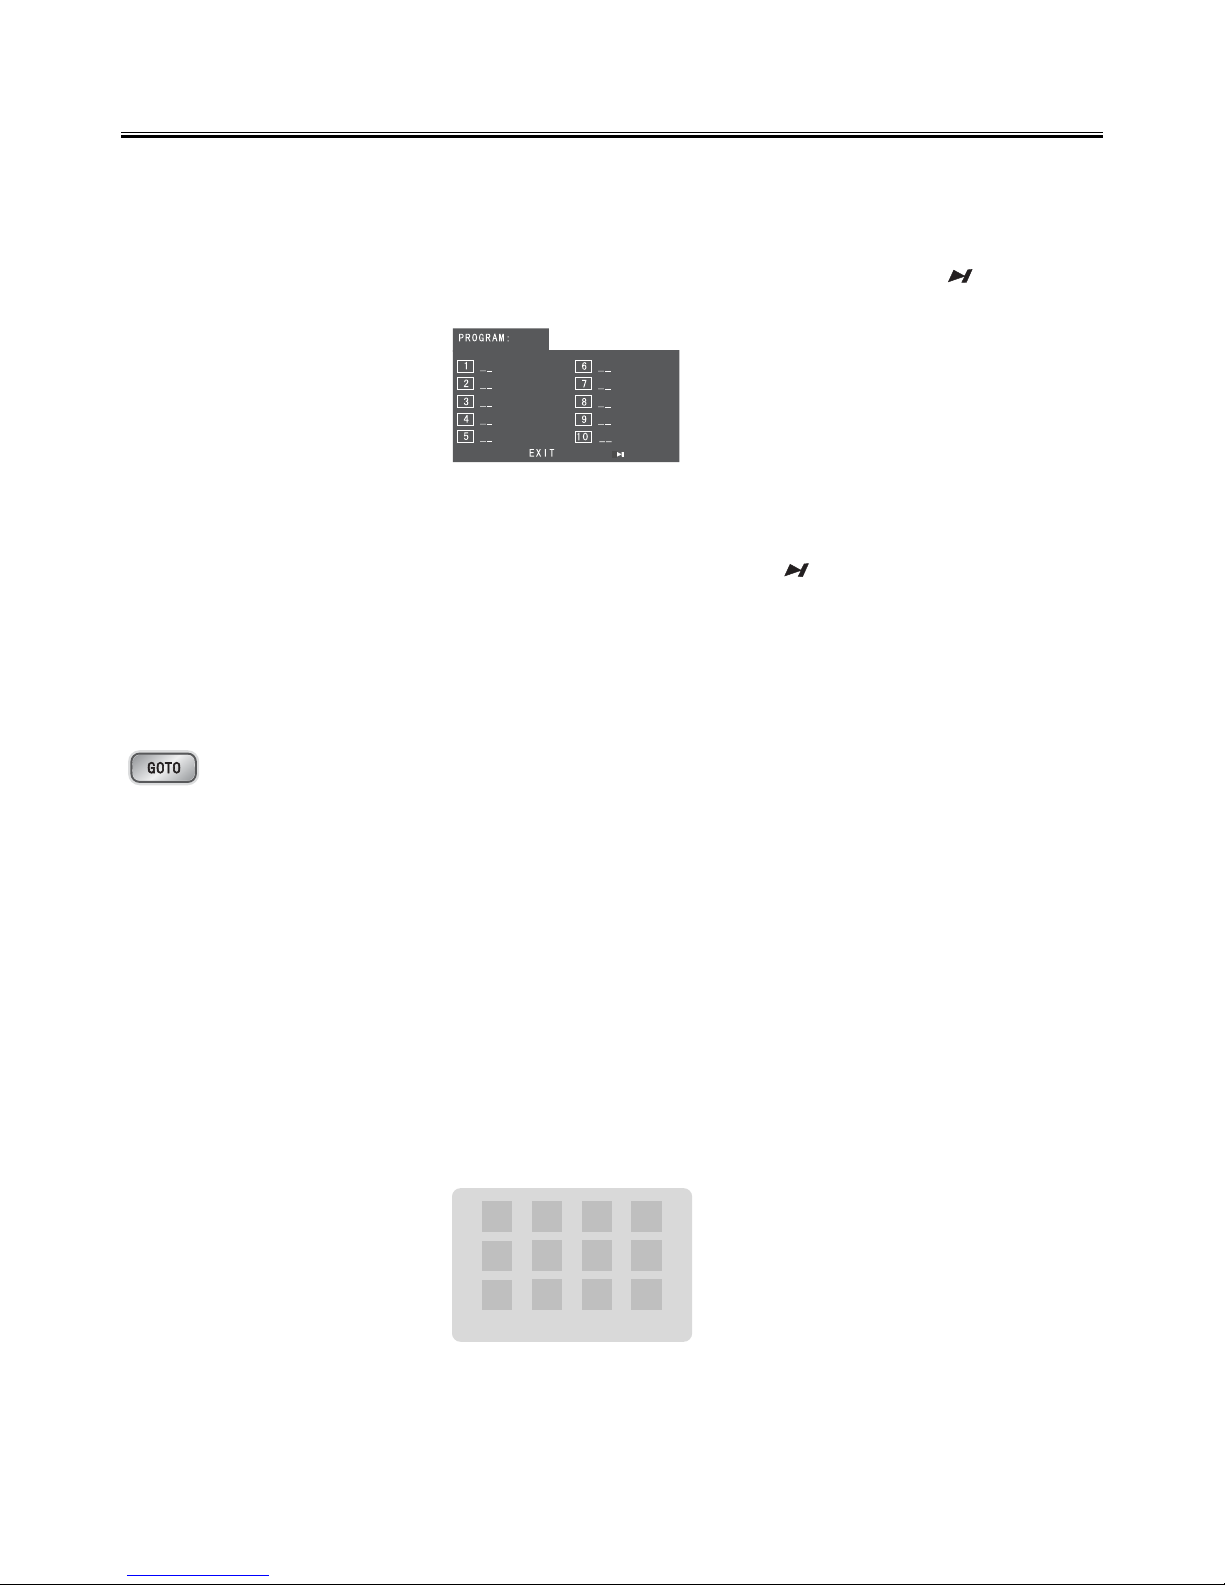
Note: Use the 1-9,10+ buttons to input the sequence number which you want to program
playing (the first selection is title and the second selection is chapter of the programs
menu.). After finishing program, press the S,T,W,X buttons to select “START” then
press the
ENTERENTER
ENTERENTER
ENTER
button to start programmed play or select “STOP” and “EXIT” to
exit the program. (If you setup disc playing order over 10, press the “
” to setup.)
If you are playing the CD disc, the TV display is as follows:
Note:Note:
Note:Note:
Note: Use the 1-9,10+ buttons to input the sequence number you want to program playing.
After the program has been entered, Press the S,T,W,X buttons to select “Start” then
press the
ENTERENTER
ENTERENTER
ENTER
button to start programmed play or select “EXIT” to exit the program.
(If you setup a disc playing order over 10, press the
“ ”
to continue to the next program
screen.)
If you are playing the MP3 disc, when Filelist is on the screen, select the files and press
program button
(
PROGRAMPROGRAM
PROGRAMPROGRAM
PROGRAM)
to add the files to the program list. Press menu button (
MENUMENU
MENUMENU
MENU
) to
display the program list then press program button
(
PROGRAMPROGRAM
PROGRAMPROGRAM
PROGRAM) to delete unwanted files from
the program list.
30. Press the goto button until the time or chapter/track edit box appears. Enter hours, minutes and
seconds from left to right in the time edit box using remote control numerical keypad. Or enter
your desired chapter/track number in the chapter/track edit box using remote control numerical
keypad.
Playing Picture CD discPlaying Picture CD disc
Playing Picture CD discPlaying Picture CD disc
Playing Picture CD disc
Place the picture CD on the disc tray correctly, the unit will read the disc and play it automatically,
if the disc can not play automatically, press the button
BF to play.
When the picture is displayed on the TV screen, you can press the
10+, 0-910+, 0-9
10+, 0-910+, 0-9
10+, 0-9 buttons on the remote control to
select the desired picture on the disc then press the
ENTER ENTER
ENTER ENTER
ENTER
button to start playing.
Note:Note:
Note:Note:
Note: Play will continue until the final picture or when the selected pictures have been played.
When playing, use the L button to select different play mode. These play modes list as the following:
Normal playingNormal playing
Normal playingNormal playing
Normal playing
Slide Show Menu <<Prev Next>>
Page 19

15
Note:Note:
Note:Note:
Note: When playing a picture CD, press the L button to enter the “THUMBNAIL MODE”, use the
S,T,W,
X
buttons to move the cursor to illuminate the “MENU” then press the
ENTERENTER
ENTERENTER
ENTER button to enter the
“REMODE KEY FUNCTION” list.
STOP : THUMBNAIL MODE H : PREVIOUS PICTURE
PLAY : PICTURE MODE
G : NEXT PICTURE
ZOOM : SWITCH ZOOM MODE S,T,W,X : PAN IN ZOOM MODE
Note:Note:
Note:Note:
Note:
Slide Show : Selections played in a random order Menu : Display “Remote Key Function” list
Prev : Display previous 12 pictures of disc Next : Display next 12 pictures of disc
You may need use the K button on the unit to stop playing and open the disc tray.
Use the USBUse the USB
Use the USBUse the USB
Use the USB
You can connect the USB flash to the USB jack at the front panel of unit. The unit will play MP3 music or the
pictures from the flash directly.
1. Plug the USB flash into the USB jack.
2. Press the
FUNCTIONFUNCTION
FUNCTIONFUNCTION
FUNCTION button on unit or the
USBUSB
USBUSB
USB button on remote control to select the USB function.
3. Display shows the word “USB” .
4. MP3 music or the pictures will be played automatically.
USB Storage Device Data ProtectionUSB Storage Device Data Protection
USB Storage Device Data ProtectionUSB Storage Device Data Protection
USB Storage Device Data Protection
--
--
- Always insert the USB device in the correct direction. Failure to do so may result in damage to the USB
device and this product.
- Do not remove the USB device while it is being accessed.
- Electrical interference and electrostatic discharges may cause the USB device to malfunction and suffer
damage, resulting in data loss.
It is strongly recommended that any important data is backed up on a PC to protect against corruption,
data loss or device malfunction. Please note that our company shall not accept any liability for damage or
loss of stored data.
Note: Note:
Note: Note:
Note: USB connection is not compatible with all hard drive models.
Normal playingNormal playing
Normal playingNormal playing
Normal playing
Page 20
16
Listening to Radio BroadcastsListening to Radio Broadcasts
Listening to Radio BroadcastsListening to Radio Broadcasts
Listening to Radio Broadcasts
Caution:Caution:
Caution:Caution:
Caution: Before listening to the radio, please check if FM antenna is correctly connected.
Press the function select button (
FUNCTIONFUNCTION
FUNCTIONFUNCTION
FUNCTION
) on the unit or the
TUNERTUNER
TUNERTUNER
TUNER
button on the remote control
to select FM function.
Press the button
(C) repeatedly to move from frequency to frequency until the next station is
found.
Press and hold the button
(C) for one second or more, the frequency will change up automati-
cally until a right station is found.
(You also can operate the tuning forward key
(
TU+TU+
TU+TU+
TU+) on the panel of the unit.)
Press the button
(D) repeatedly to move from frequency to
frequency until the next station is found.
Press and hold the button
(D) for one second or more, the frequency will change down auto-
matically until a right station is found.
(You also can operate the tuning backward key
(
TU-TU-
TU-TU-
TU-
) on the panel of the unit.)
You can store the well tuned station by pressing the program button
(
PROGRAMPROGRAM
PROGRAMPROGRAM
PROGRAM
) on the remote
.
(You can preset up to 16 FM stations .)
Tune in the desired station, then press the program button
(
PROGRAMPROGRAM
PROGRAMPROGRAM
PROGRAM).
Use
CH-CH-
CH-CH-
CH-
button or
CH+CH+
CH+CH+
CH+
button on the unit or the buttons (H
,
G) on the remote control once by
once to select the preset number.
Press the program button
(
PROGRAMPROGRAM
PROGRAMPROGRAM
PROGRAM) to store the station.
Note:Note:
Note:Note:
Note: If the system is unplugged or if a power failure occurs, the preset stations will
remain stored in the memory.
Press the button (G) once by once to select preset number after preset
presetting station. Its band and frequency are displayed on the VFD.
Press the button (
G) once by once to select the preset number when in store the station.
Press (on the unit) or the button (
H) on the remote once by once to select preset number
before presetting station. Its band and frequency are displayed on the VFD.
Press the button (
H) once by once to select the preset number when in store the station.
(You also can operate the channel select forward button (
CH+CH+
CH+CH+
CH+) and the channel select backward
button (
CH-CH-
CH-CH-
CH-) on the panel of the unit.)
Press the mode button (
MODEMODE
MODEMODE
MODE) to select the Stereo or MONO channel to receive the FM radio
mode, it can get the best effect.
Page 21
17
Clock/TClock/T
Clock/TClock/T
Clock/T
imer Functionsimer Functions
imer Functionsimer Functions
imer Functions
Setting the Clock
The built-in clock shows the correct time in the display.
- In standby mode, press the clock button (
CLOCKCLOCK
CLOCKCLOCK
CLOCK
) , the hour indicator will blink.
- Set the hour with the
++
++
+
button or
- -
- -
-
button.
- Press the clock button (
CLOCKCLOCK
CLOCKCLOCK
CLOCK
), the minute indicator will blink.
- Set the minute with the
++
++
+ button or
--
--
- button.
- Press the clock button (
CLOCKCLOCK
CLOCKCLOCK
CLOCK
, the built-in clock starts operating and the seconds start counting
from 0.
Note:Note:
Note:Note:
Note:
The operating time of every step shouldn’t be longer than 10 seconds or it will return to the
original display.
If there is a power failure or the power system is turned off, the clock will lose its setting.
TT
TT
T
o confirm the clock timeo confirm the clock time
o confirm the clock timeo confirm the clock time
o confirm the clock time
When you press the clock button (
CLOCKCLOCK
CLOCKCLOCK
CLOCK
), the clock time is displayed. Wait for a few seconds until
the display returns to the original display.
Setting the Daily TSetting the Daily T
Setting the Daily TSetting the Daily T
Setting the Daily T
imerimer
imerimer
imer
In standby mode with the clock time having been set, you can use the daily timer setting to turn the
unit on automatically at a certain time everyday under standby mode. When the setting timer is on,
the timer indictor “
” will display on the VFD, however the clock must be set correctly for the timer
function to work.
- In standby mode, press the timer button (
TIMERTIMER
TIMERTIMER
TIMER), the hour indicator will blink.
- Set the hour with the
++
++
+ button or
--
--
- button.
- Press the timer button (
TIMERTIMER
TIMERTIMER
TIMER), the minute indicator will blink.
- Set the minute with the
++
++
+ button or
--
--
- button.
- Press the timer button (
TIMERTIMER
TIMERTIMER
TIMER), the selected time is set. Then set the daily timer to “ON” (daily
timer set is in effect) or “OFF” (daily timer set is to cancel) by pressing the
++
++
+ button or
--
--
- button.
Note:Note:
Note:Note:
Note:
You can only set the daily timer only in standby mode and the clock timer had been set.
The operating time of every step shouldn’t be longer than 10 seconds or it will return to time
display.
The sound source of the “timer on” mode is the same as the sound source when the unit was
turned off by the standby switch.
TT
TT
T
o confirm the daily timeo confirm the daily time
o confirm the daily timeo confirm the daily time
o confirm the daily time
Press the timer button (
TIMERTIMER
TIMERTIMER
TIMER
) in standby mode, the daily time is displayed. Wait for a moment
until the display returns to the time display.
Page 22
18
TT
TT
T
o cancel the daily timer settingo cancel the daily timer setting
o cancel the daily timer settingo cancel the daily timer setting
o cancel the daily timer setting
In standby mode, repeatedly press the timer button (
TIMERTIMER
TIMERTIMER
TIMER
) until the “ON” display on the VFD,
then you can set the daily timer to “OFF” by pressing the
++
++
+
button or
--
--
-
button (the daily timer will be
cancelled).
If the system is unplugged or there is a power failure, the daily timer will be cancelled.
Setting the Sleep TSetting the Sleep T
Setting the Sleep TSetting the Sleep T
Setting the Sleep T
imerimer
imerimer
imer
Use the sleep timer button to turn the system off after some time when playing. By setting the sleep
timer, you can fall asleep and know that your system will turn off by itself rather than playing all
night.
- Play a disc or tune in to the desired station.
- If you set the sleep timer first, each time you press the sleep button (
SLEEPSLEEP
SLEEPSLEEP
SLEEP
), it changes the
number of minutes shown on the VFD in this sequence:
- If you change the sleep timer, each time you press the sleep button (
SLEEPSLEEP
SLEEPSLEEP
SLEEP), it changes the
number of minutes shown on the VFD in this sequence:
After setting the number of minutes for the sleep timer, the display will return to the display as before setting the sleep timer.
The system is now set to turn off after the number of minutes you set.
TT
TT
T
o confirm the sleep timeo confirm the sleep time
o confirm the sleep timeo confirm the sleep time
o confirm the sleep time
When pressing the sleep button (
SLEEPSLEEP
SLEEPSLEEP
SLEEP
), the remaining sleep time is displayed. After a few
seconds the display returns to the original display.
TT
TT
T
o cancel the sleep timer settingo cancel the sleep timer setting
o cancel the sleep timer settingo cancel the sleep timer setting
o cancel the sleep timer setting
Repeatedly press the sleep button (
SLEEPSLEEP
SLEEPSLEEP
SLEEP) until the “00” displays on the VFD.
You can cancel the sleep timer by resetting the clock or turning off the unit.
Clock/TClock/T
Clock/TClock/T
Clock/T
imer Functionsimer Functions
imer Functionsimer Functions
imer Functions
10 20 80 90 00
10 20 80 90 00
Page 23
19
DVD Menu OptionsDVD Menu Options
DVD Menu OptionsDVD Menu Options
DVD Menu Options
Caution:Caution:
Caution:Caution:
Caution:
The content of this chart is for reference only. If something has changed, please take theThe content of this chart is for reference only. If something has changed, please take the
The content of this chart is for reference only. If something has changed, please take theThe content of this chart is for reference only. If something has changed, please take the
The content of this chart is for reference only. If something has changed, please take the
actual display for standard.actual display for standard.
actual display for standard.actual display for standard.
actual display for standard.
Menu function setupMenu function setup
Menu function setupMenu function setup
Menu function setup
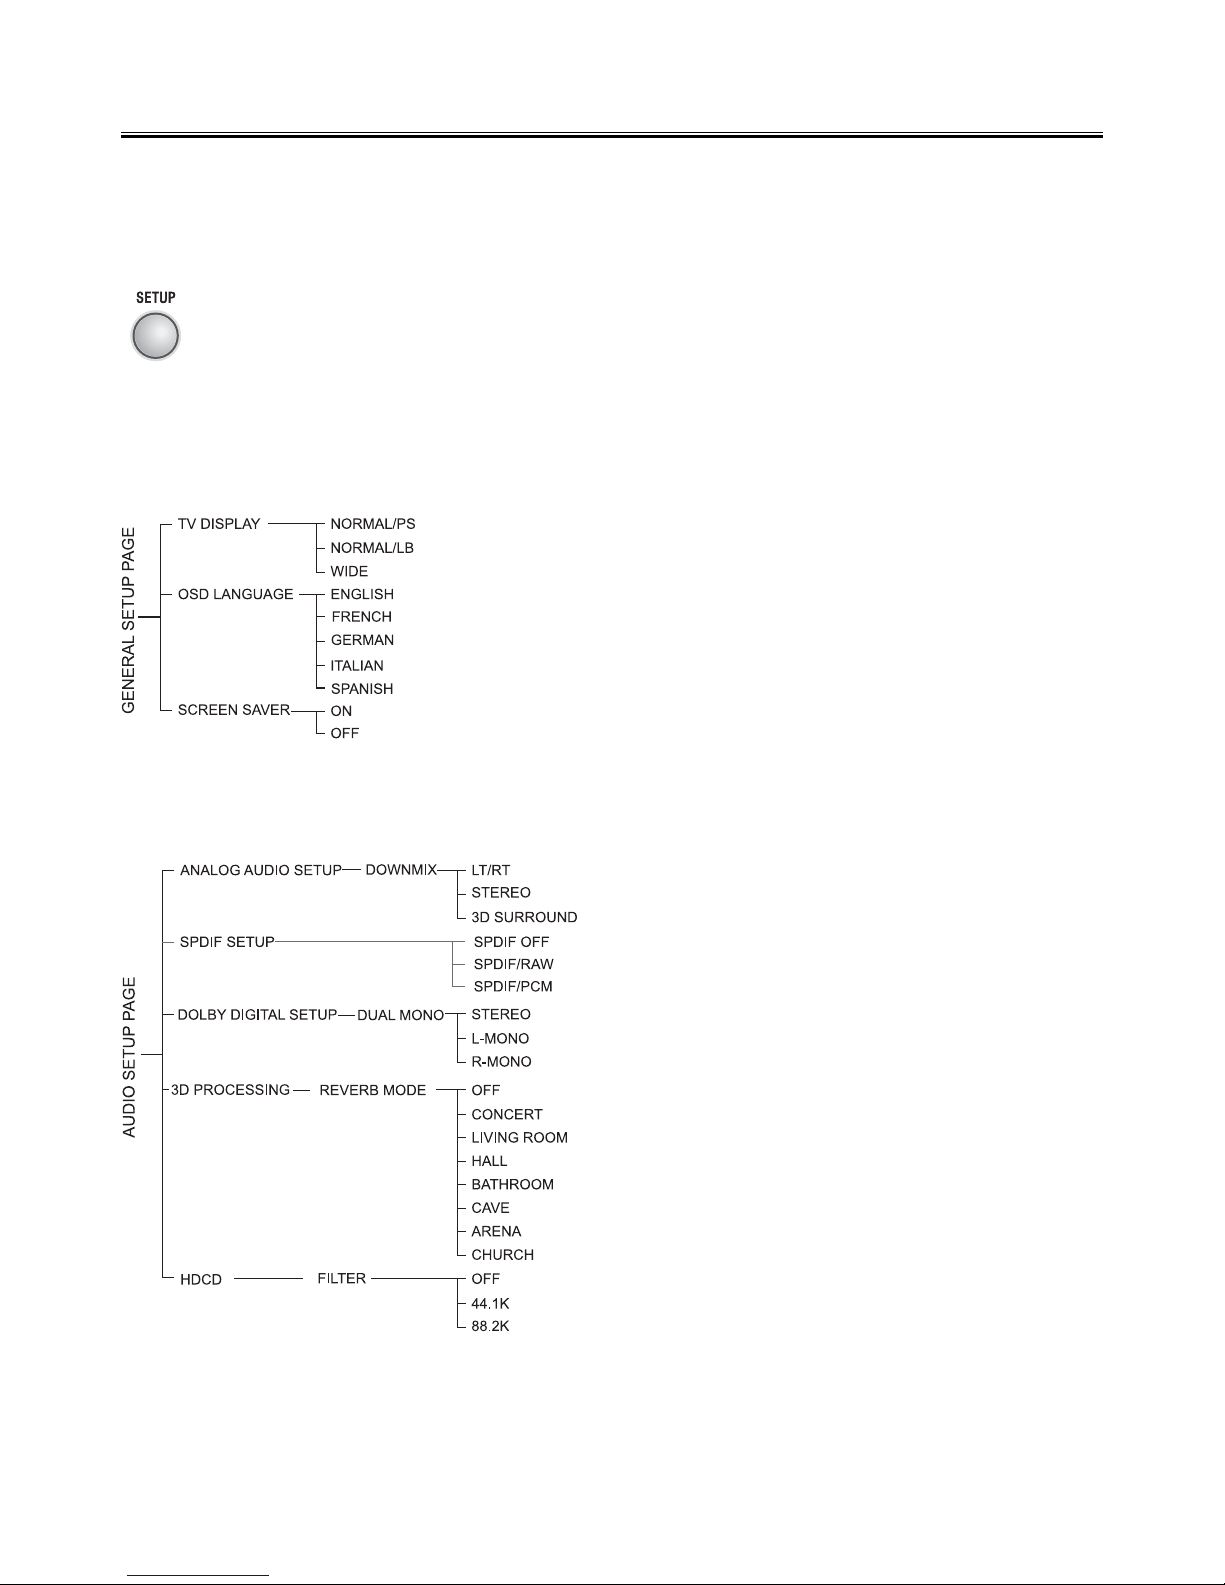
If you want to setup the function of this unit, please press the function setting button (
SETUPSETUP
SETUPSETUP
SETUP
) to
display the DVD setup menu, then use the S,T,W,X buttons and
ENTERENTER
ENTERENTER
ENTER
button. Press the func-
tion setting button
(
SETUPSETUP
SETUPSETUP
SETUP) again to exit the function setting main menu.
Note:Note:
Note:Note:
Note:If the item displays in gray, that means that it can’t be setup and there isn’t this function in the
disc.
General Setup PageGeneral Setup Page
General Setup PageGeneral Setup Page
General Setup Page
TV DisplayTV Display
TV DisplayTV Display
TV Display
This menu allows the user to select the aspect ratio of
the TV to be connected.
OSD LanguageOSD Language
OSD LanguageOSD Language
OSD Language
This menu allows the user to select the language for
the on-screen display.
Screen SaverScreen Saver
Screen SaverScreen Saver
Screen Saver
Set the screen saver to on/off.
Audio Setup PageAudio Setup Page
Audio Setup PageAudio Setup Page
Audio Setup Page
Analog Audio SetupAnalog Audio Setup
Analog Audio SetupAnalog Audio Setup
Analog Audio Setup
When the disc has Dolby Pro Logic stereo, you can
choose LT/RT (Left/Right audio) or Stereo or 3D
Surround (Virtual Surround Sound) mode to play this
disc.
SPDIF SetupSPDIF Setup
SPDIF SetupSPDIF Setup
SPDIF Setup
SPDIF Off......Turns off the SPDIF output.
SPDIF RAW..If you have connected your digital out.
SPDIF PCM..If your receiver is not capable of
decoding multi-channel audio.
Dolby Digital SetupDolby Digital Setup
Dolby Digital SetupDolby Digital Setup
Dolby Digital Setup
Stereo......Left channel is output from the left speaker,
and right channel is output from the right speaker.
L-MONO..Left channel is output from the front left and
right speakers. R-MONO..Right channel is output from
the front left and rightspeakers.
3D Processing3D Processing
3D Processing3D Processing
3D Processing
This setting provides following sound effects: Off,
Concert, Living Room, Hall, Bathroom, Cave, Arena
and Church.
HDCDHDCD
HDCDHDCD
HDCD
When playing a HDCD disc, the audio output width
degree can be set here.
Page 24
20
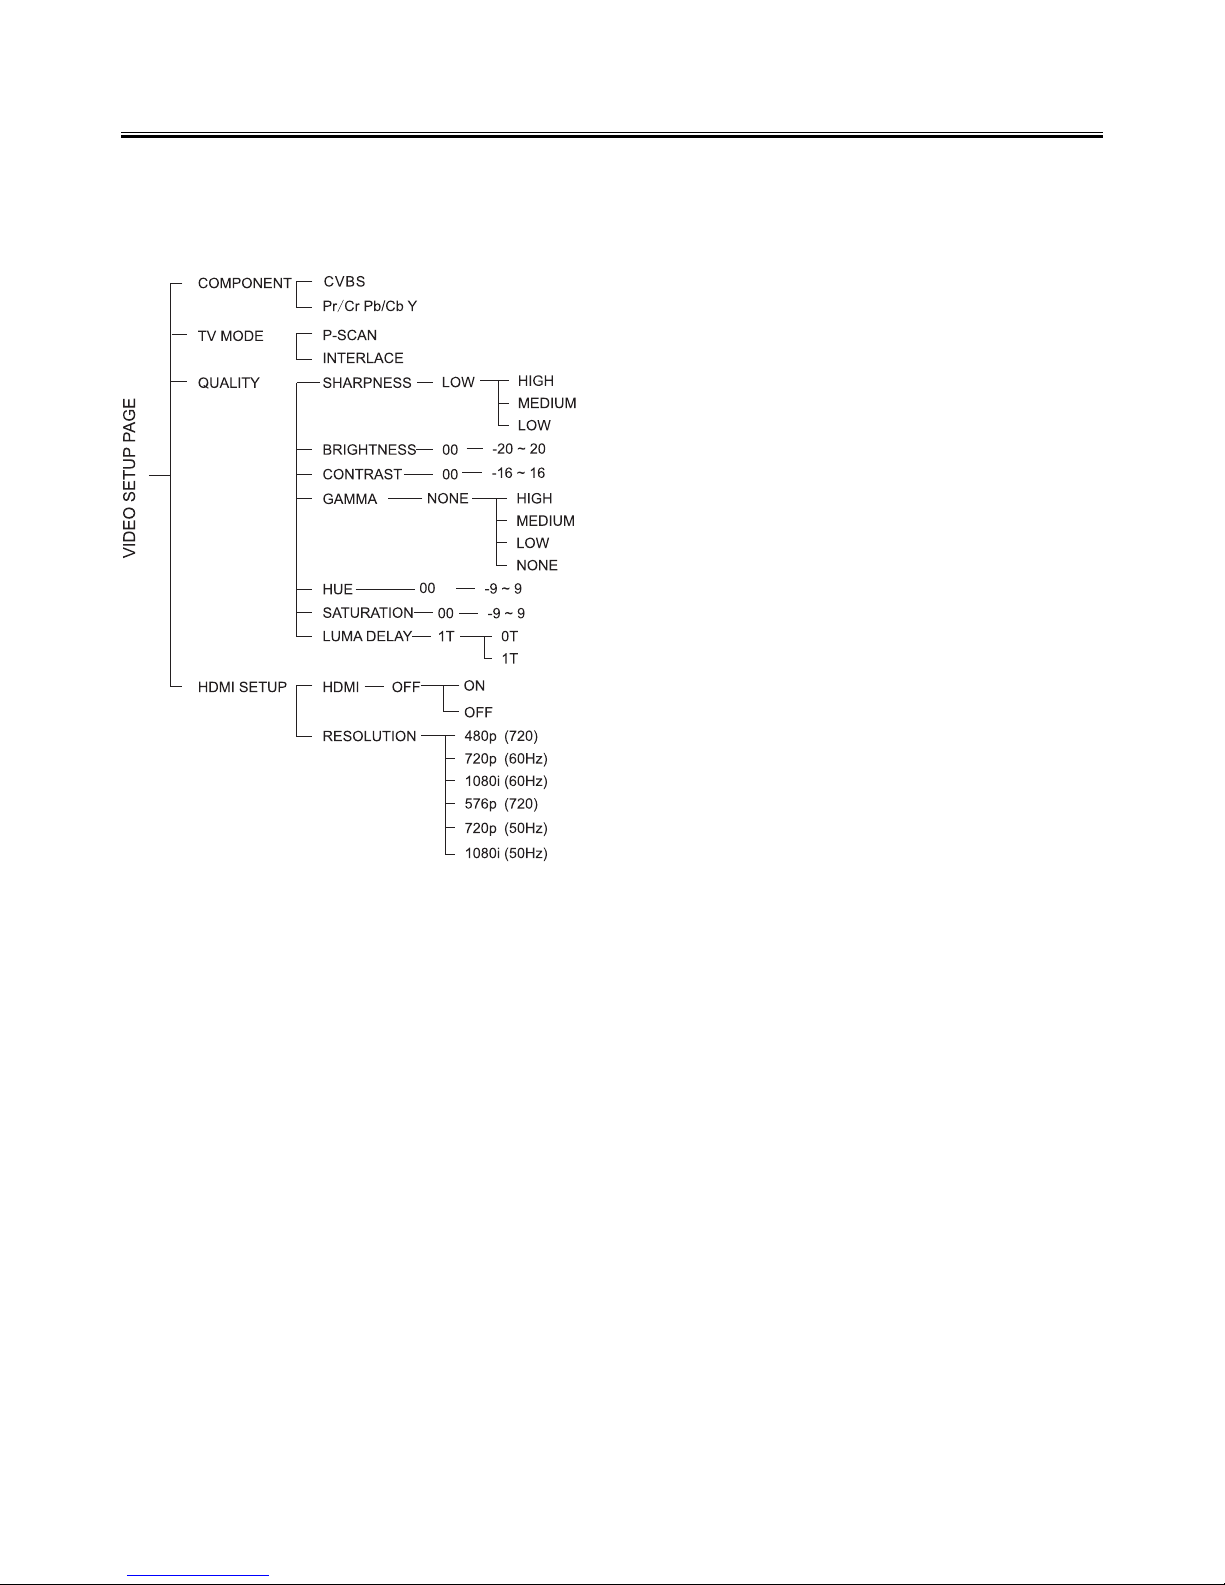
Video Setup PageVideo Setup Page
Video Setup PageVideo Setup Page
Video Setup Page
ComponentComponent
ComponentComponent
Component
You can setup this according to TV video output type.
Note:Note:
Note:Note:
Note:This setting is available only when the HDMI
SETUP is set to “OFF”.
TV ModeTV Mode
TV ModeTV Mode
TV Mode
You can select interlace or P-SCAN video output
mode when Ypbpr is selected.
Note:Note:
Note:Note:
Note:This setting is available only when the
Pr/Cr Pb/Cb Y is selected and HDMI SETUP
is set to “OFF”.
QualityQuality
QualityQuality
Quality
You can adjust the picture to your personal preference.
HDMI SetupHDMI Setup
HDMI SetupHDMI Setup
HDMI Setup
You can select this when your TV is connected to the
HDMI terminal.
Note :Note :
Note :Note :
Note : Resolution setting is available only when
“HDMI” is set to “ON”.
DVD Menu OptionsDVD Menu Options
DVD Menu OptionsDVD Menu Options
DVD Menu Options
Page 25
21
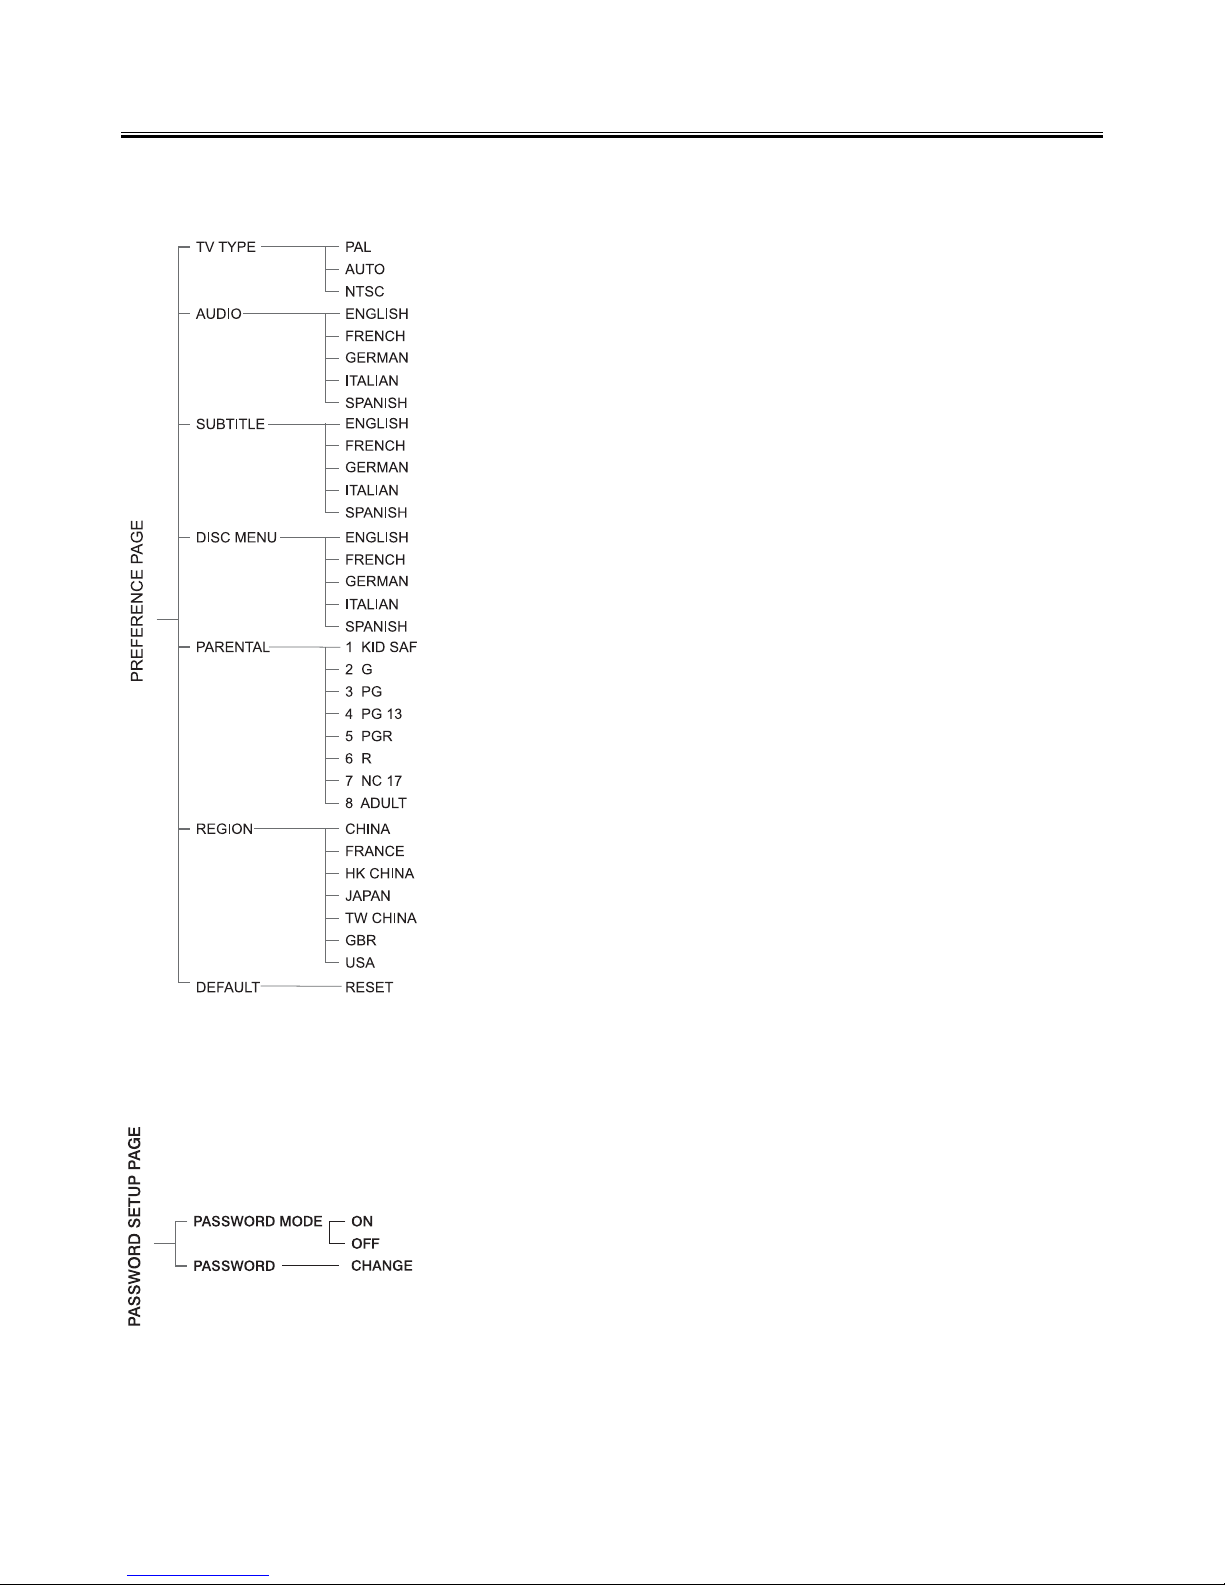
Preference PagePreference Page
Preference PagePreference Page
Preference Page
Note: Note:
Note: Note:
Note: Preference features can be selected only during “NO DISC” condition or full STOP mode.
TV TTV T
TV TTV T
TV T
ypeype
ypeype
ype
This menu allows the user to select the colour system.
Audio, Subtitle, Disc MenuAudio, Subtitle, Disc Menu
Audio, Subtitle, Disc MenuAudio, Subtitle, Disc Menu
Audio, Subtitle, Disc Menu
This menu allows the user to select the language.
ParentalParental
ParentalParental
Parental
Setup this system when playing disc which had age control.
RegionRegion
RegionRegion
Region
This menu allows the user to select the region.
DefaultDefault
DefaultDefault
Default
Restore to factory setting.
Password Setup PagePassword Setup Page
Password Setup PagePassword Setup Page
Password Setup Page
Password ModePassword Mode
Password ModePassword Mode
Password Mode
Select this item to set new password for this unit, follow the
screen’s indication and enter a password.
PasswordPassword
PasswordPassword
Password
The original password is 1234.
DVD Menu OptionsDVD Menu Options
DVD Menu OptionsDVD Menu Options
DVD Menu Options
Page 26
22
Protect the DiscProtect the Disc
Protect the DiscProtect the Disc
Protect the Disc
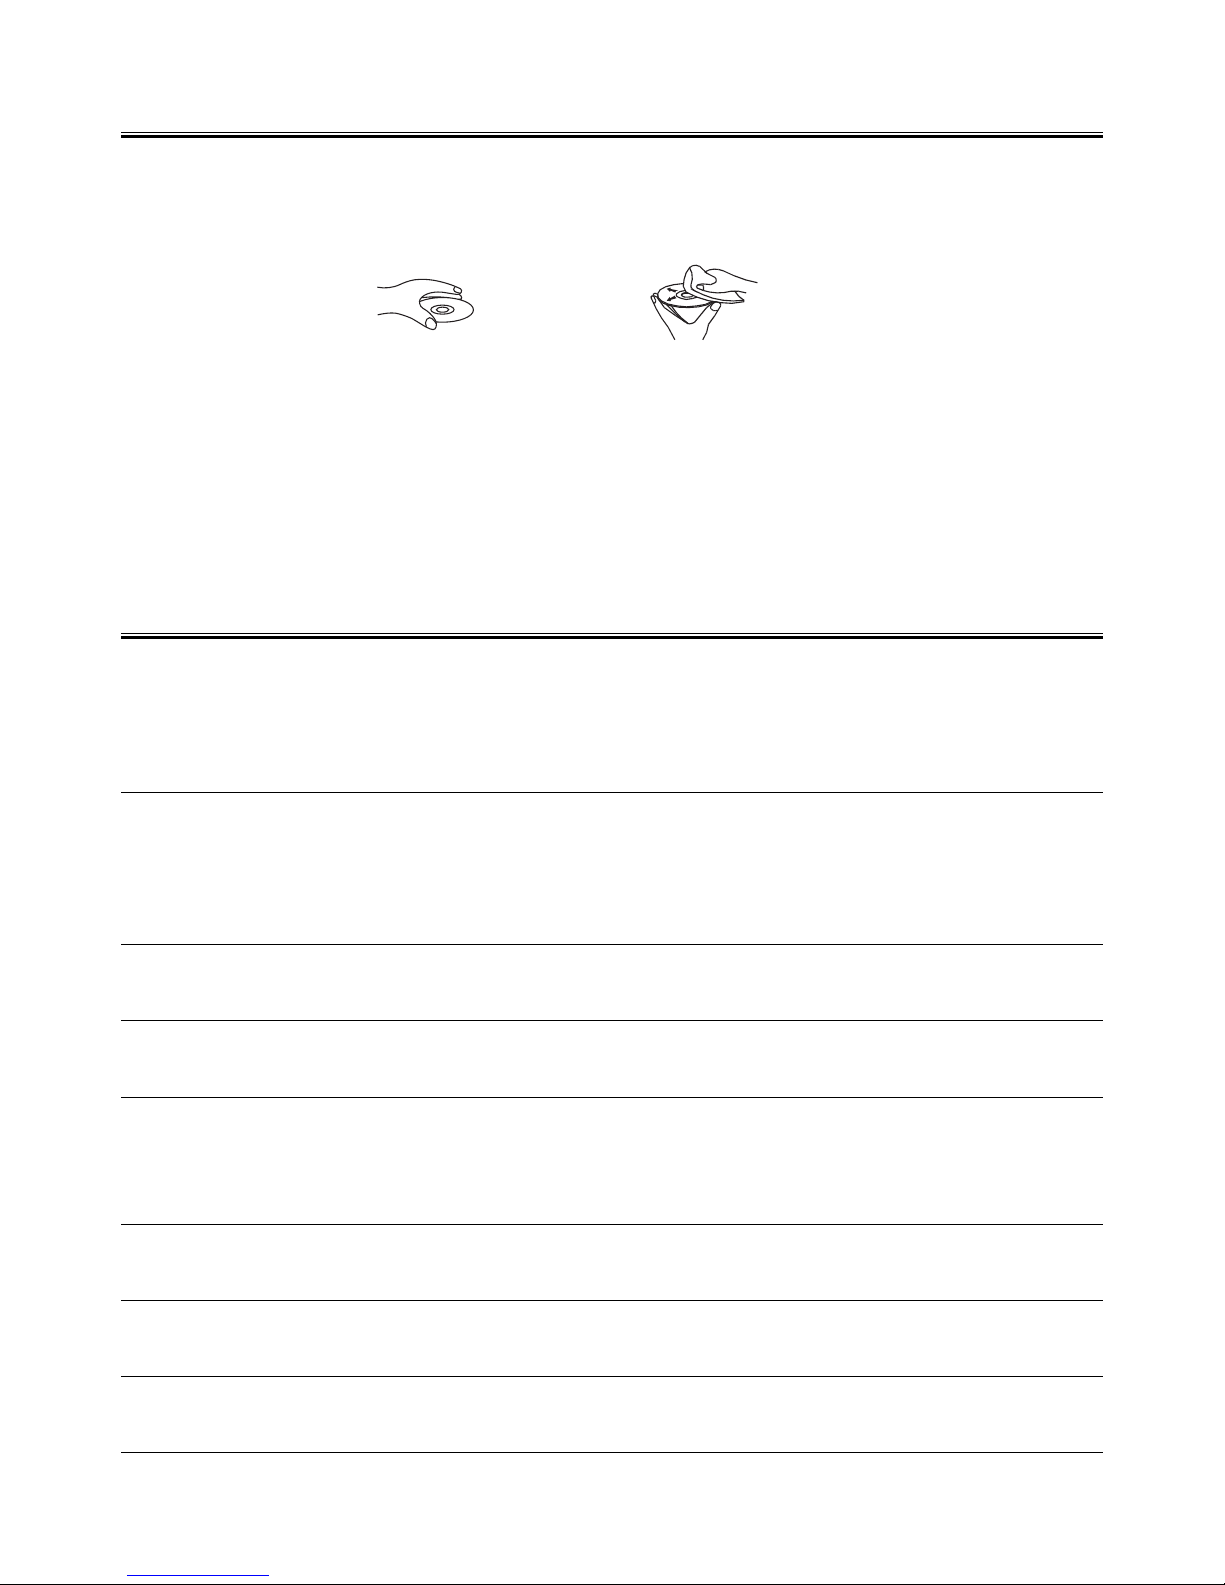
1. To keep the disc clean, please do not touch the disc’s surface when you are holding it. You should hold the
edge.
2. If the disc is dirty, it will affect the sound quality. Please use the clean and soft cloth to wipe the disc from
inside to outside. Do not wipe the disc in circular motion.
3. Do not stick paper on the disc.
4. Do not place discs in direct sunlight or near or on heat sources.
5. After you have finished with the disc, please place it back in its original case. To avoid warping or damage,
do not stack discs.
6. Do not play the disc which has flaw or deformation, in case of damaging this player.
7. Clean your discs using only a soft dry cloth. Do not use any chemicals such as benzine, thinner, antistatic
or record sprays as these can damage the disc surface.
SymptomSymptom
SymptomSymptom
Symptom
No sound is heard
No picture
Bad sound quality
The disc does not play
Poor radio reception
Unable to operate
the remote control
Operations are disabled
Possible CausePossible Cause
Possible CausePossible Cause
Possible Cause
Connections are incorrect, or loose
TV or power amplifier operates wrong
The amplifier’s receiving signal
position is wrong
Volume setting to minimum
Connect wrong or loose
TV Operation and setting is wrong
Audio connect wrong
Audio output mode setting wrong
No disc in the tray
The disc is upside down
The disc is dirty or scratched
The unit is foggy inside
The antenna is disconnected
The FM antenna is not properly
extended and positioned
The path between the remote control
and the sensor on the unit is blocked
The batteries have lost their charge
The built-in microprocessor has
malfunctioned due to external
electrical interference
ActionAction
ActionAction
Action
Check all connections and make
corrections
Check whether the operation is right
Check the position of receive signal
Adjust volume
Check all connection and correct it
Check whether operation and setting is
right
Check whether audio connection is right
Check whether audio output setting is
right
Place a disc
Place the disc in with the printed side up
Clean or replace the disc
Take out the disc, turn on the unit for
about an hour
Reconnect the antenna securely
Extend FM wire antenna to the best
reception position
Remove the obstruction
Replace the batteries
Unplug the system then plug it back in
TT
TT
T
roubleshootingroubleshooting
roubleshootingroubleshooting
roubleshooting
If you are having a problem with your system, check this list for a possible solution before calling for service.
If you can not solve the problem from the hints give here, or the system has been physically damaged, call a
qualified person, such as your dealer, for service.
Page 27

23
SpecificationSpecification
SpecificationSpecification
Specification
DVDDVD
DVDDVD
DVD
Power Supply ..................................................................... ~240V AC / 50 Hz
Power Consumption .......................................................... 75W
Operating Temperature ...................................................... -10~40
Video Output ...................................................................... 1 VP-P 75Ω, Negative synchronism
Video System..................................................................... Multi/PAL/NTSC
Horizontal Definition ........................................................... 576 lines (DVD)
Frequency Response (Line Out)........................................ 20Hz-20kHz(±3dB)
Distortion ............................................................................ ≤ 0.8%
Supported Format .............................................................. DVD,DVD-/+R/RW,CD,CD-R/RW
USB Supported Size Up to ................................................ 2GB
Dimensions ........................................................................ 184(W) x 222(H) x 304(D) mm
Weight ................................................................................ 1.68Kg
Composite Video OutputComposite Video Output
Composite Video OutputComposite Video Output
Composite Video Output
Output Level ....................................................................... 1±0.2Vp-p (75Ω)
S-Video OutputS-Video Output
S-Video OutputS-Video Output
S-Video Output
Output Level ....................................................................... 0.7±0.14Vp-p (75Ω)
Component Video Output (Y,Cb/Pb,Cr/Pr)Component Video Output (Y,Cb/Pb,Cr/Pr)
Component Video Output (Y,Cb/Pb,Cr/Pr)Component Video Output (Y,Cb/Pb,Cr/Pr)
Component Video Output (Y,Cb/Pb,Cr/Pr)
Y Output Level ................................................................... 0.7±0.14Vp-p (75Ω)
Cb/Pb,Cr/Pr ....................................................................... 0.7±0.14Vp-p (75Ω)
TT
TT
T
uneruner
uneruner
uner
FM Frequency range ......................................................... 87.5-108 MHz
FM Noise limit sensitivity ................................................... ≤ 20μV
FM S/N ............................................................................... ≥ 46dB
SpeakerSpeaker
SpeakerSpeaker
Speaker
Impedance ......................................................................... 4Ω
Input power ........................................................................ 50W
Dimensions ........................................................................ 100(W) x 350(H) x 200(D) mm
Weight ................................................................................ 2.45Kg x 2
Sub-WooferSub-Woofer
Sub-WooferSub-Woofer
Sub-Woofer
Power consumption ........................................................... 100W
Dimensions ........................................................................ 230(W) x 285(H) x 360(D) mm
Weight ................................................................................ 9.40Kg
Page 28

24
SpecificationSpecification
SpecificationSpecification
Specification
AmplifierAmplifier
AmplifierAmplifier
Amplifier
Output PowerOutput Power
Output PowerOutput Power
Output Power
Subwoofer(100Hz,10%THD) ............................................. 100W
L/R (1KHz,10%THD) ......................................................... 50W
Frequency Response
Subwoofer (40-170HZ)....................................................... - 6 ± 2 dB
L/R...................................................................................... 100Hz - 60dB, 20KHz - 3dB
RemoteRemote
RemoteRemote
Remote
Distance ............................................................................. 6m
Angle .................................................................................. 30
O
AccessoriesAccessories
AccessoriesAccessories
Accessories
FM antenna ....................................................................... 1
Video cable ........................................................................ 1
RGB cable ......................................................................... 1
Wall bracket ....................................................................... 2
Remote control................................................................... 1
Instruction manual .............................................................. 1
Stand .................................................................................. 1
* Features and specifications are subject to change without notice.
* Weight and dimensions are approximate.
* All trademarks and registered trademarks are the property of their respective owners. All rights reserved.
* Manufactured under the license of Dolby Laboratories. Dolby, Pro Logic, and the double-D symbol are registered
trademarks of Dolby Laboratories.
41005494
Page 29

TEAC AUSTRALIA PTY.,LTD.
A.B.N.: 11 113 998 048
Service Providers in Australia
please contact one of the following service providers in your area if you require service for your product.
ACT
Name
Address
Phone
Fax
Associated Electronics 7 Molonglo Mall FYSHWICK 2609 (02)62 80 4698 (02)62 80 5437
TEAC Perth Service Centre 273 Great Eastern Highway BELMONT 6104 (08)94 79 6499 (08)94 79 6544
Inpulse Electronics 3 Sloane Street MARIBYRNONG 3032 (03)93 17 4000 (03)39 17 4040
Jav Electronics 65 Mackie Road BENTLEIGH EAST 3165 (03)95 70 4911 (03)95 63 8722
Watpace Electronics 62 Wingara Avenue KEILOR EAST 3033 (03)93 36 4042 (03)93 36 3768
QQ Electronics Pty Ltd Unit 5, 14-38 Bellona Avenue REGENTS PARK 2143 1300 883 229 (02)97 38 1311
Maxwell Electronics 106 Bath Road KIRRAWEE 2232 (02)95 42 3000 (02)95 42 3377
TCS (Total Care Services) 62 Leader Street FORESTVILLE 5035 (08)83 51 1044 (08)83 51 1043
NSW
Name
Address Phone
Fax
B & H Electronics 466 David Street ALBURY 2640 (02)60 41 3911 (02)60 21 7455
Border Video & TV Service
Shop 3, 339 Urana Road LAVINGTON 2641 (02)60 40 2229 (02)60 40 2184
Bourkes Video & Tv Service 111 Danger Street ARIMDALE 2350 (02)67 71 1513 (02)67 71 1696
Nichols Electronics Shop 4/70 River Street BALLINA 2478 (02)66 86 9422 (02)66 81 4999
Baytech Electronics Shop 3, 270 Beach Road BATEHAVEN 2536 (02)44 72 7023 (02)44 72 7354
Sapphire Electronics
U5B/85 Bega Street BEGA 2550 (02)64 92 2522 (02)64 93 2062
Lawson Radio & TV 298 Great Western Highway LAWSON 2783 (02)47 59 1254 (02)47 59 2312
Visual Audio Services 510 Chapple Street - PO BOX 76 BROKEN HILL 2880 (08)80 87 4055 (08)80 87 4055
T K Electronics Unit 2 10 O’Hart Close CHARMHAVEN 2263 (02) 43 92 0828 (02)43 93 1018
TV Technologies 20 Marcia Street COFFS HARBOUR 2450 (02)66 51 7366 (02)66 50 0152
Coogee Electronic Service 261 Arden Street COOGEE 2034 (02)93 15 8566 (02)66 50 0152
Electronics 2000 Shop 3/190 Sharp Street COOMA 2630 (02)64 52 4179 (02)64 52 4179
Lachlan Valley TV 49 Vaux Street COWRA 2794 (02)63 42 2189 (02)63 42 2189
Greg’s TV 2 Bingalong Street DALMENY 2546 (02)44 76 7544 (02)44 76 7544
Deniliquin Hi-Tech 44 Hardinge Street DENILIQUIN 2710 (03)58 81 1444 (03)58 81 1444
Western Electronic Service 437 Hopkins Parade DUBBO 2830 (02)68 82 3905 (02)68 82 3870
Con Carr Retravision 126-128 Murray Street FINLEY 2713 (03)58 83 1611 (03)58 83 2114
Forbes TV & Video Repairs 132 Rankin Street FORBES 2871 (02)68 52 2921 (02)68 52 2921
Forster Electronic Services Shop 15, Forster Tower, Wallis Street FORSTER 2428 (02)65 54 5352 (02)65 54 5352
V.J. & C.M. Davey TV & 137 Meade Street GLEN INNES 2370 (02)67 32 2260 (02)67 32 2260
Ray White Television Repairs 2 Taylor Street GOULBURN 2580 (02)48 22 4050
Repairs & Spares 140 Fitzroy Street GRAFTON 2460 (02)66 42 1911 (02)66 43 3961
Griffith Home Appliance 94-98 Yambil Street GRIFFITH 2680 (02)69 62 1826
S & K Electronics 111 Banna Avenue GRIFFITH 2680 (02)69 62 2847 (02)69 64 7774
Ron Burns Electrical 8 Hillcrest Road GUNNEDAH 2380 (02)67 42 3299
Tele – Fridge Electronics 82 Conadilly Street GUNNEDAH 2380 (02)67 42 0022 (02)67 42 3878
Inverlec Electronics Shop 1,20 Glen Innes Road INVERELL 2360 (02)67 22 4522 (02)67 22 4522
Maxwell Electronics 106 Bath Road KIRRAWEE 2232 (02)95 42 3000 (02)95 42 3377
Jag Electronics 59 Tambourine Bay Road LANE COVE 2066 (02)94 27 5478 (02)94 28 2634
AVL Electronics 2/87 Bold Street LAURIETON 2443 (02)65 59 6330 (02)65 59 6330
Leeton Appliances 99 Grevillia Street LEETON 2705 (02)69 53 4151 (02)69 53 4151
Hans Electronic Services 147 Magellan Street LISMORE 2480 (02)66 21 9311 (02)66 21 9711
Robert Peatfield 2 West Street MACKSVILLE 2447 (02)65 68 2867 (02)65 68 2867
Mullumbimby TV Service Shop 3 97-99 Stuart Street MULLUMBIMBY 2482 (02)66 84 2335 (02)66 84 3554
John Rice TV Service 13 Park Avenue MURWILLUMBAH 2484 (02)66 72 3292 (02)66 72 3292
Spencer Electronics Unit 2, 26 Somerset Avenue NARELLAN 2567 (02)46 47 2046 (02)46 47 2046
Kaputar TV Service
27 Maitland Street NARRABRI 2390 (02)67 92 1017 (02)67 92 1017
Newcastle Quickfix/ J P Electronics Shop 5, 468 Pacific Hwy BELMONT 2280 (02)49 45 4699 (02)49 45 5696
Page 30

NSW
Name
Address
Phone
Fax
Videotel Unit 1/17 Quinns Lane SOUTH NOWRA 2541 (02)44 21 5250 (02)44 23 3280
Ideal Electronics 145 Woodward Street ORANGE 2800 (02)63 62 8270 (02)63 62 8270
Parkes Sight 'n' Sound 67 Clarinda Street PARKES 2870 (02)68 62 4475 (02)68 63 4209
Vickery Sound
171 Brisbane Water Drive POINT CLARE 2250 (02)43 23 3623 (02)43 23 1581
Quickfix Repairs 118 Stafford Street PENRITH 2750 (02)47 22 8550 (02)47 22 9949
BJRAE Electronics 2/199 Adelaide Street RAYMOND TERRACE 2324 (02)49 87 7032 (02)49 87 6194
QQ Electronics Pty Ltd Unit 5, 14-38 Bellona Avenue REGENTS PARK 2143 1300 883 229 (02)97 38 1311
Quickfix Repairs Shop 17 West Market Street RICHMOND 2754 (02)45 78 2111 (02)45 78 2021
Tech 1 Electronic Repairs Shop1/12 Sunset Ave WARILLA 2528 (02)42 97 5397 (02)42 97 5398
Cherries Electronics Unit 3, 8 Walter Street SINGLETON 2330 (02)65 71 2488 (02)65 71 2488
Videtel Video, TV & Monitor 232 Marius Street EAST TAMWORTH 2340 (02)67 61 3788 (02)67 61 3388
Peel Television Service 1 Macquarie Street TAMWORTH 2340 (02)67 66 3928 (02)67 66 9932
Colour Fix TV & Video Service 172 Bridge Street TAMWORTH WEST 2340 (02)67 65 5539 (02)65 62 0561
Hawkins Electronic Service 94 Manning Street TAREE 2430 (02)65 52 2288 (02)65 52 4059
Household Electronics 3/39 Shearwater Drive TAYLORS BEACH 2316 (02)49 19 0344 (02)49 19 0355
That Repair Shop 122 Fitzmaurice Street WAGGA WAGGA 2650 (02)69 21 5200 (02)69 25 9491
Schuberts Electronics 53 Hastings Street WAUCHOPE 2446 (02)65 85 1533 (02)65 85 3816
ILLAWARRA Electronics Solution Shop 3, 60 Lakeside Drive KANAHOOKA 2530 (02)42 61 9234 (02)42 61 9227
United Television Service Pty Ltd 390 Keira Street WOLLONGONG 2500 (02)42 28 4555 (02)42 26 3453
Vac Shak Pty Ltd 16 Lovell Street YOUNG 2594 (02)63 82 5700 (02)63 82 7366
QLD
Name
Address
Phone
Fax
McMahon Electrical Traders 23 Mabel Street ATHERTON 4883 (07)40 91 1788 (07)40 91 1741
Beerwah Electronics Peachester Road BEERWAH 4519 (07)54 94 0466 (07)54 94 0416
Bremer Television Service 36 Station Road BOOVAL 4304 (07)32 82 3593 (07)32 82 1214
Bowen Retravision (Northern Elect) 40 George Street BOWEN 4805 (07)47 86 1633 (07)47 86 2257
Telefix Unit 9, 19 Lensworth Street COOPERS PLAINS 4108 (07)33 23 2700 (07)33 23 2730
Nielsons Radio & TV Service 68 Gavin Street BUNDABERG 4670 (07)41 53 1377 (07)41 53 1534
A1 Sound & TV Service 14 Gloucester Road BUDERIM 4556 (07)54 45 4777 (07)54 45 1311
Caboolture Video & Microwave 4/125 Morayfield Road CABOOLTURE 4510 (07)54 95 3477 (07)54 95 3477
Digital TV Service 197 Lyons Street WESTCOURT 4870 (07)40 51 1711 (07)40 51 1771
Garrows Video & TV Service 4/74 Omrah Avenue CALOUNDRA 4551 (07)54 91 3238 (07)54 91 7457
Charleville Radio & TV 14 Wills Street CHARLEVILLE 4470 (07)46 54 1633 (07)46 54 2266
Jab Electronics Cnr. Ruby & Egerton Streets EMERALD 4720 (07)49 87 7770 (07)49 87 7772
Precise Electronics 1 / 4 Northview Street MERMAID BEACH 4218 (07)55 75 1377 (07)55 72 4689
Ready Electronics Shop 3/1 Tibbing Street NERANG 4211 (07)55 96 6359 (07)55 02 2734
Tweed Television Shop 3/12 Machinery Drive SOUTH TWEED HEADS 2486 (07)55 24 4483
Harbour City TV & Video Shop 3/1 Mellefont Street GLADSTONE 4680 (07)49 72 9495 (07)49 72 9495
Lloyd Lawrence Electronics Shop 8-9, 5 Torquay Road HERVEY BAY 4655 (07)41 24 3787 (07)41 24 3787
Professional VCR Sales Service 90 Mourilyan Road INNISFAIL 4860 (07)40 61 4720 (07)40 61 4720
Dunstans SBTV 37 Kingaroy Street KINGAROY 4619 (07)41 62 1547 (07)41 62 2343
Nev Robert Electronics 31 Hart Street MACKAY 4740 (07)49 57 6498 (07)49 51 3737
Sunland TV Service Unit 5 Centre One, Norval Court MAROOCHYDORE 4558 (07)54 43 6444 (07)54 43 6464
Telefix Unit 1, 96 Aerodrome Road MAROOCHYDORE 4558 (07)33 23 2700 (07)33 23 2730
Sunland TV Service Shop 4, 54 Rene Street NOOSAVILLE 4566 (07)54 74 2101
Cumners Electronics Shop 4, 131 Old Pacific Highway OXENFORD 4210 (07)55 73 5250 (07)55 73 5403
N & M TV & Video Service 47a Yandilla Street PITTSWORTH 4356 (07)46 93 2886 (07)46 93 2886
C.Q. Video & TV Service 227 Berserker Street ROCKHAMPTON 4701 (07)49 28 8811 (07)49 28 2698
Matthew's TV & Video Service 176 Main Street ROCKHAMPTON 4701 (07)49 28 5377 (07)49 28 5608
Top Beat Entertainment & Elec 97A Folkestone Street STANTHORPE 4380 (07)46 81 0681 (07)46 81 0682
T.I. TV Repairs 11 Summer Street THURSDAY ISLAND 4875 (07)40 90 2139 (07)40 69 2577
Clark & Webb TV & Radio 14 Grange Street TOOWOOMBA 4350 (07)46 32 7290 (07)46 32 9244
Downs Radio & TV Service (DR TV) 35 Dent Street TOOWOOMBA 4350 (07)46 32 1044 (07)46 32 1224
Townsville Electronics 197 Ingham Road WEST END 4810 (07)47 75 7774 (07)47 79 6867
Top Beat Entertainment & Electrical 46 Wood Street WARWICK 4370 (07)46 61 2690
Page 31

NT
Name
Address
Phone
Fax
The Television Workshop Shop 4 Elder St Centre ALICE SPRINGS 0870 (08)89 52 8555 (08)89 52 5557
New Age Electronics Unit 1/21 Delatour Street COCONUT GROVE 0810 (08)89 48 1755 (08)89 48 1766
Eletech Service 13 Sandalwood Ave NHULUNBUY 0880 (08)89 87 3828 (08)89 87 3828
SA
Name
Address
Phone
Fax
TCS (Total Care Services) 62 Leader Street FORESTVILLE 5035 (08)83 51 1044 (08)83 51 1043
E.K. Dunstan & Co 255 Main Street CLARE 5453 (08)88 42 2144 (08)88 42 3942
Peter's Electronics 25 Lorna Street LOXTON 5333 (08)85 84 6920 (08)85 84 6920
Gambier Sound& Vision Repairs 16-18 Watson Tce MT GAMBIER 5290 (08)87 23 3955 (08)87 23 3855
Portside Technologies 28 Hallet Place PORT LINCOLN 5606 (08)86 82 1500
Pirie Antenna & TV 283B Senate Road PORT PIRIE 5540 (08)86 32 2565 (08)86 33 0091
Riverland Electronics Services 113 Renmark Avenue RENMARK 5341 (08)85 86 5600 (08)85 86 5533
Victor Electronic Service 44 Torrens Street VICTOR HARBOR 5211 (08)85 52 1471 (08)85 52 1098
Eyre Electronics 15B Forsyth Street WHYALLA 5600 (08)86 45 4764 (08)86 45 5576
TAS
Name
Address
Phone
Fax
R.M Electronics 32 Strahan Street BURNIE SOUTH 7320 (03)64 31 8922 (03)64 31 89 22
Somerset Electronics 16 Douglas Street EAST DEVONPORT 7310 (03)64 27 0016
D.J. Hingston 95 James Road SPREIGHTON 7310 (03)64 27 2145 (03)64 27 2145
Integrated Components 54A Albert Road MOONAH 7009 (03)62 78 1932 (03)62 78 8387
K.T. National Electronics 1 Hobart Road SANDHILL 7249 (03)63 44 5665 (03)63 43 0466
VIC
Name
Address
Phone
Fax
Border Video & TV Service 362 Griffith Road LAVINGTON 2641 (02)60 40 2229 (02)60 40 2184
Greene's Television Services 149 Hummfray Street BALLARAT 3350 (03)53 32 6256 (03)53 32 7597
Ted Rivett Services 145 Creswick Road BALLARAT 3550 (03)53 32 6371 (03)53 33 4002
Proud’s Hi Fi 78- 80 Pall Mall BENDIGO 3550 (03)54 42 2722 (03)54 42 2522
All – Tronics 78A Garsead Street BENDIGO 3550 (03)54 42 7000 (03)54 41 7502
Jav Electronics 65 Mackie Road BENTLEIGH EAST 3165 (03)95 70 4911 (03)95 63 8722
Inpulse Electronics 3 Sloane Street MARIBYRNONG 3032 (03)93 17 4000 (03)39 17 4040
B M Tronics 197 Murray Street COLAC 3250 (03)52 32 1504 (03)52 32 1935
T & C Electronics Service 31 Pegleg Road EAGLEHAWK 3556 (03)54 46 3000 (03)54 46 3022
Echuca TV & Video Service 1/7 Mitchell Street ECHUCA 3564 (03)54 80 7874
Central Appliance Service 222 Moorabool Street GEELONG 3200 (03)52 22 1418 (03)52 22 1418
RTD Services Pty Ltd 25-29 Fairlie Street GEELONG NORTH 3215 (03)52 78 9766 (03)52 78 3545
Linke Electrical Repairs 82 Londsdale Street HAMILTON 3300 (03)55 72 5788 (03)55 72 4090
Frank Ritchie Electrical P/L 9 Victoria Street KERANG 3579 (03)54 52 2908 (03)54 52 2908
Watpace Electronics 62 Wingara Avenue KEILOR EAST 3033 (03)93 36 4042 (03)93 36 3768
Harold Hurren 26 Fitzroy Street KILMORE 3764 (03)57 82 1327 (03)57 82 1487
Soundwave Electronics 2B Holt Street LEONGATHA 3953 (03)56 62 3665 (03)56 62 3665
Inpulse Electronics 3 Sloane Street MARIBYRNONG 3032 (03)93 17 4000 (03)39 17 4040
Sunshine Electronics Aust Shop 2, 17 Moore Street MOE 3825 (03)51 26 1110 (03)51 26 1275
Peninsula VCR Repairs
1/8 Virginia Street MORNINGTON 3931 (03)59 75 0800 (03)59 76 2300
Ferguson Electronics 116 Orange Avenue MILDURA 3500 (03)50 23 5846 (03)50 21 2690
Bensi TV Electrical Pty. Ltd. 128 Nicholson Street ORBOST 3888 (03)51 54 1454 (03)51 54 1344
G & R Video & TV Services Pty. 24 Dunkirk Avenue SHEPPARTON 3630 (03)58 21 0258 (03)58 21 8187
Inpulse Electronics 496 Whitehorse Road SURREY HILLS 3027 (03)93 17 4000 (03)98 36 5922
Swantronics 45 Campbell Street SWAN HILL 3585 (03)50 33 1633 (03)50 33 1287
Earl & Becker 4-26 Shakespeare Street TRARALGON 3844 (03)51 74 8454 (03)51 74 8454
BM Tronics 459 Raglan Parade WARRNAMBOOL 3280 (03)55 61 6622 (03)55 62 8388
Tellycare (Nugents) 105 Queen Street WARRAGUL 3820 (03)56 22 1102 (03)56 22 1102
John B. Electronics Shop 94 High Street WODONGA 3690 (02)60 56 1066 (03)57 28 7299
Page 32

WA
Name
Address
Phone
Fax
AB Video 50 Cockburn Road ALBANY 6330 (08)98 42 1270 (08)98 42 2728
Albany TV Service Shop 8 35-37 Campbell Road ALBANY 6330 (08)98 41 1573 (08)98 42 5958
Camtec Bunbury 1/31 Denning Road BUNBURY 6230 (08)97 91 7277 (08)97 91 7377
Excel Electronics 3 Newman Court NICKOL 6725 (08)91 44 1266 (08)91 44 1266
Eclipse Kimberley Unit 4, 20 Hunter Street BROOME 6725 (08)91 92 2832 (08)92 92 8069
Elricks TV Service 62 Spencer Street BUNBURY 6230 (08)97 21 4047 (08)97 21 1161
Busselton TV & Video 65B Strelley Street BUSSELTON 6280 (08)97 54 4457 (08)97 54 4824
Electronic Plus Unit 3/11 Egan Street CARNARVON 6701 (08)99 41 3690 (08)99 41 3660
Esperance Communications 33 Norseman Road ESPERANCE 6450 (08)90 71 3344 (08)90 71 4545
Bird Electronics 14 Abraham Street GERALDTON 6530 (08)99 64 1631 (08)99 21 7584
Geraldton Radio & TV Service 26 Anzac Terrace GERALDTON 6530 (08)99 64 2777 (08)99 64 2776
Oz West Electronics 6/200 Winton Road JOONDALUP 6027 (08)93 00 1066
Printek Electronics 1 Lesueur Drive JURIEN BAY 6516 (08)96 52 1664 (08)96 52 1664
Kalgoorlie Electronics 395 Hannan Street KALGOORLIE 6430 (08)90 21 1420 (08)90 21 1420
J & P Electronics 3/88 Albany Hwy KOJONUP 6395 (08)98 31 1991 (08)98 31 1991
Tuckerbox Retravision White Gum Street/P.O. BOX 941 KUNUNNURRA 6743 (08)91 68 1100 (08)91 68 2491
Waytec Electronics Unit 3, 10 Thornborough Road MANDURAH 6210 (08)95 82 0882 (08)95 82 0352
Manjimup TV Service 88 Giblett Street / P.O. BOX 370 MANJUMUP 6258 (08)97 71 1598 (08)97 72 4025
Chris's TV & Satelite 66 Barrack Street MERREDIN 6415 (08)90 41 1484 (08)90 41 1484
G & J Suckling Radio & TV 1 Hale Street NARROGIN 6312 (08)98 81 2148 (08)98 81 3129
Proton 21A Charles Street NORTHAM 6401 (08)96 22 3168 (08)96 22 3168
TEAC Perth Service Centre 273 Great Eastern Highway BELMONT 6104 (08)94 79 6499 (08)94 79 6544
Charles Hunt Electronics 25 Brodie Court BALDIVIS 6171 (08)63 63 5593 (08)95 24 2890
S & R TV Service Unit 7/42 Crompton Road ROCKINGHAM 6168 (08)95 92 1130 (08)95 92 3685
Page 33
TEAC CUSTOMER CARE CENTRE (TCCC)
Free call: 1800 656 700
Between Monday to Friday – EST 9AM to 5PM
 Loading...