

Page 1

USER MANUAL
WARRANTY INFORMATION INSIDE. PLEASE READ
www.teac.com.au
IMPORTANT !
DLE3289HD
LED TV
Trademark of TEAC Corporation JAPAN
Page 2

WARRANTY PROCEDURE
v1.5.2: DEC 2011
Please read t he owner’s manual carefully and ensure that you have followed the correct installation and operating
procedures.
1. Please read this warr anty c ard.
2. Keep your purchase receipt to enable you to proceed quickly in the event of a Warranty Servic e.
3. If you require Warranty Ser vice, pleas e contact the TEAC Customer Support H otline at 1300 553 315 f or
assistanc e. Please ensure that you h ave the model number, seri al number and purchase receipt ready when
you call.
Please c omplete the s ection below and keep this inf ormati on for your own records.
Owner’s Name
Owner’s Address
Postcode
Model Name/N o. Serial No.
Dealer’s Name
Dealer’s Address
Postcode
Authorised Service Centres in Major Australian Cities
NSW
151 Arthur Street
Homebush West, NSW 2140
Queen slan d
Unit 1, 3 20 Curt in Ave West
Eagle Farm, QLD 4009
Western Aust rali a
Unit 2, 5 0 Pilbara Street
Welshpool, W A 6106
South Austral ia
11 McInnes Street
Ridleyton, SA 5008
Victoria
282 Normanby R oad
South Melbourne, VIC 3205
Thank you for selecting a TEAC product
.
If you should require assistance with your product regarding its setup
or operation, or if any difficulties arise, please call us directly for advice
between Monday to Friday at 8.30AM – 6PM AEST at the
TEAC Customer Support Hotline
1
1300 553 315
teacs ervic es up [email protected] om.au
www.teac.com.au
Page 3

WARRANTY INFORMATION
v1.5.2: DEC 2011
Our go ods come w ith g uarant ees t hat cannot be excl uded under the Austr al ian Cons umer Law . You ar e
ent it led to a r ep lacement or ref und for a major failur e and for com p ensat ion for any other reason ab ly
foreseeabl e lo ss o r d am age. You are also ent it l ed t o hav e the goods r ep aired or replac ed if the go o ds fail
to be of ac cept ab le qual ity an d the f ailur e d oes not amou nt t o a major fail ure.
Warranty Terms & Conditions
1. TEAC warrants t hat this product is free from defects in mat erial and workmans hip under normal d omestic use with
reasonable care and skill. Maintenanc e and cleaning (i.e. laser head) is not covered by this warranty. The TEAC
warranty only applies to TEAC products purchased, us ed and serviced in Australia.
2. The benefits to t he consumer given by this W arranty are in additi on to other rights and remedies of th e consumer
under a law in relation t o goods or services to which the warranty relat es, being the Australian Consumer Law.
3. Refund or replacement via your retailer is available f or a period of 14 days after purchase for goods that have been
inspect ed and determined to have a major failure. Refund and exchange is not applicable for change of mind.
4. Subject to the t erms herein, this warranty effectively covers the equipment as specified in the W arranty Periods
Table below from the date of purchase.
TEAC PRODUCT
WARRANTY PERIOD
LED/LCD TV 32” (80 cm) and above 1 Year (In-Home Servic e/ Pick up A vailable)*
All other TEAC products 1 Year (Carry-in Service)
5.
This service will only be provided as part of this warranty if all the following conditions are met;
In Home Service/Pic k up* Service
a) The product is indicated in the W arranty Period T able.
b) The product is within the warran ty period.
c) The product is located within the normal servic e area of the local T EAC Authoris ed Service C entre.
If TEAC determines that the pr oduct is not repai rable on site, TEAC c an c omplete the repair by taking the pr oduct to
a TEAC Authorised Service C entre.
Where In-Home service/Pick up* is not available, the purchaser is required to s end the pr oduct to the near est TEAC
Authorised Service Centre for repair. In this event, pr oof of purchase is required to support a warranty claim. After
the repair, the product will be available for collection by or return to the purchaser at a fee upon request. TEAC inhome service can be made available at a fee upon request.
Carry-in Service
6. A 12-month replacement warranty is applicable to all Acc essories such as Remote, Power A daptors and C ables.
7. TEAC will ensure to the best of its abilities that all required parts are made available for any requir ed servic e/repair.
8. TEAC Australia Pty Ltd and its Authorised Service Centres will use their best endeavours to complete product
repairs within a reasonable period based on available resources and workload during the time when servic e is
requested and perf ormed.
9. Refurbis hed parts may be used to repair the product. In the case of a repl acement, the product may be replaced,
with a refurbished unit of the same type or, if one is unavailable, a similar refurbished model with equal or better
features & specifications.
10. Please be advised that if the product pr esent ed for repair is c apable of ret aining user-generated d ata, the data may
be lost during servicing. Customers are st rongly encouraged to back up all important inf ormation/data before
sending t he product in for s ervic e/repair .
11. Service will be provided only durin g normal business hours and under safety conditions and circumstances. TEAC
and its authoris ed service agents can refus e any repair if safety, in relation to OH&S, becomes a concern to its staff
or authorised service agents’ pers onnel.
12. The warranty is void and warranty claims may be refused, s ubject to the Australian C onsumer Law, if:
a) The product was not tr ansported, installed, op erated or maintained according to manufacturer instruct ion, or
b) The product was abus ed, damaged, tampered, altered or repaired by any unauthoris ed persons, or
c) Product fail ure is due to accidents during use, install ation or transit, power surges, us e of defective or
incompat ible external devices, exposur e to abnormal conditions such as excessive temperatures or humidit y, or
entry of liquids, objects or creatures into the product.
13. No one is authoris ed to assu me any liabilit y on behalf of TEAC or impose any obligation on it, in connection with the
sale of any equipment other than as stated in this warranty and outlined above.
14. TEAC reserves the right to inspect and verif y whether the product is exhibiting a major failure as claimed by
customers/retailers.
15. LCD dead pixel policy, please contact TEAC Customer Support Hotline on 1300 553 315 for assistance.
Page 4

TABLE OF CONTENTS
1 Safety Precautions
1ylppuSrewoP1.1
2
3
4
5
5-7
8
9
10
10
11
12
13
13-15
16
17
17
18
19-20
21
22
23
24
25
26
26
30
33
1.2 Installation
1.3 Use and Maintenance
1.4 Important Safety Instructions
2TVPlacementSetup
2.1 Accessories
2.2 TV Stand/Wall Mounting Assembly
3 Parts & Connections
3.1 Front View
3.2 Back View
4 Initial Setup & Input Sources
4.1 Initial Power On
4.2 Selecting an Input Source
5 Remote Control
5.1 Remote Control Buttons and Functions
5.2 Battery Installation
6 On-Screen Display (OSD) Menu
6.1 OSD Menu Overview
6.2 Menu Map
7 TV & Electronic Programme Guide
7.1 ATV/DTV Mode
7.2 Electronic Programme Guide (EPG)
7.3 Channel Customisation
7.4 Channel List and Favourite List
7.5 Password Lock for Channels and Programmes
8 Digital Video Recording (DVR)
8.1 Setting up for USB Recording
8.2 Instant Recording
8.3 Time Shift (Pause Live TV)
8.4 Scheduled Recording/Viewing Reminder
8.5 Using the Recorded File List
9 USB Multimedia Playback
9.1 Connecting the USB Storage Device
9.2 Playing Multimedia Files
10 Reference
10.1 Troubleshooting
10.3 USB Usage Precautions
31
10.2 Specifications
Page 5

1. SAFETY PRECAUTIONS
1.1 Power Supply
It is the responsibility of
the user to make sure all
precautions and warnings
are heeded and followed.
DO NOT touch the power
plug with wet hands.
DO NOT bend the power cord
excessively or place heavy
objects on it.
DO NOT use a damaged
power cord or plug or a
loose outlet.
DO NOT plug several devices
into the same outlet.
Insert the power plug fully into
the outlet.
fire or electric shock.
the outlet to overheat and start
a fire.
loose or improperly
inserted power plug
may result in fire.
electric shock.
fire or electric shock.
When disconnecting the
power cord from an
outlet, always grasp it by
the plug.
can damage the internal wire
and may result in a fire.
cleaning.
fire or electric shock.
Safety PrecautionsParts & Connections
3D Video Playback
USB Multimedia
Playback
TV Placement
Setup
Initial Setup &
Input Sources
Remote Control
On-Screen DisplayTV & Electronic
Programme Guide
Digital Video
Recording (DVR)
(OSD) Menu
Reference
1
Safety PrecautionsParts & Connections
USB Multimedia
Playback
TV Placement
Setup
Initial Setup &
Input Sources
Remote Control
On-Screen DisplayTV & Electronic
Programme Guide
Digital Video
Recording (DVR)
(OSD) Menu
Reference
Page 6

Disconnect this device from power by turning the power off at the AC power outlet and unplugging the AC plug.
Warning : Ignoring this precaution may result in death or serious injury.
Caution : Ignoring this precaution may result in injury or property damage.
DO NOT place a burning candle,
burning incense, or lighted
cigarette on top of the unit.
DO NOT place the unit near
any heat source such as a fireplace or space heater.
DO NOT place the unit where
it is exposed to rain, excessive
moisture or grease.
DO NOT use or store flammable
or combustible materials near
the unit.
electric shock, malfunction,
or deformation.
or explosion.
of overheating and a possible fire
outbreak.
DO NOT place the unit in a poorly
ventilated enclosure, such as a
cabinet.
DO NOT run power cords near
heat-producing appliances such
as radiators, stoves, or irons.
The excessive heat can melt
the insulation and expose live
wires, resulting in fire or electric
shock.
of overheating and a possible fire
outbreak.
DO NOT place the unit on an unstable
surface, such as a sloped table, or any
stand with a contact area smaller than
the bottom surface of the unit stand.
can prevent accidents from happening.
Ignoring this precaution may result in the
unit toppling over and causing injury.
.
Install the antenna away from
high-voltage power lines and
communication cables. Make sure
it is installed securely.
contact with the antenna may result
in fire, electric shock, or serious injury.
Install the unit at an adequate
distance from the wall to ensure
sufficient ventilation.
Insufficient ventilation may result
in the unit overheating, which
may cause a possible fire
outbreak.
Do not cover the unit with a
tablecloth, curtain, or other
material.
result in the unit overheating,
which may cause a possible
fire outbreak.
Be sure to place the unit on a
level surface.
The following precautions are divided into "Warnings" and "Cautions".
DO NOT place containers with
liquids such as vases, drink cans,
bottles or small metallic objects
on top of the unit.
metal object falls into the unit, it
may result in a short circuit, fire,
or electric shock.
Safety PrecautionsParts & Connections
USB Multimedia
Playback
TV Placement
Setup
Initial Setup &
Input Sources
Remote Control
On-Screen DisplayTV & Electronic
Programme Guide
Digital Video
Recording (DVR)
(OSD) Menu
Reference
2
Page 7

Although the LCD screen is made with high-precision technology and 99.99% or more of the pixels are effective,
black dots may appear or bright points of light (red, blue, or green) may appear constantly on the LCD screen.
This is a property of the LCD screen and is not a malfunction.
Disconnect the power cord from
the power source during a
thunderstorm.
1RWGRLQJVRPD\UHVXOWLQILUH
or electric shock.
When not using the unit for
long periods of time, disconnect the power cord from the
wall outlet.
,IQRWFOHDQHGFORJJHGGXVW
particles at ventilation holes
could cause the unit to heat up,
and ignite when switched on,
which may result in a fire
outbreak.
Always have two or more people
at hand to lift or move the unit.
,IWKHXQLWLVGURSSHGLWFRXOG
get damaged or otherwise
cause injury.
Wipe off any moisture, dirt, or
dust on the power plug pins
with a clean, dry cloth.
)DLOXUHWRGRVRPD\UHVXOWLQ
fire or electric shock.
Always turn off the unit and
unplug the power cord when
cleaning the unit. Use a soft dry
cloth to clean the unit.
1HYHUFOHDQZLWKindustrial
strength polish, wax, benzene,
paint thinner, air freshener
,
lubricant, detergent, or other
such chemicals. Also, do not
clean with a damp cloth.
When moving the unit, be sure
to turn off the unit and unplug
the power cord from the wall
outlet.
0RYLQJWKHXQLWZLWKWKH
power cord connected to the
outlet may cause damage to
the cord, resulting in fire or
electric shock.
,I\RXQRWLFHDQ\XQXVXDORGRUV
or smoke around the unit,
immediately disconnect the unit
from the outlet and contact the
service center.
)DLOXUHWRGRVRPD\UHVXOWLQ
fire or electric shock.
When removing the batteries
from the remote control, make
sure children do not swallow
them. Keep the batteries out of
the reach of infants and
children.
,IDFKLOGKDVVZDOORZHGD
battery, seek medical attention
immediately.
'2127LQVHUWDQ\PHWDO
objects, such as a screwdriver,
paper clip, or a bent wire into
the ventilation openings or A/V
terminals.
'RLQJVRSRVHVDVHULRXVULVN
of fire or electric shock.
'2127DOORZFKLOGUHQWRFOLPE
onto the unit.
The unit could topple over
onto a child and result in
serious injury.
'2127GLVPDQWOHRUPRGLI\WKH
unit in any way. Do not attempt to
service the unit yourself.
'RLQJVRPD\UHVXOWLQILUHRU
HOHFWULFVKRFN,IWKHXQLW
requires repair, contact the
service center.
Do not display still images and partially
still images on the LED panel for more
than 2 hours as it can cause screen
image retention. This image retention is
also known as “screen burn”. To avoid
such image retention, reduce the
degree of brightness and contrast of the
screen when displaying a still image.
Watching the LED TV in 4:3 format for a
long period of time may leave traces of
borders displayed on the left, right and
centre of the screen caused by the
difference of light emission on the
screen. Playing a DVD or a game
console may cause a similar effect to
the screen. Damages caused by the
above effect are not covered by the
Warranty. Displaying still images from
Video games and PC for longer than a
certain period of time may produce
partial after-images. To prevent this
effect, reduce the ‘brightness’ and
‘contrast’ when displaying still images.
Safety PrecautionsParts & Connections
3D Video Playback
USB Multimedia
Playback
TV Placement
Setup
Initial Setup &
Input Sources
Remote Control
On-Screen DisplayTV & Electronic
Programme Guide
Digital Video
Recording (DVR)
(OSD) Menu
3
Safety PrecautionsParts & Connections
USB Multimedia
Playback
TV Placement
Setup
Initial Setup &
Input Sources
Remote Control
On-Screen DisplayTV & Electronic
Programme Guide
Digital Video
Recording (DVR)
(OSD) Menu
Reference
Page 8

4
Safety PrecautionsParts & Connections
USB Multimedia
Playback
TV Placement
Setup
Initial Setup &
Input Sources
Remote Control
On-Screen DisplayTV & Electronic
Programme Guide
Digital Video
Recording (DVR)
(OSD) Menu
Reference
Page 9

User’s Guide
2 x AAA Battery Contact CardQuick Start Guide
Parts & Connections
3D Video Playback
USB Multimedia
Playback
TV Placement
Setup
Initial Setup &
Input Sources
Remote Control
On-Screen DisplayTV & Electronic
Programme Guide
Digital Video
Recording (DVR)
(OSD) Menu
5
Parts & Connections
USB Multimedia
Playback
TV Placement
Setup
Initial Setup &
Input Sources
Remote Control
On-Screen DisplayTV & Electronic
Programme Guide
Digital Video
Recording (DVR)
(OSD) Menu
Reference
Remote Control
123
456
789
0
OK
CH.FAV
AUDIO MUTE
DTV/USB INPUT
PICTURE SOUND ASPECTSLEEP
EXIT
DISPLAY
CH
CH
VOL
VOL
HOLD
D.MENU D.TITLE
VOL
TV/TXT CANCEL REVEAL REPEAT
D.SETUP
SUBTITLE A-B GOTO
SIZE SUBPAGE INDEX
DELETE REC.LIST SCH.LIST SCREEN
MENU
EPG
0118020315
Page 10

2. TV PLACEMENT SETUP
Parts & Connections
3D Video Playback
USB Multimedia
Playback
TV Placement
Setup
Initial Setup &
Input Sources
Remote Control
On-Screen DisplayTV & Electronic
Programme Guide
Digital Video
Recording (DVR)
(OSD) Menu
TV Stand Installation/Removal
1. Place the unit face down on a soft surface.
2. Gently position the glass base to the leg at the bottom of the TV.
3. Fasten the 6 provided screws (screw size B4x16F) to secure the stand to the TV
according to the diagram.
4. To remove the stand, reverse the steps above.
Fall Prevention
To prevent the TV from tilting forward and falling over to cause damage or injury, please
secure the TV to your table or wall using screws or eyebolts and strong cord (not provided).
An example on fixing the TV to a table is shown below
1. Install a wood screw or eyebolt into the table that is supporting the TV.
2. Fix a machine screw into a screw hole near the base in the back of the TV.
Alternatively, secure the TV to the wall directly behind it by fixing eyebolts to the wall and
tying them to screws fixed on the centre of the TV back panel.
3. Tie the wood screw or eyebolt to the machine screw with a strong cord.
6
Parts & Connections
USB Multimedia
Playback
TV Placement
Setup
Initial Setup &
Input Sources
Remote Control
On-Screen DisplayTV & Electronic
Programme Guide
Digital Video
Recording (DVR)
(OSD) Menu
Reference
5
Page 11

2. TV PLACEMENT SETUP
100mm
100mm
100mm
100mm
Thread hole size M4 x 10 depth (TV Mounting Screw Size) on the TV.
Wall Mounting
1. Ensure that the selected wall is made of appropriate material and can support the
weight of the TV. Make sure there are no pipes or cables inside the wall on your
chosen position.
2. Obtain a suitable wall mounting bracket and mounting eyebolts (thread size M4x10)
and screws from your local hardware store.
3. Place the unit face down on a soft surface.
4. Remove the attached leg at the bottom of the TV by removing the 5 screws on the
leg cover.
5. Refit the cover securely by replacing the 5 screws into their original positions.
6. Fasten 4 eyebolts panel according to the
diagram.
7. Fasten the wall mounting bracket using screws onto the wall.
8. Connect the eyebolts and the wall bracket securely with strong rope
9. Carefully check that all fastenings are secure before releasing the TV.
7
Parts & Connections
USB Multimedia
Playback
TV Placement
Setup
Initial Setup &
Input Sources
Remote Control
On-Screen DisplayTV & Electronic
Programme Guide
Digital Video
Recording (DVR)
(OSD) Menu
Reference
Page 12

8
Parts & Connections
USB Multimedia
Playback
Initial Setup &
Input Sources
Remote Control
On-Screen DisplayTV & Electronic
Programme Guide
Digital Video
Recording (DVR)
(OSD) Menu
Reference
INPUT: Display the input source menu.
MENU: Display/exit the OSD menu.
CH+/-: Scan through channels.
VOL+/-: Adjust the volume.
POWER: Turn on/standby the TV set.
Page 13
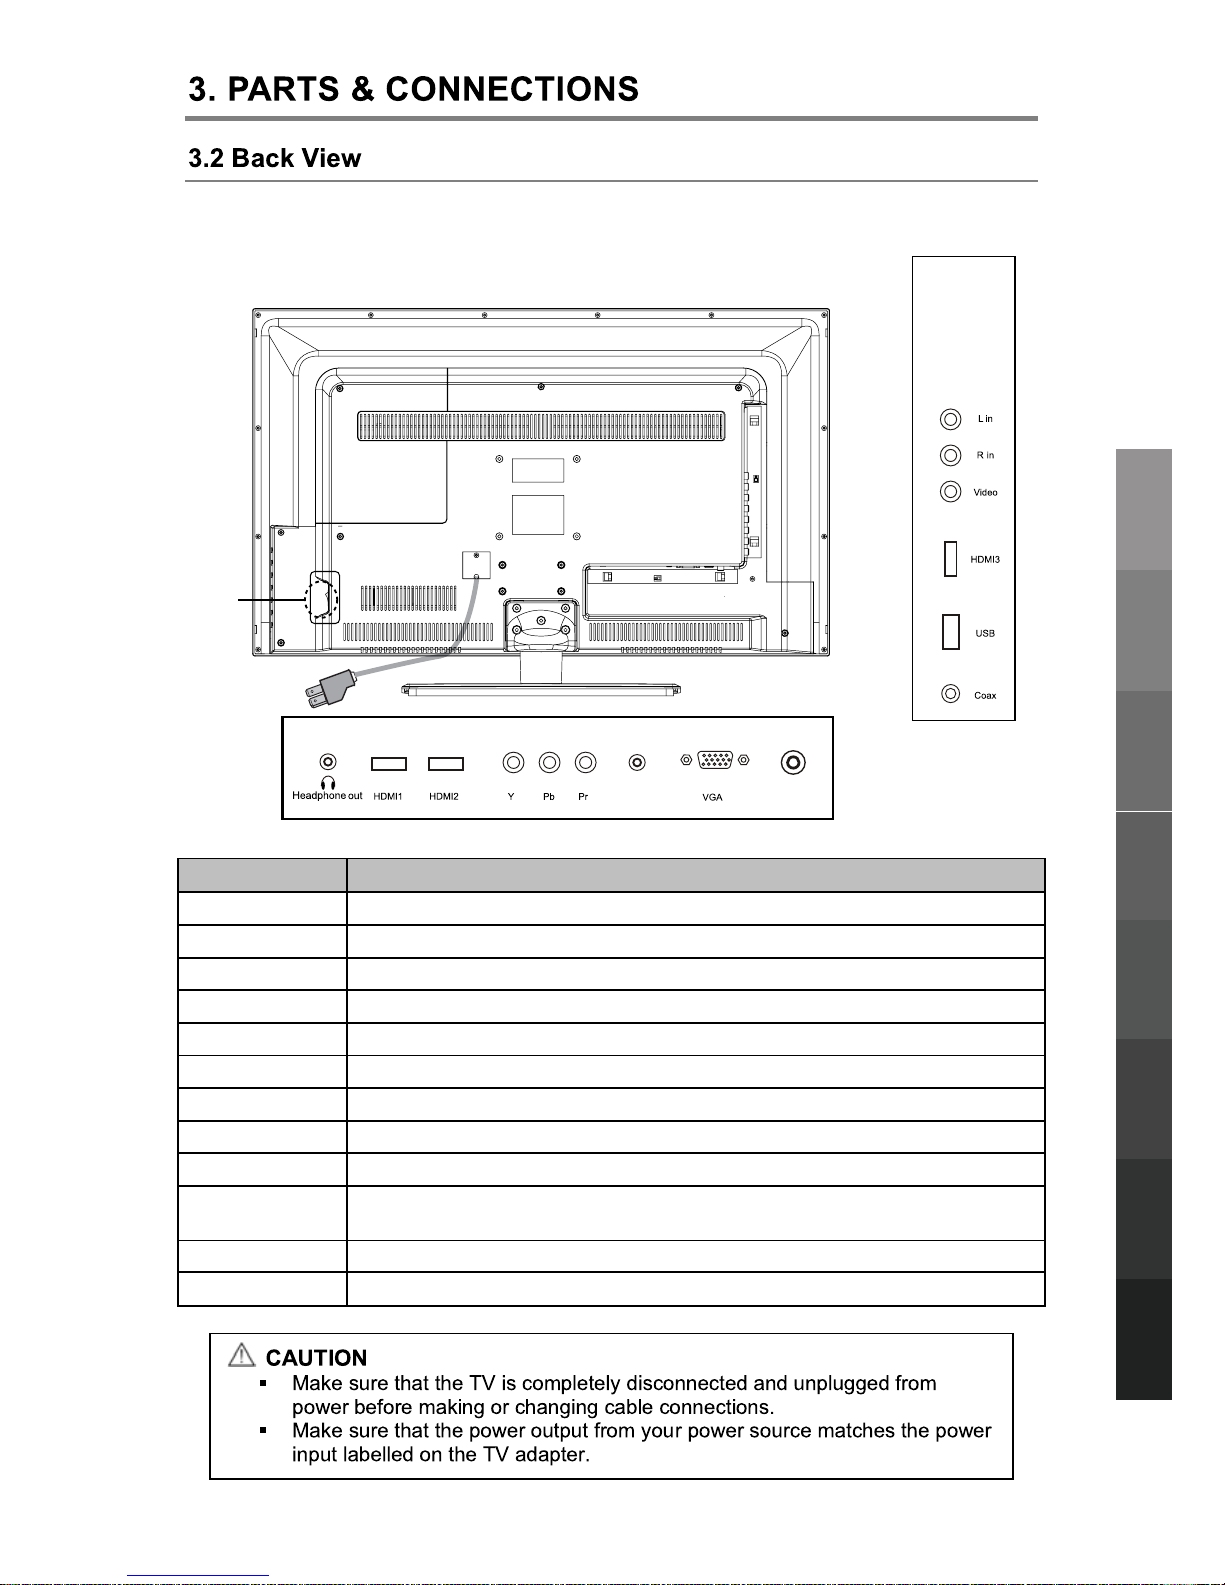
AC POWER IN
SWITCH
9
Parts & Connections
USB Multimedia
Playback
Initial Setup &
Input Sources
Remote Control
On-Screen DisplayTV & Electronic
Programme Guide
Digital Video
Recording (DVR)
(OSD) Menu
Reference
PC-IN RF
Part Name Function
Power Switch Turn on/off the power supply.
AC Power In Connect to the AC power supply
Headphone Connect to headphones
HDMI 1/2/3 Connect to the HDMI socket of your DVD or satellite box
YPbPr Connect to the component YPbPr output of external devices
PC IN PC audio input
VGA Connect to the PC VGA output to display PC graphics
RF Connect to antenna or cable source
COAX Digital output to AV receiver
USB
Connect to a USB storage device for DVR (Recording) and USB
Multimedia Playback
Video Connect to the co
mposite video output of external devices
Audio L/R In Audio signal input for AV (shared with YPbPr)
Page 14
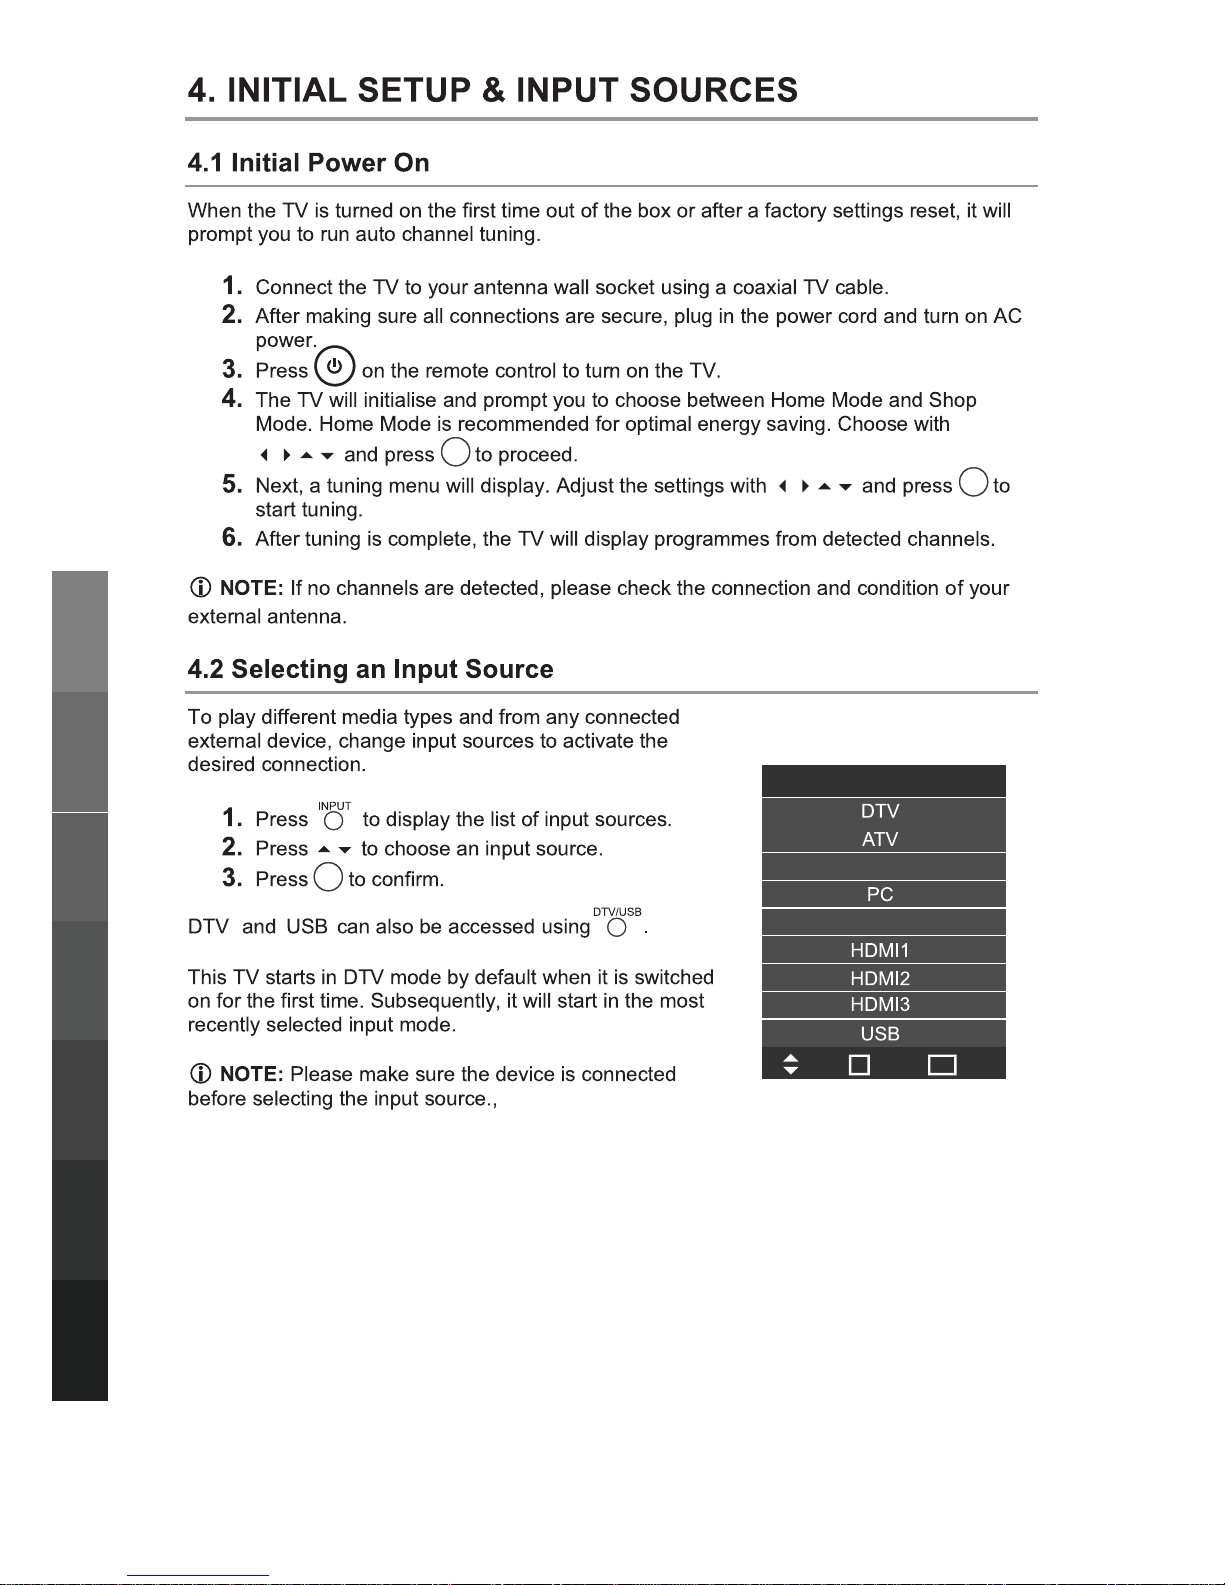
Input Source
Move
Select
Quit
OK
EXIT
AV
YPbPr
10
USB Multimedia
Playback
Initial Setup &
Input Sources
Remote Control
On-Screen DisplayTV & Electronic
Programme Guide
Digital Video
Recording (DVR)
(OSD) Menu
Reference
OK
OK
OK
Page 15
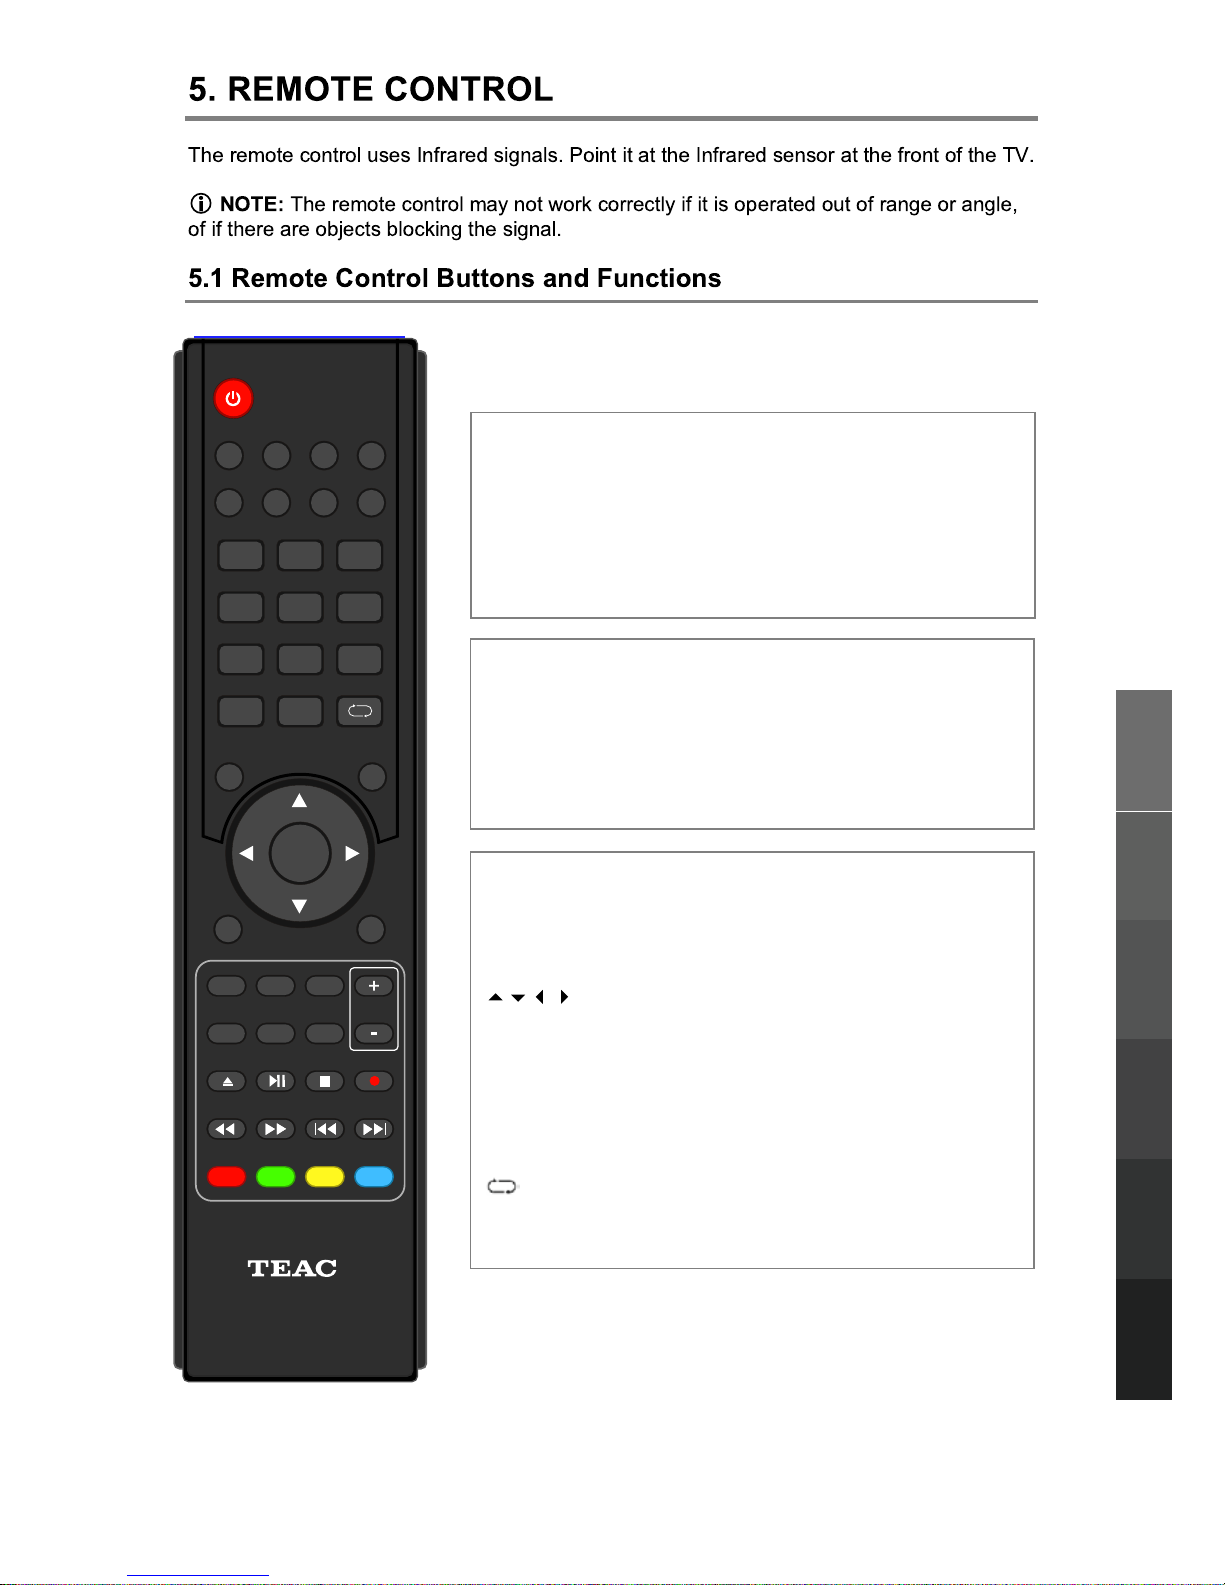
MENU: Switch the TV on or off Standby mode.
SUBTITLE: Choose from available subtitles.
AUDIO: Choose from available audio tracks.
EPG: Access the Electronic Programme Guide.
DISPLAY: Display detailed information or controls.
: Directional navigation buttons.
OK: Confirm a setting.
CH+/-: Browse next/previous channel.
VOL+/-: Adjust volume level.
EXIT: Exit menu or return to last level.
MUTE: Toggle audio output muting.
Number Buttons: Key in numbers to view channels or
other option inputs.
: Return to the most recently viewed TV channel.
CH.FAV: Show Channel List, then Favourite Channels
List.
11
USB Multimedia
Playback
Remote Control
On-Screen DisplayTV & Electronic
Programme Guide
Digital Video
Recording (DVR)
(OSD) Menu
Reference
123
456
789
0
OK
CH.FAV
AUDIO MUTE
DTV/USB INPUT
PICTURE SOUND ASPECTSLEEP
EXIT
DISPLAY
CH
CH
VOL
VOL
HOLD
D.MENU D.TITLE
VOL
TV/TXT CANCEL REVEAL REPEAT
D.SETUP
SUBTITLE A-B GOTO
SIZE SUBPAGE INDEX
DELETE REC.LIST SCH.LIST SCREEN
MENU
EPG
0118020315
POWER: Switch the TV on or off Standby mode.
DTV/USB: Switch to DTV/USB Mode.
INPUT: Access the Input Source Menu.
PICTURE:Cycle through preset picture profiles.
SOUND: Cycle through preset sound profiles.
DELETE: Delete files from the Recorded File List.
REC. LIST: Display the Recorded File List.
SCH.LIST: Display the Schedule List.
SCREEN: 1. While playing music, turn off the screen.
2. In HDMI Mode, change between Video and
PC Overscan Modes.
3. In PC(VGA) Mode, auto-align the screen.
Page 16
12
USB Multimedia
Playback
Remote Control
On-Screen DisplayTV & Electronic
Programme Guide
Digital Video
Recording (DVR)
(OSD) Menu
Reference
123
456
789
0
OK
CH.FAV
AUDIO MUTE
DTV/USB INPUT
PICTURE SOUND ASPECTSLEEP
EXIT
DISPLAY
CH
CH
VOL
VOL
HOLD
D.MENU D.TITLE
VOL
TV/TXT CANCEL REVEAL REPEAT
D.SETUP
SUBTITLE A-B GOTO
SIZE SUBPAGE INDEX
DELETE REC.LIST SCH.LIST SCREEN
MENU
EPG
0118020315
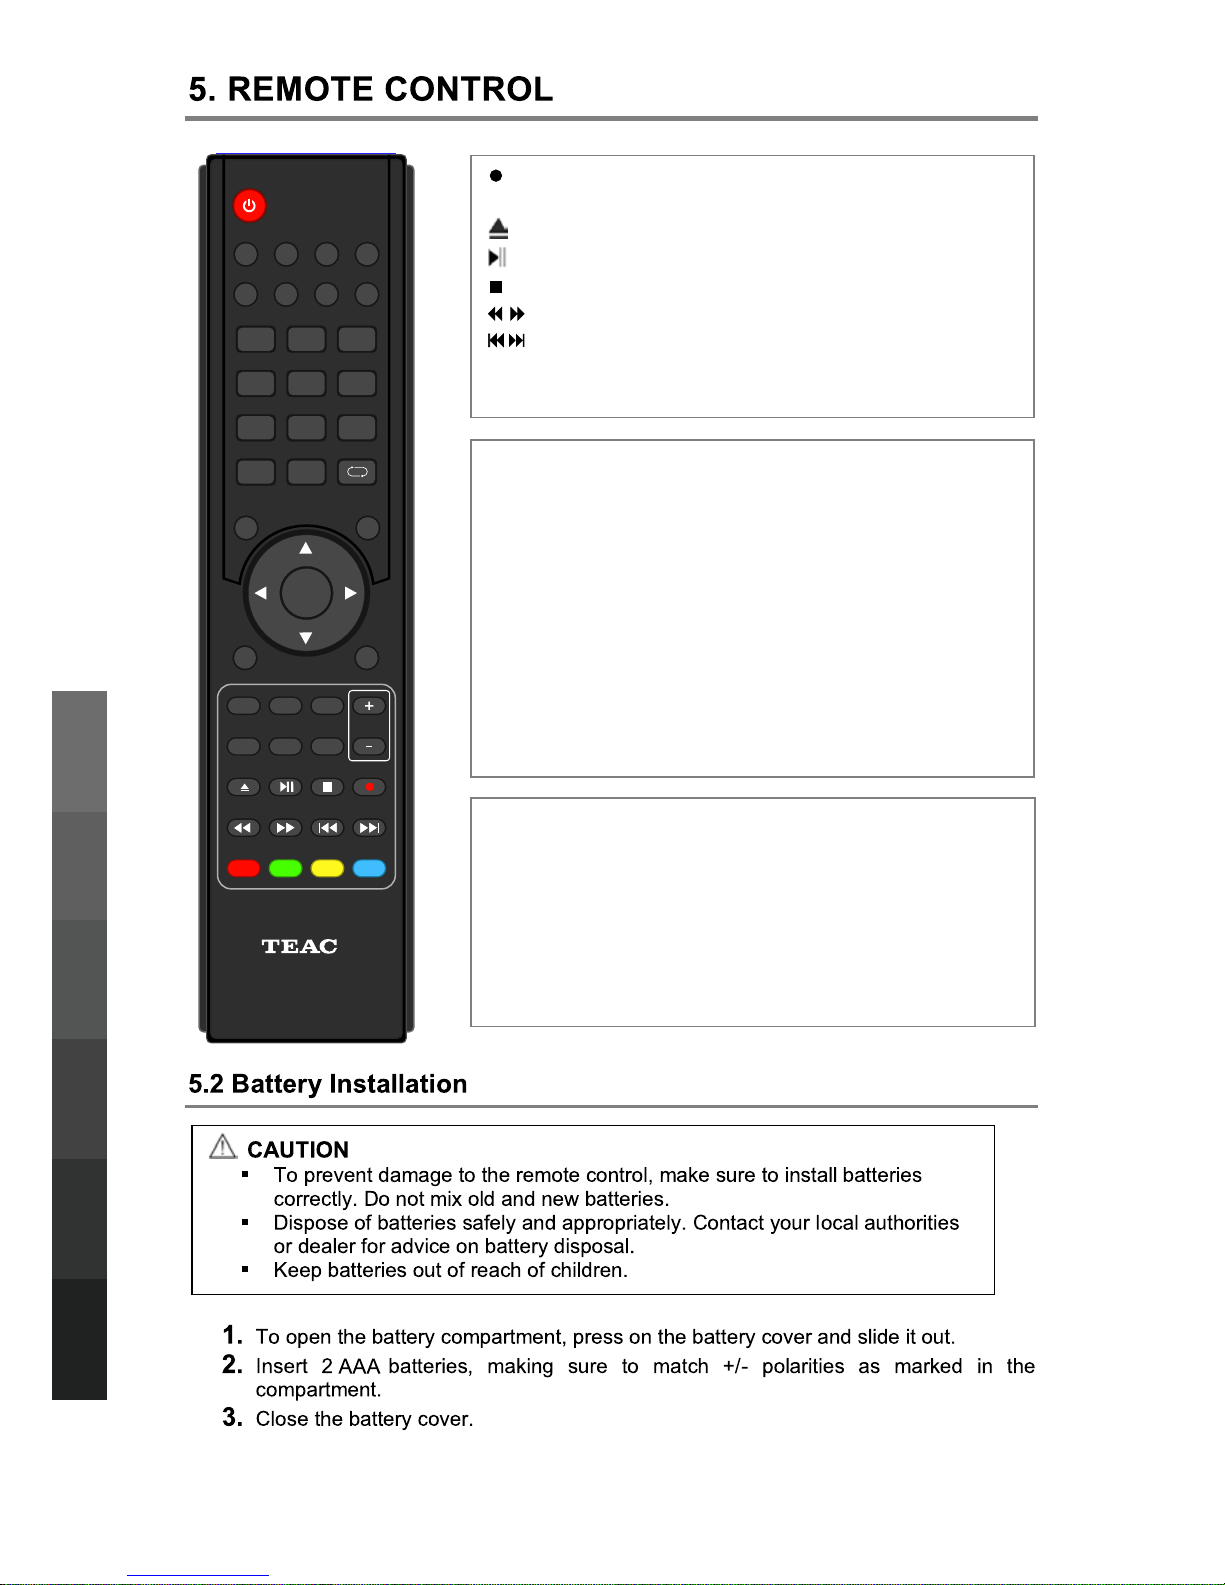
D.SETUP: Function not available for this model.
GOTO: Jump to a specific point during playback by keying
numbers in the format HH:MM:SS.
A-B: Define Points A and B for looping playback. Press
once for A, again for B, a third time to cancel looping.
ASPECT: Cycle through different picture aspect settings by
pressing this button repeatedly.
SLEEP: Cycle through and set Timer Sleep settings by
pressing this button repeatedly.
(REC): Start recording when in DTV Mode.
REPEAT: Toggle Repeat options in USB Mode.
: Stop playback.
: Fast Rewind/Fast Forward up to 16x.
D.MENU: Function not available with this model.
D.TITLE: Function not available with this model.
: No function for this model.
: Play/Pause playback, or toggle DTV Time Shift.
: Previous/next chapter/track.
Teletext operation:
Teletext is an information system broadcasted by certain
channels providing news, weather forecasts, puzzles as
well as subtitles. Subject to availability from broadcaster.
SUBPAGE: Toggle subpage.
HOLD: Hold or resume browsing the subpage.
SIZE: Cycle through page zoom-in views.
INDEX: Go to Index.
CANCEL: Cancel the Teletext Display.
REVEAL: Reveal any hidden text.
TV/TXT: Toggle Teletext viewing modes.
Co
lour buttons: Shortcut keys per on-
screen hints.
Page 17
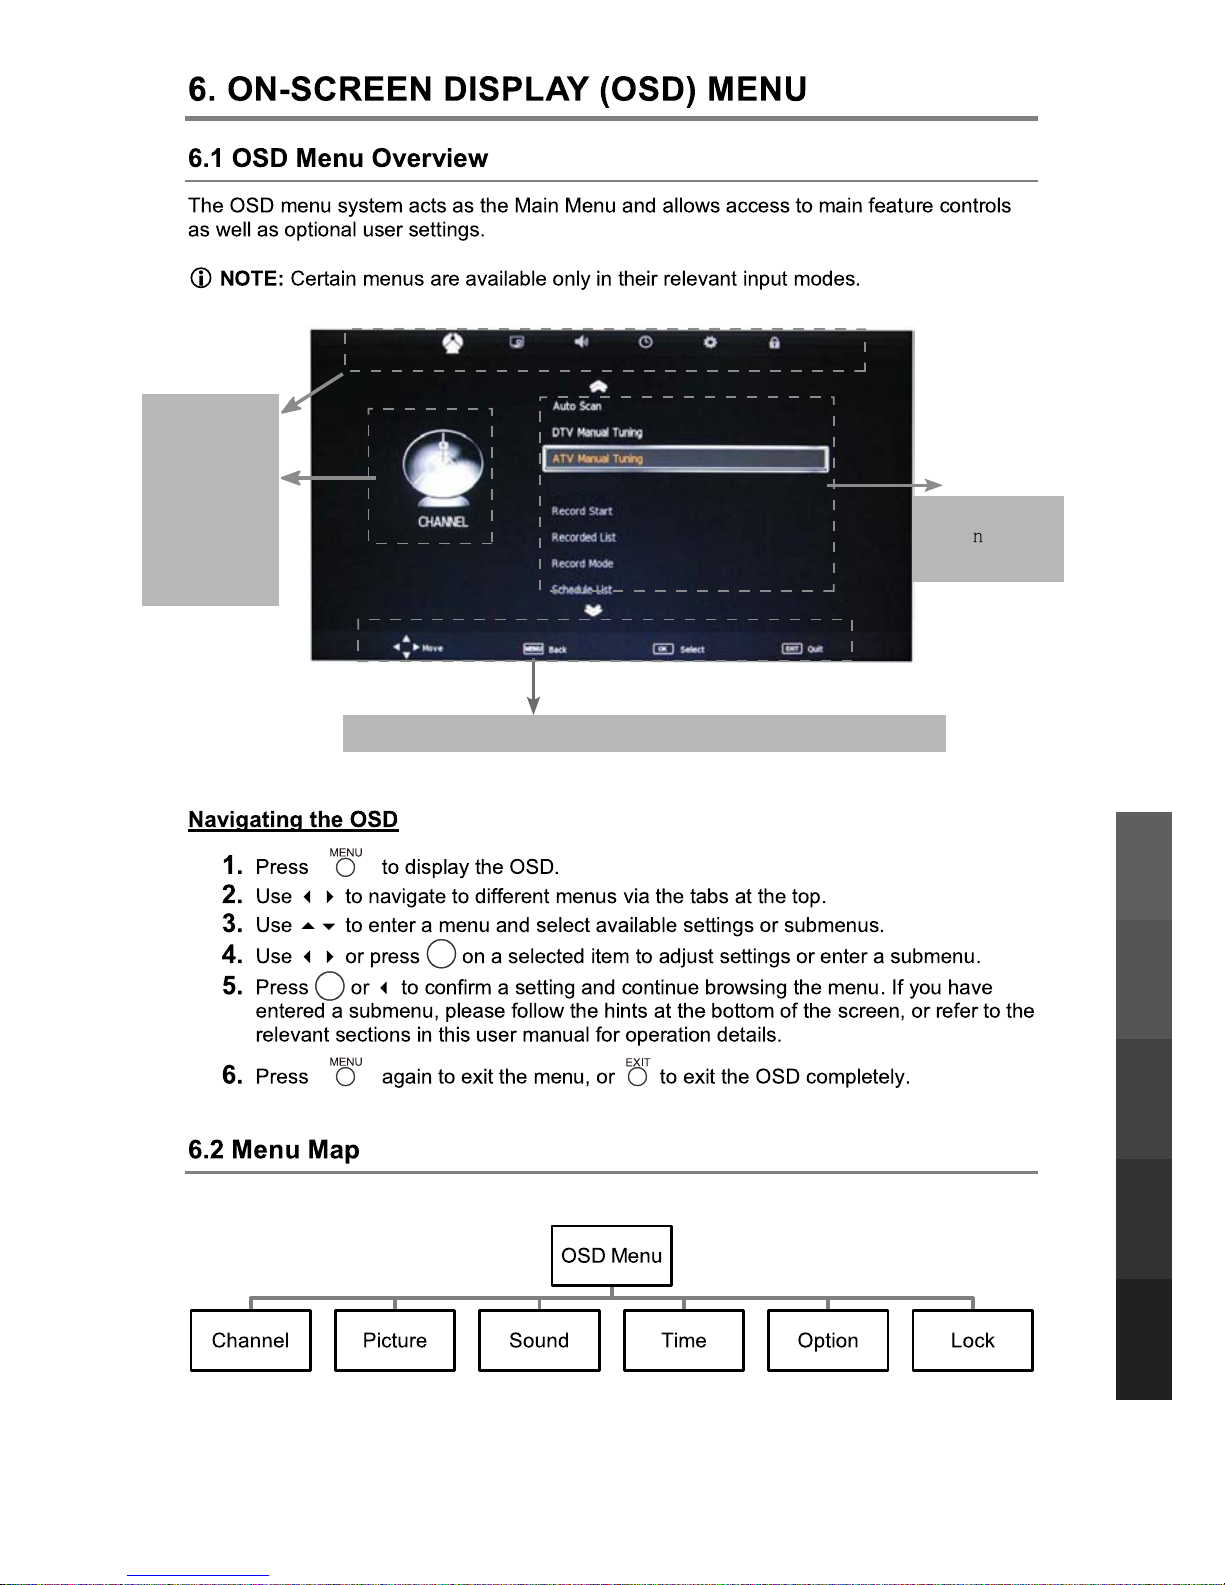
13
USB Multimedia
Playback
On-Screen DisplayTV & Electronic
Programme Guide
Digital Video
Recording (DVR)
(OSD) Menu
Reference
Main menu
CHANNEL
PICTURE
SOUND
TIME
OPTION
LOCK
Submenu
(Channel
menu
for example)
Hint---you should operate the OSD menu according to the hint.
Channel Edit
OK
OK
Page 18
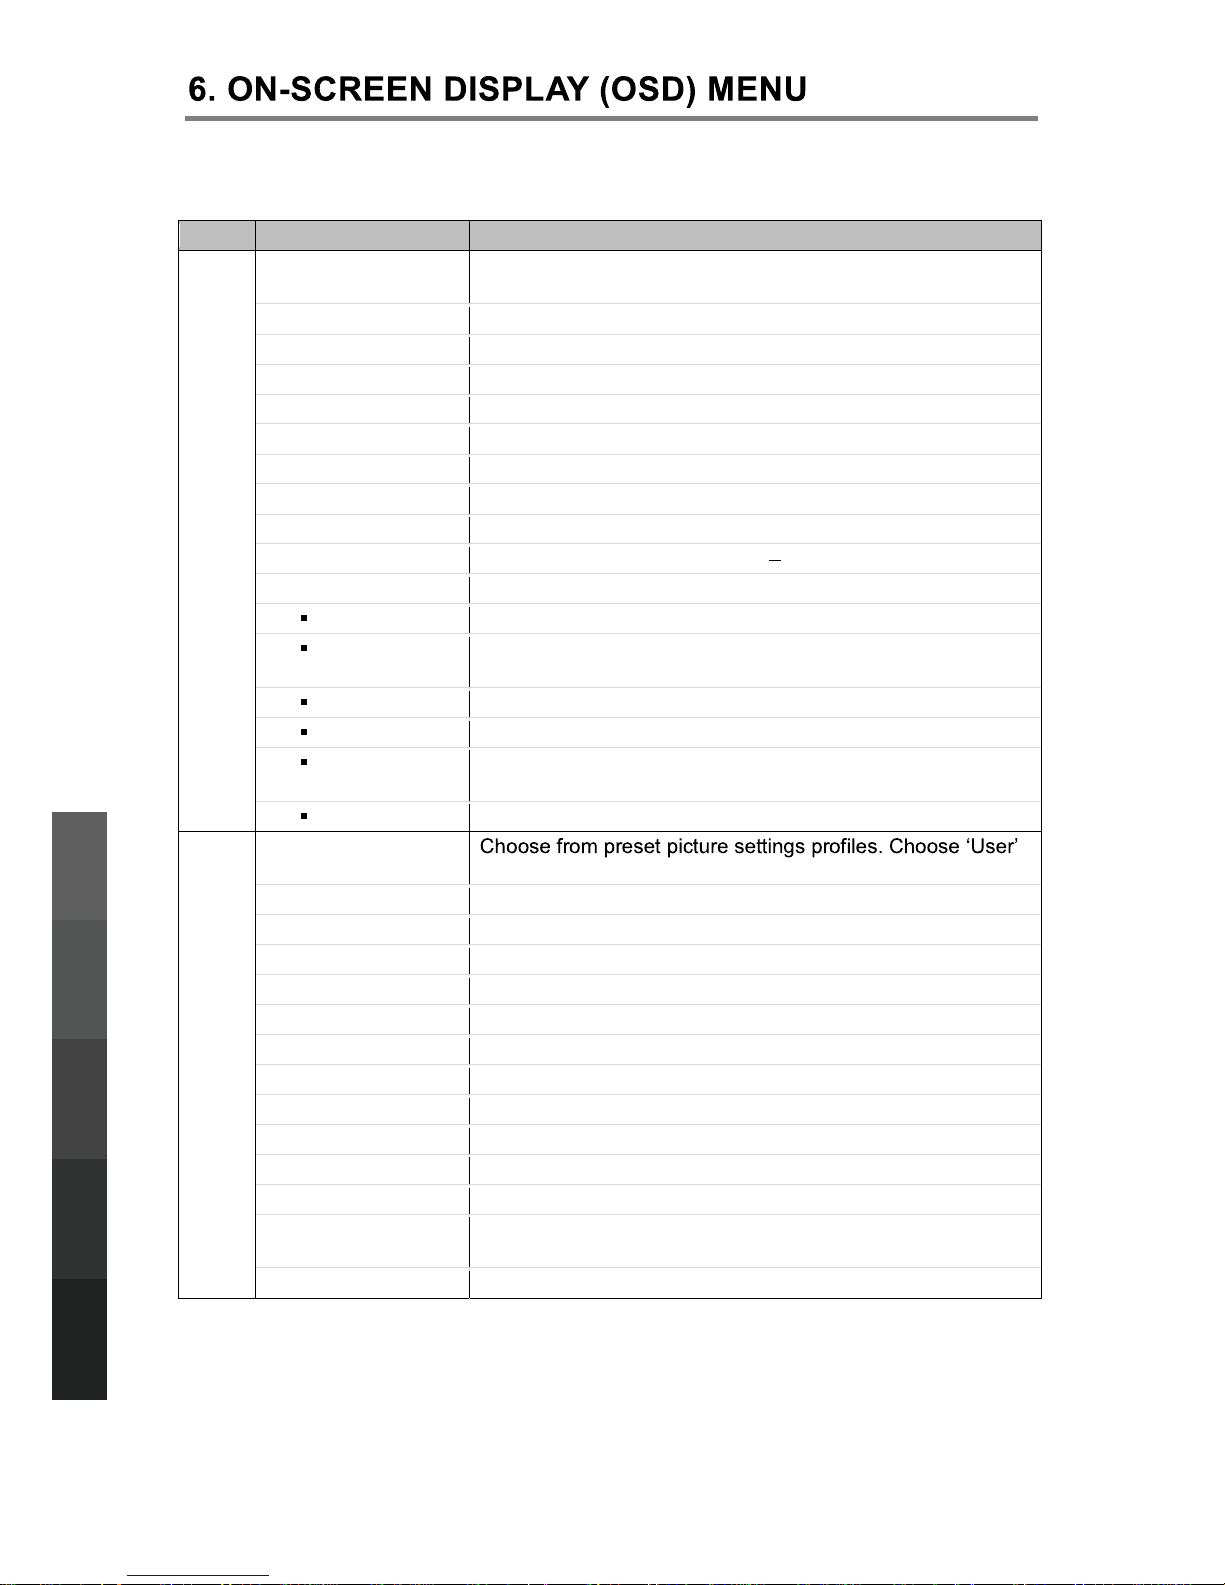
Menu Option Description
CHANNEL
Auto Scan Tune channels automatically. This will overwrite any
previously saved channels and channel settings.
DTV Manual Tuning Tune digital TV channels manually.
ATV Manual Tuning Tune analogue channels manually.
Channel Edit Customize channel list display and channel access.
Signal Information Display detailed channel signal information.
Record Start Start recording the current DTV channel at once.
Recorded List Display the Recorded File List.
Record Mode Schedule a future recording.
Schedule List Display the Schedule List.
Free Record Limit Set a recording limit between 1 6hours.
DVR File System Access the DVR File System Menu.
Select Disk Select a connected USB storage device.
Check DVR
File System
Check if the selected USB storage device is compatible.
USB Disk Show if the selected USB storage device is compatible.
Format Format the selected USB storage device.
Time Shift
Size
Available data storage space for Time Shift recording
USB Speed Shows the speed of the selected USB storage device.
PICTURE
Picture Mode
for manual customisation.
Contrast Adjust picture contrast.
Brightness Adjust picture brightness.
Colour Adjust picture colour.
Sharpness Adjust picture sharpness.
Tint Adjust picture tint. (NTSC format only)
Colour Temperature Adjust colour temperature.
Red Adjust Red colour level.
Green Adjust Green colour level.
Blue Adjust Blue colour level.
Aspect Ratio Adjust picture aspect ratio.
Noise Reduction Adjust noise reduction settings.
SCREEN
PC Mode: Access the submenu to adjust the
Horizontal/Vertical position, Size or Phase of the picture.
Over Scan
HDMI Mode: Choose between Video and PC.
14
USB Multimedia
Playback
On-Screen DisplayTV & Electronic
Programme Guide
Digital Video
Recording (DVR)
(OSD) Menu
Reference
Page 19
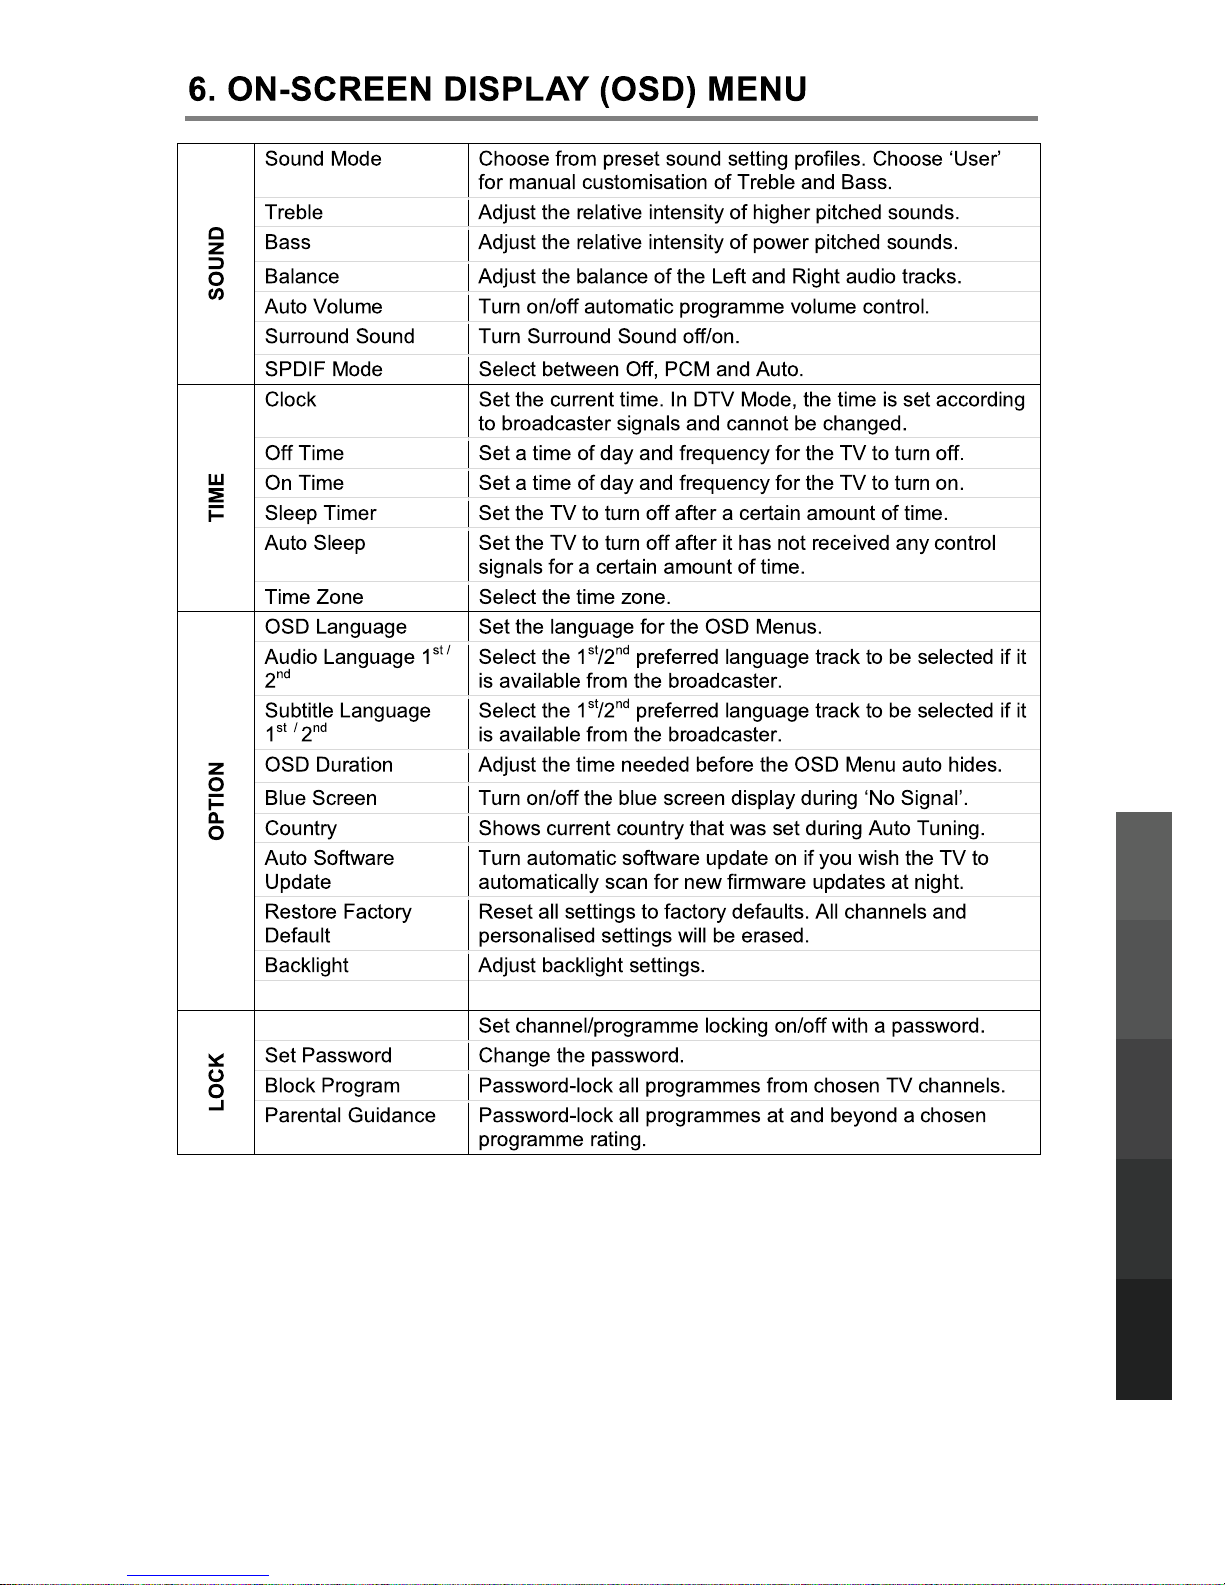
15
Enable Locks
System Info
USB Multimedia
Playback
On-Screen DisplayTV & Electronic
Programme Guide
Digital Video
Recording (DVR)
(OSD) Menu
Reference
Display detailed information or controls.
Page 20
16
USB Multimedia
Playback
TV & Electronic
Programme Guide
Digital Video
Recording (DVR)
Reference
OK
OK
OK
OK
OK
OK
Page 21
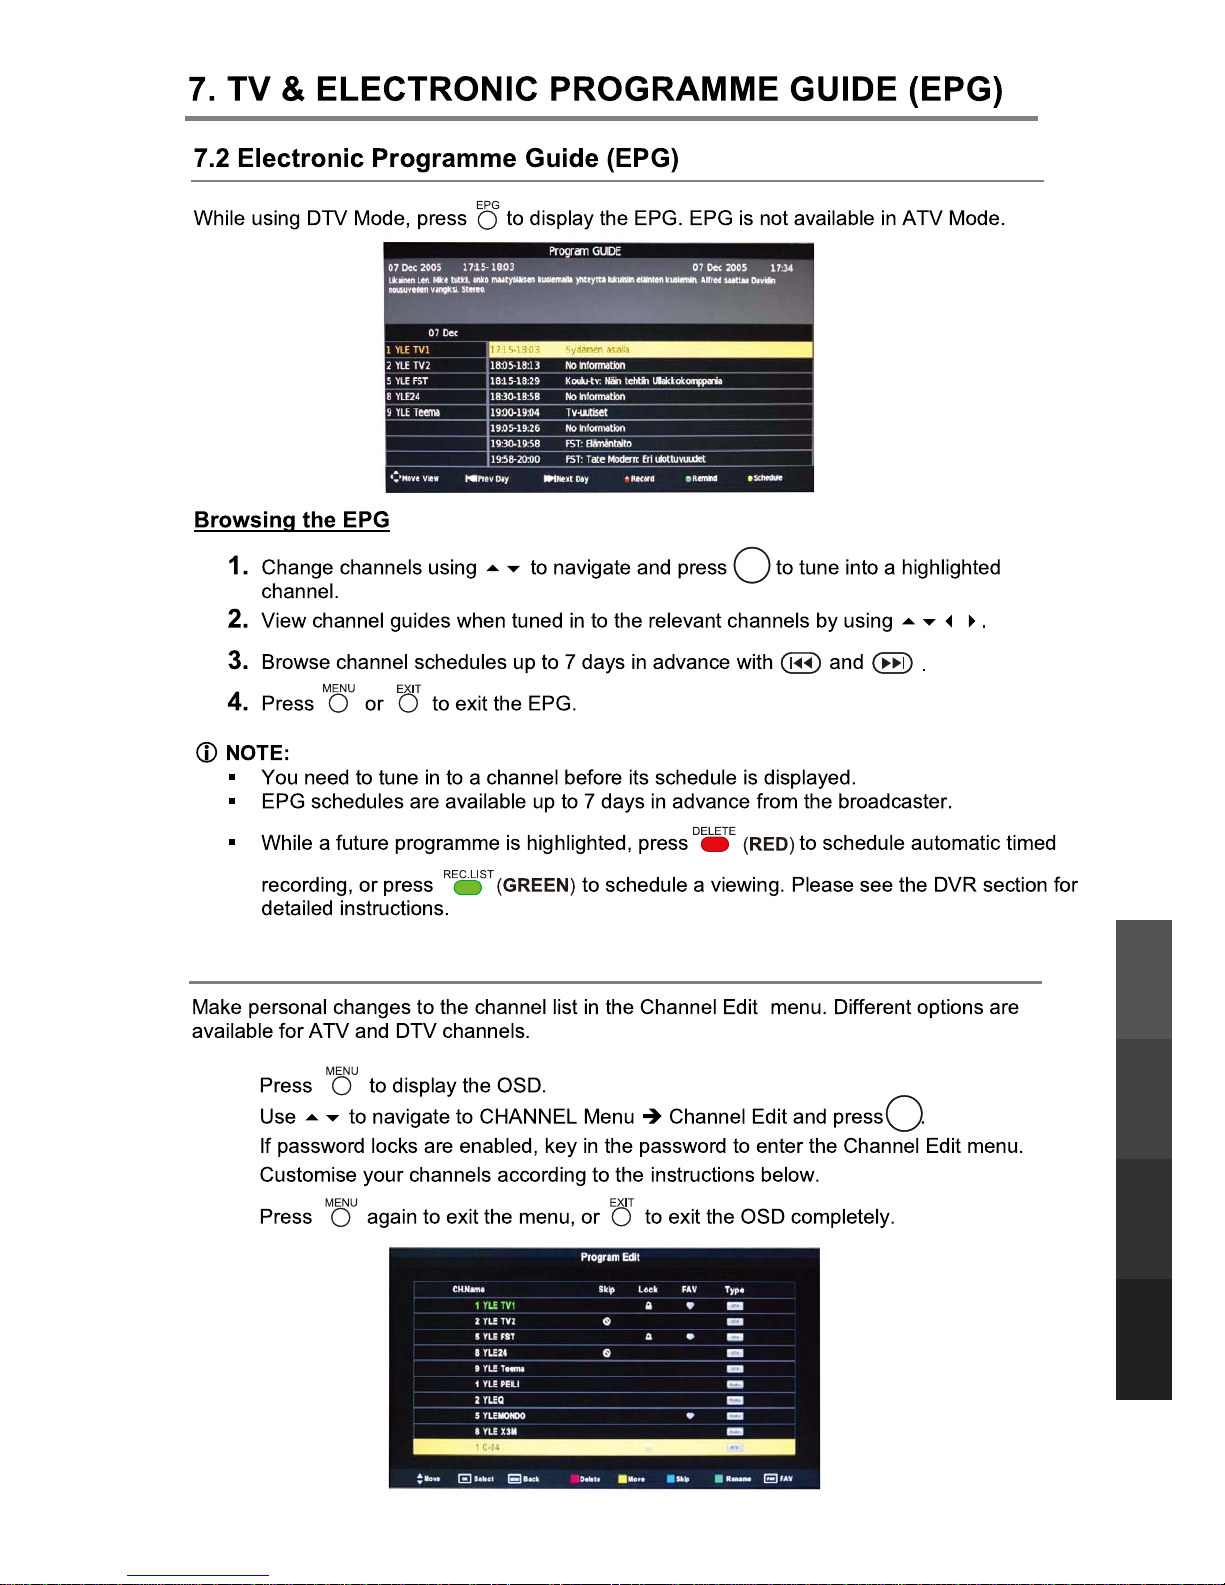
17
USB Multimedia
Playback
TV & Electronic
Programme Guide
Digital Video
Recording (DVR)
Reference
7.3 Channel Customisation
1.
2.
3.
4.
5.
OK
OK
Page 22
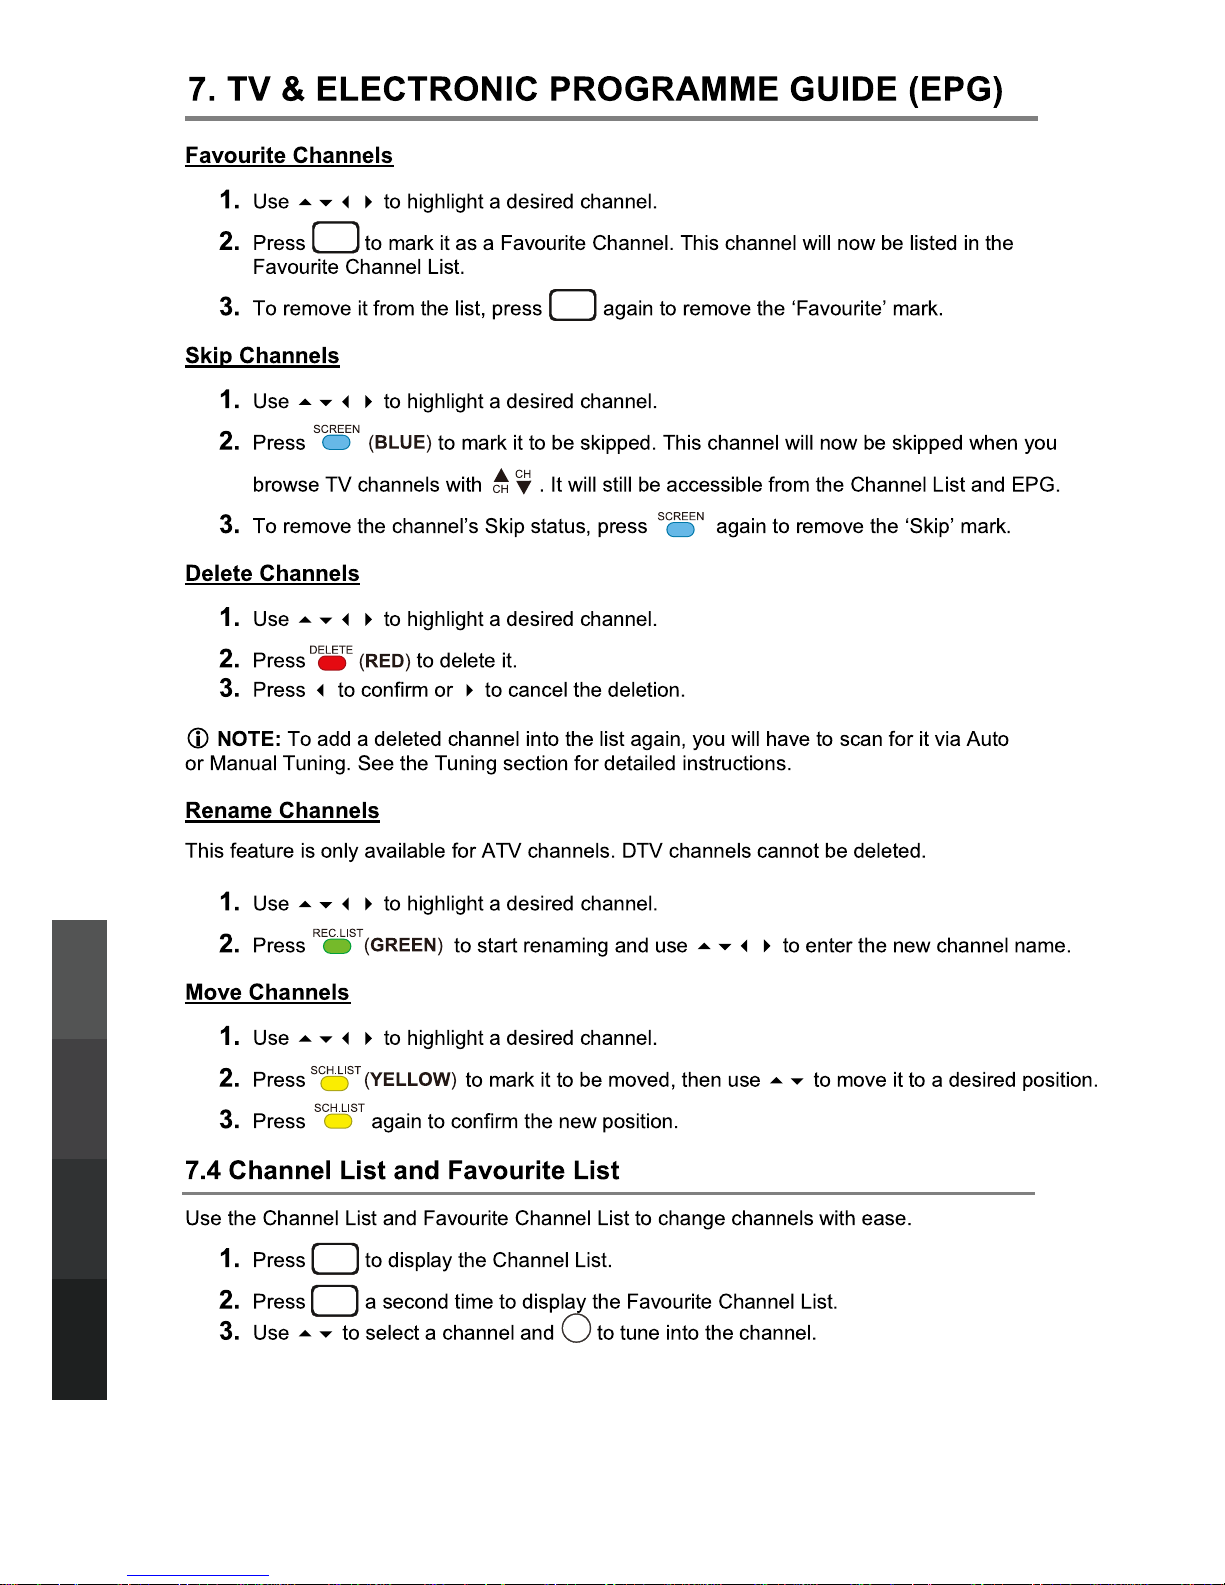
18
USB Multimedia
Playback
TV & Electronic
Programme Guide
Digital Video
Recording (DVR)
Reference
OK
CH.FAV
CH.FAV
CH.FAV
CH.FAV
Page 23
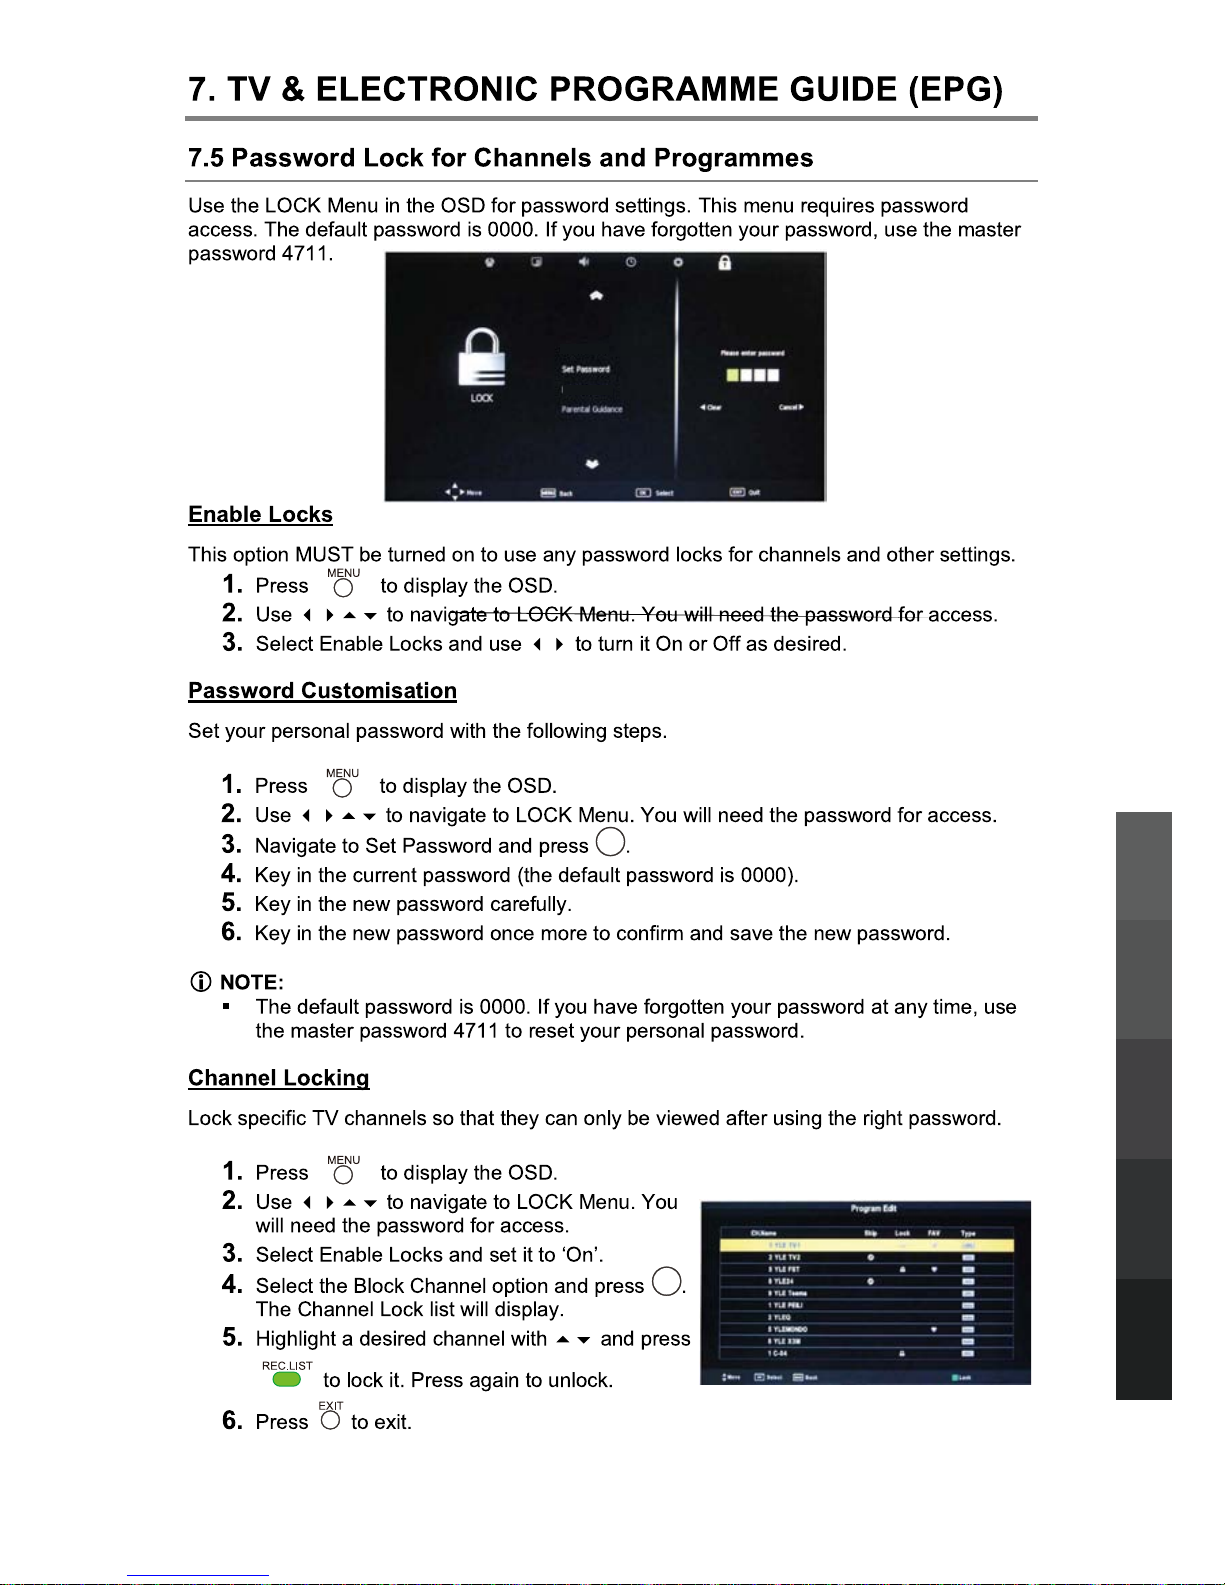
19
USB Multimedia
Playback
On-Screen DisplayTV & Electronic
Programme Guide
Digital Video
Recording (DVR)
(OSD) Menu
Reference
Enable Locks
Block Channel
OK
OK
Page 24
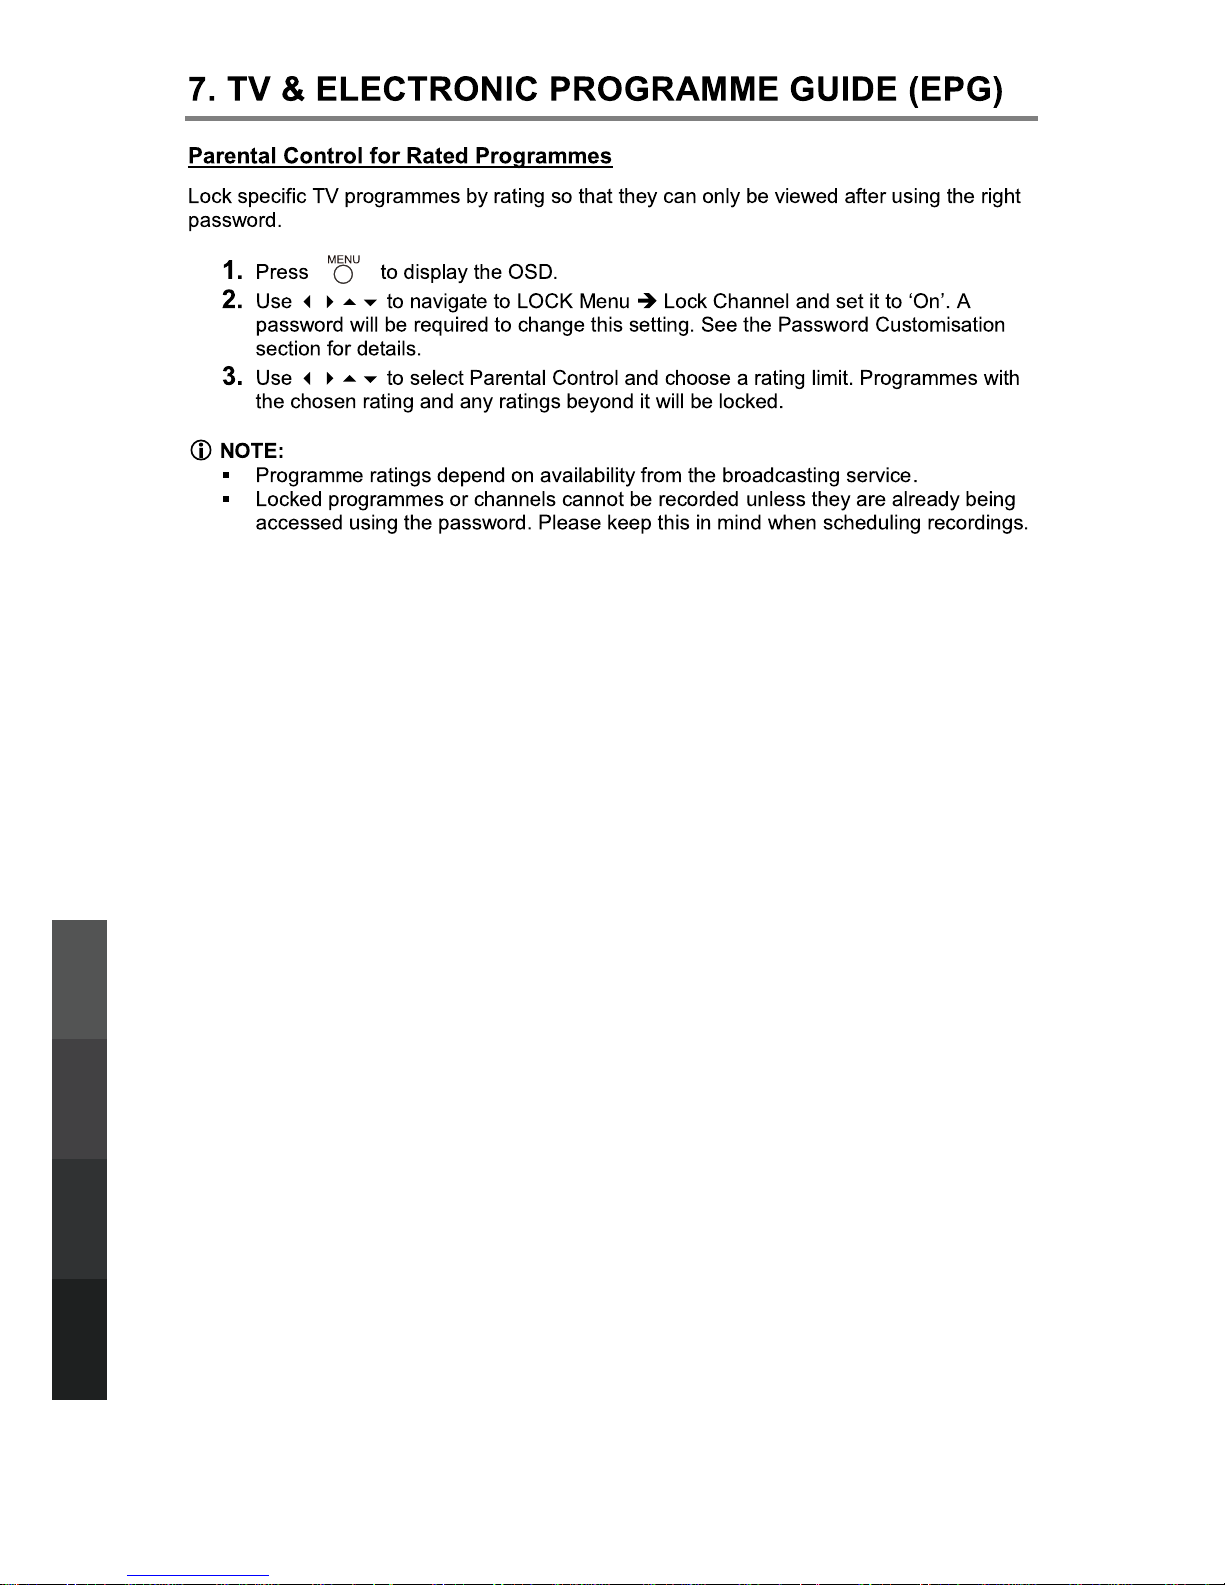
20
USB Multimedia
Playback
TV & Electronic
Programme Guide
Digital Video
Recording (DVR)
Reference
Page 25
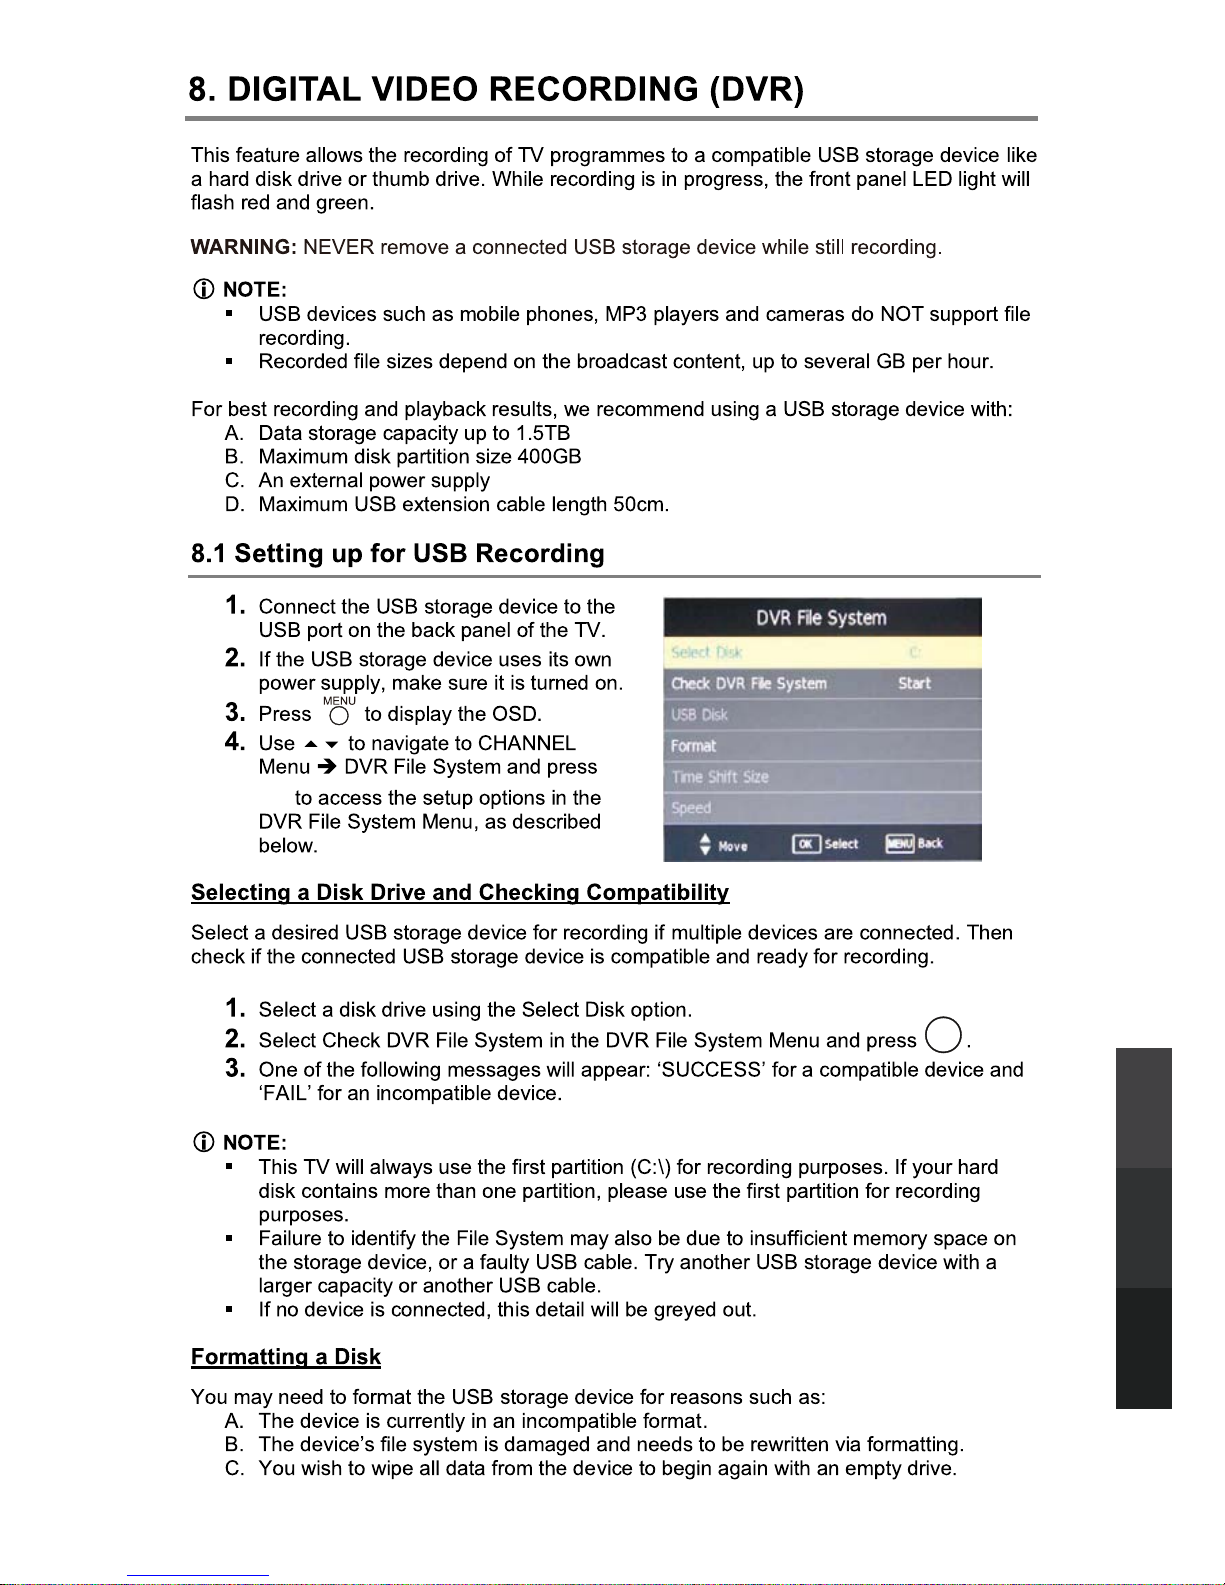
21
USB Multimedia
Playback
Digital Video
Recording (DVR)
Reference
OK
Page 26
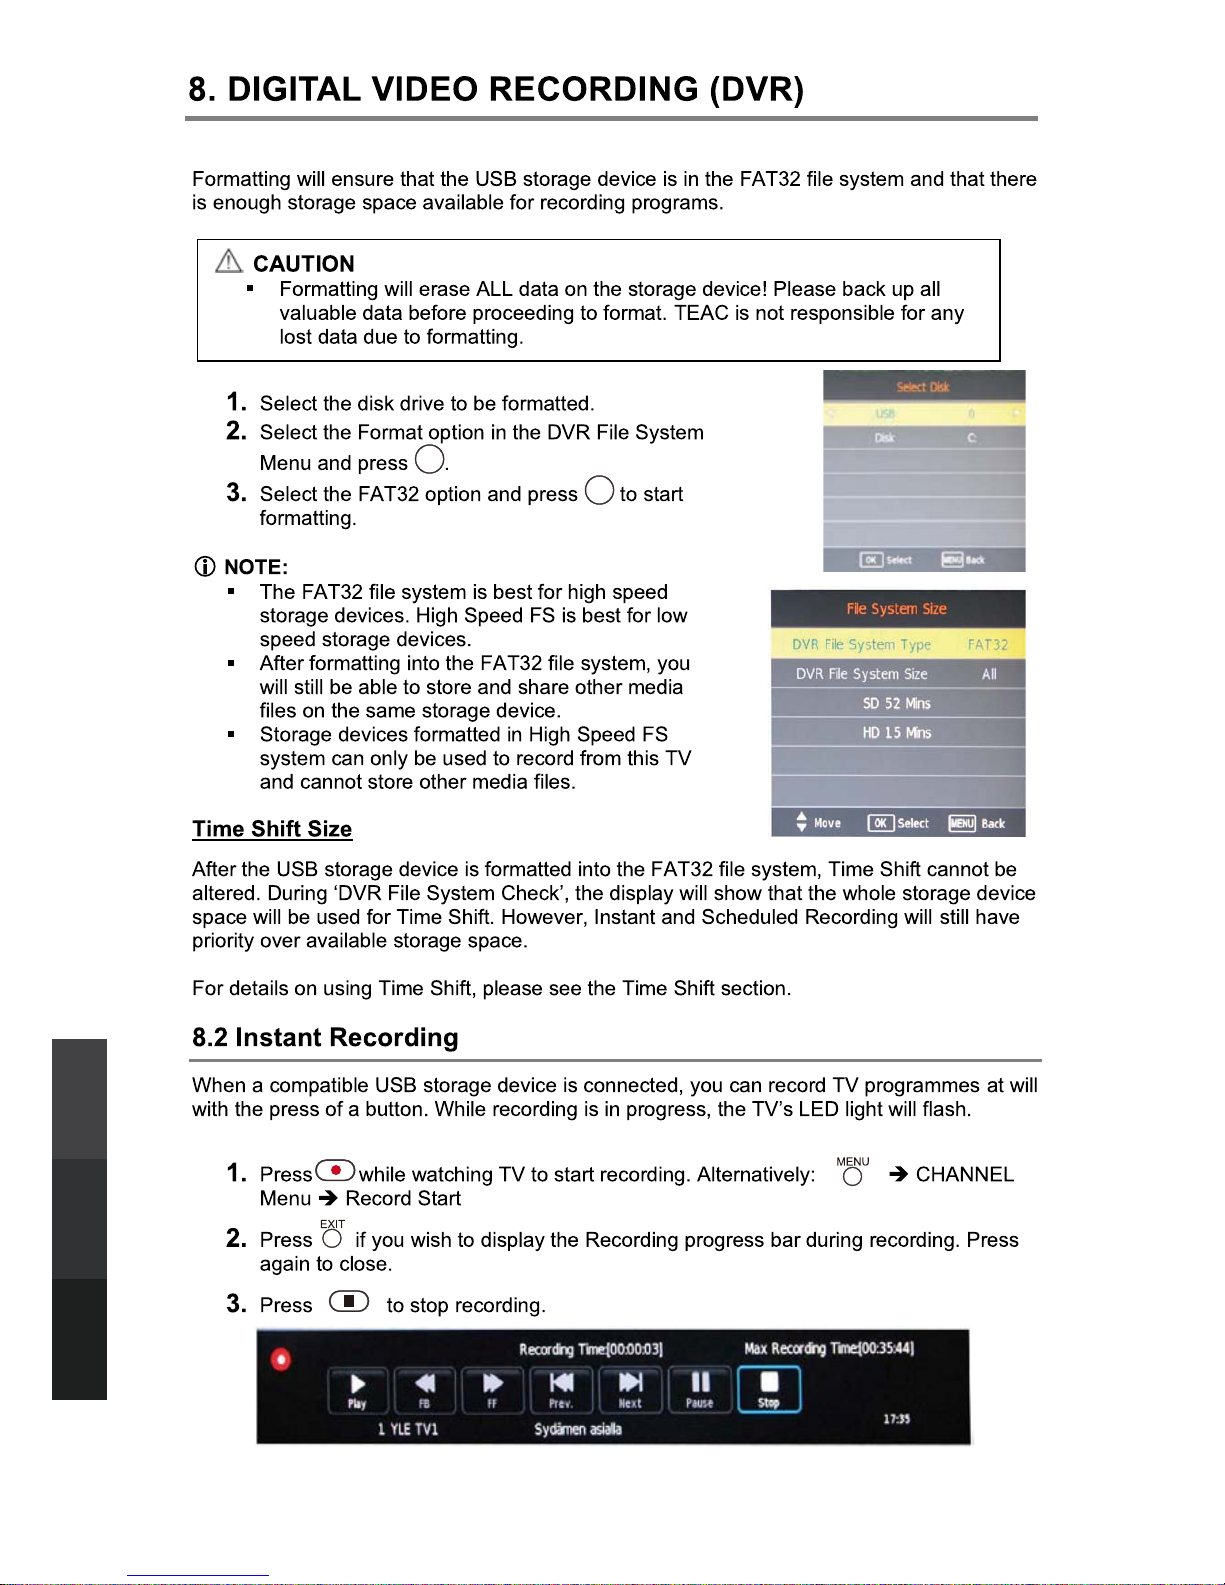
22
USB Multimedia
Playback
Digital Video
Recording (DVR)
Reference
OK
OK
Page 27
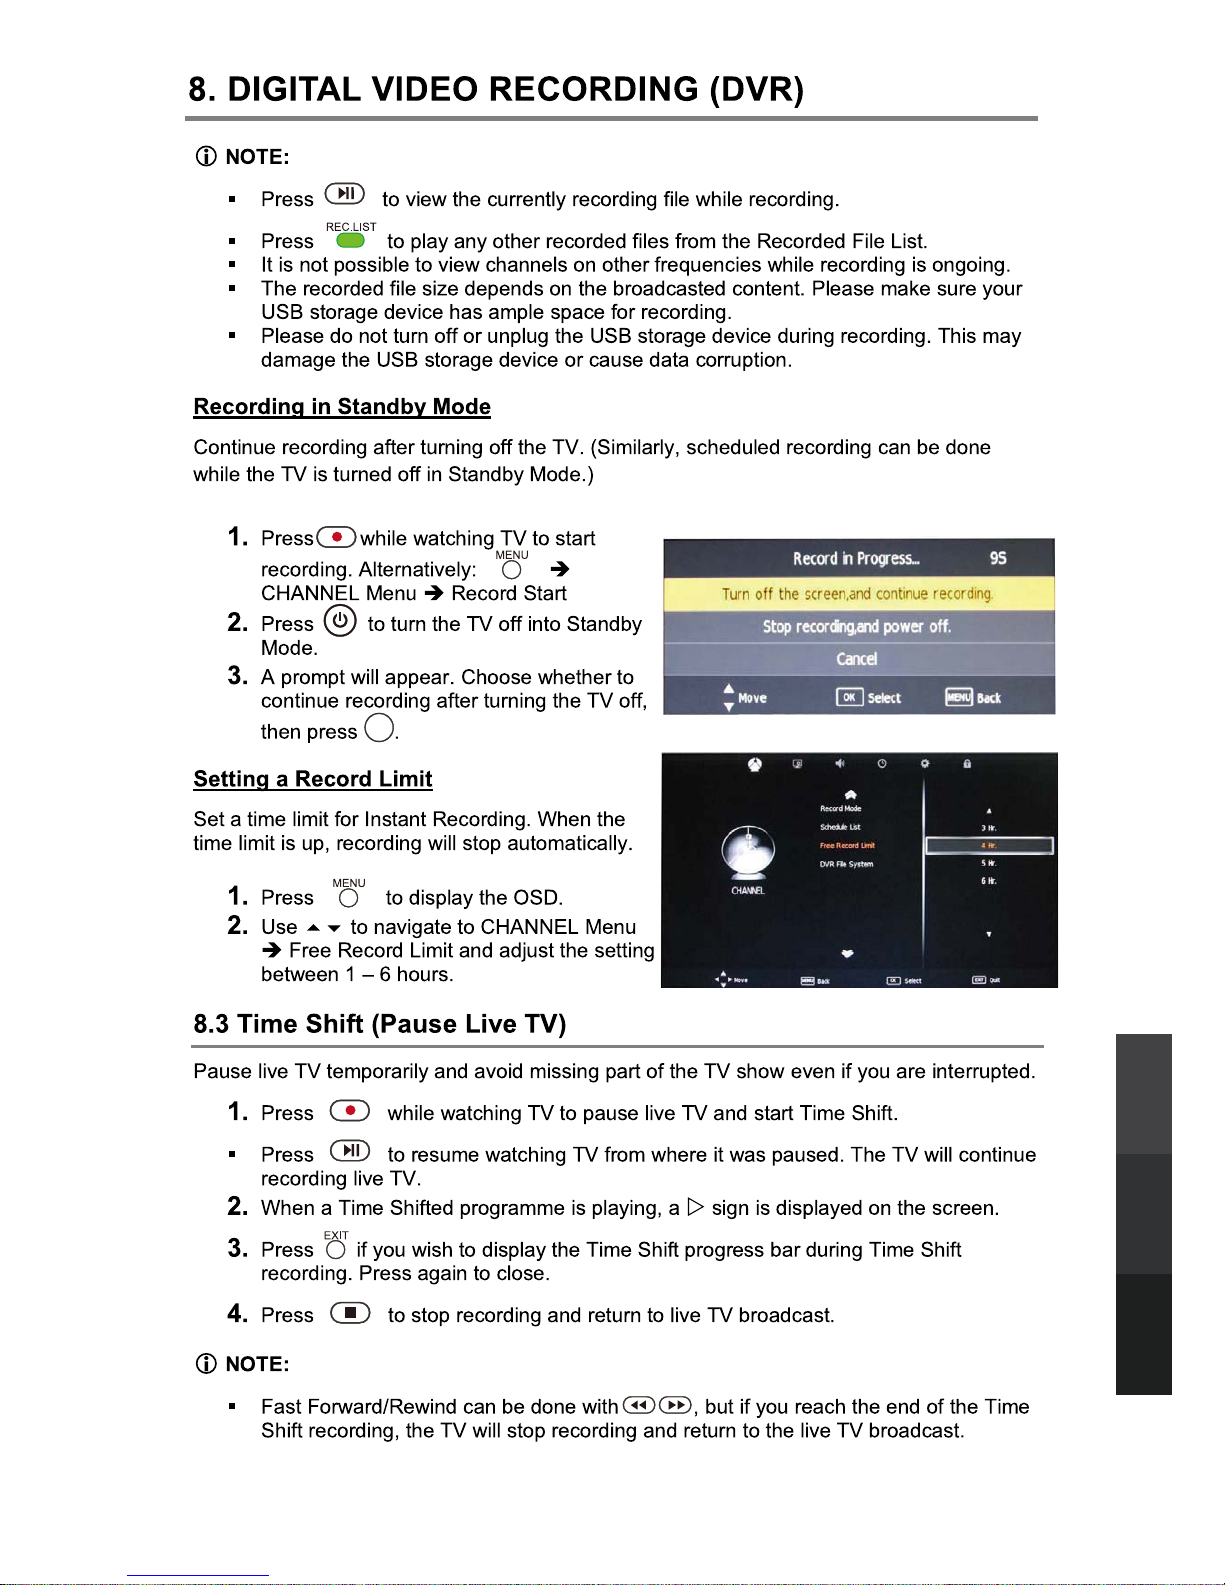
23
USB Multimedia
Playback
Digital Video
Recording (DVR)
Reference
OK
Page 28
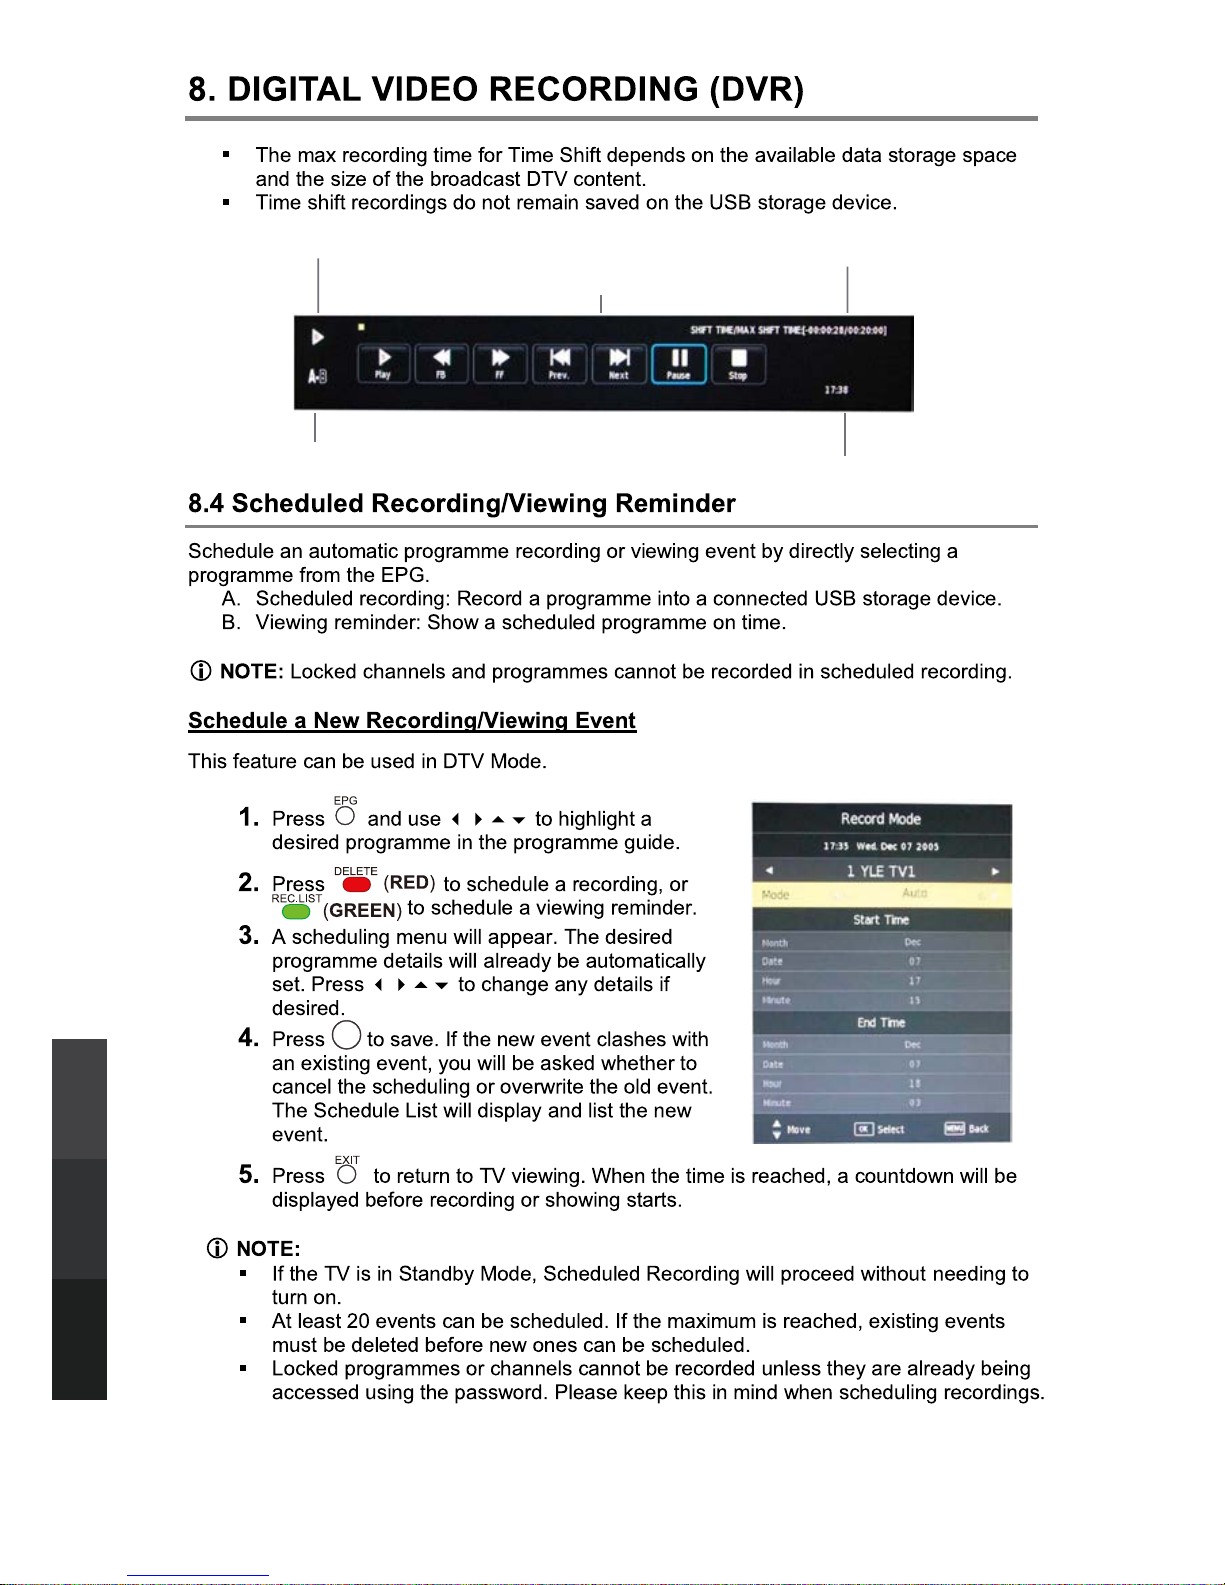
The current state of the program
The current time
The name and number
of the program
The process of the program
A-B mark
24
USB Multimedia
Playback
Digital Video
Recording (DVR)
Reference
OK
Page 29
25
USB Multimedia
Playback
Digital Video
Recording (DVR)
Reference
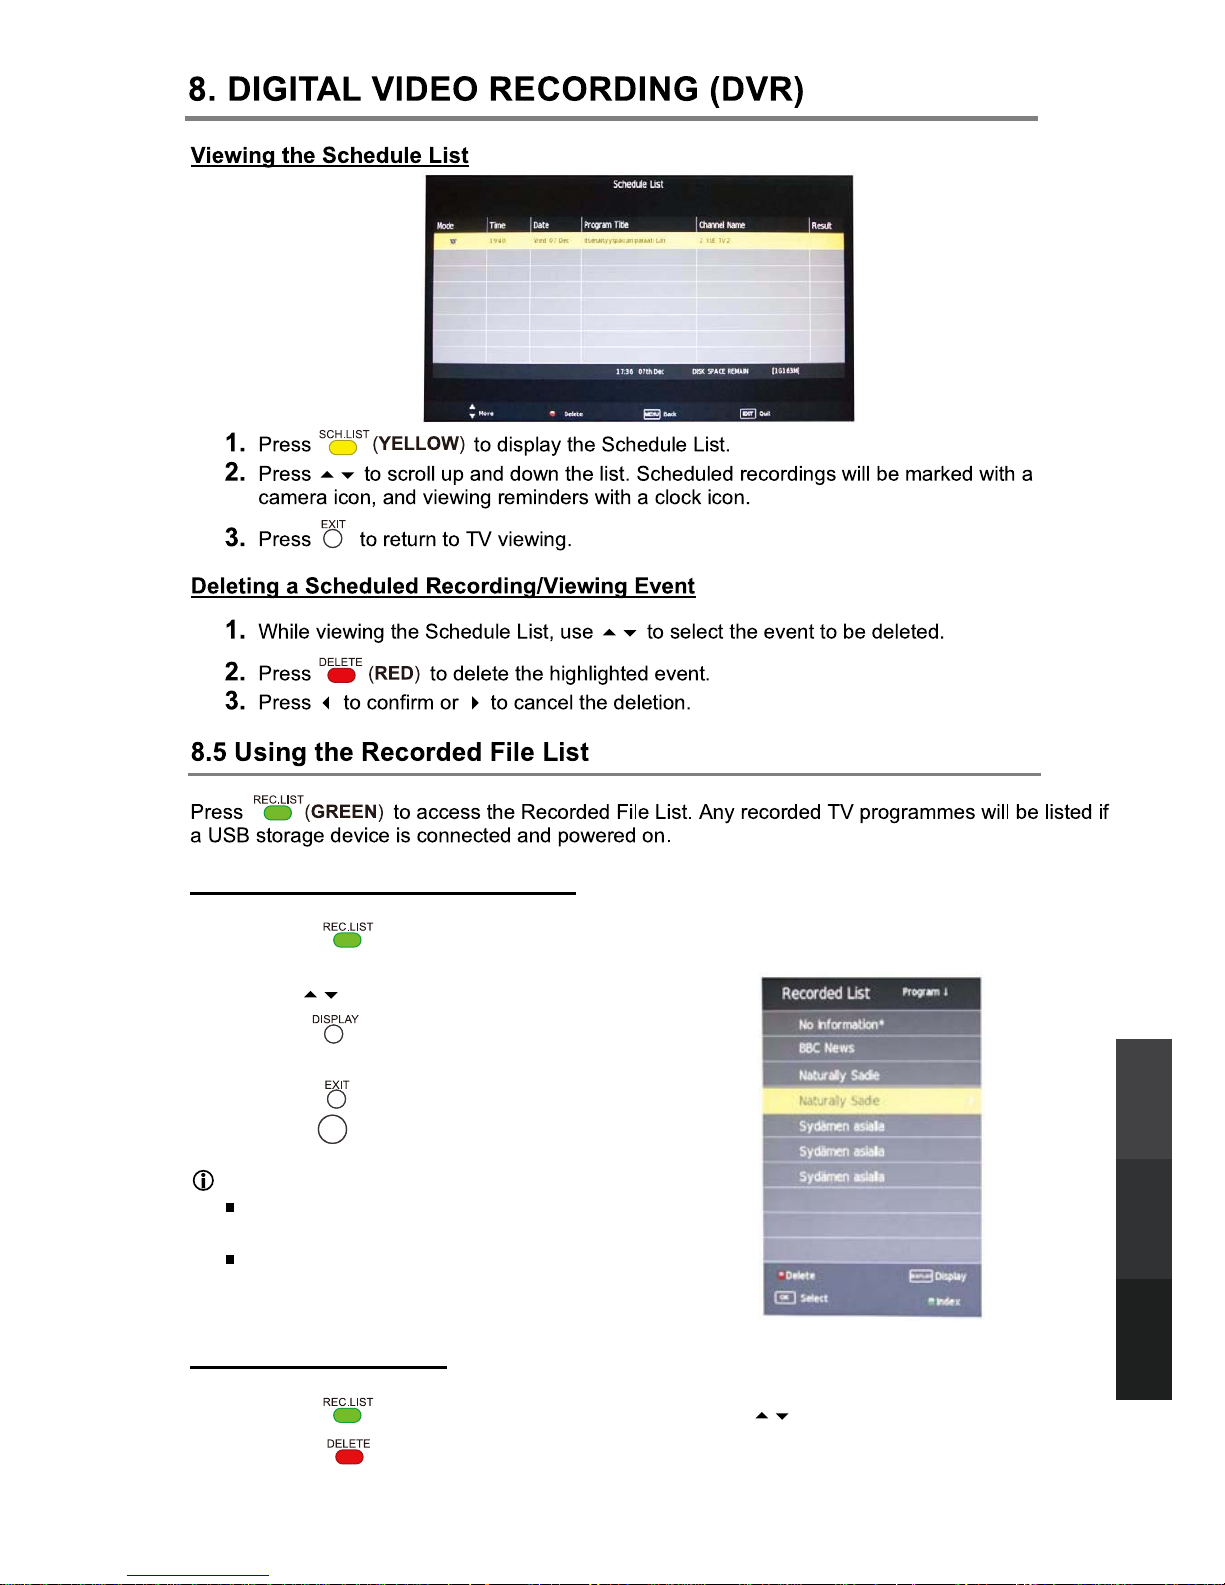
Viewing and Playing Recorded Files
1. Press to view the Recorded File List. Press repeatedly to sort the files by
Programme, Channel and Time.
2. Use to browse the list and select a file.
3. Press to display detailed information on the
highlighted file.
4. Press to show an on-screen control bar.
5. Press to start playing the selected file.
NOTE:
If playback is stopped, the track position is
remembered and playback will resume from there.
If the recorded programme is locked because of
parental control settings, key in the correct password
to view it.
Deleting Recorded Files
1. Press to view the Recorded File List, then use to select a file.
2. Press to delete a file.
OK
Page 30
26
USB Multimedia
Playback
Reference
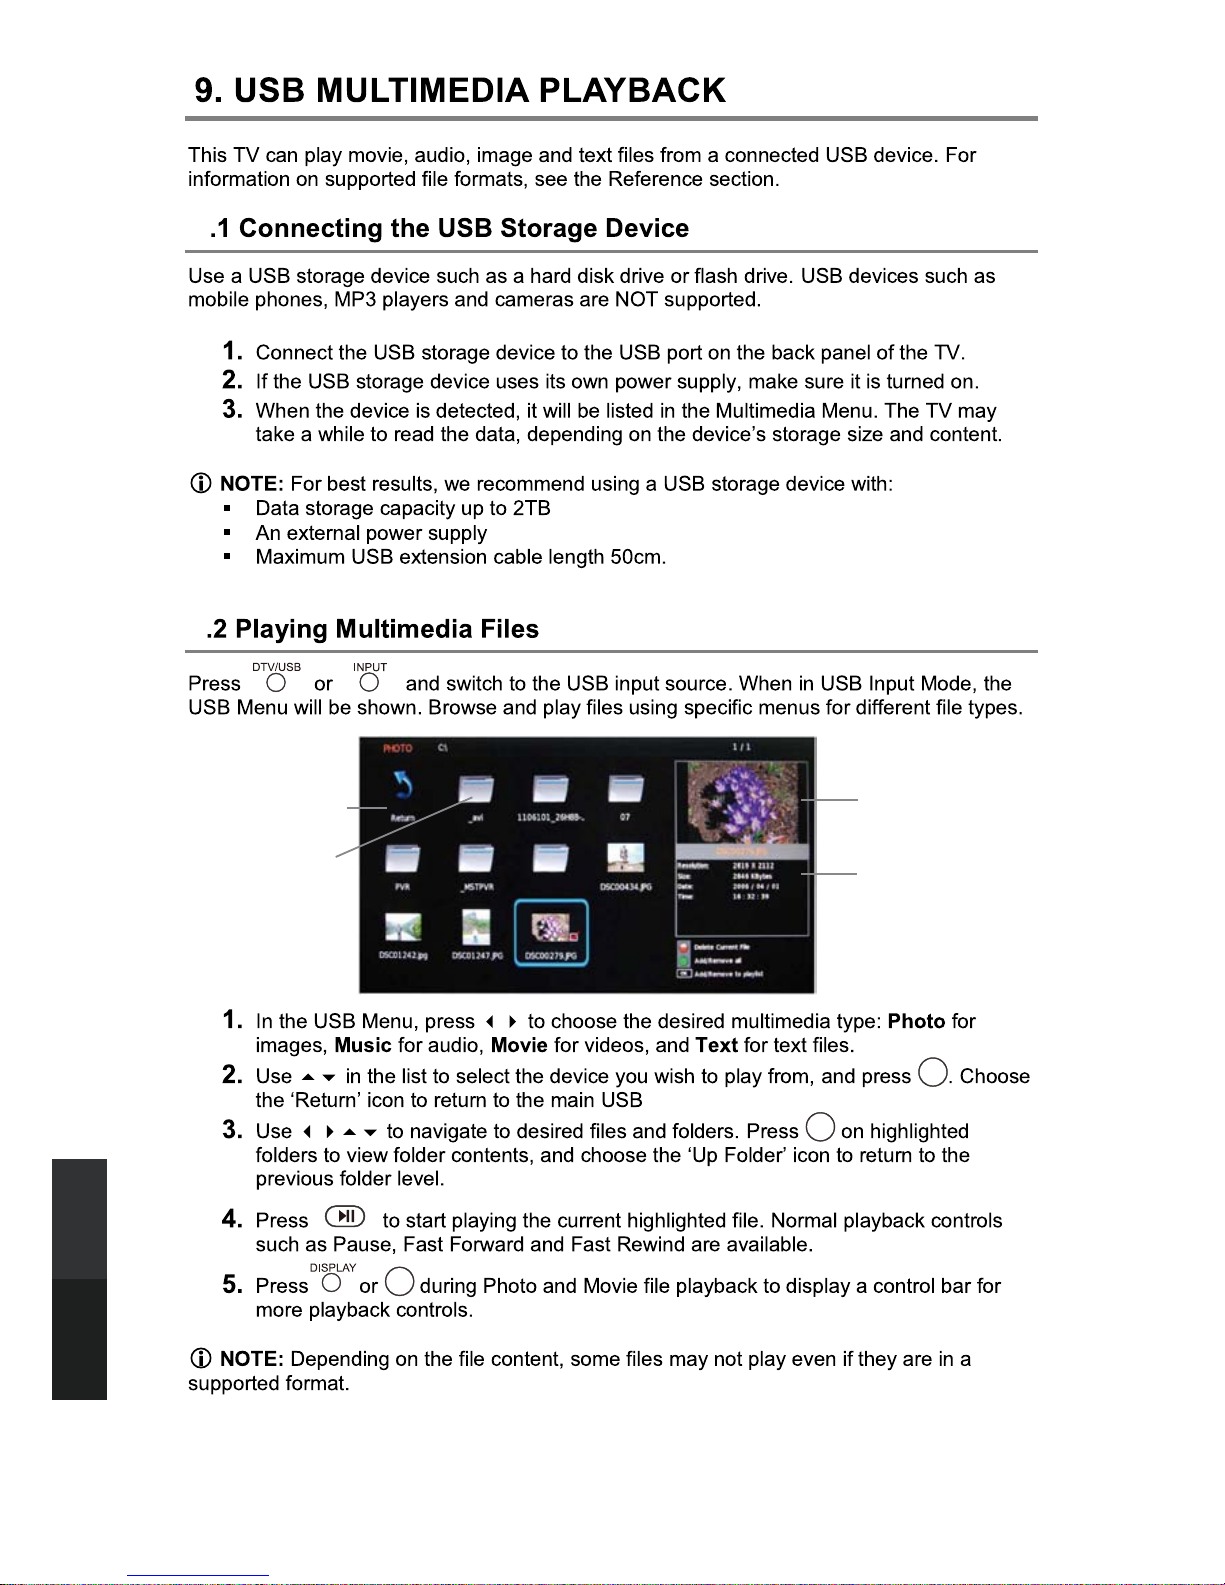
9.
Return to
device list
Up Folder
Preview
Information
9.
OK
OK
OK
Page 31
27
USB Multimedia
Playback
Reference
OK
OK
OK
OK
OK
Page 32
28
USB Multimedia
Playback
Reference
OK
OK
OK
OK
OK
Page 33
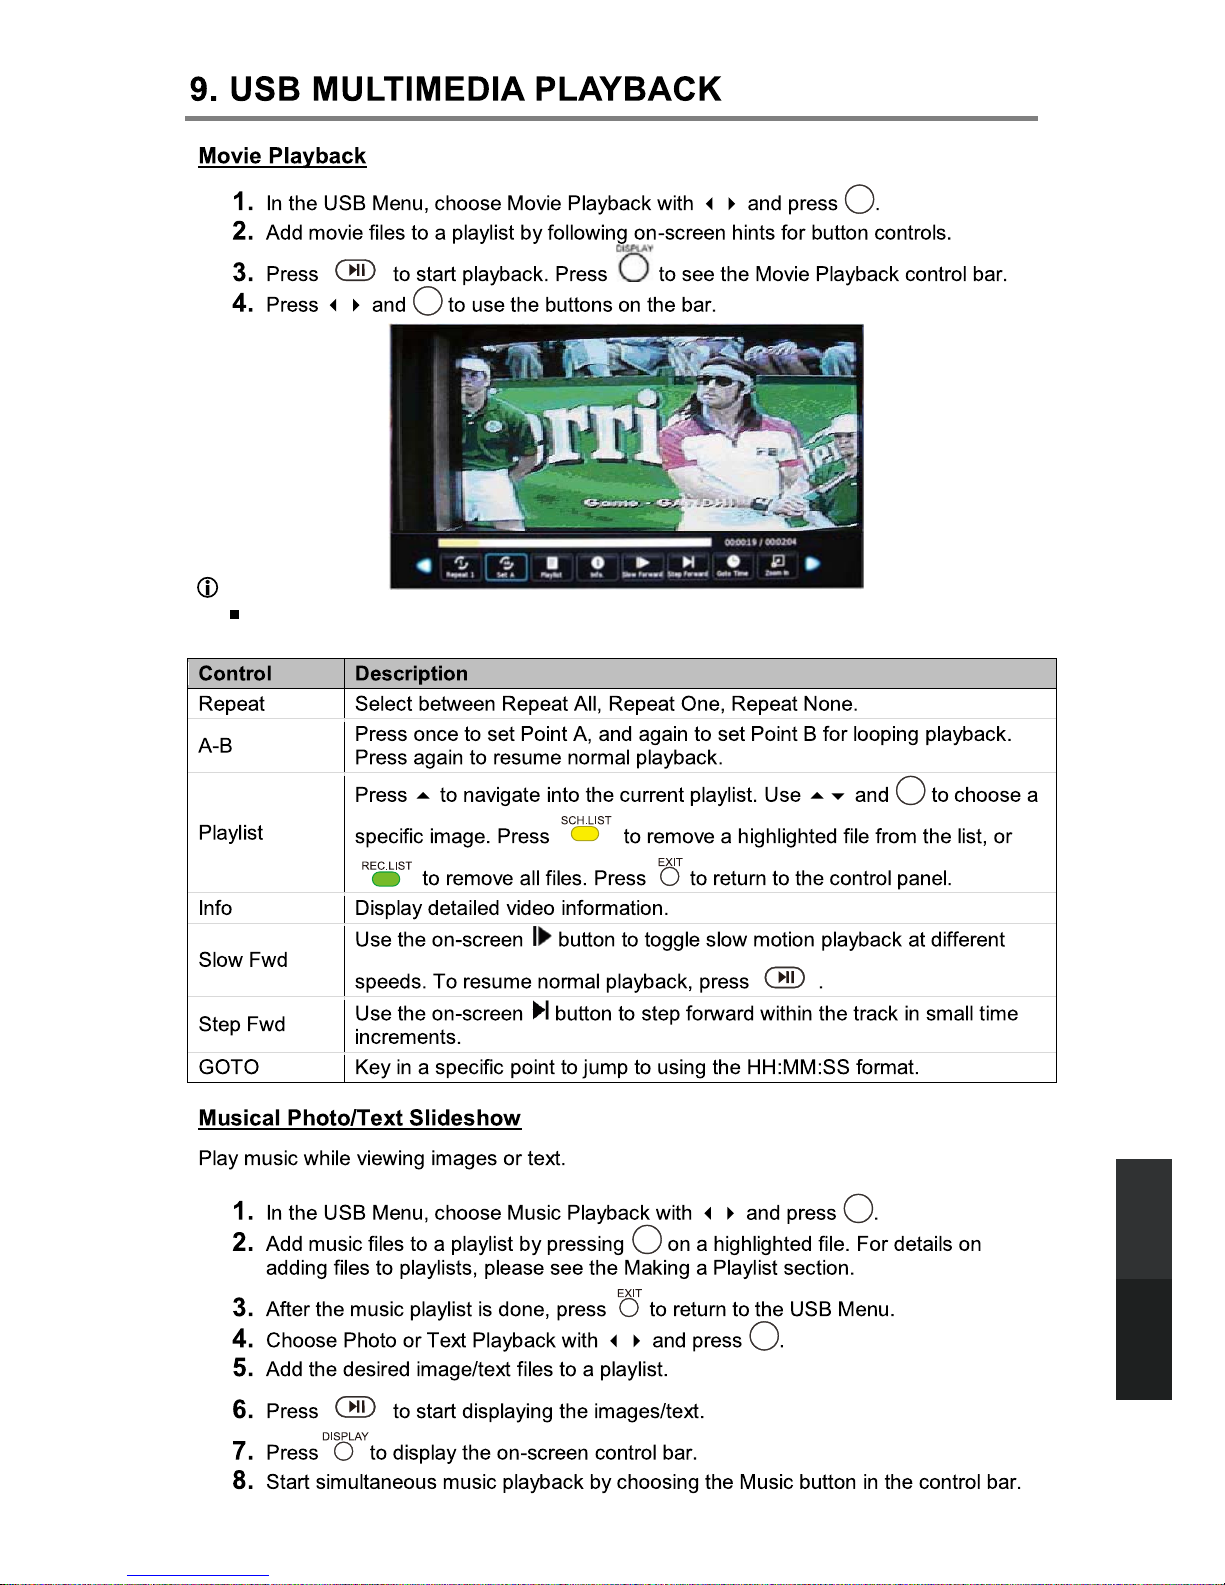
29
USB Multimedia
Playback
Reference
NOTE:
If playback is stopped, the track position is remembered and playback will resume
from there.
OK
OK
OK
OK
OK
OK
Page 34
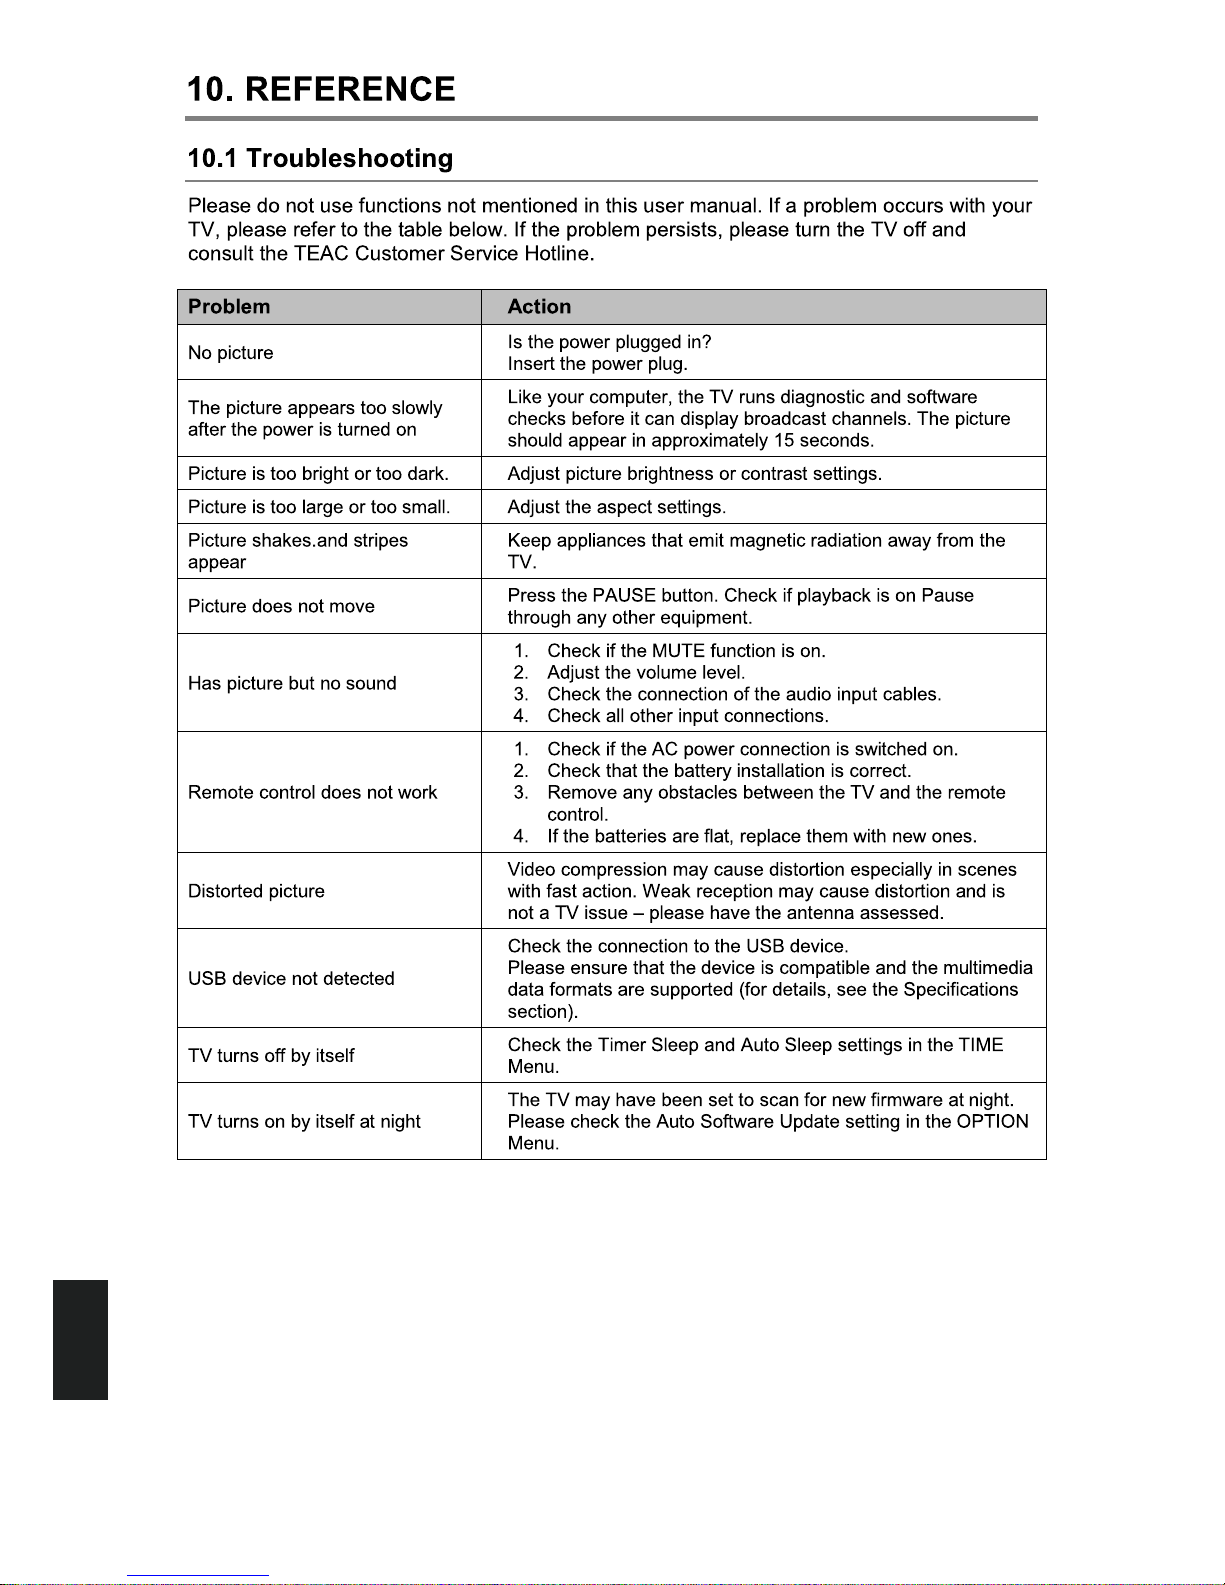
30
Reference
Page 35
10. REFERENCE
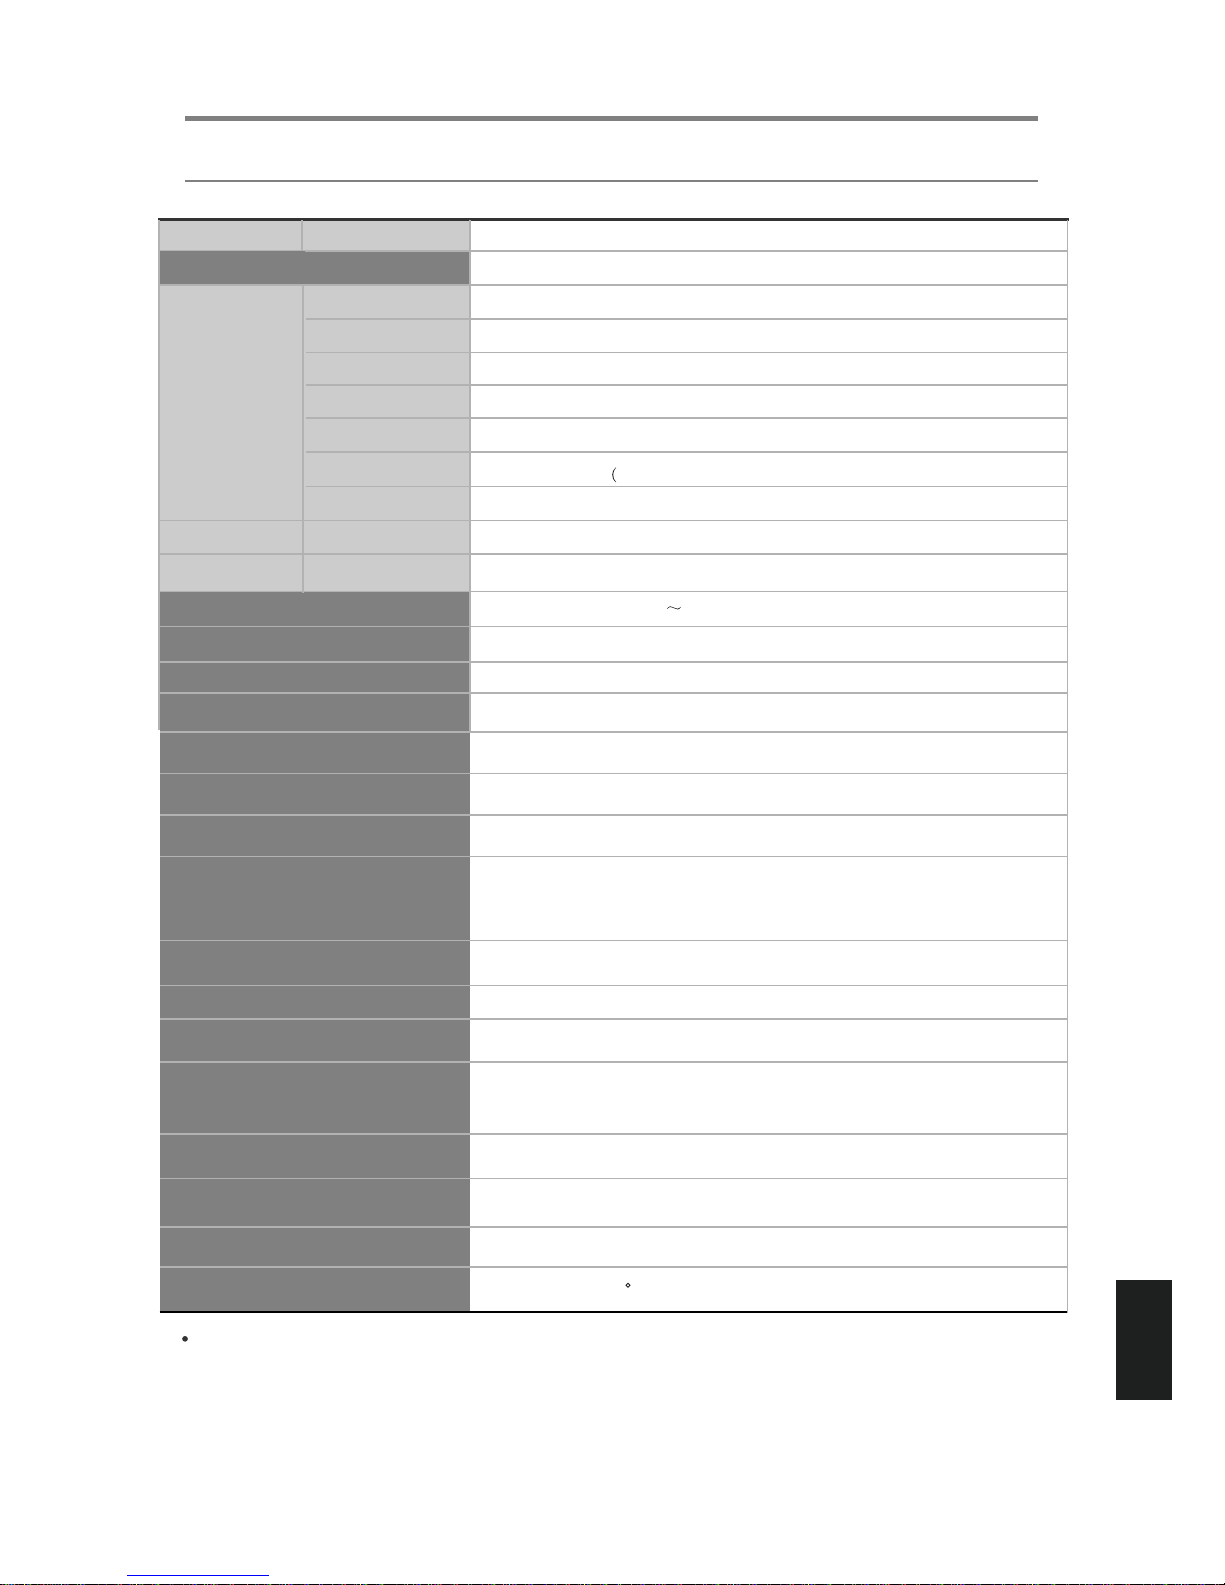
10.2 Specifications
31
Reference
Specifications are subject to change without notice.
Weight and dimensions are approximate.
Panel Size
LCD Panel
Max. Resolution
Input Connector
Output Connector
VIDEO
YPbPr
AUDIO (L/R)
PC/AUDIO
VGA
HDMI
RF
HEADPHONE
COAX
Power Source
TV receive system
Frequency range
Speaker output power
Antenna impedance
Supported file system
Recommended USB standard
Supported Multimedia Player formats
Dimensions
Weight
Wall mounting dimensions
Wall mounting screw size
Operating temperature range
Power Consumption
31.5”
1
1
1
1
1
3
The HDMI support 1.3, the HDCP support 1.1)
1
1
1
2×10W
75 ohm
USB2.0
0~40 C
DVR Recording: FAT32
USB Multimedia Playback: FAT32 and NTFS
Maximum hard disk partition size: 400GB
75W
100-240V
50/60Hz
<0.5W
WUXGA (Maximum supported resolution: 1360X768 @ 60Hz)
100x100mm
M5X10
8kg
See the table on next page
1366x768
Standby Power Consumption
PC Input supported resolution
48.25 - 863.25 MHz
(Without stand)
(With stand)
745x185x500 mm
745x80x448 mm
PAL BG/DK/I SECAM BG/DK L/L'
Page 36
32
Reference
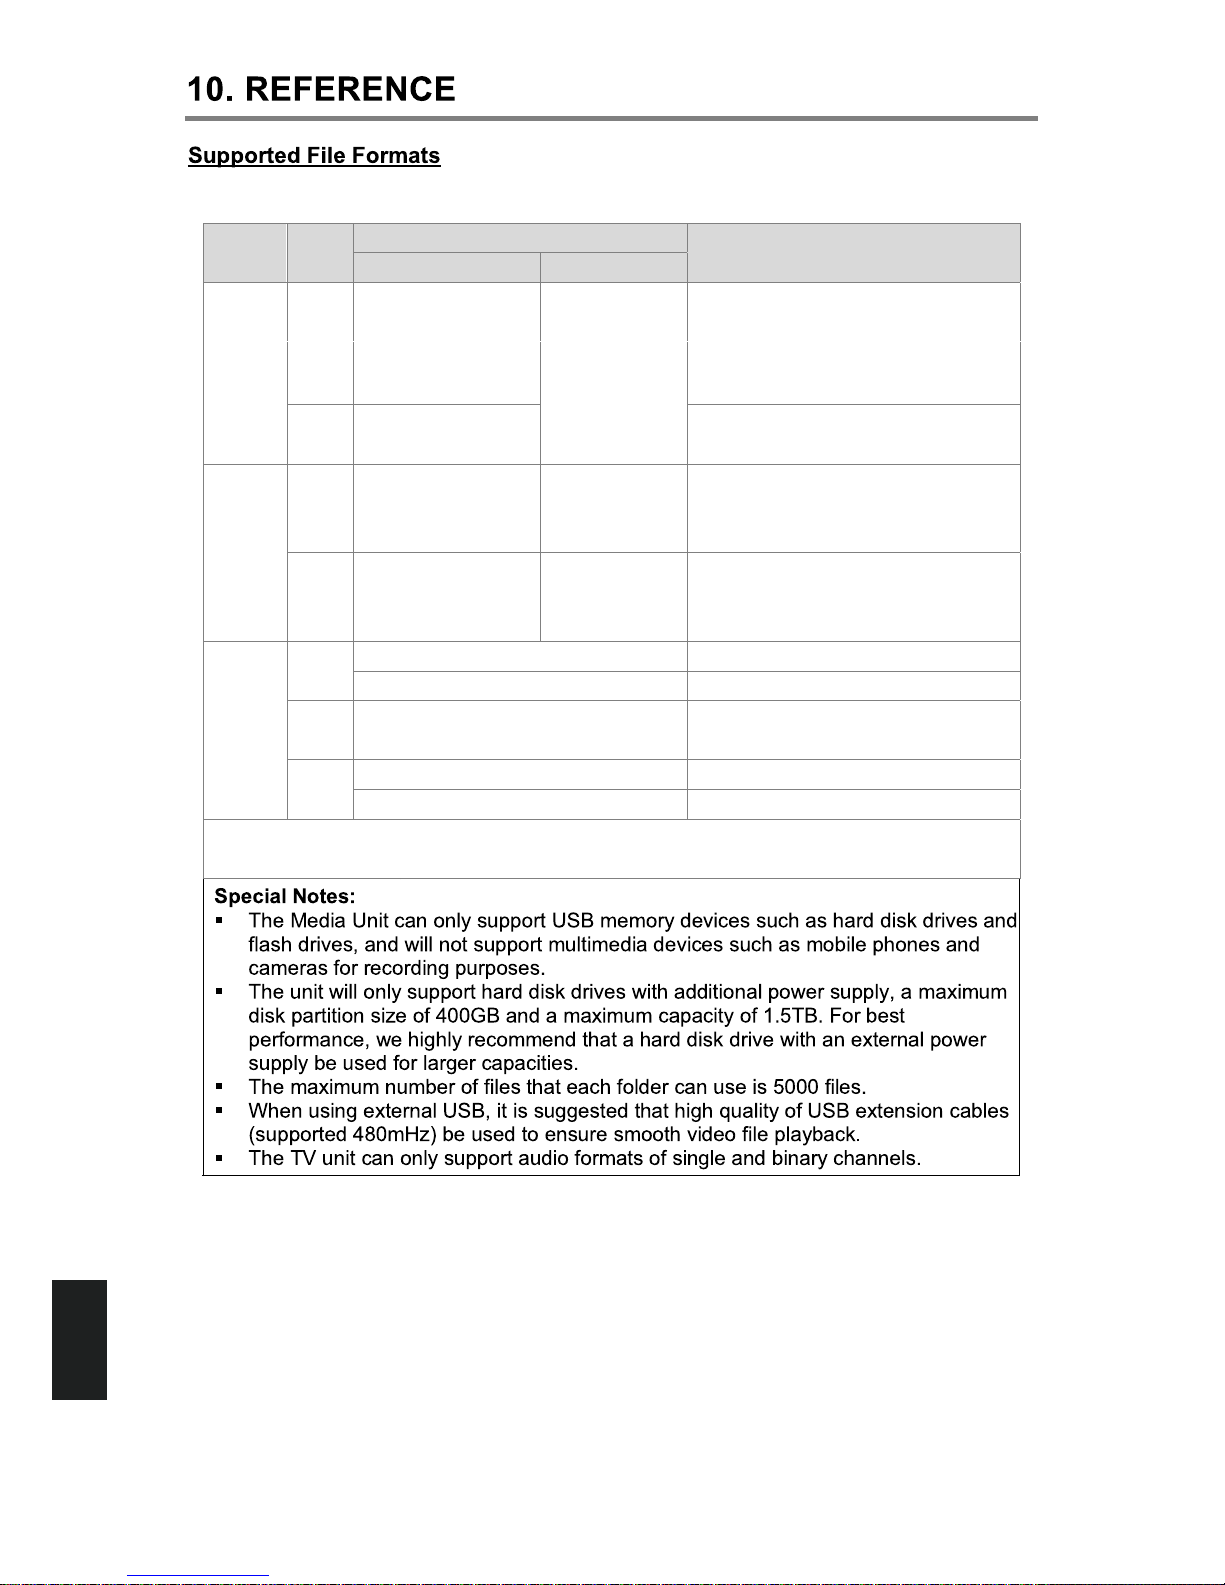
<CT0612>
Media
File
Ext.
Codec
Remark
Video Audio
Movie
.mpg MPEG-1, MPEG-2
MPEG-1, MPEG-2
MP3, AAC, AC3
Max Resolution: 1920×1080
MaxDataRate:40 Mbps
.avi
.ts
.dat
Max Resolution: 720×576
Max Data Rate: 40 Mbps
.vob
Music
.mp3 -- MP3
Sample Rate: 8K~48KHz
Bit Rate: 32K~320Kbps
Channel: Mono/Stereo
.m4a/
.aac
-- AAC
Sample Rate: 16K~48KHz
Bit Rate: 32K~442Kbps
Channel: Mono/Stereo
Photo
.jpg/
.jpeg
Progressive JPEG Max Resolution: 1024×768
Baseline JPEG
BMP
Max Resolution: 8192×8192
Max Resolution: 6500×6500
Pixel Depth: 1/4/8/16/24/32 bpp
.png
.bmp
Non-Interlaced Max Resolution: 3000×3000
Interlaced Max Resolution: 1500×1500
File system: Hi Speed FS, FAT32, FAT16, NTFS(NTFS compressed file is not supported)
Page 37

Never turn the unit off or disconnect a USB Storage Device (Flash Drive) when it is
being accessed. Doing so could damage the TV and the connected USB storage
device.
Do not use a device that has a maximum current consumption of 100 mA or more.
Do not use a device that has security functions or other special functions.
Do not use a device that is divided into two or more partitions.
A USB hub cannot be used to connect USB devices to this unit.
USB storage devices that can be played on this unit
Only USB Storage Device (Flash Memory) maximum 16GB can be used. Do NOT
use a high-capacity USB hard disk with this unit.
Some flash memory players that charge from USB terminals cannot be used for
playback.
Hard disk drives, CD/DVD Drives, and other devices connected via USB cannot be
used.
This unit cannot copy or move files.
Playable formats: FAT12, FAT16, FAT32
Depending on the condition of the USB flash drive, this unit might
not be able to play
the files on it or skipping might occur.
NTFS, HFS and HFS+ formats are not supported and cannot be used.
Max. number of playable folders: 200
Max. number of playable files: 999
If the USB storage device contains more than 999 files or 200 folders, this unit
cannot play it back correctly.
This unit cannot play files that are larger than 2GB.
Files with variable bit rates might not play correctly.
File information display
The display of this unit can only show single-byte letters and numbers.
If the file information contains Japanese, Chinese or other double-byte characters,
playback is possible but the name will not be shown correctly.
10. REFERENCE
10.3 USB Usage Precautions
Reference
Page 38
7($&&86720(56833257+27/,1(7&6
%HWZHHQ0RQGD\WR)ULGD\±$(67$0WR30
 Loading...