

Page 1

9A09987500
ENGLISH FRANÇAIS
OWNER’S MANUAL
MANUEL DU PROPRIÉTAIRE
Compact Hi-Fi Stereo System
Z
DC-D6300
0104.MA-0854A
This appliance has a serial number located on the rear panel. Please record
the model number and serial number and retain them for your records.
Model number Serial number
TEAC CORPORATION
3-7-3, Nakacho, Musashino-shi, Tokyo 180-8550, Japan Phone: (0422) 52-5081
TEAC AMERICA, INC. 7733 Telegraph Road, Montebello, California 90640 Phone: (323) 726-0303
TEAC CANADA LTD. 5939 Wallace Street, Mississauga, Ontario L4Z 1Z8, Canada Phone: (905) 890-8008
TEAC MEXICO, S.A. De C.V Campesinos N°184, Colonia Granjas Esmeralda, Delegacion Iztapalapa, CP 09810, México DF Phone: (525) 581-5500
TEAC UK LIMITED 5 Marlin House, Croxley Business Park, Watford, Hertfordshire, WD18 8TE, U.K. Phone: 01923-819699
TEAC DEUTSCHLAND GmbH Bahnstrasse 12, 65205 Wiesbaden-Erbenheim, Germany Phone: 0611-71580
TEAC FRANCE S.A. 17, Rue Alexis-de-Tocqueville, CE 005 92182 Antony Cedex, France Phone: (1) 42.37.01.02
TEAC ITALIANA S.p.A. Via C. Cantù 11, 20092 Cinisello Balsamo, Milano, Italy Phone: 02-66010500
TEAC AUSTRALIA PTY., LTD. 106 Bay Street, Port Melbourne, Victoria 3207, Australia Phone: (03) 9644-2442
A.B.N. 80 005 408 462
Z
Page 2

59
FRANÇAIS
Spécifications
Section AMPLIFICATEUR
Puissance de sortie . . . . . . . . . . . . . . . . . . . . . . . . 15W+15W
Sensibilité d’entrée . . . . . . . . . . . . . . . . . . . . . . . . . . . 220mV
Réponse de fréquence . . . . . . . . . . . . . . . . . . 50 à 20.000 Hz
Section SYNTONISATEUR (FM)
Gamme de fréquence . . . . . . . . . . . . . . 87,50 à 108,00 MHz
Sensibilité(S/B 30dB) . . . . . . . . . . . . . . . . . . . . . . . . . 20dBµV
Section SYNTONISATEUR (AM)
Gamme de fréquence . . . . . . . . . . . . . . . . . . 530 à 1710 kHz
Sensibilité(S/B 20dB) . . . . . . . . . . . . . . . . . . . . . . . 60dBµV/m
Section LECTEUR DISQUE COMPACTE
Réponse de fréquence. . . . . . . . . . . . . 20 à 20.000 Hz (±1dB)
Rapport signal/bruit . . . . . . . . . . . . . . . . . . . . . . . . . . . . 55dB
Pleurage & scintillement . . . . . . . . . . . . . . . . . Non-mesurable
Section MAGNÉTOPHONE
Système de piste . . . . . . . . . . . . . . . 4 pistes, 2 canaux stéréos
Vitesse de bande . . . . . . . . . . . . . . . . . . . . . . . . . . 4,8cm/sec
Pleurage & scintillement . . . . . . . . . . . . . . . .0,35% ( WRMS )
Réponse de fréquence . . . . . . . . . . . . . . . . . . 100 à 8.000 Hz
Rapport signal bruit . . . . . . . . . . . . . . . . . . . . . . . . . . . . 35dB
Section TOURNE DISQUE
Moteur . . . . . . . . . . . . . . . . . . . . . . . . . . . . moteur servo CC
Engrenage. . . . . . . . . . . . . . . . . . . . . . . . . . . . . . Par courroie
Vitesse . . . . . . . . . . . . . . . . . . . . 33-1/3 rpm, 45 rpm, 78 rpm
Pleurage et scintillement . . . . . . . . . . moins de 2,5% (WRMS)
Rapport signal/bruit . . . . . . . . . . . . . . . . . . . . . . Plus de 50dB
Cartouche . . . . . . . . . . . . . . . . . Cartouche céramique stéréo
Aiguille . . . . . . . . . . . . . . . . . . . . . . . . . . . . . . . . . . . STL-103
Section Système de HAUT-PARLEUR
Type . . . . . . . . . . . . . . . . . . . . . . . . 2 voies reflêt des basses
Impédance . . . . . . . . . . . . . . . . . . . . . . . . . . . . . . . . 6 ohms
< Conception et spécifications sujêtes à des changements sans
pré-avis.
< Poids et dimmensions sont approximatives
< Les illustrations peuvent être légèrement différentes des
modèles produits.
GÉNÉRALITÉ
Alimentation . . . . . . . . . . . . . . . . . . . . . . . . . . . . 120V, 60Hz
Consommation . . . . . . . . . . . . . . . . . . . . . . . . . . . . . . . 65 W
Dimension (L x H x P)
Unité centrale . . . . . . . . . . . . . . . . . . 350 x 366 x 376 mm
Haut-Parleur . . . . . . . . . . . . . . . . . . . 200 x 366 x 190 mm
Poid (net)
Unité centrale . . . . . . . . . . . . . . . . . . . . . . . . . . . . . 8,3 kg
Haut-Parleur. . . . . . . . . . . . . . . . . . . . . . . . . . . . 2,6 kg x 2
Accessoires Standard
Télécommande (RC-954) x 1
Adapteur 45 RPM x 1
Guide de l’utilisateur x 1
Carte de garantie x 1
2
IMPORTANT SAFETY INSTRUCTIONS
1) Read these instructions.
2) Keep these instructions.
3) Heed all warnings.
4) Follow all instructions.
5) Do not use this apparatus near water.
6) Clean only with dry cloth.
7) Do not block any ventilation openings. Install in accordance with
the manufacturer’s instructions.
8) Do not install near any heat sources such as radiators, heat
registers, stoves, or other apparatus (including amplifiers) that
produce heat.
9) Do not defeat the safety purpose of the polarized or groundingtype plug. A polarized plug has two blades with one wider than
the other. A grounding type plug has two blades and a third
grounding prong. The wide blade or the third prong are provided
for your safety. If the provided plug does not fit into your outlet,
consult an electrician for replacement of the obsolete outlet.
10) Protect the power cord from being walked on or pinched
particularly at plugs, convenience receptacles, and the point
where they exit from the apparatus.
11) Only use attachments/accessories specified by the manufacturer.
12) Use only with the cart, stand, tripod,
bracket, or table specified by the
manufacturer, or sold with the apparatus.
When a cart is used, use caution when
moving the cart/apparatus combination
to avoid injury from tip-over.
13) Unplug this apparatus during lightning storms or when unused
for long periods of time.
14) Refer all servicing to qualified service personnel. Servicing is
required when the apparatus has been damaged in any way,
such as power-supply cord or plug is damaged, liquid has been
spilled or objects have fallen into the apparatus, the apparatus
has been exposed to rain or moisture, does not operate normally,
or has been dropped.
< Do not expose this apparatus to dripps or splashes.
< Do not place any objects filled with liquids, such as vases, on the
apparatus.
< Do not install this apparatus in a confined space such as a book
case or similar unit.
< The apparatus draws nominal non-operating power from the AC
outlet with its POWER switch in the off position.
CAUTION: TO REDUCE THE RISK OF ELECTRIC SHOCK,
DO NOT REMOVE COVER (OR BACK). NO USERSERVICEABLE PARTS INSIDE. REFER SERVICING TO
QUALIFIED SERVICE PERSONNEL.
The lightning flash with arrowhead symbol, within an
equilateral triangle, is intended to alert the user to the
presence of uninsulated “dangerous voltage” within the
product’s enclosure that may be of sufficient magnitude
to constitute a risk of electric shock to persons.
The exclamation point within an equilateral triangle is
intended to alert the user to the presence of important
operating and maintenance (servicing) instructions in the
literature accompanying the appliance.
Page 3

ENGLISH
3
Optical pickup:
Type : SLD104u
Manufacturer : SONY Corporation
Laser output : Less than 0.5 mW on the objective lens
Wavelength : 760 - 800 nm
For U.S.A.
①
This product has been designed and manufactured according to
FDA regulations “title 21, CFR, chapter 1, subchapter J, based on
the Radiation Control for Health and Safety Act of 1968“, and is
classified as class 1 laser product. There is not hazardous invisible
laser radiation during operation because invisible laser radiation
emitted inside of this product is completely confined in the
protective housings.
The label required in this regulation is shown
①.
58
Dépannage
En cas d’anomalie de fonctionnement, consultez le tableau qui
suit et tentez de résoudre la question qui se pose à vous avant
de faire appel au revendeur ou au service d’entretien de TEAC.
N’allume pas
e Assurez-vous que l’appareil est branché. Assurez-vous que la
source d’alimentation n’est pas commuté et si c’est le cas
que le commutateur est en marche. Assurez-vous que la
prise de courant est allimentée en branchant un autre
appareil tel qu’une lampe ou ventilateur.
Aucun son des haut-parleurs
e Choisir la source en appuyant sur la touche correspondante
ou la touche FUNCTION.
e Vérifiez les connexions aux haut-parleurs
e Réglez le volume
e Débranchez les écouteurs
e Si le témoin “MUTING´est allumé, appuyez sur la touche
MUTING. (Quand “CD” est choisi, appuyez sur la touche
PLAY pour engendrer la lecture.)
Le son est bruyant
e L’appareil est trop proche d’un téléviseur ou appareil
semblable. Éloignez l’appareil ou les éteindre.
La télécommande ne fonctionne pas
e Appuyez sur la touche POWER pour allumer l’appareil
e Si les piles sont mortes, les changer
e Utilisez la télécommande en dedans de la distance (5m /
15pieds) et pointez la vers le panneau avant.
e Enlevez les obtacles entre la télécommande et l’unité
principale
e Si il y a une lumière puissante près de l’appareil, éteignez là.
Lecteur CD
Ne joue pas
e Chargez un disque avec le coté de lecture vers le bas
e Si le disque est sale, nettoyez la surface du disque
e Un disque vierge est chargé. Chargez un disque pre-
enregistré.
e Cet appareil ne joue pas les disques CD-RW.
e Dépendemment du disque, etc... il est possible que les
disques CD-R ne jouent pas. Essayez un autre disque.
e Vous ne pouvez pas jouer des disques CD-R non-finalisés.
Finalisez le disque dans un graveur CD et essayez de
nouveau.
Son saute
e Installez l’appareil dans un endroit stable pour éviter les
vibrations et les heurts.
e Si le disque est sale, nettoyez la surface du disque.
e Ne pas utiliser des disques égratignés, endommagés ou
bombés.
Syntonisateur
Il n’est pas possible d’écouter aucun poste, ou signal est
trop faible
e Syntonisez le poste correctement.
e Tournez l’appareil ou le fil d’antenne FM pour la meilleure
position de réception.
La transmission est stéréo, mais le son est mono
e Appuyez sur la touche FM MODE.
Platine à cassette
e Le compartiment de bande ne ferme pas.
e Les touches ne fonctionnent pas.
e Insérez une bande sécuritairement
Le son est distortionné ou bruyant
e Nettoyez et démagnétisez les têtes
e Utilisez des bandes standards
Ne peut pas enregistrer
e Si les onglets de sécurité de la bande sont brisés, couvrir
l’orifice avec un ruban adhésif.
e Nettoyez et démagnétisez les têtes.
Platine
Ne joue pas
e Dévissez la visse et enlevez le protecteur de l’aiguille. (Le
protecteur d’aiguille est un couvercle blanc en plastique qui
protège l’aiguille durant le transport. Si il n’est pas enlevé,
l’aiguille ne vient pas en contact avec le sillon du disque et il
n’y a pas de son).
e Si l’aiguille est usé, changez là
e Choisir la bonne vitesse de reproduction
Le son saute
e Installez l’appareil dans un endroit stable pour éviter les
vibrations et les heurts. Assurez-vous que l’appareil est de
niveau, avant arrière et d’un coté à l’autre.
e Nettoyez la surface du disque.
e Ne pas utiliser des disques égratignés, endommagés ou
bombés
Si l’appareil est débranché, les réglages sauvegarder en
mémoire sont perdus (horloge, postes pré-réglés, réglage
de minuterie).
Si vous ne parvenez pas à rétablir un fonctionnement
normal, débrancher le cordon d’alimentation et le
rebrancher.
CAUTION
< DO NOT REMOVE THE EXTERNAL CASES OR CABINETS TO
EXPOSE THE ELECTRONICS. NO USER SERVICEABLE PARTS
ARE WITHIN!
< IF YOU ARE EXPERIENCING PROBLEMS WITH THIS PRODUCT,
CONTACT TEAC FOR A SERVICE REFERRAL. DO NOT USE THE
PRODUCT UNTIL IT HAS BEEN REPAIRED.
< USE OF CONTROLS OR ADJUSTMENTS OR PERFORMANCE OF
PROCEDURES OTHER THAN THOSE SPECIFIED HEREIN MAY
RESULT IN HAZARDOUS RADIATION EXPOSURE.
WARNING : TO PREVENT FIRE OR SHOCK
HAZARD, DO NOT EXPOSE THIS APPLIANCE
TO RAIN OR MOISTURE.
This equipment has been tested and found to comply with the
limits for a Class B digital device, pursuant to Part 15 of the
FCC Rules. These limits are designed to provide reasonable
protection against harmful interference in a residential
installation. This equipment generates, uses, and can radiate
radio frequency energy and, if not installed and used in
accordance with the instructions, may cause harmful
interference to radio communications. However, there is no
guarantee that interference will not occur in a particular
installation. If this equipment does cause harmful interference
to radio or television reception, which can be determined by
turning the equipment off and on, the user is encouraged to
try to correct the interference by one or more of the following
measures:
• Reorient or relocate the equipment and/or the receiving
antenna.
• Increase the separation between the equipment and
receiver.
• Connect the equipment into an outlet on a circuit different
from that to which the receiver is connected.
• Consult the dealer or an experienced radio/TV technician
for help.
CAUTION
Changes or modifications to this equipments not expressly
approved by TEAC CORPORATION for compliance will void the
user’s warranty.
For U.S.A.
Page 4

57
FRANÇAIS
Enregistrement minuté
Réglez l’heure de départ et d’arrêt (voir page 55)
Chargez une bande enregistrable dans TAPE
@.
2
1
Choisir une source d’enregistrement en appuyant sur la
touche correspondante.
3
< Ne pas choisir “TAPE”
< Quand vous choisissez “TUNER”, syntonisez un poste
Appuyez sur la touche TIMER
4
Le témoin “TIMER” est affiché.
Appuyez sur la touche POWER pour allumer l’appareil
5
Appuyez sur la touche RECORD de TAPE @.
6
Afficheur
Chaque fois que la touche DISPLAY est appuyée, l’afficheur
change comme suit:
Durant la lecture d’un CD:
Quand l’appareil est allumé:
“clock”, “timer on” ou “timer off” est affiché pour 5
secondes et ensuite retourne à “source”.
Quand l’appareil est éteint:
“timer on” ou “timer off” est affiché pour 5 secondes et
ensuite retourne à “clock”
temps écoulé de
la piste courante
temps qui reste
sur le disque
horloge
minuterie
désengendrée
minuterie
en marche
(source) horloge
minuterie
désengendrée
minuterie
en marche
5
4
6
3
2
TIMER
ON OFF
STEREO
CLASSIC
ROCK
POPS
FLAT
PLAY
MHz
kHz
2
1
3
4
Contents
Thank you for choosing TEAC. Read this manual carefully
to get the best performance from this unit.
Before Use
Read this before operation
< As the unit may become warm during operation, always leave
sufficient space around the unit for ventilation.
< The voltage supplied to the unit should match the voltage as
printed on the rear panel. If you are in any doubt regarding
this matter, consult an electrician.
< Choose the installation location of your unit carefully. Avoid
placing it in direct sunlight or close to a source of heat. Also
avoid locations subject to vibrations and excessive dust, heat,
cold or moisture.
< Do not place the unit on an amplifier/receiver or any other
electronic device that generates heat.
< Do not open the sealed cabinet as this might result in damage
to the circuitry or electrical shock. If a foreign object should
get into the set, contact your dealer or service agency.
< When removing the power plug from the wall outlet, always
pull directly on the plug, never yank the cord.
< To keep the laser pickup clean, do not touch it, and always
close the disc tray.
< Do not attempt to clean the unit with chemical solvents as
this might damage the finish. Use a clean, dry cloth.
< Keep this manual in a safe place for future reference.
DO NOT MOVE THE UNIT DURING PLAYBACK
During playback, the disc rotates at high speed. Do NOT lift or
move the unit during playback. Doing so may damage the
disc or the record.
WHEN MOVING THIS UNIT
When changing places of installation or packing the unit for
moving, be sure to remove the disc and the record. Moving
this unit with the disc or the record loaded may result in
damage to this unit. If the unit is to be packed and moved a
large distance, it is also advisable to tighten the turntable
transport locking screw. See page 12 for instructions.
Beware of condensation
When the unit (or a disc) is moved from a cold to a warm
place, or used after a sudden temperature change, there is a
danger of condensation; vapor in the air could condense on
the internal mechanism, making correct operation erratic or
impossible. To prevent this, or if this occurs, leave the unit for
one or two hours with the power turned on. The unit will
stabilize at the temperature of its surroundings.
Maintenance
Always keep the turntable clean.
If the surface of the unit gets dirty, wipe with a soft cloth or
use diluted mild liquid soap. Be sure to remove any excess
completely. Do not use thinner, benzine or alcohol as they
may damage the surface of the unit. Allow the surface of the
unit to dry completely before using
CAUTION
Do not expose this unit to liquids of any kind. Keep any
objects containing liquids such as vases, water glasses, potted
plants, et cetera off the top of this unit.
Do not install this equipment in a confined space such as a
book-case or similar unit.
Important Safety Instructions . . . . . . . . . . . . . . . . . . . . . . . . . . 2
Contents . . . . . . . . . . . . . . . . . . . . . . . . . . . . . . . . . . . . . . . . . 4
Before Use . . . . . . . . . . . . . . . . . . . . . . . . . . . . . . . . . . . . . . . . 4
Discs. . . . . . . . . . . . . . . . . . . . . . . . . . . . . . . . . . . . . . . . . . . . . 5
Cassette Tape . . . . . . . . . . . . . . . . . . . . . . . . . . . . . . . . . . . . . . 6
Handling Records . . . . . . . . . . . . . . . . . . . . . . . . . . . . . . . . . . . 7
How to Replace the Stylus. . . . . . . . . . . . . . . . . . . . . . . . . . . . . 7
Connection. . . . . . . . . . . . . . . . . . . . . . . . . . . . . . . . . . . . . . . . 8
Remote Control Unit. . . . . . . . . . . . . . . . . . . . . . . . . . . . . . . . . 9
Names of Each Control (Front Panel/Remote Control Unit) . . . 10
Names of Each Control (Turntable) . . . . . . . . . . . . . . . . . . . . . 12
Basic Operation. . . . . . . . . . . . . . . . . . . . . . . . . . . . . . . . . . . . 13
Listening to a Record . . . . . . . . . . . . . . . . . . . . . . . . . . . . . . . 14
Listening to CDs . . . . . . . . . . . . . . . . . . . . . . . . . . . . . . . . . . . 16
Programmed Playback. . . . . . . . . . . . . . . . . . . . . . . . . . . . . . . 18
Intro Check. . . . . . . . . . . . . . . . . . . . . . . . . . . . . . . . . . . . . . . 19
Shuffle Playback . . . . . . . . . . . . . . . . . . . . . . . . . . . . . . . . . . . 20
Repeat Playback . . . . . . . . . . . . . . . . . . . . . . . . . . . . . . . . . . . 20
Listening to the Radio . . . . . . . . . . . . . . . . . . . . . . . . . . . . . . . 21
Preset Tuning . . . . . . . . . . . . . . . . . . . . . . . . . . . . . . . . . . . . . 22
Listening to Tapes. . . . . . . . . . . . . . . . . . . . . . . . . . . . . . . . . . 23
Extended Playback . . . . . . . . . . . . . . . . . . . . . . . . . . . . . . . . . 24
Recording . . . . . . . . . . . . . . . . . . . . . . . . . . . . . . . . . . . . . . . 24
Dubbing (Copy from TAPE
! to TAPE @). . . . . . . . . . . . . . . . . . 25
Setting the Clock . . . . . . . . . . . . . . . . . . . . . . . . . . . . . . . . . . 26
Setting the Timer . . . . . . . . . . . . . . . . . . . . . . . . . . . . . . . . . . 27
Timer Playback . . . . . . . . . . . . . . . . . . . . . . . . . . . . . . . . . . . . 28
Timer Recording . . . . . . . . . . . . . . . . . . . . . . . . . . . . . . . . . . . 29
Display . . . . . . . . . . . . . . . . . . . . . . . . . . . . . . . . . . . . . . . . . . 29
Troubleshooting . . . . . . . . . . . . . . . . . . . . . . . . . . . . . . . . . . . 30
Specifications . . . . . . . . . . . . . . . . . . . . . . . . . . . . . . . . . . . . . 31
Page 5

5
ENGLISH
Discs
< Never use such chemicals as record sprays, antistatic sprays or
fluid, benzine or thinner to clean the discs. Such chemicals
will do irreparable damage to the disc’s plastic surface.
< Discs should be returned to their cases after use to avoid dust
and scratches that could cause the laser pickup to “skip.”
< Do not expose discs to direct sunlight or high humidity and
temperature for extended periods. Long exposure to high
temperatures will warp the disc.
< CD-R discs are more sensitive to the effects of heat and
ultraviolet rays than ordinary CDs. It is important that they are
not stored in a location where direct sunlight will fall on
them, and which is away from sources of heat such as
radiators or heat-generating electrical devices.
< Printable CD-R discs aren’t recommended, as the label side
might be sticky and damage the unit.
< Do not stick papers or protective sheets on the discs and do
not use any protective coating spray.
< Use a soft oil-based felt-tipped pen to write the information
on the label side. Never use a ball-point or hard-tipped pen,
as this may cause damage to the recorded side.
< Never use a stabilizer. Using commercially available CD
stabilizers with this unit will damage the mechanisms and
cause them to malfunction.
< Do not use irregular shape CDs (octagonal, heart-shape, etc.).
CDs of this sort can damage the unit.
Discs which can be played on this unit:
• Conventional audio CDs bearing the CD-DA logo on the
label:
?
• Properly finalized CD-R discs
Note:
< Depending on the quality of the disc and/or the condition of
the recording, some CD-R discs may not be playable.
< CD-RW discs cannot be played on this unit.
< Copy-protected discs and other discs which do not conform
to the CD standard may not play back correctly in this player.
If you use such discs in this unit, TEAC Corporation and its
subsidiaries cannot be responsible for any consequences or
guarantee the quality of reproduction. If you experience
problems with such non-standard discs, you should contact
the producers of the disc.
< Always place the disc on the disc tray with the label side
uppermost. (Compact discs can be played or recorded only on
one side.)
< To remove a disc from its storage case, press down on the
center of the case and lift the disc out, holding it carefully by
the edges.
How to remove the disc How to hold the disc
< Should the disc become dirty, wipe the surface radially with a
soft, dry cloth.
< If you are in any doubt as to the care and handling of a CD-R
disc, read the precautions supplied with the disc, or contact
the disc manufacturer directly.
56
Réglage de la minuterie 2
Appuyez sur la touche UP (ou DOWN) pour régler les
minutes d’arrêt et appuyez sur la touche CLOCK ADJ.
8
Appuyez sur la touche DISPLAY (ou ne rien toucher
pour 5 secondes)
Maintenant le réglage de la minuterie est entreposé dans la
mémoire.
9
Lecture minutée
Réglez l’heure de départ de d’arrêt (voir page 55).
Choisir une source en appuyant sur la touche
correspondante.
2
1
< Préparez la source. Quand vous choissisez “TUNER”
syntonisez un poste.
Appuyez sur la touche TIMER.
3
“TIMER” est affiché
Appuyez sur la touche POWER pour éteindre l’appareil
(standby)
4
Si ”TAPE” est choisi, appuyez sur la touche PLAY de TAPE !
ou @.
L’appareil s’allumera et s’éteindra aux heures spécifiés.
< La minuterie ne fonctionne pas si l’appareil est allumé
manuellement
< Si vous n’utilisez pas la minuterie, appuyez sur la touche
minuterie pour la désengendrer.
REMAINCH REPEAT SHUFFLE
TIMER
AUX
CDTAPE TUNER
ON OFF
STEREO
CLASSIC
ROCK
POPS
FLAT
PLAY
TRACK
MHz
kHz
INTRO
MEMORY
2
1
3
“minutes” clignote
REMAINCH REPEAT SHUFFLE
TIMER
AUX
CDTAPE TUNER
ON OFF
STEREO
CLASSIC
ROCK
POPS
FLAT
PLAY
TRACK
MHz
kHz
INTRO
MEMORY
2
1
3
Appuyez sur la touche UP (ou DOWN) pour régler
l’heure d’arrêt et appuyez sur la touche CLOCK ADJ.
7
4
3
2
TIMER
ON OFF
STEREO
CLASSIC
ROCK
POPS
FLAT
PLAY
MHz
kHz
2
1
3
Page 6

55
FRANÇAIS
Réglage de la minuterie 1
Réglez l’horloge avant de régler la minuterie
Appuyez sur la touche DISPLAY répététivement jusqu’à
temps que le témoin “TIMER ON” est affiché
1
En dedans de 5 secondes, appuyez sur la touche CLOCK
ADJ.
2
“heure” clignote.
< Si aucune touche est appuyée pour 10 secondes, le réglage
de la minuterie est annulé.
“minute” clignote.
Appuyez sur la touche UP (ou DOWN) pour régler les
minutes de départ et appuyez sur la touche CLOCK ADJ.
4
Appuyez sur la touche DISPLAY.
“TIMER OFF” est affiché
5
En dedans de 5 secondes, appuyez sur la touche CLOCK
ADJ.
6
“heure” clignote
REMAINCH REPEAT SHUFFLE
TIMER
AUX
CDTAPE TUNER
ON OFF
STEREO
CLASSIC
ROCK
POPS
FLAT
PLAY
TRACK
MHz
kHz
INTRO
MEMORY
2
1
3
REMAINCH REPEAT SHUFFLE
TIMER
AUX
CDTAPE TUNER
ON OFF
STEREO
CLASSIC
ROCK
POPS
FLAT
PLAY
TRACK
MHz
kHz
INTRO
MEMORY
2
1
3
REMAINCH REPEAT SHUFFLE
TIMER
AUX
CDTAPE TUNER
ON OFF
STEREO
CLASSIC
ROCK
POPS
FLAT
PLAY
TRACK
MHz
kHz
INTRO
MEMORY
2
1
3
REMAINCH REPEAT SHUFFLE
TIMER
AUX
CDTAPE TUNER
ON OFF
STEREO
CLASSIC
ROCK
POPS
FLAT
PLAY
TRACK
MHz
kHz
INTRO
MEMORY
2
1
3
REMAINCH REPEAT SHUFFLE
TIMER
AUX
CDTAPE TUNER
ON OFF
STEREO
CLASSIC
ROCK
POPS
FLAT
PLAY
TRACK
MHz
kHz
INTRO
MEMORY
2
1
3
Appuyez sur la touche UP (ou DOWN) pour régler
l’heure de départ et appuyez sur la touche CLOCK ADJ.
3
CLOCK ADJ
DISPLAY
UP/DOWN
6
Cassette Tape
Tape Handling
Use your finger or a pencil to turn the cassette’s hub and take
up any slack tape.
< Avoid touching the tape. Fingerprints attract dust and dirt.
Do not store tapes in the following places:
< On top of heaters, exposed to direct sunlight or in any other
places with high temperatures.
< Near speakers, on TV sets or amplifiers or where they would
be exposed to strong magnetic fields.
< Where humidity is high and in dirty, dusty places.
< Avoid dropping or subjecting cassettes to excessive shocks.
< As C-120 tapes are physically weak and could become
entangled in the transport mechanism, do not use them.
Tape Selection
Metal and chrome (cobalt) tapes have identification holes.
< This unit can play normal (Type
!
) tape only.
(TAPE @only)
Demagnetizing Heads
Be sure that the power is off, then demagnetize the heads
using a demagnetizer. For details of its use, read its
instructions.
Maintenance
The heads and tape path should be cleaned and
demagnetized periodically.
Cleaning Tape Path
< Apply head cleaning fluid to a cotton swab or soft cloth, and
lightly rub the heads , capstan and all metal parts in the
tape path.
< Also clean the pinch roller using rubber cleaning fluid.
C
BA
Normal (Type!)
CrO2(Type
@
)
Metal (Type!%)
c
b
a
A
A
B
C
a
b
c
Page 7

7
ENGLISH
Handling Records
< Keep your records away from dust. Keep them in a cool, dry
place.
< To avoid dust and scratches, keep records in their sleeves and
jackets when not in use.
< Store records upright on their edges. Records stored
horizontally will eventually bend and warp.
< Do not expose records to direct sunlight or high humidity and
temperature. Long exposure to high temperatures will warp
the record.
< Do not store your records in the trunk of your car. The
temperatures in a closed trunk can ruin your collection.
< Store records in an area with stable temperature and
humidity.
< Should the record become dirty, gently wipe the surface in a
circular motion, using a soft anti-static cloth.
Many commercial record cleaning systems are available from
many retailers or on-line. TEAC does not endorse any specific
product but, depending on the condition of your record
collection, it may be advisable to look into one of these
systems. Clean records protect your stylus from undue wear.
< Do not touch grooves. Handle records by the edges or the
label only, with clean hands. Skin oils from even clean hands
can leave a residue on the record surface that will gradually
deteriorate the quality of your record.
label
grooves
edge
How to Replace the Stylus
Stylus should last about 50 hours under normal use. However, it
is recommended to replace the stylus as soon as you notice a
change in sound quality.
Prolonged use of a worn-out stylus may damage the record.
Wear and tear will accelerate when playing 78 RPM records. The
higher speed of 78 RPM records wears the stylus more quickly.
Caution:
< Do not remove or bend stylus.
< To avoid injury, do not touch the needle.
< Turn off the power of the unit before you replace the stylus.
< Keep out of reach of children.
< Handle with care, as the stylus is delicate. Use of a bent or
broken stylus may damage the record and cause malfunction.
< Do not expose stylus to extreme heat.
< Contact a qualified repair company if you experience difficulty
in changing the stylus.
Removing old stylus
1. Set a screwdriver at the tip of stylus and push down to the
direction “A”.
2. Pull out to the direction “B”.
A
B
爪部(内側)
Guide Pins (inside)
Installing new stylus
1. Hold the tip of stylus and insert the other edge to the
direction “C”.
2. Push up to the direction “D” until it locks at the tip.
The replacement stylus for this DC-D6300 is a STL-103. Please
contact TEAC Parts at (323) 726-0303, extension 840 to order.
Or call our automated Service Agency Locator at: (800) 447TEAC for the closest authorized repair company that can
replace the stylus for you.
54
Réglage de l’horloge
< Si l’appareil est allumé, appuyez sur la touche POWER pour
l’éteindre, ou appuyez sur la touche DISPLAY une ou deux
fois pour afficher l’horloge (“:” clignote)
Appuyez sur la touche CLOCK ADJ.
“heure” clignote
1
Appuyez sur la touche UP (ou DOWN) pour régler
l’heure.
2
Appuyez sur la touche CLOCK ADJ.
“minute” clignote
3
Appuyez sur la touche UP (ou DOWN) pour régler les
minutes
4
Appuyez sur la touche CLOCK ADJ.
L’horloge se mait en marche.
5
CLOCK ADJ
UP/DOWN
Page 8

53
FRANÇAIS
Copiage (Copiage de TAPE I à TAPE II)
Chargez une bande pré-enregistrée dans TAPE ! et une
bande enregistrable dans TAPE
@.
< Vous pouvez utiliser des bandes standards (Type
!) seulement.
1
Appuyez sur la touche TAPE ou FUNCTION pour choisir
“TAPE”
2
Choisir la vitesse de copiage en appuyant sur la touche
DUBBING SPEED.
3
HIGH:
La copie se fait à haute vitesse
(Il est possible qu’il existe une détérioration de la fidelité
durant le copiage à haute vitesse. Faite une copie d’essaie
pour vérifier la qualité sonore.)
NORMAL:
La copie se fait à une vitesse normale
Appuyez sur la touche PAUSE et RECORD de TAPE
@
.
4
Appuyez sur la touche PLAY de TAPE !.
5
Le copiage commence.
< Ne pas choisir une autre source durant le copiage, sinon le
copiage sera interrompu.
< Pour arrêter le copiage, appuyez les touches STOP de TAPE
!
et TAPE @.
23
15
TAPE
!
TAPE
@
1 44
8
Connection
LINE OUT
RL
DVD, CD-R, etc.
A
BC
E
D
Page 9

9
ENGLISH
FM antenna
While in FM mode, tune in an FM station and extend the
lead to find the best position for reception. This antenna
may need to be repositioned if you move your unit to a new
location.
SPEAKERS
Connect the left speaker’s plug to L, and the right speaker’s
plug to R.
< When using speakers other than those supplied with the
system, the impedance should be 6 ohms or more.
< Do not connect anything other than speakers to these
terminals.
AUX
You can connect a DVD player, VCR etc. to this unit.
Connect the component with RCA pin cords. Make sure to
connect the white plug to the white jacks (Left) and the red
plug to the red jacks (Right).
AC Power Cord
Plug this AC power cord into an AC wall socket.
RESET
In the following cases, function buttons may not work
properly.
• When the system is damaged by some electrical shock.
• When the power is irregular or has electrical noises.
In these cases, press the RESET switch once or twice with a
pencil or a ball-point pen lightly.
E
D
C
B
A
CAUTION
Turn off the power of all the equipment before making
connections.
Read instructions of each component you intend to use with
this unit.
< Be sure to insert each plug securely. To prevent hum and
noise, do not bundle the connection cords with the power
cord.
Remote Control Unit
Remove the battery compartment cover.
Insert two “AAA” (R03, UM-4) dry batteries. Make sure that
the batteries are inserted with their positive “+” and negative
“_” poles positioned correctly.
Close the cover.
Battery Replacement
If the distance required between the remote control unit and
main unit decreases, the batteries are exhausted. In this case
replace the batteries with new ones.
Precautions concerning batteries
< Be sure to insert the batteries with correct positive “+” and
negative “_” polarities.
< Use batteries of the same type. Never use different types of
batteries together.
< Rechargeable and non-rechargeable batteries can be used.
Refer to the precautions on their labels.
< When the remote control unit is not to be used for a long
time (more than a month), remove the batteries from the
remote control unit to prevent them from leaking. If they leak,
wipe away the liquid inside the battery compartment and
replace the batteries with new ones.
< Do not heat or disassemble batteries and never dispose of old
batteries by throwing them in a fire.
3
2
1
The provided Remote Control Unit allows the unit to be operated
from a distance.
When operating the remote control unit, point it towards the
REMOTE SENSOR on the front panel of the unit.
< Even if the remote control unit is operated within the effective
range, remote control operation may be impossible if there
are any obstacles between the unit and the remote control.
< If the remote control unit is operated near other products
which generate infrared rays, or if other remote control
devices using infrared rays are used near the unit, it may
operate incorrectly. Conversely, the other products may
operate incorrectly.
Battery Installation
123
52
Lecture continu
Appuyez sur la touche TAPE ou la touche FUNCTION
pour choisir “TAPE”
1
Chargez une bande dans TAPE ! et TAPE @.
2
Appuyez sur la touche PLAY de TAPE !.
3
Appuyez sur la touche PAUSE et PLAY de TAPE @.
4
Quand TAPE !s’arrête, la lecture de TAPE @commence
automatiquement.
Quand TAPE
@
s’arrête, la lecture continue se termine.
Enregistrement (TAPE II seulement)
Chargez une bande enregistrable dans TAPE @.
1
< Vous pouvez utiliser des bandes standard seulement (Type !).
< Si les onglets de sécurité de la bande sont brisés, couvrir
l’orifice avec du ruban adhésif.
Choisir la source d’enregistrement en appuyant sur la
touche correspondante.
2
< Ne pas choisir TAPE
< Préparez la source d’enregistrement. Quand vous choissisez
“TUNER”, syntonisez un poste.
Appuyez sur la touche RECORD pour engendrer
l’enregistrement.
3
< Quand vous choisissez “CD”, la lecture du CD commence
automatiquement.
< Pour un arrêt momentané de la lecture, appuyez sur la touche
PAUSE. Pour rejouer la bande appuyez sur la touche PAUSE
de nouveau.
< Pour arrêter l’enregistrement, appuyez sur la touche STOP.
Enregistrement synchronisé d’un CD
1. Chargez une bande enregistrable dans TAPE
@
2. Appuyez sur la touche CD ou la touche FUNCTION pour
choisir “CD”
3. Choisir un disque à enregister en appuyant sur la touche
correspondante (DISC 1, 2 ou 3) ou la touche DISC SKIP.
< Vous pouvez programmer les pistes à enregister.
4. Appuyez sur la touche RECORD pour engendrer
l’enregistrement.
La lecture du CD débute automatiquement.
< Pour arrêter l’enregistrement, appuyez sur la touche STOP.
Quand la touche RECORD est
appuyée, la touche PLAY est aussi
appuyée automatiquement.
23
TAPE
!
24 4
TAPE
@
1
3 1
PAUSE
STOP/EJECT
2
Page 10
51
FRANÇAIS
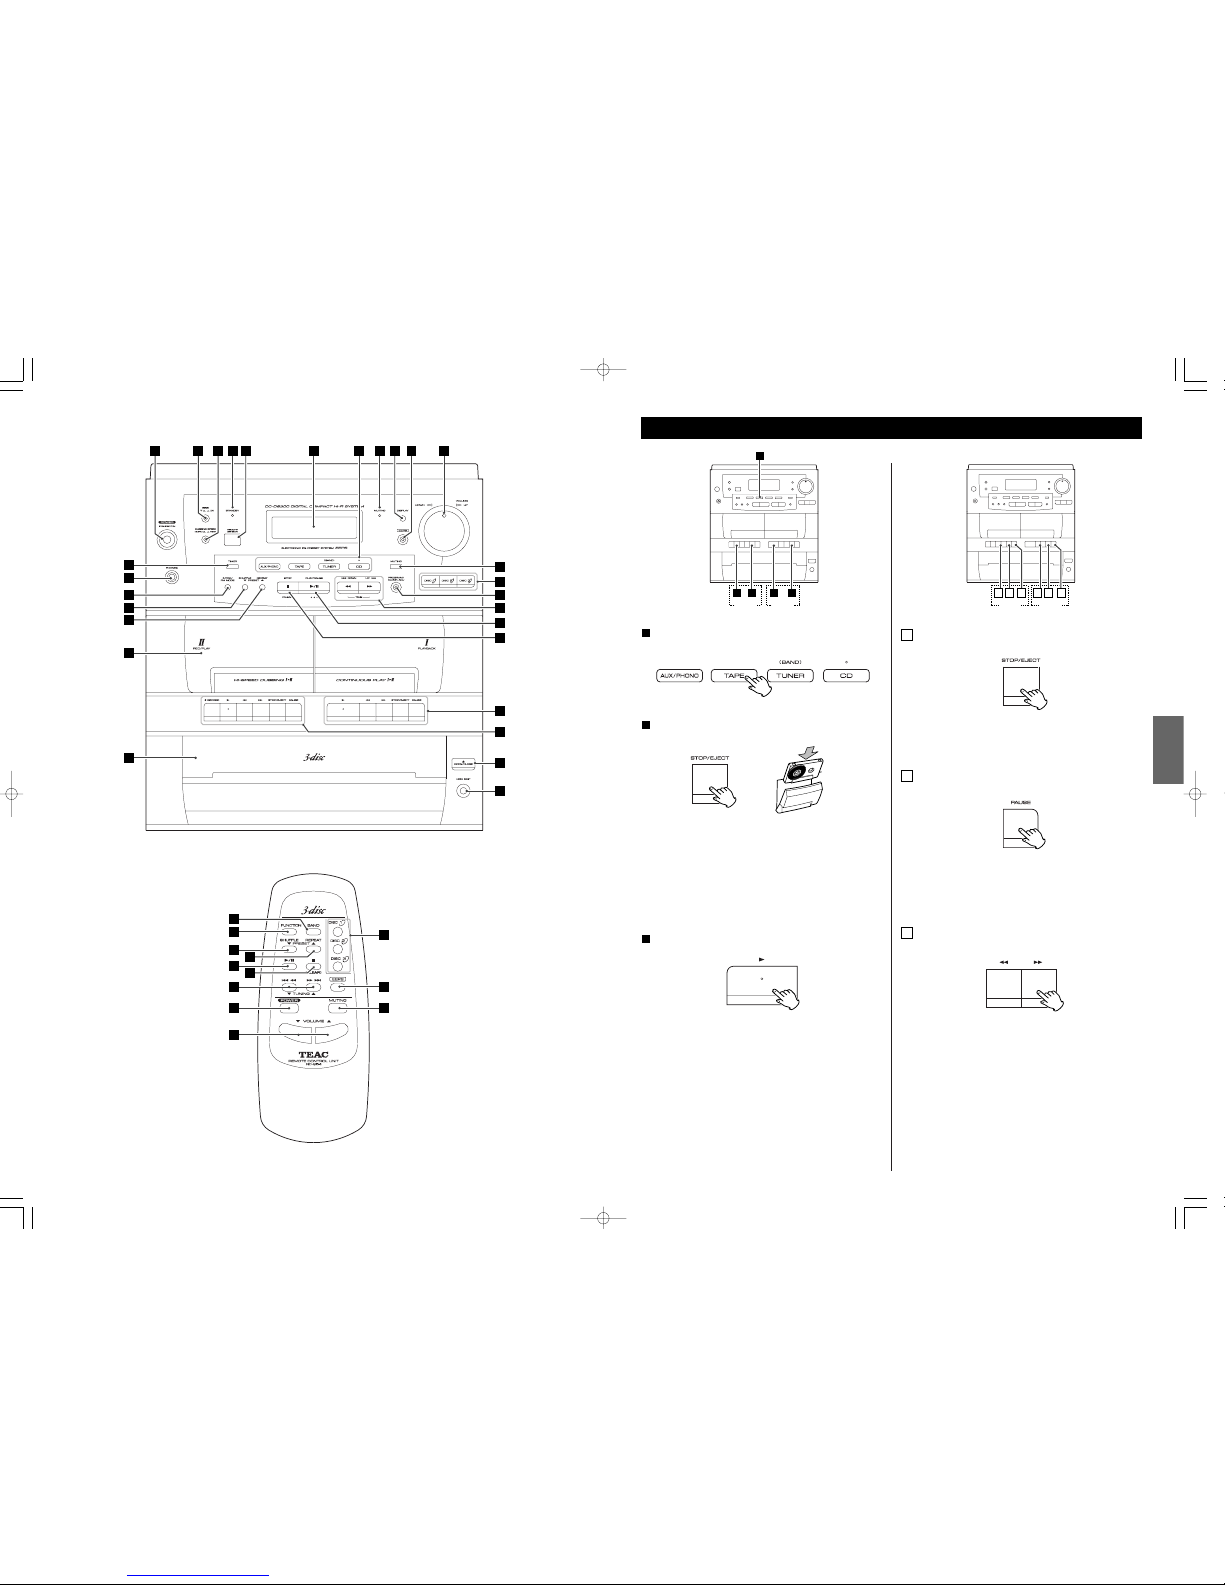
Écoute de bandes
Appuyez sur la touche TAPE ou la touche FUNCTION
pour choisir “TAPE”
1
Chargez une bande pré-enregistrée
2
Appuyez sur la touche STOP/EJECT pour ouvrir le
compartiment de la bande, chargez la bande avec son coté
exposé vers le bas et fermer le compartiment.
< Cet appareil joue des bandes standard (Type
!
) seulement.
< Vous pouvez utiliser TAPE
!
ou TAPE @pour la lecture.
Appuyez sur la touche PLAY pour engendrer la lecture.
3
Pour arrêter la lecture
A
Appuyez sur la touche STOP/EJECT pour arrêter la lecture.
Pour suspendre la lecture momentanément
(mode pause)
B
Appuyez sur la touche PAUSE. La lecture s’arrête à l’endroit
choisi. Pour continuer la lecture, appuyez sur la touche
PAUSE de nouveau.
Avance rapide et rembobinage
C
Appuyez sur la touche m ou ,
Appuyez sur la touche STOP pour arrêter l’avance rapide ou
le rembobinage
< Quand la bande arrive à la fin, assurez-vous d’appuyez sur la
touche STOP pour arrêter l’appareil.
1
23
TAPE
!
23
TAPE
@
AC
TAPE
!
BAC
TAPE
@
B
10
A B IC D H K
L
T
U
R
M
F GE J
N
O
S
V
G
c
Y
P
O
A
K
X
M
J
L
a
Z
Y
X
b
W
P
Q
Q
Page 11
11
ENGLISH
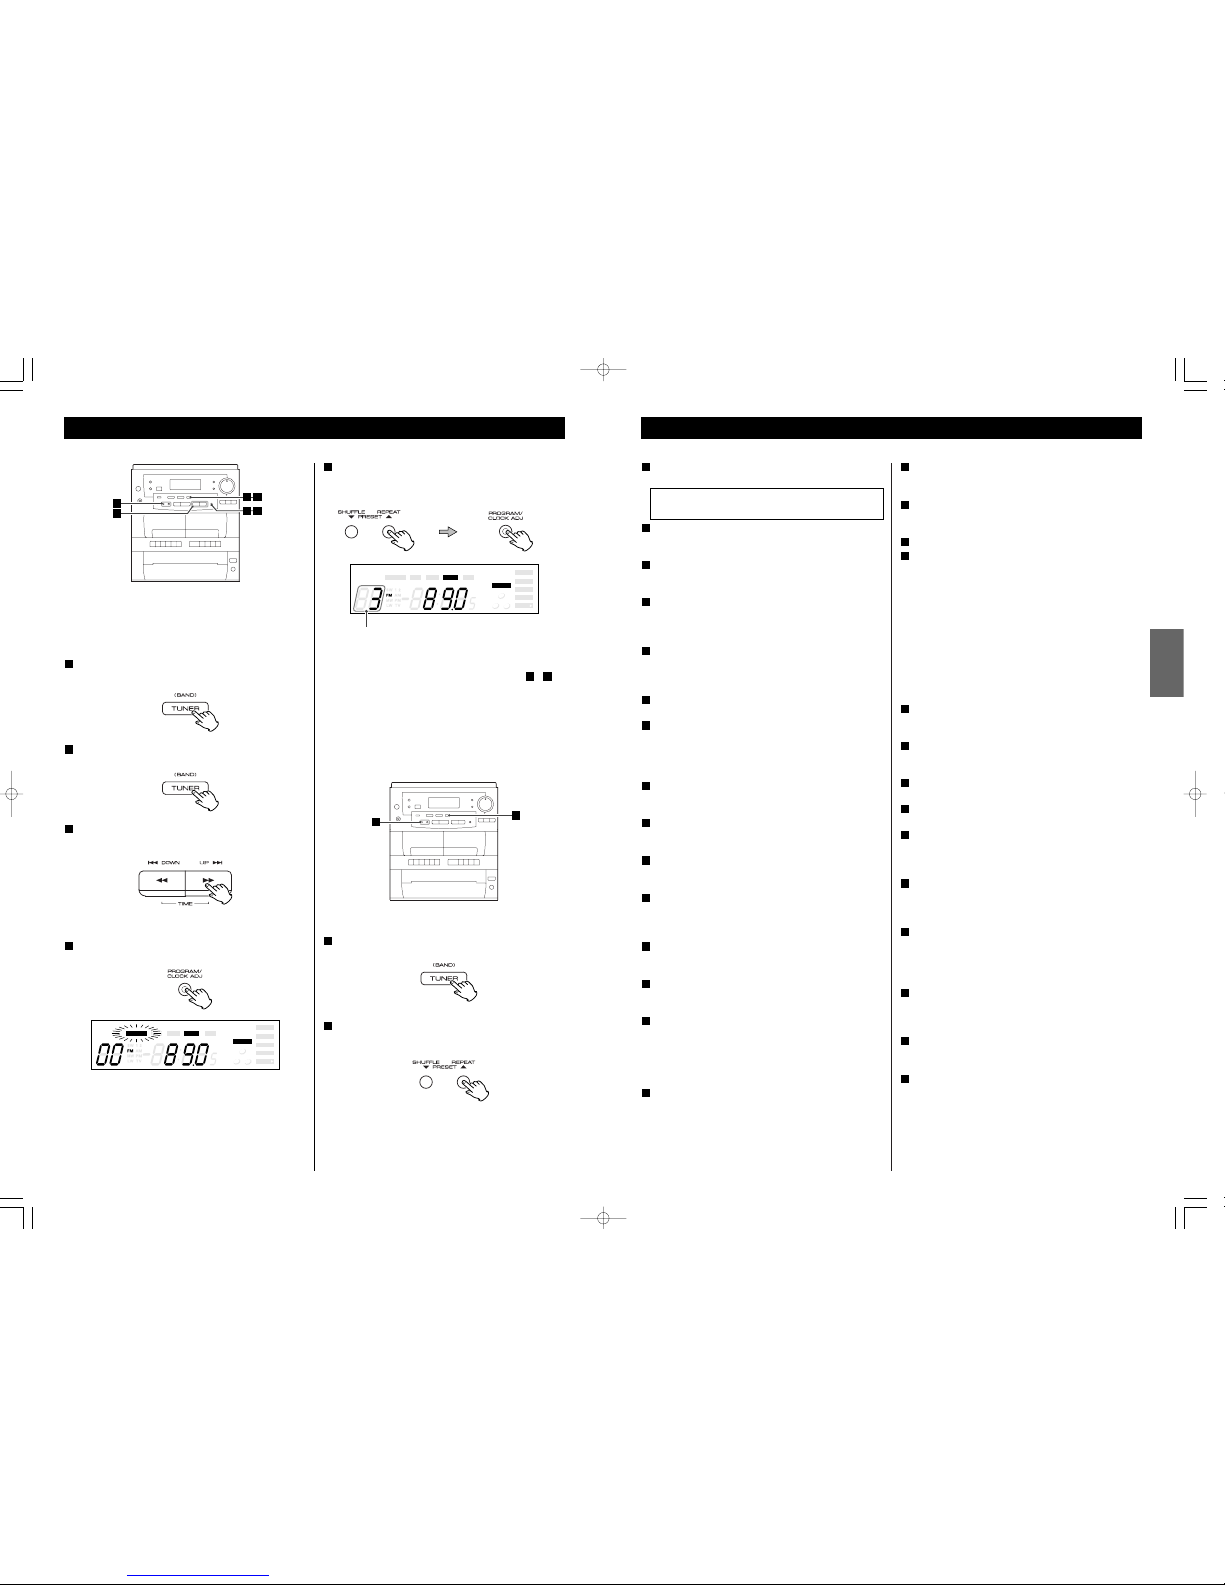
Names of Each Control (Front Panel/Remote Control Unit)
POWER
Press this switch to turn the unit on or off (standby).
BBS
Use this button to boost bass.
DUBBING SPEED
Use this button to select the dubbing speed.
STANDBY indicator
This indicator lights when the unit is in the standby mode.
When the unit is turned on, the light goes off.
REMOTE SENSOR
When operating the remote control unit, point it towards the
REMOTE SENSOR.
Display
FUNCTION (AUX/PHONO, TAPE, TUNER, CD)
Use these buttons to select a source.
In TUNER mode, press the TUNER (BAND) button to select FM
or AM.
MUTING indicator
illuminates during mute.
DISPLAY
Use this button to change the display.
EEPS
Use this button to select a preset equalizer.
VOLUME
Turn this knob (or press the VOLUME buttons of the remote
control unit) to adjust the volume.
MUTING
Use this button to mute the sound.
DISC 1, 2, 3
Use these buttons to select a disc.
PROGRAM/CLOCK ADJ
In CD mode, use this button to program tracks.
In TUNER mode, use this button to store preset channels into
memory.
This button is also used for clock adjustment.
SKIP/UP/DOWN (.m/,/)
In CD mode, momentarily press this button to skip tracks.
Hold down this button to search for a part of a track.
In TUNER mode, momentarily press this button to tune in
stations.
O
N
M
L
K
J
I
H
G
F
E
D
C
B
A
PLAY
Use this button to start or pause playback of CD.
STOP
Use this button to stop playback of CD.
TAPE
! operation buttons
TAPE
@ operation buttons
PLAY :
Use this button to start playback of the tape.
SEARCH :
Use these buttons to fast-forward or rewind the tape.
STOP/EJECT :
Use this button to stop playback. In the stop mode, use this
button to open the cassette holder.
PAUSE :
Use this button to pause playback.
RECORD :
Use this button to start recording.
OPEN/CLOSE
Use this button to open and close the disc tray.
DISC SKIP
Use this button to rotate the carousel.
Disc tray
Cassette holder
REPEAT/PRESET
In CD mode, use this button for repeat playback.
In TUNER mode, use this button to select preset stations.
SHUFFLE/PRESET
In CD mode, use this button for shuffle playback.
In TUNER mode, use this button to select preset stations.
INTRO/FM MODE
In CD mode, use this button to start intro check.
In FM TUNER mode, use this button to select stereo or
monaural.
PHONES
For private listening, insert the headphones plug into this jack,
and adjust the volume by turning the VOLUME knob.
TIMER
Use this button to set the timer.
BAND
Use this button to select AM or FM.
c
b
a
Z
Y
X
W
V
U
T
S
R
Q
P
Note:
To simplify explanations, instructions refer to names of
buttons and controls on the front panel, making no mention
of the use of remote control unit.
The equipment draws a nominal amount of power from the
AC outlet even with its POWER switch in the OFF position.
50
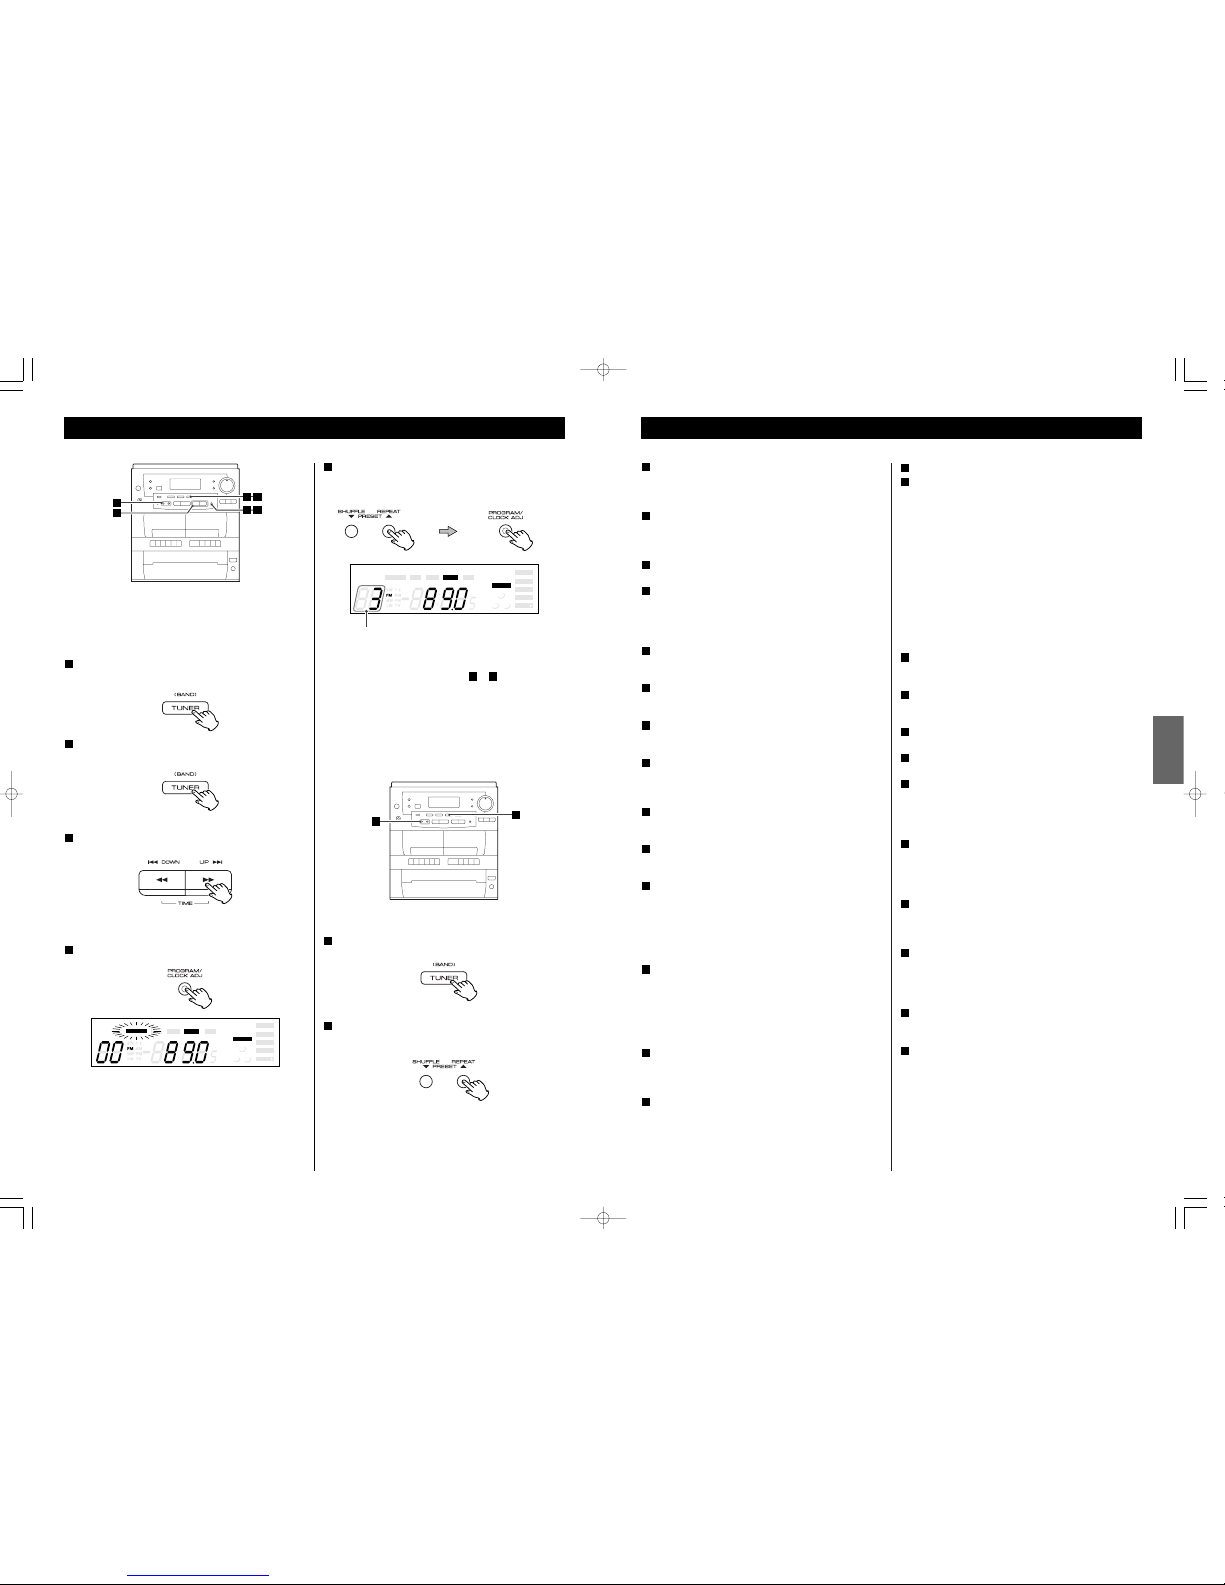
Syntonisation pré-réglée
Vous pouvez entreposer dans les canaux pré-réglés de 1 à 20
postes FM et AM.
Appuyez sur la touche TUNER(BAND) ou la touche
FUNCTION pour choisir “TUNER”
1
Choisir AM ou FM en appuyant sur la touche
TUNER(BAND)
2
Choisir le poste que vous désirez écouter.
3
Appuyez sur la touche PROGRAM
4
Le témoin MEMORY clignote.
En dedans de 5 secondes, choisir un canal pré-réglé
pour sauvegarder le poste utilisant les touches PRESET
et ensuite appuyez sur la touche PROGRAM.
5
Le poste est sauvegardé et le témoin MEMORY s’éteint.
Pour sauvegarder d’autre postes, répétez les étapes à .
52
Choisir AM ou FM en appuyant sur la touche
TUNER(BAND)
1
Appuyez sur la touche PRESET répététivement jusqu’à
temps que le poste désiré est trouvé.
2
Comment choisir des postes pré-réglés
REMAINCH REPEAT SHUFFLE
TIMER
AUX
CDTAPE TUNER
ON OFF
STEREO
CLASSIC
ROCK
POPS
FLAT
PLAY
TRACK
MHz
kHz
INTRO
MEMORY
2
1
3
REMAINCH REPEAT SHUFFLE
TIMER
AUX
CDTAPE TUNER
ON OFF
STEREO
CLASSIC
ROCK
POPS
FLAT
PLAY
TRACK
MHz
kHz
INTRO
MEMORY
2
1
3
canal pré-réglé
21
3
5
54
1
2
Page 12
49
FRANÇAIS
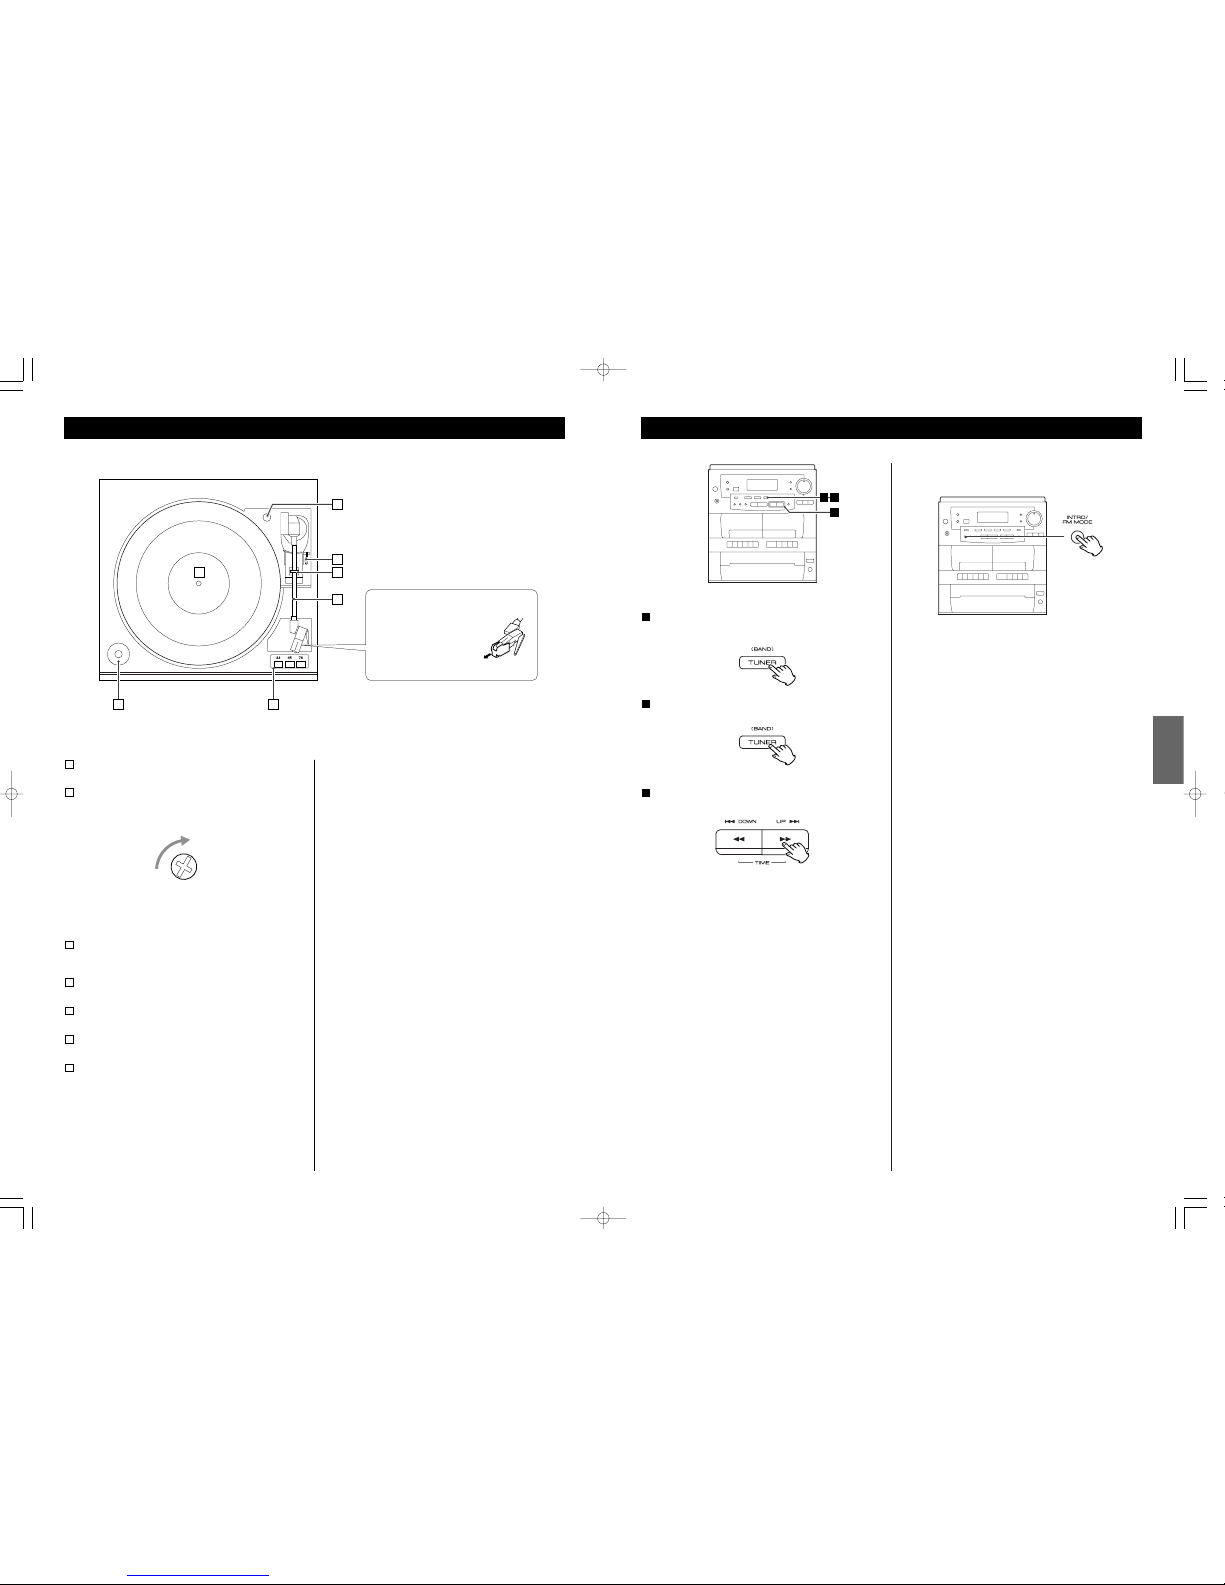
Écoute de la radio
Choisir “TUNER” en appuyant sur la touche TUNER
(BAND) ou la touche FUNCTION.
1
Choisir AM ou FM en appuyant sur la touche TUNER
(BAND).
2
Choisir le poste que vous désirez écouter (choix
automatique)
3
Maintenez la touche UP (ou DOWN) enfoncée jusqu’à temps
que l’affichage de la fréquence change. Quand un poste est
syntonisé, le procédé de syntonisation s’arrête
automatiquement.
< Appuyez sur la touche UP (ou DOWN) pour arrêter le choix
automatique.
Choix de postes qui ne peuvent pas être syntoniser
automatiquement (choix manuel)
Lorsque vous appuyez brièvement sur la touche UP (ou
DOWN), la fréquence change d’une quantité fixe.
Appuyez de manière répétée sur la touche UP (ou DOWN)
jusqu’à ce que la station que vous désirez écouter soit
localisée.
Touche FM MODE
L’appui de cette touche alterne entre le mode stéréo ou
mono.
Stéréo:
Les postes FM stéréos sont captés en stéréo et le témoin
“STEREO” est allumé
Mono:
Pour l’écoute de postes FM stéréo faibles, choisir ce mode. La
réception est maintenant monorale, réduisant les parasites.
Si la réception est mauvaise
Postes AM
L’antenne AM est à l’intérieur du cabinet. Repositionner
l’appareil pour obtenir la meilleur réception possible de postes
AM.
Postes FM
Repositionner l’antenne FM pour obtenir la meilleure
réception possible.
21
3
12
Names of Each Control (Turntable)
C
B
D
E
A
G F
Before use, detach the
stylus guard (white plastic
cover) by pulling it
straight off the front of
the cartridge in the
direction of the arrow.
turntable
screw fixing the turntable for transportation
Before use, completely loosen the screw by turning it
clockwise with a coin or screwdriver.
When you transport the unit, turn the screw counterclockwise
to fix the turntable.
cue-lever
Use this lever to lift the tone arm.
tone arm holder
tone arm
speed selector
45 RPM adaptor
G
F
E
D
C
B
A
How to open/close the turntable cover
To Open:
Lift the turntable cover all the way up until it stops.
To Close:
Slowly lower the cover. Make sure you grasp the cover by the
edges to avoid pinching yourfingers as it closes.
Page 13
13
ENGLISH
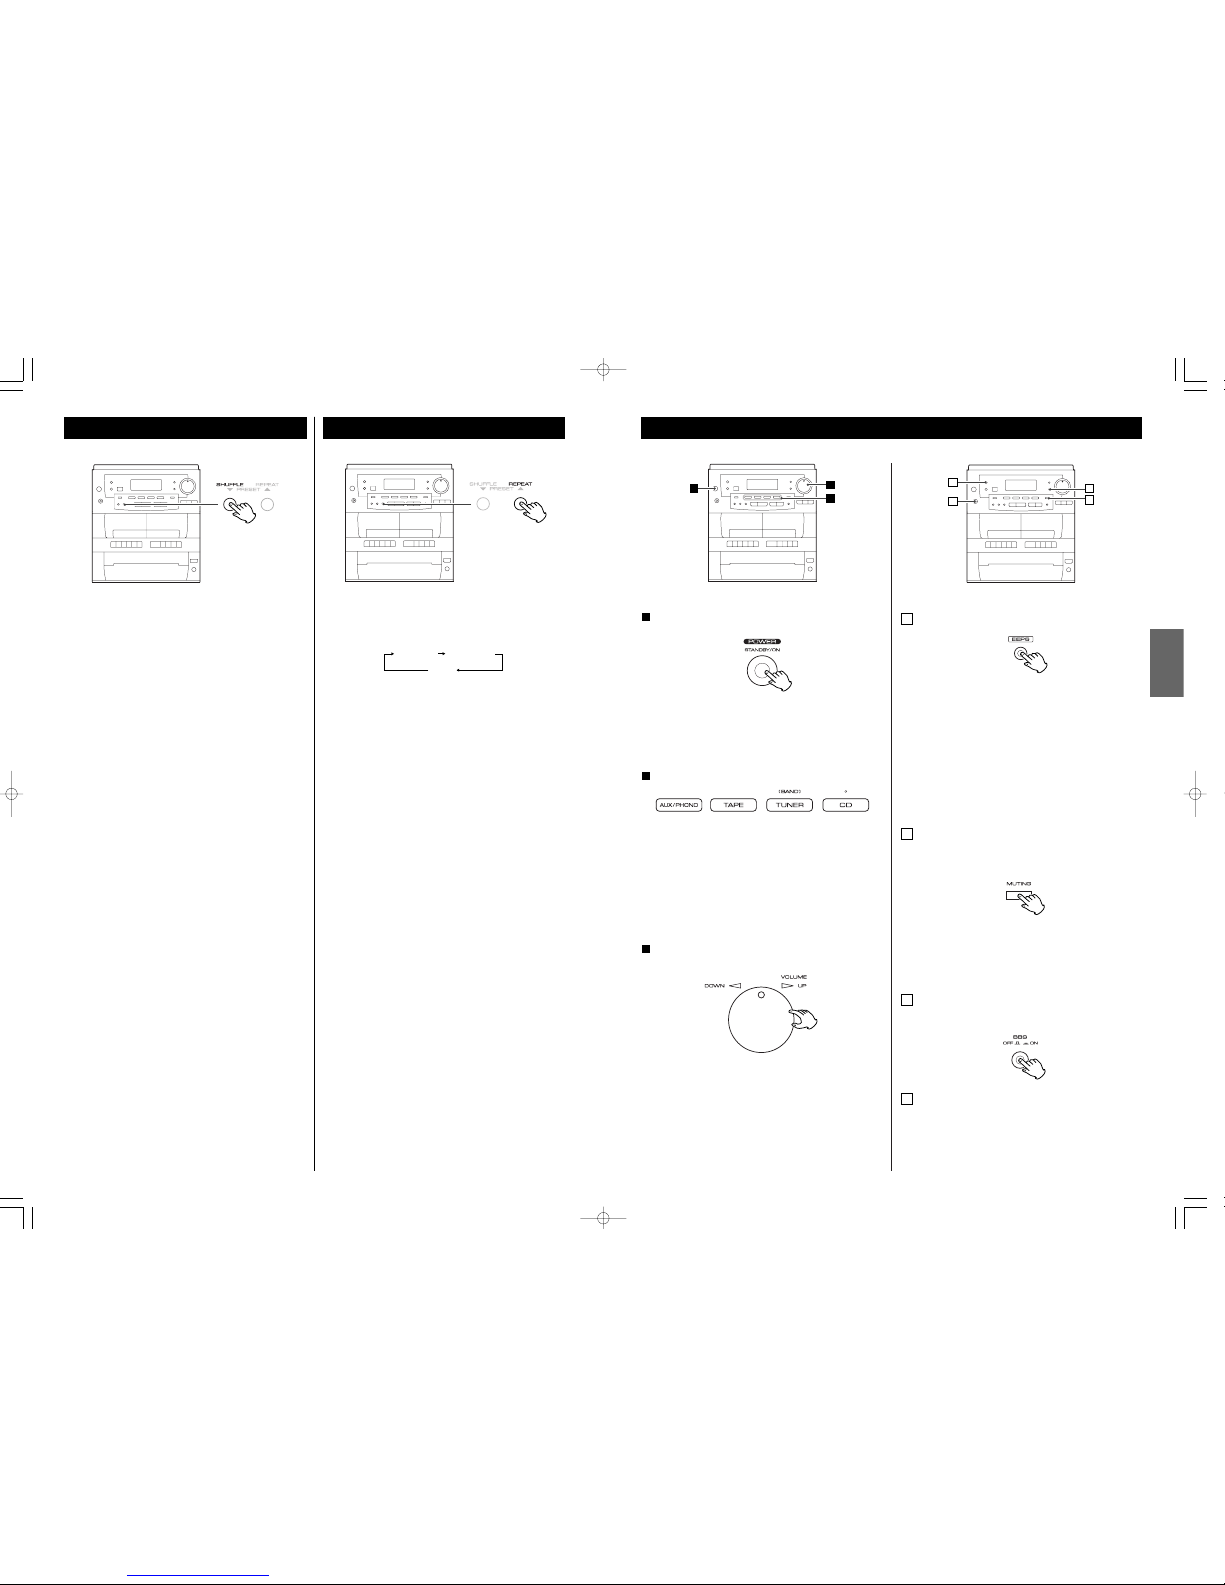
Basic Operation
1
3
2
Press the POWER switch to turn the unit on.
1
The standby indicator goes off.
< When the unit is turned on, the MUTING indicator lights
momentarily. This is not a malfunction.
Select a source by pressing the corresponding button.
2
< When using the remote control unit, press the FUNCTION
button repeatedly until the desired source appears on the
display.
< To listen to an external source connected to AUX jacks, press
the AUX/PHONO button.
< If you play an external source and a record simultaneously,
the sound will be mixed.
Play the source, and adjust the volume by turning the
VOLUME knob.
3
C
D
A
B
EEPS (Electronic Equalizer Preset System)
A
Each time the EEPS button is pressed, the mode is changed
as follows:
Muting
To mute the sound temporarily, press the MUTING button.
Press the MUTING button again to restore the sound.
B
< While muting is engaged, the muting indicator lights.
< The muting indicator also lights in the stop or pause mode
of CD, even when the muting isn’t selected. When the PLAY
button is pressed, it goes off.
Bass Boost System
To emphasize bass, press the BBS button. Press the button
again to turn it off.
C
Headphones
For private listening, insert the headphones plug into the
PHONES jack, and adjust the volume by turning the
VOLUME knob. The sound from the speakers is cut off while
the headphone jack is inserted.
D
CLASSIC:
A balanced sound; suitable for classical music.
ROCK:
Provides a heavy powerful sound; suitable for rock music.
POPS:
Emphasizes vocal tones; suitable for popular music.
FLAT:
EEPS is off.
48
Lecture aléatoire
Les pistes sont jouées aléatoirement. Appuyez sur la touche
SHUFFLE durant la lecture. (En mode d’arrêt, appuyez sur la
touche SHUFFLE et la touche PLAY/PAUSE).
Quand la lecture aléatoire de toute les pistes du disque choisi
est terminée, la lecture du disque suivant commence.
Quand la lecture aléatoire de tous les disques est terminée,
l’appareil s’arrête et la lecture aléatoire est annulée.
< Si vous appuyez sur la touche / pendant la lecture au
hasard, une nouvelle piste est choisie au hasard puis jouée. Si
vous appuyez sur la touche . , la piste qui joue
présentement rejoue à partir du début. Une piste ne peut pas
être rejouée pendant la lecture au hasard.
< La lecture aléatoire ne fonctionne pas durant la lecture
programmée.
< Si une des touches suivantes est appuyée, la lecture aléatoire
est annulée:
SHUFFLE, STOP, FUNCTION (TAPE, AUX/PHONO, TUNER),
DISC SKIP, DISC 1,2,3, POWER, OPEN/CLOSE tandis que
l’appareil est à l’arrêt, INTRO tandis que l’appareil est à
l’arrêt
Répétition de la lecture
Chaque pression sur la touche REPEAT, modifie comme suit le
mode de fonctionnement :
Répétition d’une piste
Appuyez sur la touche REPEAT une fois durant la lecture. Le
témoin REPEAT s’allume. La piste qui joue sera rejouer
répététivement. Si vous appuyez sur la touche SKIP et
choisissez une autre piste, la piste choisie va jouée
répététivement.
Il est aussi possible de choisir une piste à être répéter en
mode d’arrêt. Appuyez sur la touche REPEAT, choisir une
piste à l’aide de la touche SKIP et ensuite appuyez sur la
touche PLAY/PAUSE pour engender la lecture.
< La lecture répétée ne fonctionne pas durant la lecture
programmée.
< Si une des touches suivantes est appuyées, le mode REPEAT
est annulé:
DISC SKIP, DISC 1,2,3, OPEN/CLOSE, SHUFFLE,
INTRO tandis que l’appareil est à l’arrêt
Répétition de toute les pistes de tous les
disques
Toute les pistes de tous les disques vont jouer répététivement.
Appuyez sur la touche REPEAT deux fois. Le témoin REPEAT
clignote.
< La lecture répétée ne fonctionne pas durant la lecture
programmée.
< Si une des touches suivantes est appuyées, le mode REPEAT
est annulé:
STOP, FUNCTION (TAPE, AUX/PHONO, TUNER), DISC SKIP,
DISC 1,2,3, OPEN/CLOSE, POWER
Repeat 1 Repeat All
(off)
(Sans)
Page 14
47
FRANÇAIS
Intro
Appuyez sur la touche INTRO en mode d’arrêt. Le début de
toute les pistes de tous les disques joue pour 10 secondes.
Quand une piste que vous désirez entendre est atteinte,
appuyez sur la touche INTRO pour retourner à une lecture
normale.
< Pour sauter à la piste précédante ou suivante, appuyez sur la
touche SKIP.
< Pour arrêter l’intro, appuyez sur la touche STOP.
Vérification de l’ordre de programmation
En mode d’arrêt, appuyez sur la touche PROGRAM
répététivement. Le numéro de piste et du programme sont
affichés.
Pour ajouter une piste à la fin du
programme
En mode d’arrêt, appuyez sur la touche PROGRAM
répététivement jusqu’à temps que “00” est affiché. Choisir
un numéro de piste à l’aide de la touche SKIP et ensuite
appuyez sur la touche PROGRAM. La piste est ajoutée à la fin
du programme.
Pour ré-écrire un programme
En mode d’arrêt, appuyez sur la touche PROGRAM
répététivement jusqu’à temps que le numéro du programme
que vous désirez changer est affiché.
Choisir un nouveau numéro de piste à l’aide de la touche SKIP
et ensuite appuyez sur la touche PROGRAM.
Pour vidanger un programme
Pour vidanger un programme de son contenu, appuyez sur la
touche PROGRAM et la touche STOP en mode d’arrêt.
< Si vous appuyez sur la touche OPEN/CLOSE, le contenu du
programme est aussi vidangé.
< Si l’appareil est débranché, le contenu du programme est
perdu.
14
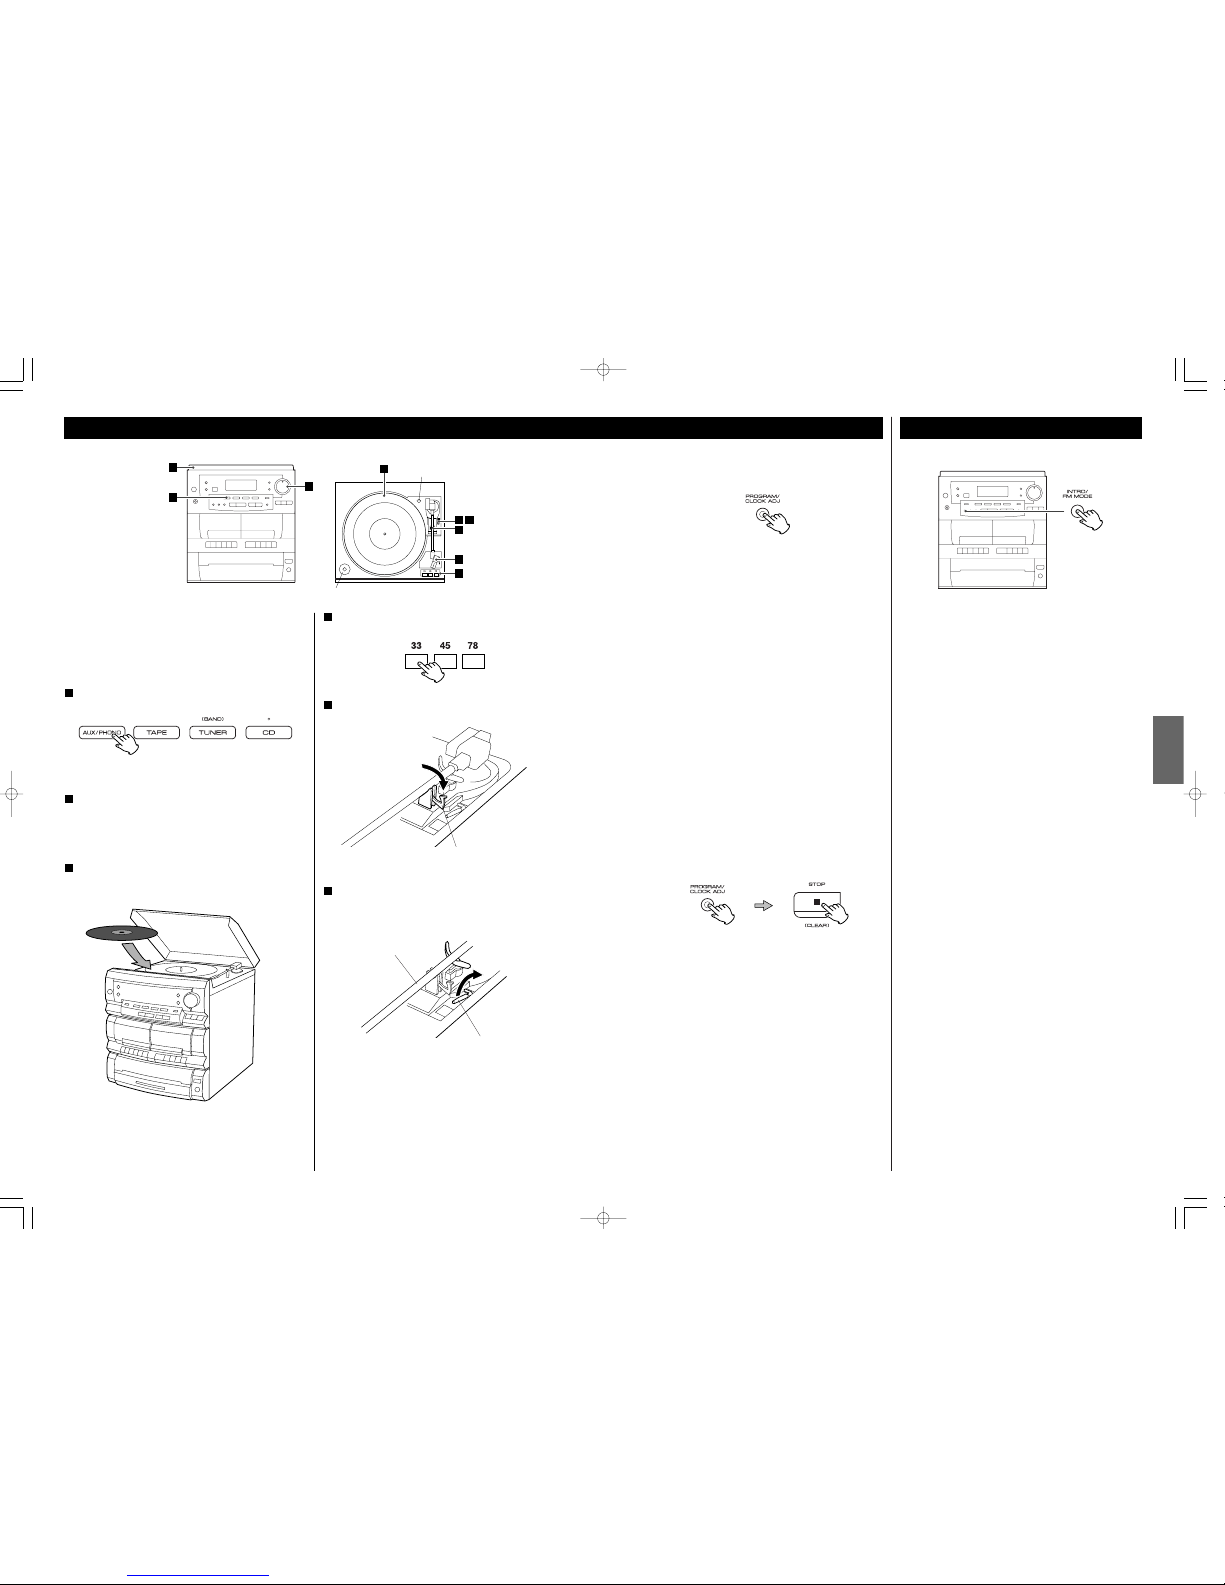
Listening to a Record
Before use, completely loosen the transportation screw by
turning it clockwise with a screwdriver or coin.
Detach the stylus guard (white plastic cover) by pulling it forward
away from the cartridge.
Press the AUX/PHONO button.
1
Gently open the turntable cover.
Be careful not to pinch your fingers.
2
Put the record on the turntable.
When playing a 45 RPM record, use the included adaptor.
3
tone arm
cue lever
Gently push the clamper to the right to release the tone
arm.
5
clamper
Raise the cue lever to lift the tone arm off the tone arm
support.
6
Select the speed.
4
1
2
9
4
7
5
6 8
3
transportation screw
adaptor
Page 15
15
ENGLISH
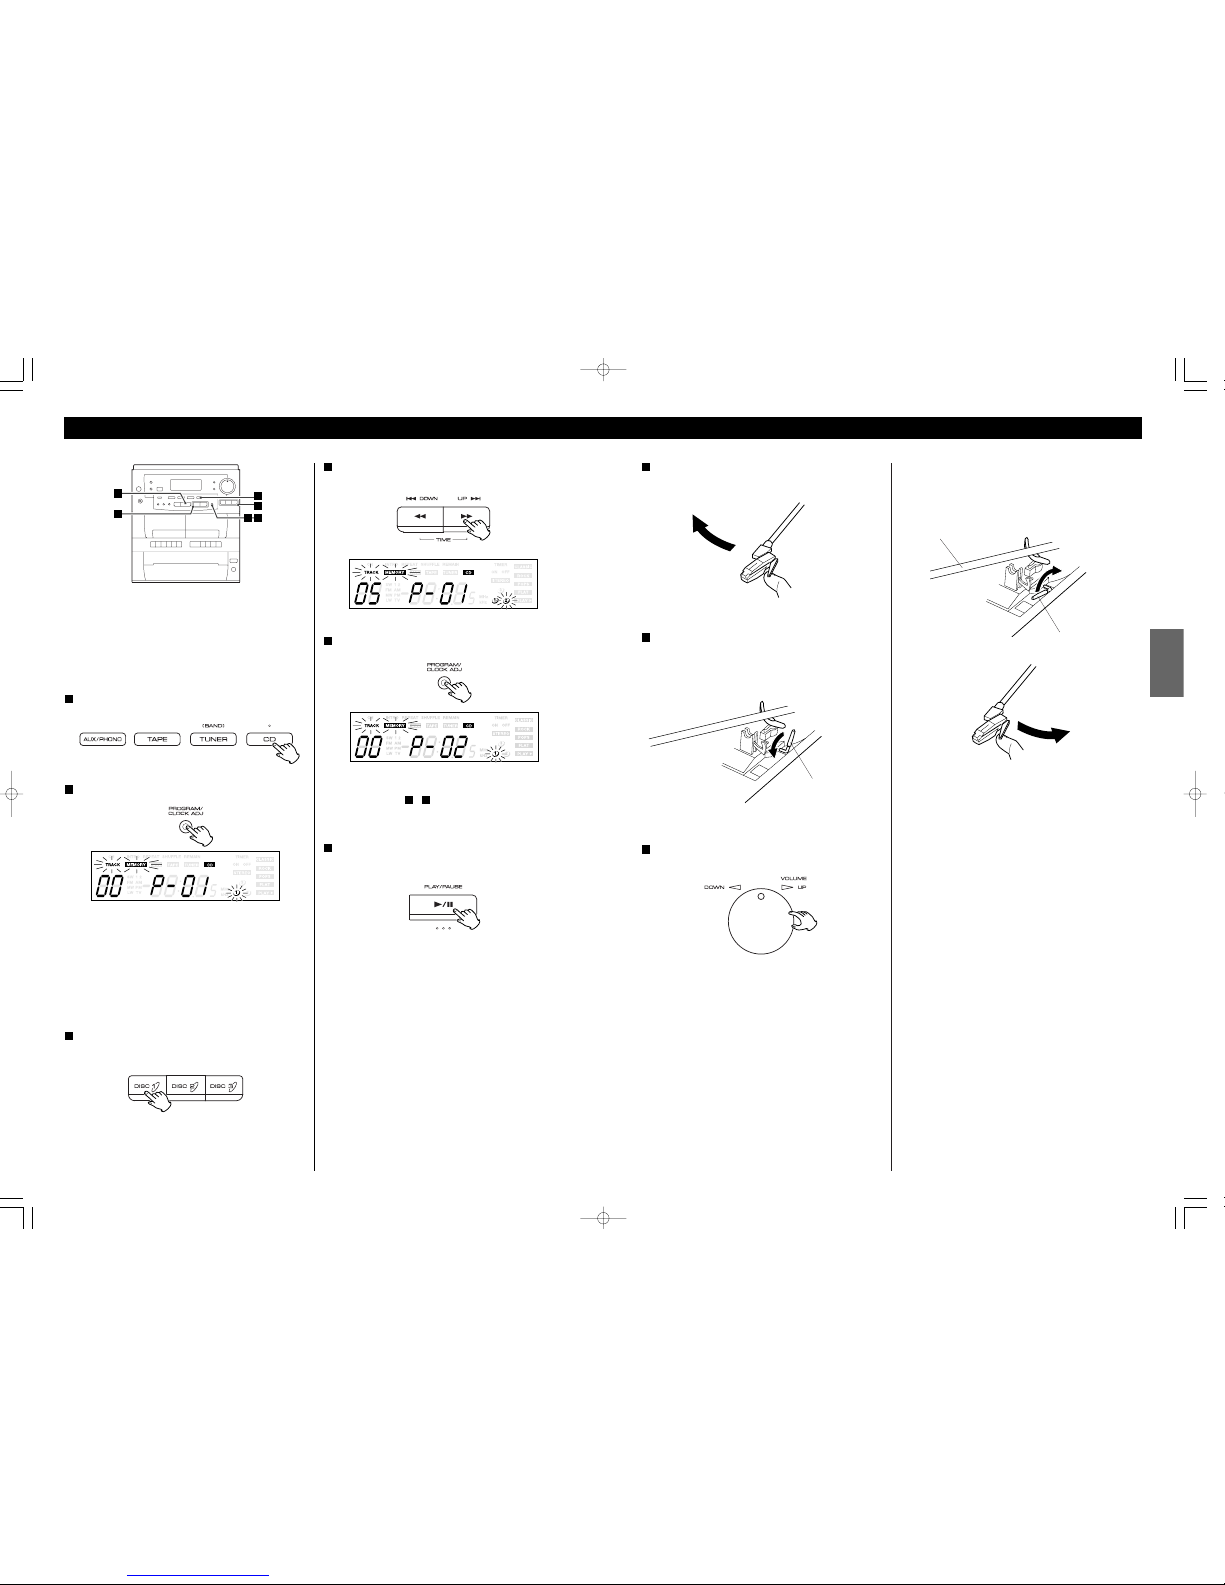
When the playback has been finished, slightly lift the tone arm
using the cue lever and return it to the tone arm holder.
The rotation stops.
Move the tone arm gently to the edge of the record (or
the starting point of a track).
The turntable will begin to turn.
7
Gently lower the tone arm by slowly releasing the cue
lever.
You can lower the tone arm manually if the cue lever has not
been raised.
8
< Playing records with the turntable cover down will prevent
dust from settling on the turntable.
tone arm
cue lever
Turn the VOLUME knob to adjust the volume.
9
cue lever
Please do not place anything on top of the turntable
cover, especially while playing a record.
46
Lecture programmée
Jusqu’à 20 pistes de 3 disques peuvent être programmer dans
l’ordre désirée
Lecture aléatoire, répétée et intro ne fonctionnent pas durant la
lecture programmée.
Appuyez sur la touche CD ou la touche FUNCTION pour
choisir “CD”
1
Appuyez sur la touche PROGRAM
2
“TRACK”, “MEMORY” et le numéro du disque courant
clignotent sur l’afficheur.
< Pour annuler la lecture programmée, appuyez sur la touche
STOP.
< Si aucune touche n’est appuyée durant 10 secondes, la
lecture programmée est annulée.
Si vous désirez choisir un autre disque, appuyez sur la
touche correspondante ou la touche DISC SKIP.
3
Appuyez de manière répétée sur la touche SKIP
(.ou/) pour choisir une piste.
4
Appuyez sur la touche PROGRAM.
5
La piste est programmée et “P-02” est affiché.
< Répétez les étapes à pour programmer d’autre pistes.
< Vous pouvez programmer jusqu’à 20 pistes.
Quand votre choix de numéros de pistes est terminé,
appuyez sur la touche PLAY/PAUSE pour engendrer la
lecture programmée.
6
53
< Si la touche PLAY/PAUSE n’est pas appuyée en dedans de 10
secondes, le témoin MEMORY s’éteint. Dans ce cas, appuyez
sur la touche PROGRAM et ensuite la touche PLAY/PAUSE
pour engendrer la lecture programmée.
< Quand la lecture de toute les pistes programmées est
terminée, ou si une des touches suivantes est appuyée, le
témoin MEMORY s’éteint et la lecture programmée est
annulée:
STOP, FUNCTION (TAPE, AUX/PHONO, TUNER), POWER
DISC SKIP, DISC 1,2,3
Mais le contenu de la programmation n’est pas perdu. Vous
pouvez retourner à la lecture programmée en appuyant sur la
touche PROGRAM et la touche PLAY. (Si une autre source est
choisie, appuyez sur la touche CD avant.
1
3
52
6
4
Page 16
45
FRANÇAIS
Pour suspendre la lecture momentanément
(mode pause)
A
Pour arrêter la lecture
Appuyez sur la touche STOP pour arrêter la lecture.
B
Pour sauter vers la piste précédante ou
suivante
C
Appuyez sur la touche PLAY/PAUSE durant la lecture. La
lecture s’arrête à la position en cours. Pour continuer la
lecture, appuyez sur la touche PLAY/PAUSE de nouveau.
Durant la lecture, appuyez de manière répétée sur la touche
SKIP (.ou/) jusqu’à temps que la piste désirée est
trouvée. La piste choisie va jouée à partir du début.
En mode d’arrêt, maintenez la touche SKIP enfoncée (ou
appuyez la touche répététivement) et la relacher quand la
piste désirée est atteinte. Appuyez sur la touche
PLAY/PAUSE pour engendrer la lecture à partir de la piste
choisie.
< Si vous appuyez sur la touche . pendant la lecture, la
lecture de la piste en cours reprend depuis le début. Pour
revenir au début de la piste précédente, appuyez deux fois
sur la touche ..
< Durant la lecture programmée, la piste précédante ou
suivante du programme joue.
Recherche d’une section d’une piste
Durant la lecture, maintenez la touche SKIP enfoncée et la
relachez quand la section désirée est atteinte.
D
Changement de disques durant la lecture
E
Vous pouvez changer les disques qui ne jouent pas, même si
un autre disque joue. Appuyez sur la touche OPEN/CLOSE
pour ouvrir le tirroir, changez le disque et appuyez sur la
touche OPEN/CLOSE de nouveau pour fermer le tirroir.
C
D
B
E
A
16
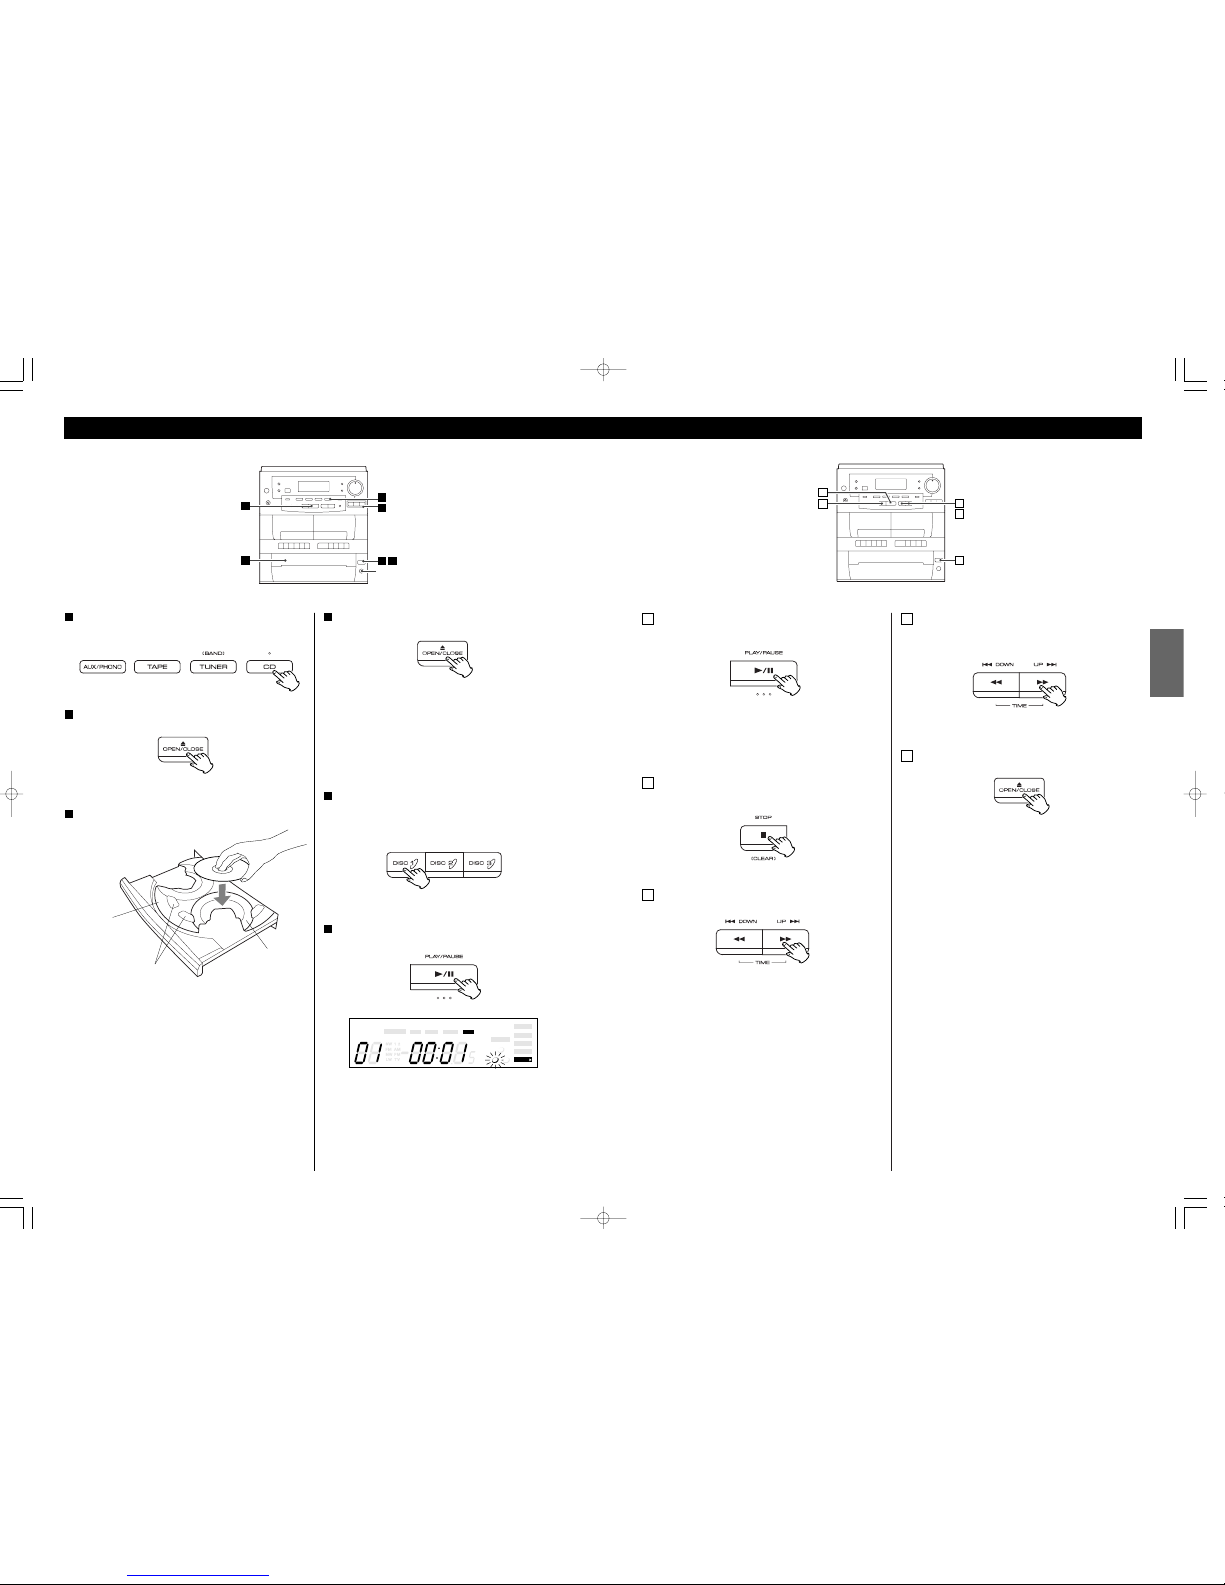
Listening to CDs
3
6
254
1
DISC SKIP
Press the CD button (or the FUNCTION button of the
remote control unit) to select “CD”.
1
Press the OPEN/CLOSE button.
2
Place a disc on a tray with the printed label face up.
3
< Never place more than one disc on a tray.
< To place a disc on the hidden tray, press the DISC SKIP
button.
< Do not touch the carousel while it is rotating.
Press the OPEN/CLOSE button to close the tray.
4
< It takes a few seconds for the unit to load the disc. No
buttons will work during loading. Wait until the total number
of the tracks and the total play time of the disc are displayed.
< When no disc is set, “no dISC” blinks.
If you want to select other disc, press the corresponding
button (DISC 1, 2 or 3) or the DISC SKIP button.
Playback starts automatically.
5
Press the PLAY/PAUSE button to start playback.
6
Playback starts from the first track of the selected disc.
When the playback of all the discs has finished, the unit stops
automatically.
tray
disc number
carousel
REMAINCH REPEAT SHUFFLE
TIMER
AUX
CDTAPE TUNER
ON OFF
STEREO
CLASSIC
ROCK
POPS
FLAT
PLAY
TRACK
MHz
kHz
INTRO
MEMORY
2
1
3
Page 17
17
ENGLISH
C
D
B
E
A
To suspend playback temporarily
(pause mode)
A
To stop playback
Press the STOP button to stop playback.
B
To skip to the next or a previous track
C
Press the PLAY/PAUSE button during playback. Playback
stops at the current position. To resume playback, press the
PLAY/PAUSE button again.
During playback, press the SKIP button (.or/ )
repeatedly until the desired track is found. The selected
track will be played from the beginning.
In the stop mode, hold down the SKIP button (or press the
button repeatedly) and release it when the track you want
to listen to is found. Press the PLAY/PAUSE button to start
playback from the selected track.
< When the . button is pressed during playback, the track
being played will be played from the beginning. To return to
the beginning of the previous track, press the . button
twice.
< During programmed playback, the next or previous track in
the program is played.
Search for a part of a track
During playback, hold down the SKIP button (.or/)
and release it when the part you want to listen to is found.
D
Change discs during playback
E
You can change discs that aren’t being played, even if
another disc is being played. Press the OPEN/CLOSE button
to open the tray, change the disc, and press the
OPEN/CLOSE button again to close the tray.
44
Écoute de CD
Appuyez sur la touche CD (ou la touche FUNCTION de la
télécommande) pour choisir “CD”.
1
Appuyez sur la touche OPEN/CLOSE.
2
Déposez un disque dans le tirroir avec l’étiquette vers le
haut.
3
< Ne jamais déposer plus d’un disque dans le tirroir.
< Pour déposer un disque dans le tirroir caché, appuyez sur la
touche DISC SKIP
< Ne pas toucher le carousel quand il tourne.
Appuyez sur la touche OPEN/CLOSE pour fermer le
tirroir
4
< Ça prend quelque secondes pour que l’appareil lit le disque.
Aucune touche fonctionne durant le chargement. Attendre
jusqu’à temps que le nombre total de pistes ainsi que la durée
totale de lecture du disque sont affichés.
< Si il n’y a pas de disque, “no dISC” clignote.
Si vous désirez choisir un autre disque, appuyez sur la
touche correspondante (DISC 1, 2 ou 3) ou la touche
DISC SKIP.
La lecture commence automatiquement.
5
Appuyez sur la touche PLAY/PAUSE pour engendrer la
lecture.
6
La lecture débute avec la première piste du disque choisi.
Quand la lecture de tous les disques est terminée, l’appareil
s’arrête automatiquement.
tirroir
numéro du disque
carousel
REMAINCH REPEAT SHUFFLE
TIMER
AUX
CDTAPE TUNER
ON OFF
STEREO
CLASSIC
ROCK
POPS
FLAT
PLAY
TRACK
MHz
kHz
INTRO
MEMORY
2
1
3
3
6
254
1
DISC SKIP
Page 18
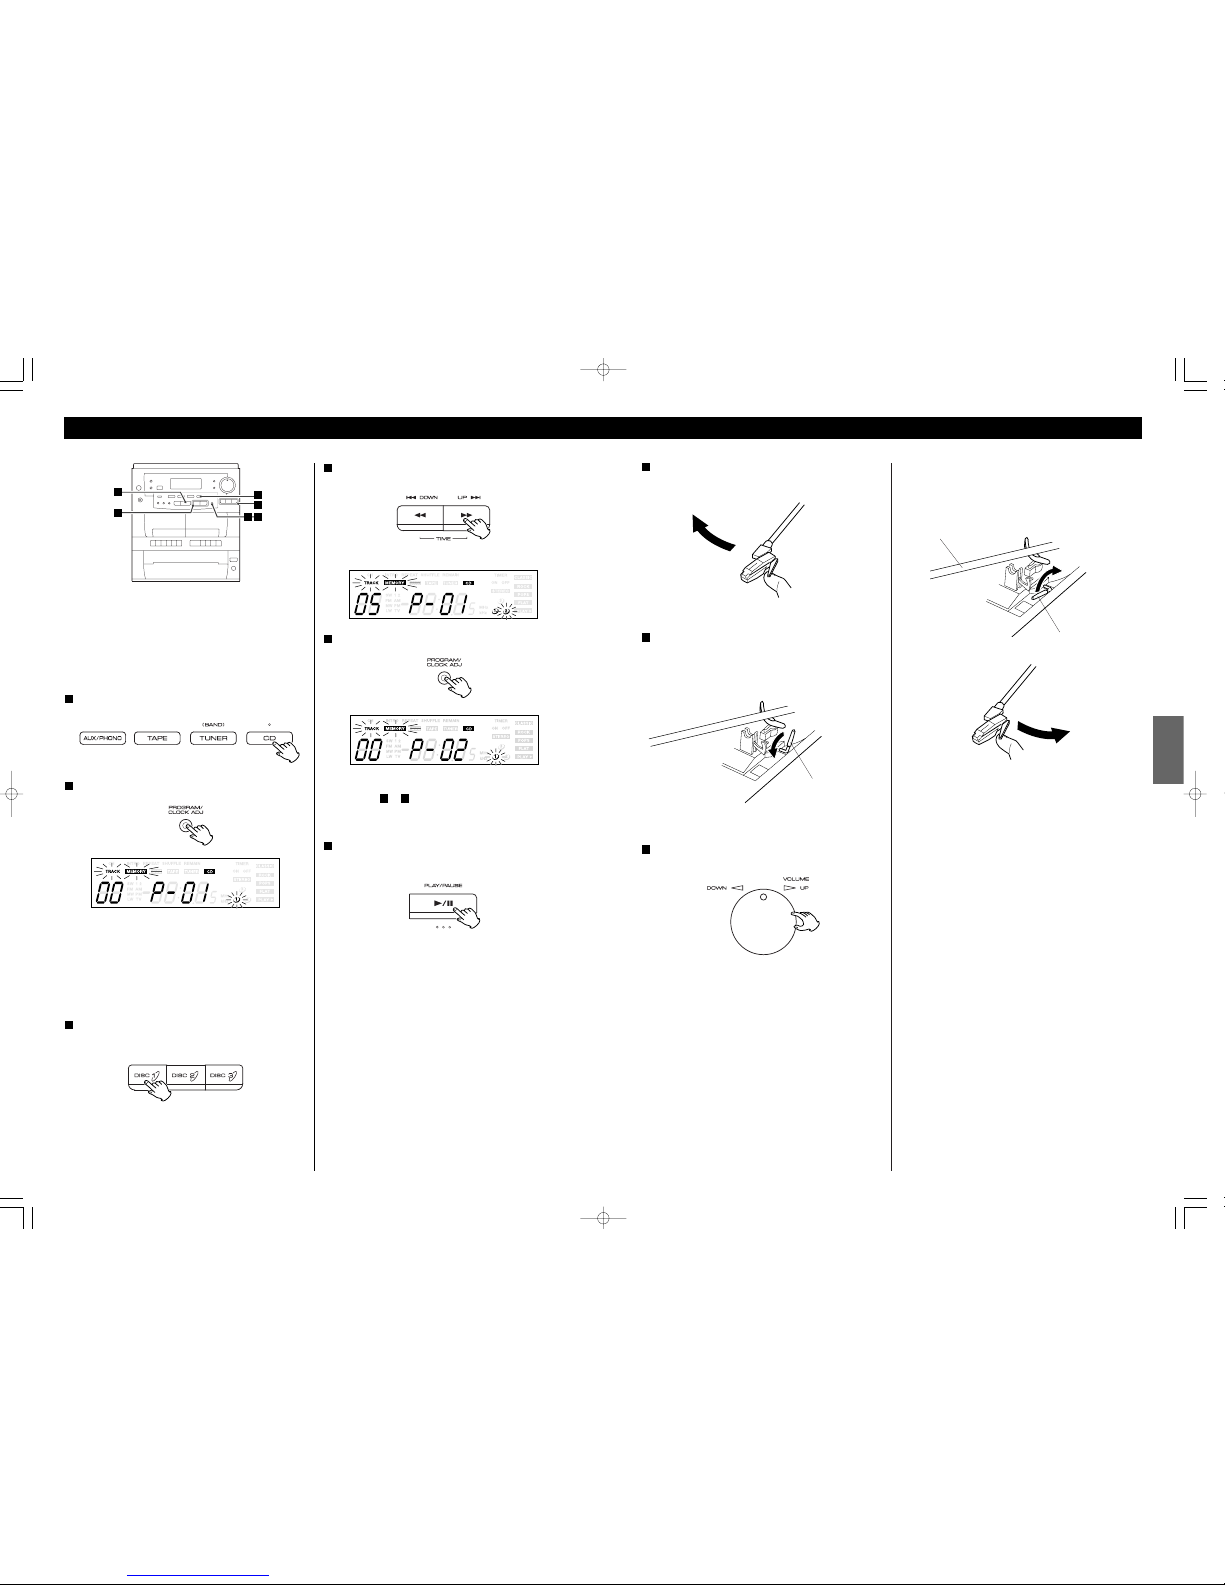
43
FRANÇAIS
Doucement déplacer le bras vers le bord du disque (ou
le point de départ d’une piste).
La table tournante commence à tourner.
7
Doucement abaisser le bras en relâchant doucement le
levier de re-pérage.
Vous pouvez abaisser le bras manuellement si le levier de
repérage n’a pas été utilisé.
8
< Tenant le couvercle baissé durant l’écoute de disque empêche
la poussière de se déposer sur la table tournante.
bras
levier de repérage
Tournez le bouton du VOLUME pour régler le volume.
9
levier de repérage
S’il vous plait ne jamais déposer aucun object sur le
dessus du couvercle de la platine, surtout si vous jouez
un disque.
Quand l’écoute est terminée, soulevez légèrement le bras
utilisant le levier de repérage et le retourner à son appui.
La rotation s’arrête.
18
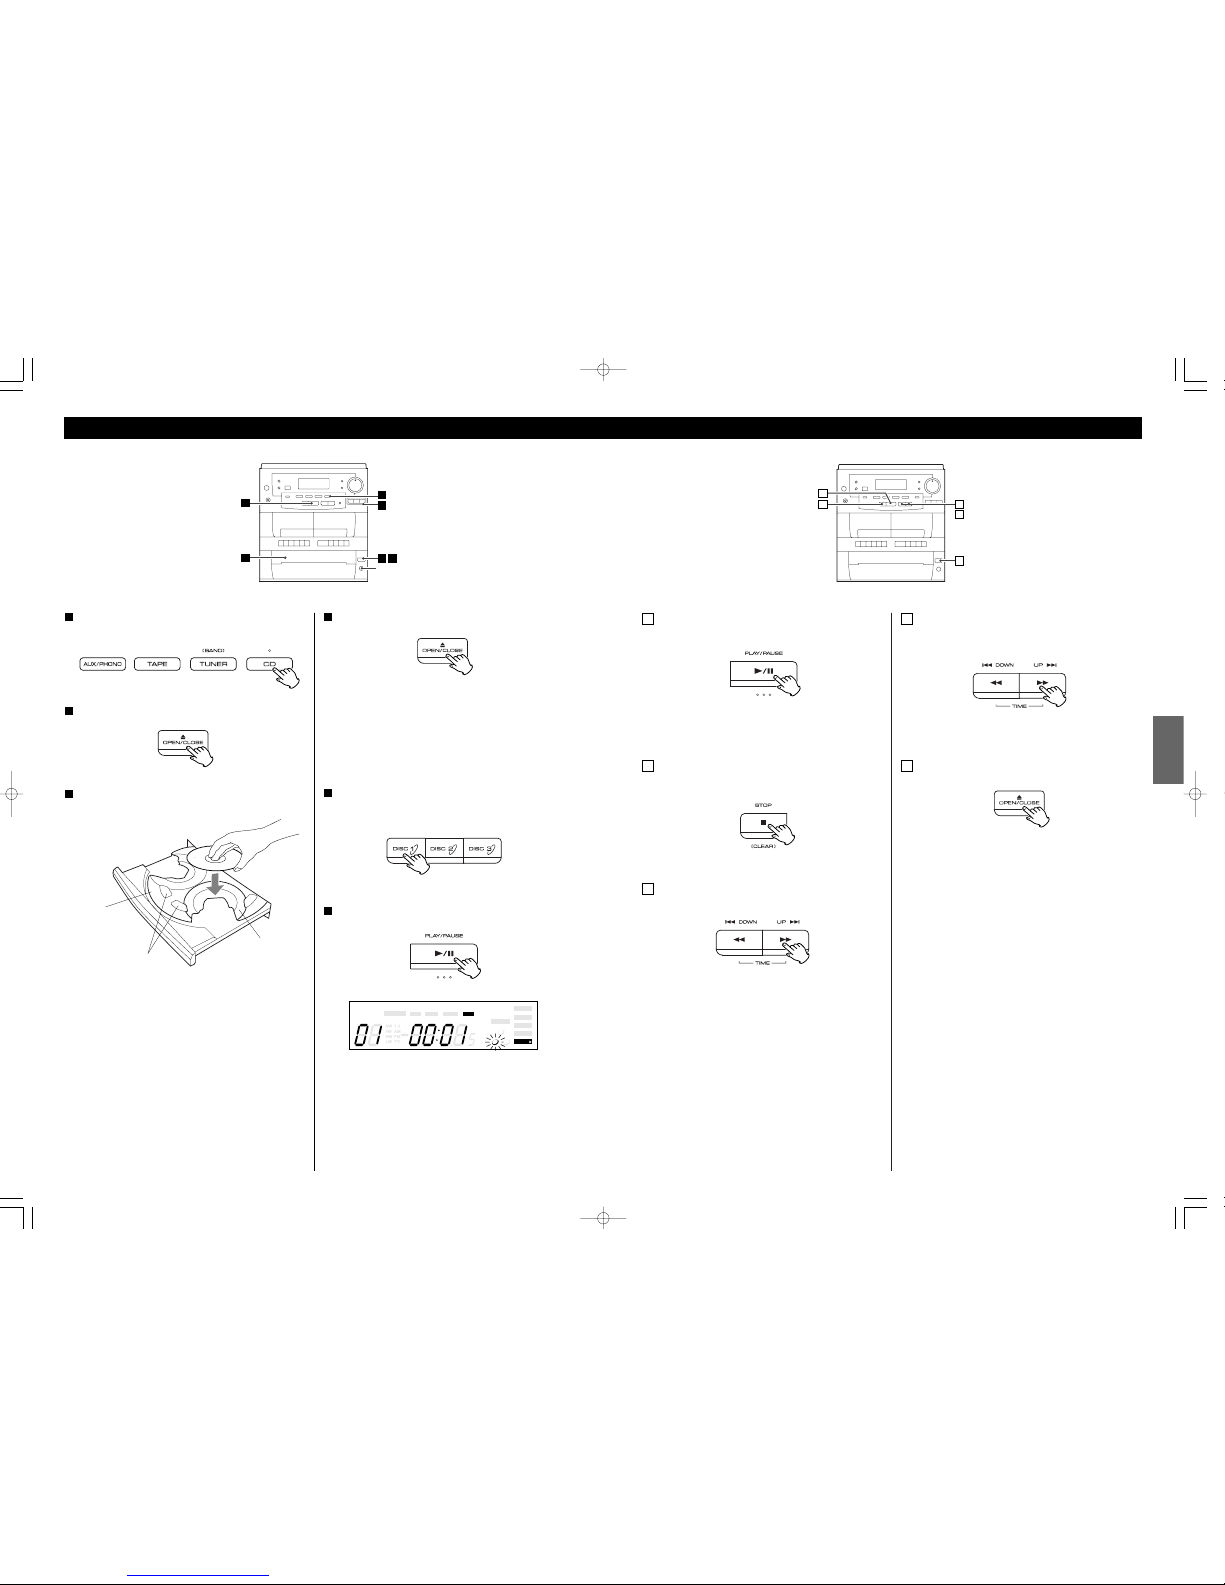
Programmed Playback
1
3
52
6
4
Up to 20 tracks from 3 discs can be programmed in the desired
order.
Shuffle, Repeat and Intro check functions don’t work during
programmed playback.
Press the CD button or the FUNCTION button to select
“CD”.
1
Press the PROGRAM button.
2
“TRACK”, “MEMORY”, and the current disc number blinks
on the display.
< To cancel the program mode, press the STOP button.
< When no button is pressed for 10 seconds, the program
mode will be cancelled.
If you want to select another disc, press the
corresponding button or the DISC SKIP button.
3
Press the SKIP button (.or/) repeatedly to select
a track.
4
Press the PROGRAM button.
5
The track is programmed, and “P-02” is displayed.
< Repeat step to to program more tracks.
< You can program up to 20 tracks.
When the selection of track numbers is completed,
press the PLAY/PAUSE button to start program
playback.
6
53
< If the PLAY/PAUSE button isn’t pressed within 10 seconds, the
MEMORY indicator will go off. In that case, press the
PROGRAM button and then press the PLAY/PAUSE button to
start program playback.
< When the playback of all the programmed tracks has finished,
or if one of the following buttons is pressed, the MEMORY
indicator will go off and the program mode will be cancelled:
STOP, FUNCTION (TAPE, AUX/PHONO, TUNER), POWER
DISC SKIP, DISC 1,2,3
But the programmed contents aren’t lost. You can return to
the programmed playback by pressing the PROGRAM button
and the PLAY button. (If another source was selected, press
the CD button beforehand.)
Page 19
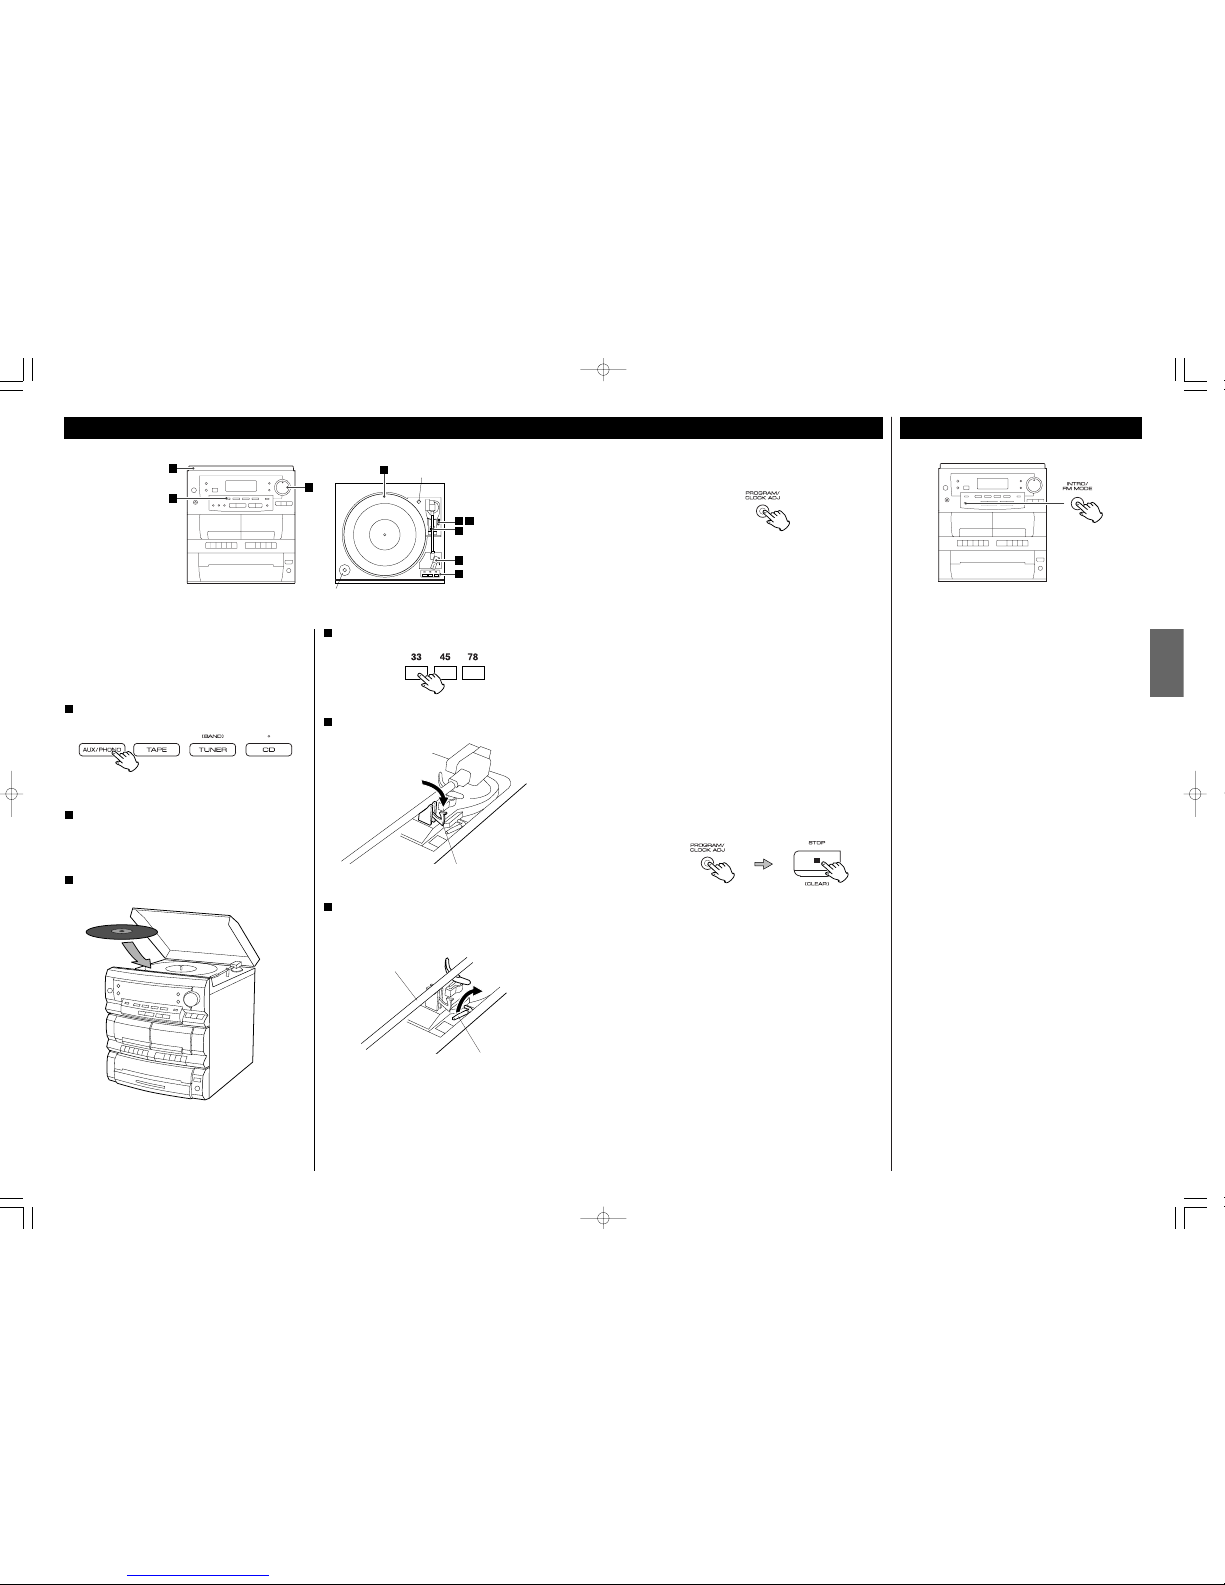
19
ENGLISH
Intro Check
Press the INTRO button in the stop mode. The beginning of all
the tracks of all the discs is played for 10 seconds each. When
a track you want to listen to is found, press the INTRO button
to resume normal playback.
< To skip to the next or a previous track, press the SKIP button.
< To stop Intro Check function, press the STOP button.
To check the programmed order
In the stop mode, press the PROGRAM button repeatedly.
The track number and program number will be shown on the
display.
To add a track to the end of the program
In the stop mode, press the PROGRAM button repeatedly
until “00” appears on the display. Select a track number
using the SKIP button and then press the PROGRAM button.
The track is added to the end of the program.
To overwrite the program
In the stop mode, press the PROGRAM button repeatedly
until the program number to be changed appears on the
display.
Select a new track number using the SKIP button and then
press the PROGRAM button.
To clear program
To clear the programmed contents, press the PROGRAM and
the STOP button in the stop mode.
< If the OPEN/CLOSE button is pressed, the programmed
contents will also be cleared.
< If the unit is disconnected from the power supply, the
programmed contents will be cleared.
1
2
9
4
7
5
6 8
3
42
Écoute de disque
Appuyez sur le bouton PHONO.
1
Doucement soulever le couvercle. Prendre soin de ne
pas coincer vos doigts.
2
Déposez le disque sur la table tournante.
3
bras
levier de repérage
Doucement poussez l’attache vers la droite pour
relâcher le bras.
5
attache
Soulever le levier de repérage pour soulever le bras de
son appui.
6
Choisir la vitesse.
4
Avant l’utilisation, déserrer complètement la visse de transport
en la tournant vers la droite utilisant une pièce de monnaie.
Détachez le protecteur de l’aiguille (couvercle plastique blanc)
visse
adapteur 45 RPM
Page 20
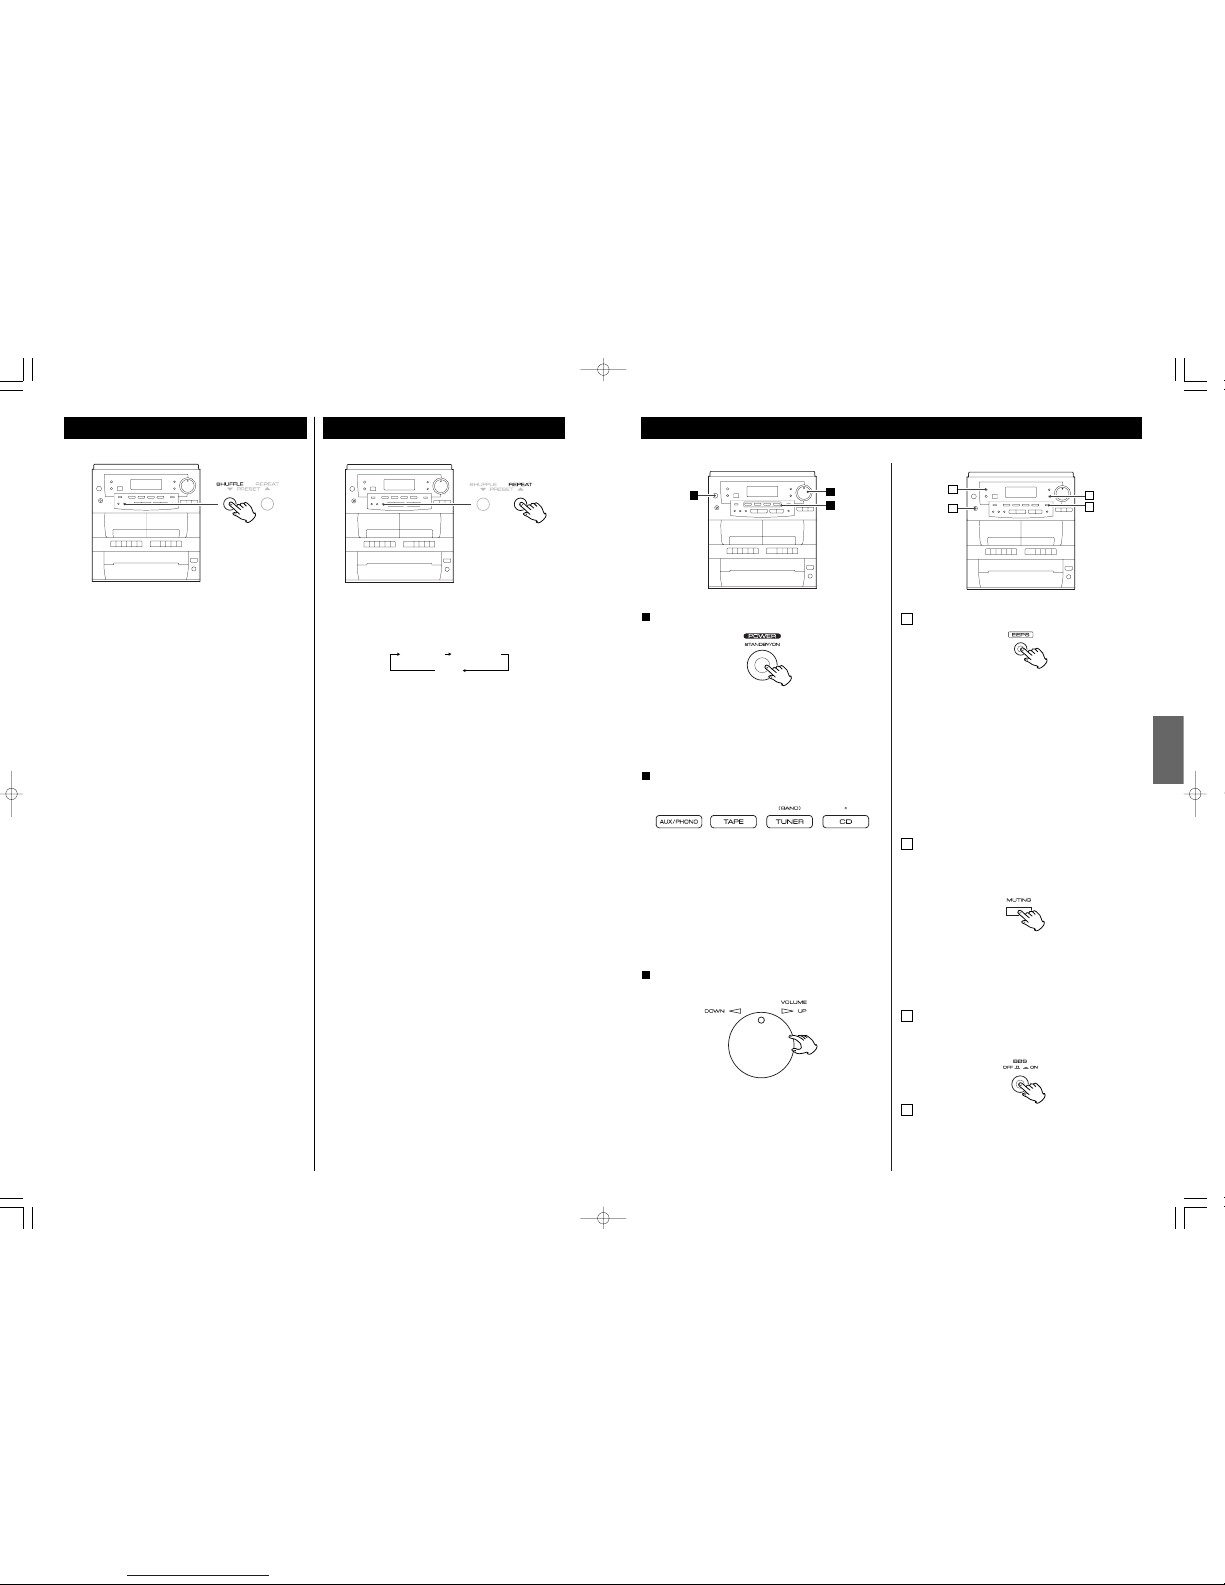
41
FRANÇAIS
Opération de base
Appuyez sur la touche POWER pour allumer l’appareil.
1
Le témoin d’attente (standby) s’éteint.
< Quand l’appareil est allumé, le témoin MUTING (SOURDINE)
s’allume momentanément. Ceci n’est pas un mauvais
fonctionnement.
Choisir une source en appuyant sur la touche
correspondante.
2
< Quand vous utilisez la télécommande, appuyez sur la touche
FUNCTION répététivement jusqu’à temps que la source
désirée apparait sur l’afficheur.
< Pour écouter une source externe branchée aux prises AUX,
appuyez sur la touche AUX/PHONO.
< Si vous jouez une source externe et un long jeu en même
temps, le son sera mélangé.
Jouez la source et réglez le volume en tournant le
bouton du VOLUME.
3
EEPS (Système d’égalisation électronique
pré-réglé)
A
Chaque fois que la touche EEPS est appuyée, le mode
change tel qui suit:
CLASSIC:
Un son équilibré; convenable pour la musique classique.
ROCK:
Fourni un son puissant et lourd; convenable pour la musique
rock.
POPS:
Rehausse les tonalités vocales; convenable pour la musique
populaire
FLAT:
Le EEPS est désengendré.
Sourdine
Pour mettre le son momentanément en sourdine, appuyez
sur la touche MUTING. Appuyez sur la touche MUTING de
nouveau pour faire revenir le son.
B
< Quand l’appareil est en sourdine, le témoin MUTING
s’allume.
< Le témoin MUTING s’allume aussi en mode d’arrêt ou pause
d’un CD, même si vous n’avez pas engendrer la sourdine.
Quand la touche PLAY est appuyée, il s’éteint.
Système de rehausse des graves
Pour rehausser les graves, appuyez sur la touche BBS.
Appuyez sur la touche de nouveau pour le désengendrer.
C
Écouteurs
Pour une écoute privée, insérez la prise des écouteurs dans
la prise PHONE et réglez le volume en tournant le bouton
VOLUME. Aucun son provient des haut-parleurs quand les
écouteurs sont branchés.
D
1
3
2
C
D
A
B
20
Shuffle Playback
The tracks can be played randomly. Press the SHUFFLE button
during playback. (In the stop mode, press the SHUFFLE button
and the PLAY/PAUSE button.)
When the shuffle playback of all the tracks of the currently
selected disc has been finished, the unit goes to the next disc.
When the shuffle playback of all the discs has been finished,
the unit stops and the shuffle playback mode is cancelled.
< If you press the / button during shuffle playback, next
track will be randomly selected and played. If you press the
. button, the currently played track will be played from
the beginning. A track cannot be replayed during shuffle
playback.
< Shuffle playback doesn’t work during programmed playback.
< If one of the following buttons is pressed, shuffle mode will
be cancelled:
SHUFFLE, STOP, FUNCTION (TAPE, AUX/PHONO, TUNER),
DISC SKIP, DISC 1,2,3, POWER, OPEN/CLOSE in the stop
mode, INTRO in the stop mode
Repeat Playback
Every time the REPEAT button is pressed, the mode is
changed as follows:
Repeat one track
Press the REPEAT button once during playback. The repeat
indicator lights steadily.
The track being played will be played repeatedly. If you press
the SKIP button and select another track, the track you
selected will be played repeatedly.
It is also possible to select a track to be repeated in the stop
mode. Press the REPEAT button, select a track using the SKIP
button, and then press the PLAY/PAUSE button to start
playback.
< Repeat playback doesn’t work during programmed playback.
< If one of the following buttons is pressed, repeat mode will
be canceled:
DISC SKIP, DISC 1,2,3, OPEN/CLOSE, SHUFFLE,
INTRO in the stop mode
Repeat All the Tracks of All the Discs
All the tracks of all the discs will be played repeatedly.
Press the REPEAT button twice. The repeat indicator blinks.
< Repeat playback doesn’t work during programmed playback.
< If one of the following buttons is pressed, repeat mode will
be canceled:
STOP, FUNCTION (TAPE, AUX/PHONO, TUNER), DISC SKIP,
DISC 1,2,3, OPEN/CLOSE, POWER
Repeat 1 Repeat All
(off)
Page 21
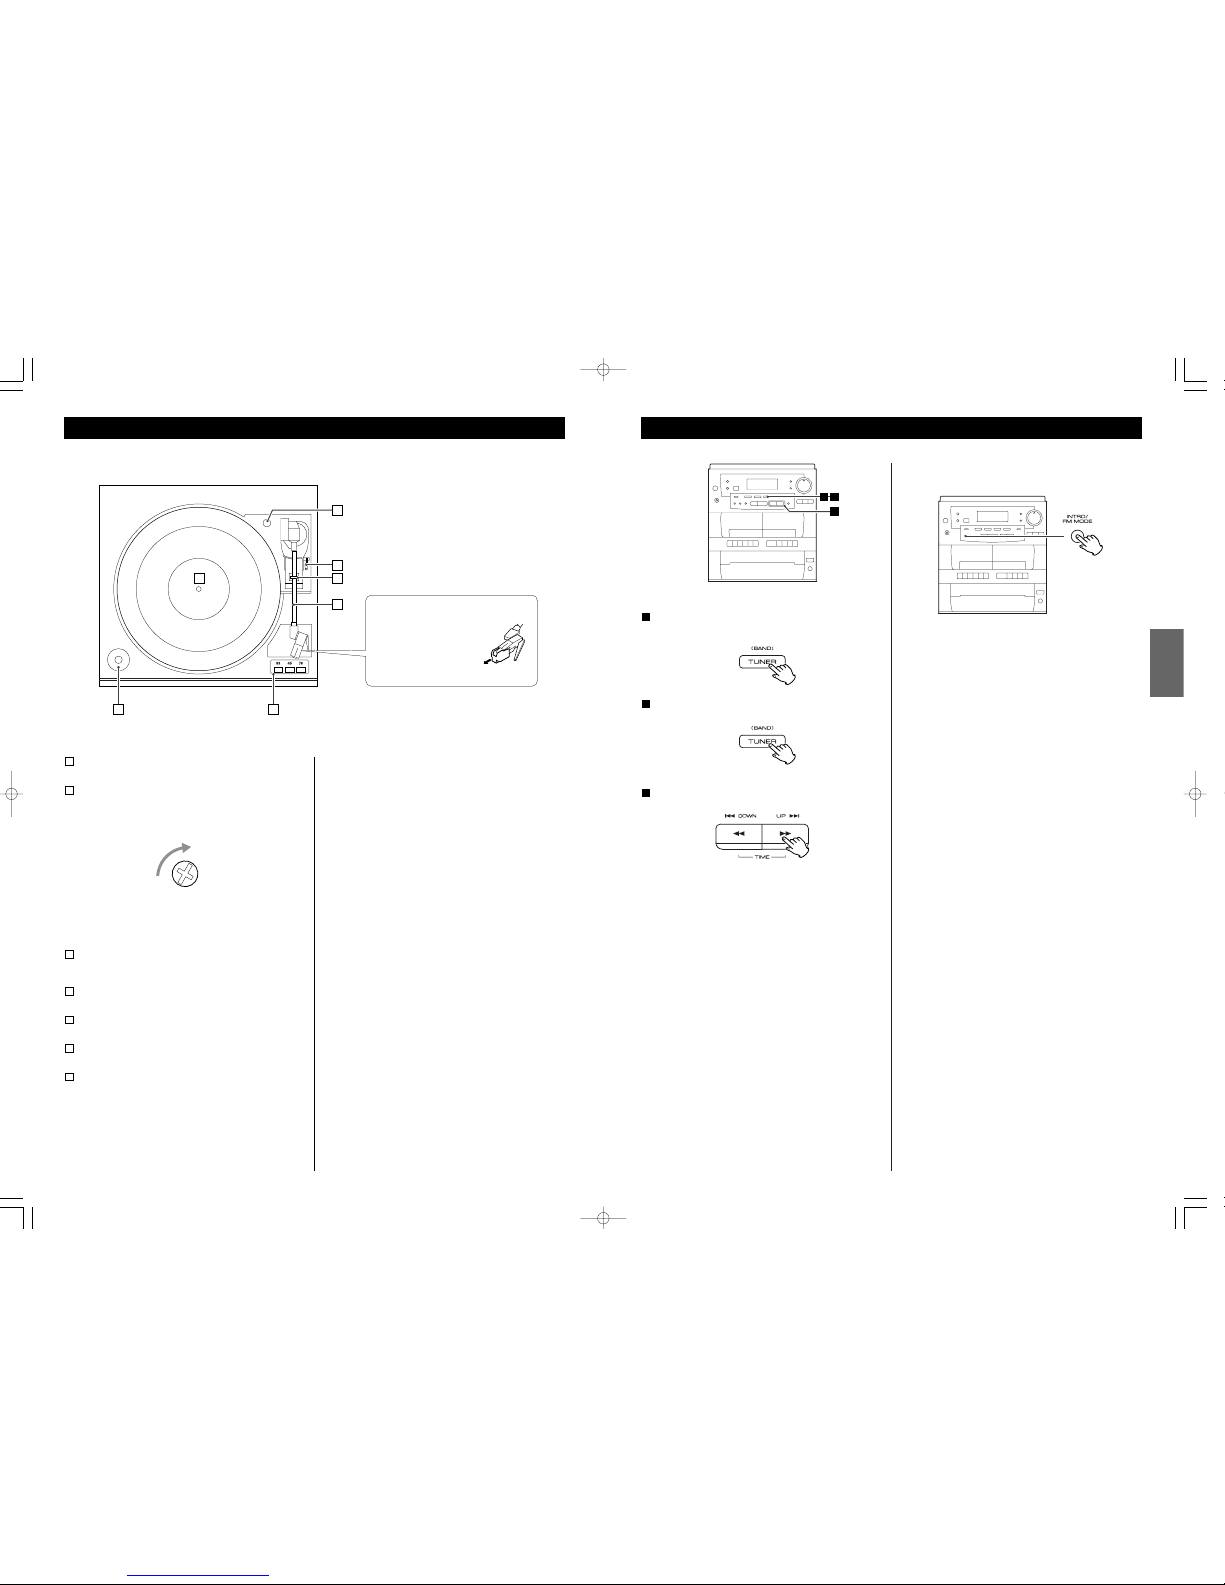
21
ENGLISH
Listening to the Radio
21
3
Select “TUNER” by pressing the TUNER (BAND) button
or the FUNCTION button.
1
Select AM or FM by pressing the TUNER (BAND) button.
2
Select the station you want to listen to (auto selection).
3
Hold down the UP or DOWN button until the frequency
display begins to change. When a station is tuned in, the
tuning process will stop automatically.
< Press the UP or DOWN button to stop the auto selection.
Selecting stations which cannot be tuned automatically
(manual selection)
When the UP or DOWN button is pressed momentarily, the
frequency changes by a fixed step.
Press the UP or DOWN button repeatedly until the station you
want to listen to is found.
FM MODE button
Pressing this button alternates between Stereo mode and
Mono mode.
Stereo:
FM stereo broadcasts are received in stereo and the
“STEREO” indicator will light.
Mono:
To compensate for weak FM stereo reception, select this
mode. Reception will now be forced monaural, reducing
unwanted noise.
If the reception is poor
AM broadcast:
The AM antenna is built within the cabinet. Reposition the
unit to find the best position for AM stations.
FM broadcast:
Reposition the FM antenna until you get the best reception.
C
B
D
E
A
G F
40
Nomenclature (table tournante)
table tournante
Visse tenant en place la table tournante pour le
transport
Avant l’utilisation, déserrer la visse en la tournant vers la
droite avec une pièce de monnaie ou tournevisse.
Quand vous transportez l’appareil, tournez la visse vers la
gauche pour tenir en place la table tournante.
levier de repérage
Utilisez ce levier pour soulever le bras.
appui
bras
sélecteur de vitesse
adapteur 45 RPM
G
F
E
D
C
B
A
Comment ouvrir/fermer le couvercle de la
platine
Pour ouvrir:
Soulevez le couvercle de la platine jusqu’à temps qu’il
s’arrête.
Pour fermer:
Abaissez doucement le couvercle.
Assurez-vous de tenir le couvercle par les bords afin d’éviter
de coincer vos doigts quand il se ferme.
Avant l’utilisation, détachez
le protecteur de l’aiguille
(couvercle plastique blanc)
en tirant directement vers
l’avant de la cartouche
dans la direction de la
flèche.
Page 22
39
FRANÇAIS
Nomenclature (Panneau avant/Télécommande)
Témoin STANDBY
Ce témoin s’allume quand l’appareil est en mode d’attente
(Standby). Quand l’appareil est allumé ce témoin est éteint.
REMOTE SENSOR
Quand vous utilisez la télécommande, pointez la vers le
capteur de télécommande.
Afficheur
FUNCTION (AUX/PHONO, TAPE, TUNER, CD)
Utilisez ces touches pour choisir une source.
En mode TUNER, appuyez sur la touche TUNER (BAND) pour
choisir le FM ou le AM
Témoin MUTING
Ce témoin s’allume pendant la coupure des sons
DISPLAY
Utilisez cette touche pour changer l’afficheur.
EEPS
Utilisez cette touche pour choisir une égalisation pré-reglée.
VOLUME
Tournez ce bouton (ou appuyez sur les touches VOLUME de
la télécommande) pour régler le volume.
MUTING
Utilisez cette touche pour assourdir le son.
DISC 1, 2, 3
Utilisez ces touches pour choisir un disque.
PROGRAM/CLOCK ADJ
En mode CD, utilisez cette touche pour programmer les
pistes.
En mode TUNER, utilisez cette touche pour sauvegarder les
canaux pré-réglés en mémoire.
Cette touche est aussi utilisée pour le réglage de l’horloge.
SKIP/UP/DOWN (.m/,/)
En mode CD, appuyez cette touche momentanément pour
sauter des pistes. Maintenez la pression d’un doigt sur la
touche pour chercher une section d’une piste.
En mode TUNER, appuyez cette touche momentanément
pour syntoniser les postes.
PLAY
Utilisez cette touche pour engendrer ou pausé la lecture d’un
CD.
STOP
Utilisez cette touche pour arrêter la lecture du CD.
Q
P
O
N
M
L
K
J
I
H
G
F
E
D
Touche d’opération TAPE ! (BANDE !)
Touche d’’opération TAPE
@ (BANDE @)
PLAY :
Utilisez cette touche pour engendrer la lecture de bande.
SEARCH :
Utilisez ces touches pour le rembobinage ou l’avance rapide
de la bande.
STOP/EJECT :
Utilisez cette touche pour arrêter la lecture. En mode d’arrêt,
utilisez cette touche pour ouvrir le compartiment de la
bande.
PAUSE :
Utilisez cette touche pour pausé la lecture.
RECORD :
Utilisez cette touche pour engendrer l’enregistrement.
OPEN/CLOSE
Utilisez cette touche pour ouvrir ou fermer le tirroir du disque
DISC SKIP
Utilisez cette touche pour tourner le carousel.
Tirroir du disque
Compartiment de la bande
REPEAT/PRESET
En mode CD, utilisez cette touche pour une lecture répétée.
En mode TUNER, utilisez cette touche pour choisir les postes
pré-réglés.
SHUFFLE/PRESET
En mode CD, utilisez cette touche pour la lecture aléatoire.
En mode TUNER, utilisez cette touche pour choisir les postes
pré-réglés.
INTRO/FM MODE
En mode CD, utilisez cette touche pour choisir stéréo ou
mono.
PHONES
Pour une écoute privée, insérez la prise des écouteurs dans
cette prise et réglez le volume en tournant le bouton
VOLUME.
TIMER
Utilisez cette touche pour régler la minuterie.
BAND
En mode TUNER, utilisez cette touche pour sélectionner la
gamme, FM ou AM.
c
b
a
Z
Y
X
W
V
U
T
S
R
22
Preset Tuning
21
3
5
54
You can store FM and AM stations into preset channels 1 to 20
respectively.
Press the TUNER (BAND) button or the FUNCTION
button to select “TUNER”.
1
Select AM or FM by pressing the TUNER (BAND) button.
2
Select the station you want to listen to.
3
Press the PROGRAM button.
4
The MEMORY indicator blinks.
Within 5 seconds, select a preset channel to store the
station using the PRESET buttons, and then press the
PROGRAM button.
5
The station is stored and the MEMORY indicator goes off.
To store more stations, repeat steps to .
52
Select AM or FM by pressing the TUNER(BAND) button.
1
Press the PRESET button repeatedly until the desired
preset station is found.
2
How to select preset stations
1
2
REMAINCH REPEAT SHUFFLE
TIMER
AUX
CDTAPE TUNER
ON OFF
STEREO
CLASSIC
ROCK
POPS
FLAT
PLAY
TRACK
MHz
kHz
INTRO
MEMORY
2
1
3
REMAINCH REPEAT SHUFFLE
TIMER
AUX
CDTAPE TUNER
ON OFF
STEREO
CLASSIC
ROCK
POPS
FLAT
PLAY
TRACK
MHz
kHz
INTRO
MEMORY
2
1
3
preset channel
Page 23
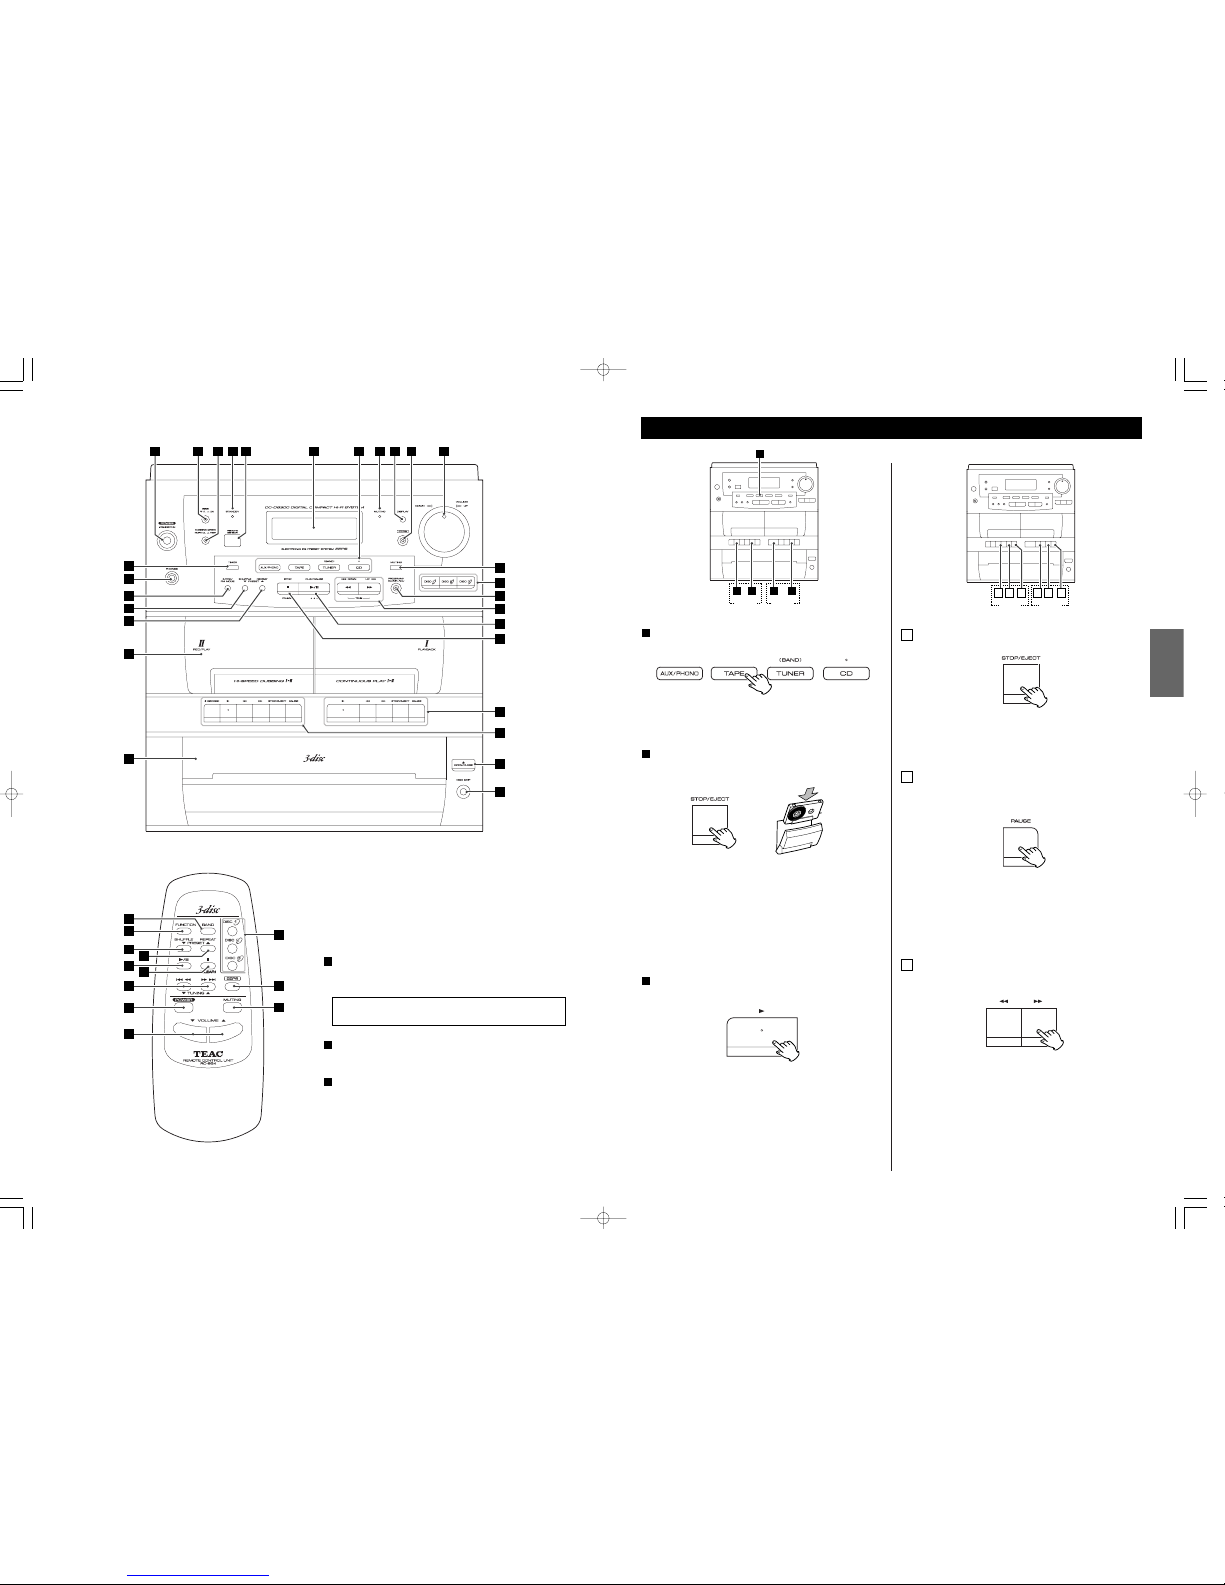
23
ENGLISH
Listening to Tapes
1
23
TAPE
!
23
TAPE
@
Press the TAPE button or the FUNCTION button to select
“TAPE” .
1
Load a pre-recorded cassette tape.
2
Press the STOP/EJECT button to open the cassette holder,
load a cassette tape with its exposed side facing down, and
close the holder.
< This unit can play normal (Type
!
) tape only.
< You can use either TAPE
!
or TAPE @for playback.
Press the PLAY button to start playback.
3
To stop playback
A
Press the STOP/EJECT button to stop playback.
To suspend playback temporarily
(pause mode)
B
Press the PAUSE button. Playback stops at the current
position. To resume playback, press the PAUSE button
again.
Fast forward and rewind
C
Press the m or , button.
Press the STOP button to stop the fast forward or rewind
operation.
< When the tape is wound up to the end, be sure to press the
STOP button to stop the unit.
AC
TAPE
!
BAC
TAPE
@
B
38
A B IC D H K
L
T
U
R
M
F GE J
N
O
S
V
G
c
Y
P
O
A
K
Q
X
M
J
L
a
Z
Y
X
b
W
P
Q
Note:
Pour simplifier les explications, les instructions utilisent les
noms des touches et commandes sur le panneau avant, sans
mentionner l’utilisation de la télécommande.
POWER
Appuyez cette touche pour allumer ou éteindre l’appareil
(standby).
BBS
Utilisez cette touche pour accentuer les graves.
DUBBING SPEED
Utilisez cette touche pour choisir la vitesse de copiage.
C
B
A
L’appareil tire de la prise secteur une puissance faible mais non
nulle lorsque l’interrupteur POWER est sur la position OFF.
Page 24
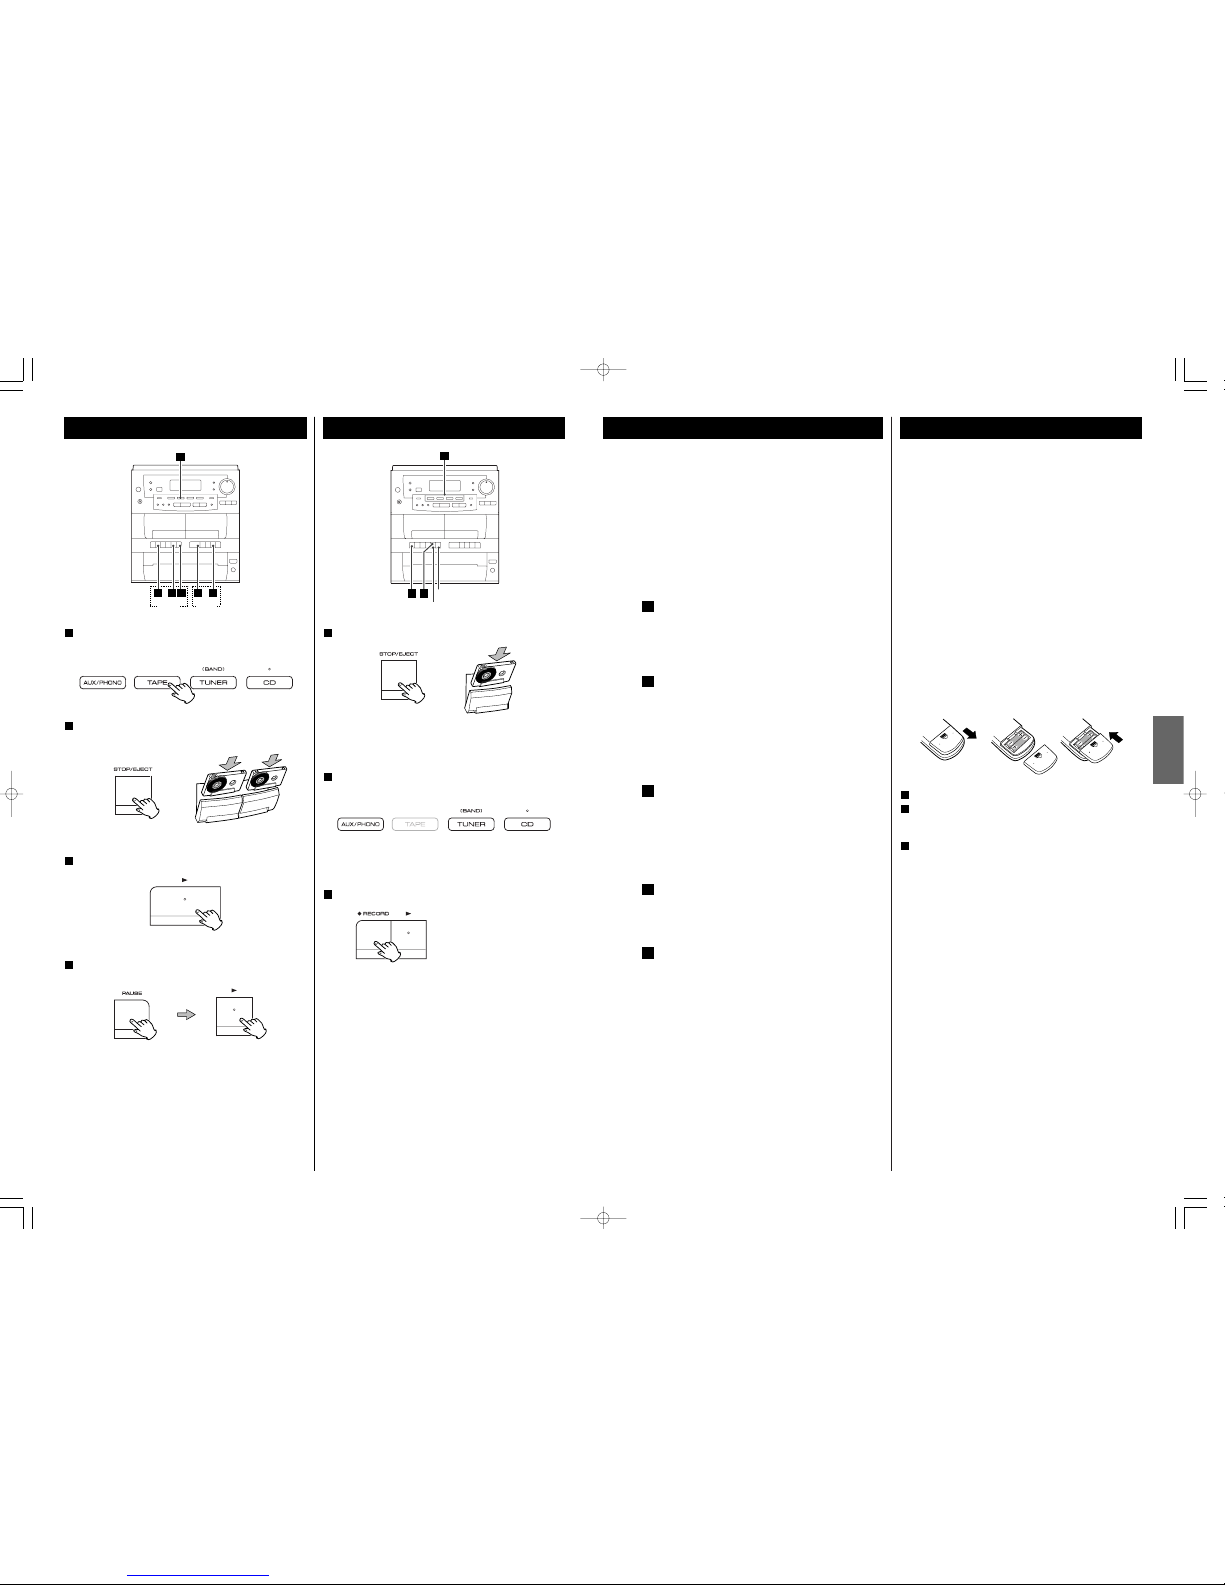
37
FRANÇAIS
Antenne FM
En mode FM, syntonisez un poste FM et étendre le fil pour
trouver une position donnant la meilleure réception. Cette
antenne doit être repositionner ci l’appareil est déplacé.
HAUT-PARLEURS
Branchez la prise du haut-parleur gauche dans L et la prise
du haut-parleur droit dans R.
< Si vous utilisez des haut-parleurs autre que ceux fournis avec
le système, l’impédance devrait être 6 ohms ou plus.
< Branchez strictement des haut-parleurs à ces bornes.
AUX
Vous pouvez brancher un lecteur DVD, magnétophone à
cassette etc... à cet appareil.
Branchez le composant utilisant des cordons RCA. Assurezvous de brancher la prise blanche avec le connecteur blanc
(Gauche) et la prise rouge avec le connecteur rouge (Droit).
Cordon d’alimentation CA
Branchez ce cordon d’alimentation dans une prise de
courant CA
Commutateur RESET
Dans les cas suivants, les boutons de fonctions peuvent ne
pas fonctionner correctement
• Quand le système est endommagé par un choc électrique.
• Quand l’alimentation est irrégulière ou bruyante
Dans ces cas, appuyer la touche RESET une ou deux fois
avec un crayon ou un stylo.
E
D
C
B
A
Boîtier de télécommande
Le boîtier de télécommande fourni permet la commande à
distance defourni permet la commande à distance de l’appareil.
Pour l’utilisation du boîtier de télécommande, le diriger vers le
détecteusation du boîtier de télécommande, le diriger vers le
détecteur de télécommande du panneau avant de l’appareil.
< Même si le boîtier de télécommande est activé dans la zone de
fonctionnement, la commande à distance peut être impossible
s’il y a des obstacles entre le lecteur et le boîtier de
télécommande.
< Si le boîtier de télécommande fonctionne dans le voisinage
d’autres appareils générant des rayons infrarouges, ou si
d’autres télécommandes utilisant des rayons infrarouges sont
utilisées près du lecteur, le lecteur peut de ne pas bien
fonctionner. Dans la situation inverse, les autres apaareils
peuvent ne pas bien fonctionner.
Mise en place des piles
Retirer le couvercle du compartiment des piles.
Introduire deux piles “AAA“ (R03, UM-4). S’assurer que les
piles sont correctement mises en respectant les polarités plus
+ et moins _ .
Fermer le couvercle jusqu’au déclic.
Remplacement des piles
Si vous remarquez que la distance entre le boîtier de
télécommande et le lecteur devient plus courte pour un
fonctionnement correct, ceci indique que les piles sont usées.
Dans ce cas, remplacer les piles par des nouvelles.
Précautions à observer concernant les piles
< Bien placer les piles en respectant les polarités plus + et
moins _ .
< Utiliser des piles du même type. Ne jamais essayer d’utiliser
des types de pile différents ensemble.
< Des piles ou des batteries peuvent être utilisées. Se référer à
leurs étiquettes pour les précautions à respecter.
< Si le boîtier de télécommande n’est pas utilisé pendant une
longue période (pluss d’un mois), retirer les piles du boîtier de
télécommande pour éviter des fuites de pile. Si elles coulent,
essuyer le liquide dans le compartiment des piles et remplacer
les piles par des neuves.
< Ne pas chauffer, démonter les piles ni les mettre au feu.
3
2
1
ATTENTION
Mettre tous les éléments de votre chaîne hors tension avant
de procéder au raccordement de cet appareil.
Lire attentivement le mode d’emploi de chacun des
éléments que vous souhaitez utiliser avec cet appareil.
< Assurez vous que chaque fiche est bien enfoncée. Pour
éviter tout ronflement ou bruit parasite, ne pas regrouper les
fils de connexion avec le cordon d’alimentation ou avec les
fils des enceintes.
123
24
Extended Playback
Press the TAPE button or the FUNCTION button to select
“TAPE” .
1
23
TAPE
!
24 4
TAPE
@
1
Load cassette tapes into TAPE !and TAPE @.
2
Press the PLAY button of TAPE !.
3
Press the PAUSE and the PLAY button of TAPE @.
4
When TAPE !stops, TAPE @starts playback automatically.
When TAPE
@
stops, the extended playback ends.
Recording (TAPE II only)
3 1
PAUSE
STOP/EJECT
2
Load a recordable cassette tape into TAPE @.
1
< You can use normal (Type!) tape only.
< If the safety tabs of the cassette tape have been broken off,
cover the holes with adhesive tape.
Select the source to be recorded by pressing the
corresponding button.
2
< Do not select TAPE.
< Prepare the source to be recorded. When you select
“TUNER”, tune in a station.
Press the RECORD button to start recording.
3
< When you select “CD”, the playback of CD starts
simultaneously.
< To stop recording temporarily, press the PAUSE button. To
restart the tape, press the PAUSE button again.
< To stop recording, press the STOP button.
CD Synchronous Recording
1. Load a recordable cassette tape into TAPE @.
2. Press the CD button or the FUNCTION button to select “CD”.
3. Select a disc to be recorded by pressing the corresponding
button (DISC 1, 2 or 3) or the DISC SKIP button.
< You can program tracks to be recorded.
4. Press the RECORD button to start recording.
The playback of CD starts simultaneously.
< To stop recording, press the STOP button.
When the RECORD button is
pressed, the PLAY button is also
pressed down automatically.
Page 25
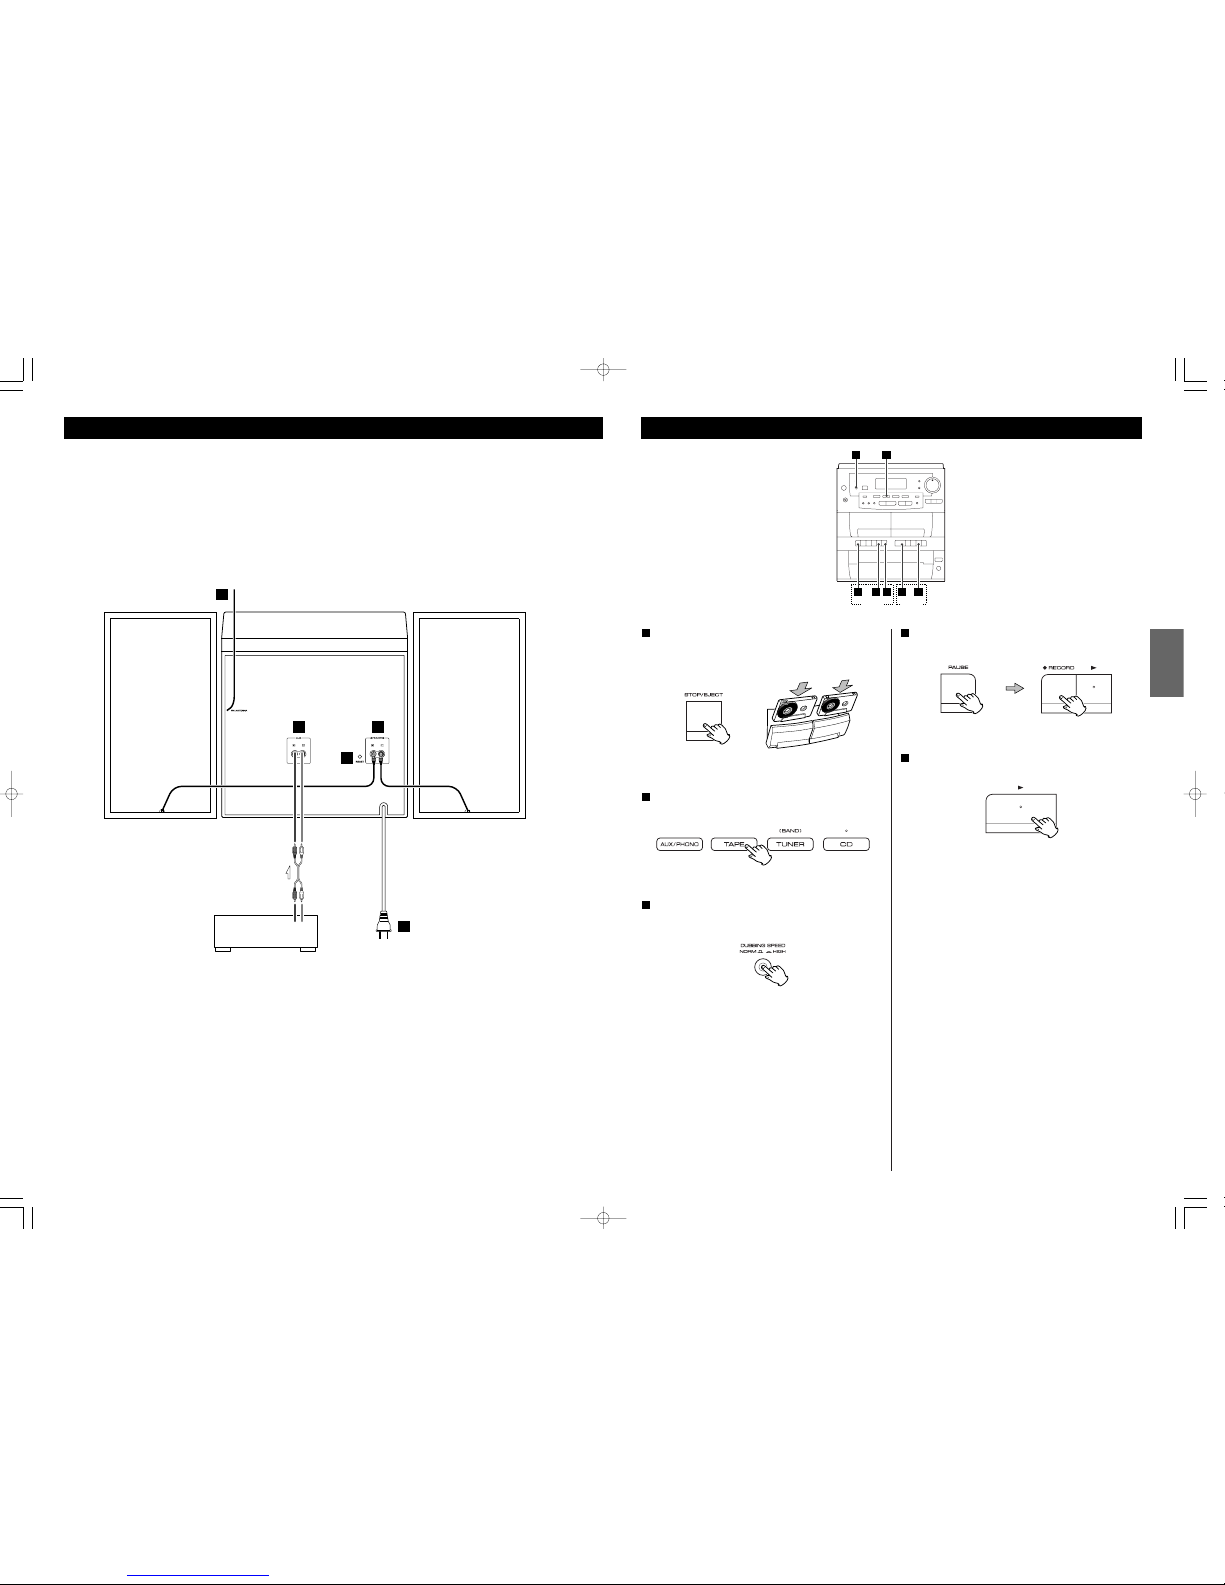
25
ENGLISH
Dubbing (Copy from TAPE I to TAPE II)
23
15
TAPE
!
TAPE
@
1 44
Load a pre-recorded cassette tape into TAPE !and a
recordable cassette tape into TAPE
@
.
< You can use normal (Type
!
) tape only.
1
Press the TAPE button or the FUNCTION button to select
“TAPE”.
2
Select the dubbing speed by pressing the DUBBING
SPEED button.
3
HIGH:
Dubbing is performed at high speed.
(You may lose some fidelity during high speed dubbing.
Make a trial recording to verify the audio quality.)
NORMAL:
Dubbing is performed at normal speed.
Press the PAUSE button and the RECORD button of
TAPE
@
.
4
Press the PLAY button of TAPE !.
5
The dubbing starts.
< Do not select another source during dubbing, or the dubbing
will be interrupted.
< To stop dubbing, press the STOP buttons of TAPE
!
and @.
36
Branchement
LINE OUT
RL
DVD, CD-R, etc.
A
BC
E
D
Page 26
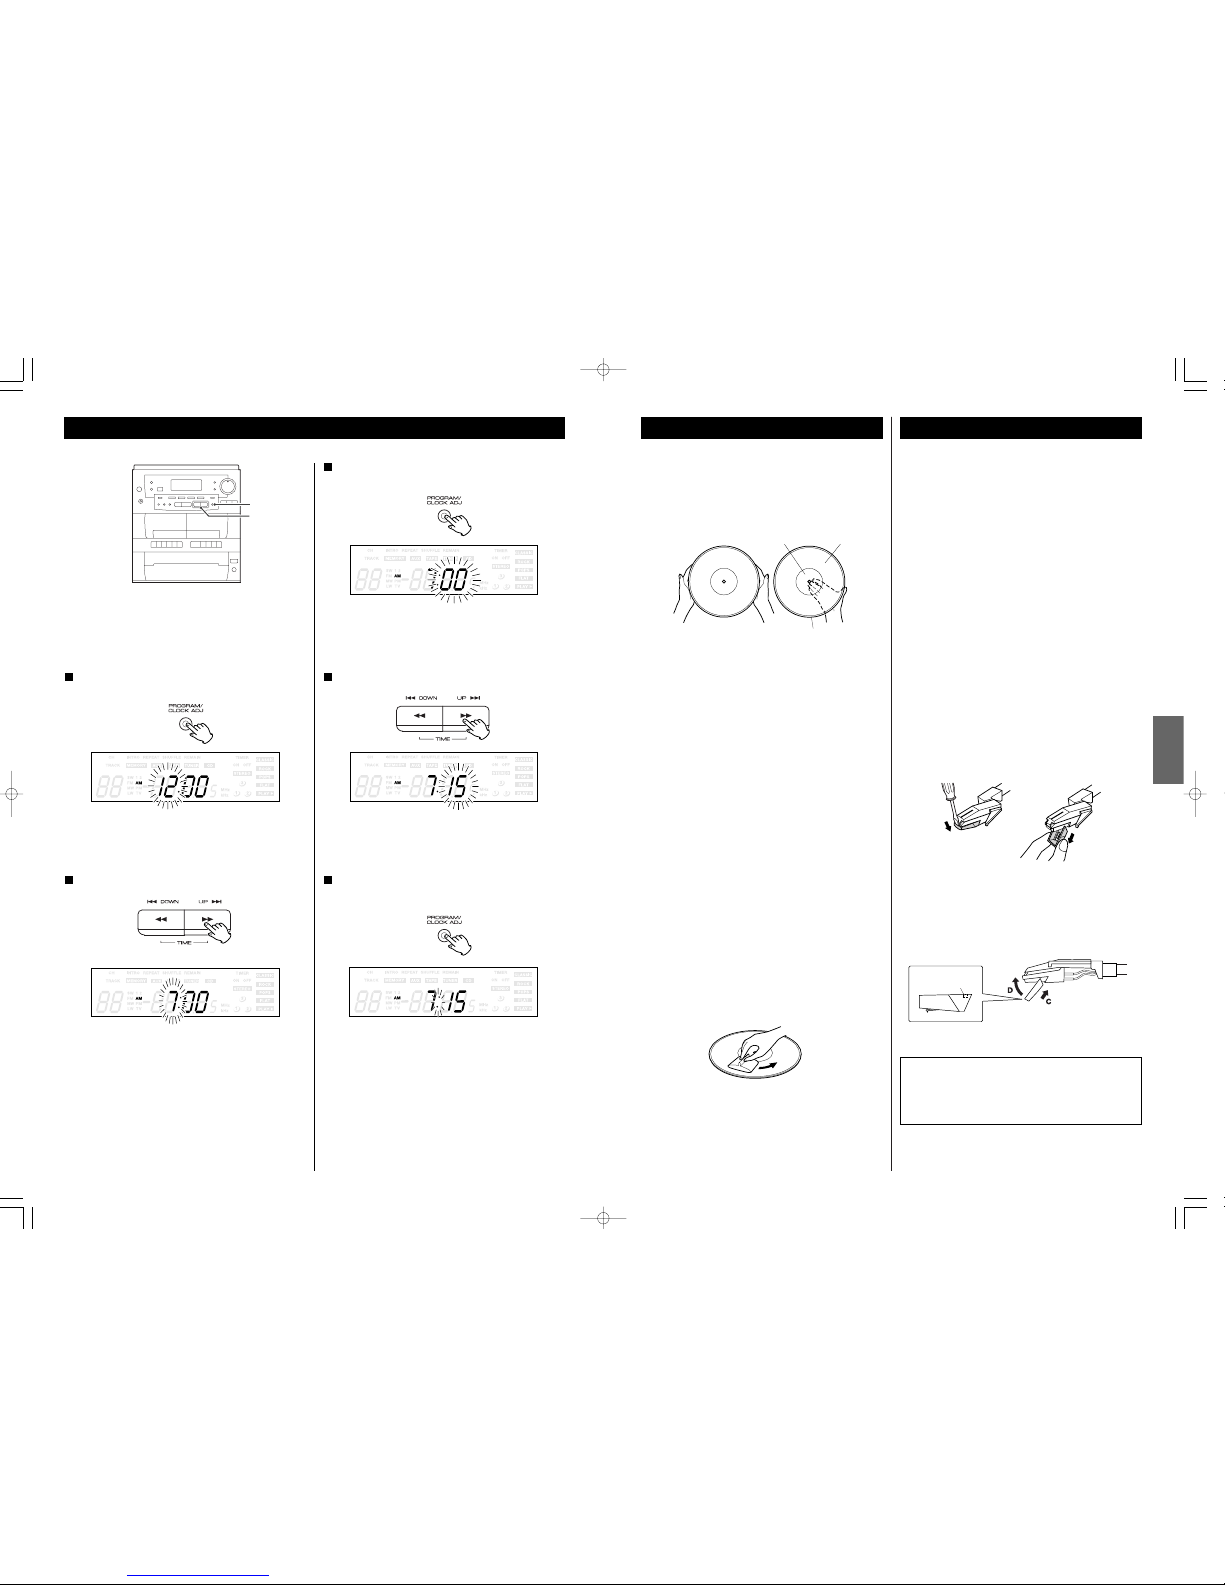
35
FRANÇAIS
Manutention des disques
< Tenir vos disques loin de la poussière. Gardez dans un endroit
frais et sec.
< Afin d’éviter la poussière et les égratignures, gardez vos
disques dans leurs étuis quand ils ne sont pas utilisés.
< Entreposez vos disques debout sur leurs bords. Les disques
entreposés horizontalement vont éventuellement pliés et
gondolés.
< Ne pas exposez vos disques aux rayons solaires directs ou une
humidité et température élevées. Une exposition prolongée à
de hautes températures va gondolé le disque.
< Ne pas entreposez vos disques dans la valise de votre voiture.
Les températures existantes dans la valise vont ruinées votre
collection.
< Entreposez vos disques dans un endroit ayant une
température et humidité stables.
< Si le disque est sale, essuyez gentillement sa surface utilisant
une motion circulaire, utilisant un chiffon doux anti-statique.
Plusieurs systèmes de nettoyage de disque sont disponibles
chez plusieurs marchands et sur ligne. TEAC n’endorse pas
aucun produit spécifique mais, dépendemment de la
condition de la collection de vos disques, çelà peut s’avérer
être un bon choix. Des disques propres protègent votre
aiguille contre l’usure.
< Ne pas touchez les sillons. Manupulez les disques par leur
bords ou l’étiquette seulement, avec des mains propres. Les
huiles de la peau, même si les mains sont propres, peuvent
laisser un résidue sur la surface du disque qui va
graduellement détériorer la qualité de vos disques.
étiquette
sillons
bord
Comment remlacer l’aiguille
L’aiguille devrait durer environ 50 heures avec un usage normal.
Par contre, il est recommendé de remplacer l’aiguille aussitôt que
vous remarquez un changement de la qualité sonore. Un usage
prolongé d’une aiguille usée peut endommager vos disques.
L’usure est accélérée quand vous jouez des disques 78 RPM.
L’augmentation de vitesse accélère l’usure.
Avertissement:
< Ne pas enlever ou plier l’aiguille.
< Pour éviter des blessures, ne pas toucher l’aiguille.
< Éteindre l’appareil avant de remplacer l’aiguille.
< Tenir loin des enfants.
< Manipuler avec soin, car l’aiguille est délicate. L’utilisation
d’une aiguille pliée ou brisée peut endommager le disque et
engendrer un mauvais fonctionnement.
< Ne pas exposer l’aiguille à une chaleur élevée.
< Contactez une station de service qualifiée si vous avez de la
difficulté à remplacer l’aiguille.
Enlèvement de l’aiguille
1. Placer un tournevisse au bout de l’aiguille et pousser vers le
bas dans la direction “A”.
2. Tirer dans la direction “B”.
A
B
爪部(内側)
Goupilles de guidage
(en dedans)
Installation d’une nouvelle aiguille
1. Tenir le bout de l’aiguille et insérer l’autre section dans la
direction “C”.
2. Poussez vers le haut dans la direction “D” jusqu’à temps que
le bout enclenche.
L’aiguille de remplacement pour ce DC-D6300 est STL-103.
Veuillez contacter Teac Canada, département des pièces au
(905) 890-8008, poste 118 pour commander. Vous pouvez
aussi obtenir le nom d’une station de service qui peut
remplacer l’aiguille pour vous au même numéro.
26
Setting the Clock
CLOCK ADJ
UP/DOWN
< If the unit is on, press the POWER switch to turn it off, or
press the DISPLAY button once or twice to display the clock
(“:” will blink).
Press the CLOCK ADJ button.
The “hour” value blinks.
1
Press the UP or DOWN button to set the current hour.
2
Press the CLOCK ADJ button.
The “minute” value blinks.
3
Press the UP or DOWN button to set the current minute.
4
Press the CLOCK ADJ button.
The clock starts.
5
Page 27
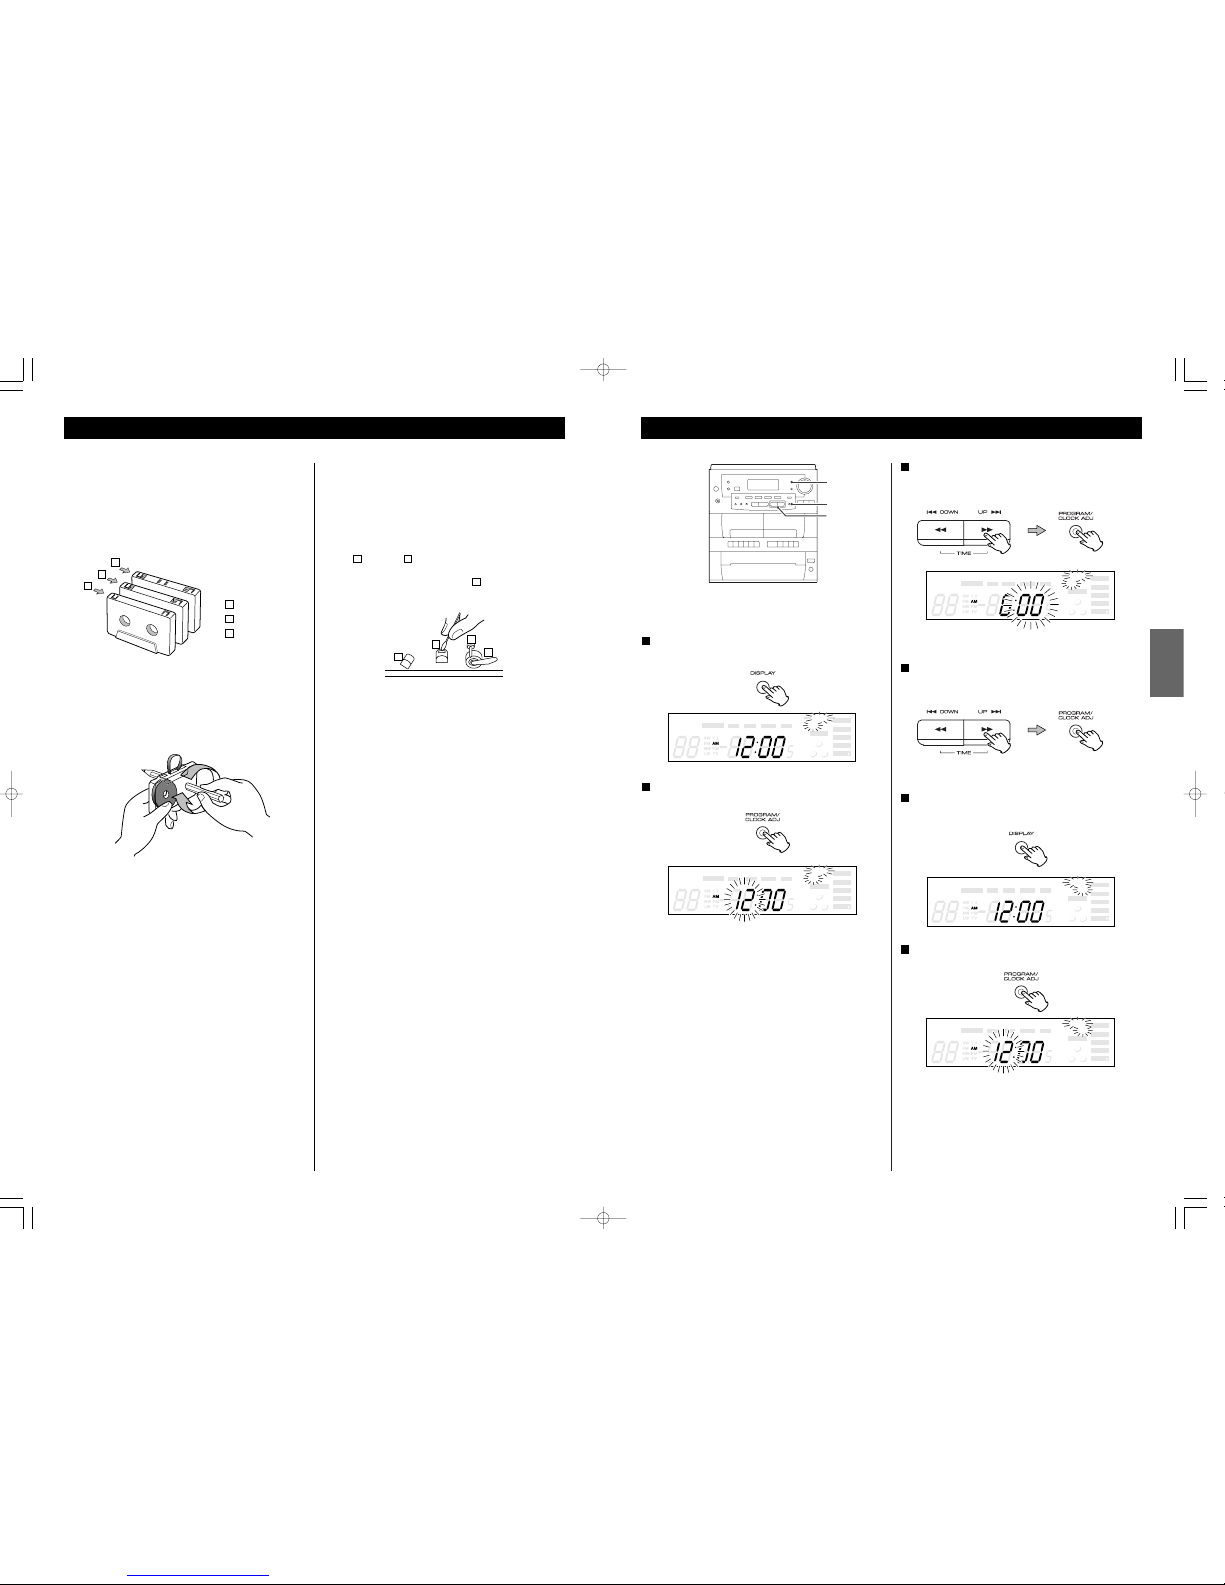
27
ENGLISH
Setting the Timer 1
CLOCK ADJ
DISPLAY
UP/DOWN
Adjust the clock before setting the timer.
Press the DISPLAY button repeatedly until “TIMER ON”
indicator appears on the display.
1
Within 5 seconds, press the CLOCK ADJ button.
2
The “hour” value starts flashing.
< When no button is pressed for 10 seconds, the timer setting
mode will be cancelled.
The “minutes” value starts flashing.
Press the UP or DOWN button to set the start time
(minutes), and press the CLOCK ADJ button.
4
Press the DISPLAY button.
“TIMER OFF” indicator appears on the display.
5
Within 5 seconds, press the CLOCK ADJ button.
6
The “hour” value starts flashing.
REMAINCH REPEAT SHUFFLE
TIMER
AUX
CDTAPE TUNER
ON OFF
STEREO
CLASSIC
ROCK
POPS
FLAT
PLAY
TRACK
MHz
kHz
INTRO
MEMORY
2
1
3
REMAINCH REPEAT SHUFFLE
TIMER
AUX
CDTAPE TUNER
ON OFF
STEREO
CLASSIC
ROCK
POPS
FLAT
PLAY
TRACK
MHz
kHz
INTRO
MEMORY
2
1
3
REMAINCH REPEAT SHUFFLE
TIMER
AUX
CDTAPE TUNER
ON OFF
STEREO
CLASSIC
ROCK
POPS
FLAT
PLAY
TRACK
MHz
kHz
INTRO
MEMORY
2
1
3
REMAINCH REPEAT SHUFFLE
TIMER
AUX
CDTAPE TUNER
ON OFF
STEREO
CLASSIC
ROCK
POPS
FLAT
PLAY
TRACK
MHz
kHz
INTRO
MEMORY
2
1
3
REMAINCH REPEAT SHUFFLE
TIMER
AUX
CDTAPE TUNER
ON OFF
STEREO
CLASSIC
ROCK
POPS
FLAT
PLAY
TRACK
MHz
kHz
INTRO
MEMORY
2
1
3
Press the UP or DOWN button to set the start time
(hour), and press the CLOCK ADJ button.
3
34
Bandes
Manipulation des bandes
Utiliser un doigt ou un crayon pour tourner le moyeu de la
cassette et rattraper le jeu de la bande.
< Eviter de toucher la bande. Les empreintes digitales attirent la
poussière et les saletés.
Ne pas entreposer des bandes dans les endroits suivants:
< Sur des radiateurs, au soleil ou dans un endroit où la
température est élevée.
< Près de haut-parleurs, sur des téléviseurs ou amplificateurs ou
encore près de champs magnétiques puissants.
< Dans des endroits où l’humidité est élevée ou poussiéreux et
sales.
< Eviter d’échapper ou soumettre les cassettes à des chocs
excessifs.
< Comme les bandes des cassettes C120 sont physiquement
faibles et peuvent facilement se coincer dans le mécanisme de
transport, ne pas les utiliser.
Choix de bande
Pour que le choix automatique de bande fonctionne
correctement, les bandes métals ou chromes (cobalt) doivent
posséder des trous d’identification.
< Cet appareil permet d’ utiliser des cassettes Normales (type!).
Démagnétisation des têtes
S’assurer que l’alimentation est coupée, puis démagnétiser les
têtes avec le démagnétiseur.
Pour plus de détails sur son utilisation, lire son manuel
d’instructions.
Entretien
Les têtes et le chemin de la bande doivent être nettoyés et
démagnétisés périodiquement.
Nettoyage du chemin de bande
< Appliquer un liquide de nettoyage de tête sur le cotontige
spécial ou sur un chiffon doux et frotter légèrement les
têtes ,
cabestans et toutes les pièces de métal du chemin
de bande.
< Nettoyer aussi le galet presseur avec un liquide de
nettoyage pour caoutchouc.
C
BA
(TAPE @uniquement)
Normale (Type!)
CrO
2 (Type
@
)
Métal (Type!%)
c
b
a
A
A
B
C
a
b
c
Page 28
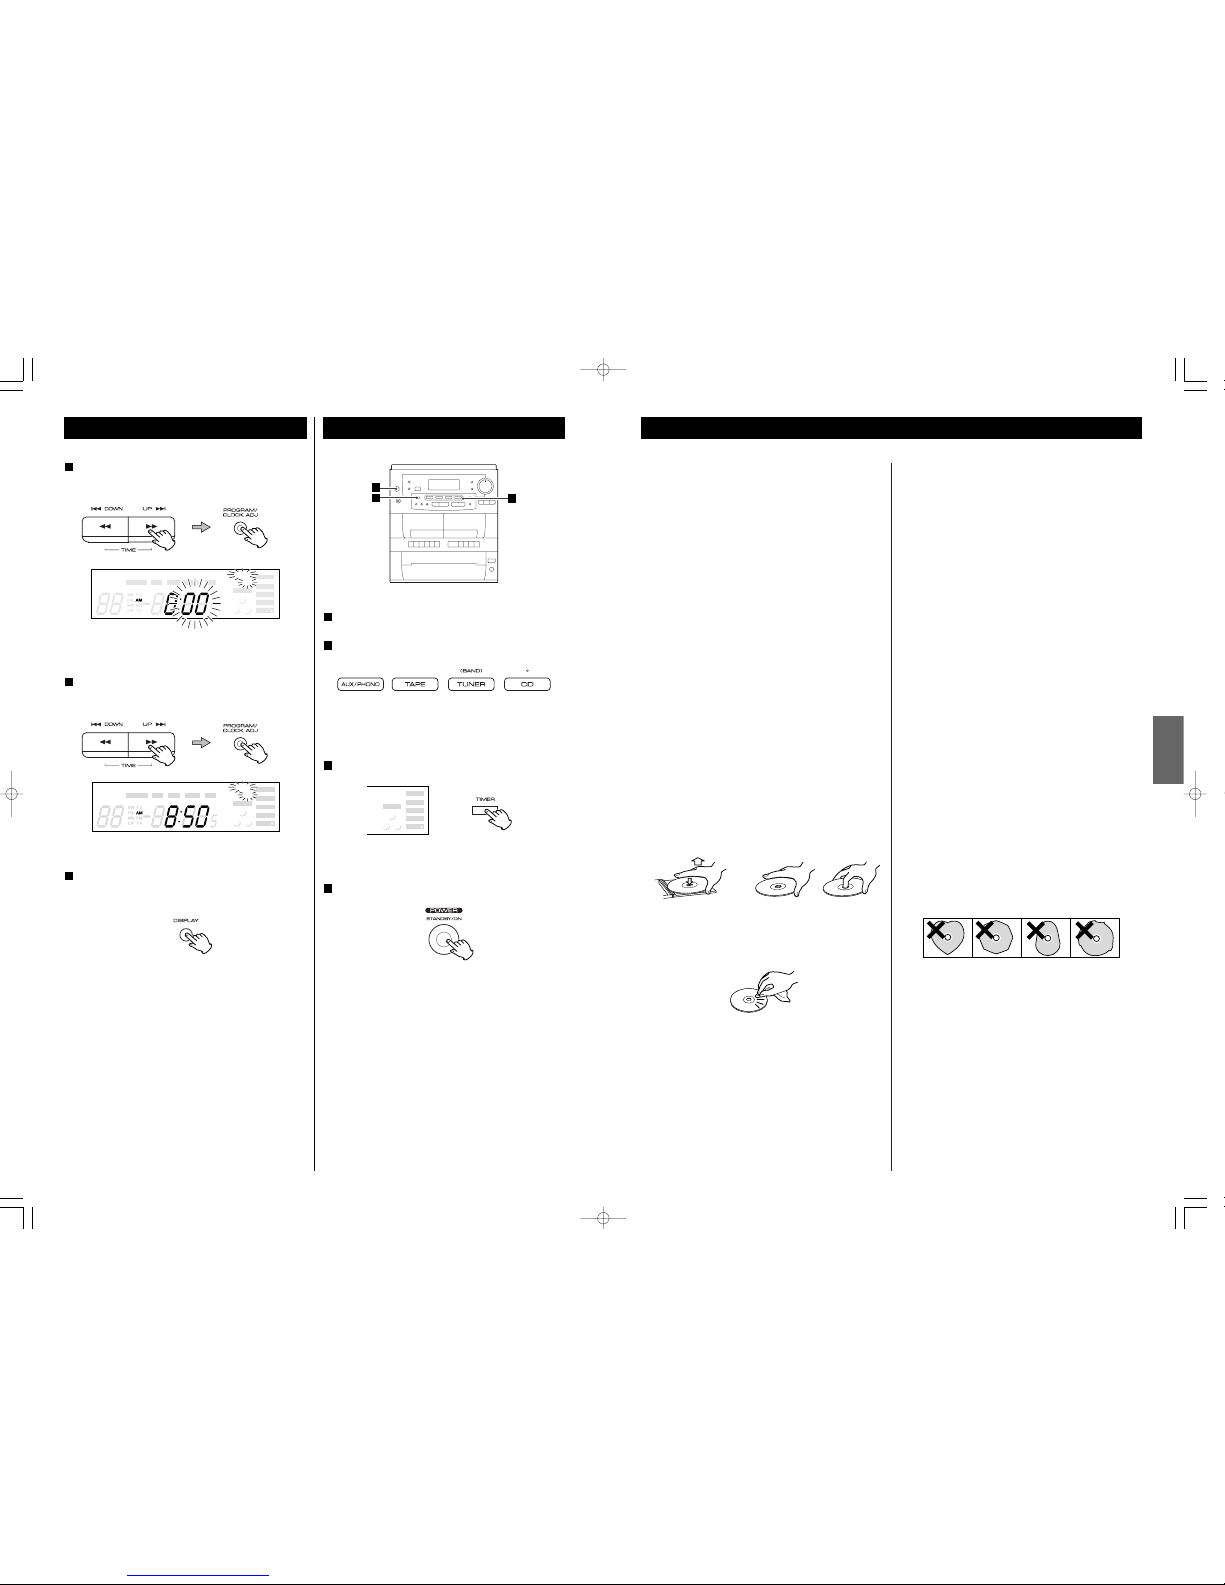
33
FRANÇAIS
Disques
< Ne jamais utiliser de produits chimiques, tels que des sprays,
des liquides antistatiques, de l’essence ou des diluants pour
nettoyer les disques. Ces produits chimiques risquent de
provoquer des dégâts irréparables sur la surface en plastique
du disque.
< Ranger les disques dans leur étui après utilisation afin d’éviter
de les rayer ou que de la poussière ne se dépose, ceci pouvant
compromettre la lecture par la tête laser.
< Ne pas exposer les disques à la lumière directe du soleil, à une
température élevée ou à une humidité excessive pendant une
période prolongée. De telles expositions risquent de
provoquer une déformation du disque.
< Les disques CD-R sont plus sensibles aux effets de la chaleur
et aux rayons ultraviolets que les disques compacts ordinaires.
Il est donc particulièrement important de les ranger dans un
endroit à l’abri de la lumière directe du soleil et de toute
source de chaleur, telle que des radiateurs ou des appareils
électriques, susceptibles de dégager de la chaleur.
< Il est déconseillé d’utiliser des disques CD-R inscriptibles, la
face portant l’étiquette risquant d’être collante et
d’endommager l’appareil.
< Ne jamais coller d’étiquette ou de feuille de protection sur le
disque; ne pas utiliser de spray destiné à déposer sur le disque
une couche de protection.
< Utiliser, pour écrire des informations sur la face portant
l’étiquette, un feutre utilisant une encre à base d’huile. Ne
jamais utiliser de stylo bille ou de stylo à pointe dure, qui
risquerait d’abîmer la surface enregistrée du disque.
< Ne jamais utiliser de stabilisateurs. L’utilisation, avec cet
appareil, de stabilisateurs pour CD disponibles dans le
commerce, pourrait endommager les mécanismes de
l’appareil et provoquer son dysfonctionnement.
< Ne pas utiliser de CD ayant une forme irrégulière (octogonale,
en forme de coeur, etc.), ceux-ci risquant d’endommager
l’appareil.
Disques pouvant être lus avec ce lecteur :
• CD audio classiques, portant le logo CD-DA sur l’étiquette :
?
• Disques CD-R correctement finalisés
Note :
< Selon la qualité du disque et/ou la qualité de l’enregistrement,
certains disques CD-R risquent de ne pas pouvoir être lus.
< Cet appareil ne permet pas de lire les disques CD-RW.
< Les disques protégés contre la reproduction, ainsi que les
disques non-conformes à la norme CD risquent de ne pas
pouvoir être lus correctement par ce lecteur.
Nous déclinons toute responsabilité en cas de dommages
provoqués par la lecture de disques de ce type et pour la
qualité sonore résultante. Si vous rencontrez des difficultés
avec des disques non conformes, contactez directement les
producteurs du disque.
< Placer toujours le disque sur le plateau, la face imprimée sur le
dessus (les disques compacts ne sont enregistrés que sur une
seule face.)
< Pour sortir un disque de son emballage, appuyer sur la partie
centrale de l’étui et sortir le disque en veillant à bien le tenir
par les bords.
Comment sortir un disque
de son emballage
< Si la surface du disque est sale, l’essuyer soigneusement à
l’aide d’un chiffon doux et sec.
< En cas de doute quant à la manipulation des CD-R, lire les
instructions fournies avec le disque ou contacter directement
le fabricant du disque.
Comment tenir le disque
28
Setting the Timer 2
Press the UP or DOWN button to set the stop time
(minutes), and press the CLOCK ADJ button.
8
Press the DISPLAY button (or leave the unit idle for 5
seconds).
Now the timer setting is stored in memory.
9
Timer Playback
Set the start time and stop time (see 27 page).
Select a source by pressing the corresponding button.
2
1
< Prepare the source. When you select “TUNER”, tune in a
station.
Press the TIMER button.
3
“TIMER” indicator appears on the display.
Press the POWER switch to turn the unit off (standby).
4
When “TAPE” is selected, press the PLAY button of TAPE !or
@
.
The unit will turn on and off at the specified time.
< The timer doesn’t work when the unit is turned on manually.
< When you don’t use timer, press the TIMER button to turn it
off.
4
3
2
TIMER
ON OFF
STEREO
CLASSIC
ROCK
POPS
FLAT
PLAY
MHz
kHz
2
1
3
REMAINCH REPEAT SHUFFLE
TIMER
AUX
CDTAPE TUNER
ON OFF
STEREO
CLASSIC
ROCK
POPS
FLAT
PLAY
TRACK
MHz
kHz
INTRO
MEMORY
2
1
3
The “minutes” value starts flashing.
REMAINCH REPEAT SHUFFLE
TIMER
AUX
CDTAPE TUNER
ON OFF
STEREO
CLASSIC
ROCK
POPS
FLAT
PLAY
TRACK
MHz
kHz
INTRO
MEMORY
2
1
3
Press the UP or DOWN button to set the stop time
(hour), and press the CLOCK ADJ button.
7
Page 29
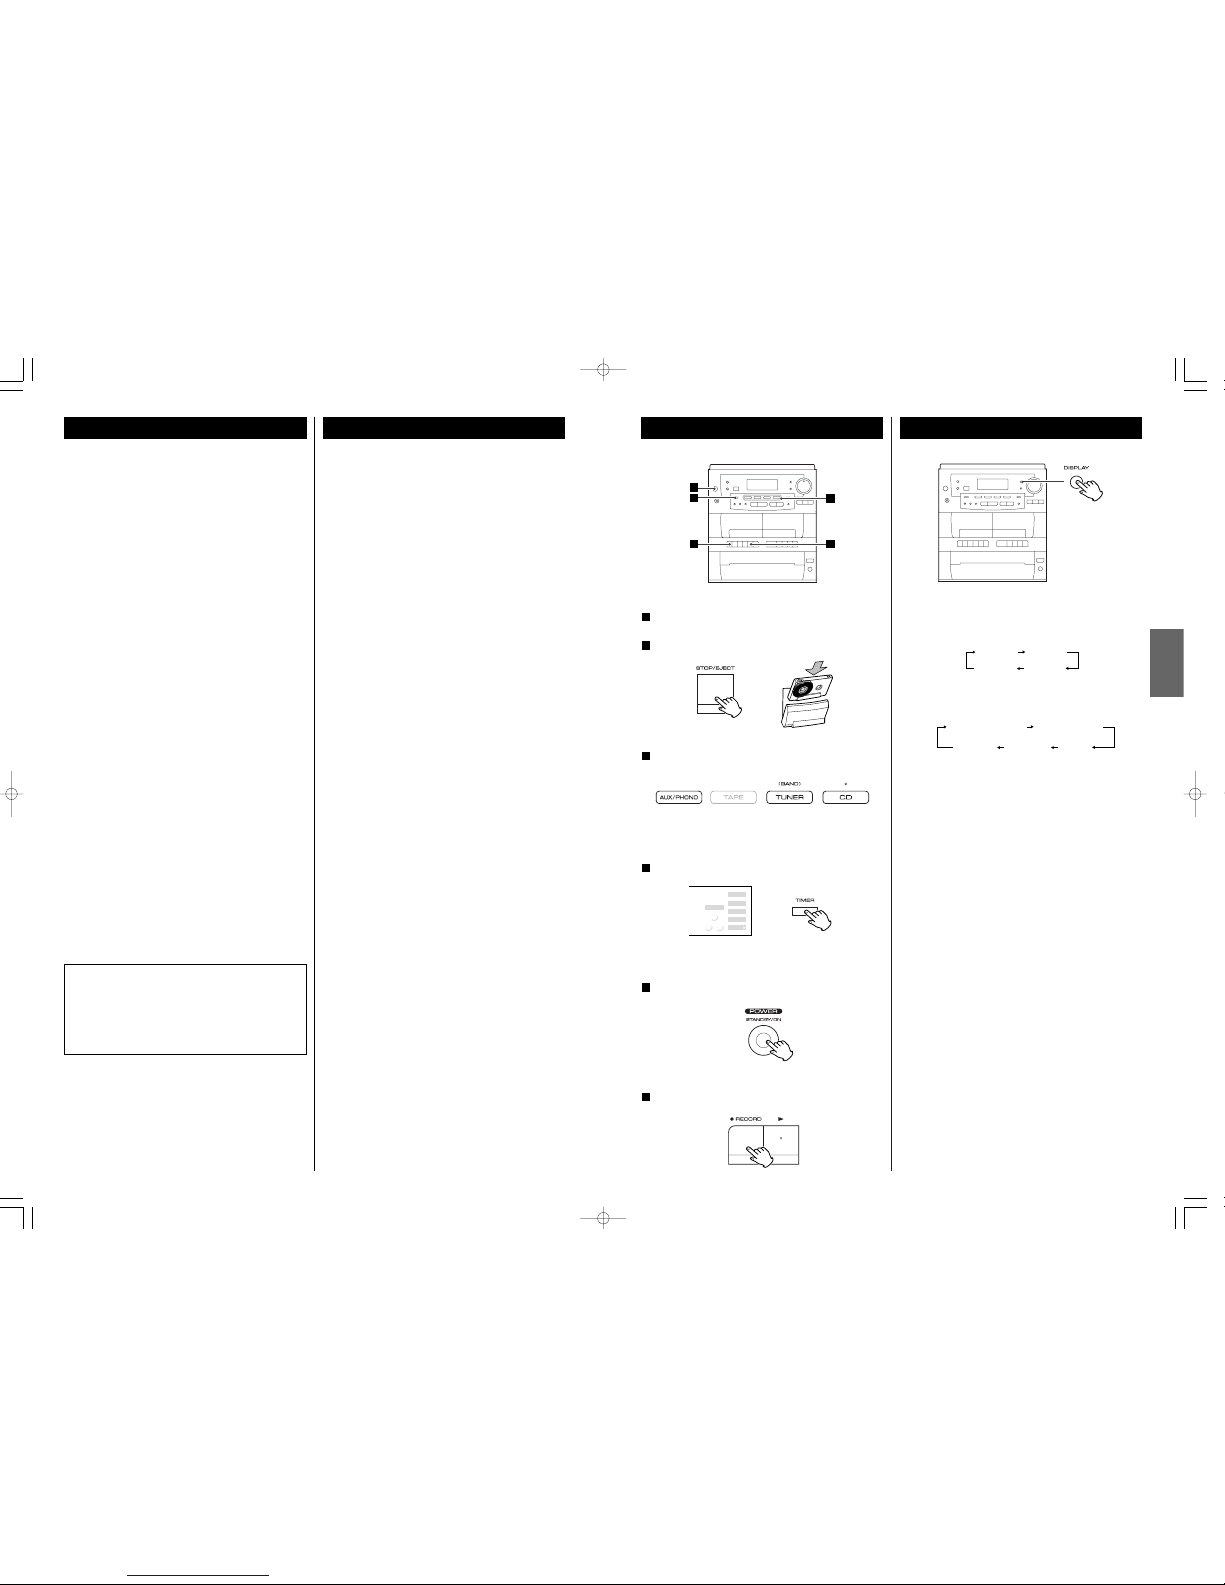
29
ENGLISH
Timer Recording
Set the start time and stop time (see 27 page).
Load a recordable cassette tape into TAPE
@
.
2
1
Select a source to be recorded by pressing the
corresponding button.
3
< Don’t select “TAPE”.
< When you select “TUNER”, tune in a station.
Press the TIMER button.
4
“TIMER” indicator appears on the display.
Press the POWER switch to turn the unit off (standby).
5
Press the RECORD button of TAPE @.
6
5
4
6
3
2
Display
Each time the DISPLAY button is pressed, the display is changed
as follows:
During playback of CD:
When the unit is on:
“clock”, “timer on” or “timer off” is displayed for 5 seconds,
and then returns to “source”.
When the unit is off:
“timer on” or “timer off” is displayed for 5 seconds, and then
returns to “clock”.
elapsed time of
the current track
remaining time
of the disc
timer off timer on clock
(source) clock
timer off timer on
TIMER
ON OFF
STEREO
CLASSIC
ROCK
POPS
FLAT
PLAY
MHz
kHz
2
1
3
32
Sommaire
Nous vous remercions pour l’achat d’un appareil TEAC. Lire
ce manuel avec attention pour obtenir les meilleures
performances possibles de cet appareil.
Avant l’utilisation
AVERTISSEMENT
Ne pas exposer cet appareil à tout liquide. Tenoir loin tout
objects contenant des liquides tel que vases, verres d’eau,
plantes etc… du dessus de l’appareil.
Ne pas installer cet appareil dans un endroit constraint tel que
bibliothèque ou endroit semblable.
Lire ce qui suit avant d’utiliser l’appareil
< Il est possible que l’appareil devient chaud durant l’utilisation,
toujours laisser un espace suffisant autour de l’appareil pour
la ventilation.
< La tension d’alimentation doit correspondre à la tension
imprimée sur le panneau arrière, si vous avez des doutes
concernant l’alimentation de l’appareil consultez un
électricien.
< Choisir l’emplacement de l’appareil soigneusement. Évitez de
l’exposer directement aux rayons solaires ou près d’une
source de chaleur. Évitez aussi des endroits sujêt aux
vibrations poussière excessive, chaleur, froid et humidité.
< Ne pas installer l’appareil au dessus d’un
amplificateur/récepteur ou n’importe quel appareil
électronique générant de la chaleur.
< Ne pas ouvrir le boitier scellé çelà peut endommager le circuit
ou causer un choc électrique. Si un object pénètre l’appareil
consultez votre dépositaire Teac ou agence de service.
< Quand vous débranchez l’appareil, toujours tirez la prise,
jamais le cordon d’alimentation.
< Pour faire en sorte que la tête de lecture laser reste propre, ne
jamais la toucher avec les doigts et ne pas oublier de fermer le
plateau porte-disque.
< Ne pas essayez de nettoyer l’appareil avec des dissolvants
chimiques, çelà peut endommager le fini. Utilisez un chiffon
propre et sec.
< Conservez ce livret dans un endroit sûr pour reférence future.
NE PAS DÉPLACER L’APPAREIL DURANT LA LECTURE
Ne PAS soulever ou déplacer l’appareil durant la lecture. Çelà
peut endommager le disque.
QUAND VOUS DÉPLACEZ CET L’APPAREIL
Quand vous changez l’endroit où l’appareil est installé ou
vous emballez l’appareil pour un déménagement, assurezvous d’enlever le disque. Le déplacement de cet appareil avec
un disque peut l’endommager. Si l’appareil va être emballé et
déplacer une grande distance, il est préfèrable de serrer la
visse de verrouillage du transport de la table tournante. Voir
page 40 pour des instructions.
Mise en garde sur la condensation
Si l’appareil (ou un disque) est déplacé d’un endroit froid à un
endroit chaud, ou utilisé après un changement soudain de
température, il existe un danger de condensation; des vapeurs
dans l’air peuvent ce condensées sur le mécanisme interne,
empêchant un bon fonctionnement. Pour prévenir çelà, ou s’il
se produit, laissez l’appareil allumé pour une ou deux heures.
L’appareil se stabilisera à la température ambiante.
Entretien
Toujours garder la table tournante propre.
Si la surface de l’unité est sale, essuyez avec un chiffon doux
ou utilisez un savon liquide doux dilué. Assurez-vous d’enlever
tout excès. Ne pas utiliser de dilluant, benzine ou alcool car ils
peuvent endommager la surfarce de l’appareil. Attendez que
la surface est sèche avant l’utilisation.
Sommaire . . . . . . . . . . . . . . . . . . . . . . . . . . . . . . . . . . . . . . . . 32
Avant l’utilisation . . . . . . . . . . . . . . . . . . . . . . . . . . . . . . . . . . 32
Disques. . . . . . . . . . . . . . . . . . . . . . . . . . . . . . . . . . . . . . . . . . 33
Bandes . . . . . . . . . . . . . . . . . . . . . . . . . . . . . . . . . . . . . . . . . . 34
Manutention des disques . . . . . . . . . . . . . . . . . . . . . . . . . . . . 35
Comment remlacer l’aiguille . . . . . . . . . . . . . . . . . . . . . . . . . . 35
Branchement . . . . . . . . . . . . . . . . . . . . . . . . . . . . . . . . . . . . . 36
Boîtier de télécommande . . . . . . . . . . . . . . . . . . . . . . . . . . . . 37
Nomenclature (Panneau avant/Télécommande). . . . . . . . . . . . 39
Nomenclature (Table tournante) . . . . . . . . . . . . . . . . . . . . . . . 40
Opération de base . . . . . . . . . . . . . . . . . . . . . . . . . . . . . . . . . 41
Écoute de disque . . . . . . . . . . . . . . . . . . . . . . . . . . . . . . . . . . 42
Écoute de CD . . . . . . . . . . . . . . . . . . . . . . . . . . . . . . . . . . . . . 44
Lecture programmée. . . . . . . . . . . . . . . . . . . . . . . . . . . . . . . . 46
Intro . . . . . . . . . . . . . . . . . . . . . . . . . . . . . . . . . . . . . . . . . . . . 47
Répétition de la lecture . . . . . . . . . . . . . . . . . . . . . . . . . . . . . 48
Lecture aléatoire . . . . . . . . . . . . . . . . . . . . . . . . . . . . . . . . . . . 48
Écoute de la radio. . . . . . . . . . . . . . . . . . . . . . . . . . . . . . . . . . 49
Syntonisation pré-réglée . . . . . . . . . . . . . . . . . . . . . . . . . . . . . 50
Écoute de bandes . . . . . . . . . . . . . . . . . . . . . . . . . . . . . . . . . . 51
Lecture continu. . . . . . . . . . . . . . . . . . . . . . . . . . . . . . . . . . . . 52
Enregistrement . . . . . . . . . . . . . . . . . . . . . . . . . . . . . . . . . . . . 52
Copiage (Copiage de TAPE
! à TAPE @). . . . . . . . . . . . . . . . . . 53
Réglage de l’horloge. . . . . . . . . . . . . . . . . . . . . . . . . . . . . . . . 54
Réglage de la minuterie . . . . . . . . . . . . . . . . . . . . . . . . . . . . . 55
Lecture minutée . . . . . . . . . . . . . . . . . . . . . . . . . . . . . . . . . . . 56
Enregistrement minuté . . . . . . . . . . . . . . . . . . . . . . . . . . . . . . 57
Afficheur . . . . . . . . . . . . . . . . . . . . . . . . . . . . . . . . . . . . . . . . 57
Dépannage. . . . . . . . . . . . . . . . . . . . . . . . . . . . . . . . . . . . . . . 58
Spécifications . . . . . . . . . . . . . . . . . . . . . . . . . . . . . . . . . . . . . 59
Page 30
31
ENGLISH
Specifications
AMPLIFIER section
Output Power. . . . . . . . . . . . . . . . . . . . . . . . . . . . 15W+15W
Input Sensitivity . . . . . . . . . . . . . . . . . . . . . . . . . . . . . 220mV
Frequency Response. . . . . . . . . . . . . . . . . . . 50 to 20,000 Hz
TUNER Section (FM)
Frequency Range . . . . . . . . . . . . . . . . . 87.50 to 108.00 MHz
Sensitivity (S/N30dB) . . . . . . . . . . . . . . . . . . . . . . . . . 20dBµV
TUNER Section (AM)
Frequency Range. . . . . . . . . . . . . . . . . . . . . 530 to 1710 kHz
Sensitivity (S/N20dB) . . . . . . . . . . . . . . . . . . . . . . . 60dBµV/m
CD PLAYER Section
Frequency Response. . . . . . . . . . . . . . 20 to 20,000 Hz (±1dB)
Signal-to-Noise Ratio . . . . . . . . . . . . . . . . . . . . . . . . . . . 55dB
Wow and Flutter . . . . . . . . . . . . . . . . . . . . . . . Unmeasurable
CASSETTE DECK Section
Track System . . . . . . . . . . . . . . . . . . 4 track, 2 channel stereo
Tape Speed . . . . . . . . . . . . . . . . . . . . . . . . . . . . . . 4.8cm/sec
Wow and Flutter . . . . . . . . . . . . . . . . . . . . . 0.35% ( WRMS )
Frequency Response. . . . . . . . . . . . . . . . . . . 100 to 8,000 Hz
Signal-to-Noise Ratio . . . . . . . . . . . . . . . . . . . . . . . . . . . 35dB
RECORD PLAYER Section
Motor . . . . . . . . . . . . . . . . . . . . . . . . . . . . . . DC servo motor
Drive System . . . . . . . . . . . . . . . . . . . . . . . . . . . . . . Belt Drive
Speed. . . . . . . . . . . . . . . . . . . . . 33-1/3 rpm, 45 rpm, 78 rpm
Wow and Flutter . . . . . . . . . . . . . . . . less than 2.5%(WRMS)
S/N ratio . . . . . . . . . . . . . . . . . . . . . . . . . . . . More than 50dB
Cartridge type. . . . . . . . . . . . . . . . . Ceramic Stereo Cartridge
Stylus. . . . . . . . . . . . . . . . . . . . . . . . . . . . . . . . . . . . . STL-103
SPEAKER SYSTEM Section
Type . . . . . . . . . . . . . . . . . . . . . . . . . . . . . . 2-way bass reflex
Impedance. . . . . . . . . . . . . . . . . . . . . . . . . . . . . . . . . 6 ohms
< Design and specifications are subject to change without
notice.
< Weight and dimensions are approximate.
< Illustrations may differ slightly from production models.
GENERAL
Power Requirements. . . . . . . . . . . . . . . . . . . . . . 120V, 60Hz
Power Consumption . . . . . . . . . . . . . . . . . . . . . . . . . . . 65 W
Dimension ( W x H x D )
Main Unit . . . . . . . . . . . . . . . . . . . . . 350 x 366 x 376 mm
(13-3/4" x 14-7/16" x 14-13/16")
Speaker . . . . . . . . . . . . . . . . . . . . . . . 200 x 366 x 190 mm
(7-7/8" x 14-7/16" x 7-1/2")
Weight
Main Unit . . . . . . . . . . . . . . . . . . . . . . . 8.3 kg (18-5/16 lb)
Speaker . . . . . . . . . . . . . . . . . . . . . . . 2.6 kg (5-5/8 lb) x 2
Standard Accessories
Remote Control Unit (RC-954) x 1
45 RPM adaptor x 1
Owner’s Manual x 1
Warranty Card x 1
30
Troubleshooting
If you have problems with your system, look through this chart
and see if you can solve the problem yourself before calling your
dealer or TEAC service center.
No power
e Check the connection to the AC power supply. Check and
make sure the AC source is not a switched outlet and that,
if it is, the switch is turned on. Make sure there is power to
the AC outlet by plugging another item such as a lamp or
fan.
No sound from speakers.
e Select the source by pressing the corresponding button or
the FUNCTION button.
e Check the connection to the speakers.
e Adjust the volume.
e Pull out the headphone’s plug from the PHONES jack.
e If the muting indicator is lit, press the MUTING button.
(When “CD” is selected, press the PLAY button to start
playback.)
The sound is noisy.
e The unit is too close to a TV or similar appliances. Install the
unit apart from them, or turn them off.
Remote control doesn’t work.
e Press the POWER switch to turn the unit on.
e If the batteries are dead, change the batteries.
e Use remote control unit within the range (15 ft) and point at
the front panel.
e Clear obstacles between the remote control unit and the
main unit.
e If a strong light is near the unit, turn it off.
CD Player
Cannot play.
e Load a disc with the playback side facing down.
e If the disc is dirty, clean the surface of the disc.
e A blank disc has been loaded. Load a prerecorded disc.
e This unit cannot play CD-RW discs.
e Depending on the disc, etc. it may not be possible to play
back CD-R discs. Try again with another disc.
e You cannot play back unfinalized CD-R discs. Finalize such a
disc in a CD recorder and try again.
Sound skips.
e Place the unit on a stable place to avoid vibration and shock.
e If the disc is dirty, clean the surface of the disc.
e Don’t use scratched, damaged or warped discs.
The SHUFFLE button doesn’t work.
e Shuffle playback won’t work until you clear the
programmed contents. If you want to clear the programmed
contents, press the PROGRAM button and the STOP button.
Tuner
Cannot listen to any station, or signal is too weak.
e Tune in the station properly.
e Rotate the unit or FM antenna wire for the best reception
position.
Though the broadcast is stereo, it sounds monaural.
e Press the FM MODE button.
Cassette Tape Deck
The cassette holder cannot be closed.
The buttons don’t work.
e Insert a cassette tape securely.
Sound is distorted or noisy.
e Clean and demagnetize the heads.
e Use Normal tape.
Cannot record.
e If the safety tabs of the cassette tape have been broken off,
cover the holes with adhesive tape.
e Clean and demagnetize the heads.
Record Player
Cannot play.
e Loosen the screw, and detach the stylus guard. (The stylus
guard is a white plastic cover that protects the stylus during
transportation. Failing to remove this guard will not allow
the needle to contact the groove of the record and no
sound will be heard!)
e Make sure the clamper and the cue lever is released.
e If the stylus is worn-out, change the stylus.
e Select the correct playback speed.
Sound skips.
e Place the unit on a stable place to avoid vibration and shock.
Make sure the unit is level both front to back and side to
side.
e Clean the surface of the record.
e Don’t use scratched, damaged or warped records.
If normal operation cannot be recovered, unplug the
power cord from the outlet and plug it again.
If the unit is disconnected from the power supply, the
settings kept in memory (clock, preset stations, timer
setting) will be erased.
 Loading...