

Page 1

®
Installation Guide
DV-516E
16X DVD-ROM Drive
control
LED indicatoremergency eject
mechanism opening
The TEAC DVD-ROM drive is designed for use in IBM PC or compatible
computers. It features a 5.25-inch standard chassis and a powered tray for convenient
disc loading.
The TEAC DVD-ROM drive can read or play DVD and CD discs in a variety of
formats, including DVD-ROM, DVD-video, DVD-R, DVD-RW, DVD+RW, CDROM, CD audio, CD-R, CD-RW, Video CD and more.
disc trayheadphone jack volume eject button
DVD discs supported have a playback capacity of 4.7GB to 17GB.
headphone jack:
3.5 mm stereo mini-plug) to this jack to listen to audio from a DVD or CD being
played in your TEAC DVD-ROM drive. For external speakers, connect a stereo
adapter to split the output into separate cables for the left and right channels.
Such adapters convert a male stereo mini-jack to two female phono jacks.
emergency eject mechanism:
to the computer
clip) into the emergency eject mechanism opening and press firmly to eject the
disc.
Caution: Do not use the emergency eject mechanism when the LED
indicator is lit or flashing or you may seriously damage the disc or
the DVD-ROM drive.
volume control:
control to the right increases the volume. (Lower the volume before you play a
disc to protect your hearing and speakers.)
LED indicator:
front panel. Various operations are indicated as per the following table:
TEAC DVD-ROM Installation Guide
You can connect headphones or external speakers (that use a
and then insert a small, thin rod (such as a straightened paper
Use the volume control to adjust audio volume. Turning the
The DVD-ROM drive features an LED indicator light on the
If the eject button fails, first
—
1—
turn off the power
Page 2
Rear Panel
Operation
At tray loading green LED flashes
At tray eject green LED flashes
During audio play green LED flashes
During seek/data transfer green LED lights up (steady)
At system/drive start-up green LED flashes
Self-diagnosis error green LED flashes
eject button:
Press this button to open or close the disc tray. (Some DVD and
LED Indication
CD-ROM titles disable the manual eject button and rely on software commands
to eject the disc. Refer to the documentation for these titles for more
information.)
disc tray:
Use the disc tray to load discs into the drive. Open the tray by pressing
the eject button. Close the tray by pressing the eject button.
Note: Do not push the tray to close it. Instead, always press the eject button to
eject or retract the tray.
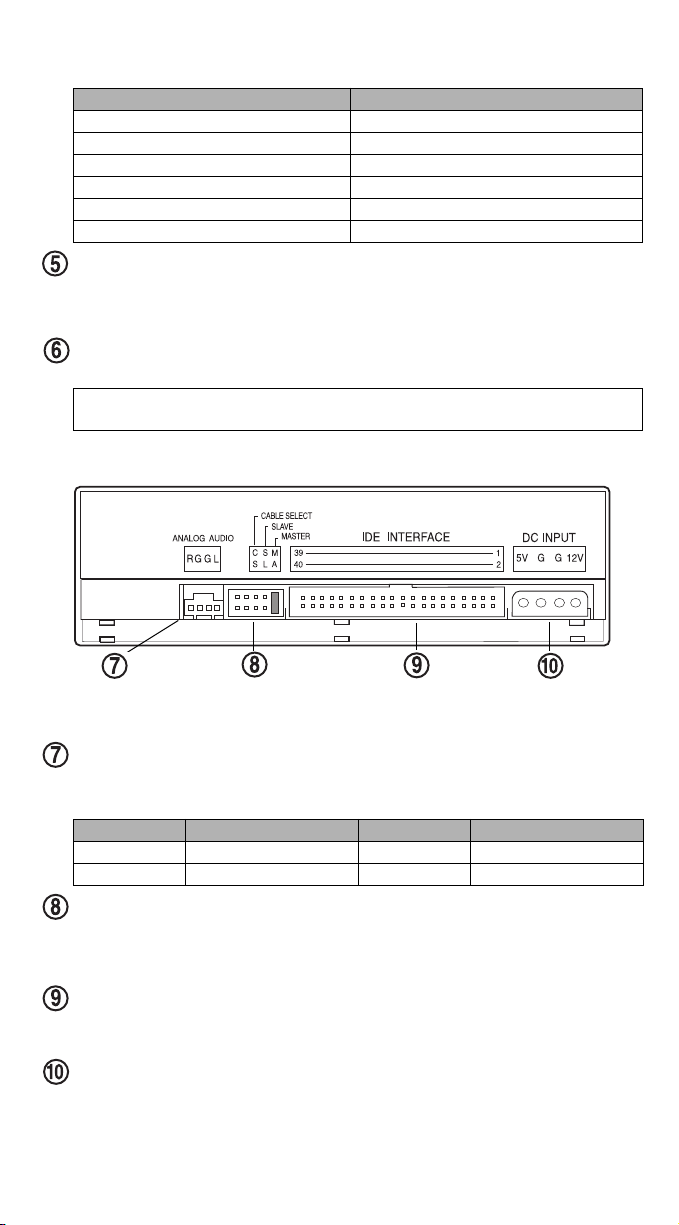
Rear Panel
analog audio
connector
CSEL/Slave/Master IDE interface
configuration jumper
analog audio output connector:
connector
Use the included audio cable to connect this
power
connector
connector to the audio input connector on a sound card. Pin assignments from
right to left are described below:
Pin Number
1 Left signal 3 Ground
2Ground 4 Right signal
CSEL/Slave/Master configuration jumper:
Audio Signal Pin Number Audio Signal
The DVD-ROM drive includes
five pairs of jumper pins on the rear panel. Three of these pairs enable you to set
the drive to CSEL, Slave, or Master mode. (See “TEAC 16X DVD-ROM Drive
Installation Guide (this manual)” on page 3.)
interface connector:
Use an IDE interface 40-pin ribbon cable to connect the
DVD-ROM drive to an IDE interface connector in your computer. (See
“Installing the DVD-ROM Drive” on page 4.)
power connector:
Connect the power connector to the +5VDC and +12VDC
power sources. The +5VDC terminal is on the left as you face the rear panel; the
+12VDC terminal is on the right. The two center terminals are ground terminals.
TEAC DVD-ROM Installation Guide
—
2—
Page 3
Recommended System Requirements
Recommended System Requirements
❑
IBM PC-compatible computer, Pentium II 350MHz or higher
❑
An available 5.25 inch drive bay
64MB of RAM (minimum)
❑
❑
20MB free hard disk space
Windows 98SE, Me, 2000, XP, or NT 4 Service Pack 5+
❑
❑
Graphics accelerator with DirectDraw
Sound card
❑
Package Contents
TEAC 16X DVD-ROM drive
❑
❑
Audio cable
Mounting screws
❑
❑
CD-ROM disc containing Power DVD XP video player software
❑
TEAC 16X DVD-ROM Drive Installation Guide (this manual)
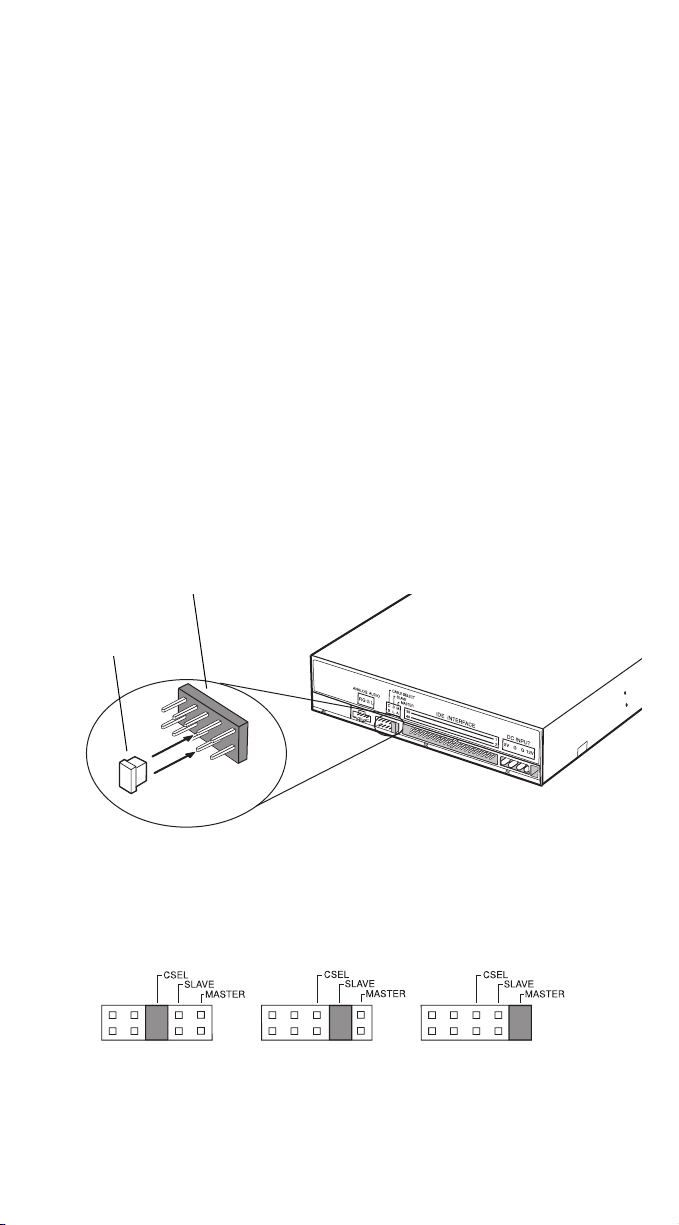
Configuring the DVD-ROM Drive
The DVD-ROM drive features five pairs of jumper pins on the rear panel. By placing
the jumper on the appropriate pair of pins, you can set the drive to Master, Slave or
CSEL mode.
jumper
The Master/Slave/CSEL jumper configuration of your TEAC DVD-ROM drive
depends on whether you already have an IDE CD-ROM or CD-RW drive installed in
your system. The following section will guide you through most typical system
configurations.
jumper
set to CSEL
TEAC DVD-ROM Installation Guide
jumper
set to Slave
—
jumper
set to Master
(default)
3—
Page 4

Installing the DVD-ROM Drive
Installing the DVD-ROM Drive
This section explains how to install the TEAC DVD-ROM drive into an IBM PC or
compatible computer. The drive may be installed in a horizontal or vertical
orientation (within ±5˚ of horizontal or vertical position). Follow the steps below and
refer to your computer documentation for information specific to your computer
system.
1. Turn off the power to the computer system and any external devices connected to it.
2. Touch the exposed metal frame of the computer to ground yourself.
This will prevent damage to the computer or DVD-ROM drive that may be
caused by a discharge of static electricity.
3. Remove your computer’s cover, faceplate, or 5.25-inch bay cover, as well
as any mounting clips, screws, and retaining brackets.
Note:
If you
(a)
have a SCSI CD-RW or CD-ROM drive already installed in
your system or
in your system, continue with Step 4. If you already have an IDE CD-ROM or
CD-RW drive installed in your system, skip step 4 and continue with Step 5.
4. If you
or
(b)
(a)
do
system, do the following:
4a)
Confirm that the jumper on the rear panel of the DVD-ROM drive is
configured to its default setting of Master (see “TEAC 16X DVD-ROM
Drive Installation Guide (this manual)” on page 3).
4b)
Slide the DVD-ROM drive into an empty 5.25" drive bay. Secure the drive
using the included 3x5mm mounting screws.
have a
not
have any
(b)
do not have any IDE CD-ROM or CD-RW drives installed
SCSI
CD-RW or CD-ROM drive installed in your system
IDE
CD-ROM or CD-RW drives installed in your
Warning:
Do not use mounting screws longer than 3x5mm to secure the
DVD-ROM drive or you may damage the unit.
4c)
Locate the secondary IDE connector on your system’s motherboard and
connect one end of the IDE interface cable to it.
Note:
The TEAC DVD-ROM kit does not include an IDE interface cable.
If you need one, you can purchase it from your local computer store.
TEAC DVD-ROM Installation Guide
secure drive with 3x5mm screws
—
4—
Page 5

Installing the DVD-ROM Drive
Be certain to connect Pin-1 of the interface cable to Pin-1 on the secondary
IDE connector on the motherboard. (Pin-1 on an interface cable is usually
designated by a color strip along one edge of the cable. Also, the interface
ribbon cable connector may feature a tab on one side. Insert the cable so that
the tab aligns with the notch on the drive’s IDE interface connector. Do not
use excessive force while trying to insert the cable into position.)
4d)
Connect the other end of the IDE interface ribbon cable to the interface
connector on the rear panel of the DVD-ROM drive.
(Skip Step 5 and
proceed to Step 6.)
audio cable
power cable
IDE interface
ribbon cable
pin 1
5. If you already have an IDE CD-ROM or CD-RW drive installed in your
system, do the following:
Typically, an IDE CD-ROM or CD-RW drive that is already installed in your
system is connected to the secondary IDE motherboard connector, and is
configured as a Master. In such cases, it is strongly recommended that you
configure the TEAC 16X DVD-ROM drive as a Slave drive, then connect it to
the same cable that currently hosts your installed CD-ROM or CD-RW drive.
5a)
Set the jumper on the rear panel of the TEAC DVD-ROM drive to Slave (see
“TEAC 16X DVD-ROM Drive Installation Guide (this manual)” on
page 3).
5b)
Slide the DVD-ROM drive into the empty 5.25-inch drive bay. Secure the
drive using 3x5mm mounting screws.
Warning:
Do not use mounting screws longer than 3x5mm to secure the
DVD-ROM drive or you may damage the unit.
5c)
Connect the DVD-ROM to the vacant middle connector on your CD-ROM/
CD-RW interface cable. (If your original cable does not have an available
middle connector, you will need to acquire and install a standard IDE cable
with three connectors.)
(Proceed to Step 6.)
6. Connect one end of the included audio cable to the analog audio connector
on the rear panel of the DVD-ROM drive, then connect the other end to
your sound card.
Note:
There is no need to install this cable if an audio cable is already connected from your CD-ROM/CD-RW drive to the sound card. Use the CDROM/CD-RW drive to listen to audio CDs.
TEAC DVD-ROM Installation Guide
—
5—
Page 6

Installing the DVD-ROM Drive
7. Connect the power cable to the power connector on the rear panel of the
DVD-ROM drive.
Insert the power cable plug in the correct orientation into the power connector.
The plug is shaped so that it can be easily inserted in only one orientation; do
not force the plug into the connector. The +5v terminal is on the left as you face
the rear panel; the +12v terminal is on the right. The two center terminals are
ground terminals.
8. Re-install your computer’s cover, faceplate, or bay cover.
9. Start your system.
Notes:
The TEAC DVD-ROM drive is a true Plug-N-Play device; therefore, it will be
❑
detected automatically by Windows 98SE/Me/2000/XP and assigned a logical
drive letter. There is no need to install any drivers.
Windows NT 4.0 Users:
❑
Windows NT 4.0 does not support the Plug-N-Play
feature. Therefore, confirm that the IDE CD-ROM DRIVE ATAPI version 1.2
driver is installed. If not, open the Control Panel, double click “SCSI Adapters,” click the “Drivers” tab, then click the “Add” button. At the “Select a SCSI
Adapter Option” window, select “IDE CD-ROM DRIVE (ATAPI Ver 1.2).”
Click “Install” and follow the instructions on screen. The drive will then be recognized by the operating system.
TEAC DVD-ROM Installation Guide
—
6—
Page 7

Installing PowerDVD Software
Installing PowerDVD Software
PowerDVD is software that enables you to play DVD discs. To install the
PowerDVD software, insert the included CD-ROM that contains the PowerDVD
software into your computer’s CD-ROM drive (or the TEAC DVD-ROM drive).
If Auto-run is enabled on your system, the on-screen InstallShield Wizard will launch
automatically. If not, click the Windows
where “
D:”
is the drive letter of the drive in which you inserted the PowerDVD CD-
ROM.
The Windows InstallShield Wizard displays the following panel:
Click the “Next” button, then follow the on-screen InstallShield Wizard’s
instructions to complete the installation.
Start
button, then select
Run>D:setup.exe
,
Note:
Once the software installation is completed, you will be prompted to execute
the system diagnostic program. Select OK and make sure to enable DMA for the
TEAC DV-516E and any other drive that supports this function.
The PowerDVD software features a graphic user interface that enables you to control
the playback of DVD discs on the TEAC DVD-ROM drive (see figure below).
Click the Help (?) button in the lower-right corner of the CyberLink panel to display
additional operational information.
Help button
TEAC DVD-ROM Installation Guide
—
7—
Page 8

Specifications
Specifications
Model
Interface IDE/ATAPI
Transfer Rate 16.6MB/sec
Data Transfer Rate DVD: 8.91MBps (6.6X) to 21.6MBps (16X) CAV
Access Time DVD: 85 msec (1/3 Stroke)
Audio Extraction 40X maximum
Buffer Size 512KB
Disc Formats Supported
Disc Size 12cm and 8cm
Front Panel Built-in headphone jack, LED indicator, volume control
MTBF 100,000 POH
Dimensions 5.83”(W) x 1.67”(H) x 7.80”(D)
Weight 2.31 lbs.
Power Supplies +5VDC, +12VDC
Analog Audio
Headphone
Line-Out
Headphone Jack 3.5mm diameter stereo mini-jack
Installation Horizontal or vertical (±5˚)
Operating Temperature 5° C to 45° C (41° F to 113° F)
Storage Temperature -30° C to 60° C (-22° F to 140° F)
Operating Humidity 5% to 85% (non-condensing)
Storage Humidity 5% to 90% (non-condensing)
Safety Standards UL, CSA, TUV, CE, FDA
DV-516E
CD: 3.09MBps (20.6X) to 7.2MBps (48X) CAV
CD: 85 msec (1/3 Stroke)
DVD Single and Dual Layer; DVD-R; DVD-RW; DVD+RW;
XA Mode-2 (Form1, Form2); Super Video CD; CD-Extra
(CD Plus); UDF; CD-I; Photo CD (Single and Multisession);
CD-R; CD-RW (MultiRead)
knob, and power eject button
0.6 ± 0.5Vrms at 32
0.7 ± 0.1Vrms at 10k
Ω
Ω
Technical Support
TEAC America, Inc. (USA)
Technical Support
Telephone: (323) 727-4860 • Fax: (323) 869-8751
Monday - Friday 8:00 a.m. - 5:00 pm PST
http://www.teac.com/DSPD/techsupport.htm
E-mail: dspdtsg@teac.com
TEAC DVD-ROM Installation Guide
—
8—
 Loading...