

Page 1
00030676
Version 12/2014
DD
-
503 E
-
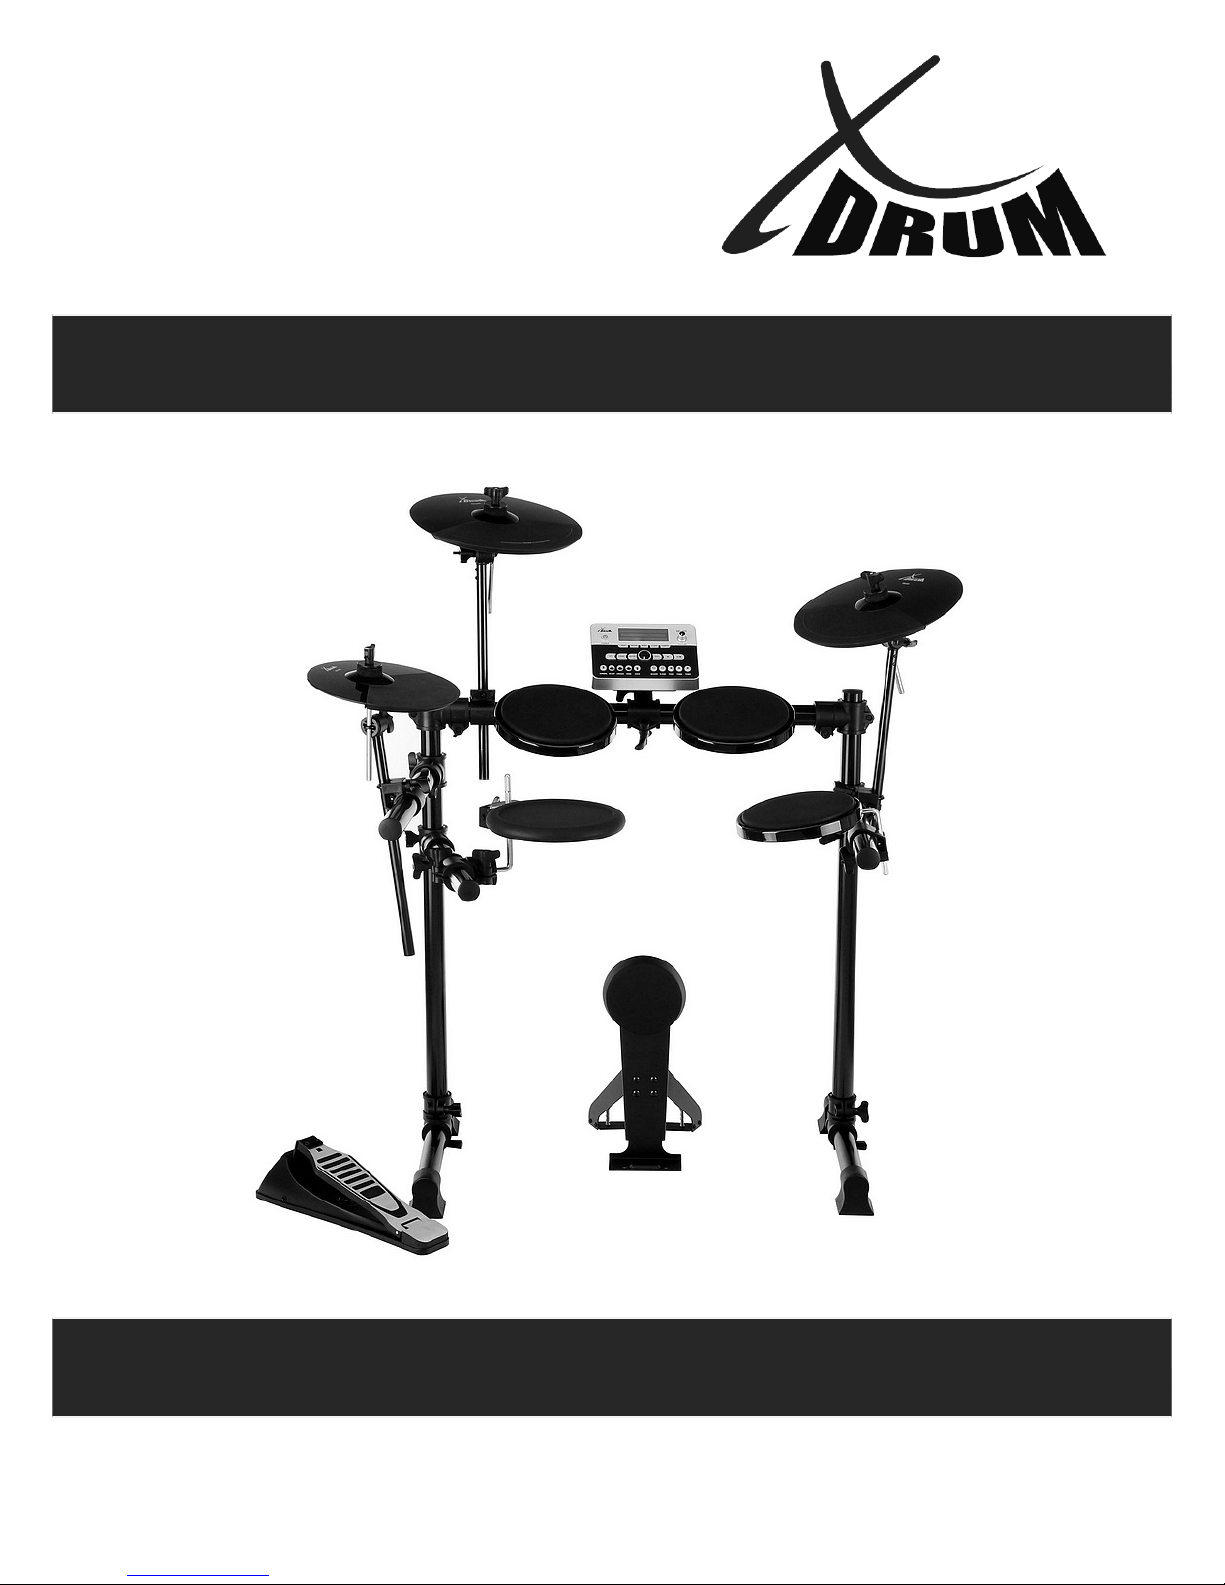
Drum Set
User manual
Page 2

CAUTION
Any changes or modifications in construction of this device which are not expressly approved by
the party responsible for compliance could void the user’s authority to operate the equipment.
WARNING
When using electrical products, basic safety precautions should always be followed, including the
following:
NOTE: This equipment has been tested and found to comply with the limits for a Class B digital
device, pursuant to Part 15 of the FCC Rules.
Also, this equipment has been tested and found to comply with the limits for following standard:
EN55022-2006
EN55024:1998/+A1:2001/+A2:2003
EN55013:2001/+A1:2003/+A3:2006
EN55020:2007
EN61000-3-2:2006
EN61000-3-3:1995/+A1:2001/+A2:2003
These limits are designed to provide reasonable protection against harmful interference in a residential installation. This equipment generates, uses, and can radiate radio frequency energy and, if
not installed and used in accordance with the instructions, may cause harmful interference to radio
communications. However, there is no guarantee that interference will not occur in a particular
installation. If this equipment does cause harmful interference to radio or television reception, which
can be determined by turning the equipment off and on, the user is encouraged to try to correct the
interference by one or more of the following measures:
- Reorient or relocate the receiving antenna.
- Increase the separation between the equipment and receiver.
- Connect the equipment into an outlet on a circuit different from that to which the receiver is
connected.
- Consult the dealer or an experienced radio/TV technician for help.
CAUTION
Page 3

TAKING CARE OF YOUR DRUM
- direct sunlight (near a window),
- high temperatures (near a heat source,
outside, or in a car during the daytime),
- rain or excessive humidity,
- excessive dust,
- strong vibration.
w The unit shall not be exposed to dripping or
splashing and no objects filled with liquids,
such as vases, shall be placed on the unit.
w The drum contains digital circuitry and may
cause interference if placed too close to
radio or television receivers. If interference
occurs, move the drum further away from
the affected equipment.
POWER
w Only use attached power adaptor.
w Turn the power switch off when the drum is
not in use.
w To avoid damage to the drum and other
devices to which it is connected, turn the
power switches of all related devices off
prior to connection or disconnection of
audio cables.
w Turn the power off if the main cable of the
adaptor is damaged or the instrument is
spattered with liquid.
w Do not switch the unit on and off in quick
succession, this places an undue load on
the electronic components.
w Unplug the AC power cord during an electri-
cal storm.
w Avoid plugging the AC adaptor into the same
AC outlet as appliances with high power
consumption, such as electric heaters or
ovens.
SERVICE AND MODIFICATION
This product should be serviced by qualified
service personnel when,
w the power supply cord or the plug of the
adaptor has been damaged,
w liquid has been spattered into the unit or it has
been exposed to rain,
w the instrument does not appear to operate
normally or exhibits a marked change in
performance,
w the instrument has been dropped or the
cabinet has been damaged.
HANDLING AND TRANSPORT
w Never apply excessive force to the controls,
connectors, pads or other parts of the
instrument.
w Always unplug cables by gripping the plug
firmly, not by pulling on the cable.
w Physical shocks caused by dropping,
bumping, or placing heavy objects on the
instrument can result in scratches and/or
more serious damage.
w Carefully check the amplifier volume control
before stating to play. Excessive volume can
cause permanent hearing loss.
CLEANING
w Clean the unit with a dry or light-wet soft cloth.
Do not use paint thinner or petrochemical
based polishes.
LOCATION
w Do not expose the drum to the following
conditions to avoid deformation, discoloration,
or more serious damage,
DO NOT ATTEMPT TO OPEN THE UNIT OR MAKE ANY CHANGE IN THE CIRCUITS OR
PARTS OF THE UNIT.
!
Page 4

INSTALLATION ............................................1
SOUND MODULE ........................................5
Control Panel ................................................5
Back Panel ....................................................6
PLAYING PAD ...............................................7
DRUM KIT .....................................................8
SONG .............................................................9
Demo Song ...................................................9
User Song ....................................................10
METRONOME ...............................................11
Metronome ....................................................11
Tempo ...........................................................11
DRUM KIT EDIT ............................................12
Select kit for editing .....................................13
Enter the Edit Mode ....................................13
Select part to edit ..........................................13
Select parameter to edit ...............................14
Edit the parameter ........................................14
Edit another parameter or part .................14
Complete the edit ........................................15
SETUP ............................................................16
Accompaniment Volume for Demo ...........16
Percussion Volume for Demo ..................16
Master Tune ................................................16
Advanced Parameter Edit ........................16
Sesitivity ............................................17
Dynamic Range ......................................17
Trigger Corve ..........................................18
Cross Talk ..............................................18
Hi-Hat Pedal setting ................................19
Reset ........................................................20
RECORD ....................................................21
Record ......................................................21
Save as a User Song ................................21
Erase User Song .......................................21
MIDI & USB .................................................22
VOICE LIST .................................................23
SPECIFICATIONS ........................................24
CONTENTS TABLE
Page 5
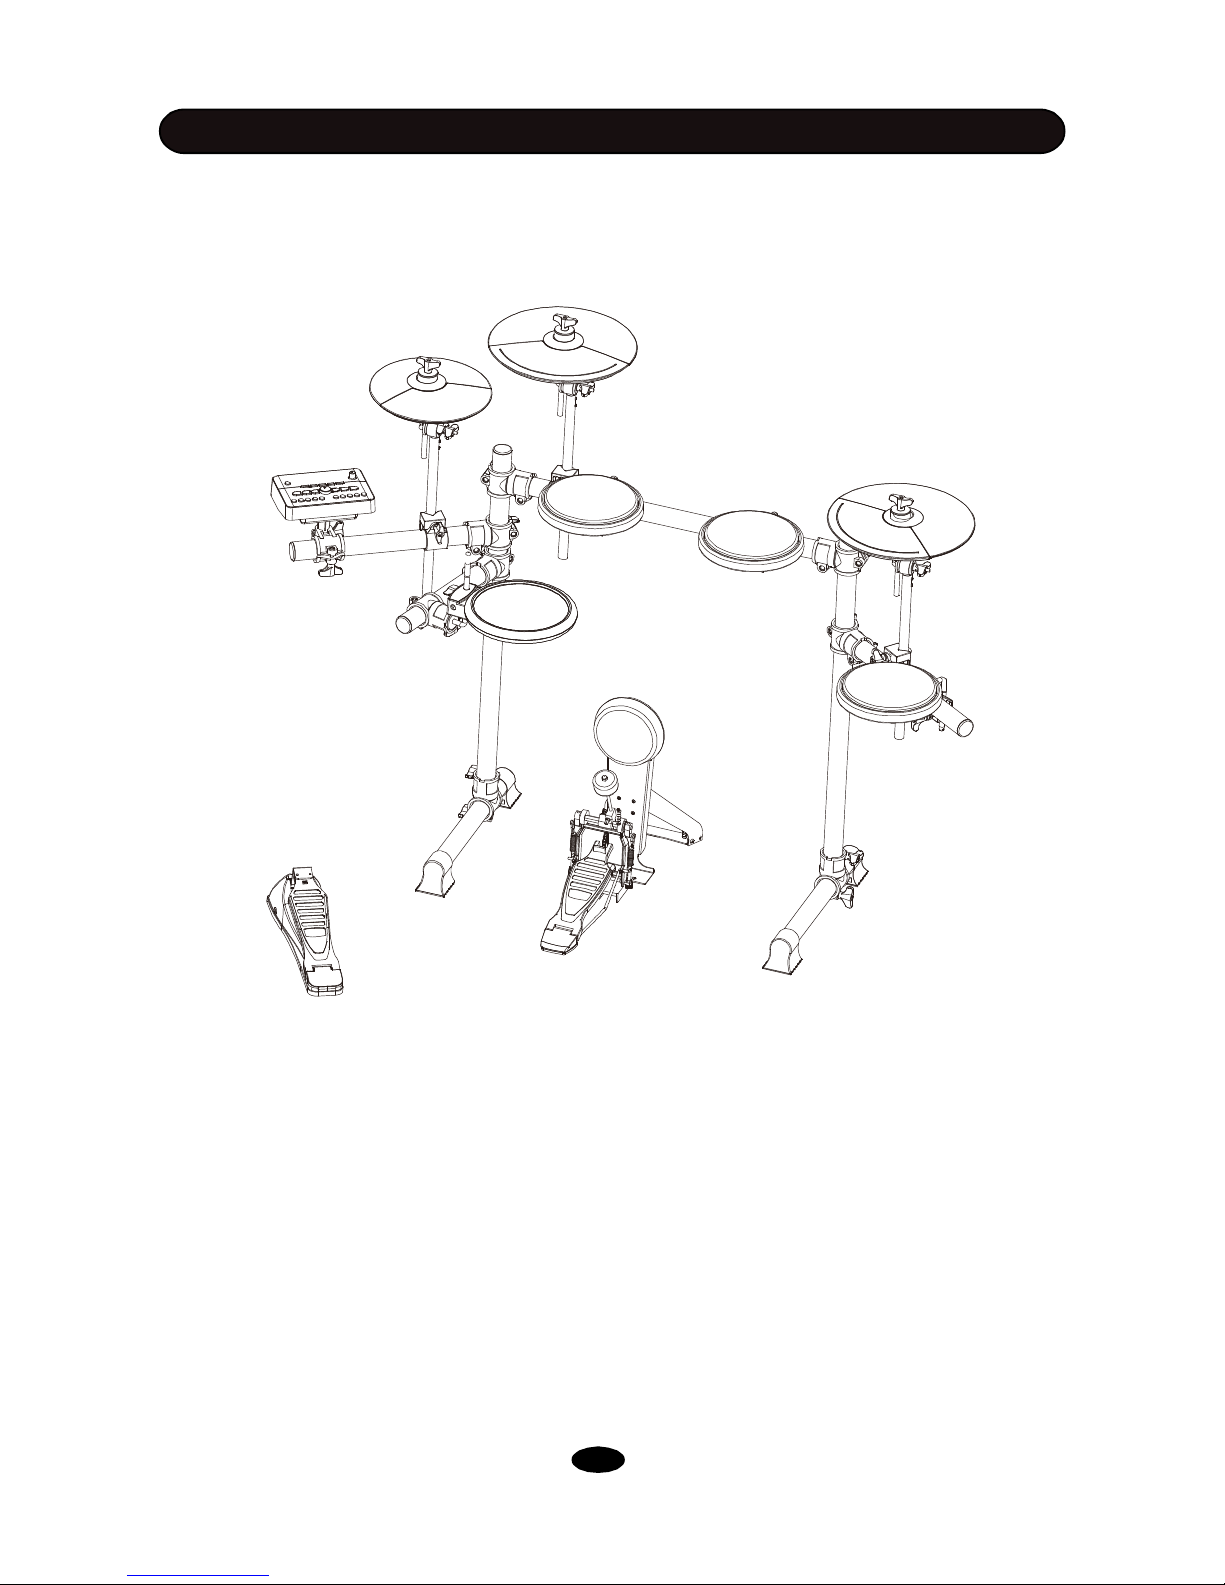
INSTALLATION
The drawing shows complete drum kit after your installation.
Power adaptor and connection cables are not shown in the drawing.
1
CRASH
TOM 1
TOM 2
HI-HAT
RIDE
TOM 3
KICK
SNARE
HH-CTRL
SOUND MODULE
Page 6
INSTALLATION
2
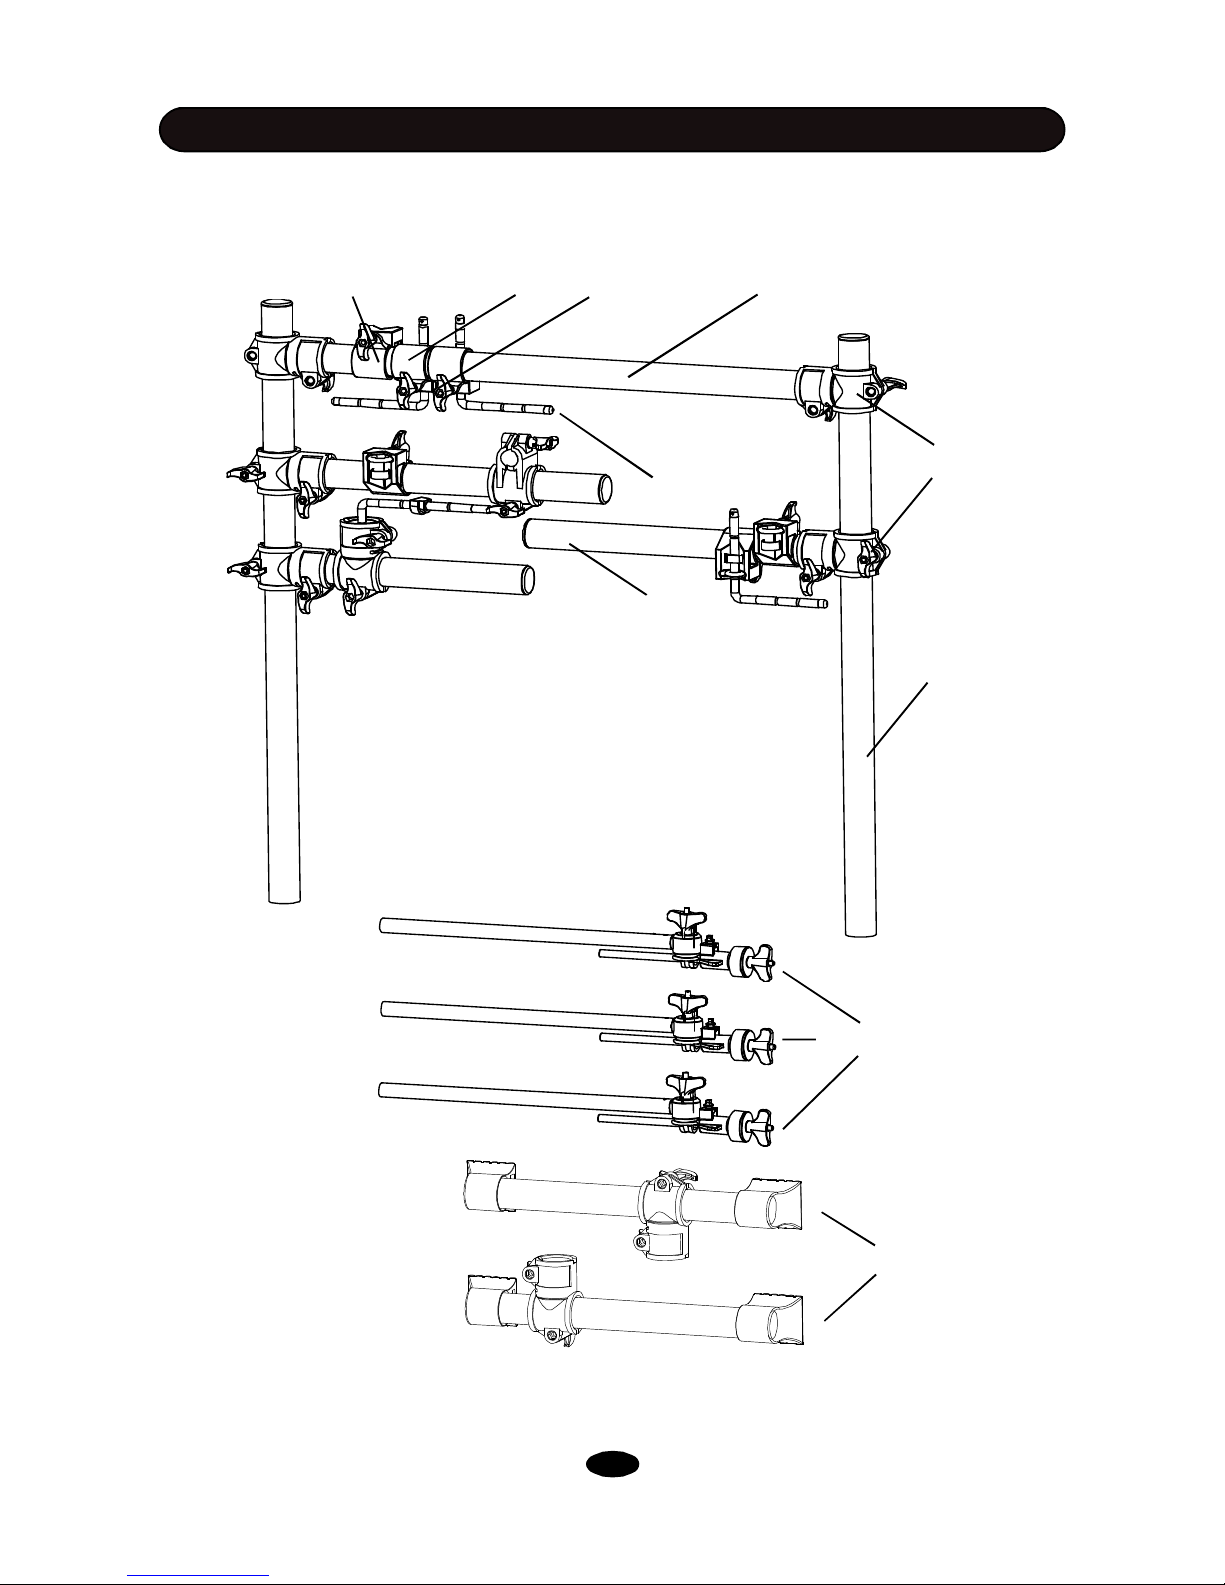
You can find all of these components in package for rack system installation..
Pad clamp
Rack clamp
L-Rod
Arm
Leg
Cymbal rod
Foot
Cross beam
Cymbal rod clamp
Wing nut
Page 7
INSTALLATION
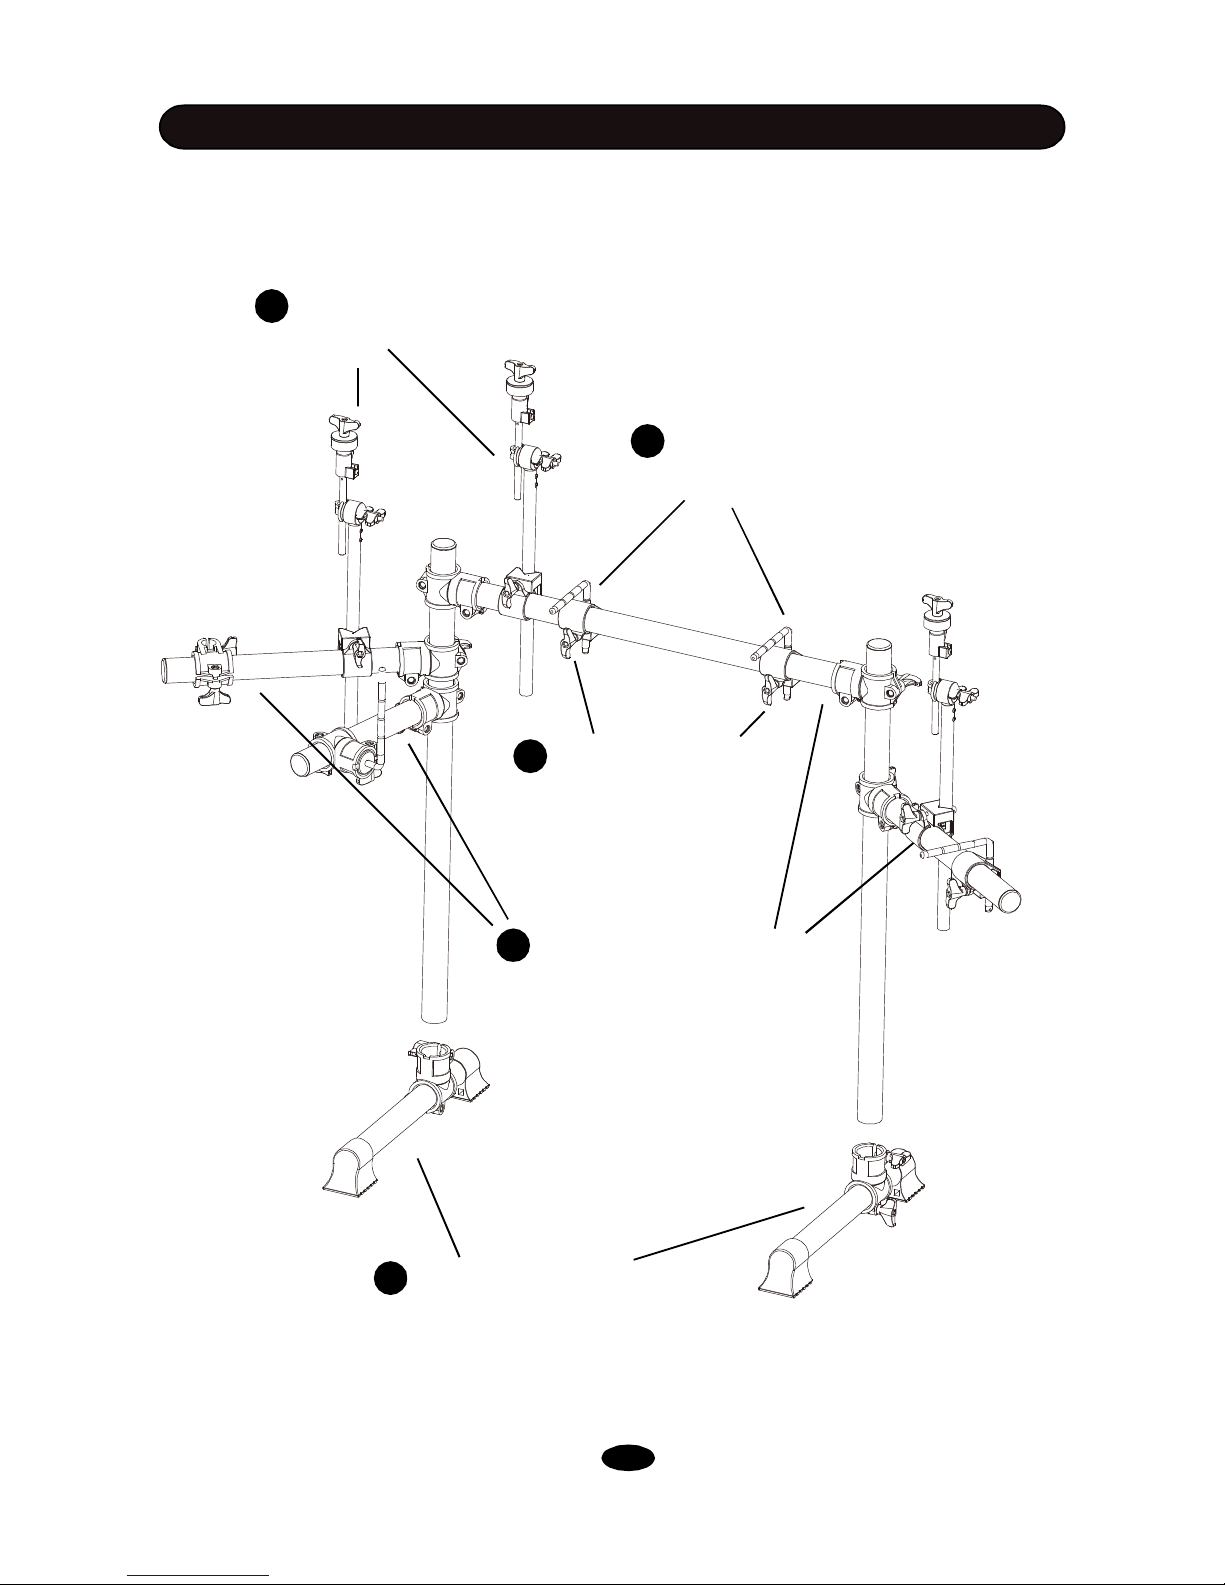
RACK SYSTEM INSTALLATION
1
Open the arns, adjust the position
of arms and cross beam, then
tighten the win nuts.
2
3
Install the right and left foot,
adjust the height to have the feet
firmly fixed onto the ground, then
tighten the winhuts.
4
Move and rotate all the
clamps to proper
location, then tihgten the
wing nuts.
5
Rotate the L-rods to proper
positions, then tighten the
wing nuts.
Insert the cymbal
rods and adjust their
position.
3
Page 8
INSTALLATION
4
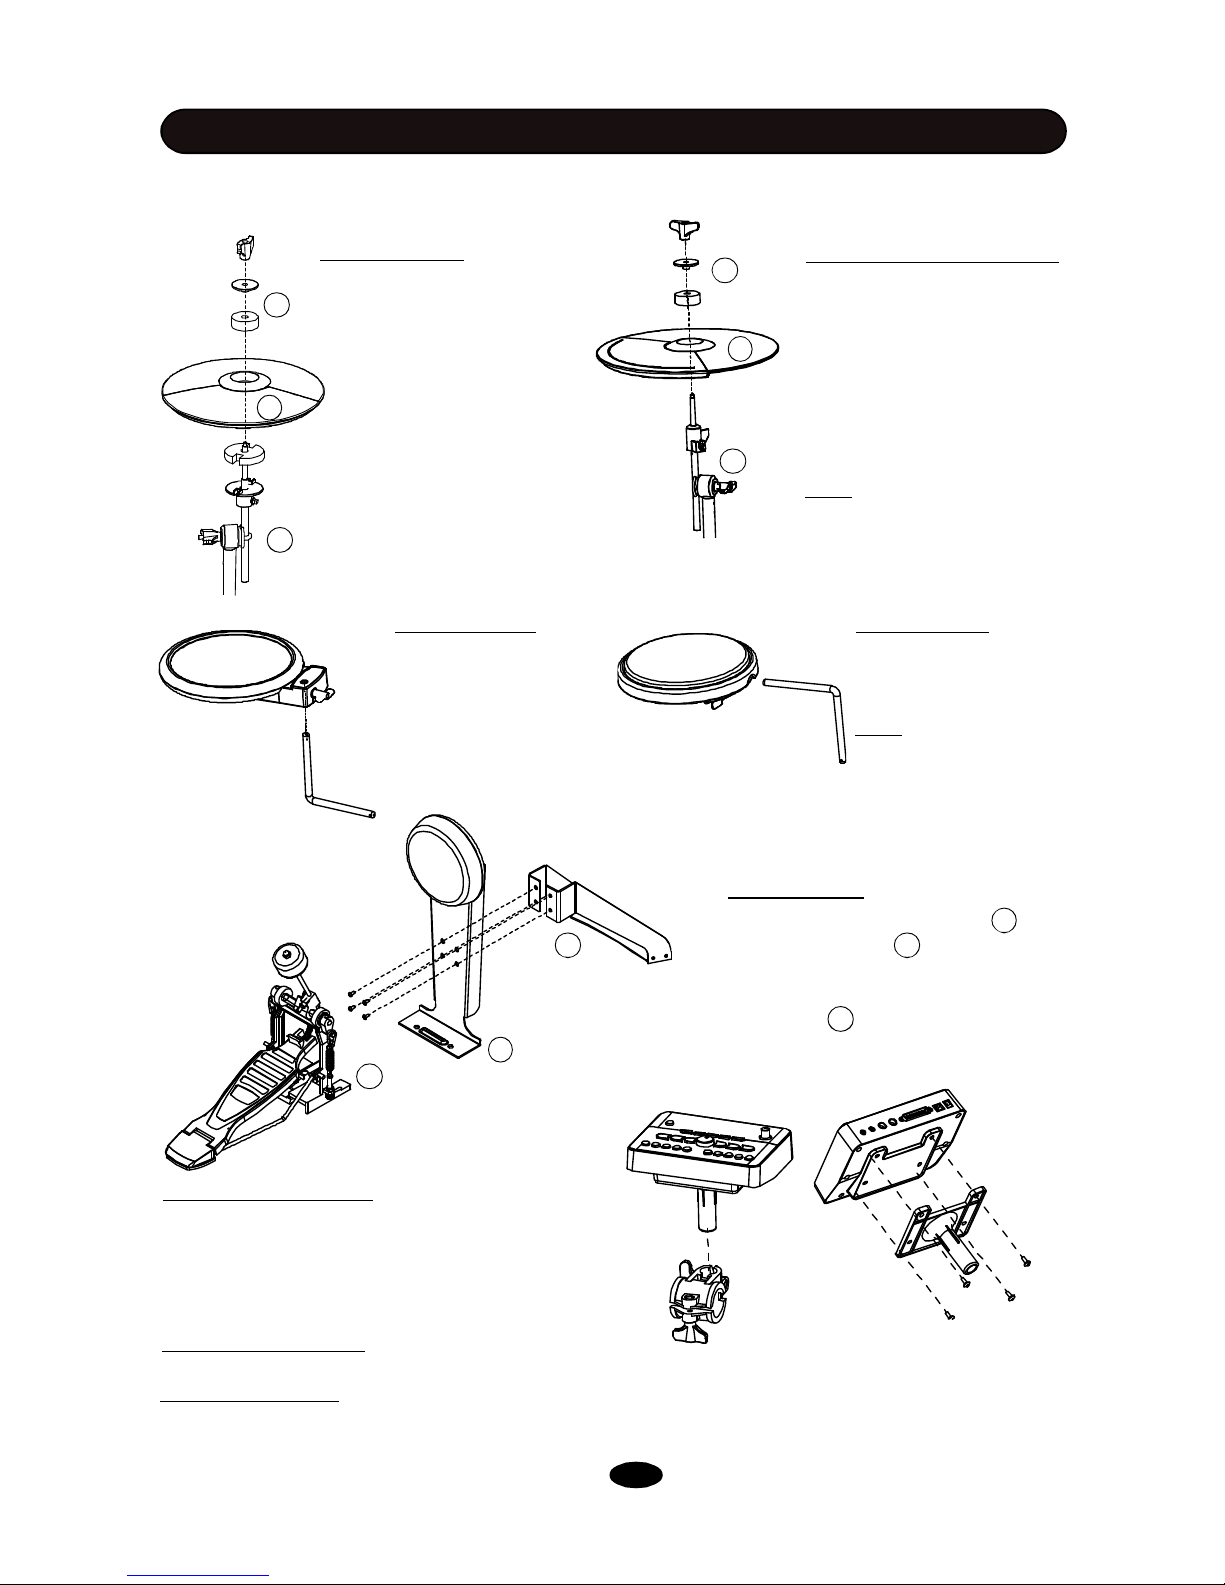
1. Remove the wing nut,
washer and felt pad
3.Adjust the angle and height
of the rod before tightening the
wing nut.
1. Remove the wing nut, washer
and felt pad
2. Put the cymbal pad into the
rod along with parts removed in
step 1. Fasten the wing nut
modertly to give the pad a little
bit wobbling like the real acoustic cymbal.
Note: Crash and Ride have dif-
ferent part numbers. Please refer to indication on page 5.
3.Adjust the angle of the rod then tighten the wing nut.
1. Insert the snare into the
L-Rod, then tighten the
wing nut.
2. Put the Hi-Hat into the rod
along with parts removed in
step 1. Fasten the wing nut.
2. Adjust the angle of the
L-Rod then tighten the
wing nut in the clamp.
Hi-Hat Installation
Crash and Ride Installation
Snare Installation
1. Insert the tom into the
L-Rod, then tighten the
wing nut.
Note: All the toms use the
same pad.
2. Adjust the angle of the L-Rod before
tightening the wing nut in the clamp.
Tom Installation
1. Align holes in the kick stand with
these in the bracket then fasten them
with screws.
2. Insert tongue of the kick stand into slot
of the pedal . Tighten the wing nut on
the pedal level to fix it.
Kick Installation
COMPONENTS INSTALLATION
1. Align holes in supporting board with these in sound
module then fasten them with screws.
2. Insert rod of the supporting board into the clamp,
then tighten the wing nut.
Sound module Installation
Please refer to the SOUND MODULE Chapter for electronic connection.
Electronic C onnection
Finalizing the Installation
Adjust arms, clamps and rods to the best position you like to finalize the installation.
2
1
3
2
1
3
2
1
3
2
1
3
Page 9
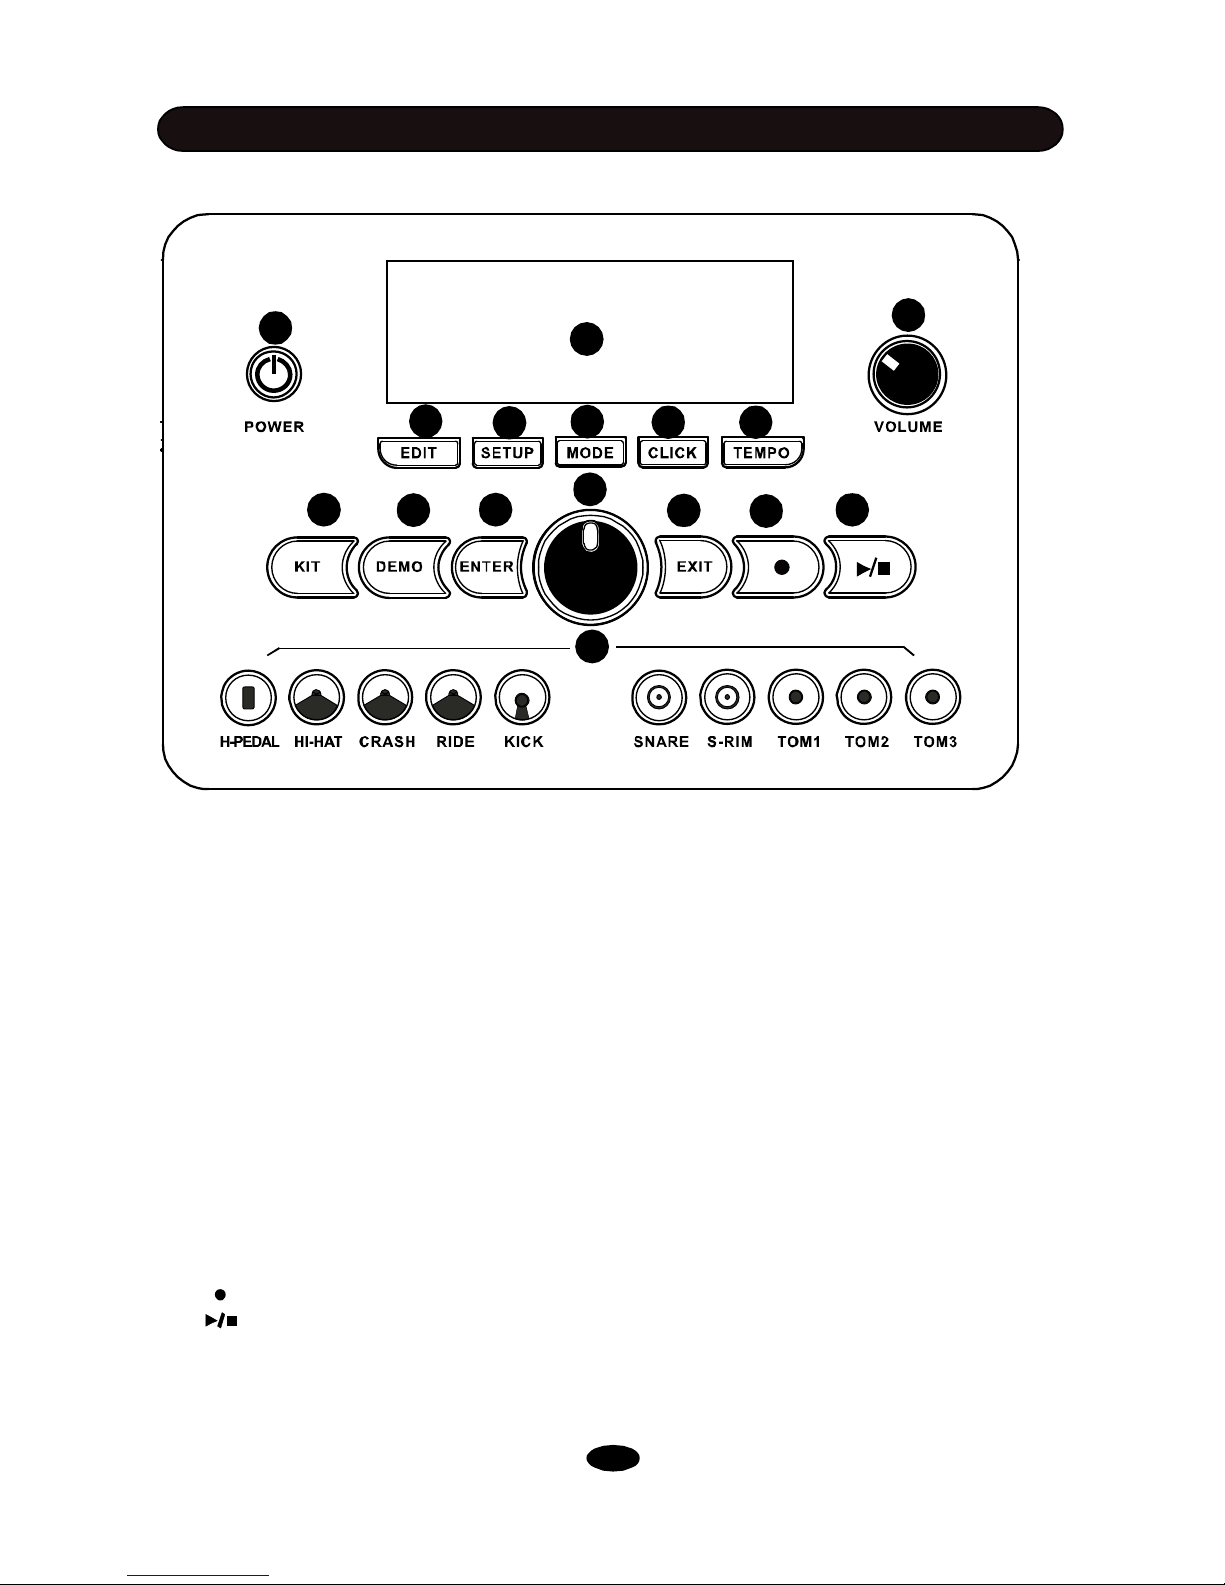
(1) DISPLAY: The screen displays such as kit number, names and other information.
(2) POWER: Turns ON/OFF the sound module.
NOTE: When you turn the power off, do not turn it on immediately. Wait at least five seconds to turn
the power on so that the electronic circuits can properly reset.
The sound module will shut down automatically if there is no operation in 20 minutes, in order to save
energy. To disable this function, power on the module while pressing on snare rim.
(3) HEADPHON
E VOL: Rotate this knob to adjust the output level of headphone and line out.
Rotate it clockwise to increase volume.
(4) EDIT: Press this button to configure drum kits.
(5) SETUP: Press this button to edit system parameters.
(6) MODE: Press to change the playing mode for demo songs.
(7) CLICK: Switch and set up the metronome.
(8) TEMPO: Change the speed of metronome and demo songs.
(9) KIT: Press to select kits.
(10) DEMO: Press to play demo songs and user songs.
(11) ENTER: To confirm operati
on or enter submenu.
(12) SCROLL WHEEL: Rotate to change value, kit, or demo. Press this button to adjust master
volume.
(13) EXIT: To cancel operation or back to root menu.
(14) Record button: Press it to record user songs.
(15) Play and stop button. Press to stop playing current song or recording. For details, please
refer to related chapter.
(16) ¨PAD BUTTONS: In edit mode, press these buttons to select and listen to the corresponding
pad.
SOUND MODULE
CONTROL PANEL
5
1
2
3
4
5
6
7 8
9
11
12
10
13 14 15
16
DD 503
Page 10
BACK PANEL
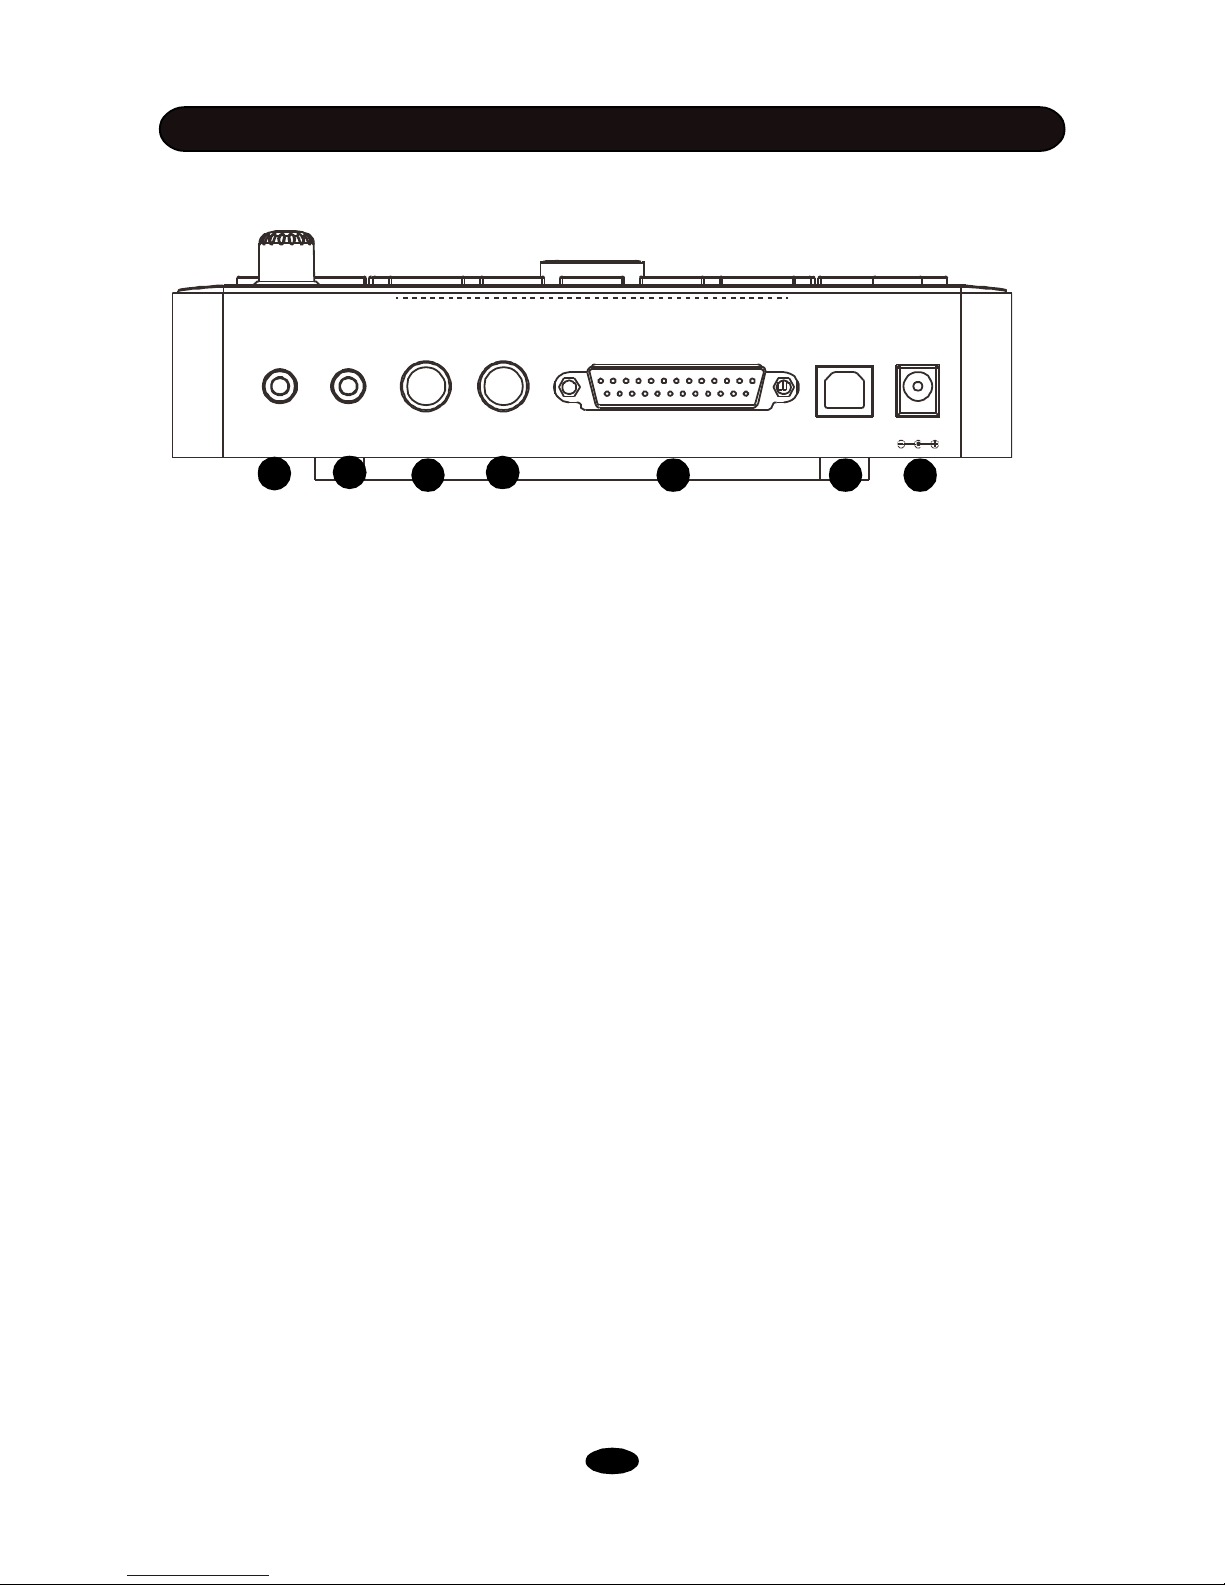
(1)HEADPHONE: This is the headphone output of the sound module. Connect a 1/8¡± TRS cable
to this output.
(2) LINEIN: Analog input socket of the sound module, 1/8¡± TRS. An extra 1/8¡± male to male
cable will be needed if you want connect your sound module to any sound source such as iPod,
CD player, mobile phone or computer. Play and practice with your favorite music.
(3) - (4) L/MONO, R: Line output of the sound module. Connect this output to any amplifier using 1/
4” TS cable. While using single amplifier, please connect L/MONO only.
(5) TRIGGER: Trigger inputs socket of sound module. Connect the multi-trigger connector (AKA
25pin connector) to this socket and lock it. There tags on all cables. Connect all cables to their
instrument according to their tags.
(6) USB: Connect standard B type USB cable to this socket for, gaming, recording MIDI and using
plug-ins for more sound on computer.
(7) DC 9V: Connect the included DC 9V power adapter to this socket.
SOUND MODULE
6
LINEINHEADPHONE L/MONO R TRIGGER USB
DC9V
1
2
3
4
5 6 7
Page 11
PLAYING PAD
7
TURN ON THE POWER
(1) Turn down the external audio device connected
with the drum.
(2) Press the POWER button while don¡¯t strike pad
or press the Hi-Hat control pedal.
(3) Turn on external devices connected.
(4) Strike the pad and adjust the volume to a proper
level.
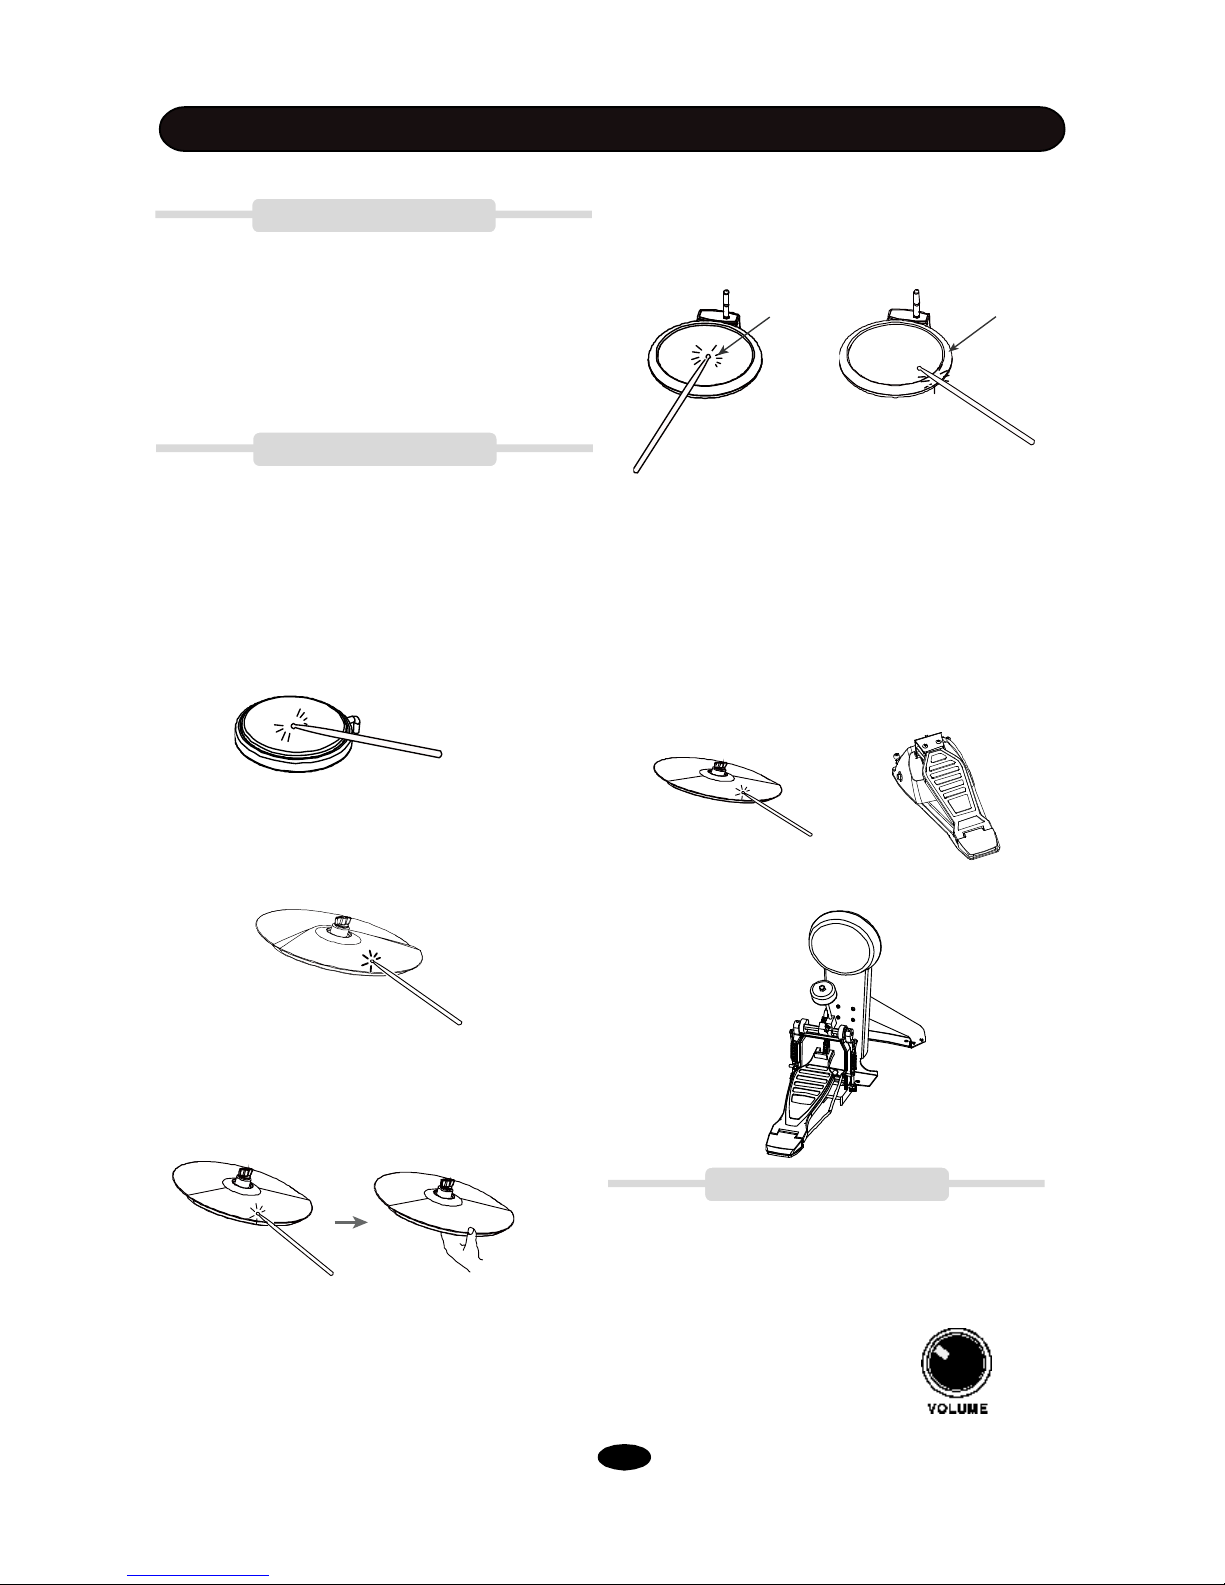
PLAYING PADS
Playing Snare Drum
Strike the central position (head) of the pad to make
head sound, strike the rim of the pad to make a rim
sound.
Playing Cymbal
Strike rubber area of the crash and ride pad to create
a cymbal sound.
The crash has choke feature. Strike the
crash pad, its sound will sustain. Squeeze
the edge portion, the sound will be mute.
All pads have striking force sensitivity feature.
Strike the pad harder to make a higher volume and
strike the pad softer to make a lower volume.
Playing Tom Drum
Strike the central position to create a sound.
Playing Hi-Hat
(1) Strike the Hi-Hat pad without pressing the Hi-Hat
control pedal to make an open Hi-Hat sound.
(2) Strike the Hi-Hat pad while fully pressing the HiHat control pedal to make a close Hi-Hat sound.
(3) Strike the Hi-Hat pad while pressing the Hi-Hat
control pedal gradually, the consecutive open sound
changes to close sound.
(4) Press the Hi-Hat pedal down quickly to make Hi-Hat
pedal sound.
Playing Kick Drum
Press the Kick drum pedal to make a kick drum
sound.
Rotate the MASTER VOLUME knob to turn the
master volume up/down. Rotate the knob clockwise to increase the volume; rotate the knob
counter-clockwise to decrease the volume.
MASTER VOLUME
Head Rim
Page 12
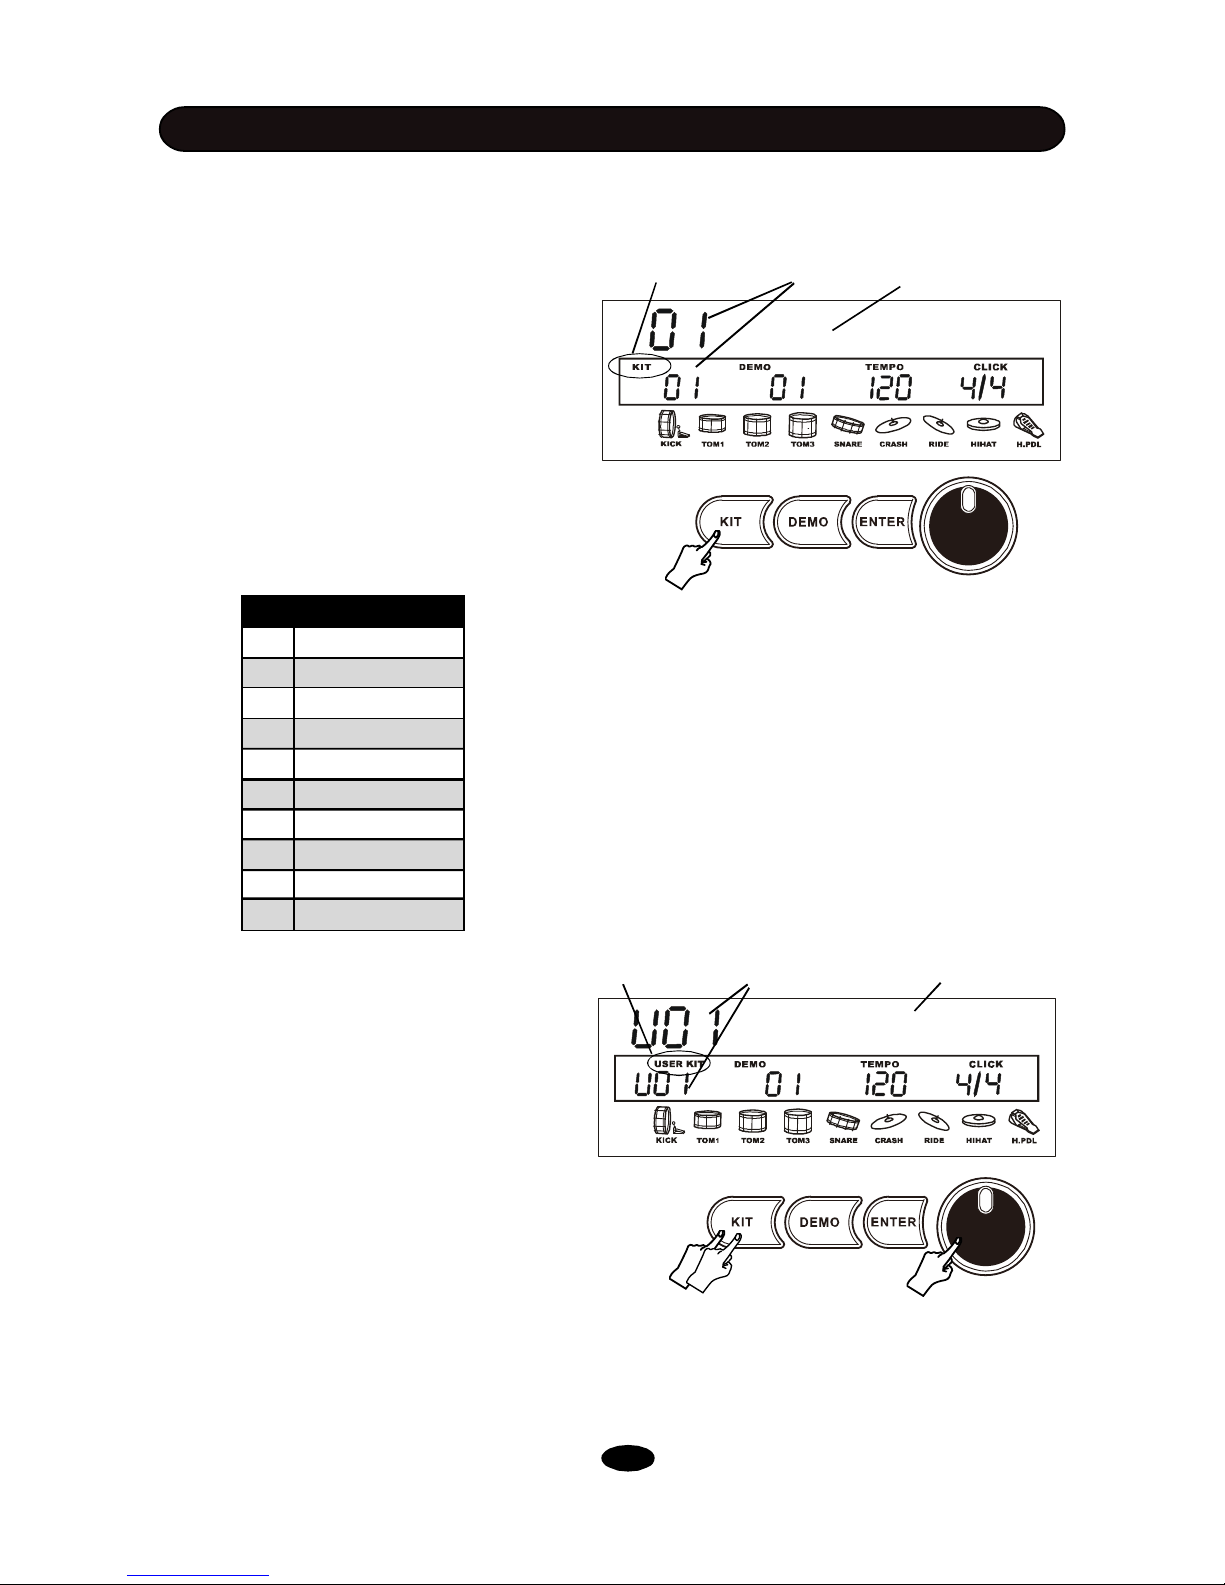
automatically while the KIT button indicator
will light up. The kit number and its name
will be displayed.
In some other operation modes, you may
press the KIT button to enter the kit select
operation mode.
PRESET KIT
The kit number is ranged 01 - 50.
Rotate the SCROLL WHEEL to select a kit
you desire. Rotate the knob clockwise to increase the kit number and anticlockwise to
decrease the kit number. All preset kit number and name are listed in the KIT LIST.
USER KIT
You can create your own user kit by edit
function. Click the KIT button repeatedly will
switch the Preset Kit and User Kit selection.
The User Kit number is U01 - U10.
Rotate the SCROLL WHEEL to select an
user kit you desire. Rotate the knob clockwise to increase the kit number and
anticlockwise to decrease the kit number.
The factory setting for all User Kits is Universal Kit. You could call them even if you
don’t create your own user kit. Of course,
you could replace it by editing. Please see
<EDIT> Chapter in this manual for details.
Press the KIT button again to back to the pre-
set kit.
KIT LIST
1 Rock
2 Vintage
3 Pop
4 Metal
5 Jazz
6 Jungle
7 Electro
8 Brush
9 Fiesta
10 Electro2
DRUM KIT
There are 10 preset drum kits and 10 User Kits. The kit is combination of different instrument voice
assigned to each pad which has unitary style for performance. All the kits are for your choice. Any
kit could be edited and saved as your own User Kit. After power, it’ll enter the kit selection mode
8
User kit mark User Kit number User Kit name
Preset kit mark Kit number Kit name
ROCK
UserKit01
Page 13
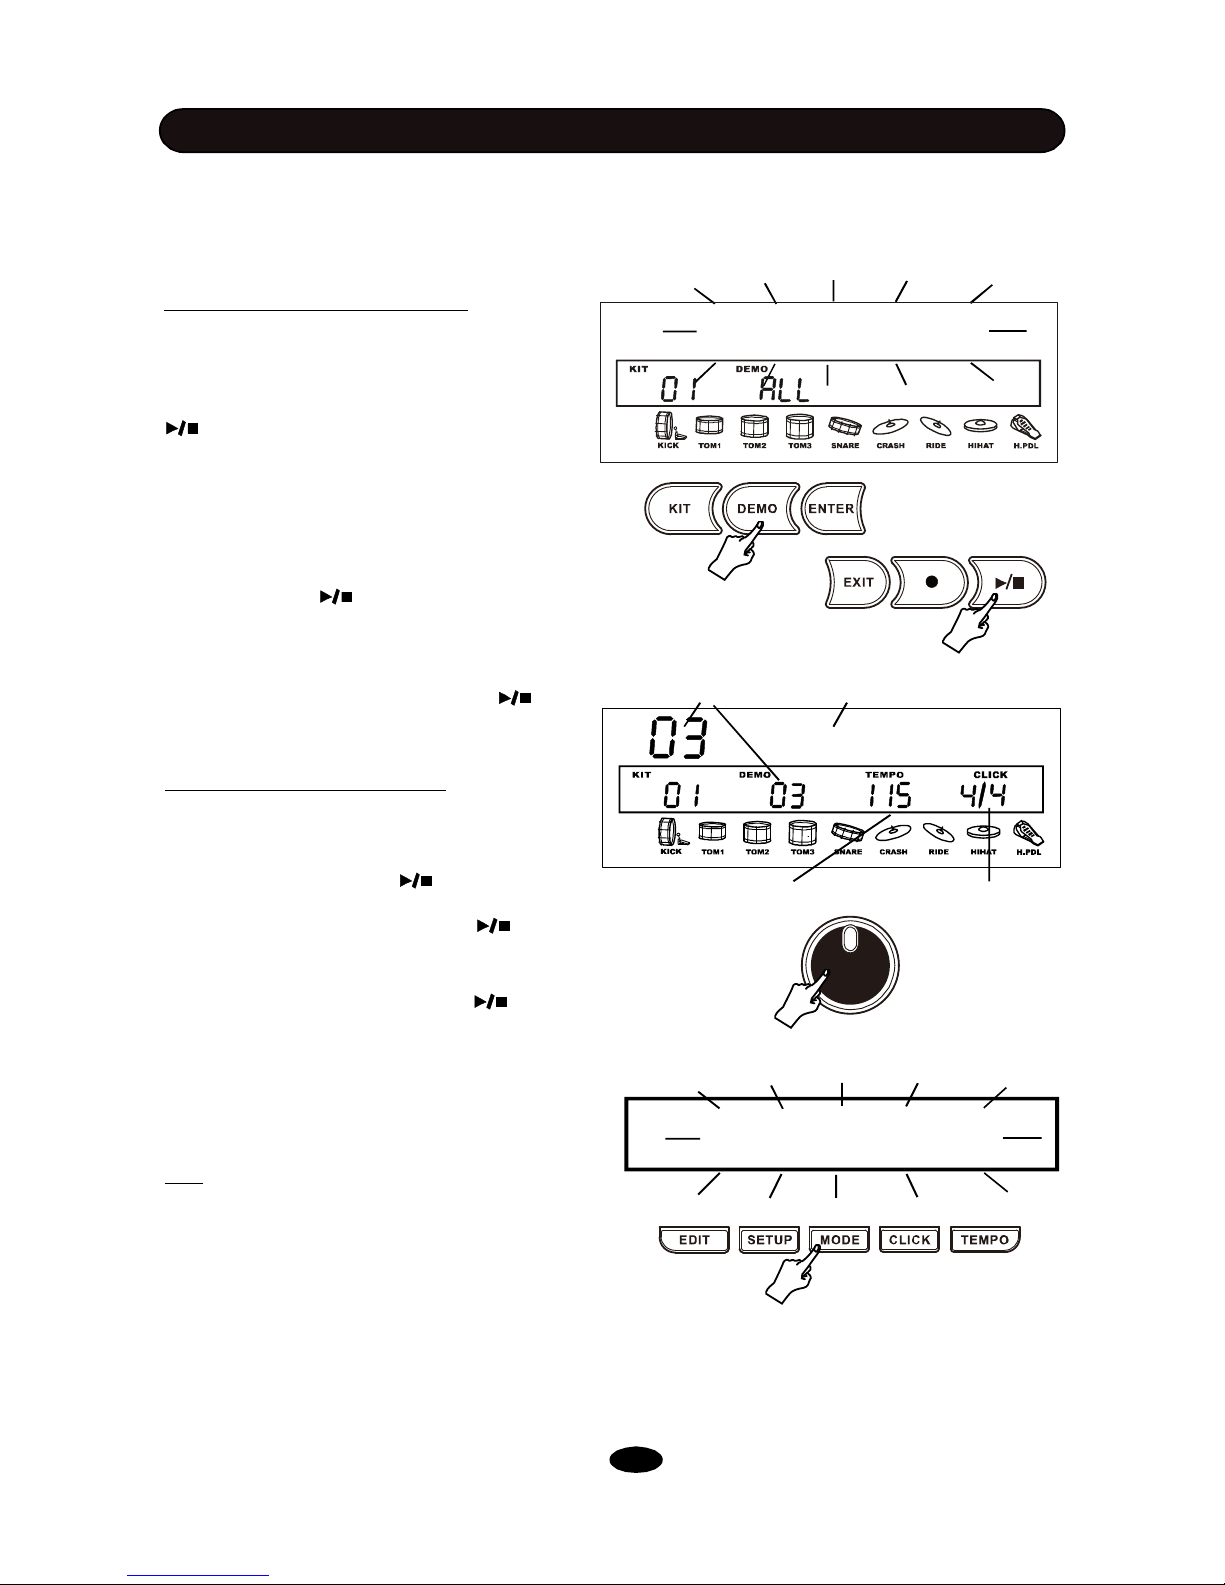
(2) Practice with Demo Song
You may practice your own performance with
the demo song.
There are three modes for your practice:
FULL - When press the button, you will
hear complete song
DRUM ONLY - When press the button,
you will hear drum sound only. It helps you to
get idea how to perform drum.
DRUM MUTE - When press the button,
you will hear background music without drum
sound. Then, you can play drums by yourself.
Press the MODE button repeatedly to change
the mode.
Tip: Volume of the background music and
drum of the demo song is adjustable
separately. Please see Chapter SETUP for
more information.
1. DEMO SONG
(1) Select and Play Demo Song
There are 52 demo songs built in.
Press the DEMO button once to engage the
demo song mode with the indicator lighting. The
display will show “All Demo ”. Press the
button immediately, all demo songs will play
one by one. If you don’t select song, after 3 second the first demo song number and name will
appear on the display.
To select a song you desire, rotate the SCROLL
WHEE to choose a song.
Then press the button to start play; the
button indicator lights up.
When select single song, it’ll be played
repeatedly.
When the demo song is playing, press the button
again to to stop the playing, the indicator turns
off.
SONG
There are two types of song. The demonstration song (Demo) is for your enjoyment and practice.
User song is your own recorded song.
9
Demo song number Demo song name
All Demo
Drum Mute
ChaCha
Demo song tempo Demo song beat
Page 14
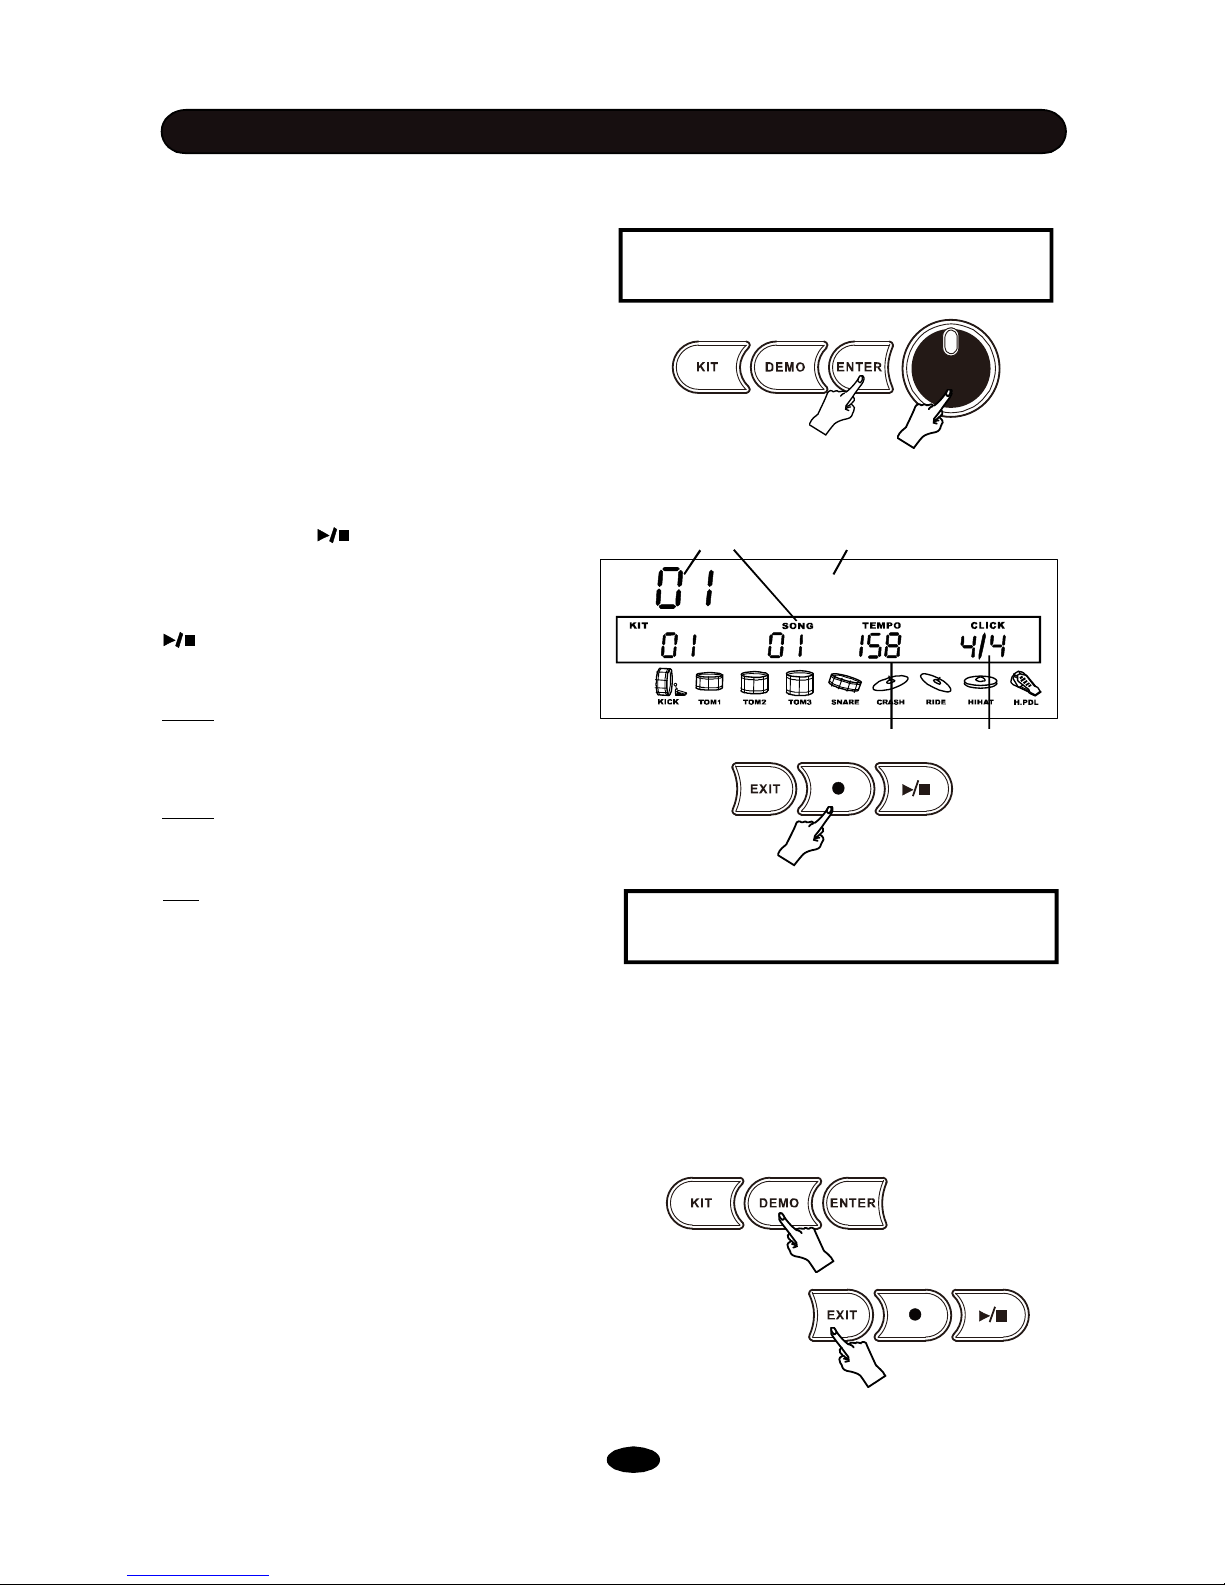
2. USER SONG
There are 10 User songs in maximum recorded
by user.
Press the DEMO button twice quickly to engage
the User Song mode with the indicator lighting.
The display will show “All U-Song”. If you don’t
select song, after 3 second the first available
user song number and name will appear on the
display.
If you want to select a song you desire, rotate
the SCROLL WHEEL to choose a song.
Then press the button to start play; the
button indicator lights up.
When the user song is playing, press the
button again to to stop the playing, the indi-
cator turns off.
Note: If the interval between the first and sec-
ond pressing of the DEMO button is longer than
2 seconds, it’ll turn to Kit mode instead of Song
mode.
Note: If you didn’t record any song, the display
will show “No u-song”. After 3 second, the mode
will change to Kit select automatically.
SONG
Tip: You may erase User Song in the User Song
mode. Please refer to the <RECORD> chapter
in the Manual for details.
3. EXIT THE SONG MODE
You may noted that press the DEMO button once
to enter the Demo mode; press the DEMO button twice quickly to enter the Song mode.
Therefore, in the Demo/User Song mode press
the DEMO button again to exit the Demo/User
Song mode and turn to the Kit selection mode.
The DEMO indicator turns off.
Or, you can simply press the EXIT button to stop
palying , exit the Demo/Song mode and turn to
the Kit selection mode.
10
User song number User song name
All U-Song
No u-song
User Song
速度
拍号
Page 15
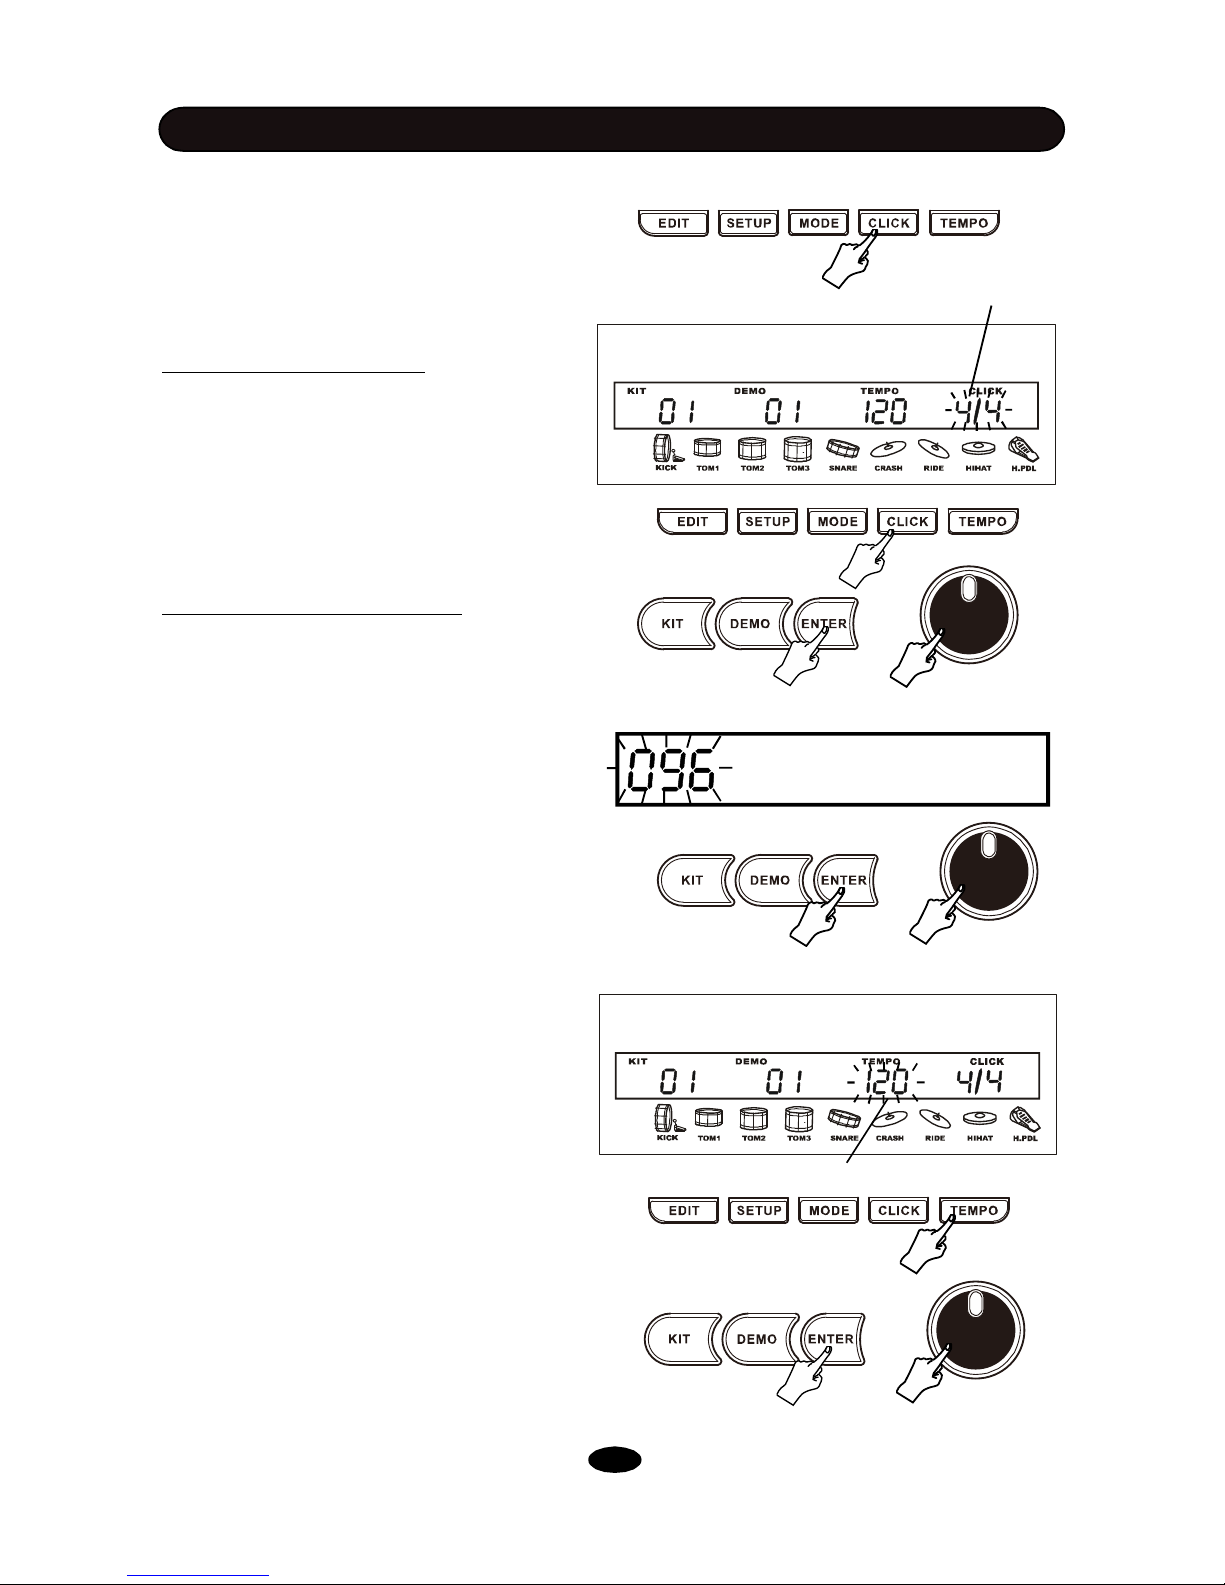
METRONOME
1. METRONOME
Press the CLICK button to sound the
metronome. Press the button again to stop it.
Press the CLICK button twice to setup the
metronome.
(1) Time Signature Setting - At first, you
could set the time signature. The the current
time signature will blink in the second row of
the display. Rotate the SCROLL WHEEL to
change the time signature. Available time
signature is 1-8/2, 1-8/4, 1-8/8, 1-8/16, The
default setting is 4/4. Press the ENTER button
to confirm you setting and turn to the next
parameter of the metronome.
(2) Metronome Volume Setting - After press
the ENTER button to finish the time signature
setting, the next parameter to setup is metronome volume. The display will show “Metro
Vol” and current volume is blinking. Rotate the
SCROLL WHEEL to change the volume
ranged 0 - 127, The default setting is 96.
Press the ENTER button to confirm you
setting and turn to the next parameter of the
metronome..
You can press the EXIT button in any step to
exit metronome setting.
During the setting, the metronome will keep
sound.
11
2. TEMPO
Press the TEMPO button,the current tempo
value will blink in the display. Rotate the
SCROLL WHEEL to change the tempo
ranged 40 - 240.
Press the ENTER button to confirm you
setting.
After about 10 seconds, this operation will exit
automatically. Or, press the EXIT button to
exit the tempo setting immediately.
Time-Sig
Tempo
Metro Vol
Time signature
Tempo
Page 16
DRUM KIT EDIT
12
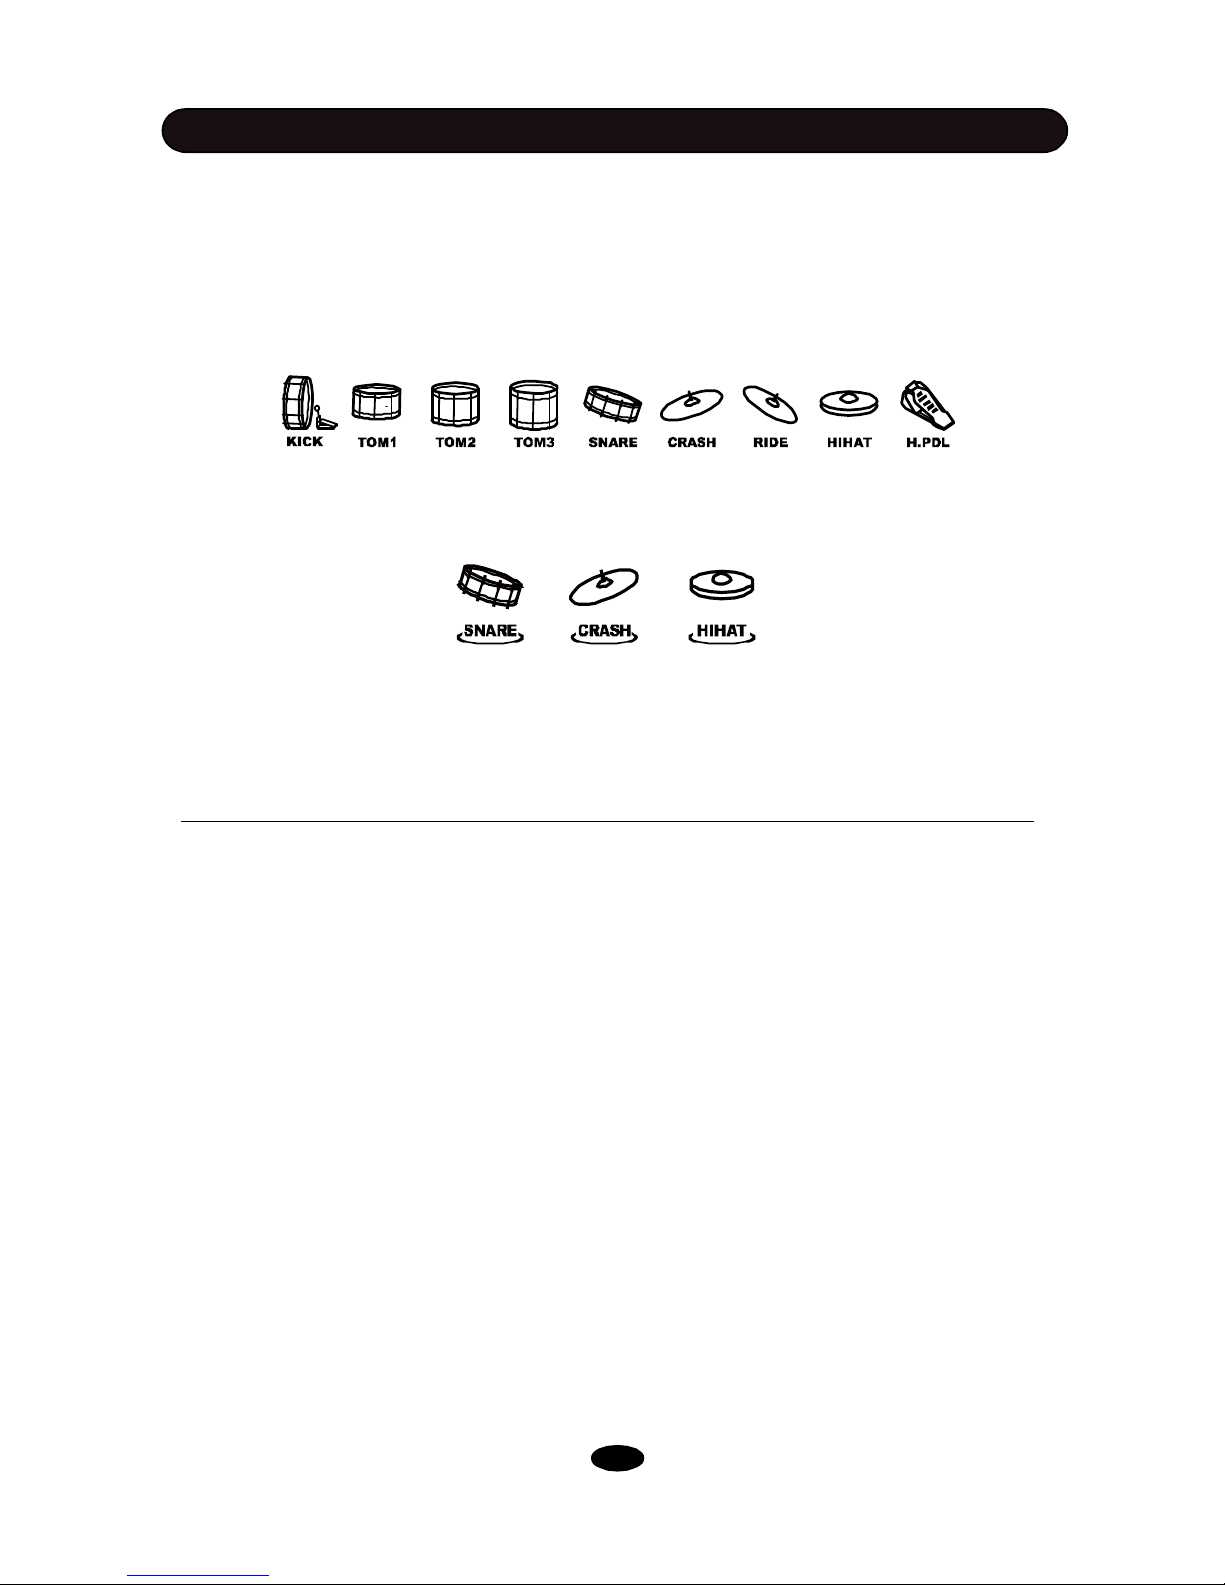
A drum kit consists of drum pads, cymbals pads and Hi-Hat pedal physically.
They generate sound in different way such as by striking head or rim of drum pad, triggered by
striking Crash bow or edge, pressing Hi-Hat pedal. We call the source to generate sound as Part.
Each part is identified on the display by the icon with mark. The icon refers to part of striking head
of pad and cymbal is shown below. H.PDL refers to sound generated by pressing the Hi-Hat pedal.
HIHAT refers to Open Hi-Hat sound generated by striking the Hi-Hat cymbal.
Alternative part of the same instrument is shown by extra mark under the icon. For example, the
part generating sound by striking the Rim 1 of the snare is marked by an arch under the SNARE
icon.
Each part has multi parameters to create its characteristics such as voice, volume, reverb level and
Pan etc. The detailed description is listed In the table below.
The edit feature is to set parameter for each part, partly or for all parts in a kit. the Edit feature
makes it possible to change the currently selected drum kit setting. In this way, you may create
your own drum kit and save it as UserKit.
Snare Rim Edge of CRASH HI-Hat Close
PARAMETER DESCRIPTION EDIT RANGE
VOICE Voice assigned to the part 1 – 418
VOLUME Volume of the part , 127 refers to the highest volume 0~127
PAN Stereo pan of the part. -64 refers to the most left, 63
refers to the most right, 0 refers to the center position -64~63
PITCH Pitch of the part. -10 refers to the lowest and 10 to the highest pitch. -10~10
REVERB Reverb effect level of the part, 127 refers to the highest level 0~127
Page 17
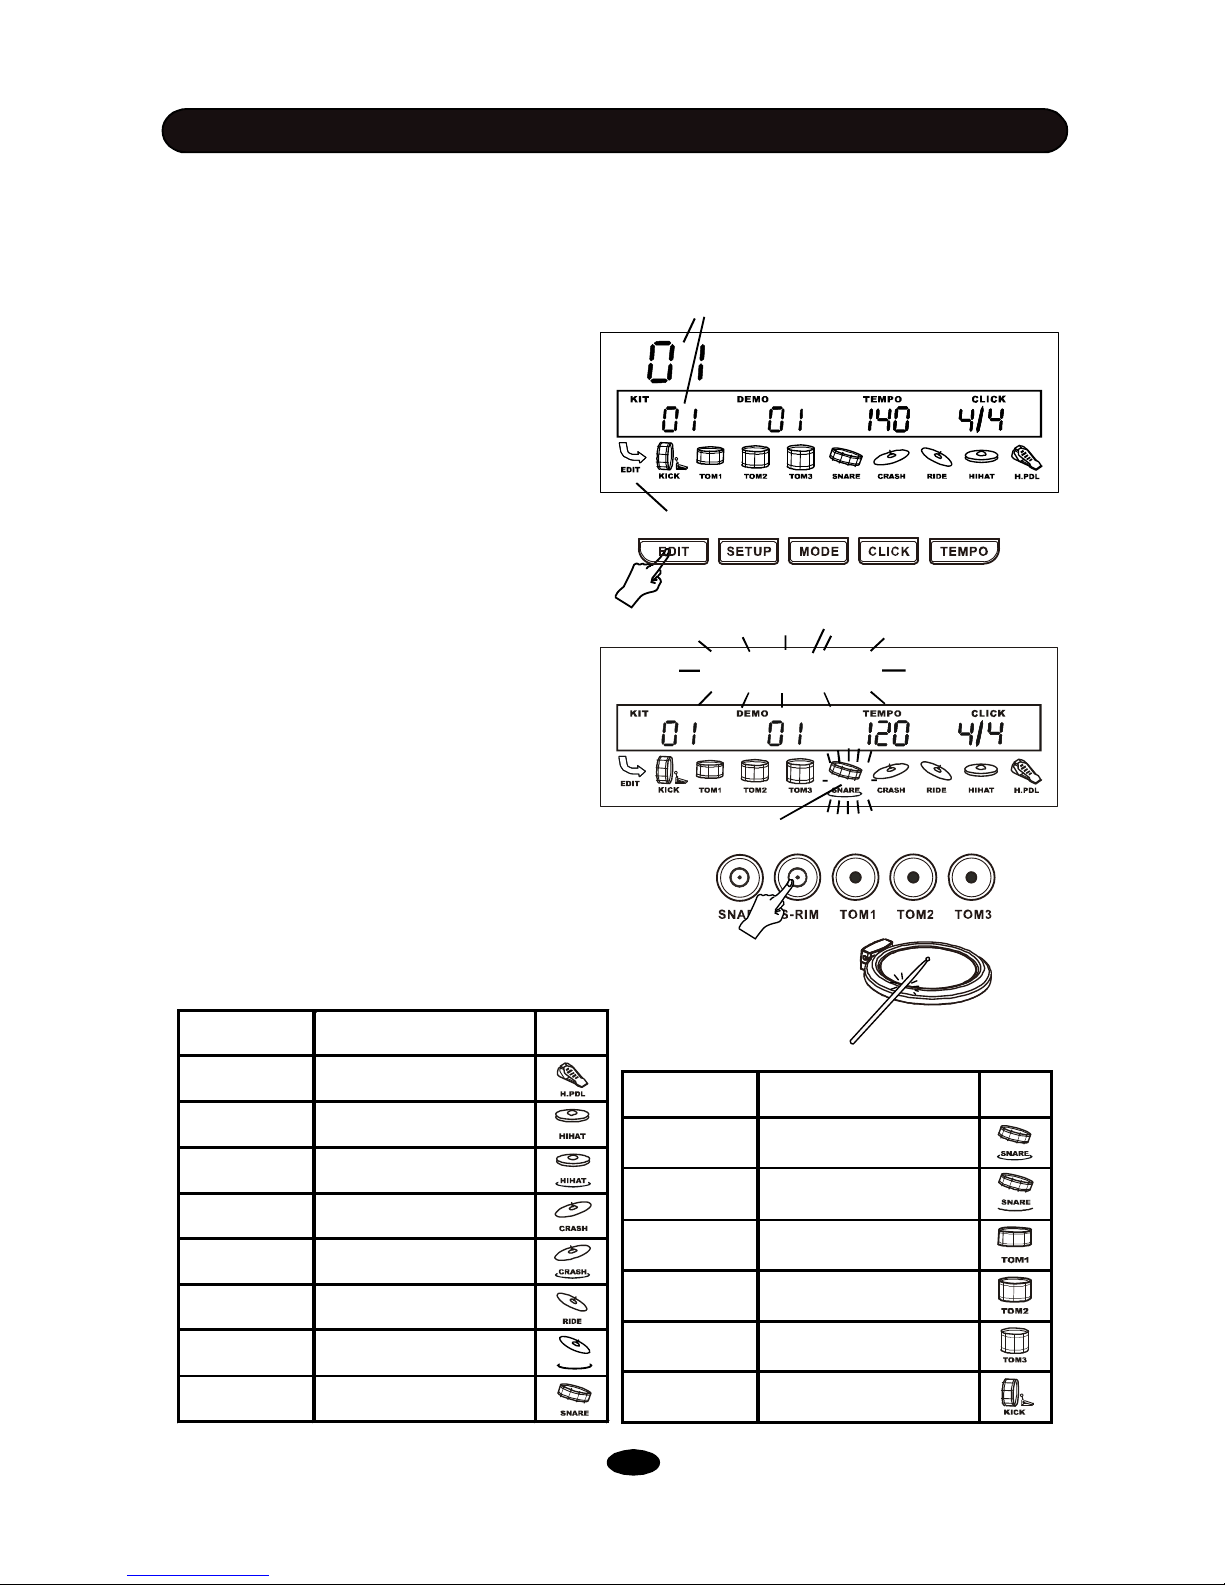
The edit procedure is the same for every parameter, Assigning voice to the part is one of the most
important function. After you are familiar with the operation of voice assignment; it’ll be easy to edit
other parameters. The following section is the edit procedure taking example how to change voice
for a pad.
DRUM KIT EDIT
13
A simple way to select part is to hit area of the
pad you desire directly. This is an aternative
metrod of pressing the button.
Edit icon
Kit number
Part for editing
2. Enter the Edit Mode
Press the EDIT button to engage the edit mode.
the display will show the kit number for editing
and the EDIT icon appear.
3. Select part to edit
Press a select button to engage editing for this
part while the corresponding icon will blink. Some
instruments have two or more parts, for example,
the ´crash has bow and edge; Hi-Hat has open
and close etc. Press the button twice to select
alternative part of this instrument, corresponding icon with the mark under the icon will flash.
Please refer to table below.
Voice
Edit Mode
PART DESCRIPTION ICON
Snare Rim1 Snare Rim1
Snare Rim2 Snare Rim2
Tom1 Tom1 Head
Tom2 Tom2 Head
Tom3 Tom3 Head
Kick Kick Drum
PART DESCRIPTION ICON
HH Pedal Hi-Hat Pedal
HiHat Open Hi-Hat Open
HiHatClose Hi-Hat Close
Crash Crash Cymbal Bow
Crash Edge Crash Cymbal Edge
Ride Ride Cymbal
Ride Edge Ride Cymbal Edge
Snare Snare Head
1. Select kit for editing
Select a kit for editing in the same way explained in the DRUM KIT chapter. The display
shows the kit number and kit name.
Item for editing
RIDE
Page 18
DRUM KIT EDIT
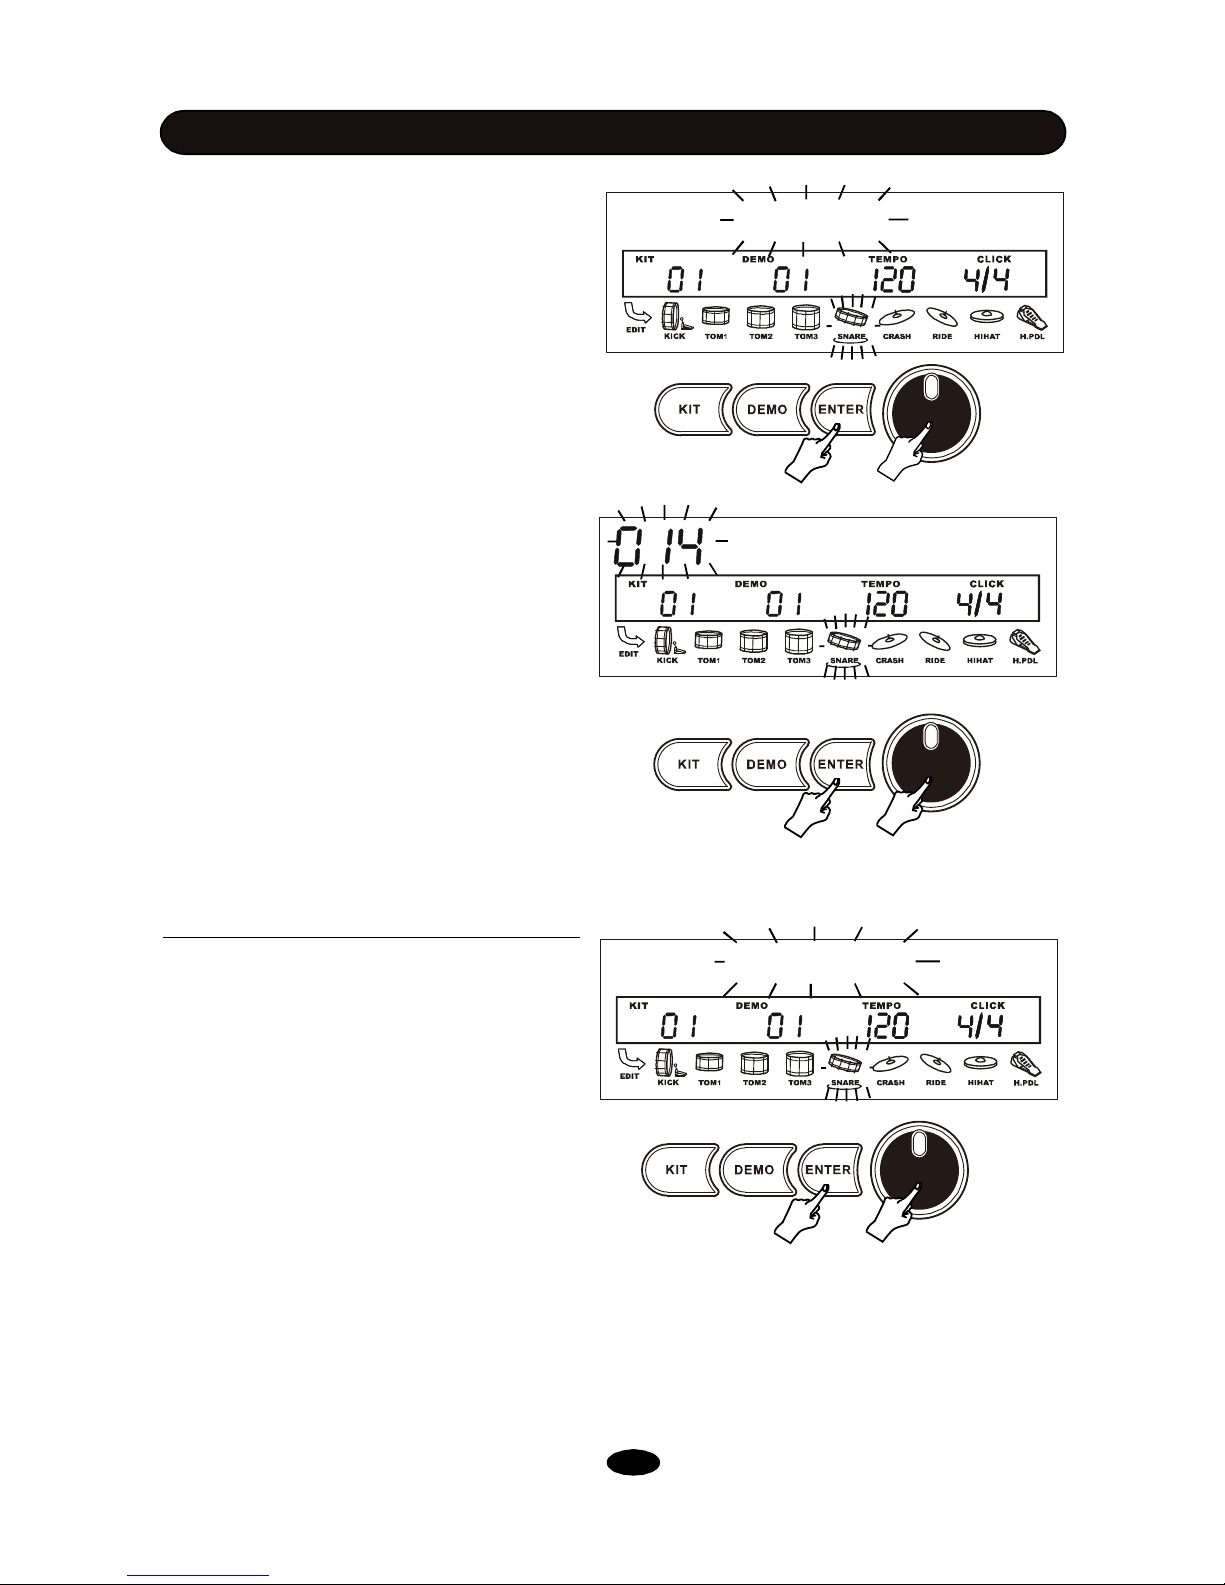
5. Edit the parameter
The current contents of this parameter will blink.
In this example, it is the voice number. Rotate
the SCROLL WHEEL to change contents of the
parameter. In this example, you’ll change voice
assigned to Snare rim. Any parameter has its
own range to set. For example, there are 95
voices can be selected to assign to a part.
Please see Appendix VOICE LIST for details.
Press the ENTER button to confirm your setting.
Then, it’ll return to the parameter selection operation stage.
6. Edit another parameter or part
Now, the parameter (the VOICE in this example)
editing for a selected part is finished. You may
continue to edit other parameters in this part or
change part to edit.
(1) Edit other parameter in the current part
After you press the ENTER button to finish current editing, it’ll turn back to the parameter selection stage with the next parameter blinking.
Press the ENTER button to edit this parameter
or select other parameter by rotating the
SCROLL WHEEL. Then, edit parameters in the
same way explained in the Step 4 - Step 5 above.
Parameters can be edited are listed in the table
in page 12.
Volume
4. Select parameter to edit
After select part, the current parameter will be
blinking . Rotate the SCROLL WHEEL to select a parameter to edit. In this example, select
VOICE. The default parameter is VOICE.
Press the ENTER button to confirm you choice.
Voice
xRock
14
Page 19
DRUM KIT EDIT
(2) Edit another part
Select another part to edit in the same way explained in Page 13. The current parameter to
edit will keep no change. It provides you easy
method to edit the same parameter for each part.
15
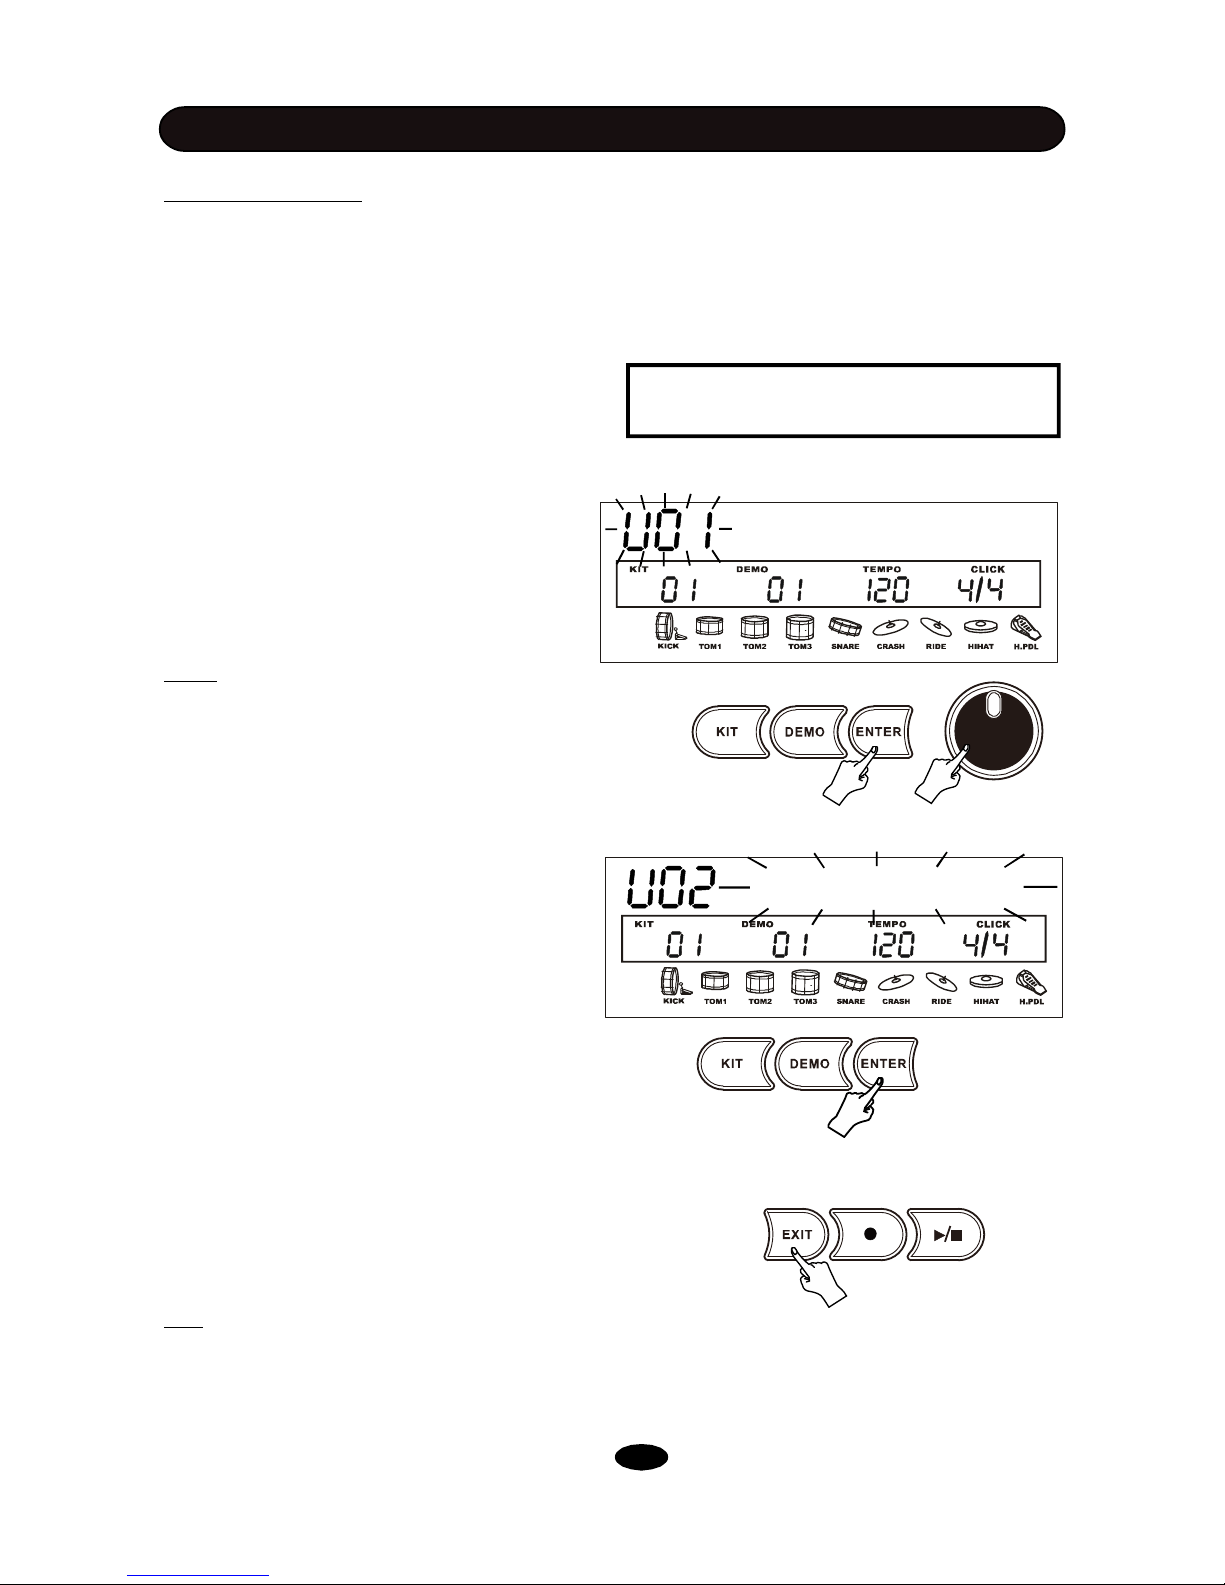
7. Complete the edit
After finish all editing job for the current drum kit,
you may terminate the edit.
Press the EXIT button, “Save it?”. Then, you
have two choices:
(1) Save edited drum kit as your own user
kit:
Press the ENTER button. “User Kit” with User
kit number blinking will appear. Rotate the
SCROLL WHEEL to choose number, then press
the ENTER button to confirm.
Note: There are 10 built-in preset User Kit. All
of them are the same as Kit 01. When you save
your own User Kit, it’ll replace the existing one.
If the saving is successful, it’ll turn to the Kit
select mode. The indicators of the pad select
button and the EDIT button will turn off.
The display always asks “Replace it”?. Press
the ENTER button to replace existing one with
your new editing. Press the EXIT button then
change another number. If you really don’t want
to cover any existing User Kit, press the EXIT
button again, and it will cover the current edited
kit then turn to the Kit Select mode. .
The User Kit setting is nonvolatile even the
power turns off.
(2) Press the EXIT button to exit the edit mode
and return to the Kit Selection mode without saving as User kit. The indicators of the pad select
button and the EDIT button will turn off.
The edited results will cover the current drum
kit and activate immediately. When the power
turn off, this changes will reset.
Tip: You may reset the kit changes by Reset
feature. Please see <SETUP> chapter in this
Manual for details.
Save it?
Replace it
User Kit
Page 20
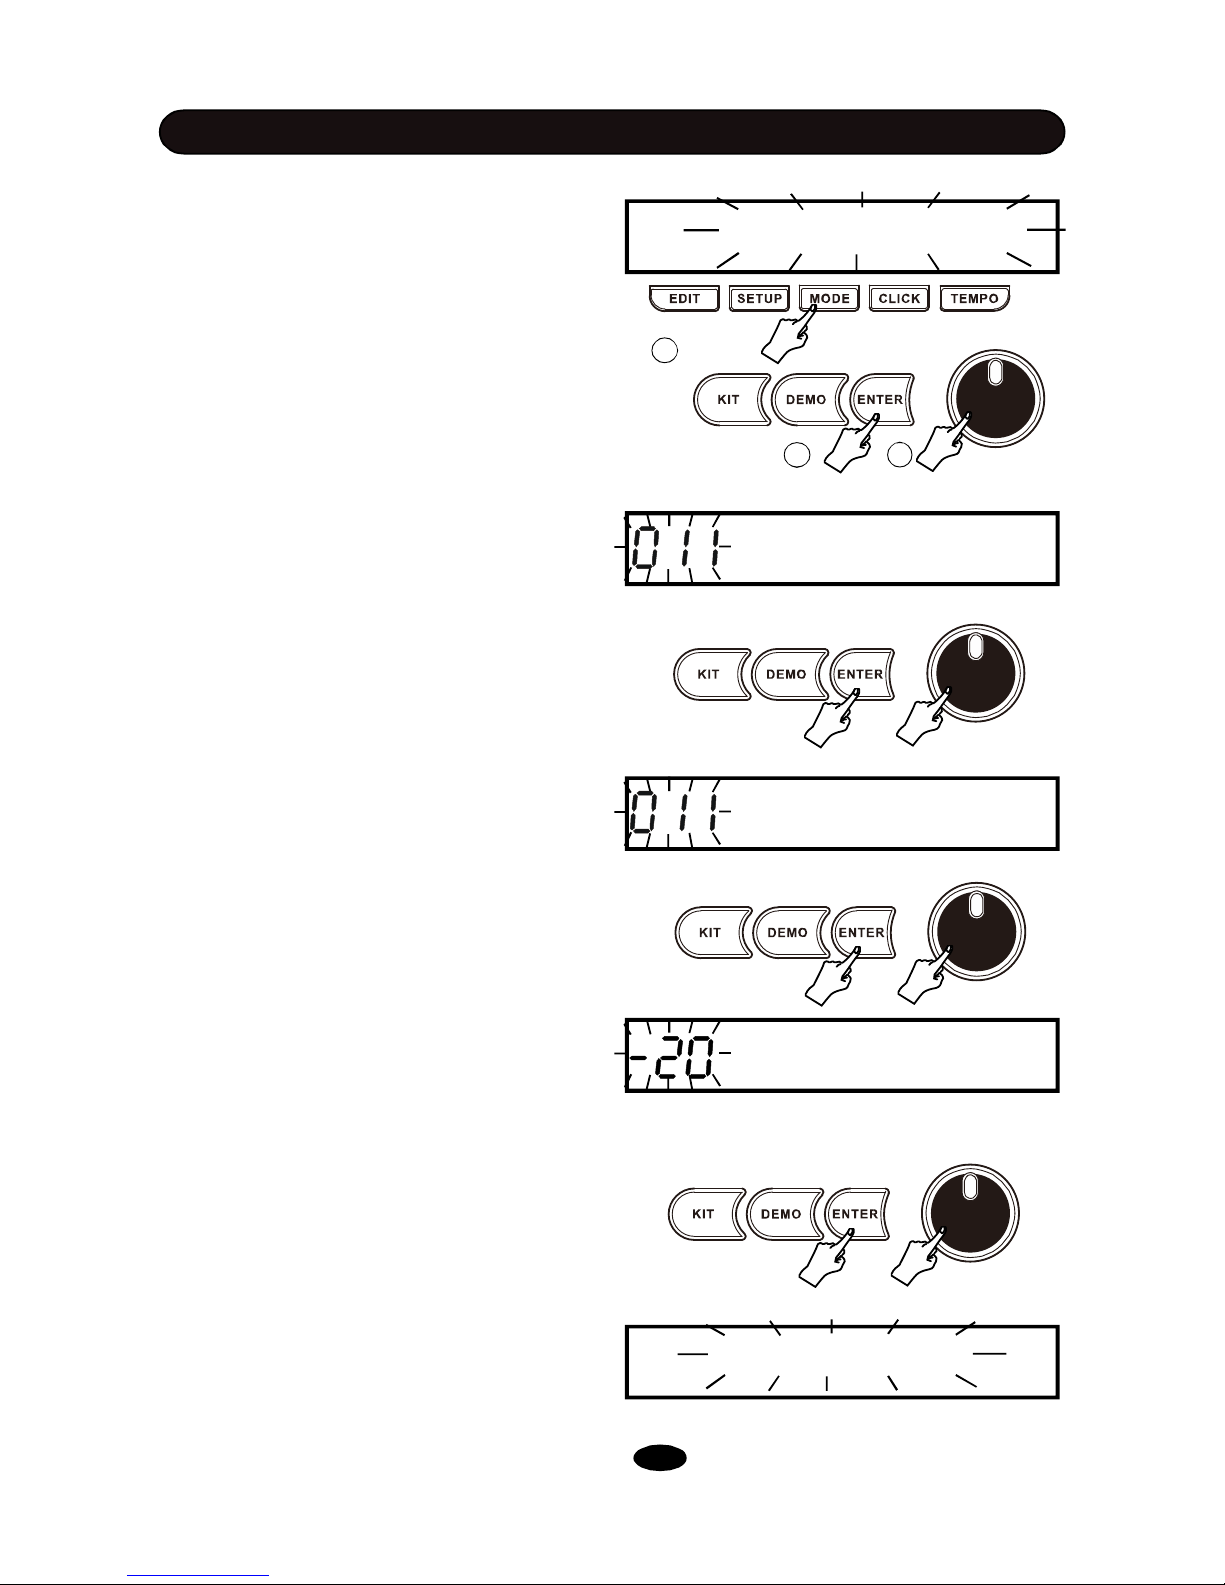
SETUP
In the Kit Selection or Demo/Song stage,
press the SETUP button to enter the Setup
mode and its indicator lights up. The param-
eter to be setup will blink. Rotate the SCROLL
WHEEL to select one of the 7 items listed
below, then press the ENTER to confirm and
its current value will be displayed.
In the item selection stage, press the EXIT but-
ton to exit setup opration and turn to the Kit
Selection mode.
1. Accompaniment Volume for Demo
When play demo song, you may hear background music accompanied. Adjust this
background music volume by parameter
Accomp Vol. Rotate the SCROLL WHEEL
to change the volume ranged 0 - 24. The de-
fault setting is 7.
Press the ENTER button to confirm and turn
to the next parameter. Press the EXIT button
to exit and turn to the parameter selection.
2. Percussion Volume for Demo
When play demo song, you may adjust percussion volume. Adjust this volume by pa-
rameter D.Drum Vol. Rotate the SCROLL
WHEEL to change the volume ranged 0 - 24.
The default setting is 11.
Press the ENTER button to confirm and turn
to the next parameter. Press the EXIT button
to cancle current edit and turn back to the
parameter selection.
Press the EXIT button to exit and to the parameter selection.
3. Master Tune
This parameter affects sound pitch globally.
Rotate the SCROLL WHEEL to change the
master tuning ranged 0 to +/- 50. The default
Setting is 0 which refers to 440 Hz at A4 note.
Press the ENTER button to confirmand turn
to the next parameter. Press the EXIT button
to exit current edit and turn to the parameter
selection.
16
4. Advanced Parameter Edit
The purpose of the drum kit edit is to change
sound characteristics such as voice, volume,
pan etc. The target of advanced parameter
edit is physical characteristics of pad such
as sensitivity, trigger curve etc.
Accomp Vol
Accomp Vol
2
1
3
D.Drum Vol
MasterTune
Advanced
Page 21
SETUP
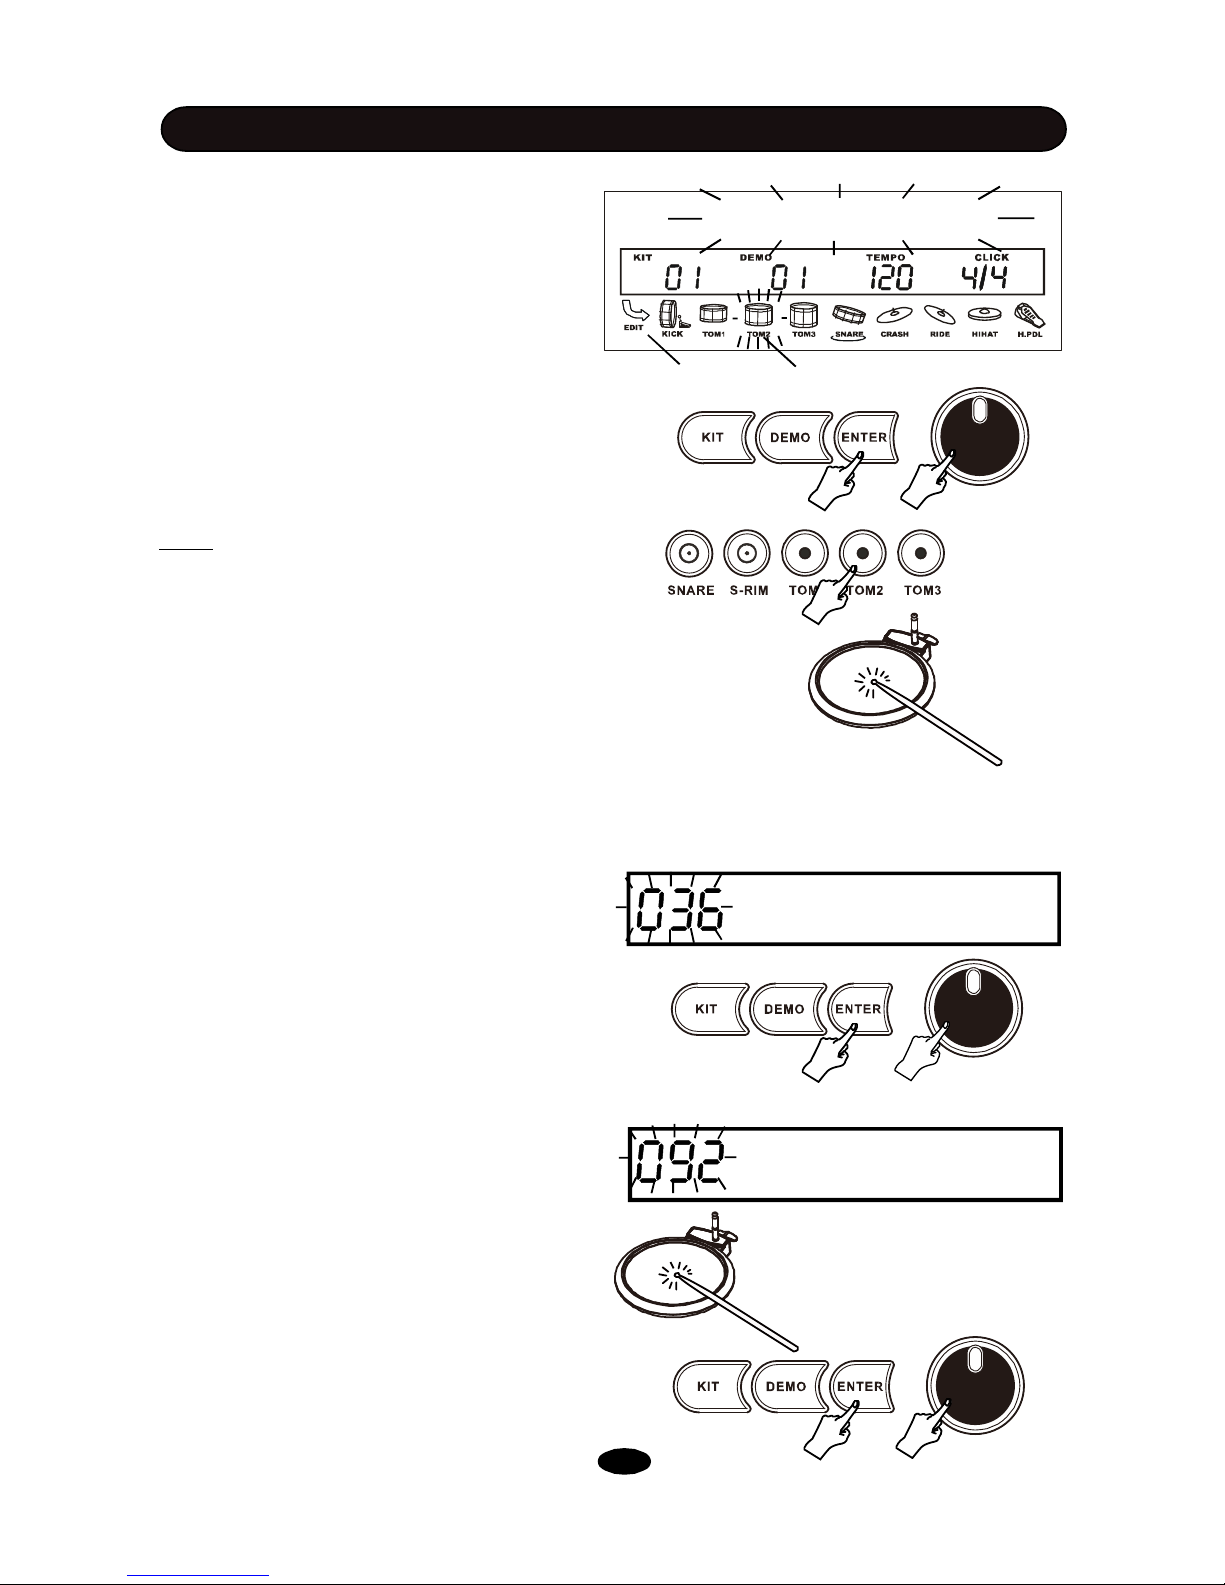
When the item name of Advanced is blinking,
press the ENTER button to confirm it. The default parameter Sensitivity will be shown and
blinking.
You could change parameter by rotating the
SCROLL WHEEL.
Any parameter is assigned for each pad
individually. You must select a pad to edit. The
default pad is Tom1. You may select pad to setup
by pressing the pad select button or strike the
pad directly.
Note:
1. There is no alternative part such as rim, edge
can be selected. It is different from part selection
procedure in DRUM KIT EDIT.
2. The advanced setup does not include Hi-Hat
pedal, which is available in individual item.
After select the parameter and pad, press the
ENTER button to confirm. The current value of
the parameter will appear and blink. Now, you
can change the value.
There are 4 advanced parameters can be edited.
They are:
Sensitivity
The pad sensitivity is ranged 1-127. Rotate
the SCROLL WHEEL to change it. The
higher value refers to the higher sensitivity.
Please note that if the sensitivity is too high,
it’ll cause unexpected sound even if you don’t
strike the pad. Press the ENTER button to
confirm your setting and turn to the next
parameter. Press the EXIT button to exit
current operation and back to Advanced
parameter selection window.
17
Dynamic Range
This feature allows you to set playing strength,
which response with the maximum volume, to
accommodate your personal taste of
performance. Strike the pad with strength you
desire, with which you want to get the maximum
volume.The value will appear automatically per
your striking, the Max. value is 127. Press the
ENTER button to confirm your setting. Press the
EXIT button to exit current operation and back
to Advanced menu.
Sensitive
Dynamic
Sensitive
Pad·for advanced setup
EDIT icon appears
Page 22
SETUP
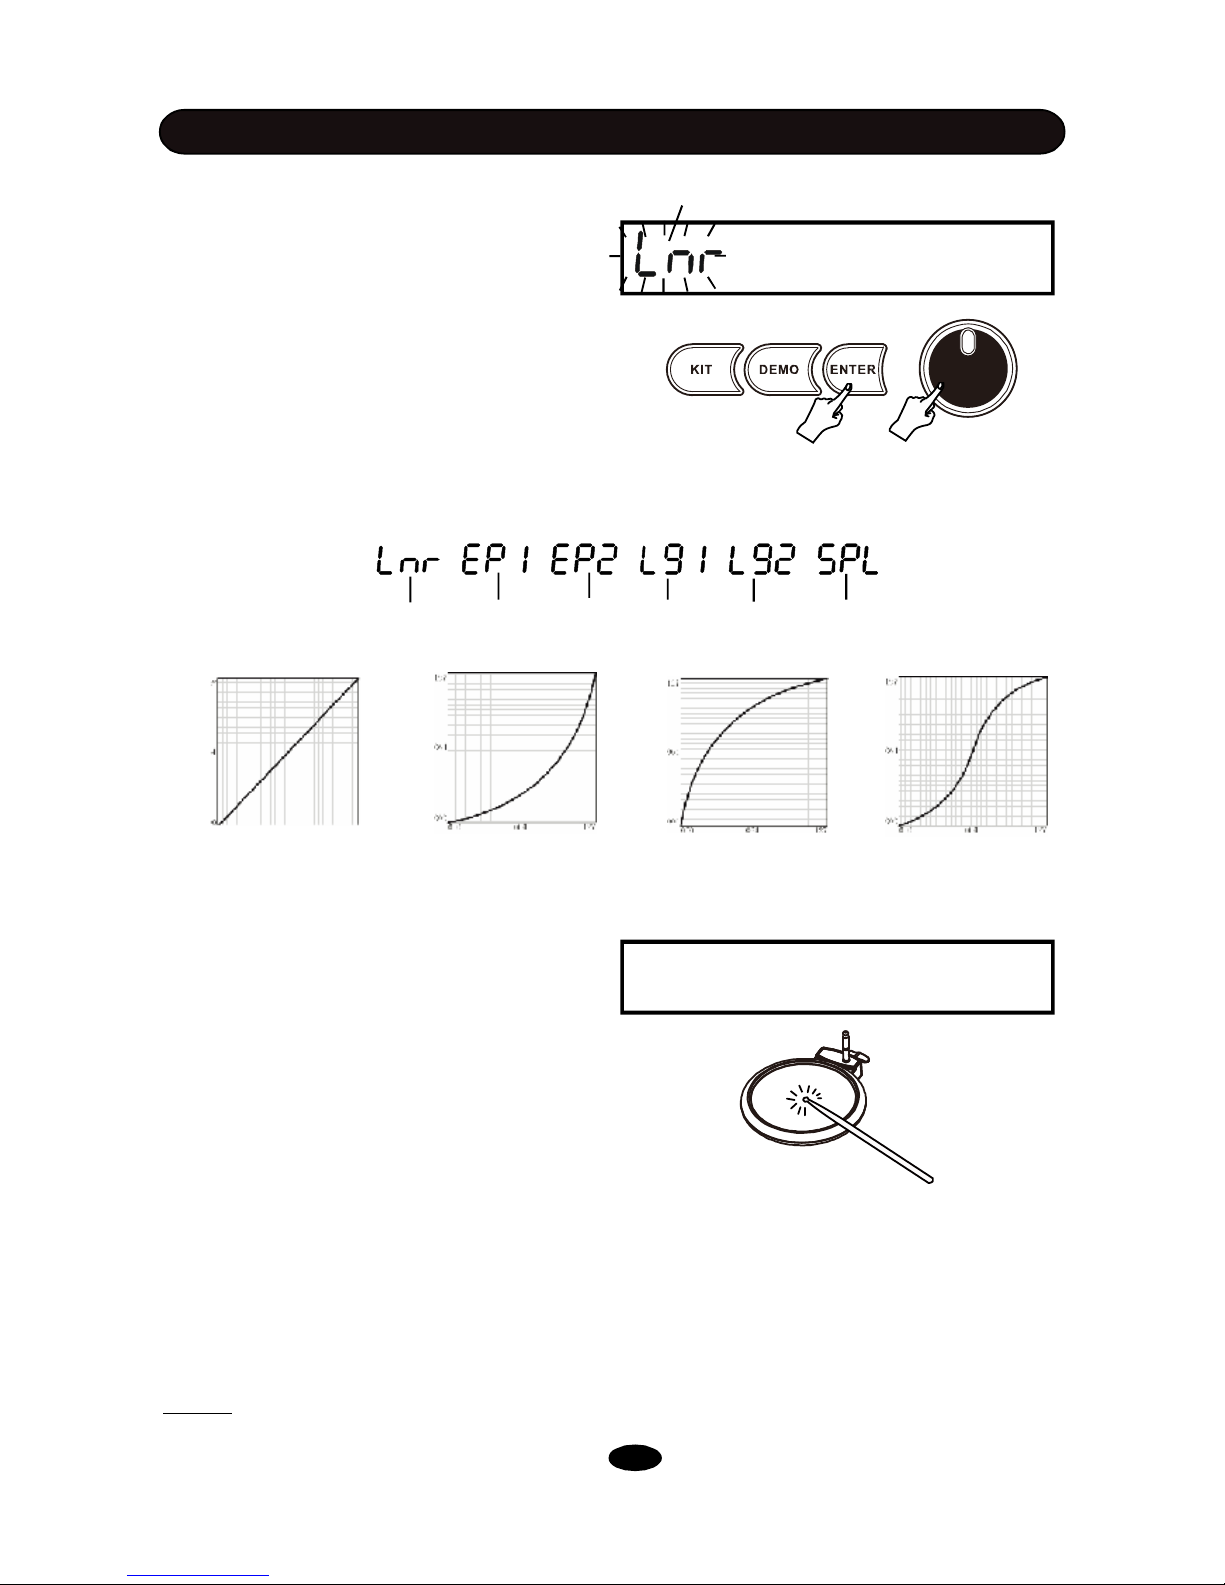
Trigger Curve
This feature allows you select a proper curve
from 6 preset curves to control the relation
between the striking force and changes in
volume. Change the curve until the response
feels as natural as possible.
Rotate the SCROLL WHEEL to choose a
curve. The corves you may select are Linear,
Exp1, Exp2, Log1, Log2 and Spline. Press
the ENTER button to confirm your setting.
Press the EXIT button to exit current operation and back to Advanced menu. The default
curve is Linear.
Cross Talk
Curve type
Diagram of 4 types of the curve
Volume
Volume
Volume
Volume
Linear Exp Log Spline
Strength
Strength
Strength Strength
18
Select Cross Talk in the menu and press
ENTER. The option "Cross Talk" on screen
will stop blinking, which indicates you have
entered cross talk adjusting mode.
Keep striking a single pad repeatedly with high
velocity ,and the system will eliminate unexpected sounds on all other pads.
Go to next pad after no unexpected sound is
heard by other pads. Finish all the cross talk
adjustment and press EXIT to finish.
For example, if you can hear sound from pad
B when you are only striking pad A, then there
is cross talk between pad A and pad B.
Enter Cross Talk adjusting mode and keep
striking pad A hard repeatedly until no sound
from pad B is audible. Press EXIT to finish
adjustment.
NOTE: The response from all the pads are bit
slower compared with when playing kits. This
is a normal phenomenon.
Cross Talk
Trigger
Linear Exp1 Exp2 Log1 Log2 Spline
Page 23
SETUP
Hi-Hat Pedal Setting
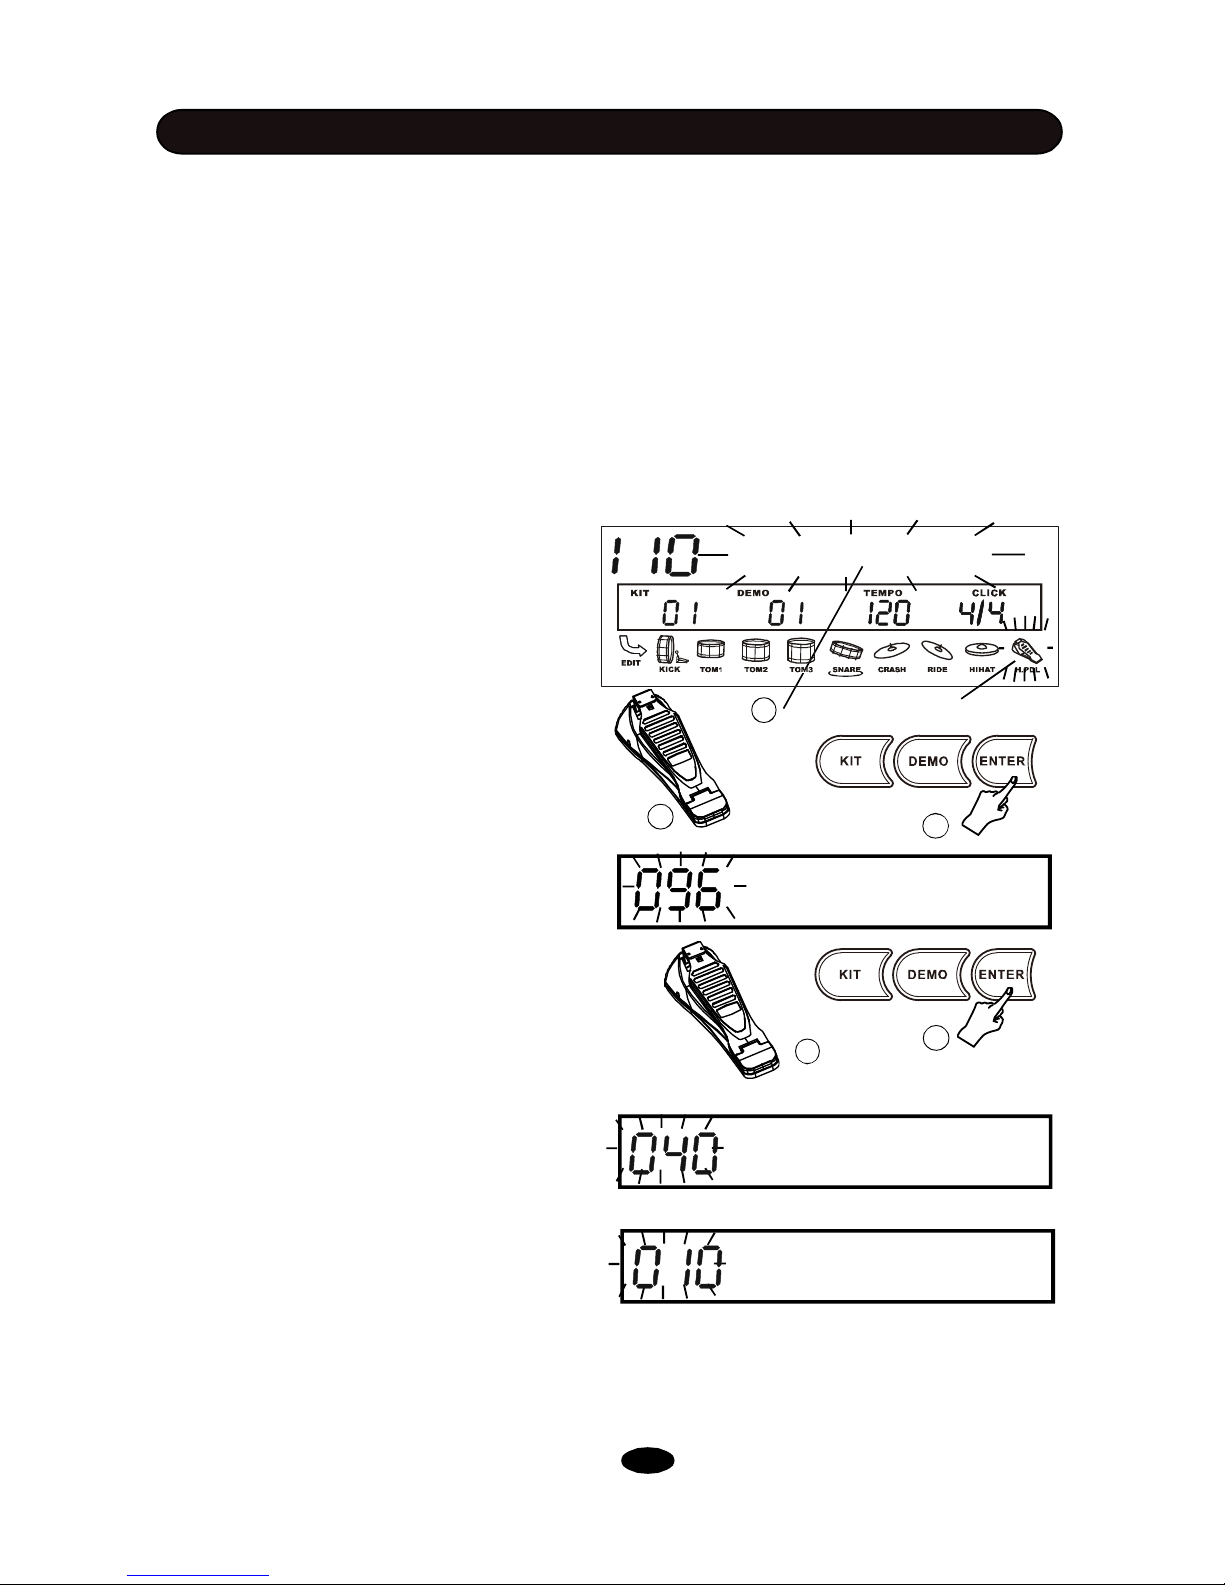
Strike the Hi-Hat pad without pressing the Hi-Hat control pedal to make open Hi-Hat sound.
The Hi-Hat pedal has three zones for sound control, which is divided by Open Threshold point and
Close Threshold point . Strike the Hi-Hat pad while the position of the pedal is higher than open
threshold point to make open Hi-Hat sound. Pressing the Hi-Hat control pedal gradually to make
consecutive open to close Hi-Hat sound when pedal position is higher than close threshold. When
pedal position is lower than close threshold, striking the Hi-Hat pad makes close Hi-Hat sound.
When press the pedal quickly and reach bottom position, it'll make Hi-Hat pedal sound and you don’t
need striking the Hi-Hat pad. The quicker the pressing, the higher the volume of the pedal sound. This
bottom position is determined by Pedal Threshold.
your comfortable pressing strength.
The Threshold points can be adjusted in the
Sensitive settings by pressing the Hi-Hat
pedal. The parameter will be "Open THR"
and blinking. Its current close threshold nalue
will be shown . Press the ENTER button to
confirm. Then, press the pedal to position
you desire as close threshold while the real
threshold value will be shown and blinking.
Press the ENTER button to confirm and turn
to the pedal threshold setting; the parameter
is "Pedal THR".
Then, set the Pedal threshold in the same
way above while you could try by pressing
the pedal quickly.
Press the ENTER button to confirm.
Press the EXIT button to exit current
operation and back to Advanced menu.
The scale of Hi-Hat pedal movement is 0 -
127. 0 represents the lowest position of the
pedal (completely pressed) and 127 represents the highest position (completely
raised).
This feature allows you to set thresholds per
19
2
1
3
Open THR
5
4
Pedal THR
Close THR
Open THR
Hi-Hat pedal icon blinks
Page 24
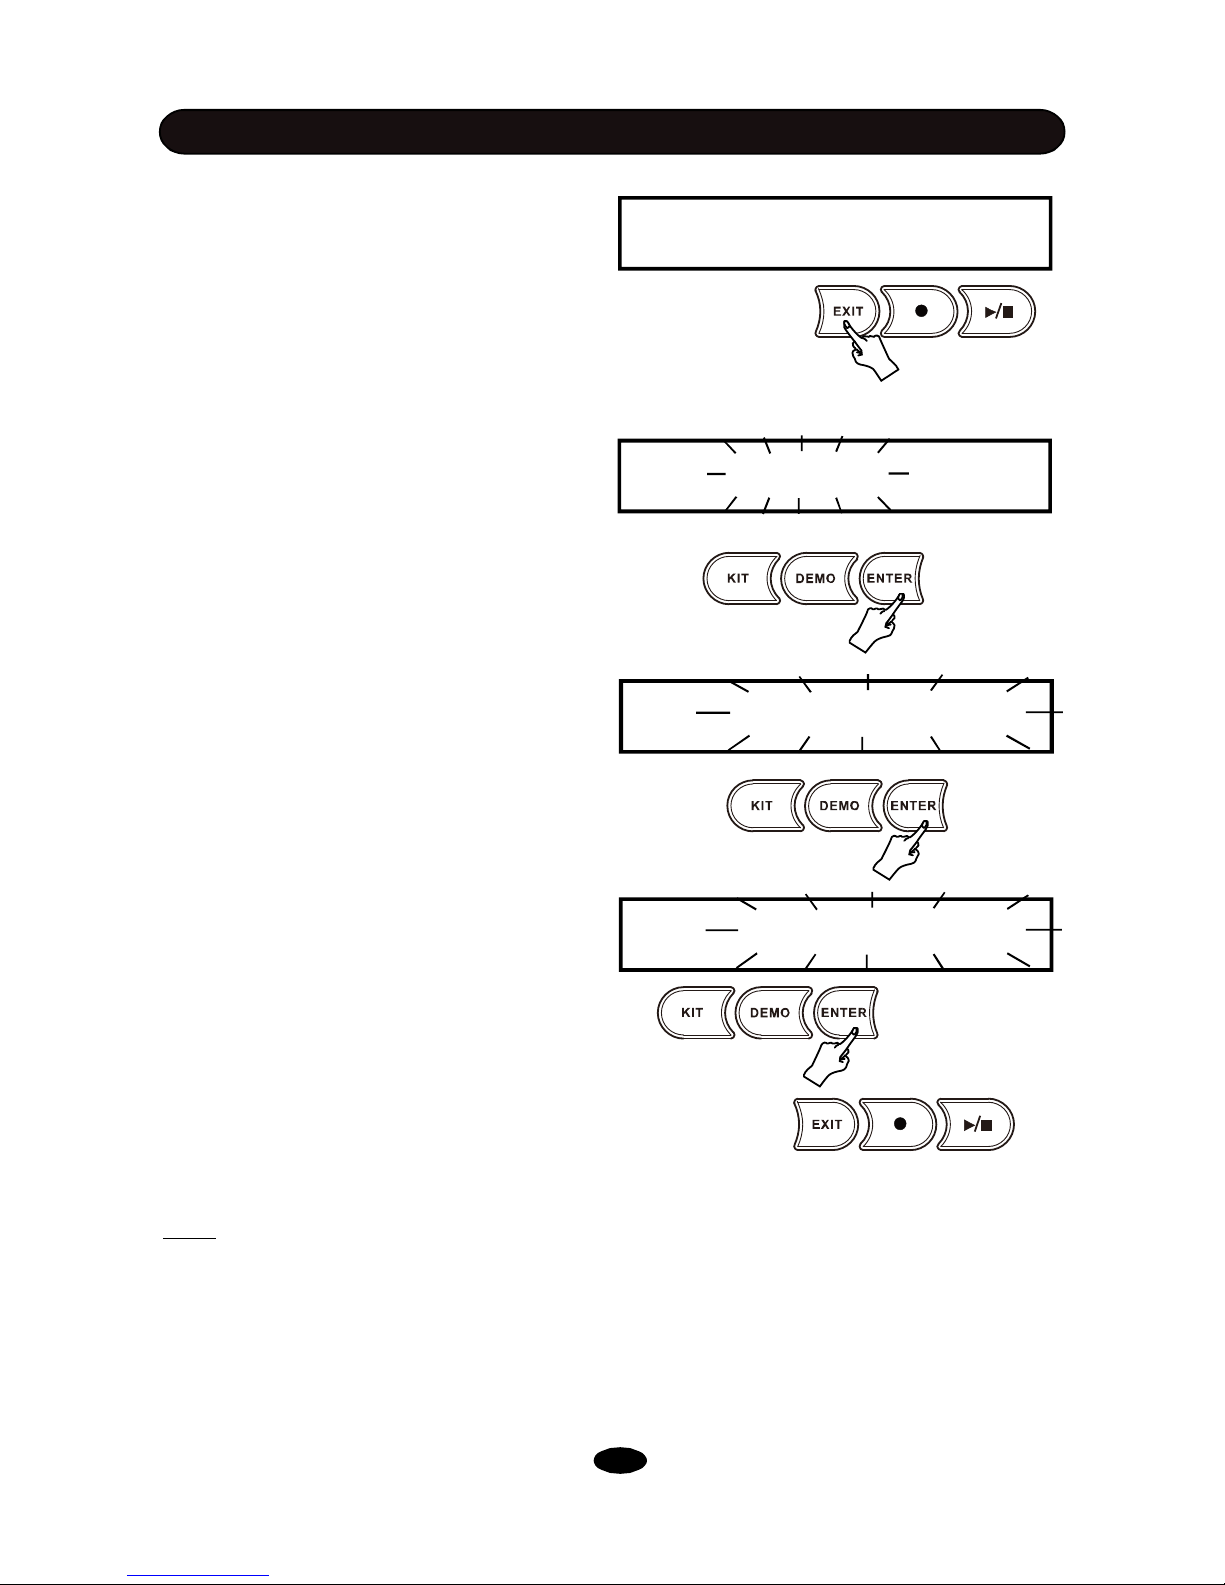
SETUP
In the Advanced menu window, press the
EXIT button to turn to the Kit Selection mode.
If you did some changes during the Advanced
setting, the changes will be saved
automatically. The display will say “Saving...”
20
5. Reset
After setup, kit editing and recording, all of
changes are saved in the unit. This feature allows you to recover the factory settings.
Select Reset in the parameter selection stage
then press ENTER button. There are four types
of reset operations can be selected. Rotate the
SCROLL WHEEL to select.
Reset Kit - Reset sound parameters in all User
kits which changed during the kit editing. When
“Reset Kit” is blinking, press the ENTER button.
The display will show “AreYouSure”. Press the
ENTER button to confirm or press the EXIT
button to cancel. Then, it’ll return to the Setup
parameter selection.
Reset Setup - Reset changes in Setup
operation. When “ResetSetup” is blinking, press
the ENTER button. The display will show
“AreYouSure”. Press the ENTER button to con-
firm and return to the Kit Selection mode. Or,
press the EXIT button to return to the Setup
parameter selection.
Reset Song - Erase all songs recorded by user.
When “Reset Song” is blinking, press the ENTER button. Press the ENTER button to confirm or press the EXIT button to cancel. Then,
it’ll return to the Setup parameter selection.
Reset All - Besides reset all items above, it also
reset physical parameter changes in kits which
changed during the kit advanced editing. When
“Reset All” is blinking, press the ENTER button.
Press the ENTER button to confirm or press
the EXIT button to cancel. Then, it’ll return to
the Setup parameter selection.
Note:
1. Don not strike any pad after press the ENTER button until it back to the Setup parameter
stage or Kit Selection mode. It needs couple of
second.
2. When enter the Setup mode from the Demo/
song stage, the reset operation is not available.
Saving...
Reset
Reset Kit
AreYouSure
Page 25
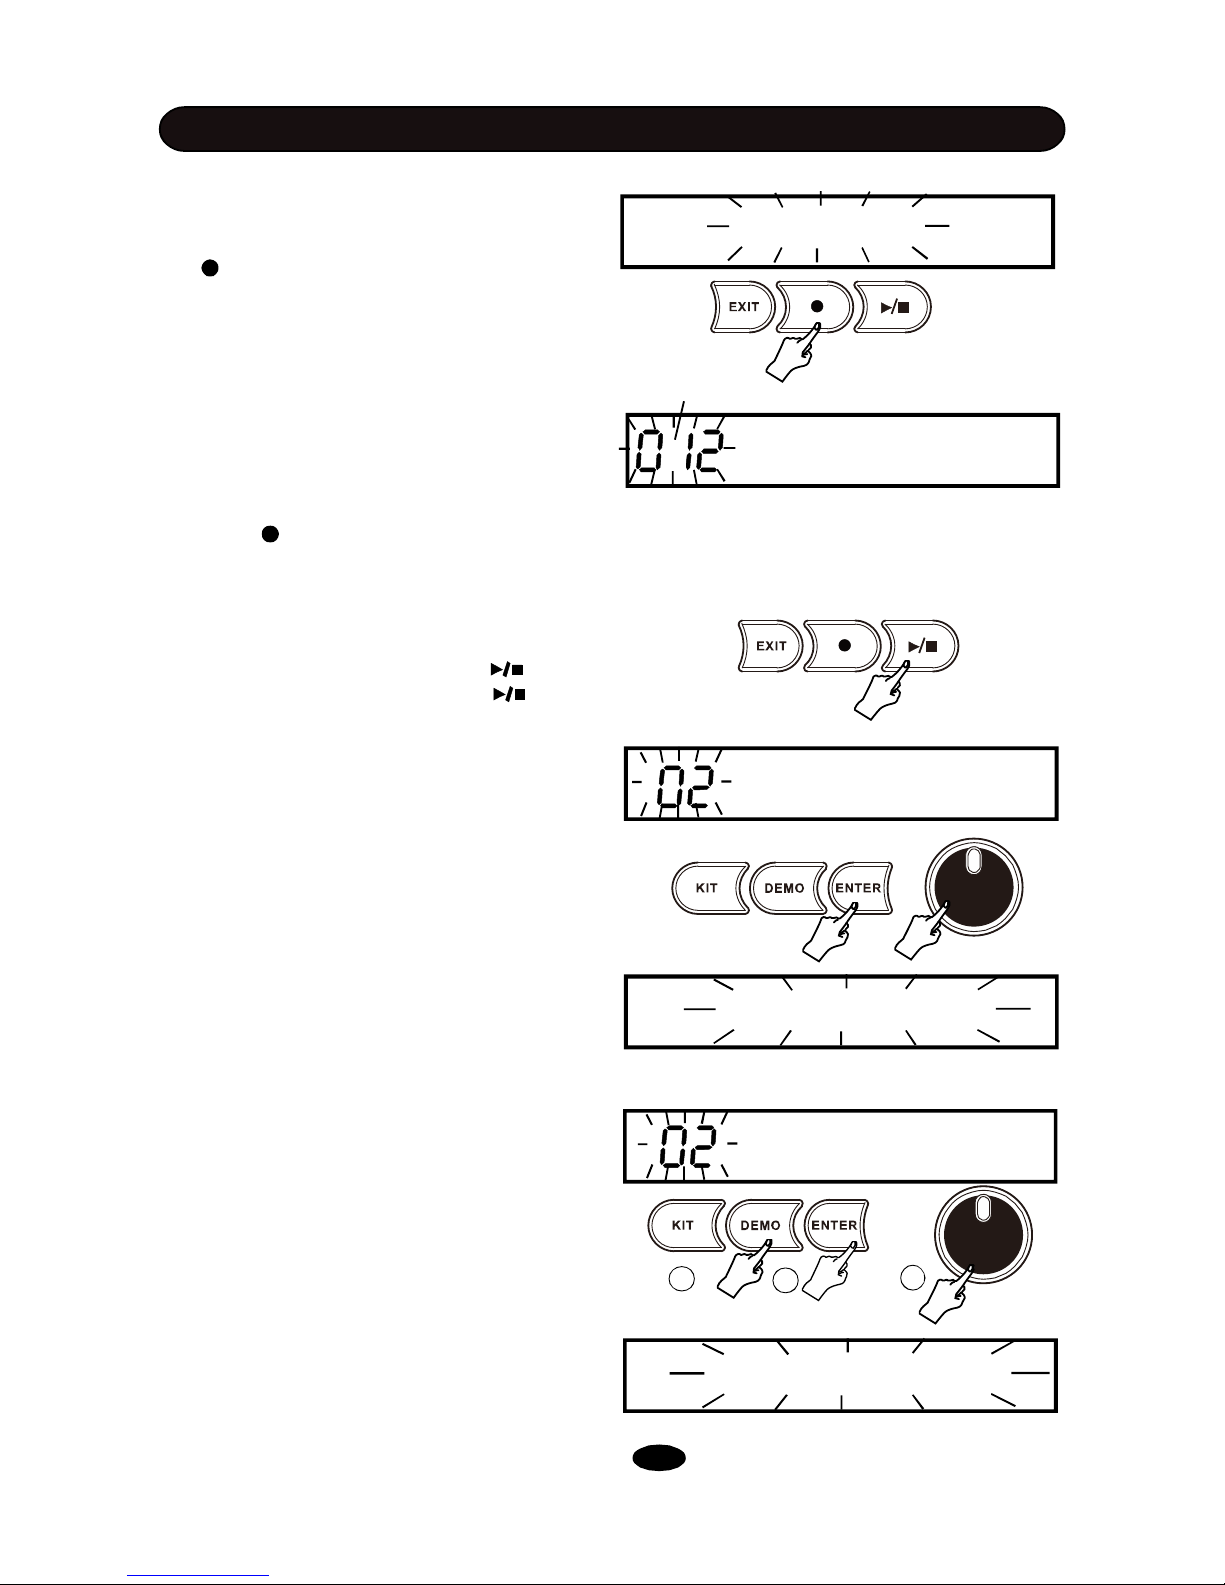
Before recording, you should prepar
neccessary settings including drum kit,
metronome, tempo, time signature etc. Press
the button to enter the record mode. The
indicator will blink. Now, it is ready for recording.
RECORD
1. Record
After one meature count-in, the record starts
immediately, no matter you strike drum pad or
not. If the metronome is turned on, you can hear
the metronome during the recording.
The record indicator will keep blinking.
The record measure count will appear on the
display.
Press the button again to stop the
recording. The display will go to the save
stage.
2. Play back your recording
After stop the recording, press the button
to playback your recording. Press button
again to stop the playback.
After you save the recording as User Song, In
the Song mode you can also select user song
to playback. Please refer to the <SONG> chapter in this Manual for details.
3. Save as a User Song
In the save operation, the User Song number
for saving your record will blink. You may ro-
tate the SCROLL WHEEL to choose song name.
Press the ENTER button to save recorded song,
press the EXIT button to turn to the Kit Selection
mode without saving.
If the song name was already used for the previous recording, it’ll ask you do you want to replace it with the new recording? Press the
ENTER button to replace it or press the EXIT
button to select another song number.
21
4. Erase User Song
In the Kit selection mode, press the DEMO
button twice to enter the User Song mode.
Select an User song then press the ENTER
button. “ Erase it?” will appear on the display.
Press the ENTER button to erase this song
or press the EXIT button to give up erasing.
Then, it’ll return to the User Song mode.
Measure
Record
Recording
User Song
Replace it
2
1
3
Erase it?
User Song
Page 26
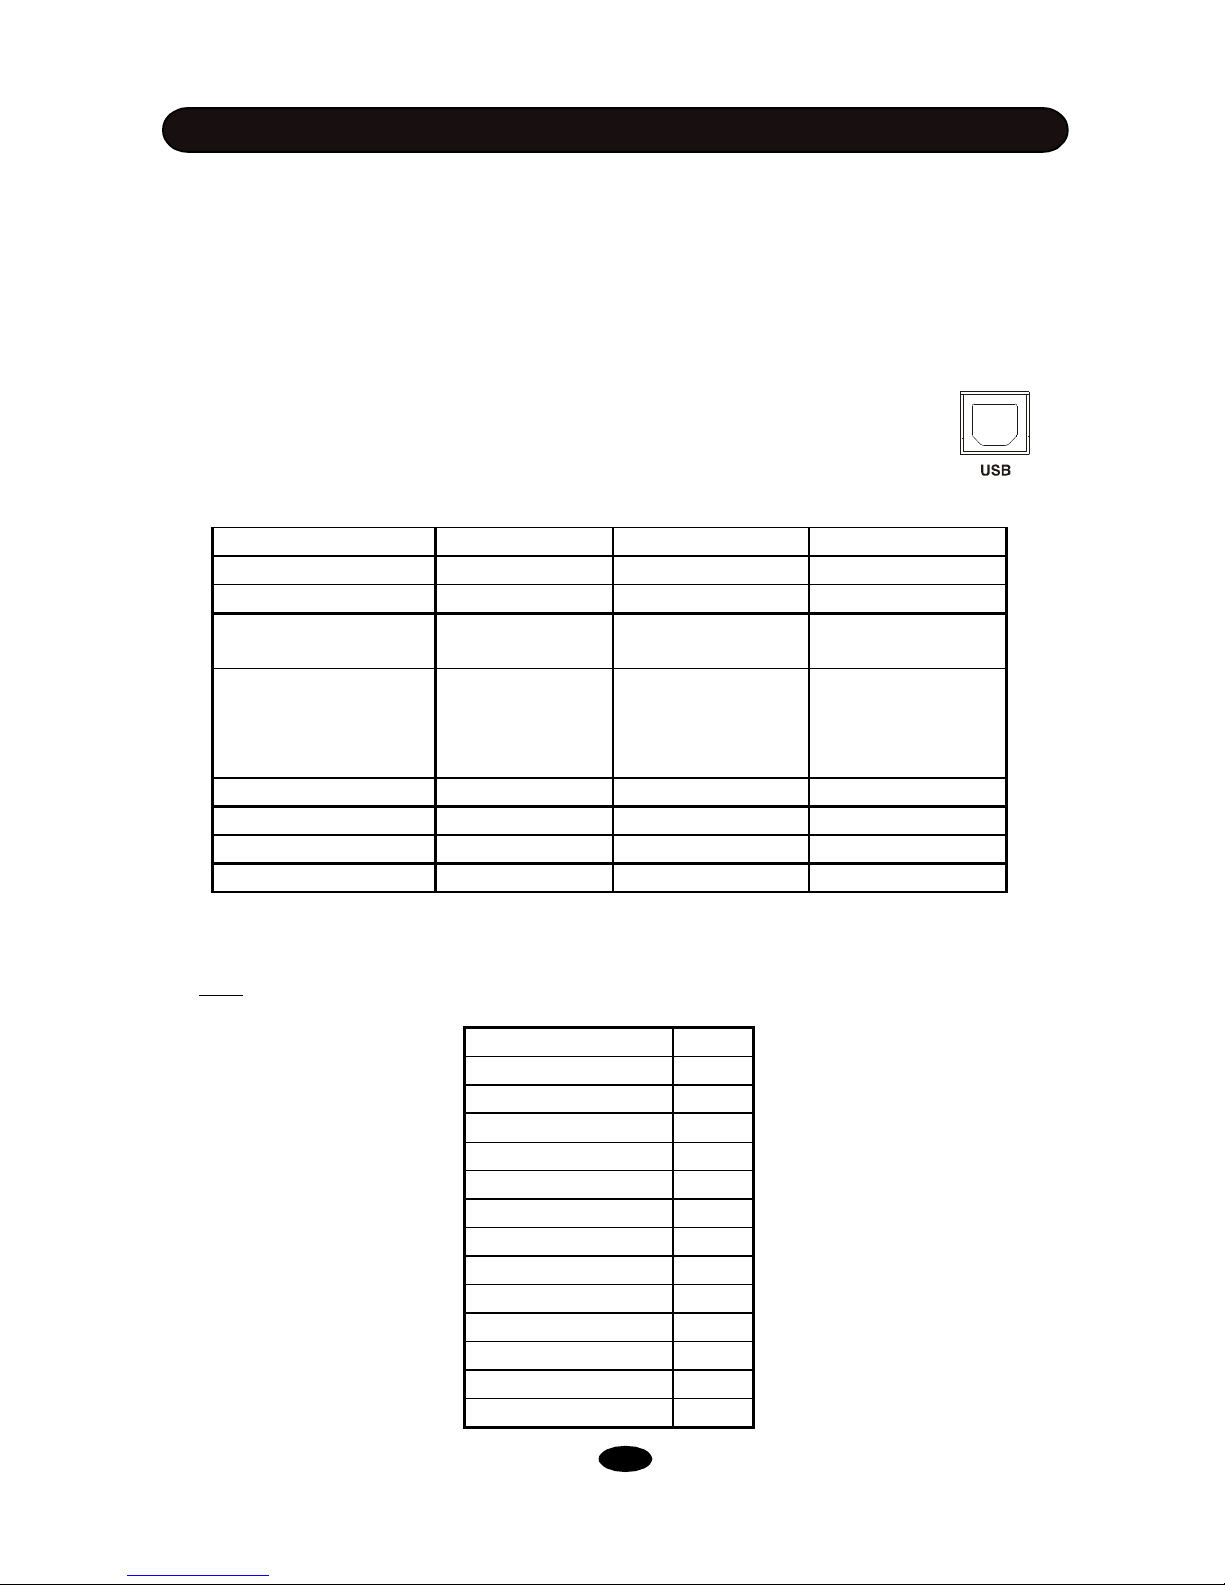
Function Transmitted Recognized Remarks
Basic Channel 10 1-16
Note Number 0-127 0-127
Velocity: Note ON
Note OFF
1-127
64
0-127
0-127
Major Controls:
B9h 04h xxh
Bxh 79h 00h
Bxh 7Bh 00h
Yes
Yes
Yes
X
Yes
Yes
Hi-Hat pedal control
Reset All Controller
All Notes OFF
Program Change X Yes *
System Exclusive Yes Yes **
RPN X ** Yes **
NRPN Yes Yes **
* Chanel 10 supports Bank 0 only
** If you need detailed information about Exclusive, RPN and NRPN, please contact your
vender
Note: Transmited note through chanel 10 for each pad if fixed as below:
PAD NOTE
Tom1 48
Tom2 45
Tom3 41
Snare 38
Snare Rim 37
Crash 55
Crash Edge 49
Ride 51
Ride Edge 59
Hi-Hat Open 46
Hi-Hat Close 42
Hi-Hat Pedal 44
Kick 36
MIDI stands for Musical Instrument Digital Interface. This is a world wide standard communication
interface that enables electronic musical instruments and computers to communicate with each
other so that instructions and other data can pass between them. This exchange of information
makes it possible to create a system of MIDI instruments and devices that offers far greater versatility and control than is available with isolated instruments. Whether you interface with computers,
sequencers, expanders or other equipment your musical horizons will be greatly enhanced. For
instance, you can edit your playing in computer or playback MIDI song from computer while play
the drum.
USB - The USB connector allows you to connect the drum directly to your
computer. It can connected without driver installation under the Windows
XP, Windows Vista & MAC OSX environment. The drum will be recognized
as USB Audio device to receive and transmit the same MIDI messages
described above.
MIDI & USB
MIDI APPLICATION CHART
22
Page 27
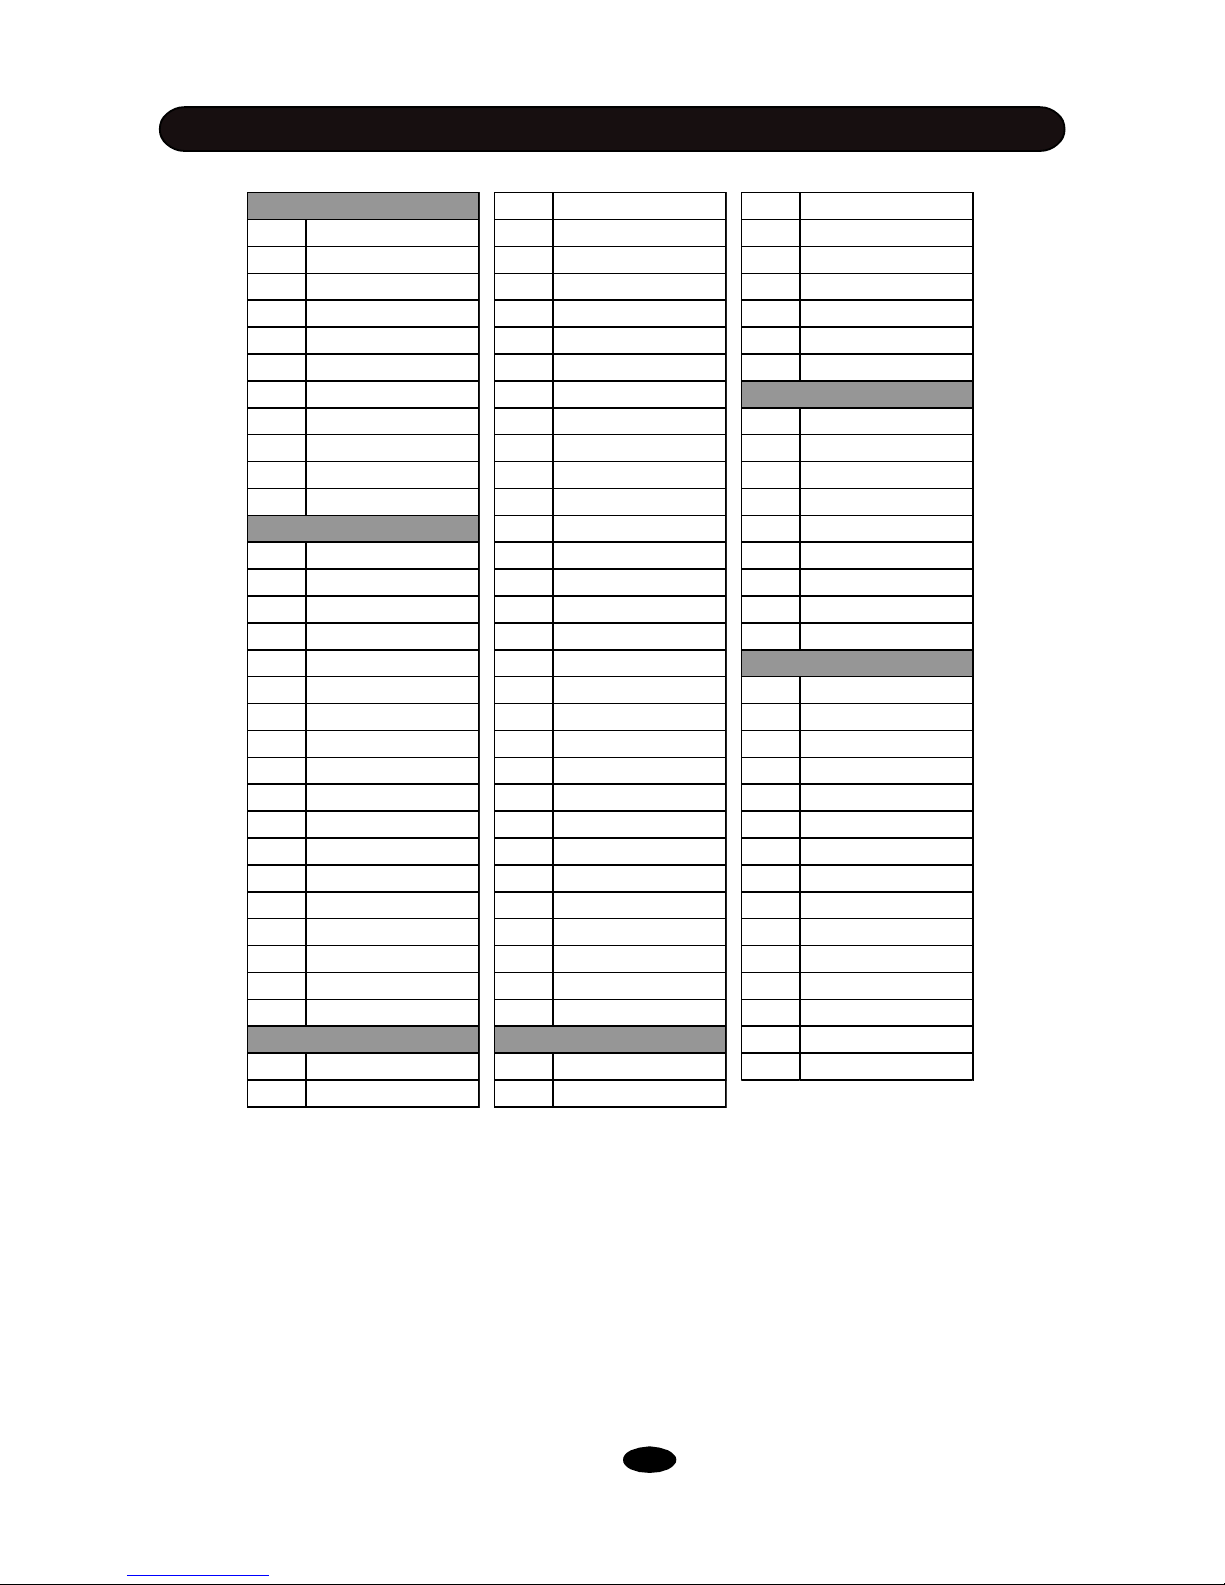
VOICE LIST
23
32tVintage3 65rMetal
1kVintage 33tRock1 66rJungle
2kRock 34tRock2 67rFiesta
3kPop1 35tRock3 68rElectro1
4kPop2 36tPop1 69rElectro2
5kMetal1 37tPop2 70rElectro3
6kMetal2 38tPop3 71rBrush
7kJungle 39tMetal1
8kJazz 40tMetal2 72cVintage
9kElectro1 41tMetal3 73cRock1
10kElectro2 42tJungle1 74cRock2
11kElectro3 43tJungle2 75cMetal1
44tJungle3 76cMetal2
12sVintage 45tJazz1 77cJungle1
13sRock 46tJazz2 78cJungle2
14xRock 47tJazz3 79cJungle3
15sPop 48tFiesta1 80cJazz
16xPop 49tFiesta2
17sMetal 50tFiesta3 81hoVintage
18xMetal 51tElectro1 82hcVintage
19sJungle1 52tElectro2 83hpVintage
20sJungle2 53tElectro3 84hoRock
21sJazz 54tElectro4 85hcRock
22xJazz 55tElectro5 86hpRock
23sFiesta 56tElectro6 87hoFiesta
24sElectro1 57tElectro7 88hcFiesta
25sElectro2 58tElectro8 89hpFiesta
26sElectro3 59tElectro9 90hoElectro
27sElectro4 60tBrush1 91hcElectro
28sElectro5 61tBrush2 92hpElectro
29sBrush 62tBrush3 93hoBrush
94hcBrush
30tVintage1 63rVintage 95hpBrush
31tVintage2 64rRock
CRASH
EXTRA
KICK
SNARE
TOM RIDE
All voice name has prefix:
k refers to kick, s refers to snare, x refers to cross-stick, r refers to ride, c refers to
crash, ho refers to hihat open, hc refers to hihat closed, hp refers to hihat pedal
Page 28
SPECIFICATIONS
24
Configuration
3 X 8” Tom, 8”Snare(with rim),12”Crash cymbal(with choke),12”Ride
cymbal,8”Hi-Hat,6”Kick,Hi-Hat pedal
Voice 95
Drum Kit 10 preset kits,10 user kits
Pattern 52, Full ,Drum Only and mute mode
Sound Effect Reverb effect with professional DSP processor
Pad Button 10, for fast select and hear the sound while editing
Setup Menu Accomp Vol,D.Drum Vol,MasterTune,Advanced,Reset
Pad Edit Voice, Volume,Pan,Pitch,Reverb
Tempo Default 96; range 40 ~240
Metro On/Off,Tempo,Time-Signature,Volume
Record 10 songs
Display Custom back-light LED
Power 9V DC
Aux. Socket Headphone, Line In,Line Out L(Mono)/R,USB, Power In DC9V
All specifications are subject to change without notice
All specifications are subject to change without notice
 Loading...