

Page 1

OPERATOR MANUAL FOR
EMBEDDED IEEE-488
PROGRAMMING INTERFACE
Document: 83-468-007 Rev B
MODEL _______________________
SERIAL _________________
405 Essex Road, Neptune, NJ 07753
Tel: (732) 922-9300
Fax: (732) 922-9334
Web: www.lambda-emi.com
Page 2

Table of Contents
1. THE DIGITAL PROGRAMMING OPTION................................................... 1
1.1 OVERVIEW: IEEE AND RS-232 PORTS ........................................................1
1.2 SCOPE
1.3 USING
OF MANUAL ......................................................................................2
DIGITAL PROGRAMMING .................................................................2
1.3.1 THE IEEE-488.2 INTERFACE............................................................2
1.3.2 THE RS-232 INTERFACE ..................................................................2
1.3.3 IEEE AND RS-232 INTERACTION ....................................................2
1.4 CONFIGURING
THE IEEE INTERFACE.........................................................3
1.4.1 CONFIGURING THE IEEE CONTROLLER .......................................3
1.4.2 CONFIGURING THE IEEE INTERFACE ...........................................3
1.5 GETTING
STARTED WITH THE SOFTWARE................................................4
1.5.1 EXAMPLE SESSION USING THE ‘IBIC’ CONSOLE.........................4
1.5.2 EXAMPLE PROGRAM WRITTEN IN VISUAL BASIC .......................4
1.5.3 EXAMPLE PROGRAM WRITTEN IN LABVIEW ................................5
1.6 PROGRAMMING
VOLTAGE AND CURRENT ...............................................6
1.6.1 PROGRAM OUTPUT VOLTAGE .......................................................6
1.6.2 PROGRAM OUTPUT CURRENT.......................................................6
1.6.3 DISABLE THE SUPPLY OUTPUT .....................................................6
1.6.4 ENABLE THE SUPPLY OUTPUT ......................................................7
1.6.5 READ PROGRAMMING MODE .........................................................7
1.7 MEASURING
VOLTAGE AND CURRENT......................................................8
1.7.1 MEASURE VOLTAGE ........................................................................8
1.7.2 MEASURE CURRENT........................................................................8
1.7.3 SET MEASUREMENT FILTERING ....................................................8
1.8 LIMITS
AND PROTECTIONS..........................................................................9
1.8.1 SET VOLTAGE LIMIT.........................................................................9
1.8.2 SET CURRENT LIMIT ........................................................................9
1.8.3 OVER-VOLTAGE PROTECTION......................................................9
1.8.4 OVER-CURRENT PROTECTION ...................................................10
1.9 COMMON
COMMANDS................................................................................12
1.9.1 READ DEVICE IDENTITY ................................................................12
1.9.2 GO TO LOCAL..................................................................................12
1.9.3 REMOTE ENABLE ...........................................................................12
1.9.4 READ STATUS BYTE REGISTER...................................................12
1.9.5 RESET THE POWER SUPPLY........................................................13
1.9.6 CHANGING THE POWER-UP DEFAULTS......................................13
1.10 USING
ERROR AND STATUS REGISTERS ................................................13
1.10.1 OVERVIEW: REGISTER FAN-OUT.................................................14
1.10.2 GLOSSARY OF REGISTER TERMS...............................................14
1.10.3 CLEAR ALL STATUS REGISTERS .................................................17
1.10.4 SERIAL POLL AND STATUS BYTE REGISTER ...........................17
1.10.5 STANDARD EVENT STATUS REGISTER .....................................18
1.10.6 THE OPERATIONAL REGISTERS ..................................................19
1.10.7 THE QUESTIONALBE REGISTERS................................................21
2. THE RS-232 INTERFACE ......................................................................... 22
Document: 83-468-007 Rev B
Page 3

2.1 CONFIGURING
2.1.1 THE RS-232 CABLE.........................................................................22
2.1.2 DEFAULT RS-232 CONFIGURATION.............................................22
2.2 RS-232
2.2.1 CHANGE CHARACTER ECHO........................................................24
2.2.2 GO TO LOCAL COMMAND..............................................................25
2.2.3 CHANGE THE BAUD RATE.............................................................25
2.2.4 CHANGE THE DATA BITS...............................................................25
2.2.5 CHANGE THE PARITY BITS ...........................................................26
2.2.6 CHANGE THE STOP BITS...............................................................26
2.3 ERROR
COMMAND SET ...............................................................................24
REGISTERS AND RS-232...............................................................27
THE RS-232 INTERFACE...................................................22
3. ADJUST THE IEEE CALIBRATION.......................................................... 28
3.1 INTRODUCTION ...........................................................................................28
3.2 CALIBRATE
3.3 CALIBRATE
3.4 CALIBRATE
3.5 CALIBRATE
THE VOLTAGE PROGRAMMING...........................................28
THE VOLTAGE MEASUREMENT...........................................30
THE CURRENT PROGRAMMING ..........................................31
THE CURRENT MEASUREMENT ..........................................32
4. SUMARY TABLE OF COMMANDS .......................................................... 35
List of Tables
Table 1. The *SAV 0 Command............................................ 13
Table 2. The Status Byte Register......................................... 17
Table 3. The Standard Event Status Register ....................... 18
Table 4. The Operational Registers....................................... 19
Table 5. Default RS-232 Configuration .................................. 22
Table 6. RS-232 Echo Settings ............................................. 24
List of Figures
Figure 1. IEEE Address Switch Settings ................................... 3
Figure 2. Status and Error Register Diagram.......................... 15
Figure 3. Status and Error Handler ......................................... 16
Figure 4. RS-232 Cable Construction ..................................... 23
Document: 83-468-007 Rev B
Page 4

WARNING:
When a power supply with IEEE option is first powered ON, or when a
“Go To Local” command is sent, the supply output will jump to
whatever is set on the front panel knobs.
Therefore, it is recommended the front panel Voltage and Current
knobs be turned counter-clockwise to ZERO before REMOTE
programming.
1 THE DIGITAL PROGRAMMING OPTION
1.1 OVERVIEW: IEEE AND RS-232 PORTS
Most power supplies come standard with the Local and Analog Remote programming
modes which use the front panel knobs or the back panel 25 pin ‘D’ connector. A third
programming mode, Digital Remote, is available as an option. This option adds an embedded interface board with two extra connectors to the back of the supply.
The connectors allow cables to be run from the supply to a remotely located operator
terminal or to a computer running an automation program. A terminal allows the operator
to type commands to the power supply which take affect as soon as they are typed. An
automation program will allow several power supplies to be ‘daisy chained’ together. It
also allows other instruments, including relay switchers and measurement devices, to be
synchronized with the power supplies in complex power systems.
When the supply is running in the digital programming mode, the front panel knobs are
disabled but all the front panel indicators still show the status of the supply. The power
supply output levels and operating states may be monitored through the computer port.
Commands that are standard with digital programming include:
Introduction
1
• Program Voltage • Program Current
• Measure Voltage • Measure Current
• Set Maximum Voltage • Set Maximum Current
• Over-Voltage Shutdown • Over-Current Shutdown
• Error and Status Messages
• Computerized Calibration
• IEEE-488.2 Compliant • SCPI Compliant
Document: 83-468-007 Rev B
Page 5

1.2 SCOPE OF MANUAL
This manual contains the information needed to setup and operate the embedded digital
interface used in the Lambda EMI power supplies including the EMS and ESS models.
The interface is contained on one circuit card. It may be optionally installed by Lambda
facilities at the time of purchase.
This manual does NOT include specifications for digital accuracy and response rate.
These values are only valid for the power supply in which the interface is installed, so
the specifications are given in the User Manual for the power supply.
1.3 USING DIGITAL PROGRAMMING
1.3.1 THE IEEE-488.2 INTERFACE
The IEEE-488 digital programming interface (also called the GPIB interface) is a popular
way to connect instruments to a computer. It uses a specialized 24-pin cable with connectors that allow cables to be ‘stacked’ together. There are eight data wires, eight control wires and eight ground wires. If the system runs from a personal computer, there are
numerous vendors of IEEE controller cards and software.
The IEEE-488 standard has gone through several upgrades. The IEEE-488.1 focused
on the handshaking of the eight control lines. The IEEE-488.2 added status registers inside each instrument and it added common commands to make programming groups of
instrument easier. The latest specification, SCPI, adds guidelines for the command syntax so one vendor’s power supply will use the same commands as another’s. The
Lambda interface follows all of these standards.
Because up to 15 instruments may be connected and independently controlled by a single IEEE controller, each instrument must have a unique address. On the power supply,
the address is set by a DIP switch accessible through a slot in the back panel.
Introduction
2
1.3.2 THE RS-232 INTERFACE
The second connector on the interface board is for the RS-232 serial port. It uses a
9-pin “D” connector. Only three wires are used: transmit data, receive data, and ground.
Compared to the IEEE port, the RS-232 is slower and it has limited status and error reporting. Also, there is no instrument addressing so only one power supply can be run
from each controller port. The advantage of RS-232 is the cable is easy to make and
every personal computer and terminal comes standard with it.
The RS-232 specification does not include any requirements for command syntax. For
this port, a “short form” command set is available where each command has only a couple of characters. The short form commands are easy to type into a terminal program.
1.3.3 IEEE AND RS-232 INTERACTION
When the power supply is first powered up, the RS-232 serial port is active. If a command is sent over the IEEE bus, the IEEE port becomes enabled and the RS-232 port
will no longer function. To restore the function to the RS-232 port, the power supply must
be cycled off and on.
Document: 83-468-007 Rev B
Page 6

1.4 CONFIGURING THE IEEE INTERFACE
1.4.1 CONFIGURING THE IEEE CONTROLLER
A typical IEEE controller is a personal computer with a IEEE interface card. Each card
vendor supplies its own configuration instructions and interface software.
Each time the software is executed, the controller must be configured as follows:
Controller Address = 0. This is factory default for all controllers.
EOI Flag = TRUE. The “End or Identify” is a control line in the IEEE cable that
is asserted when the last character of a message string is sent. It is required
for Lambda EMI supplies
EOS Flag = FALSE: The “End of String” is used in some instruments to say a
character, such as a linefeed, marks the last character of a message. The
Lambda EMI supply does not require an end of string character.
1.4.2 CONFIGURING THE IEEE INTERFACE
The power supply is connected to the controller using a standard IEEE-488 cable. Standard connecting requirements are as follows:
Verify the power supply is switched OFF before connecting any cables to it.
ConfiguringBeginning Software
3
A maximum of 15 devices may be connected to any one IEEE bus. Maximum
cable length between any two devices should be six feet. Total cable length
should be less than 65 feet.
Before powering up the supply, set the IEEE address on its back panel switch.
It is labeled “IEEE ADDRESS”. Each device on the IEEE bus must have a
unique address. The controller is normally at address = 0 and address = 31 is
reserved, so the available addresses are from 1 to 30. See Figure 1.
Before powering up the supply, verify the FORCED LOCAL switch on IEEE
address switch is downward for OFF. Setting this switch ON will disable remote programming over the IEEE and RS-232 busses. See Figure 1.
Figure 1. IEEE Address Switch Settings
Document: 83-468-007 Rev B
Page 7

1.5 GETTING STARTED WITH THE SOFTWARE
A computer can use a variety of controllers, programs, and programming languages for
the IEEE bus. Here are three examples showing minimal programs to set the voltage,
set the current and measure the voltage from a Lambda EMI power supply.
1.5.1 EXAMPLE SESSION USING THE ‘IBIC’ CONSOLE
A popular console program is National Instruments “Win32 Interactive Control” (file:
ibic.exe). As the operator types each command on the computer, at the colon prompt, it
is immediately sent to the power supply. This example works only for computers with
National Instruments and compatible IEEE controller cards.
Win32 Interactive Control
Copyright 1996 National Instruments Corporation
All rights reserved.
Type 'help' for help or 'q' to quit.
: ibdev Controller address
enter board index: 0
enter primary address: 4
enter secondary address: 0
enter timeout: 13
enter 'EOI on last byte' flag: 1
enter end-of-string mode/byte: 10
ud0: ibwrt "sour:volt 100"
[0100] ( cmpl )
count: 12
Program supply to
ud0: ibwrt "sour:curr 5"
[0100] ( cmpl )
count: 11
ud0: ibwrt "meas:volt?" output voltage?”
[0100] ( cmpl )
count: 10
ud0: ibrd 50
[2100] ( end cmpl )
count: 11
31 30 30 2e 30 38 33 31 1 0 0 . 0 8 3 1
30 31 0a 0 1 .
Supply reported output voltage
Supply Address on DIP Switch
Program supply to
100 volts output
5 amps output
Query: “What is
Read response
4
1.5.2 EXAMPLE PROGRAM WRITTEN IN VISUAL BASIC
Microsoft’s Visual Basic is a windows programming language that may be used to create
“virtual instruments” and automation programs. Here is a simple program which sends
commands to a Lambda EMI power supply to set the voltage, set the current and measure the voltage. The program’s window only conatains two items: a “Start” button and a
text box to show the measured voltage. The syntax of the CALLed functions are correct
only for National Instruments and compatible IEEE controllers. Don’t forget to add the
forms “Ni-global.bas” and “Vbib-32.bas” to you project.
Document: 83-468-007 Rev B
Page 8
Beginning Software
Example Program Written in Visual Basic
Option Explicit
Dim LambdaUD As Integer 'supply device descriptor
Dim strMeasVolt As String * 50 'buffer for reading input message
Private Declare Function GetTickCount Lib "kernel32" () As Long
Private Sub cmdStart_Click()
'start program here after "Start" button clicked
'open IEEE port, get "User Device Description" = LambdaUD
'assume power supply address is set to "4" on DIP switch
Call ibdev(0, 4, 0, T3s, 1, 10, intLambdaUD)
Call ibwrt(LambdaUD, "volt 100") 'program output to 100 volts
Call ibwrt(LambdaUD, "curr 2") 'program output to 2 amps
Wait 500 'wait 0.5 sec for output to settle
Call ibwrt(LambdaUD, "meas:volt?") 'ask "What is output voltage?"
Call ibrd(LambdaUD, strMeasVolt) 'read back output voltage
txtOutVolt.Text = strMeasVolt 'display output voltage on window
End Sub
Private Sub Wait(mSecWait As Long)
'subroutine to wait "mSecWait" milliseconds
Dim StartTime As Long
StartTime = GetTickCount
Do
Loop While (GetTickCount - StartTime < mSecWait)
End Sub
5
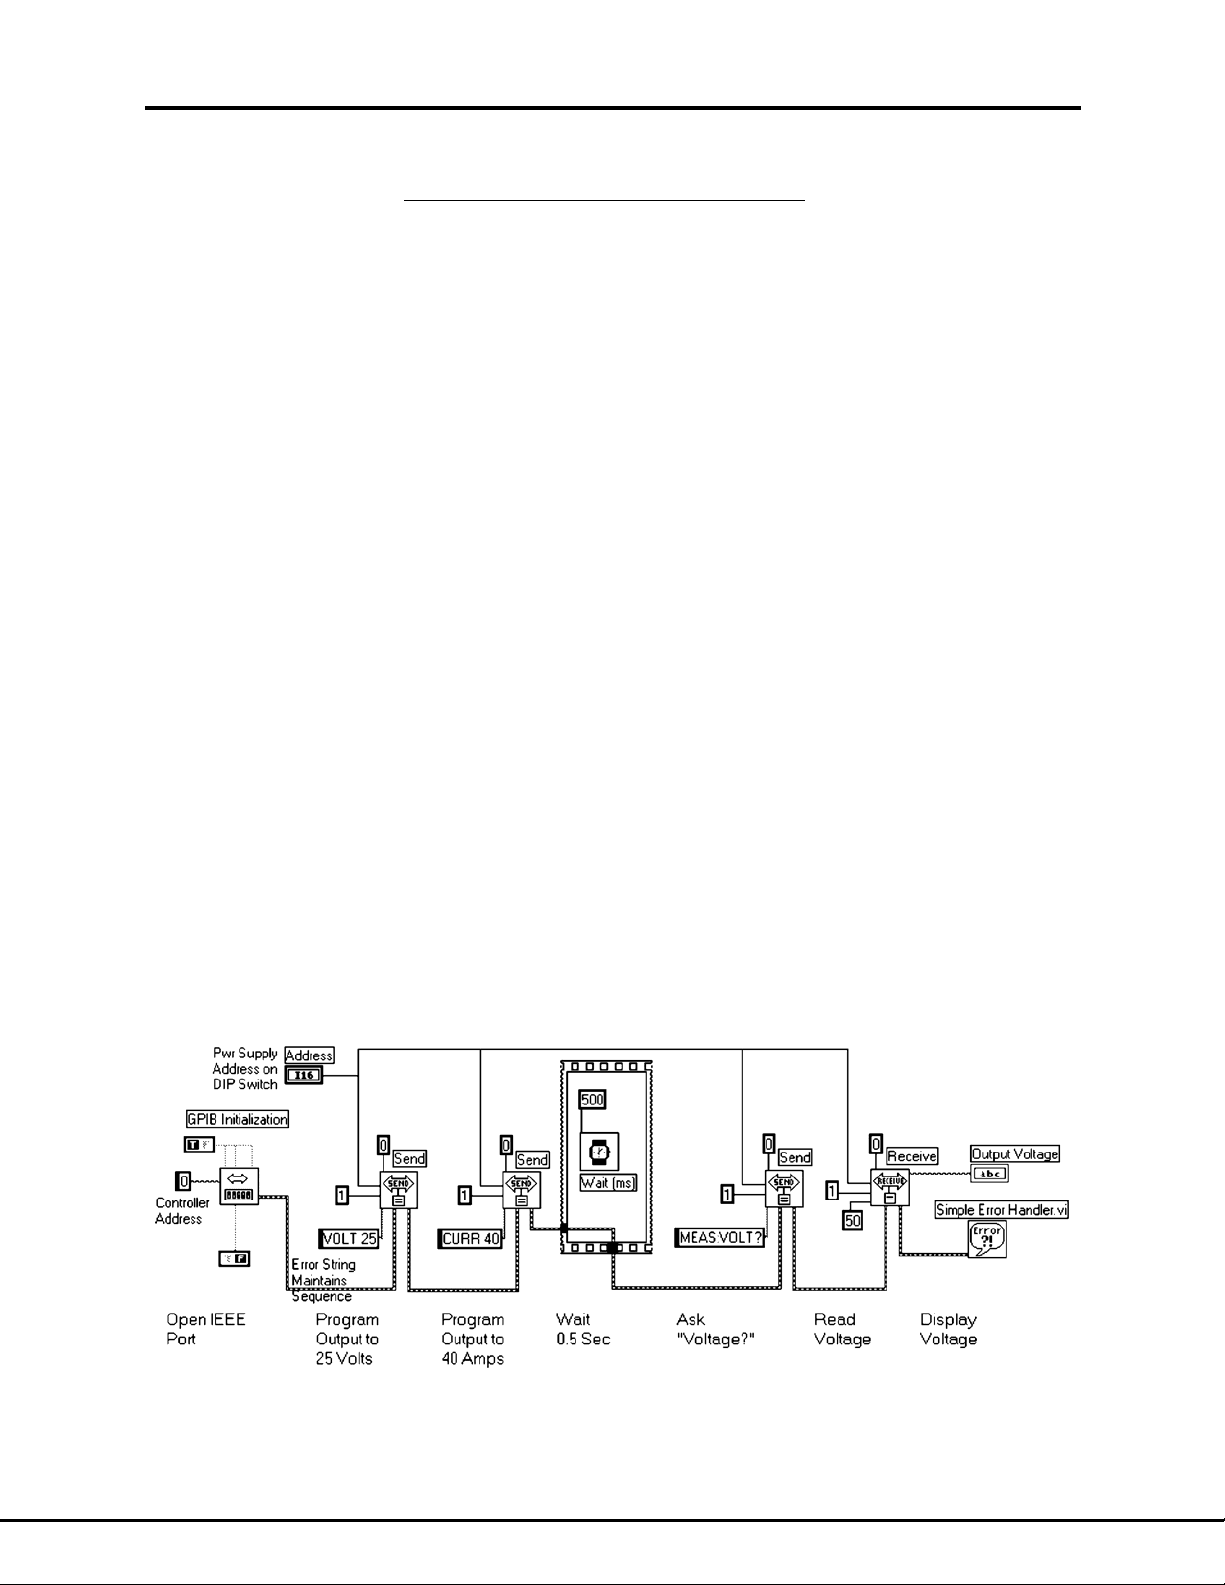
1.5.3 EXAMPLE PROGRAM WRITTEN IN LABVIEW
The National Instruments LabVIEW programming language is a popular language which
is optimized for instrument control and data analysis. It is a graphical language where
functions are shown as icons with connection points and data flows along drawn lines.
Here is a simple program which sends commands to a Lambda EMI power supply to set
the voltage, set the current and measure the voltage. The program’s window only conatains two items: a numeric control for the supply IEEE address and a text indicator to
show the measured voltage.
Document: 83-468-007 Rev B
Page 9

Program OutputBeginning Software
1.6 PROGRAMMING VOLTAGE AND CURRENT
1.6.1 PROGRAM OUTPUT VOLTAGE
The output voltage can be programmed by sending the command:
SOURCE:VOLTAGE:AMPLITUDE <nn.nn>
where <nn.nn> is any valid voltage with or without decimal places. There must be a
space before the number.
Per the Summary Table in Section 4, the command can be abbreviated in any of the following ways:
SOUR:VOLT:AMPL <nn.nn>
SOUR:VOLT <nn.nn>
VOLT:AMPL <nn.nn>
VOLT <nn.nn>
The power supply output will not reach the programmed voltage until a Program Current
command is also sent. To get the sharpest transition from zero to programmed output,
disable the output (Section 1.6.3), program voltage and current, then enable the output.
If the voltage is more than the supply output or less than zero, the command will be ignored and the Command Error bit of the Standard Event Status Register will be set. If
the voltage is higher than the limit set by the SOURCE:VOLTAGE:LIMIT value, the
command will be ignored and the Execution Error bit of the Standard Event Status Register will be set.
To read what voltage the supply was programmed to, regardless of the actual voltage,
send query SOUR:VOLT:AMPL? and read the response message.
The short form of “program voltage” is: PV <nn.nn>
6
1.6.2 PROGRAM OUTPUT CURRENT
The output current is programmed by sending the command:
SOURCE:CURRENT:AMPLITUDE <nn.nn> or “CURR” <nn.nn>
where <nn.nn> is any valid current with or without decimal places. There must be a
space before the number.
The power supply output will not reach the programmed current until a program voltage
command is also sent. To get the sharpest transition from zero to programmed output,
disable the output (Section 1.6.3), program voltage and current, then enable the output.
If the <nn.nn>is more than the supply output or less than zero, the command will be ignored and the Command Error bit of the Standard Event Status Register will be set. If
the current is higher than the limit set by the SOURCE:CURRENT:LIMIT value, the
command will be ignored and the Execution Error bit of the Standard Event Status Register will be set.
To read what current the supply was programmed to, regardless of the actual output current, send query SOUR:CURR:AMPL? and read the response message.
The short form of “program current” is: PC <nn.nn>
1.6.3 DISABLE THE SUPPLY OUTPUT
Document: 83-468-007 Rev B
Page 10

The power supply output can be shut off by sending this command:
SOURCE:VOLTAGE:OUTPUT OFF or VOLT:OUT OFF
This command will not disconnect the supply output. It is equivalent to programming the
output to zero volts.
To read if the supply output is disabled, send query VOLT:OUTP?. A “0” (zero) will be
returned if the output is disabled.
The short form for “supply off” is: SF
1.6.4 ENABLE THE SUPPLY OUTPUT
After the supply output has been shut off with the SOUR:VOLT:OUTP OFF command,
the output can be turned back on by sending this command:
SOURCE:VOLTAGE:OUTPUT ON or VOLT:OUTP ON
The output will immediately jump to the last programmed voltage and current.
To read if the supply output is enabled, send query VOLT:OUTP?. A “1” (one) will be returned if the output is enabled.
The short form for “supply on” is: SN
1.6.5 READ PROGRAMMING MODE
7
The power supply may be programmed in two modes. In Local Mode, the front panel
knobs or back panel analog connections set the supply output. In Remote Mode, the
IEEE/RS232 interface sets the output. The mode is indicated by the front panel
REMOTE LED (if it is installed). The mode may be read by sending this query:
SYSTEM:PROGMODE? or SYST:PROG?
The response will be one of three choices: LOCAL, REMOTE, OR FORCED_LOCAL.
Since sending a query takes the supply out of Local Mode, that response will not be received. The Forced Local Mode is set by the first rocker on the IEEE address switch
(see Figure 1).
The short form for this command is: MH?
Document: 83-468-007 Rev B
Page 11

1.7 MEASURING VOLTAGE AND CURRENT
1.7.1 MEASURE VOLTAGE
The output voltage can be measured by sending the command:
MEASURE:VOLTAGE? or MEAS:VOLT?
When the controller does the next IEEE Read, the supply will send the measured voltage to it. The measurement is always given to six decimal places even if the measurement is not so accurate. See the Specifications Section in the power supply User Manual
for actual measurement accuracy. If the back panel analog connector is wired for Remote Voltage Sensing, the measured value will be the voltage at the sense lines, not the
voltage at the supply output.
The short form for “measure voltage” is MV?
1.7.2 MEASURE CURRENT
The output current can be measured by sending the SCPI command:
MEASURE:CURRENT? or MEAS:CURR?
When the controller does the next IEEE Read, the supply will return the amperes of current being produced. The measurement is always given to six decimal places even if the
measurement is not so accurate. See the Specifications Section in the power supply
User Manual for actual measurement accuracy.
The short form for “measure current” is: MC?
Measure Output
8
1.7.3 SET MEASUREMENT FILTERING
The output voltage or current may be queried with MEAS:VOLT? or MEAS:CURR?. Because of noise, the measurements may have unacceptable random variations. Therefore, a routine is implemented so the board makes measurements every 16 milliseconds
and keeps a running average of the output.
The number of samples in the running average may be adjusted. A higher number will
“smooth” constant output readings but it will slow down the reported response to actual
changes in output.
The voltage measurement averaging is set by the command:
AFV nnn
Where nnn is a number between 1 and 250. The default is 20.
The current measurement averaging is set by the command:
AFC nnn
Where nnn is a number between 1 and 250. The default is 20.
Changing the averaging value will not slow down the bus speed or slow down the response time to an over-voltage and over-current shutdown.
Any changes in AFV or AFC may be made the power-up default by sending the *SAV 0
command.
Document: 83-468-007 Rev B
Page 12

1.8 LIMITS AND PROTECTIONS
1.8.1 SET VOLTAGE LIMIT
The maximum voltage that may be programmed to the power supply is set by the following command. It does not monitor the actual output voltage. It only inspects the numeric
value in a voltage programming command.:
SOURCE:VOLTAGE:LIMIT <nn.nn> or VOLT:LIM <nn.nn>
where <nn.nn> is a number between zero and the maximum supply output voltage. The
decimal is optional.. A space is required before the number.
By default, the voltage limit equals the power supply maximum voltage. A new voltage
limit will remain in effect until the supply power is switched off. A new voltage limit can be
made to be the power-up default by following VOLT:LIM with the *SAV 0 command.
See Section 1.9.6 for a description of the *SAV 0 command.
If a command is sent to set the supply to a voltage higher than the voltage limit, the
command will be ignored and the Execution Error bit of the Standard Event Status Register will be set.
To read what voltage limit has been set, send query VOLT:LIM? and read the response
message.
The short form for “set voltage limit” is: SVL <nn.nn>
Limit Output
9
1.8.2 SET CURRENT LIMIT
The maximum current that may be programmed to the power supply is set by the following command. It does not monitor the actual output current. It only inspects the numeric
value in a current programming command.
SOURCE:CURRENT:LIMIT <nn.nn> or CURR:LIM <nn.nn>
where <nn.nn> is a number between zero and the maximum supply output current in
amperes. The decimal is optional.. A space is required before the number.
By default, the current limit equals the power supply maximum current. A new current
limit will remain in effect until the supply power is switched off. A new current limit can be
made to be the power-up default by following CURR:LIM with the *SAV 0 command.
See Section 1.9.6 for a description of the *SAV 0 command.
If a command is sent which sets the supply to a current higher than the current limit, the
command will be ignored and the Execution Error bit of the Standard Event Status Register will be set.
To read what current limit has been set, send query CURR:LIM? and read the response
message.
The short form for “set current limit” is: SCL <nn.nn>
1.8.3 OVER-VOLTAGE PROTECTION
Lambda supplies feature two types of over-voltage protection that shuts down the output
if the output exceeds some settable voltage level. The analog method uses the OverVoltage Adjustment potentiometer on the front panel. The digital method uses the IEEE
board to constantly sample the supply output voltage. The analog pot setting always
takes priority over any digital programmed level. Therefore, for digital over-voltage protection, it is recommended the potentiometer be turned clockwise to maximum.
Document: 83-468-007 Rev B
Page 13

Using IEEE protection, the time between an over-voltage occurring and the supply shutting down is typically 20 milliseconds. This is the time for two successive readings to exceed the limit. The analog protection responds much faster. There is no analog overcurrent protection.
IEEE over-voltage protection is implemented with four commands:.
1.8.3.1 Set the over-voltage threshold:
SOURCE:VOLTAGE:LEVEL <nn.nn> or VOLT:LEV <nn.nn>
where <nn.nn> is a number between zero and the maximum supply output voltage. The
decimal is optional.The voltage may be more or less than the limit set by the
SOURCE:VOLTAGE:LIMIT command described in the previous paragraphs.
The set voltage level may be read by sending the query VOLT:LEV? and reading the response number.
The short form for “set voltage protection level” is: SVPL <nn.nn>
1.8.3.2 Enable the protection:
SOURCE:VOLTAGE:STATE ON or VOLT:STAT ON
The protection can be disabled by specifying OFF instead of ON.
The state of the protection may read by sending the query VOLT:STAT? and reading the
response. A “1” (one) means the protection is enabled..
The short form for “set voltage protection state” is: SVPS ON (or OFF)
Limit Output
10
1.8.3.3 Query for over-voltage shutdown:
SOURCE:VOLTAGE:TRIPPED? or VOLT:TRIP?
Read the response number. The normal response is “0” (zero). If a “1” (one) is returned,
it means an over-voltage has occurred and the output is shut down.
The response number is actually the value of the Operational Condition Register Bit 0.
Because an over-voltage can set bits in four IEEE registers, it is recommended that a
*CLS be sent to clear them after an over-voltage occurs. See the Section 0 on Status
and Error Register Programming for more details.
The short form for “set voltage protection tripped?” is: SVPT?
1.8.3.4 Reset after shutdown:
SOURCE:VOLTAGE:CLEAR or VOLT:CLE
After an over-voltage shut down has occurred, this command must be sent to clear the
error status before any new voltage commands will be accepted.
If and over-voltage is not cleared, and a new voltage command is sent, the command
will be ignored and the Command Error bit in the Standard Event Status Register will be
set.
The short form for “set voltage protection clear” is: SVPC
1.8.4 OVER-CURRENT PROTECTION
The IEEE Interface board constantly measures the power supply output current and the
board can be set to shut down the supply if the output current exceeds a settable level.
The time between an over-current occurring and the supply shutting down is typically
20 milliseconds.
Document: 83-468-007 Rev B
Page 14

Over-current protection is implemented with the following four commands:
1.8.4.1 Set the over-current threshold:
SOURCE:CURRENT:LEVEL <nn.nn> or CURR:LEV <nn.nn>
where <nn.nn> is a number between zero and the maximum supply output current. The
decimal is optional. The current may be more or less than the limit set by the
SOURCE:CURRENT:LIMIT command described in the previous paragraphs.
The set current level may be read by sending the query CURR:LEV? and reading the response number.
The short form for “set current protection level” is: SCPL <nn.nn>
1.8.4.2 Enable the protection:
SOURCE:CURRENT:STATE ON or CURR:STAT ON
The protection can be disabled by specifying OFF instead of ON.
The state of the protection may read by sending the query CURR:STAT? and reading
the response. A “1” (one) means the protection is enabled..
The short form for “set current protection state” is: SCPS ON (or OFF)
1.8.4.3 Query for over-current shutdown:
Limit Output
11
SOURCE:CURRENT:TRIPPED? or CURR:TRIP?
Read the response number. The normal response is “0” (zero). If a “1” (one) is returned,
it means an over-current has occurred and the output is shut down.
The response number is actually the value of the Operational Condition Register Bit 1.
Because an over-current can set bits in four IEEE registers, it is recommended that a
*CLS be sent to clear them after an over-current occurs. See Section 0 on Status and
Error Register Programming for more details.
The short form for “set current protection tripped?” is: SCPT?
1.8.4.4 Reset after shutdown:
SOURCE:CURRENT:CLEAR or CURR:CLE
After an over-current shut down has occurred, this command must be sent to reset the
error status before any new current commands will be accepted.
If and over-current is not reset, and a new current command is sent, the command will
be ignored and the Command Error bit in the Standard Event Status Register will be set.
The short form for “set current protection clear” is: SCPC
Document: 83-468-007 Rev B
Page 15

1.9 COMMON COMMANDS
1.9.1 READ DEVICE IDENTITY
The IEEE spec requires that every instrument be able to report its identify to the controller. The query is:
*IDN?
When the controller reads the output from the power supply, a single-line identity string
will be returned. A typical identity string format is:
LAMBDA, EMS <max volt>-<max curr>, S/N <supply serial>, REV <ieee brd rev>
1.9.2 GO TO LOCAL
This is not a command. It is a function whose syntax varies with the application being
executed in the controller computer.
When the first IEEE command is detected by the supply, it goes into remote mode. It’s
front panel voltage and current knobs cease to function. A “Go To Local” function may
be executed to temporarily return control to the front panel knobs. Queries such as
MEASURE:VOLTAGE? will put the supply back into remote mode.
In most applications, the “Go To Local” may be sent with or without a trailing address. If
no address is used, all devices on the bus will go to the local mode. If an address is
used, only the addressed device will go to the local mode.
The power supply may be returned from local to remote mode by either sending a programming command or by executing the Remote Enable function.
Common Commands
12
1.9.3 REMOTE ENABLE
This is not a command. It is a function whose syntax varies with the application being
executed in the controller computer.
This function will cause the controller to assert the Remote Enable (REN) line in the
IEEE cable. If the power supply was in local mode, it will go to remote mode when this
function is executed.
1.9.4 READ STATUS BYTE REGISTER
The Status Byte Register contains eight bits which are set to show that some other register has recorded an event or an error. This is the same register that is read by the Serial Poll function. See Section 1.10.4 (Serial Poll) for details.
*STB?
The response to this query will be a binary weighted number from 0 to 255. See description of Status Byte in Table 2 for the meaning of each of the bit positions.
Using the *STB? query is not recommended because it puts its response in the Output
Queue and it sets the Message Available bit in the Status Register. If a previous query
had already done these things, the IEEE bus will lock up until the controller generates a
Timeout Error.
Document: 83-468-007 Rev B
Page 16
1.9.5 RESET THE POWER SUPPLY
The supply will be reset to Local mode and all registers cleared to the power-up state by
sending:
*RST
1.9.6 CHANGING THE POWER-UP DEFAULTS
Many calibration, scaling, identity, and operational variables are stored in Electrically
Erasable Programmable Read-Only Memory (EEPROM). These values are the powerup default settings.
To change one or more default settings, enter the one or more commands with new settings and then enter this command:
*SAV 0
This will write any changed settings to the IEEE board EEPROM.
WARNING:
Common Commands
Error Registers
13
When a power supply is set to REMOTE mode, its output will jump
to the last voltage and current programmed before the last *SAV 0.
Therefore, it is recommended the commands “VOLT 0” and
“CURR 0” be sent immediately before *SAV 0 is sent.
The following commands will load values that are stored by the *SAV 0 command:
CAL:IDN CAL:DATE
CAL:LOCK
AFV AFC
SOUR:VOLT:AMPLITUDE SOUR:CURR:AMPLITUDE
SOUR:VOLT:LIMIT SOUR:CURR:LIMIT
SOUR:VOLT:LEVEL SOUR:CURR:LEVEL
CAL:SOUR:VOLT:SLOPE CAL:SOUR:CURR:SLOPE
CAL:SOUR:VOLT:OFFSET CAL:SOUR:CURR:OFFSET
CAL:MEAS:VOLT:GAIN CAL:MEAS:CURR:GAIN
CAL:MEAS:VOLT:OFFSET CAL:MEAS:CURR:OFFSET
SYST:COMM:SERIAL:BAUD SYST:COMM:SERIAL:BITS
SYST:COMM:SERIAL:SBITS SYST:COMM:SERIAL:PARITY
ECHO (EN or EF)
Table 1. The *SAV 0 Command
1.10 USING ERROR AND STATUS REGISTERS
Document: 83-468-007 Rev B
Page 17

1.10.1 OVERVIEW: REGISTER FAN-OUT
The IEEE Interface board has a set of status and error registers. They are defined by the
IEEE-488.2 specification as part of the Common Command set required by all compliant
instruments.
These registers allow the IEEE controller to examine the operational state of the supply
in detail. A “fan-out” architecture is used so only one summary register needs to be read
to know if an event occurred in any other register. This fan-out allows automatic test
programs to efficiently manage the remote programming mode.
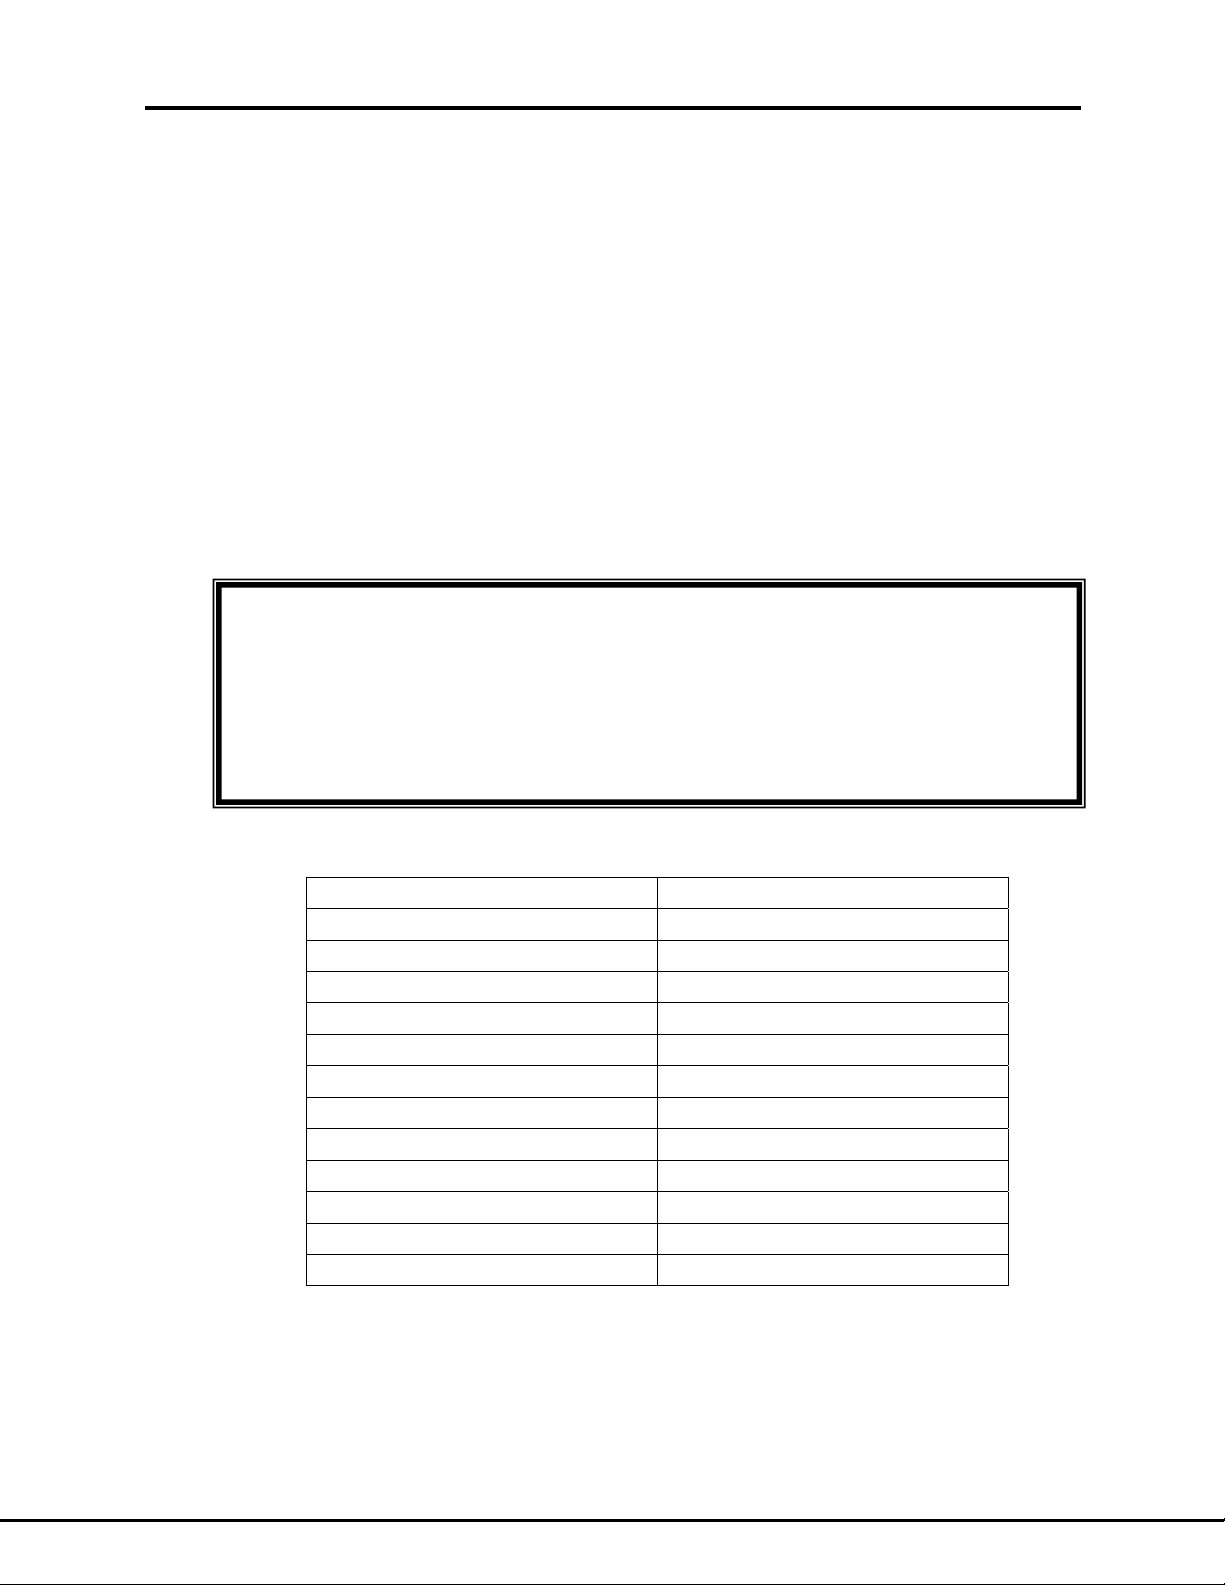
A diagram of the register structure is shown in Figure 2. This diagram does not show all
the registers in the IEEE-488.2 specification. It only shows the registers typically used in
the Lambda power supply. The algorithm for reading the register fan is part of a program
“device driver”. It is sketched in Figure 3.
1.10.2 GLOSSARY OF REGISTER TERMS
SERVICE REQUEST: When an instrument on the IEEE bus asserts the SRQ
line in the cable, it tells the controller that it has completed its task or that an
error has occurred.
SERIAL POLL: An IEEE function which reads back the data in an instrument’s
Status Byte Register. The controller should perform this function after every
command to verify the command was successful.
14
REGISTER QUERIES: Read the contents of registers. The contents are re-
turned as a binary weighted decimal number.
CONDITIONAL REGISTERS. These contain bits that are set when an event
or error occurs. The bits are only cleared when the event or error is cleared.
The contents may be read but not changed.
ENABLE REGISTERS: The various Enable Registers can be set to allow the
status and errors to be detectable by a Serial Poll.
EVENT REGISTERS: These contain bits that are set when an event or error
occurs. The bits are cleared when the contents of the register are queried.
Document: 83-468-007 Rev B
Page 18
Error Registers
15
Output
Queue
Operation Complete
Query Error
Device Depend Error
Execution Error
Command Error
Not Calibrated
Power-On
T
*ESR nn
Standard EVENT
Status Register
DDE OPC
URQ
PON CME EXE QUE
X
*ESR?
0123
567
T
E
Queue
Not
Empty
IEEE Comliance.
This diagram does
not exactly follow
the IEEE-488.2 example.
This diagram has been
modified for the example
of the Lambda EMI
power supply.
*ESE nn
*ESE?
Standard Event Status
ENABLE Register
Logical
OR
4
Logical OR
01234567
(not used)
Questionable Registers
QUE
Lambda IEEE Register Fan-Out
Over-Voltage
Over-Current
Remote
Operat. CONDITION
STAT:OPER:COND?
Register
OV
OC
RMO
Figure 2. Status and Error Register Diagram
STAT:OPER:EVEN nn
Operational EVENT
Register
0115 8
RMO OC OV
0
STAT:OPER:EVEN?
STAT:OPER:ENAB nn
Operational ENABLE
Register
0
STAT:OPER:ENAB?
OR
Logical
OPR RQS ESB MAV
Serial Poll
Status Byte Register
Service Request
Service Request Line
*SRE?
*SRE nn
ENABLE Register
Document: 83-468-007 Rev B
Page 19
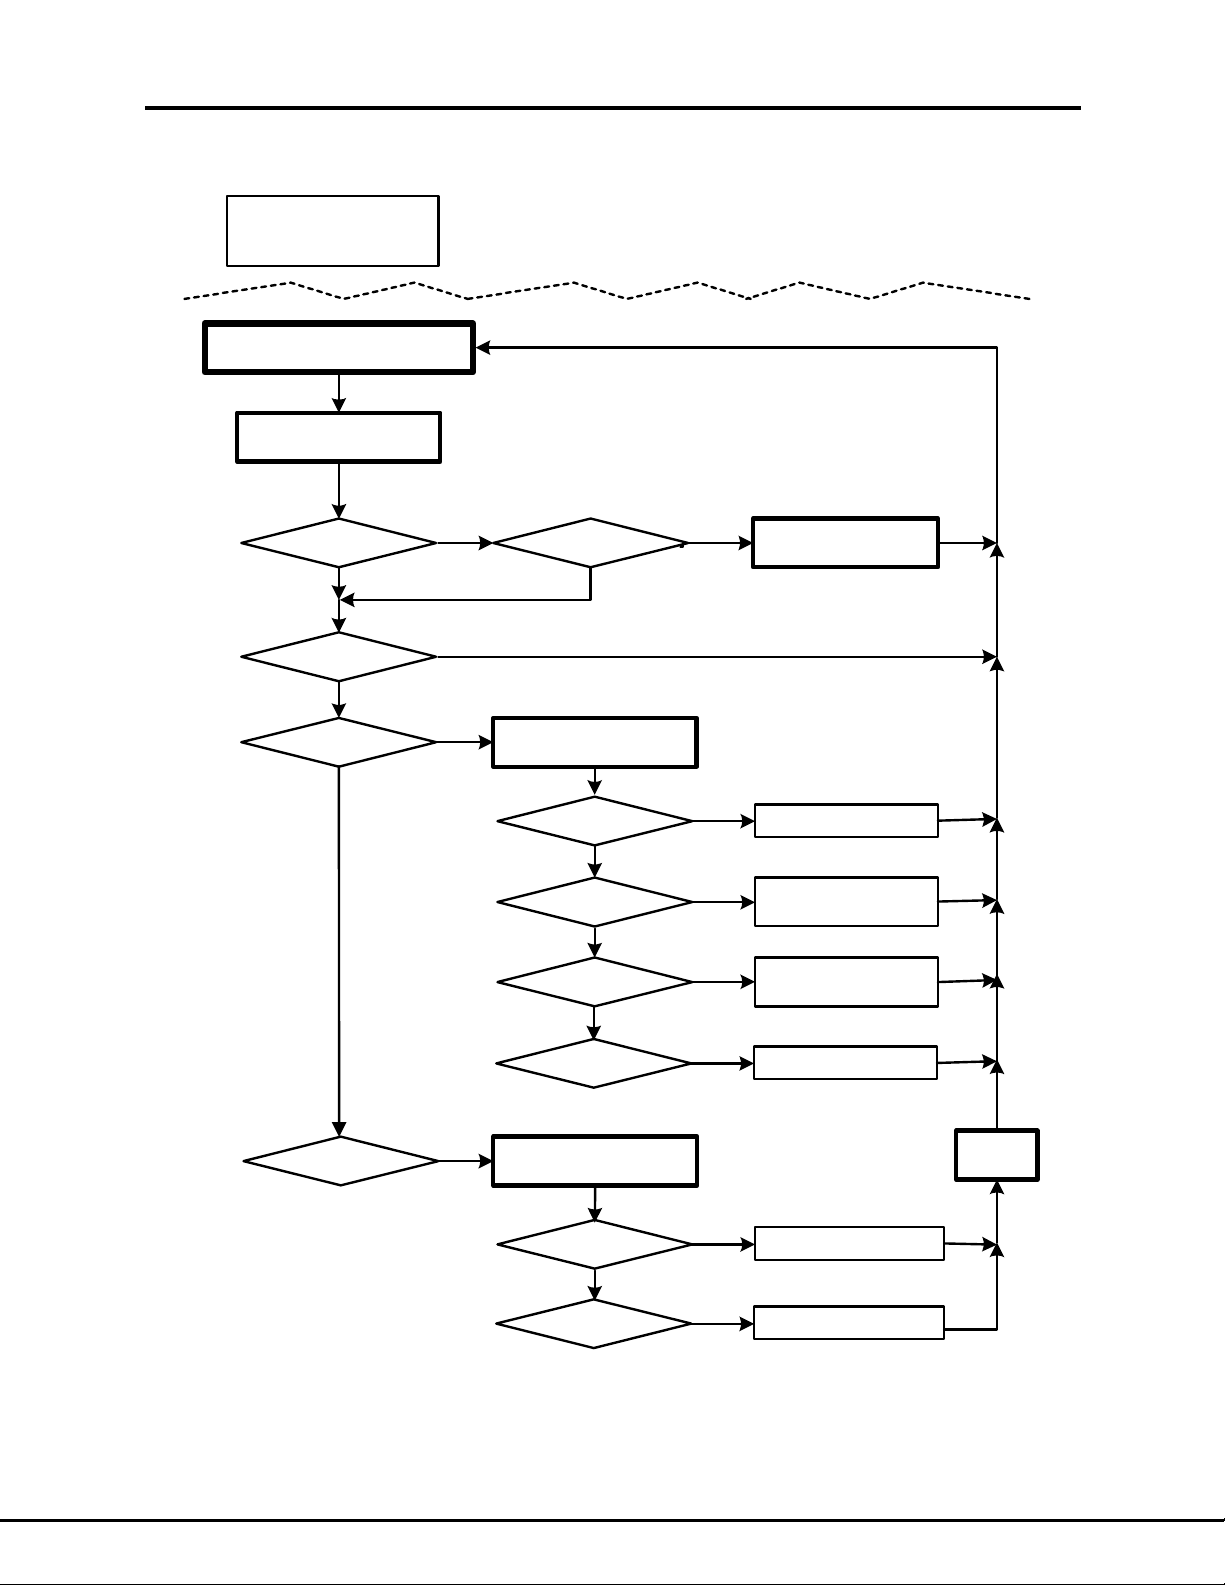
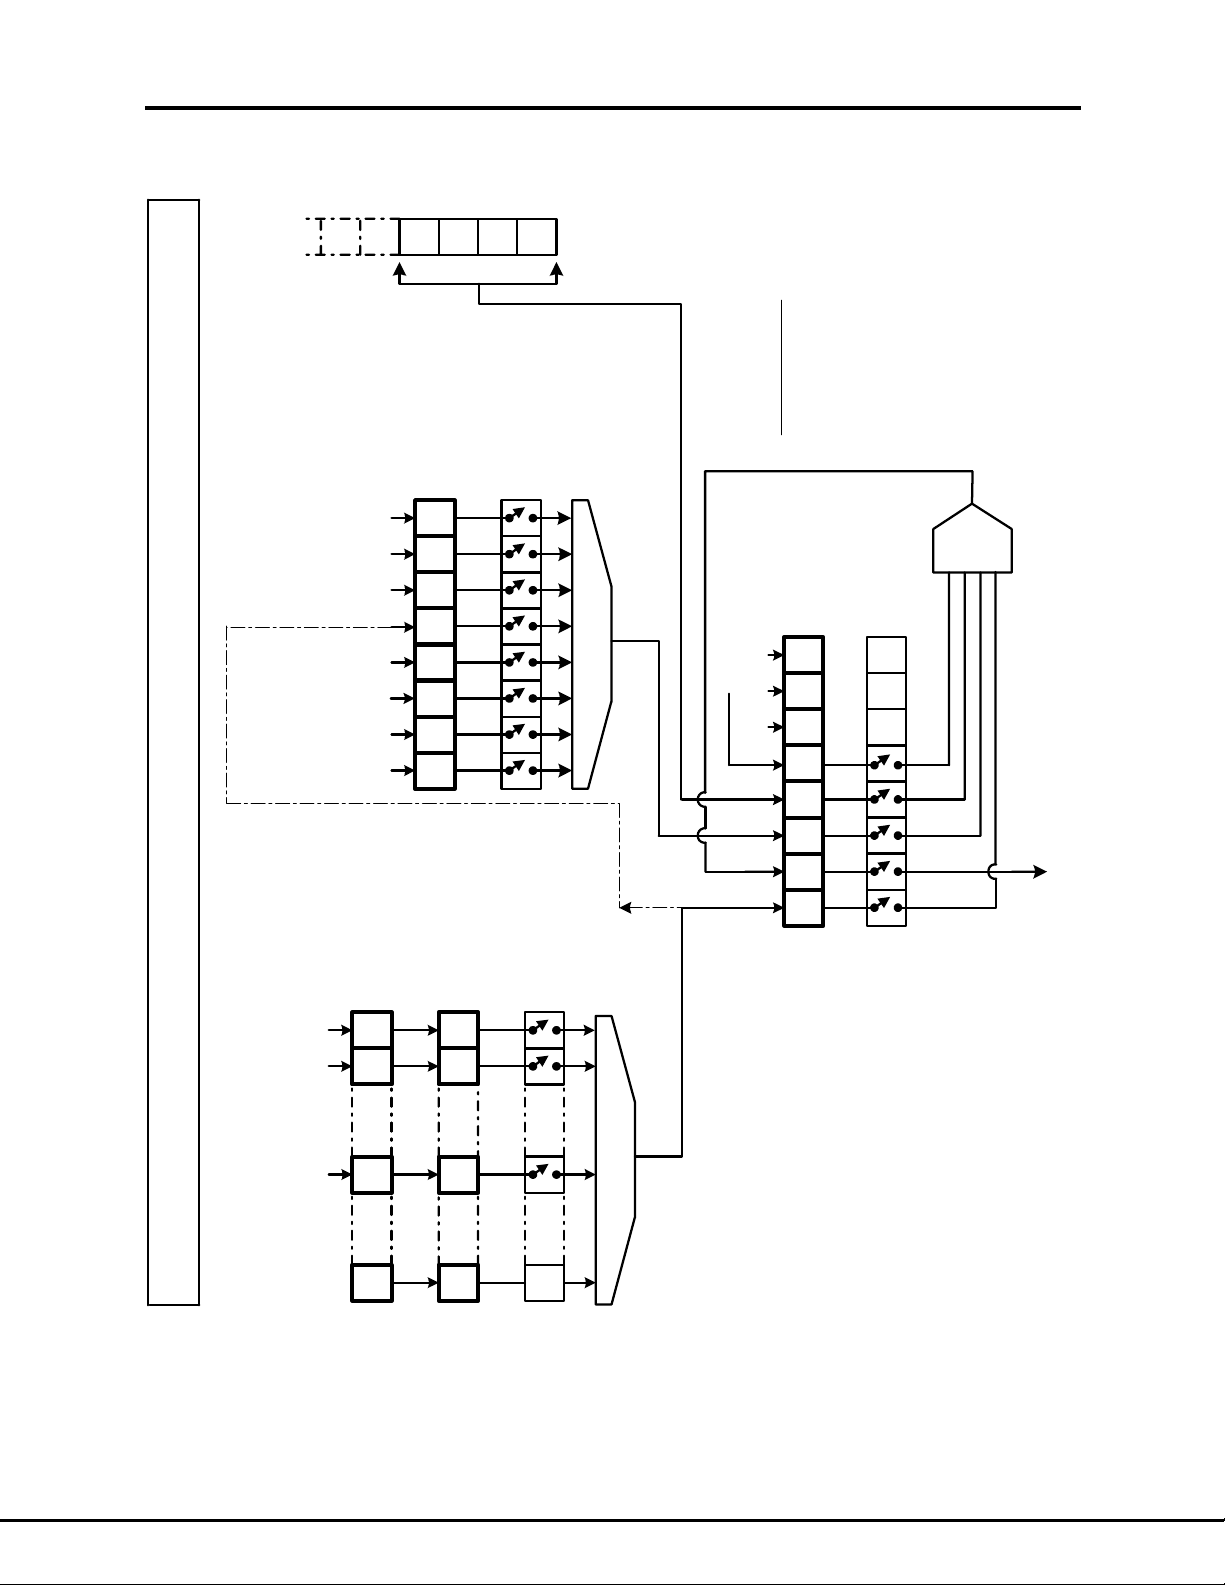
Initialize Error Registers
Sample Error Handler
Error Registers
16
*SRE 240
*ESE 180
Routine Suitable for Automation Programming
OPER:STAT:ENAB 3
Send Command
SERIAL POLL
(read Status Byte)
(Last cmd end with "?")
QUERY?
Yes
Bit 4 (MAV)
Set?
NoNo
Yes
Read Output
Queue
Bit 6 (RQS)
Set?
Yes
Bit 5 (ESB)
Set?
No
Bit 7 (OPR)
Set?
No
Yes
Yes
*ESR?
Bit 2 (QUE)
Set?
No
Bit 4 (EXE)
Set?
No
Bit 5 (CME)
Set?
No
Bit 7 (PON)
Set?
STAT:OPER:EVEN?
Yes
Yes
Yes
Yes
Query Error Detected
Execution Error
Detected
Command Error
Detected
Power On Detected
*CLS
Figure 3. Status and Error Handler
Document: 83-468-007 Rev B
Bit 0 (OV)
Set?
No
Bit 1 (OC)
Set?
Yes
Yes
Over-Voltage Detected
Over-Current Detected
Page 20
1.10.3 CLEAR ALL STATUS REGISTERS
The contents of the status registers will be reset to zeroes by sending:
*CLS
This command will clear the Status Byte Register and the Event Registers. It will not affect the Conditional or the Enable registers. After an error, this command will also turn
off the red error LED on the interface board.
1.10.4 SERIAL POLL AND STATUS BYTE REGISTER
The Status Byte Register contains three bits that are set when a condition occurs in any
of three status registers. If any of these three bits are set, the Request Service (RQS) bit
can become set. The RQS bit is important because it will assert a signal onto the Service Request (SRQ) line in the IEEE cable. The controller program can detect the SRQ,
read what the problem is from the power supply, and clear the SRQ.
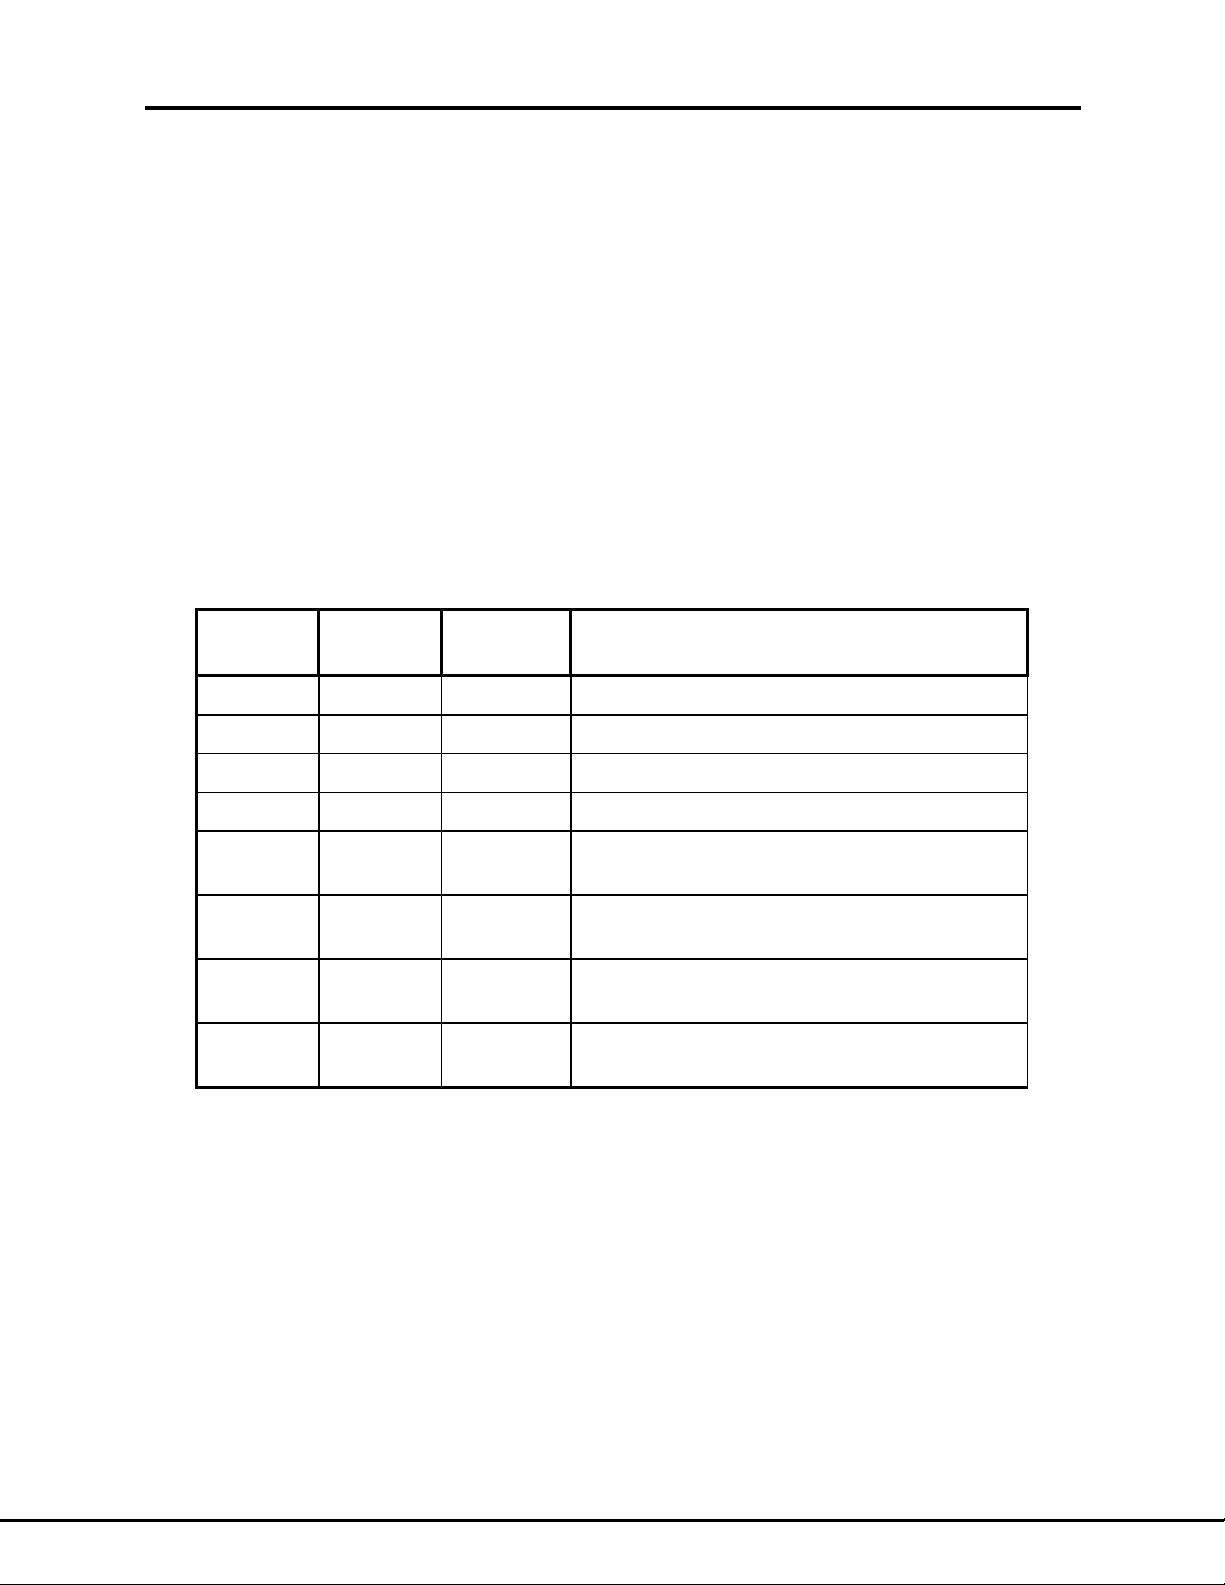
The bit assignments for the Status Byte Register are:
Error Registers Error Registers
17
BIT
NUMBER
0 1 Not Used
1 2 Not Used
2 4 Not Used
3 8 Not Used
4 16 MAV Message Available in Output Que.
5 32 ESB Status or error reported by
6 64 RQS Request For Service. Is set if any one of
7 128 OPR Over-volt or over-current error reported by
DECIMAL
VALUE
BIT
SYMBOL DESCRIPTION
Set after query message is received
Standard Event Status Register
MAV, ESB or OPR is enabled and set.
Operational Event Register
Table 2. The Status Byte Register
1.10.4.1 The Service Request Enable Register
The Status Byte Register may be set so if an event causes bits 4, 5 or 7 to go high then
the Service Request may or may not be asserted. The command to set the bits high in
the enable register is:
*SRE <nn>
where <nn> is a number between zero and 255. A space is required before the number.
The power-up default is all zeroes in the enable register. This means no status or errors
will be reported by the serial poll function.
Document: 83-468-007 Rev B
Page 21

Typically, the enable register will be initialized with *SRE 160 set bits 5 and 7. This will
enable a service request if an error occurs in the Standard Event Status Register or in
the Operational Event Register.
The contents of the Service Request Enable Register may be queried by sending:
*SRE?
The response will be a bit weighted number whose bits correspond to Table 2. Bit 6, the
Service Request bit, cannot be set. It is always zero.
1.10.5 STANDARD EVENT STATUS REGISTER
The Standard Event Status Register has eight bits that indicate status and errors for the
power supply and the interface. It is a very popular register. An error in this register will
illuminate the red error LED on the interface board. Resetting this register will turn off
the LED.
To read the contents of this register, use the common query:
*ESR?
The response message will be a binary weighted number from 0 to 255. Zero is returned
if there are no errors or events. The contents of the Standard Event Status Register will
be cleared to zeroes after the *ESR? Query is received.
Error Registers
18
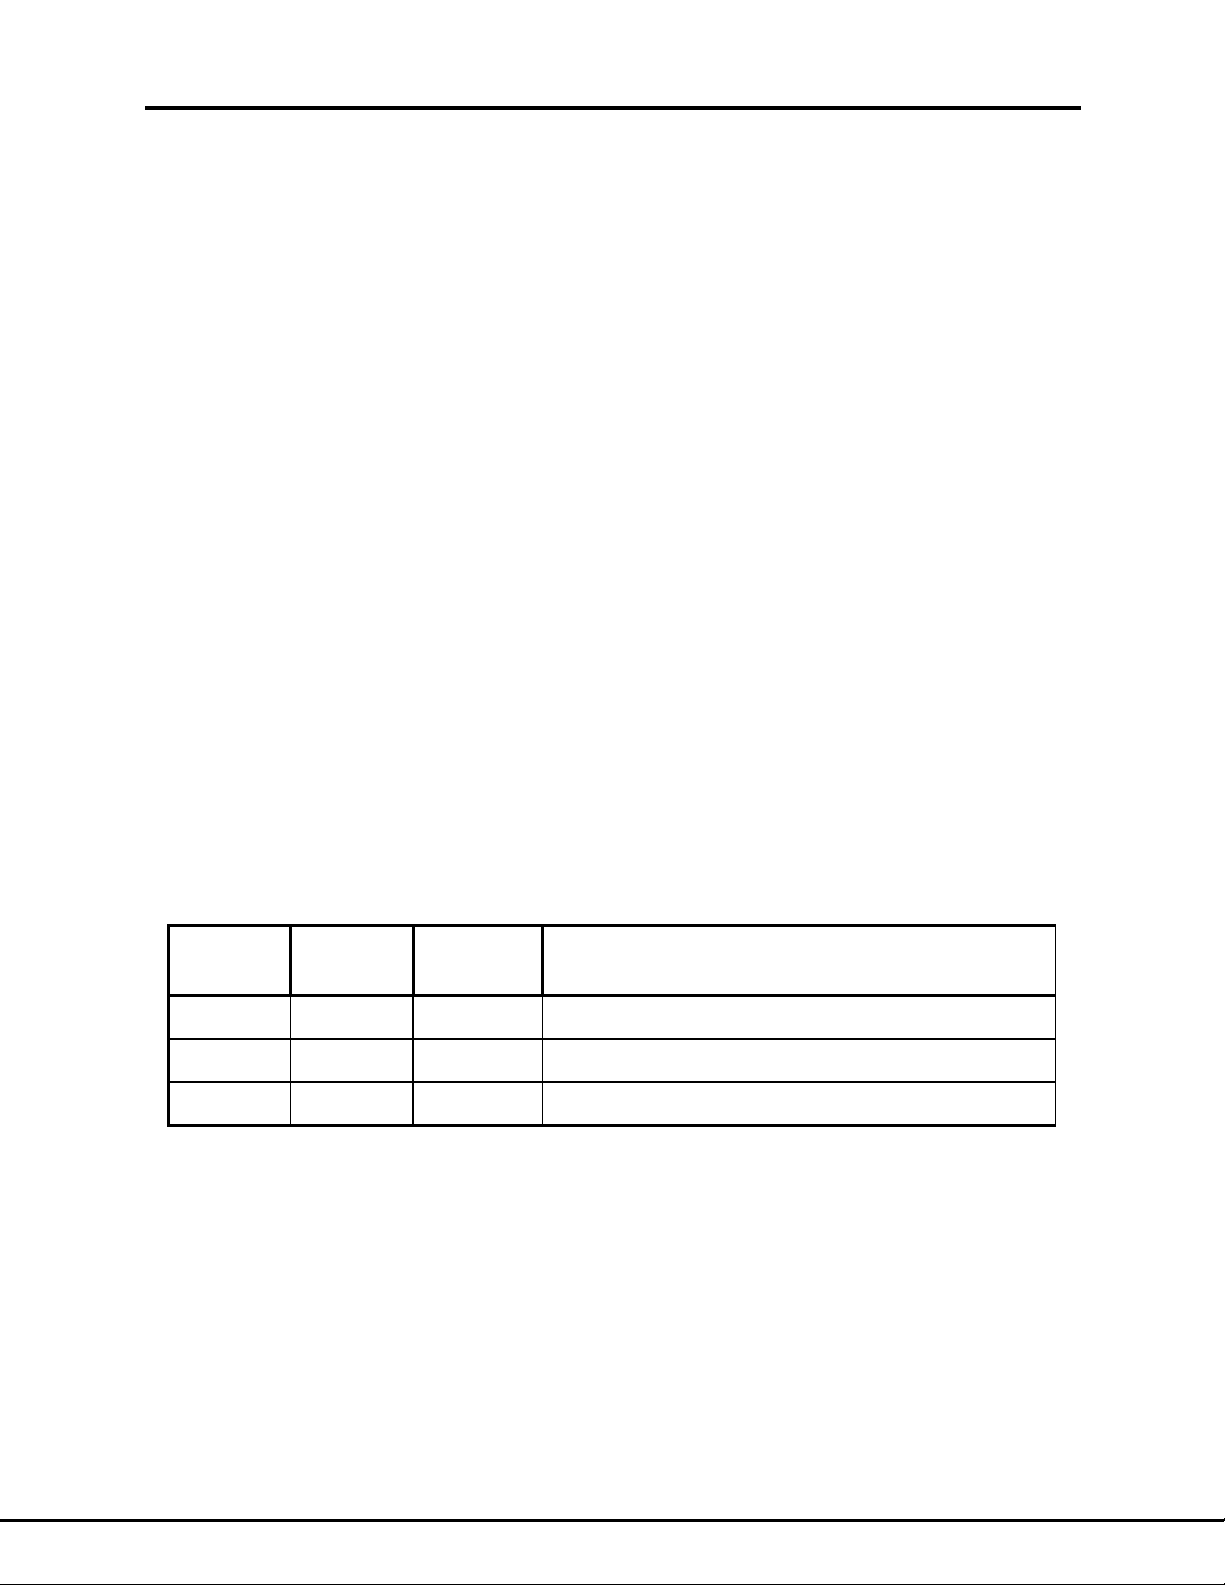
The bit assignments for this register are:
BIT
NUMBER
0 1 OPC Operation complete. Not used.
1 2 Not used.
2 4 QUE Query Error. Set if illegal string ending with
3 8 DDE Device Dependant Error. Set if over-voltage or
4 16 EXE Execution Error. Typically set if programming
5 32 CME Command Error. Typically set if unrecognized
6 64 URQ User Request. Set at power-up if interface board
7 128 PON Power On. Set when power is switched on.
DECIMAL
VALUE
BIT
SYMBOL DESCRIPTION
a question mark is received.
over-current is enabled and detected.
command is outside of legal range.
command string was received.
has not been calibrated by manufacturer.
Table 3. The Standard Event Status Register
1.10.5.1 The Standard Event Enable Register
If the bits in the Standard Event Status Register are enabled, an error will propagate to
the Status Byte Register (see Section 1.10.4). If bit 5 in the Status Byte is enabled with
the *SRE 32 command, this error will cause the Service Request to be asserted. By
Document: 83-468-007 Rev B
Page 22
writing a binary weighted value to the Standard Event Enable Register, the bits in the
Standard Event Status Register may be individually enabled so only selected events will
cause a service request.
The syntax for writing to the Standard Event Enable Register is:
*ESE <nn>
where <nn> is a number between zero and 255. A space is required before the number.
The power-up default is all zeroes in the enable register. This means no status or errors
will be sent to the Status Byte Register. However, even if no bits are enabled, the contents of the Standard Event Status Register may always be read with the *ESR? query.
The contents of the Standard Event Enable Register may be read by sending:
*ESE?
The response will be a bit weighted number whose bits correspond to Table 3
1.10.6 THE OPERATIONAL REGISTERS
The Operational Registers are three 16-bit registers whose bits are not defined by the
IEEE specification but are specific to the IEEE device. In the power supply, bits 0 and 1
are set when an over-voltage or over-current event has occurred.
Digital over-voltage protection is enabled by sending the SOUR:VOLT:STAT ON command (see Section 1.8.3). If an over-voltage occurs, bit zero of the Operational Condition Register will be set high. If bit 0 of the Enable register is set high, the over-voltage
will set bit 0 of the Event register. This in turn sets bit 3 of the Standard Event Register to
illuminate the red ERROR LED. It also sets bit 3 in the Status Byte Register so the overvoltage error becomes detectable by a Serial Poll sent by the controller.
Digital over-current works in a similar manner, but it occupies bit 1 of the Operational
register.
The bit assignments for the Operational Registers are:
Error Registers
19
BIT
NUMBER
0 1 OV Set high if digital Over-Voltage detected.
1 2 OC Set high if digital Over-Current detected.
8 256 RMO Remote operation. Always set high.
DECIMAL
VALUE
BIT
SYMBOL DESCRIPTION
Table 4. The Operational Registers
1.10.6.1 The Operational Condition Register
Bits 0 and 1 of this register will contain zeroes unless over-voltage or over-current is
enabled and detected.
To read the contents of this register, use the common query:
Document: 83-468-007 Rev B
Page 23

STATUS:OPERATION:EVENT:CONDITION? or STAT:OPER:COND?
The response message will be a binary weighted number from 0 to 259. Since bit eight
is always set, 256 is returned if there are no errors.
Over-voltage bit 0 may also be read by using the query (see Section 1.8.3.3):
SOURCE:VOLTAGE:TRIPPED? or VOLT:TRIP?
After an over-voltage shutdown, the error may be cleared to zero by sending
SOURCE:VOLTAGE:CLEAR or VOLT:CLE
Over-current bit 1 may also be read by using the query (see Section 1.8.4.3):
SOURCE:CURRENT:TRIPPED? or CURR:TRIP?
After an over-current shutdown, the error may be cleared to zero by typing
SOURCE:CURRENT:CLEAR or CURR:CLE
1.10.6.2 The Operational Enable Register
An over-voltage or over-current can propagate to generate a Service Request signal that
will be detected by the controller performing a Serial Poll. The propagation is enabled by
sending the command:
STATUS:OPERATION:EVENT:ENABLE <nn> or STAT:OPER:ENAB <nn>
where <nn> is a number between 0 and 3. A space is required before the number. Although this is a 16-bit register, the most significant bit 15 is not used and trying to set it
high will cause a Command Error.
The power-up default is all zeroes in the enable register. This means no protection errors will be sent to the Status Byte Register. However, even if no bits are enabled, the
contents of the Operational Event Register may always be read with the
STAT:OPER:COND? query.
The contents of the Operational Enable Register may be queried by sending:
STATUS:OPERATION:EVENT:ENABLE? or STAT:OPER:ENAB?
The response will be a bit weighted number whose bits correspond to Table 4
20
1.10.6.3 The Operational Event Register
If over-voltage and over-current errors are reported by the Operational Condition Register, and they are enabled by the Operational Enable Register, the error will be loaded
into the Operational Event Register. The Event register differs from the Condition register because the Event register is cleared to all zeroes when its contents are read
whereas a bit set in the conditional register remains set until the condition is removed.
The contents of the Operational Event register is read by the command:
STATUS:OPERATION:EVENT? or STAT:OPER:EVEN?
Document: 83-468-007 Rev B
Page 24

The response message will be a binary weighted number from 0 to 3. Zero is returned if
there are no protection errors. The contents of the Operational Event Register will be
cleared to zeroes after the STAT:OPER:EVEN? is received.
1.10.7 THE QUESTIONABLE REGISTERS
These are a set of registers required by the IEEE-488.2 specification. They have a similar structure and command set as the Conditional Registers described in the previous
section. Since the Questionable Register is not used by Lambda supplies, it is not described here.
Error Registers
21
Document: 83-468-007 Rev B
Page 25
RS-232 Configuration
2 THE RS-232 INTERFACE
The optional IEEE interface board has a 9 pin “D” connector for the RS-232 serial port. It
uses only three wires to transmit data, receive data, and connect ground. The port is Full
Duplex where the power supply and the controller may both transmit messages at the
same time. Compared to the IEEE port, the RS-232 is slower and it has limited status
and error reporting. Also, there is no instrument addressing in the RS-232 port so only
one power supply can be run from each port in the controller. The advantages of RS-232
is the cable is easy to make and every personal computer comes standard with this
port.
2.1 CONFIGURING THE RS-232 INTERFACE
2.1.1 THE RS-232 CABLE
The power supply RS-232 port is configured as a “DCE” device. It has a 9-pin female
connector. A modem cable (not null-modem) is used to connect it to a personal computer. The cable may be up to 50 feet long. It has three wires: transmit data, receive
data and ground. The cable must be twisted and/or shielded. To reduce ground loops,
only one end of the shield should be connected to chassis (earth) ground. See Figure 4
for details of cable construction.
22
2.1.2 DEFAULT RS-232 CONFIGURATION.
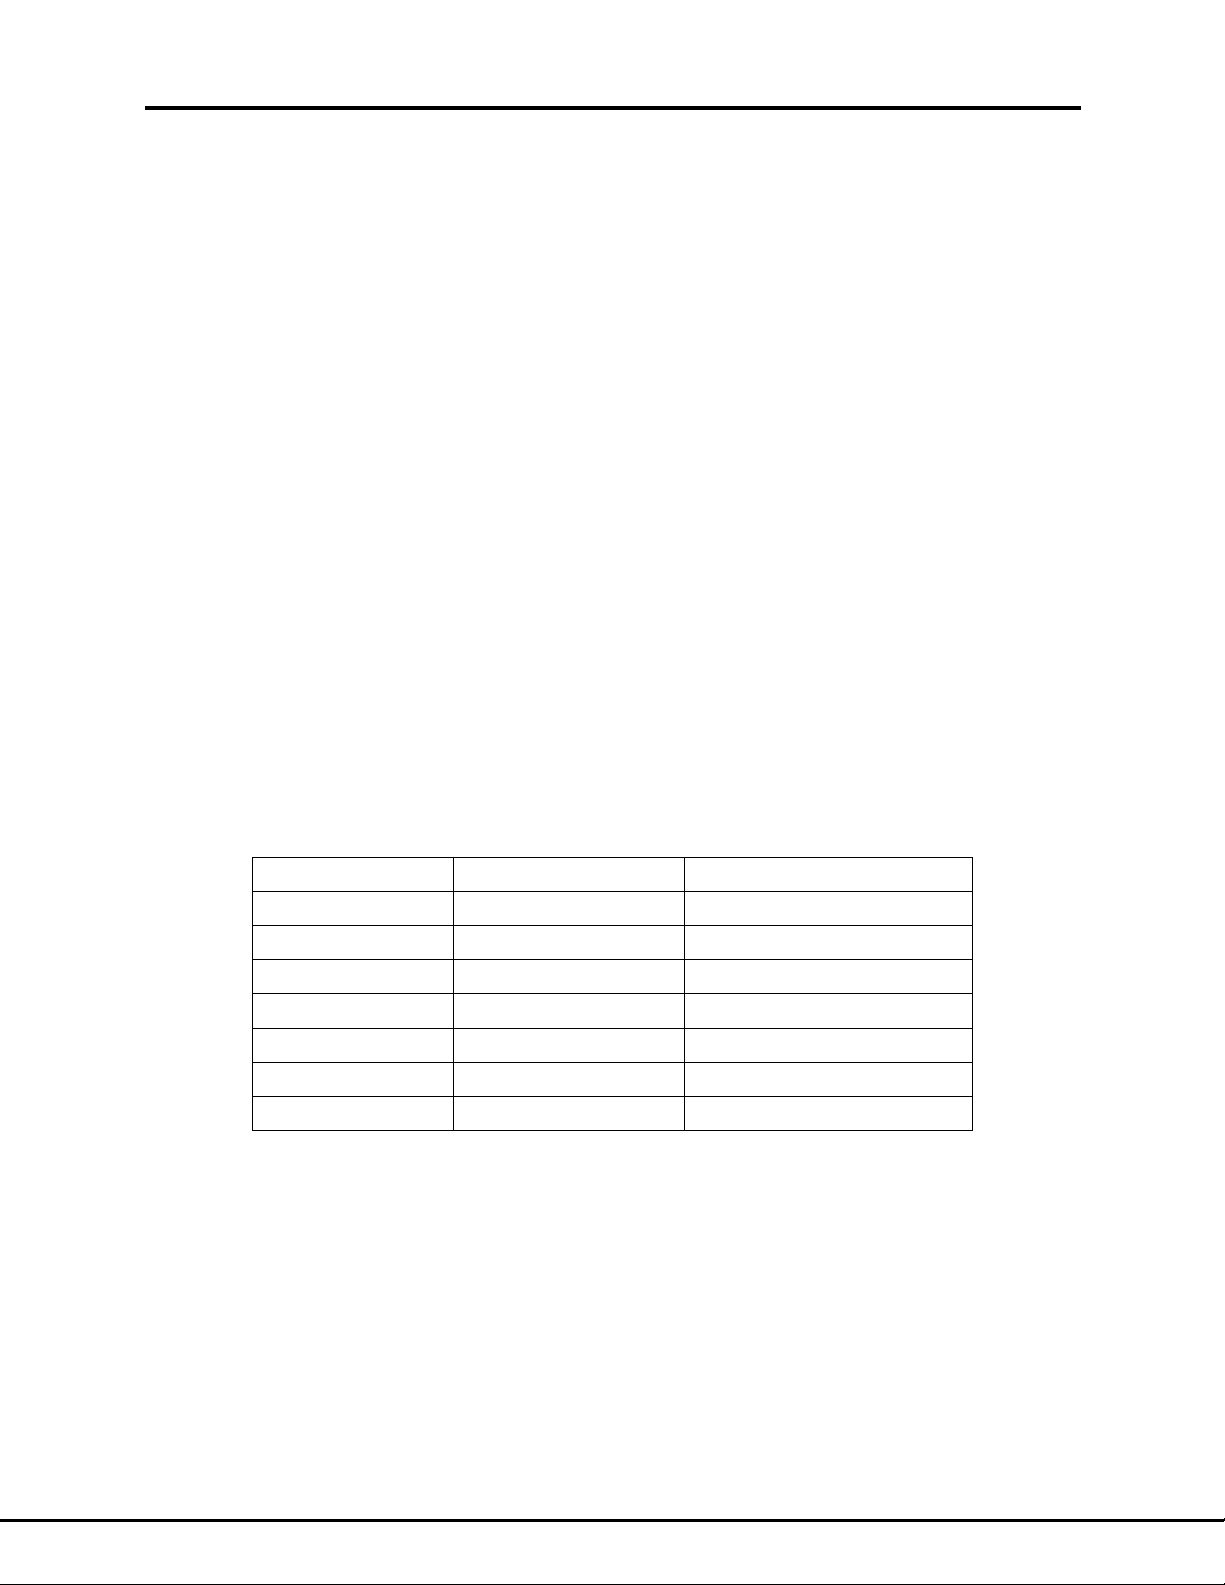
The controller and the power supply must configured to the same signal timing and message control. The factory default settings are shown in Table 5 below. On the power
supply end, the default settings may be changed by using the commands in the following
section.
Parameter
Baud Rate 9600 Bits per Second
Data Bits 8 ASCII Characters
Parity None
Stop Bits 1
Flow Control None No Handshaking
Char. Echo On See “Echo” command
EOS LF (ASCII 10) End of String
Default Value
Table 5. Default RS-232 Configuration
Remember to verify the Forced Local switch is set down to OFF. The switch is rocker
number 1 on the IEEE Address selector shown in Figure 1.
Notes
Document: 83-468-007 Rev B
Page 26

RS-232 Configuration
23
Power
to 9-Pin PC
Supply
5
9
6
1
Ground
Data Flow
Data Flow
Shield
Pin to Pin
DCE
DB-9 Connector
Female Sockets
2 2
3 3
5 5
Power
to 25-Pin PC
Supply
NOTE: If a "25 to 9 Pin" adapter is used, it may reverse
pins 2 and 3. In this case, pins 2 and 3 in cable are straight.
5
9
6
1
DTE
DB-9 Connector
Male Pins
13
25
5
9
6
1
DCE
DB-9 Connector
Female Sockets
Figure 4. RS-232 Cable Construction
Ground
Data Flow
Data Flow
Shield
Pin to Pin
2 3
3 2
5 7
14
1
DTE
DB-25 Connector
Male Pins
Document: 83-468-007 Rev B
Page 27

2.2 RS-232 COMMAND SET
Most commands listed in the IEEE section of this document will also work with the RS232 interface. Some commands are applicable only to RS-232 programming and they
are listed here. The power supply will acknowledge every command by returning “OK”
followed by a linefeed character.
2.2.1 CHANGE CHARACTER ECHO
The serial port has a default power-up condition where any character received will be
sent back to the controller. This is the “Echo On” configuration and it is one method of
verifying message integrity. Echo on is typically used when the operator is sending
commands through a console terminal. The echo will typically be turned off when an
automatic computer program is the controller.
Echo On is set by sending the command:
EN
Echo Off is set by sending the command:
EF
The power supply echo may be set on or off, and the controlling terminal local echo may
be set on or off. The supply will respond correctly with any setting, but what the operator
sees will change with each setting. The combinations are shown in this table:
Controller
Local Echo OFF
Supply
Echo OFF
Supply
Echo ON
EOS = End-Of-String Terminator
EOS = LF Typed characters do
NOT appear on terminal
EOS =
CR-LF
Typed characters
appear on terminal
RS-232 Configuration
Controller
Local Echo ON
Typed characters
appear on terminal
Typed characters
appear TWICE on terminal
24
Table 6. RS-232 Echo Settings
Document: 83-468-007 Rev B
Page 28

2.2.2 GO TO LOCAL COMMAND
The power supply may be commanded into LOCAL mode where the front panel knobs
will set the output voltage and current. The command for “Set Local” is:
SL
After receiving the SL command, the supply will remain in LOCAL mode until the next
command or query is received. The SR command may also be used to set remote.
When a “Go To Local” command is sent, the supply output will
jump to whatever is set on the front panel knobs.
Therefore, it is recommended the front panel Voltage and Current
knobs be turned counter-clockwise to ZERO before REMOTE
programming.
RS-232 Configuration
WARNING:
25
2.2.3 CHANGE THE BAUD RATE
The serial port may be set to any speed specified by the RS-232 specification. The
speed, called the BAUD rate, is in bits per second. The actual message rate includes
the Bits per Byte, the Start Bit, the Stop Bits and the Parity Bit.
The default BAUD rate is 9600. The BAUD rate will be changed by sending command.
SYSTEM:COMM:SERIAL:BAUD <nnn> or SYST:COMM:SER:BAUD <nnn>
where <nnn> is one of these standard values:
110 1200 4800 19200
300 2400 9600 38400
This command will not take affect until a SYST:COMM:UP or a *SAV 0 is sent.
2.2.4 CHANGE THE DATA BITS
Each character sent over the RS-232 bus may use 7 or 8 data bits. The default ASCII
character set is eight bits. If a bit is taken for parity checking, only seven bits are allowed
for each character.
The number of data bits is set with the command:
SYSTEM:COMM:SERIAL:BITS <8 or 7> or SYST:COMM:SER:BITS <8 or 7>
This command will not take affect until a SYST:COMM:UP or a *SAV 0 is sent.
Document: 83-468-007 Rev B
Page 29

2.2.5 CHANGE THE PARITY BITS
Parity is error checking done by the interface hardware. If parity is enabled, the data
length may only be seven bits. Typically, parity checking is not needed so the default is
“None”.
The parity is set with the command::
SYSTEM:COMM:SERIAL:PARITY <Ptype>
or SYST:COMM:SER:PAR <Ptype>
where <Ptype> is ”NONE” or “ODD” or “EVEN”.
This command will not take affect until a SYST:COMM:UP or a *SAV 0 is sent.
2.2.6 CHANGE THE STOP BITS
1 or 2 stop bits may follow each character sent over the RS-232 bus. The default is 1.
The number of stop bits are set with the command::
SYSTEM:COMM:SERIAL:SBITS <1 or 2>
or SYST:COMM:SER:SBITS <1 or 2>
This command will not take affect until a SYST:COMM:UP or a *SAV 0 is sent.
RS-232 Configuration
26
Document: 83-468-007 Rev B
Page 30

2.3 ERROR REGISTERS AND RS-232
In the power-up default condition, the power supply acknowledges all commands by returning “OK”. The OK is returned even after an invalid command is sent.
The RS-232 in the supply may be set to asynchronously return a status value when an
invalid command is received. The value is the contents of the Status Byte Register. This
register is established by the IEEE-488 specification and it is described in detail in Section 1.10.4. Study that section to follow the example below.
The Status Byte Register must be enabled to report errors by sending these commands
over the RS-232 bus when the supply is first powered up:
*SRE 224 (Enable bits 5,6,7 in Status Byte)
*ESE 255 (Enable all bits in Std Event Status Reg)
STAT:OPER:ENAB 3 (Enable OV and OC protection report)
After this setup, any error condition will cause the power supply to send a Service Request Message (SRM). For example, if an illegal command is sent, the supply will respond by returning this message over the RS-232 line:
SRM 96
OK
The 96 equals 01100000 in binary. This indicates the Status Byte Register bits 5 (ESB)
and 6 (RQS) are set. To see why ESB is set, read the contents of the Standard Event
Status Register by sending this command:
*ESR?
RS-232 Error Registers
27
The response from the power supply will be “32”. This equals 00100000 in binary and it
means bit 5 (CME) of the Standard Event Status Register is set. This bit indicates a
Command Error occurred.
Reading these registers will clear the errors and reset the interface to report more errors.
NOTE:
If an “SRM” error is NOT cleared, no further errors will be reported.
Therefore, after an error message, send the command “*CLS” .
Document: 83-468-007 Rev B
Page 31

p
Calibrate: Volt Programming
3 ADJUST THE IEEE CALIBRATION
3.1 INTRODUCTION
It may be necessary to adjust the calibration of the digital programming and measurement circuit commands. The following instructions explain how to select new calibration
factors and save them into the interface nonvolatile memory.
NOTE:
These instructions are only good for slight adjustments to the
digital interface. The power supply must be in good operating
condition and it must have been previously calibrated by the
factory.
These instructions are NOT sufficient to setup a new IEEE
interface board into a
ower supply.
28
The following commands may be sent using a terminal connected to the IEEE-488 or the
RS-232 port. Only the short forms of the commands are shown. Commands are shown
inside double quotes. Do not type the quotes.
3.2 CALIBRATE THE VOLTAGE PROGRAMMING
Verify the load connected to the supply keeps it in voltage mode even when the voltage
is set to maximum. The load should not allow the current to exceed 90% of maximum
current. The load may be entirely disconnected from the output (open load), but for best
results use the load typical of your application.
Note: any change in calibration (“SVPG” or “SVPO” command) will not change the
supply output until a new program voltage “PV” command is sent.
3.2.1 ADJUST GAIN VALUE
Send commands:
“PV <Maximum supply voltage>”
“PC <Maximum supply current>”.
If it is not known, read voltage programming gain value by sending query:
“SVPG?” Save response message as <Old SVPG>
3.2.2 Measure supplies output voltage and calculate:
<New SVPG> = <Old SVPG> X <Maximum supply voltage>
<Voltage measured at output>
Send commands:
“SVPG <New SVPG>”
Document: 83-468-007 Rev B
Page 32

“PV <Maximum supply voltage>” .
Repeat this step until <Voltage measured at output> is within ±0.05% of the <Maximum
supply voltage>.
3.2.3 ADJUST OFFSET VALUE
Send commands to set supply to 10% of its maximum voltage:
“PV <Tenth of maximum supply voltage>”
“PC <Maximum supply current>”.
If it is not known, read voltage programming gain value by sending query:
“SVPO?” Save response message as <Old SVPO>
3.2.4 Measure supply output voltage. If it is higher than the target 10% of its maximum voltage then choose a lower value for the next SVPO factor. If the output is too low,
choose a higher SVPO. Picking the correct SVPO is a trial and error process. It is typically 0.001 and it must be between -0.3 and +0.5
Send commands:
“SVPO <New SVPO>”
Calibrate: Volt Programming
29
“PV <Maximum supply voltage>” .
Repeat this step until the measured output voltage is within ±0.05% of the expected 10%
of full output.
3.2.5 VERIFY VOLTAGE PROGRAMMING LINEARITY
Program the supply to various voltages between 10% and 100% of full output by sending
the command:
“PV <Program Volt>”
For each programmed voltage, measure the actual supply output. Verify the output error
is less than ±0.1% of the maximum voltage. If the measurement is out of tolerance, the
supply is NOT calibrated.
If the voltage programming is not calibrated, repeat procedure from step 3.2.1. to 3.2.4
3.2.6 SAVE CALIBRATION FACTORS
Enter commands:
“PV 0”
“PC 0”
“*SAV 0”
Document: 83-468-007 Rev B
Page 33

Calibrate: Volt Measurement
3.3 CALIBRATE THE VOLTAGE MEASUREMENT
Verify the load connected to the supply keeps it in voltage mode even when the voltage
is set to maximum. The load should not allow the current to exceed 90% of maximum
current. The load may be entirely disconnected from the output (open load), but for best
results use the load typical of your application.
3.3.1 ADJUST GAIN VALUE
Send commands to set supply to maximum voltage:
“PV <Maximum supply voltage>”
“PC <Maximum supply current>”.
If it is not known, read voltage measurement gain value by sending query:
“SVRG?” Save response message as <Old SVRG>
Use voltmeter to measure supply output voltage.
3.3.2 Use IEEE card to measure output voltage by sending:
“MV?” and record the response message
30
Calculate:
<New SVRG> = <Measured output voltage> X <Old SVRG>
<Response to MV?>
Send command:
“SVRG <New SVRG>”
Repeat this step until the response from the “MV? query is within ±0.05% of the measured output voltage.
3.3.3 ADJUST OFFSET VALUE
Send command to set supply to 10% of its maximum voltage:
“PV <Tenth of maximum supply voltage>”
“PC <Maximum supply current>”.
If it is not known, read existing voltage offset value by sending query:
“SVRO?” Save the response message as <Old SVRO>
3.3.4 Use IEEE card to measure output voltage by sending:
“MV?” Record the response message
Measure the supply output voltage. If the response to the MV? query is higher than this
measurement, you have to choose a lower value for SVRO. If the response message is
lower, choose a higher SVRO. Picking the correct SVRO is a trial and error process. It
is typically 0.001 and it must be between -0.1 and +0.1.
Send new calibration factor by sending command:
“SVRO <New SVRO>”
Repeat this step until the value returned from the “MV? query is within ±0.05% of the
measured output voltage.
Document: 83-468-007 Rev B
Page 34

g
3.3.5 VERIFY VOLTAGE MEASUREMENT LINEARITY
Program the supply to various voltages between 10% and 100% of full output by sending
the command:
“PV <Program Volt>”
For each programmed voltage, measure the actual supply output. Send “MV?” query
and record the response message. Verify the difference between the MV? response
and the actual output voltage is less than ±0.1% of the full output voltage.
If the error at any level is greater than ±0.1% of full output, then the voltage measurement on the IEEE card is NOT calibrated.
If the IEEE measurement is NOT calibrated, repeat procedure from step 3.3.1 to step
3.3.4
3.3.6 SAVE CALIBRATION FACTORS
Enter commands: (“0” is zero, not letter)
“PV 0”
“PC 0”
“*SAV 0”
Calibrate: Current Programmin
31
3.4 CALIBRATE THE CURRENT PROGRAMMING
Verify the load connected to the supply keeps it in current mode even when the current
is set to maximum. The load should not allow the voltage to exceed 90% of maximum
voltage. A cable may be connected across the output terminals (shorted load), but for
best results use the load typical of your application.
Throughout this section, references are made to <Actual output current>. Since we
cannot measure current directly, the <Actual output current> is found by connecting an
external shunt resister, measuring the shunt voltage and applying the formula:
<Actual output current> = <Meas’d shunt volt> X <Specified shunt current>
<Specified shunt voltage>
Note: any change in calibration (“SCPG” or “SCPO” command) will not change the supply output until a new program current “PC” command is sent.
3.4.1 ADJUST GAIN VALUE
Send commands:
“PV <Maximum supply voltage>”
“PC <Maximum supply current>”.
If it is not known, read the current programming gain by sending query:
“SCPG?” Save response message as <Old SCPG>
3.4.2 Measure supply output current and calculate:
<New SCPG> = <Old SCPG> X <Maximum supply current>
<Actual output current>
Document: 83-468-007 Rev B
Page 35

Send commands:
“SCPG <New SCPG>”
“PC <Maximum supply current>” .
Repeat this step until <Actual output current> is within ±0.05% of the <Maximum supply
current>.
3.4.3 ADJUST OFFSET VALUE
Send commands to set supply to 10% of its maximum current:
“PV <Maximum supply voltage>”
“PC <Tenth of maximum supply current>”
If not known, read existing current programming offset by sending query:
“SCPO?” Save response message as <Old SCPO>
3.4.4 Measure supply output current. If it is higher than the target 10% of its maximum current then choose a lower value for the next SCPO factor. If the output is too low,
choose a higher SCPO. Picking the correct SCPO is a trial and error process. It is typically 0.001 and it must be between -0.03 and +0.5
Calibrate: Current Programming Calibrate: Current Measurement
32
Send commands:
“SCPO <New SCPO>”
“PC <Tenth of maximum supply current>”
Repeat steps 3 and 4 until actual output current is within ±0.05% of the expected 10% of
full output.
3.4.5 VERIFY CURRENT PROGRAMMING LINEARITY
Program the supply to various voltages between 10% and 100% of full output by sending
the command:
“PV <Program Volt>”
For each programmed voltage, measure the actual supply output. Verify the output error
is less than ±0.1% of the maximum voltage. If the measurement is out of tolerance, the
supply is NOT calibrated.
If the voltage programming is not calibrated, repeat procedure Steps 3.4.1 to 3.4.4.
3.4.6 SAVE CALIBRATION FACTORS
Enter commands: (“0” is zero, not letter)
“PV 0”
“PC 0”
“*SAV 0”
3.5 CALIBRATE THE CURRENT MEASUREMENT
Verify the load connected to the supply keeps it in current mode even when the current
is set to maximum. The load should not allow the voltage to exceed 90% of maximum
Document: 83-468-007 Rev B
Page 36

voltage. A cable may be connected across the output terminals (shorted load), but for
best results use the load typical of your application.
Throughout this section, references are made to <Actual output current>. Since we
cannot measure current directly, the <Actual output current> is found by connecting a
series shunt resister, measuring the shunt voltage and applying the formula:
<Actual output current> = <Meas’d shunt volt> X <Specified shunt current>
<Specified shunt voltage>
3.5.1 ADJUST GAIN VALUE
Send commands to set supply to maximum current:
“PV <Maximum supply voltage>”
“PC <Maximum supply current>”.
If it is not known, read existing current measurement gain by sending query:
“SCRG?” Save response message as <Old SCRG>
3.5.2 Measure supply output current.
Calibrate: Current Measurement
33
Use IEEE card to measure output current by sending query:
“MC?” and record the response message
Calculate:
<New SCRG> = <Measured output current> X <Old SCRG>
<Response to MC?>
Send command:
“SCRG <New SCRG>”
Repeat this until the response from the “MC? query is within ±0.05% of the measured
output current.
3.5.3 ADJUST OFFSET VALUE
Send command to set supply to 10% of its maximum current:
“PV < Maximum supply voltage>”
“PC < Tenth of maximum supply current>”.
If it is not known, read existing current offset value by sending query:
“SCRO?” Save the response message as <Old SCRO>
3.5.4 Use IEEE card to measure output current by sending:
“MC?” Record response message
Measure the supply output current. If the response to the MC? query is higher than this
measurement, you have to choose a lower value for SCRO. If the response message is
lower, choose a higher SCRO. Picking the correct SCRO is a trial and error process. It
is typically 0.001 and it must be between -0.1 and +0.1.
Send new calibration factor by sending command:
Document: 83-468-007 Rev B
Page 37

“SCRO <New SCRO>”
Repeat this step until the value returned from the “MC? query is within ±0.05% of the
measured output current.
3.5.5 VERIFY CURRENT MEASUREMENT LINEARITY
Program the supply to various current between 10% and 100% of full output by sending
the command:
“PC <Program Current>”
For each programmed current, measure the actual supply output. Send “MC?” query
and record the response message. Verify the difference between the MC? response
and the actual output current is less than ±0.1% of the full output current.
If the error at any level is greater than ±0.1% of full output, then the current measurement on the IEEE card is NOT calibrated.
If the IEEE measurement is NOT calibrated, repeat procedure from Step 3.5.1 to Step
3.5.4
3.5.6 SAVE CALIBRATION FACTORS
Enter commands: (“0” is zero, not letter)
“PV 0”
34
“PC 0”
“*SAV 0”
Document: 83-468-007 Rev B
Page 38

Command List
4 SUMARY TABLE OF COMMANDS
This is summary of the IEEE and RS-232 command set.
In most cases, the long form (SCPI) and short form commands are both valid for either
IEEE or RS-232 programming.
When a command includes a value, that value can usually be read back by appending a
question mark to make the command into a query.
In the command format, small letters are optional and words in square brackets are optional. See example in Section 1.6.1
Command Name Description Command Format
SCPI Short Form
PROGRAMMING COMMANDS
Voltage Set power supply output voltage. [SOURce]
Value is 0 to 1000 :VOLTage
[:AMPLitude] PV
Voltage Prog Set maximum voltage program limit.
Limit Value is 0 to 1000 :LIMit SVL
Supply On Turn the Supply Output ON. :OUTPut ON SN
Supply Off Turn the Supply Output OFF. :OUTPut OFF SF
Current Set power supply output current. [SOURce]
Value =0 to 1000 [0] : CURRent
[:AMPLitude] PC
Current Prog Set maximum current program limit.
Limit Value = 0 to 1000 [100] :LIMit SCL
MEASUREMENT COMMANDS
35
Measure Measure the voltage present at MEASure
supply output :VOLTage? MV?
Measures the current present at :CURRent? MC?
supply output
Measure both voltage & current present at (none) MVC?
the output of supply (No IEEE cmd)
Filter Sets filter number for
voltage measurement, 1 to 250 [20] AFV
Sets filter number for
voltage measurement, 1 to 250 [20] AFC
Report Mode Report the program mode. SYSTem
Document: 83-468-007 Rev B
Page 39

Response is LOCAL, REMOTE, :PROGmode? MH?
or FORCED_LOCAL
Command List
PROTECTION COMMANDS
Set software overvoltage and overcurrent protection functions
Voltage Set Protection Level [SOURce]
Value = 0 to 1000 [1000] :VOLTage
:LEVel SVPL
Enable Protection ON | [Off] :STATe SVPS
Query the Protection Circuit state :TRIPped? SVPT?
Clear the tripped state :CLEar SVPC
Current Set Protection Level [SOURce]
Value = 0 to 1000 [1000] :CURRent
:LEVel SCPL
Enable Protection ON | [Off] :STATe SCPS
Query the Protection Circuit state :TRIPped? SCPT?
Clear the tripped state :CLEar SCPC
Report V-Prog Present program voltage MVP?
Report V-Limit Present voltage limit value. MVL?
Report 1-Prog Present current programming value. MCP?
Report I-Limit Present current limit value. MCL?
RS-232 SPECIFIC COMMANDS
Set Local Set Program Mode to Local. SL
Set Remote Set programming to Remote Mode. SR
Set Echo On Allows Controller to echo back EN
commands received plus OK CNTL-E
Set Echo Off Controller only returns OK EF
CNTL-F
Address Reads address switch setting EXTADR?
36
Document: 83-468-007 Rev B
Page 40

Following commands take affect
after a *SAV 0, *RCL 0, or an UPdate
Set BAUD Sets baud rate SYSTem
:COMM
50 to 38,400 [9600] :SERial
BAUD
Set Bits Set # of Data Bits, 7 or 8 [8] :BITS
Set Stop Bits Set # of Stop Bits, 1 or2 [1] :SBITS
Set Parity Sets parity, none, Odd or Even [none] :PARity
Update Updates UART with new settings :UPdate
Command List
STATUS COMMANDS (SCPI required Status Register Commands)
Operation Operational Registers STATus:OPERational
[:EVENt]?
:CONDition?
:ENABle
:PTRansition
:NTRansition
Questionable Questionable Registers STATus:QUEStionable
[:EVENt]?
:CONDition?
:ENABle
:PTRansition
:NTRansition
IEEE 488.2 COMMANDS
Clear Status *CLS
Service Request Enable (0 to 255) *SRE <value>
Service Request Enable Query *SRE?
Event Status Enable (0 to 255) *ESE <value>
Event Status Enable Query *ESE?
Event Status Register Query *ESR?
Identification Query *IDN?
Operation Complete Command *OPC
Operation Complete Query *OPC?
Recall Restores the power on setting. *RCL 0
37
Document: 83-468-007 Rev B
Page 41

Reset Restores its power-up state except *RST RS
that the state of IEEE-488 interface is
unchanged
Save Saves current SCPI configuration in flash *SAV 0
So it becomes the new power-on setting.
Read Status Byte *STB?
Self-Test Query Causes the controller to respond with *TST?
last self test status.
Wait-to-Continue *WAIt
Command List
CALIBRATE
Calibrate Establishes programming gain CALibrate
:SOURce
Slope range : VOLTage
Offset range :SLOPe SVPG
:OFFset SVPO
Slope range :CURRent
Offset range :SLOPe SCPG
:OFFset SCPO
Calibrate Establishes measurement gain CALibrate
:MEASure
Gain range : VOLTage
Offset range :GAJN SVRG
:OFFset SVRO
:CURRent
Gain range :GAIN SCRG
Offset range :OFFset SCRO
Lock Prevents unauthorized changes CALibrate
to other calibration values. :LOCK SLOCK
Value 0 or 1, OFF or ON
Set Identity Allows entry of text string up to CALibrate
72 characters, four comma fields :IDN SIDN
Ex: Mfgr, Model, Serial Number, Revision
Set Date Allows input of calibration date CALibrate
in mm/dd/yyyy format :DATe SDAT
38
Document: 83-468-007 Rev B
Page 42

Notes:
39
Document: 83-468-007 Rev B
 Loading...