

TDK TREK Flex A28 Quick Start Manual
English
Refer to the included Important Safety Instructions. Please read and save this Quick Start
Guide, Important Safety Instructions and Warranty. For additional information, please go to
TDKperformance.com.
Français
Veuillez consulter les Instructions de sécurité importantes ci-jointes. Veuillez lire et conserver
ce Guide de démarrage rapide, Instructions de sécurité importantes et garantie. Pour plus
d’informations, veuillez consulter TDKperformance.com.
Connect the smaller end of the supplied
USB cable to the Charge Micro USB jack
v (under flap) and the other end to a
powered USB jack on your computer or an
AC power supply (not included).
When the speaker’s power is on and
charging, the Power/Battery indicator
will light red, and light amber when fully
charged. When the unit is off and charging,
the Power/Battery indicator will light red
and turn off when fully charged. The Power/
Battery indicator will blink red when it is in
need of charging.
To check battery status (when the unit is on), press and hold the Power button for three seconds;
the Volume indicators will blink to indicate the battery charge as follows:
One LED = 0-20%, Two LEDs = 21-40%, Three LEDs = 41-60%, Four LEDs = 61-80%, Five LEDs = 81-100%.
Note: The battery will provide approximately eight hours of operation at normal listening level.
Rechargeable Battery Notes:
• Each time you charge and discharge the battery (charge cycles), battery capacity slightly
diminishes. Rechargeable batteries have a limited number of charge cycles and need to be
replaced eventually.
• You may wish to replace your battery when, or before, the battery does not supply enough
power to function your device. Also, proper disposal is essential from environmental and safety
point of view. Putting any battery directly in the trash will harm the environment.
• Do not incinerate.
• If you do not plan on using the battery for a month or more, turn o the main power (OFF/
ON) switch and store it in a clean, dry, cool place away from heat and metal objects.
Rechargeable batteries will self-discharge during storage; remember to recharge the
batteries every three months and before use.
• If battery has not been charged for more than 4-6 months, perform a couple of full charge/
discharge cycles to improve battery capacity.
• It is recommended to charge the batteries for more than eight hours before rst use.
Replacing the Rechargeable Battery:
If the battery does not supply enough power, visit www.tdkperformance.com for
instructions on battery replacement.
Connectez la petite extrémité du câble
USB fourni à la prise de charge Micro USB v
(sous rabat) et l’autre extrémité à une prise
d’alimentation USB de votre ordinateur ou
à une alimentation secteur (non inclue).
Lorsque l’enceinte est allumée et en charge,
l’indicateur d’alimentation/batterie s’allumera
en rouge, et en couleur jaune une fois
la batterie pleinement chargée. Lorsque
l’appareil est éteint et en charge, l’indicateur
d’alimentation/batterie s’allumera en rouge
et s’éteindra à pleine charge. L’indicateur
d’alimentation/batterie clignotera en rouge
quand la batterie sera faible.
Pour vérifier l’état de la batterie (lorsque l’appareil est allumé), appuyez et maintenez le bouton
d’alimentation pendant trois secondes ; les indicateurs de volume clignoteront pour indiquer la charge
de la batterie comme suit :
Une LED = 0-20%, Deux LED = 21-40%, Trois LED = 41-60%, Quatre LED = 61-80%, Cinq LED = 81-100%.
Remarque : La batterie fournira environ huit heures d’alimentation pour une écoute à niveau normal.
Remarques sur la batterie rechargeable :
• Chaque fois que vous chargez et déchargez la batterie (cycles de chargement), la capacité de
la batterie diminue légèrement. Les batteries rechargeables ont un nombre limité de cycles de
chargement et doivent être éventuellement remplacées.
• Vous pouvez décider de remplacer votre batterie lorsque, ou avant que, celle-ci ne fournisse plus
suffisamment d’alimentation pour faire fonctionner votre dispositif. Une mise au rebut correcte est
également essentielle pour préserver l’environnement et du point de vue de la sécurité. Mettre une
batterie directement à la poubelle nuit à l’environnement.
• Ne pas incinérer.
• Si vous ne prévoyez pas d’utiliser la batterie pendant un mois ou plus, éteignez le commutateur
d’alimentation principale (OFF / ON) et stockez-la dans un endroit propre, sec, frais, loin d’une
source de chaleur et des objets métalliques. Les batteries rechargeables se déchargeront pendant
le stockage ; pensez à recharger les batteries tous les trois mois et avant utilisation.
• Si la batterie n’a pas été chargée pendant plus de 4-6 mois, eectuer un cycle de quelques
charges/décharges complètes an d’améliorer la capacité de la batterie.
• Il est recommandé de charger les batteries pendant plus de huit heures avant la première utilisation.
Remplacement de la batterie rechargeable :
Si la batterie ne fournit pas assez d’alimentation, veuillez consulter
www.tdkperformance.com pour obtenir les instructions sur le remplacement
de la batterie.
RECHARGING THE BATTERY RECHARGER LA BATTERIE
LOCATION OF CONTROLS EMPLACEMENT DES COMMANDES
63953379 C
1. With the unit on, press the
Bluetooth
button ak to select
Bluetooth
mode.
2. Press and hold the
Bluetooth
button ak for
approximately three seconds until the
Bluetooth
indicator blinks quickly to make
the speaker “discoverable”.
3. On the
Bluetooth
device, enable
Bluetooth
and select “TREK Flex” from
the Device List. If the
Bluetooth
device
asks for a passkey, use “0000”. Some
Bluetooth
devices will ask you to accept
the connection. If the units are paired
properly, the speaker will beep and the
Bluetooth
indicator will light solid blue. If
it failed, the
Bluetooth
indicator will blink
slowly. Note: After you pair a device, this
TREK Flex will remember it for future use.
When in
Bluetooth
mode, the
Bluetooth
indicator will light blue if connected to a
Bluetooth
device. If not connected to a
Bluetooth
device, the
Bluetooth
indicator will
blink slowly, about once every 2-3 seconds.
1. Une fois l’unité en marche, appuyez sur le bouton
Bluetooth
ak pour sélectionner le mode
Bluetooth
.
2. Appuyez et maintenez le bouton Bluetooth ak pendant
environ trois secondes, jusqu’à ce que l’indicateur
Bluetooth
clignote rapidement pour mettre l’enceinte
en mode « détectable ».
3. Sur le dispositif
Bluetooth
, activez
Bluetooth
et choisissez
« TREK Flex » à partir de la Liste des dispositifs. Si
le dispositif Bluetooth vous demande un mot de
passe, utilisez « 0000 ». Certains dispositifs
Bluetooth
vous demanderont d’accepter
la connexion. Si les unités sont appairés
correctement, l’enceinte émettra un bip et
l’indicateur
Bluetooth
s’allumera en bleue
Sinon, l’indicateur Bluetooth clignotera
lentement.
Remarque : Une fois que vous avez apparié le
dispositif, le TREK Flex le mettra en mémoire.
En mode
Bluetooth
, l’indicateur
Bluetooth
s’allumera en bleue s’il est connecté à un
dispositif
Bluetooth
. S’il n’est pas connecté à
un dispositif
Bluetooth
, l’indicateur Bluetooth
clignotera lentement, environ une fois toutes
les 2-3 secondes.
NFC offers a simple setup method for
your TREK Flex speaker. Simply turn on the
TREK Flex speaker and hold the NFC
enabled device (NFC on the device
must be “on”) within a few centimeters of
the NFC symbol on top of the TREK
Flex speaker to pair and establish a
Bluetooth connection. It’s just that simple.
NFC offre une méthode de connexion
simple pour votre enceinte TREK Flex.
Allumez simplement l’enceinte TREK
Flex et maintenez le dispositif NFC
activé (sur le dispositif, NFC doit être sur
« activer ») à quelques centimètres du
symbole NFC au-dessus du hautparleur TREK Flex pour appairer et
mettre en place une connexion
Bluetooth. C’est tout aussi simple.
1. Slide the Battery OFF/ON switch x to the ON position; the unit will enter the Standby mode.
2. Press the Power button U to turn the unit on; the Power indicator will light amber (if battery
charged).
3. Connect the unit via NFC (see above) or pair with a Bluetooth device (see previous column).
4. Press the Phone/Play/Pause/Skip button am to start playback. Press the Phone/Play/Pause/Skip
button am again to pause or resume playback.
5. Press the Volume + X/– V buttons to adjust the volume.
6. Press the Phone/Play/Pause/Skip button am TWICE to advance to the next track.
7. Press the Phone/Play/Pause/Skip button am THREE TIMES to go back to the previous track.
8. To turn the unit off, press the Power button U again. To save the rechargeable battery, slide
the Battery OFF/ON switch x to the OFF position.
1. Mettez le commutateur de batterie OFF/ON x sur la position ON ; l’appareil passera en mode Veille.
2. Appuyez sur le bouton d’alimentation U pour allumer l’appareil ; l’indicateur d’alimentation
s’allumera en jaune (si la batterie est chargée).
3. Connectez l’appareil via NFC (voir ci-dessus) ou appairez avec un dispositif Bluetooth (voir la
colonne précédente).
4. Appuyez sur le bouton Téléphone/Lecture/Pause/Saut am pour démarrer la lecture. Appuyez de
nouveau sur le bouton Téléphone/Lecture/Pause/Saut am pour mettre en pause ou reprendre la
lecture.
5. Appuyez sur les boutons Volume + X/– V pour régler le volume.
6. Appuyez DEUX FOIS sur le bouton Téléphone/Lecture/Pause/Saut am pour passer à la piste suivante.
7. Appuyez TROIS FOIS sur le bouton Téléphone/Lecture/Pause/Saut am pour revenir à la piste
précédente.
8. Pour éteindre l’appareil, appuyez de nouveau sur le bouton d’alimentation U. Pour économiser la
batterie rechargeable, mettez le commutateur de batterie OFF/ON x sur la position OFF.
PAIRING A BLUETOOTH DEVICE
APPAIRER LE DISPOSITIF BLUETOOTH
PAIRING WITH NFC (Requires NFC Enabled Phone)
APPAIRAGE AVEC LA TECHNOLOGIE NFC (Nécessite un téléphone compatible NFC)
OPERATION
FONCTIONNEMENT
If the
TREK Flex
has no audio signal for twenty minutes, the
TREK Flex
will turn itself off. To
“wake” the
TREK Flex
, simply press the Power button
U.
Si le TREK Flex n’émet aucun signal pendant vingt minutes, le TREK Flex s’éteindra
automatiquement. Pour « réveiller » le TREK Flex, appuyez simplement sur le bouton
d’alimentation
U.
AUTO POWER OFF
ARRÊT AUTOMATIQUE
SPECIFICATIONS
CARACTÉRISTIQUES
Power Source (DC) ............................... Internal NiMH
...................................................rechargeable battery
Dimensions ..............7.8 (W) x 2.7 (H) x 2.9 (D) inches
........................................197 (W) x 69 (H) x 75 (D) mm
Weight. .................................................1.25 lb / 0.57 kg
Speaker Size ...................2 x 40 mm full-range drivers,
...............1 x 90 x 42 mm oval shape passive radiator
Source d’alimentation (CC) .................Interne NiMH
..................................................batterie rechargeable
Dimensions ...............7,8 (L) x 2,7 (H) x 2,9 (P) pouces
...........................................197 (L) x 69 (H) x 75 (P) mm
Poids .....................................................1,25 lb/ 0,57 kg
Taille de l’enceinte .............2 x 40 mm transducteurs
..............................................................pleine gamme,
........1 x 90 x 42 mm radiateur passif de forme ovale
Speaker Power Output. ....................................4 W x 2
Wireless Audio .......Bluetooth, A2DP, AVRCP, HFP, HSP
Line-Input Audio. .........................3.5 mm stereo jack,
...............................................up to 1 Vrms input signal
USB Port......................................5 V @ 1A charge only
IP Grade ..................................................................IP65
Specifications are subject to change without notice.
Puissance de sortie haut-parleur. ....................4 W x 2
Audio sans fil .........Bluetooth, A2DP, AVRCP, HFP, HSP
Entrée ligne audio ........................Prise stéréo 3,5 mm
.....................................signal d’entrée jusqu’à 1 Vrms
Port USB............................5 V @ 1A charge seulement
Grade IP ..................................................................IP65
Ces caractéristiques peuvent être modifiées sans
préavis.
TREK is a trademark of Imation Corp. The TDK Life on Record Logo is a trademark of TDK
Corporation and is used under license. The Bluetooth® word mark and logos are registered
trademarks owned by Bluetooth SIG, Inc. and any use of such marks by Imation Corp. is under
license. The N Mark is a trademark or registered trademark of NFC Forum, Inc. in the United States
and other countries. All other trademarks and logos are property of their respective owners.
TREK est une marque commerciale d’Imation Corp. Le logo TDK Life on Record est une marque
commerciale de TDK Corporation et est utilisé sous licence. La marque et les logos Bluetooth
®
sont des marques déposées de Bluetooth SIG, Inc. et leur utilisation par Imation Corp. fait l’objet
d’un accord de licence. La marque N est une marque déposée ou une marque déposée
enregistrée de NFC Forum, Inc. aux États-Unis et dans autres pays. Toutes les autres marques
déposées et logos sont la propriété de leurs propriétaires respectifs.
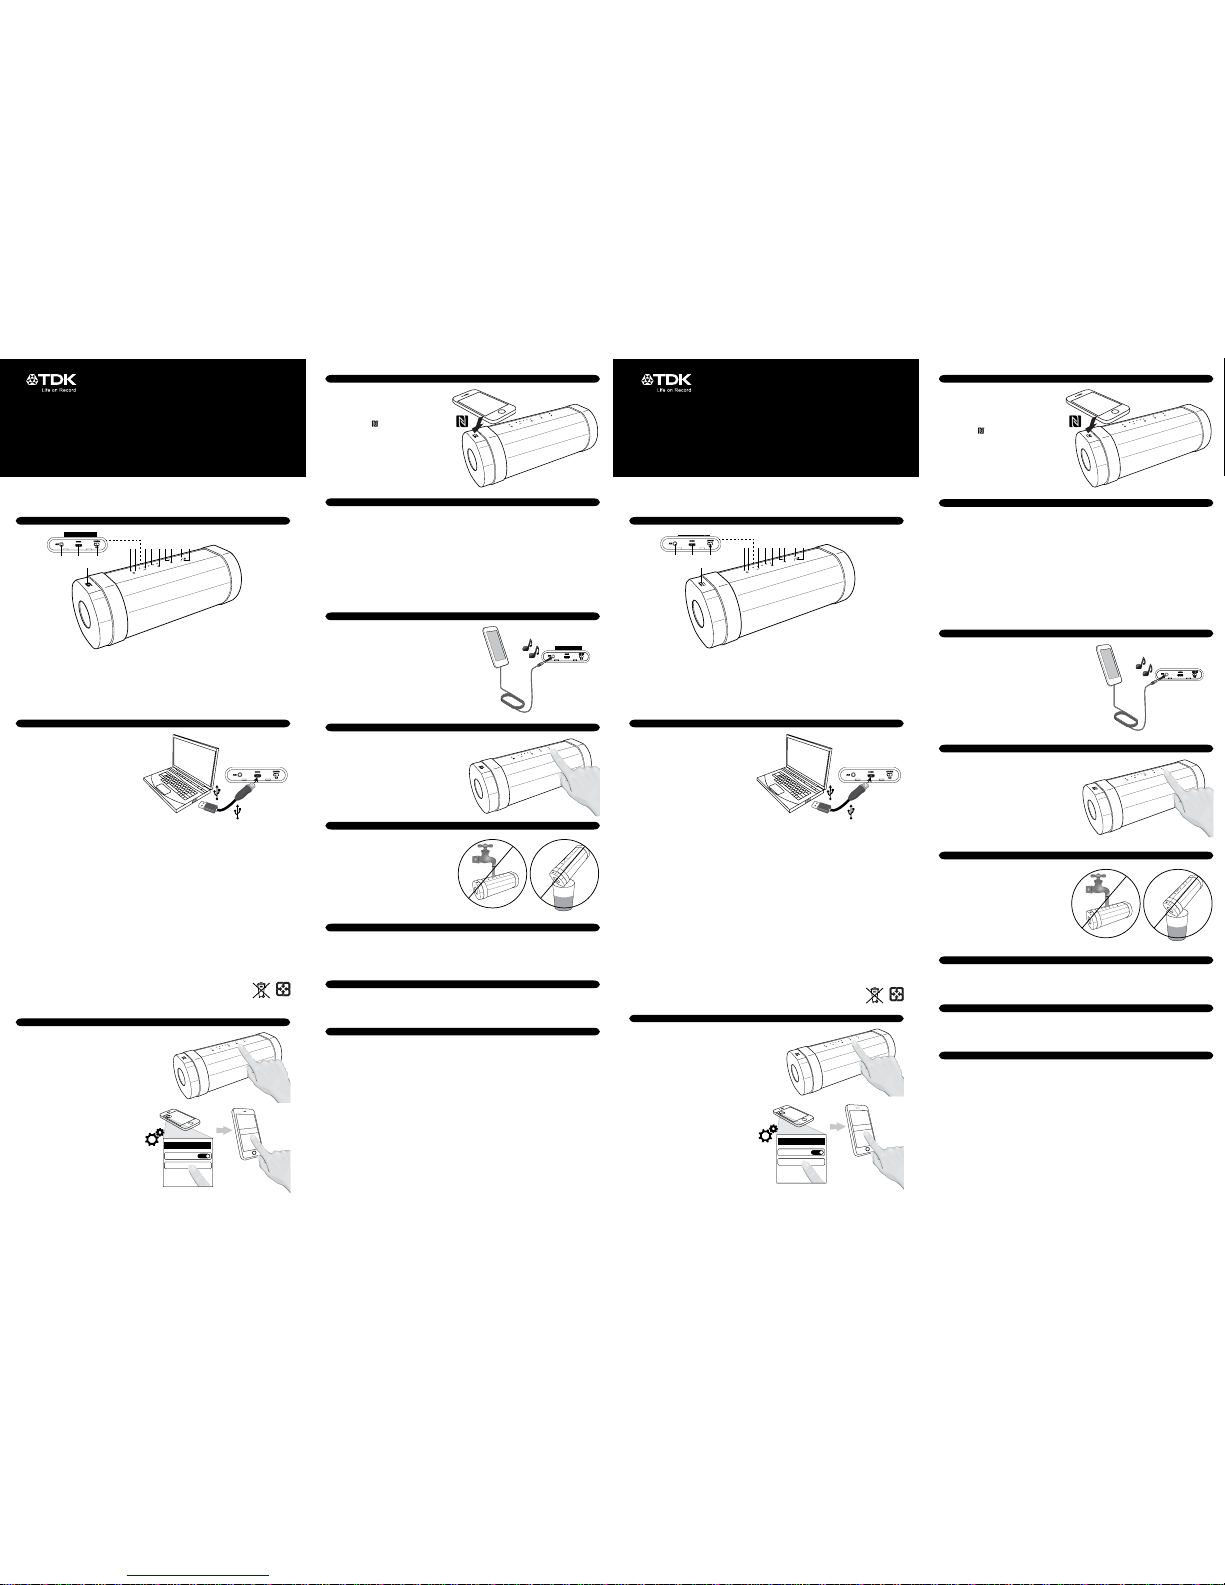
Under Flap
1 2 4
3
65 7 8 9
1110
12 13
Under Flap
Insert one end of an audio cable (not included)
into the LINE OUT jack on your external audio
unit and the other end into the AUX IN jack
under the flap. The Aux device will automatically
be selected when the audio cable is
connected. Start playback of the external unit
and the external audio unit’s output sound will
be heard through the TREK Flex’s speakers.
The Phone/Play/Pause/Skip button will not
function when using the Aux In jack.
Insérez l’une des extrémités du câble audio (non
inclus) dans la prise de sortie LINE OUT sur l’unité
audio externe et l’autre extrémité dans la prise
d’entrée AUX IN sous le rabat. Le dispositif Aux
est automatiquement sélectionné lorsque le
câble audio est connecté. Lancez la lecture sur
l’unité externe et le son de sortie audio de l’unité
externe sera émis à travers les haut-parleurs du
TREK Flex.
Le bouton Téléphone/Lecture/Pause/Saut n’est
pas compatible avec la prise AUX IN.
When receiving a phone call on your paired
Bluetooth device, press the Phone/Play/Pause/
Skip button am to answer (the indicator will light
amber) and use the built-in microphone on
this TREK Flex to take the call. Press twice to
disconnect/end the call.
Lors de la réception d’un appel téléphonique
sur votre dispositif Bluetooth appairé, appuyez
sur le bouton Téléphone/Lecture/Pause/Saut am
pour répondre (l’indicateur s’allumera en jaune)
et utilisez le microphone intégré sur ce TREK Flex
pour prendre l’appel. Appuyez deux fois pour
déconnecter / mettre fin à l’appel.
The TREK Flex is splash resistant, but cannot
be submerged in water or be subjected to
a constant flow of water. In order to ensure
the product is splash resistant, close the
rubber flap on the TREK Flex, then smooth
out entire flap until flap is flush with the
sides of the unit.
Le TREK Flex résiste aux éclaboussures, mais
ne doit pas être submergé ou soumis à
un flot constant de liquide. Afin de vous
assurer que le produit est résistant aux
éclaboussures, assurez vous que la rabat
soit fermé complètement afin d’être aligné
avec les bords du Trek Flex.
Certified to an IK07 under international standard IEC62262 for protection against external
mechanical impacts. However, it is still advised to protect the TREK Flex when using to avoid
possible damage.
Résistance aux chocs mécaniques externes IK 07 conformément à la norme internationale
IEC62262 pour la protection contre les impacts mécaniques externes. Cependant, il
est recommandé de toujours protéger le TREK Flex lors de son utilisation pour éviter de
l’endommager.
USING THE AUX IN JACK
UTILISATION DE LA PRISE AUX IN
ANSWERING A PHONE CALL
RÉPONDRE À UN APPEL TÉLÉPHONIQUE
SPLASH RESISTANT
RÉSISTANT AUX ÉCLABOUSSURES
SHOCK RESISTANT
RÉSISTANT AUX CHOCS
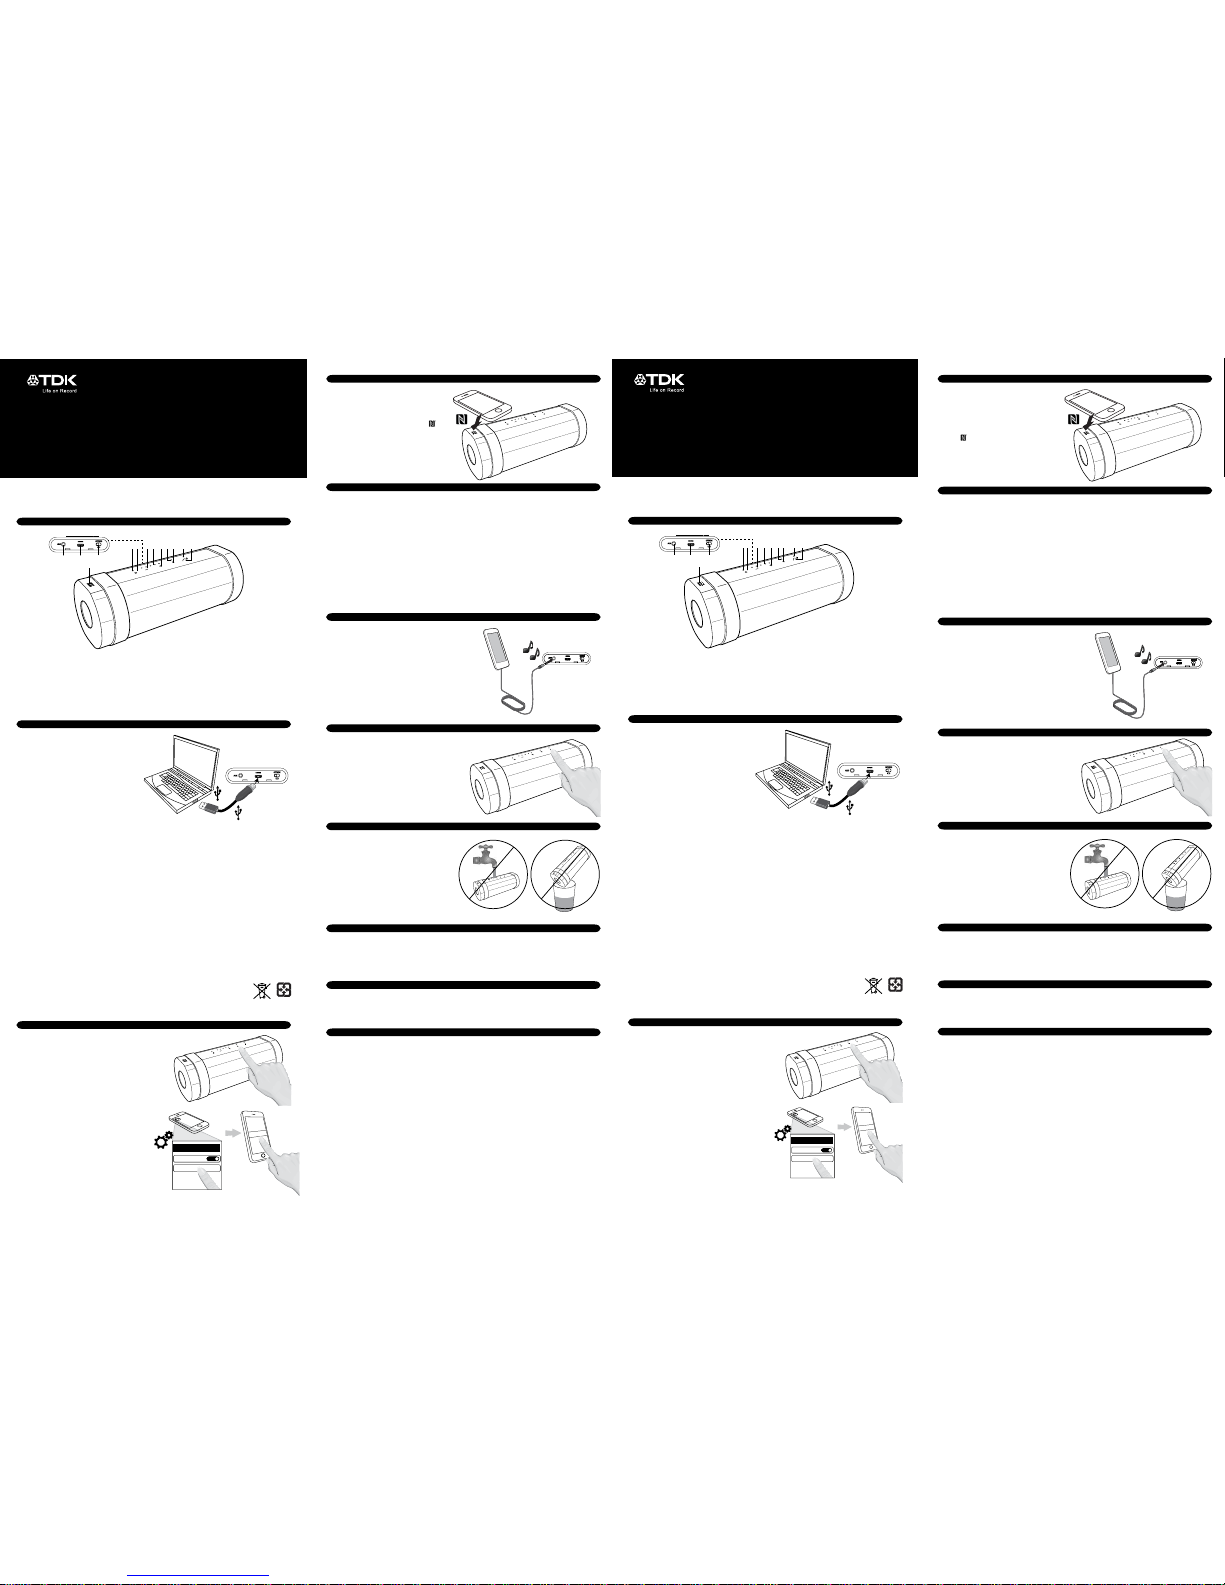
1. Aux Jack
2. Charge Micro USB Jack
3. NFC (Near Field Communication)
4. Battery OFF/ON Switch
5. Power Indicator
6. Power Button
7. Volume – Button
8. Volume Indicators
9. Volume + Button
10. Bluetooth Indicator
11. Bluetooth Button
12. Phone/Play/Pause/Skip Indicator
13. Phone/Play/Pause/Skip Button
1. Prise Aux
2. Prise de charge Micro USB
3. NFC (Near Field Communication)
4. Commutateur de batterie OFF/ON
5. Indicateur d’alimentation
6. Bouton d’alimentation
7. Bouton Volume –
8. Indicateurs de volume
9. Bouton Volume +
10. Indicateur Bluetooth
11. Bouton Bluetooth
12. Indicateur Téléphone/Lecture/Pause/Saut
13. Bouton Téléphone/Lecture/Pause/Saut
TREK Flex
ON
Bluetooth
Bluetooth
ON
0-0-0-0
TREK Flex
ON
Bluetooth
Bluetooth
ON
0-0-0-0
TREK Flex
Wireless Speaker
Enceinte sans fil
TREK Flex
A28 A28
Under Flap
1 2 4
3
65 7 8 9
1110
12 13
Sous rabat
Under Flap
Sous rabat
Imation Confidential - Use Only By Permission
Controlled material extracted from Matrix on Feb 20, 2015 08:51:45 AM CST
Deutsch
Bitte lesen Sie die beigefügten Wichtigen Sicherheitshinweise. Bitte lesen und speichern Sie diese
Schnellstartanweisung sowie die wichtigen Sicherheitshinweise und die Garantie. Für zusätzliche
Informationen, besuchen Sie bitte unsere Webseite: TDKperformance.com.
Verbinden Sie die kleinere Seite des
beigefügten USB Kabels mit der Laden
Micro USB Buchse v (unter der Klappe)
und die andere Seite mit einer aktiven USB
Buchse an Ihrem Computer oder einer AC
Energiequelle (nicht inklusive). Wenn der
Lautsprecher eingeschaltet ist und lädt, wird
die Power/Batterie Anzeige rot aufleuchten
und gelb, wenn diese vollständig geladen
ist. Wenn die Einheit ausgeschaltet ist und
lädt, wird die Power/Batterie Anzeige rot
aufleuchten und sich ausschalten, wenn
diese vollständig geladen ist. Die Power/
Batterie Anzeige wird rot blinken, wenn
diese aufgeladen werden muss.
Um den Batteriestatus zu kontrollieren (wenn die Einheit eingeschaltet ist), drücken und halten Sie
den Power Knopf für drei Sekunden gedrückt; die Lautstärkenanzeigen werden blinken, um die
Batterieladung wie folgt anzuzeigen:
Ein LED = 0-20%, Zwei LEDs = 21-40%, Drei LEDs = 41-60%, Vier LEDs = 61-80%, Fünf LEDs = 81-100%.
Bitte beachten Sie: Die Batterie wird ungefähr acht Stunden lang halten, bei einem normalen
Hörverhalten.
Anmerkungen zur wiederaufladbaren Batterie:
• Jedes Mal, wenn Sie die Batterie auf- und entladen (Ladezyklen), verringert sich die
Batteriekapazität. Wiederaufladbare Batterien haben eine begrenzte Anzahl Ladezyklen und
müssen letztendlich ersetzt werden.
•
Sie können Ihre Batterie ersetzen, wenn diese nicht mehr genügend Leistung bietet, um Ihr Gerät zu
betreiben, oder bereits vorher. Auch ist die ordnungsgemäße Entsorgung wesentlich aus Umweltund Sicherheitsperspektive. Eine Batterie direkt im Müll zu entsorgen, schadet der Umwelt.
• Nicht anzünden.
• Wenn Sie vorhaben, die Batterie für einen Monat oder länger nicht zu verwenden, schalten
Sie den Hauptschalter (OFF/ ON) aus und lagern Sie diese an einem sauberen, trockenen,
kühlen Ort, weg von Hitze und Metallobjekten. Wiederaufladbare Batterien werden sich selbst
entladen während der Lagerung; denken Sie daran, die Batterien alle drei Monate und vor
dem Gebrauch erneut zu laden.
• Sollte eine Batterie für mehr als 4-6 Monate nicht geladen worden sein, führen Sie einige
vollständige Lade-/Entladezyklen aus, um die Batteriekapazität zu verbessern.
• Es wird empfohlen, die Batterien vor dem ersten Gebrauch für mehr als acht
Stunden zu laden.
Ersetzen der wiederaufladbaren Batterie:
Sollte die Batterie nicht mehr genügend Leistung erbringen, gehen Sie auf www.tdkperformance.
com für Anweisungen zum Auswechseln der Batterie.
DIE BATTERIE AUFLADEN
POSITION DER STEUERUNG
1. Während das Gerät eingeschaltet ist, drücken Sie
den Bluetooth Taste ak, um den Bluetooth Modus
auszuwählen.
2. Drücken und halten Sie den Bluetooth Taste für
etwa drei Sekunden gedrückt, bis die Bluetooth
Anzeige schnell blinkt, um den Lautsprecher
„erkennbar“ zu machen.
3. Auf dem Bluetooth Gerät aktivieren Sie Bluetooth
und wählen Sie „TREK Flex“ von der Geräteliste.
Sollte das Bluetooth Gerät ein Passwort verlangen,
verwenden Sie „0000“. Einige Bluetooth Geräte
werden Sie bitten, die Verbindung zu
akzeptieren. Wenn die Geräte ordnungsgemäß
gekoppelt sind, wird der Lautsprecher piepen
und die Bluetooth Anzeige leuchtet ständig
blau. Sollte dies fehlschlagen, wird die Bluetooth
Anzeige langsam blinken. Bitte beachten Sie:
Nachdem Sie ein Gerät gekoppelt haben, wird
der TREK Flex sich daran erinnern für zukünftigen
Gebrauch.
Wenn im Bluetooth Modus, wird die Bluetooth
Anzeige blau aufleuchten, falls verbunden mit
einem Bluetooth Gerät. Falls nicht mit einem
Bluetooth Gerät verbunden, wird die Bluetooth
Anzeige langsam blinken, etwa alle 2-3 Sekunden
einmal.
NFC bietet eine einfache
Einrichtungsmethode für Ihren TREK Flex
Lautsprecher. Schalten Sie einfach den
TREK Flex Lautsprecher ein und halten Sie
das NFC aktivierte Gerät (NFC muss auf
dem Gerät auf “on” stehen) innerhalb
von ein paar Zentimetern vom NFC
Symbol
oben am TREK Flex
Lautsprecher zum Koppeln und stellen Sie
eine Bluetooth-Verbindung her. Es ist
wirklich so einfach.
1. Schalten Sie den Batterie OFF/ON Schalter x auf die ON Position; das Gerät befindet sich jetzt im
Standby Modus.
2. Drücken Sie auf den Power Taste
U
, um das Gerät einzuschalten; die Power Anzeige leuchtet gelb
(wenn die Batterie geladen ist).
3. Verbinden Sie das Gerät über NFC (siehe oben) oder koppeln Sie mit einem Bluetooth-Gerät (siehe
vorige Spalte).
4. Drücken Sie auf den Phone/Play/Pause/Skip Knopf
am
, um die Wiedergabe zu starten. Drücken Sie
den Phone/Play/Pause/Skip Knopf am erneut, um die Wiedergabe zu pausieren oder weitergehen
zu lassen.
5. Drücken Sie die Lautstärke +
X/– V
Tasten, um die Lautstärke anzupassen.
6. Drücken Sie den Phone/Play/Pause/Skip Taste
am
ZWEIMAL, um zum nächsten Stück zu springen.
7. Drücken Sie den Phone/Play/Pause/Skip Taste
am
DREIMAL, um zum letzten Stück zurückzukehren.
8. Um das Gerät auszuschalten, drücken Sie den Power Knopf
U
erneut. Um die wiederaufladbare
Batterie zu schonen, bewegen Sie den Batterie OFF/ON Schalter x auf die OFF Position.
KOPPELN EINES BLUETOOTH GERÄTS
KOPPELUNG MIT NFC (Erfordert NFC Aktiviertes Telefon)
BETRIEB
Falls der TREK Flex für zwanzig Minuten kein Audiosignal empfängt, wird sich der TREK Flex
von selbst ausschalten. Um den TREK Flex zu „wecken“ drücken Sie einfach auf den Power
Knopf
U.
ABSCHALTAUTOMATIK
SPEZIFIKATIONEN
Energieversorgung (DC) ...................... Interne NiMH
...........................................wiederaufladbare Batterie
Abmessungen ...............7,8 (B) x 2,7 (H) x 2,9 (T) Inch
...........................................197 (B) x 69 (H) x 75 (T) mm
Gewicht. ..............................................1,25 lb / 0,57 kg
Lautsprecher Größe. .....2 x 40 mm Full-range Treiber,
.............1 x 90 x 42 mm ovale Form passiver Radiator
Lautsprecher Power Output. ........................... 4 W x 2
Schnurlos Audio ....Bluetooth, A2DP, AVRCP, HFP, HSP
Line-Input Audio .................... 3,5 mm Stereo Buchse,
..............................................bis zu 1 Vrms Input Signal
USB Port. .........................5 V @ 1A lade ausschließlich
IP Klasse ................................................................. IP65
Spezifikationen unterliegen Änderungen ohne
vorhergehende Mitteilung.
TREK ist eine Handelsmarke der Imation Corp. Das TDK Life on Record Logo ist eine Handelsmarke
der TDK Corporation und wird unter Lizenz verwendet. Das Bluetooth® Wort als Markierung sowie
die Logos sind eingetragene Handelsmarken der Bluetooth SIG, Inc. und jeglicher Gebrauch
dieser Marken durch die Imation Corp. ist unter Lizenz. Die N Markierung ist eine Handelsmarke
oder eine eingetragene Handelsmarke der NFC Forum, Inc. in den Vereinigten Staaten und
anderen Ländern. Alle anderen Handelsmarken und Logos sind Eigentum ihrer jeweiligen
Eigentümer.
Stecken Sie die eine Seite eines Audio Kabels
(nicht inklusive) in die LINE OUT Buchse an
Ihrer externen Audioeinheit und die andere
Seite in die AUX IN Buchse unter der Klappe.
Das Aux Gerät wird automatisch ausgewählt,
wenn das Audio Kabel verbunden ist. Starten
der Wiedergabe der externen Einheit und der
Output Klang der externen Audioeinheit ist
hörbar durch die TREK Flex Lautsprecher.
Der Phone/Play/Pause/Skip Knopf funktioniert
nicht, wenn die Aux In Buchse verwendet wird.
Wenn Sie einen Anruf auf Ihrem gekoppelten
Bluetooth-Gerät erhalten, drücken Sie
den Phone/Play/Pause/Skip Knopf am, um
diesen anzunehmen (die Anzeige wird
gelb aufleuchten) und verwenden Sie das
eingebaute Mikrofon an diesem TREK Flex,
um den Anruf entgegenzunehmen. Drücken
Sie zweimal, um den Anruf abzubrechen/zu
beenden.
Der TREK Flex ist spritzwasserbeständig,
aber kann nicht unter Wasser getaucht
werden oder einem konstanten Wasserfluss
ausgesetzt werden. Um sicherzustellen,
dass das Produkt spritzwasserbeständig ist,
schließen Sie die Gummiklappe am TREK
Flex, und streichen Sie dann die gesamte
Klappe glatt, bis diese bündig mit den
Seiten des Geräts abschließt.
Zertifiziert nach IK07 unter dem internationalen Standard IEC62262 bezüglich des Schutzes vor
externen mechanischen Einflüssen. Dennoch wird empfohlen, den TREK Flex während des
Gebrauchs vor möglichen Schäden zu schützen.
ANWENDUNG DER AUX IN BUCHSE
ANNEHMEN EINES TELEFONISCHEN ANRUFS
SPRITZWASSERBESTÄNDIG
STOSSBESTÄNDIG
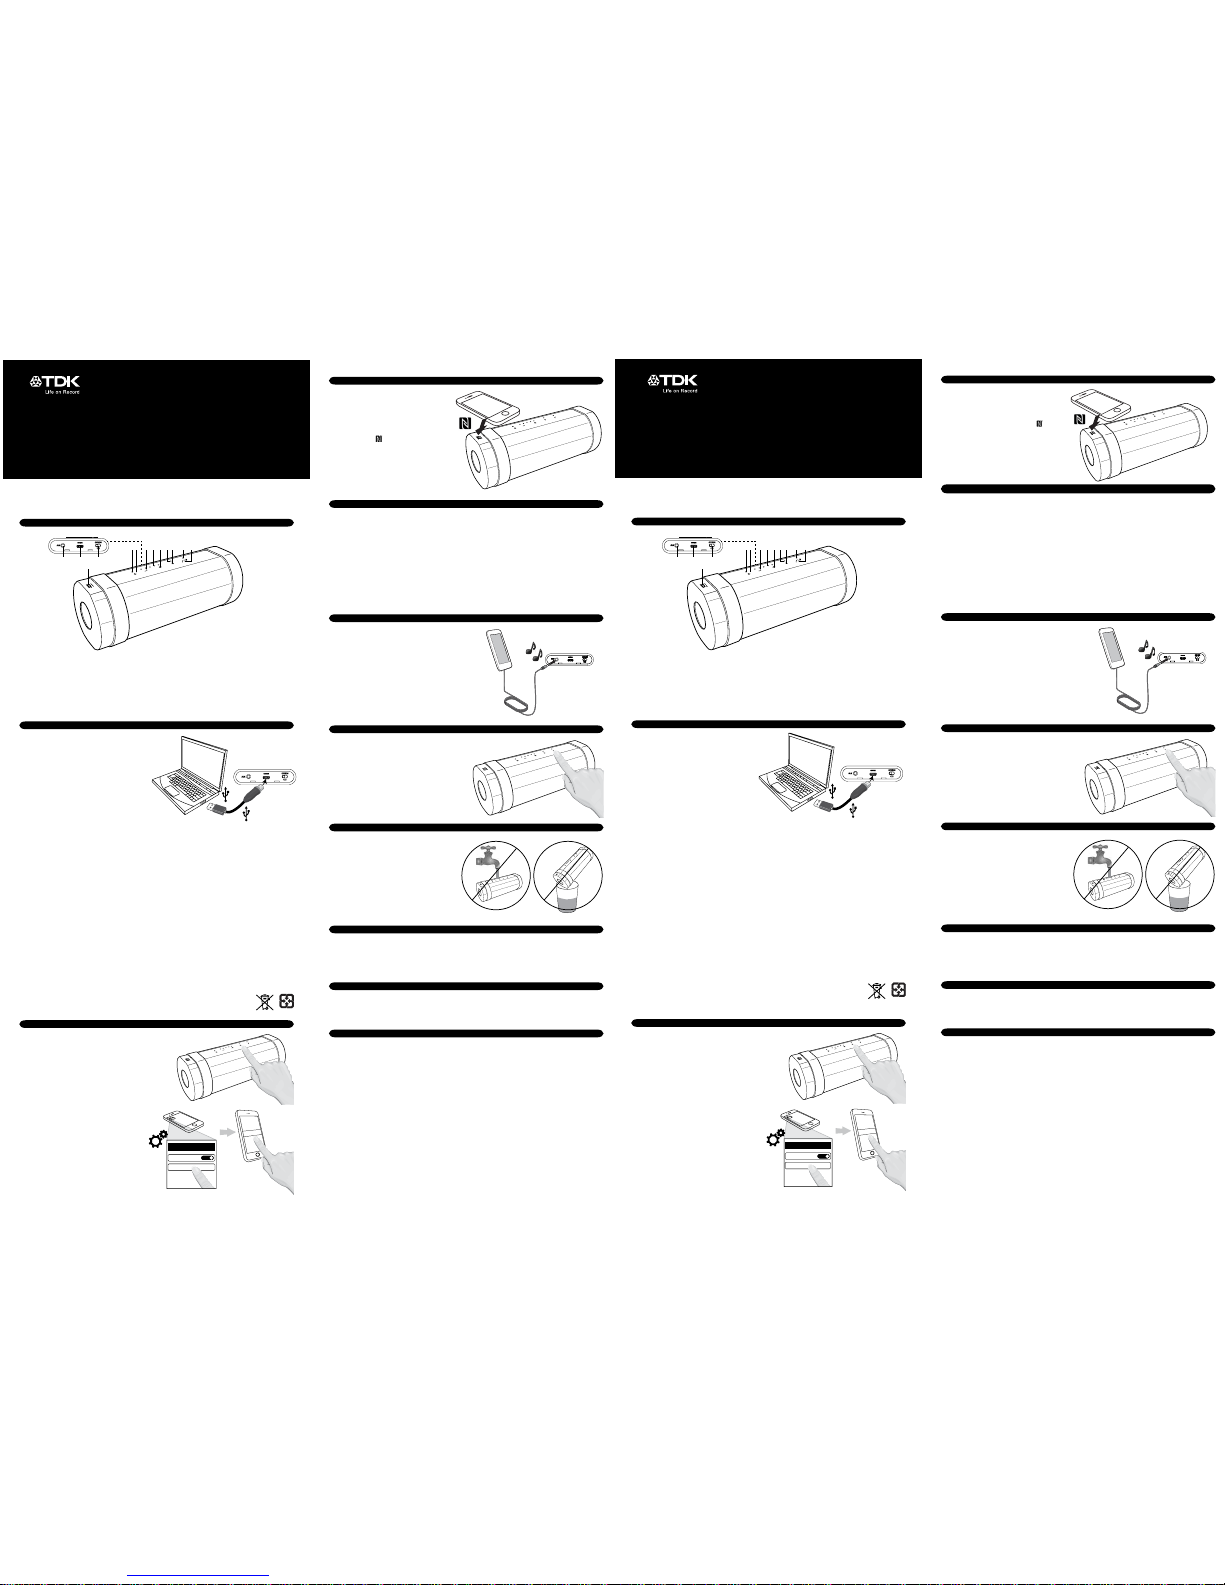
1. Aux Buchse
2. Laden Micro USB Buchse
3. NFC (Near Field Communication)
4. Batterie OFF/ON Schalter
5. Power Anzeige
6. Power-Taste
7. Lautstärketaste
8. Lautstärkenanzeigen
9. Lautstärke + Taste
10. Bluetooth Anzeige
11. Bluetooth Knopf
12. Phone/Play/Pause/Skip Anzeige
13. Phone/Play/Pause/Skip Knopf
TREK Flex
ON
Bluetooth
Bluetooth
ON
0-0-0-0
Kabelloser Lautsprecher
TREK Flex
A28
Under Flap
1 2 4
3
65 7 8 9
1110
12 13
Unter der Klappe
Under Flap
Unter der Klappe
Italiano
Fare riferimento alle importanti istruzioni sulla sicurezza. Leggere e salvare questa guida
introduttiva, le istruzioni sulla sicurezza e la garanzia. Per ulteriori informazioni, visitare il sito
TDKperformance.com.
Collegare l’estremità più piccola del cavo
USB in dotazione al jack carica Micro USB
v (sotto l’aletta) e l’altra estremità ad un
jack USB alimentato dal computer o un
alimentatore CA (non incluso). Quando
l’alimentazione dell’altoparlante è su ON
è in carica, l’indicatore Alimentazione/
Batteria (Power/Battery) lampeggerà in
rosso e quando sarà completamente
carico diventerà arancione. Quando
l’unità è spenta è in carica, l’indicatore
Alimentazione/Batteria (Power/Battery)
lampeggerà in rosso e si spegnerà a
carica completata. Quando necessita
di essere ricaricato, l’indicatore Alimentazione/Batteria (Power/Battery) lampeggerà in rosso.
Per controllare lo stato della batteria (quando l’unità è accesa), tenere premuto il pulsante
Alimentazione (Power) per tre secondi.
Gli indicatori del volume lampeggeranno per indicare il caricamento della batteria come segue:
un LED = 0-20%, due LED = 21-40%, tre LED = 41-60%, quattro LED = 61-80%, cinque LED = 81-100%.
Nota: la batteria fornirà circa 8 ore di funzionamento a un livello di ascolto normale.
Note sulla batteria ricaricabile:
• Tutte le volte che la batteria viene caricata e scaricata (cicli della batteria), la capacità della
batteria si riduce leggermente. Le batterie ricaricabili hanno un numero limitato di cicli di
carica, dopodiché devono essere sostituite.
• La sostituzione della batteria viene presa in considerazione quando la batteria non fornisce
energia sufficiente per far funzionare il dispositivo o prima. Inoltre, lo smaltimento è essenziale
dal punto di vista ambientale e della sicurezza. Gettare qualsiasi batteria direttamente nel
cestino danneggerà l’ambiente.
• Non incenerire.
• Se si prevede di non utilizzare la batteria per almeno un mese, spegnere l’interruttore
dell’alimentazione principale (ON/OFF) e riporla in un luogo fresco, asciutto e pulito, lontano
da oggetti metallici e fonti di calore. Le batterie ricaricabili si scaricheranno automaticamente
durante lo stoccaggio. Ricordare di ricaricare le batterie ogni tre mesi e prima dell’uso.
• Se la batteria non viene caricata da più di 4-6 mesi, eseguire un paio di cicli di carica/scarica
completi per migliorare la capacità della batteria.
• Si consiglia di caricare le batteria per più di otto ore prima dell’uso.
Sostituzione della batteria ricaricabile:
Se la batteria non supporta suciente energia, visitare il sito www.tdkperformance.com per
ottenere istruzioni sulla sostituzione della batteria.
RICARICARE LA BATTERIA
POSIZIONE DEI COMANDI
1. Con l’unità accesa, premere il pulsante Bluetooth ak
per selezionare la modalità Bluetooth.
2. Tenere premuto il pulsante Bluetooth ak per circa
tre secondi, finché l’indicatore Bluetooth non
lampeggerà velocemente, per permettere il
rilevamento dell’altoparlante.
3. Sul dispositivo Bluetooth, abilitare Bluetooth e
selezionare “TREK Flex” dall’Elenco Dispositivi
(Device List). Qualora il dispositivo Bluetooth richieda
una chiave, utilizzare “0000”. Alcuni dispositivi
Bluetooth chiederanno di accettare la
connessione. Se le unità sono accoppiate
correttamente, l’altoparlante emetterà un
segnale acustico e l’indicatore Bluetooth
diventerà blu. Se l’accoppiamento non è
riuscito, l’indicatore Bluetooth lampeggerà
lentamente. Nota: dopo aver accoppiato
un dispositivo, TREK Flex lo ricorderà per un
uso futuro.
Quando è in modalità Bluetooth, l’indicatore
Bluetooth lampeggerà in blu se è collegato a
un dispositivo Bluetooth. Se non è collegato a
un dispositivo Bluetooth, l’indicatore Bluetooth
lampeggerà lentamente, circa una volta ogni
2-3 secondi.
NFC offre una semplice modalità di
configurazione dell’altoparlante TREK
Flex. Attivare l’altoparlante TREK Flex e
tenere il dispositivo abilitato per NFC
(NFC del dispositivo deve essere su “on”)
a pochi centimetri dal simbolo NFC
in
cima all’altoparlante TREK Flex da
accoppiare e con cui stabilire una
connessione Bluetooth. È davvero
semplice.
1. Posizionare il pulsante Batteria (Power) ON/OFF x in posizione ON. L’unità entrerà in modalità
Standby.
2. Per accendere l’unità premere il pulsante Alimentazione (Power) U. L’indicatore
Alimentazione (Power) diventerà giallo (se la batteria è carica).
3. Collegare l’unità tramite NFC (vedere sopra) o accoppiarla con un dispositivo Bluetooth
(vedere la colonna precedente).
4. Per avviare la riproduzione premere il pulsante Telefono/Riproduci/Pausa/Salta (Phone/Play/
Pause/Skip) am. Per mettere in pausa o riavviare la riproduzione premere di nuovo il pulsante
Telefono/Riproduci/Pausa/Salta (Phone/Play/Pause/Skip) am.
5. Per regolare il volume premere i pulsanti Volume + X/– V.
6. Per passare alla traccia successiva premere DUE VOLTE il pulsante Telefono/Riproduci/Pausa/
Salta (Phone/Play/Pause/Skip) am.
7. Per tornare alla traccia precedente premere TRE VOLTE il pulsante Telefono/Riproduci/Pausa/
Salta (Phone/Play/Pause/Skip) am.
8. Per spegnere l’unità premere di nuovo il pulsante Alimentazione (Power) U. Per risparmiare la
batteria ricaricabile, posizionare il pulsante Batteria (Battery) x ON/OFF in posizione OFF.
ACCOPPIARE UN DISPOSITIVO BLUETOOTH
FUNZIONAMENTO
Se TREK Flex non ha segnale audio per venti minuti, TREK Flex si spegnerà da solo. Per
riattivare TREK Flex, premere il pulsante Alimentazione (Power)
U.
AUTOSPEGNIMENTO
SPECIFICHE
Alimentatore (CC) ................................NiMH interna
.......................................................batteria ricaricabile
Dimensioni .................7,8 (L) x 2,7 (A) x 2,9 (P) pollici
...........................................197 (L) x 69 (A) x 75 (P) mm
Peso.. ....................................................1,25 lb/ 0,57 kg
Dimensioni altoparlante ..2 x driver full-range da 40 mm,
.......
radiatore passivo dalla forma ovale 1 x 90 x 42 mm
Uscita alimentazione altoparlante. ............... 4 W x 2
Audio wireless ......Bluetooth , A2DP, AVRCP, HFP, HSP
Audio linea in ingresso ..........Jack stereo da 3,5 mm
.................................segnale d’ingresso fino a 1 Vrms
Porta USB .....................................5 V @1 A solo carica
Grado IP ..................................................................IP65
Le specifiche sono soggette a modifica senza
preavviso.
TREK è un marchio di fabbrica di Imation Corp. TDK Life on Record Logo è un marchio di fabbrica
di TDK Corporation ed è utilizzato in licenza. I loghi e il wordmark Bluetooth® sono marchi di
fabbrica registrati di Bluetooth SIG, Inc. e Imation Corp. ne possiede la licenza d’uso. Il marchio
NFC è un marchio di fabbrica registrato di NFC Forum, Inc. negli Stati Uniti e in altri Paesi. Tutti gli
altri marchi di fabbrica e loghi sono proprietà dei rispettivi proprietari.
Inserire un’estremità del cavo audio (non
incluso) nel jack LINEA IN USCITA (LINE OUT)
dell’unità audio esterna e l’altra estremità nel
jack INGRESSO AUX (AUX IN) sotto l’aletta.
Collegando il cavo audio, il dispositivo Aux
verrà selezionato automaticamente. Avviare la
riproduzione dell’unità esterna e gli altoparlanti
TREK Flex riprodurranno il suono in uscita
dell’unità audio esterna.
Il pulsante Telefono/Riproduci/Pausa/Salta
(Phone/Play/Pause/Skip) non funzionerà
quando si utilizza il jack ingresso Aux (Aux In).
Quando si riceve una chiamata sul dispositivo
Bluetooth accoppiato, premere il pulsante
Telefono/Riproduci/Pausa/Salta (Phone/Play/
Pause/Skip) am per rispondere (l’indicatore
diventerà giallo) e utilizzare il microfono
integrato su questo TREK Flex per prendere
la chiamata. Per disconnettersi/terminare la
chiamata, premere due volte.
TREK Flex è resistente agli spruzzi, ma non
può essere immerso in acqua o sotto ad
un flusso costante d’acqua. Per assicurarsi
che il prodotto sia resistente agli spruzzi,
chiudere l’aletta di gomma sul lato di TREK
Flex, quindi distendere l’aletta finché non è
a filo con i lati dell’unità.
Certificato con grado IK07 dello standard internazionale IEC 62262 per la protezione contro
impatti meccanici esterni. Tuttavia, si consiglia di proteggere comunque TREK Flex durante l’uso
per evitare possibili danni.
UTILIZZARE IL JACK INGRESSO AUX (AUX IN)
RISPONDERE A UNA TELEFONATA
RESISTENZA AGLI SPRUZZI
RESISTENZA AGLI URTI
1. Jack AUX
2. Jack carica Micro USB
3. NFC (Near Field Communication)
4. Pulsante Batteria (Battery) ON/OFF
5. Indicatore Alimentazione (Power)
6. Pulsante Alimentazione (Power)
7. Pulsante Volume -
8. Indicatori volume
9. Pulsante Volume +
10. Indicatore Bluetooth
11. Pulsante Bluetooth
12. Indicatore Telefono/Riproduci/Pausa/
Salta (Phone/Play/Pause/Skip)
13. Pulsante Telefono/Riproduci/Pausa/Salta
(Phone/Play/Pause/Skip)
TREK Flex
ON
Bluetooth
Bluetooth
ON
0-0-0-0
Altoparlante Wireless
TREK Flex
A28
Under Flap
1 2 4
3
65 7 8 9
1110
12 13
Sotto l’aletta
Under Flap
Sotto l’aletta
ACCOPPIAMENTO CON NFC (Richiede un Smartphone abilitato per NFC)
Imation Confidential - Use Only By Permission
Controlled material extracted from Matrix on Feb 20, 2015 08:51:45 AM CST
Español
Consulte las Instrucciones importantes de seguridad que se incluyen. Lea y guarde esta Guía
de inicio rápido, las Instrucciones de seguridad y la Garantía. Para más información, visite
TDKperformance.com.
Conecte el extremo más pequeño del
cable USB provisto a la entrada Micro USB
v (debajo de la solapa) y el otro extremo
a un conector USB de un ordenador o un
alimentador de CA (no incluido). Cuando la
unidad está encendida y se está cargando,
el indicador de Encendido/Apagado/Batería
(Power/Battery) se iluminará de color rojo y
luego se iluminará de color ámbar cuando
esté totalmente cargado.
Cuando la unidad está apagada y se está
cargando, el indicador de Encendido/
Apagado/Batería (Power/Battery) se
iluminará de color rojo y luego se apagará
cuando esté cargada completamente. El
indicador de Encendido/ Apagado/Batería
(Power/Battery) parpadeará de color rojo cuando necesite carga.
Para verificar el estado de la batería (cuando la unidad está encendida), oprima el botón de
Encendido/Apagado (Power) durante tres segundos; los indicadores de volumen parpadearán
para indicar la carga de la batería de la siguiente manera:
Un LED = 0-20 %, dos LED = 21-40 %, tres LED = 41-60 %, cuatro LED = 61-80 %, cinco LED = 81-100 %.
Nota: La batería proporcionará aproximadamente ocho horas de funcionamiento con un nivel
normal de audición.
Nota para las baterías recargables:
• Cada vez que cargue y descargue las baterías (ciclo de carga), su capacidad disminuye un
poco. Las baterías recargables tienen un número limitado de ciclos de carga y finalmente
deben sustituirse.
• Puede sustituir la batería cuando no suministre suficiente energía como para hacer funcionar
su dispositivo, o antes de que eso ocurra. Asimismo, el desecho adecuado es fundamental
desde el punto de vista ambiental y de la seguridad. Desechar las baterías directamente en
la basura daña el medio ambiente.
• No incinerar.
• Si no tiene pensado usar la batería durante un mes o más, apague el interruptor de
alimentación principal (APAGADO/ENCENDIDO [OFF/ON]) y guarde la batería en un lugar
limpio, seco y fresco, lejos del calor y de los objetos metálicos. Las baterías recargables se
descargarán solas durante el almacenamiento: recuerde cargarlas cada tres meses y antes
de usarlas.
• Si la batería no se ha cargado durante más de 4 - 6 meses, realice un par de ciclos completos
de carga/descarga para mejorar la capacidad de la misma.
• Se recomienda cargar las baterías durante más de ocho horas antes del primer uso.
Sustitución de la batería recargable:
Si la batería no suministra suciente energía, visite www.tdkperformance.com para
obtener instrucciones sobre la sustitución de la batería.
CÓMO RECARGAR LA BATERÍA
UBICACIÓN DE LOS CONTROLES
1. Con la unidad encendida, presione el botón
Bluetooth
ak
para seleccionar el modo
Bluetooth.
2. Mantenga presionado el botón Bluetooth
ak
durante aproximadamente tres segundos
hasta que el indicador de Bluetooth parpadee
rápido para que el altavoz sea reconocible.
3. En el dispositivo Bluetooth, habilite Bluetooth
y seleccione “TREK Flex” en la lista de
dispositivos. Si el dispositivo Bluetooth le pide
una contraseña de acceso, utilice “0000”.
Algunos dispositivos Bluetooth le solicitarán que
acepte la conexión. Si las unidades están
emparejadas correctamente, el altavoz
emitirá un pitido y el indicador Bluetooth se
iluminará en azul. Si falló, el indicador de
Bluetooth parpadeará lentamente. Nota:
Después de emparejar un dispositivo, el
TREK Flex lo recordará para usos futuros.
Cuando se encuentra en modo Bluetooth,
el indicador de Bluetooth se iluminará en
color azul si está conectado a un dispositivo
Bluetooth. Si no está conectado el indicador
de Bluetooth parpadeará lentamente,
aproximadamente una vez cada 2-3
segundos.
NFC ofrece un método de
emparejamiento sencillo para el sistema
de altavoz TREK Flex. Simplemente
encienda el altavoz TREK Flex y sostenga
el dispositivo habilitado para NFC (en el
dispositivo la función NFC debe estar
activada) a pocos centímetros del
símbolo de NFC
en la parte superior
del altavoz TREK Flex para emparejar y
establecer una conexión Bluetooth. Así
de sencillo.
1. Coloque el interruptor de ENCENDIDO/APAGAGO (ON/OFF) x de la bateria en la posición de
ENCENDIDO (ON); la unidad pasará al modo En espera.
2. Oprima el botón de Encendido/Apagado (Power) U para encender la unidad; el indicador de
Encendido/Apagado (Power) se iluminará de color ámbar (si la batería está cargada).
3. Conecte la unidad a través de NFC (consultar más arriba) o emparéjela con un dispositivo
Bluetooth (ver la columna anterior).
4. Oprima el botón Teléfono/Reproducir/Pausar/Saltar (Phone/Play/Pause/Skip) am para comenzar la
reproducción. Oprima dicho botón am nuevamente para pausar o reanudar la reproducción.
5. Oprima los botones de Volumen (Volume) + X/– V para ajustar el volumen.
6. Oprima Teléfono/Reproducir/Pausar/Saltar (Phone/Play/Pause/Skip) am DOS VECES para
adelantar a la próxima pista.
7. Oprima el botón Teléfono/Reproducir/Pausar/Saltar (Phone/Play/Pause/Skip) am TRES VECES para
volver a la pista anterior.
8. Para apagar la unidad, oprima Encendido/Apagado (Power) U nuevamente. Para ahorrar
consumo de la batería recargable, deslice el interruptor de ENCENDIDO/APAGADO (ON/OFF) x
de la batería a la posición APAGADO (OFF).
CÓMO EMPAREJAR UN DISPOSITIVO BLUETOOTH
EMPAREJAMIENTO CON NFC (Requiere un teléfono con tecnología NFC)
FUNCIONAMIENTO
Si el TREK Flex no tiene señal de audio durante veinte minutos, se apagará solo. Para
“activarlo nuevamente”, simplemente pulse el botón Encendido/Apagado (Power)
U.
APAGADO AUTOMÁTICO (AUTO POWER OFF)
ESPECIFICACIONES
Fuente de alimentación (DC) ..................Batería NiMH
.............................................................interna recargable
Dimensiones ...7,8 (Ancho) x 2,7 (Alt.) x 2,9 (Prof.) pulg.
............................197 (Ancho) x 69 (Alt.) x 75 (Prof.) mm
Peso ...........................................................1,25 lb
/ 0,57 kg
Tamaño del altavoz .......................altavoces de gama
...................................................completa de 2 x 40 mm,
........radiador pasivo de forma oval de 1 x 90 x 42 mm
Potencia de salida de altavoces. ..................... 4 W x 2
Audio inalámbrico ...Bluetooth, A2DP, AVRCP, HFP, HSP
Audio de entrada de línea ...............Conector estéreo
............de 3,5 mm, hasta 1 Vrms de señal de entrada
Puerto USB ..................5 V @ 1 A de carga únicamente
Grado de IP ................................................................ IP65
Las especificaciones están sujetas a cambio sin
previo aviso.
TREK es una marca comercial de Imation Corp. El logotipo de TDK Life on Record es una marca
comercial de TDK Corporation y se usa bajo licencia. La marca y los logotipos Bluetooth® son
marcas comerciales registradas propiedad de Bluetooth SIG, Inc., y todo uso que Imation Corp.
haga de esas marcas es bajo licencia. N Mark es una marca comercial o marca registrada de
NFC Forum, Inc., en los Estados Unidos y en otros países. Todas las otras marcas comerciales y
logotipos son propiedad de sus respectivos titulares.
Inserte uno de los extremos del cable de
audio (no incluido) en el conector de LÍNEA
DE SALIDA (LINE OUT) en la unidad de audio
externa y el otro extremo en la ENTRADA AUX
(AUX IN) debajo de la solapa. El dispositivo
auxiliar se seleccionará automáticamente
cuando el cable de audio se conecte. Inicie la
reproducción de la unidad externa; el sonido
de salida de la unidad de audio externa se oirá
a través de los altavoces del TREK Flex.
El botón de Teléfono/Reproducir/Pausar/Saltar
(Phone/Play/Pause/Skip) no funcionará cuando
se utiliza el conector de entrada auxiliar.
Al recibir una llamada telefónica en el
dispositivo Bluetooth emparejado, pulse el botón
Teléfono/ Reproducir/ Pausar/Saltar (Phone/
Play/Pause/Skip) am para aceptar la llamada (se
iluminará de color ámbar) y use el micrófono
integrado del TREK Flex para responder la
llamada. Pulse dos veces para desconectar/
finalizar la llamada.
TREK Flex es resistente a las salpicaduras,
pero no se debe sumergir en el agua ni
mantener en contacto con un flujo de
agua constante. Para garantizar que el
producto sea resistente a las salpicaduras,
cierre la solapa de goma del TREK Flex,
luego alise la solapa totalmente hasta
que esté alineada con la superficie de la
unidad.
Certificado IK07 conforme a la norma internacional IEC62262 para la protección contra
impactos mecánicos externos. Sin embargo, aún se recomienda proteger el TREK Flex cuando se
utiliza para evitar el posible daño.
USO DEL CONECTOR DE ENTRADA AUXILIAR
CÓMO CONTESTAR UNA LLAMADA
RESISTENTE A LAS SALPICADURAS
RESISTENTE A LOS GOLPES
1. Conector auxiliar
2. Conector micro USB de carga
3. NFC (Conexión Bluetooth por proximidad)
4. Interruptor de APAGADO/ENCENDIDO
(OFF/ON) de la batería
5. Indicador de encendido/apagado
(Power)
6. Botón de encendido/apagado (Power)
7. Botón de Volumen – (Volume)
8. Indicadores de Volumen
9. Botón de volumen + (Volume)
10. Indicador de Bluetooth
11. Botón de Bluetooth
12. Indicador de Teléfono/Reproducir/Pausar/
Saltar (Phone/Play/Pause/Skip)
13. Botón de Teléfono/Reproducir/Pausar/
Saltar (Phone/Play/Pause/Skip)
TREK Flex
ON
Bluetooth
Bluetooth
ON
0-0-0-0
Altavoz Inalámbrico
TREK Flex
A28
Under Flap
1 2 4
3
65 7 8 9
1110
12 13
Debajo de la solapa
Under Flap
Debajo de la
solapa
Nederlands
Raadpleeg de meegeleverde belangrijke veiligheidsvoorschriften. Lees en bewaar deze snelle
startgids, de belangrijke veiligheidsinstructies en de garantie. Ga voor meer informatie naar
TDKperformance.com.
Sluit het kleinere uiteinde van de
meegeleverde USB-kabel aan op de microUSB-aansluiting voor opladen v (onder de
flap) en het andere uiteinde op een
USB-aansluiting op uw computer of een
AC-voeding (niet meegeleverd). Als
de luidspreker is ingeschakeld en wordt
opgeladen, zal de aan-uit-/batterij-indicator
rood oplichten, en oranje oplichten als deze
volledig is opgeladen. Als het apparaat is
uitgeschakeld en wordt opgeladen, zal de
aan-uit-/batterij-indicator rood oplichten en
stoppen met branden wanneer het volledig
is opgeladen. De aan-uit-/batterij-indicator
knippert rood als de batterij moet worden opgeladen.
Om de batterijstatus te controleren (als het apparaat aanstaat) houdt u de aan-uitknop gedurende
drie seconden ingedrukt; de volume-indicatoren zullen als volgt knipperen om de oplaadstatus van
de batterij aan te geven:
Een LEDLAMPJE = 0-20%, twee LEDLAMPJES = 21-40%, drie LEDLAMPJES = 41-60%, vier LEDLAMPJES =
61-80%, vijf LEDLAMPJES = 81-100%.
Let op: De batterij werkt ongeveer acht uur bij een normaal luisterniveau.
Opmerkingen voor oplaadbare batterij:
• Elke keer dat u de batterij oplaadt en ontlaadt (laadcycli) neemt de batterijcapaciteit iets
af. Oplaadbare batterijen kunnen een beperkt aantal keer worden opgeladen en moeten
uiteindelijk worden vervangen.
• U wilt de batterij misschien vervangen als, of voordat, de batterij niet genoeg stroom meer levert
om uw apparaat goed te doen functioneren. Ook het weggooien van de batterij op de juiste
manier is van essentieel belang uit milieu- en veiligheidsoogpunt. Het weggooien van de batterij
bij het huisvuil schaadt het milieu.
• Niet ver branden.
• Als u van plan bent om de batterij gedurende een maand of langer niet te gebruiken, schakelt
u de hoofdschakelaar (AAN/UIT) uit en bewaart u deze op een schone, droge, koele plek, uit
de buurt van warmte en metalen voorwerpen. Oplaadbare batterijen zullen zichzelf ontladen
tijdens de opslag, vergeet daarom niet om de batterijen om de drie maanden en vóór gebruik
opnieuw op te laden.
• Als de batterij gedurende meer dan 4-6 maanden niet is opgeladen, voert u een aantal
volledige laad-/ontlaadcycli uit om de batterijcapaciteit te verbeteren.
• Het wordt aanbevolen om de batterijen gedurende meer dan acht uur op te
laden alvorens ze voor de eerste keer te gebruiken.
De oplaadbare batterij vervangen:
Als de batterij niet voldoende stroom levert, bezoek dan www.tdkperformance.com voor instructies
over het vervangen van de batterij.
DE BATTERIJ OPNIEUW OPLADEN
LOCATIE VAN BEDIENINGSELEMENTEN
1. Druk op de
Bluetooth
-knop ak terwijl het apparaat
aanstaat om de
Bluetooth
-modus te selecteren.
2. Houd de
Bluetooth
-knop ak gedurende ongeveer
drie seconden ingedrukt totdat de
Bluetooth
indicator snel begint te knipperen om de luidspreker
“vindbaar” te maken.
3. Schakel
Bluetooth
in op het
Bluetooth
-apparaat en
selecteer “TREK Flex” uit de apparatenlijst. Als het
Bluetooth
-apparaat vraagt om een wachtwoord,
voer dan “0000” in. Sommige
Bluetooth
-apparaten
zullen u vragen om de verbinding te
accepteren. Als de apparaten op de juiste
manier zijn gekoppeld, zal de luidspreker
piepen en de
Bluetooth
-indicator constant
blauw oplichten. Als dit niet is gelukt, zal
de
Bluetooth
-indicator langzaam knipperen.
Let op: Als u een apparaat eenmaal hebt
gekoppeld, zal de TREK Flex dit apparaat
onthouden voor toekomstig gebruik.
Als het apparaat in de
Bluetooth
-modus is, zal
de
Bluetooth
-indicator lichtblauw oplichten
als deze wordt verbonden met een
Bluetooth
apparaat. Als het apparaat niet verbonden is
met een
Bluetooth
-apparaat, zal de
Bluetooth
indicator langzaam knipperen, ongeveer elke
2-3 seconden.
NFC biedt een eenvoudige
installatiemethode voor uw TREK Flexluidspreker. Zet de TREK Flex-luidspreker
aan en houd het apparaat (NFC moet
“aan” staan) binnen een paar
centimeter van het NFC-symbool
aan de bovenkant van de TREK Flexluidspreker en creëer een Bluetoothverbinding. Zo simpel is het.
1. Schuif de AAN-UIT-schakelaar van de batterij x naar de AAN-positie. Het apparaat wordt dan in
standby-modus gezet.
2. Druk op de aan-uitknop U om het apparaat aan te zetten. De aan-uitindicator zal oranje
oplichten (als de batterij is opgeladen).
3. Sluit het apparaat aan via NFC (zie hierboven) of koppel het met een
Bluetooth
-apparaat (zie
voorgaande kolom).
4. Druk op de knop voor telefoneren/afspelen/pauzeren/overslaan am om het afspelen te starten.
Druk opnieuw op de knop voor telefoneren/afspelen/pauzeren/overslaan am om te pauzeren of
om het afspelen te hervatten.
5. Druk op de knoppen Volume + X/– V om het volume aan te passen.
6. Druk TWEEMAAL op de knop voor telefoneren/afspelen/pauzeren/overslaan am om door te gaan
naar het volgende nummer.
7. Druk DRIEMAAL op de knop voor telefoneren/afspelen/pauzeren/overslaan am om terug te gaan
naar het vorige nummer.
8. Om het apparaat uit te schakelen drukt u opnieuw op de aan-uitknop U. Om de oplaadbare
batterij te besparen schuift u de AAN-UIT-schakelaar van de batterij x naar de positie UIT.
EEN BLUETOOTH-APPARAAT KOPPELEN
KOPPELEN MET NFC (Hiervoor is een telefoon met NFC nodig)
WERKING
Als de TREK Flex geen audiosignaal heeft uitgezonden gedurende twintig minuten, zal het
apparaat zichzelf uitschakelen. Om de TREK Flex te “ontwaken” drukt u simpelweg op de
aan-uitknop
U.
AUTOMATISCH UITSCHAKELEN
TECHNISCHE GEGEVENS
Stroomvoorziening (DC) ....................... Interne NiMH
......................................................oplaadbare batterij
Afmetingen ..................7,8 (B) x 2,7 (H) x 2,9 (D) inch
......................................... 197 (B) x 69 (H) x 75 (D) mm
Gewicht.. ..............................................1,25 lb/ 0,57 kg
Luidsprekerformaat ... 2 x 40 mm breedbanddrivers,
.....................1 x 90 x 42 mm ovale passieve radiator
Uitgangsvermogen luidspreker ......................4 W x 2
Draadloze audio. .Bluetooth, A2DP, AVRCP, HFP, HSP
Lijningang audio ...............3,5 mm stereo-aansluiting,
............................................ tot 1 Vrms ingangssignaal
USB-poort ............................5 V @ 1A alleen opladen
IP-klasse ..................................................................IP65
De gegevens zijn zonder kennisgeving aan
wijzigingen onderhevig.
TREK is een handelsmerk van Imation Corp. Het TDK Life on Record-logo is een handelsmerk van
TDK Corporation en wordt onder licentie gebruikt. Het
Bluetooth
®
-woordmerk en de Bluetooth®logo’s zijn gedeponeerde handelsmerken van Bluetooth SIG, Inc. en enig gebruik van dergelijke
merken door Imation Corp. is onder licentie. Het N-Mark is een handelsmerk of gedeponeerd
handelsmerk van NFC Forum, Inc. in de Verenigde Staten en andere landen. Alle andere
handelsmerken en logo’s zijn eigendom van hun respectievelijke eigenaars.
Steek een uiteinde van een audiokabel (niet
meegeleverd) in de LINE OUT-aansluiting
van uw externe audioapparaat en steek
het andere uiteinde in de AUX IN-aansluiting
onder de flap. Het aux-apparaat wordt
automatisch geselecteerd zodra de audiokabel
is aangesloten. Als u vervolgens het afspelen
start op het externe apparaat zal het geluid van
het externe audioapparaat worden afgespeeld
door de luidsprekers van de TREK Flex.
De knop voor telefoneren/afspelen/pauzeren/
overslaan werkt niet wanneer u de aux
in-aansluiting gebruikt.
Als u een oproep ontvangt op uw gekoppelde
Bluetooth
-apparaat, klik dan op de knop voor
telefoneren/afspelen/pauzeren/overslaan am
om deze te beantwoorden (de indicator zal
oranje oplichten) en gebruik de ingebouwde
microfoon op deze TREK Flex om de oproep aan
te nemen. Druk tweemaal om de verbinding/
het gesprek te beëindigen.
De TREK Flex is spatwaterdicht, maar kan
niet worden ondergedompeld in water of
worden blootgesteld aan een constante
waterstroom. Om ervoor te zorgen dat
het product spatwaterdicht is, sluit u de
rubberen flap op de TREK Flex en strijkt
u vervolgens de hele flap glad totdat
deze gelijk ligt met de zijkanten van het
apparaat.
Gecertificeerd volgens IK07 onder de internationale norm IEC62262 voor bescherming tegen
externe mechanische schokken. Het wordt echter nog steeds aangeraden om de TREK Flex te
beschermen tijdens het gebruik om mogelijke schade te voorkomen.
HET GEBRUIK VAN DE AUX IN-AANSLUITING
EEN OPROEP BEANTWOORDEN
SPATWATERDICHT
SLAGVAST
1. Aux-aansluiting
2. Micro-USB-aansluiting voor opladen
3. NFC (Near Field Communication)
4. Batterij AAN-UIT-schakelaar
5. Aan-uitindicator
6. Aan-uitknop
7. Volume – knop
8. Volume-indicatoren
9. Volume + knop
10. Bluetooth - indicator
11. Bluetooth knop
12. Indicator voor telefoneren/afspelen/
pauzeren/overslaan
13. Knop voor telefoneren/afspelen/
pauzeren/overslaan
TREK Flex
ON
Bluetooth
Bluetooth
ON
0-0-0-0
Draadloze luidspreker
TREK Flex
A28
Under Flap
1 2 4
3
65 7 8 9
1110
12 13
Onder de flap
Under Flap
Onder de flap
Imation Confidential - Use Only By Permission
Controlled material extracted from Matrix on Feb 20, 2015 08:51:45 AM CST
 Loading...