

Page 1

Page 2
NOTE ON HELP MATERIALS......................................... 4
UNPACKING MOJO....................................................... 4
QUICK SETUP.............................................................. 5
USING THE TDK UNIFI
™
SOFTWARE..............................9
USING MOJO..............................................................15
FIRMWARE UPGRADE NOTE........................................38
TROUBLESHOOTING................................................... 39
PRECAUTIONS........................................................... 41
SPECIFICATIONS........................................................ 44
TECHNICAL SUPPORT................................................. 45
3
TABLE OF CONTENTS
Page 3

5
Follow the instructions below to install MOJO. Here’s an overview of the installation process:
Prepare MOJO
-THEN-
• If using a Windows computer, install the UniFi software and desired bonus applications
-OR-
• If using a Mac, install the iTunes Plug-In
A_PREPARE MOJO
1.Open the battery compartment door and insert one AAA battery (included). Be sure to match the battery’s
polarity markings (+ and -) to the polarity markings on the player.
2.After inserting the battery, close the battery compartment door.
NOTE: Make sure the battery is a standard AAA alkaline.
QUICK SETUP
1
2
Page 4

NOTE: Before installing the software, verify that MOJO is NOT connected to your computer.
C_INSTALL BONUS SOFTWARE IF DESIRED (Windows 98SE/ME/2000/XP only)
Your MOJO installation CD-ROM includes a few bonus applications as described below.
RealOne Player by Real Networks
RealOne Player is a popular music playback and track management application that can be used to transfer tracks
to MOJO. To enable using RealOne Player to transfer tracks to MOJO, you must install RealOne Player and then
install the plug-ins included on the installation CD-ROM.
To enable using RealOne Player to transfer tracks to MOJO:
1.Install RealOne Player from the installation CD-ROM.
2.Install the plug-ins from the installation CD-ROM.
To install RealOne Player and its song transfer plug-in:
1.Load the included installation CD-ROM into your PC.
• The installer screen should automatically appear. If the installer screen doesn’t automatically appear, double
click MY COMPUTER, double click the drive (typically "D:" or "E:") into which you loaded the installation
CD-ROM, and then in the window that opens, double click SETUP.EXE. The installer screen will appear.
2. Click the installer screen’s REALONE PLAYER button and follow the on-screen prompts to install the application.
3. Click the installer screen’s PLUG-INS button and follow any on-screen prompts to install the required song
transfer plug-in.
NOTE: Windows Media Player is not included on the MOJO installation CD-ROM, but the application can be downloaded
from www.microsoft.com, and used to transfer tracks to your MOJO. To enable this functionality, install Windows Media
Player on your PC, then install the PLUG-INS from the MOJO installation CD-ROM.
NOTE: To navigate up and down in MOJO’s track/folder lists, use the SKIP FORWARD and SKIP BACKWARD buttons.
To open a folder, highlight the folder and press SELECT. To go up a folder level, press NAV.
7
™
SOFTWARE (Windows 98SE/ME/2000/XP only)
Page 5
9
(INCLUDED ONLY WITH MOJO 256F)
If your computer is running Windows, the included TDK UniFi software can be used to transfer tracks to MOJO.
To transfer tracks to MOJO with the TDK UniFi Software:
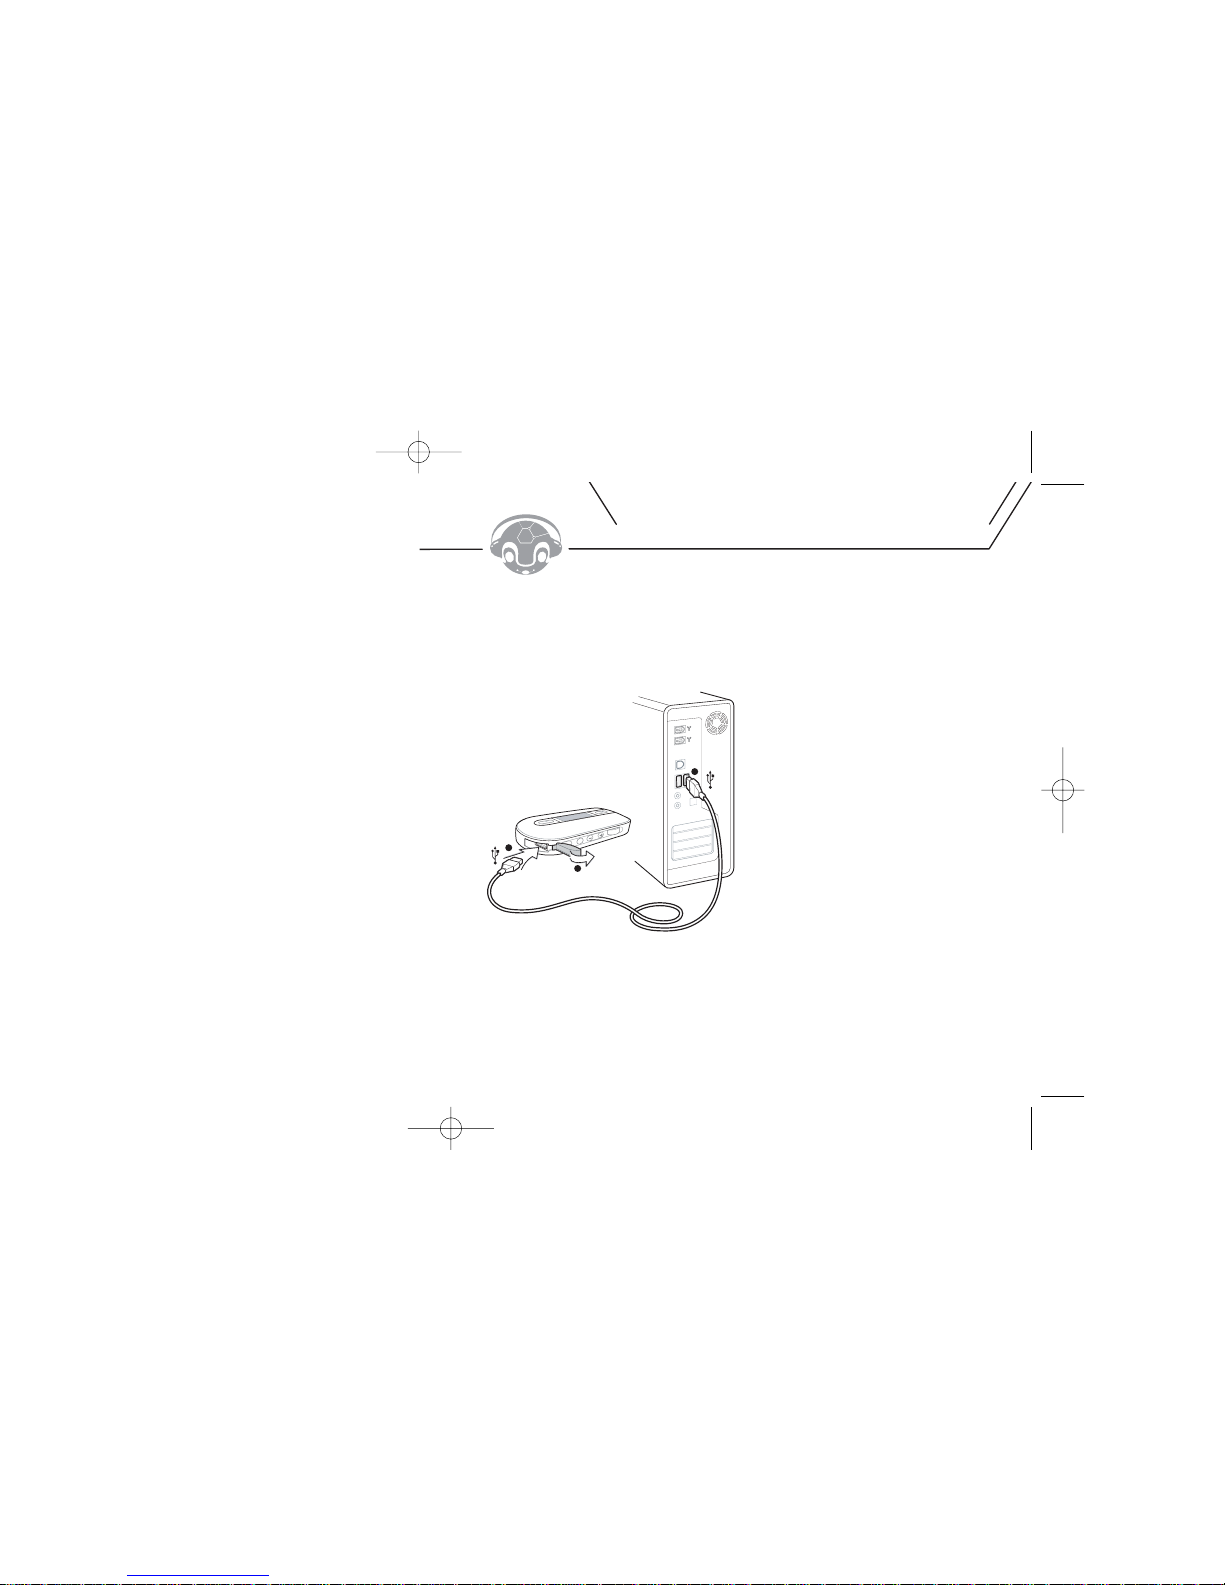
1.Power on MOJO and use the USB cable to connect MOJO to your computer.
• The USB CONNECTED message should display on the unit's LCD screen once the cable is connected.
USING THE TDK UniFi™ SOFTWARE
1
2
3
Page 6

5.To create a new folder, click the NEW FOLDER button, type the desired name and press ENTER.
After you've created your desired folder(s), you're ready to transfer music to the MOJO.
NOTE: The folder labeled MOJO RECORD is reserved for voice and radio recordings and should not
be used to store music.
6.Double-click the folder to which you want to add music files.
• The folder name will be displayed in the lower right-hand corner, along with the file information and
free memory.
NOTE: A slash ("\") with no folder name means you are in the root, or main, directory of the MOJO.
NOTE: Approximately 1MB of the MOJO's memory is dedicated to system files (which are not visible on the file
manager). As a result, total free space will always be approximately 1MB less than the total system memory.
7. In the left side of the top half of the window, navigate to the folder that contains the music files or
folders you would like to transfer to MOJO.
11
Page 7

3.In the left side of the top half of the window, navigate to the folder that contains the music files or
folders you would like to add to the playlist.
4.Drag files from the right side of the top half of the window to the left side of the bottom half of the window
(i.e. to the "Playlist" pane).
•You can rearrange the playback order of playlist files by clicking and dragging the files.
•To save your playlist on your computer, right click in the left side of the bottom half of the window
(i.e. to the "Playlist" pane), select SAVE PLAYLIST, select a save location and file name, and click SAVE.
5.While holding down your keyboard’s CONTROL (CTRL)key, click the files in the playlist that you wish to
transfer to MOJO.
6.Click the MOVE TO MOJO icon to begin transferring the selected tracks to MOJO.
NOTE: UniFi creates and can load .m3u type playlists.
NOTE: To load a playlist that’s saved on your hard drive into UniFi, right click in the left side of the bottom half of the
UniFi window (i.e. to the "Playlist" pane), select LOAD PLAYLIST, navigate to the location where the desired playlist is
located, click on the playlist and select OPEN.
To delete tracks from MOJO with the UniFi Software:
1.Power on MOJO and use the USB cable to connect MOJO to your computer.
• The USB CONNECTED message should display on the unit's LCD screen after the cable is connected.
2.Start the UniFi Software.
13
Page 8
15
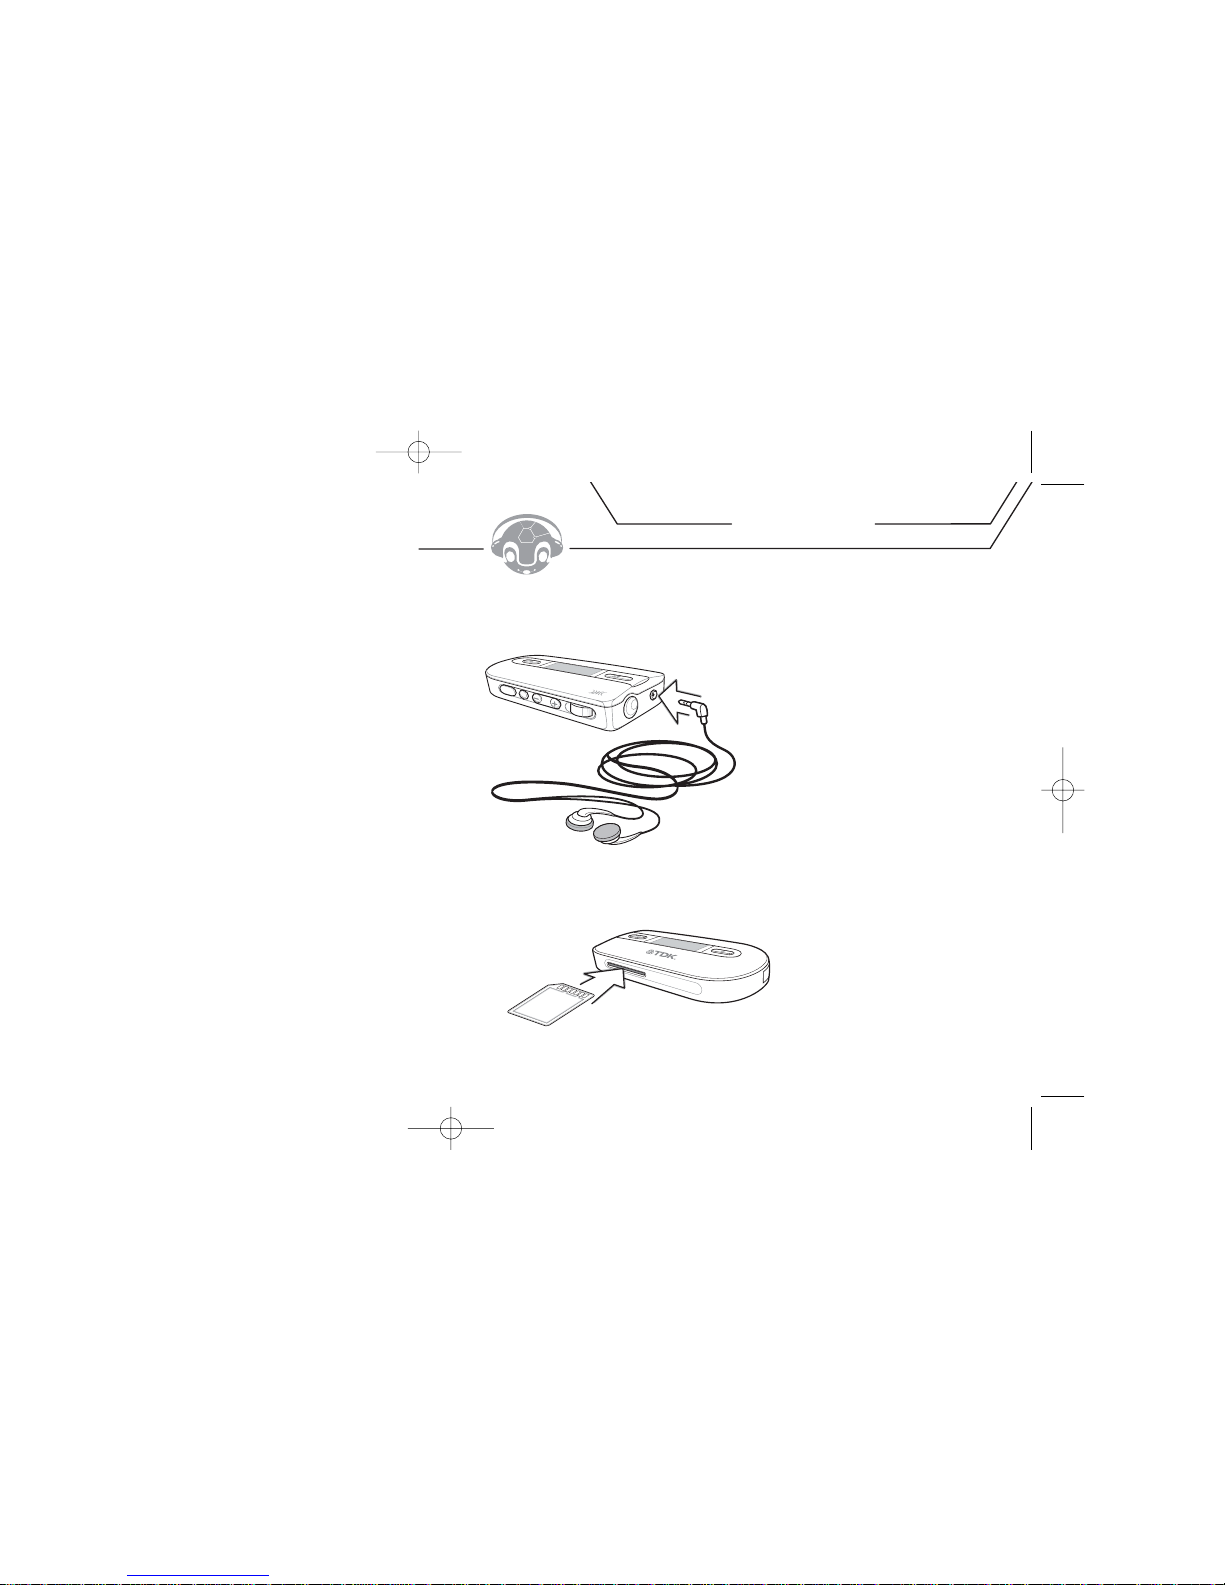
To enable hearing MOJO:
• Fully connect stereo headphones to MOJO’s headphone port.
To insert an SD/MMC memory expansion card (not included) into MOJO:
• Insert an SD or MMC card with its contacts facing the top of the unit as shown in the illustration.
To remove the card, steadily press in until it releases from the slot.
USING MOJO
SDMMC
Page 9

This is an FM mode playback screen:
[1] FM icon
[2] Channel search mode enabled.
[3] Number of station presets programmed / Number of stations that can be stored
[4] Mono or Stereo
[5] When a programmed preset is tuned, the preset number will be displayed in the "No Information" area
[6] Frequency tuned
To change modes:
•Press and hold the MODE button until FM MODE or MP3 MODE appears on the display.
NOTE: When HOLD is ON, all other buttons are disabled.
17
12 3
4
5
6
Fw
d NA
V R
ew
Record Play/Pause
Mic
– +
Volum
e
Hold Mode
9
10
11
Page 10

PLAYING MP3 AND WMA TRACKS
MOJO is compatible with MP3 and WMA compressed audio tracks.
To play MP3/WMA tracks with MOJO:
1.If MOJO is not already on, press the PLAY/PAUSE[ ] button for a few seconds to power it on.
• The LCD screen will light up and will begin the boot-up animation. Press any button to skip the animation.
2.Using the REWIND [ ] FAST FORWARD [ ] buttons, scroll through the file and
folder list on the LCD screen.
NOTE: If MOJO is in the MOJO RECORD directory, press MODE to go up to the directory where your music tracks are stored.
3.To enter a sub-folder (if one is present on MOJO), click NAV [ ].
• If the MOJO enters the setup menu (displaying Equalizer, Repeat, etc icons), you have pressed the NAV button
too long. Wait a few seconds for the MOJO to return to the file/folder mode, and try again.
4.To move to a parent folder (up one level), click (but do not hold) the MODE button once.
• If the MOJO enters FM mode, you have pressed the MODE button too long.
Press and hold the MODE button for more than a second to return to MP3 mode.
5.Once the desired music file is highlighted, click the PLAY/PAUSEbutton to start playback.
19
RESULT IF KEY PRESSED
WHILE PLAYBACK IS PAUSED
N/A
Turns off power
Play selected music
Move to previous song
Scrolls up through track list
within folder
Move to next track
Scrolls down through track list
within folder
Enter setup menu
Enter selected folder
Navigates to parent folder
Switches to FM mode
Activates voice recording
mode
Raises volume one increment
Raises volume continuously
Lowers volume one increment
Lowers volume continuously
RESULT IF KEY PRESSED
WHILE PLAYBACK IS ACTIVE
N/A
Turns off power
Pause music playback
If less than 10 seconds into
track: Move to previous track;
if more than 10 seconds into
track: Return to beginning of
track
Searches backwards within
current track
Move to next track
Searches forward within
current track
Enter setup menu
N/A
Changes visualization mode
Switches to FM mode
Marks repeat start/end point
Raises volume one increment
Raises volume continuously
Lowers volume one increment
Lowers volume continuously
Page 11

PLAYING FM STATIONS
With MOJO, you can:
• Manually tune FM stations
• Scan FM stations
-OR-
• Save and play programmable FM station presets
To manually tune or scan FM stations:
1.If the MOJO is not already on, press the PLAY/PAUSE button for at least one full second.
• The LCD screen will light up and begin the boot-up animation.
2.Press and hold the MODE button for more than one second.
• The MOJO will enter FM mode.
3.Tune an FM station of your choice by pressing FAST FORWARD or REWIND.
(Press and hold FAST FORWARDor REWIND to scan for a station.)
• One press will move the frequency 1MHz (e.g. from 87.5MHz to 87.6MHz).
•Pressing MODE will enable AUTO SEEK mode, where programmed presets can be tuned.
SAVING FM PRESETS
MOJO can store 20 of your favorite FM stations as programmable presets.
To save FM presets:
1.While in FM mode, tune the desired station.
2.To add the currently tuned station to the list of presets, press the NAV button until the setup
menu opens.
3.With the SAVE CHANNEL icon highlighted, press NAV.
21
In MANUAL seek mode
N/A
Turns off power
Move to previous frequency
Scan to previous active
frequency
Move to next frequency
Scan to next active frequency
Switch to AUTO seek mode
Switches to MP3 mode
Enter setup menu
Activates FM recording mode
Raises volume one increment
Raises volume continuously
Lowers volume one increment
Lowers volume continuously
In AUTO seek mode
N/A
Turns off power
Move to previous station
preset
Scan through previous station
presets
Move to next station preset
Scan through next station
presets
Switch to MANUAL seek mode
Switches to MP3 mode
Enter setup menu
Activates FM recording mode
Raises volume one increment
Raises volume continuously
Lowers volume one increment
Lowers volume continuously
Page 12

FM STATION RECORDING
MOJO can record FM stations. Later you can listen to the recording on MOJO (in MP3 mode) or can transfer the
recording back to your computer.
To record an FM station:
1.While in FM mode, press the RECORD button.
2.By pressing REWIND or FAST FORWARD, choose LOW or HIGH recording rate.
3.With the desired recording rate highlighted, click the RECORD button.
• The LCD display will show the filename (e.g. "FM001.WAV"), the elapsed recording time, and the
remaining recording time.
4.To end the recording, click the RECORD button again.
• MOJO will return to FM tuning mode.
5.To play back the recorded FM streams, see the "To play FM/voice recordings" section.
VOICE RECORDING
MOJO can record voice memos using its built-in microphone. Voice memos can be played back in MP3 mode,
and can be transferred back to your computer.
To voice record:
1.Make sure the MOJO is powered on and in MP3 mode.
2.Click the RECORD button.
3.By pressing REWIND or FAST FORWARD, choose LOW or HIGH recording rate.
4.With the desired recording rate highlighted, click the RECORD button.
• The LCD display will show the filename (e.g. "VOICE001.WAV"), the elapsed recording time, and the
remaining recording time.
5.To end the recording, click the RECORD button again.
• MOJO will return to MP3 mode.
•To play back the recorded voice memos, see the "To play FM/voice recordings" section.
Your FM and voice recordings are stored in the same folder (MOJO RECORD) on your MOJO. You can listen to them
in MP3 mode, or upload them to your computer.
To play FM/voice recordings:
1.Make sure MOJO is powered on and in MP3 mode.
23
Page 13

8. In the right side of the top bottom half of the window, click the file(s) you would like to transfer to your
hard drive.
•To choose multiple files, hold down the CONTROL (CTRL)key while clicking the file names.
9. Click the UPLOAD icon to move the selected file(s) from MOJO to the desired folder on your hard drive.
•A confirmation dialog box will appear. Click YES.
10.The files will begin transferring to the hard drive. You can click the CANCELbutton at any time to abort
the file transfer.
• Repeat the above steps as necessary, until you’ve copied all the desired recordings from MOJO to
your hard drive.
11. Once all the desired recordings have been copied, you can delete the recordings from MOJO by following
the “To delete tracks from MOJO with the UniFi Software” instructions section of this document.
12. Once you have completed uploading the files, detach MOJO from the USB cable.
MP3 MODE SETUP MENU
The MP3 mode setup menu allows you to customize and tweak MOJO to your tastes and preferences. Note that the
MP3 mode setup menu and the FM mode setup menu (described later in this document) offer different options.
Here’s a rundown of the MP3 mode setup menu icons:
To access MOJO’s MP3 mode setup menu:
1.Enter the setup menu by holding down NAV while in MP3 playback mode.
• The LCD screen will display the icons of the setup menu.
2.By pressing REWIND or FAST FORWARD, navigate through the setup menu icons.
Press NAV to enter the sub-menu of the desired function.
3.To automatically exit the setup menu, don't click or navigate for approximately 3 seconds.
25
EQUALIZER REPEAT FOLDER NAVIGATION ERASE LANGUAGE SYSTEM RETURN
Page 14

• The currently activated mode will be marked with a check.
3.Press NAV to activate the highlighted repeat mode.
• The chosen repeat mode will be engaged, and the display will return to the main setup menu.
4.Navigate to and click on the RETURN icon, or wait approximately 3 seconds, and MOJO will automatically
return to the MP3 navigation display.
SETTING FOLDER MODE
You can set folder mode to ENABLE or DISABLE. When playback is active, DISABLE will play all of the music stored
on MOJO. ENABLE will play only the music stored within the current folder on MOJO.
To enable or disable folder mode:
1.Enter the setup menu by holding down NAV while in MP3 playback mode.
• The LCD screen will display the icons of the setup menu.
2.From the setup menu, highlight the FOLDER icon and click NAV.
3.Highlight DISABLE or ENABLE folder mode.
• Disable: Plays all of the music stored on your MOJO.
• Enable: Plays only the music stored within the current folder of your MOJO.
4.Press NAV to activate the highlighted folder mode.
• The chosen folder mode will be engaged, and the display will return to the main setup menu.
5.Navigate to and click on the RETURN icon, or wait approximately 3 seconds, and MOJO will
automatically return to the MP3 navigation display.
USING STUDY MODE
Study mode allows you to vary the playback speed of certain files. This can come in handy when reviewing
lectures, audio books, etc.
To use study mode:
1.Enter the setup menu by holding down NAV while in MP3 playback mode.
• The LCD screen will display the icons of the setup menu.
2.From the setup menu, highlight the SYSTEM icon and click NAV.
3.Highlight STUDY MODE and click NAV.
27
Page 15

3.Highlight ERASE FILE and press NAV.
•A prompt will appear.
4.Highlight YES (to delete the file) or NO (to keep the file) and press NAV.
To delete all files from MOJO using the player’s controls:
1.Enter the setup menu by holding down NAV while in MP3 playback mode.
• The LCD screen will display the icons of the setup menu.
2.From the setup menu, highlight the ERASE icon and click NAV.
3.Highlight ERASE ALL and press NAV.
•A prompt will appear.
4.Highlight YES (to delete all files) or NO (to keep all files) and press NAV.
NOTE: You can also delete some or all of the files from MOJO by following the instructions in the “Using TDK UniFi
Software” section of this document.
CHANGING THE DISPLAY LANGUAGE
You can change the language of system menus, but song titles will remain in their original languages.
To change the display language:
1.Enter the setup menu by holding down NAV while in MP3 playback mode.
• The LCD screen will display the icons of the setup menu.
2.From the setup menu, highlight the LANGUAGE icon and click NAV.
3.Highlight the desired language (English, French, Spanish, Japanese) and click NAV.
• The currently activated mode will be marked with a check.
4.Press the NAV button to activate the highlighted language.
• The chosen display language will be engaged, and the display will return to the main setup menu.
5.Navigate to and click on the RETURN icon, or wait approximately 3 seconds, and MOJO will
automatically return to the MP3 navigation display.
29
Page 16

5.Click NAV to activate the highlighted autoplay mode. The chosen autoplay mode will be
engaged, and the display will return to the main system menu.
6.Navigate to and click on the RETURN icon, or wait approximately 3 seconds, and MOJO will
automatically return to the MP3 navigation display.
To set the play position option:
1.Enter the setup menu by holding down NAV while in MP3 playback mode.
• The LCD screen will display the icons of the setup menu.
2.From the setup menu, highlight the SYSTEM icon and click NAV.
3.Highlight the PLAY POSITION option and click NAV.
• The currently activated mode will be marked with a check.
4.Highlight the desired play position mode (Initial, Stopped).
• Initial: The song last played before powering down will be played from the beginning.
• Stopped: The song last played before powering down will be played from the point at which it
was previously paused.
5.Click NAV to activate the highlighted play position mode. The chosen play position
mode will be engaged, and the display will return to the main system menu.
6. Navigate to and click on the RETURN icon, or wait approximately 3 seconds, and MOJO will
automatically return to the MP3 navigation display.
To set the auto power off option:
1.Enter the setup menu by holding down NAV while in MP3 playback mode.
• The LCD screen will display the icons of the setup menu.
2.From the setup menu, highlight the SYSTEM icon and click NAV.
3.Highlight the AUTO POWEROFF option and click NAV.
• The currently activated mode will be marked with a check.
4.Highlight the desired auto power off mode (Default, User).
• Default: When no music is playing, MOJO will automatically power off after 3 minutes of no user input.
• User: Use FAST FORWARDand REWIND to set a customized auto power off time, from 3 to 60 minutes.
5.Click NAV to activate the highlighted auto power off mode. The chosen auto power off mode
will be engaged, and the display will return to the main system menu.
6.Navigate to and click on the RETURN icon, or wait approximately 3 seconds, and MOJO will
automatically return to the MP3 navigation display.
31
Page 17

To set the scroll speed option:
1.Enter the setup menu by holding down NAV while in MP3 playback mode.
• The LCD screen will display the icons of the setup menu.
2.From the setup menu, highlight the SYSTEM icon and click NAV.
3.Highlight the SCROLL SPEED option and click NAV.
• The currently activated mode will be marked with a check.
4.Highlight the desired scroll speed mode (Default, User).
• Default: File information scrolls at the standard speed.
• User: Use the joystick to set a customized scroll speed, from 16 to 128; the higher the number, the
faster the scrolling. Click MODE to engage the desired speed.
5.Click NAV to activate the highlighted scroll speed mode. The chosen scroll speed mode
will be engaged, and the display will return to the main system menu.
6.Navigate to and click on the RETURN icon, or wait approximately 3 seconds, and MOJO will
automatically return to the MP3 navigation display.
To set the fade in/out option:
1.Enter the setup menu by holding down NAV while in MP3 playback mode.
• The LCD screen will display the icons of the setup menu.
2.From the setup menu, highlight the SYSTEM icon and click NAV.
3.Highlight the FADE IN/OUT option and click NAV.
• The currently activated mode will be marked with a check.
4.Highlight the desired fade in/out mode (Disable, Enable).
• Disable: Songs start and end as they were originally recorded.
• Enable: MOJO fades up songs as they begin and fades them out as they end.
5.Click NAV to activate the highlighted fade in/out mode. The chosen fade in/out mode
will be engaged, and the display will return to the main system menu.
6.Navigate to and click on the RETURN icon, or wait approximately 3 seconds, and MOJO will
automatically return to the MP3 navigation display.
33
Page 18

FM PRESETS
MOJO has 20 programmable FM presets.
To create FM presets:
1.While in FM mode, tune the desired station.
2.To add the currently tuned station to the list of presets, press the NAV button until
the setup menu opens.
3.With the SAVE CHANNEL icon highlighted, press NAV.
•You will enter the preset menu.
4.By pressing REWIND or FAST FORWARD, move up or down the list of
FM presets until the desired preset (e.g. FM-03) is highlighted.
5.Once the desired preset is highlighted, click NAV again.
• The current station will be assigned to the desired preset, and the display will return to
the main setup menu.
6.Wait approximately 3 seconds, and MOJO will automatically return to the FM display.
SOUND MODE
MOJO can be set to play FM stations in mono or stereo.
To set the sound mode option:
1.Enter the setup menu by holding down NAV while in FM playback mode.
• The LCD screen will display the icons of the setup menu.
2.From the setup menu, highlight the SOUND MODE icon and click NAV.
• The currently activated mode will be marked with a check.
3.Highlight the desired sound mode (Mono, Stereo).
• Mono: Sound is monophonic, meaning the same audio signal will be played in the left and right
headphone drivers.
• Stereo: Sound is stereo, meaning that if the source is stereo (most FM stations are), distinct
audio signal will be played in the left and right headphone drivers, as originally recorded.
4.Press NAV to activate the highlighted sound mode.
• The chosen sound mode will be engaged, and the display will return to the main FM setup menu.
5.Navigate to and click on the RETURN icon, or wait approximately 3 seconds, and MOJO will
automatically return to the FM navigation display.
35
Page 19

SEEK STEP
This setting allows selecting various tuning increments. Typically, it is not necessary to adjust seek step.
To adjust the seek step option:
1.Enter the setup menu by holding down NAV while in FM playback mode.
• The LCD screen will display the icons of the setup menu.
2.From the setup menu, highlight the SEEK STEP icon and click NAV.
• The currently activated mode will be marked with a check.
3.Highlight the desired seek step mode (100 kHz, 50 kHz).
• 100kHz: Manual tuning is within increments of 100kHz (e.g. 89.10MHz to 89.20MHz).
• 50kHz: Manual tuning is within increments of 50kHz (e.g. 89.10MHz to 89.15MHz).
4. Press NAV to activate the highlighted seek step mode.
• The chosen seek step will be engaged, and the display will return to the main FM setup menu.
5.Navigate to and click on the RETURN icon, or wait approximately 3 seconds, and MOJO will
automatically return to the FM navigation display.
NOTE: The backlight, sleep mode and information options can be reached from FM mode by using the same
basic process described earlier in this user’s guide.
37
Page 20

39
If you encounter difficulties that cannot be resolved, please read this entire section before calling
TDK Technical Support.
If the player does not turn on when the ON button is pressed:
• The battery may be inserted incorrectly. Be sure to match the battery’s polarity markings (+ and -)
to the polarity markings on the player.
• The battery may be depleted. Use a new battery.
If tracks are skipping or the sound quality is poor:
• There may be strong magnetic fields near the unit. Move the unit away from the TV or other source
of a magnetic field.
• The battery may be nearly depleted. Use a new battery.
If MOJO will not start playback:
• The HOLD function may be activated. Put the HOLD switch in its OFF position.
• The internal memory and/or expansion card may not contain any music tracks.
If MOJO is not recognized by Windows:
• Check the USB connection between your unit and the computer.
•Verify that the PC’s USB drivers are properly installed.
If MOJO freezes:
• Remove the battery, reinsert the battery and hold down ON/PLAY/PAUSE for a few seconds to
power on MOJO. Normal operation should be possible.
TROUBLESHOOTING
FIRMWARE UPGRADE NOTE
Page 21

41
Carefully read the following safety and operating instructions. Keep this document handy for future reference.
DO NOT SUBJECT THE PLAYER TO EXTREME FORCE
Vibration during walking or exercising will not affect the MOJO player. However, dropping the player or
dropping a heavy object on the player may result in distorted sound and/or damage to the unit.
KEEP THE PLAYER AWAY FROM WATER AT ALL TIMES
The player may be damaged if water enters it. If the player comes in contact with water,
wipe it immediately with a dry cloth. If the player does not function, call TDK Technical Support.
KEEP THE PLAYER AWAY FROM CHILDREN AND ANIMALS.
The player contains small parts that present a choking hazard.
STORE THE PLAYER WITH CARE
Avoid keeping the MOJO and the flash memory card (not included) on or near high heat source(s) or
in places with high humidity or a strong magnetic field.
CLEANING THE PLAYER
Disconnect the power supply adapter (not included) from the wall outlet or power source
before cleaning. Do not use liquid or aerosol cleaners. Use a damp cloth for cleaning.
PRECAUTIONS
Page 22

Do not listen to headphones at loud volumes as permanent hearing damage may result. If you experience
ringing in your ears, discontinue use.
BATTERY HEALTH HAZARDS
Inhalation
Inhaling the fumes from the contents of an exposed battery may cause respiratory irritation.
Seek fresh air and medical attention.
Skin Contact
Direct skin contact with the contents of an exposed battery may cause skin irritation and/or chemical burns.
Remove contaminated clothing and wash the affected skin area with soap and water. If a chemical burn or
the irritation persists, seek medical attention.
Eye Contact
If the contents of an exposed battery comes into contact with the eyes, this may cause severe irritation and
chemical burns. Flush the eyes thoroughly with water immediately for at least 15 minutes, lifting the upper
and lower eyelids while doing so, until no evidence of the chemical remains. Seek medical attention.
43
Page 23

45
Keep TDK’s email, web site and phone numbers in a convenient location. Keep your MP3 player’s model
number, serial number, and a copy of your sales receipt handy as well.
If you experience a problem while installing or operating your MOJO MP3 player, please refer first to the relevant
sections of this manual regarding setup and installation. If you are not able to resolve the problem, please refer
next to the section on Troubleshooting. You may also wish to refer to the TDK Technical Support web site at
www.tdksupport.com for additional information.
HOW TO CONTACT US
There are several ways for you to contact TDK’s Technical Support Department:
•Visit our web site at www.tdksupport.com for Help, upgrades, and answers to
Frequently Asked Questions (FAQ’s)
• Call our 800-835-8326 technical support line
TECHNICAL SUPPORT
128MB (128F model); 256 MB (256F model)
Yes
Yes, through iTunes plug-in
Yes
Yes
Yes (memory card not included)
Yes
Yes
Yes
Yes
Yes
Yes
20
Yes low/high
Yes (32 kbps / 89 kbps)
Yes, via download when/if available
Yes
English, Japanese, Spanish, French for Menu System
Yes (32 kbps / 89 kbps)
Yes (0 – 60 minutes)
Normal, 1 all, random
1 AAA alkaline
up to 12 hours
Page 24

TDK MAKES NO OTHER WARRANTIES, EXPRESS OR IMPLIED, INCLUDING BUT NOT LIMITED TO THE WARRANTIES OF
MERCHANTABILITY ,FITNESS FOR A PARTICULAR PURPOSE, OR NON INFRINGEMENT OF THIRD PARTY RIGHTS. TO
THE EXTENT THAT ANY IMPLIED WARRANTIES APPLY, DESPITE THEIR EXCLUSION UNDER THIS LIMITED WARRANTY,
SUCH WARRANTIES SHALL BE LIMITED TO THE DURATION OF THE EXPRESS WARRANTIES PROVIDED HEREUNDER.
THE REMEDIES PROVIDED UNDER THIS LIMITED WARRANTY ARE THE SOLE AND EXCLUSIVE REMEDIES. TDK’S
LIABILITY UNDER ANY LEGAL THEORY FOR ANY LOSS OR DAMAGE IN ANY WAY RELATED TO THE PRODUCT SHALL
IN NO EVENT EXCEED THE PURCHASE PRICE OF THE PRODUCT. IN NO EVENT SHALL TDK BE LIABLE FOR ANY
INCIDENTAL OR CONSEQUENTIAL DAMAGES RESULTING FROM USE OF THE PRODUCT.
Some states do not allow limitations on how long an implied warranty lasts or any exclusion or limitation of
incidental or consequential damages, so the above limitations and exclusions may not apply to you. This
warranty gives you specific legal rights, and you may have other rights which vary from state to state.
TDK Electronics Corp.
901 Franklin Ave.
Garden City, NY 11530
1-800-835-8326
47
Page 25

 Loading...