

Page 1
CD
•
MP3
DIGITAL JUKEBOX
V1
Page 2
SAFETY
CAUTION! This product uses a Class 1 laser. Use of controls or
adjustments or performance of procedures other than those specified
herein may result in hazardous radiation exposure. Do not open covers and do
not repair yourself. Refer servicing to qualified personnel.
WARNING: TO REDUCE THE RISK OF FIRE OR ELECTRIC SHOCK,
DO NOT EXPOSE THIS APPLIANCE TO RAIN OR MOISTURE.
CAUTION! This equipment has been tested and found to comply with
the limits for a Class B digital device, pursuant to Part 15 of the FCC
Rules. These limits are designed to provide reasonable protection against
h a rmful interf e rence in a residential installation. This equipment generates,
uses and can radiate radio frequency energy and, if not installed and used
in accordance with the instructions, may cause harmful interf e rence to radio
communications. However, there is no guarantee that interference will not occur
in a particular installation. If this equipment does cause harmful interference
to radio or television reception, which can be determined by turning the
equipment off and on, the user is encouraged to try to correct the interference
by one of the following measures:
• Reorient or relocate the receiving antenna.
• Increase the separation between the equipment and receiver.
• Connect the equipment into an outlet on a circuit different from that
to which the receiver is connected.
• Consult the dealer or an experienced radio/TV technician for help.
Any unauthorized changes or modifications to this equipment would void the
user’s authority to operate this device.
This device complies with Part 15 of the FCC Rules. Operation is subject
to the following two conditions: (1) This device may not cause harmful
interference, and (2) this device must accept any interference received,
including interference that may cause undesired operation.
Page 3

LISTENING PRECAUTIONS
• Do not use while operating motorized or wheeled vehicles. You should use
extreme caution and discontinue use in potentially hazardous situations.
• Do not play headphones at high volume. If you experience a ringing in your
ears, reduce volume or discontinue use immediately.
• Do not turn up the volume to the point that you can’t hear what’s around you.
Sound can be deceiving. Over time your hearing “comfort level” adapts to
higher volumes of sound. What sounds “normal” can actually be loud and
harmful to your hearing. Guard against this by setting your equipment at
a safe level BEFORE your hearing adapts.
To establish a safe level:
• Start your volume control at a low setting.
• Slowly increase the sound until you can hear it comfortably and clearly,
and without distortion.
Once you have established a comfortable sound level, leave it there.
Page 4

NAVIGATING THE MOJO MANUAL
4
OPTION 1:
Toggle between the TABLE OF
CONTENTS and specific topics.
1.Clicking on the desired subject
heading takes you to it's
location in the manual.
OPTION 2:
Utilize Adobe Acrobat’s Bookmark palette.
1.Click the Navigation Pane and select the Bookmark T ab.
2.Click the desired subject entry to go to its page within the manual.
2.Clicking on a page number
within the manual takes you
back to the T able of Contents.
Page 5

CONTENTS
Intro: MOJO At A Glance................................................................................................1
About Software................................................................................................................ 1
System Requirements..................................................................................................... 2
Handling Instructions..................................................................................................... 2
Cleaning and Servicing................................................................................................... 2
Using and Replacing Batteries........................................................................................3
Power Sources................................................................................................................. 3
Your MOJO Player........................................................................................................... 4
Controls.......................................................................................................................... 4
Setting up MOJO............................................................................................................. 6
Using Your MOJO............................................................................................................ 7
Playing Audio CDs........................................................................................................... 7
Playing MP3 CDs............................................................................................................. 8
Selecting a Song by Artist, Title, Genre or Directory........................................................................ 8
Selecting an Entire Directory Within a Playlist................................................................................ 9
Adding and Removing Items From Your Playlist........................................................................... 10
Restoring All Songs in a Playlist................................................................................................... 10
Removing All Songs in a Playlist.................................................................................................. 10
Adjusting System Settings...........................................................................................11
Hold..............................................................................................................................11
Changing EQ settings...................................................................................................11
Changing Repeat Modes...............................................................................................12
Setting the Bass...........................................................................................................13
Setting the ESP.............................................................................................................13
Setting the Backlight Display.......................................................................................14
Setting AutoPlay............................................................................................................15
Setting Audible Beep....................................................................................................15
Setting Contrast............................................................................................................16
Resetting System Defaults............................................................................................16
Setting FIF or ID3..........................................................................................................17
Using TDK Navitrack Software (PC).............................................................................18
Converting Songs to An FIF Compatible Format............................................................19
Selecting Songs to Convert to An FIF Compatible Format.............................................20
Converting Songs Manually..........................................................................................22
Saving before Burning..................................................................................................23
Burning an MP3 CD......................................................................................................23
Troubleshooting...........................................................................................................24
Specifications..............................................................................................................25
Warranty......................................................................................................................26
Page 6

MOJO AT A GLANCE
Your TDK MOJO CD-MP3 Digital Jukebox is a bre a k t h rough in portable music
playback. The lightweight, battery - p o w e red MOJO plays regular Audio CDs as well
as CD-R and CD-RW discs containing MP3 music files. Best of all, MOJO makes
finding the music on your MP3-CDs fast and easy.
To get the most of your MOJO, it’s important to understand its two MP3 operating
modes - ID3 and FIF, both accessible via MOJO’s System setting menu.
In its ID3 Mode, MOJO reads and displays ID3 tag information (Title, Artist, Genre )
contained in an MP3 file. If you have Internet access and you rip songs from CDs using
a program like MusicMatch Jukebox, ID3 tags are automatically added to your MP3 files.
But MOJO has an additional operating mode, called Field in Filename or FIF.
The FIF mode lets MOJO scan, sort and navigate by the information contained in
the filename area of a properly named MP3 file. With FIF enabled, MOJO even lets
you create a playlist of tunes stored on an MP3-CD.
ID3 tag information, however, is usually contained at the end of an MP3 file - not
in the filename area. The Navitrack software included with your MOJO handles MP3
file renaming for you; it automatically copies ID3 Art i s t - Ti t l e - G e n re information into
the filename area, and gives you a fast, easy way to edit and add new information.
MOJO also gives you a very powerful Directories feature. Directories let you
access the tunes on your CD-R/RW discs any way you find most convenient.
To use MOJO’s Dire c t o ry function you need to set up a dire c t o ry stru c t u re on your
C D - R / RW disc. A nesting dire c t o ry stru c t u re consisting of Art i s t / A l b u m s / S o n g s ,
for instance, lets MOJO display all the Artists on your CD, all the Albums by a
p a rticular Artist, and all the Songs in each Album.
ABOUT SOFTWARE
• TDK Navitrack Software: For renaming MP3 files by copying Artist,
Title and Genre information into the filename.
• MusicMatch Jukebox
™
: Music management software for ripping
and encoding MP3s.
Page 7

SYSTEM REQUIREMENTS:
TDK Navitrack Software-(PC only)
WIN 95/98/ME/2000/NT
Pentium 150 or higher
32 MB of RAM
Soundcard
HANDLING INSTRUCTIONS
• Do not drop the MOJO or allow heavy objects to fall directly onto it.
• Keep away from water and moisture, such as showers, bathtubs, sinks,
swimming pools, open windows, rain or in wet basements.
• Keep away from heat sources such as radiators, heat registers, stoves,
amplifiers, or similar devices.
• Do not let objects fall into the system obstructing use. Keep liquids
away from spilling on the system.
• Place power cords so that they are not stepped on, pinched, squeezed,
or pulled. Unplug the system if not in use for long periods of time.
• Do not insert any object inside the MOJO player other than CDs.
CLEANING AND SERVICING
• Disconnect the power adapter from the wall outlet or power source and
remove batteries before cleaning.
• Do not use liquid or aerosol cleaners.
• Clean your MOJO with a soft cloth. Clean the laser lens using a soft brush
such as a camera brush.
• Do not service the system yourself. Do not modify batteries. Servicing
should be left for qualified personnel. For additional assistance call
TDK Customer Care.
2
Page 8

USING AND REPLACING BATTERIES
Insert batteries according to the polarity markings in the MOJO
player’s battery compartment. (see page 6)
• Handle leaking batteries with rubber gloves.
• Dispose of used batteries as required by local ordinances or regulations.
• Keep batteries out of reach of children.
WARNING: Always remove all batteries before using MOJO’s supplied
AC adapter. Do not recharge dry cell or alkaline batteries.
• Do not mix different types, makes, or aged batteries.
• Do not short-circuit, disassemble, apply excessive heat or throw into fire.
• Do not repair or disassemble the batteries.
• Do not drop the batteries or subject them to extreme force.
• Do not short-circuit the batteries. It may result in skin burns.
• Do not inhale fumes from an exposed, damaged, or leaking battery.
• Direct skin contact with the contents of a damaged battery may cause skin
irritation and chemical burns.
• If contents of a damaged battery come into contact with the eyes, severe
i rritation and chemical burns may result. Flush eyes thoroughly with clean
water immediately for at least 15 minutes. Seek immediate medical attention.
POWER SOURCES
This product should be operated only from the type of power source indicated on
the marking label. If you are not sure of the type of power supply to your home,
consult your producer dealer or local power company. For products intended to
operate from battery power, or other sources, refer to the operating instru c t i o n s .
3
Page 9
4
YOUR MOJO PLAYER
Included with your MOJO CD-MP3 Digital Jukebox are:
•AC Adapter
•Software Disc with TDK Navitrack PC Software and MusicMatch Jukebox
•Headphones
•Operations Manual
•2 AA Batteries
CONTROLS:
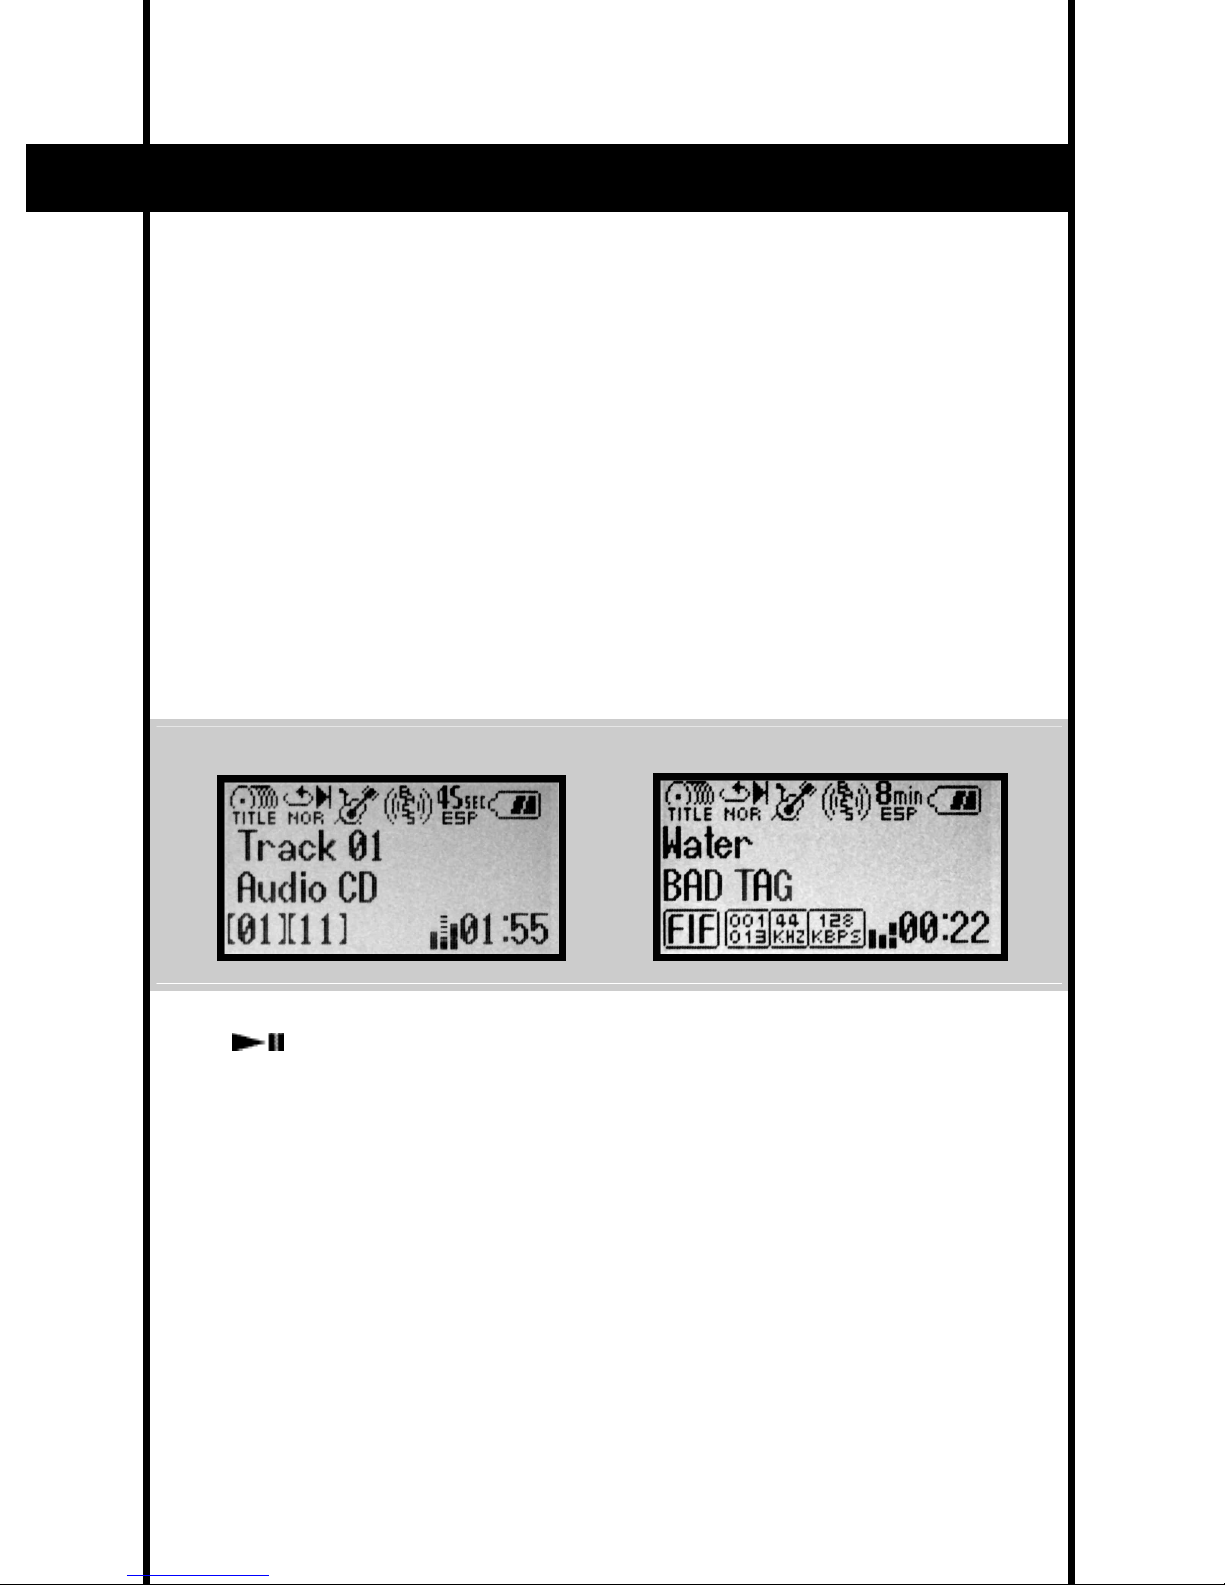
THE 4-LINE LCD DISPLAY - Shows all MP3 and Audio CD information, including:
1. Current Settings
2. Track Number / Title of Track
3. Audio CD / Name of Artist
4. Current song info
AUDIO CD display MP3 CD display
[ ] PLAY/PAUSE/ON -
1. Press to start playing a song.
2. Press to pause playback.
3. Hold to turn unit ON.
[ ■ ] STOP/OFF - Press to stop playing a song or hold to turn unit OFF.
[ Vol up ] button - Used to turn volume up during playback or to scroll up.
[ Vol down ] button -Used to turn volume down during playback or to scroll down.
[ Prev/Rv ] button - Plays the last track or moves you back a level in the menu.
(Audio CD only-Hold down to search backwards within a song.)
[ Fwd/Nxt ] button - Plays the next track or moves you to the next level in the menu.
(Audio CD only-Hold down to fast forward within a song.)
- 1 -
- 2 -
- 3 -
- 4 -
Page 10

OPEN TRAY
HOLD
HEADPHONES
BUTTON CONSOLE
LINE OUT
DC IN
[ SELECT ] button -
1. Used to finalize a choice from the menu.
2. Press to rotate through RANDOM modes during playback.
[ REMOVE ] button -
1 . Used to select what will be deleted from your playlist when in the playlist menu.
2. Press to rotate through EQ settings during playback mode.
3. Hold to turn Bass ON/OFF during playback mode.
[ MODE ] button - Used to toggle between main display and options menu.
HOLD - Slide to lock or unlock the use of all buttons.
OPEN- Slide to open to insert new CDs.
HEADPHONES - Plug in headphones for private listening.
LINE OUT-Plug in various output sources.
DC In - Plug in power adapter to an AC source.
5
Page 11

6
SETTING UP MOJO
Inserting the batteries
Insert the (supplied) batteries into the MOJO, following the polarity markings
inside the battery compartment.
Using the headphones
1. Insert the headphones into the headphone jack on the side of your MOJO.
2. Make sure volume control is set low to avoid hearing damage.
3. Press PLAY.
Installing the software
Insert the TDK Navitrack CD-ROM into your computer disc drive and follow
the install instructions.
- or -
If the install program does not start automatically:
1 . Open MY COMPUTER and double-click on the drive that holds the Navitrack disc.
2. Find and double-click “INSTALL TDK NAVITRACK”.
3. Follow the prompts to complete installation.
Page 12

7
USING YOUR MOJO
TIP: Getting the most out of MOJO’s navigation capabilities requires
you to convert all filenames into the FIF format using the supplied
Navitrack software. To maximize the DIRECTORIES function, it is important to
store all of your MP3 files in directories on your hard drive and burn your CDs
using folders rather than individual songs.
PLAYING AUDIO CDS
Power ON/OFF
Press the PLAY [ ] button to turn power ON.
Press and hold the STOP [ ■ ] button to power OFF.
Volume
Adjust volume using the [ Vol up ] / [ Vol down ] arrow buttons.
Track Advance/Track Back
Press the [ Fwd/Nxt ] (Arrow Right) button to advance to the next track.
Press the [ Prev/Rv ] (Arrow Left) button to go to a previous track.
Track Search
Hold the [ Fwd/Nxt ] (Arrow Right) button to fast forward within a track.
Hold the [ Prev/Rv ] (Arrow Left) button to rewind within a track.
Page 13

PLAYING MP3 CDS
NOTE: The unit remembers the last song played and the playback
settings of up to three MP3 CDs.
To select a Song by Artist, Title, Genre or Directory:
1. Press the MODE button.
2. Highlight ‘Song Select’ and press NEXT.
3. Use the arrow keys to scroll to the category (Artist, Title) you wish to
search by and press NEXT.
4. Scroll to the TITLE (or other category) you want and press NEXT.
5. Scroll to select the song you want and press PLAY.
2. SONG SELECT display 3. CATEGORY display
4. ARTIST SELECT display 5. PLAY
8
Page 14

To select an entire directory within a playlist
1. Press the MODE button.
2. Highlight ‘Song Select’ and press NEXT.
3. Scroll down to DIRECTORY, press NEXT.
4 . S c roll down to the folder or folders you want and press SELECT to select it.
(when the dire c t o ry has been selected, its icon will appear filled in instead of hollow. )
If you wish to remove certain songs within a selected folder, continue with step 5.
5. Highlight the folder you want and press NEXT.
6. Highlight the song or songs you wish to remove and press REMOVE.
(the icon next to the song will appear hollow when it has been removed
from the playlist.)
2. SONG SELECT display 3. DIRECTORY select
4. FOLDER display 5. FOLDER selected
6. SONG display 6. SONG selected
9
Page 15

Adding and removing items from your playlist
Selected items will have the icon in front of it filled in.
Removed items will have the icon in front of it hollowed out.
The first time you insert a new CD, all the songs on that CD will be in your playlist.
1. Press MODE.
2. Choose Song Select, press NEXT.
3. Scroll to your desired category (Title, Artist, Genre, Directory, or Playlist)
and press NEXT.
4. Highlight the item you want and press SELECT or REMOVE accordingly.
To Restore ALL songs in the playlist
1. Highlight any item within Title, Artist, Genre, Directory or the Playlist menus
and hold down SELECT until the “SELECT ALL” menu box appears.
2. Highlight YES, press SELECT.
To Remove ALL songs in the playlist
1. Highlight any item within Title, Artist, Genre, Directory, or the Playlist menus
and Hold down REMOVE until the “REMOVE ALL” box appears.
2. Highlight YES, press SELECT.
RESTORE ALL REMOVE ALL
10
Page 16

ADJUSTING SYSTEM SETTINGS
HOLD BUTTON
1. Switch the HOLD button to the right to disable all button functions.
(LOCK icon appears)
2. Switch the HOLD button to the left to use all button functions.
(LOCK icon disappears)
CHANGING EQ SETTINGS
You can adjust the EQ settings of your MOJO to suit your listening tastes.
1. Quickly press REMOVE to toggle through the different EQ settings during
playback mode.
- or -
2. Press MODE.
3. Scroll down to EQUALIZER, press NEXT.
4. Scroll down to the EQ setting you want and press SELECT.
5. Press MODE to save and return to the main display.
HOLD activated HOLD deactivated
3. EQUALIZER selected 4. EQUALIZER settings
▲ ▲
11
Page 17

CHANGING REPEAT MODES
Normal - Plays straight through the playlist and stops.
Repeat 1 - Repeats one song from the playlist infinately.
Repeat All - Repeats the playlist infinately.
Random - Randomly picks songs from the playlist.
1. In the main display, quickly press SELECT to toggle through different
Repeat Modes during playback.
- or -
2. Press MODE.
3. Scroll down to REPEAT MODE, press NEXT.
4. Scroll down to the repeat mode you want and press SELECT.
5. Press MODE to save and return to the main display.
3. REPEAT select 4. REPEAT MODES
12
Page 18

SETTING BASS ON/OFF
1. Press and hold the REMOVE button to turn the bass ON/OFF.
- or -
2. Press MODE.
3. Scroll down to BASS, press NEXT.
4. Select ON or OFF and press SELECT.
5. Press MODE to save and return to the main display.
SETTING ESP (Electronic Shock Protection)
NOTE: ESP can only be turned off when playing an Audio CD (45
second anti-shock). MP3 CDs are always set to 8 minutes of anti-shock.
1. Press MODE.
2. Scroll down to highlight ESP, press NEXT.
3. Highlight ON or OFF and press Select.
4. Press MODE to save and return to the main display.
3. BASS select 4. BASS on/off
2. ESP select 3. ESP on/off
13
Page 19

SETTING BACKLIGHT DISPLAY
You can set the display screen’s backlight to 3 Secs ON, Always ON, or Always
OFF after a button is pressed.
To adjust the backlight display options:
1. Press MODE.
2. Scroll down to SYSTEM, press NEXT.
3. Choose BACKLIGHT, press NEXT.
4. Press the UP/DOWN arrows to select 3 Secs ON, Always ON, or Always OFF.
5. Press SELECT then MODE to save and return to the main display.
2. SYSTEM select 3. BACKLIGHT On
4. BACKLIGHT 3 Sec 4. BACKLIGHT Off
14
Page 20

SETTING AUTOPLAY
The AutoPlay feature begins playback of your CDs as soon as you put it in your
MOJO player. The AutoPlay default setting is ‘ON’. To set AutoPlay:
1. Press MODE.
2. Scroll down to SYSTEM, press NEXT.
3. Scroll down to AUTOPLAY, press NEXT.
4. Use the UP/DOWN arrows to turn ON or OFF.
5. Press SELECT then MODE to save and return to the main display.
SETTING AUDIBLE BEEP
You can use the Audible Beep to confirm when a selection has been made.
The default setting for Audible Beep is “ON.” To set Audible Beep:
1. Press MODE.
2. Scroll down to SYSTEM, press NEXT.
3. Scroll down to BEEP, press NEXT.
4. Use the UP/DOWN arrows to turn ON or OFF.
5. Press SELECT then MODE to save and return to the main display.
2. SYSTEM select 3. AUTOPLAY select
2. SYSTEM select 3. BEEP selected
15
Page 21

SETTING CONTRAST
You can adjust the CONTRAST of the MOJO’s screen to improve readability
in different lighting conditions.
1. Press MODE.
2. Scroll down to SYSTEM, press NEXT.
3. Scroll down to CONTRAST, press NEXT.
4. Use the UP/DOWN arrows to set contrast level.
5. Press SELECT then MODE to save and return to the main display.
RESETTING TO SYSTEM DEFAULTS
At any time, you can reset your MOJO to its original, factory set defaults.
System Defaults: Repeat-Off, EQ-Normal, Bass-Off, ESP-ON (audio CD),
FIF Mode-On.
1. Press MODE.
2. Scroll down to SYSTEM, Hold down REMOVE until the “Reset All”
box appears.
3. Select YES or NO from the pop up box, press SELECT.
4. If you choose YES, unit will power off, when unit is turned back on, all
defaults will be reset. If you choose NO, unit will return to main menu.
2. SYSTEM select 3. CONTRAST settings
2. SYSTEM select SYSTEMRESET
16
Page 22

SETTING FIF OR ID3
NOTE: The FIF mode lets MOJO scan, sort and navigate by the
information contained in the filename area of a properly named MP3
file. Use the Navitrack software to make full use of MOJOs navigation by
c o n v e rting your MP3s to FIF compatible MP3s. ID3 mode reads re l e v a n t
information in the ID3 tag of the MP3 file like Title, Artist, and Genre, but does
not allow for navigation or playlist creation. For more information on FIF, please
refer to the Using Navitrack section of the manual.
To toggle between ID3 and FIF mode:
1. Press MODE.
2. Scroll down to SYSTEM, press NEXT.
3. Scroll down to FIF/ID3, press NEXT.
4. Use the UP/DOWN arrows to choose FIF or ID3.
5. Press SELECT then MODE to save and return to the main display.
2. SYSTEM select 3. FIF / ID3 selection
17
Page 23

18
USING TDK NAV I T R A CK SOFTWARE ( P C )
TDK Navitrack Software arranges your MP3 filenames into a format that allows
MOJO to easily read sort and organize your songs. This file format is called FIF
(Field In Filename). Although the file is renamed in the Navitrack software, the
actual file will have an MP3 file extension and can be played with any MP3
player or software.
NOTE: Navitrack is used only for filename conversion and NOT for
actual CD burning. Please use your regular burning application to
burn your MP3s as Data CDs.
NOTE: When burning a CD, MP3s are Data files. When choosing
to create a CD, make sure to select DATA CD.
Page 24

19
CONVERTING SONGS TO AN FIF COMPATIBLE FORMAT
You can set the FIF type to recognize only:
Artist and Title
- or -
Artist, Title and Genre
If you select the Art i s t - Title format, that information will be copied into the MP3’s
new filename. This will eliminate your ability to search by Genre with MOJO.
Setting a FIF Type
The default FIF Type is set to recognize filenames as “ARTIST-TITLEGENRE.MP3”.
To change the settings to recognize filenames as “ARTIST-TITLE.MP3”, do the
following:
• Select the TOOLS menu from the toolbar.
• Select the SET FIF TYPE option. The “SET FIF TYPE” box will appear.
• Select the FIF type you wish to use and click “OK.”
Page 25

20
SELECTING SONGS TO CONVERT TO AN
FIF COMPATIBLE FORMAT
• Using the navigation frame on the left side of the screen, select the
folder that holds your MP3s.
• Your MP3 files will appear in the display window on the right side.
• If an “M” icon is shown, the file has been recognized as an MP3 file
that needs to become FIF compatible.
• If an “F” icon is shown, the file has been recognized as a FIF compatible file.
• Select the songs you want to convert to a FIF compatible file by checking
the box next to each song designated by an “M” icon.
- or -
• To select all songs, press the “SELECT ALL” button.
Page 26

21
• To deselect a song,uncheck the box next to the song.
- or -
• To deselect all songs, press the “CLEAR ALL” button.
NOTE: A selected song will have a check in the box, a song that has
not been selected will not have a check in the box.
After you have selected the songs you want to convert, p ress the Display Final
List Button which will take you to the Conversion Scre e n .
There are 3 sections:
1. FIF Formatted File List-Lists all MP3 files that have been converted to a FIF
compatible format.
2. Manual Convert List-Lists all MP3 files that need to be converted manually.
3. Auto Convert List-Lists all MP3 files that can be converted automatically.
Page 27

22
• If there are songs in the Auto Convert List press the AUTO CONVERT button.
These MP3s will be converted to FIF compatible files.
• If you have songs in the Manual Convert List, see the section below titled
“Converting Songs Manually.”
• All songs that were converted will now have an “F” icon in front of it and
will move to the FIF Formatted File List.
CONVERTING SONGS MANUALLY
NOTE: Files with no ID3 tag information will require you to add Artist,
Title, and Genre information during the manual conversion process.
Files that do not originate from a commercially pressed CD, re c o r ded from an analog
(tape, LP etc.) source, or are ‘live’ re c o rdings will not contain ID3 Tag inform a t i o n .
To convert songs to FIF manually:
• Double-click on the song you want to convert from the Manual Convert
List-the File Converter Box will open.
• Completely fill in the Artist, Title, and Genre text boxes and press the
CONVERT FIF button.
NOTE: All fields must be completed for conversion.
Page 28

23
SAVING BEFORE BURNING
After conversion is complete, the original MP3 will also be recognized as a FIF
compatible file. If you would like to save and copy your selected songs into
folders or other directories, follow these steps:
NOTE: Saving songs using the Navitrack program will actually make
another copy of your file.
1. If you want certain directories or folders, check off the songs you want
in a directory.
2. Press the DISPLAY FINAL LIST button to make sure that all selected FIF
songs are in the File Formatted List.
3. Click the “Save As” button.
4. Click the “Add Folder” button to create a directory for your songs.
(ie. My “cool songs” folder will hold songs 2,3,6,14,and 1. My “best hits of
cool songs” folder will hold songs 1,4,5,11,10 and 7.)
5. Click OK and the files will be copied to the new destination from the File
Formatted List.
Repeat steps 1-5 to make additional folders.
BURNING AN MP3 CD
NOTE: When burning a CD-R/W, remember that MP3s are data files.
When choosing to create a CD, make sure to select DATA CD. Do not
select Audio CD.
To link Navitrack to your burning application for the first time:
1. Click the TOOLS menu in the toolbar.
2. Click SELECT BURNING PROGRAM. A search browser opens.
3. Find and select your burning application (.exe or .ico file) and click OPEN.
4. You will be linked to your CD burning software (not included) and ready to
burn a CD.
TO BURN:
Press the BURN button in the button bar at the top right of your screen.
The button will link to start your CD burning application (not included).
Page 29

SYMPTOM: No sound or poor sound quality
SYMPTOM: MOJO won’t play disc
SOLUTIONS:
•
Check all connection plugs and push
plugs all the way in.
•
Replace batteries or use the AC adapter.
•
Turn volume up.
•
Check and clean headphone plug.
CAUSES:
•
Connection plugs may not be inserted
all the way.
•
Weak batteries.
•
Volume may be set too low.
•
Headphone plug is dirty.
SOLUTIONS:
•
Replace batteries or use the AC adapter.
•
Turn off Hold switch.
•
Insert disc label side up.
•
Completely close CD lid.
CAUSES:
•
Weak batteries.
•
Hold switch is ON.
•
Disc inserted improperly.
•
CD lid is open.
SYMPTOM: Sound skips
SOLUTIONS:
•
Clean disc.
•
Carefully clean the lens as prescribed
in the manual.
•
Place MOJO on a stable surface.
CAUSES:
•
Dirty disc
•
Optical lens is dirty.
•
Excessive jolting.
24
TROUBLESHOOTING
Page 30

SYMPTOM: MOJO doesn’t play all the songs on my mixed CD
SOLUTIONS:
•
Burn data-only or audio only CDs.
•
If burning an Audio CD, only audio
files will be recognized. If burning a
Data CD, only MP3s and FIF files will
be recognized.
CAUSES:
•
If burning a mixed CD, the audio is
recorded first and then data is
recorded last.
•
The MOJO will only recognize the audio
files and not the MP3 files.
CD-ROM, CD-R, CD-RW (12cm, 8cm)
Multi-Session, ISO9660, Joliet,
Enhanced-CD, Mixed CD, CD-DA
11025Hz - 96000Hz
8 - 320Kbps
MPEG 1,2,2.5, layer 3
DC:4.5V
0 - 50 degrees Celsius
-20 - 70 degrees Celsius
>80db
>85db
MEDIA
SUPPORTED CD FORMAT
SUPPORTED SAMPLING RATES
SUPPORTED BIT RATES
SUPPORTED FILE FORMAT
VOLTAGE
OPERATING TEMPERATURE
STORAGE TEMPERATURE
SIGNAL TO NOISE RATIO (HEADPHONE JACK)
SIGNAL TO NOISE RATIO (LINEOUT)
NOTE: MOJO will not recognize CD-RWs that have been
formatted for Packet Writting
SYMPTOM: Can’t search by Artist, Title, or Genre
SOLUTIONS:
•
Go into the system menu and change
the setting to FIF mode.
•
Use the Navitrack software to make FIF
compatible MP3s.
CAUSES:
•
ID3 mode is on or the songs weren’t
FIF compatible.
25
SPECIFICATIONS (Subject to change)
Page 31

26
WARRANTY
90 Day Limited Warranty.
TDK Electronics Corporation (“TDK”) warrants to the end-user customer that the
MOJO CD-MP3 Player will be free from defects in material and workmanship for
a period of 90 days from date of purchase. If TDK receives notice of any such
defects during the warranty period, TDK will, at its option, either repair or
replace the Product which it finds to be defective at no charge (except for
shipping and insurance). Repair of defective Product may be with either new or
rebuilt replacement parts that will be warranted for the remainder of the
original warranty period. Any exchanged parts under this warranty will become
the pro p e rty of TDK. Replacement Product may be either new or reconditioned. If
the Product is discontinued and no longer available, then it may be re p l a c e d
with Product determined by TDK to be of similar value and perf o rm a n c e .
TDK does not warrant that the operation of the Product will be uninterrupted
or error free. This Limited Warranty does not apply to defects resulting from
(1) acts of God, accident, misuse, abuse, negligence, abnormal, or unusually
heavy use; (2) improper installation, operation, testing or maintenance;
(3) power failure or connection to improper voltage supply; or (4) attempted
repair by any party other than TDK. This Limited Warranty does not apply when
the malfunction results from the use of the Product in conjunction with other
products, software or accessories, or where it is determined by TDK that there
is no fault with the Product itself. This Limited Warranty is invalid if the
factory-applied serial number has been altered or removed from the Product.
This Limited Warranty extends only to the original end-user customer and is
not transferable to any subsequent purchaser. This Limited Warranty is valid
only within the United States. For areas outside the United States, contact the
authorized dealer from whom you purchased the Product to determine what
warranty, if any, applies.
In order to obtain warranty service, you must deliver the Product to TDK fre i g h t
prepaid, in either its original package or packaging providing a degree of
protection equivalent to that of the original packaging, along with proof of
purchase. [Please contact TDK at the number listed below or in the manual
for further information.]
Page 32

27
TDK MAKES NO OTHER WARRANTIES, EXPRESS OR IMPLIED, INCLUDING BUT NOT
LIMITED TO THE WARRANTIES OF MERCHANTABILITY OR FITNESS FOR A PA RT I C U L A R
PURPOSE. TO THE EXTENT THAT ANY IMPLIED WARRANTIES APPLY, DESPITE THEIR
EXCLUSION UNDER THIS LIMITED WA R R A N T Y, SUCH WARRANTIES SHALL BE LIMITED
TO THE DURATION OF THE EXPRESS WARRANTIES PROVIDED HEREUNDER.
THE REMEDIES PROVIDED UNDER THIS LIMITED WARRANTY ARE THE SOLE AND
EXCLUSIVE REMEDIES. TDK’S LIABILITY UNDER ANY LEGAL THEORY FOR ANY
LOSS OR DAMAGE IN ANY WAY RELATED TO THE PRODUCT SHALL IN NO EVENT
EXCEED THE PURCHASE PRICE OF THE PRODUCT. IN NO EVENT SHALL TDK BE
LIABLE FOR ANY INCIDENTAL OR CONSEQUENTIAL DAMAGES RESULTING FROM
THE USE OF THE PRODUCT.
Some states do not allow limitations on how long an implied warranty lasts or
any exclusion or limitation of incidental or consequential damages, so the above
limitations or exclusions may not apply to you. This warranty gives you specific
legal rights, and you may have other rights which vary from state to state.
TDK Electronics Corp.
901 Franklin Ave.
Garden City, NY 11530
For Technical Support:
1-866-629-3893
techsupport@tec.tdk.com
 Loading...