

Page 1

TDK Life on Record Lock
Password Protection Soware
USER GUIDE
v1.1
(Mode 8)
Page 2

TABLE OF CONTENTS
1. Introduction to the TDK Life on Record Lock Security Soware ...........................................2
2. Before You Get Started .............................................................................2
3. Features ..........................................................................................2
4. Public and Secured Partition ........................................................................3
5. How to use TDK Life on Record Lock Security Soware ..................................................3
A. Setup a Password .............................................................................3
B. Main Screen and Button Function ...............................................................5
C. Login to the Secured Area......................................................................6
D. Logging Out of the Secured Area ...............................................................7
E. Change Password.............................................................................8
F. Password Hint Feature ........................................................................10
G. Auto Reset ..................................................................................11
H. Congure Size / Resize Partitions ...............................................................12
6. Regulatory.......................................................................................16
All Pictures Shown Are For Reference Use Only, It May Not Be Exactly The Same As What You See.
1
Page 3

1. INTRODUCTION TO THE TDK LIFE ON RECORD LOCK SECURITY SOFTWARE
The data stored in your USB ash drive may sometimes be highly condential and you need to be able to protect
that data from un-authorised disclosure. The TDK Life on Record Lock Security Soware is a “stand-alone”
application program, which helps to keep your data safe. TDK Life on Record Lock oers a customizable password
for the secure partition, to allow protecting your data in the secured area with the customized password, while
leaving the non-sensitive data in the public area.
You can also customize/resize the partitions’ sizes for the secured and non-secured areas. Protecting data has never
been easier with TDK Lock. Feel safe and keep your data safe with TDK Life on Record Lock.
2. BEFORE YOU GET STARTED
Before using TDK Life on Record Lock with USB 3.0 Secure Drive, please note:
• DO NOT plug in two or more USB 3.0 Secure Drives at the same time
• TDK Lock is only designed for Windows based operating systems
(Windows 8, Windows 7, Windows Vista, Windows XP, Windows 2000).
• Please install USB 3.0 driver rst before using your USB 3.0 Secure Drive
• This soware is designed for operation on the TDK USB 3.0 TF 1000 Pro ash drives and External
Solid State Drive (SSD) only.
• It is very important that you don’t forget the password you’ve entered (password hint feature provided).
NO password recovery feature is provided.
Special Note for Windows Vista and 7 Users: Please disable ReadyBoost function rst before using the TDK
Life on Record Lock soware on the USB 3.0 Secure Drive.
3. FEATURES
(a) Customized Password: You can set your own password up to 16 characters.
(b) Password Reminder: Password hint function is available as a password reminder.
(c) Password Retry: You have SIX chances of entering the correct password. A warning will show on the h
password retry, indicating that one more incorrect entry will cause the data stored in the secured area to be
erased and the password reset to “1234”.
(d) Multi Language: TDK Lock supports English, Japanese, Chinese (Traditional/Simplied) language user interfaces.
Soware automatically detects your Windows language and shows the respectiveUI.
Defaultis set to English.
All Pictures Shown Are For Reference Use Only, It May Not Be Exactly The Same As What You See.
2
Page 4
4. PUBLIC AND SECURED PARTITION
Public
When you plug in your device to a USB port, your operating system should recognize the device and show a
“RemovableDisk” icon. This is the “Public” partition and the security application program - TDK Life on Record Lock
will be stored in this partition.
Partition
Public Area / Public Partition
When the device is inserted into the USB port, you will only see the public partition. The public partition is available
to all users to read and write data. The security application soware – TDK Life on Record Lock will also be stored in
this partition. Password security will only apply to and protect the secure partition and will not aect this partition.
Secured Area / Secure Partition
This secure area is protected by user password and can only be accessed by setting up a password (if no password
had been set before). If NO password exists, then you cannot use this partition. When a password had been setup,
you will be required to enter the password rst. Once a correct password had been entered, the public partition will
disappear and the secure partition will show.
5. HOW TO USE TDK LIFE ON RECORD LOCK SECURITY SOFTWARE
A. Setup a Password
You have to set up a password rst, in order to see and use the secure partition.
(1) Insert your Secure Drive in the USB port.
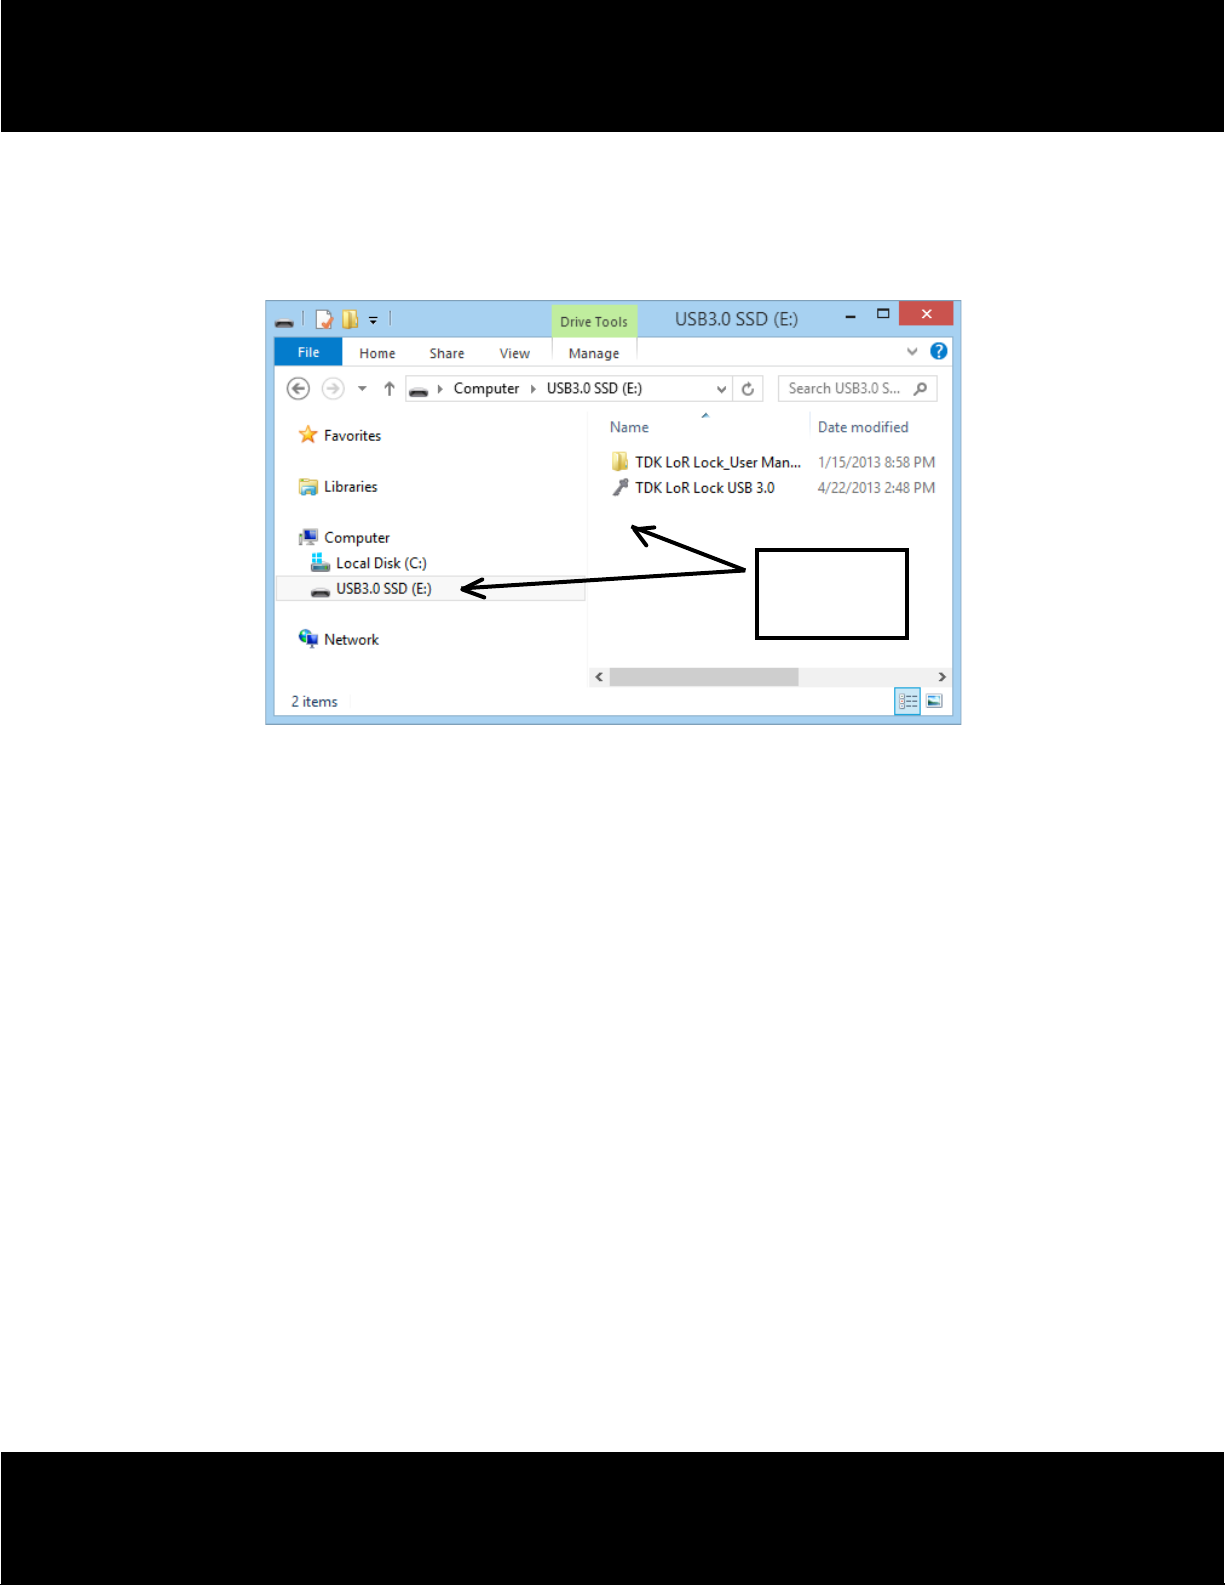
(2) In the removable drive, double-click and run TDK LoR Lock.exe le
(3) If you are using TDK Lock for the rst time, then you will be prompted to set up a password rst.
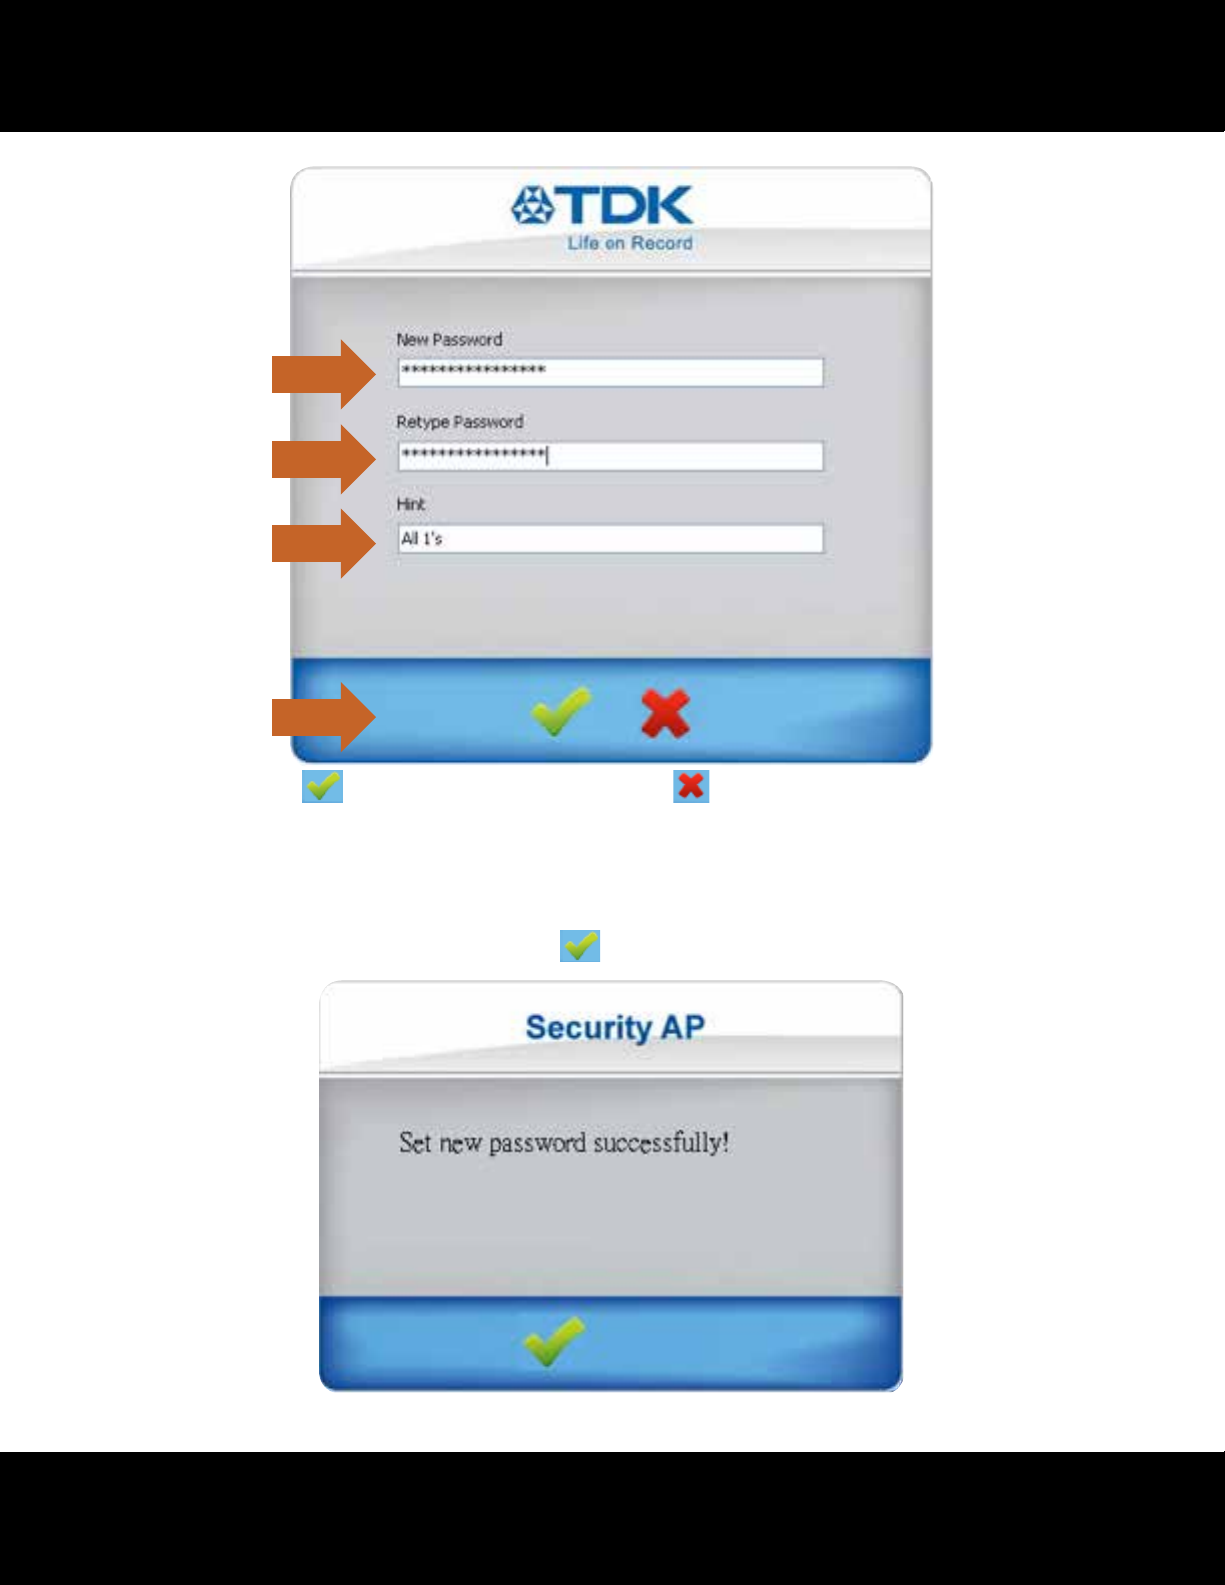
3-1. Enter a password of your choice (maximum 16 characters, including spaces)
3-2. Conrm password by re-entering the password.
3-3. Enter a password hint as a reminder (maximum 32 characters long, including spaces).
Please enter a valid password hit. No password recovery feature will be provided.
3
All Pictures Shown Are For Reference Use Only, It May Not Be Exactly The Same As What You See.
Page 5
3-1
3-2
3-3
3-4
3-4. Click on to save the password set, or click on
Note: You can only type in English letters and numbers
3-5. If all information has been entered correctly, a message window will show, and your device is now
logged into the secure partition. The device will be locked automatically (back to public partition) when
you remove it from the USB port. Click
to continue.
to cancel/exit.
4
All Pictures Shown Are For Reference Use Only, It May Not Be Exactly The Same As What You See.
Page 6
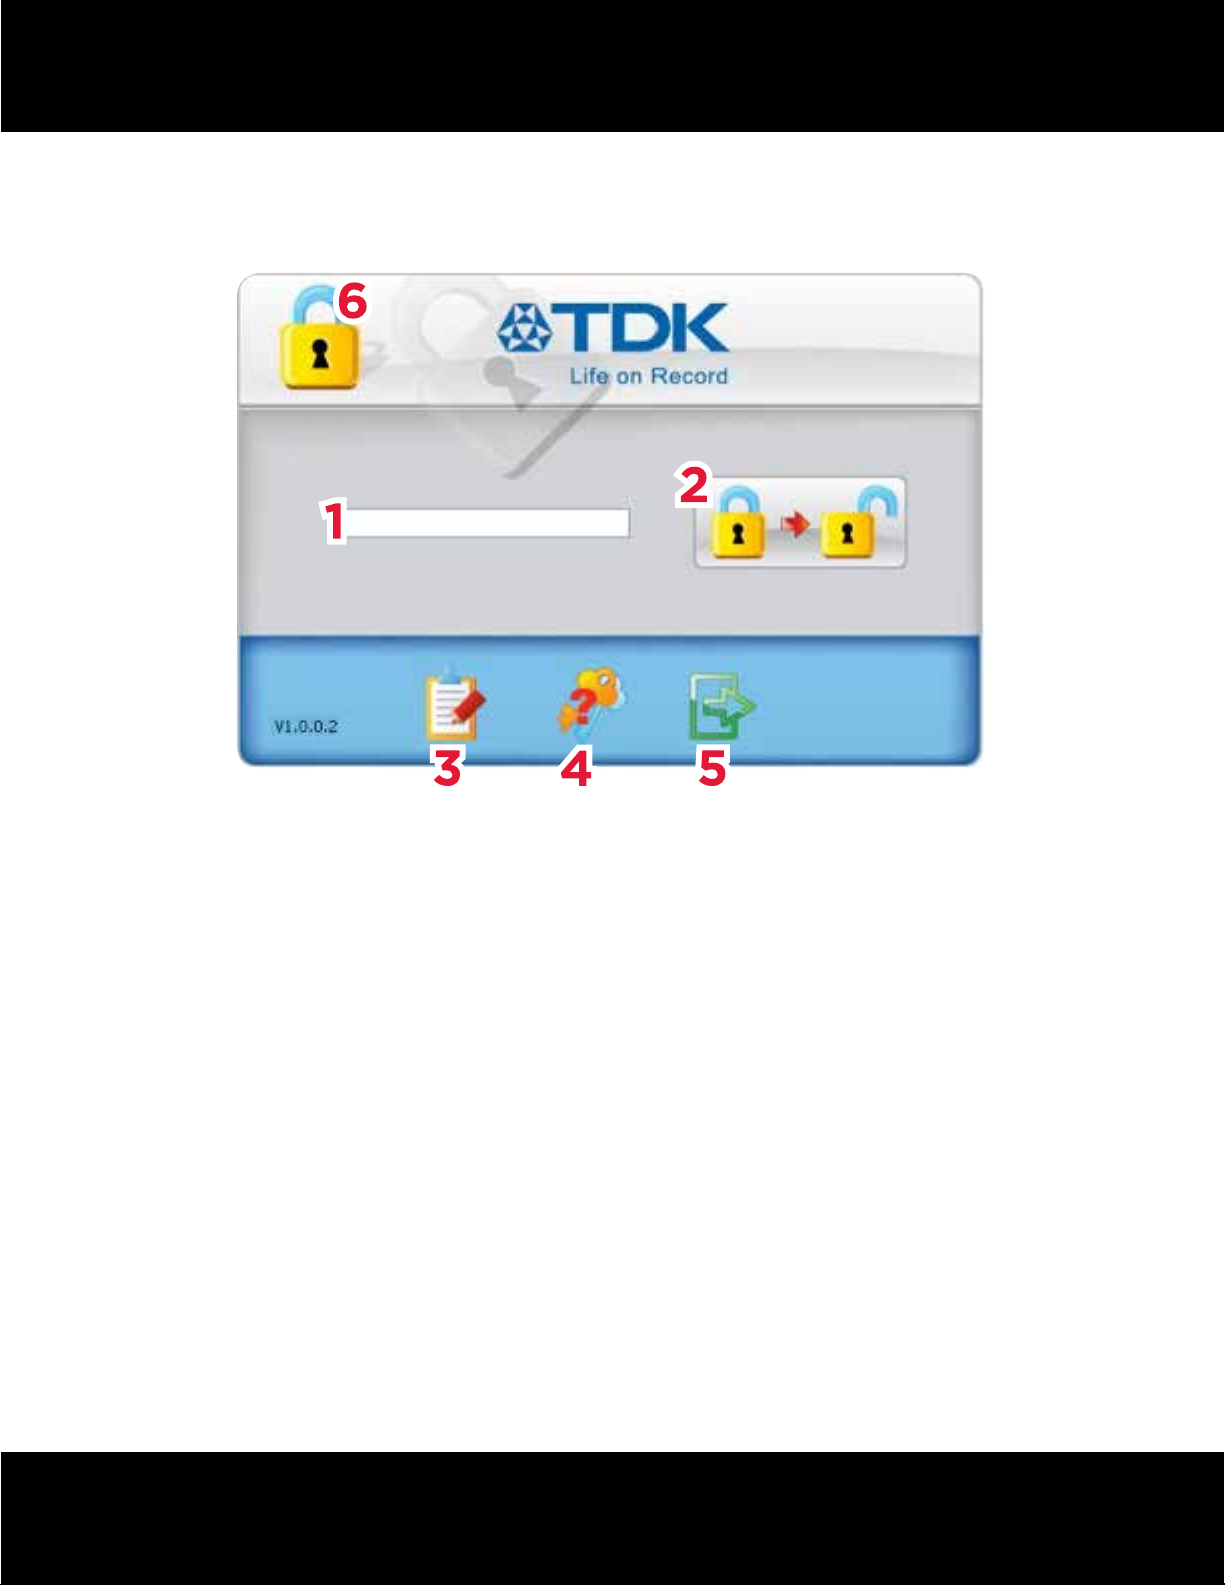
B. Main Screen and Button Function
From the public partition, double-click and run TDK LoR Lock.exe
Main screen will only show up when a password has been setup.
(1) Password Area: for entering your password.
(2) Unlock/lock Device: to lock or unlock your device.
(3) Setting: allow to change your password or resize partitions.
(4 ) Password Hint: your password reminder.
(5) Exit: to exit the program.
(6) Device Status: icon information to tell you if the device is currently locked or unlocked.
When you move your mouse pointer to an icon on the main screen, a text dialog will automatically
appear to tell you the function of that icon.
All Pictures Shown Are For Reference Use Only, It May Not Be Exactly The Same As What You See.
5
Page 7

C. Login to the Secured Area
This section will demonstrate how to log into the secured area, assuming a password has been set up correctly
(please refer to setup a password section).
(1) Enter your password and click the login button
(2) If you have entered a valid password, the following message window will show, indicate that you have now
entered the secured area. Click
to continue.
6
All Pictures Shown Are For Reference Use Only, It May Not Be Exactly The Same As What You See.
Page 8

(3) If you have entered an invalid password, the following message window will show, telling you that you have
entered an incorrect password, and the remaining number of retries you have. If you have forgotten your
password, try the “Password Hint”, it may help you remember your password.
Click
to continue.
# of attempts / max. # of re-tries
D. Logging Out of the Secured Area
To log out from the secured area and back to the public area, simply run the TDK LoR Lock soware
and click the “logout” button
7
All Pictures Shown Are For Reference Use Only, It May Not Be Exactly The Same As What You See.
Page 9

E. Change Password
(1) Click the “Setting” button
(2) Click on the “Change Password” button
All Pictures Shown Are For Reference Use Only, It May Not Be Exactly The Same As What You See.
8
Page 10

(3) You will be asked to enter your old (current) password and the new password, and then conrm the new
password by retyping the new password again. You can also change the password hint as well. Once
ready, click
to apply the new password or press
to cancel and exit.
(4) If all information was entered correctly, a message window will show and tell you that the password has
been changed. Click
to continue.
9
All Pictures Shown Are For Reference Use Only, It May Not Be Exactly The Same As What You See.
Page 11

F. Password Hint Feature
You may have forgotten your password when you try to log in or change the password. Fortunately, the
Password Hint feature of TDK Life on Record Lock can help remind you about the password that you have set
(if you have entered a valid password hint).
(1) From the TDK user interface, click on the “Hint” button
(2) A message window will appear to show you the password reminder.
Click
to continue.
10
All Pictures Shown Are For Reference Use Only, It May Not Be Exactly The Same As What You See.
Page 12

G. Auto Reset
If you have entered a wrong password when you try to login, change your password or resize the partitions,
upon the second of the last retry, you will be reminded with the following message, that if you enter a wrong
password one more time, your device will be formatted, all data in the secure area and password will
bedeleted.
Click
to continue.
When you typed in the wrong password for the last time, the SECURED partition of your device is erased and
password is reset to “1234.” You will see the following message window. Click
to continue.
Note: At the completion of the partitioning the default password 1234 is set.
All Pictures Shown Are For Reference Use Only, It May Not Be Exactly The Same As What You See.
11
Page 13

H. Congure Size / Resize Partitions
You can re-congure the capacity size for the public area and secure area.
Please note: All data in both partitions will be erased!
(1) Click on the “Setting” button
(2) Click the “Congure Size” button
12
All Pictures Shown Are For Reference Use Only, It May Not Be Exactly The Same As What You See.
Page 14

(3) Move the pointer to the le or to the right to adjust the capacity for both partitions.
(4) Enter your password and click
(5) When you click
, the following screen displays for conrmation of the formatting
to continue; or click
to cancel at any time.
13
All Pictures Shown Are For Reference Use Only, It May Not Be Exactly The Same As What You See.
Page 15

(6) When you click, formatting/resizing will take place.
Do not remove the device or force close the program before the process is done.
(7) When the initial conguration completes successfully, the following message will show.
This allows large partitions greater than 13GB to be formatted to NTFS.
Click
to continue with NTFS formatting, Click
to use FAT32 formatting.
14
All Pictures Shown Are For Reference Use Only, It May Not Be Exactly The Same As What You See.
Page 16

(8) When the formatting completes successfully, the following message will show. Click
Aer conguring your device, we recommend that you remove the device from USB port
and re-insert it again before using.
to continue.
15
All Pictures Shown Are For Reference Use Only, It May Not Be Exactly The Same As What You See.
Page 17

6. REGULATORY
United States
This device complies with Part 15 of the FCC rules. Operation is subject to the following two conditions:
(1) This device may not cause harmful interference, and (2) This device must accept any interference received,
including interference that can cause undesired operation.
FCC Digital Emissions Compliance
This equipment has been tested and found to comply with the limits for a Class B digital device, pursuant to Part
15 of the FCC Rules. These limits are designed to provide reasonable protection against harmful interference in a
residential installation. This equipment generates uses and can radiate radio frequency energy and, if not installed
and used in accordance with the instructions, may cause harmful interference to radio communications. However,
there is no guarantee that interference will not occur in a particular installation. If this equipment does cause
harmful interference to radio or television reception, which can be determined by turning the equipment o and
on, the user is encouraged to try to correct the interference by one or more of the following measures:
• Reorient or relocate the radio or television receiving antenna.
• Increase the separation between the computer equipment and receiver.
• Connect the equipment into an outlet on a circuit dierent from that to which the
radio or television receiver is connected.
• Consult the dealer or an experienced radio television technician for help.
Canadian Digital Apparatus Compliance
CAN ICES-3(B) / NMB-3(B)
Note: Changes or modications not expressly approved by the party responsible for compliance could
void the user’s authority to operate the equipment.
Imation Europe B.V.
Planeetbaan 4, 2132 HZ Hoofddorp, The Netherlands
www.TDKPerformance.eu
Imation Enterprises Corp
1 Imation Way, Oakdale, MN 55128
www.TDKPerformance.com
The TDK Life on Record logo is a trademark of TDK Corporation and is used under license.
All other trademarks and logos are property of their respective owners.
All Pictures Shown Are For Reference Use Only, It May Not Be Exactly The Same As What You See.
63953027A
16
 Loading...